

Page 1
www.ttmmonaco.com
1
Page 2

2
Page 3
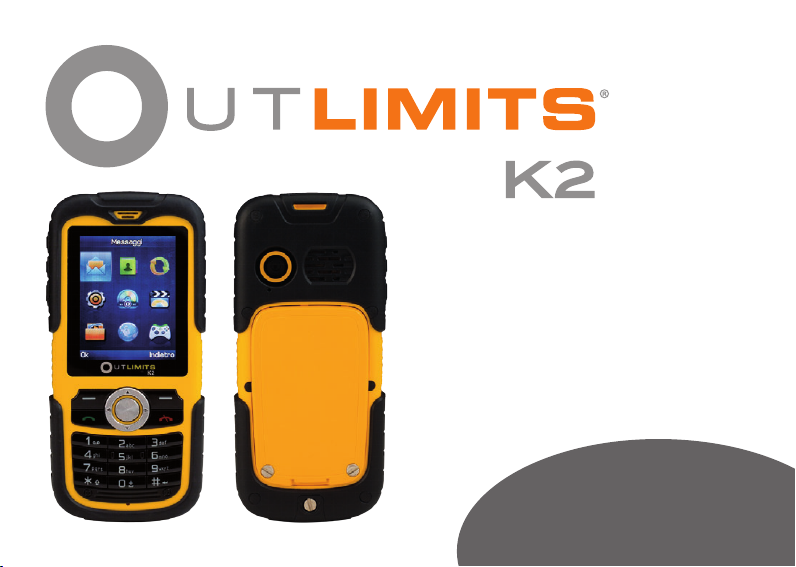
Outlimits K2
User Manual
V. 1.0
ENGLISH
3
Page 4

CONTENTS
I. SAFETY AND PRECAUTIONS ................................................................................. 5
II. CELL PHONE OUTLINE .......................................................................................... 7
III. PREPARATIONS ..................................................................................................... 8
IV. DESCRIPTION OF CELL PHONE
V
. BASIC OPERATION OF CELL PHONE ................................................................. 15
........................................................................ 12
VI. OPERATION MENU FUNCTION .......................................................................... 18
VII. OPERATING INSTRUCTIONS OF EDITOR
APPLICATION OF USB STORAGE FUNCTION
VIII.
IX. APPENDIX
1 ......................................................................................................... 38
........................................................ 36
................................................ 37
X. APPENDIX 2 .......................................................................................................... 39
4
Page 5

I. Safety and Precautions
To use your cell phone safely and effectively, please read the following information before use:
• Please turn off your phone when you are near a chemical plant, a gas station, an oil depot or other explosives.
• Please keep your phone out of the reach of children.
• To ensure safety, please use earphone during driving; Otherwise, unless emergency, you should make a call
after parking your car by the roadside. Do NOT use the phone during driving at high speed.
• Do NOT use your cell phone while in a plane. Please check whether Auto Power On is set or not before board.
• Do not use your cell phone in a hospital to avoid interference with the normal operation of medical equipment
which may result in a medical accident. If the cell phone is used near a pacemaker, audiphone and some
medical electronic equipment, you should pay special attention to that the cell phone may interfere with these
devices.
• Auxiliaries and accessories not provided by us are excluded from the guarantee.
• Do not dismantle your cell phone by yourself. In case of a failure, please contact the service station specied by us.
• Do NOT charge your phone with no battery. Please turn off your phone before removing the battery; otherwise,
the phone memory may be damaged.
• The phone should be charged in the environment which is well-ventilated, and should be kept away from the
inammables and explosives.
• To avoid demagnetization, please keep your phone away from magnetic substances, such as magnetic disk,
credit card, etc.
• Please be sure the phone isn’t exposed to any liquid. If this situation occurs, please remove the battery and
contact the service station specied by us.
• Please use your phone in the environment which is neither too hot nor too cold, and do not expose your phone
to the strong sunlight or use in high-humidity environment.
• Do NOT use liquid or wet cloth with strong detergent to clean your phone.
• Your cell phone has photo and record functions, so please use these functions following the related laws and
regulations. You may violate the law and regulation if taking photo and record without authorization.
• Do not throw, drop or hit the cell phone during use to avoid damage to the housing or the elements inside the
phone.
• Do NOT dispose the worn battery as common domestic rubbish. Please dispose the worn battery according to
the specied instructions where the disposal of a worn battery is clearly specied.
5
Page 6

(Note) 1. The Company won’t undertake any responsibility for any consequences caused by failure to observe
the above-mentioned suggestions or improper applications.
2. The provided cables are only applicable to this type of mobile phone and the provided charge; you can
also connect the phone to the PC by a USB cable to charge the phone. Do not charge the phone by any
other mode.
If any content described in this manual goes against that of your cell phone, please subject to the real cell phone.
The original factory is entitled to modify the manual at any time without further notice.
6
Page 7
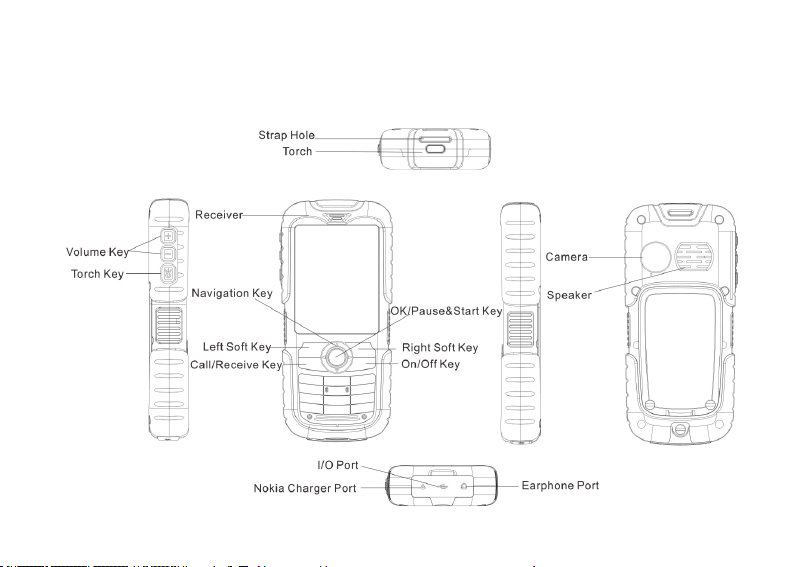
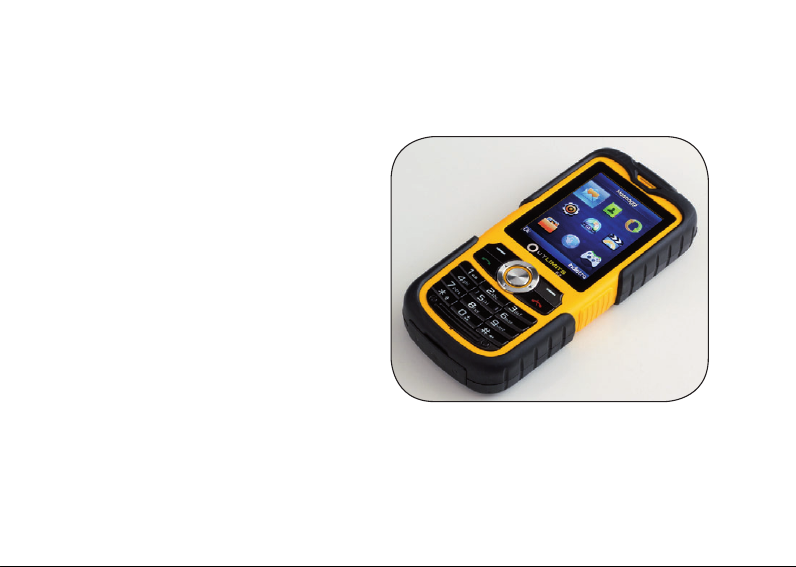
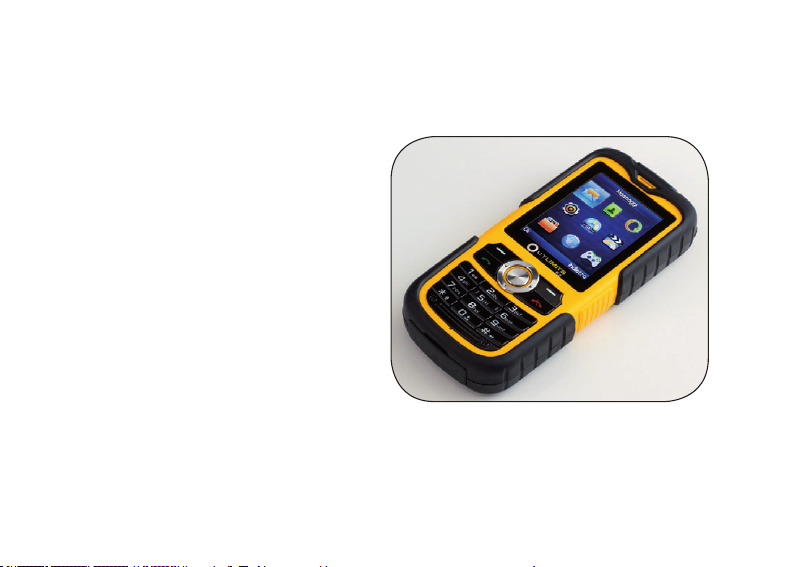
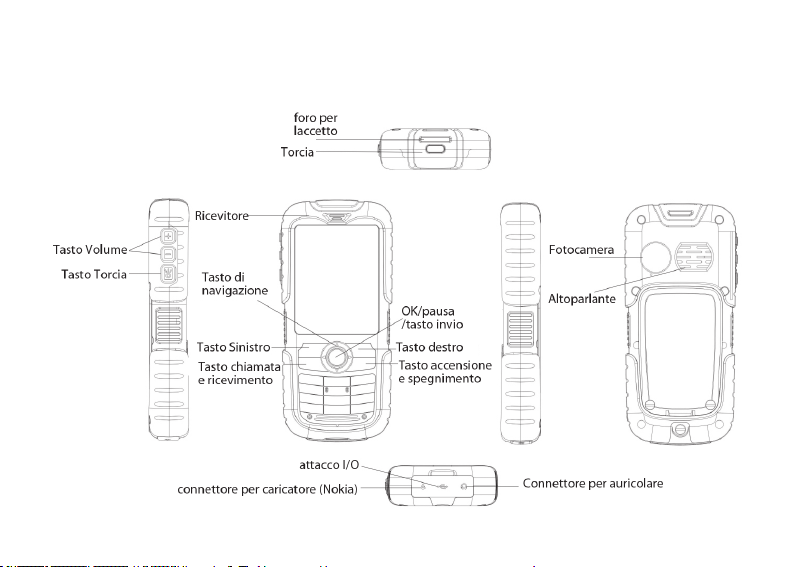
II. Cell Phone Outline
The following is the view of the phone
7
Page 8
III. Preparations
Installation of your SIM card
You can apply for two different numbers offered by two network providers and get two SIM cards (users identify
cards).
With those two SIM cards, you can use various functions of this cell phone. Many parameters required for
communications are stored in the SIM cards. Personal data, including the PIN (personal identication number),
phonebook, SMS and other extra system services can also be stored in the SIM cards.
Warning: Do NOT twist or scratch the SIM card and expose it to static electricity, dust or water. If you lost your SIM
card, please contact your network operator for help.
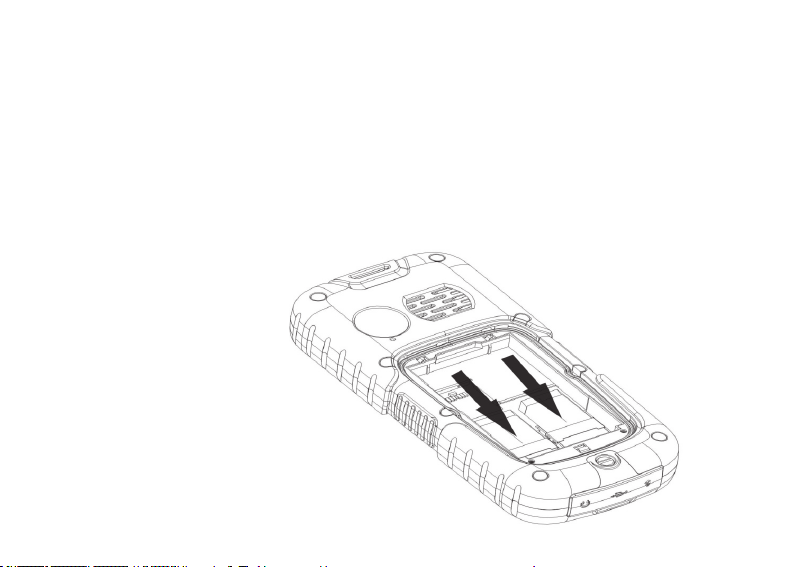
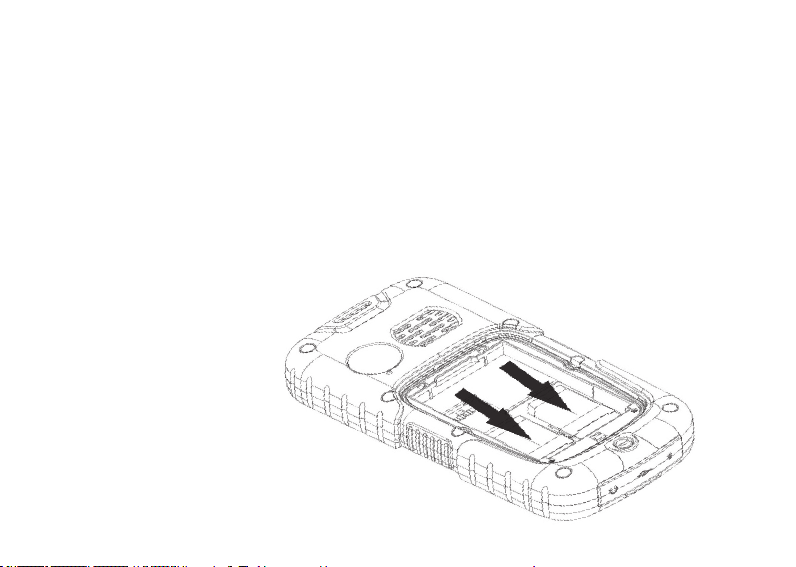
To install your SIM cards, please turn off your cell phone rst, remove the back cover, and insert the SIM cards into
the SIM card slots at the back of the phone.
Please install the SIM cards as shown below:
Note: The SIM card is a small object, please
keep the card out of the reach of the child to
avoid swallowing the card by accident!
8
Page 9
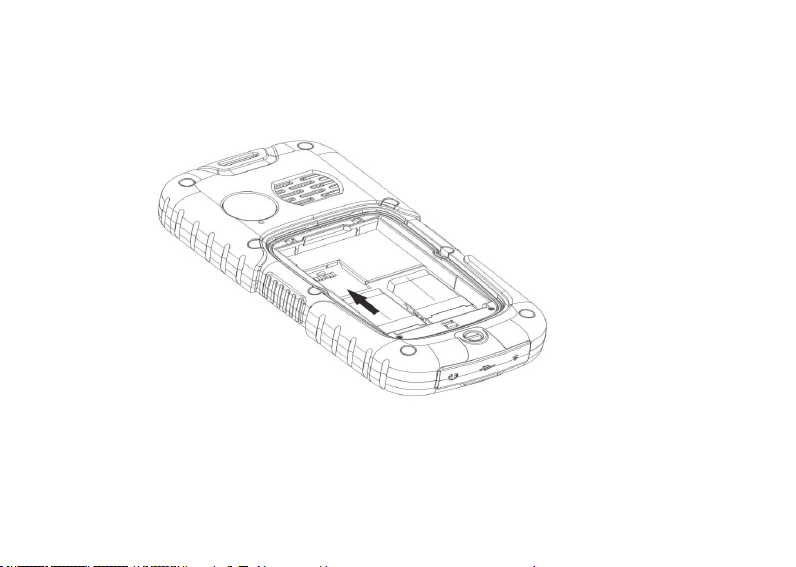
Installation of memory card
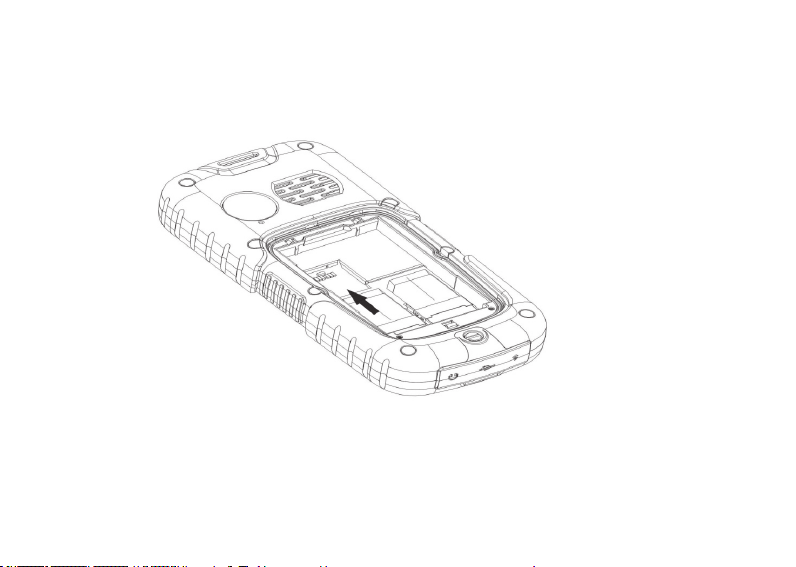
The phone supports T-FLASH card as to expand the memory space. Please install or take out the memory card as
shown in the following picture after shutting down the phone.
Note: The T-FLASH card is a small object, please keep the T-FLASH card out of the reach of the child to avoid
swallowing the card by accident!
Tip: The phone supports a memory card with capacity up to 8GB. It is recommended that only the attached
standard TF card and other TF cards of well-known brand like SanDisk and Kingston are used. Other TF cards may
be not compatible with the phone.
9
Page 10
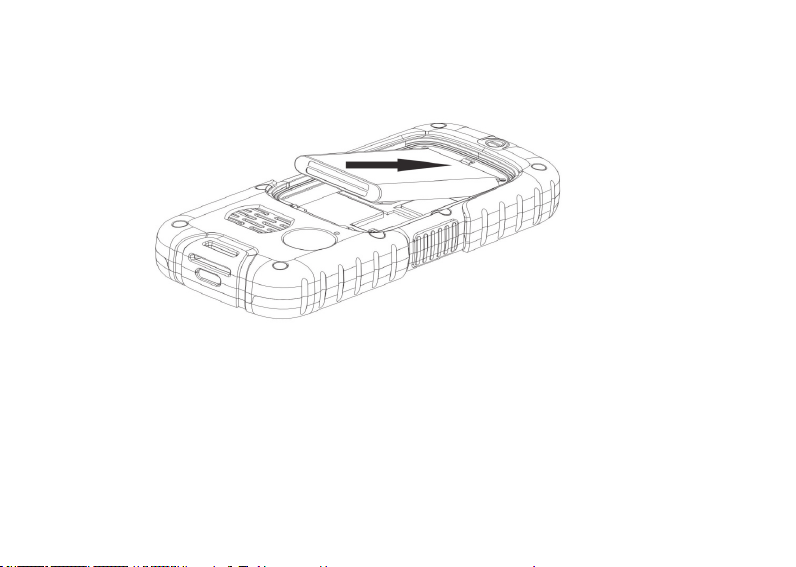
Installation of battery
Please use the original-packaging battery and accessories. Store the battery well if it is not used.
Please install the battery at shut down status.
Note: Please follow the correct procedures as shown in the gure to prevent damage to the battery contact points.
Charge the battery
The new battery must be fully charged and discharged for several times to reach its best performance.
Charge as soon as possible when the power is used up as over-discharge will damage your battery.
Disconnect the charger and the power supply and then disconnect the mobile phone when the battery is fully
charged.
Connect your phone to the charger as shown in the following drawing.
10
Page 11
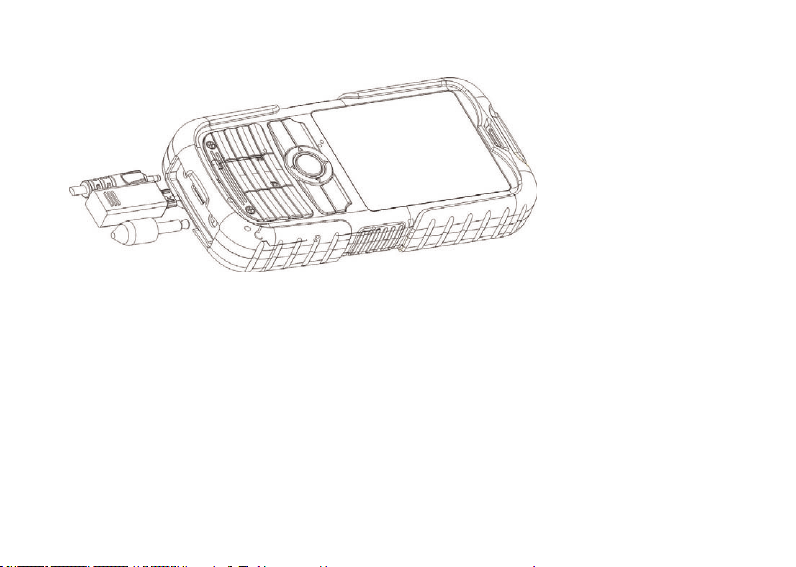
When charging, if the phone is switched on, the power quantity icon at the top right corner of the screen will twinkle
and will stop twinkling and fully display when the battery is fully charged. If the phone is switch off, an icon will
appear at the screen to show the battery is in charging.
Note: A little heating while charging is normal.
Use of battery
The performance of the battery is affected by multiple factors including your wireless loading network conguration,
signal intensity and temperature when using the phone, the function or settings you selected, the accessories
adopted for cell phone and other applied program modes.
To optimize the performance of the battery, please do as following regulations:
11
Page 12

• New battery or a battery is left unused for a long time should be charged for a long time;
• Keep the temperature at or near room temperature when charging;
• The battery may require longer time to be full charged after being used for a long time and this is normal. If the
call time becomes too short, you may need to buy a new battery produced by original factory or authorized by our
company. Unqualied battery or accessories may damage your phone and even cause danger;
• If the battery is left unused for a long time or the power is too low, it may require longer time for the charging
interface to appear, please wait patiently.
Note: For your safety and environment, please do not throw away the battery everywhere.
Warning: Explosion, re or personal injury may be caused by any type of battery short-circuit!
PIN
PIN1 code: Personal identication code used to enter SIM card and to prevent others to use the SIM card without
your permission. If PIN1 code safeguard function of your cell phone has already been started, the system will
display “Enter SIM card 1/2 PIN” to enter when switching on the phone. * will be displayed instead of the PIN1 you
entered. You can get PIN1 from your network provider together with the SIM card.
PIN2: The personal identication number use for special functions such as charging function provided by the
network.
PUK and PUK2 (8 digits)
A PUK is required to change the PIN. To change the PIN2, you need to use PUK2 (personal unlock code). If PUK is
not provided together with the SIM card, please ask for it from your network provider.
(Warning): If the PIN code is entered continuously three times, the SIM card will be locked in. Please consult the
network supplier right away to look for deciphering. Unauthorized deciphering may cause permanent failure to the
SIM card.
IV: Description of Cell Phone
Dialing key
Make or answer calls from SIM 1.
Short pressing the dialing key can enter SIM 1 call log under standby status.
Hang-up key & on/off key
12
Page 13
Hang-up or reject a call.
Long press the key to switch off the phone under standby status.
Long press the key to switch on the phone when the phone is switched off.
Direction keys
Move the bar or cursor.
Enter appointed shortcut under standby status.
OK Key
Conrm an operation in menus.
Number keys
Input numbers or characters.
Long press the number keys 1to 9 to quick-dial while standby.
Long press the # key to mute and quit mute under standby mode.
Short press the * key repeatedly or long press it to enter “P”, “+” or “W” characters under dialing interface.
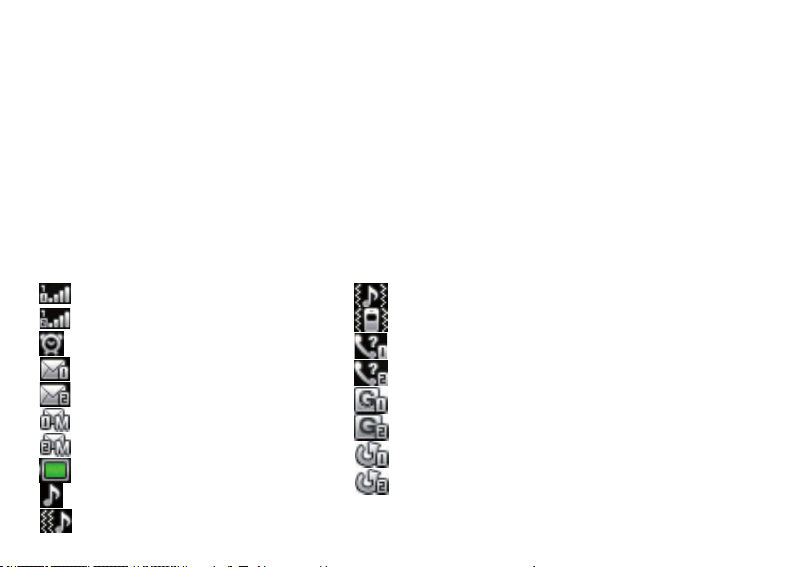
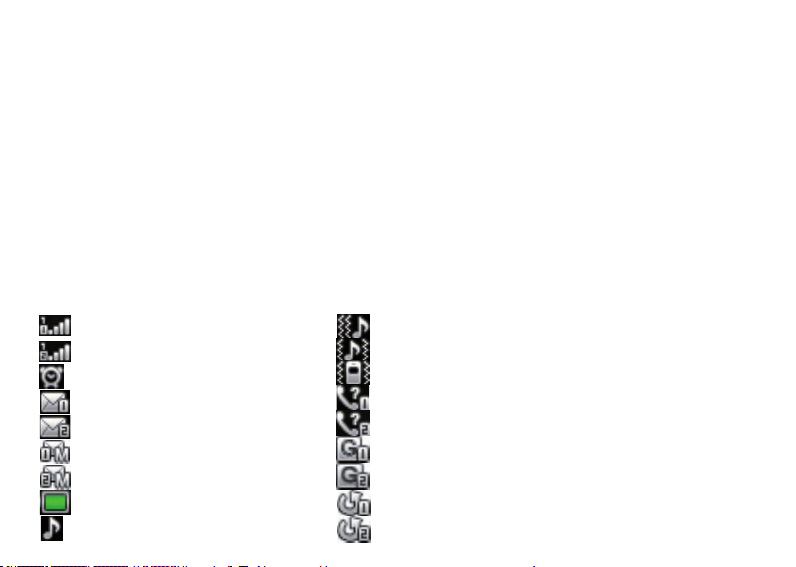
Icons on screen in standby status
SIM card 1 Antenna
SIM card 2 Antenna
Alarm clock activated
SIM card 1 SMS
SIM card 2 SMS
SIM card 1 MMS
SIM card 2 MMS
Battery
Vibration and ring
Vibration
Missed calls in SIM card 1
Missed calls in SIM card 2
SIM card 1 GPRS
SIM card 2 GPRS
Call divert activated in SIM card 1
Call divert activated in SIM card 2
Ringing
Vibration then ring
13
Page 14

Languages & Input Methods
English input method is provided in your phone. For details, please refer to chapters related to language editing,
where you can learn different input methods and how to switch between them.
Incoming Call alert method
The built-in vibrating motor and buzzer in your phone provides the following alerting modes:
Ring
Vibrating
Vibrating and ringing
Vibrating then ringing
Descriptions of nouns
• Making a national call
The simplest way to make a domestic call is to input a phone number by numeral keys and press the dialing key.
If the both SIM cards are inserted and dual SIM open, SIM card 1 dial or SIM card 2 dial would be selected by
pressing dialing keys of SIM 1 or SIM 2.
Note: Enable the function of LSK dialing function in the mune “Call center / General call settings/ SIM card 2 call
settings”. Then you could dial from SIM 1 by pressing the calling key,and dial from SIM 2 by pressing LSK.
The screen displays animation of dialing. If dialing from SIM card 1, the screen will display “SIM Card 1 Dialing”,
and if dialing from SIM card 2, the screen will display “SIM Card 2 Dialing”.
Call status will display on the screen when the call is answered.
Press the hang-up key to end the call.
Make domestic calls: zone number + phone number + dialing key.
• Making an international call
To make an international call, long press or repeatedly short press the * key until the symbol “+” is displayed on
the screen. This allows you to make an international call without knowing the prex number of that country (e.g.
China is +86).
Then input the country code and the complete phone number. The country code is subject to convention, e.g.
Germany is 49, Britain is 44 and Sweden is 46, etc.
Make international calls: + country code + complete phone number + dialing key.
• Call extension of a xed phone
Extensions of some xed phones are not accessible directly, in such case, you need to dial the host number and
14
Page 15

then the extension number. Simply insert the letter “P” between the host number and the extension number and
you can call the extension. You can input a “P” by long pressing or repeatedly short pressing the * key.
Call extension of a xed phone: phone number + P + extension number + dialing key.
• Make emergency calls
In any country where digital GSM is used, you can make an emergency call if your phone is covered by the
network (you can know about this by checking the signal strength indicator bar at the upper corner of the display
of the cell phone). If your network operator does not provide roaming service in that area, the screen will display
“EMERGENCY CALLS ONLY”, telling you that you can make this kind of call only. If you are in the coverage of
the network, you can make emergency calls even if your SIM card is not inserted in.
In some areas, the 112 (emergency call) service is provided by the network operator. If there is anything
abnormal, contact your network operator!
• IMEI
International Mobile Equipment Identity. You can see the bar code label printed with this number at the back of the
cell phone after you have turned off the cell phone and remove the battery. This number is also stored in the cell
phone, and can be displayed when you enter “*#06#” on the screen dial interface.
V: Basic operation of cell phone
Switch on
Press and hold on “ON/OFF” to start up the cell phone. If no password settings are given for the SIM card and cell
phone, the phone will search for a network automatically, and when the cell phone registers a network, the name of
the network supplier will be shown on the screen. You can now answer or make a call.
If the display indicates “Insert SIM card 1”or”Insert SIM card 2” after the start-up, please power off your phone, and
check whether your opposite SIM cards have been installed correctly or hasn’t yet been installed or not.
After plugging into a SIM card, the phone will automatically check SIM card for availability, then the display screen
will indicate the following prompts in sequence:
1) “Enter phone lock password” ―― if you have started up the phone lock (default password: 1122.)
2) “Enter SIM card 1/2 PIN” ―― if you have started up the SIM card 1/2 lock.
3) “No service” ―― it represents the register network failure, and you can’t call at this time.
4) “Emergency Call” ―― it allows to call 112.
5) “Search” ―― the phone is searching a network, until it nds out a suitable service network.
6) The screen displays the network operator name – it represents the network register success.
15
Page 16

If only SIM 1 card is installed and the current mode is “SIM card 1 only”, the screen will display the name of SIM
card 1 provider only and that “SIM card 2 is off”; if only SIM card 2 is installed, the screen displays in reverse. If
only SIM card1 is installed and the current mode is “two cards on”, the screen will display the name of SIM card 1
provider only and that “Please insert SIM card 2”; if only SIM card 2 is installed, the screen displays in reverse.
Switch off
If you want to shut down the cell phone, please long press ON/OFF key, and after the screen displays the power off
animation, the cell phone will shut down. Please don’t shut down the phone directly by dismantling the battery, and
if you do like this, it is easy to damage SIM card and may cause loss of some information.
Making a call
• Enter the phone number in standby status, and press the calling key to call. If you want to hang up or cancel
the call, please press the hook up/cancel key;When the phone is connected, you can see the holding time on the
screen.
• Use the phonebook to make a call: Search the name/phone number saved in the phonebook, and press the
calling key to call.
• Redial the latest phone number; Press the calling key in standby status to search the latest list of phone number
or name. Roll over to the number or name, then press the calling key.
Adjusting the receiver volume
During a call, you can press side keys to adjust the receiver volume.
Answering a call
When there is a coming call, it will indicate in a mode of ring, vibration, vibration and ring, ring after vibration or
lighting according to the setup of cell phone.
To answer a call, press the calling key.
To reject a call, press on/off key.
If you have applied for calling number identication service, the calling number will show on the screen. If this
number has already stored in the phonebook, the corresponding name of this number then will show on the screen.
If the call is to SIM card 1, “Call to SIM Card 1” will display in front of the number or name.
If the call is to SIM card 2, “Call to SIM Card 2” will display in front of the number or name.
Speed dial
The phone provides 8 speed buttons, and you can dene the phone numbers corresponding to these buttons. So,
as long as you long press [2 to 9] keys in standby status, you can call speedily; [1] key is specially used for the
16
Page 17

speed dial of voice mailbox number.
(Note): To speed dial, you have to press and hold on/press a key for 2 seconds and above, and if you haven’t
designated the speed dial function for that key, then you can’t be successful for the call.
Sending DTMF signal
When you have set up the DTMF signal sending function, if you press the digit key and * and # key of the keypad
during the period of conversation, it will be sent out in the form of DTMF signal to the other party. If you don’t start
up this function, you can’t carry out the extension number calling, etc. functions probably.
Call Hold
If you have applied for the value adding of call waiting, the following function menu may appear when you click an
entry during conversation:
• Hold: Temporarily suspend the current conversation, but the conversation channel still under connection.
• End: End the current connection.
• New conversation: Enter the dial interface, and make another call.
• Phonebook: You can enter a phonebook directory.
• Information: You can enter messages directory.
• Record: You can record the current calling contents.
• Background tone: Enable or disable the background tone.
• Mute/resume: You can switch on/off microphone.
• Dual-tone multi-frequency, DTMF: You can set up whether to send out a DTMF signal.
Note: Some menu entries just appear under the specic condition, or they need support from the local network,
such as: “Hold” and “New conversation”, etc., for detail, please consult the network supplier.
Non-response event
When the cell phone has new unread messages and missed call etc. events, the cell phone will have the
corresponding picture or icon prompt, please search these messages in time.
Connecting to voice mailbox
Your cell phone allows you to divert the incoming call to the voice mailbox, then, you will receive a notice
concerning the voice messages (the center number of voice mailbox should be set up properly in advance).
17
Page 18

VI. Operation menu function
1 Messaging
The SMS function is a network service. You may need to apply to the network operator rst before you can send
and receive a short message.
Your cell phone supports the short message sending function. Short messages are sent to network SMS center rst
and then sent to subscribers. If the subscriber does not turn on the phone or cannot receive messages (storage is
full), the network will keep this message temporarily. The keeping period will be determined jointly by the message
sending user’s setting and the service operator.
By using the SMS, the phone can send and receive long messages. Sending long messages may affect the charge
for the messages. For details, please contact your service operator.
If the memory for message is full, a twinkling icon will remind you on the screen. You mobile phone support dual
SIM card so messages in SIM card 1 and 2 are separately stored. The reminders for full memory of SIM card 1
and 2 will also be given separately. In such case, you need to delete at least one message in the memory of the
corresponding SIM card to receive new message.
Note: When you send a short message through SMS network, “Message sent” will be displayed on the screen.
That is to say, the phone has sent the message to the message center mailbox set by your phone. But that isn’t to
say, the specied user has received the message. For more detailed information about SMS, please contact your
network operator.
1.1 Write message
You can create a message in this menu.
The phone supports sending a long message having over 160 characters (character number restriction for
common text messages). If a message has more than 160 characters, the message will be divided into two or more
messages and sent.
The following menu option functions by using left key are provided when you are writing a short message:
• Send to:
Enter recipient
Add from Phonebook
• Input method: To select the input method for edition of a message.
• Add picture: To insert an image to the message.
18
Page 19

• Add sound: To insert an audio le to the message from phone or memory card.
• Add video: To insert a video le to the multimedia message.
• Add subject: You can add a subject for the current message.
• Slide options:
Add slide behind: To insert a new slide behind the current slide.
Add slide before: To insert a new slide ahead of the current slide.
• Switch to MMS
• Advanced:
1. Insert text Template: Select frequently used phases from the template and insert into message editing interface.
2. Insert attachment: Insert ring tones, picture and images animations.
3. Insert contact name and number: Enter contacts and insert the found name and number.
4. Insert bookmark: Enter the bookmark interface, insert the selected bookmark.
• Save: You can save the current message into Drafts or as a template.
• Details: You can check the character of the message
1.2 Inbox
The received messages are saved in Inbox. You can view all received messages in Inbox. The messages of SIM card
1/2 are separately saved. You can perform the following operations:
• View: View the content of the message.
• Reply: To replay a received short message.
• Call sender: Make a call to the sender.
• Forward: To forward the current message to the other subscriber.
• Delete: To delete the current message.
• Delete all: To delete all messages Inbox.
• Save to Phonebook: To save the sender number to SIM1/2 or Phone.
• Move to Archive: Move the current message to archive.
• Mark several: You can mark several messages, then edit these messages the same operation.
1.3 Drafts
Select “Save” when you want to send a short message, then the message will be stored in draft box. The message
failed to send will be also stored in drafts box, and relative operations can be implemented.
19
Page 20

1.4 Outbox
If you fail to send some messages which will be stored in Outbox.
1.5 Sent messages
The messages that have been sent successfully are stored in SentBox, and you can implement the relative
operations of the messages.
• View: View the content of the message.
• Forward: To forward the current message to the other subscriber.
• Delete: To delete the current message.
• Delete all: To delete all messages sentbox.
• Mark several: You can mark several messages, then edit these messages the same operation.
1.6 Archive
You can implement the relative operations to the messages moved in archive.
1.7 Delete messages
You can delete all messages of Inbox, Drafts, Outbox, Sent messages and Archive.
1.8 Broadcast message
Cell broadcast is a service provided by the network operator to send messages such as weather forecast, trafc
status, etc. to all GSM subscribers in a specic area.
Note: The realization of the cell broadcast function needs the support of the network. For details, please contact the
network operator.
- Receive mode: To enable/disable the Broadcast Message.
- Read message: When the Broadcast Message has been enabled, the received message can be read after the
corresponding server has been enabled.
- Languages: To enable/disable the all languages of messages received.
- Channel settings:To select, add, edit or delete channel numbers.
1.9 Templates
Include the templates of SMS and MMS.
20
Page 21

1.10 Message settings
1.10.1 Text message
1.10.1.1 Message setting of SIM card 1/2:
You can set some parameters of messages in this menu. Parts of setting menu of SIM card 1/2 are separate.
- Prole setting: To set the name of a prole, SMS center number, message validity period, and message type. To
send a message, the SMS center number shall be provided.
Note: The number of the SMS center is provided by the network operator. For details, please contact the network
operator.
- Voicemail server:
Voice mail server is a network service. You may apply for this service beforehand. For detailed information and
voice mail server number, please contact your network operator.
SIM card 1/2 voice mail server:
• Call voicemail: To dial the voice mail server number stored in your voice mail server number list.
• Edit: To edit voice mail name and server number. Press OK to store your number.
Tip: Under the standby condition, you can call the voice mailbox number by long pressing the key “1” after you
have set the voice mailbox number.
- Common setting: Enable or disable delivery report and reply directory.
• Delivery report: The network reports whether the opposite side has received the message and the time received.
• Reply path: To transfer the reply path to the network terminal. This function requires the support of message
center.
• Save sent message: Set the sent message stored in Sentbox.
- Memory Status: Check memory space use of SIM card or mobile phone.
- Preferred Storage: Appoint the directory to save the message (SIM cards or mobile phone).
1.10.1.2 Message Firewall: Enable or disable the blacklist function. You can enter a number in the blacklist. When
the function is enable, you phone will reject the messages form the number.
1.10.2 Multimedia message
You can set parameters for MMS or view the memory status in this menu. For detailed information on MMS
parameters, please contact your network operator.
Proles: Set the current proles
Common settings:
21
Page 22

Compose:
- Slide time: Set play time of each page.
- Creation mode: Select the compose mode.
- Picture resizing: Enable or disable resizing of picture.
- Auto signature: Enable or disable auto signature.
- Signature: Input signature.
Sending:
- Validity period: Set valid time of the message in Message Center.
- Delivery report: Enable/disable delivery report.
- Read report: Enable/disable read report.
- Priority: Set priority to be sent of the multimedia messages.
- Delivery time: Set storage time of the message in Message Center. This setting depends on your network
provider and your setting.
- Send and save: Able or disable the function of “send and save”.
Retrieval:
- Home network: Immediate, reject, postponed.
- Roaming: Same with main network, postponed, reject.
- Filters: Set “Anonymous sender” and “Advertisement” to allow ro return messages.
- Read report: Send, do not send, inquire.
- Delivery report: Enable/disable delivery report.
Preferred storage: You can choose phone or memory card as your preferred strorage.
Memory status: You can check the phone used rate, used and unused space.
2 Phonebook
2.1 Phonebook
Each contact saved in your phone contains the following useful information: three phone numbers(mobile phone
number, home number and ofce number), company name, email, fax number, birthday, photo, ring tone, video
connect and group(providing ve mode: family, friend, important, colleague and others); each contact save in the
SIM card only contains name and phone number.
You can input at most 1000 contacts in the contacts saved in the mobile phone: for volume of Contacts saved in
SIM card, it depends on the SIM card.
22
Page 23

2.2 Edit
You can delete, copy and move all the contacts in phonebook.
2.3 Caller group
You can edit the caller group and the content of it such as caller ringtone, caller picture and caller video.
2.4 Phonebook settings
- Preferred storage: To select the storage directory of the current number.
- Speed dial: To switch on the speed dial function, and edit the corresponding speed dial number. If the speed dial
is “on”. Then you can long press the corresponding key (2-9) to dial the number designated to the key through the
standby interface.
- My number: To implement the editing and sending operation.
- Extra numbers: To view and edit the own number
- Memory status: To view the service condition of the phone book storage.
3 Call Center
Call history
SIM card 1/2 calling record, including:
- Dialed calls: To view the list of calls you dialed or tried to dial.
- Received calls: To view the list of 20 answered calls (requiring network service support)
- Missed calls: To view the list of missed calls (requiring network service support).
Options
- Delete call logs: To delete call history. You can select to delete all numbers in call history, or only delete the
numbers listed in Missed Calls, Dialed Calls or Answered Calls.
- Call timer:
• Last call: To view the duration of the last call.
• Dialled calls: To view the duration of all dialed calls.
• Received calls: To view the duration of all answered calls.
• Reset all: To reset duration of all calls.
Note: The actual call and service time in the service operator’s bill may vary. It depends on such factors as network
function, accounting rounding-off and tax. For details, please contact your network operator.
- Call cost: Requires the support of the network operator.
• Last call cost: To view the cost of the last call.
23
Page 24

• Total cost: To view the total cost of all calls.
• Reset cost: To reset cost record of all calls. (Please enter PIN2 for this function.)
• Max cost: To limit the cost within specied amount of pricing unit or currency unit. PIN2 is required for setting the
call cost.
• Price per unit: This function is supported by your network. For details, please contact your network operator.
- Text msg counter:View the quantity record of sent and received message.
- GPRS counter:
• Last sent:To view the volume of data sent in last linkage.
• Last received:To view the volume of data received in last linkage.
• All sent:To view the volume of data sent in all linkages.
• All received:To view the volume of data received in all linkages.
• Reset counter:To reset the GPRS counter.
4 Settings
4.1 general setting
4.1.1 User proles:
Various proles are provided for your phone. Personalize your phone according to your preference, and then start a
prole desired. The proles available are General, Meeting, Outdoor, Indoor, Headset, Bluetooth and Saving.
Note: The phone automatically switches to the Headset mode when the headset is plugged, and it restores to the
previous mode when the headset is unplugged.The phone automatically switches to the Bluetooth mode when the
Bluetooth device is connected, and it restores to the previous mode when the device is unconnected. Long press
the “#” key when the phone is in the standby state to switch the phone to the Mute mode. Long press it again will
restore to the previous mode.
4.1.2 Phone settings:
4.1.2.1 Dual SIM switch: Set the dual SIM switch mode.
4.1.2.2 Dual SIM settings:
• Dual SIM open: Open card 1 and card 2
• Only SIM1 open: Open card 1
• Only SIM2 open: Open card 2
• Flight mode: Turn on ight mode
24
Page 25

4.1.2.3 Time and date: To set the current time, date and the display format.
- Set home city: To set the home city.
Note: This option needs application together with the auto time renewal, and needs the network support for the
operation of auto time and date renewal.
- Set time/date: To set the current time and date.
- Set format: To set the time and date display format.
- Update with time zone:Enable or disable update with time zone.
Note: It is required to reset the time again when you load battery again or switch on the phone again after charging
the battery if you remove the battery from the cell phone or if the battery has already been exhausted for a very
long period.
4.1.2.4 Schedule power on/off: Set the designated phone On/Off time.
Caution: In particular area (such as airplane compartment) forbidding the use of a cell phone, you shall conrm that
the Schedule Power On/Off function is disabled to avoid an accident.
4.1.2.5 Language: To select the used language for the phone.
4.1.2.6 Pref. input methods: To set the default input method according to your operation habit.
4.1.2.7 Greeting text:
Status: Enable or disable the greetings, you will see the greeting interface when switch on the function.
Greeting Text: Edit the content of the greetings.
4.1.2.8 Dedicated key:
You can appoint the shortcuts of direction keys. Press a key to use the corresponding function under standby
interface.
4.1.2.9 Auto update of date and time: Enable or disable auto updating of date and time.
4.1.2.10 UART settings: SIM1 or SIM2
4.1.2.11 Misc.settings: Bright and time of screen display can be set by LCE backlight.
4.1.3 Network settings:
SIM card 1/2 Network Setup
25
Page 26
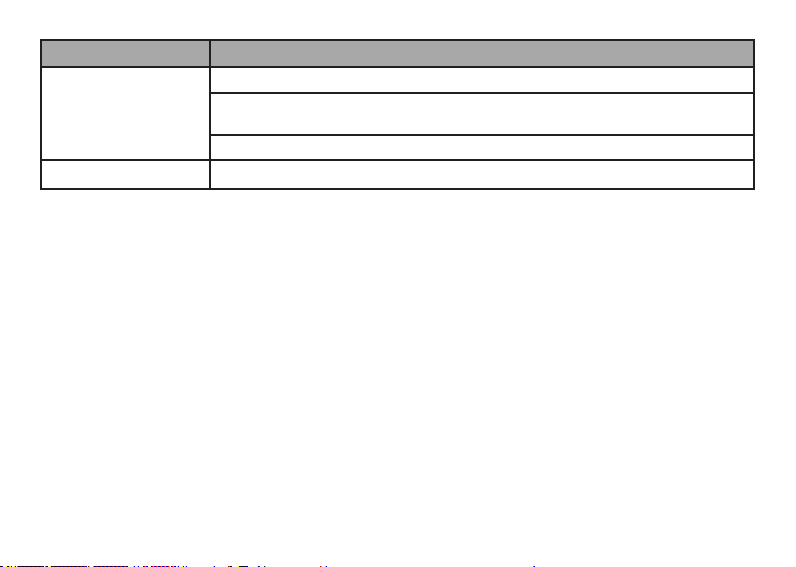
Name Description
Network selection
New Search: To search the network again.
Select network: The phone only load the appointing network. When the network can’t
work, the phone won’t register other network
Search mode: Automatic/Manual.
Preferences To select the preferred network.
4.1.4 Bluetooth
- Power: Activate/deactivate Bluetooth.
- Visibility: Set the visibility of Bluetooth device.
- My device: Display device model when connected.
- Search audio device: Display the model of online device.
- My name: Edit the Bluetooth device’s name.
- Advanced: Setting the parameters when Bluetooth is connected.
• Audio path: Set voice to the phone or to handsfree device.
• Storage: Set the path of transmission.
• Sharing permission: Set the permission as only reading or full control.
• My address: Display the information of the Bluetooth device.
4.1.5 Restore Factory Settings
You can restore some settings of the phone to factory settings. To restore the factory settings, enter the password.
The default password is “1122”.
4.2 Sound setting
You can set one of the following options:
• Tone settings: To set the tone for incoming calls of SIM card 1/2, alarm, power-on (except Bluetooth mode),
power-off, messages of SIM card 1/2 and key press.
• Volume: To set the volume of ring tone and key tone.
26
Page 27

• Alert type: Includes Ring, Vibrate, Vibrate and Ring, Vibrate then Ring
• Ring type: To set the ring type, including Single, Repeated and Ascending.
• Extra tone: Includes four types, Warning, Error, Camp-on, and Connect.
• Answer mode: You can choose the answer mode as Cover answer or Any key.
4.3 Display
• Wallpaper: Set the background picture in standby screen interface
• Screen saver: Set Standby on / off screen, and start the waiting time.
• Power on display: Select the system picture and user dened picture as your power on display.
• Power off display: Select the system picture and user dened picture as your power off display.
• Show date and time: Enable/disable to display the date and time.
• Show owner number: Enable/disable to display the owner number.
4.4 Call settings
4.4.1 SIM1/SIM2 call settings:
- Caller ID: Includes Set by Network, Hide ID, and Send ID.
• Set by networ: The number of the phone will be sent as per the default mode when a call is initiated.
• Hide ID: The number of the phone will not be sent when a call is initiated. If the system doesn’t support this
function, it may not make a call.
• Send ID: The number of the phone will be sent when a call is initiated.
Note: This function requires the network support. For details, please contact the network operator.
- Call waiting: To set functions like activate/deactivate and enquiry call waiting. During call holding and
making multi-party calls, this function should be activated rst, and network support is required for the specic
implementation of the function.
- Call divert: It is a network function that can only be used when you apply for this service of the network operator.
The function can divert calls that satisfy the conditions to the other caller’s phone number you have designated.
27
Page 28
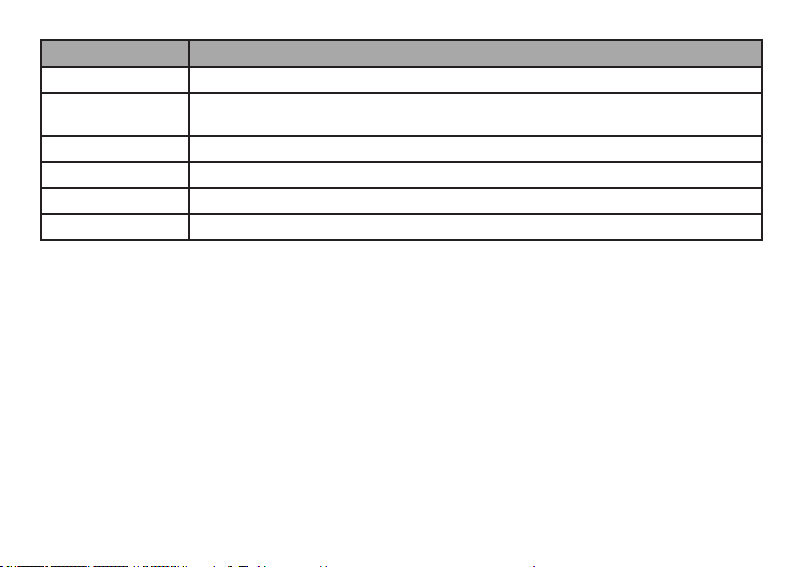
Name Description
Diver all voice calls Network will divert unconditionally all your incoming calls.
Divert if unreachable To divert an incoming calls when your phone cannot be reached (the phone is either
switched off or out of network coverage).
Divert if no answer To divert an incoming call after a certain time period during which the call is not answered.
Divert if busy To divert an incoming call when you have an active call or other operation is busy.
Divert all data calls Network will divert call incoming calls (requiring support of network).
Cancel all diverts Cancel all the divert functions.
- Call barring
1 Outgoing calls
• All calls: To restrict all outgoing calls.
• International calls: To restrict international outgoing calls.
• International calls except to home PLMN: While you are abroad, you can only call the numbers of the country
(where you are) and your home country (at which your service supplier is located).
2 Incoming calls:
• All calls: To restrict all incoming calls.
• When roaming: To restrict all incoming calls except the numbers from your local service area.
3 Cancel all: For canceling call barring. (Password for barring is required.)
4 Change barring password: Apply to the network for changing the password for call barring.
- Line switching: To choose Line 1 or Line 2.
- Closed user group: This function requires support of network. Please consult your network operator for more
information.
4.4.2 Advance settings
4.4.2.1 Incoming tel blacklist
- Mode: Open or close the blacklist or red list .
28
Page 29

- Black List numbers: You can add some numbers into blacklist.
4.4.2.2 Auto redial:
To set the auto redial as “On” or “Off”. If your call can not get through, up to 10 redials for you to try to connect a
phone number.
4.4.2.3 Call time display: Enable or disable the function of display the calling time.
4.4.2.4 Call time reminder: Enable or disable this function. Single and periodic reminder ways are available under
this menu.
4.4.2.5 Auto quick end: You can set a limit time. If this function is enabled, the phone will hang up automatically
when the call time reaches the set time limit.
4.4.2.6 Connect Vibration: Enable or disable this function.
4.4.2.7 Reply msg while incoming call: Enable this function, when you have a coming call, enter “option” choosing
“reject by SMS”, cell phone can send the default message to caller.
4.5 Security settings:
4.5.1 SIM1/SIM2 security setup
4.5.1.1 SIM 1/SIM2 lock: To unlock or lock SIM(PIN).
4.5.1.2 Change password: Change the PIN/PIN2 password of SIM card 1. PIN(PIN1) and PIN2 code can be get
from your network operator.
4.5.2 Phone lock: This function allows you to lock/unlock your phone. Note: the default password is “1122”.
4.5.3 Auto keypad lock: To unlock or lock the keypad. The time for locking keypad can be set.
4.5.4 Change Password: The default password “1122” of phone, message, phonebook, calling records and privacy
protection can be changed as the desired password of 4 to 8 digits.
4.5.5 SIM Hide: Enable or disable SIM 1/2 hide.
4.5.6 Privacy protect: Includes protection for phone book, message and call history. If this function is enabled,
corresponding menu or content will be locked. For access, enter the password. The default password is “1122”. You
can change the password in the menu of changing password.
29
Page 30

5. Audio Player
The operating system above WIN2000 does not need to install the drivers. You need not power-off the phone
when download songs. When the phone is connected to PC, it will display USB setting interface. Press the option
of “Storage device”, then the PC display the message of found new hardware and update one mobile Disc. The
selected MP3 need be copied into “My Music” root directory, if it is copied into other directory it can’t be played
(Only .mp3 and .amr formats are supported).
Options:
- Play: Play the music you choose.
- Detail: View the detail information of the music you choose.
- Add to ringtone: You can add the song you choose into the ringtone folder.
- Refresh list: Search and list all the songs in your phone.
- Settings: Choose detail parameters for your audio player.
Note: Your audio player support display lyric together with song if you open the lyric play in music setting. Make
sure the lyric (.LRC format) document have the same name with the corresponding song, otherwise the lyric will
not be displayed. If the lyric downloaded has different playing rate with the song, the lyric will not synchronize with
song, which is not relevant to the audio player.
1. Albums and artists support 500 songs only.
2. You have to update the music list once the preferred music list is changed.
6 Multimedia
6.1 Camera
With this function, you can use the built-in camera of the phone to take a photo, or adjust the camera settings.
Photos generated by the camera are in JPG format. If they have been downloaded to your PC, view them with the
right software!
When the phone has insufcient memory space for new photos, you should delete some old photos or other les in
the “File Manager” function list to release memory space for new pictures.
- Photos: To view a saved photo.
- Camera settings:You can choose special parameter under this menu, such as shutter sound, contrast, anti icker
and so on.
- Image settings: You can choose the size and quality of the image.
- White balance: Adjust the white balance.
30
Page 31

- Scene mode: To set the night mode as Auto or Night.
- Effect settings: Setting the special effect for photo shooting.
- Storage:To set the storage directory for photos.
- Restore default: To restore the settings of camera to factory settings.
6.2 Games
Provide you two games: snake; boxman.
6.3 FM Radio
You can receive the FM Radio channel just when plugging earphone.
6.4 Schedule FM record
Record the appointed frequency audio at the appointed time.
6.5 Image viewer
The shot photos are stored in the image viewer.
Descriptions of image viewer options:
• View: To view a photo.
• Browse style: To select the mode for browsing photos.
• Send: To send a photo to the desired application.
• Use as: To use the current picture as wallpaper, screen saver, power on/off display or caller picture.
• Rename: To rename the selected image or photo.
• Delete: To delete the selected photo.
• Sort by: To sort photos by the desired method.
• Delete all les: To delete all photos.
• Storage: To set the storage directory for photos.
6.6 Video player
Support video such as 3gp etc. format. The following operation can be performed to the selected video le:
• Play: To play a video le.
• Send: To send a video le to the desired application.
• Rename: To rename a video le.
• Delete: To delete the selected video le.
• Delete all les: To delete all video les.
• Sort by: To sort video les by desired method.
• Storage: To select the storage directory (cell phone or memory card) for a video le.
31
Page 32

6.7 Video recorder
Press the red icon bottom of the screen or press OK key to start or pause video recording. The recording time is
limited by the volume of the memory of the phone or the memory card. Enter the option, you can make the following
settings:
• Camcorder settings: Setting the related parameters of the recorder.
• Video settings: Set the parameters of the video to be recorded.
• White balance: Set the parameter of white balance.
• Effect settings: Set special effect to be applied when recording.
• Storage: It is able to choose the saving route of record le (cell phone or memory card).
• Restore default: Resume the consumer settings for recording to the original plant default.
6.8 Sound recorder
To make an audio record, select the “Audio Recorder”. Select the “Options” for the selected record le to perform
the following operation.:
6.8.1 New record: To make a audio record.
6.8.2 List: List of all the record les.
• Play: To play a selected record le.
• Append: Append a record to the designated les in the upper directory. (You can only append a record le in .AMR
and .AWB format.)
• Rename: To rename the selected record le.
• Delete: To delete the selected record le.
• Delete all les: To delete all record les.
• Use as: Use the current le to user prole
• Send: Send a sound le to a relevant application.
6.8.3 Settings: To set the Preferred Storage and File Format for record les.
7 Organizer
7.1 File manager
Phone: Support memory of about 506K.
Folders or les in the memory card or the phone can be managed by the les management template.
7.2 Alarm
32
Page 33

The time format of the alarm clock is the tame with the format in the clock. The alarm clock can work even if the
phone is switched off as long as there is enough power in the battery. Alarm time, snooze time-out and alarm tone
can be set independently for every alarm. The phone will alarm when the time reaches the set time and current
time and date will display on the screen. Press Stop to stop the alarm; press Sleep, the alarm will pause and alarm
again at the snooze time-out.
Note: Your phone support alarm clock when switching off.
7.3 Calendar
With this function, you can view the calendar and schedule, and you can schedule with the scheduler to set
the schedule and alert. Move the cursor to the desired date with direction keys, and the date will be highlighted
in light blue frame. If a memo has been set in the schedule of some date, the date bottom adds displaying of
schedule icon. To view all memos of a day, move the cursor to the date. In this case, the following operation can be
performed:
7.4 Calculator
• Eight operators, i.e. “+”, “-”, “×”, “÷”, “m+”, “m-”, “mc”, and “mr”, are provided.
• Choose the Clear or press the right soft key to clear items entered. Long press the Clear or long press the right
soft key to clear all content. Press the “Ok” to show the result of calculation.
Note: The accuracy of this calculator is limited, and the calculator can only be used in simple calculation
7.5 Measure count
You can see the temperature ,air pressure and height.
Need to test the comparison instrument, Under the condition of knowing the height, testing the barometer and
altitude separately to see if the gures are the same, and get the height (Compare with the sea lever) difference
The measure count is suitable for outdoor sports like climbing mountain etc.
Temperature (Unit: °C):it will show you updated temperature, so you can protect your body in time and know the
weather situation. The temperature will come down as you go up. When sunny the gure is high, when rain the
gure is low.
Air pressure (Unit:Pa):it will show you updated air pressure ,so you will forecast the change of weather and take
care of yourself. Please pay attention air pressure will change according to the change of height or time. When
sunny the gure is high, when rain the gure is low.
For example:
A. Air pressure change as height change
1. When you at mountain bottom and the air pressure is 1013.25hPa
33
Page 34

2. Then you climb to mountain top and get 941.25hPa ,usually near the earth, the air pressure will average come
down 12hPa when climb up 100 meters
3. When you climb in the middle of mountain and get 973.25hPa, you will feel it’s a little bit hard to breathe and the
feeling remind you make up your Oxygen and know how long you will get to top.
B. Air pressure change as time change
1. usually the air pressure will reach maximum at 10AM ,then slowly come down
It will reach minimum at 4PM,then slowly go up
It will reach second maximum at 10PM,then slowly come down
It will reach second minimum at 4AM,then slowly go up
2. When the air pressure change within 4hPa except the factor of time,it mean the weather will change from Sunny
to Cloudy, Cloudy to Cloudy sky, Cloudy sky to Rain ,or Cloudy sky to Sunny etc.
3. When the air pressure change beyond 4hPa in short time,it means the weather will have a huge change like
sunny to rainstorm or rain to sunny. Pay attention to this and avoid the risk.
Height (Unit:meter): it’s altitude height, it will show you the updated height, so you can easy to get the real height of
a mountain by calculate or you can know your location
For example:
1. When you at mountain bottom and the height is 100 meters ,
2. Then you climb to mountain top and get 700 meters,
3. So the real mountain height is 600 meters.
4. Or if your height show 400 meters, you will know you are in the middle of mountain.
The above 3 features like a small weather station .Help you know the situation of weather and get the real gure for ref.
7.6 Compass
Compare with the mechanical compass:
1.in the open places
2.without interference (such as large current equipment,magnet)
3.the horizontal distance between the testing machine and the comparison should be more than 25cm.
With mechanical compass shall prevail,record the gures shows on the compass every 20°
For example:
1.on the same surface take 0°as the North
2.rotate 20° lockwise
3.take the gures of the machanical compass as the standard one
34
Page 35

4.check if the gure on the testing compass shows 20°(If the deviation in more or less 5°,it is qualied)
Using this method to rotate 360°and recording 17 sets of data.
7.7 E-Book Reader
E-book application can help you to read a le that stored in phone or memory card in .txt format.
• Open ebook: To open an E-book.
• Clean up bookshelf: You can clean up the bookshelf you are using.
• Global settings: To set the attributes of an E-book.
• Book Info: To view the attributes of a text.
• Delete: To delete a text.
• Delete all: To delete all texts.
• Sort by: To sort E-books in a folder.
• Apply: To apply the settings.
• Help: To open E-book help description.
7.8 Tasks
For creating a new memo or viewing the memos set in the schedule. You can also perform View, Add, Edit, Delete
Entry, Delete All and Transfer Date book, etc. If the alarm reminder is set up for the memo, the cell phone will remind
you with ring once the time is up, and it will display the contents of the memo settings.
7.9 World clock
View the corresponding to the time zone of countries in the world by the direction keys.
7.10 Stopwatch
Your phone supports ordinary stopwatch and multifunctional stopwatch. You can time, time by lap and view records, etc.
8 Services
8.1 STK
STK is a value added service provided by your network provider.
The display of function menu may differ according to different SIM cards.
8.2 Internet Service
This function allows you to acquire or visit diversied services on the Internet through message or network. The
services may include entertainment, weather forecast, news, nancial information, ring tone download, stock market
and other useful information. Some functions are provided by the network provider. You will see different menus
according to the services provided by the SIM card. Please contact your network provider for more information.
35
Page 36

- Homepage: Enable WAP connection and visit the home page..
- Bookmarks: Visit or edit the bookmark.
- Input address: Provide user-dened inputting web address.
- Last web address: View the last web pages.
- Recent pages: Record the recently visited web addresses.
- Service inbox: Save the PUSH messages received by the phone.
- Settings: Set parameters of WAP browser. Please consult your network provider for details of the parameters.
• Select prole: To select prole from SIM1 or SIM2
• Proles: To edit and enable the prole function.
• Browser options: To set the wait time and whether to show images. Display the address list and select image can be
performed.
• Preferences:To set the timeout,show pictures,cahe and cookies.
• Security settings: To view the trusted certicates provided by the system.
• Service message settings: Enable or disable.
• Restore browser settings: Restore the setting of browser.
8.3 Data account:
• GSM data——Some account data will be provided by GSM data
• GPRS——Using GSM data will provide some account information
9 Fun & Games
9 Fun & Games
9.1 MSN
After sign in and keep on line, you can use MSN as the one installed in your computer under this menu, and it needs
the support of your network.
9.2 Yahoo
After sign in and keep on line, you can use MSN as the one installed in your computer under this menu, and it needs
the support of your network.
VII. Operating instructions of editor
Your phone provides you with different input methods for the convenience of using other function. You can enter
texts by keypad at anywhere requiring entering texts. Enter function setting > Phone setting > Default input method
36
Page 37

to choose a default input method.
Input interface key function
Press corresponding key under input interface, for example of writing message.
Numeral 1 to 9 is used to edit text contents.
Direction keys: Control the movement of cursor.
# key:Switch the input method.
* key: Enter the selecting of symbol.
Hang-up key: Retreat from the edit interface.
Smart English input
Press the numeral keys 2 to 9, the letters contained in the number and the corresponding number will appear on
the screen.
Enter a word
Under smart English input method, continuously press 2 to 9 keys for twice or more, the corresponding word will
appear on the screen.
For example, if you want to enter “book”, press the numeral keys “2665”, and then select the word “book”. You can
press the 0 key to enter a space when you need.
English letters and gure input
You can input English letters such as A , a and digit 1 by choosing different input method “ABC, abc, 123” .
Symbol input
Press * key to into the interface of inputting symbol, when the phone not under the interface of symbol. Transfer
direction keys to move the cursor to desired symbol, press OK key to select it.
VIII. Application of USB storage function
Precautions before using
• Please maintain correct operation of USB equipment connection and disconnection.
• Please don’t use windows formatting command to carry on the format operation to the mobile disk of cell phone;
otherwise, it will result in the damage that can’t be repaired any more.
• USB operation environment:
• Windows2000 / XP.
• For other operating systems, it may require the installation of USB driver before successfully creating the
connection of PC and cell phone.
37
Page 38
IX. Appendix 1
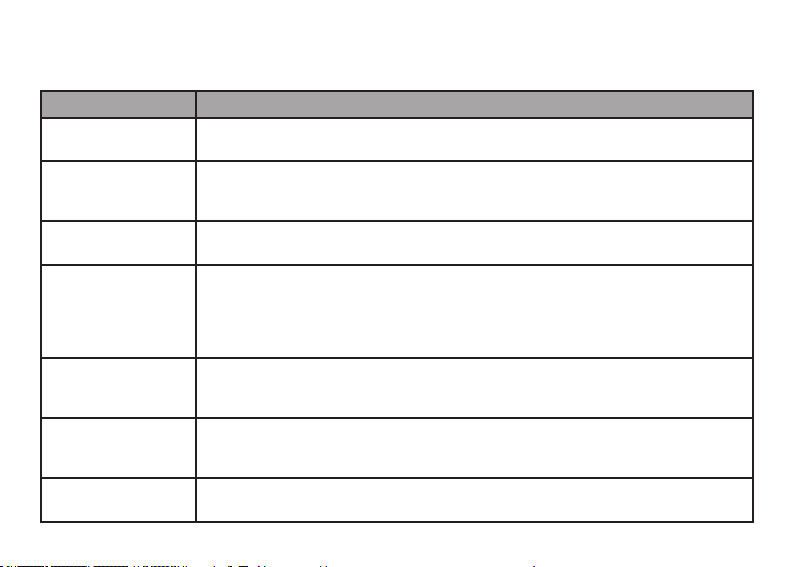
Troubleshooting
Failure Possible cause
The phone fail to
power on
SIM card error 1. Check whether the SIM card is dirty. If the card is dirty, clean it;
Weak signal Check that the signal intensity indicator on the screen. 4 bars indicate a strong signal,
Call initiation fails 1. You may set the Hide Caller ID but the network operator does not support this
Battery charge fails 1. The battery may have been excessively discharged. To charge the battery, it is
Cannot connect to the
network
Photos shot too dark 1.The brightness is set too low;
38
1. Check that the battery is charged;
2. Check that the battery is installed correctly.
2. Reinstall the SIM card;
3. If the SIM card is damaged, replace the SIM card.
and 2 bars or less indicate a weak signal.
service;
2. A strong signal interference may exist;
3. You may activate the Call Barring function;
4. You may activate Line 2 but the network operator does not support this service.
necessary to connect it to a charger for a certain period of time;
2. The battery may be deteriorated.
1. Check whether the signal is too week or wireless interference exists around;
2. Check whether the SIM card is installed correctly, poor connection exists, or the SIM
card is damaged. If the SIM card is damaged, please contact the network operator.
2. The ambient light is too dark.
Page 39
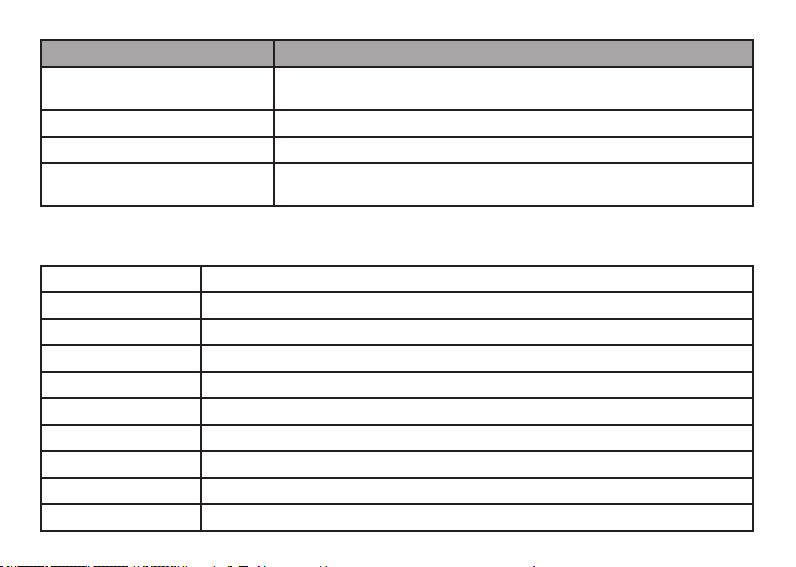
Failure Possible cause
Photos shot too blurred 1. The object shot is moving;
Photos shot is distorted The object shot is too near to the lens.
Cannot access the service menu The SIM card may not support the service.
The standby picture can’t be
displayed integrally.
2. Your hand shakes when the shutter is pressed
Maybe the picture is extra of the size.
X. Appendix 2
Abbreviations
SMS Short Message Service
EMS Enhanced Message Service
SIM Subscriber Identity Module
GSM Global System for Mobile Communication
PIN Personal Identity Number
PUK PIN Unblocking Key
IMEI International Mobile Equipment Identity
CB Cell Broadcast
GPRS General Packet Radio Service
MMS Multimedia Message service
39
Page 40

40
Page 41
Outlimits K2
Manuale d’uso
V. 1.0
ITALIANO
41
Page 42

CONTENUTI
I. SICUREZZA E PRECAUZIONI .............................................................................. 43
II. PROFILO DEL CELLULARE .................................................................................. 45
III. PREPARAZIONE
IV
. DESCRIZIONE DEL TELEFONO .......................................................................... 50
................................................................................................... 46
V. OPERAZIONI BASE DEL TELEFONO .................................................................. 53
VI. MENU FUNZIONI D’UTILIZZO ............................................................................. 56
VII. ISTRUZIONI PER L’UTILIZZO DELL’EDITORE .................................................. 75
VIII. APPLICAZIONE PER LA FUNZIONE DI MEMORIZZAZIONE USB ................... 76
IX. APPENDICE 1....................................................................................................... 77
X. APPENDICE........................................................................................................... 78
42
Page 43

I. Sicurezza e precauzioni
Per utilizzare il cellulare in modo sicuro ed efcace, si prega di leggere le seguenti informazioni prima dell’utilizzo:
• Non utilizzare il telefono in prossimità di impianti chimici, stazioni di rifornimento, depositi di carburante o in
presenza di materiali esplosivi.
• Conservare il telefono in un posto sicuro, fuori dalla portata dei bambini.
• Per la vostra sicurezza in auto, si consiglia l’utilizzo del kit viva voce durante la guida. Se bisogna effettuare o
rispondere ad una chiamata, accostare e parcheggiare prima di utilizzare il telefono. Si prega di NON utilizzare il
telefono mentre si viaggia ad alta velocità.
• Non utilizzare il cellulare durante un volo aereo. Si prega di vericare che il vostro apparecchio sia disinserito
prima dell’ imbarco.
• Non utilizzare il telefono all’interno di ospedali in quanto potrebbe interferire con il funzionamento di
apparecchiature mediche sensibili. Se il telefono viene utilizzato vicino ad un pacemaker, ad un apparecchio
acustico e ad altri apparecchi medici, occorre prestare la massima attenzione al fatto che potrebbero vericarsi
delle interferenze e causare malfunzionamenti ai dispositivi medici.
• Gli accessori non approvati da noi sono esclusi dalla garanzia.
• Non smontate il telefono. In caso di rottura, rivolgersi presso un centro assistenza da noi autorizzato.
• Non mettere in ricarica il telefono senza la batteria. Si prega di spegnere il telefono prima di rimuovere la
batteria, la memoria del telefono potrebbe danneggiarsi.
• Il telefono va ricaricato in un luogo ben ventilato, e deve essere tenuto lontano da materiali esplosivi ed
inammabili.
• Per evitare la smagnetizzazione, si prega di tenere il telefono lontano da oggetti magnetici, come calamite, carte
di credito, ecc.
• Si prega di assicurarsi che il telefono non venga a contatto con alcun tipo di liquido. Se dovesse succedere, si
prega di rimuovere la batteria e di contattare i centri da noi consigliati.
• Si prega di non utilizzare il telefono in ambienti né troppo caldi né troppo freddi, non esporre il telefono alla luce
diretta solare o utilizzarlo in ambienti con un alto tasso di umidità.
• Evitare l’utilizzo di panni imbevuti con liquidi quali detergenti corrosivi per pulire il telefono.
• Il cellulare supporta funzioni fotograche e di registrazione, quindi si prega di utilizzare queste funzioni seguendo
le leggi ed i regolamenti. Si può incorrere in violazioni di legge scattando foto o facendo delle registrazioni senza
autorizzazione.
43
Page 44

• Non sottoporre il telefono cellulare a scosse, urti o vibrazioni per evitare rotture alle parti interne del telefono.
• Non gettare la batteria del telefono come se fosse un comune riuto domestico. Attenersi alle istruzioni del
produttore per lo smaltimento delle batterie usate.
(Nota) 1. La Società declina qualsiasi forma di responsabilità per le conseguenze causate dal non rispetto delle
prescrizione sopra citate o per utilizzi impropri.
(Nota) 2. Gli accessori annessi sono utilizzabili solamente per questo tipo di telefono e per il suo carica batterie; è
possibile connettere il telefono al PC con una chiave USB per ricaricarlo. Non ricaricare il telefono in altri modi.
Se qualsiasi contenuto descritto in questo manuale non dovesse adattarsi al vostro telefono, si prega di riferirlo al
telefono cellulare corrispondente.
La fabbrica si riserva la facoltà di modicare il manuale in qualsiasi momento senza preavviso.
44
Page 45
II. Prolo del telefono cellulare
Di seguito l’immagine del telefono:
45
Page 46
III. Preparazione
Inserimento della scheda SIM
E’ possibile usufruire di due differenti numeri offerti da due operatori diversi e ottenere due diverse schede SIM
(schede di identicazione utente).
Con entrambe le schede SIM, è possibile utilizzare le diverse funzioni del cellulare. Molti parametri richiesti per le
comunicazioni sono memorizzati nelle schede SIM. Dati personali, incluso il codice PIN (numero di identicazione
personale), rubrica, SMS e altri servizi extra possono inoltre essere salvati nelle schede SIM.
Attenzione:Non grafare o piegare la scheda SIM e non esporla a fonti di elettricità, getti d’aria o d’acqua. Se si
perde la scheda SIM, si prega di contattare il proprio operatore di rete.
Per l’installazione delle schede SIM, spegnere per prima cosa il telefono, rimuovere il coperchio posteriore e la
batteria nella parte posteriore del telefono, quindi inserire le schede SIM negli appositi alloggiamenti.
Si prega di installare le schede SIM come mostrato nell’immagine seguente:
Nota: La scheda SIM è un oggetto di piccole
dimensioni, si prega di tenerlo al di fuori
dalla portata dei bambini per evitare che
venga ingerita accidentalmente!
46
Page 47
Inserimento della Scheda Memoria
Il telefono supporta una scheda T-FLASH per poter espandere la memoria. Si prega di installare o estrarre la
scheda di memoria come mostrato nell’immagine successiva dopo aver spento il telefono.
Nota: la scheda T-FLASH è un oggetto di piccole dimensioni, si prega di tenerlo al di fuori dalla portata dei bambini
per evitare che venga ingerita accidentalmente!
Suggerimento: Il telefono supporta una scheda di memoria con una capacità massima di 2GB. E’ raccomandato
l’utilizzo di schede TF di marchi conosciuti quali SanDisk e Kingston. Altre tipologie di schede potrebbero non
essere compatibili con il telefono.
47
Page 48
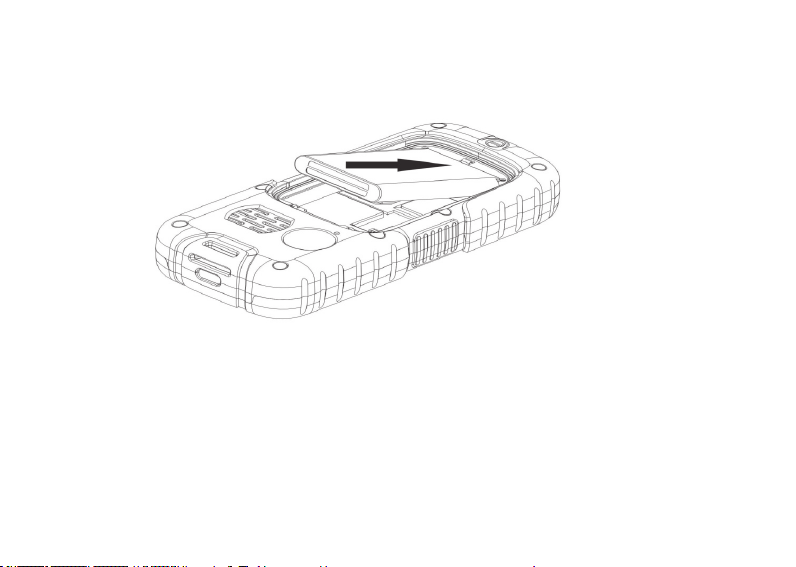
Inserimento della batteria
Si prega di utilizzare il pacchetto di accessori e batteria originali. Conservare nel miglior modo possibile la batteria
nel caso non venga utilizzata.
Si prega di installare la batteria a telefono spento.
Nota:Si prega di seguire le procedure corrette come mostrato nell’immagine precedente per evitare danni ai punti
di contatto della batteria.
Caricare la batteria
La batteria nuova deve essere caricata e scaricata completamente per più volte per ottenere le migliori prestazioni.
Caricare al più presto possibile quando viene utilizzato no al completo esaurimento poiché la batteria potrebbe
danneggiarsi.
Disconnettere il carica batteria e successivamente staccare il telefono dalla spina quando la batteria è
completamente carica.
Connettere il telefono al carica batteria come mostrato nell’immagine seguente:
48
Page 49
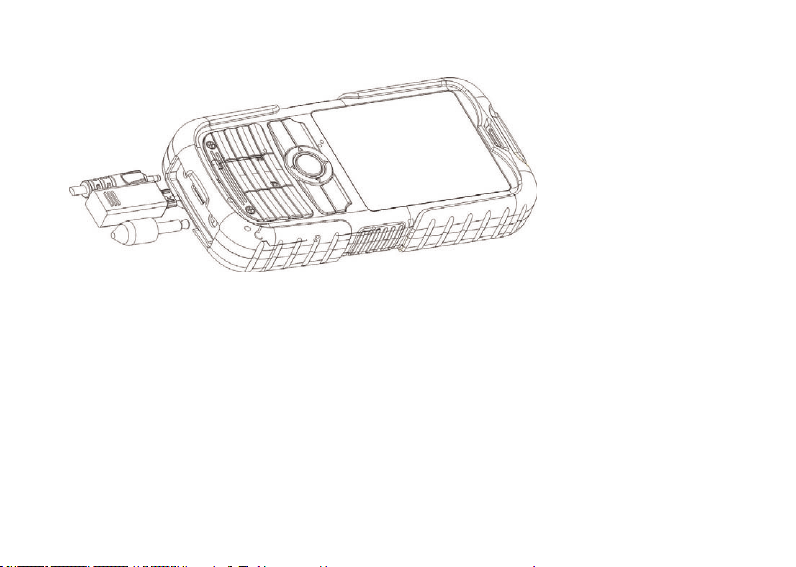
Durante la ricarica, se il cellulare è acceso, l’icona della batteria in alto a destra dello schermo inizierà a
lampeggiare e si fermerà a ricarica terminata, l’immagine della batteria si riempirà a ricarica ultimata. Durante la
ricarica, se il telefono è spento, un’icona apparirà sullo schermo per indicare che la batteria è in fase di ricarica.
Nota:Un lieve surriscaldamento può vericarsi durante la carica.
Utilizzo della batteria:
Le prestazioni della batteria sono condizionate da molteplici fattori compreso il caricamento della congurazione
della rete wireless, l’intensità del segnale e la temperatura quando si utilizza il telefono, la funzione o l’impostazione
selezionata, gli accessori utilizzati per il telefono ed altri programmi in funzione.
Per ottimizzare le prestazioni della batteria, si prega di seguire le seguenti regole:
49
Page 50

• Una batteria nuova oppure una batteria inutilizzata da molto tempo necessiterà di una lunga ricarica;
• Durante la ricarica si prega di mantenere la stessa temperatura della stanza in cui si trova il telefono oppure una
temperatura similare;
• E’ normale che una batteria utilizzata per un lungo periodo necessiti di un periodo di tempo di ricarica più lungo.
Se la batteria si scarica troppo velocemente, sarebbe opportuno sostituirla con una batteria originale fornita dal
produttore oppure da un rivenditore autorizzato dalla nostra società. Batterie non qualicate o accessori non
raccomandati potrebbero danneggiare il telefono ed essere causa di pericolo!
• Se una batteria non viene utilizzata per un lungo periodo oppure è quasi completamente scarica, è possibile che
l’icona di ricarica non appaia immediatamente sullo schermo, bisognerà attendere un pò.
Nota: Per la propria sicurezza e per quella dell’ambiente, si prega di non gettare indiscriminatamente la batteria.
Attenzione: Esplosioni, fuoco o incuria personale potrebbero danneggiare il telefono o creare un cortocircuito!
PIN
Codice PIN1: Il codice di identicazione personale è utilizzato per la scheda SIM per evitare che altre persone
possano utilizzare la vostra scheda SIM senza autorizzazione. Se il codice PIN1 è a salvaguarda della scheda
SIM1/2,quando si accenderà il telefono, il sistema richiederà “Inserire PIN scheda SIM1/2”. Durante l’inserimento
apparirà * al posto delle cifre mentre queste vengono inserite per la composizione del codice PIN1. E’ possibile
ottenere il PIN1 dal proprio operatore di rete assieme alla scheda SIM.
PIN2: E’ il numero di identicazione personale utilizzato per funzioni speciali come la funzione di carica assegnata
dalla rete.
PUK e PUK2 (8 cifre)
Un codice PUK viene richiesto per cambiare il codice PIN. Per cambiare il PIN2, è necessario utilizzare il PUK2
(codice di sblocco personale). Se il codice PUK non è stato fornito insieme alla scheda SIM, si prega di chiedere
informazioni al proprio operatore di rete.
(Attenzione) Se il codice PIN viene inserito in modo errato per tre volte consecutive, la scheda SIM verrà bloccata.
Si prega di consultare il proprio operatore di rete per procedere allo sbloccamento. Uno tentativo di sblocco non
corretto potrebbe bloccare denitivamente la scheda SIM
IV: Descrizione del Cellulare
Tasti di dialogo
50
Page 51
Effettuare o riutare una chiamata dalla SIM1. In modalità di standby, premendo brevemente il tasto dialogo, vi
consentirà di entrare nell’opzione di chiamata della SIM1.
Tasto di risposta e tasto on/off
Rispondi o riuta una chiamata.
Tenere premuto il tasto per spegnere il telefono nello stato standby.
Tenere premuto il tasto per accendere il cellulare quando questo è spento.
Tasti direzionali
Muovere la barra o il cursore.
Inserire i tasti selezionati in modalità di stato standby.
Tasto OK
Conferma un’operazione nel menu.
Tasti alfanumerici
Inserire numeri o caratteri.
In modalità di standby premere più a lungo i tasti da 1 a 9 per effettuare una chiamata rapida. In modalità di
standby premere più a lungo il tasto # per inserire lo stato muto e per eliminarlo.
Premere brevemente o più a lungo il tasto * per inserire “P”, “+” o “W” sulla schermata di chiamata
Icone dello schermo nella modalità di standby
Antenna SIM1
Antenna SIM2
Sveglia attiva
SIM card 1 SMS
SIM card 2 SMS
SIM card 1 MMS
SIM card 2 MMS
Batteria
Suoneria
Vibra poi suona
Vibra e suona
Vibrazione
Chiamate perse nella SIM1
Chiamate perse nella SIM2
SIM card 1 GPRS
SIM card 2 GPRS
Deviazione di chiamata attivata per la SIM1
Deviazione di chiamata attivata per la SIM2
51
Page 52

Lingua e metodo di inserimento
Il metodo di inserimento caratteri Inglese è fornito nel telefono. Per ulteriori dettagli, si prega di fare riferimento ai
capitoli relativi alla lingua, dove è possibile imparare diversi metodi di inserimento e come districarsi tra questi.
Metodo di avviso per le chiamate in entrata
Il meccanismo di vibrazione e il cicalino forniti nel telefono offrono le seguenti modalità di avviso:
Suona
Vibra
Vibra e suona
Vibra poi suona
Descrizione delle funzioni
• Effettuare una chiamata nazionale
Il metodo più veloce per effettuare una chiamata nazionale è inserire un numero telefonico con i tasti numerici
e premere il tasto di chiamata. Se entrambe le schede SIM sono inserite ed il sistema Dual è attivato, occorre
selezionare la chiamate se dalla SIM1 o dalla SIM2 digitando i tasti dialogo della SIM1 o della SIM2.
Nota: Per consentire la funzione di dialogo LSK nel menu digitare “Centro di chiamata/ Impostazioni generali di
chiamata/ impostazioni di chiamata SIM2”. Successivamente sarà possibile chiamare dalla SIM1 digitando il tasto
di chiamata, e chiamare dalla SIM2 digitando LSK.
Lo schermo mostra l’animazione della chiamata. Se si chiama dalla SIM1, lo schermo mostrerà “Chiamata SIM1”, e
se si sta chiamando dalla scheda SIM2, lo schermo mostrerà “Chiamata SIM2”.
Lo stato della chiamata verrà mostrato sullo schermo quando si risponderà.
Premere il tasto riattacca per terminare la chiamata.
Per effettuare chiamate nazionali: Presso + numero telefonico + tasto di chiamata.
• Effettuare una chiamata internazionale
Per effettuare una chiamata internazionale, tenere premuto o ripetutamente per breve tempo il tasto * no
all’apparizione del simbolo “+” sullo schermo. Questo consente di effettuare una chiamata internazionale senza
essere a conoscenza del presso dello Stato che si desidera chiamare (esempio: Cina è +86). Successivamente
inserire il presso di zona seguito dal numero telefonico completo. I codici dei paesi sono convenzionati, esempio:
Germania 49, Gran Bretagna 44 e Svezia 46, etc.
Effettuare chiamate internazionali: codice del paese + presso di zona + numero telefonico + tasto di chiamata.
• Chiamata estesa ad un numero sso
Le estensioni di alcuni numeri ssi non sono accessibili direttamente, in alcuni casi, è necessario chiamare il
52
Page 53

numero ospite e successivamente il numero per l’estensione. Inserire semplicemente la lettera “P” tra il numero
ospite e l’estensione numerica e sarà così possibile chiamare. E’ possibile inserire la lettera “P” digitando a lungo o
brevemente per più volte consecutive il tasto *.
L’estensione della chiamata ad un numero sso: numero telefonico + P + estensione numerica + tasto di chiamata.
• Effettuare chiamate di emergenza
In qualsiasi paese dove venga utilizzato il servizio GSM, è possibile effettuare una chiamata d’emergenza se il
cellulare ha copertura di rete (è possibile conoscere lo stato del segnale rete guardando l’indicatore posizionato
sulla parte alta dello schermo del telefono). Se il proprio operatore di rete non è provvisto del servizio roaming in
quell’area, lo schermo mostrerà “SOLO CHIAMATE DI EMERGENZA”, facendo presente che è possibile effettuare
solo quel tipo di telefonate. Se è presente la copertura di rete, sarà possibile effettuare una chiamata di emergenza
anche se la scheda SIM non è inserita.
In alcune aree, il servizio 112 (chiamata di emergenza) è fornito dall’operatore di rete. Se dovesse presentarsi
qualcosa di anomalo, contattare il proprio operatore di rete!
• IMEI
Strumento di identicazione mobile internazionale. E’ possibile osservare l’etichetta del codice a barre stampata
con questo numero nella parte posteriore del telefono dopo averlo spento e aver estratto la batteria. Questo
numero è anche salvato nel cellulare, e può essere visualizzato inserendo “*#06#” sull’interfaccia di dialogo
presente sullo schermo.
V. Operazioni base del telefono
Accensione
Tenere premuto il tasto “ON/OFF” no all’accensione del telefono cellulare. Se non sono state inserite password
per la scheda SIM e per il telefono, il cellulare ricercherà automaticamente la rete, e quando il cellulare registrerà
una rete, il nome della rete del fornitore verrà mostrato sullo schermo. Sarà quindi possibile rispondere o effettuare
una chiamata.
Se il display indica “Inserire scheda SIM1” oppure “Inserire scheda SIM2” dopo l’accensione, si prega di spegnere il
cellulare e controllare se la scheda SIM sia stata inserita, o vericare che sia stata inserita correttamente.
Dopo l’inserimento della scheda SIM, il telefono controllerà automaticamente la compatibilità della scheda SIM,
successivamente sul display possono apparire le seguenti richieste:
1) “Inserire password sblocco telefono” ―― se si è attivato il blocco (la password preimpostata è 1122).
2) “Inserire PIN della scheda SIM1/2” ―― se si è attivato il blocco della SIM1/2.
53
Page 54

3) “Nessun servizio” ―― rappresenta la mancanza di rete, non sarà possibile effettuare chiamate in quel
momento.
4) “Chiamata di emergenza” ―― consente di chiamare il 112.
5) “Ricerca” ―― il telefono sta ricercando la rete, no a che non riuscirà a trovare una rete utilizzabile.
6) Lo schermo mostra il nome dell’operatore di rete – questo signica che la rete è stata registrata con successo.
Se è stata inserita solamente la scheda SIM1 e la modalità corrente è impostata su “Solo scheda SIM1”, lo
schermo mostrerà il nome del fornitore della scheda SIM1 e che la “scheda SIM2 è inattiva”; se è stata installata
solamente la scheda SIM2, lo schermo mostrerà l’informazione opposta. Se è stata installata solamente la scheda
SIM1 e la modalità corrente è “due schede attive”, lo schermo mostrerà solamente il nome del fornitore della
scheda SIM1 e “Si prega di inserire la scheda SIM2”; se è stata inserita solamente la scheda SIM2, lo schermo
mostrerà l’informazione opposta.
Spegnimento
Se si desidera spegnere il cellulare, si prega di tenere premuto il tasto ON/OFF, e successivamente il display
mostrerà l’icona di spegnimento, il cellulare si spegnerà. Si prega di non spegnere il cellulare togliendo la batteria,
nel caso dovesse succedere, vi è la possibilità che la scheda SIM rimanga danneggiata con la possibilità della
perdita di informazioni in essa contanute.
Effettuare una chiamata
• Digitare il numero telefonico nello stato standby e premere sul tasto di chiamata per telefonare. Se si desidera
riagganciare o cancellare la chiamata, premere sul tasto di riaggancio/cancella. Quando sul telefono è impostata la
funzione, è possibile visionare la durata della chiamata sullo schermo.
• Utilizzare la rubrica per effettuare una chiamata: Selezionare il nome/numero salvato nella rubrica, premere il
tasto di chiamata per telefonare.
• Richiamare l’ultimo numero chiamato: Premere il tasto di chiamata nello stato standby per ricercare l’ultimo
numero o nome chiamato. Selezionale il numero o il nome e successivamente premere il tasto di chiamata.
Ricevere una chiamata
Quando si riceve una chiamata, il telefono squillerà, vibrerà, vibrerà e squillerà, squillerà e dopo vibrerà, oppure si
illuminerà a secondo di come è stato impostato il telefono.
Per rispondere ad una chiamata, premere il tasto di chiamata.
Per riutare una chiamata, premere il tasto di accensione/spegnimento.
Se è stato attivato il servizio di identicazione del numero chiamante, il numero verrà mostrato sullo schermo.
Se il numero è stato salvato nella rubrica telefonica, il nome corrispondente al numero in questione verrà mostrato
54
Page 55

sullo schermo.
Se la chiamata è diretta alla SIM1, “Chiamata verso SIM1” apparirà davanti al numero o al nome.
Se la chiamata è diretta alla SIM2, “Chiamata verso SIM2” apparirà davanti al numero o al nome.
Chiamata rapida
Il telefono supporta 8 tasti rapidi, ed è possibile denire i numeri telefonici corrispondenti a questi tasti. Premendo
prolungatamente i tasti [da 2 a 9] nella modalità standby, si potranno chiamare i numeri corrispondenti in modo
rapido; il tasto [1] è solitamente utilizzato per la chiamata rapida al numero di casella vocale.
(Nota):Per effettuare una chiamata rapida, è necessario tenere premuto un tasto per 2 secondi o più, se non
è stato impostato alcun numero di chiamata rapida corrispondente al tasto, nessuna chiamata potrà essere
effettuata.
Invio segnale DTMF
Quando si è impostata la funzione di invio del segnale DTMF, premendo il tasto designato + * + # sulla tastiera
durante una conversazione, verrà inviata alle altre parti un segnale in formato DTMF. Se la funzione non è stata
impostata, non sarà possibile effettuare l’estensione al numero chiamato.
Chiamata in attesa
Se l’opzione di chiamata in attesa è stata attivata, le seguenti funzioni del menu appariranno quando verrà premuto
il tasto durante una conversazione:
• Trattenere: Sospende temporaneamente la conversazione in corso, ma il canale di conversazione rimane attivo.
• Termina: Termina la conversazione in corso.
• Nuova conversazione: Entra nell’interfaccia di dialogo, ed effettua un’altra chiamata.
• Rubrica: Accedere alla rubrica telefonica.
• Informazione: Accedere all’elenco dei messaggi.
• Registra: Registrare i contenuti della chiamata.
• Tono di sottofondo: Abilita oppure disabilita il tono di sottofondo.
• Muto/riprendi: Attivare/disattivare il microfono.
• Tono-Dual multi frequenza, DTMF: E’possibile impostarlo per inviare un segnale DTMF.
(Nota): Alcune voci del menu appaiono sotto una specica condizione, oppure necessitano di un supporto dalla
rete locale, come: “Trattieni” e “Nuova conversazione”, etc., per dettagli, si prega di consultare il fornitore di rete.
Evento non riscontrato
Quando il telefono ha un messaggio non letto oppure una chiamata senza risposta etc., il telefono mostrerà
l’immagine dell’icona corrispondente, per poter ricercare questi messaggi.
55
Page 56

Connessione alla casella di posta vocale
Il telefono consente di deviare le chiamate alla casella di posta vocale, successivamente, si riceverà un
messaggio di notica riguardante i messaggi vocali (il numero del centro messaggi dovrebbe essere impostato
antecedentemente).
VI. Funzioni operative del menu
1 Messaggi
La funzione SMS è un servizio di rete. E’ possibile che sia necessario richiedere l’abilitazione del servizio al vostro
operatore di rete per poter inviare e ricevere messaggi.
Il cellulare supporta la funzione di invio messaggi. I messaggi vengono inviati prima al centro di rete SMS e
successivamente ai destinatari. Se il destinatario non accende il cellulare o non può ricevere il messaggio
(memoria piena), la rete tratterrà momentaneamente il messaggio. Il periodo di trattenimento terminerà inviando
congiuntamente il messaggio al destinatario e all’operatore di rete.
Utilizzando il servizio SMS, il telefono può inviare e ricevere messaggi lunghi. Invio di messaggi lunghi potrebbe
comportare l’addebito degli stessi. Per dettagli, si prega di contattare il proprio operatore di rete.
Quando la memoria dei messaggi è piena, un’icona lampeggerà sullo schermo. Il cellulare supporta il sistema
Dual SIM quindi i messaggi vengono salvati separatamente nella SIM1 o nella SIM2. Il promemoria dello stato
di memoria della SIM1 e della SIM2 verrà dato separatamente. In alcuni casi, è necessario cancellare alcuni
messaggi dalla lista nella memoria corrispondente alla SIM in cui un nuovo messaggio viene ricevuto.
Nota: Quando si invia un messaggio attraverso la rete SMS, “Messaggio inviato” apparirà sul display. Questo
signica che il telefono ha inviato il messaggio al centro messaggi impostato sul telefono. Ma ciò non signica che
il destinatario abbia ricevuto il messaggio. Per ulteriori informazioni circa il servizio SMS, si prega di contattare il
proprio operatore di rete.
1.1 Scrivere messaggi
Con questo menu è possibile procedere alla compilazione di un messaggio.
Il telefono supporta l’invio di messaggi composti da 70 caratteri (la restrizione dei caratteri è quella comune ai
messaggi di testo). Se un messaggio supera i 70 caratteri, verrà diviso in due o più messaggi ed inviato.
Le seguenti opzioni del menu rappresentano le funzioni fornite utilizzando il tasto sinistro del telefono quando si sta
scrivendo un messaggio:
• Invia a:
56
Page 57

Inserire il destinatario
Aggiungere dalla rubrica
• Inserire un simbolo: E’ possibile inserire alcuni simboli di uso comune.
• Inserire metodo: Per selezionare il metodo di inserimento caratteri per la compilazione di un messaggio.
• Aggiungere immagine: Per inserire un’immagine nel messaggio.
• Aggiungere suono: Per inserire un le audio nel messaggio dal telefono o dalla memory card.
• Aggiungere video: Per inserire un le video dai messaggi multimediali.
• Aggiungere soggetto: E’ possibile aggiungere un soggetto per il messaggio corrente.
• Opzioni diapositive:
• Aggiungere una diapositiva successiva: Per inserire una nuova diapositiva dopo quella corrente.
• Aggiungere diapositiva antecedente: Per inserire una nuova diapositiva prima di quella corrente.
• Passare agli MMS
• Inoltro:
1. Inserire modello di testo: Selezionare le frasi utilizzate con maggior frequenza dai modelli ed inserire nel
messaggio modello.
2. Inserire accessori: Inserire suonerie, immagini e animazioni.
3. Inserire un numero nei contatti: Entrare nei contatti ed inserire un numero.
4. Inserire un nome nei contatto: Entrare nei contatti ed inserire un nome.
5. Inserire un segnalibro: Entrare nell’interfaccia del segnalibro, inserire un segnalibro.
• Salva: E’ possibile salvare il messaggio corrente nelle Bozze oppure come un modello.
• Dettagli: E’ possibile controllare i dettagli del messaggio.
1.2 Messaggi ricevuti
I messaggi ricevuti sono salvati nella casella dei messaggi ricevuti. E’ possibile visualizzare tutti i messaggi ricevuti
nella casella dei messaggi ricevuti. I messaggi della SIM1/2 sono salvati separatamente. E’ possibile effettuare le
seguenti operazioni:
• Visualizza: Visualizzare i contenuti dei messaggi.
• Rispondi: Rispondere ad un messaggio ricevuto.
• Chiama destinatario: Chiamare il destinatario.
• Inoltra: Inoltrare il messaggio corrente ad un altro destinatario.
• Cancella: Cancellare il messaggio corrente.
• Cancella tutto: Cancellare tutti i messaggi.
57
Page 58

• Sposta nell’archivio: Spostare il messaggio corrente nell’archivio.
• Filtra da: Scegliere di visualizzare l’SMS dalla SIM1 o dalla SIM2 oppure tutti i messaggi.
• Segna come non letto: Segnare il messaggio corrente come non letto.
• Opzioni avanzate
1. Copia nel telefono: Copiare il messaggio corrente sul telefono.
2. Sposta sul telefono: E’ possibile spostare il messaggio corrente sulla memoria del telefono.
3. Copia tutto: Copiare i messaggi tra il telefono e la SIM.
4. Sposta tutto: Spostare i messaggi tra il telefono e la scheda SIM
1.3 Bozze
Selezionare “Salva” quando si invia un messaggio, successivamente il messaggio verrà salvato nelle bozze. Un
messaggio anche se non inviato verrà salvato nelle bozze, e le relative opzioni possono essere implementate.
1.4 Messaggi in uscita
Se non si riesce ad inviare un messaggio questo verrà salvato nei Messaggi in uscita.
1.5 Messaggi inviati
I messaggi che sono stati inviati con successo sono salvati nella casella dei messaggi inviati, ed è possibile
utilizzare le relative operazioni dei messaggi.
• Visualizza: Visualizza il contenuto del messaggio.
• Inoltra: Inoltrare il messaggio corrente ad altri destinatari.
• Cancella: Cancellare il messaggio corrente.
• Cancella tutto: Cancellare tutti i messaggi dalla casella dei messaggi inviati.
• Contrassegnare: E’ possibile contrassegnare più messaggi, e quindi modicarli con la stessa operazione.
1.6 Archivio
Si possono implementare le operazioni relative ai messaggi spostati nell’archivio.
1.7 Cancella messaggi
E’ possibile cancellare tutti i messaggi dai Messaggi ricevuti, dalle Bozze, dai Messaggi in uscita, dai Messaggi
inviati e dall’Archivio.
1.8 Messaggi di broadcast
E’ un servizio fornito dal proprio operatore di rete per inviare messaggi come le previsioni del tempo, lo stato del
trafco, ecc. a tutti gli abbonati GSM in una specica area.
Nota: La realizzazione di questa funzione necessita il supporto della rete. Per ulteriori dettagli, si prega di
contattare l’operatore di rete.
58
Page 59

- Modalità di ricezione: Abilita/Disabilita il messaggio broadcast.
- Leggi messaggio: Quando il servizio è stato abilitato, il messaggio ricevuto può essere letto dopo che il server
corrispondente è stato a sua volta abilitato.
- Lingua: Abilita/Disabilita tutte le lingue dei messaggi ricevuti.
- Impostazione del canale: Per selezionare, aggiungere, modicare oppure cancellare i numeri.
1.9 Modelli
Include i modelli di SMS e MMS.
1.10 Impostazione dei messaggi
1.10.1 Messaggio di testo
1.10.1.1 Impostazione messaggio della scheda SIM 1/2:
In questo menu è possibile impostare alcuni parametri dei messaggi. Parte delle impostazioni per la SIM 1/2 sono
rese separatamente.
- Impostazione prolo: Per impostare il nome di un prolo, numero del centro SMS, periodo di validità del
messaggio, e tipologia del messaggio. Per inviare un messaggio, il numero del centro messaggi deve essere
fornito.
Nota: Il numero del centro SMS è fornito dal proprio operatore di rete. Per ulteriori dettagli, si prega di contattare il
proprio operatore di rete.
- Server Casella Vocale
Il server della Casella Vocale è un servizio di rete. Per questo servizio è possibile che sia richiesto un previo
pagamento. Per ulteriori dettagli si prega di contattare il proprio operatore di rete.
Server casella vocale SIM 1/2:
• Chiamare casella vocale: Per chiamare il numero del server della casella vocale salvato nel numero di lista della
casella vocale.
• Modica: Per modicare il nome della casella vocale ed il numero del server. Digitare OK per salvare il numero.
Consiglio: In modalità di standby, è possibile chiamare il numero di casella vocale tenendo premuto il tasto “1” dopo
aver impostato il numero della casella vocale.
- Impostazioni Comuni: Abilita o Disabilita il rapporto di consegna e la directory delle risposte.
• Rapporto di consegna: La rete informa sul rapporto e sul tempo di ricezione se il destinatario ha ricevuto il
messaggio.
• Percorso di risposta: Per trasferire il percorso della risposta al terminale di rete. Questa funzione richiede il
supporto del centro messaggi.
59
Page 60

• Salvataggio dei messaggi inviati: Imposta il messaggio salvato nella casella dei Messaggi inviati.
- Stato della memoria: Controlla lo spazio della memoria utilizzato nella scheda SIM o nel telefono.
- Memoria preferita: Designa la directory per il salvataggio dei messaggi (schede SIM o telefono).
1.10.1.2 Messaggi sbarrati: Abilitare o disabilitare la funzione lista nera. Si può memorizzare un numero nella lista
nera. Quando questa funzione è abilitata, il vostro telefono riuterà i messaggi provenienti da questo numero.
1.10.2 Messaggi multimediali
In questo menu è possibile impostare i parametri per gli MMS o visualizzare lo stato della memoria. Per
informazioni più dettagliate sui parametri degli MMS, si prega di contattare il proprio operatore di rete.
Proli: Imposta il prolo corrente.
Impostazioni comuni:
Composizione:
- Tempo di scorrimento: Imposta il tempo di azione per ogni pagina.
- Modalità di composizione: Seleziona la modalità di composizione.
- Ridimensionamento immagine: Abilita o Disabilita il ridimensionamento dell’immagine.
- Firma automatica: Abilita o Disabilita la rma automatica.
- Firma: Inserisce la rma.
Invio:
- Periodo di validità: Imposta il periodo di validità del messaggio nel Centro Messaggi.
- Rapporto di consegna: Abilita/Disabilita il rapporto di consegna.
- Leggi rapporto: Abilita/Disabilita la lettura del rapporto.
- Priorità: Imposta la priorità con cui inviare i messaggi multimediali.
- Tempo di consegna:Imposta il periodo di memorizzazione del messaggio nel Centro Messaggi. Questa
impostazione dipende dal proprio operatore di rete e dall’impostazione personale.
Recupera:
- Rete domestica: Immediato, riuta, postponi.
- Roaming: Con la stessa rete principale, postponi, riuta.
- Filtro: Imposta “Mittente anonimo” e “Pubblico” per consentire il ritorno dei messaggi.
- Leggi rapporto: Inviare, non inviare, informare.
- Rapporto di consegna: Abilita/Disabilita il rapporto di consegna.
Stato della memoria: E’ possibile controllare la percentuale di spazio utilizzato e non utilizzato nella memoria del
telefono.
60
Page 61

2 Rubrica
Ogni contatto salvato nel telefono contiene le seguenti utili informazioni: tre numeri telefonici (numero di cellulare,
numero di casa e numero dell’ufcio), nome della società, Email, numero di fax, compleanno, foto, suoneria,
collegamento video e gruppo (fornisce cinque modalità: famiglia, amici, importante, colleghi e altri); ogni contatto
salvato nella scheda SIM contiene solamente il nome ed il numero telefonico.
E’ possibile inserire al massimo 1000 contatti tra quelli salvati nel telefono, il volume dei Contatti salvati nella
scheda SIM dipende dalla stessa scheda.
2.2 Redigere
Si può cancellare, copiare e spostare tutti i contatti nella rubrica.
2.3 Chiamata di gruppo
E possibile modicare il gruppo chiamate ed il suo contenuto come suoneria del chiamante, immagine del
chiamante e video del chiamante.
2.4 Impostazioni rubrica
- Archiviazione preferita: Per selezionare la directory di archiviazione del numero corrente.
- Selezione rapida: Per attivare la funzione di chiamata rapida e modicare il corrispondente numero di selezione
rapida. Se il selettore di velocità è su “attivo” Si può premendo a lungo il tasto corrispondente (2-9) comporre il
numero designato al tasto attraverso l’interfaccia di attesa.
- Il mio numero: Per implementare le operazioni di modica ed invio.
- Numeri extra: Per visualizzare e modicare il proprio numero
- Stato della memoria: Per visualizzare lo stato di servizio d’archiviazione della rubrica.
3 Centro chiamate
Storico delle chiamate
SIM card 1/2 registrazione chiamate, include:
- Chiamate effettuate: Per visionare la lista delle chiamate da voi effettuate o non riuscite.
- Chiamate ricevute: Per visionare la lista delle ultime 20 chiamate ricevute (richiede il supporto dell’operatore di
rete).
- Chiamate perse: Per visionare la lista delle chiamate perse ( richiede il supporto dell’operatore di rete).
Opzioni
- Eliminare il registro delle chiamate: Per eliminare lo storico delle chiamate. Si può selezionare l’eliminazione
di tutti i numeri dello storico di chiamate, o eliminare solamente i numeri dalla lista chiamate perse, chiamate
61
Page 62

effettuate o chiamate risposte.
- Timer di chiamata:
Ultima chiamata: Per visualizzare la durata dell’ultima chiamata.
Chiamate effettuate: Per visualizzare la durata di tutte le chiamate effettuate.
Chiamate ricevute: Per visionare la durata di tutte le chiamate risposte.
Azzerare tutte: Azzerare la durata di tutte le chiamate.
Nota: La chiamata ed il tempo reale di servizio dei costi del gestore di servizi può variare. Dipende da fattori quale
la funzione di rete, contabilità e tasse. Per ulteriori informazioni, contattare il proprio operatore di rete.
- Costo delle chiamate: Richiede il supporto dell’operatore di rete.
Costo dell’ultima chiamata:Per visionare il costo dell’ultima chiamata.
Costo totale: Per visionare il costo totale di tutte le chiamate.
Azzerate costi: Per azzerare i costi di tutte le chiamate. (Inserire il PIN2 per questa funzione.)
Costi massimi: Per limitare i costi entro quantità specicate di unità prezzi o unità monetaria. Il PIN2 è necessario
per impostare il costo della chiamata.
Prezzo per unità: Questa funzione è supportata dall’operatore di rete. Per dettagli, contattare il vostro operatore di
rete.
- Contatore di testo MSG: Per visionare la quantità registrata di messaggi inviati e ricevuti.
- Contatore GPRS:
Ultimo inviato: Per visualizzare il volume di dati inviati nell’ultimo collegamento.
Ultimo ricevuto: Per visualizzare il volume di dati ricevuti nell’ultimo collegamento.
Tutti gli inviati: Per visualizzare il volume di dati inviati di tutti i collegamenti.
Tutti i ricevuti: Per visualizzare il volume di dati ricevuti di tutti i collegamenti.
Azzerare il contatore: Per azzerare il contatore GPRS.
4 Impostazioni
4.1 Impostazioni generali
4.1.1 Proli utente:
Vari proli sono disponibili per il telefono. Personalizzare il telefono in base alle proprie preferenze, e quindi
avviare il prolo desiderato. I proli disponibili sono: Normale, Riunione, Esterno, Interno, Auricolare. Bluetooth e
salvataggio.
Nota: Il telefono passa automaticamente alla modalità auricolare quando l’auricolare è inserito, e si ripristina
62
Page 63

alla modalità precedente quando l’auricolare viene disinserito. Il telefono passa automaticamente alla modalità
Bluetooth quando il Bluetooth è connesso, e si ripristina alla modalità precedente quando l’apparecchio non
è connesso. Premere a lungo il tasto “#” quando il telefono è in standby per accendere il telefono cellulare in
modalità Muto. Premendo a lungo nuovamente si ripristinerà il modo precedente.
4.1.2 Impostazioni telefono:
4.1.2.1 Commuttatore Dual SIM: Impostare la commutazione di modalità Dual Sim.
4.1.2.2 Impostazioni Dual SIM:
Attivazione Dual SIM: Attivare scheda 1 e scheda 2
Attivazione solo SIM1: Attivare scheda 1
Attivazione solo SIM2 : Attivare scheda 2
Modalità aerea: Attivare la modalità aerea
4.1.2.3 Ora e data: Inserire l’ora , data ed il formato schermo.
• Inserimento città di residenza: Inserire la città di residenza.
Nota: Questa opzione esige l’applicazione in concomitanza con il tempo di rinnovo automatico e necessita il
supporto della rete per il funzionamento di rinnovo automatico dell’ora e della data.
• Inserimento ora/data: Inserire l’ora e data.
•Formato: Impostare il formato di visualizzazione dell’ora e data.
• Aggiornare il fuso orario:Abilitare o disabilitare l’aggiornamento del fuso orario.
Nota: E’necessario aggiornare l’ora quando la batteria è stata completamente esaurita, non utilizzata per un lungo
periodo o è stata rimossa dal telefono.
4.1.2.4 Pogrammare accensione/spegnimento: Impostare l’ora designata per l’accensione/spegnimanto.
Cautela: In aree particolari (quali aeroplani) dove è vietato l’uso del telefono, assicurarsi che il telefono sia stato
disattivato premendo sul tasto spegni per non provocare incidenti.
4.1.2.5 Lingua: Per selezionare la lingua da usare per il telefono.
4.1.2.6 Metodi preferiti di impostazione: Per impostare il metodo predenito di inserimento in accordo con le
operazioni abituali di funzionamento.
4.1.2.7 Testo di saluto:
Stato: Abilita o disabilita il testo di saluto nella schermata iniziale all’accensione del telefono.
Testo di saluto : Modicare il testo di saluto.
4.1.2.8 Tasto dedicato:
63
Page 64
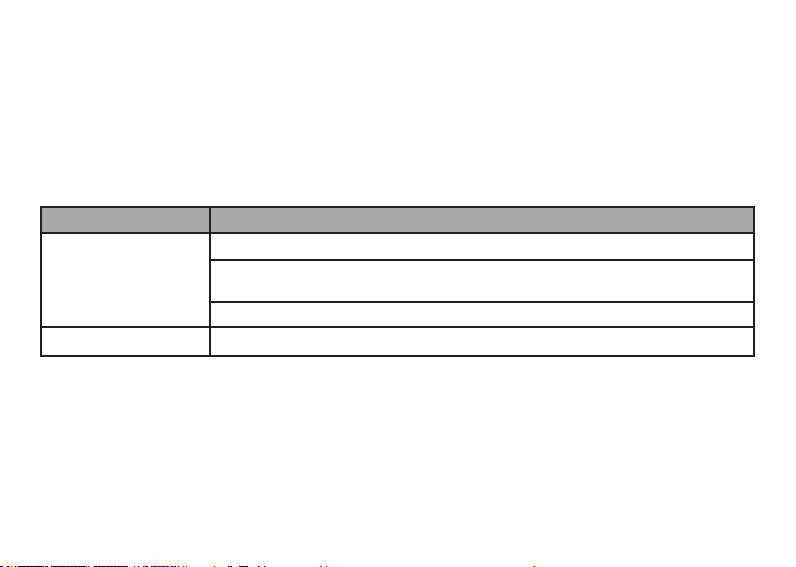
Si possono nominare le scorciatoie dei tasti di direzione. Premere un tasto per utilizzare la funzione corrispondente
nell’interfaccia stand-by.
4.1.2.9 Auto aggiornamento della data ed ora: Abilitare o disabilitare l’aggiornamento automatico della date e
dell’ora.
4.1.2.10 Impostazioni UART: SIM1 o SIM2
4.1.2.11 Misc.Impostazioni: La luminosità e tempo di visualizzazione dello schermo con retroilluminazione
possono essere impostatae.
4.1.3 Impostazioni di rete:
Carta SIM 1/2 installazione di rete
Nome Descrizione
Selezione di rete
Nuova ricerca: Per ricercare una rete.
Selezionare rete: Il telefono accetta solo la rete nominata. Quando la rete non è
attiva, il telefono non registra altre reti
Modalità di ricerca: Automatica/Manuale.
Preferiti Per selezionare le reti preferite.
4.1.4 Bluetooth
- Attivazione: Attivare/disattivare Bluetooth.
- Visibilità: Impostare la visibilità del dispositivo Bluetooth.
- Miei dispositivì:Visualizzare i modelli dei dispositivi quando connessi.
- Auto ricerca dispositivi: Visualizzare il modello del dispositivo in linea.
- Mio nome: Modicare il nome del dispositivo Bluetooth.
- Avanzate: Impostazione dei parametri quando il Bluetooth è connesso.
• Percorso audio: Impostare l’audio del telefono o dell’ auricolare.
• Memorizzazione: Impostare il percorso o la trasmissione.
• Condivisione permessa: Impostare il permesso come solo lettura e pieno controllo.
64
Page 65

• Mio indirizzo: Visualizzare le informazioni del dispositivo Bluetooth.
4.1.5 Ripristinare le impostazioni di fabbrica
E’ possibile ripristinare alcune impostazioni di fabbrica. Per ripristinare le impostazioni da fabbrica, inserire la
password. La password per difetto è “1122”.
4.2 Impostazioni del suono
Si può impostare una delle seguenti opzioni:
• Impostazione toto: Per impostare il tono per le chiamate in entrata della SIM 1 / 2, allarme, accensione (eccetto
modalità Bluetooth), spegnimento, messaggi da SIM 1 /2 e tono tasto.
• Volume: Per impostare il volume della suoneria o tono chiamata e tono tasti.
• Tipo di allarmi: Include squillo, vibrazione, vibrazione e squillo, vibrazione e poi squillo
• Tipo squillo: Per impostare il tipo di squillo, include singolo, ripetuto ed in crescendo.
• Tono Extra: Include Quattro tipi, Avviso, Errore, in campo, e connesso.
• Modalità di risposta: Si può scegliere la modalità di risposta con tasto risposta o qualsiasi tasto.
4.3 Schermo
• Sfondo schermo: Impostare l’immagine di sfondo schermo nell’interfaccia di stand-by
• Salva schermo: Imposta Standby schermo acceso/spento, ed avviare il tempo di attesa.
• Schermo attivo: Selezionare il sistema di immagine ed usare l’immagine denita per lo schermo attivo
• Schermo inattivo: Selezionare il sistema di immagine ed usare l’immagine denita per lo schermo inattivo.
• Mostrare data ed ora: Attivare/disattivare la visualizzazione della data e dell’ora
• Mostrare il proprio numero: Attivare/disattivare la visibilità del proprio numero.
4.4 Impostazioni chiamate
4.4.1 SIM1/SIM2 impostazioni chiamate:
- ID chiamante: include impostazione da rete, nascondi ID, ed invia ID.
Impostazione da rete: Il numero del telefono viene visualizzato per difetto quando una chiamata viene iniziata.
Nascondi ID: Il numero del telefono non viene mostrato quando una chiamata viene iniziata. Se il sistema non
supporta questa funzione , non si può effettuare la chiamata.
Mostra ID: Il numero del telefono viene mostrato quando una chiamate viene iniziata.
Nota: Questa funzione necessita il supporto della rete. Per ulteriori dettagli si prega di contattare il vostro operatore
di rete.
65
Page 66
- Chiamate in attesa: Imposta funzioni come attivare / disattivare l’avviso di chiamata e di ricerca, partecipare ad
una chiamata ed effettuare chiamate multiple, questa funzione dovrebbe essere attivata per prima, e il supporto di
rete è necessario per l’attuazione specica della funzione.
- Deviazioni chiamate: E’ una funzione di rete che può essere utilizzata solo quando si applica il servizio del
gestore di rete. La funzione può deviare le chiamate che soddisfano determinate condizioni che sono state
anticipatamente designate.
Nome Descrizione
Devia tutte le chiamate
La Rete devia incondizionatamente tutte le chiamate in arrivo..
vocali
Devia se non raggiungibile Devia le chiamate in arrivo quando il telefono non è raggiungibile (il telefono è
spento o fuori dalla copertura di rete)
Devia se non c’è risposta Devia la chiamata in arrivo dopo un certo periodo di tempo nel quale non vi è
risposta..
Devia se occupato Devia la chiamata in arrivo quando si ha un’altra chiamata attiva o il telefono è
occupato in un’altra operazione.
Devia tutte le chiamate dati La Rete devia le chiamate in arrivo (che richiedono il supporto di rete).
Cancella tutte le deviazioni Cancella tutte le deviazioni impostate..
- Blocco chiamate:
1 Chiamate in uscita
Tutte le chiamate: Per limitare tutte le chiamate in uscita.
Chiamate internazionali: Per limitare le chiamate internazionali in uscita.
Chiamate internazionali eccetto verso casa PLMN: Mentre si è all’estero, è possibile chiamare solo i numeri del
paese (dove vi trovate) e il paese d’origine (in cui si trova anche il fornitore del servizio).
2 Chiamate in entrata:
66
Page 67

Tutte le chiamate: Per limitare tutte le chiamate in arrivo.
Durante il roaming: Per limitare tutte le chiamate in entrata, tranne i numeri dalla propria area di servizio locale.
3 Cancella tutte: Per annullare il blocco delle chiamate (la password di blocco è necessaria).
4 Cambiare la password di blocco: Applicazione della rete per il cambio password blocco chiamate.
- Commutazione di linea: Scegliere Linea 1 o Linea 2.
- Gruppo utenti chiuso: Questa funzione richiede il supporto della Rete. Consultare il proprio fornitore di Rete per
i dettagli.
4.4.2 Impostazioni avanzate
4.4.2.1 Telefonate in entrata da lista nera
- Modalità: Aprire o chiudere la lista nera o la lista rossa.
- Numeri lista nera: E’ possibile aggiungere numeri alla lista nera.
4.4.2.2 Riselezione automatica:
Per impostare la funzione di ripetizione come “Acceso o Spento”. Quando la vostra linea non riesce a chiamare, 10
tentativi disponibili di ricomposizione per provare a collegarsi con un numero di telefono.
4.4.2.3 Visualizzazione del tempo di chiamata:
Abilita o disabilita la funzione di visualizzazione del tempo di chiamata.
4.4.2.4 Promemoria tempo di chiamata: abilitare o disabilitare questa funzione. Una modalità di promemoria
singola o periodica è disponibile in questo menù.
4.4.2.5 Auto conclusione rapida: E’ possibile impostare un tempo limite di chiamata. Se questa funzione è
abilitata, il telefono si bloccherà automaticamente quando il tempo di chiamata raggiungerà il termine prestabilito.
4.4.2.6 Vibrazione: Abilitare o disabilitare questa funzione.
4.4.2.7 Rispondere ad un MSG durante una chiamata in entrata:
Abilitare questa funzione, quando ricevete una chiamata, scegliere “opzione” quindi scegliere “riutare via SMS”,
il cellulare invierà il messaggio predenito al chiamante.
4.5 Impostazioni di sicurezza:
4.5.1 SIM1/SIM2 impostazione di sicurezza
4.5.1.1 SIM 1/SIM2 blocco :Per bloccare o sbloccare SIM(PIN).
4.5.1.2 Cambiare password: Cambiare la password del PIN/PIN2 o della carta SIM 1. Il codice del PIN(PIN1) e
67
Page 68

PIN2 si può ottenere dal vostro operatore di rete.
4.5.2 Blocco telefono: Questa funzione vi permette di bloccare/sbloccare il vostro telefono. Nota: la password
preimpostata per difetto è “1122”.
4.5.3 Auto blocco tastiera: Per bloccare o sbloccare la tastiera. Il tempo di blocco tastiera può essere impostato.
4.5.4 Cambiare la Password: La password per difetto “1122” del telefono, messaggi, rubrica, registrazione
chiamate e protezione della privacy può essere modicata con una nuova password composta da 4 a 8 cifre.
4.5.5 Nascondere SIM: Abilitare o disabilitare il nascondere della SIM 1/2.
4.5.6 Protezione della privacy: Include la protezione della rubrica, messaggi e lo storico della chiamate. Se
questa funzione è attivata, il menu corrispondente o il contenuto saranno bloccati. Per accedere, inserire la
password. La password preimpostata per difetto è “1122”. Si può cambiare la password nel menu o cambiare la
password.
5. Riproduttore audio
Il sistema operativo WIN2000 non richiede l’installazione di un driver. Non è necessario spegnere il telefono
quando si scaricano brani musicali. Quando il telefono è connesso al PC, verrà mostrato USB installazione
nell’interfaccia. Premere opzioni di “Dispositivo di memorizzazione”, il PC visualizzerà il messaggio o troverà nuovi
hardware e aggiornare il disco mobile. Gli MP3 selezionati devono essere copiati nella directory “mia musica”,
diversamente non potranno essere riprodotti (Solo formati .mp3 e .amr sono supportati).
Descrizioni del lettore Audio :
• Riproduci: Riproduce il brano MP3 selezionato.
• Dettagli: Visualizza i dettagli delle informazioni dell’MP3 selezionato.
• Aggiungi alle suonerie: Aggiunge la musica selezionata all’elenco dei toni suoneria.
• Aggiorna elenco: Aggiorna la lista dei brani.
• Impostazioni: Imposta i parametri per i brani MP3.
Opzioni:
- Riprodurre: Riproduce la musica scelta.
- Dettagli: Visualizza i dettagli delle informazioni della musica scelta.
- Aggiungere alle suonerie: E’ possibile aggiungere il brano scelto all’elenco suonerie.
- Aggiorna elenco: Ricerca ed elenca i brani nel telefono.
- Impostazioni: Scegliere i dettagli dei parametri del riproduttore audio.
68
Page 69

Nota: Il vostro riproduttore audio supporta la visualizzazione di brani musicali insieme a canzoni se si attiva
l’installazione brani musicali. Assicurarsi che i brani (formato .LRC) abbiano lo stesso nome del brano
corrispondente, altrimenti il brano non potrà essere visualizzato. Se il brano scaricato ha una diversa velocità di
riproduzione con il testo, il brano musicale non sarà sincronizzato can il testo, questo non è rilevante per il lettore
audio.
1. Albums ed artisti supportano solo 500 brani.
2. E’ necessario aggiornare l’elenco musica una volta che la lista di musica preferita è cambiata.
6 Multimedia
6.1 Fotocamera
Con questa funzione è possibile utilizzare la fotocamera integrata nel telefono cellulare per scattare una foto, o
regolare le impostazioni della fotocamera. Le foto generate dalla fotocamera sono in formato JPG. Se sono state
scaricate sul PC, usare il software giusto per visualizzarle!
Quando il telefono ha uno spazio di memoria insufciente per le nuove fotograe, è necessario eliminare alcun foto
o altri le in “File Manager” nella lista delle funzioni per liberare lo spazio di memoria per le nuove foto.
- Foto: Per visualizzare una foto salvata.
- Impostazioni fotocamera: Si possono scegliere parametri speciali in questo menu, quali suono scatto, contrasto,
contro sfarfallio e cosi via.
- Impostazione immagine: Si può scegliere la dimensione e la qualità dell’immagine.
- Bilanciamento del bianco:Regolare il bilanciamento del bianco.
- Modalità scena: Installare la modalità notte come automatico o notte.
- Impostazione effetti: Impostare gli effetti speciali per le foto.
- Memorizzazione: Impostare la memorizzazione della foto directory.
- Ripristino congurazioni predenite: Ripristinare le impostazioni di fabbrica della fotocamera.
6.2 Giochi
Offre due giochi: serpente; boxman.
6.3 FM Radio
Si può ricevere il canale FM radio solo se l’auricolare è inserito.
6.4 Programmare registrazioni FM
Registrare da una fequenza audio designata all’ ora designata.
6.5 Visualizzazione immagini
69
Page 70

Le foto scattate sono memorizzate nel visualizzatore immagini.
Descrizione delle opzioni del visualizzatore immagini:
• Visualizza: Per visualizzare una foto.
• Sfogliare: Per selezionare la modalità per sfogliare le foto.
• Invia: Per inviare una foto verso l’applicazione desiderata.
• Usa come: Per usare l’immagine corrente come sfondo schermo, salva schermo, immagine di accensione/
spegnimento o immagine del chiamante.
• Rinominare: Per rinominare l’immagine o la foto selezionata.
• Eliminare: Per eliminare la foto selezionata.
• Ordinamento: Ordinamento delle foto nella modalità desiderata.
• Eliminate tutti i les: Per eliminare tutte le foto.
• Memoria: Per selezionare la memorizzazione della directory delle foto.
6.6 Riproduttore video
Supporta formati video quali 3gp etc. La seguente operazione può essere eseguita per il le video selezionato:
• Riproduci: Per riprodurre un le video.
• Invia: Per inviare un le video verso un’applicazione desiderata.
• Rinomina: Per rinominare il le video.
• Elimina: Per eliminare il le video selezionato.
• Eliminare tutti i le: Per eliminate tutti i les video.
• Ordinamento: Ordinamento dei les video nella modalità desiderata.
• Memoria: Per selezionare la memorizzazione della directory (telefono cellulare o carta memoria) per i le video.
6.7 Registratore video
Premere l’icona rossa nella parte inferiore dello schermo o premere il tasto OK per avviare o sospendere
la registrazione video. Il tempo di registrazione è limitato dalla memoria del telefono o della carta memoria.
Selezionando opzioni, è possibile effettuare le seguenti impostazioni:
• Impostazioni videocamera: Impostare i relativi parametri del registratore.
• Impostazioni video: Impostare i parametri del video da registrare.
• Bilanciamento del bianco: Impostare i parametri del bilanciamento del bianco.
• Impostazione effetti: Impostare gli effetti speciali da applicare durante la registrazione.
• Archiviazione: E’ in grado si scegliere il percorso di salvataggio del le di registrazione ( cellulare o scheda di
memoria).
70
Page 71

• Ripristina predenite: Ripristinare le impostazioni di registrazione originali predenite dal fabbricante.
6.8 Registratore suoni
Per effettuare una registrazione audio, selezionare “Registratore Audio”. Selezionare “Opzioni” per selezionare il
le di registrazione che permette di eseguire le seguenti operazioni:
6.8.1 Nuova registrazione: Effettuare una registrazione audio.
6.8.2 Lista: Elenca tutti i le di registrazione.
Riprodurre: Riprodurre il le di registrazione selezionato.
• Aggiungere: Aggiungere una registrazione al le indicato nella directory superiore. (E’ possibile aggiungere
solamente un le di registrazione in formato .AMR e .AWB).
• Rinominare: Rinominare il le di registrazione selezionato.
• Eliminare: Eliminare il le di registrazione selezionato.
• Eliminare tutti i les: Eliminare tutti i le di registrazione.
• Usa come: Usare il le corrente come prolo dell’utente
• Inviare: Inviare un le audio verso un’applicazione rilevante.
6.8.3 Impostazioni: Impostare la memorizzazione preferita ed il formato dei les di registrazione.
7 Organizzatore
7.1 File manager
Telefono: Supporta una memoria di circa 506K.
Le cartelle ed i les nella carta di memoria o nel telefono possono essere gestiti gestione modelli les.
7.2 Allarme/Sveglia
Il format dell’ora della sveglia è la stesso del format inserito nell’orologio. La sveglia funziona anche se il telefono è
spento, sempre e solo se la batteria non sia scarica. Si possono impostare segnali sonori differenti per più allarmi.
Il telefono darà il segnale di allarme quando viene raggiunta l’ora e la data prestabilita, questi verranno visualizzati
sullo schermo. Premere stop per fermare ed annullare l’allarme; premendo Sleep, l’allarme cesserà e riprenderà
all’ora prestabilita.
Nota: L’allarme telefonico è funzionante anche se il vostro telefono è stato spento.
7.3 Calendario
Con questa funzione è possibile visualizzare il calendario ed i programmi, si possono programmare con il
programmatore le pianicazioni e gli avvisi. Spostare il cursore sulla data desiderata con i tasti di direzione, la data
verrà evidenziata con luce e cornice blu. Se un appunto è stato impostato, un’icona di pianicazione apparirà in
71
Page 72

basso sullo schermo. Per visualizzare tutti gli impegni del giorno, spostare il cursore sulla data. In questo caso, le
seguenti operazioni potranno essere effettuate:
7.4 Calcolatrice
• Otto operazioni, i.e. “+”, “-”, “×”, “÷”, “m+”, “m-”, “mc”, e “mr”, sono disponibili.
• Scegliere cancella o premere il tasto destro per cancellare gli elementi inseriti. Premere a lungo cancella o
ripetutamente il tasto di funzione destro per cancellare tutto il contenuto. Premere il tasto “ok” per visualizzare il
risultato del calcolo.
Nota: La precisione di questa calcolatrice è limitata, la calcolatrice può essere usata solo per calcoli semplici.
7.5 Misuratore
Il misuratore è adatto per gli sport all’aria aperta come l’alpinismo etc.
Termometro (Unità:°C): mostra la temperature attuale, in modo da conoscere la situazione meteo così da potersi
proteggere dal maltempo. La temperatura tende a scendere quando voi salite. Quando c’è il sole il normalmente la
temperatura sale, quando piove la temperatura scende.
Barometro (Unità:Pa): mostra la pressione atmosferica, che vi permette di sapere il cambiamento meteorologico
così da potersi proteggere. Notare che la pressione cambia in funzione dell’altezza e dell’ora. Quando c’è il sole la
pressione sale, quando piove la pressione scende.
Per esempio:
A. La pressione dell’aria cambia con l’altezza
1. La pressione ai piedi della montagna è di 1013.25hPa
2. La pressione quando avete raggiunto la vetta della montagna è di 941.25hPa , Man mano che si sale la
pressione dell’aria scende di media di 12hPa per ogni 100 metri di risalita
3. Se siete à meta della scalata e la pressione è di 973.25hPa, avvertirete una difcoltà nella respirazione per
mancanza di ossigeno, è il caso di premunirsi di ossigeno per potere arrivare alla vetta.
B. La pressione dell’aria cambia a secondo dell’ora
1. Normalmente la pressione dell’aria tende a raggiungere il livello massimo verso le 10 del mattino, dopo di chè
tenderà a scendere
- Raggiungerà il minimo verso le 16 del pomeriggio, poi lentamente risalirà
- Raggiungerà nuovamente il livello Massimo alle 22 di sera, per poi ridiscendere lentamente
- Raggiungerà nuovamente il minimo alle 4 del mattino, poi lentamente risalirà
2. Se la pressione dell’aria cambia di 4hPa ma non per il fattore orario, vuol dire che il tempo meteorologico sta
cambiando, da soleggiato a nuvoloso, da nuvoloso a completamente coperto, da completamente coperto a pioggia
72
Page 73

o da leggermente coperto a soleggiato.
3. Se la pressione dell’aria cambia con più di 4hPa in poco tempo, vuol dire che il tempo cambierà bruscamente
come da soleggiato a temporale o da temporale a soleggiato. Fare molta attenzione per non correre rischi.
Altimetro (Unità: metro): l’altimetro vi mostrerà la reale altitudine per conoscere l’altitudine dal punto di partenza
e calcolare la vostra posizione.
Per esempio:
1. Quando siete ai piedi della montagna e l’altitudine è di100 metri,
2. Risalite verso la vetta della montagna raggiungendo i 700 metri
3. Saprete che la reale altitudine raggiunta è di 600 metri.
4. Se l’altitudine segnalata è di 400 metri, saprete che avete ancora 200 metri di risalita.
Le su riportate tre funzioni sono come una piccola stazione meteorologica. Consentono di conoscere la situazione
del tempo ed ottenere i dati reali.
7.6 Bussola
E’ importante calibrare la bussola per mezzo di una bussola meccanica, questo è vivamente consigliato:
1. in uno spazio all’aperto
2. libero da interferenze (come da grandi macchinari o da magneti)
3. con una distanza minima di 25 cm tra la bussola e la bussola meccanica
Ogni 20° si potranno registrare eventuali differenze nei valori
Per esempio:
1. posizionare i due apparecchi sulla stessa supercie e ritenere 0°come Nord
2. ruotare per 20° in senso anti orario
3. ritenere i dati della bussola meccanica come standard
4. controllare se i dati del test sulla bussola mostrano 20°( se la differenza tra i valori è più o meno di 5° vuol dire
che sono attendibili)
In questo modo girare per 360 gradi per ottenere 17 set di dati sulla precisione di funzionamento della bussola.
7.7 Lettore Rubrica
L’applicazione del lettore rubrica può aiutarvi nel visionare un le memorizzato nel telefono o sulla scheda di
memoria nel formato .txt.
• Aprire un’ agenda: Per aprire.
• Libera raccolta dati: Liberare la raccolta dati che si sta usando.
• Impostazioni globali: Impostare gli attributi di un’agenda.
73
Page 74

• Informazioni Agenda: Per visionare gli attributi di un testo.
• Eliminare: Per eliminare un testo.
• Eliminare tutto: Per eliminare tutti i testi.
• Ordinamento: Ordinamento di un’agenda in una cartella.
• Applicare: Per applicare un’ impostazione.
• Aiuto: Per aiutare nella descrizione di una Agenda.
7.8 Funzioni
Per creare un nuovo impegno o visionare gli impegni impostati nel programma. Si può anche visionare,
aggiungere, redigere, cancellare voci, cancellare tutto e trasferire i date dell’ agenda. Se l’avvisatore è attivato per
gli impegni, il telefono cellulare vi avviserà alla scadenza, e vi mostrerà l’impegno impostato.
7.9 Orologio mondiale
Per visionare l’ora corrispondente a zone e paesi nel mondo utilizzando i tasti di direzione.
7.10 Cronometro
Il telefono supporta un cronometro ordinario ed uno multinzionale. Si possono cronometrare i tempi, i tempi per
giro e visionare i registrati, ecc.
8 Servizi
8.1 STK
STK è un servizio aggiunto dal gestore di rete.
La visualizzazione del Menu funzioni può variare in base alle diverse schede SIM.
8.2 Servizio Internet
Questa funzione consente di acquisire o di visitare servizi diversicati su Internet tramite messaggi o rete. I servizi
possono includere intrattenimento, previsioni meteo, notizie, informazioni nanziarie, scaricare toni o suonerie,
mercato azionario e altre informazioni utili. Alcune funzioni sono fornite dal gestore di rete. Vedrete menù diversi a
seconda dei servizi forniti dalla scheda SIM. Si prega di contattare il proprio gestore di rete per ulteriori informazioni
- Pagina principale: Abilita la connessione WAP e visita la pagina principale.
- Raccolta dati: Visiona o modica la raccolta dati
- Pagine recenti: Registra gli indirizzi internet visitati di recente.
- Pagine non in linea: Visualizza le pagine web salvate.
- Immetti indirizzo: Inserisce l’indirizzo web denito dall’utente.
74
Page 75

- Servizio info ricevute: Salva i messaggi ricevuti dal telefono cellulare.
- Impostazioni: Impostare i parametri del browser WAP. Si prega di consultare il proprio gestore di rete per i
dettagli dei parametri.
• Seleziona prolo: Per selezionare il prolo da SIM 1 e SIM 2.
• Proli: per modicare ed attivare la funzione prolo.
• Opzioni del browser: per impostare il tempo di attesa e decidere se visualizzare le immagini. Visualizza l’elenco di
indirizzi e immagini selezionate che possono essere eseguite.
• Preferiti: Per impostare il timeout, visionare foto, cache e cookies.
• Impostazioni di sicurezza: Per visionare i certicati sicuri forniti dal sistema
• Impostazione dei messaggi di servizio: Attivare o disattivare.
• Ripristinare le impostazioni del browser: Ripristinare le impostazione del browser.
8.3 Dati conto:
• GSM dati—— Alcuni dati di account verranno forniti dai dati GSM
• GPRS——L’uso dei dati GSM fornisce alcune informazioni del conto
9 Divertimento & Giochi
9.1 MSN
Dopo l’accesso alla linea, è possibile utilizzare MSN come quello installato sul vostro computer sotto questo menu,
necessita il supporto della rete.
9.2 Yahoo
Dopo l’accesso alla linea, è possibile utilizzare Yahoo come quello installato sul vostro computer sotto questo
menu, necessita il supporto della rete.
VII. Istruzioni d’uso dell’editore
Il telefono offre diversi metodi di impostazioni convenienti per l’utilizzo di altre funzioni. E’possibile inserire qualsiasi
testo richiesto. Inserire impostazione funzione > impostazione telefono > metodo di impostazione predenito per
scegliere un metodo di impostazione predenita.
Impostazioni di interfaccia del tasto di funzione
Premere il tasto corrispondente in interfaccia di impostazione, per esempio di scrittura dei messaggi.
Numeri 1 a 9 sono utilizzati per redigere il contenuto del testo.
Tasti di direzione: Controlla il movimento de cursore.
75
Page 76

Tasto # :Attiva il metodo di impostazione
Tasto * :Inserisce un simbolo selezionato.
Tasto ne chiamata : Dipendente dal redigere dell’interfaccia.
Smart input Inglese
Premere i tasti numerici 2 a 9, le lettere corrispondenti al numero ed i corrispondenti numeri appariranno sullo
schermo.
Scrivere una parola
Utilizzando il metodo smart Inglese, premendo ripetutamente i tasti 2 a 9 per più volte, la parola corrispondente si
comporrà ed apparirà sullo schermo.
Per esempio, se volete scrivere “book”, premere i tasti numerici “ 2665”, ed allora selezionare la parola “book”.
Premere il tasto 0 per ottenere lo spazio.
Lettere Inglesi e introduzione gure
Si possono introdurre lettere Inglesi come A, a e 1 digitando e scegliendo differenti metodi di introduzione “ABC,
abc,123” .
Introduzione Simboli
Premere il tasto * nell’interfaccia dell’impostazione simboli, se il telefono non si trova nell’interfaccia dei simboli.
Con il tasto cursore spostarsi sul simbolo desiderato, selezionarlo e premere il tasto OK.
VIII. Applicazione della funzione memorizzazione USB
Precauzioni prima dell’uso
• Si raccomanda un corretto uso per la connessione e la disconnessione delle attrezzature USB
• Si raccomanda di non usare i comandi di formattazione Windows per formattare il disco mobile del cellulare,
altrimenti si avrà un danno irreparabile.
• USB ambiente operativo:
• Windows2000 / XP.
• Per altri sistemi operativi, può essere richiesto l’installazione di un driver USB prima di poter creare con successo
il collegamento al PC ed al telefono cellulare.
76
Page 77
IX. Appendice 1
Risoluzione problemi
Problema Possibile causa
Il telefono non si accende 1. Controllare che la batteria sia carica;
Errore Scheda SIM 1. Controllare che la Scheda SIM non sia sporta; se è così, pulirla;
Segnale debole Vericare l’indicatore di intensità del segnale sullo schermo. 4 linee indicano
L’iniziazione chiamata non
riesce
Ricarica batteria fallita 1. La batteria potrebbe essersi eccessivamente scaricata. Per ricaricare la
Impossibile connettersi
alla rete
Messa a fuoco troppo scura 1. La luminosità impostata è troppo bassa;
2. Controllare che la batteria sia installata correttamente.
2. Reinstallare la Scheda SIM;
3. Se la Scheda SIM è danneggiata, sostituirla.
un segnale forte, e 2 linee o meno indicare un segnale debole.
1. E’ possibile sia impostato il nascondi ID chiamante ma l’operatore non
supporta questo servizio;
2. Può esistere un forte segnale di interferenza;
3. E’ possibile che il blocco chiamate sia attivato;
4. E’ possibile attivare la linea 2 ma l’operatore non supporta questo servizio.
batteria è necessario collegarla al caricabatterie per un certo periodo di tempo;
2. La batteria potrebbe essere deteriorata.
1. Controllare se il segnale è troppo debole o esistono interferenze di apparec-
chi wireless (senza li) intorno;
2. Controllare che la carta SIM sia installata correttamente, se c’è poca
connessione, o la scheda SIM è danneggiata. Se la carta SIM è danneggiata,
contattare il gestore di rete.
2. La luce dell’ambiente è troppo bassa.
77
Page 78
Messa a fuoco sfocata L’oggetto fotografato è in movimento;
La messa a fuoco è distorta L’oggetto inquadrato è troppo vicino alla lente.
2. La mano ha tremato allo scatto.
Impossibile accedere al Menu
di Servizio
L’immagine di attesa non
può essere visualizzata
integralmente.
La carta SIM potrebbe non supportare il servizio.
Forse l’immagine è di dimensioni extra.
X. Appendice 2
Abbreviazioni
SMS Short Message Service
EMS Enhanced Message Service
SIM Subscriber Identity Module
GSM Global System for Mobile Communication
PIN Personal Identity Number
PUK PIN Unblocking Key
IMEI International Mobile Equipment Identity
CB Cell Broadcast
GPRS General Packet Radio Service
MMS Multimedia Message service
78
Page 79
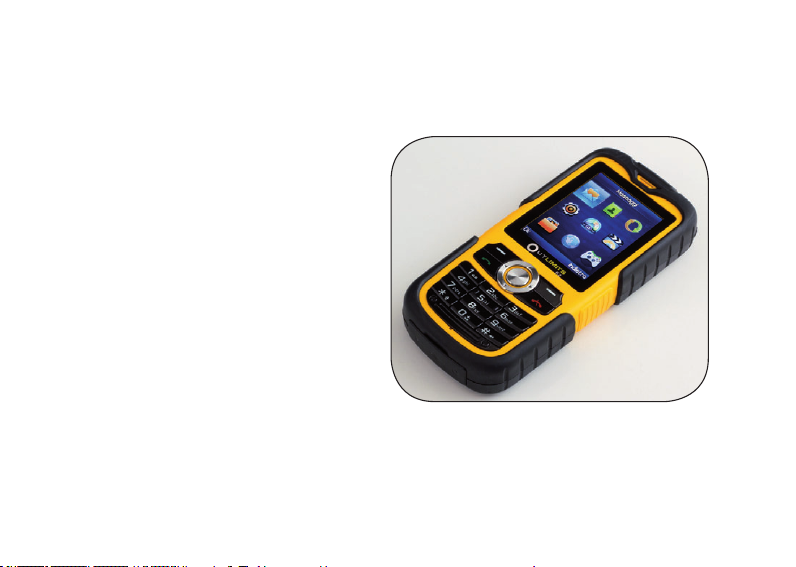
Outlimits K2
Notice d’utilisation
V. 1.0
FrANçAISE
79
Page 80

CONTENU
I. SECURITE ET PRECAUTION D’UTILISATION ..................................................... 81
II. PROFIL DU TELEPHONE PORTABLE .................................................................. 86
III. PREPARATION ..................................................................................................... 87
IV
. DESCRIPTION DU TELEPHONE
V
. OPERATIONS DE BASE DU TELEPHONE
VI. MENU OPERA
TIONS DU MENU ......................................................................... 97
VII. INSTRUCTIONS POUR LES OPERATIONS DE REDACTION
......................................................................... 92
........................................................... 94
.........................11
VIII. APPLICATION DE LA FONCTION DE MEMORISATION USB .........................119
IX. APPENDICE 1..................................................................................................... 120
X. APPENDICE 2...................................................................................................... 121
80
8
Page 81
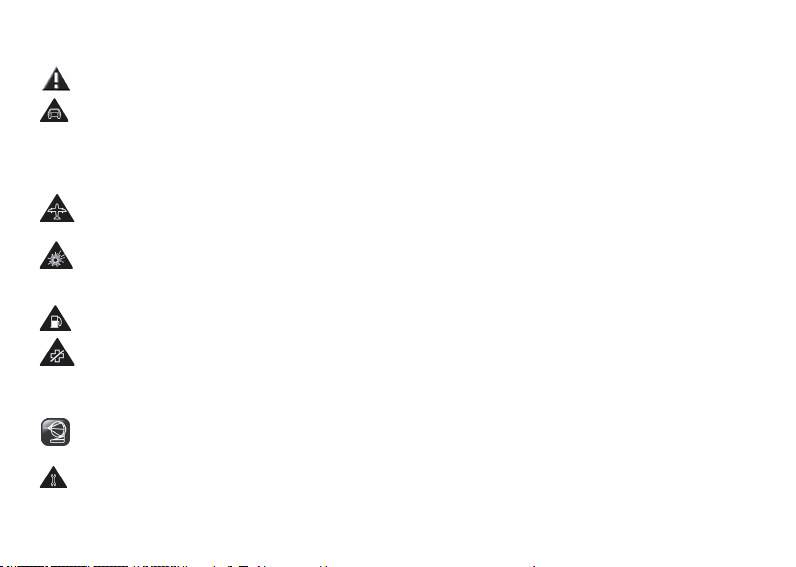
I. Sécurité et précautions
Avant de vous servir de votre téléphone mobile, lire attentivement ces simples consignes de sécurité. Le
non-respect de ces consignes peut être dangereux ou illégal.
Conduire en toute sécurité
1) Ne jamais utiliser votre téléphone en conduisant. Pour utiliser votre téléphone au volant, il faut
impérativement utiliser le kit mains-libres.
2) Positionner votre téléphone sur la borne prévue à cet effet. Ne jamais positionner votre téléphone sur le siège
passager ou à un endroit où il pourrait tomber en cas de collision avec un autre véhicule ou suite à un coup de frein
violent.
Voler en toute sécurité
Les téléphones mobiles peuvent causer des interférences. L’usage du téléphone est interdit pendant le vol.
Mettre hors tension le téléphone avant de monter dans l’avion et ne jamais le rallumer pendant le vol.
Mettre le téléphone hors tension en proximité de zones où sont entreposés des produits explosifs ou
chimiques, inammables ou dangereux.
Observer strictement les règlements interdisant l’usage de téléphone portable à proximité de zones potentiellement
explosives.
Mettre le téléphone hors tension à proximité des stations d’essence ou de zones où sont stockés des
produits pétrolifères, chimiques ou tous biens dangereux.
Hôpitaux et Appareils médicaux
Se conformer strictement aux règlements ou aux lois du pays en ce qui concerne l’utilisation de téléphones
dans les hôpitaux. Mettre toujours hors tension le téléphone à proximité d’un appareil médical. Les équipements
de transmission par signaux radio, notamment les téléphones mobiles, peuvent causer des interférences avec des
appareils médicaux ou des équipements électroniques.
Interférences
Les performances de ce téléphone mobile, ainsi que celles de tous les autres téléphones, peuvent être
perturbées par les interférences radio.
Service professionnel :
Le téléphone doit être installé ou réparé uniquement par du personnel qualié et agréé. Ne jamais essayer
d’installer ou de réparer le téléphone par vous-même an d’éviter tous risques de blessures et la perte de la
garantie.
81
Page 82
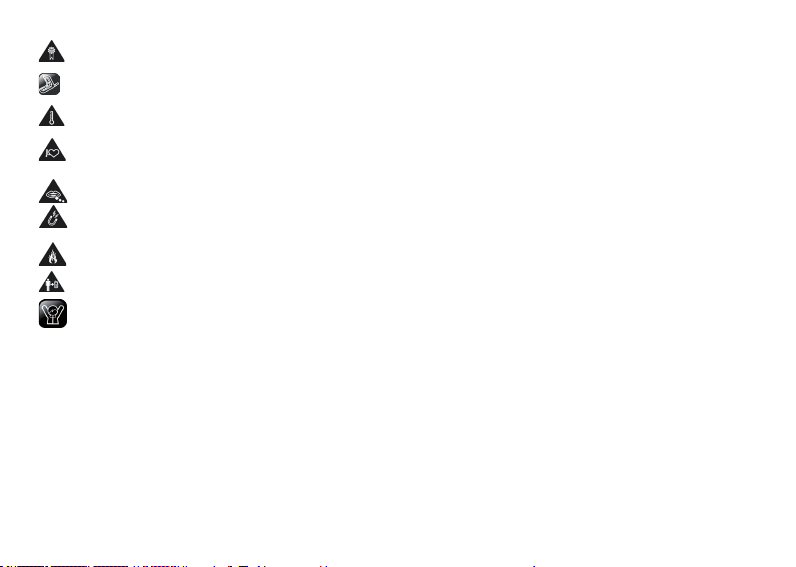
Accessoires et batterie
Ne jamais utiliser des accessoires et des batteries non agréés par le Fabricant.
Usage correct
Ce téléphone doit être utilisé uniquement tel que détaillé dans ce mode d’emploi.
Éviter d’utiliser le téléphone dans des zones où les températures sont excessivement froides ou chaudes. Ne
jamais exposer le téléphone aux rayons directs du soleil ou dans des lieux humides ou poussiéreux.
Faire très attention si vous utilisez le téléphone à proximité de dispositifs médicaux tels que, mais non
seulement, stimulateurs cardiaques, aides auditives ou tout autre appareil électro-médical, qui peuvent être
sensibles aux interférences d’un téléphone mobile.
Si les composants ou les pièces du téléphone sont ingérés, ils pourraient provoquer des chocs.
Pour éviter toute démagnétisation, ne jamais entreposer le téléphone et ses accessoires en proximité de tout
objet magnétiques, tels que disques magnétiques ou cartes de crédit.
Ne jamais jeter le téléphone, ou ses parties, ou accessoires, dans le feu.
Respecter une distance d’au moins 2,2 cm du corps lors de l’utilisation du téléphone.
Appel de secours
Vous pouvez programmer un numéro d’abonné (112, etc.) pour effectuer un appel d’urgence ; pour ce faire,
le téléphone doit être sous tension et en état de marche. Il suft d’appuyer sur la touche d’appel pour appeler,
indiquez ensuite votre position et expliquez ce qui vous arrive. Ne jamais terminer l’appel sans autorisation.
Note: Comme tout autre téléphone, ce téléphone aussi peut présenter des caractéristiques qui ne sont pas
supportées par certains réseaux dont la couverture ou le signal sont insufsant (certains réseaux, par ex. ne
prévoient pas le service de secours via le numéro 112. Il s’ensuit qu’il ne faut pas compter uniquement sur un
téléphone mobile pour émettre des appels de première importance tels qu’un appel aux services d’urgences
médicales, etc.).
Veuillez vérier cette condition avec votre opérateur.
2. Consignes Supplémentaires de Sécurité
82
Page 83

Le téléphone et ses accessoires peuvent contenir des petites pièces. Conserver le téléphone hors de portée des
enfants.
Environnement d’utilisation
Respectez toujours la législation spéciale en vigueur dans certains secteurs et pays et mettre toujours l’appareil
hors tension lorsque son utilisation est interdite ou lorsqu’elle peut causer des interférences ou un danger. Utilisez
l’appareil uniquement dans sa position de fonctionnement normale.
Cet appareil est conforme aux recommandations relatives aux radiations lorsqu’il est utilisé en position normale
près de votre oreille ou lorsqu’il est éloigné d’au moins 2,2 cm de votre corps. Lorsque l’appareil est sous tension et
que vous le portez sur vous, vériez que son support ou étui ne renferme pas de métal et qu’il se trouve éloigné de
votre corps de la distance minimum indiquée ci-dessus. Veuillez toujours respecter les directives concernant cette
distance jusqu’à la n du transfert.
Certains composants de l’appareil sont magnétiques, il peut donc exercer une attraction sur les objets métalliques.
Ne pas conserver de cartes de crédit ou d’autres supports de stockage magnétiques à proximité du téléphone car
les informations qu’il contient pourraient être effacées et perdues.
Appareils médicaux
Les équipements de transmission par signaux radio, notamment les téléphones mobiles, peuvent engendrer des
interférences avec des appareils médicaux mal protégés. Consultez un médecin ou le constructeur de l’appareil
médical pour s’assurer qu’il soit parfaitement protégé contre les radiofréquences ou si vous avez des doutes.
Mettre le téléphone hors tension dans les centres de soins médicaux où des avis en interdisent l’utilisation. Les
hôpitaux et les centres de santé peuvent utiliser des équipements sensibles aux radiofréquences.
Stimulateurs cardiaques (pacemaker)
Les constructeurs de stimulateurs cardiaques recommandent une distance minimum de 15 cm (6 pouces) entre
un téléphone mobile et un stimulateur cardiaque an d’éviter toute interférence possible avec le stimulateur.
Ces recommandations sont conformes à celles des recherches indépendantes réalisées par le WTR (Centre de
Recherche spécialisé dans la technologie sans l).
Les personnes possédant des stimulateurs :
- Doivent toujours garder l’appareil à une distance supérieure à 15 cm de leur stimulateur.
- Ne doivent pas transporter l’appareil dans une poche poitrine.
- Doivent placer l’appareil sur l’oreille opposée au stimulateur pour éviter toute interférence.
83
Page 84

si vous pensez qu’une interférence pourrait se produire, éteignez immédiatement votre appareil et éloignez-le
d’avantage.
Aides auditives
Certains appareils numériques sans l peuvent perturber le fonctionnement de certaines prothèses auditives. Si tel
est le cas, contactez le fabricant de la prothèse utilisée.
Véhicules
Les radiofréquences peuvent perturber le fonctionnement des systèmes électroniques mal installés ou non blindés
des véhicules à moteur, tels que les systèmes d’injection électronique, de freinage ABS, de régulation de vitesse
ou les systèmes d’airbag. Pour plus de renseignements, contactez le constructeur ou le concessionnaire du
véhicule, ainsi que celui des équipements ajoutés au véhicule.
Ne jamais laisser ou transporter des liquides inammables, du gaz ou des matériaux explosifs dans le même
compartiment que l’appareil ou ses accessoires. Pour les véhicules équipés d’airbags, se rappeler que les airbags
se gonent à l’air injecté avec une très grande puissance.
Ne placer aucun objet, y compris des équipements de transmission par signaux radio xes ou portatifs, dans la
zone située au-dessus de l’airbag ou dans sa zone de déploiement. Si le téléphone mobile est mal placé et si
l’airbag se déploie, ce dernier pourrait entraîner de graves blessures.
L’utilisation de téléphones mobiles est interdite en vol. Mettre l’appareil hors tension avant de monter à bord.
L’utilisation d’appareils sans l dans un avion peut s’avérer dangereuse pour le fonctionnement de l’avion et
perturber les télécommunications. Cet usage est interdit.
Environnements potentiellement explosifs
Mettre toujours l’appareil hors tension dans des zones où l’atmosphère est potentiellement explosive et respecter
tous les panneaux de signalisation. Il s’agit notamment des zones où il est généralement exigé d’arrêter le moteur
des véhicules. Dans de telles zones, quelques étincelles peuvent provoquer une explosion ou un incendie, causant
des dommages corporels graves, voire mortels.
Mettre l’appareil hors tension dans les stations service, près des pompes à carburant ainsi que dans les garages.
Respecter les restrictions en vigueur sur l’utilisation d’équipements de transmission par radiofréquences dans les
dépôts de carburant, les zones de stockage et de distribution, les usines chimiques ou dans les endroits où sont
utilisés des explosifs.
Les zones présentant une atmosphère potentiellement explosive sont souvent, mais pas toujours, clairement
signalées. Il s’agit notamment des ponts de bateaux, des installations destinées au transfert ou au stockage de
produits chimiques, des véhicules utilisant des gaz liquides (tels que le propane ou le butane) et des zones dont
84
Page 85

l’air contient des produits ou des particules chimiques, des céréales, des poussières ou des poudres métalliques.
Appels d’urgence
IMPORTANT !
Les téléphones mobiles, comme ce modèle, utilisent des signaux radio, des réseaux téléphoniques cellulaires et
terrestres, ainsi que des fonctions programmées par l’utilisateur. De ce fait, une connexion able ne peut pas être
garantie en toutes circonstances.
Par conséquent, vous ne devez pas compter uniquement sur un téléphone mobile pour émettre des appels de
première importance, tel qu’un appel aux services d’urgences médicales.
Informations sur la Certication (DAS)
Ce modèle est conforme aux directives internationales relatives à l’exposition aux ondes radioélectriques. Votre
Téléphone mobile est un appareil émetteur-récepteur. Il a été conçu et fabriqué de manière à ne pas dépasser les
limites relatives à l’exposition de l’énergie radiofréquence établies par les directives internationales.
Ces directives s’appuient sur des normes qui ont été élaborées par des organismes scientiques indépendants
ICNIRP et prévoient une marge de sécurité substantielle an d’assurer la sécurité de toutes les personnes,
quelque soit leur état de santé ou leur âge.
Les normes d’exposition applicables aux téléphones mobiles utilisent une unité de mesure appelée Débit
d’absorption spécique (DAS). La valeur DAS limite recommandée par l’ICNIRP pour les appareils mobiles est de
2,0 W/kg autorisés pour la population de façon générale.
Bien que le DAS soit déterminé au plus haut niveau de puissance certié, le niveau réel du DAS du téléphone en
fonctionnement peut être nettement inférieur à la valeur maximale.
Cet écart tient au fait que le téléphone est conçu pour fonctionner à différents niveaux de puissance an d’utiliser
seulement la puissance nécessaire pour communiquer avec le réseau.
Bien qu’il puisse y avoir des différences entre les niveaux DAS de différents téléphones et dans différentes
positions, tous sont conformes aux dispositions ofcielles de sécurité.
L’Organisation Mondiale de la Santé (OMS) a déclaré que les informations scientiques actuelles n’incitent à
aucune précaution particulière quant à l’usage de téléphones mobiles. Il faut cependant signaler que la réduction
de la durée des communications et l’utilisation de kit “mains-libres” réduisent l’exposition aux signaux.
Directive DEEE
La poubelle mobile barrée signie que dans l’Union Européenne ce type de produit doit être mis au rebut
séparément à la n de sa vie. Cette directive s’applique à votre téléphone mobile, ainsi qu’à tous les autres
dispositifs marqués de ce symbole. Ne jamais mettre au rebut ce type de produits sans un préalable tri sélectif.
85
Page 86
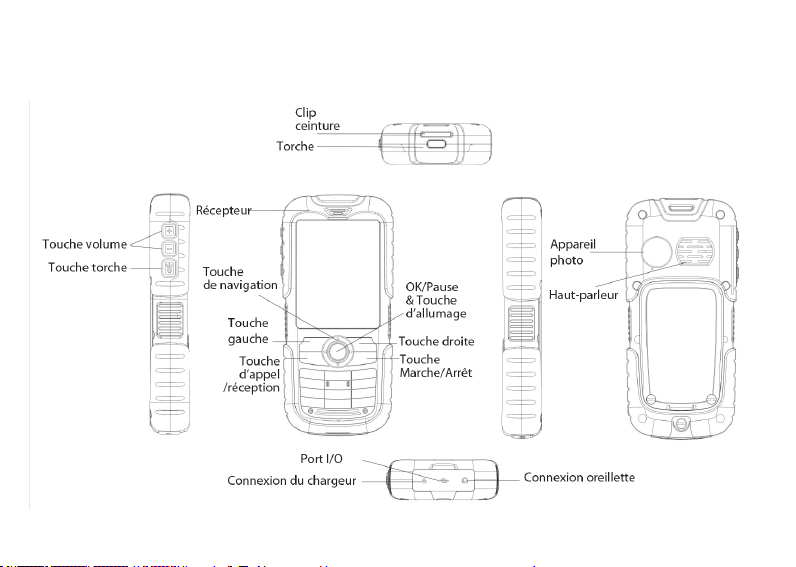
II. Prol du téléphone portable
Description du téléphone:
86
Page 87
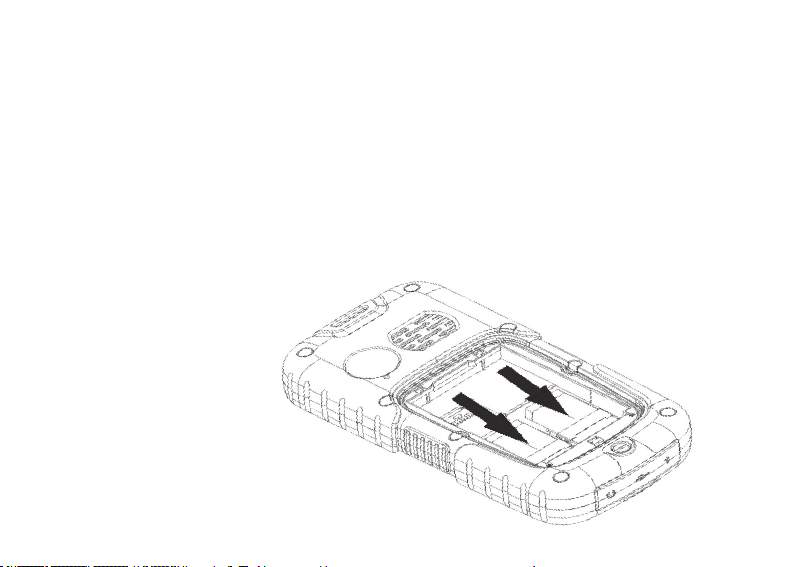
III. Préparation
Installation de la carte SIM
Vous pourrez insérer deux numéros différents offerts par deux opérateurs différents et obtenir ainsi deux cartes
SIM distinctes.
Avec les deux cartes SIM, il vous sera possible d’utiliser différentes fonctions de votre téléphone portable. De
nombreux paramètres demandés pour les communications sont mémorisés dans les cartes SIM. Les données
personnelles, le code PIN (numéro d’identication personnelle), le répertoire, les SMS et autres services
supplémentaires peuvent être sauvegardés dans les cartes SIM.
Attention: Ne jamais griffer ou plier votre carte SIM. Evitez toute exposition à des sources électriques, des jets
d’air ou d’eau. Si vous égarez votre carte SIM, veuillez contacter votre opérateur.
Pour installer les cartes SIM, veuillez éteindre le téléphone. Retirez le cache batterie et la batterie, et insérez
ensuite les cartes SIM dans les emplacements prévus à cet effet et situés dans la partie postérieure du téléphone.
Veuillez installer la ou les cartes SIM comme indiqué sur le schéma ci-dessous:
Note: La carte SIM est un objet de petite
dimension, veillez à la laisser hors de
portée des enfants an d’éviter qu’elle ne
soit ingérée accidentellement!
87
Page 88
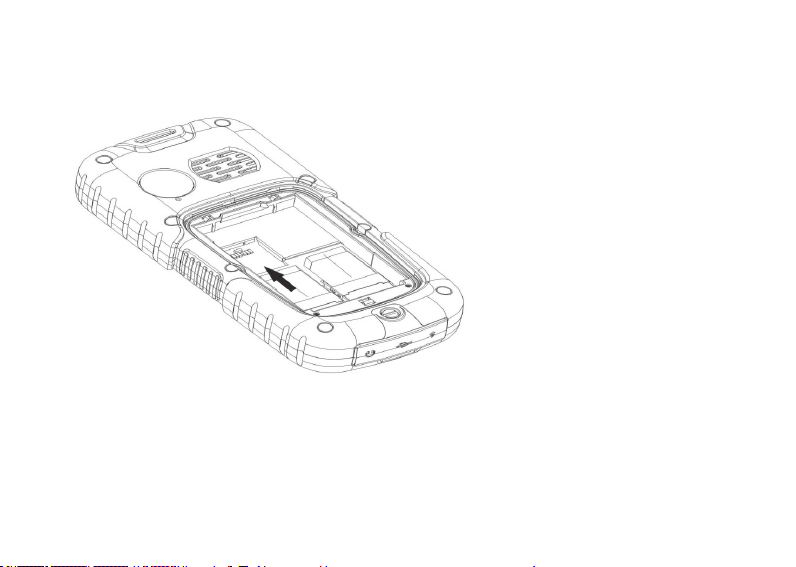
Insertion de la carte mémoire
Le téléphone peut supporter une carte T-FLASH permettant d’augmenter la mémoire de votre téléphone. Veuillez
installer ou extraire la carte mémoire comme indiqué sur l’image ci-dessous après avoir éteint le téléphone.
Note: La carte T-FLASH est un objet
de petite dimension, veillez à la laisser
toujours hors de portée des enfants
an d’éviter qu’elle ne soit ingérée
accidentellement!
Typologie: Votre téléphone supporte une
carte mémoire d’une capacité maximale
de 8GB. Il est vivement recommandé
d’utiliser des cartes mémoire de marques
connues telles que SanDisk et Kingston.
Tout autre typologie de carte pourrait ne
pas être compatible avec le téléphone.
88
Page 89
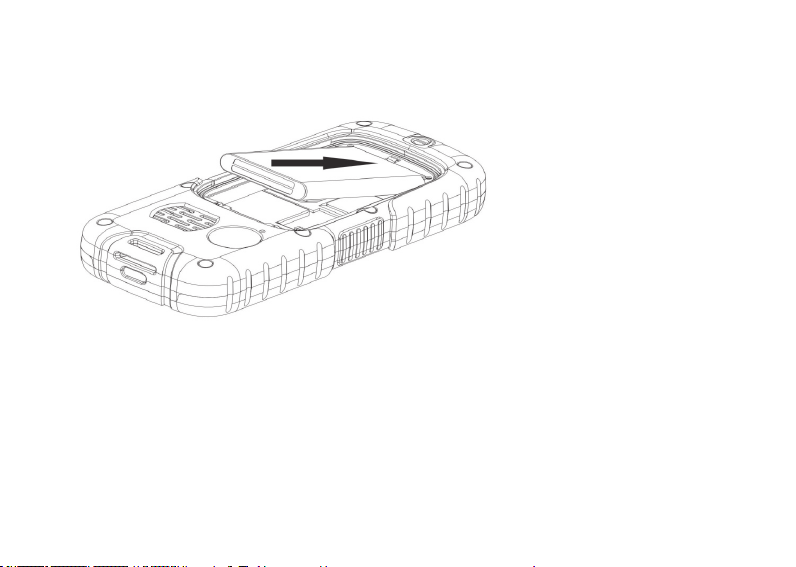
Installation de la batterie:
Nous vous conseillons d’utiliser uniquement les accessoires et la batterie originales qui vous ont été vendus avec
l’appareil. Veuillez installer la batterie après avoir éteint votre téléphone.
Veillez à retirer la batterie et à la conserver dans un lieu propre et sec en cas de non utilisation prolongée de
l’appareil.
Note: Veuillez suivre les procédures comme indiqué dans le précédent schéma pour éviter tout dommage aux
points de contacts de la batterie.
Recharger la batterie
La nouvelle batterie doit être chargée et déchargée complètement pour plusieurs fois pour obtenir les meilleures
performances. Recharger votre téléphone dès que possible et utilisez-le jusqu’au complet épuisement pour éviter
d’endommager la batterie.
Déconnectez le chargeur et successivement débrancher le téléphone de la prise lorsque la batterie est
complètement chargée.
89
Page 90
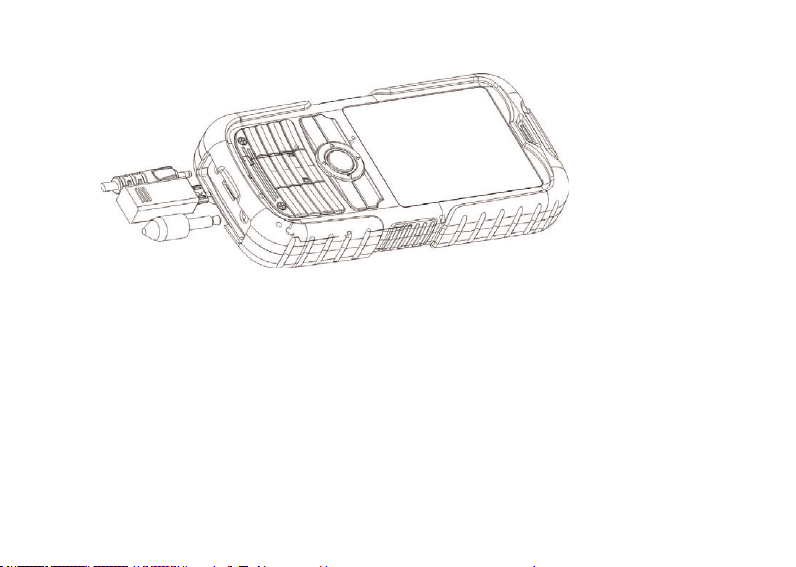
Connecter le téléphone au chargeur de batterie comme indiqué ci-dessous.
Pendant la charge, si le portable est allumé, l’icône de charge dans la partie haute à droite de l’écran commencera
à clignoter, s’arrêtera et se remplira lorsque la batterie sera complètement chargée. Si le téléphone est éteint, une
icône apparaîtra sur l’écran indiquant ainsi que la recharge de la batterie est en cours.
Note: Une surchauffe peut se vérier pendant la charge.
Utilisation de la batterie:
Les performances de la batterie sont conditionnées par de multiples facteurs comprenant le chargement de la
conguration du réseau sans l, l’intensité du signal et la température lors de l’utilisation du téléphone, la fonction
ou la position sélectionnées, les accessoires utilisés pour le téléphone ainsi que d’autres programmes en fonction.
Pour optimiser les performances de la batterie, veuillez suivre les règles suivantes:
• Une nouvelle batterie ou une batterie inutilisée pendant une longue période nécessitera une longue recharge;
• Pendant la charge, il est recommandé de garder la même température de la pièce dans laquelle se trouve le
téléphone ou une température proche de celle-ci;
90
Page 91

• La batterie peut nécessiter un temps de recharge plus long après l’avoir utilisée pour une longue période, ce qui
est normal. Si la durée de l’appel est trop courte, il pourrait être nécessaire d’acheter une nouvelle batterie originale
ou dite compatible avec votre appareil. Toutes batteries ou accessoires non recommandés pourraient endommager
le téléphone et causer un réel danger.
• Si la batterie n’est pas utilisée pour une longue période ou si l’énergie est insufsante, il sera sans doute
nécessaire d’attendre plus longtemps avant de voir apparaître l’icône de charge. Veuillez attendre patiemment.
Note: Pour votre propre sécurité et pour la protection de l’environnement, veuillez ne jamais jeter la batterie
n’importe où. Renseignez-vous auprès du point de vente le plus proche de chez vous, vous y trouverez une boîte
pour batterie ou un centre de recyclage de piles.
Attention: Toute explosion, amme ou dégradation personnelle pourraient endommager ou créer un court-circuit!
Code PIN
Code PIN1: Le code d’identication personnelle est activé pour utiliser la carte SIM et pour éviter que d’autres
personnes n’utilisent votre carte SIM sans votre autorisation. Si le code PIN1 de sauvegarde de votre téléphone
est actif, le système afchera l’indication “Insérer PIN carte SIM1/2” lorsque le téléphone s’allume. Le symbole *
apparaîtra lors de la saisie des chiffres qui composent le code PIN1.
Si vous ne possédez pas ce code ou si vous l’avez oublié, veuillez contacter votre opérateur avec votre carte SIM.
Code PIN2: Il s’agit du numéro d’identication personnelle utilisé pour des fonctions spéciales telles que la fonction
de charge assignée par le réseau.
PUK et PUK2 (8 chiffres)
Un code PUK vous sera demandé pour changer le code PIN. Pour changer le PIN2, il vous sera nécessaire
d’utiliser le PUK2 (code de déblocage personnel). Si le code PUK ne vous a pas été donné avec votre carte SIM,
veuillez demander plus de renseignements à votre opérateur.
Attention: Si le code PIN est inséré erronément trois fois de suite, la carte SIM se bloquera. Contactez votre
opérateur pour procéder au déblocage de la carte. Toute tentative de déblocage non autorisée et non correcte
pourrait bloquer de manière dénitive et irréversible votre carte SIM.
91
Page 92
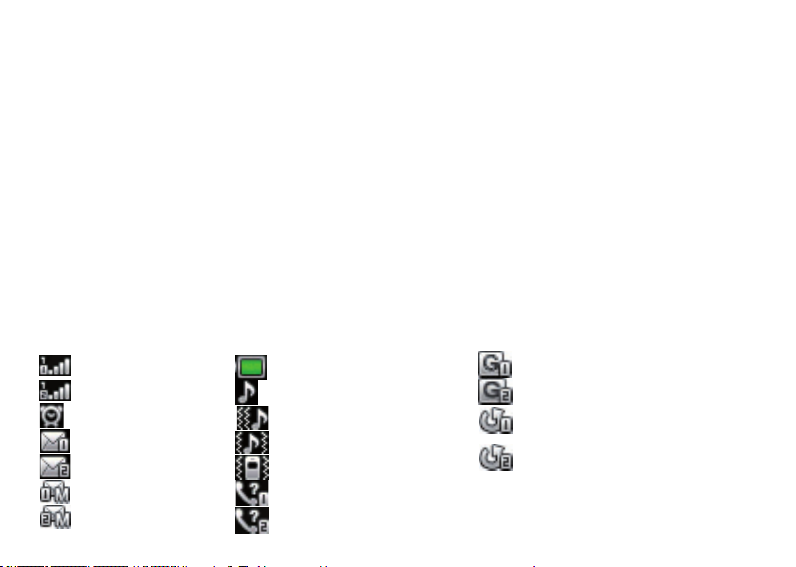
IV. Description du téléphone
Touches de dialogue
Effectuez ou refusez un appel de la carte SIM1. Appuyez brièvement sur la touche dialogue en mode veille, vous
pourrez dès lors accéder à l’option d’appel de la carte SIM1.
Touche de réponse et touche Marche/Arrêt
Répondre ou refuser un appel.
Maintenir appuyé longuement la touche pour éteindre le téléphone en mode veille.
Appuyez longtemps sur cette touche pour allumer le portable lorsqu’il est éteint.
Touches directionnelles
Pour déplacer la barre ou le curseur.
Vous pourrez insérez le raccourci nommé en mode veille.
Touche OK
Pour conrmer une opération dans le menu.
Touches numériques
Insérez des numéros ou des caractères.
Appuyez longuement sur les touches de 1 à 9 en mode veille pour émettre un appel rapide.
En mode veille, appuyez longuement sur la touche # pour activer ou désactiver le mode Silence.
Appuyez brièvement ou longuement sur la touche * pour insérer “P”, “+” ou “W” sur la visualisation d’appel.
Icône de l’écran en mode veille
Antenne SIM1
Antenne SIM2
Alarme active
Carte SIM 1 SMS
Carte SIM 2 SMS
Carte SIM 1 MMS
Carte SIM 2 MMS
92
Batterie
Sonnerie
Vibre puis sonne
Vibre et sonne
Vibreur
Appels en absence carte SIM1
Appels en absence carte SIM2
Carte SIM 1 GPRS
Carte SIM 2 GPRS
Transfert d’appel activé pour
la carte SIM1
Transfert d’appel activé pour la carte
SIM2
Page 93

Langue et mode de saisie
Le mode de saisie des caractères Anglais vous est proposé dans le téléphone. Pour d’autres détails, veuillez vous
référer aux chapitres relatifs à la sélection de la langue. Vous y trouverez les différentes possibilités de saisie ainsi
que les modalités pour les sélectionner.
Signal pour appels entrants
La fonction Vibreur et la vibration sonore proposées par votre téléphone, offrent les signalisations d’appels
suivantes:
Sonne
Vibre
Vibre et sonne
Vibre puis sonne
Description des fonctions
• Pour effectuer un appel national
La méthode la plus rapide pour effectuer un appel national consiste à saisir un numéro de téléphone à l’aide des
touches numériques et à appuyer ensuite sur la touche d’appel. Si les deux cartes SIM sont correctement insérées
et si le système dual est actif, vous devrez alors sélectionner si appeler à partir de la carte SIM1 ou SIM2 en
utilisant les touches de dialogue de la carte SIM1 ou SIM2.
Note: Pour permettre la fonction de dialogue LSK, dans le menu accédez à l’option “Centre d’appel / réglages
généraux d’appels / réglages appels SIM2.” Il vous sera dès lors possible d’appeler à partir de la carte SIM1 en
appuyant sur la touche d’appel, ou appeler à partir de la carte SIM2 en numérisant LSK. L’écran afche l’animation
de l’appel. Si un appel est émis à partir de la carte SIM1, l’écran afchera la mention “Appel SIM1”, et si vous êtes
en train d’émettre un appel à partir de la carte SIM2, l’écran afchera “Appel SIM2.”
L’état de l’appel sera visualisé à l’écran lorsque vous répondrez.
Appuyez sur la touche raccrocher pour mettre n à l’appel.
Pour effectuer des appels nationaux: Composer le préxé + le numéro de téléphone et appuyez ensuite sur la
touche d’appel.
• Effectuer un appel international
Pour effectuer un appel international, appuyez longuement ou plusieurs fois brièvement sur la touche * jusqu’à
ce que le symbole “+” s’afche à l’écran. Cela vous permettra d’effectuer un appel international sans connaître le
93
Page 94

préxe de l’état que vous désirez appeler. Par exemple: pour la Chine ce serait +86.
Insérez ensuite le code du pays et le numéro de téléphone complet. Le code pays est différent pour tous les pays.
Par exemple, Allemagne 49- Grande-Bretagne 44 -Suède 46, etc.…
• Effectuer des appels internationaux: composer le code pays + le numéro de téléphone complet et appuyez
ensuite sur la touche d’appel.
• Extension d’appel à un numéro xe
Les extensions de certains numéros xes ne sont pas directement accessibles, dans certains cas, il sera
nécessaire d’appeler le numéro hôte et successivement le numéro pour l’extension. Insérer simplement la lettre
“P” entre le numéro hôte et l’extension numérique et vous pourrez ainsi émettre un appel. Insérez la lettre “P” en
appuyant longuement ou brièvement plusieurs fois consécutives sur la touche *.
L’extension de l’appel à un numéro xe se fait en composant: le numéro de téléphone + P + extension numérique +
touche d’appel.
• Effectuer des appels d’urgence
Dans tous les pays où le réseau et le service GSM sont utilisés, vous pourrez émettre un appel d’urgence si votre
portable a une couverture de réseau sufsante. Pour connaître l’état du signal, regardez l’indicateur positionné sur
la partie haute de l’écran du téléphone.
Si votre opérateur ne dispose pas de service de roaming sur cette zone, l’écran afchera “APPELS D’URGENCE
UNIQUEMENT “, et sachez qu’il ne vous sera possible d’effectuer que ce type d’appel.
Si la couverture du réseau est sufsante, vous pourrez effectuer un appel d’urgence même si la carte SIM n’est
pas insérée.
Dans certaines zones, le service 112 (appel d’urgence) est proposé par votre opérateur. Si quelque chose
d’anormal devait se présenter, nous vous conseillons de contacter votre opérateur!
• IMEI
Il s’agit de l’Instrument d’identication mobile internationale. Il vous est possible d’observer l’étiquette du codebarres imprimée avec ce numéro positionné dans la partie postérieure du téléphone après l’avoir éteint et avoir
retirée la batterie. Ce numéro est également sauvegardé dans le téléphone portable, et pourra être visualisé en
composant “* #06#” sur l’interface de dialogue présente à l’écran.
V. Opérations de base du téléphone
Mise en marche
94
Page 95

Appuyez et maintenez appuyé la touche “Marche/Arrêt” pour allumer le portable. Si aucun mot de passe n’a
pas été inséré pour la protection de votre carte SIM et pour le téléphone, le portable recherchera le réseau
automatiquement, et lorsque le portable enregistre un réseau, le nom du réseau sera visualisé à l’écran. Vous
pourrez dès lors répondre et effectuer un appel.
Si l’écran indique la mention “Insérer carte SIM1” ou “Insérer carte SIM2” après l’allumage, veuillez éteindre votre
portable, et contrôler que la carte SIM signalée soit correctement insérée ou simplement si elle n’a pas été insérée.
Après avoir insérée la carte SIM, le téléphone contrôlera la disponibilité de la carte SIM automatiquement, l’écran
indiquera les demandes suivantes successivement en séquence:
1) « Insérez mot de passe pour bloquer le téléphone »----si le blocage a été activé (le mot de passe paramétré est
le 1122).
2) « Insérez le code PIN de la carte SIM1/2 »----si le blocage de la carte SIM1/2 a été activé.
3) « Aucun service »----signie que le signal est insufsant et il ne vous sera donc pas possible d’effectuer d’appel
à cet instant.
4) « Appel d’urgence »----permet de contacter le 112.
5) « Recherche » -----le téléphone recherche le réseau jusqu’à ce qu’un réseau soit détecté.
6) L’écran visualise le nom de l’opérateur----signie que le réseau a été enregistré avec succès.
Si seule la carte SIM1 a été insérée et la modalité utilisée est paramétrée sur “Seule SIM1”, l’écran visualisera
le nom du fournisseur de la carte SIM1 et la mention “carte SIM2 inactive”; si seule la carte SIM2 a été installée,
l’écran afchera les données opposées.
Si seule la carte SIM1 a été installée et la modalité en cours est “deux cartes actives”, l’écran afchera le nom
du fournisseur de la carte SIM1 et la mention “insérer carte SIM2”; si seule la carte SIM2 a été insérée, l’écran
afchera les renseignements opposées.
Arrêt du téléphone
Si vous désirez éteindre le téléphone portable, appuyez longuement sur la touche Marche/Arrêt, et l’écran
visualisera successivement l’icône d’extinction et votre téléphone portable s’éteindra. Veuillez ne jamais éteindre
votre téléphone portable en enlevant la batterie, vous pourriez endommager la carte SIM et provoquer la perte de
certaines données.
Effectuer un appel
• Insérer le numéro téléphonique en mode veille, et appuyez sur la touche d’appel pour téléphoner. Si vous désirez
raccrocher ou effacer l’appel, appuyez sur la touche raccrocher/effacer. Lorsque le téléphone est connecté, il vous
est possible de voir la durée de l’appel à l’écran.
95
Page 96

• Utilisez le répertoire pour effectuer un appel: recherchez le nom/numéro désiré et mémorisé dans le répertoire et
appuyez sur la touche d’appel pour téléphoner.
• Rappel du dernier numéro: appuyez sur la touche d’appel en veille pour chercher le dernier numéro ou nom de la
liste. Faire déler jusqu’au numéro ou nom souhaité et appuyez successivement sur la touche d’appel.
• Régler le volume: Appuyez sur les touches latérales lors de l’appel pour régler le volume selon vos besoins.
Répondre à un appel
Lors d’un appel entrant, celui-ci vous sera signalé et vous entendrez la sonnerie, le vibreur, le vibreur et la
sonnerie, la sonnerie et après le vibreur ou encore l’éclairage sur la base du téléphone.
Pour répondre à un appel, appuyez sur la touche d’appel.
Pour refuser un appel, appuyez sur la touche Marche/Arrêt.
Si le service d’identication de l’appelant a été activé, le numéro sera visualisé à l’écran. Si le numéro a également
été sauvegardé dans le répertoire, le nom correspondant au numéro sera afché à l’écran.
Si l’appel est dirigé sur la SIM1, la mention “Appel vers SIM1” apparaîtra devant le numéro ou le nom.
Si l’appel est dirigé sur la SIM2, la mention “Appel vers SIM2” apparaîtra devant le numéro ou le nom.
Appel rapide
Le téléphone propose 8 touches rapides, et il vous sera possible de dénir les numéros correspondants à ces
touches. Ainsi, il vous sufra d’appuyer sur les touches de 2 à 9 en mode veille pour effectuer un appel rapide; la
touche [1] est utilisée pour l’appel rapide au numéro de la messagerie.
Note: Pour effectuer un appel rapide, appuyez et maintenez appuyé une touche pendant deux secondes ou plus.
Si aucun numéro n’a été paramétré sur ces touches d’appels rapides, il ne vous sera pas possible d’émettre
d’appel.
Envoi signal DTMF
Lorsque la fonction d’envoi du signal DTMF est paramétrée, si vous appuyez sur les touches désignées + * + # sur
le clavier lors d’une conversation, un signal en format DTMF sera envoyé aux autres parties. Si la fonction n’a pas
été paramétrée, il ne vous sera pas possible d’effectuer d’extension au numéro appelé.
Appel en attente
Si l’option d’appel en attente est activée, les fonctions suivantes du menu apparaîtront lorsque vous
cliquerez sur cette touche pendant une conversation:
• En attente: Pour suspendre temporairement la conversation en cours tout en gardant le canal de conversation actif.
• Terminer: Mettre n à la conversation en cours.
• Nouvelle conversation: Pour accéder à l’interface de dialogue et effectuer un autre appel.
96
Page 97

• Répertoire: Il est possible d’accéder au répertoire.
• Renseignement: Pour accéder à la liste des messages.
• Enregistrer: Pour enregistrer les contenus des appels.
• Fond sonore: Pour activer ou désactiver le signal sonore de fond.
• Silence/Reprendre: Pour activer/désactiver le micro.
• Ton dual multifréquence DTMF: Vous pourrez procéder au paramétrage et envoyer un signal DTMF.
Note: Certaines données du Menu apparaissent sous certaines conditions, ou nécessitent le support de votre
réseau comme: “En attente” et “Nouvelle conversation”, etc.… pour plus de renseignements, veuillez contactez
votre opérateur.
Événement particulier
Lorsque le téléphone a reçu un message non lu ou un appel en absence etc., le téléphone afchera l’image ou
l’icône correspondante. Veuillez consulter et effacer régulièrement vos anciens messages.
Connexion à la messagerie vocale
Le téléphone permet de faire basculer les appels sur votre messagerie. Vous recevrez successivement un
message de notication concernant les messages vocaux (le numéro du centre de messages devra être paramétré
au préalable).
VI. Fonctions opératives du menu
1 Messages
La fonction SMS est un service de réseau. Il se peut que vous nécessitiez de l’application de réception de votre
opérateur an d’ envoyer et recevoir un message /SMS.
Le portable supporte la fonction d’envoi des messages. Les messages sont tout d’abord envoyés au centre de
réseau SMS et successivement aux destinataires. Si le destinataire n’allume pas son portable ou s’il ne peut
pas recevoir le message, car la mémoire est pleine par exemple, le réseau gardera en mémoire le message
momentanément. La période de réception se terminera en envoyant conjointement le message au destinataire et à
l’opérateur.
En utilisant le service SMS, le téléphone peut envoyer et recevoir des messages longs. L’envoi de messages très
longs peut entraîner des frais supplémentaires. Pour plus de détails, contacter votre opérateur.
97
Page 98

Si la mémoire des messages est pleine, une icône clignotante le signalera à l’écran. Le portable supporte le
système dual SIM, les messages sont par conséquent sauvegardés séparément dans la carte SIM1 ou la carte
SIM2. L’état de mémoire de la carte SIM1 et SIM2 sera donné séparément. Dans certains cas, il est nécessaire
d’effacer un message de la liste dans la mémoire de la carte SIM correspondante dans laquelle le nouveau
message sera reçu.
Note: Lorsque un SMS est envoyé via le réseau, la mention “Message envoyé” s’afche à l’écran. Cela signie que
le téléphone a envoyé le message au centre de messages paramétré sur le téléphone. Mais ceci ne signie pas
que le destinataire a reçu le message. Pour d’autres renseignements relatifs à ce service SMS, contactez votre
opérateur.
1.1 Ecrire un message
Dans ce menu, vous pourrez procéder à la compilation d’un message.
Le téléphone supporte l’envoi de messages composés de 160 caractères, la restriction des caractères est
commune aux messages texte standard. Si un message dépasse les 160 caractères, il sera divisé en deux ou plus
messages et sera ensuite envoyé.
Les options suivantes du menu représentent les fonctions attribuées en utilisant la touche gauche du téléphone
lorsque vous êtes en train d’écrire un message:
• Envoyer à: Insérez le destinataire
Ajoutez à partir répertoire
• Choisir mode de saisie: Pour sélectionner le mode de saisie vous permettant d’écrire un message.
• Ajouter une image: Pour insérer un image dans votre message.
• Ajouter son: Pour insérer un chier audio dans le message du téléphone ou de la carte mémoire.
• Ajouter vidéo: Pour insérer un chier vidéo pour les messages multimédia.
• Ajouter un sujet: Vous pourrez ajouter un sujet au message.
• Option diapositive:
Ajouter une diapositive successive: Pour insérer une nouvelle diapositive suite à celle en cours.
Ajouter une diapositive antécédente: Pour insérer une nouvelle diapositive avant celle en cours.
• Passer aux MMS
• Fonctions avancées:
1. Insérer modèle texte: Sélectionnez les phrases le plus fréquemment utilisées à partir des modèles et insérer le
modèle dans le message.
98
Page 99

2. Insérer des accessoires: Insérez une sonnerie, une image et une animation.
3. Insérer le numéro du contact: Accédez aux contacts et insérez le numéro trouvé.
4. Insérer signet: Accédez à l’interface signet et insérez le signet sélectionné.
• Sauvegarder : Vous pourrez sauvegarder le message courant dans les Brouillons ou comme modèle.
• Détails: Vous pourrez contrôler les détails du message.
1.2 Messages reçus
Les messages reçus sont sauvegardés dans le chier des messages reçus. Vous pourrez visualiser tous les
messages reçus dans le chier des messages reçus. Les messages des cartes SIM1/2 sont sauvegardés
séparément.
Vous pouvez effectuer les opérations suivantes:
• Visualiser: Visualiser le contenu des messages.
• Répondre: Pour répondre à un message reçu.
• Appeler destinataire: Appeler le destinataire.
• Transférer: Pour transférer le message en cours à un autre destinataire.
• Effacer: Pour effacer le message en cours.
• Tout effacer: Pour effacer tous les messages.
• Sauvegarder au répertoire : Pour sauvegarder le numéro sur la carte SIM1/2 ou sur le téléphone.
• Déplacer dans les archives: Pour déplacer les messages en cours dans les archives.
• Marquer plusieurs: Vous pourrez marquer certains messages et les modier par la même opération.
1.3 Brouillons
Sélectionnez “Sauvegarder” lorsque vous désirez envoyer un message et le sauvegarder successivement dans
les brouillons. Le message non envoyé sera sauvegardé dans les brouillons, et les options relatives pourront être
utilisées dans les messages placés dans l’archive.
1.4 Messages sortants
Si vous ne parvenez pas à envoyer un message, celui-ci sera sauvegardé dans les messages sortants.
1.5 Messages envoyés
Les messages ont été envoyés avec succès et sont sauvegardés dans le chier des messages envoyés. Vous
pourrez utiliser les opérations relatives des messages.
• Visualiser: Vous pourrez visualiser le contenu du message.
• Transférer: Vous pourrez transférer le message courant à d’autres destinataires.
99
Page 100

• Effacer: Vous pourrez effacer le message en cours.
• Tout effacer: Vous pourrez effacer tous les messages du chier des messages envoyés
• Marquer: Vous pourrez marquer certains messages et les modier par la même opération.
1.6 Archive
Vous pourrez classer les opérations relatives aux messages déplacés dans les archives.
1.7 Effacer les messages
Il est possible d’effacer tous les messages reçus des chiers Messages reçus, brouillons, messages sortants, des
messages envoyés et de l’archive.
1.8 Messages d’émission (Broadcast)
Il s’agit d’un service proposé par votre opérateur pour envoyer des messages tels que les prévisions du temps, les
infos trac… à tous les abonnés GSM dans une zone spécique.
Note: Cette fonction nécessite l’autorisation de votre réseau. Pour plus de renseignements, veuillez contacter votre
opérateur.
- Mode réception: Pour activer/désactiver le message d’émission.
- Lire message: Lorsque le service est activé, le messages reçu peut être lu dès que le serveur correspondant a
été autorisé.
- Langue: Pour activer ou non toutes les langues des messages reçus.
- Réglages du canal: Pour sélectionner, ajouter, modier ou effacer les numéros.
1.9 Modèles
Incluant les modèles de SMS et MMS.
1.10 Réglages des messages
1.10.1 Message texte
1.10.1.1 Réglage des messages de la carte SIM 1/2:
Dans ce menu, il vous sera possible de sélectionner certains paramètres des messages. Certains réglages pour la
carte SIM 1/2 sont donnés séparément.
• Réglages prol Pour paramétrer le nom d’un prole, le numéro du centre SMS, la période de validité du
message ainsi que le type de message. Vous pourrez envoyer un message, via votre centre de SMS.
Conseil: Il vous sera possible d’appeler le numéro de boîte vocale en mode veille en appuyant longuement sur la
touche “1” après avoir paramétré le numéro de la boîte vocale.
- Server Boîte Vocale
100
 Loading...