


Model 970
7.1 Channel Preamplifier Processor
Owner’s Manual
Version 1.0

Owner’s Manual
Warnings
Please Read First
CAUTION: To reduce the risk of electric shock, do not remove the cover. No user
serviceable parts inside. Refer to qualified personnel.
WARNING: To reduce the risk of fire or electric shock, do not expose this appliance
to rain or moisture.
The lightning flash with arrowhead, within an equilateral triangle, is
intended to alert the user to the presence of uninsulated “dangerous volt
age” within the product’s enclosure that may be of sufficient magnitude to
constitute a risk of electrical shock to persons.
The exclamation point within an equilateral triangle is intended to alert
the user to the presence of important operating maintenance (servicing)
instructions in the literature accompanying the appliance.
WARNING: Important Safeguards
Read Instructions–All the safety and operating instructions should be read before the
unit is operated.
Retain Instructions–The safety and operating instructions should be retained for
future reference.
Heed Warnings–All warnings on the unit and in the operating instructions should
be adhered to.
Follow Instructions–All operating and use instructions should be followed.
Cleaning–Unplug the unit from the wall outlet before cleaning. The unit should be
cleaned only as recommended by the manufacturer.
Attachments–Do not use attachments not recommended by the unit manufacturer
as they may cause hazards.
Water and Moisture–Do not use the unit near water–for example, near a bath tub, wash
bowl, kitchen sink, or laundry tub; in a wet basement; or near a swimming pool.
Accessories–Do not place the unit on an unstable cart, stand, tripod, bracket, or table.
The unit may fall, causing serious injury to a child or adult, and serious damage to
the unit. Any mounting of the unit should follow the manufacturer’s instructions,
and should use a mounting accessory recommended by the manufacturer.
Ventilation–Slots and openings in the cabinet are provided for ventilation and to ensure
reliable operation of the unit and to protect it from overheating, and these openings
must not be blocked or covered. The openings should never be blocked by placing the
unit on a bed, sofa, rug, or other similar surface. The unit should not be placed in a
built-in installation such as a bookcase or rack unless proper ventilation is provided.
There should be free space of at least 16 cm (6 in.) and an opening behind the unit.
Power Sources–The unit should be operated only from the type of power source
indicated on the marking label. If you are not sure of the type of power supplied to
your home, consult your unit dealer or local power company.
Grounding or Polarization–The unit may be equipped with a polarized alternating
current line plug (a plug having one blade wider than the other). This plug will fit
into the power outlet only one way. This is a safety feature. If you are unable to insert
the plug fully into the outlet, try reversing the plug. If the plug should still fail to fit,
contact a licensed electrician to replace your obsolete outlet. Do not defeat the safety
purpose of the polarized plug.
Power-Cord Protection–Power-supply cords should be routed so that they are not likely
to be walked on or pinched by items placed upon or against them, paying particular
attention to cords where they enter a plug, or a convenience receptacle, and the point
where they exit from the unit.
Outdoor Antenna Grounding–If an outside antenna or cable system is connected to the
unit, be sure the antenna or cable system is grounded so as to provide some protection
against voltage surges and built-up static charges. Article 810 of the National Electrical
Code, ANSI/NFPA 70, provides information with regard to proper grounding of the mast
and supporting structure, grounding of the lead-in wire to an antenna-discharge unit, size
of grounding conductors, location of antenna-discharge unit, connection to grounding
electrodes, and requirements for the grounding electrode.
Lightning–For added protection for the unit during a lightning storm, or when it is
left unattended and unused for long periods of time, unplug it from the wall outlet
and disconnect the antenna or cable system. This will prevent damage to the unit due
to lightning and power-line surges.
Power Lines–An outside antenna system should not be located in the vicinity of
overhead power lines or other electric light or power circuits, or where it can fall into
-
such power lines or circuits. When installing an outside antenna system, extreme care
should be taken to keep from touching such power lines or circuits as contact with
them might be fatal.
Overloading–Do not overload wall outlets, extension cords, or integral convenience
receptacles as this can result in a risk of fire or electric shock.
Object and Liquid Entry–Never push objects of any kind into the unit through open-
ings as they may touch dangerous voltage points or short-out parts that could result
in a fire or electric shock. Never spill liquid of any kind on the unit.
Servicing–Do not attempt to service the unit yourself as opening or removing covers
may expose you to dangerous voltage or other hazards. Refer all servicing to qualified
service personnel.
Damage Requiring Service–Unplug the unit from the wall outlet and refer servicing
to qualified service personnel under the following conditions:
When the power-supply cord or plug is damaged,
If liquid has been spilled, or objects have fallen into the unit,
If the unit has been exposed to rain or water,
If the unit does not operate normally by following the operating instructions. Adjust
only those controls that are covered by the operating instructions as an improper
adjustment of other controls may result in damage and will often require extensive
work by a qualified technician to restore the unit to its normal operation,
If the unit has been dropped or damaged in any way, and great care should be exercised in
handling, and the unit should be examined by qualified service personnel.
When the unit exhibits a distinct change in performance–this indicates a need for
service.
Replacement Parts–When replacement parts are required, be sure the service techni-
cian has used replacement parts specified by the manufacturer or have the same
characteristics as the original part. Unauthorized substitutions may result in fire,
electric shock, or other hazards.
Safety Check–Upon completion of any service or repairs to the unit, ask the service
technician to perform safety checks to determine that the unit is in proper operation
condition.
Wall or Ceiling Mounting–The unit should be mounted to a wall or ceiling only as
recommended by the manufacturer.
Heat–The unit should be situated away from heat sources such as radiators, heat
registers, stoves, or other units (including amplifiers) that produce heat.
IMPORTANT SAFETY NOTE
Before connecting a new component such as the Model 970 to your audio or home theater
system it is always good practice to make certain that all components are turned off, and
preferably unplugged from their AC power source. Many modern electronics products
feature automatic turn-on circuits that may be activated during an installation, causing
the potential for damage to electronic components and/or speakers. Such damage is not
covered by product warranties and Outlaw Audio specifically disclaims responsibility for
any such damage.
2
Outlaw Audio

Owner’s Manual
Precautions
Precautions
Verify The Line Voltage
Your new Model 970 has been factory configured for 120 (+/- 3%) volt AC lines. Connecting
the unit to a line voltage other than that for which it is intended can create a safety and
fire hazard, and may damage the Model 970. If you have any questions about the voltage
requirements for your specific model, or about the line voltage in your area, contact Outlaw
Audio before plugging the unit into a wall outlet.
NOTE: It is always a good idea to avoid using any audio or video equipment on
the same AC circuit as equipment with motors, such as air conditioners or refrigerators. This will lessen the possibility of power variation and electrical start-up
noise affecting your sound system.
Power Cord
The removable power cord that is shipped with the Model 970 is specifically designed to be
used with this product. DO NOT use any other power cord, as that may reduce the unit’s
performance and possibly create a safety hazard. In particular, DO NOT use standard IEC
type power cords designed for computers and other business equipment products, as they
have a three prong plug that is not meant for use with the 970. Should the power cord
require replacement, use an identical type, or contact Outlaw Audio for service.
Handle the AC Power Cord Gently
When disconnecting the power cord from an AC outlet, always pull the plug, never pull
the cord. If you do not intend to use the Model 970 for any considerable length of time,
disconnect the plug from the AC outlet. If the power cord is replaced, make certain that it is
of similar gauge. As with all electrical devices, do not run power cords under rugs or carpets
or place heavy objects on them. Damaged power cords should be replaced immediately
with cords meeting factory specifications.
AC Fuse
The fuse is located inside the chassis and is not user-service-able. If power does not come
on, contact your authorized service station.
Wiring
Cables that are run inside of walls should have the appropriate markings to indicate compliance with, and listing by the UL , CSA or other standards required by the UL, CSA, NEC
or your local building code. Questions about cables inside of walls should be referred to a
qualified custom installer, or a licensed electrician or low-voltage contractor.
Installation Location
To assure proper operation and to avoid the potential for safety hazards, place the unit
on a firm and level surface capable of supporting it’s weight. When placing the unit on a
shelf, be certain that the shelf and any mounting hardware can support the weight of the
unit and any additional items in the equipment rack, or on the shelf.
When positioning the Model 970 in its final location, make certain that it has adequate
ventilation on all sides, as well as on the top and bottom. In particular, it is a good idea
to provide at least two or three inches of room above the unit for air circulation. DO NOT
place CDs, DVDs, videotapes, owner’s manuals, or other paper on top of, or beneath, the
unit, or in-between multiple amplifiers in a stack. This will block airflow, causing heat
build-up, degraded performance, and may create a possible fire hazard.
If the unit is to be enclosed in a cabinet or rack, make certain there is adequate air circulation. Sufficient ventilation should be provided so that hot air may exit, and cool air
may enter the cabinet. In some instances, a small cooling fan may be required to insure
adequate airflow through the cabinet. If you are in doubt as to the ventilation requirements for your specific installation, please contact us. Also, do not place the Model 970
directly on a carpeted surface, as this will inhibit airflow underneath as well as create a
potential fire hazard.
Avoid installation in humid locations, in extremely hot or cold locations, or in areas that
are exposed to direct sunlight or space heating equipment.
Do Not Open The Cabinet
There are no user serviceable components inside this product. Opening the cabinet may
present a shock hazard, and any modification to the product will void your guarantee. If
water or any metal object, such as a paper clip, coin or a staple, accidentally falls inside
the unit, disconnect it from the AC power source immediately, and contact Outlaw Audio
for further instructions.
Recording Copyright
Recording of copyrighted material for other than personal use is illegal without permission
of the copyright holder.
Note to CATV system installer
This reminder is provided to call the CATV system installer’s attention to Article 820-40 of
the NEC, ANSI/NFPA 70, which provides guidelines for proper grounding and, in particular,
specifies that the cable ground shall be connected to the grounding system of the building,
as close to the point of cable entry as practical.
FCC Information for User
CAUTION
for compliance could void the user’s authority to operate the equipment.
NOTE
digital device, pursuant to Part 15 of the FCC Rules. These limits are designed to provide
reasonable protection against harmful interference in a residential installation.
This equipment generates, uses and can radiate radio frequency energy and, if not installed
and used in accordance with the instructions, may cause harmful interference to radio
communications. However, there is no guarantee that interference will not occur in a
particular installation.
If this equipment does cause harmful interference to radio or television reception, which
can be determined by turning the equipment off and on, the user is encouraged to try to
correct the interference by one or more of the following measures:
Reorient or relocate the receiving antenna.
Increase the separation between the equipment and processor.
Connect the equipment into an outlet on a circuit different from that to which the
: ANY changes or modifications not expressly approved by the party responsible
: This equipment has been tested and found to comply with the limits for a Class B
processor is connected.
Outdoor Antenna Installation
Safe Antenna and cable Connection
If an outside antenna or cable system is connected to the equipment, be sure the antenna or cable system is grounded so as to provide some protection against built up static
charges and voltage surges. Section 810 of the
national Electrical Code, ANSI/NFPA 70
(in Canada, part 1 of the Canadian
Electrical Code) provides
information with
respect to proper
grounding of the
mast and s upporting structure,
grounding of the
lead-in wire to an
ante nn a d is cha rg e
un it , si ze o f g ro un di ng
conductors, location of antenna discharge
unit, connection to grounding electrodes and
requirements for the grounding electrode.
Keep Antenna Clear of High Voltage Power Lines or Circuits
An outside antenna system should be located well away from power lines, electric light or
power circuits and where it will never come into contact with these power sources if it should
happen to fall. When installing an outside antenna, extreme care should be taken to avoid
touching power lines, circuits or other power sources as this could be fatal. Because of the
hazards involved, antenna installation should be left to a professional.
Model 970 7.1 Channel Preamplifier Processor
3

Owner’s Manual
Table of Contents
Table of Contents
2 Please Read First
4 Serial Numbe
5 A Brief Note On This Manua
5 A Quick Guide to the Model 970’s Feature
6 Unpackin
6 Accessorie
6 Model 970 Front Pane
8 Model 970 Rear Pane
10 Remote Contro
12 Front Panel and On-screen Display (OSD
12 Surround Format
12 Available Surround Mode
13 Dolby Digital
13 Dolby Digital E
13 Dolby Pro Logic II
14 Dolby Virtual Speaker
14 Dolby Headphone
14 DTS
14 DTS-ES
14 DTS Neo:
14 Stereo Listening Mode
14 Stereo
14 7-Channel Stereo/5-Channel Stere
14 Bypass
14 Connecting Your Model 97
16 Connecting Audio Component
16 Connecting Video Component
18 Antenna Connection
18 Amplifier Connection
18 Subwoofer Connectio
18 Other Connection
18 AC power connectio
24 System Setu
24 Input Configuratio
26 Speaker Placemen
28 Speaker Size Configuratio
29 Speaker X-Over (Crossover) Configuratio
30 Surround Setting Configuration
31 Channel Calibratio
33 Delay Adjus
34 System Configuration Setting
35 Model 970 Operatio
35 Power
35 Direct Operatio
38 Using the AM/FM Tune
39 Using Headphones
40 Remote Control Setup and Operatio
40 Battery Installatio
40 Setup Using Preprogrammed Code
41 Volume Control Punch-Throug
42 Operation
42 Care and Maintenanc
42 Cleaning
42 When You Are Awa
42 System Rese
43 TroubIeshootin
43 Setup Code
47 Model 970 Specifications
48 Outlaw Audio Limited Warrant
r
l
g
s
l
l
l
s
s
X
x
6
s
o
0
s
s
s
s
n
s
n
p
n
t
n
s
n
t
s
n
n
r
n
n
s
h
e
y
t
g
s
y
s
)
IMPORTANT NOTE: The Model 970 is shipped from the factory with
the following default settings:
Output Configuration: 5.1 channels
Loudspeaker Size: Small
Surround Mode: Dolby Pro Logic IIx
Crossover Frequency: 100 Hz
n
We chose these settings because they’re a safe starting point for any
speaker configuration. However, we strongly recommend that you
customize these setting to match your components and listening
preferences. Just follow the instructions in this manual. In particular, if
you have a 7.1 channel system, it is important to make the necessary
adjustments or you will not be able to access all the surround modes.
Serial Number
Record your Model 970’s serial number and date of purchase here. The serial
number is found on the back panel.
Serial Number
Date of Purchase
The contents of this manual are Copyright © 2005 by Outlaw Audio, LLC, and
may not be duplicated or reproduced by any means, whether physical, electronic
or otherwise without prior written consent from Outlaw Audio.
4
Outlaw Audio

Outlaw Audio Model 970
7.1 Channel
Preamplifier Processor
Welcome to the hideout–you're now an Outlaw! Although you've selected one
of the most advanced A/V components available today, being an Outlaw isn't
always easy. Owning Outlaw components often ruffles the feathers of friends
or acquaintances that don't. That's because Outlaw products outperform
comparably priced units from virtually all other companies or cost much,
much less than units offering similar performance. But that's what being an
Outlaw is all about. So, once again, welcome. And sincere thanks for joining
the gang. We think you're going to enjoy being an Outlaw.
A Brief Note On This Manual
Read it! It's that simple. We know some of you won’t (Outlaws are a contrary
bunch!) But those who take the time will get some serious help craftily disguised
in non-serious language. Yep, you might say that this manual is a bit different
from some you’ve encountered in the past. Who knows, it might even provide
you with a chuckle or two as you read it.
On the serious side, this Manual contains everything you need to know to connect, configure, and use your new processor. It'll show you how to integrate
your new processor with all the other components in your system, and how to
customize the Model 970 to match your preferences.
If you still have questions, we’re not going to leave you staked out in
the sun waiting for some posse to round you up. You can contact us via
e-mail at
(688-5297)
You may also find fellow Outlaws hanging out around the campfire at the
Outlaw Saloon. It’s a great place to share your Model 970 experiences with
like-minded folk. Mosey on in by clicking on “Hideout” on our home page
and then clicking on “Saloon.” But make sure no one else is watching, OK?
We don't want anyone to know where the Outlaws hang out.
A Quick Guide to the Model 970’s Features
Your new Outlaw Audio Model 970 Preamplifier Processor is built with topquality components for state-of-the-art audio performance. It combines a
broad range of inputs and outputs, performance minded features, and the
very latest audio processing technologies that will make your system deliver
all the sound it’s capable of.
No matter what source material you throw at it, the Model 970 provides the
right surround-sound processing technology as well as other options to heighten
your enjoyment of movies, music, and video games. The processor works with
practically any audio and video component from analog sources to CD players,
cable and satellite boxes, PCs, digital TV tuners, and the latest Super Audio-CD
and DVD-Audio players. Of course, there is also a built-in AM/FM tuner.
Clean design and intuitive controls make the Model 970 one of the easiest-touse surround processors ever.
customerservice@outlawaudio.com
.
or call us at
1-866-OUTLAWS
A Quick Guide to the Model 970's Features
8 Digital Audio Inputs (4 coaxial, 4 optical)
Owner’s Manual
These are “assignable” inputs. That means the setup menu system “links”
the front or rear panel digital inputs to any source. In short, you can
use any digital input for any digital source. Hook them up first, program
them later!
2 Digital Audio Outputs (1 coaxial, 1 optical)
These let you connect digital audio sources to digital audio recorders.
DVI (Digital Video Interface) Input/Output (2 input, 1 output)
For the best possible picture with DVI- or HDMI-equipped digital TV tuners, satellite receivers and DVD players. Remember that DVI carries video
signals only. If another component has HDMI (High Definition Multimedia
Interface) connections, you will need a DVI/HDMI adaptor or dual-purpose
cable, such as those available from the Outlaws..
High-Bandwidth Component Video Switching
This lets you use the Model 970 as a switching center for your high-def
sources like digital set-top boxes and progressive-scan DVD players without
losing any picture quality.
5 Composite and S-Video Inputs
These provide high-quality video signal paths to and from your video
sources.
8 Analog Audio Inputs with Bypass Capability
Connect all your audio sources to the Model 970 with ease. And you can
bypass all digital processing (surround processing, bass management, etc.)
to listen to straight analog two-channel sources whenever you want.
Video Output Conversion
All composite and S-video signals are “transcoded” or upconverted to
component video, so every video signal (except DVI) is available at the
component output jacks. Of course, the on-screen menus are also available
on the component outputs (except when HDTV signals are in use.)
High-performance AM/FM/FM Stereo tuner with 30 presets
Audiophile-quality digital-to-analog and preamplifier stages
Provide maximum performance for critical music listening.
High-performance, matched Op-Amps
Dolby Digital EX® and Pro Logic IIx
®
Dolby Digital decoding delivers 5.1-channel digital surround sound from
DVD, satellite, cable and digital TV sources. Dolby Digital EX adds an
additional rear-surround channel. Pro Logic IIx converts stereo sound
to 5.1, 6.1 or 7.1 channels, and also converts 5.1 sources to 7.1.
DTS®, DTS-ES® and DTS Neo:6
®
The full suite of DTS decoding and processing modes is available to provide
up to 6.1 channels of sound from virtually any analog source as well as
DTS-encoded programs.
7.1-Channel Analog Input with digital or analog bass management
This is for connection of today’s multi-channel source devices (Super Audio
CD and DVD-Audio players) as well as future high definition sources. You
may choose either digital or analog bass management, or simply go with
the by-pass mode when your player has internal bass management.
Model 970 7.1 Channel Preamplifier Processor
5

Owner’s Manual
Unpacking
Dolby Headphone
®
This creates a surround-sound effect with ordinary headphones.
Dolby Virtual Speaker
®
Creates a surround-sound effect when only two speakers are connected.
Lip Sync Delay
This important feature allows you to compensate for the video delay that
is often caused by the scaling circuitry in flat panel and micro-display
based video displays, digital video recorders or digital video sources.
Independently adjustable for each input, this feature restores lip sync.
Four-Way Crossover
Allows you to optimize bass reproduction and power handling by setting
different crossover frequencies for front, center, side surround, and rear
surround speakers. (Don’t worry about understanding all of this right
now – we’ll explain later. Trust us, we’re Outlaws!)
RS-232 Port
An RS-232 port makes it possible to update the Model 970’s software right
from your computer.
Low-Voltage Trigger
This output jack sends a signal to an external system component (amplifier, video projector, etc.) so that it turns on whenever you turn the Model
970 on. Yes, it’ll turn those same things off when you put the Model 970
into standby mode, too, so don’t worry.
Unpacking
Your processor comes in a carton with packing materials designed to cushion it
from all the rudeness it’ll undoubtedly encounter during shipping. We strongly
suggest you save them for use if you move, or if the unit ever needs to be shipped
back to us for any reason (our warranty requires it).
OK, your hideout may be small but you can minimize the size of the carton for
storage. Flatten it by carefully opening the top and bottom flaps and folding the
carton flat. Do the same with other cardboard inserts. If some of the packing
material can’t be folded, save it in a plastic bag.
The Model 970 is not light. It can’t be with all those goodies stuffed inside. So
take care when you lift it. Use your legs, not your back! And don’t bash your
furniture with the protruding front-panel volume control knob or the rearpanel connectors.
Accessories
After unpacking your Model 970, please check to make sure that the following accessories are in the box. If the Outlaws in the factory left anything out,
please get in touch with us.
1 Remote control
2 AA Batteries for the remote control
1 AC power cord
1 FM antenna
1 AM loop antenna
2 Front panel input insert covers
1 Owner's manual
Model 970 Front Panel
FP1 On/Standby Indicator LED (see pages 24, 36)
Glows amber when the unit is in standby (ready) mode and turns blue
when you turn the unit on.
FP2 IR (Infrared) Sensor (see page 40)
The IR sensor receives commands from the hand held remote control.
Don’t block or hide it. If the Model 970 is placed in a closet, cabinet, or
behind tinted glass doors, you may have to use an external IR sensor.
FP3 Front panel display (see page 12)
Shows the input you’ve selected, what it’s assigned to, the AM or FM frequency and tuner preset (if any), volume level, mute, which channels are
active, etc. It may be set to turn off automatically from 15 to 60 seconds
after it shows the information and may be used instead of the on-screen
display to help set up the Model 970 and the rest of your system.
FP4 Cursor (Navigation) controls
In general, the Up and Down cursor buttons select a particular function
or parameter from the on-screen or front panel display menu while the
Left and Right cursor buttons adjust whatever function or parameter
you’ve just selected. The Enter/Set button (in the middle of the Cursor
buttons) locks in the adjustments you’ve just made.
FP5 Menu button (see page 24)
Activates or cancels the on-screen menu.
FP6 Input button (see page 36)
Pressing activates input select function. Use the Cursor UP and DOWN
buttons to select the desired input.
FP7 Surround mode button (see page 36)
Pressing activates surround mode select function. Use the Cursor UP and
DOWN buttons to select the desired surround mode.
FP8 Tone button (see page 38)
Activates the tone controls. Use the Cursor UP and DOWN buttons to
select the desired tone control mode.
FP9 Mute button (see page 36)
Mutes the volume of the Model 970. Pushing the button again, or turning
the volume control, restores the sound.
FP10 Volume knob (see page 36)
Adjusts volume level through your speakers. The front panel display shows
volume settings from –70dB to +10dB. Turning the knob clockwise
increases volume. Turning it counterclockwise decreases levels. Volume
control overrides the Mute circuit.
FP11 Standby/On button (see pages 24, 35)
When the rear panel Master Power switch is in the ON position, pressing
this button toggles the unit from standby (most everything off except for
the IR sensor and associated circuits) to on (fully operational).
FP12 Headphone jack (see page 39)
Use to connect headphones. Pure stereo or Dolby Headphone processing
is available. The speakers are muted when the headphones are in use.
6
Outlaw Audio

Model 970 Front Panel
NOTE:
The Model 970 is shipped with insert
covers for the front panel inputs.
To remove them, press gently on the left
side of the insert until the right side pops
out, and then pull the insert towards you.
To replace the inserts, slip the left side in
first while holding the insert at a 45
degree angle, and then gently push the
right side of the insert into place.
Owner’s Manual
Model 970 Front Panel
FP
1
FP
2
FP
3
FP
4
FP5FP6FP7FP8FP
9
FP
10
FP11FP12FP
13
FP13 Headphone level knob (see page 39)
Adjusts the volume level of the headphones.
FP14 Tuner button (see page 38)
Selects between AM or FM.
FP15 Tune Mode button (see page 38)
Selects between FM mono and FM stereo.
FP16 Preset button (see page 39)
Advances tuner to the next preset in the selected frequency band
(AM or FM).
FP14FP15FP
16
FP
17
FP
18FP19FP20
FP17 Digital 4 Inputs (Coaxial and Optical) (see pages 15-23)
Connect the output of a portable or other device with digital audio to
these jacks. They may be assigned to any video input.
FP18 S-Video 4 input (see pages 15-23)
Connect the S-Video output of a game console, camcorder or any other
portable video device to this input.
FP19 Composite video 4 input (see pages 15-23)
Connect the composite video output of a game console, camcorder or
any other portable video device to this input.
FP20 Stereo analog audio inputs (see pages 15-23)
Connect audio for video game systems, camcorders, and portable music
or DVD players.
Model 970 7.1 Channel Preamplifier Processor
7

Owner’s Manual
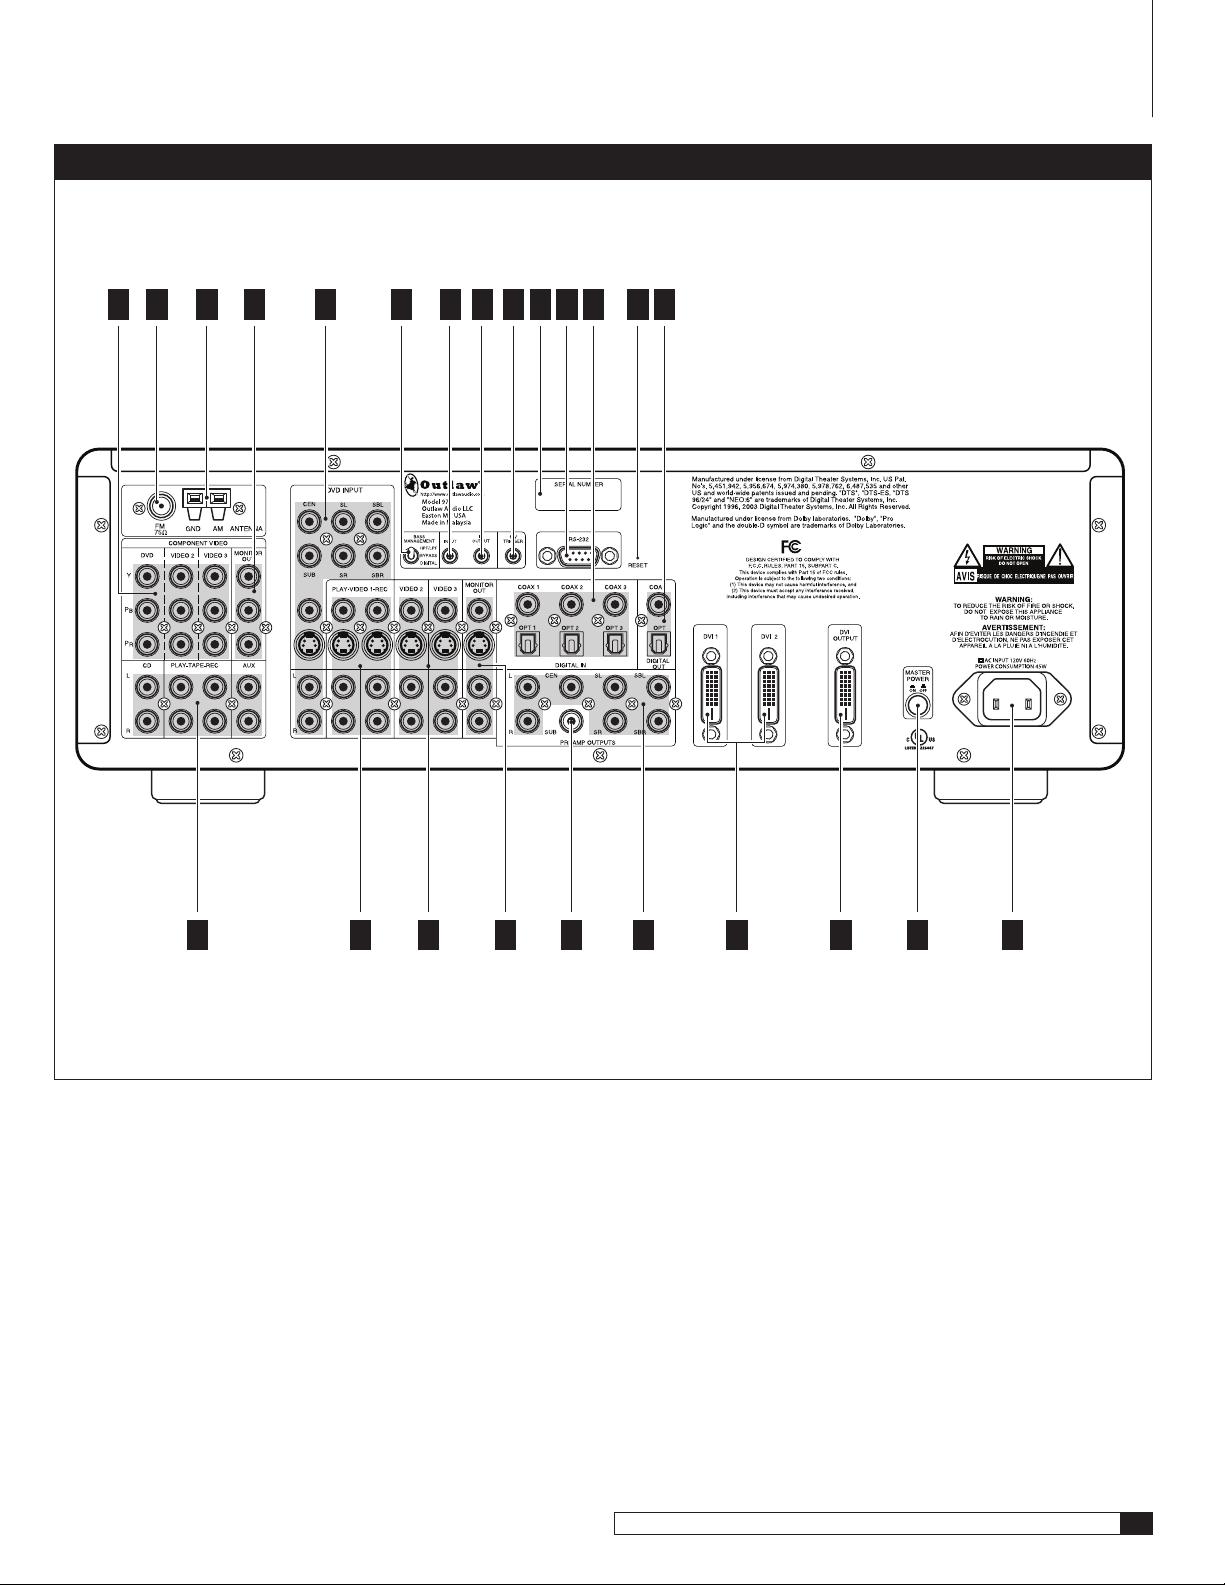
Model 970 Rear Panel
Model 970 Rear Panel
The Model 970 rear panel provides a wide range of digital and analog inputs
and outputs. Many current components provide multiple types of audio and
video connectors. When in doubt about which to use, choose the best available
connection based on the following: For video, the highest quality signal is
obtained by using DVI/HDMI, followed by component, S-Video and composite.
For audio, start with either a coaxial or optical digital cable, otherwise use
standard RCA-type analog connectors.
In some cases you will want to make more than one type of connection for added
flexibility in configuring your system. Those situations will be noted below.
RP1 Component video inputs (see pages 15-23)
Use these three sets of jacks to connect devices with component video
outputs, such as a DVD player or a digital TV tuner. If the device has a
DVI or HDMI output, use that connection instead.
RP2 FM antenna input (see page 18)
Accepts a 75-ohm coaxial cable. Use it to connect the supplied FM
antenna.
RP3 AM antenna input (see page 18)
Use this to connect the supplied AM loop antenna or any other external
AM antenna.
RP4 Component video output (see pages 15-23)
Connect to a video display that accepts component video. If the device has
a DVI or HDMI input, use that connection instead.
RP5 DVD input (see pages 15-23)
Use this group of inputs to connect a device with analog multi-channel
outputs, such as a DVD-Audio or Super Audio CD player. The composite
and S-Video jacks are specifically designated for use with this input,
or you may assign any of the DVI or component video inputs. A pair of
analog audio inputs is also provided.
RP6 Bass Management selector switch
Three position toggle switch for selecting how the Model 970 routes bass
signals for the DVD 7.1 multi-channel analog inputs only. Choices are
“Digital” (which applies the choices that you’ll make in the Speaker Size
and Speaker X-Over sub-menus), “Bypass” (no bass management at all)
and “HPF/LPF” (a fixed analog crossover at 80Hz). Bass Management
parameters are set for all other inputs using the Speaker Size and Speaker
X-Over sub-menus explained on pages 30-31.
RP7 IR input
Connect an external infrared sensor to this input to allow remote control
of the Model 970 even if it is installed in a cabinet with solid doors. It also
allows control of the Model 970 from a second room.
RP8 IR output
Feeds an infrared flasher attached to another piece of audio/video gear.
Any infrared remote signal received by the Model 970’s front-panel sensor or by an external sensor connected to the Model 970 will be relayed
through this jack, so concealed audio/video devices can be controlled
by remote.
RP9 12V Trigger output (see page 18)
This jack provides a 12-volt DC output whenever the Model 970 is switched
on. Usually, this jack is used for automatic turn-on of a compatible
amplifier equipped with a DC trigger input.
RP10 Serial number
Write this number in the space provided on page 4 for future reference.
RP11 RS-232 port (see page 18)
Use this connector for uploading new software into the Model 970.
RP12 Digital audio inputs (see pages 15-23)
Optical and coaxial inputs for connecting digital audio devices such as
DVD players, CD players, and digital TV tuners. These inputs are assignable to any video or audio source.
RP13 Reset switch access
Together with the RS-232 port, this switch is used to enable the software
update process of the Model 970. This switch should not be confused with
resetting the Model 970 configuration settings to their factory defaults
which is explained on page 49.
RP14 Digital audio outputs (see pages 15-23)
Connect these to a CD recorder, MiniDisc recorder, a computer or any
other audio recording device that accepts digital inputs. Both optical and
coaxial outputs are provided.
RP15 Analog audio connections (see pages 15-23)
This group includes input connectors for analog audio devices, such as
cable boxes, laserdisc players or older CD players. There is also a tape
loop for feeding an analog audio recorder or cassette deck.
RP16 Video 1 connections (see pages 15-23)
Connect these audio and video jacks to a VCR or a DVD recorder. If the recorder
has an S-Video input, use that connection instead of composite video.
RP17 Video 2 and 3 connections (see pages 15-23)
Connect these two sets of audio and video jacks to video devices, such
as DVD players, satellite receivers, regular and S-VHS VCRs, cable boxes
or laserdisc players.
RP18 Monitor out connections (see pages 15-23)
Connect these audio and video jacks to your TV or monitor. Use the
S-Video or composite connectors when the display does not have a component or DVI/HDMI video input.
RP19 Subwoofer output (see pages 18 and 23)
Connect to the input of a powered subwoofer or to an amplifier that feeds
a passive (non-powered) subwoofer. The output of the signal at this jack
is determined by the settings in the Speaker Size and Speaker X-Over
sub-menus explained on pages 30-31.
RP20 Preamp audio outputs (see pages 18 and 23)
Variable outputs for connecting to an external power amplifier to your
system while still using the speakers connected to the loudspeaker outputs. If desired, an external amplifier with higher power than the Model
970’s internal amp–such as one of Outlaw’s own amplifiers–can be
connected to the Model 970 using these jacks. Alternatively, an external
amp can be connected here to drive additional speakers in a remote
location, such as a patio or second room.
8
Outlaw Audio
Model 970 Rear Panel
Owner’s Manual
Model 970 Rear Panel
RP1RP2RP3RP
4
RP
5
RP
RP
6
7
RP
8
RP9RP10RP
11
12
RP
RP
13
RP
14
RP
15
16
RP
RP
17
RP21 DVI inputs (see pages 15-23)
These digital video connections provide the best possible picture when
using a DVI- or HDMI-equipped video sources. (Use a DVI-to-HDMI
adapter or dual-purpose DVI to HDMI cables such as those available
from Outlaw Audio.)
RP22 DVI output (see pages 15-23)
When DVI or HDMI sources are connected to the Model 970’s DVI Inputs,
connect this jack to a DVI equipped video display, or use an adaptor or
dual purpose cable to connect it to an HDMI display. Analog video sources
and on-screen menus do not appear on the DVI output.
18
RP
19
RP
RP
20
21
RP
RP
22
23
RP
RP
24
RP23 MAIN POWER button (see pages 24 and 36)
Connects and disconnects the Model 970 from AC power. When this
switch is on, the Standby/On indicator on the front panel illuminates.
When it is off, all power is cut and the front STANDBY/ON switch will
not function.
RP24 AC input (see page 18)
Connect the supplied AC power cord here. Do not use standard IEC type
power cords.
Model 970 7.1 Channel Preamplifier Processor
9
Owner’s Manual
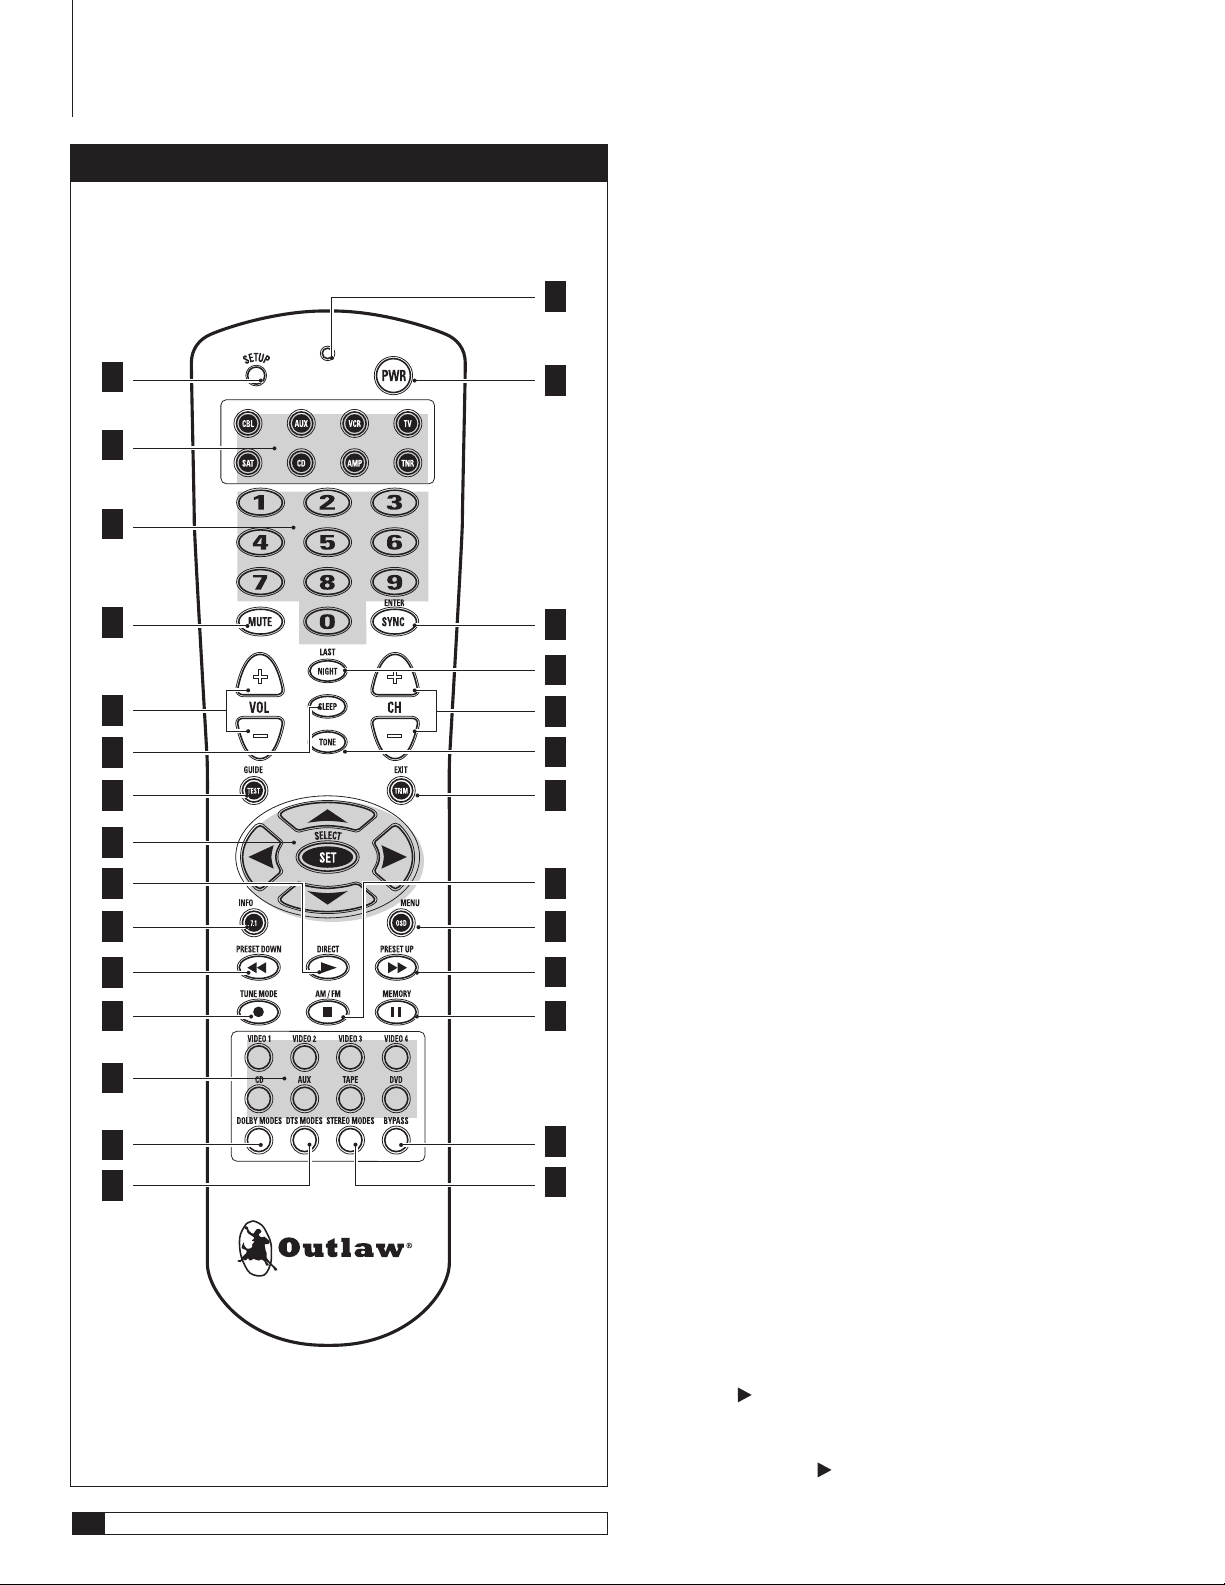
Remote Control
Model 970 Remote Control
RC
1
RC
2
RC
3
RC
4
RC
5
RC
6
RC
7
RC
8
RC
9
RC
10
RC
11
RC
12
RC
13
RC
14
RC
15
16
17
18
19
20
21
22
23
24
25
26
27
28
Remote Control
The Model 970’s hand held remote controller is a pre-programmed universal
unit that contains an extensive library of IR codes and can control up to seven
other system components in addition to duplicating every one of the Model
RC
RC
RC
RC
RC
RC
RC
RC
RC
RC
RC
RC
RC
970’s front panel functions. All of these choices are shown on the Model 970’s
front panel and on-screen displays.
Activate the remote’s backlight by simply touching any pushbutton. This lets
you use the remote comfortably even in a dark room. The backlight stays on
for 5 seconds after you’ve touched a pushbutton.
RC1 Setup button (see pages 40-42)
Holding down this button for three seconds causes the remote to enter
setup mode. In this mode, you can enter an entire set of codes for another
device to be controlled.
RC2 Device Control Selector buttons (see pages 24, 36, 40-42)
Selects the component you want to control with the remote.
Push TNR
to control the Model 970.
RC3 Numeric keypad (see pages 38-42)
Buttons for control functions requiring you to enter numbers, such as
command code selection when programming the remote, using the
tuner, selecting CD and DVD player tracks, etc.
RC4 Mute button (see page 36)
Mutes the Model 970’s output. Pushing the button again restores the
volume to its previous level. Changing the front panel or remote control
volume setting also releases the mute function. Mute status is shown on
the front panel display.
RC5 Volume Up/Down buttons (see pages 36, 40-42)
These buttons control the Model 970’s volume.
RC6 Sleep button (see page 37)
Activates the sleep timer, putting the processor into Standby mode after
a certain period. The first push sets the timer at 90 minutes; subsequent
pushes scroll though 75, 60, 45, 30, 20, 10, 5 minutes, and Off. Once the
timer is set, pushing this button again displays the remaining time on
both the front panel and the on-screen display.
RC7 Guide/Test dual function button (see page 37)
Model 970
: Test turns on the test tone generator to set speaker levels. To
route the test tone from one speaker to the next, press the Left or Right
Cursor buttons. Use the Up/Down cursor buttons to adjust levels. Press
Set when finished.
Other components
: Guide calls up the program guide on satellite receiv-
ers and cable boxes.
RC8 Cursor control buttons (menu navigation)
In general, the Up and Down cursor buttons select a particular function
or parameter from the on-screen menu while the Left and Right cursor
buttons adjust whatever function or parameter that’s been selected. Set
activates selections made while using the on-screen menu.
RC9 Direct/ dual function button (see page 38)
Model 970
: Direct enables access to a radio station directly. Press once,
then enter the station’s frequency using the numeric keys.
Other components
:
begins the play function.
10
Outlaw Audio

Owner’s Manual
Remote Control
RC10 Info/7.1 dual function button
Model 970
Other components
: 7.1 selects the 7.1 multi-channel audio input.
: Info calls up whatever menu or information is
available.
RC11 Preset Down/
Model 970
dual function button (see page 39)
: Preset Down advances the AM/FM tuner to the next lower
preset station.
Other components
RC12 Tune Mode/ dual function button (see page 38)
Model 970
:
begins rewind or reverse scan.
: Tune Mode selects between mono and stereo while listening
to FM. The selected mode appears on-screen.
Other components
RC13 Source Selector buttons (see pages 35 and 42)
:
activates the recording function.
Turns the Model 970 power on and selects a particular source as the
Model 970’s input. The source appears on the front panel and the onscreen display.
RC14 Dolby Modes button (see page 36)
Selects from the available Dolby surround modes, depending on the
input source and the number of speakers in your system. Each press of
the button selects another mode. Mode selections appear on the front
panel and the on-screen display.
RC15 DTS Modes button (see page 36)
Selects from the available DTS surround modes, depending on the input
source and the number of speakers in your system. Each press of the
button selects another mode. Mode selections appear on the front panel
and the on-screen display.
RC16 Status LED Indicator (see pages 40 and 41)
Lights briefly after pushing a control key. Flashes twice in rapid succession when you’ve successfully entered “setup” mode.
RC17 Power off button (see pages 35 and 42)
Turns off the Model 970. Also turns other components controlled by
the remote on and off.
To turn on the processor, press any Source
Selector button. This turns the Model 970 on and switches the unit to
that input.
RC18 Enter/Sync dual function button (see page 38)
Model 970
: Sync, sometimes called “lip synch,” delays audio in precise
steps to preserve synchronization with the video image. Each push of
the button increases the delay by 10 milliseconds. The on-screen display
indicates the amount of delay. After delay is set, pushing the button again
resets the delay to 0.
Other components
: Enters a selection (a channel number, etc.) made
with the numeric keypad.
RC19 Last/Night dual function button (see page 37)
Model 970
: Night reduces the audio signal’s dynamic range for late
night viewing.
Other components
: Last toggles between the two most recently selected
TV channels.
RC20 Channel Up/Down buttons (see page 38)
Adjusts AM/FM radio tuning frequency. Frequency appears on both the
front panel and on-screen. Also serves as channel selector when controlling other devices.
RC21 Tone button (see page 38)
Activates the tone controls. After pushing the Tone button, use the Up
and Down cursor buttons to change treble settings. Press Tone again to
change bass settings.
RC22 Exit/Trim dual function button. (see page 37)
Model 970
: Trim enables level calibration of each channel for “onthe-fly” adjustments without test tones (for example, increasing center
channel level).
Other components
RC23 AM/FM/ dual function button (see page 38)
Model 970
: Exit takes you out of that component’s menu.
: AM/FM selects the AM/FM tuner when using another source.
Push it again to switch between AM and FM.
Other components
:
stops whatever media the component is using,
cancels Record (if engaged) and disengages the transport mechanism.
RC24 MENU/OSD dual function button (see page 24)
Model 970
Other components
RC25 Preset Up/
Model 970
: OSD activates the on-screen display.
: Menu calls up that device’s menu.
dual function button (see page 39)
: Preset Up advances the AM/FM tuner to the next higher
preset station.
Other components
RC26 Memory/ dual function button (see page 39)
Model 970
:
initiates fast forward or forward scan.
: Selects a station memory of the internal AM/FM tuner; press
the button then enter the number of the desired memory. Holding this button down for three seconds activates automatic channel scan, which scans
the band you are on for the next highest active frequency/station.
Other components
RC27 Bypass button (see page 36)
:
temporarily stops Play or Record.
Turns off all digital-domain audio signal processing, including Bass
Management.
RC28 Stereo Modes button (see page 36)
Deactivates surround sound processing and selects from traditional
two-channel stereo, 5 Stereo and 7 Stereo modes. Stereo mode selection
is indicated on the front panel and the on-screen display.
Model 970 7.1 Channel Preamplifier Processor
11
Owner’s Manual
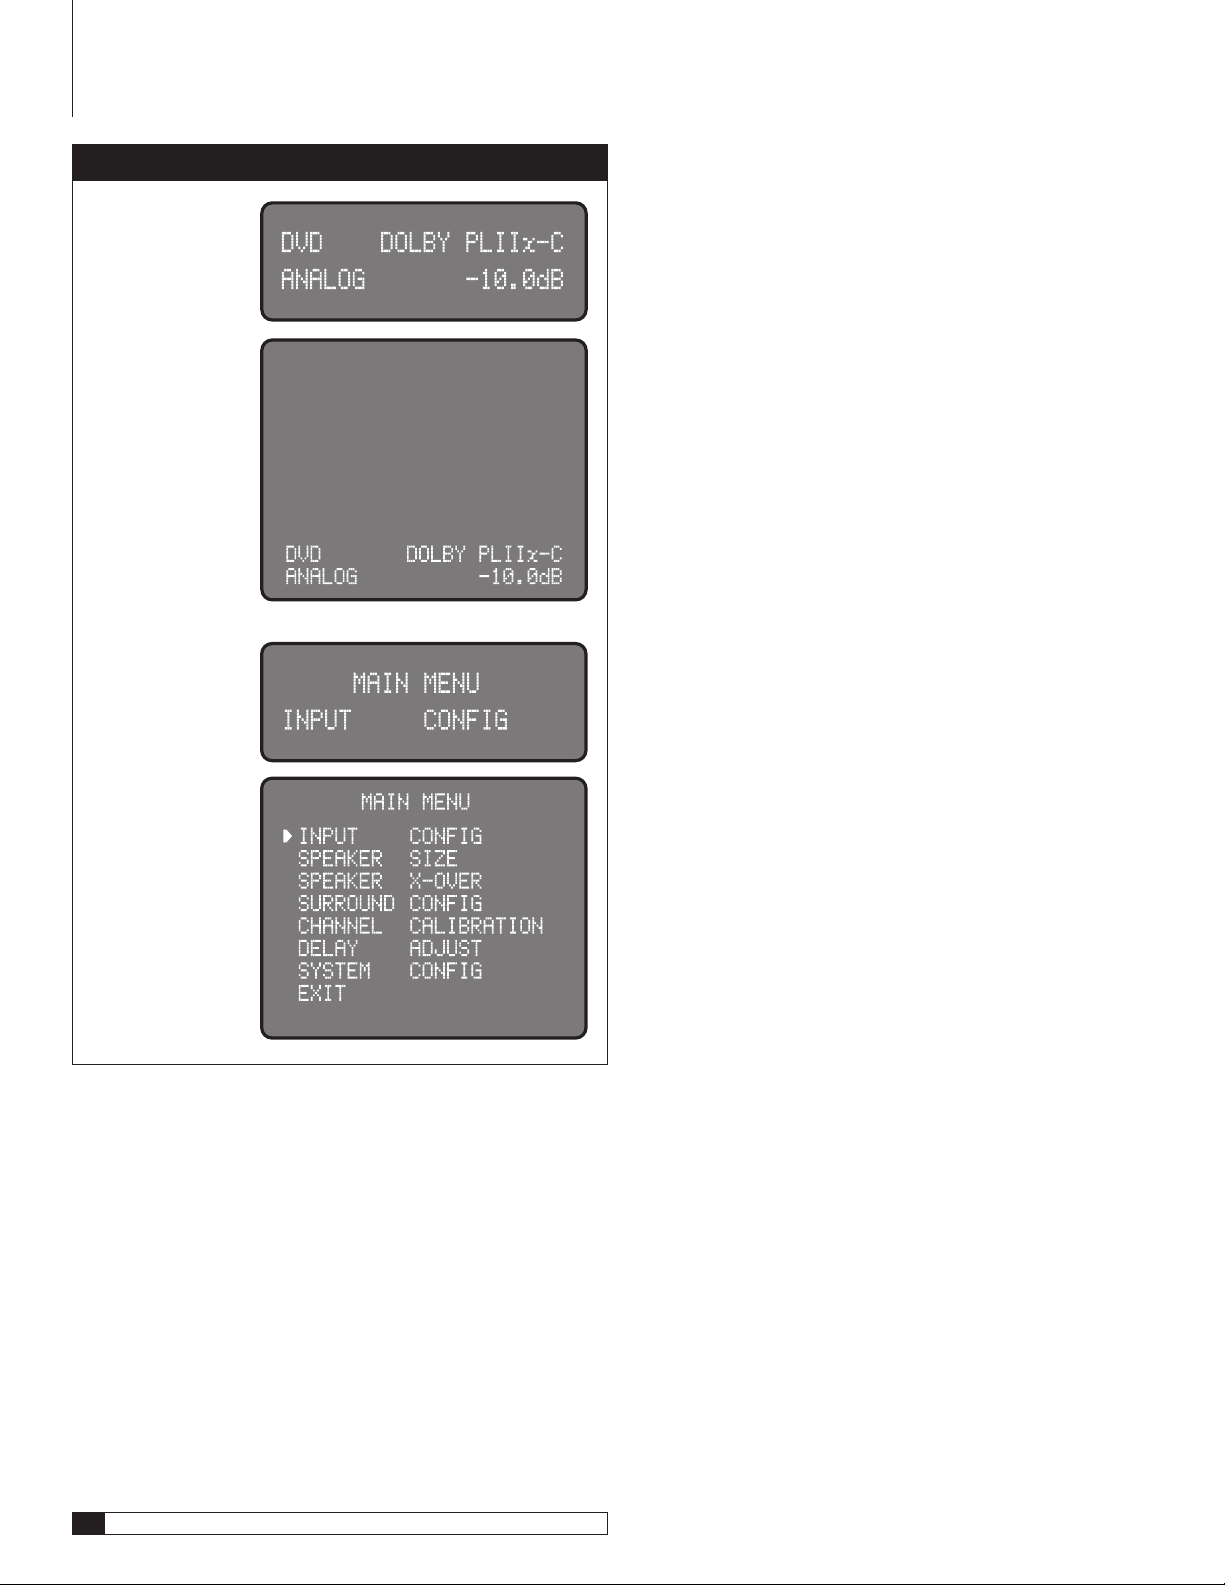
Front Panel and On Screen Display (OSD)
Model 970 Front Panel and On Screen Display
Example of Front Panel
Display when an input
source is selected.
Example of On Screen
Display when an input
source is selected.
Example of Front Panel
Display when the Main
Menu is selected.
Example of On Screen
Display when the Main
Menu is selected.
Front Panel and On-screen Display (OSD)
The front-panel display and on-screen display (OSD) provide visual feedback
of the current settings, surround modes, and configuration menus of the unit.
Information is constantly displayed at the front panel whenever the Model 970
is turned on.
To use the OSD, the unit must be connected to your display device using either
the composite video output or S-Video output jacks. You may also view the OSD
using the component video output, but the picture may blank temporarily when
you activate the menu system.
The information presented in the front-panel display will in most cases reflect
what is displayed in the OSD, but certain operations require that you use one
or the other.
Surround Formats
The Model 970 incorporates today’s most advanced surround sound technologies. The Model 970 handles the full roster of Dolby and DTS formats. In the
Dolby column, you’ll see Dolby Digital, Dolby Digital EX, and Dolby Pro Logic
IIx (Movie, Music, and Game modes). On the DTS side of the tracks, we’ve
included DTS, DTS-ES (Discrete and Matrix), Neo:6, and 96/24.
You’ll also find Dolby Headphone for convincing surround effects with conventional stereo headphones and Dolby Virtual Speaker for an exceptionally
enveloping surround soundfield with just two full-range speakers. The Model 970
also offers 5-Channel Stereo and 7-Channel Stereo modes.
What you won’t find is a plethora of artificial “environments” like “stadium,”
“concert hall,” “jazz club,” etc. We did this on purpose–they’re usually not worth
the effort to scroll past on the way to something really useful. Want excellent
surround sound from stereo sources? Use Dolby Pro Logic IIx or DTS Neo:6.
Available Surround Modes
To help you further understand the messages that appear in the front panel
display and the on-screen messaging system, the chart and information that
follow below explain how the information messages from the Model 970 relate
to the surround decoding and processing modes available on the Model 970.
It is important to remember that not all modes are available at all times. Some
modes, such as Dolby Pro Logic IIx Digital EX and “7 Stereo” are only available
when you have a 7.1 system with the Surround Back speakers set to SMALL or
LARGE in the Speaker Configuration menu (see pages 30-31). Other modes,
including Dolby Digital, DTS and DTS-ES require a digital data stream, and
are thus not available when an analog source is playing.
To make it easier to navigate the multitude of mode options, we have added two
important columns to the chart below and put special key indicators:
The “D” column tells you which modes are available when a digital source
is playing, depending on the specific digital data stream.
DD indicates modes that are only available with Dolby Digital encoded
sources.
DTS
indicates modes that are only available with DTS encoded sources.
P indicates modes that are available only with two-channel PCM data
streams.
+ indicates a post-processing mode that’s available as an “adder” to two channel
(2.0) Dolby Digital or PCM data streams. For example, when a Dolby Digital 2.0
data stream is present you may add Dolby Pro Logic II or IIx as a post processing
mode. In those cases you will see the main mode name in the display messages
first, followed by a “+” and then the post processing mode’s name.
The “A” column tells you which modes are available with two-channel
analog inputs.
12
Outlaw Audio
D A Display Text Name Description/Suggested Use
DD
DD
+
+
+
+
+
+
+
+
•
DTS
DTS
P+
P+
P
P
P
DOLBY DIG Dolby Digital Decodes Dolby Digital data for discrete (2.0 to 5.1 depending on the playback source) multi-channel playback
DOLBY DIG EX Dolby Digital EX Decodes Dolby Digital soundtracks to a 7.1 soundfield
•
DOLBY PLll-C Dolby Pro Logic II Cinema Creates a 5.1 soundfield from stereo or matrix encoded sources. Optimized for movie soundtracks.
•
DOLBY PLII-M Dolby Pro Logic II Movie Creates a 5.1 soundfield from stereo or matrix encoded sources. Optimized for music playback.
•
DOLBY PLII-X Dolby Pro Logic II Game Creates a 5.1 soundfield from stereo or matrix encoded sources. Optimized for use with games.
•
DOLBY PLllx-C Dolby Pro Logic IIx Cinema Creates a 7.1 soundfield from stereo or matrix encoded sources. Optimized for movie soundtracks.
•
DOLBY PLIIx-M Dolby Pro Logic IIx Movie Creates a 7.1 soundfield from stereo or matrix encoded sources. Optimized for music playback.
•
DOLBY PLIIx-X Dolby Pro Logic IIx Game Creates a 7.1 soundfield from stereo or matrix encoded sources. Optimized for movie soundtracks.
•
VS Dolby Virtual Speaker Creates a multi-channel soundfield from stereo sources
•
PRO LOGIC Dolby Pro Logic Dolby Labs’ original Pro Logic matrix decoding mode
DTS DTS 5.1 Delivers 5.1 sound from DTS encoded material
DTS-ES DTS-ES Discrete Delivers a discrete 6.1 soundfield from DTS-ES discrete encoded material
DTS-ES DTS-ES Matrix Delivers a 6.1 soundfield from DTS-ES matrix encoded material
•
NEO:6 CINEMA DTS Neo:6 Cinema Creates a multi-channel soundfield from stereo sources
•
NEO: 6 MUSIC DTS Neo: 6 Music Creates a multi-channel soundfield from stereo sources
•
STEREO Two-Channel Stereo Two channel stereo with digital bass management
•
5 STEREO Five-Channel Stereo Creates a 5-channel program from a stereo source
•
7 STEREO Seven-Channel Stereo Creates a 7-channel program from a stereo source
•
BYPASS Bypass “Pure” two channel playback with no digital processing for bass management
Owner’s Manual
Surround Formats
Dolby Digital
This format provides 5.1-channel surround sound. Dolby Digital source material includes DVDs, digital TV broadcasts, many PlayStation 2® video games,
all Xbox® video games, laserdiscs, some cable and satellite programs, digital
cable programming, and D-VHS tapes.
Dolby Digital EX
Dolby Digital Surround EX-encoded soundtracks contain an extra back
surround channel that’s been added to the soundtrack during mixing. This
additional channel places audio directly behind the listener to provide more
detailed imaging, enhanced depth, better ambience, and more precise sound
localization. You can play this “back” channel through one or two additional
surround speakers. There’s a list of Dolby Digital EX-encoded movies on the
Dolby web site,
www.dolby.com
.
You can use Dolby Digital EX to play back non-EX encoded material but the
results probably won’t be precisely what you might expect. Instead, we recommend that you use Dolby Digital +
Pro Logic IIx-C
(movie mode) for more
predictable results.
Dolby Pro Logic IIx
Dolby Pro Logic Ilx is the most recent version of Dolby Pro Logic decoding. Pro
Logic II was a substantial improvement over original Pro Logic and Pro Logic
IIx is the 7.1-channel version of Pro Logic II. You can use it only when you’ve
got back surround speakers connected to the Model 970. Otherwise, the Model
970 provides standard Pro Logic II processing.
Pro Logic IIx’s Movie mode
is excellent for decoding Dolby Surround-encoded
movie and TV soundtracks. It also works well with video games, especially those
encoded in Pro Logic II. Use this mode for VHS tapes, standard TV broadcasts,
and DVDs encoded in Dolby Digital 2.0.
The Pro Logic IIx Music mode
converts stereo music into surround sound.
Use it with any stereo music source, including CDs, FM radio, and MP3 players. The Music mode includes three controls, which are adjustable through the
Model 970's Surround Configuration sub-menu: They are:
Panorama:
Extends the front stereo image to the surround speakers for a
“wraparound” effect.
Dimension:
Lets you correct for “dry” recordings by extending the soundfield
towards the back of the listening/viewing area and to decrease apparent reverberation by “collapsing” the image towards the front.
Center Width:
This blends sound from the center channel into the left and right
channels to create a more seamless front soundstage. You can vary the effect from
one extreme (where the center channel speaker is shut off and only a “phantom”
signal derived from the left and right speakers remains) to the other (where only
the center channel speaker reproduces center channel information.)
The Pro Logic IIx Game mode
sends surround channel bass signals to the
subwoofer to preserve visceral impact.
Pro Logic IIx processing also works with 5.1-channel material, either Dolby
Digital or DTS, to create 7.1-channel sound. This mode is shown in the front
panel and on-screen displays as “ProLogicIIx-X
Model 970 7.1 Channel Preamplifier Processor
13

Owner’s Manual
Stereo Listening Modes
Dolby Virtual Speaker
Strictly speaking, this isn’t a surround format at all. Using advanced algorithms
(mathematical manipulations), it duplicates the sound field generated by a
full 5.1-channel speaker array with just two speakers placed as you would for
conventional stereo listening. Dolby Virtual Speaker delivers precise localization,
accurate spatial clues, and high sound quality and is ideal for anyone who wants
a surround experience without a center channel and surround speakers.
Dolby Headphone
You could call this “Dolby Virtual Speaker for Headphones” because that’s a
pretty accurate description of what it does. This circuitry creates a convincing surround effect that’s ideal for private listening with conventional stereo
headphones. The math behind it is complicated. The enjoyment isn’t.
DTS
Similar to Dolby Digital but employing a higher sampling rate, standard DTS
provides 5.1-channel surround sound. It is available on CD, DVD, laserdiscs,
PlayStation 2 video games, and D-VHS tapes. Audio-only DTS discs may be used
with any CD, DVD, or laserdisc player with a digital audio output, but DVD discs
with DTS audio must be used on players with the “DTS Digital Out” logo.
DTS-ES
DTS-ES extends the original DTS format by adding an additional back surround
channel to a soundtrack. DTS-ES-Matrix titles provide the sixth channel by
a matrix process, while DTS-ES-Discrete media deliver a true, discrete back
surround channel. Both DTS-ES formats are backward compatible with the
original DTS process, and will deliver a 5.1-channel output if your system has
no back surround speakers. The Model 970 automatically senses the presence
of either DTS-ES format and switches the processing mode when required.
DTS Neo:6
This processing mode creates up to six full-bandwidth channels from any
matrix-encoded 2-channel source. It offers two modes, Cinema and Music. Use
the Cinema mode for movie soundtracks, the Music mode for stereo music.
More info about the Model 970’s various surround-sound technologies can be
found at the
www.dtsonline.com
and
www.dolby.com
.
Stereo Listening Modes
The Model 970 offers advanced technology for stereo listening, too.
Stereo
This mode routes sound only to your front left and right speakers–and to your
subwoofer, if one is connected.
Connecting Your Model 970
Before connecting your Model 970 to other system components, please observe
the following simple precautions:
Don’t plug the power cord into your Model 970 until you’ve made all other con-
nections.
Always pay attention to the warnings, options, and specific procedures contained
in the instructions that came with the component you’re connecting.
For analog connections, remember that:
red input jacks = right channel audio
white input jacks = left channel audio
yellow input jacks = composite video
Insert all plugs and connectors securely. If you don’t, you may experience noise,
poor performance, or equipment damage.
Don’t bundle audio/video connection cables with power cords and speaker cables.
To get the performance you expect, run all the power cords down one side of the
cabinet, all the signal connections down the other side, and the speaker cables
down the center.
You may want to use digital and analog connections to and from the same
component. This will give you additional flexibility as you configure your system,
particularly when you use an analog audio recorder.
When using an optical input or output jack, always use a high-quality optical
fiber cable.
Given the wide variety of components and many ways you can connect them,
you might find initial set-up a bit intimidating. Don’t worry. The following
diagrams will guide you through the maze. They graph some of the more common situations you might encounter. Rest assured, however, that there would
most likely be several ways to connect a component so these diagrams are not
hard and fast blueprints. (Please remember to consult the owner's manual that
came with the component you are connecting for more information.)
In order to alleviate potential confusion, use the chart on page 15 to record each
connection (which output to which input, etc.) as you connect your system’s
components. These connections might change as you get further into your
system configuration and we suggest that you make a few photocopies of that
page (or print a few copies of the page from the PDF version of this manual,
which is available from our website) to use as worksheets before you start. When
you’re done and your system is functioning properly, you can enter the final
connections into the manual itself for a more permanent record.
7-Channel Stereo/5-Channel Stereo
This mode routes the signal from a stereo recording to all of the speakers in
your system. There’s minimal processing so you’ll enjoy very even sound quality
as you move around the room–that’s why this is often called “party mode.”
Bypass
Like Stereo mode, Bypass also routes sound only to your front left and right
speakers. The difference between the two is that Bypass has no DSP (digital
signal processing), so there’s no surround modes, etc. As you might expect,
Bypass delivers a somewhat cleaner sound than Stereo mode.
14
Outlaw Audio

Connection Record Chart
Connecting Your Model 970
Owner’s Manual
Model 970 7.1 Channel Preamplifier Processor
15

Owner’s Manual
Connecting Your Model 970
Connecting Audio Components
(see page 19)
CD Player or Music Server
Analog
Connect the L and R channel outputs on the CD player or music server
to the CD input jacks (
Digital
If your CD player or music server has a digital output, connect it to
RP15
).
one of the coaxial or optical inputs (RP9) depending on the type of connector
used by the source. (You’ll configure the Model 970 later to use the input you’ve
chosen. For now, note that digital input on your system chart.)
Audio Recorder
(Cassette deck, MD recorder, DAT, CD recorder, etc.)
Analog
PLAY) to the TAPE IN jacks (
marked REC) to the RECORD OUT/TAPE jacks (
Digital
optical input (
Connect the L and R audio outputs on the recorder (usually marked
RP15
). Connect the L and R audio inputs (usually
RP15
).
Connect your recorder’s digital output jack to either the coaxial or
RP12
) depending on the type of connector used by your recorder.
(As with the digital CD input, configuration will come later. For now, just note
that input on your system chart.)
If your recorder has a digital input jack, connect it to either the coaxial or optical output (
RP14
) depending on the type of connector used by your recorder.
(Configure this later, but note the connection now.)
Computer sources
NOTE: Although you can connect a computer via analog or digital
inputs, we suggest a PCM, Dolby Digital or DTS connection when possible for the best sound. You can also use your computer to record
sound from the other devices connected to the Model 970.
Analog
Using a 1/8” (3.5mm) stereo miniplug to dual-RCA adapter cable (a
“Y” cable with male connectors at both ends), connect the computer sound
card’s audio output minijack to the TAPE IN jacks (
RP15
). Then, using a second “Y” cable, connect the sound card’s audio input minijack to the RECORD
OUT/TAPE jacks (
NOTE: If you have to make a choice between connecting another
recording device or your computer through analog connections, opt to
use the analog jacks for the other recording device.
Digital
Connect your sound card’s digital output jack to either the coaxial or
optical input (
RP15
).
RP12
) depending on the type of connector used by the sound
card. (As with the digital CD input, configuration will come later. For now, just
note that input on your system chart.)
If your sound card has a digital input jack, connect it to either the coaxial or
optical output (
RP14
) depending on the type of connector used by the sound
card. (You’ll configure this later but note the connection now.) Note, however,
that the signal must be output from the computer in a form that is compatible with the Model 970’s signal processing, such as Dolby Digital, DTS or
conventional PCM. Other digital audio formats such as MP 3 may not be used
directly with the Model 970.
MP3 Player
Analog
You can use any analog audio input to connect an MP3 player to the
Model 970 but you’ll probably find it most convenient to use the Left and Right
channel analog audio jacks on the front panel Video 4 input (
FP18
). Use the
same 1/8” (3.5mm) stereo miniplug to dual-RCA adapter cable (a “Y” cable
with male connectors at both ends) that we’ve suggested above to go from the
MP3 player’s headphone output to the Model 970. Remember the color-coding
on the RCA end of the cable – red for right, white for left.
Connecting Video Components
(see pages 20-22)
Before making connections to any video devices, you should understand how
the Model 970 routes video signals.
Any signal appearing at any composite video input (DVD, VIDEO 1-4 IN) is
automatically sent to the composite and S-Video VIDEO MONITOR OUT and
VIDEO 1 REC OUT jacks and to the component MONITOR OUT jacks.
Any signal appearing at any S-Video input jack (DVD, VIDEO 1-4 IN) is auto-
matically sent to the composite and S-Video VIDEO MONITOR OUT and VIDEO
1 REC OUT jacks and to the component MONITOR OUT jacks.
Any signal appearing at the component video (DVD, VIDEO 1-2 IN) input jacks
is automatically sent to the component video MONITOR OUT jacks only.
Any signal appearing at either the DVI 1 or DVI 2 input is sent to the DVI OUT
jack only.
NOTE: For the greatest flexibility, connect composite or S-Video cables
from all of your video source components to the Model 970, even if
you are already using a component video or DVI connection.
Remember that the Model 970's on-screen display does not appear at the DVI
OUT jack so always provide a component, S-Video, or composite video connection in addition to DVI.
DVD Player
This is a complex bit of interconnectivity simply because there are many possibilities. You’ll have to deal with several video signal formats and a variety of
audio possibilities, too. So read this section carefully before you begin.
Video Connections
Composite
DVD player’s composite video output to the composite video DVD input (
NOTE: You may be tempted to use standard audio “patch cords” for
composite video connections. Resist that temptation. The impedance
specification of audio cables is not the same as for video and you may
see image degradation as a result.
S-Video
connect the DVD player’s S-video output to the S-video DVD input (
Using a video cable with yellow RCA jacks at both ends, connect the
RP5
).
Using a S-video cable with a 4-pin mini-DIN connector at each end,
RP5
).
S-Video delivers a better picture than composite connections and should be
used whenever possible unless component or DVI connections are available.
They deliver better pictures than S-Video.
16
Outlaw Audio

Connecting Your Model 970
Owner’s Manual
Component
to the component DVD IN jacks (
If your DVD player has component video outputs, connect them
RP1
). Because component video connections
require three video-grade cables, remember to follow the alphabet (“Y” to “Y,”
“PB” to “PB,” and “PR” to “PR”) when making these connections.
DVI/HDMI
If your DVD player has a DVI or HDMI video output and your video
monitor has a DVI or HDMI input, connect the DVD player to the Model 970’s
DVI 1 or 2 input (
RP21
). (For HDMI-equipped DVD players, use an HDMI-to-DVI
adapter, or dual-purpose cable such as those available from Outlaw Audio.)
Audio Connections
Analog
and R channel analog audio outputs to the DVD analog audio jacks (
Digital
to one of the digital inputs (
Using a pair of RCA-to-RCA audio cables, connect your DVD player’s L
RP5
).
Connect your DVD player’s digital audio output (coaxial or optical)
RP12
). Note the selected input on your worksheet
for configuration later.
Multi-Channel Audio
If your DVD player has a multi-channel audio output for
DVD-Audio or SACD playback, connect the six outputs from your player to the
multi-channel AUDIO IN jack set (
RP5
). Use the L, R, CEN, SUB, SL, and SR
jacks only – ignore the jacks labeled SBL and SBR. (These will accommodate
future 7.1-channel formats if they appear.) Be careful to maintain continuity:
Connect L to L, center to CEN, and so on. If your DVD player includes a built-in
Dolby Digital decoder with 5.1-channel analog audio outputs but no DVD-A or
SACD capability, do not use the player’s 5.1 channel analog outputs. Instead, use
a digital connection as described above. Your ears will applaud your choice.
Digital TV Tuner/Cable Box/Satellite Receiver
Video Connections
Composite
Using a video cable with yellow RCA jacks at both ends, connect
the device’s composite video output to your choice of the Video 1-3 composite
video inputs. (
S-Video
choice of the Video 1-3 S-video inputs. (
Component
component Video 1-2 input jacks (
RP16
or
RP17
).
Using an S-video cable, connect the device’s S-video output to your
RP16
or
RP17
).
If your device has component video outputs, connect them to the
RP1
). As you make this connection, remember
to “follow the alphabet.” (See DVD player above if you don’t remember what
this means.)
DVI/HDMI
has a DVI or HDMI input, connect the device to the DVI 1 or 2 input (
If your device a DVI or HDMI video output and your video monitor
RP21
(For HDMI-equipped components, use either an interconnect cable with one
type of connector on each end [preferred] or an HDMI-to-DVI adapter.)
Audio Connections
Analog
R channel analog audio outputs to the Video 1-3 analog audio jacks (
or
Digital
of the digital inputs (
Using a pair of RCA-to-RCA audio cables, connect your device’s L and
RP17
).
Connect your device’s digital audio output (coaxial or optical) to one
RP12
). Note the selected input on your worksheet for
RP16
configuration later.
).
NOTE: You must use the multi-channel audio input for SACD and
DVD-Audio players in order to hear the high-resolution digital sound
these players provide.
Video Recorder
You can connect a video recording device (VCR, PVR, DVD recorder, etc.) by
using the following methods.
Video Connections
Composite
1 IN composite video input jack (
video input to the VIDEO 1 REC OUT composite video jack (
Connect your video recorder’s composite video output to the VIDEO
RP16
). Then connect the recorder’s composite
RP16
). Use the same
type of cable specified in the DVD Player section immediately above.
S-Video
Using a S-video cable with a small 4-pin mini-DIN connector at
each end, connect the DVD player’s S-video output to the S-video Video 1
input (
RP16
). Then connect the recorder’s S-video input to the S-video Video
1 output (
Audio Connections
Digital
to one of the digital inputs (
RP16
).
Connect your video recorder’s digital audio output (coaxial or optical)
RP12
). Note the selected input on your worksheet
for configuration later.
If your recording device has a digital input, connect it to either the coaxial or
optical (
RP14
) output jack. The signal from a selected digital source will be
sent to the recorder.
NOTE: Particularly with digital cable set top boxes, we recommend that
you make both an analog and digital audio connections. This will enable
the Model 970 to revert to analog audio when you switch away from a
digital channel to one that only has analog audio. (See page 19)
Video Display Connections
Connect a video display device (a TV, projector, etc.) to the Model 970 using
the following methods.
Video Connections
Composite
Using a video cable with yellow RCA jacks at both ends, connect
the display device’s composite video input to the Model 970’s composite Monitor
Out jack (
S-Video
the S-Video Monitor Out jack (
Component
the component Monitor Out jacks (
DVI/HDMI
to the DVI Out connection (
RP18
).
Using an S-video cable, connect the display device’s S-video input to
RP18
).
If your display device has component video inputs, connect them to
RP4
). Once again, “follow the alphabet.”
If your display device has a DVI or HDMI video input, connect it
RP22
). (For HDMI-equipped components, use an
HDMI-to-DVI adapter.)
NOTE: The Model 970's on-screen display does not appear at the DVI
OUT jack. Use a component, S-Video, or composite video connection
to your video display device in addition to the DVI connection.
Model 970 7.1 Channel Preamplifier Processor
17

Owner’s Manual
Connecting Your Model 970
Audio Connections
Analog
If your display device has an internal tuner with an analog audio
output, connect the L and R channel outputs to the Video 1-3 analog audio
inputs (
RP16
or
RP17
).
Digital
of the coaxial or optical input jacks (
If your display device has a digital audio output, connect it to one
RP12
). Note the selected input on your
worksheet for configuration later.
Antenna Connections
The Model 970 has an internal AM/FM tuner with separate connections for
each band’s antenna.
FM Antenna
Connect the supplied FM dipole antenna by pushing the antenna’s coaxial
connector onto the FM antenna connector (
NOTE: The supplied FM antenna is for indoor use only. For best reception, fully extend the antenna and experiment with its positioning to
get the strongest signal. You can attach it to a wall or other surface
using push-pins, tacks, or small nails.
If FM reception is poor with the supplied indoor antenna, we recommend
using an amplified indoor or a high-gain outdoor antenna. Connect these
antennas in the same way.
RP2
.)
Subwoofer Connection
(see page 23)
Powered (self-amplified) subwoofers
Using a shielded RCA-to-RCA cable, connect the subwoofer output jack (
RP19
to the subwoofer’s line Input jack. Then follow any specific connection and/or
configuration instructions supplied with the subwoofer.
Passive (non amplified) subwoofer
Using the same cable type described above, connect the subwoofer output jack
(
RP19
) to the input of the amplifier used to power the subwoofer, and then
connect the subwoofer to the amplifier following the guidelines contained
in the full-range speaker section above.
Other Connections
12 volt Trigger connections
Your Model 970 has one 12 volt Trigger output (
a 12 volt DC signal that will turn on another component (provided it has a
complementary circuit) when you turn your Model 970 on. Use a cable tipped
at each end with a 1/8” (3.5mm) mono mini plug to connect the Trigger
output to another component.
RS-232 Port
RS-232 port (
RP11
) is used to upload new software if it becomes available.
RP9
). This output produces
)
AM Antenna
Connect the supplied AM antenna to the rear panel push terminals (
RP3
). Press
one lever on the bottom of the terminal block and insert one of the antenna
wires. Release the lever and repeat the process with the other wire and lever.
Experiment with the antenna's position to obtain the strongest signal.
Amplifier Connections
IMPORTANT NOTE: Before attempting to make any connection to
your power amplifier, make sure the amplifier is turned off and/or
disconnected from AC power. Failure to do so can result in severe
damage to your amplifier and/or loudspeakers.
(see page 23)
Use the audio jacks labeled PREAMP OUT to connect the Model 970 to an
external power amplifier such as those from Outlaw Audio. The Model 970 can
output up to 7.1 channels of sound (seven main channels and one subwoofer
channel), even when you are listening to 2-channel stereo material.
The output jacks supplied by the Model 970 are: Front Left (L), Center (CEN),
Front Right (R), Surround Left (SL), Surround Right (SR), Surround Back Left
(SBL), Surround Back Right (SBR), and Subwoofer (SUB). These both carry
the same signal, so you can use either jack or both.
Be sure to verify that the correct outputs are connected to the appropriate input
jacks on your amplifier—for example, Front Left to Front Left, Surround Back
Right to Surround Back Right, etc. If the inputs on your amplifier are not
labeled, it probably does not matter which of the Model 970’s output channels
is con-nected to a particular amp channel. However, you must be sure that the
appropriate speaker is connected to that amp channel.
NOTE: When making connections to the RS-232 port, be certain to
use a "straight-through" male-to-female serial cable with DB-9 connectors on each end. DO NOT use a serial cable designed for "null
modem" use.
AC power connection
Insert the supplied power cord into the AC input socket (
plied power cord, not a standard IEC 3-prong (grounded) power cord. In the
event a replacement power cord is used, it must be sufficient to handle the
Model 970’s power draw. DO NOT use lightweight power cords designed for
computers, printers or other low current draw products.
CAUTION: Before you plug the power cord into an AC wall outlet,
confirm that you’ve made all connections to the Model 970 first.
WARNING: Never disconnect the power cord at the Model 970 end
while the other end is still plugged into an AC outlet. This may cause
an electric shock. Always connect power by plugging into the AC
outlet last and disconnect by unplugging from the AC outlet first.
RP24
). Use the sup-
18
Outlaw Audio
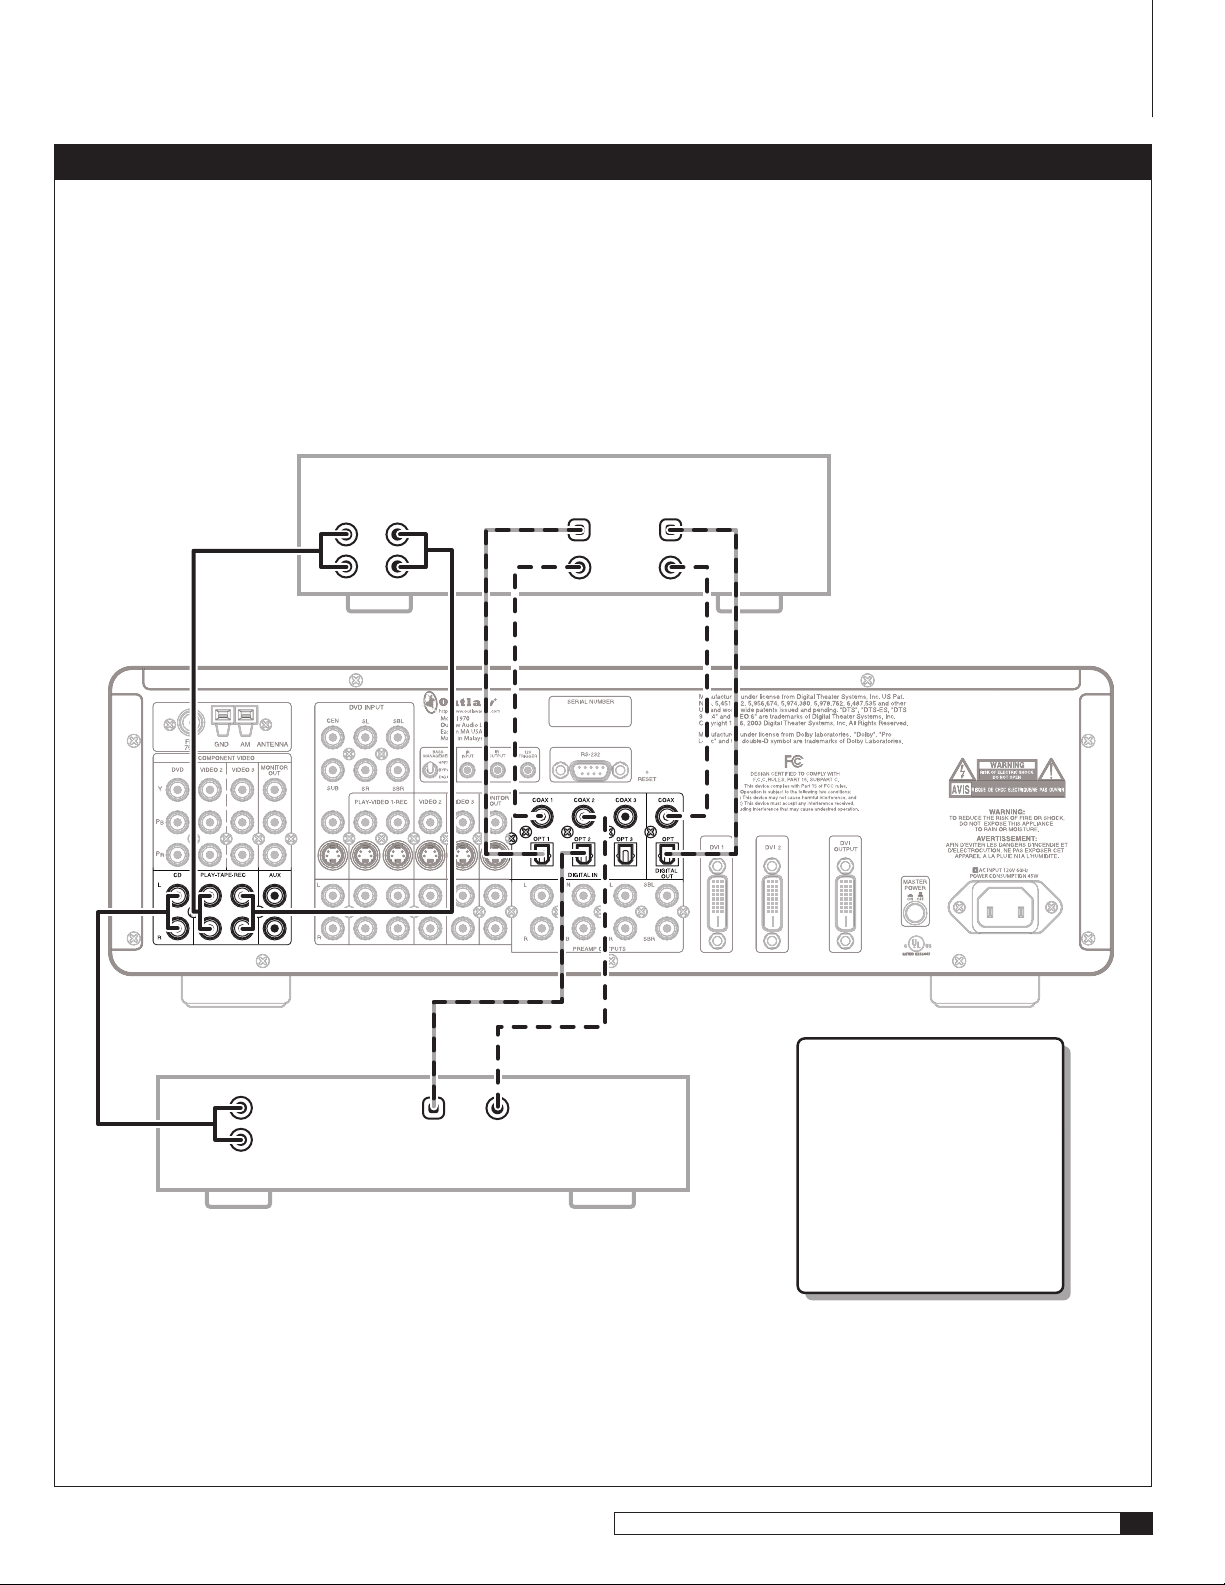
Connecting Audio Equipment to the Model 970
Optical
Out
Coaxial
Out
Digital Outputs
Analog Outputs
L
R
Digital
Analog
PLAY REC IN PLAY REC IN
L
R
CD Player
Audio Recording Device
Optical
Coaxial
NOTE:
When making digital connections,
use either the Coaxial or Optical
connection, but not both.
For Coaxial connections,
use either COAX 1, 2 or 3.
Likewise, Optical connections
OPT 1-3 are interchangeable.
You will configure the
Model 970 later to use the
specific input you have chosen.
Connecting Your Model 970
Owner’s Manual
Model 970 7.1 Channel Preamplifier Processor
19

Owner’s Manual
Optical
Coaxial
DIGITAL AUDIO
CompositeS-Video Component
DVI
Y PBP
R
DVD-Audio/SACD/DVD Player
L
R
C
SUB
SL
SR
SBL
SBR
7.1 AUDIO VIDEO
DVD CONNECTION NOTE:
Your connection requirements will
vary according to your video gear’s
capabilities. In most cases, only one
type of video connection is required.
Make sure that you use choose from
the connections that correspond to
the DVD inputs: DVI 1, Component
Video DVD, or the DVD Input
composite and S-Video jacks.
Similarly, when making digital audio
connections, use either the Coaxial or
Optical connection, but not both.
For Coaxial connections, use either
COAX 1, 2 or 3. Likewise, Optical
connections OPT 1-3 are interchangeable.
You will configure the Model 970 later
to use the specific input you have chosen.
Connecting Your Model 970
Connecting a DVD Player to the Model 970
20
Outlaw Audio

Connecting Other Video Components to the Model 970
OpticalCoaxial
Digital
Analog
L R
Digital
Optical
Coaxial
Analog
AUDIO
VIDEO
PLAY OUT PLAY OUT
REC IN REC IN
L
R
Composite S-Video
CompositeS-Video Component
DVI Out
IN
OUT
Video Device
(DVD Player, Satellite Receiver, Cable Box, etc.)
Video Recording Device
VIDEO
AUDIO
Y PBP
R
AUDIO CONNECTION NOTE:
When making digital audio connections,
use either the Coaxial or
Optical connection, but not both.
For Coaxial connections, use either
COAX 1, 2 or 3. Likewise, Optical
connections OPT 1-3 are interchangeable.
You will configure the Model 970 later
to use the specific input you have chosen.
VIDEO CONNECTION NOTE:
Your connection requirements will
vary according to your video gear’s
capabilities. In most cases, only one
type of video connection is required.
Make sure to use the connections that
correspond to the same video input. For
example, if you connect a component’s
composite or S-Video output to the Video 2
inputs on the Model 970, you must also use
the Component Video 2 inputs as well.
If a DVI (or HDMI) output is available,
connect it in place of the component
video outputs.
The Connection Record Chart on page 15
provides an easy way to determine which
video connections are associated with a
particular input.
Connecting Your Model 970
Owner’s Manual
Model 970 7.1 Channel Preamplifier Processor
21

Owner’s Manual
OpticalCoaxial
Digital
Analog
L R
AUDIO IN
CompositeS-Video Component
DVI
TV/Monitor
VIDEO IN
Y PBP
R
NOTE:
Your connection requirements will
vary according to your video display’s
capabilities. In most cases, only one
type of video connection is required.
If the video display has an HDMI input,
use a DVI to HDMI adaptor, or a
dual-purpose cable such as those
available from Outlaw Audio.
Similarly, when making digital audio
connections, use either the Coaxial or
Optical connection, but not both.
Connecting Your Model 970
Connecting a Video Display to the Model 970
22
Outlaw Audio
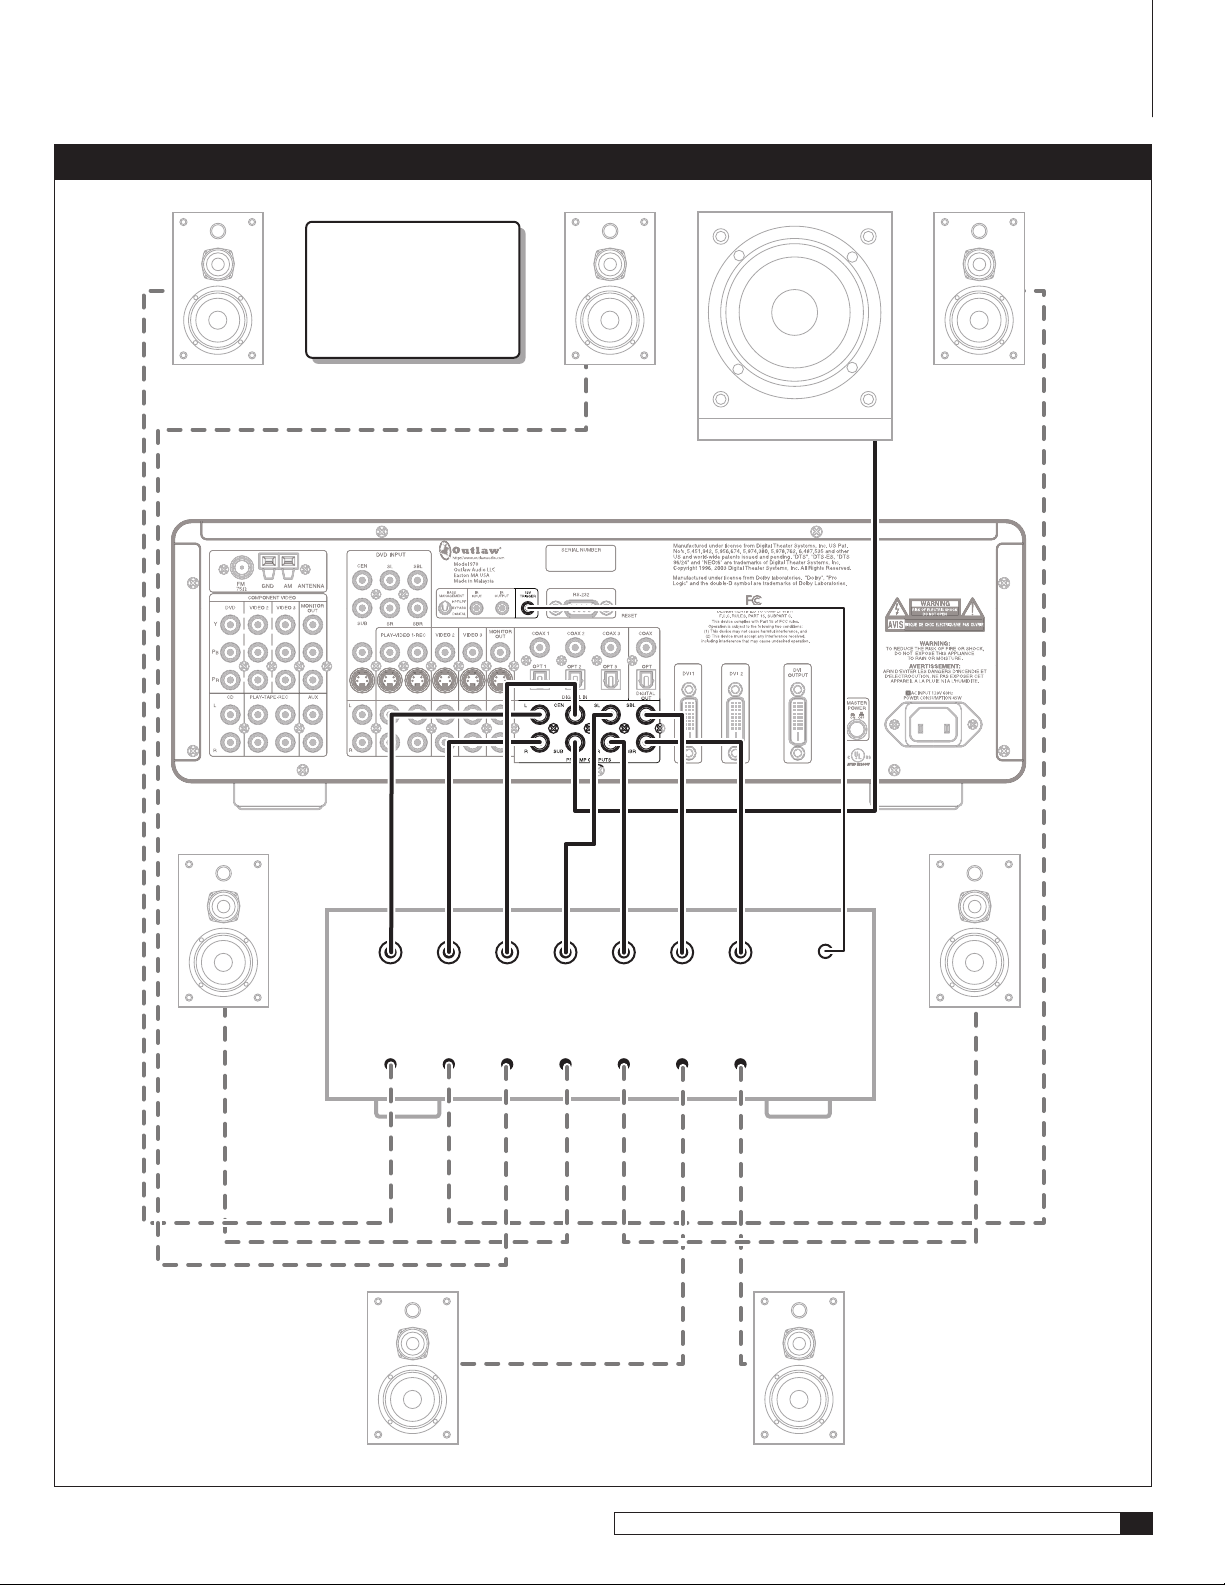
Connecting an External Amplifier to the Model 970
Left
Trigger
Right Left Sur Right Sur Left Sur
Back
Right Sur
Back
Center
External
Amplifier
Powered
Subwoofer
NOTE:
When using a passive
(non-powered) subwoofer,
connect the Sub Preamp
output on the Model 970
to the subwoofer’s
external amplifier input.
Connecting Your Model 970
Owner’s Manual
Model 970 7.1 Channel Preamplifier Processor
23

Owner’s Manual
System Setup
System Setup
At this point all of the necessary physical connections between the Model 970
and your source devices, display and speakers should be completed. All that
remains is to properly configure the system to reflect your specific equipment
and room characteristics.
Before starting the configuration process, make sure that all connections
between the Model 970 and other system components are tight and secure
Then turn on the Model 970 and your display device.
NOTE: When using the Remote Control during the configuration
process, remember to first press the TNR button to control the
Model 970.
To turn the Model 970 on:
1. Press the MASTER POWER ON/OFF button on the unit’s rear panel
until it latches.
The Standby/On indicator on the front panel will glow amber.
2. Press the STANDBY button on the front panel, or any source
selector button on the remote control.
The Standby/On indicator will turn green, and the front-panel display
will illuminate.
3. Turn on your display device.
Make certain that it is set to the input for the jacks that are used to connect it to the Model 970, but do not select the DVI (or HDMI) input, as the
Model 970’s menus are not visible through that type of connection.
4. Press the MENU button on the front panel or the remote control.
The Main menu will appear on-screen. You’ll also see an abbreviated version of the Main menu on the Model 970’s front panel display (FP3).
Surround Config
This menu lets you customize the parameters of the surround
modes so that they match your needs and preferences.
Channel Calibration
This menu sets the output level for each channel so the
surround sound field accurately reproduces the source material.
Delay Adjust
On this menu you enter the distance from each speaker to
your viewing/listening position so that the Model 970 correctly delays sounds
to each speaker as needed to make sure that they arrive at your ears when
they should.
System Config
This menu is where you enter general system-wide parameters such as how long your on-screen display remains visible, volume control
defaults, sleep timer settings, etc.
Exit
Takes you out of Menu mode.
A NOTE ON SETUP MENUS AND THE FRONT PANEL DISPLAY:
To make it easier to configure the Model 970 we suggest that you
use a video display to view all the menu choices, but should you wish
to set up your system with only the unit’s front panel display note
that the top line of the display will always show what would be the
top line of an on-screen menu display; the name of the menu or submenu in use. The bottom line of the display will change as you scroll
through the available options to show the choices available in the
menu being adjusted.
Input Configuration
This menu is where you start your system configuration, and for that reason it
is the first item on the Main menu. Here is where you will tell the Model 970
which source components are connected to it so that the signals flow properly.
You’ll also be able to customize each input by assigning a series of default values
for surround modes and other parameters.
MAIN MENU
> INPUT CONFIG
SPEAKER SIZE
SPEAKER X-OVER
SURROUND CONFIG
CHANNEL CALIBRATION
DELAY ADJUST
SYSTEM CONFIG
EXIT
Here’s a brief explanation of each item on the Main menu:
Input Config
This menu enters the configuration settings for your Model 970’s
inputs so that the desired audio source, surround mode, lip sync delay and other
features are automatically put into use for each input when it is selected.
Speaker Size
This menu tells your Model 970 where to route the bass frequencies to each speaker as best fits your system to give you the best bass reproduction
without overdriving or possibly damaging your full-range speakers.
Speaker X-over
This menu selects the crossover points that direct bass frequencies to your subwoofer in line with the precise capabilities of the speakers
at each position in your system.
Video Input Configuration
We’ll start with the video inputs first. You may want to reference the Connection
Record Chart you filled out when making connections to the Model 970.
To configure a Video input:
1. Turn on each of the sources you plan to use with the Model 970.
If you are using a DVD player, put a disc in and start it up.
2. Press the MENU button on the front panel or the remote to display
the Main Menu.
The Main Menu appears on-screen:
MAIN MENU
> INPUT CONFIG
SPEAKER SIZE
SPEAKER X-OVER
SURROUND CONFIG
CHANNEL CALIBRATION
DELAY ADJUST
SYSTEM CONFIG
EXIT
24
Outlaw Audio

Owner’s Manual
System Setup
3. With the cursor pointing to INPUT CONFIG, press SET on the front
panel or the remote.
The Input Configuration sub-menu appears:
INPUT CONFIG
> DVD CONFIG
VIDEO 1 CONFIG
VIDEO 2 CONFIG
VIDEO 3 CONFIG
VIDEO 4 CONFIG
TUNER CONFIG
CD CONFIG
TAPE CONFIG
AUX CONFIG
RETURN TO MAIN MENU
There are 5 video inputs to configure: DVD and Videos 1-4. Configuration
of most of the inputs follow the same steps. For the following example
we'll use the DVD Input. To select a different input to configure, use
the Up and Down cursor buttons. Once you’ve selected an input to
configure, press Set.
4. With the cursor pointing to DVD CONFIG, press SET on the front
panel or the remote.
The DVD Configuration sub-menu will appear:
DVD CONFIG
> AUDIO :ANALOG
VIDEO :AUTO
OSD :ON
SURR:DOLBY PLIIx-C
LEVEL TRIM : 0dB
AUTO POLL :ON
BASS : 0dB
TREBLE : 0dB
LIP SYNC DELAY: 0mS
RETURN TO INPUT MENU
The following steps will guide you through the process of choosing the correct
settings for your video input devices.
Setting the Audio
To configure the Audio of a video input:
1. Move the cursor to AUDIO by using the
front panel or remote.
2. Press the
through the available audio input choices.
and buttons on the front panel or remote to scroll
and buttons on the
The input choices appear as follows as you scroll through them:
ANALOGEXT 7.1OPTICAL 1OPTICAL 2OPTICAL 3
OPTICAL 4COAXIAL 1COAXIAL 2COAXIAL 3COAXIAL 4
Select the one that matches the connections you have made to the input
being adjusted.
Setting the Video
To configure the Video of a video input:
1. Move the cursor to
front panel or remote.
2. Press the
through the available video input choices.
VIDEO by using the and buttons on the
and buttons on the front panel or remote to scroll
The input choices appear as follows as you scroll through them:
AUTOCOMPONENTS VIDEOCOMPOSITE
Select the one that matches the connections you have made to the input
being adjusted.
Auto
samples analog video inputs and selects the best available signal.
If you are using a DVI connection from your DVD player, the Model 970
will default to DVI 1 when it detects a signal at that input. Note that the
DVI 1 input is available only when you select DVD. It is “hard-wired” to
that input, but is available only when a signal activates it.
The DVI 2 input is “hard-wired” to the
Video 2
input. If you have a second
DVI (HDMI) source, you should make the configuration adjustments
for the device connected to DVI 2 in the
Setting the OSD (On-screen display)
To configure the appearance of the OSD when a video input is selected:
1. Move the cursor to
panel or remote.
2. Press the
between ON and OFF.
OSD by using the and buttons on the front
and buttons on the front panel or remote to toggle
Video 2
input.
If you select ON, messages will appear at the bottom of your video display
when you make an adjustment to the Model 970, such as a volume change
or other parameter adjustment, using the remote or front panel.
If you select
NOTE: When you switch to another input, the OSD choice you’ve
made for that input will take priority.
Setting the Surround Format
To configure the Surround Format of a video input:
1. Move the cursor to
front panel or remote.
2. Press the
through the preferred surround format for this input.
OFF
, these on-screen messages, will not appear.
SURR by using the and buttons on the
and buttons on the front panel or remote to scroll
If you are using an analog input, or a digital input receiving a 2-channel
signal, or if the video source is stopped or turned off, the choices appear
as follows as you scroll through them:
PLIIx-CPLIIx-MPLIIx-XPRO LOGICDOLBY PLII-C
DOL B Y PL II-M
NEO-6 MUSIC
D OLBY PLII-XN EO-6 CINEMA
7 STEREO5 STEREOSTEREO
NOTE: Even if you choose a digital input, you will not be able to see
all the surround format choices available UNLESS that input is receiving a digital audio signal from your source.
NOTE: Your choices will differ depending on the number of speakers
you are using and whether you’ve selected a digital or analog audio
input. For example, you will not see “7 stereo” for a 5.1 system. You will
not see any all-digital formats if you’ve selected an analog input.
Model 970 7.1 Channel Preamplifier Processor
25

Owner’s Manual
System Setup
Setting the Level Trim:
To configure the Level Trim of a video input:
1. Move the cursor to
the front panel or remote.
2. Press the
through the preferred level trim for this input.
LEVEL TRIM by using the and buttons on
and buttons on the front panel or remote to scroll
The input choices appear as follows as you scroll through them:
0dB-6dB-12dB
These choices allow you to adjust relative audio levels so that when you
switch from one source to another, you won’t be subjected to a wide
disparity in volume. We suggest that you accept the “0dB” default for
each input and make changes only after you determine that an input
needs “trimming.”
Setting Auto Polling
To configure the Auto Polling of a video input:
1. Move the cursor to
the front panel or remote.
2. Press the
between ON and OFF.
AUTO POLL by using the and buttons on
and buttons on the front panel or remote to toggle
When ON is selected the Auto Poll circuitry will automatically switch
the audio input from the selected digital source to the analog input for
the source when the digital data stream is interrupted. This is helpful
for use with digital cable boxes where the audio switches between digital
and analog, depending on which channel is selected.
When
OFF
is selected the Model 970 will keep the digital input active
even when the digital data is interrupted. This is the preferred setting
for the DVD input where the digital audio stops during menu setup or
when a disc is paused.
Setting Bass and Treble
You’ll make both these tone control adjustments in the same way.
To configure the Bass or Treble of a video input:
1. Move the cursor to
on the front panel or remote.
2. Press the
through the preferred tone control settings for this input.
BASS (or TREBLE) by using the and buttons
and buttons on the front panel or remote to scroll
The input choices for both Bass and Treble appear as follows as you
scroll through them:
-6dB-5dB-4dB-3dB-2dB-1dB0dB1dB2dB
3dB4dB5dB6dB
Setting Lip Sync Delay
Digital video sources and displays will often use extensive video processing
for scaling or in transmission paths that may cause the video on your screen
to lag behind the audio. The amount of this delay will vary with a number of
factors, but the Model 970 lets you delay the audio to fix this problem. It also
lets you set a different lip sync delay time for each input.
To configure the Lip Sync Delay of a video input:
1. Move the cursor to
on the front panel or remote.
2. Press
to increase the amount of lip sync delay, or to decrease it.
LIP SYNC DELAY by using the and buttons
Up to 200ms of delay can be selected in 10ms increments.
Choosing Another Input
To select another input from the Input Configuration sub-menu:
1. Move the cursor to
buttons on the front panel or remote.
2. Press SET on the front panel or the remote.
RETURN TO INPUT MENU by using the and
The Input Configuration sub-menu appears.
3. Move the cursor to the new input that you want to configure by
using the
4. Press SET on the front panel or the remote.
and buttons on the front panel or remote.
You’ll see the same configuration sub-menu as you did for the DVD input.
You’ll configure the remaining video inputs (Video 1-4) by following
the same procedures. Remember that the DVI 2 connector is available
only when you’ve selected the Video 2 input.
Configuring Audio Inputs
In general, the procedures for configuring Audio inputs (Tuner, CD, Tape,
and Aux) are very similar to those for configuring Video inputs. Two major
differences are:
You can’t choose a video input for any of the four audio sources (the menu line
is there but the only choice is “None”)
There is no Lip Sync Delay available for audio-only sources
Proceed with configuring the tuner and remaining audio components connected to your Model 970. Once you have completed the input configuration
process for all inputs, your next step is to configure the Model 970 to match
the number and type of speakers in your system.
To return to the Main Menu:
1. Move the cursor to RETURN TO MAIN MENU by using the
buttons on the front panel or remote.
2. Press SET on the front panel or the remote.
and
The Main Menu appears.
Speaker Placement
Before we get to the Speaker Size sub-menu, it is worth mentioning that you
should understand that correct speaker placement is critical to good sound.
Then again, also understand that there are no hard and fast laws governing
where you should put them!
Frustrating, right? The good news is that there are several guidelines you
can follow. Unfortunately, every listening room and combination of speakers exhibits different acoustic qualities, so what works in one situation won’t
necessarily work in another. So, you’ll probably have to experiment a bit before
you’re really happy with your system’s sound. That being said, here are some
pointers to follow.
26
Outlaw Audio

Owner’s Manual
System Setup
Left Front, Center, and Right Front Speakers
Place them at the same relative height and, if at all possible, a bit away from
any walls. Some acousticians recommend placement far away from any walls
but that may not be practical in your situation.
Most speakers sound best with the tweeter positioned at “seated ear height”; the
same height your ears are when you’re ready to watch and listen.
Take care to aim the speakers at your prime viewing/listening position. That
will probably mean that the center channel speaker will be aimed straight
ahead while the left and right speakers are “toed-in” a bit.
Left and Right Surround Speakers
Put these speakers about 3' (1 meter to you metric Outlaws) above your “seated
ear height.”
Mount them on the side walls of your listening room, preferably a bit to the
rear of the prime seating position, if possible. Different authorities have different ideas here but, if the speakers are at the right height, you can vary their
placement from slightly behind to slightly ahead of your prime viewing/
listening position.
Speaker Placement
If your surround speakers are dipolar rather than directional, remember to orient the arrows on the dipole enclosures properly. For speakers on the side walls,
point the arrows to the front of the room (i.e., towards the video display).
Surround Back Left and Right Speakers
NOTE: These speakers are required for Dolby Digital EX, DTS-ES,
Dolby Pro Logic IIx, a nd 7-Channel Stereo. They are also desirable,
though not required, for DTS Neo:6.
Put these speakers about 3’ (or 1 meter) above your “seated ear height.”
Place them on the rear wall, behind the prime viewing/listening position so that
the angle between each speaker and the listener is approximately 30 degrees.
If that’s confusing, try “dividing” the rear wall into thirds and placing the
speakers at the 1/3 points on the back wall.
Dipoles placed on a rear or back wall should have the arrows pointing toward
each other to achieve the correct acoustical image in the room.
If you’re using just one surround back speaker, center it directly behind your
main viewing/listening area.
Model 970 7.1 Channel Preamplifier Processor
27
Owner’s Manual
System Setup
Subwoofers
The fact is, proper subwoofer placement is more difficult than placing any
other speaker. Some say that you should place the sub away from a wall, other
experts advise putting the sub near a wall, still others (probably not experts)
just tell you to put the sub in a corner. Well, they’re all right. And they’re all
wrong! It all depends on the size, shape and furnishings and floor coverings
in the room your sub will be sitting in.
The culprits here are called “standing waves” that are generated every time you
introduce a sound in a confined area. They create pressure zones in all rooms
that are most noticeable in the bass frequency range. And they usually result
in too much “boom” in some parts of the room and not enough real bass in
others. In addition, these seemingly random effects are very difficult to predict
unless you’re a trained acoustician with a lot of experience.
But here’s some practical advice from Outlaws who’ve tamed many a room to
be downright docile:
Never put your prime viewing/listening position tight against a wall
Walls create “high pressure zones” that will have your ears begging for bass
relief in short order. Likewise, a viewing/listening position in the center
of the room will most likely result in too little bass. So make sure your
comfy couch is somewhat free-standing in the room. (And that will give
you plenty of leeway to place your surround and back surround speakers
more advantageously, too.)
Put the subwoofer where your ears are!
Forget about the advice to move the subwoofer all around the room until
you happen to find that one magic spot where the bass sounds “right,
tight, with lots of bite.” Instead, find this ideal position the Outlaw way.
Place the subwoofer on your favorite chair or couch (watch those spikes!)
then get down on your hands and knees and move around the room until
you hear the best bass. That’s where you’re going to put the subwoofer!
Simple, isn’t it?
Consider using more than one sub
Even when you’re feeding the same signal to each one, multiple subs placed
in different parts of the room will go a long way to taming those standing
waves and will help to create very even and natural-sounding bass that just
seems to go all the way down to the, pardon the pun, sub-basement!
Speaker Size Configuration
Since you’ve just configured all the inputs you’ll be using, it’s time to move on
to the next item on the Main Menu: Speaker Size. Here, you tell the Model 970
how many speakers your system has and what their bass reproduction capabilities are. When you see the words “Large” and “Small,” just think “lots of
bass” and “not much” respectively. (The industry’s use of the confusing term
“size” comes from the early days of HiFi when you just couldn’t get decent bass
response from small speakers.)
NOTE: To avoid errors, the Model 970 does not allow some speaker
combinations. For example, you can set the subwoofer to "none" only
if you have large front speakers. If you have small front speakers, the
subwoofer setting will automatically be "yes." If you have no side
surround speakers, the back surround channels are automatically
deactivated.
To enter settings for speaker size:
1. Press the MENU button on the front panel or the remote to display
the Main Menu.
The Main Menu appears on-screen:
MAIN MENU
> INPUT CONFIG
SPEAKER SIZE
SPEAKER X-OVER
SURROUND CONFIG
CHANNEL CALIBRATION
DELAY ADJUST
SYSTEM CONFIG
EXIT
2. Move the cursor to SPEAKER SIZE by using the and buttons
on the front panel or remote.
3. With the cursor pointing to SPEAKER SIZE, press SET on the front
panel or the remote.
The Speaker Size sub-menu appears:
SPEAKER SIZE
> FRONT L/R :SMALL
CENTER :SMALL
SURR L/R :SMALL
SURR BACK SIZE :NONE
SURR BACK OUT :NONE
SUBwOOFER :YES
RETURN TO MAIN MENU
4. Use the and buttons on the front panel or remote to move to
each line on this menu.
5. Press the
the setting so that it shows the correct speaker size for each
position.
Select
and buttons on the front panel or remote to change
LARGE
if the speakers at the selected position are full range speakers, capable of reproducing the full spectrum of sound including low
bass frequencies. These speakers are typically physically large, but they
don’t have to be as long as they can handle the bass.
Select
SMALL
if the speakers are the popular “satellite” type with limited
bass capability that typically bottoms out between 80 HZ and 150 Hz.
Select
NONE
if there are no speakers at the position you are entering
the settings for. Remember that you can’t enter “NONE” for the front
left/right speakers, and you won’t be able to access the “7.1” modes unless
you chose a speaker type for the SURR BACK Speakers.
28
Outlaw Audio

Owner’s Manual
System Setup
6. Proceed to enter a speaker “size” for each of the four positions
7. Use the
the cursor to the SURR BACK OUT line.
and buttons on the front panel or remote to move
You may skip this step if you have entered NONE for the SURR BACK SIZE
setting. Here, you tell the system if you have a 6.1 or 7.1 system.
Select
SBL
if you are using a single Surround Back speaker. The amplifier channel for that speaker should be connected to the Surround Back
Left speaker output (see the Connecting Loudspeakers to the Model 970
diagram on page 22).
Select
LB/RB
when you have two Surround Back speakers.
8. Use the and buttons on the front panel or remote to move
the cursor to the SUBWOOFER line.
When the front speakers are set to SMALL it is automatically set to YES
and no further adjustment is required. However, when the front speakers are set to LARGE, this setting lets you determine where the LFE and
derived bass is directed.
Select
LFE
to send the special Low Frequency Effects channel information
on multichannel digital sources to the subwoofer while a full range front
channel signal will be sent to the front Left/Right speakers along with
the derived bass signal from the other speaker positions.
Selecting
L/R+Sub
tells your processor that you want bass signals sent to
your main L and R speakers in addition to your subwoofer. Choose this
option only if your main L and R speakers have good bass handling capability. It may be the best selection for medium-sized front speakers.
To enter settings for speaker crossover:
1. Press the MENU button on the front panel or the remote to display
the Main Menu.
The Main Menu appears on-screen:
MAIN MENU
> INPUT CONFIG
SPEAKER SIZE
SPEAKER X-OVER
SURROUND CONFIG
CHANNEL CALIBRATION
DELAY ADJUST
SYSTEM CONFIG
EXIT
2. Move the cursor to SPEAKER X-OVER by using the and buttons
on the front panel or remote.
3. With the cursor pointing to SPEAKER X-OVER, press SET on the
front panel or the remote.
The Speaker X-Over sub-menu appears:
SPEAKER X-OVER
> FRONT L/R :100Hz
CENTER :100Hz
SURR L/R :100Hz
SURR BACK L/R :100Hz
Select
NONE
to send all bass information, including both LFE and
derived bass to the front left/right speakers.
9. When you have completed the configuration process for all main
speaker positions and the subwoofer, use the
the front panel or remote to set the cursor to RETURN TO MAIN
MENU.
10. Press SET on the front panel or the remote.
and buttons on
The Main Menu appears.
Speaker X-Over (Crossover) Configuration
A little theory before we begin. Think of a crossover as a dividing network
that sends low frequencies to one speaker (usually the subwoofer) and higher
frequencies to another speaker (your front L and R speakers, etc.) If this is a
bit too technical just remember that a crossover lets the drivers (the domes,
cones, ribbons, etc.) in your speakers work efficiently to reproduce only the
frequency range they were designed to handle. Your Model 970 lets you set
different crossover points for front, surround, and surround back speakers so
you can enjoy the best performance with the speakers you’ve chosen.
To make these settings as accurate as possible, you may want to consult the
owner’s manual for your speakers before entering the crossover settings. Look
at the specs for the speakers and find the lowest frequency each speaker can
handle. That is the number you want enter in this menu.
RETURN TO MAIN MENU
4. Use the and buttons on the front panel or remote to move to
each line on this menu.
5. Press the
the correct crossover setting for each speaker position.
and buttons on the front panel or remote to select
When SMALL has been chosen as the “size” for a speaker position, the
available choices are:
40Hz60Hz80Hz100Hz120Hz150Hz
NOTE: When LARGE is selected on the SPEAKER SIZE menu a full
range signal will be sent to the speaker position being adjusted.
When NONE is selected on the SPEAKER SIZE menu, no adjustment is
needed or possible.
6. When you have completed the configuration process for all main
speaker positions, use the
remote to set the cursor to RETURN TO MAIN MENU.
7. Press SET on the front panel or the remote.
and buttons on the front panel or
The Main Menu appears.
Model 970 7.1 Channel Preamplifier Processor
29

Owner’s Manual
System Setup
Notes on Setting Crossover Frequencies
You may find the following suggestions helpful in setting good crossover points
for your speakers.
If you hear distortion from a particular speaker during passages where the bass
is loud, that speaker’s crossover is probably set too low. Increase the crossover
frequency until the distortion disappears.
A medium-sized tower speaker usually works well with a 40 or 60Hz crossover
point.
A standard-sized home theater “LCR-type” speaker works well with an 80 or
100Hz crossover point.
Slim, on-wall speakers designed to go with flat-screen (LCD and plasma) TVs
tend to work well with a 100 or 120Hz crossover point.
Miniature satellite speakers, ones measuring 4 to 7" high, often have a crossover
point of 120 or 150Hz.
Surround Setting Configurations
The items on the Surround Configuration menu enable you to adjust the
parameter settings available for some of the Model 970’s surround modes. In
many cases the factory defaults are a good starting point, and you may wish
to skip this menu during the initial configuration of a new Model 970 and
return to them later.
To enter Surround Configuration settings:
1. Press the MENU button on the front panel or the remote to display
the Main Menu.
The Main Menu appears on-screen:
Night Mode
Night Mode controls the use of dynamic range compression that reduces the
intensity of loud sounds and raises the level of very soft sounds, for example,
when watching a movie with some whispered dialog followed immediately by
a loud explosion. This circuit works only with Dolby Digital sources, playing
signals received through a digital input. This circuitry is useful when listening
to movies with lowered overall volume without reducing the relative intensity
of loud sounds in relation to those with lower level.
To activate Night Mode:
1. From the SURROUND CONFIG menu, press or to move the
cursor to NIGHT MODE.
2.
Press the and buttons on the front panel or remote to toggle
between ON and OFF.
Select ON to engage the Night mode.
Select
OFF
to disengage the compressor circuit and experience an audio
signal’s full dynamic range.
Panorama
Panorama extends the front stereo image to the surround channels, creating a more
enveloping, wraparound effect. Panorama is a non-adjustable, on/off feature.
To activate Panorama mode:
1. From the SURROUND CONFIG menu, press or to move the
cursor to
2.
Press the and buttons on the front panel or remote to toggle
between ON and OFF.
PANORAMA.
Select ON to engage the Panorama circuitry.
MAIN MENU
> INPUT CONFIG
SPEAKER SIZE
SPEAKER X-OVER
SURROUND CONFIG
CHANNEL CALIBRATION
DELAY ADJUST
SYSTEM CONFIG
EXIT
2. Move the cursor to SURROUND CONFIG by using the and
buttons on the front panel or remote.
3. With the cursor pointing to SURROUND CONFIG, press SET on the
front panel or the remote.
The Surround Configuration sub-menu appears:
SURROUND CONFIG
> NIGHT MODE :OFF
PANORAMA :ON
CENTER wIDTH :STEP 3
DIMENSION :STEP 0
HP MODE :STEREO
2CH SUB OFFSET : 0dB
RETURN TO MAIN MENU
Select
OFF
to disengage the Panorama circuitry.
Center Width
Center Width blends sound from the center channel into the left and right
channels to create a more seamless front soundstage. Experiment to see which
setting sounds best to you. The default setting of STEP 3 is a good starting point
for many systems and types of material.
To adjust Center Width:
1. From the SURROUND CONFIG menu, press or to move the
cursor to
2.
Press
STEP 0 to STEP 7.
Step 0
CENTER WIDTH.
and buttons
to adjust CENTER WIDTH anywhere from
provides no blending from center to left and right front speakers
at all.
Steps 1
and 2 feed a small amount of the center channel feed into the
left and right front speakers.
Step 3
is the factory default,
Steps 4, 5
and 6 begin to widen the front sound stage by feeding
increasing amounts of the center channel into the left and right front
speakers.
Step 7
shuts off the center channel speaker entirely. At this setting the
left and right front speakers create a “phantom” center channel.
30
Outlaw Audio

Owner’s Manual
System Setup
Dimension
This setting adjusts the depth of the surround soundfield. Depending on the
level you chose, it has the affect of putting your listening position closer to the
front of the room, or further back into the room’s acoustical environment. This
is a highly subjective adjustment that may also require some experimentation before you find the right setting for your room and listening preferences.
The setting also allows you to compensate for overly “dry” recordings (those
with little or no sense of reverberation or “space”) and for those with a more
reverberant sound.
To adjust Dimension:
1. From the SURROUND CONFIG menu, press or to move the
cursor to
2. Press the
Dimension anywhere from -3 to 3
DIMENSION.
and buttons on the front panel or remote
to
adjust
The -3, -2 and -1 settings increase the sense of depth and reverberation
by “placing” you further back in the acoustic environment.
The factory default setting of 0 is neutral and in many cases you will
find it the most enjoyable.
The 1, 2, and 3 settings decrease the sense of depth and reverberation by
“placing” you further towards the front of the acoustic environment.
NOTE: The Panorama, Dimension and Center Width adjustments may
be made while any mode is selected, but they only take effect when the
Dolby Pro Logic II Music or Dolby Pro Logic IIx Music modes are in use.
HP (Headphone) Mode
This setting determines whether the output at the headphone jack is two-channel stereo or processed using Dolby Headphone mode to create a surround-sound
effect through ordinary headphones.
To set HP Mode:
1. From the SURROUND CONFIG menu, press or to move the
cursor to
2. Press the
between
STEREO
HP MODE.
and buttons on the front panel or remote to toggle
STEREO and DH1.
(the factory default) sends a conventional, unprocessed two-
channel stereo feed to the headphone jack.
DH1
(DH stands for Dolby Headphone) creates a surround-sound effect
through conventional stereo headphones and simulates the acoustically
controlled environment of a recording studio control room.
2-Channel Subwoofer Offset
Some listeners find that after they’ve carefully set their system’s playback levels
for multi-channel listening, the subwoofer sounds too loud when playing music.
The Sub Offset setting allows you reduce the subwoofer level automatically
for 2-channel stereo playback. There is no "by the book" or "proper" way to
set Sub Offset. Simply adjust it to your taste. Play some music you like, set the
Model 970 for stereo playback, and adjust the Subwoofer Offset until it sounds
good to you.
To adjust 2-Channel Subwoofer Offset:
1. From the SURROUND CONFIG menu, press or to move the
cursor to 2CH SUB OFFSET
2. Press the
the 2CH SUB OFFSET anywhere from 0 to -6dB.
and buttons on the front panel or remote
.
to
adjust
The 0dB setting (the factory default) provides no subwoofer offset.
The -6 dB setting creates the most subwoofer offset.
NOTE: This is a negative offset only; you may not increase the output
of the subwoofer in stereo relative to its level in other modes.
To return to the Main Menu:
1. Move the cursor to RETURN TO MAIN MENU by using the
buttons on the front panel or remote.
2. Press SET on the front panel or the remote.
and
The Main Menu appears.
Channel Calibration
Next we will begin the channel calibration process, but first, a bit of background
is important. “Calibration” means setting the playback levels of each channel
so that they have equal volume at your prime viewing/listening position. If
one or two channels are louder than the others, surround effects will be less
convincing. The use of a constant level test tone that cycles from one speaker
to another allows you to adjust individual channel levels more accurately.
Although it’s possible to set channel levels by ear, we don’t encourage this practice. Instead, use an SPL (sound pressure level) meter. Radio Shack and other
retailers offer SPL meters that are inexpensive and reasonably accurate.
Once the playback levels are properly set and you’re enjoying a movie or music
selection, any level differences you hear are intentional – they’ve been “engineered into” the audio track for a specific reason.
To calibrate channel levels:
1. Press the MENU button on the front panel or the remote to display
the Main Menu.
The Main Menu appears on-screen:
MAIN MENU
> INPUT CONFIG
SPEAKER SIZE
SPEAKER X-OVER
SURROUND CONFIG
CHANNEL CALIBRATION
DELAY ADJUST
SYSTEM CONFIG
EXIT
2. Move the cursor to CHANNEL CALIBRATION by pressing the and
buttons on the front panel or remote.
Model 970 7.1 Channel Preamplifier Processor
31

Owner’s Manual
System Setup
3. With the cursor pointing to CHANNEL CALIBRATION, press SET on
the front panel or the remote.
The Channel Calibration sub-menu appears:
CHANNEL CALIBRATION
> TEST TONE :OFF
AUTO SEQ :ON
FRONT LEFT : 0dB
CENTER : 0dB
FRONT RIGHT : 0dB
SURR RIGHT : 0dB
SURR BACK R
SURR BACK L
SURR LEFT : 0dB
SUBwOOFER : 0dB
RETURN TO MAIN MENU
: 0dB
: 0dB
To calibrate the channel levels of the Model 970, you can use either the built-in
test tone, or your own test disc or tone generator. In addition, when using the
internal test tone, you can have the Model 970 circulate the signal from one
speaker to the next automatically (AUTO SEQ: ON), or you can select each
channel manually
We recommend using the Model 970’s test tone for your initial adjustments.
The use of the tone assures that an equal level signal is sent to each channel,
providing an accurate basis for the adjustments. The test tone is a wide bandwidth signal technically called “pink noise,” that sounds a bit like a waterfall.
This wide bandwidth signal avoids some of the room problems a single tone
test signal (like a sine wave) might generate and compensates for speakers that
have different “acoustic signatures.”
If you wish to use a test disc or your own tone generator to make the output
level adjustments, make certain that the input for the source to be used for
the external test signal is selected, and if necessary in the “play” mode before
proceeding.
SETUP HINT: Regardless of which modes you select for actually
adjusting the channel levels, we recommend that you set both TEST
TONE and AUTO SEQ to ON so that the tone circulates through all
channels automatically. Do not make any adjustments during this first
pass. Rather, note the position of the cursor in the on-screen menu listing or the channel names that will appear in the lower line of the front
panel display and make certain that you hear the test tone from each
speaker in your system at the location that matches the name shown.
This enables you to check that all speakers are properly connected to
the correct channel output. If any speaker does not output the tone
when it should, or if the tone comes from a speaker position that does
not match the cursor position (such as the tone coming from the Surround Left speaker when the cursor is pointing to Surround Right), exit
the menu system, turn your Model 970 off and check your speaker
connections before proceeding further.
If you are using a sound pressure (SPL) meter (recommended), place the meter
close to where your ears would be while watching or listening. Most have a tripod
socket in order to use a camera/camcorder tripod to set the meter in exactly the
right place without straining to hold it there for the entire calibration period.
Remember to set the weighting curve to “C” and the response to“Slow.” Then
adjust the range dial so that the meter reads somewhere near 0. You’ll be able
to read the output level of each speaker directly with no guessing or dependence
on your brain’s (notoriously unreliable) “acoustic memory.”
Channel Calibration with the Model 970 Test Tone
The Model 970 is factory set to automatically send the test tone sequentially to
each of the speakers in your system. Alternatively, if you set AUTO SEQ to OFF,
you can use the and Navigation buttons to move the cursor manually to
each speaker that you would like to adjust. Use the and Navigation buttons
to change the output level.
To calibrate the channels with the internal Test Tone:
1. With the cursor pointing to
on the front panel or remote
TEST TONE, press the and buttons
so that the setting is ON
If AUTO SEQ is set to ON, the cursor will automatically drop down two
lines to the FRONT LEFT speaker position, and the test tone will be
heard from that speaker.
If you change the AUTO SEQ setting to
OFF
, you will need to use the
and Navigation buttons to change a channel. In this mode you
may take as long as is needed to adjust any channel, changing them
as you desire.
2. Press the button on the front panel or remote to raise the level
in the channel, or
to lower it
The channel with the cursor next to it is the one you can adjust.
You can adjust each channel’s relative level from -10dB to +10dB. This
will give you adequate adjustment range for almost any multi-channel
system calibration.
When the level from one speaker sounds (or better yet, measures) close
to the previous channel, let the Test Tone circulate to the next channel,
or use the and Navigation buttons to move the channel if you have
AUTO SEQ set to OFF.
Repeat the sequence as the tone moves from one channel to another
as often as is needed until the output from each speaker sounds (or
measures) the same as all the others.
3. When you have finished setting the level for all of the channels in
your system, move the cursor to RETURN TO MAIN MENU by using
the
and buttons on the front panel or remote.
4. Press SET on the front panel or the remote.
The Main Menu appears.
Manual Channel Calibration with Your Own Test Source
If you wish to use a test disc or tone generator to make the output level adjustments, make certain that the input for the source to be used for the external test
signal is selected, and if necessary in the “play” mode before proceeding.
Before you begin, make sure that you are in the Channel Calibration sub-menu
and that TEST TONE and AUTO SEQ are both set to OFF.
To manually calibrate channel levels:
1. With the input for the source of the external tone generator or test
disc on and playing, move the cursor by using the
on the front panel or remote to FRONT LEFT.
and buttons
32
Outlaw Audio
Owner’s Manual
System Setup
2. Press the button on the front panel or remote to raise the level
in the channel, or
to lower it
You can adjust the channel’s relative level from -10dB to +10dB.
When the level from one speaker sounds or measures close to the
previous channel, use the and Navigation buttons to move to the
next channel.
Repeat for each channel as often as is needed until the output from each
speaker sounds (or measures) the same as all the others.
3. When you have finished setting the level for all of the channels
in your system, move the cursor to RETURN TO MAIN MENU by
using the
4. Press SET on the front panel or the remote.
and buttons on the front panel or remote.
Delay Adjust
In all probability, your speakers won’t all be at the same distance from your
main viewing/listening position. That means that the sound from each speaker
won’t reach your ears at the same time. And that means that you won’t hear
the soundtrack exactly as you should hear it – the soundstage, particularly
surround effects, will be altered, in some cases subtly and in other cases more
obviously. That is why Delay Adjustment is important!
The Model 970 makes it easy to adjust the delay without any fancy calculations involving microseconds or other esoteric quantities. You simply tell your
processor how far each speaker is from your main viewing/listening position
and the Model 970 will take care of the rest!
Before proceeding, measure the distance from each speaker to your main
viewing/listening position and write the measurements down.
To set the Delay for each channel:
1. Press the MENU button on the front panel or the remote to display
the Main Menu.
The Main Menu appears on-screen:
MAIN MENU
> INPUT CONFIG
SPEAKER SIZE
SPEAKER X-OVER
SURROUND CONFIG
CHANNEL CALIBRATION
DELAY ADJUST
SYSTEM CONFIG
EXIT
2. Move the cursor to DELAY ADJUST by using the and buttons
on the front panel or remote.
3. With the cursor pointing to DELAY ADJUST, press SET on the front
panel or the remote.
The Channel Calibration sub-menu appears:
DELAY ADJUST
> DELAY UNIT :FEET
FRONT LEFT : 10FEET
CENTER : 10FEET
FRONT RIGHT : 10FEET
SURR RIGHT : 5FEET
SURR BACK R
SURR BACK L
SURR LEFT : 5FEET
SUBwOOFER : 10FEET
RETURN TO MAIN MENU
4. Press the and buttons on the front panel or remote to toggle
between
5. Move the cursor to
the front panel or remote.
6. Press the button on the front panel or remote to increase the
distance, or
FEET and METER.
: 0FEET
: 0FEET
FRONT LEFT by using the and buttons on
to lower it
You can adjust the distance from 0 to 20 feet (6 meters).
If a speaker is farther than 20 feet, follow the steps in the section Delay
Settings for Larger Rooms.
Repeat steps 5 and 6 for all the speakers in your system.
7. When you have finished setting the delay for all of the channels
in your system, move the cursor to RETURN TO MAIN MENU by
using the
8. Press SET on the front panel or the remote.
and buttons on the front panel or remote.
The Main Menu appears.
Delay Settings for Large Rooms.
If one or more of your speakers are greater than 20 feet away from your favorite
viewing spot, use the following procedure.
1. Measure the distance from each speaker to your main viewing/
listening position.
2. Write down each measurement.
3. Subtract 20 from the longest measurement.
4. Use the resulting answer as an “offset” for all the distances.
For example, the longest measurement in your system is the Back
Surround Left speaker at 26 feet. Subtract 20 from it. The answer of 6
becomes your offset. Now subtract the offset number from the actual
measured distances to get the measurements that you’d enter.
Speaker Actual Distance Entered Distance
Left Front 15’ 9’
Center 17’ 11’
Right Front 14’ 8’
Surr Right 13’ 7’
Surr Back R 20’ 14’
Surr Back L 24’ 18’
Surr Left 12’ 6’
Subwoofer 26’ 20’
Model 970 7.1 Channel Preamplifier Processor
33

Owner’s Manual
System Setup
System Configuration Settings
This final sub-menu lets you adjust some convenience and comfort parameters
that enable you to enjoy the Model 970 even more by custom tailoring key settings. Note that some of these settings may require a bit of experience with the
Model 970 in its factory default mode before you decide which to change, and
to what degree the changes should be made. If you are in a rush to get your
new Model 970 into action, there is no problem in leaving the factory settings
in place and returning to this menu later to make the desired changes.
1. Press the MENU button on the front panel or the remote to display
the Main Menu.
The Main Menu appears on-screen:
MAIN MENU
> INPUT CONFIG
SPEAKER SIZE
SPEAKER X-OVER
SURROUND CONFIG
CHANNEL CALIBRATION
DELAY ADJUST
SYSTEM CONFIG
EXIT
2. Move the cursor to SYSTEM CONFIG by using the and buttons
on the front panel or remote.
3. With the cursor pointing to
front panel or the remote.
The Channel Calibration sub-menu appears:
SYSTEM CONFIG
> OSD TIME OUT :3OSEC
DISPLAY TIME OUT :ON
VOLUME DEFAULT :LAST
DEFAULT VOL :-25dB
SLEEP :OFF
RETURN TO MAIN MENU
OSD (On-screen display) Time Out
This setting determines the length of time that the on-screen messages (volume change, input selection, surround mode, etc.) appear on the on-screen
display.
To adjust the OSD time out:
1. From the SYSTEM CONFIG menu, press or to move the cursor
to
OSD TIME OUT.
2. Press the
the desired setting.
and buttons on the front panel or remote to select
The available choices are:
SYSTEM CONFIG, press SET on the
Display Time Out:
This setting determines if the on screen messages and setup menus time out
(disappear from the screen) after the length of time selected in the OSD TIME
OUT line, as shown above. In most cases you will want to use the ON setting.
However, when making adjustments during the setup process, you may want
to leave the menus on until you intentionally turn them off.
To set display time out:
1. From the SYSTEM CONFIG menu, press or to move the cursor
to
DISPLAY TIME OUT.
2. Press the
between ON and OFF.
and buttons on the front panel or remote to toggle
Selecting ON (default) will cause on-screen messages to disappear after
the time period set in OSD Time Out.
Selecting
OFF
will make on-screen messages remain visible until the
Menu button on the remote or front panel is pressed.
Volume Default
This setting determines the volume level when the Model 970 is turned on.
To set the Volume Default:
1. From the SYSTEM CONFIG menu, press or to move the cursor
to
VOLUME DEFAULT.
2. Press the
between
Choose
and buttons on the front panel or remote to toggle
LAST and ON.
LAST
(default) to have the Model 970 always turn on at the same
volume level in place when it was turned off.
Choose ON to always have the Model 970 play at the level specified in
Default Volume each time you turn it on.
Default Volume
If you selected ON in the VOLUME DEFAULT menu above, your Model 970 will
always turn on at the same volume. Use the Default Volume setting to enter
that volume level.
To set the Default Volume level:
1. From the SYSTEM CONFIG menu, press or to move the cursor
to
DEFAULT VOLUME.
2. Press the
the desired setting.
and buttons on the front panel or remote to select
You can adjust the level from -70 to +10dB.
Keep in mind that a -70dB setting will be below your threshold of hearing
and +10dB may well make your ears bleed.
We suggest something in the range of -30 dB. That way, you’ll be sure
to know that your system’s on and working.
5SEC10SEC15SEC20SEC25SEC30SEC
34
Outlaw Audio

Owner’s Manual
Model 970 Operation
Sleep
The Model 970’s sleep timer automatically shuts the unit off after a predetermined amount of time, from 5 to 90 minutes. The sleep time can also be
activated directly from the SLEEP button on the remote control, using the
Model 970’s front-panel display.
To set the Sleep timer from the on-screen display:
1. From the SYSTEM CONFIG menu, press or to move the cursor
to
SLEEP.
2. Press the
the desired setting.
and buttons on the front panel or remote to select
The available choices are:
90MIN75MIN60MIN45MIN30MIN20MIN10MIN5MINOFF
Choosing one of the time settings will cause the Model 970 to turn itself
off after selected amount of time.
Choose
OFF
to disengage the sleep timer function
To exit the menu system
1.
Move the cursor to RETURN TO MAIN MENU by using the and
buttons on the front panel or remote.
2. Press SET on the front panel or the remote.
The Main Menu appears.
3. Move the cursor to EXIT by using the and buttons on the front
panel or remote.
4. Press SET on the front panel or the remote.
Your Model 970 is ready for action! The next section of this manual will give
you the information you need to use the Model 970 on a daily basis, as well as
the instructions for programming the remote.
Model 970 Operation
Now that you have completed the initial setup and configuration of the Model
970, you will find it easy to operate. Read the following section to learn the basics
of operating the Model 970, as well as a few tips and tricks that will enhance
your enjoyment of your home theater system.
Power
To turn the Model 970 on:
1. Press the MAIN POWER button on the unit’s rear panel until it
latches.
The Standby/On indicator on the front panel will glow amber.
2. Press the STANDBY button on the front panel, or any source button
(such as DVD, VIDEO 1, or CD) on the remote control.
The Standby/On indicator will turn green, and the front-panel display
will illuminate.
another device, remember that the TNR button must be pressed in order
for the remote to send commands to the Model 970.
To turn the Model 970 off:
Press the STANDBY button on the front panel or the PWR button
on the remote. The Standby/On indicator will turn amber, and the
front-panel display will disappear.
NOTE: The PWR button on the remote is used only to turn the
Model 970 OFF. This makes it possible for the Model 970 to have
separate, discrete commands for “on” and “off” that may be used to
program an optional programmable remote control. Remember, to
turn the Model 970 ON, press any of the source buttons at the
bottom section of the remote.
If you have previously been using the remote to control
Direct Operation
In addition to entering settings into the Model 970 using the on-screen menu
system, as described in various sections of this manual, many of the controls
may be changed directly at any time using the remote control or the front-panel
buttons. We will describe how to make these adjustments in this section.
Source Selection
To select a source/input from the remote control:
Press one of the source buttons (DVD, CD, VIDEO 1, etc.) on the
remote control.
This will turn the Model 970 on and select the desired input. Remember
that in order to actually control the selected source device you must
press the appropriate Device Selector Button. These are at the top of the
remote, and are the only buttons on the remote with the lettering in
white on a black background.
The front-panel display will show the selected source. The on-screen
display will also show the selected source unless you have set OSD to
OFF in the Input Configuration menu.
Model 970 7.1 Channel Preamplifier Processor
35

Owner’s Manual
Model 970 Operation
To select a source/input from the front panel:
1. Press the INPUT button on the front panel.
2. Press the
source.
or buttons on the front panel to selec t the
The front-panel display will show the selected source (or the name you
have chosen for it if you have renamed that input). The on-screen display
will also show the selected source unless you have selected OSD: OFF in
the Input Configuration menu.
Volume Control
Use this control to adjust the volume level.
To adjust main volume level:
Press the VOLUME UP or DOWN buttons on the remote, or turn
the VOLUME knob on the front panel.
The volume level will be indicated on the front-panel display and the
on-screen display (unless you have selected OSD: OFF in the Input
Configuration menu). The range of the volume control runs from
-70dB to +10dB.
When you use the remote control to adjust the volume setting it will
change up or down in 0.5 dB increments if you tap the volume controls
up or down slowly. When you hold the volume control buttons down the
volume will change quickly, but only in 1dB increments. When the front
panel volume control is used the level is changed in 1dB increments.
Muting the Volume
Use this control to turn the sound off momentarily, such as when interrupted
by a phone call.
To mute the main volume:
Press the MUTE button on the front panel or the remote control.
The sound will mute and the word “MUTE” will replace the volume
level in the displays and blink on the front-panel display, but remain
constant in the on screen display.
To turn mute off:
Press either MUTE button to restore the volume to its previous level.
The name of the selected source will reappear in the displays.
OR
Press the VOLUME UP or DOWN buttons on the remote, or turn
the VOLUME knob on the front panel.
The volume of the selected source will return at the new level.
Changing the Surround Mode
Use these controls to change the surround mode from the default selected
during input configuration. Only the modes that can be used with the signal
(stereo, Dolby Digital, or DTS) currently being played will be available for you
to select. Seven-channel modes such as Dolby Pro Logic IIx Movie cannot be
used unless you have seven speakers connected.
To change the surround mode from the front panel:
1. Press the SURR MODE button.
2. Press the
desired mode appears.
or buttons on the front panel until the name of the
The selected surround mode is shown on the front-panel display, and
the on-screen display unless you selected OSD: OFF in the Input Configuration menu.
This method also allows you to select one of the Model 970’s stereo modes,
including stereo, bypass, 5-channel stereo and 7-channel stereo.
To change the surround mode from the remote:
1. Press the DOLBY MODES button or the DTS MODES button,
depending on what type of signal you are listening and the mode
type desired until the name of the mode you want to select
appears.
The selected surround mode will be shown on the front-panel display,
and in the on-screen message (unless you selected OSD: OFF in the Input
Configuration.). The DOLBY MODES button works with any type of signal. The DTS MODES button works only when you are playing stereo
or DTS material.
Changing Stereo Modes
The Model 970 offers several stereo listening models, including stereo, 5-channel
stereo, and 7-channel stereo. With stereo material, such as CDs or FM radio, all
of these modes are available. With Dolby Digital and DTS material, most of these
modes will be not be available.
To change the stereo mode from the front panel:
1. Press the SURR MODE button.
2. Press the
desired mode appears.
or buttons on the front panel until the name of the
The selected surround mode will be shown on the front-panel display
and in the on-screen messages (unless you selected OSD: OFF in the Input
Configuration menu.)
To change the stereo mode from the remote:
Press the STEREO button until the name of the desired name
appears.
The selected stereo mode will be shown on the front-panel display and
in the on-screen messages (unless you selected OSD: OFF in the Input
Configuration menu.)
Selecting the Bypass Mode
The Model 970’s Bypass mode allows you to route the signal from an analog
stereo input directly from the inputs to the volume control in a “straight-wire”
mode, without any digital processing.
To select Bypass from the front panel:
1. Press the SURR MODE button.
2. Press the or buttons on the front panel until Bypass appears.
To select Bypass from the remote:
Press the Bypass button to toggle between Bypass mode and
standard mode with digital processing.
36
Outlaw Audio

Owner’s Manual
Model 970 Operation
Channel Trim
Channel Trim allows you to fine-tune the channel levels to compensate for
various soundtrack anomalies. For example, you may play a movie and find that
the center (dialogue) channel sounds weak, making the movie hard to follow.
Simply trimming the center channel up a decibel or two can fix the problem.
Or another movie may have much more bass than normal; trimming the
subwoofer channel down a few decibels should balance the sound correctly.
You can trim the channels while you are listening to a source, or you can
trim the channels using the Model 970’s internal test tone. The trim range is
+10dB to -10dB.
To adjust channel level while listening to a source:
1. Press TRIM on the remote control.
“TRIM LEVEL ADJUST” will appear in the front panel display and in
the on-screen messages (unless you selected OSD: OFF in the Input Configuration menu). FRONT LEFT” will be the first channel to be shown
on-screen and on the front-panel display along with the current channel
output level offset.
2. Press the or buttons to adjust the level as desired.
3. When the desired level offset is set, use the
move through the list of channels.
and buttons to
Repeat steps 2 and 3 until you finished adjusting the channel levels.
4. Press SET when you are finished adjusting the channel outputs or
wait a few seconds for the display to disappear.
To adjust channel level using the test tone, use the same procedure described
above, except start the process by pressing the TEST button on the remote
instead of the TRIM button. :
NOTES ON RECORDING:
tal to digital but you cannot record analog to digital or digital to analog
through the Model 970.
If you change the input source during recording, you will record the
signals from the newly selected input source from that point on.
You can record analog to analog and digi-
Night Mode Selection
The Model 970’s Night Mode is intended for late-night listening. It suppresses
the loud peaks in movie soundtracks and music videos so that the sound from
your system does not disturb others. Yet you will still be able to play the system
loud enough so you can hear dialogue clearly. Night Mode works only with
Dolby Digital soundtracks.
You can activate Night Mode through the Surround Configuration sub-menu
(see page 30) or directly from the remote control.
To adjust Night Mode from the remote control when a Dolby Digital
source is playing:
1. Press the NIGHT button on the remote control.
The current setting of Night Mode appears on the front panel display
and in the on-screen messages (unless you selected OSD: OFF in the
Input Configuration menu.)
2. Press the NIGHT button to toggle between the two modes.
No Comp
DR Comp
3. Press EXIT on the remote control to exit Night Mode selection, or
wait a few seconds for the display to disappear.
means no compression (i.e., Night Mode Off)
means dynamic range compression (i.e., Night Mode On)
Recording a Source
You can record from any input source connected to the Model 970 when you
have an audio or video recorder properly connected to the appropriate output
jacks on the rear panel but you cannot monitor the output of the recorder
through the Model 970 while recording.
To record from a currently selected analog input source:
1. Prepare your analog recording device.
Follow the recommended procedure from the recorder manufacturer
about settings, etc.
2. Set the device to the record mode and begin recording.
The source audio signals appear at the Tape Record Outputs and the
Video 1 audio outputs. If the source contains a video signal, it appears
at both the composite and S-Video Record Outputs.
To record from a currently selected digital input source:
1. Prepare your digital recording device.
Follow the recommended procedure from the recorder manufacturer
about settings, etc.
2. Set the device to the record mode and begin recording.
The source audio signals appear at the Coaxial and Optical Digital
Audio Output jacks. If the source contains a video signal, it appears at
both the composite and S-Video Record Outputs.
Sleep Timer
The Model 970’s sleep timer automatically shuts the unit off after a predetermined amount of time. The sleep time can be activated through the System
Configuration sub-menu (see page 35), or directly from the remote control.
To activate the sleep timer from the remote:
1. Press SLEEP on the remote.
“SLEEP TIME: 90 MIN” appears on the lower line of the front-panel
display and in the on-screen messages (unless you selected OSD: OFF
in the Input Configuration menu.)
2. Press SLEEP repeatedly to reduce the amount of time before the
Model 970 shuts off.
The available choices are:
90MIN75MIN60MIN45MIN30MIN20MIN10MIN5MINOFF
Choosing one of the time settings will cause the Model 970 to turn itself
off after selected amount of time.
Choose
OFF
to disengage the sleep timer function
3. Press EXIT on the remote to remove the sleep timer display, or
wait a few seconds for the display to disappear.
4. To check the amount of time left on the sleep timer, press SLEEP
again.
Model 970 7.1 Channel Preamplifier Processor
37

Owner’s Manual
Model 970 Operation
Lip-Synch Delay
Because video is more data-intensive than audio, processing video takes longer. As
a result, sometimes the video will lag behind the audio, causing a lip sync error.
The problem may vary with each source device. In particular, digital TV tuners
(or the stations they receive) seem to cause lip sync problems more than do DVD
players. The Model 970 lets you delay the audio to fix this problem. It also lets you
set a different lip sync delay for each input, in increments of 10 milliseconds.
You can adjust lip sync delay for a specific video input directly from the remote
or from the Input Configuration Menu (see page 26). Lip sync delay is not
available for audio-only inputs.
To set lip sync delay from the remote:
1. Press the SYNC button on the remote.
The current Lip Sync delay for the input in use will appear on the bottom
line of the front panel display and the on screen message (unless you
have selected OSD: OFF in the Input Configuration menu).
2. Press the or buttons on the remote to adjust the amount of
delay being applied.
Watching a close-up of an actors’ lips while carefully listening to their
dialogue is the best way to set the proper amount of lip sync delay.
If you hear dialog before you see lips moving, increase the delay time.
If you see lips moving before you hear dialog, decrease the delay time.
3. Press SET to choose the new lip sync setting.
Adjusting Tone Controls
You can adjust the bass and treble for a specific input directly from the remote
or from the Input Configuration Menu (see page 26). The maximum boost
or cut is ±6dB.
To adjust tone controls:
1. Press the TONE button on the front panel or remote.
The current setting for Treble boost or cut will appear in the lower line
of the front panel and on screen display (unless you have selected OSD:
OFF in the Input Configuration menu.)
2. Press the or buttons on the front panel or remote to increase
the boost or cut of the Treble as desired.
The input choices for both Bass and Treble appear as follows as you
scroll through them:
-6dB-5dB-4dB-3dB-2dB-1dB0dB1dB2dB
3dB4dB5dB6dB
3. When the desired boost or cut is set, press the TONE button again
to toggle from Treble to Bass.
4. Press the
the boost or cut of the Bass as desired.
5. Press the SET button on the front panel or remote when you are
finished with the tone control adjustments.
or buttons on the front panel or remote to increase
Using the AM/FM Tuner
The Model 970 incorporates an AM/FM/FM stereo tuner with 30 station-memory
presets. You can mix AM and FM presets as you wish. Stations can also be
tuned manually. To use the tuner, you must connect antennas to the AM and
FM antenna terminals on the back of the unit (see page 18).
To select the AM/FM tuner as your source:
Press AM/FM on the remote or TUNER on the front panel.
The band and frequency will appear on the bottom line of the front
panel display and in the on-screen messages (unless you have selected
OSD: OFF in the Input Configuration menu).
To change the frequency (station) manually:
Press CHANNEL UP or CHANNEL DOWN on the remote control, or
the or buttons on the front panel.
The band and frequency will appear on the bottom line of the front
panel and on-screen display (unless you have selected OSD: OFF in the
Input Configuration menu.)
To scan for the next frequency (station) automatically:
Press CHANNEL UP or CHANNEL DOWN on the remote control,
or the
or buttons on the front panel. Hold the button down
for one second, then release it.
The tuner will automatically scan up or down to the next active frequency. The band and frequency will appear on the bottom line of the
front panel and on-screen display (unless you have selected OSD: OFF
in the Input Configuration menu.)
To enter a frequency (station) directly:
1. Press DIRECT on the remote.
The current frequency will go blank on the bottom line of the front
panel and on-screen displays.
2. Use the 10-key numerical keypad on the remote to enter the
desired frequency.
For example, to enter 89.3 FM, simply punch in 0893.
3. Press SET on the remote.
To change the band (AM or FM):
Press AM/FM on the remote or TUNER on the front panel.
The band and frequency will appear on the bottom line of the front
panel and on-screen display (unless you have selected OSD: OFF in the
Input Configuration menu.)
To change the FM tune mode (mono or stereo):
Press TUNE MODE on the remote or the front panel to select the
desired tuner mode.
STEREO
will tune stereo signals.
MONO
will tune either mono or stereo signals. When a station’s signal is
weak in the STEREO mode, selecting mono will often provide a signal
that is more acceptable by switching to the mono sound mode.
38
Outlaw Audio

Owner’s Manual
Model 970 Operation
Creating an AM or FM station-memory preset manually:
1. Tune the station you want to enter into memory following the
directions shown above.
2. Press the MEMORY button on the remote.
You will see “Memory” immediately above the broadcast frequency in
the front panel and on-screen displays.
If any station presets have already been entered, you’ll see a number
immediately after “Memory.” The first digit of that number will flash.
3. Within 5 seconds, enter a two-digit memory number (from 01 to
30) using the remote’s numeric keypad.
4. Wait a few seconds as the present number is entered into the
Model 970’s memory.
The first digit of the preset number will blink. This is your indication
that the memory is being loaded.
5. The word MEMORY changes to PRESET and the first digit of the
number will stop flashing.
This is your indication that the preset number has been memorized.
NOTE: If the memory number you have chosen was previously used
for another station, that memory will be overwritten with the new station preset number.
AM station presets must be entered manually, they cannot be entered
using the automated process described below.
To use the headphones:
1. Plug a set of headphones in to the front panel using the headphone
jack.
The signal to the main speaker outputs will automatically mute when
the headphones are in use.
2. Use the HEADPHONE LE VEL CONTROL to the right of the
headphone jack to set the sound level for the headphones
The main system front panel or remote volume controls do not have any
influence on the headphone level setting.
CAUTION: We recommend that you turn the headphone level control
all the way down before using headphones for the first time, and then
slowly increasing the level by turning the knob to the right. This avoids
the chance that you might damage your hearing by encountering a
headphone level that is too high. Always use caution and good sense
when setting the headphone level, as high levels may cause hearing
damage. Listening to headphones for prolonged periods at high volume levels can permanently damage your hearing
The headphones may be used in either the Stereo or Dolby Headphone mode.
To change the setting, go to the Surround Configuration Menu, following the
instructions shown on page 31.
To create FM station-memory presets automatically:
Press and hold the remote’s MEMORY button for three seconds,
then release it.
The tuner will automatically scan the FM band for all active stations,
and create memory presets for the first 30 stations tuned with a signal
that has acceptable strength for good reception.
To select a preset station:
From the remote, press the PRESET UP or PRESET DOWN buttons
to scan through the list of preset stations.
OR
1. From the front panel, press the PRESET button.
2.
Press the or buttons to scan through the list of preset stations.
Using Headphones
The Model 970’s front headphone jack allows you to listen in private without
disturbing others nearby. You may enjoy headphone listening in either pure
stereo or thanks to the Model 970’s Dolby Headphone processing, you can enjoy
a realistic surround-sound effect even when using headphones.
The Model 970 has a 1/4-inch headphone jack, which accommodates the
1/4-inch plugs found on most quality headphones. If you want to use portablestyle headphones such as those included with portable CD or MP3 players, you
will need a stereo 1/8-inch to 1/4-inch adapter, which is readily available at
RadioShack and other electronics stores.
Model 970 7.1 Channel Preamplifier Processor
39

Owner’s Manual
Remote Control Setup and Operation
Remote Control Setup and Operation
The Model 970 remote control is preprogrammed with remote codes for 1,000
audio and video components. Programming is accomplished by simply punching in a four-digit code number that matches your equipment.
In addition to the Model 970 itself, the remote control can operate up to seven
other audio and video devices in your home entertainment system. They are
listed below:
TVs, Monitors, Video Projectors
VCRs, TV/VCR combination units
Cable boxes, Internet set-top boxes
Satellite receivers—DirecTV, Dish Network, Primestar, DBS, C-band
Audio receivers, preamplifiers, surround processors
Compact disc players, multi-disc changers
DVD, laserdisc players
Cassette tape players, DAT, MiniDisc, switchers, lighting, home control devices,
and video scalers
For the best performance when operating your remote control, please follow
the guidelines below:
Remember to point the remote control toward the remote control sensor on the
Model 970, not toward the TV screen. Place the 970 away from strong light such
as direct sunlight or fluorescent light, which can prevent proper operation of
the remote control.
Using another remote control of a similar type or placing the Model 970
near equipment which also uses infrared control may cause operational
interference.
Do not put objects on the remote control. The buttons of the remote control may
be pressed by mistake and drain the batteries.
Make sure any doors covering the front of the 970 do not have colored or smoked
glass. Placing the unit behind such doors may prevent proper remote control
operation.
If there is any obstacle between the remote control and the remote control sensor,
the remote control will not operate.
The remote control also has many advanced features that can add ease and
enjoyment to the operation of your home entertainment system. After becoming
familiar with the layout of the buttons on the remote (see pages 10-11), follow
the steps below to customize the remote for your particular setup.
Battery Installation
The remote control uses two AA 1.5-volt alkaline batteries (supplied). Please
be sure to match the batteries with the + and - markings inside the battery
compartment during installation.
NOTE: Do not mix new and old batteries or different kinds off batteries. To avoid corrosion, remove the batteries if the remote control will
not be used for one month or more. Remove dead batteries immediately to avoid damage from corrosion.
To install batteries in the remote control:
1.
On the back of the remote, push the tab and lift off the battery cover.
2. Insert two new AA alkaline batteries. Match the + and - marks on
the batteries to the + and - marks in the battery case.
3. Press the battery cover back into place. The tab should click when
the cover is locked.
4. Test the unit by pressing PWR and any mode key (i.e., AUX, CBL, etc.).
If the batteries are inserted correctly, the LED will blink once.
NOTE:
The batteries will usually last about six months under normal
use. When batteries need replacement, the remote will blink twice with
every key press. Simply replace them and the remote control will be
restored to its full functionality, including favorite settings.
Setup Using Preprogrammed Codes
The Model 970 remote can be programmed to operate other audio or video
components in your system.
the Model 970.
To program the remote to control another device, you must enter
a four-digit code. Codes for a wide variety of devices and brands are provided
in the following pages. More than one setup code number may work with your
device. You should test the functions for each of the code numbers that work
with your device to determine the best one for your particular unit.
The procedure for setting up the Model 970 remote to control a TV/VCR is different—see Programming TV/VCR Control below.
NOTE: Some devices, such as CD players and DVD players that do not
have power buttons on their original remote controls, may not shut off
during programming. For these devices, it may be necessary to first
store the setup code number and then test functions like PLAY, STOP,
etc, to determine if the correct number has been selected.
To program using four-digit codes:
1. Turn on the device you would like the remote control to operate,
either manually or with its original remote control.
2. Find the four-digit setup code number for your device from the
tables on pages 42 to 45.
3. Press the Device Control Selector button on the Model 970 remote
that corresponds to the device you want to control.
You can choose from CBL, AUX, VCR, TV, SAT, CD, or AMP.
NOTE: The codes for controlling DVD players are programmed into
the AUX button.
4. Press and hold SETUP on the remote until the red LED at the top
of the remote blinks twice, then release SETUP.
5. Enter the first four-digit code for your component.
The LED should blink twice. If it does not, then repeat steps 3, 4, and 5
above, using the same code.
6. Aim the remote at the component and press PWR once.
The component should turn off. If it does not respond, repeat steps 3, 4, and
5, trying each code for your brand until you find one that works. If it still does
not work, try searching for the code (see Searching For Your Code, below).
7. Repeat the process for other components you wish to control with
the Model 970 remote.
The TNR button is used exclusively for control of
40
Outlaw Audio

Remote Control Setup and Operation
Owner’s Manual
Programming TV/VCR Control
The Model 970 can control TV/VCR combo units, but the procedure is somewhat
different than entering codes to control other components. As with other components, you must enter a four-digit code. Codes for many TV/VCR brands are
provided in the following pages. More than one setup code number may work
with your device. You should test the functions for each of the code numbers
that work with your device to determine the best one for your particular unit.
If you want to control TV functions besides power on/off, you may need to enter
a separate TV code, as described below.
To program TV/VCR control:
1. Turn on the TV/VCR, either manually or with its original remote
control, and insert a video cassette.
2. Find the four-digit code for your TV/VCR from the tables on pages
44 to 49. Your TV/VCR may have a separate TV code listed. If so,
be sure to note both codes.
3. On the Model 970 remote, press VCR.
4.
Press and hold SETUP until the red LED blinks twice, then release SETUP.
5. Enter the first four-digit code for your component.
If the code entry is performed correctly, the LED will blink twice. If it
does not, then repeat steps 3, 4, and 5, using the same four-digit code.
6. Aim the remote at the TV/VCR and press PWR once. The TV/VCR
should turn off. If it does not respond, repeat steps 3, 4, and 5, trying
each code for your brand until you find one that works. If it still does
not work, try searching for the code (see Searching For Your Code).
7. If your component has a separate TV code listed, press TV on the
Model 970 remote control.
The LED will blink twice.
8. Enter the four-digit TV code for your TV/VCR combo.
If the code is entered correctly, the LED will blink twice. If it does not,
then repeat steps 7 and 8 using the same four-digit code.
Searching for Your Code
If your device does not respond to the remote after you have tried all codes
listed for your brand, or if your brand is not listed at all, try searching for your
code.
To search for a code for your component:
1. Press the Device Control Selector button on the Model 970 remote
that corresponds to the device you want to control.
You can choose CBL, AUX, VCR, TV, SAT, CD, or AMP.
2. Press and hold SETUP until the red LED on the remote blinks twice,
then release SETUP.
3. Enter 991.
The LED will blink twice.
4.
Aim the remote control at the component and slowly alternate between
pressing PWR and the button for the device you pushed in step 1
5. Stop when the TV turns off.
6. Press SETUP once.
7. To search for the codes of your other components, repeat the
process, using the appropriate button for the new device in steps
1 and 4.
.
Checking the Codes
If you have set up the Model 970 remote by searching for the codes, for future
reference, you may wish to find out which four-digit code is operating your
equipment.
To find the four-digit code for a device:
1. On the Model 970 remote, press the button near the top of the
remote for the type of device you want to control.
2. Press and hold SETUP until the red LED on the remote blinks twice,
then release SETUP.
3. Enter 990.
The LED will blink twice.
4. To view the code for the first digit, press 1.
After three seconds, the LED will blink to indicate the first code number
(i.e., 3 blinks = 3). Count the blinks and write down the number.
5. Repeat steps 1-4 for each of the other three digits.
Press 2 for the second digit, 3 for the third, and 4 for the fourth. Count
the blinks and write down the numbers.
6. To check for the codes of your other components, repeat steps 1
through 5, but substitute the appropriate key in step 1 for the new
component you are checking.
Re-Assigning Device Buttons
If you wish to control a second device of a type already programmed into the
Model 970 remote (i.e., if you want to use two DVD players), you will need to
re-assign an unused device button (CBL, AUX, VCR, TV, SAT, CD, or AMP) to
operate the second device.
To reassign an unused device button:
1. On the Model 970 remote, press and hold SETUP until the LED
blinks twice, then release SETUP.
2. Enter 992.
The LED will blink twice.
3. Press the button for the device already programmed (i.e., CBL),
then press the button for the unused device (i.e., TV).
The LED will blink twice.
4. The button for the unused device is now ready to be programmed
for the second component. See Setup Using Preprogrammed
Codes.
Volume Control Punch-Through
You can program the Model 970 remote so that the VOLUME UP, VOLUME
DOWN, and MUTE buttons on the remote will control those functions on the
Model 970 even when the remote is set to control another device.
To set volume control punch-through:
1. On the Model 970 remote, press and hold SETUP until the LED
blinks twice, then release SETUP.
2. Enter 993.
3. Press the TNR key on the Model 970 remote.
The LED will blink twice.
Model 970 7.1 Channel Preamplifier Processor
41

Owner’s Manual
Care and Maintenance
Operation
After you have programmed the remote control for your equipment, use the
following procedures to operate the components of your home entertainment
system:
To operate a system component that you have programmed:
1. On the Model 970 remote, press the button near the top of the
remote for the device you want to control (CBL, AUX, VCR, TV, SAT,
CD, or AMP)
2. Aim the remote control at the device and press the POWER button
to turn on the device.
3. Press the buttons that send out the commands you desire.
NOTE:
Some audio/video devices have separate buttons for POWER
ON and POWER OFF. To operate these devices on the remote, press
the corresponding device button to turn the equipment ON and press
the POWER button to turn the equipment OFF.
Please try all the functions of this remote control with your equipment. The most
common functions are labeled on the remote. However, some of the secondary
functions might be stored under a button that has a different name from the
one on your original remote control.
Source Selection Buttons
Pressing a source button (VIDEO 1, DVD, etc.) at the bottom of the remote
control performs the following functions:
If the Model 970 is in Standby mode, powers up the unit.
Selects that source on the Model 970.
Backlighting
Pressing any button on the Model 970 remote illuminates all the buttons on
the remote control for about 5 seconds. The backlight is extended an additional
5 seconds with any button press while the backlight is on.
Care and Maintenance
Cleaning
When the unit becomes dirty, wipe it with a clean, soft, dry cloth. If necessary,
first wipe the surface with a soft cloth slightly dampened with mild soapy water,
then with a fresh cloth dampened with clean water. Wipe dry immediately
with a dry cloth. NEVER use benzene, thinner, alcohol or any other volatile
cleaning agent. Do not use abrasive cleaners, as they may damage the finish
of the metal parts. Avoid spraying insecticide, waxes, polishing agents, or any
aerosol product near the unit.
When You Are Away
If you will not be using your home theater system for an extended period of time,
it is always a good idea to turn the unit off using the MAIN POWER button on
the rear panel of the Model 970. This will prevent the automatic turn on circuits
from accidentally turning the system on during your absence.
System Reset
In rare cases the Model 970’s internal processor may freeze or lock-up causing
abnormal operation. This is common to all microprocessor-controlled devices when
the unit is subject to excessive static discharge, AC line noise, or power spikes.
In most cases it is easy to solve this problem by simply unplugging the
Model 970 from its AC power source for about five minutes. After waiting,
reconnect the power cord and turn the unit on. If the unit functions normally,
no further action is needed.
In the event that the unit still does not operate properly, it may be necessary to
manually reset the processor. Note, however, that when the processor is reset
you will lose all settings including digital audio assignments, surround mode
settings, speaker configurations, tuner presets and any other memory items.
For this reason we strongly recommend that you record these settings on the
chart provided on page 15 of this manual so that it is easy to restore them after
resetting the processor.
To perform a system reset:
1. Turn the rear-panel MAIN POWER switch on. The STANDBY/ON
indicator on the front panel will glow amber.
2. Turn on the Model 970 by pressing any of the input source
buttons.
3. Press the MENU and MUTE buttons on the front panel at the same
time.
“PRESS (1) TO LOAD DEFAULT” appears in the front-panel display.
4. Release the the MENU and MUTE buttons.
5. Within five seconds, press the 1 button on the remote control.
“OUTLAW AUDIO/MODEL 970” appears briefly to indicate that the unit
has been reset. The unit will then return to normal operation.
42
Outlaw Audio

Owner’s Manual
Setup Codes
TroubIeshooting
Listed below are some of the more common issues you could encounter. For
additional hints on using the Model 970 or resolving problems we suggest that
Your new Model 970 is designed to provide years of trouble-free operation.
However, the complexity of today’s sophisticated home theater systems means
that you might encounter an occasional problem with your system involving
you look at the Model 970 section of our website at www.outlawaudio.com, or
enter the Model 970 Section of our Outlaw Saloon. If your problem persists,
please call us at 866-OUTLAWS (688-5297) or 866-OUTLAWA (688-5292).
the Model 970.
Symptom Possible Cause Solution Options
Unit does not turn on when remote or
front panel buttons are pressed
No sound from digital audio source Input not properly selected Make certain the correct digital input is associated to the source
No DTS when a DVD is playing Incorrect bitstream output from DVD player Check the DVD player’s setup menus to make certain DTS output is selected
No sound from rear surround speakers Incorrect speaker configuration Check Speaker Configuration menu to make certain that surround speakers are set to “small”
Intermittent buzzing in tuner Interference from local sources Move or relocate the antenna
Unit does not respond to remote
commands
No AC Power Make certain AC power cord is plugged into a live outlet
Make certain rear panel MAIN POWER switch is ON
Check the disc menu to make certain DTS is selected
or “large”
Move the antenna or unit away from computers, fluorescent or neon lights, or appliances
with motors
Low remote battery power
Remote set to different device
Remote sensor is obscured
Change the batteries
Press the TNR button to make sure the remote is outputting 990 codes
Make certain the front-panel remote sensor is not blocked or connect an external remote
sensor
No sound from one or more channels Poor connections
Incorrect surround mode
Incorrect speaker configuration
Setup Codes
CABLE CONVERTERS
Manufacturer/Brand Setup Code Number
ABC 0003, 0017
Americast 0899
Bell South
General Instrument 0276, 0476, 0810
GoldStar 0144
Hamlin 0009, 0273
Jerrold 0003, 0276, 0476, 0810
Memorex 0000
Motorola 1106
Pace 0237
Panasonic 0107, 0000
Paragon 0000
Philips 0305, 0317
0899
Check interconnects to the amplifier and connections from the amplifier to the speakers
Check surround mode to make certain it provides output to all speakers
Check Speaker Configuration menu to make certain all speakers are set to “small” or “large”
Pioneer 0144, 0533, 0877
Pulsar 0000
Quasar 0000
Regal 0273, 0279
Bunco 0000
Samsung 0144
Scientific Atlanta 0017, 0477, 0877
Starcom 0003
Toshiba 0000
Zenith 0000, 0525, 0899
CD PLAYERS
Manufacturer/Brand Setup Code Number
Aiwa 0157
Burmester 0420
Cal. Audio Labs
0029
Carver 0157, 0179
DKK 0000
Demon 0003, 0873
Emerson 0305
Fisher 0179
Garrard 0420
Genexxa 0032, 0305
Harman/Kardon 0157, 0173
Hitachi 0032
JVC
Kenwood 0028, 0190, 0826, 0037, 0626,
Krell 0157
LX. 0305
Linn 0157
MCS 0029
0072
0681
Model 970 7.1 Channel Preamplifier Processor
43
Owner’s Manual
Setup Codes
MTC 0420
Magnavox 0157, 0305
Marantz 0157, 0626, 0029
Mission 0157
NSM 0157
Onkyo 0101, 0868
Optimus 0032, 0468, 0420, 0179, 0305,
Panasonic 0029
Parasound 0420
Philips 0157, 0626
Pioneer 0032, 0468, 0305, 1062, 1063
Polk Audio
Proton 0157
QED 0157
Quasar 0029
RCA 0053, 0032, 1062, 0468, 0305,
Realistic 0179, 0420
Rotel 0157, 0420
SAE 0157
Sansui 0157, 0305
Sanyo 0179
Scott 0305
Sears 0305
Sharp 0037, 0861
Sherwood 1067
Sonic Frontiers
Sony 0000, 0490
Soundesign 0145
Tascam 0420
Teac 0420
Technics 0029
Victor 0072
Wards 0053, 0157
Yamaha 0036, 0888
DVD PLAYERS
Manufacturer/Brand Setup Code Number
Apex 0672
Denon 0490
Fisher 0670
GE 0522
Gradiente 0651
Hitachi 0573, 0664
Hiteker 0672
JVC 0623, 0558
1063, 0000, 0037, 0145
0157
0179
0157
Kenwood 0682, 0534
Konka 0719, 0711, 0720, 0721
Magnavox 0503, 0675
Marantz 0539
Mitsubishi 0521
Onkyo 0503
Optimus 0571
Oritron 0651
Panasonic 0490, 0677, 0632
Philips 0539, 0503
Pioneer 0571, 0525, 0632
Proscan 0522
RCA 0522, 0571
Samsung 0573
Sharp 0630
Sony 0533
Toshiba 0503
Yamaha 0490, 0545
Zenith 0591, 0503
HOME AUTOMATION
Manufacturer/Brand Setup Code Number
GE 0240
One For All
Radio Shack
Security System
Universal X10
X10 0167
SATELLITE RECEIVERS
Manufacturer/Brand Setup Code Number
AlphaStar 0772
Chaparral 0216
Echostar 0775, 1005
GE 0566
General Instrument
HTS 0775
Hughes Net. Sys. 0749, 1142, 1749
Philips 1076, 1142, 0722, 0724, 0749
Proscan 0392
RCA 0506, 0392, 0143, 0855
Radio Shack
Samsung 1109
Star Choice
Zenith 0856
0167
0240
0167
0167
0869
0869
0869
TELEVISIONS
Manufacturer/Brand Setup Code Number
AOC 0019, 0030
Admiral 0093, 0463
Aiko 0092
Aiwa 0701
Akai 0030
Alaron 0179
America Action
Anam 0180
Audiovox 0092, 0180, 0451, 0623
Baysonic 0180
Bclmr 0019
Bell & Howell 0016, 0154
Bradford 0180
Brockwood 0019
Broksonic 0236, 0463
CXC 0180
Candle 0030, 0056
Carnivale 0030
Carver 0054
Celebrity 0000
Cineral 0451, 0092
Citizen 0056, 0030, 0060, 0092
Concerto 0056
Contec 0180
Craig 0180
Crosley 0054
Crown 0180
Curtis Mathes 0060, 0030, 0016, 0047, 0051,
Daewoo 0092, 0623, 0019, 0624, 0451
Daytron 0019
Denon 0145
Dumont 0017, 0019
Electroband 0000
Emerson 0236, 0180, 0178, 0179, 0463,
Envision 0030
Fisher 0154
Fujitsu 0179, 0683
Funai 0180, 0171, 0179
Futuretech 0180
GE 0047, 1347, 0051, 0178, 0451,
Gibralter 0017, 0019, 0030
GoldStar 0178, 0019, 0030, 0056
0180
0054, 0056, 0093, 0145, 0154,
0166, 0451, 1147, 1347
0624, 0623, 0019, 0154
1147, 0093
44
Outlaw Audio

Owner’s Manual
Setup Codes
Gradiente 0056, 0053
Grunpy 0179, 0180
Hallmark 0178
Harley Davidson
Harman/Kardon 0054
Harvard 0180
Hitachi 0145, 0056, 0016
Infinity 0054
Inteq 0017
JBL
JCB
KEC 0180
KTV 0180, 0030
Kenwood 0030, 0019
Konka 0707, 0632, 0628, 0638, 0703
LG 0056
LXI 0154, 0047, 0054, 0156, 0178
Logik 0016
Luxman 0056
MGA 0150, 0019, 0030, 0178
MTC 0060, 0030, 0019, 0056
Magnavox 0054, 0030, 0179, 1254
Marantz 0054, 0030
Matsushita 0250
Megatron 0145, 0178
Memorex 0179, 0463, 0178, 0016, 0056,
Midland 0017, 0047, 0051
Motorola 0093
Multitech 0180
NAD 0156, 0166, 0178
NEC 0030, 0019, 0056
NTC 0092
Nikko 0178, 0030, 0092
Onwa 0180
Optimus 0250, 0166, 0154
Optonica 0093
Orion 0463, 0179, 0236
Panasonic 0051, 0250
Penney 0047, 1347, 0060, 0030, 0178,
Philco 0145, 0019, 0030, 0054, 0463
Philips 0054
Pilot 0019, 0030
Pioneer 0166, 0679
Portland 0019, 0092
Princeton 0717
0179
0054
0000
0150, 0154, 0250
0051, 0019, 0056, 0156
Prism 0051
Proscan 0047
Proton 0178
Pulsar 0017, 0019
Quasar 0051, 0250
RCA 0047, 1347, 1147, 0679, 1247,
RadloShack 0180, 0030, 0178, 0154, 0019,
Realistic 0180, 0154, 0030, 0178, 0019,
Runco 0017, 0030
SSS 0019, 0180
Sampo 0030
Samsung 0060, 0019, 0178, 0030, 0056
Sansei 0451
Sansui 0463
Sanyo 0154
Scimitsu 0019
Scotch 0178
Scott 0236, 0019, 0178, 0179, 0180
Sears 0154, 0056, 0156, 0047, 0054,
Semivox 0180
Setup 0156
Sharp 0093, 0688
Shogun 0019
Signature 0016
Sony 0000
Soundesign 0178, 0179, 0180
Squareview 0171
Starlite 0180
Supreme 0000
Sylvania 0054, 0030
Symphonic 0171, 0180
TMK 0056, 0178
TNC 0017
Tandy 0093
Technics 0051, 0250
TechnoAce 0179
Techwood 0051, 0056
Teknika 0016, 0054, 0179, 0180, 0 019,
Telefunken 0056
Toshiba 0156, 0060, 0154, 1256
Vector Research
Victor 0053
0019, 0051, 0090, 0093, 1047,
1447
0047, 0056
0056
0171, 0178, 0179
0092, 0056, 0060, 0150
0030
Vidikron 0054
Vidtech 0019, 0178
Wards 0054, 0178, 0016, 0019, 0030,
0056, 0179
White Westinghouse 0624, 0623, 0463
Yamaha 0019, 0030
Zenith 0017, 0624, 0016, 0092, 0463
TV/VCR COMBOS
Manufacturer/Brand Setup Code Number
American High 0035 (for TV use 0051)
Brocksonic 0002, 0294,
Colt 0072
Curtis Mathis 0035 (for TV use 0051)
Daewoo 0278
Emerson 0002, 0294, 0479
Funai 0000
GE 0035 (for TV use 0051), 0060
(for TV use 0047), 0048 (for
TV use 0093), 0240
Hitachi 0035 (for TV use 0051), 0000
HQ 0000
Lloyds 0000
MGA 0240
Magnavox 0081 (for TV use 0054), 0035
(for TV use 0051), 0000
Magnin 0240
Memorex 0037, 0162 (for TV use 0250)
Mitsubishi 0048 (for TV use 0093)
Orion 0002, 0294, 0479
Panasonic 0035 (for TV use 0051), 0162
(for TV use 0250)
Penney 0035 (for TV use 0051), 0240,
0162 (for TV use 0250)
Quasar 0035 (for TV use 0051), 0162
(for TV use 0250)
RCA 0060 (for TV use 0047), 0035
(for TV use 0051), 0048 (for
TV use 0093)
Sansui 0000, 0479
Sanyo 0240
Sharp 0048 (for TV use 0093)
Sony 0032 (for TV use 0000)
Symphonic 0000
Zenith 0000
Model 970 7.1 Channel Preamplifier Processor
45

Owner’s Manual
Setup Codes
VCRs
Manufacturer/Brand Setup Code Number
Admiral 0048, 0209
Adventure 0000
Aiko 0278
Aiwa 0000, 0037
Asha 0240
Audiovox 0037
Beaumark 0240
Bell & Howell
Broksonic 0121, 0184, 0002, 0209, 0479
CCE 0072, 0278
Calix 0037
Canon 0035
Carver 0081
Citizen 0278, 0037
Colt 0072
Craig 0037, 0072, 0047, 0240
Curtis Mathes 0035, 0060, 0162
Cybernex 0240
Daewoo 0278, 0045
Denon 0042
Dynatech 0000
Electrohome 0037
Electrophonic 0037
Emerex 0032
Emerson 0184, 0002, 0209, 0278, 0121,
Fisher 0047, 0104
Fuji 0033, 0035
Funai 0000
GE 0035, 0060, 0048, 0240
Garrard 0000
Go Video
GoldStar 0037, 0038
Gradiente 0000
HI-Q 0047
Harley Davidson
Harman/Kardon 0038, 0081
Harwood 0072
Hitachi 0042, 0000
Hughes Net. Sys.
JVC
KEC 0037, 0278
KLH 0072
Kenwood 0067, 0038
Kodak 0035, 0037
0104
0479, 0000, 0037, 0043
0432
0000
0042
0067
LXI 0037
Lloyd’s 0000
Logik 0072
MEI 0035
MGA 0043, 0240
MGN Technology
MTC 0000, 0240
Magnasonic 0278
Magnavox 0035, 0081, 0563, 0000, 0039,
Marantz 0081, 0035
Marta 0037
Matsushita 0035, 0162
Memorex 0104, 0047, 0479, 0000, 0037,
Minolta 0042
Mitsubishi 0043, 0048, 0067
Motorola 0035, 0048
Multitech 0000, 0072
NEC 0038, 0067, 0104
Nikko 0037
Noblex 0240
Olympus 0035
Optimus 0162, 1062, 1162, 0048, 1262,
Orion 0479, 0002, 0184, 0209
Panasonic 0035, 0162, 1162, 1262, 1362,
Penney 0035, 0240, 0037, 0042, 0038
Pentax 0042
Philco 0035, 0209, 0479
Philips 0081, 0035, 0618, 1081, 1181
Pilot 0037
Pioneer 0067
Polk Audio
Profitronic 0240
Proscan 0060
Protec 0072
Pulsar 0039
Quasar 0035, 0162, 1162
RCA 0060
RadioShack 0000, 1037
Radix 0037
Randex 0037
Realistic 0000, 0104, 0047, 0048, 0037,
ReplayTV 0614, 0616
0240
0149
0048, 0035, 0240, 1037, 0039,
0162, 0209, 1162, 1262
0037, 1048, 0104, 0432
0616, 1062
0081
0035
Runco 0039
STS 0042
Samsung 0045, 0240
Sansui 0479, 0000, 0067, 0209
Sanyo 0047, 0104, 0240
Scott 0184, 0121, 0043, 0045
Sears 0037, 0042, 0000, 0035, 0047,
Semp 0045
Sharp 0048
Shintom 0072
Shogun 0240
Singer 0072
Sony 0033, 0032, 0000, 0035, 0636,
Sylvania 0035, 0081, 0000, 0043
Symphonic 0000
TMK 0240
Teac 0000
Technics 0035, 0162
Teknika 0000, 0035, 0037
Thomas 0000
Tivo 0618, 0636
Toshiba 0045, 0043
Totevision 0037, 0240
Unitech 0240
Vector 0045
Vector Research
Video Concepts
Videosonic 0240
Wards 0035, 0060, 0000, 0047, 0240,
White Westinghouse 0072, 0278, 0209
XR-1000 0072, 0000, 0035
Yamaha 0038
Zenith 0039, 0000, 0033, 0209, 0479
VIDEO ACCESSORIES
Manufacturer/Brand Setup Code Number
Panasonic 1120
Pioneer 1010
Sensory Science
Sharp 1010
0104
1032
0038
0045
0042, 0048, 0072, 0081, 0149
1126
46
Outlaw Audio
Model 970 Specifications
Model 970 Specifications
Owner’s Manual
Audio Section
Input Impedance 26kΩ
Output Impedance (Main-RCA) <600Ω
Pre Out 1V
Maximum Output 6V
Volume Range (Main) -70dB to +10dB (0.5dB resolution)
Bass Management
High-Pass Slope Crossover Frequency
(Small Speaker Setting) (Adjustable 40/60/80/100/120/150Hz)
12 dB/octave (2nd order)
Low-Pass Slope (Subwoofer) 24dB/octave (4th order), 40-150Hz as above
Tone Control
Bass Center Frequency/Range 30Hz ± 6dB
Treble Center Frequency/Range 10KHz ± 6db
Frequency Response (Line) 10Hz to 100kHz ± 1dB
S/N Ratio (IHF-A) 101dB
IMD (CCIF @ 15Hz to 1kHz) 0.09%
FM Tuner Section
Sensitivity
IHF 10dBµ typ.
50dB S/N 13dBµ typ.
S/N Ratio
Mono 70dB
Stereo 67dB
Distortion
Mono 0.2%
Stereo 0.3%
Stereo Separation 40dB typ.
Adjacent Channel Selectivity 70dB ±400kHz
IF Rejection Ratio 120dB
Frequency Response 20Hz to 15kHz ± 1.5dB
Video Section (NTSC Format)
Bandwidth
Composite & S-Video 6 MHz –3dB
Component >100MHz
Input Sensitivity @ 75Ω
Composite & S-Video 1.0Vp-p
Component R-Y Signal 0.5Vp-p
Component B-Y Signal 0.5Vp-p
Component Y Signal 1.0Vp-p
General
Supply Voltage 120V, 60Hz only
Power Consumption
Standby Power Off 1.9W
Idle 6W
@ Full Load 45W max.
Trigger Output Sequential Delay 50 mA @ 12 VDC
Dimensions
Width 17.2 inches / 436.9 mm
Height 5.9 inches / 149.7 mm
Depth 15.5 inches / 393.7 mm
Weight 20 lbs. / 18.1 kg
AM Tuner Section
Sensitivity (20dB S/N) 200µV
S/N 50dB
Selectivity 25dB
Distortion 0.7%
Digital Audio
All digital audio inputs and outputs are to S/PDIF electrical (75Ω, 0.5Vp-p),
S/PDIF optical (Toslink), or AES / EBU (110Ω, 5Vp-p) standards as appropriate.
Processor CS49400
All features and specifications are subject to change without notice or liability to upgrade
existing units.
Outlaw Audio and the Outlaw Audio logo are registered trademarks of Outlaw Audio, LLC.
Manufactured under license from Dolby Laboratories. Dolby, Pro Logic and the double-D symbol are
registered trademarks of Dolby Laboratories.
Manufactured under license from DTS, Inc. DTS, DTS-ES, DTS 96/24 and DTS Neo:6 are registered
trademarks of DTS, Inc.
Any trademark not acknowledged is recognized as the property of the respective owner.
Model 970 7.1 Channel Preamplifier Processor
47

Outlaw Audio Limited Warranty
This warranty protects the owner of the Outlaw Model 970 Preamplifier
Processor (the PRODUCT) for two (2) years from the date of purchase.
This warranty covers all defects in material and workmanship with the
following specific exceptions. These are:
Damage caused by improper installation or adjustment
Damage caused by accident, unreasonable use or neglect
Damage from failure to follow instructions contained in this Owner’s
Manual
Damage from the performance of repairs by someone not authorized
by Outlaw Audio
Any unit on which the serial number has been effaced, modified, or
removed
Damage occurring during shipment
Units which have been altered or modified in design, appearance or
construction.
This warranty covers only the actual defects within the PRODUCT itself.
IT DOES NOT cover costs of installation in (or removal from) a fixed
installation, or normal setup, claims based on any misrepresentation by
the seller, or performance variations resulting from installation related
circumstances such as signal quality, AC power or incompatibilities with
speakers and/or other system components.
During the warranty period, Outlaw Audio will, at its option, either repair
the defect, or replace the defective product, or the defective parts, or components thereof at no charge to the owner for parts and labor covered by
this warranty If necessary repairs are not covered by this warranty, or if
a unit is examined which is not in need of repair, you will be charged for
the repairs and/or the examination. If non-warranted repairs are needed,
we will notify you of the estimated cost and ask for your authorization to
perform said repairs.
You must pay shipping charges incurred in getting your Product to the factory. We will pay the return shipping charges if the repairs are covered by
the warranty. Please save the original shipping cartons, as the unit MUST
be returned in the original carton and packing. (Replacement cartons are
available at a modest charge.)
If your product needs service, please call Outlaw Audio at 866-OUTLAWS
(688-5297) or 866-OUTLAWA (688-5292).
You will need to present the original bill of sale to establish the date of
purchase. In the event that the proof of purchase cannot be established
with the original receipt, the warranty period shall be determined by the
earliest date of manufacture shown on the unit, provided that the serial
number label has not been altered in any manner, or by our records relating to that serial number.
In the event that you wish to return your Outlaw Product back to us, for
any reason, please call to arrange for a Return Authorization Number. This
will ensure that your problem is discussed with a service technician who
will determine if there is a quick solution to your problem.
Outlaw Audio shall not be liable for, in any way responsible for, any incidental or consequential damages of any kind. Some states do not allow
limitations on how long an implied warranty lasts and/or do not allow the
exclusion of incidental or consequential damages; therefore, the limitations and exclusions stated herein may not apply to you. This warranty
gives you specific legal rights; and you may also have other rights that
vary from state to state.
THERE ARE NO WARRANTIES GIVEN BY OUTLAW AUDIO THAT EXTEND
BEYOND THE DESCRIPTION GIVEN HEREIN. ANY IMPLIED WARRANTIES OF FITNESS FOR PURPOSE SOLD, MERCHANTABILITY, DESCRIPTION, QUALITY OR ANY OTHER MATTERS ARE LIMITED TO THE TERMS
OF THE EXPRESSED LIMITED WARRANTY STATED HEREIN.
Products are sold on the basis of specifications applicable at the time of
sales. Outlaw Audio shall have no obligation to modify products once they
have been sold.
This warranty is applicable only in the United States.
For applicability in other countries, please call Outlaw Audio.
O u t l a w A u d i o
 Loading...