

Page 1

User manual
Model:UM100322
Brand:OUTFORM
User Guide
Page 2
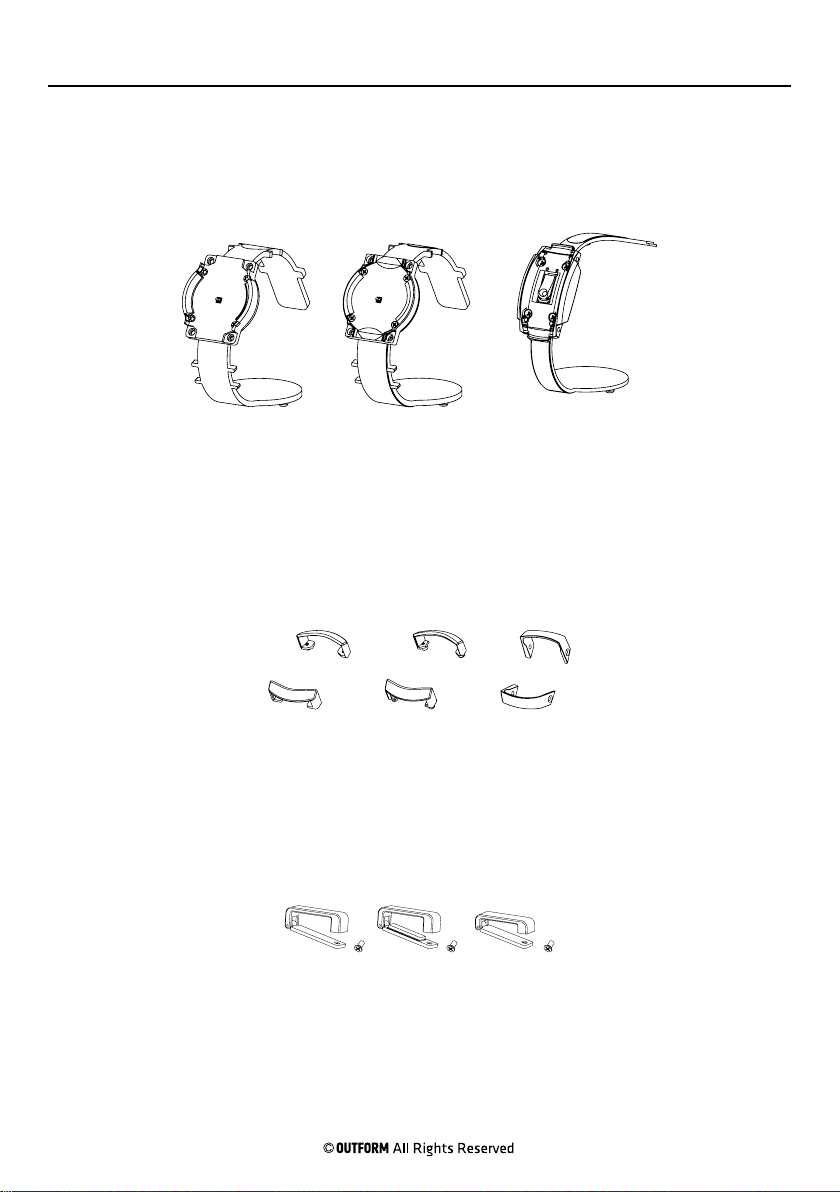
Package Contents
Page 1
C-Clips and Charging
Plates (3 types)
Gear Fit 2S2 Classic S2 Sport
Gear Frame Bracket
(3 Types)
Band Clip (x12)
Gear Fit 2S2 Classic S2 Sport
Gear Fit 2S2 Classic S2 Sport
Page 3
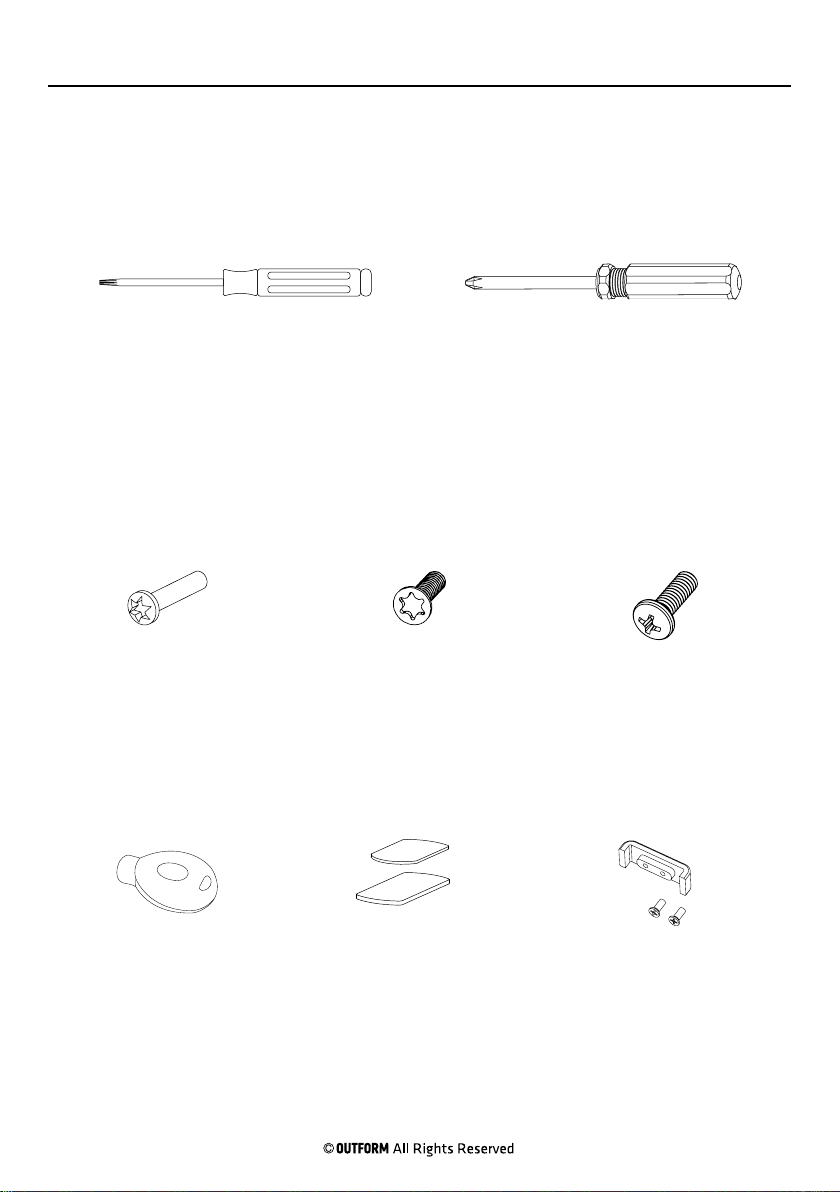
Package Contents
Page 2
Torque Screwdriver
C-Clip Screws
(x6)
IR Key Friction Pads
Watch Bracket
Screw (x14)
Screwdriver
Phillips
Screws (x6)
Fit Band Lock
and Screws
Page 4

Package Contents
Page 3
Alarm Puck
Alarm Cable
Connector Assembly
Pull Box Bracket
Pull Box
Alarm Puck Caps
(two kinds)Wing Nut
Page 5
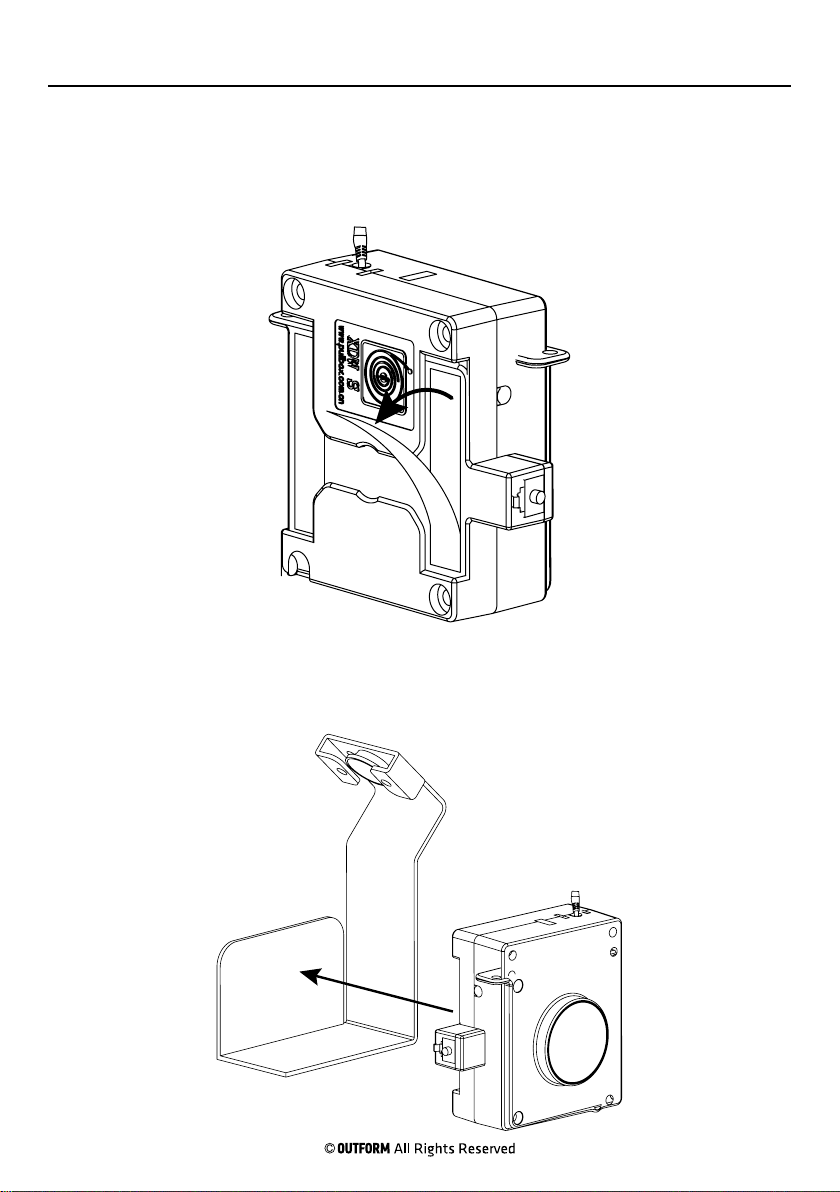
Installation Instructions
Step 1. Remove protective film from the side of the pull box.
Page 4
Step 2. Install the pull box into the pull box bracket. Press the pull box into place
for ten seconds to ensure adhesion.
Page 6

Installation Instructions
Step 3. Connect the two halves of the alarm puck together using two Phillips
screws and the screwdriver.
Page 5
Step 4. Slide the threaded posts on the alarm puck into the slot on the front
surface of the display. Make sure that the threaded rods go into the holes on the
top of the pull box bracket.
Page 7
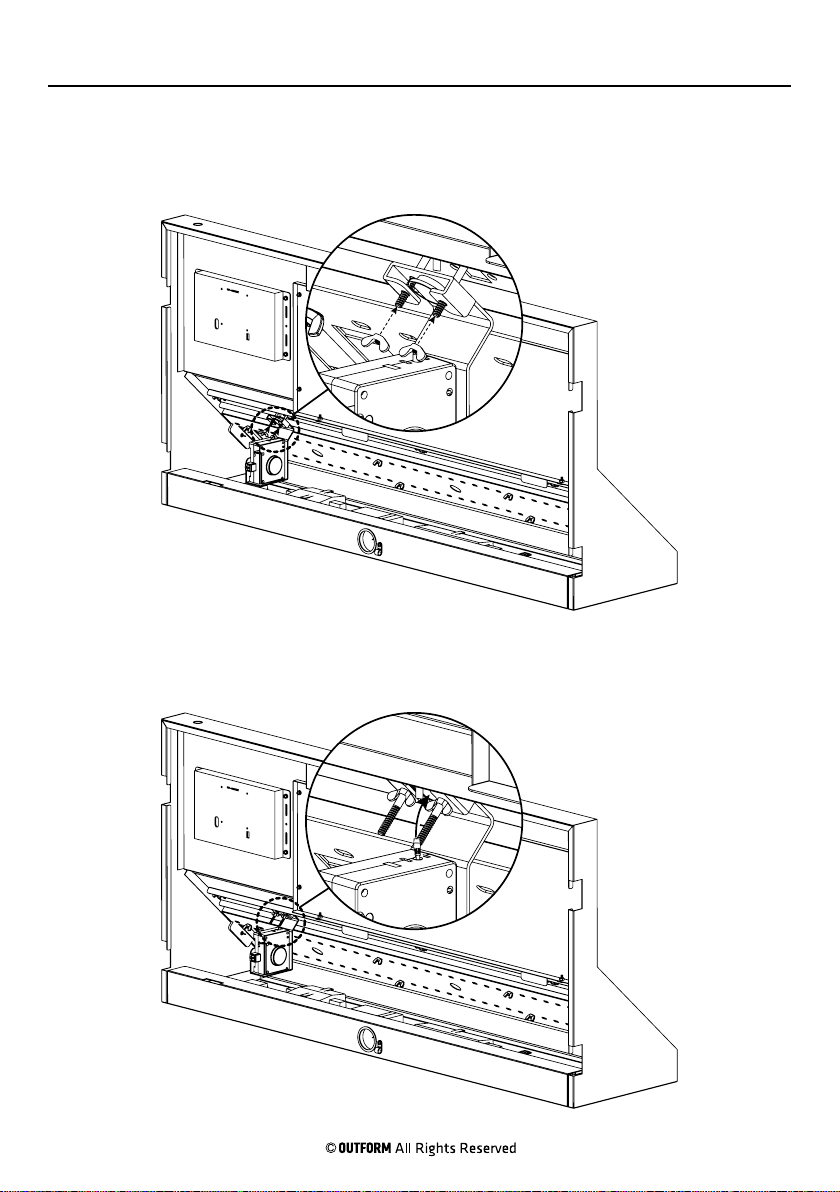
Installation Instructions
Step 5. Secure the alarm puck to the pull box bracket with two wing nuts.
Page 6
Step 6. Thread the cable from the pull box up through the center of the alarm
puck.
Page 8
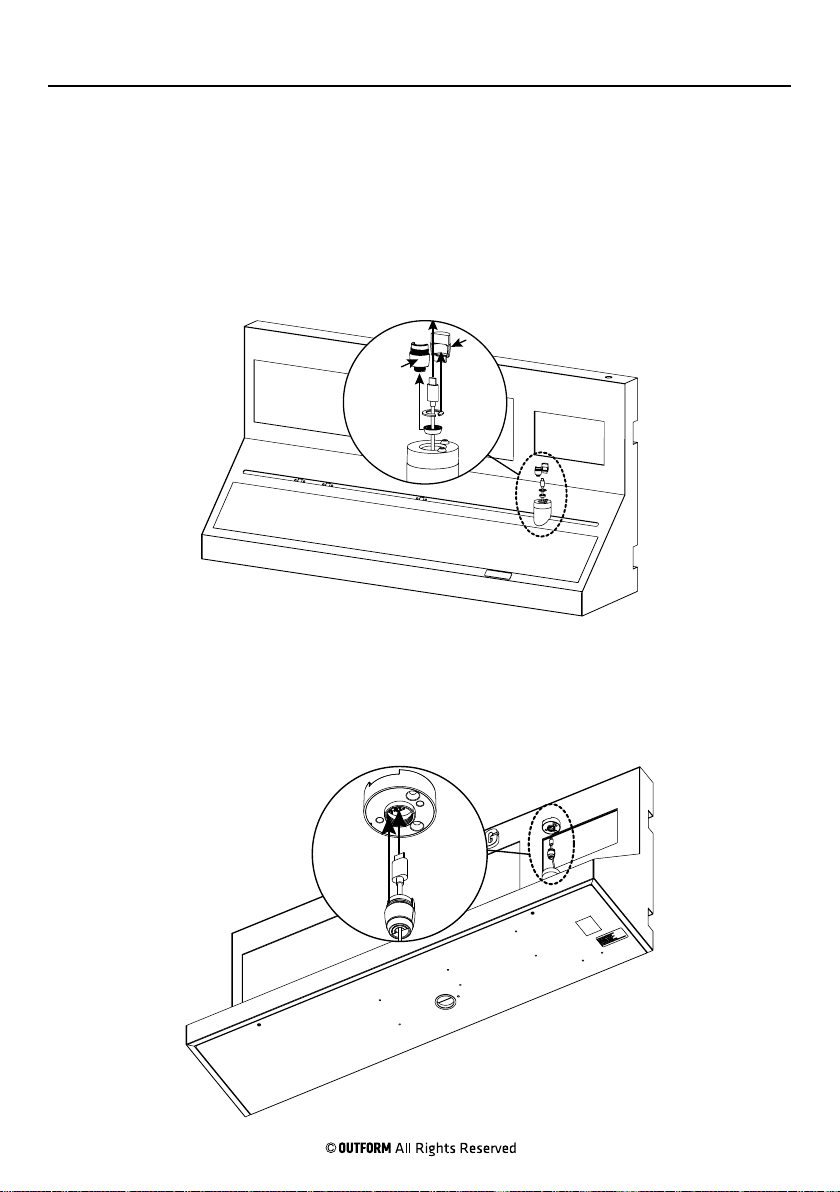
Installation Instructions
Step 7. From the front side of the display, attach the alarm cable connector
assembly to the pull box cable. First slide on the bottom plastic ring (threaded
side facing the connector on the cable). Next, slip the plastic slip washer onto the
cable between the connector and the plastic ring. Then, put the two halves of the
threaded connector together with the slip washer inside below the cable connector.
Screw the bottom plastic ring onto the assembled threaded connector halves.
Page 7
Step 8. Plug the micro USB cable into the port on the bottom of the C-clip base
and screw on the alarm cable connector. There is one alarm puck base for the Fit
and there are two for the S2 Classic. Make sure that the Gear Fit C-Clip is installed
on the correct alarm puck.
Page 9
Installation Instructions
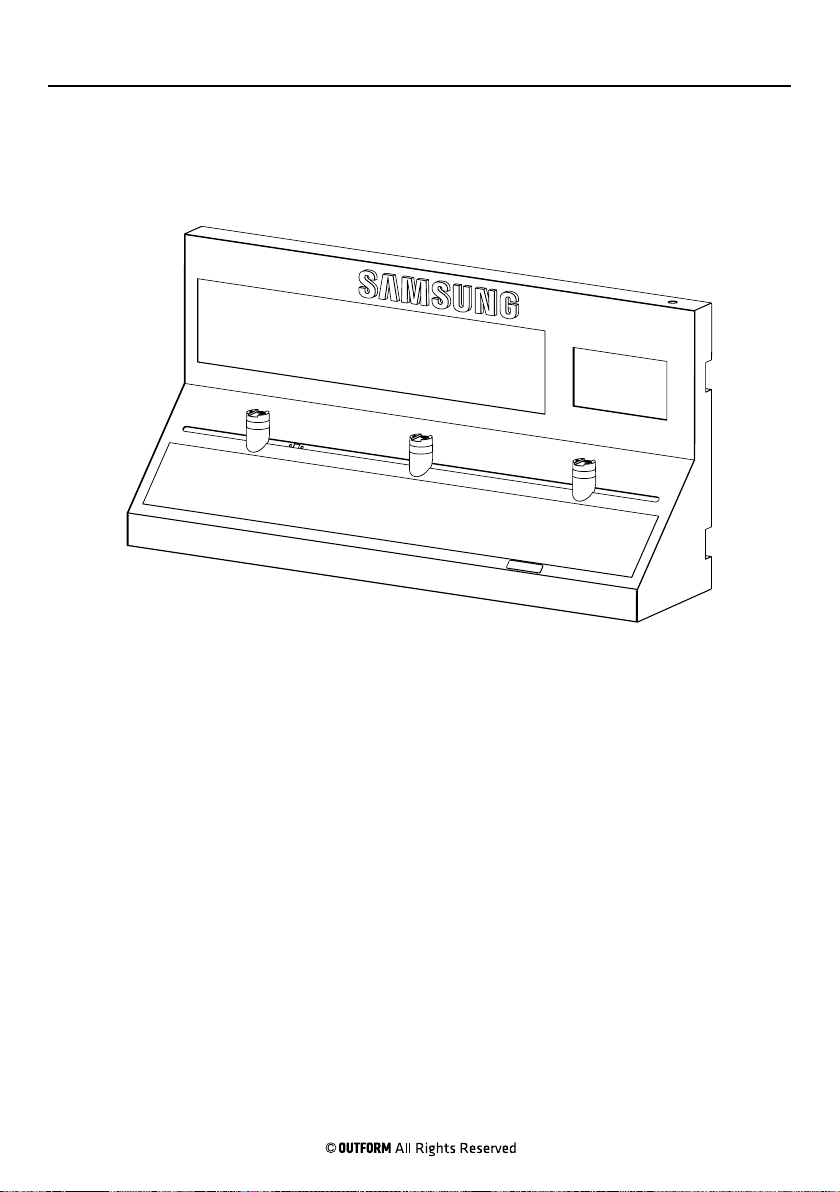
Step 9. Repeat this process to install the other two alarm pucks.
Page 8
Page 10
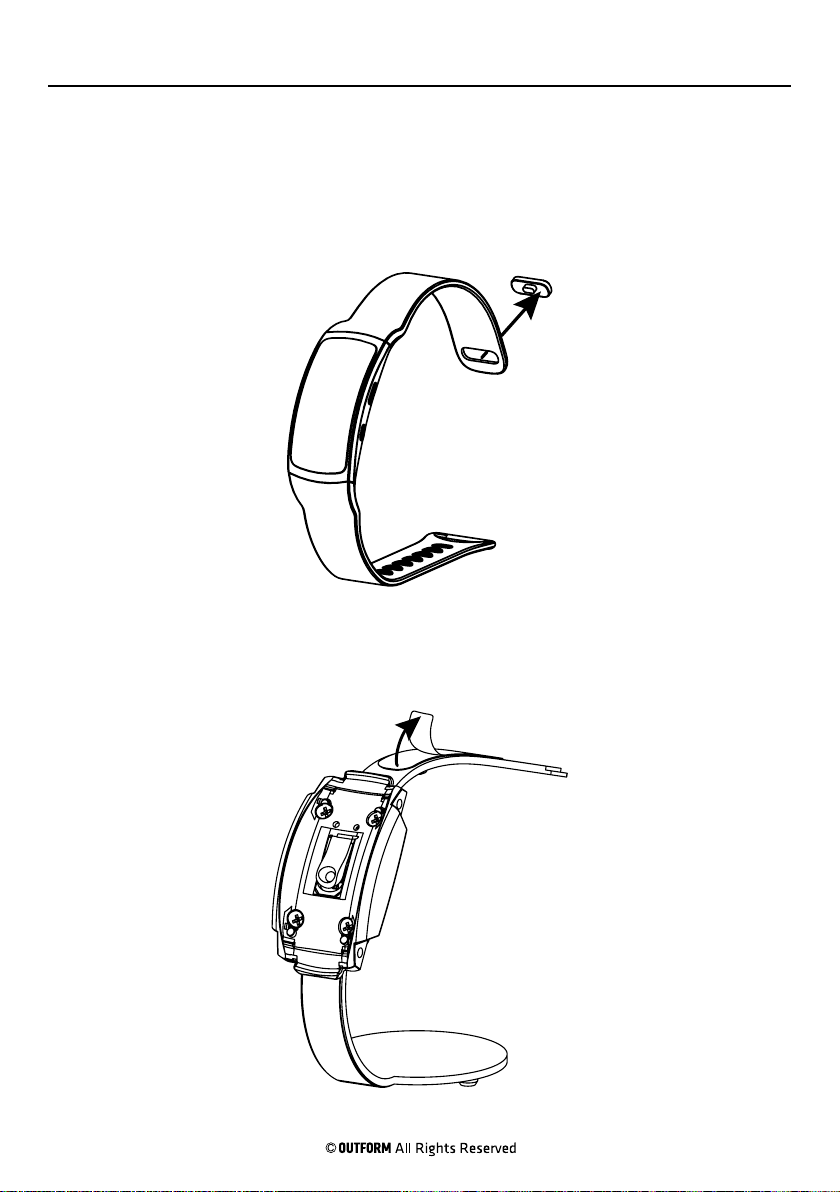
Installation Instructions
Note: All C-clips require a watch with a large band.
Step 1. For Gear Fit: If there is a plug in the hole at end of the watch band,
remove the plug. Insert the Fit band lock into the hole at the end of the band.
Page 9
Step 2. Remove the protective film from the adhesive strip on the top of the Gear
Fit C-clip.
Page 11
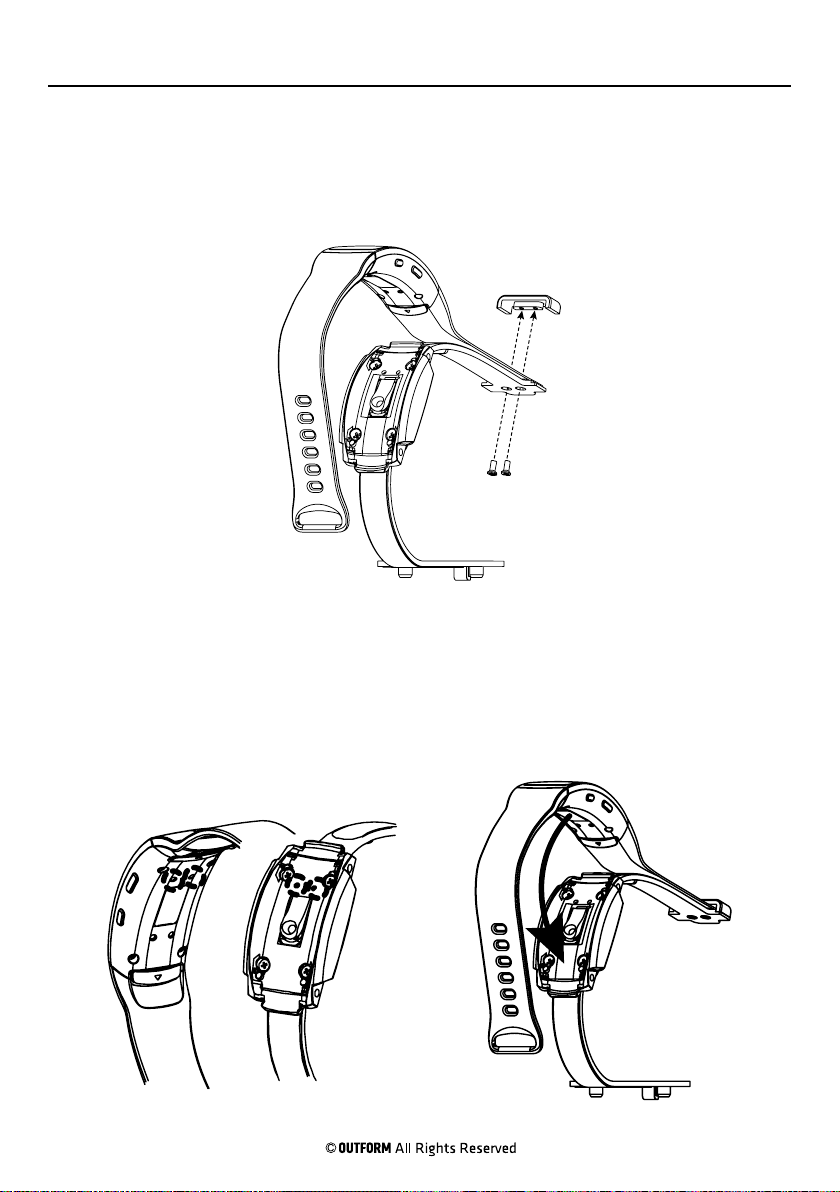
Installation Instructions
Step 3. Use the screwdriver and two small screws to secure the top fit band to
the C-clip. Twist the screws into the Fit band lock at the end of the band.
Page 10
Step 4. Place the Gear Fit onto to the charging plate on the C-clip. Make sure
that the 4 contact points on the back of the Gear Fit align with the 4 pins on the
charging plate. Place the Gear Fit straight down and do not slide it across the face
of the charging plate as this could damage the alarm sensor. Attach the band to the
C-clip using the C-clip screw and screwdriver.
Page 12
Installation Instructions
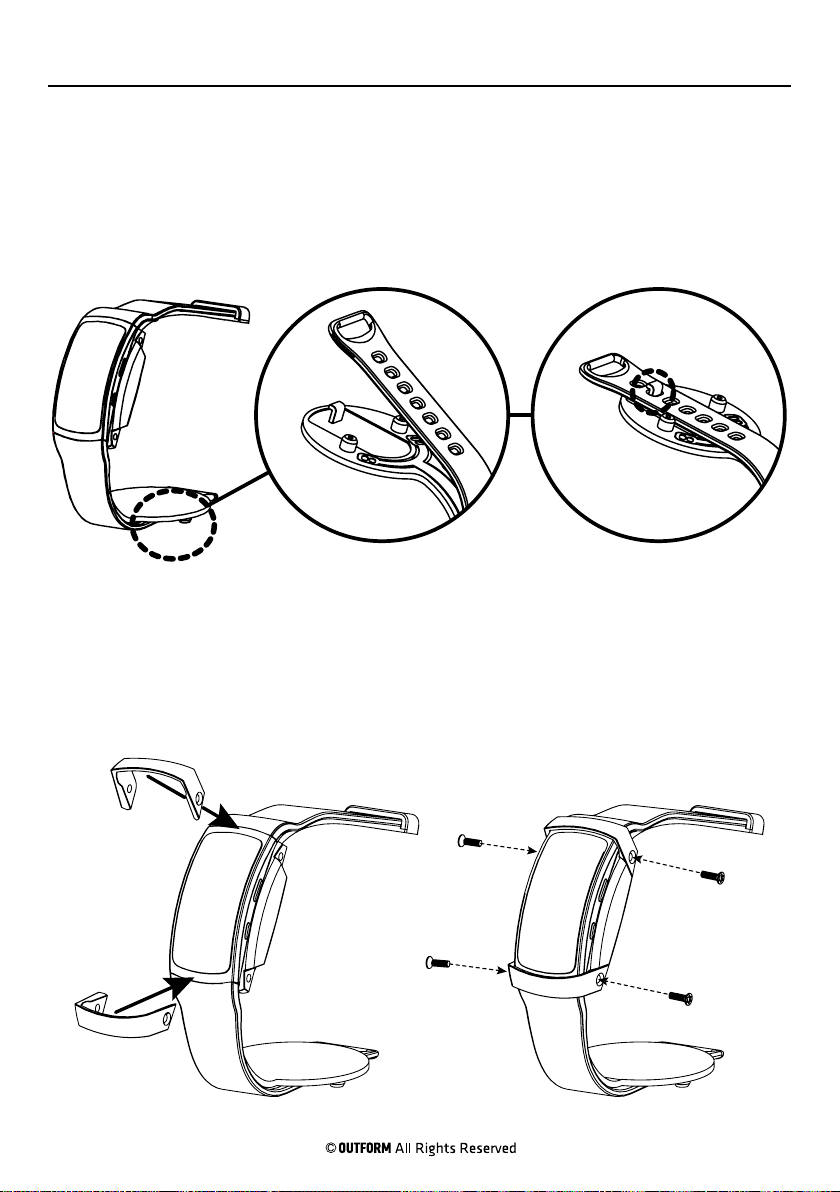
Step 5. Lock the bottom Fit band into place by pulling it tight around the C-clip
and hooking the second hole from the end of the band onto the tab sticking out of
the bottom of the C-clip.
Page 11
Step 6. Install the Gear Fit frame brackets on both sides of the watch face. Use
the torque screwdriver and four torque screws to secure the brackets in place.
Page 13

Installation Instructions
Step 7. Secure the Gear Fit 2 to the C-clip with a Band clip. Close the band clip
onto the C-clip and watch band. The band clip should sit between the watch face
and the metal tab on the inside of the C-clip. Use the screwdriver and a small
Phillips screw to secure the band clip. Repeat this process to install the second band
clip.
Page 12
Step 8. Seat the bottom of the C-clip and Gear Fit together onto the alarm puck,
inserting the 2 protruding bottom clip rods into the corresponding puck holes.
Page 14
Installation Instructions
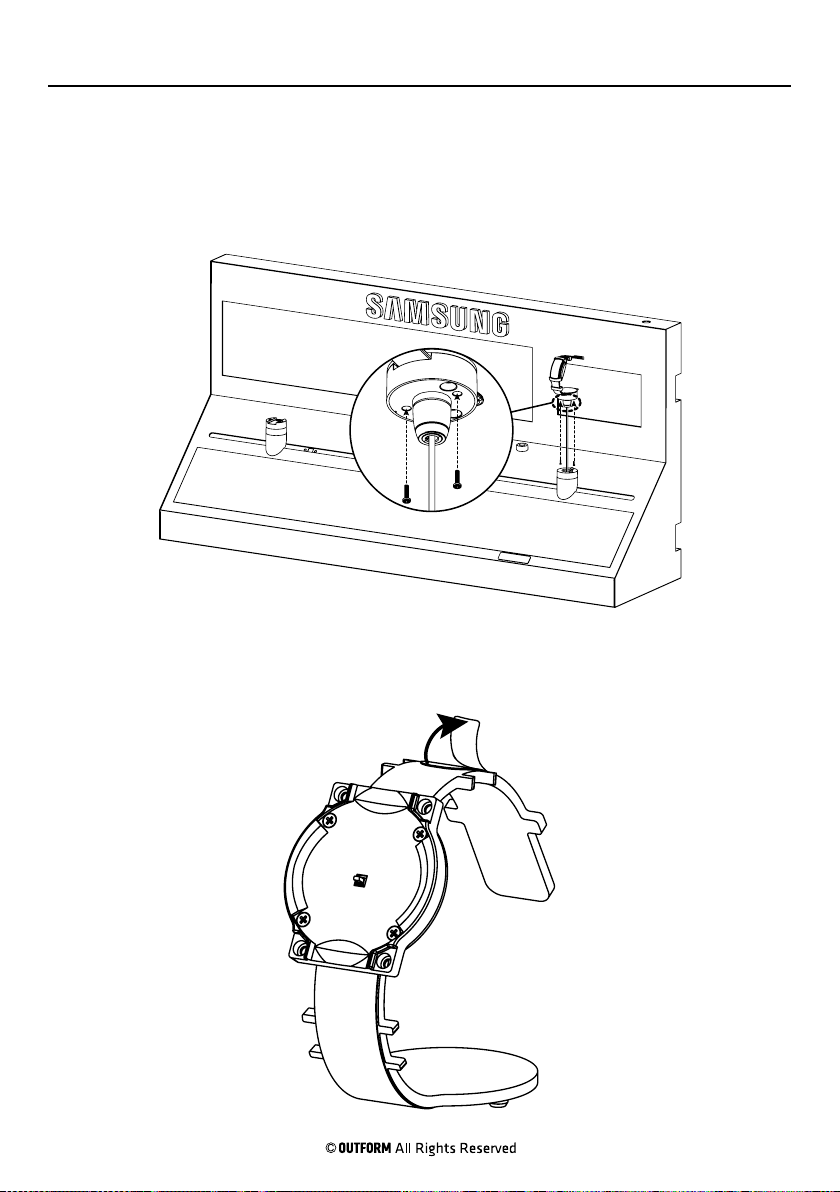
Step 9. Pull up the tethered alarm puck cap and C-clip together. Using the torque
screwdriver, insert and tighten the 2 alarm puck cap screws into the bottom of the
puck cap, securing the cap to the Gear Fit and C-clip.
Page 13
Step 10. Remove the protective film from the double sided stickers that are
mounted to the top of the next C-clip (either S2 classic or sport).
Page 15
Installation Instructions
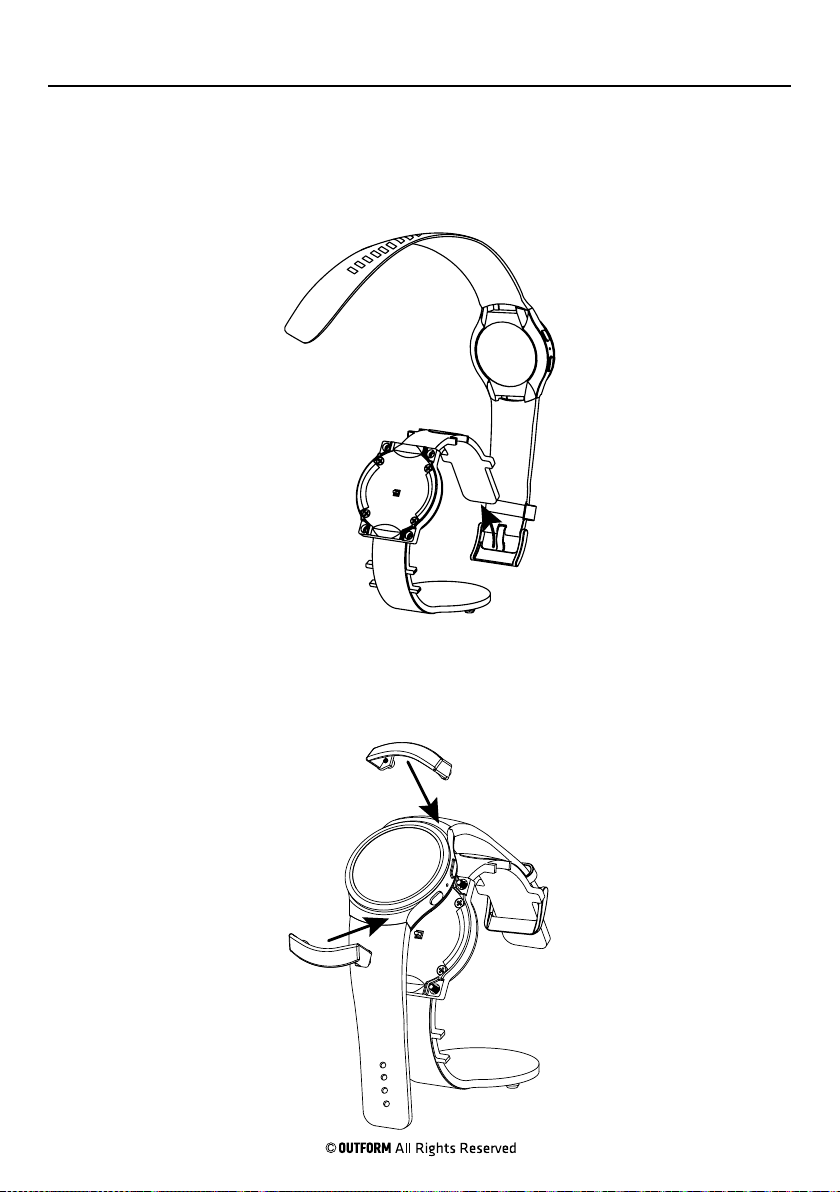
Step 11. Hook the Gear 2 watch buckle over the end of the C-clip and fold the
watch band around to the bottom of the C-clip.
Page 14
Step 12. Install the Gear Fit frame brackets on both sides of the watch face.
Page 16
Installation Instructions
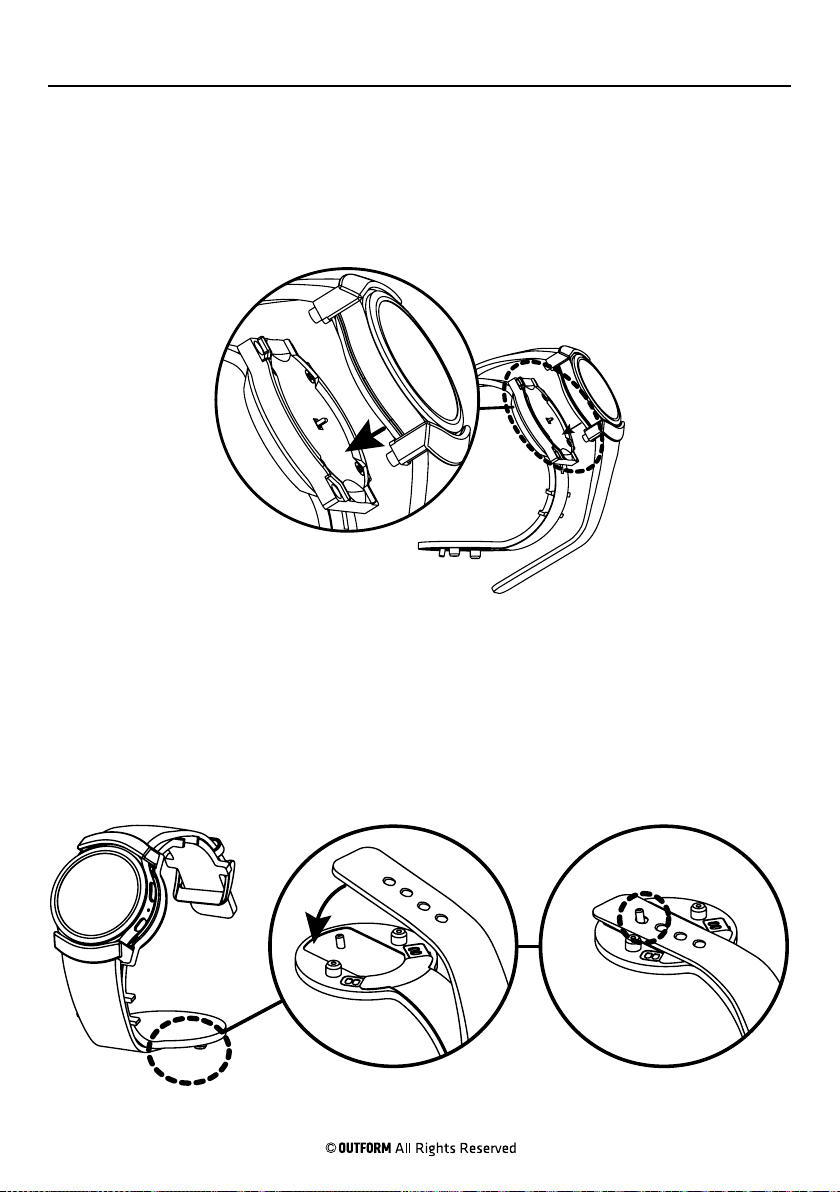
Step 13. Seat the watch face onto the charging plate of the C-clip.
Page 15
Step 14. Lock the bottom Gear S2 band into place by pulling it tight around the
C-clip and hooking the hole of the band onto the tab sticking out of the bottom of
the C-clip. The band should sit tight around the C-clip.
Page 17

Installation Instructions
Step 15. Use the torque screwdriver and four torque screws to secure the brackets
in place.
Page 16
Step 16. Install the Gear frame brackets on the top and bottom of the watch face.
Use the torque screwdriver and four torque screws to secure the brackets in place
from behind.
Page 18
Installation Instructions
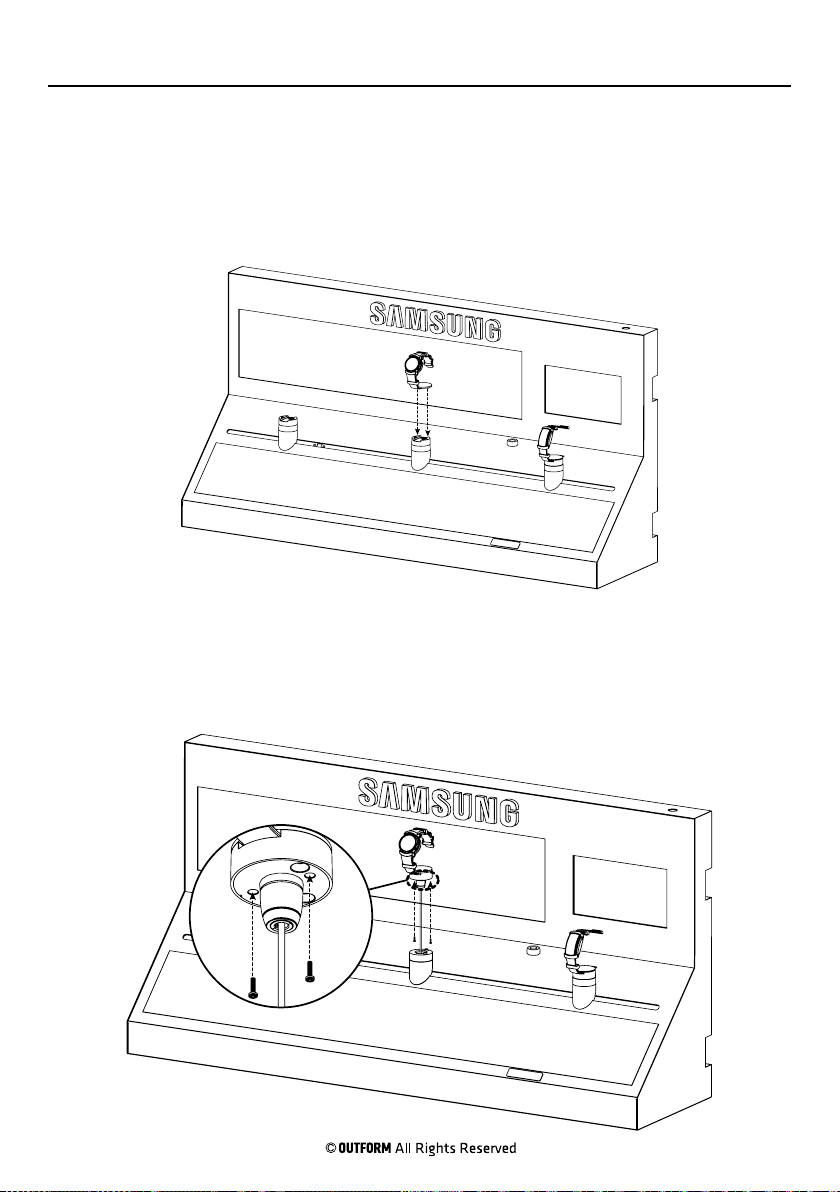
Step 17. Seat the bottom of the C-clip and watch together onto the alarm puck,
inserting the 2 protruding bottom clip rods into the corresponding puck holes.
Page 17
Gear Fit 2
Step 18. Pull up the tethered alarm puck cap and watch together. Using the
screwdriver, insert and tighten the 2 alarm puck cap screws into the bottom of the
puck cap, securing the cap to the watch and C-clip. Repeat steps 10-16 for additional
watch.
S2 Sport
S2 Classic
Page 19
Installation Instructions
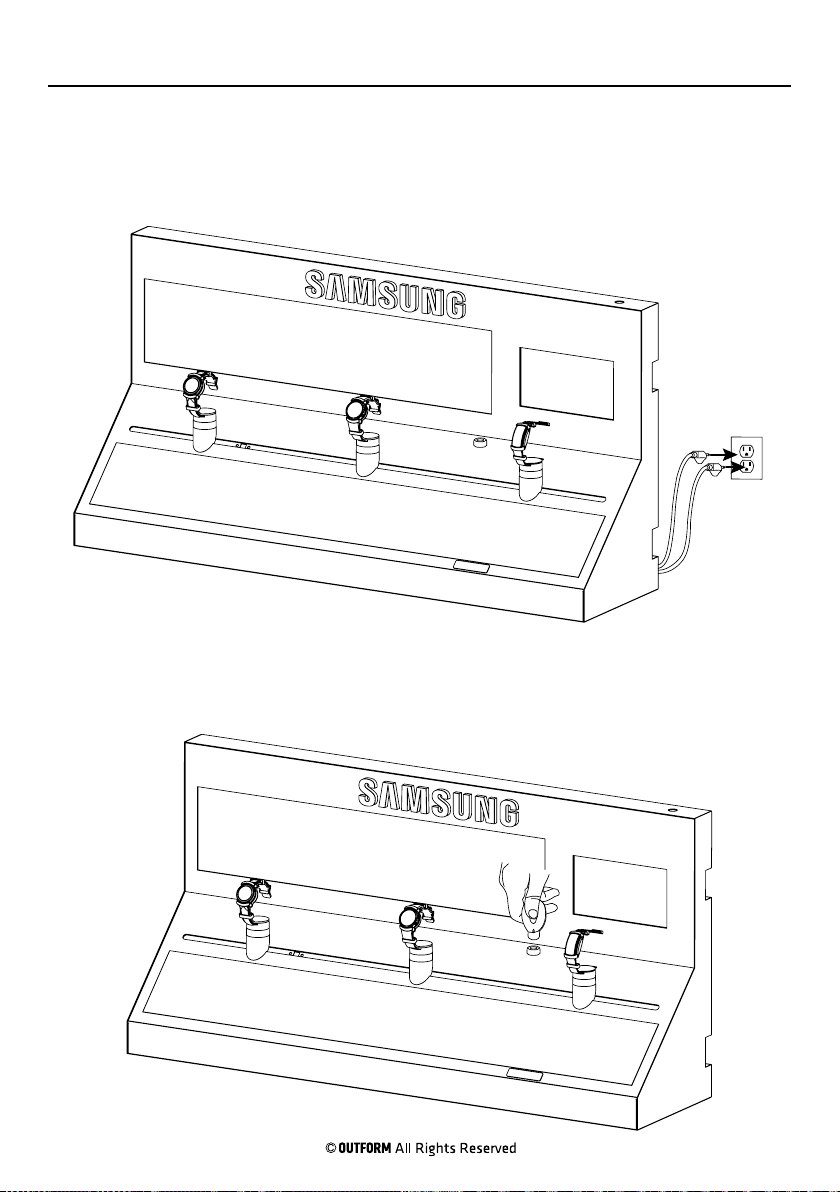
Step 19. Plug the display power cables into a nearby power outlet. The watches
start charging and the alarm is active. Note: When unplugging the display, first
use the IR key to disarm the alarm.
Page 18
Step 20. To disarm an activated alarm: While holding the IR key up against
the IR lens as shown below, press the key button to disarm the alarm. The alarm is
active again when the watch causing the alarm is returned to its charger.
Page 20

FCC Caution.
This device complies with part 15 of the FCC Rules. Operation is subject to the following two
conditions: (1) This device may not cause harmful interference, and (2) this device must accept
any interference received, including interference that may cause undesired operation.
Any Changes or modifications not expressly approved by the party responsible for compliance
could void the user's authority to operate the equipment.
Note: This equipment has been tested and found to comply with the limits for a Class B digital
device, pursuant to part 15 of the FCC Rules. These limits are designed to provide reasonable
protection against harmful interference in a residential installation. This equipment generates
uses and can radiate radio frequency energy and, if not installed and used in accordance with the
instructions, may cause harmful interference to radio communications. However, there is no
guarantee that interference will not occur in a particular installation. If this equipment does
cause harmful interference to radio or television reception, which can be determined by turning
the equipment off and on, the user is encouraged to try to correct the interference by one or
more of the following measures:
-Reorient or relocate the receiving antenna.
-Increase the separation between the equipment and receiver.
-Connect the equipment into an outlet on a circuit different from that to which the receiver is
connected.
-Consult the dealer or an experienced radio/TV technician for help.
The USB port only used for DC charging, not connected to a computer for data transmission function.
 Loading...