

Page 1

iVIEW / iMENU CLASSIC USER MANUAL
Page 2
IMPORTANT SAFETY INSTRUCTIONS
MAIN SUPPLY
This equipment is designed to operate from a 100-240 Volt, 50/60Hz AC main supply. The use of other power
sources may damage it. Ch eck that the voltage marked on the rating plate located at the rear of the power
adaptor states 100-240V. The manufacturer will NOT accept responsibility for damage or injury caused by
connecting to the wrong voltage.
MAIN ADAPTOR
The power adaptor supplied is compatible with a standard mains socket.
NB. If the power adaptor or lead gets damaged, it must be replaced by a qualified service agent with an
approved adaptor of the same type and rating.
This device complies with part 15 of the FCC rules. Operation is subject to the following two
conditions: (1) This device may not cause harmful interference, and (2) This device must
accept any interference received, including interference which may cause undesired operation.
This equipment has been tested and found to comply with the limits for a Class B digital
device, pursuant to Part 15 of the FCC Rules. These limits are designed to provide reasonable
protection against harmful interference in a residential installation.
This equipment generates uses and can radiate radio frequency energy and, if not installed and
used in accordance with the instructions, may cause harmful interference to radio
communications. However, there is no guarantee that interference will not occur in a particular
installation.
If this equipment does cause harmful interference to radio or television reception, which can be
determined by turning the equipment off and on, the user is encouraged to try to correct the
interference by one or more of the following measures:
- Reorient or relocate the receiving antenna.
- Increase the separation between the equipment and receiver.
- Connect the equipment into an outlet on a circuit different from that to which the receiver is
connected.
- Consult the dealer or an experienced radio / TV technician for help.
In accordance with FCC requirements, changes or modifications not expressly approved by
manufacturer could void the user’s authority to operate this product.
2
www.i-display.com
Page 3
There are important operating and maintenance instructions in the literature accompanying
This mark is applied to show the equipment conforms to European safety and
WARNING:
• The mains plug shall be the main disconnect device and shall remain operable at all times.
• Never let anyone push objects into holes and ventilation slots.
• Do not expose this product to dripping or splashing or place any objects filled with liquids on or near the
• Do not place a naked flame source such as lighted candles on or near this product.
• Do not attempt to repair this product yourself; always get a qualified service agent to carry out adjustments
Dangerous voltage constituting a risk of electric shock is present inside this equipment.
electro-magnetic compatibility standards.
this equipment.
product.
or repairs.
QUICK START
Turning On
1. Plug into elec tr ic ity or in s er t fully charged battery.
2. Display will automatically load movie and play.
Playing Other Movies / Change Content
1. Connect a USB stick to the unit.
2. Content from the USB stick will au tomatically be copied to the unit's internal memory.
3. After content is copied, the new content will start playing automatically
Important: If you do not want the old content to be played, you need to delete the old content (see how
below).
www.i-display.com
3
Page 4

Table of Contents
PAGE NO.
1. OVERVIEW
1.1 Components 5
1.2 Front View of the Product 5
1.3 Side A 6
1.4 Side B 6
1.4.1 Silicon Cover for Slots 6
1.4.2 USB Slot 7
1.4.3 Mini USB Slot 7
1.4.4 SD Card Slot 7
1.5 Back 7
1.5.1 DC Connector 7
1.5.2 On/Off Button 7
1.5.3 Rechargeable Battery Slot 8
2. OPERATING INSTRUCTIONS
2.1 Buttons & Remote Control 10
2.1.1 Buttons 10
2.1.2 Remote Control 10
2.2 Screen Status Indicators 13
2.3 Menu features 13
2.3.1 Playlist 13
2.3.2 WI-FI 15
2.3.3 Calendar 18
2.3.4 Settings 19
4
www.i-display.com
Page 5
1. OVERVIEW
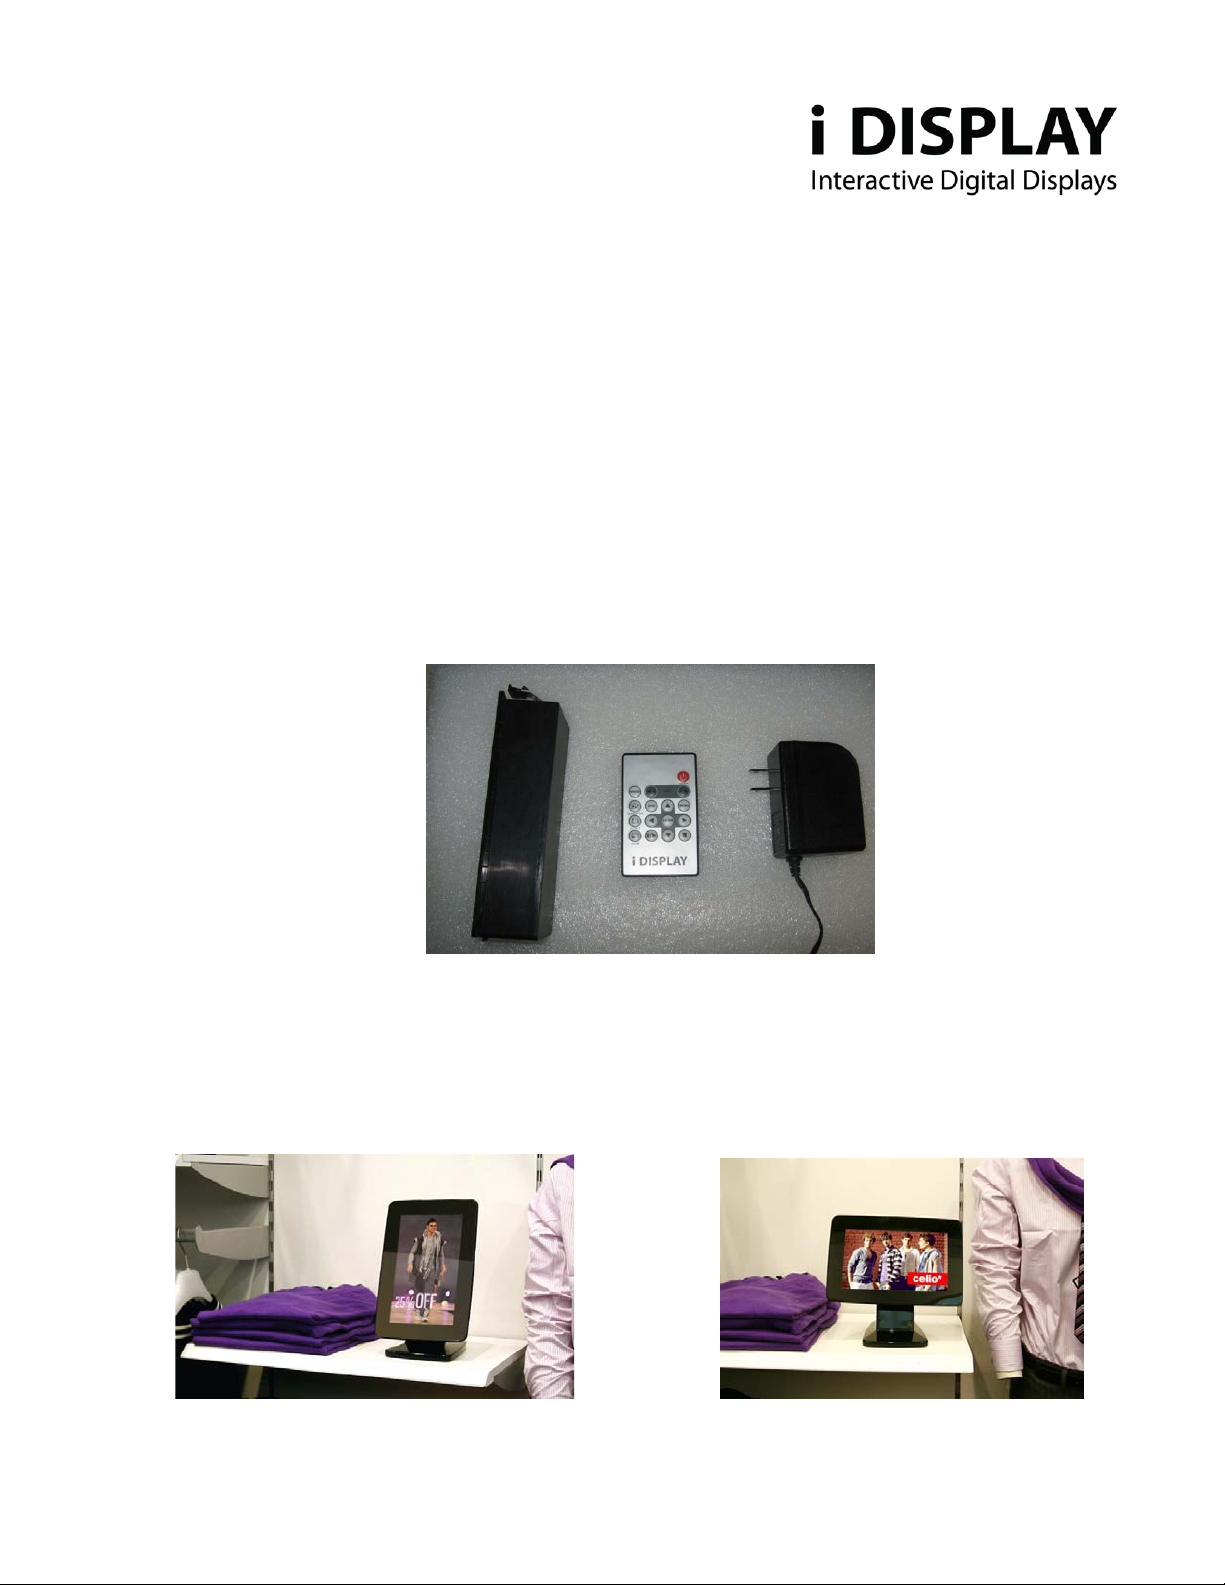
1.1 Components:
a. Power Adaptor – US, EU/UK Plugs available.
b. 4 Cell Rechargeable battery – Not included in the package. Must be bought separately
c. Remote Control
d. Metal Shelf Clamp (not seen in picture) – Not included in the package. Must be bought
separately.
Diagram 1.1 Components
1.2 Front View
Diagram 1.2A F ront Vi e w of the Product – Portrait style Diagram 1.2B Front View of the Product – Landscape style
www.i-display.com
5
Page 6

1.3 Side A:
Left In menu mode this function is used for moving left through the various options. In playback
mode you can go to the previous content in the playlist..
(Note it is only operable for content copied from USB or SD card not for content downloaded from I
Display Server.)
Right In menu mode this function is used for moving right through the various options. In playback
mode you can go to the next content in the playlist..
(Note it is only operable for content copied from USB or SD card not for content downloaded from I
Display Server)
Up In menu mode, this button is used for moving left. In playback mode, it is used to increase the
volume if current content being played is a movie.
Down In menu mode, this button is used for moving right. In playback mode, it is used to decrease the
volume if current content being played is a movie.
Misc In menu mode, this function is used for the same function as the OSD button in the remote,
explained in Section 2.1.2. In playback mode, it is not operable.
OK In playback mode:
a) Short press – Used for making changes between
(i) Repeat selected movie (repeats the chosen file in endless loop) and
(ii) Repeat all (repeats the entire playlist in endless loop).
b) Long Press (3 seconds) – Used to return to the menu page
In menu mode:
a) Short press – Used for selecting various options.
b) Long press (3 seconds) - Used to return to the main menu (first menu page).
6
www.i-display.com
Page 7

1.4 Side B:
1.4.1 SILICON COVER FOR SLOTS: This reduces access to slots or prevent stealing of SD card (if used).
The Silicon cover needs to be open as shown and can be easily removed by just pulling it out. A screw can be
added for extra security.
Diagram 1.4.1 Silicon Cover for Slots
1.4.2 USB SLOT: This is used for connecting flash drives. Once the flash drive is connected, all its content is
automatically copied to the internal memory. Note, deleting content is explained in Section 2.3.1
1.4.3 MINI USB SLOT: This slot is used for connecting to a PC. Once a mini usb is connected to the display and
connected to a PC, the user can change content via the computer. Note, a mini USB is not included in the
package
1.4.4 SD CARD SLOT: Once an SD card is inserted into the unit, the content on the SD card will start to play.
In menu mode, the user will be able to either play content directly from SD card or manually copy its
content to the unit's internal memory. Note, the SD Card is not included in the package.
1.5 Back
1.5.1 DC CONNECTOR: Used to connect the power located at the back of the unit’s leg.
www.i-display.com
7
Page 8
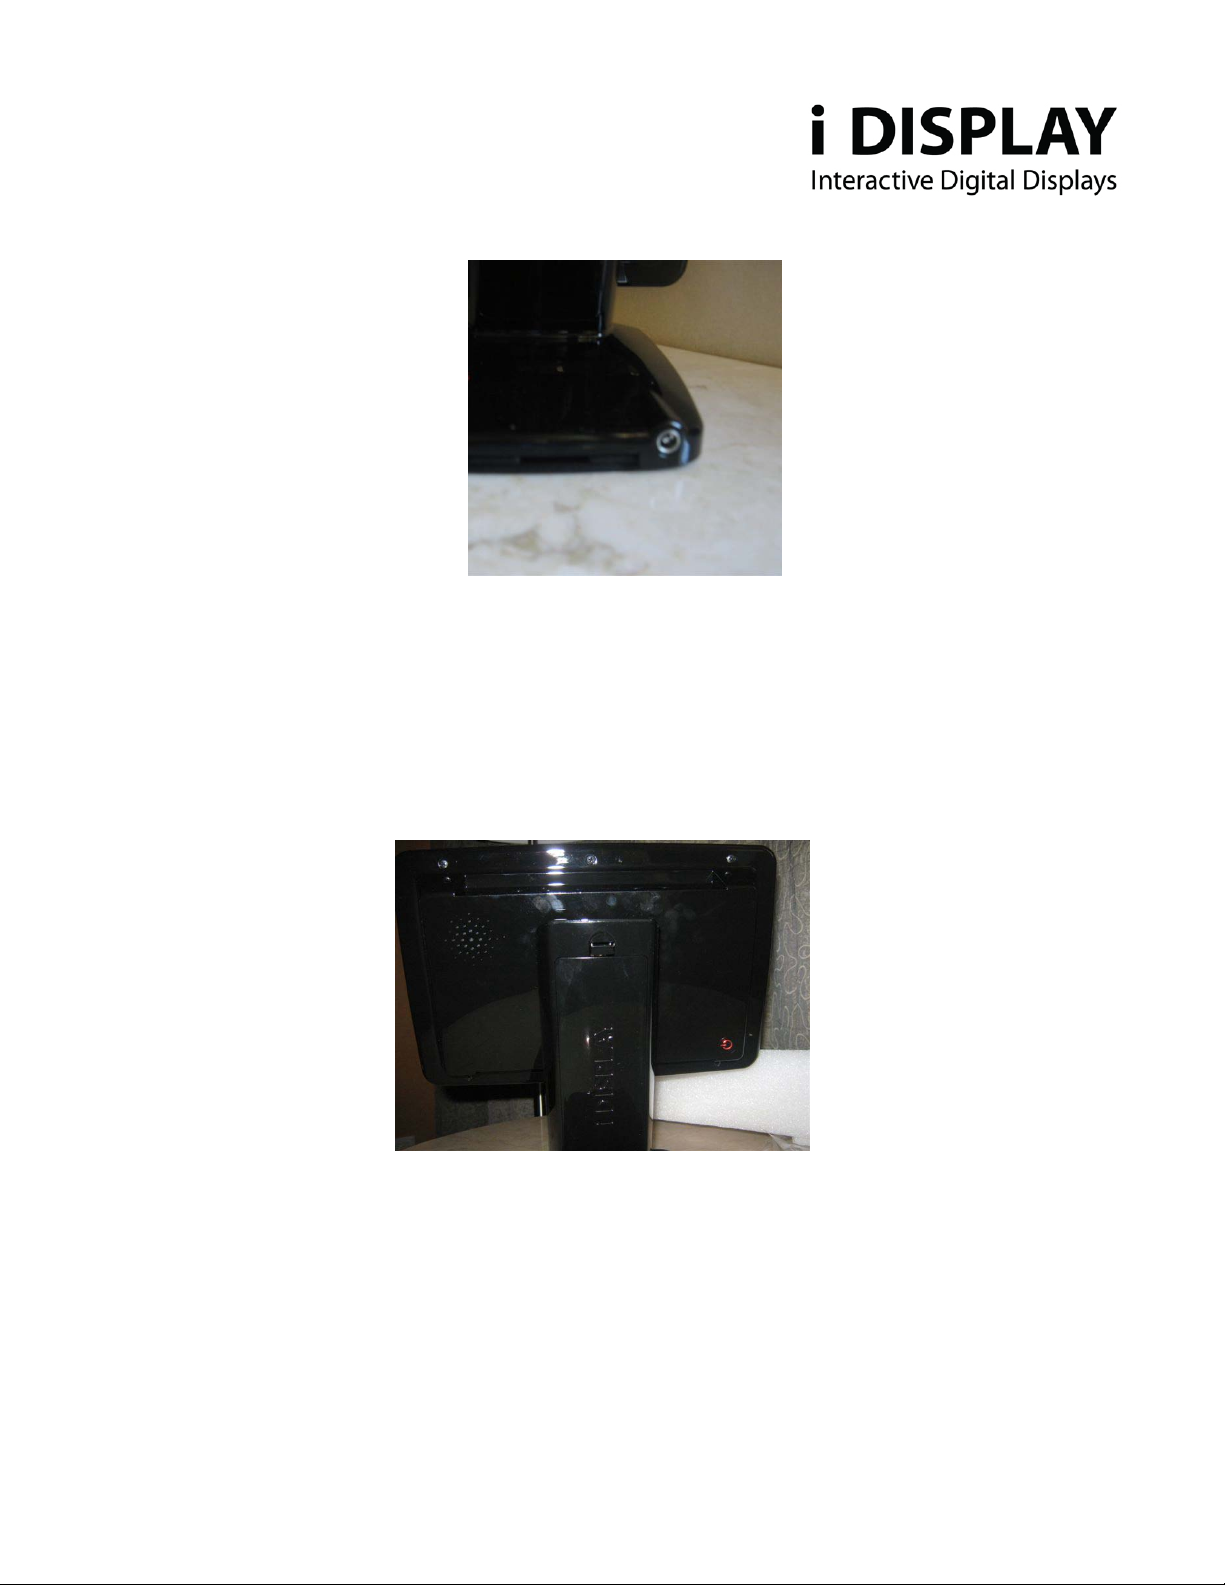
Diagram 1.5.1 Location of DC Connector
1.5.2 ON/OFF BUTTON: Located at the corner of the back part of unit. Once the unit is shut down, the on/off
button will have a red color. When the unit is turned on, the on/off button will have a green color. Important
comment: it takes about 10 seconds for the first image to appear after the on/off button is activated.
Diagram 1.5.2 Location of On/Off Button
1.5.3 RECHARGEABLE BATTERY SLOT: Used to house rechargeable battery.
www.i-display.com
8
Page 9
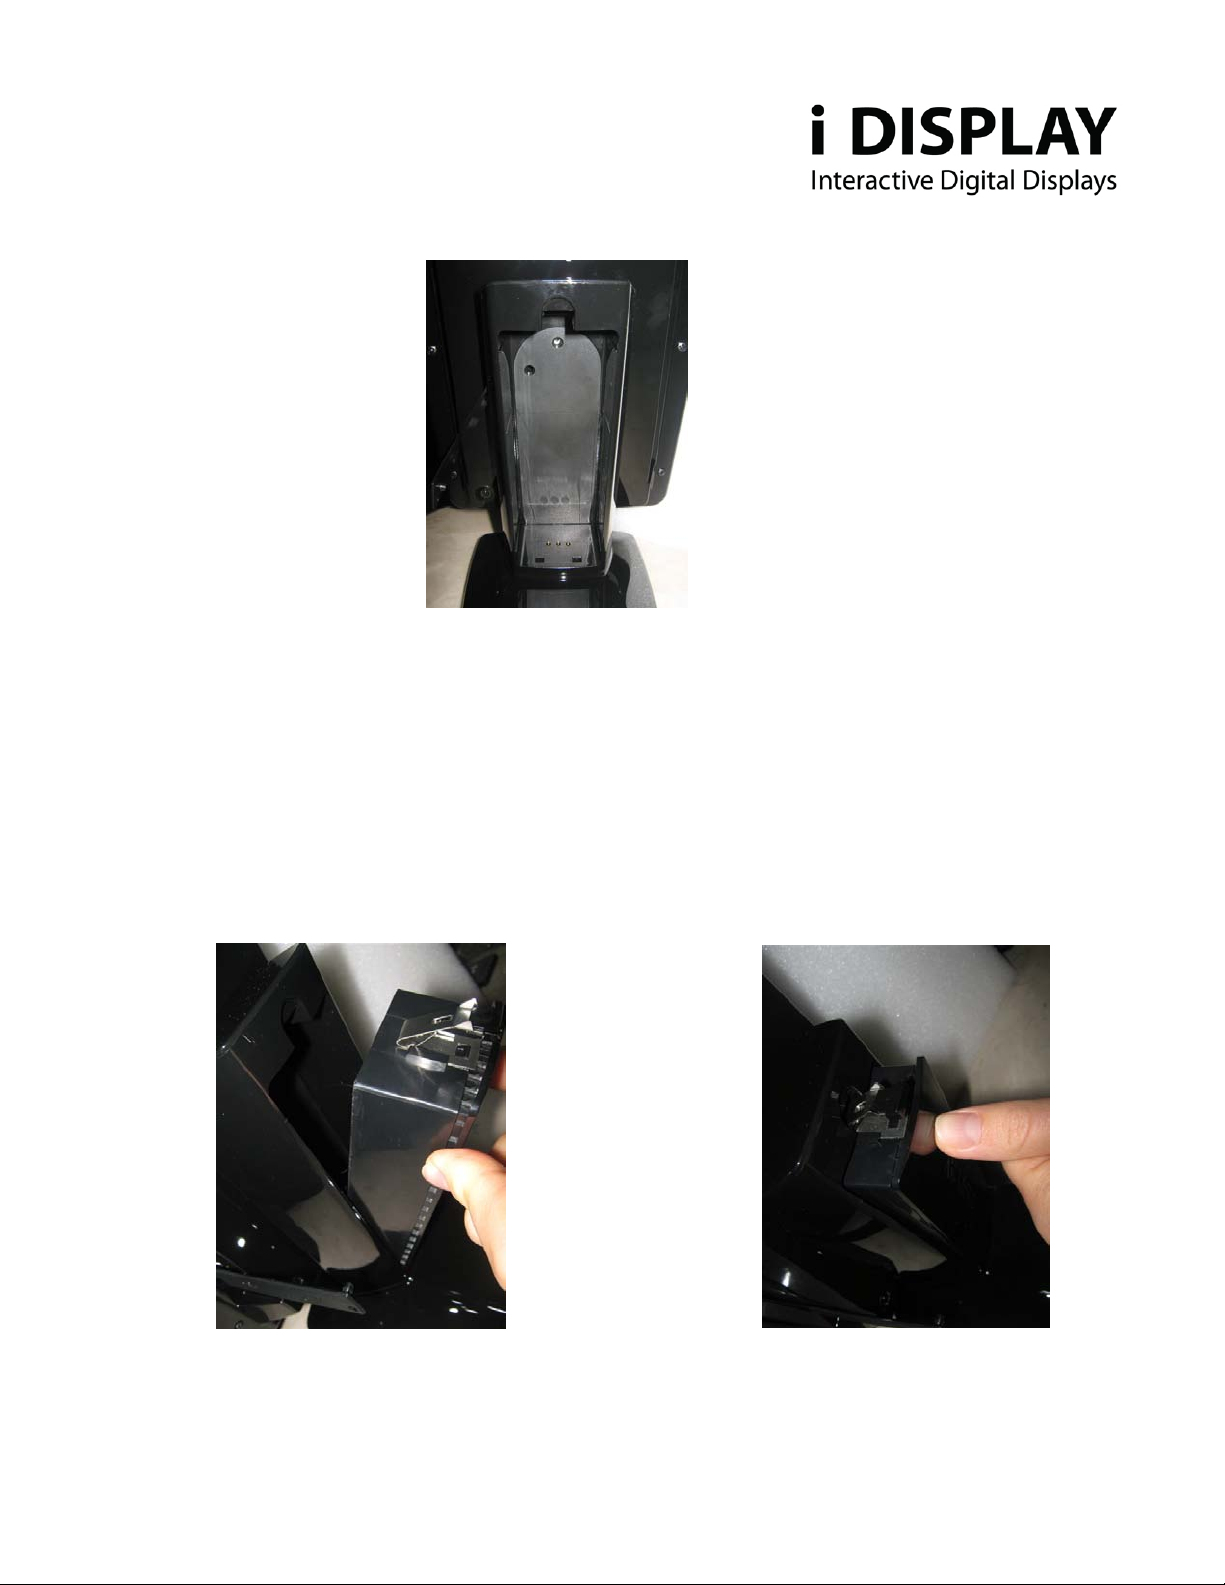
Diagram 1.5.3 Picture of Rechargeable Battery Slot
1.5.3.1 The rechargeable battery needs to be placed as shown in these images.
- In diagram A it is slid in from the bottom end first.
- In diagram B it is snapped shut to the top end.
Diagram 1.5.3.1. Placing of Rechargeable Battery
A B
9
www.i-display.com
Page 10
2. OPERATING INSTRUCTIONS
2.1 BUTTONS AND REMOTE CONTROL
2.1.1 BUTTONS:
Refer to Section 1.3
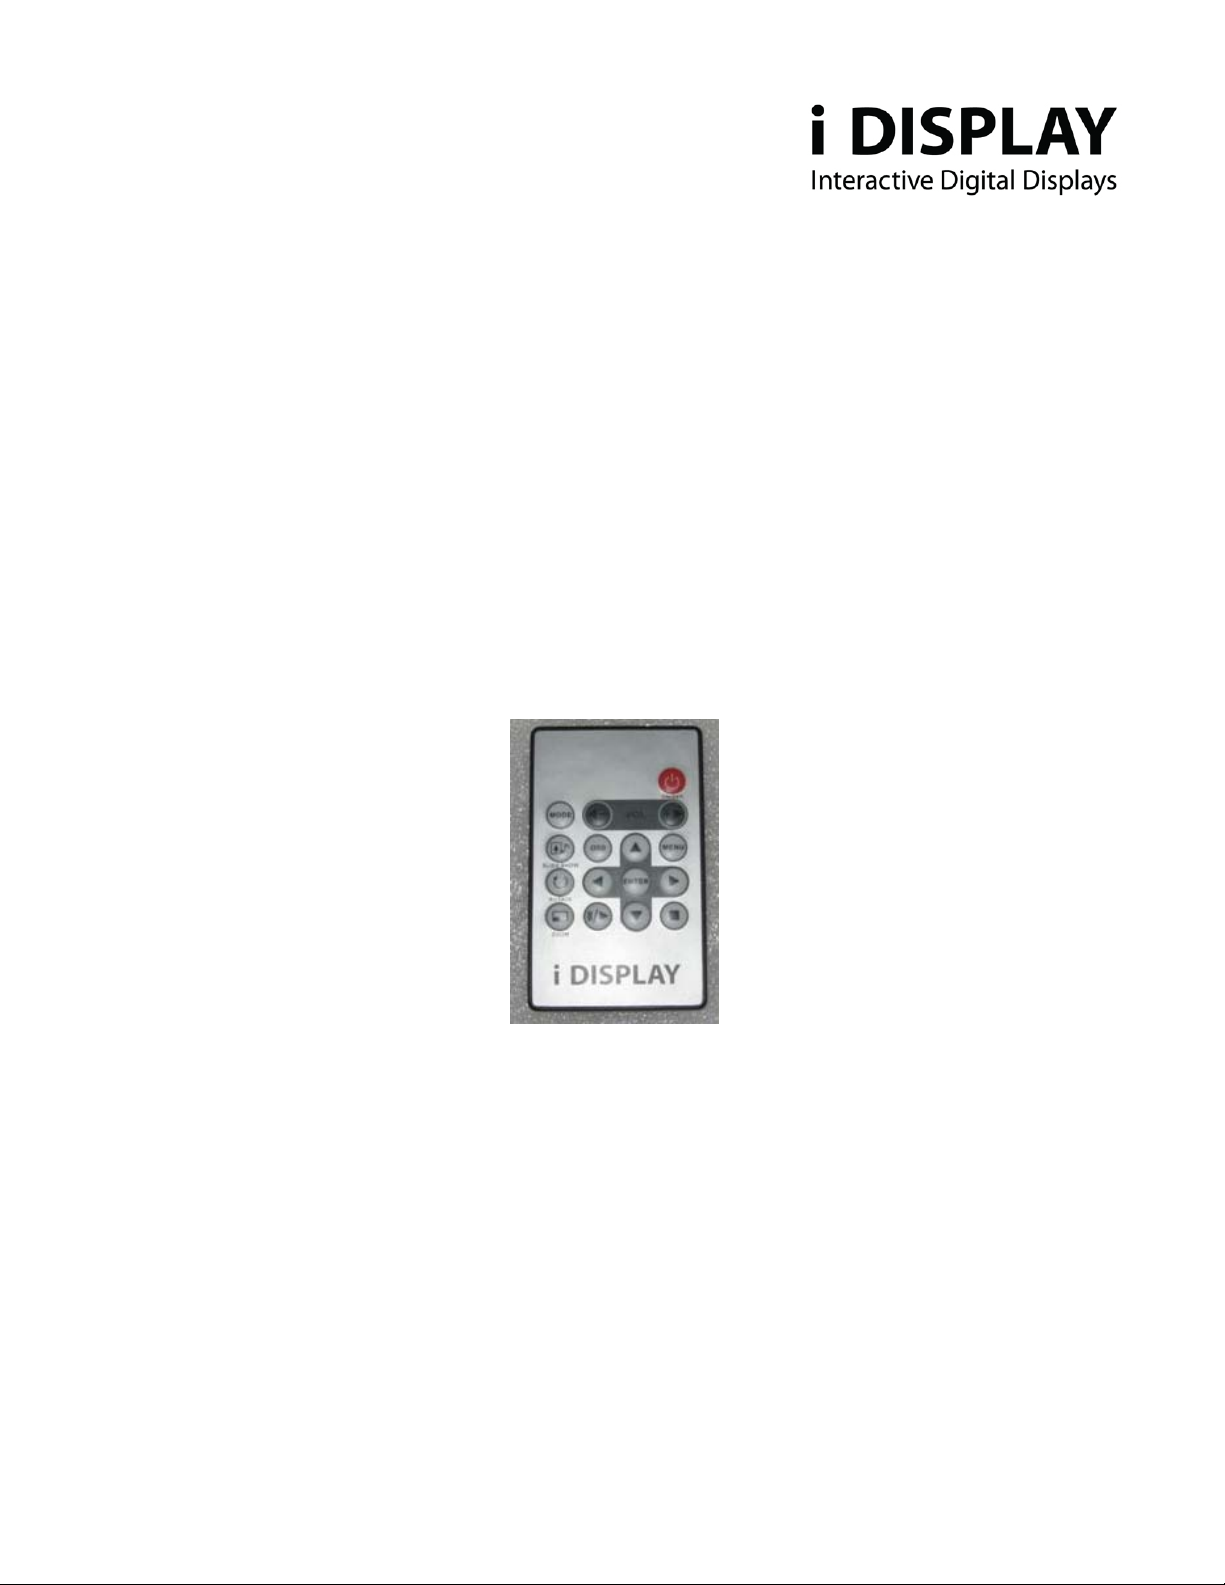
2.1.2 REMOTE CONTROL:
Diagram 1.7.1 Remote Control
On/Off Turns the unit on or off.
Volume (- / +) Increase/decrease volume when movies are played.
Left
In menu mode this function is used for moving left through the various options. In playback
mode you can go to the previous content in the playlist.
(Note it is only operable for content copied from USB or SD card not for content downloaded
from I Display Server.)
www.i-display.com
10
Page 11
Right In menu mode this function is used for moving right through the various options. In playback
mode you can go to the next content in the playlist.
(Note it is only operable for content copied from USB or SD card not for content downloaded
from I Display Server)
Up In menu mode it is used for moving up. It is not operable in playback mode.
Down In menu mode it is used for moving down. It is not operable in playback mode
Enter In menu mode, it is used to select an option. It is not operable in playback mode
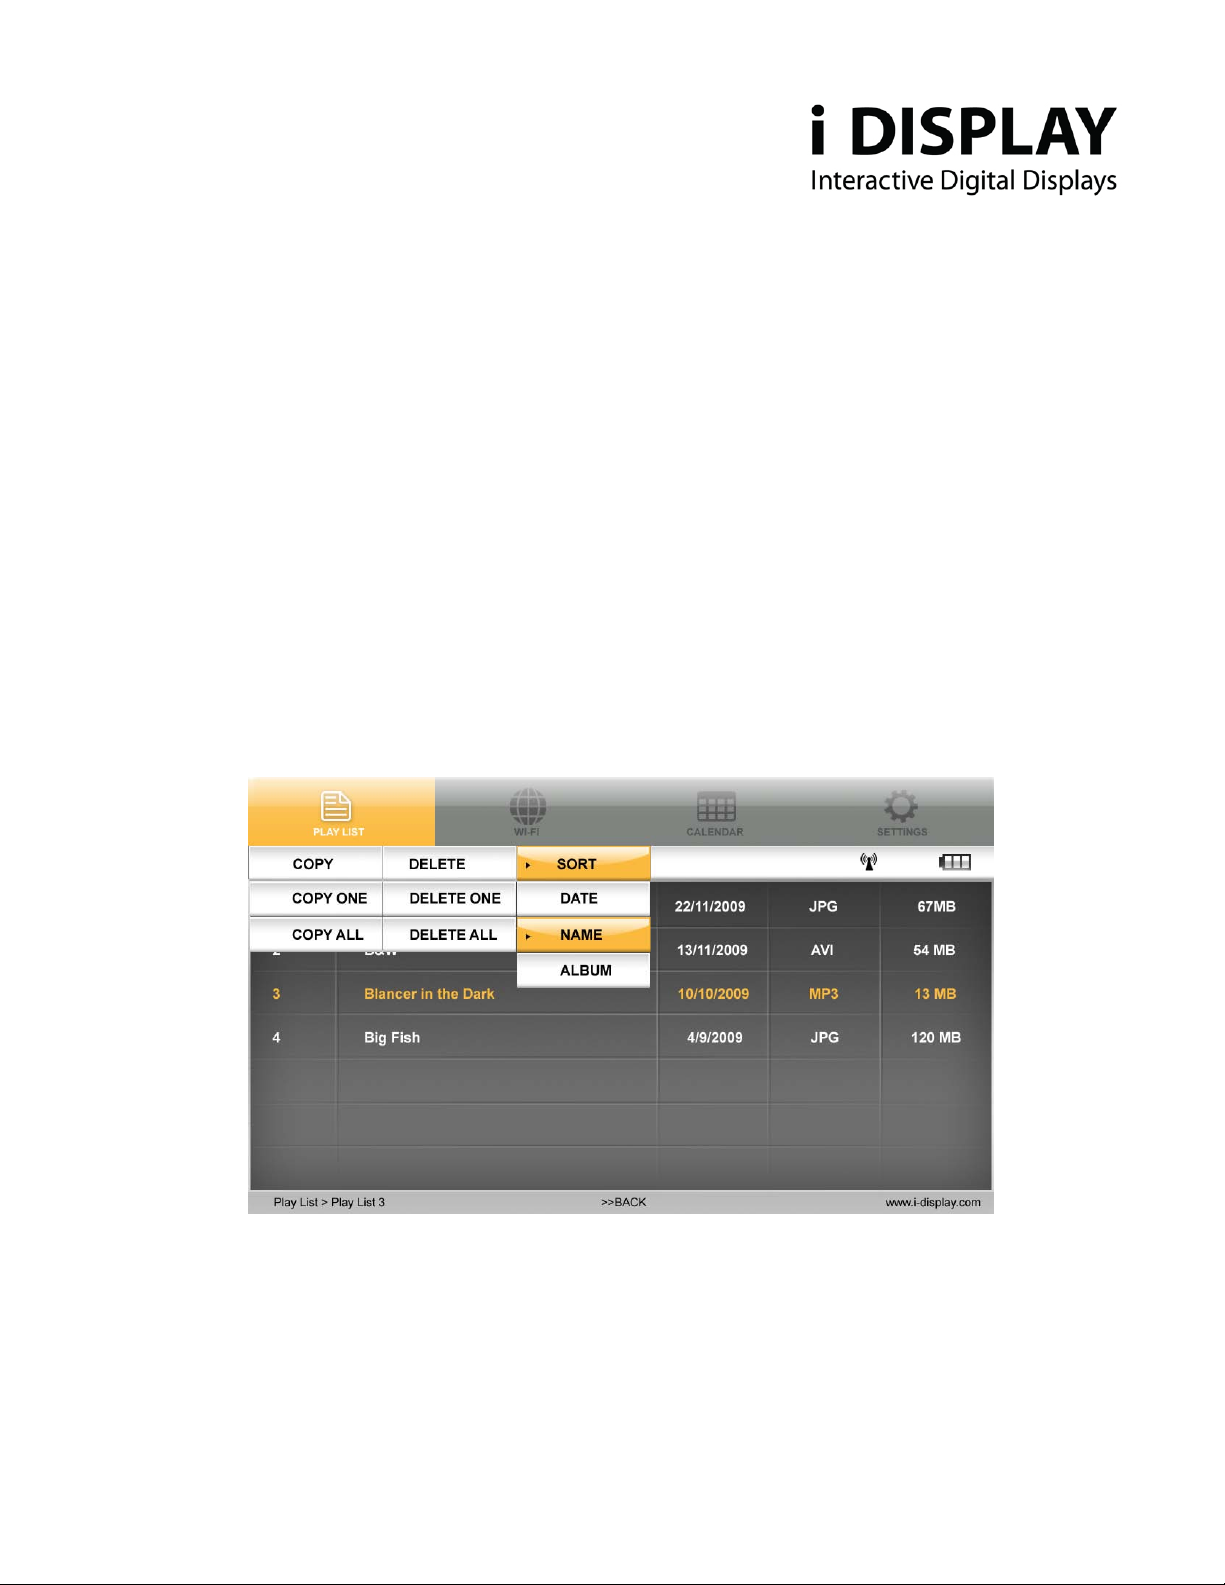
OSD While playlist is being viewed in menu mode and the OSD function is pressed, a table with
Copy/Delete/Sort will appear, enabling
NB. P
laylist refers to only that which is copied from USB or SD Card or a playlist viewed
from SD card and
not for content downloaded from I Display Server)
Diagram 2.1.2 Sc reen Shot
the use of these functions on the playlist content.
Play/Pause In playback mode this function is used to pause or play a specific JPG or movie (This function is
only operable on content copied from a USB or SD Card or a playlist viewed from a SD card and
not for content downloaded from I Display Server).
www.i-display.com
11
Page 12

Stop In playback mode, pressing this f unction once will stop t he cur rent content playing and w il l make
the screen return to the menu mode. In menu mode, it is used to go back to main menu.
Slide show In playback mode, it is used to change between “repeat one” (repeats the chosen file in endless
loop) and “repeat all” (repeats the entire playlist in endless loop).
(This function is only operable on content copied from a USB or SD Card or a playlist viewed
from a SD card and
not for content downloaded from I Display Server).
Rotate In playback mode, it is used to rotate JPG pictures. It cannot be used for movies being played.
(This function is only operable on content copied from a USB or SD Card or a playlist viewed
from a SD card and
not for content downloaded from I Display Server).
Zoom In playback mode, is used to zoom on JPG pictures. It cannot be used for movies played.
(This function is only operable on content copied from a USB or SD Card or a playlist viewed
from a SD card and
not for content downloaded from I Display Server).
Mode is currently an inactive function.
2.2 Scre en Status Indic ato rs
WIFI Signal: Indicates unit is connected to WIFI network.
Battery Icon: Indicates the unit is working on battery power and shows the amount of power left in
battery.
Empty Battery Icon : Indicates the battery has 30 minutes of power remaining to keep the unit activated.
2.3 Menu Features
The Menu includes 4 main features: Playlist / WIFI / Calendar / Settings.
Each can be accessed and activated by either the remote control or buttons on the side of the unit.
12
www.i-display.com
Page 13
2.3.1 Playlist:
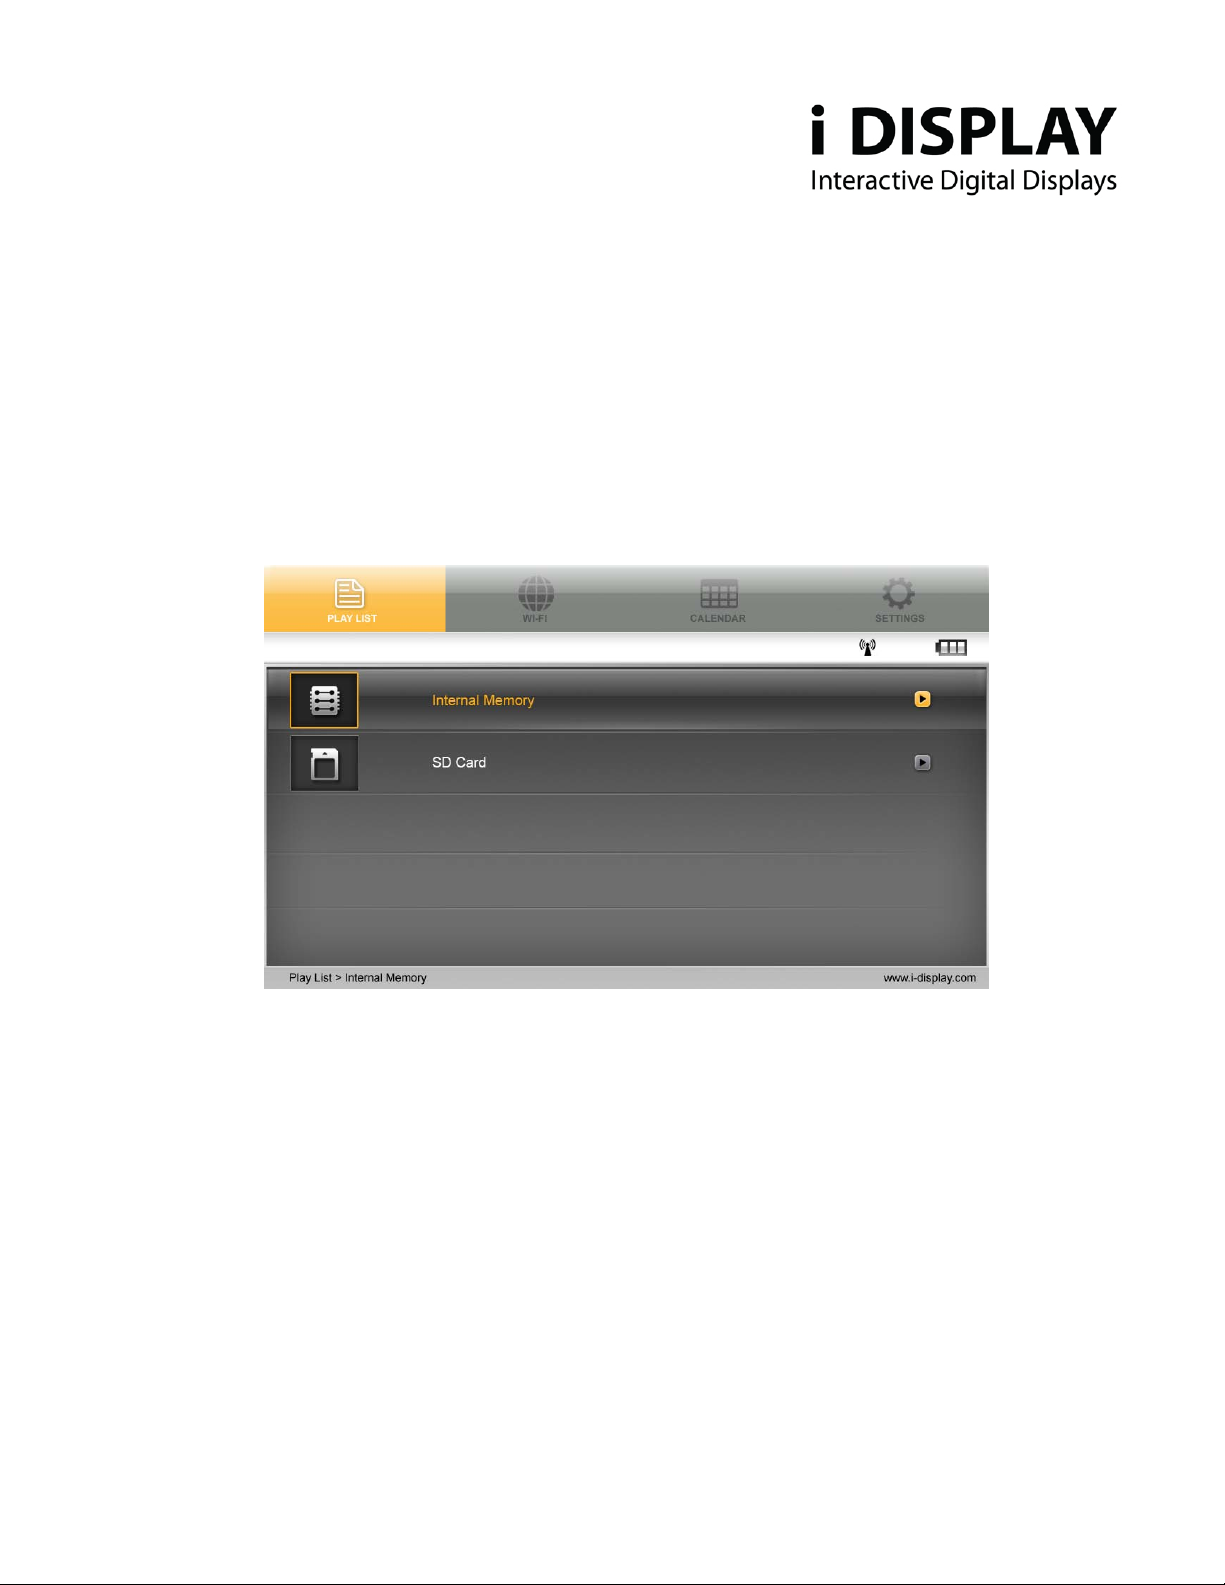
The playlist holds a list of content which can be played on the unit.
To view the playlist:
a. Select internal memory or SD card
NB. The playlist only shows content copied to internal memory by USB or SD card. It does not show
content downloaded from a server:
Diagram 2.3.1a. View of Main Menu Screen
b. Choose any of the selected files that appear on the playlist by movi ng the up and down arrows on the
remote. Then press “Enter” to play the relevant content. (Note the files can be either in JPEG or
various movies formats e.g. MPEG 1, 2 and 4. Recommended format is XVID)
www.i-display.com
13
Page 14
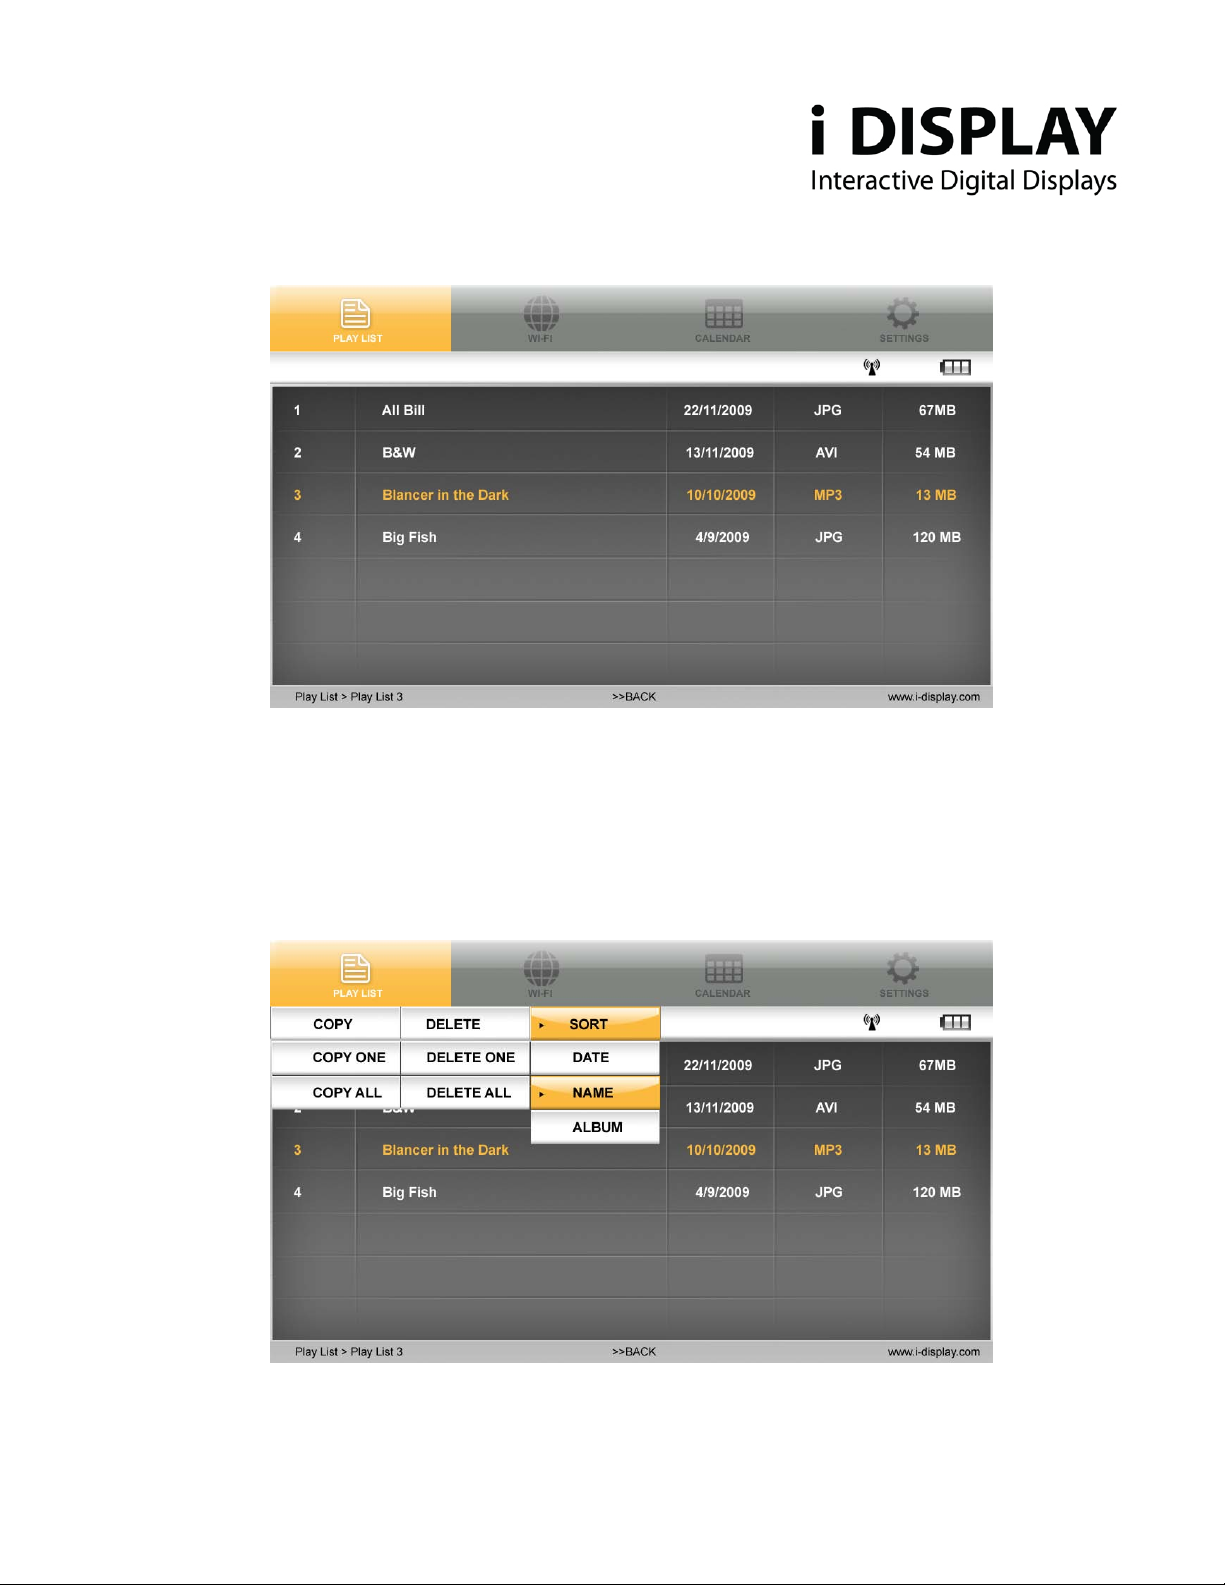
Diagram 2.3.1.b View of Playlist
c. Press OSD to copy/delete/sort content.
(NB. This function is only operable on content copied from a USB or SD Card or a playlist viewed from
a SD card and
not for content downloaded from I Display Server).
Use the arrows to move between these options and press “Enter” in order to see the drop down menu of
each of these options as shown below:
Diagram 2.3.1.c View Screen Shot showing Copy/Delete/Sort
14
www.i-display.com
Page 15
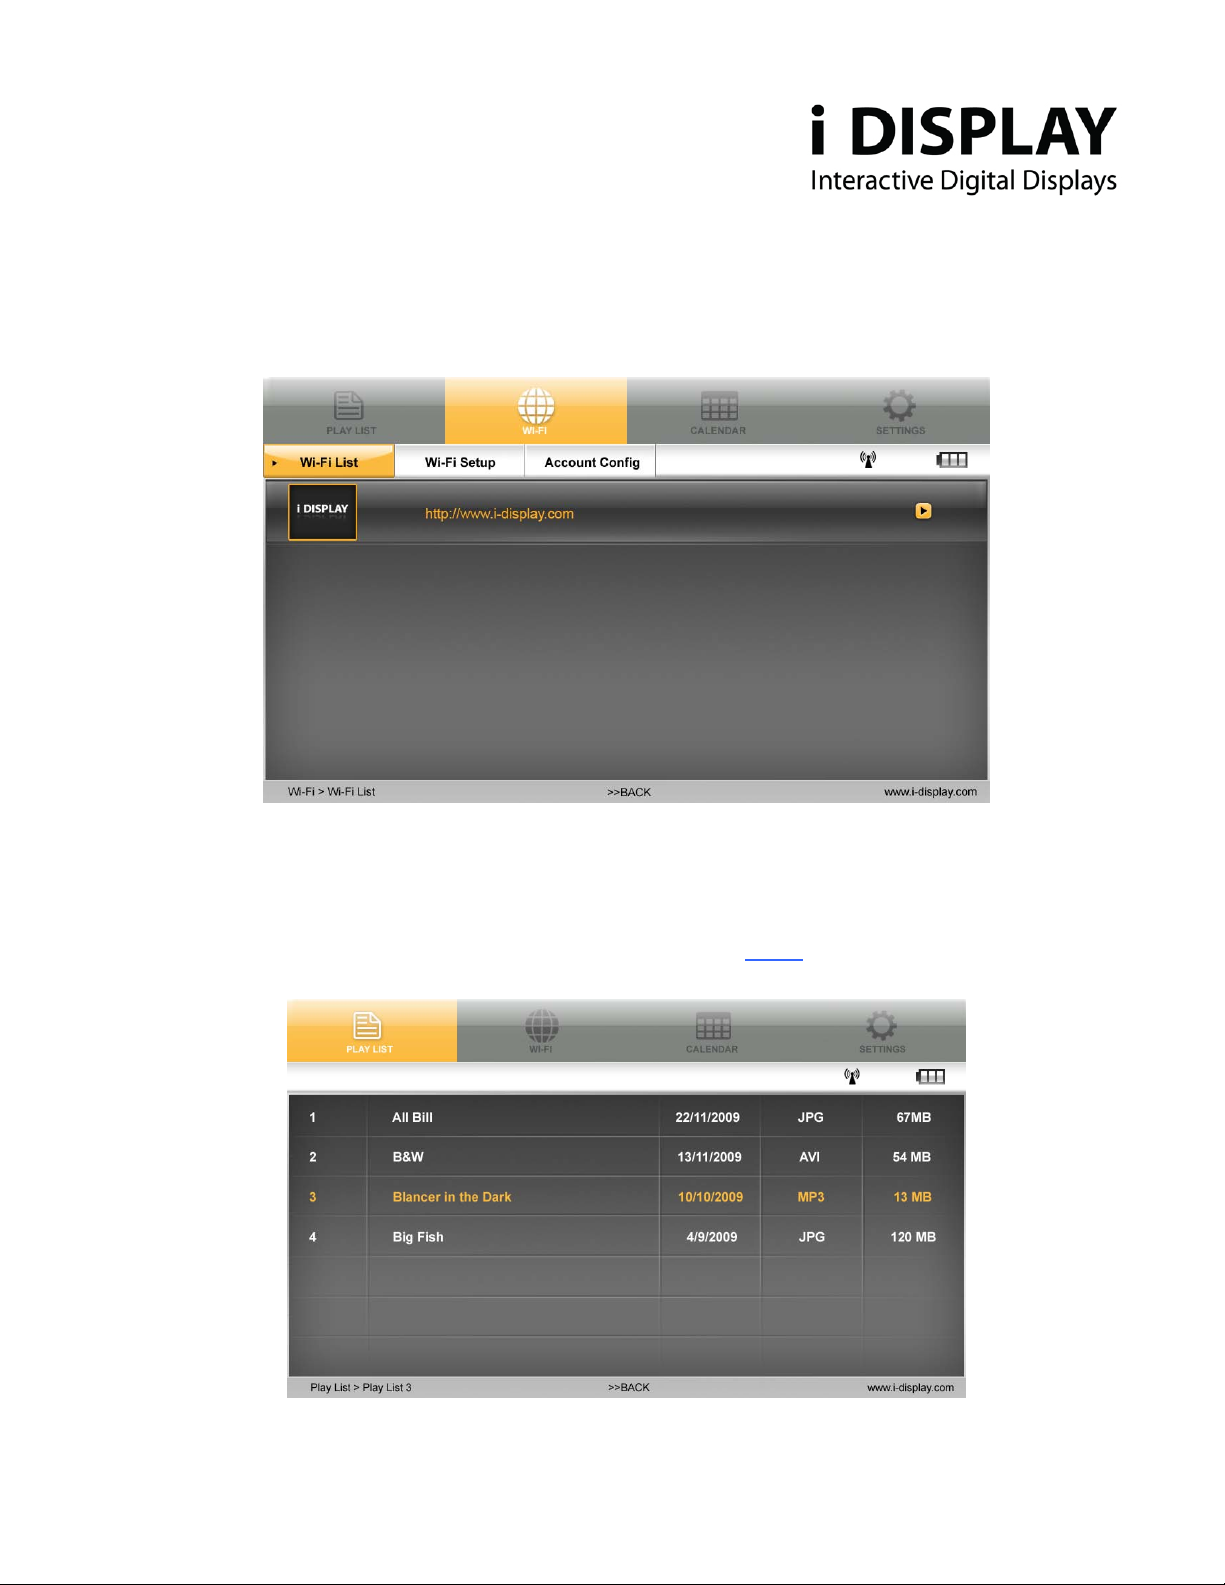
2.3.2 WIFI
Holds 3 main features: WI-FI list / WI-FI Setup / Account Config
Diagram 2.3.2a V iew of WI-FI options
To activate the WI-FI:
a. Select WI-FI list to see playlist downloaded from I Display server
Diagram 2.3.2.b View of Playlist
15
www.i-display.com
Page 16
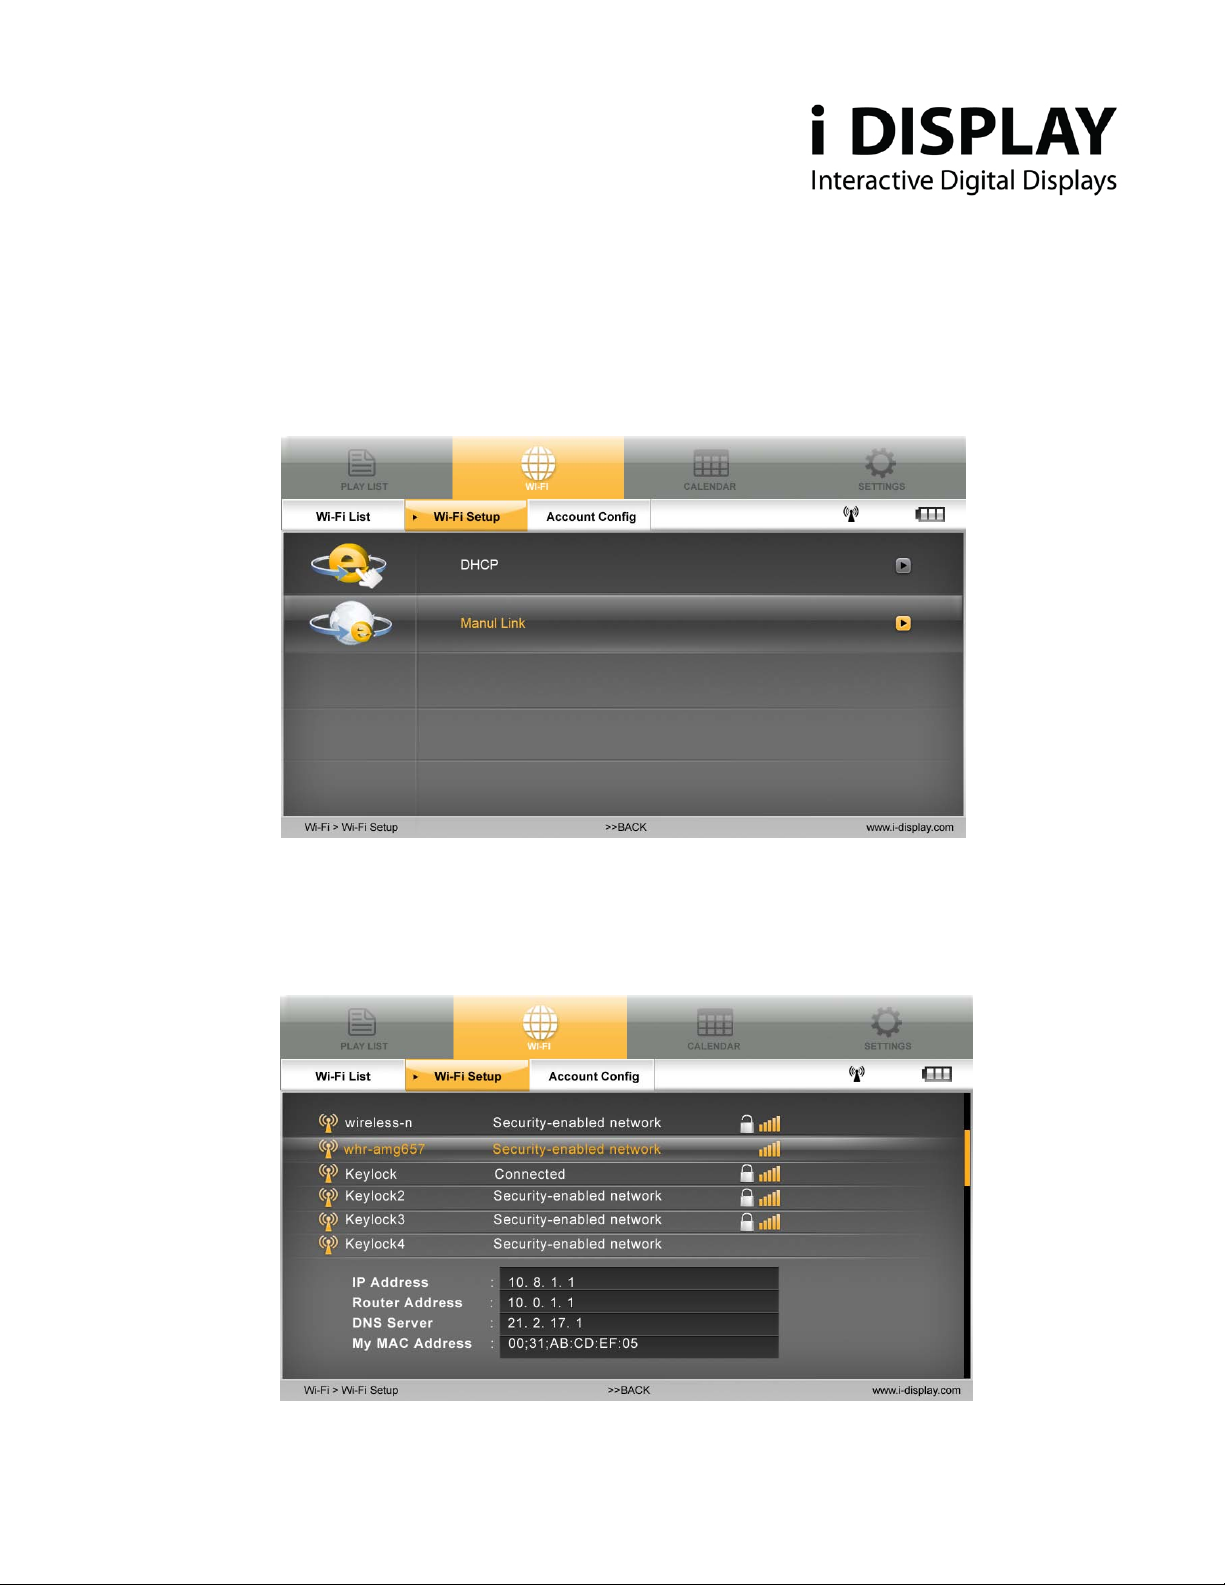
b. Select WI-FI Setup to be able to choose a method of connection to WIFI network. Either DHCP –
Automatically locating available WIFI networks or Manual link – manually inserting network key.
2.3.2.1 DHCP
Diagram 2.3.2.1 View of WI-FI Set Up Screen
a) Automatically locate available WI-FI networks
Diagram 2.3.2.1.a View of available WI-FI Networks
16
www.i-display.com
Page 17
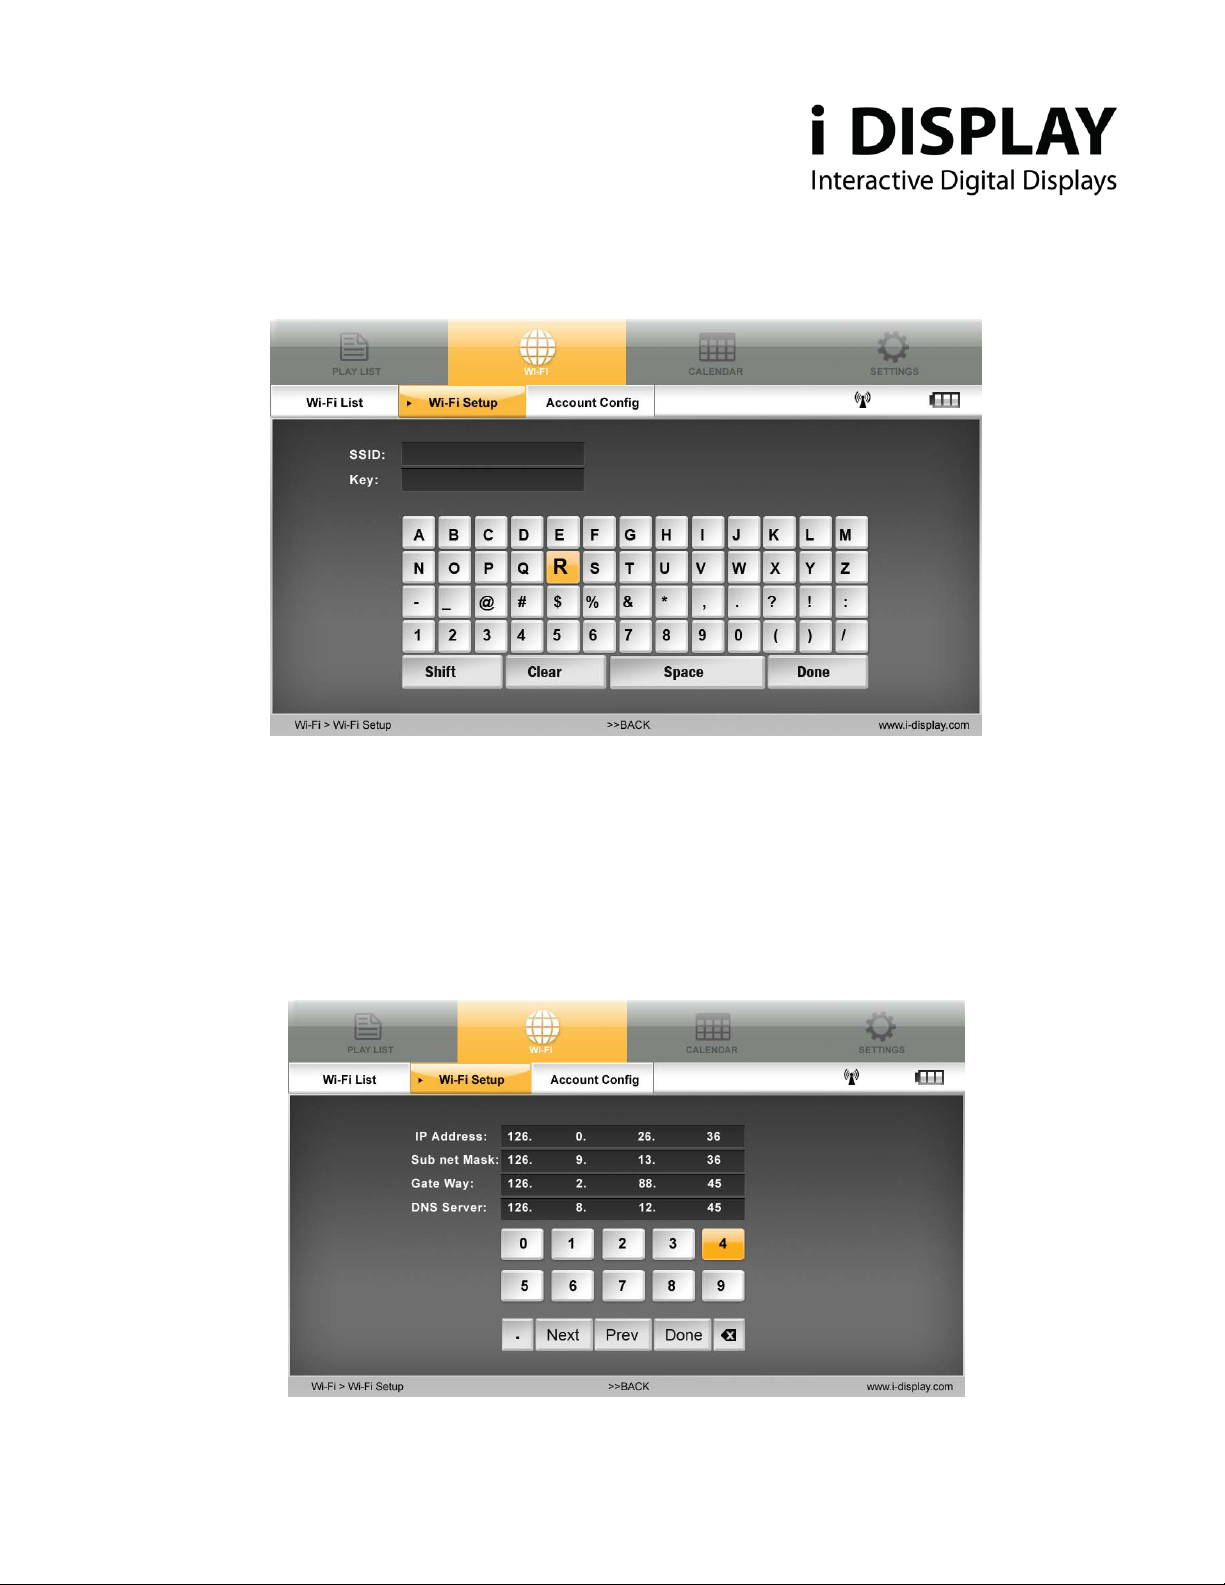
b) On secure WIFI networks, insert relevant network code to connect to WIFI & press “Done”.
Diagram 2.3.2.1.b View of Code Insertion
c) Once unit is connected a WIFI signal will appear.
2.3.2.2 Manual Link
From WI-FI Setup, choose manual link. Then insert the required information below and press “Done”.
Diagram 2.3.2.2 View of Manual Link Set Up
17
www.i-display.com
Page 18
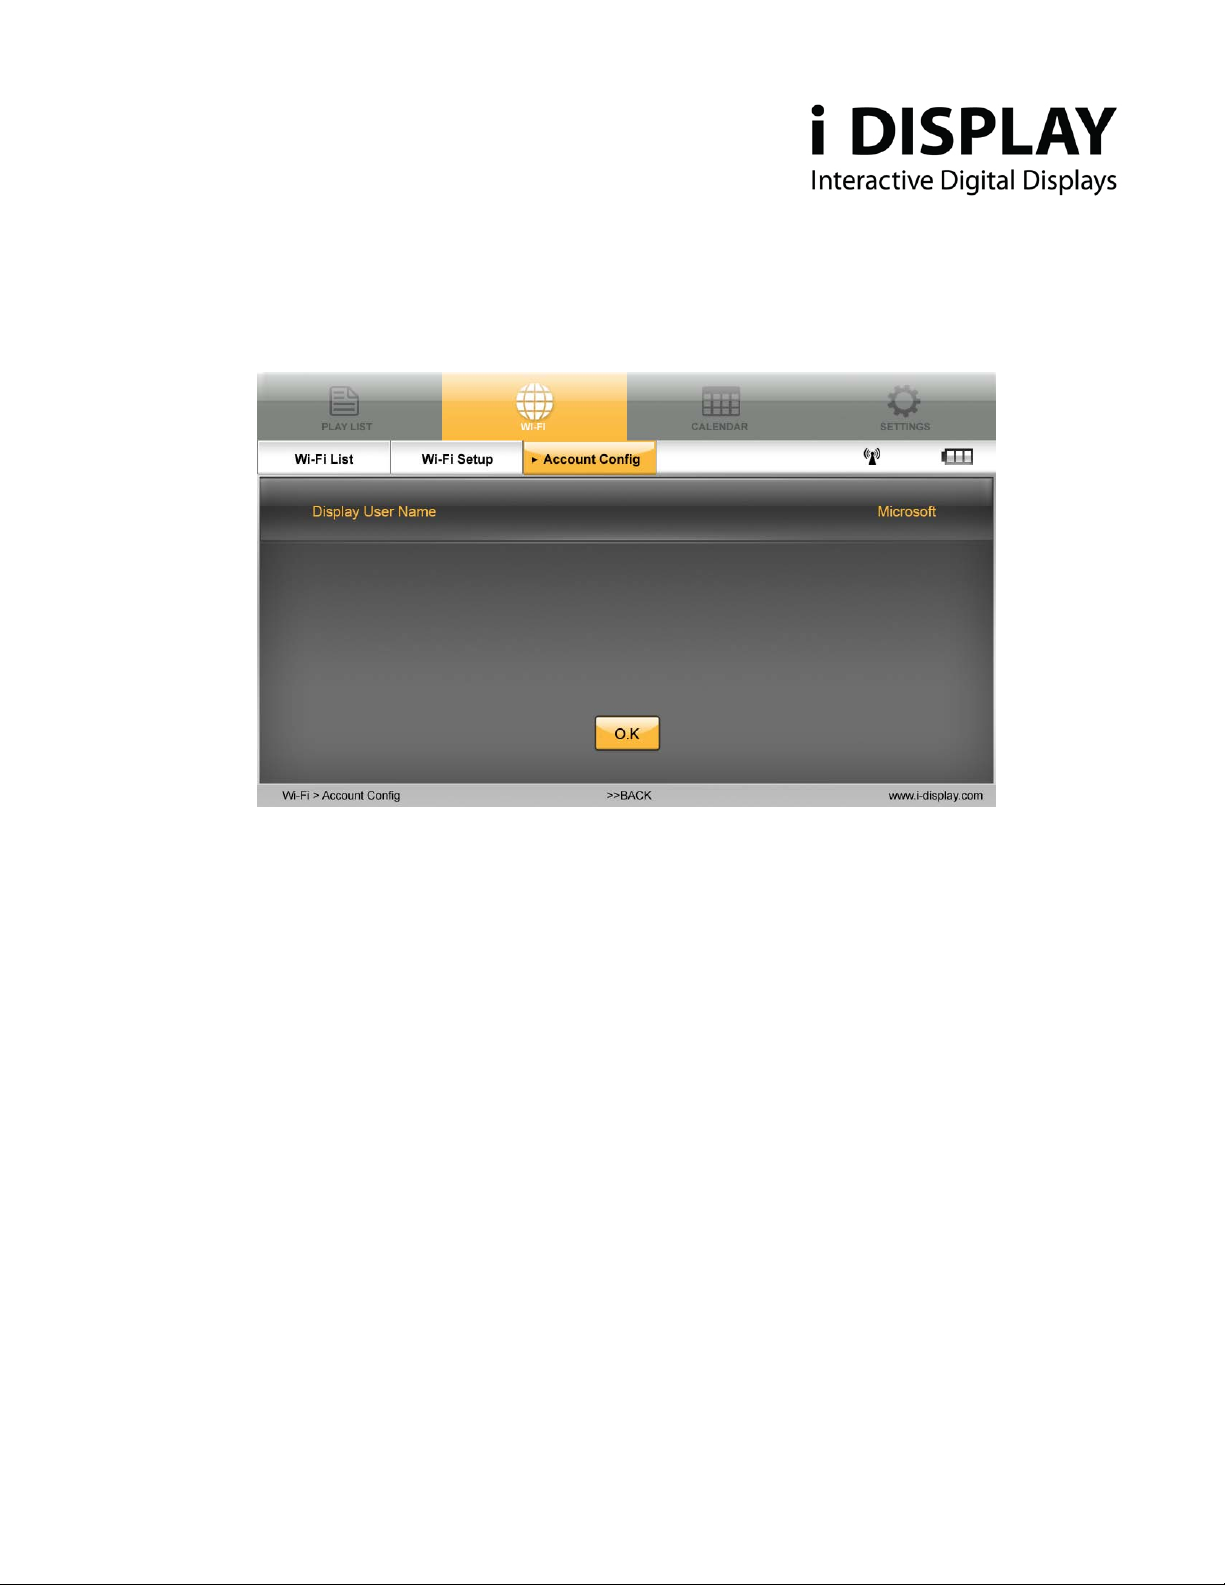
2.3.2.3 Account Config:
a) After unit is connected to WIFI, the user name the unit is linked to will appear.
Diagram 2.3.2.3 View of Account Config
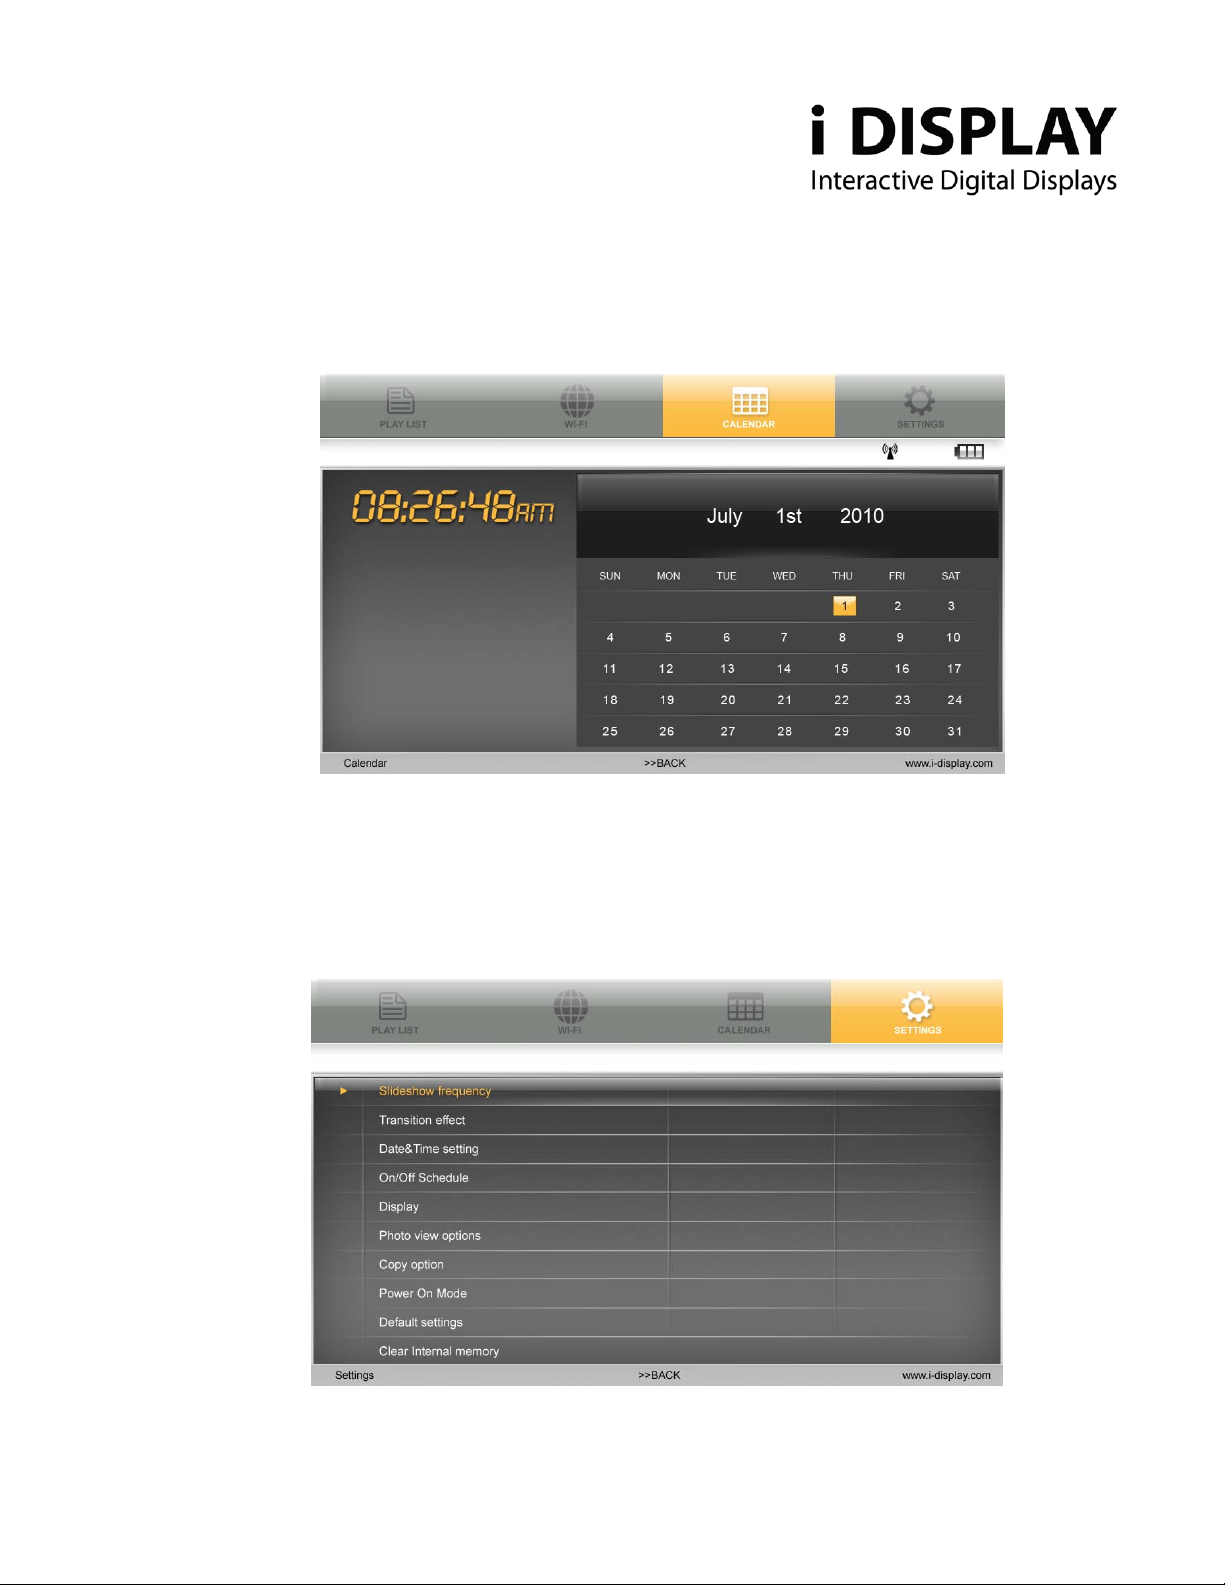
2.3.4 Calendar
This shows time and date set in unit.
If content in internal memory (copied from USB or SD card) has JPG it will appear in a slide show below the
digital clock.
To change the date and time on the unit:
a) Go to the “Settings” function by using the arrows to move across the top menu. (Note, you must be in
the main menu to select the “Settings” function).
b) Use the “down” arrow to select “Date and Time Setting”.
c) Press “Enter” to see another sub menu appear
d) Use the down and up arrows to select which options you would like to change, i.e. year, month, day,
hour, etc.
e) Once standing on the selected option using the left or right arrows to increase or decrease the number
until reaching the number you desire.
f) When you have finished selecting the date and time you want then pr ess the “St op” but t on to sa ve your
18
www.i-display.com
Page 19
options. This will make the sub-menu disappear.
g) And then you may return to the previous menu to select another option in “Settings” or return to
another page on the Main Menu.
Diagram 2.3.4 View of Calendar Page
2.3.5 Settings
Holds a list of functions as shown in the screen short below e.g. Slideshow Frequency, Transition effect, etc.:
Diagram 2.3.5 a View of Functions listed in Settings
19
www.i-display.com
Page 20
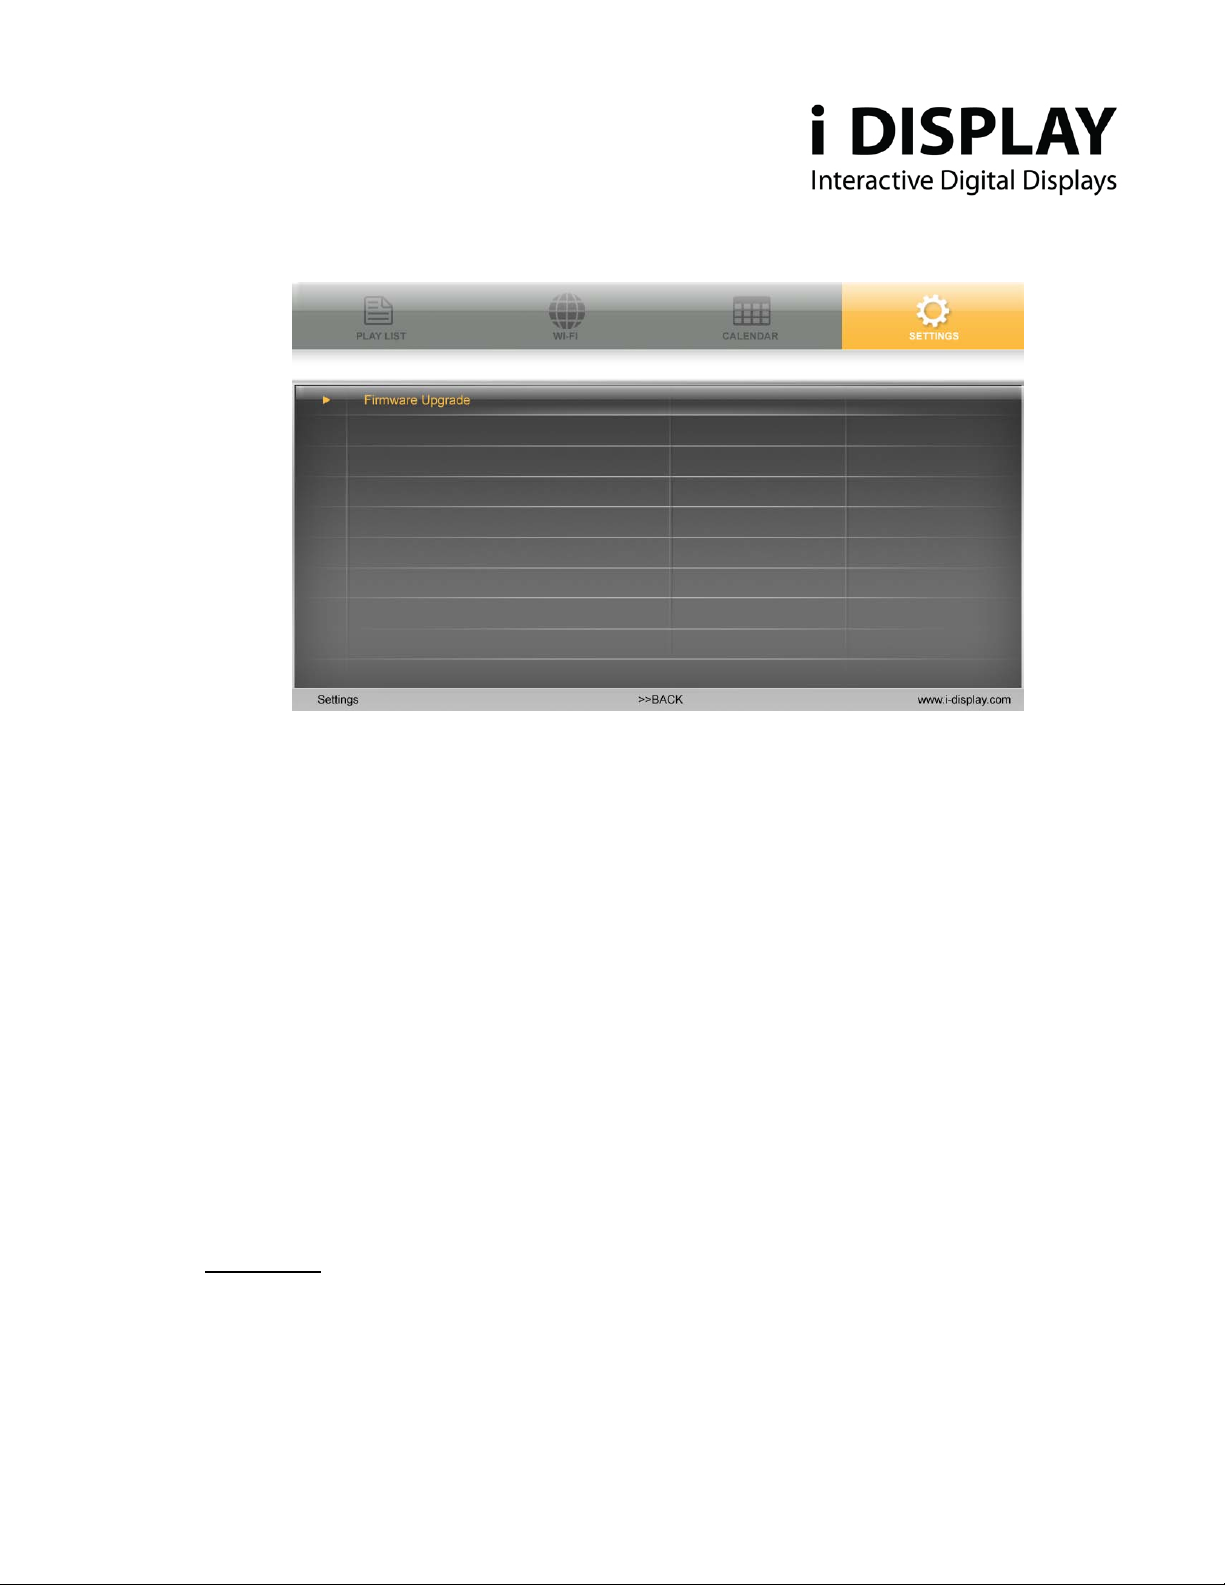
Diagram2.3.5b View of Firmware Upgrade Screen
1. Slide show frequency: Controls the amount of time each JPG will be shown when played. This only
affects content copied from USB or SD to internal memory or content played from SD card and
content downloaded from I Display Server
not for
2. Transition Effect: Controls the way each JPG will appear on the screen. This function does not work
for movies. This only affects content copied from USB or SD to internal memory or content played from
SD card and
not for content downloaded from I Display Server
3. Date & Time Setting: Controls the time and date which appear in the calendar.
4. On/Off Schedule: Controls when the unit will shut off and turn on automatically.
5. Display: Controls brightness and contrast of the unit.
6. Photo view options: Allows JPG to be shown in their original size or fill in the screen.
7. Copy option: Allows reduction of the size of the files copied from USB or SD to internal memory.
8. Power on mode: Allows choosing from which location the content will play automatically when unit is
turned on – content on internal memory copied from USB/SD or content downloaded from I Display
server. Current default is content on internal memory copied from USB/SD.
20
www.i-display.com
Page 21

9. Default settings: Return unit to default settings.
10. Clear internal memory: Erases all content copied from USB or SD to internal memory. It does not
erase content downloaded from the server.
11. Firmware upgrade: Allows upgrading the unit's current firmware. Upgrading can be done via SD card.
First step is to insert the flash disk with the new firmware file. Then choo se the fir mware upgrade
function in setting. The unit will start upgrading the firmware. IMPORTANT: Do not shut down the
unit while it’s being upgraded or the unit may malfunction.
Electrical Data:
Display: Input: 12 V, 2000mA
Power Adaptor: Input 100-240V, 50/60 Hz, 0.8A; Output 12V, 2000mA
Produced by: Outform Ltd.
www.i-display.com
21
 Loading...