

Page 1
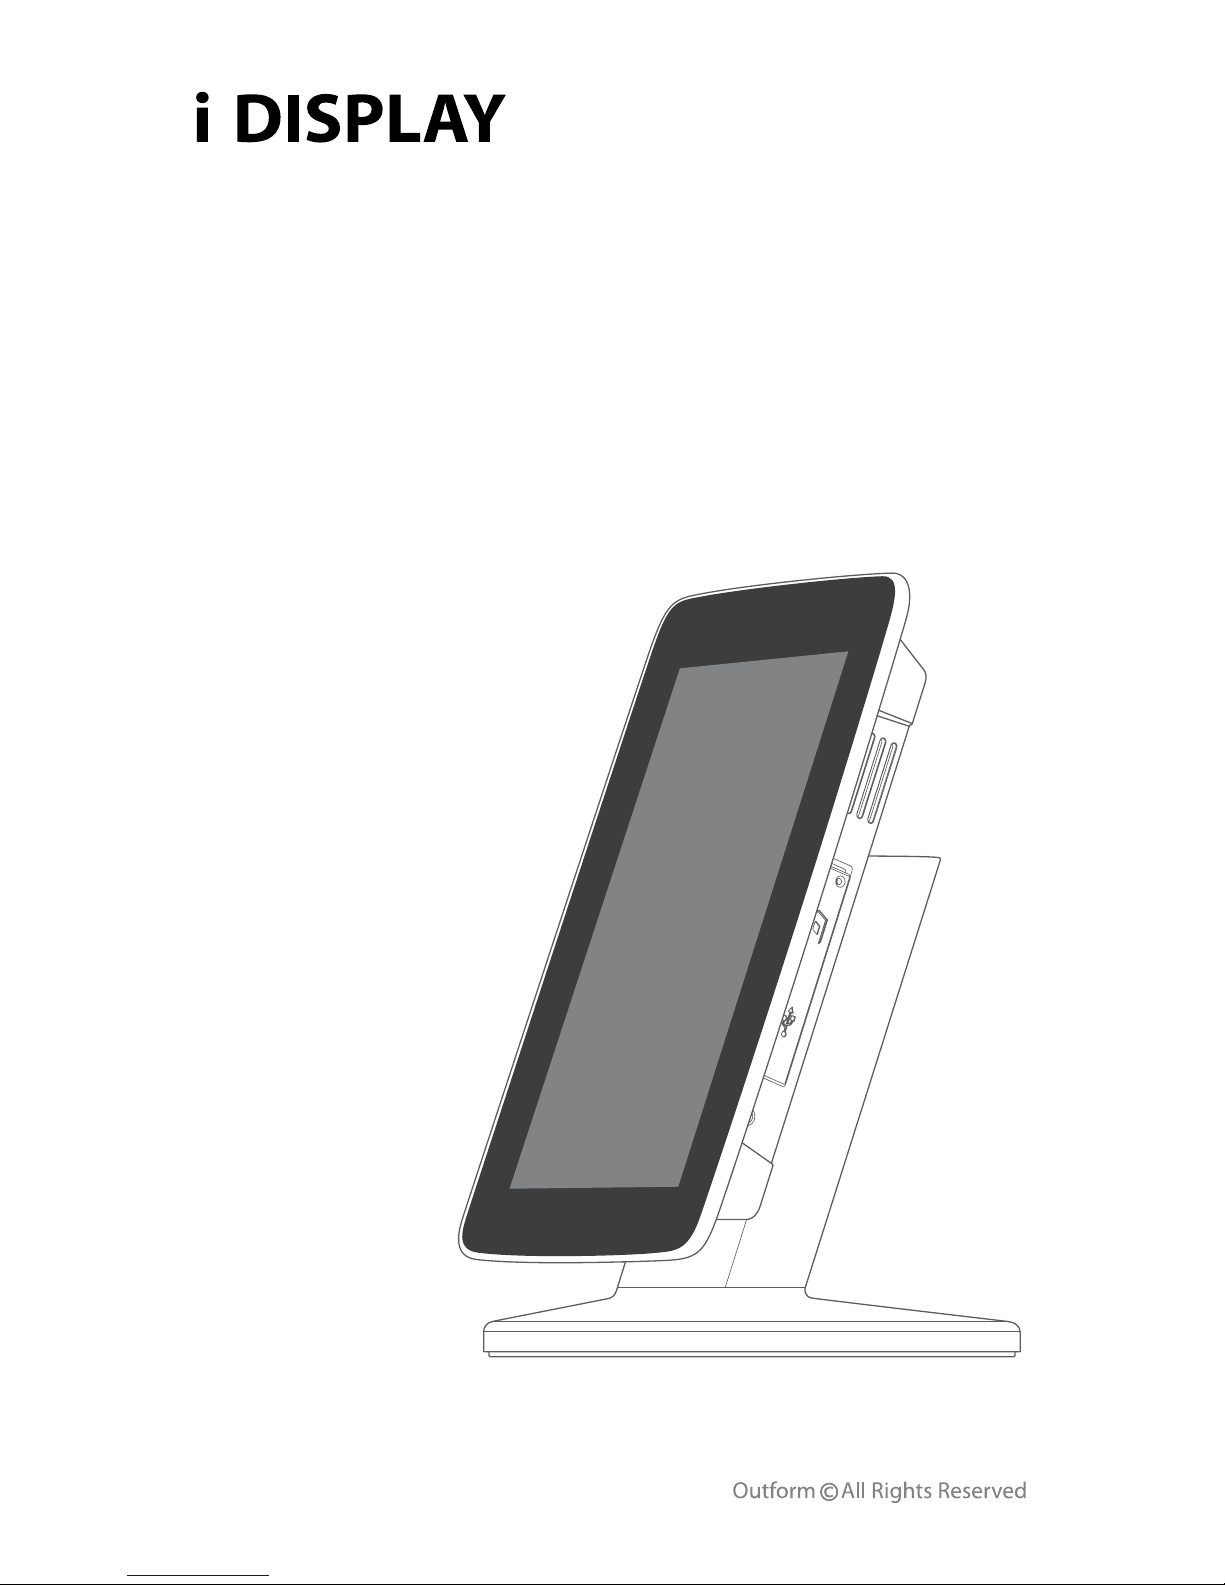
Interactive Digital Displays
i View / i Menu Classic
User Manual
Page 2

2
Main Supply
Main Adaptor
FCC Radiation Exposure Statement
Warning
Contents
Front View
Side A
Side B
Back
Quick Start
Video
Picture
Buttons and Remote Control
Screen Status Indicators
Menu Features
Playlist
Wi-Fi
Calendar
Settings
Power Supply Unit Electrical Data
Safety and Warning
Overview
Operating Instructions
3
3
4
4
5
5
6
6
7
9
9
10
10
12
13
13
14
20
21
22
Index
Page 3

3
Main Supply
This equipment is designed to operate from a 100-240 Volt, 50/60Hz AC main
supply. The use of other power sources may damage this equipment. Check that
the voltage marked on the rating plate located at the rear of the power adaptor
states 100-240V. The manufacturer will NOT accept responsibility for damage or
injury caused by connecting to the wrong voltage.
Main Adaptor
The power adaptor supplied is compatible with a standard main socket.
NB. If the power adaptor or lead gets damaged, it must be replaced by a qualied
service agent with an approved adaptor of the same type and rating.
This device complies with part 15 of the FCC rules. Operation is subject to the
following two conditions: (1) This device may not cause harmful interference, and
(2) This device must accept any interference received, including interference which
may cause undesired operation.
This equipment has been tested and found to comply with the limits for a Class B
digital device, pursuant to Part 15 of the FCC Rules. These limits are designed to
provide reasonable protection against harmful interference in a residential
installation.
This equipment generates uses and can radiate radio frequency energy and, if not
installed and used in accordance with the instructions, may cause harmful interference to radio communications. However, there is no guarantee that interference
will not occur in a particular installation.
If this equipment does cause harmful interference to radio or television reception,
which can be determined by turning the equipment o and on, the user is encouraged to try to correct the interference by one or more of the following measures:
- Reorient or relocate the receiving antenna.
- Increase the separation between the equipment and receiver.
- Connect the equipment into an outlet on a circuit dierent from that to which the
receiver is connected.
- Consult the dealer or an experienced radio / TV technician for help.
In accordance with FCC requirements, changes or modications not expressly
approved by manufacturer could void the user’s authority to operate this product.
Safety and Warnings
Main Supply / Main Adaptor
Page 4

4
FCC Radiation Exposure Statement
This equipment complies with FCC radiation exposure limits set forth for an
uncontrolled environment. This equipment should be installed and operated with
minimum distance 20cm between the radiator & your body
Dangerous voltage constituting a risk of electric shock is present inside this
equipment.
This mark is applied to show the equipment conforms to European safety and
electro-magnetic compatibility standards.
There are important operating and maintenance instructions in the literature
accompanying this equipment.
Warning
The mains plug shall be the main disconnect device and shall remain operable at
all times.
Never let anyone push objects into holes and ventilation slots.
Do not expose this product to dripping or splashing or place any objects lled
with liquids on or near the product.
Do not place a naked ame source such as lighted candles on or near this product.
Do not attempt to repair this product yourself; always get a qualied service agent
to carry out adjustments or repairs.
•
•
•
•
•
FCC Radiation Exposure Statement / Warning
Page 5
5
Overview
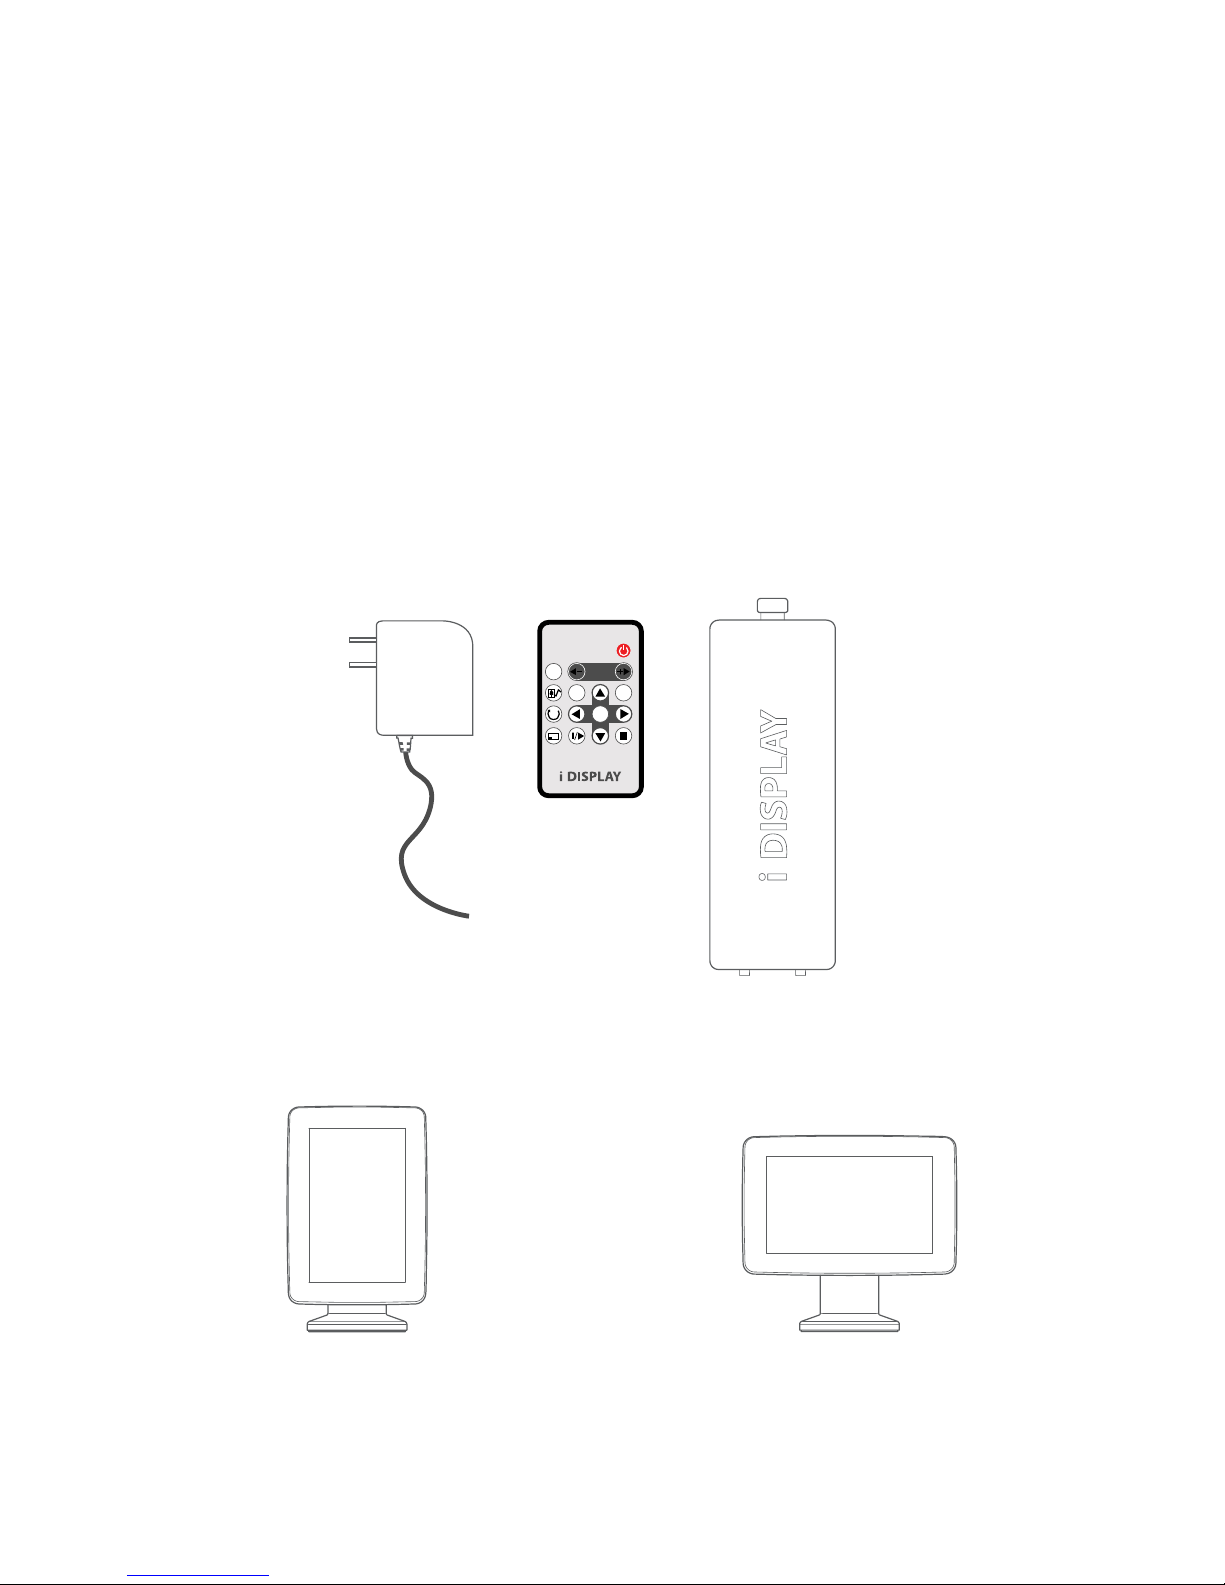
Components
Power Supply Unit – US, EU/UK Plugs available.
Remote Control.
4 Cell Rechargeable Battery – Not included in the package. (Must be purchased
separately)
Desk Mount Clip (not seen in picture) – Not included in the package. (Must be
purchased separately)
Securing Cable. (not seen in picture) – Not included in the package. (Must be
purchased separately)
Front View
1.
2.
3.
4.
5.
Front View of the Product – Portrait style Front View of the Product – Landscape style
MUTE
MENU
OSD
ROTATE
SLIDE SHOW
ON/OFF
ZOOM
VOL
ENTER
1. Power Supply Unit
3. 4 Cell Rechargeable Battery
2. Remote Control
Components/ Front View
Page 6
6
Side A
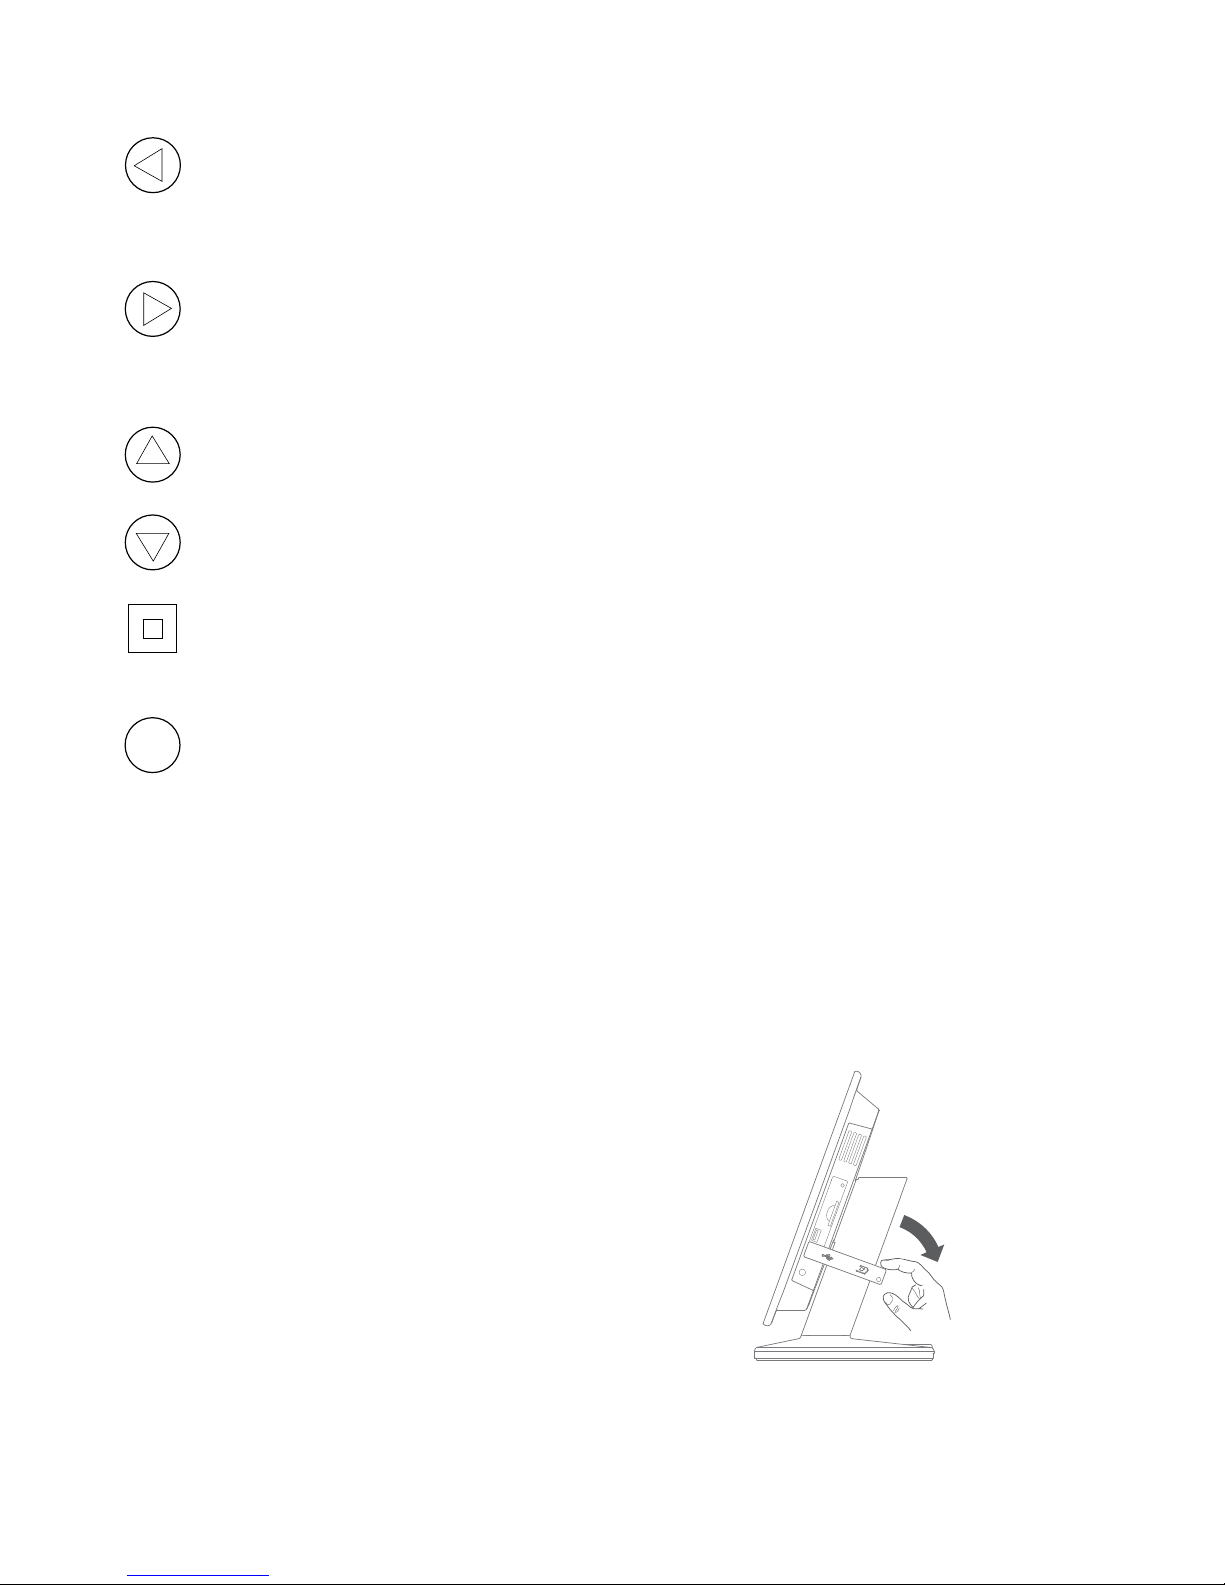
Setting buttons
Left In menu mode, this function is used for moving left through the various
options. In playback mode you can go to the previous content in the playlist.
(Note this is only operational for content copied from USB or SD Card, not for
content downloaded from i-Display Content Management System).
Right In menu mode, this function is used for moving right through the various
options. In playback mode you can go to the next content in the playlist.
(Note it is only operational for content copied from USB or SD Card, not for content
downloaded from i-Display Content Management System).
Up In menu mode, this button is used for moving left. In playback mode, it is
used to increase the volume if current content being played is a movie.
Down In menu mode, this button is used for moving right. In playback mode, it is
used to decrease the volume if current content being played is a movie.
Misc In menu mode, this function is used for the same function as the OSD
button on the remote control (as explained in Remote Control section). In
playback mode, it is not operational.
OK In playback mode:
Short press – Used for making changes between
(i) Repeat selected movie (repeats the chosen le in endless loop).
(ii) Repeat all (repeats the entire playlist in endless loop).
Long Press (3 seconds) – Used to return to the menu page.
In menu mode:
Short press – Used for selecting various options.
Long press (3 seconds) - Used to return to the main menu (rst menu page).
Side B
Silicon cover for slots
This reduces access to slots or prevents stealing of
SD Card (if used). To insert or remove an SD Card the
Silicon cover needs to be positioned as shown and
can be easily opened by gently lifting up and turning
clockwise. A screw can be added for extra security.
OK
Side A / Side B
Page 7
7
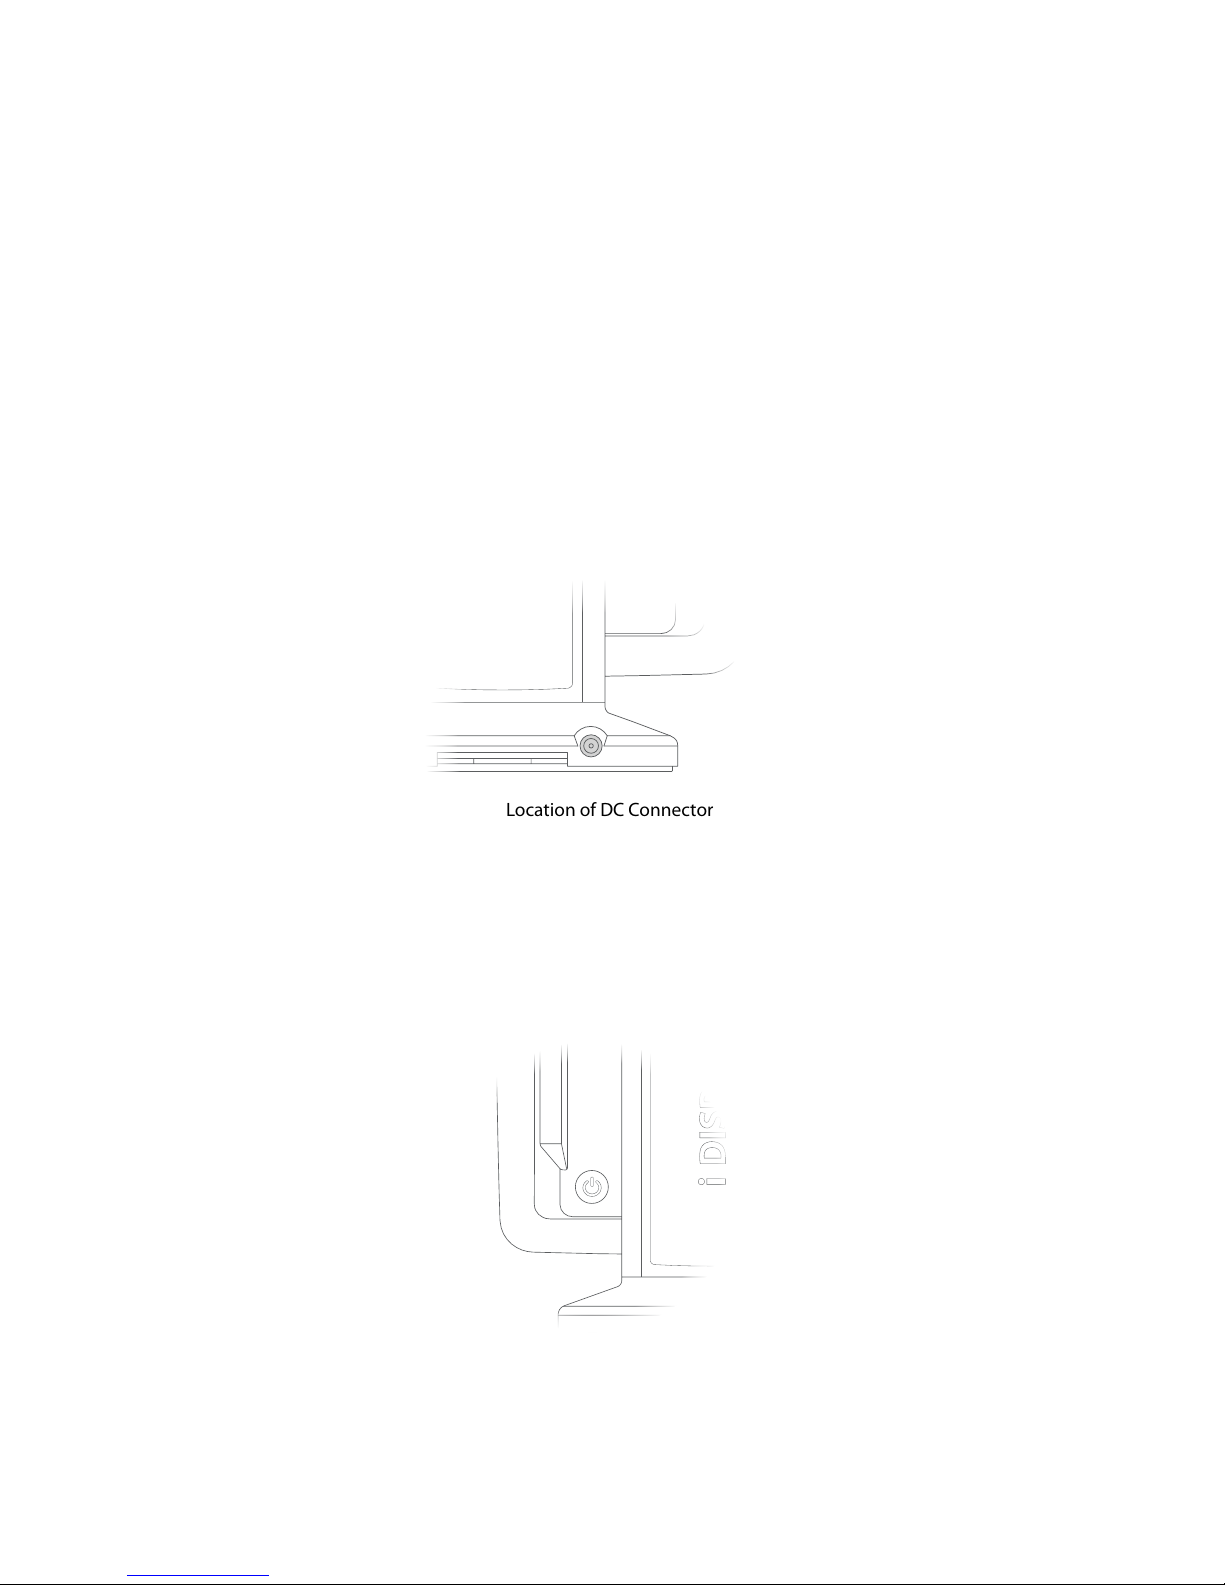
Location of DC Connector
Location of On/O Button
USB slot
This is used for connecting ash drives. Once the ash drive is connected, all its
content is automatically copied to the internal memory. To delete old content see
Playlist section.
SD card slot
Once an SD Card is inserted into the unit, the content on the SD Card will start to
play. In menu mode, the user will be able to either play content directly from the
SD Card or manually copy its content to the unit's internal memory.
Important: SD Card is not included, it must be purchased separately.
Back
DC connector
Located at the back of the unit’s leg. Used to connect the power.
On/O button
Located on the back bottom section of the unit. Red button indicates the unit is
switched o. Green button indicates the unit is switched on.
Important: It takes approx 10 seconds for the rst image to appear once the unit is
switched on.
Back
Page 8
8
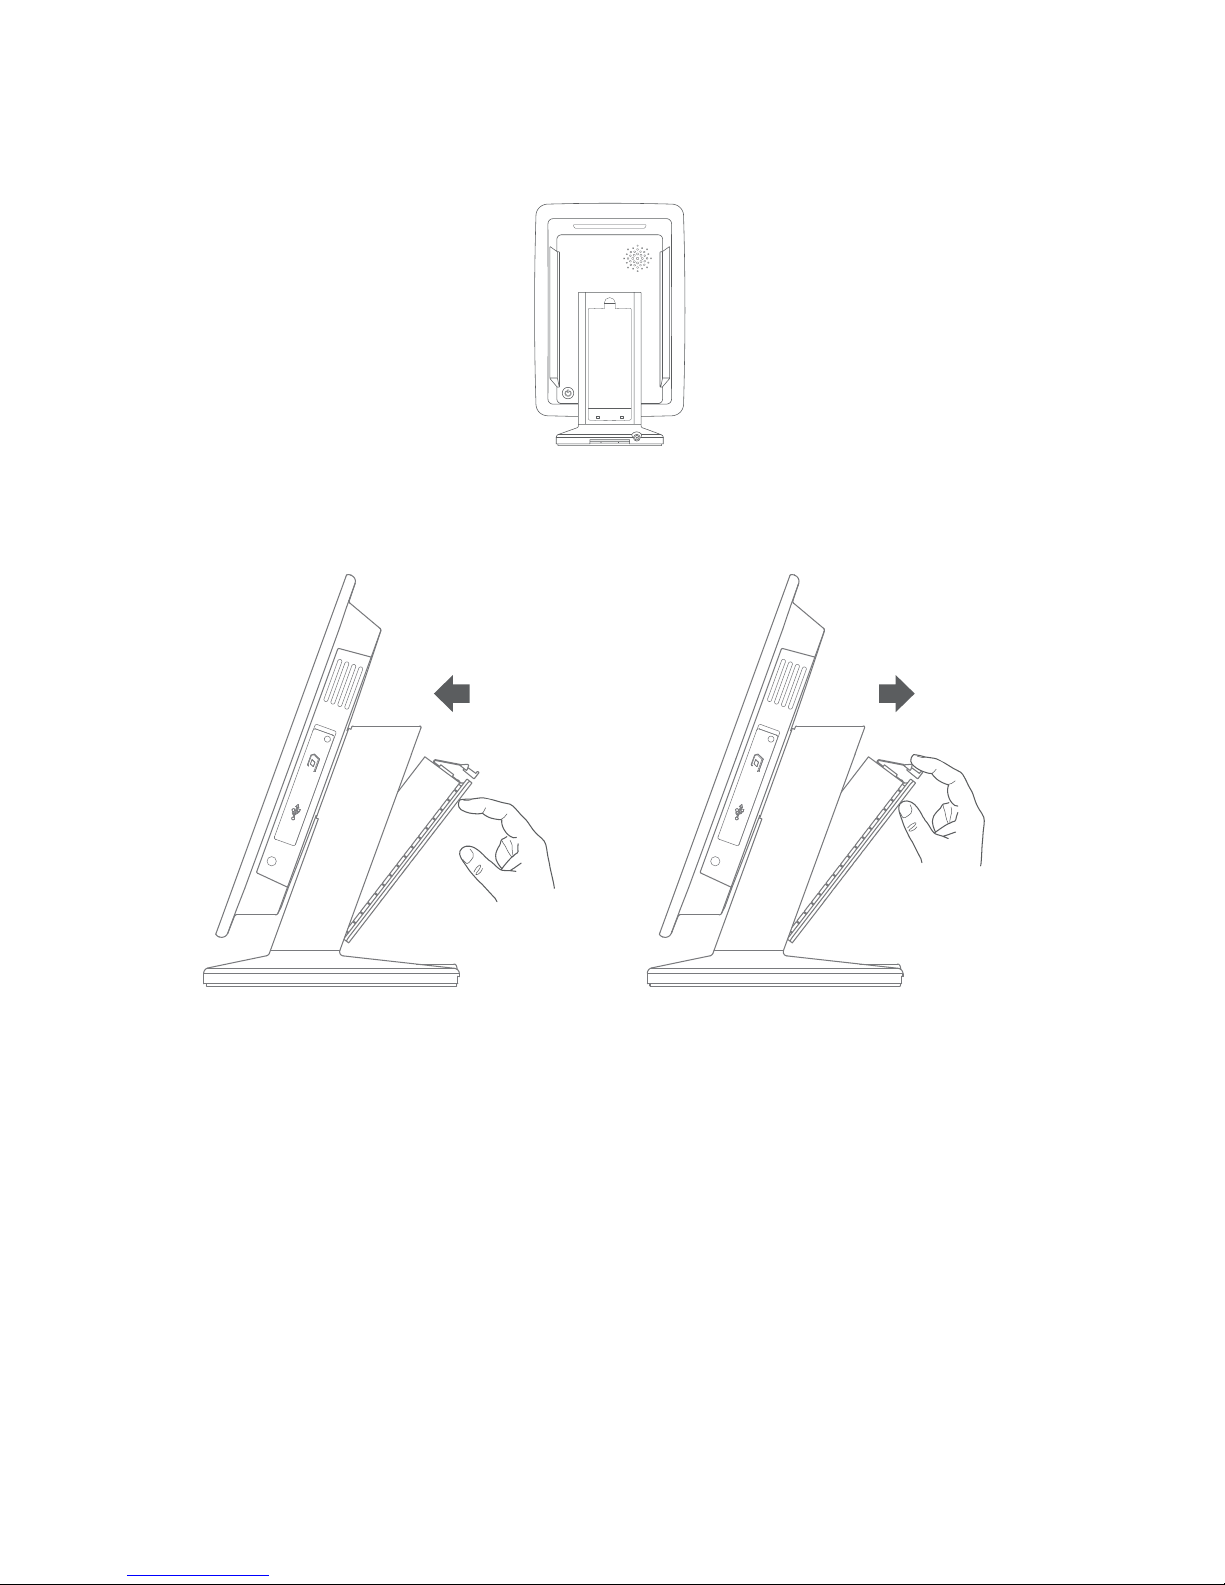
Removing the Rechargeable Battery
Placing the Rechargeable Battery
Rechargeable battery slot
Used to house the rechargeable battery.
The rechargeable battery needs to be placed as shown in these images.
Back
Page 9

9
Operating Instructions
Quick Start
Turning On
Plug into electricity or insert fully charged battery.
Display will automatically load movie and play. (If the unit does not play a movie
automatically, press the power button at the back of the display. RED light
indicates standby mode and GREEN light indicates the unit is switched ON.)
Playing other movies / change content
Connect a USB stick to the unit.
Content from the USB stick will automatically be copied to the unit's internal
memory.
Once the content has copied successfully, the new content will start playing
automatically.
Remove the USB from the unit.
Important: If you no longer require the old content to be played, you will need to
delete the old content (to explain how this is done see Playlist section).
Playing content from SD card
Insert an SD Card to the unit.
The unit will play the content of the SD Card automatically.
Video
Recommended Video Resolution:
Landscape
Format: AVI
Codec: XVID
Audio code: MPEG-1 Audio layer 3 160Kbps
Resolution: 720X400 30PFS 2800Kbps
Portrait
Format: AVI
Codec: XVID
Audio code: MPEG-1 Audio layer 3 160Kbps
Resolution: 400X720 30PFS 2800Kbps
video can be rotated anti-clockwise by 90 degrees
1.
2.
1.
2.
•
•
•
•
•
•
•
•
•
1.
2.
3.
4.
Quick start / Video
Page 10
10
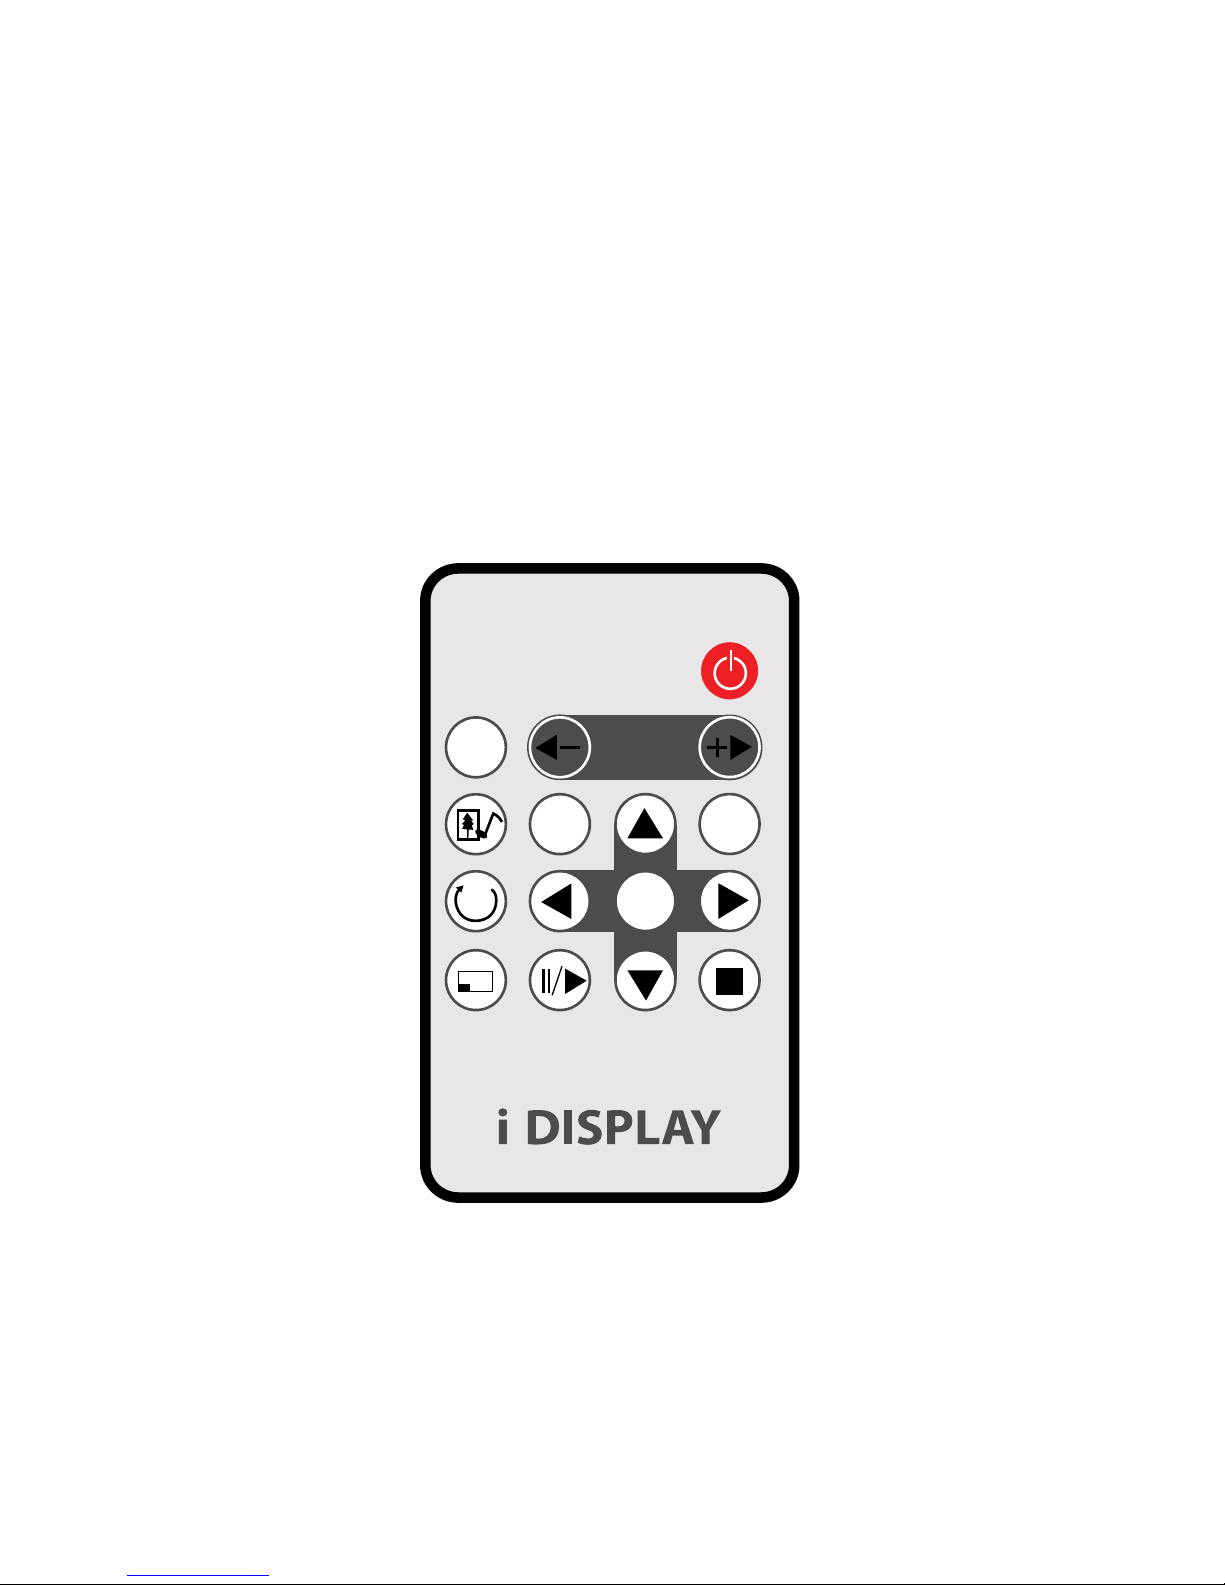
Remote Control
MUTE
MENU
OSD
ROTATE
SLIDE SHOW
ON/OFF
ZOOM
VOL
ENTER
Picture
Recommended Picture Resolution:
Landscape
Format: JPG
Resolution: 600X1024
Portrait
Format: JPG
Resolution: 1024X600
Buttons and Remote Control
Remote Control
On/O Turns the unit on/o.
Volume (- / +) Increase/decrease volume when movies are played.
•
•
•
•
Picture / Buttons and remote control
Page 11
11
Menu Returns the unit to setup mode.
Left In menu mode, this function is used for moving left through the various
options. In playback mode, this function allows you to go to the previous content
in the playlist.
(Please note: This is only operational for content that is copied from USB or SD
Card, not for content downloaded from i-Display Content Management System.)
Right In menu mode, this function is used for moving right through the various
options. In playback mode, this function allows you to go to the next content in
the playlist.
(Please note: This is only operational for content that is copied from USB or SD
Card and not for content downloaded from i-Display Content Management
System.)
Up In menu mode, ths is used for moving up. It is not operational in playback
mode.
Down In menu mode, this is used for moving down. It is not operational in
playback mode.
Enter In menu mode, it is used to select an option. It is not operational in
playback mode.
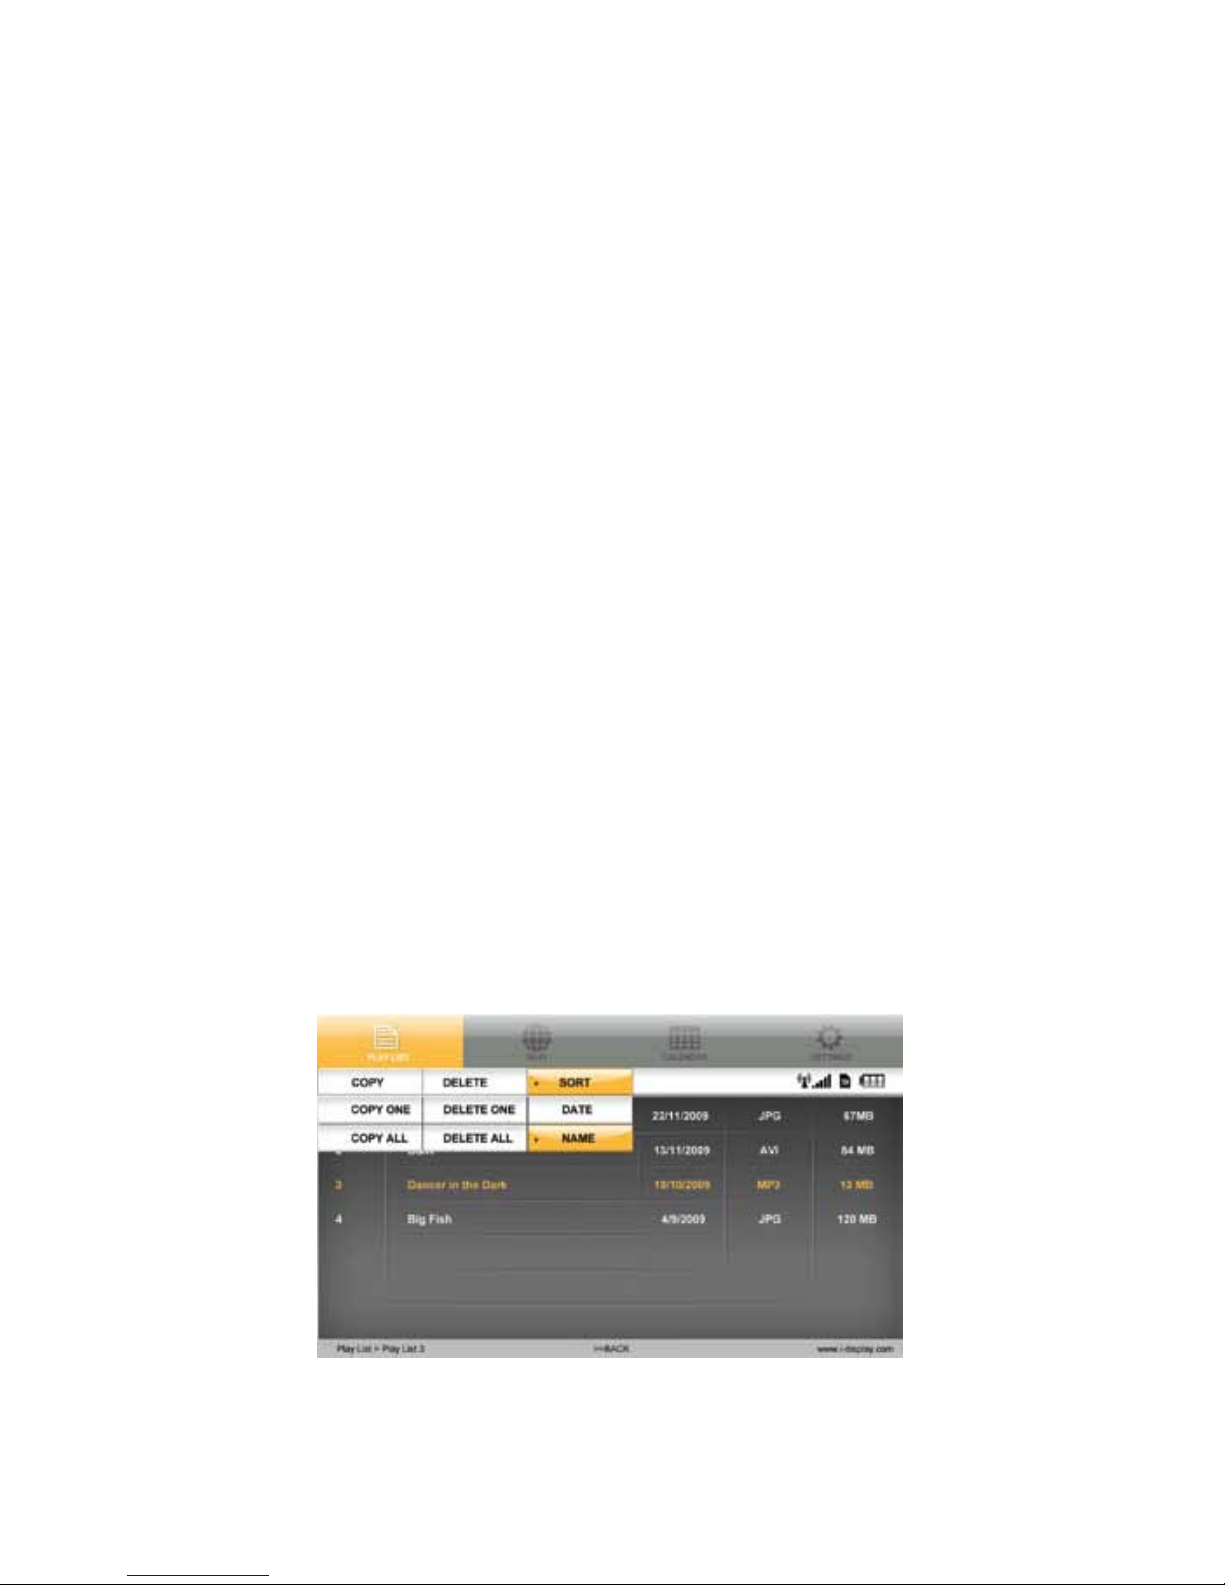
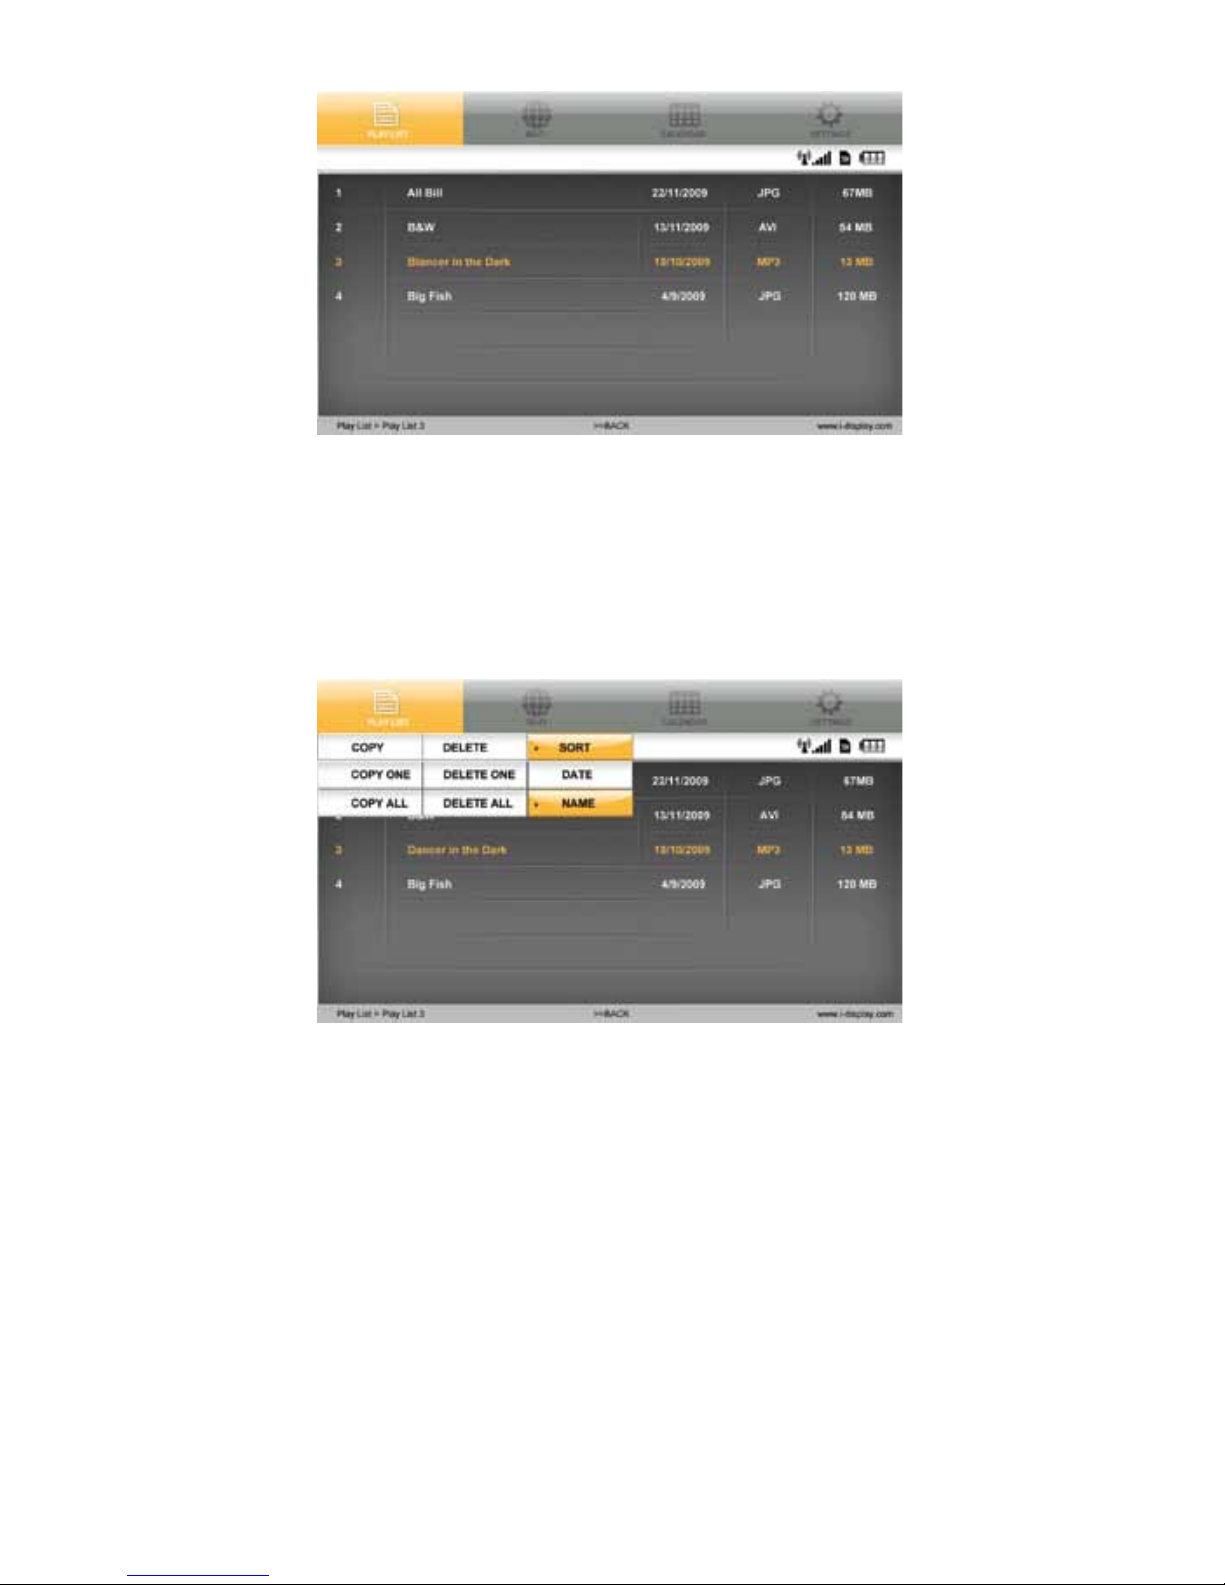
OSD While playlist is being viewed in menu mode and the OSD function is
pressed, a table with Copy/Delete/Sort will appear, enabling the use of these
functions on the playlist content.
(Please note: Playlist refers to only the content that is copied from USB or SD Card
or a playlist viewed from an SD Card and not for content downloaded from
i-Display Content Management System.)
Buttons and remote control
Page 12

12
Play/Pause In playback mode, this function is used to pause or play a specic
JPG or movie. (This function is only operational on content copied from a USB or
SD Card or a playlist viewed from an SD Card and not for content downloaded
from i-Display Content Management System.)
Stop In playback mode, pressing this function once will stop the current content
playing and will make the screen return to the menu mode. In menu mode, it is
used to go back to main menu.
Slide show In playback mode, it is used to change between “repeat one” (repeats
the chosen le in endless loop) and “repeat all” (repeats the entire playlist in
endless loop).
(This function is only operational on content copied from a USB or SD Card or a
playlist viewed from an SD Card and not for content downloaded from i-Display
Content Management System.)
Rotate In playback mode, this is used to rotate JPG pictures. It cannot be used for
movies being played. (This function is only operational on content copied from a
USB or SD Card or a playlist viewed from an SD Card and not for content downloaded from i-Display Content Management System.)
Zoom In playback mode, this is used to zoom on JPG pictures. It cannot be used
for movies played. (This function is only operational on content copied from a USB
or SD Card or a playlist viewed from an SD Card and not for content downloaded
from i-Display Content Management System.)
Mute In Playback mode, this is used to mute sound. Another click on the Mute
button restores the sound.
Screen Status Indicators
Wi-Fi Signal Indicates the unit is connected to Wi-Fi network.
Battery Icon Indicates the unit is working on battery power and shows the
amount of power left in the battery.
Empty Battery Icon Indicates the battery has 30 minutes of power remaining to
keep the unit activated.
Screen status indicators
Page 13
13
1.
2.
Menu Features
The Menu includes 4 main features:
Playlist / Wi-Fi & Activation to Remote Content Management / Calendar / Settings.
Each can be accessed and activated by either the remote control or buttons on the
side of the unit.
Playlist
The playlist holds a list of content, which can be played on the unit.
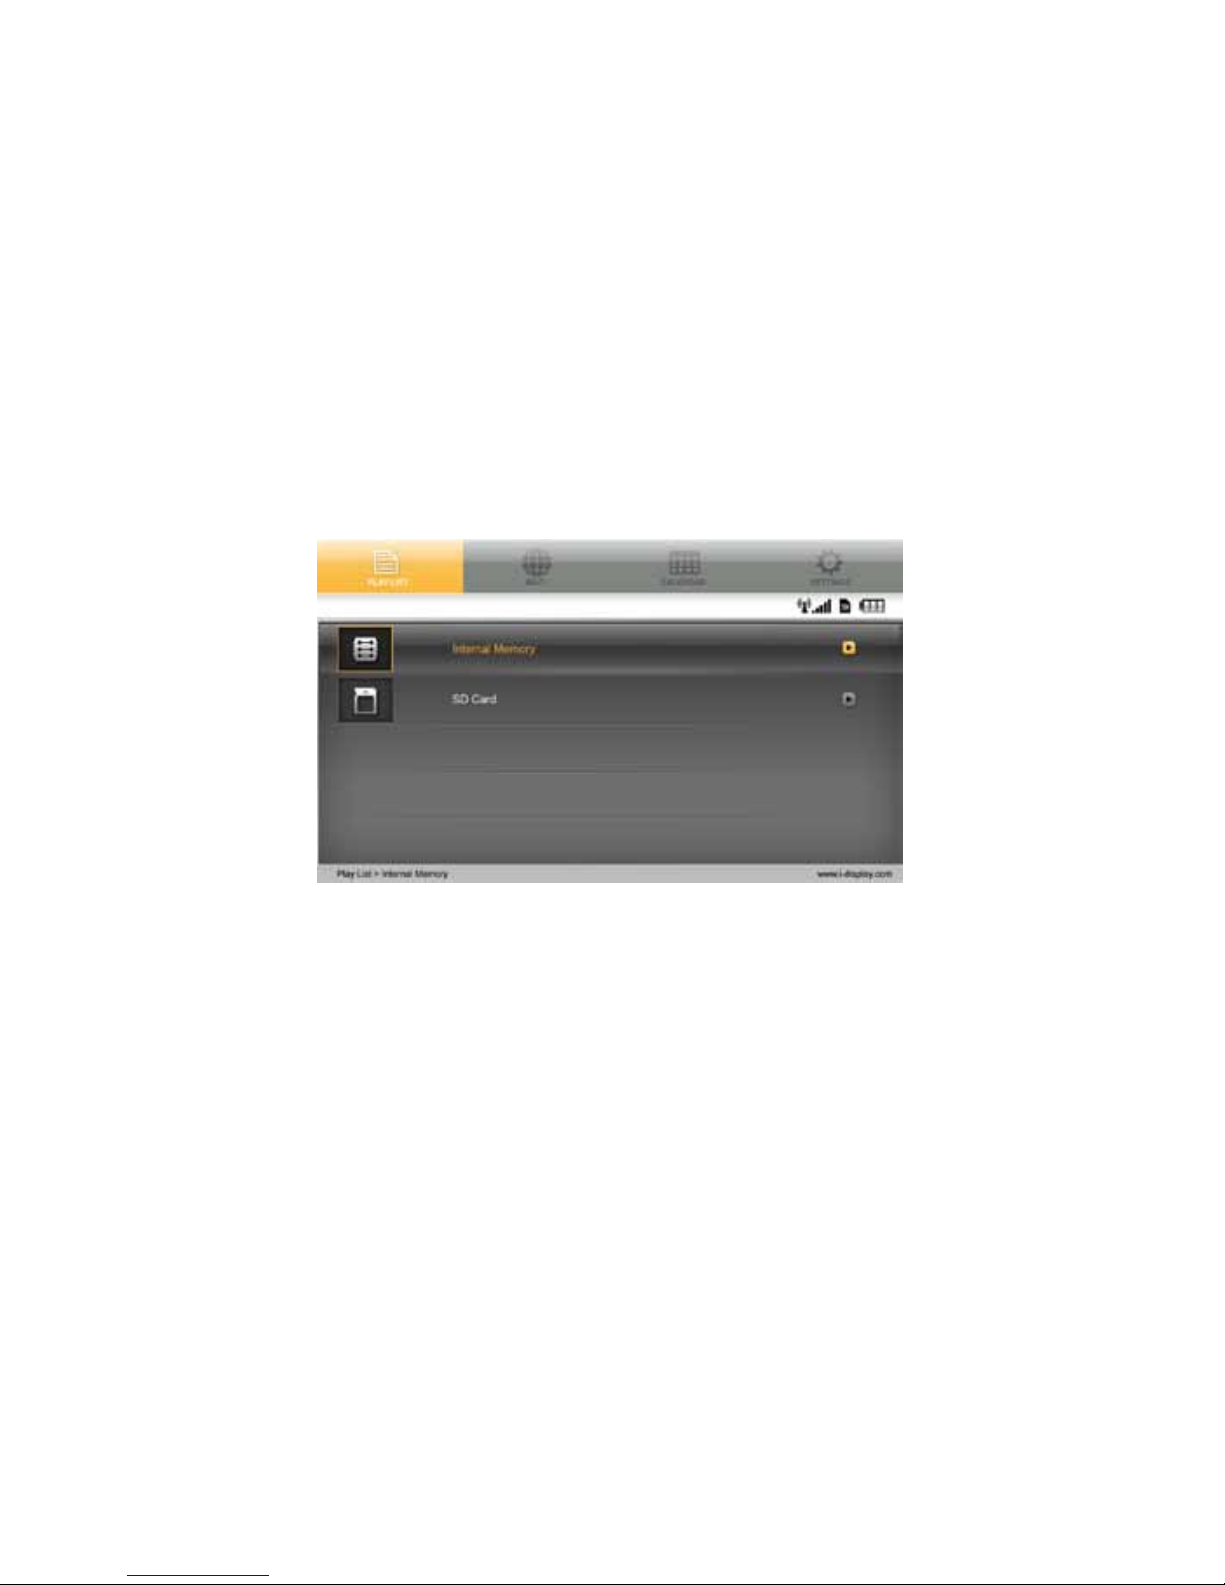
To view the playlist:
Select internal memory or SD Card.
Please note: The playlist only shows content copied to internal memory by USB or
SD Card. It does not show content downloaded from the i-Display Content
Management System.
Choose any of the selected les that appear on the playlist by moving the up and
down arrows on the remote. Then Click “Enter” to play the relevant content.
(Please note: These les can be either JPEG or various movie formats e.g. MPEG 1, 2
and 4. Recommended format is XVID.)
Menu features / Playlist
Page 14
14
3.
2.
1.
Click OSD to copy / delete / sort content.
(Please note: This function is only operational on content copied from a USB or SD
Card or a playlist viewed from an SD Card and not for content downloaded from
i-Display Content Management System)
Use the arrows to move between these options and Click “Enter” in order to see the
drop down menu of each of these options as shown below:
Wi-Fi
Holds 3 main features: Wi-Fi list / Wi-Fi Setup / Account Cong
Step One: Connect to the internet
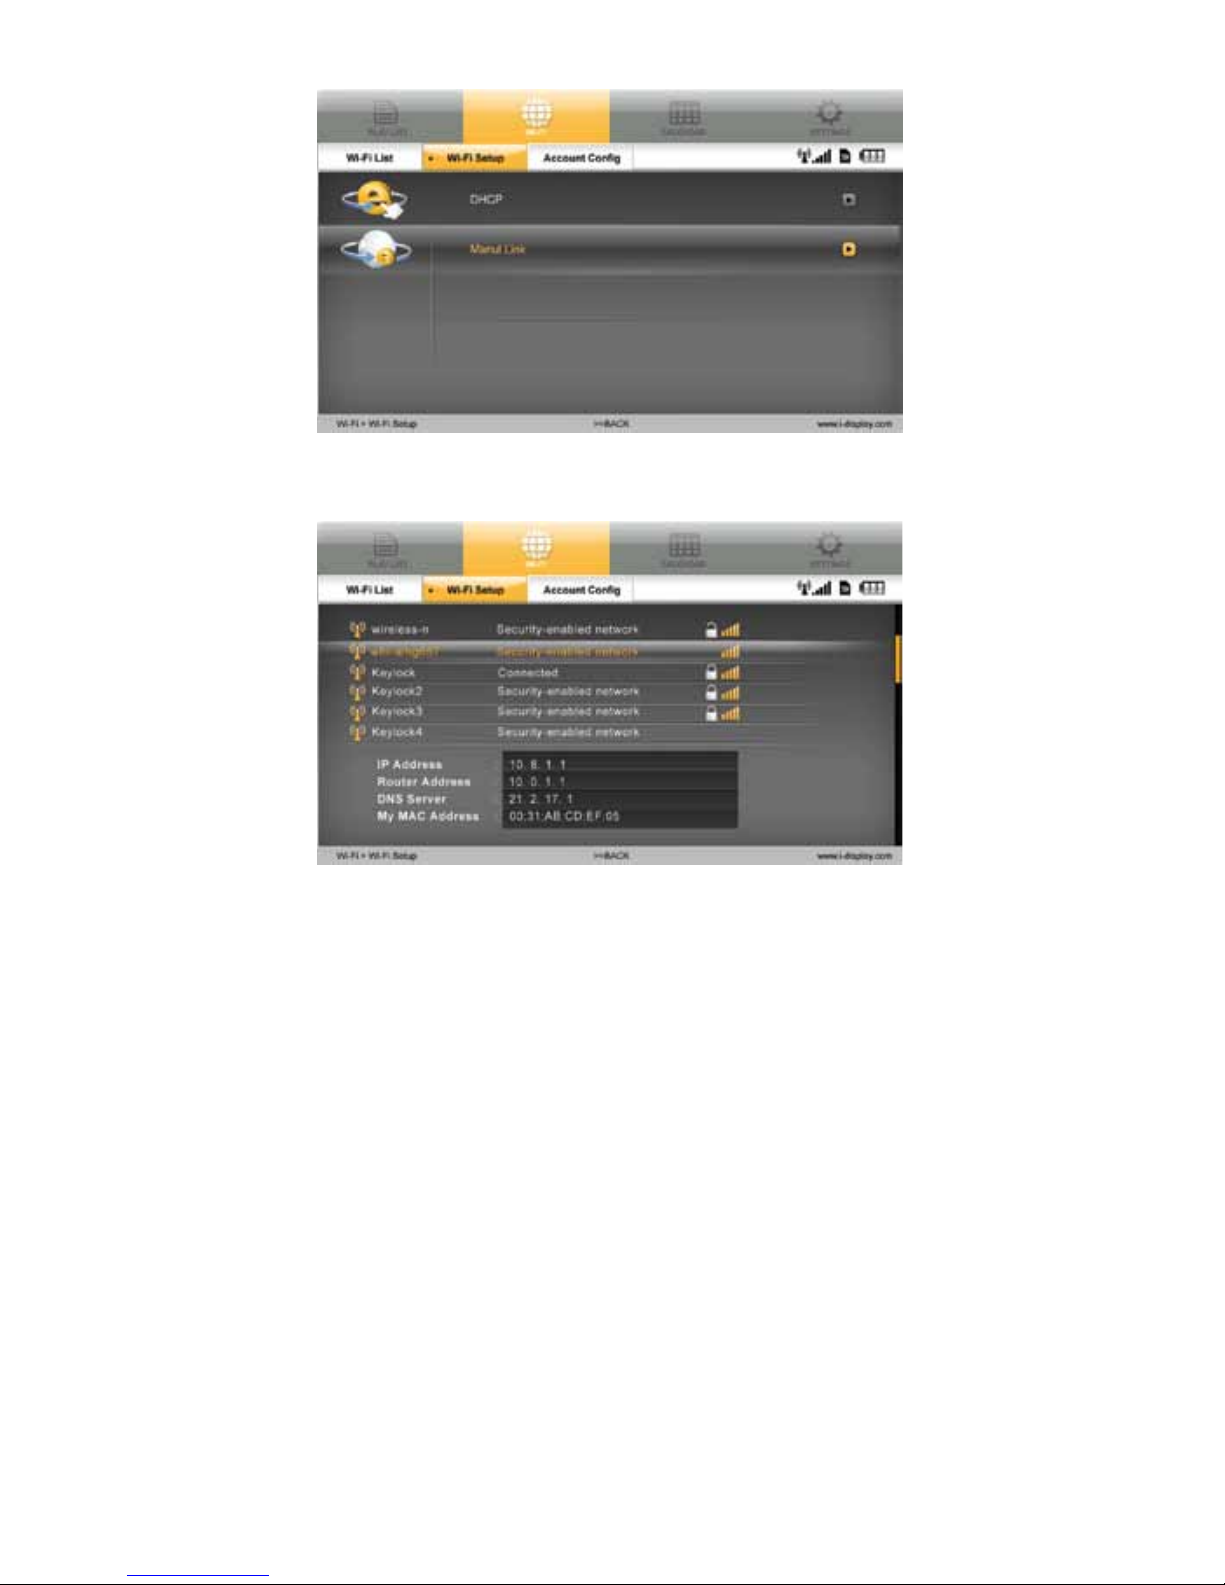
Click MENU to see Setting page. Go to the Wi-Fi tab using your remote control (or
the setting buttons on your Player).
Choose the Wi-Fi tab then click OK, select Wi-Fi Setup and click OK.
Wi-Fi
Page 15
15
3.
4.
Click OK on DHCP, the player will automatically locate available Wi-Fi networks.
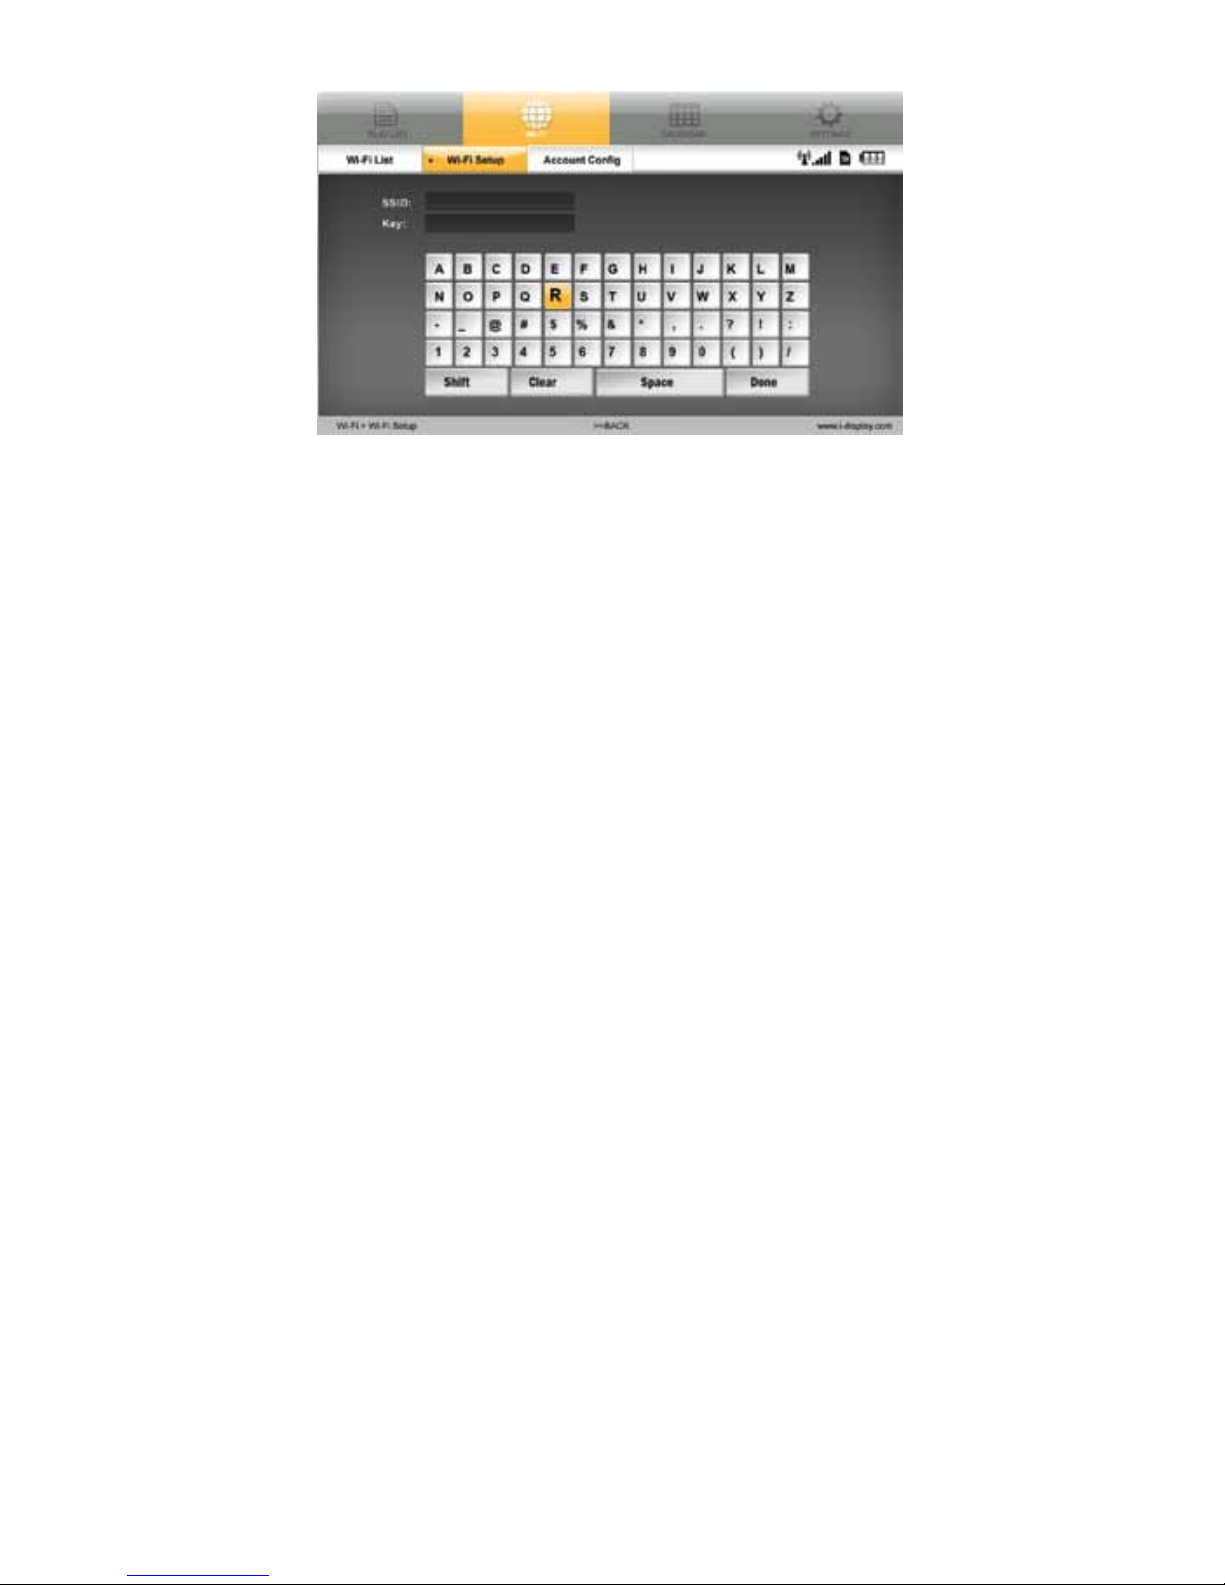
Click OK on your selected wireless network. (If your Wi-Fi connection does not
require a password the Player will connect to the wireless network automatically.
However, if the wireless network requires a password, click OK, you will need to
ll-in the Username and Password.)
Wi-Fi
Page 16
16
5.
6.
1.
2.
3.
On secure Wi-Fi networks, insert relevant network code using the remote control,
then click “Done”.
Once the unit is connected, a Wi-Fi signal will appear. If an error message appears,
retype your username and password (please ensure you are using the right
information and capital letters if applicable, otherwise the Player will not be able
to connect to the wireless network). If the connection is still not successful, a
problem may have occurred - try rebooting the unit and connect again.
Should you need more support, please go to:
www.i-display.com/cong/player_wireless - to download conguration le.
Manual link
Click MENU to see Setting page. Go to the Wi-Fi tab using your remote control (or
the setting buttons on your player).
Choose the Wi-Fi tab and click OK, select Wi-Fi Setup and click OK (see screenshot
above).
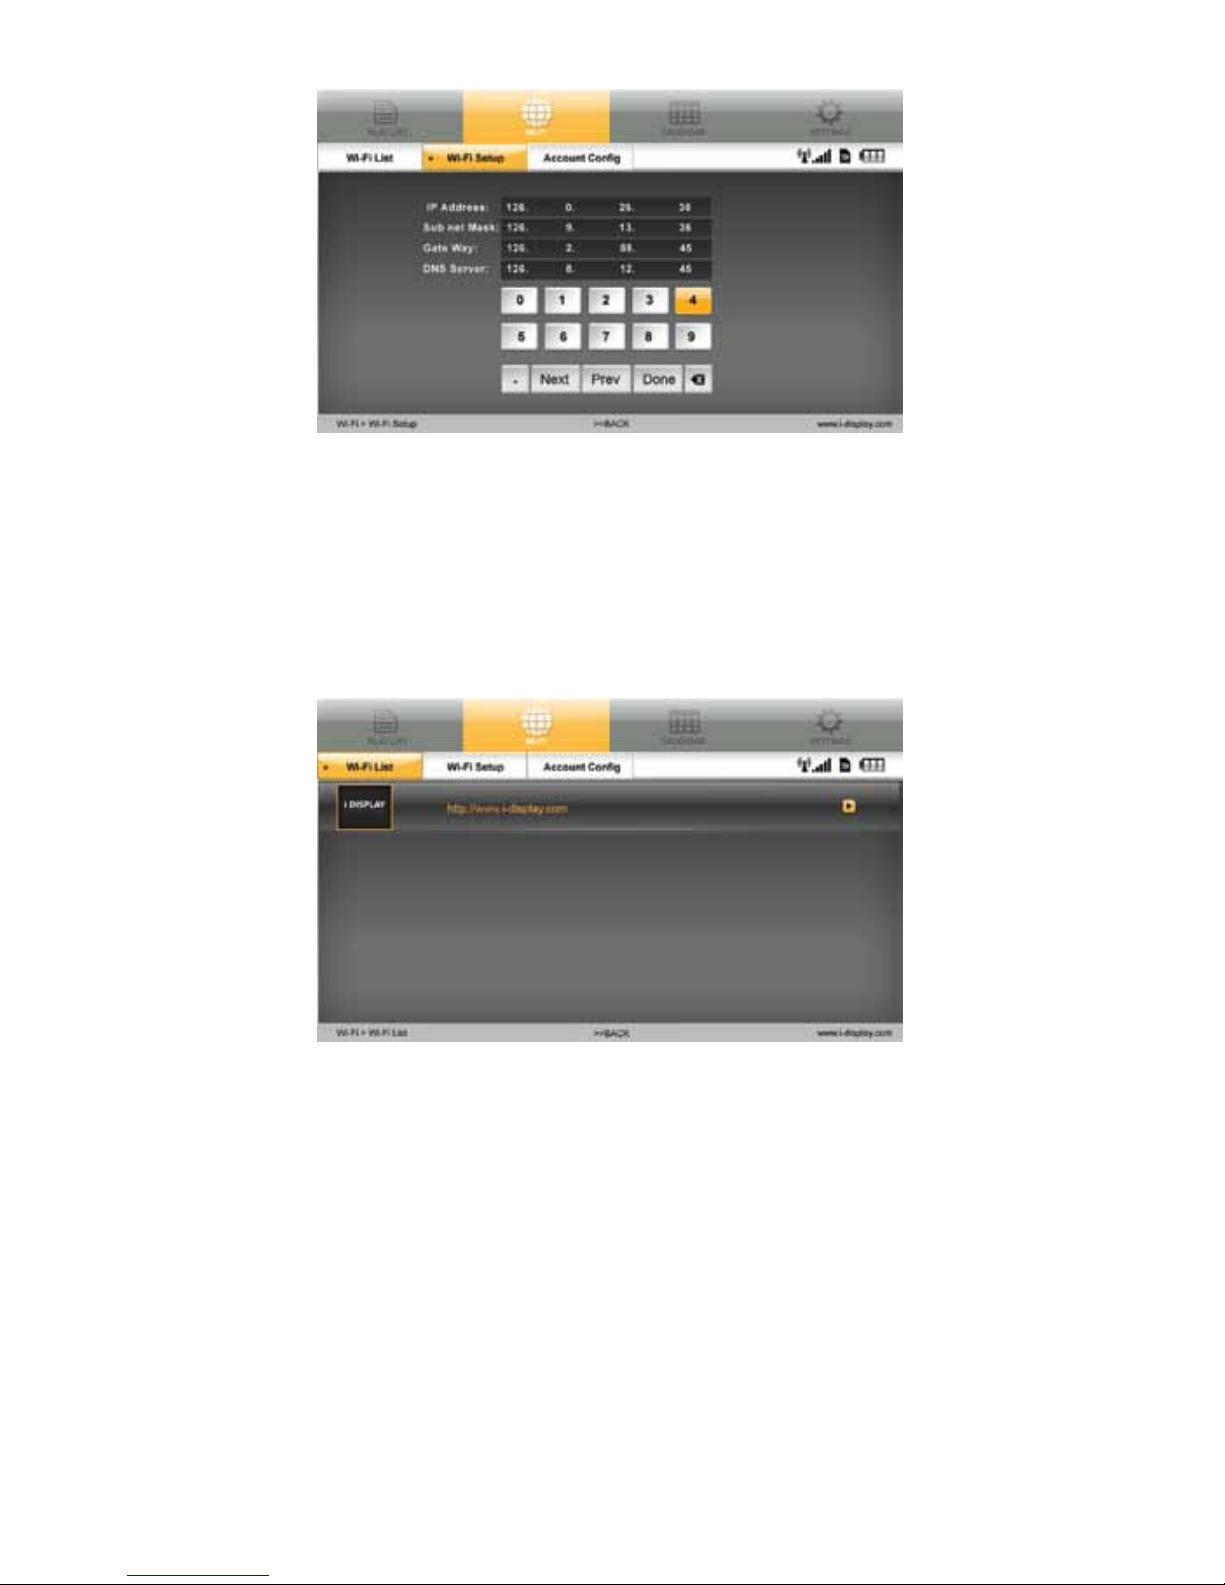
From Wi-Fi Setup, go to Manual Link. You will need to insert the relevant
information (see next screenshot). Once this information has been entered, click
Done.
Wi-Fi
Page 17
17
1.
2.
3.
Step Two: Getting an activation code
Make sure the unit is connected to Wi-Fi (Wi-Fi connection via DHCP or Manual
Link explained in Wi-Fi section).
Use the remote control or Player buttons and go to Wi-Fi List in Wi-Fi tab, then click
OK.
Click OK on the i-Display Logo (as shown in screenshot above) and wait for
approximately 3 minutes (the Player will indicate it is connected to Wi-Fi by
showing the Wi-Fi icon) as the Player downloads an "activation slide".
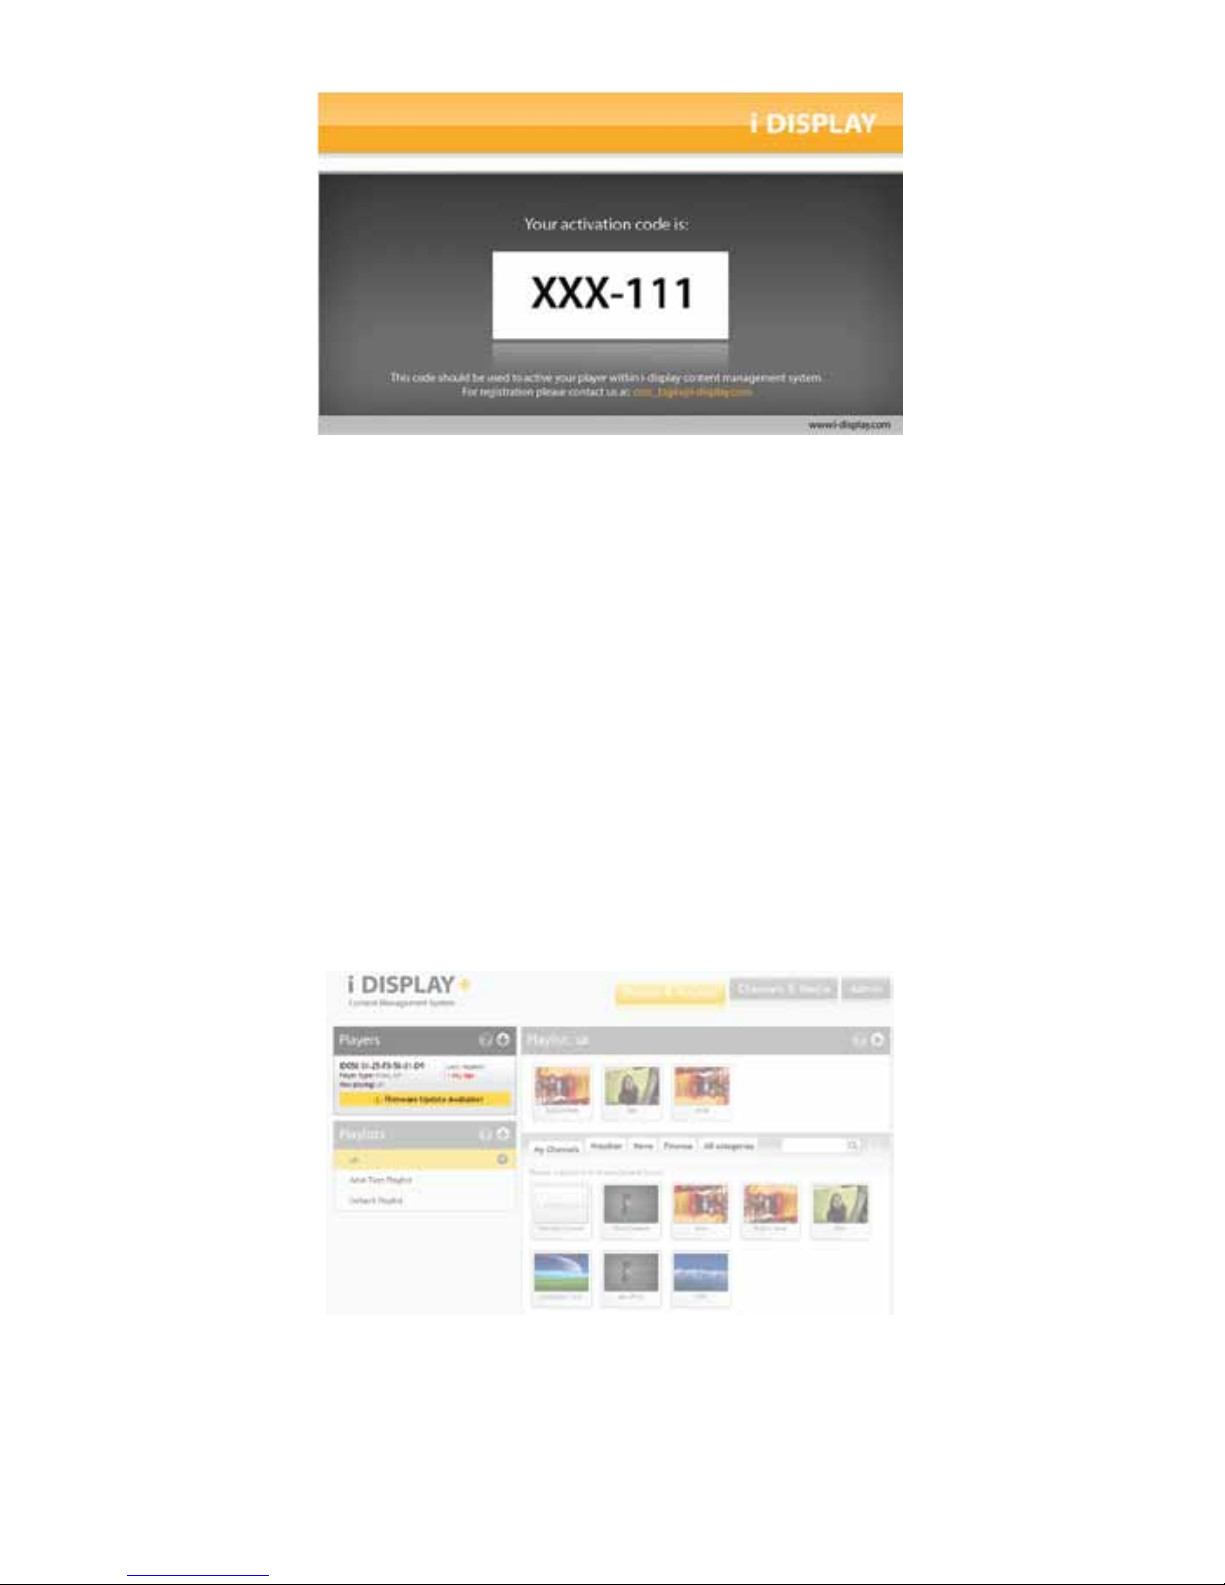
The activation slide downloaded should appear on the Player screen.
Wi-Fi
Page 18
18
4.
1.
2.
3.
Write down the activation code, as it is needed to activate this specic Player on
the i-Display Content Management System.
Step Three: Activate your player within i-Display content management system
Log on to i-Display Content Management System at www.i-display.com
(http://www.i-display.com) and click on the LOGIN link in the home page.
Within the LOGIN page, please ll-in your Username and Password. (If you do not
have a Username and Password, please click CREATE AN ACCOUNT and follow the
instructions. At the end of the registration process you will get a LOGIN access to
i-Display Content Management System.)
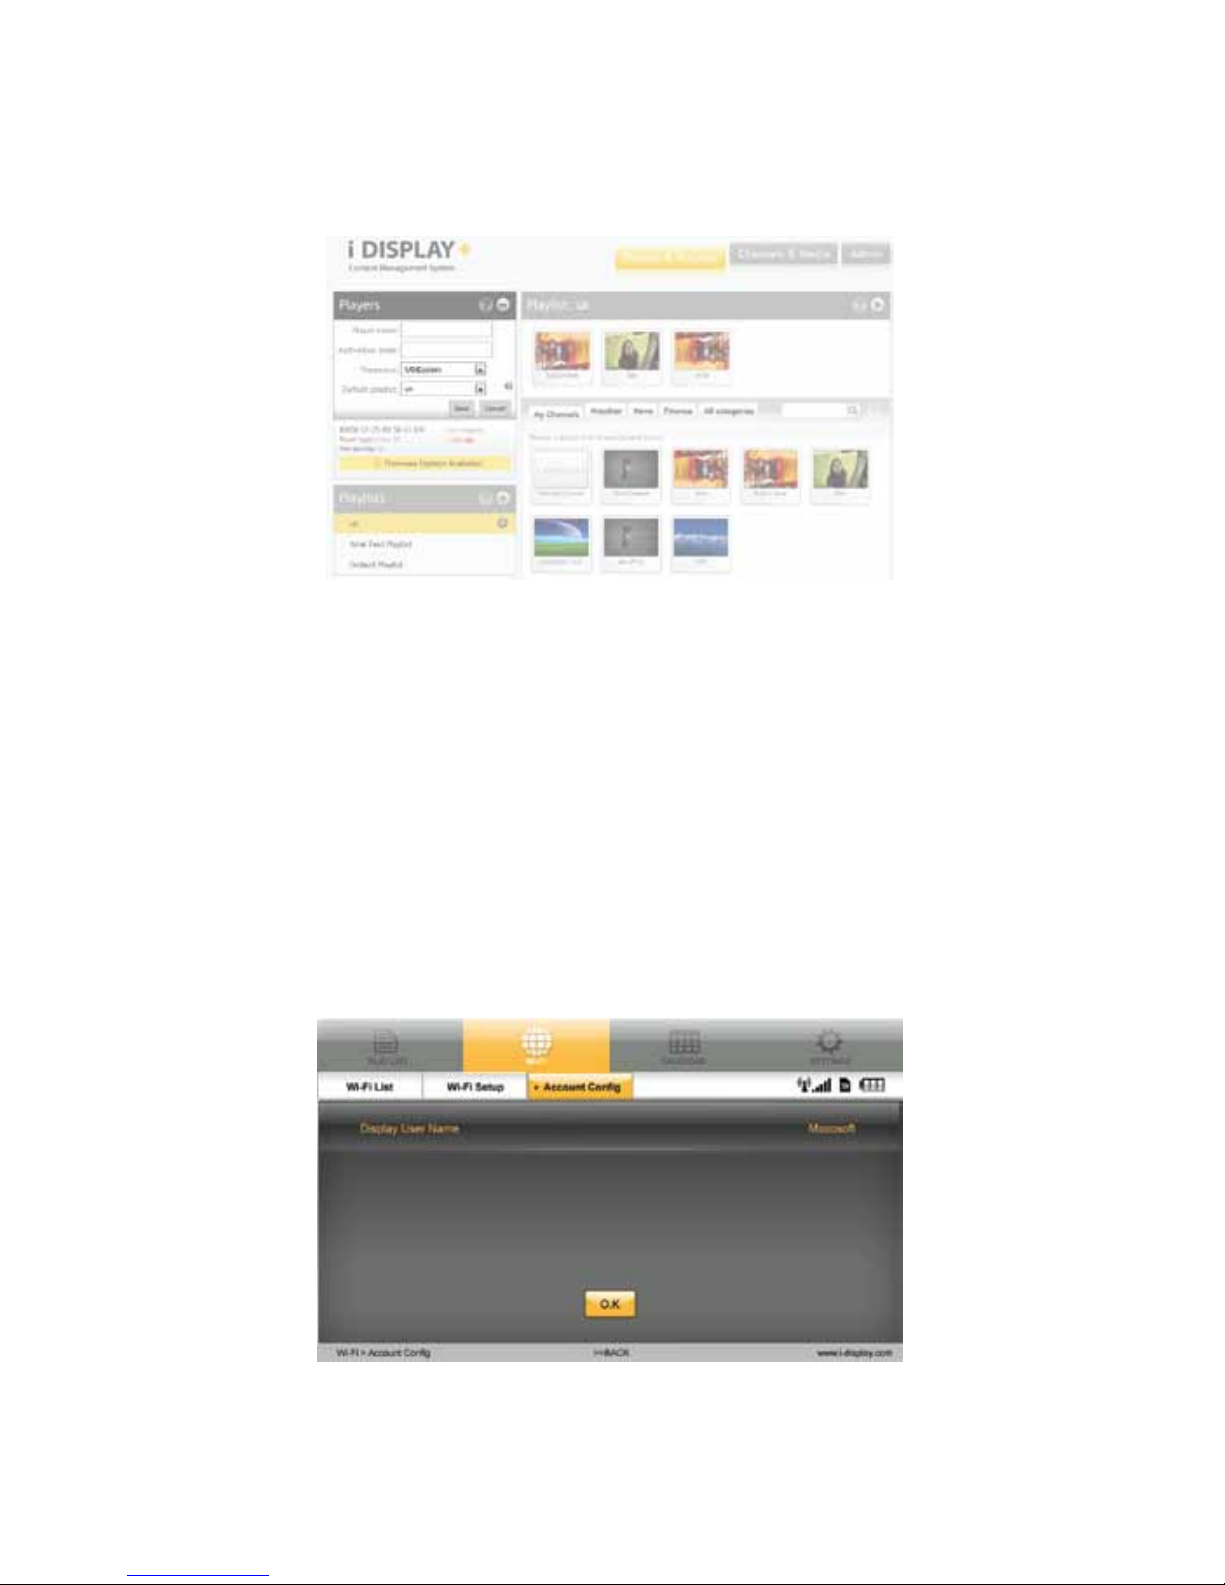
Once you are connected to i-Display Content Management System, click on the +
sign button in the Players column to add a Player. Click OK when you see the
“Activate Player” alert.
Wi-Fi
Page 19
19
5.
6.
7.
1.
2.
4.
Enter a Player name (it is highly recommended that the Player name will include a
unique number which you will then be able to use to identify it from other players)
and the unique Activation Code shown on the Player screen, as shown in Step Two:
Getting an activation code.
Set up any applicable Player setting:
(i) Time zone
(ii) Playlist
Then click SAVE to nish.
Now your Player is connected to i-Display Content Management System.
Step Four: Conrm Player is connected
Click MENU to see Setting page. Go to the Wi-Fi tab using your remote control (or
the setting buttons on your Player).
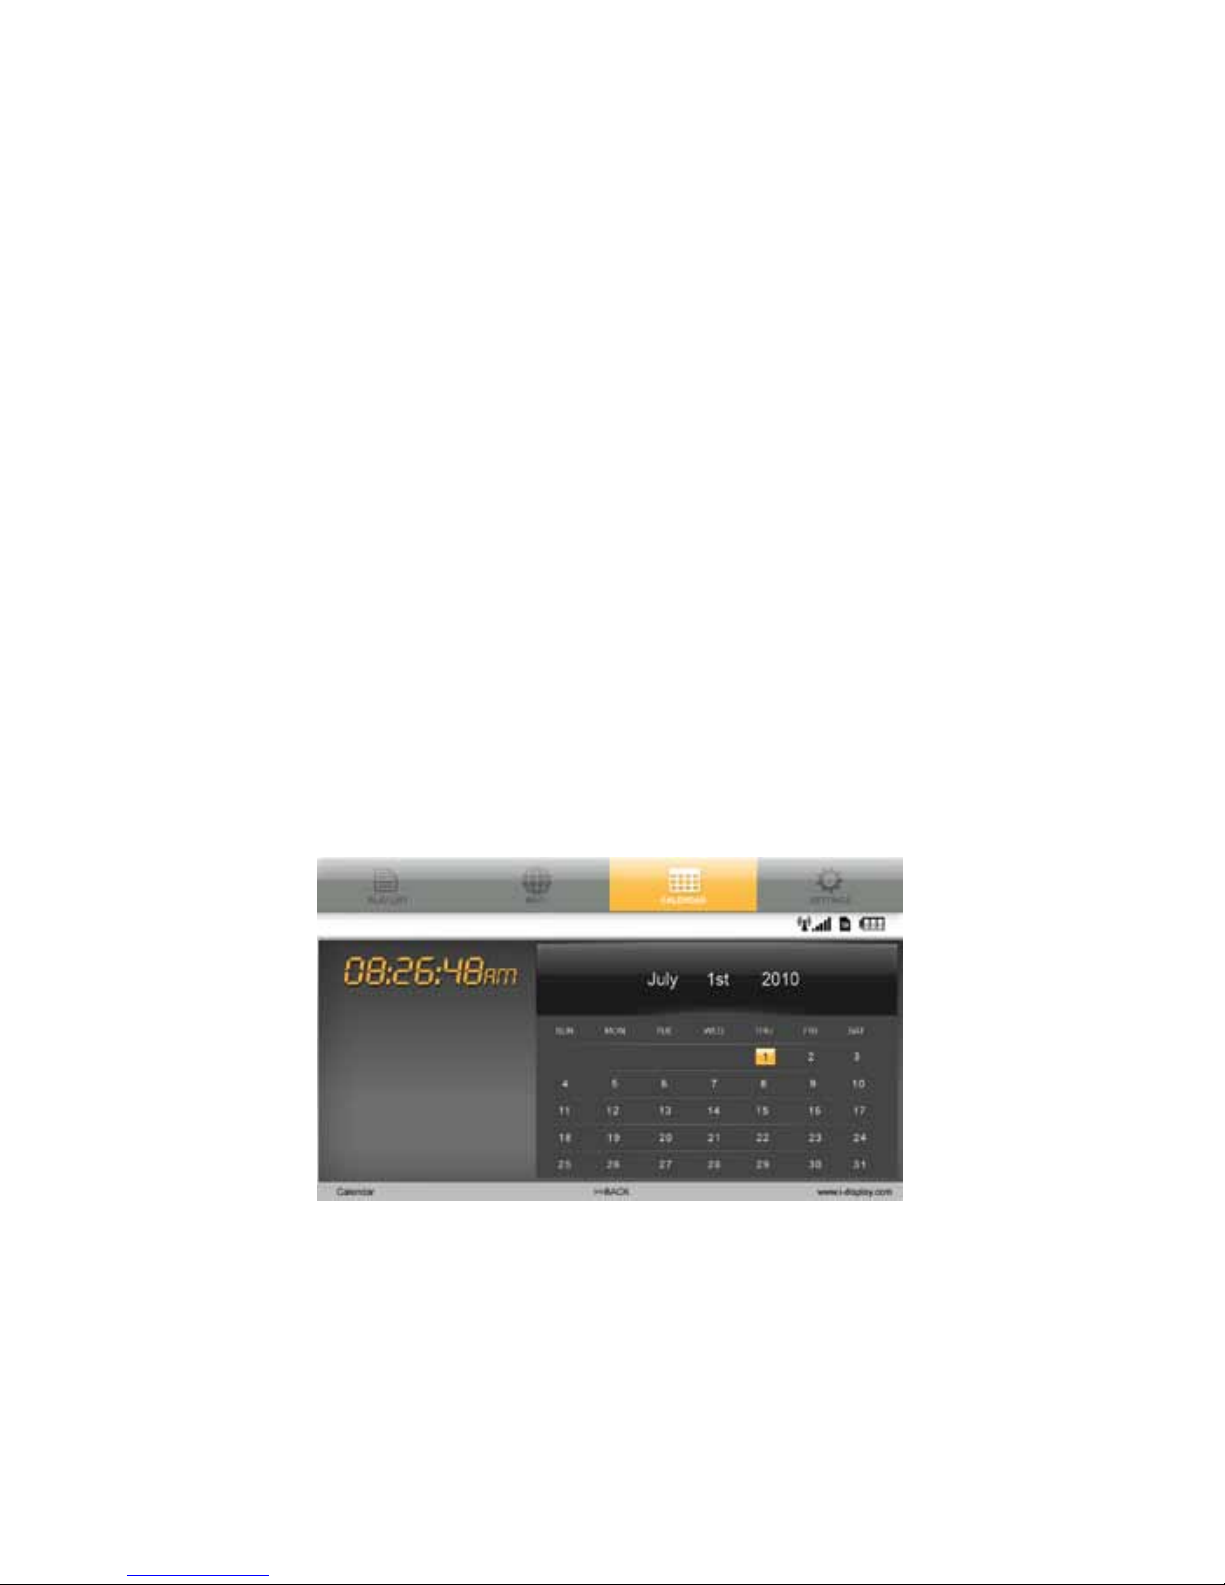
Choose the Wi-Fi tab then click OK. Select Account Cong and click OK (Make sure
the Player is connected to Wi-Fi).
Wi-Fi
Page 20
20
3.
4.
1.
2.
3.
4.
5.
6.
7.
The name that appears on the Account Cong should be the same as your account
name in i-Display Content Management System (the same account name you gave
when you registered). If the name matches your registered account name, your
Player is now connected to the i-Display Content Management System.
For an introduction on how to use the Content Management System, please select
the Demo tab to get more information.
Calendar
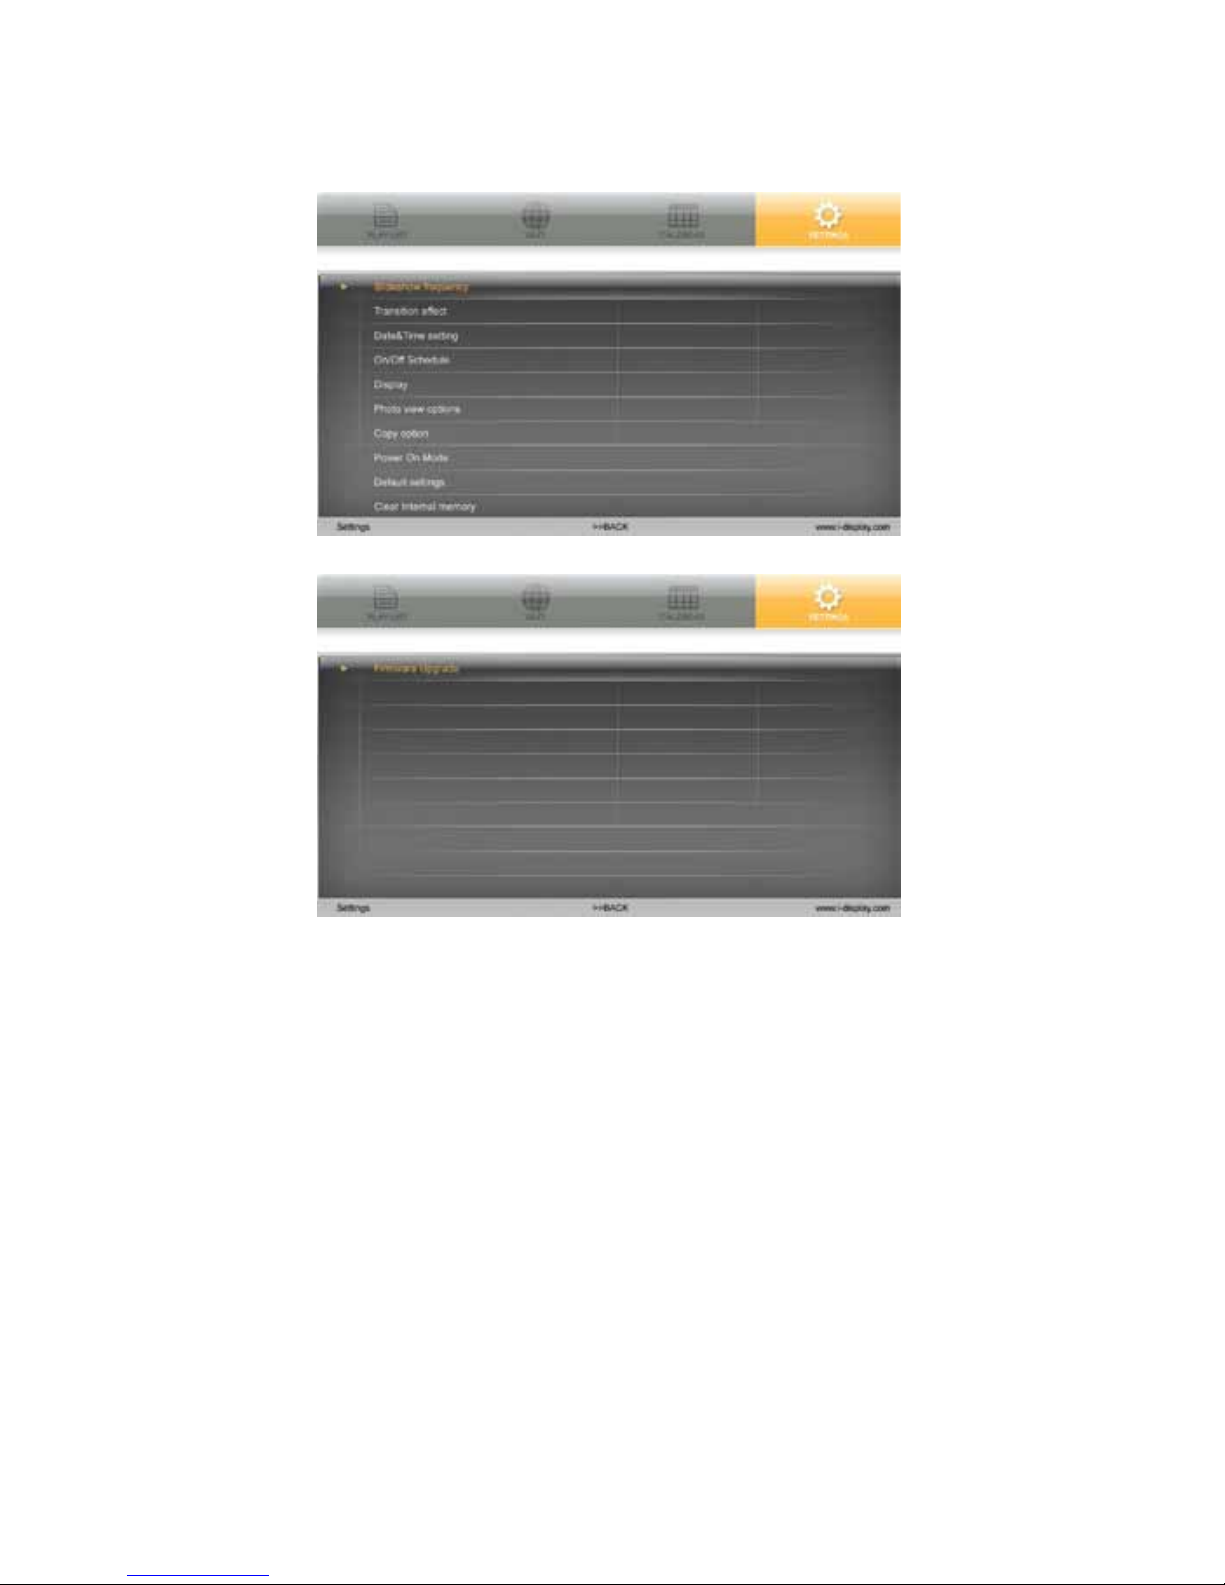
This shows time and date set in unit. If content in internal memory (copied from
USB or SD Card) has a JPG it will appear in a slide show below the digital clock.
To change the date and time on the unit:
Go to the Settings tab by using the arrows to move across the top menu.
(Please note: You must be in the main menu to select the Settings tab).
Use the “Down” arrow to select “Date and Time Setting”.
Press “Enter” to see another sub-menu appear.
Use the “Down” and “Up” arrows to select which options you would like to change,
i.e. year, month, day, hour, etc.
Once option is selected, use the “Left” or “Right” arrows to increase/decrease the
number until reaching the number you desire.
When you have nished selecting the date and time you want, press the “Stop”
button to save your options. This will make the sub-menu disappear.
Then you may return to the previous menu to select another option in “Settings” or
return to another page on the Main Menu.
Calendar
Page 21
21
1.
2.
3.
4.
Settings
Holds a list of functions as shown in the screenshots below e.g. Slideshow
Frequency, Transition eect, etc.:
Slide Show Frequency: Controls the amount of time each JPG will be shown when
played. This only aects content copied from USB or SD Card to internal memory
or content played from SD Card and not content downloaded from i-Display
Content Management System.
Transition Eect: Controls the way each JPG will appear on the screen. This
function does not work for movies. This only aects content copied from USB or
SD Card to internal memory or content played from SD Card and not content
downloaded from i-Display Content Management System.
Date & Time Setting: Controls the time and date which appear in the calendar.
On/O Schedule: Controls when the unit will turn o and turn on automatically.
Settings
Page 22

22
5.
6.
7.
8.
9.
10.
11.
Display: Controls brightness and contrast of the unit.
Photo View Options: Allows JPGs to be shown in their original size or ll in the
screen.
Copy Option: Allows reduction of the size of the les copied from USB or SD Card
to internal memory.
Power On Mode: Allows choosing from which location the content will play
automatically when unit is turned on – content on internal memory copied from
USB/SD Card or content downloaded from i-Display Content Management System.
Current default is content on internal memory copied from USB/SD Card.
Default Settings: Return unit to default settings.
Clear Internal Memory: Erases all content copied from USB or SD Card to internal
memory. It does not erase content downloaded from the i-Display Content
Management System.
Firmware Upgrade: Allows upgrading the unit's current rmware.
Upgrading can be done via SD Card: First step is to insert the SD Card with the new
rmware le. Then choose the rmware upgrade function in setting. The unit will
start upgrading the rmware.
Important: i-Display Content Management System automatically updates the
Player’s rmware as newer versions become available. When you see the following
warning on screen, DO NOT UNPLUG THE POWER, be advised the unit is updating
its rmware. The update process will complete in less than 1 minute and the Player
will automatically reboot and resume normal operation.
Do not turn o the unit while it is upgrading or the unit may malfunction.
Troubleshooting
Why is my media content not up to date?
The Player is probably not connected to the network; please try and reconnect to
Wi-Fi as shown in section Step One: Connect to the internet.
Power Supply Unit Electrical Data
Display: Input: 12 V, 3000mA
Power Adaptor: Input 100-240V, 50/60 Hz, 0.8A; Output 12V, 3000mA
Produced by: HONOR ELECTRONIC CO.LTD
Power Supply Unit Electrical data
Page 23

Interactive Digital Displays
For further information or support, please contact: [email protected]
 Loading...