

Page 1
KODIAK PLUS 2.0
WARNING: Use only a UL certied adapter when recharging
the Kodiak USB Power Bank. The use of a USB to AC adapter
WARNING: The use of non-certied USB to AC adapters can
that is not UL certied can cause high voltage and a spike in
lead to undesirable results when used to charge power banks.
AC current, which in turn could cause the Power Bank, the
There is a risk of high voltage and current spike which could
adapter, or both to explode or catch on re. To verify that the
lead to a risk of re and even explosion. Use only UL certied
UL mark on the adapter has been certied by UL go to: http://
adapters. To verify that the UL mark on the adapter has been
database.ul.com/cgi-bin/XYV/template/LISEXT/1FRAME/
certied by UL go to: http://database.ul.com/cgi-bin/XYV/
index.html?utm_source=ulcom&utm_medium=web&utm_
template/LISEXT/1FRAME/quickguide.html
campaign=database
Page 2

Hi.
Page 3

Good call on picking up the Outdoor Tech®
Kodiak Plus 2.0 Portable Powerbank. Your
experience of the universe will soon be
enha nced powerfully. This manual exists to
help make sure that you use them correctly,
so you’re denitely going to want to relax
for a hot second and look through this.
Kisses,
Page 4

www.outdoortechnology.com
Page 5

CONTENTS
Anatomy
Power Up
Charging Stuff
Features
Care & Maintenance
Specs
1
2
3
5
7
9
Page 6
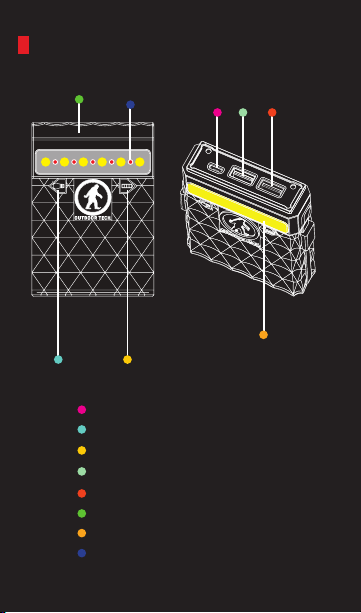
ANATOMY
1
Micro USB Charge Port
Flashlight Button
Battery Level Indicator Button
Out 1 amp USB Output Port
Out 2.4 amp USB Output Port
Power Seal
Flashlight
Battery Level Indicator
Page 7
POWER UP
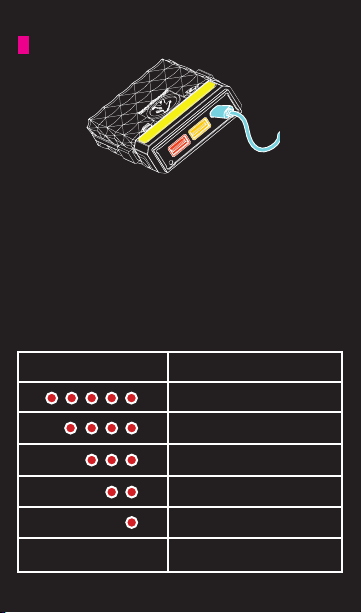
- Connect the micro USB port cable to the Kodiak Plus
2.0 input Port.
- Connect the USB Port to the computer or the 5V/2A
USB Power Adapter.
- The Red LED Lights will start flashing when you charge
the Kodiak Plus 2.0. When charging is complete, all of
the Red LED lights will turn off.
Battery Level Lights
(Flashing)
Battery Level
Fully Charged
80% Remaining
60% Remaining
40% Remaining
20% Remaining
Less than 5% Remaining*
2
Page 8

CHARGING STUFF
Charging your devices:
1. Connect the USB Port cable to the Kodiak Plus 2.0
output port.
2. Connect the other port to your device.
3. Press the power button for about 1 second, the LED
battery indicator will display the battery level
when the Kodiak Plus 2.0 is turned on.
4. When your device is fully charged, disconnect
the Kodiak Plus 2.0.
3
Page 9
CHARGING STUFF (CONTINUED)
What makes the Kodiak Plus 2.0 so great? It's
thin, light weight structure packs the power of 10
Kodiak bears and has two different USB ports to
simultaneously charge your devices.
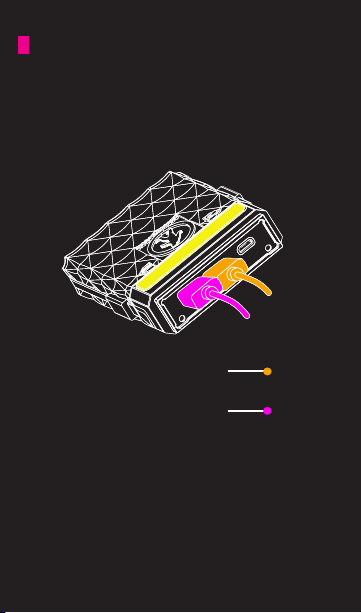
1 AMP out USB Port
2.4 AMP out USB Port
The two ports are different by the amount
the amps delivered. One port is meant for
charging smartphones, iPods and small
devices. The other port is meant for charging
larger devices such as tablets and iPads.
4
Page 10
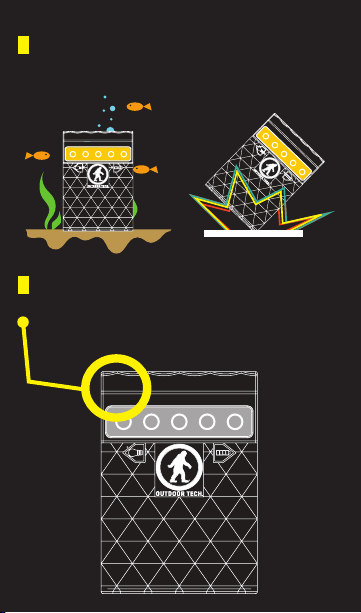
FEATURES: WATERPROOF
& SHOCK PROOF
FEATURES: POWER SEAL
Be sure the power seal is fully depressed all around
the edges before exposure to different elements.
5
Page 11
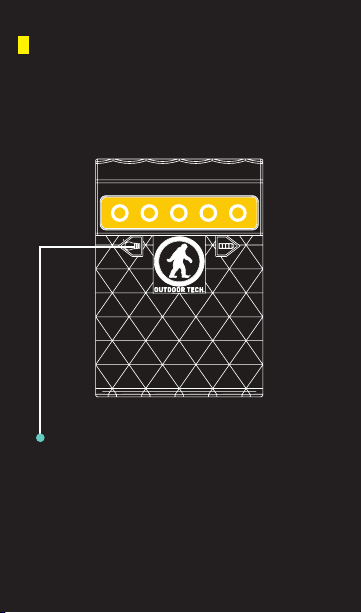
FEATURES: FLASHLIGHT
The Kodiak Plus 2.0 has three flashlight settings:
- Low Beam, High Beam and Strobe
Simply double tap the Flashlight (FL)
Button to turn on the flashlight feature,
low beam will light up. Then press the FL
button one time for high beam, then press
one time again for strobe and finally press
one time to turn the flashlight off.
6
Page 12

CARE & MAINTENANCE
- Do not access the input/output simultaneously.
It may affect the product’s performance and not
charge properly.
- When not in use, please make sure the lid is tightly
closed and kept away from extreme heat conditions.
- Keep the Kodiak Plus 2.0 away from direct sunlight
or hot places. High temperatures will shorten the life
of electronic devices, destroy the battery or distort
certain plastic parts.
- Use a soft, dry cloth to wipe the surface.
Do not use intensive chemical products or detergent
to clean the product.
- Charge the product at least once every three months,
to prevent the batteries from drying out.
7
Page 13

CARE & MAINTENANCE (CONT.)
- For best performance, fully charge the Kodiak Plus
2.0 before charging other devices.
- Do not try to disassemble the Kodiak Plus 2.0.
- Do not scratch the surface with sharp things.
- It is normal for the battery to heat up during its
charge. The temperature should be below 45° & does
not affect the Kodiak Plus 2.0 performance.
- All products have passed the strict quality
inspection, Do not use the battery if it gives off an
odor, generates heat, becomes deformed, abrasion,
damaged or appears abnormal in any way.
8
Page 14

SPECS
Battery: High Quality Lithium Polymer Battery
Capacity: 10,000 mAh / 37Wh
Charging Time: 6 hours
Transfer Efficiency: 80%
Input Voltage: 5V DC
Output Voltage: 5V DC
Input Current: 2 A
Output Current: 1 A & 2.4 A
Operating Temperature: -4°F ~ 140°F
Lumens: 65-100 lumens
9
Page 15

K, thanx. Bye.
Page 16

DON’T BE SO ANTISOCIAL
Facebook.com/outdoortechnology
Twitter & Instagram: @outdoortech
Questions, comments, complaints, secret desires,
or just to say what’s up: email [email protected]
K bye.
outdoortech.com
 Loading...