

Outdoors RV Mountain, Titanium, MTN TRX Back Country, MTN TRX Trail Owner's Manual

OWNER’S MANUAL
541-624-5500
62582 Pierce Rd.
La Grande, OR 97850
Revised 7/11/2019


Table of Contents
INTRODUCTION
Owner’s Manual & Info Packet . . . . . 1
Reporting Safety Defects . . . . . . . . 1
Safety Information . . . . . . . . . . . . . 2
WARRANTY
Outdoors RV 1−2−3 Warranty . . . . . 3
Warranty Exclusions . . . . . . . . . . . . 3
Owner Responsibility . . . . . . . . . . . . 4
Dealer Responsibility . . . . . . . . . . . . 4
Outdoors RV Responsibility . . . . . . 4
Warranty Disclamers . . . . . . . . . . . . 4
In Matters Of Dispute . . . . . . . . . . . 4
Component Product Registration . . . 5
How to Obtain Warranty Service . . . 5
Pre−Delivery Inspection . . . . . . . . . . 6
Owner Registration . . . . . . . . . . . . . . 6
Getting to Know Your RV . . . . . . . . 6
Making an Appointment . . . . . . . . . . 6
Inspecting Repairs . . . . . . . . . . . . . . 7
ON THE ROAD
Guidelines for Equipment Selection . 8
Operator Licensing Requirements . . 10
Hitching Up . . . . . . . . . . . . . . . . . . . 10
Braking System . . . . . . . . . . . . . . . . 13
Loading Your RV . . . . . . . . . . . . . . . 15
Hitch Receivers . . . . . . . . . . . . . . . . 17
Distributing your Load . . . . . . . . . . . 17
Safe Driving Guidelines . . . . . . . . . . 22
Tire Safety and Information . . . . . . . 25
Wheel Lug Nut Torquing . . . . . . . . . 31
Pre−Departure Checklist . . . . . . . . . . 33
LIVING WITH YOUR RV
Fire Safety . . . . . . . .. . . . . . . . . . . . . 35
Effects of Long−Term Occupancy . . 37
Leveling and Stabilization. . . . . . . . . 43
Window Coverings . . . . . . . . . . . . . . 45
Dinette Conversion . . . . . . . . . . . . . . 46
Sofa Conversion . . . . . . . . . . . . . . . . 47
Storage Compartments . . . . . . . . . . . 48
Entry Doors, Screens and Locks . . . 49
PLUMBING SYSTEMS
Fresh (Potable) Water System . . . . . 50
Sanitizing Fresh Water System . . . . 56
Waste Water System . . . . . . . . . . . . 56
Plumbing Systems Awareness . . . . . 60
. . . . . . . . . . . . . . . . . . . 1
. . . . . . . . . . . . . . . . . . . . . . . 3
. . . . . . . . . . . . . . . . . . . . . 8
. . . . . . . . . . . . 35
. . . . . . . . . . . . . . . 50
ELECTRICAL SYSTEMS
120 Volt AC System . . . . . . . . . . . . . 62
12 Volt DC System . . . . . . . . . . . . . . 66
The RV Battery . . . . . . . . . . . . . . . . . 68
Solar . . . . . . . . . . . . . . . . . . . . . . . . . 70
Bulbs and Fuses . . . . . . . . . . . . . . . . 71
PROPANE SYSTEM
Propane Safety . . . . . . . . . . . . . . . . . 72
System Components . . . . . . . . . . . . . 74
Filling Propane Tanks . . . . . . . . . . . 77
Propane System Checks . . . . . . . . . . 78
Propane Leak Detector . . . . . . . . . . . 78
Lighting Propane Appliances . . . . . . 80
APPLIANCES AND EQUIPMENT
Furnace . . . . . . . . . . . . . . . . . . . . . . . 82
Water Heater . . . . . . . . . . . . . . . . . . . 82
Water Pump . . . . . . . . . . . . . . . . . . . 83
Refrigerator . . . . . . . . . . . . . . . . . . . 83
Range/Oven/Cooktop . . . . . . . . . . . . 83
Range Hood . . . . . . . . . . . . . . . . . . . 83
Microwave/Convection Oven . . . . . 83
Fireplace . . . . . . . . . . . . . . . . . . . . . . 84
Air Conditioner . . . . . . . . . . . . . . . . . 84
Thermostat . . . . . . . . . . . . . . . . . . . . 85
TV/Stereo Antenna . . . . . . . . . . . . . . 85
TV/Satellite Connections . . . . . . . . . 85
Televisions . . . . . . . . . . . . . . . . . . . . 87
Awning . . . . . . . . . . . . . . . . . . . . . . . 87
Slide−Out Topper . . . . . . . . . . . . . . . 88
Power Roof Vents . . . . . . . . . . . . . . 88
Manual Roof Vent . . . . . . . . . . . . . . 88
Rear Monitor Camera . . . . . . . . . . . . 88
Heated Holding Tanks . . . . . . . . . . . 88
Monitor Panel . . . . . . . . . . . . . . . . . . 89
Propane Leak Detector . . . . . . . . . . . 89
Carbon Monoxide Detector . . . . . . . 89
Smoke Detector . . . . . . . . . . . . . . . . 91
Wireless Function Controller . . . . . . 91
Spare Tire Carriers . . . . . . . . . . . . . . 91
Slideout Room . . . . . . . . . . . . . . . . . 92
Toy−Lock . . . . . . . . . . . . . . . . . . . . . 95
Battery Tray . . . . . . . . . . . . . . . . . . . 95
Tongue Jack . . . . . . . . . . . . . . . . . . . 96
Manual Stabilizer Jacks . . . . . . . . . . 96
Electric Stabilizer Jacks . . . . . . . . . . 96
Automatic Leveling System . . . . . . . 96
Flow−Longer LP Gas Line Kit . . . . . 97
LP Generator . . . . . . . . . . . . . . . . . . 97
. . . . . . . . . . . . 62
. . . . . . . . . . . . . . . . . 72
. . . . . 81

Table of Contents
STORAGE & WINTERIZATION
STORAGE & WINTERIZATION
Storage Checklist . . . . . . . . . . . . . . . 108
Storage Checklist . . . . . . . . . . . . . . . 97
Winterization . . . . . . . . . . . . . . . . . . 109
Winterization . . . . . . . . . . . . . . . . . . 98
Reactivating RV After Storage . . . . . 111
Reactivating RV After Storage . . . . . 100
MAINTENANCE
MAINTENANCE
Exterior . . . . . . . . . . . . . . . . . . . . . . . 113
Exterior . . . . . . . . . . . . . . . . . . . . . . . 102
Interior . . . . . . . . . . . . . . . . . . . . . . . 120
Interior . . . . . . . . . . . . . . . . . . . . . . . 108
Maintenance Schedule . . . . . . . . . . . 124
Maintenance Schedule . . . . . . . . . . . 110
Maintenance & Repair Log . . . . . . . 125
Maintenance & Repair Log . . . . . . . 111
THE RV TOOL BOX
THE RV TOOL BOX
OWNER NOTES
OWNER NOTES
RAMP MODEL FEATURES
RAMP MODEL FEATURES
See Addendum (if applicable)
See Addendum (if applicable)
. . . . . . . . . . . . . . . . . . . . 113
. . . . . . . . . . . . . . . . . . . . 101
. . . . . . . . . . . . . . . . . 126
. . . . . . . . . . . . . . . . . 112
. . . . . . . . . . . . . . . . . . . . 127
. . . . . . . . . . . . . . . . . . . . 113
. . . . . . 108
. . . . . . 97

Introduction
Outdoors RV Manufacturing appreciates and welcomes you as a customer. We want your RV purchase
and camping experience to be most enjoyable for many years to come! We have provided this Owner’s
Manual so that you and your family will be able to make the most out of your camping experience.
Your new RV has been constructed to conform with or exceed Federal and State safety regulations.
Quality assurance methods and/or functions meet or exceed standards prescribed by ANSI/NFPA 1192
and/or CSA Z240 as approved by the agency having jurisdiction in the United States or Canada.
We thank you for your purchase!
Outdoors RV Manufacturing
P.O. Box 1047
62585 Pierce Road
La Grande, OR 97850
Phone: 541-962-1866
Fax: 541-962-1894 (Parts & Service)
Website: http://outdoorsrvmfg.com/
Facebook: https://www.facebook.com/outdoorsrvmfg/
OWNER’S MANUAL AND INFORMATION PACKET
To help you get started please make time to read and review this Owner’s Manual. This information will
help provide you with many of the functions and required maintenance procedures necessary on your
RV. Your RV will require regular care and maintenance in order to deliver maximum value and
performance. Your dealership will provide you basic operating and maintenance instructions. However,
be sure to read all instructional materials and equipment manuals located in your Owner Information
Packet included with your new RV. Many of these manuals are also available as free downloads at each
product manufacturers website in the event that something may be missing from your packet. You may
also visit our website for a free download of this manual.
Some components in this manual or packet may be components of a differing product line or are
optional equipment in which case will be noted as 'If Equipped'. Product specifications, design and
equipment may change without notice due to continuous product improvement by Outdoors RV. It is
possible that recent product changes may not be included in this manual. Product information included
in this Owner’s Manual were as accurate as possible at the time of publication and may or may not be
specific in their depiction of actual equipment, fabrics, interior, or exterior decor or design options as
installed on or in your RV. This manual is subject to change without notice.
REPORTING SAFETY DEFECTS
If you believe that your vehicle has a defect which could cause a crash or could cause injury or death,
you should immediately inform the National Highway Traffic Safety Administration (NHTSA) in
addition to notifying Outdoors RV Manufacturing. If NHTSA receives similar complaints, it may open
an investigation, and if it finds that a safety defect exists in a group of vehicles, it may order a recall and
remedy campaign. However, NHTSA cannot become involved in individual problems between you,
your dealer, or Outdoors RV Manufacturing.
1
Introduction
To contact NHTSA, you may call the Vehicle Safety Hotline toll-free at 1-888-327-4236 (TTY: 1-800424-9153); go to http://nhtsa.safercar.gov; or write to: Administrator, NHTSA, 1200 New Jersey
Avenue SE, Washington, DC 20590. You can also obtain other information about motor vehicle safety
from http://www.safercar.gov.
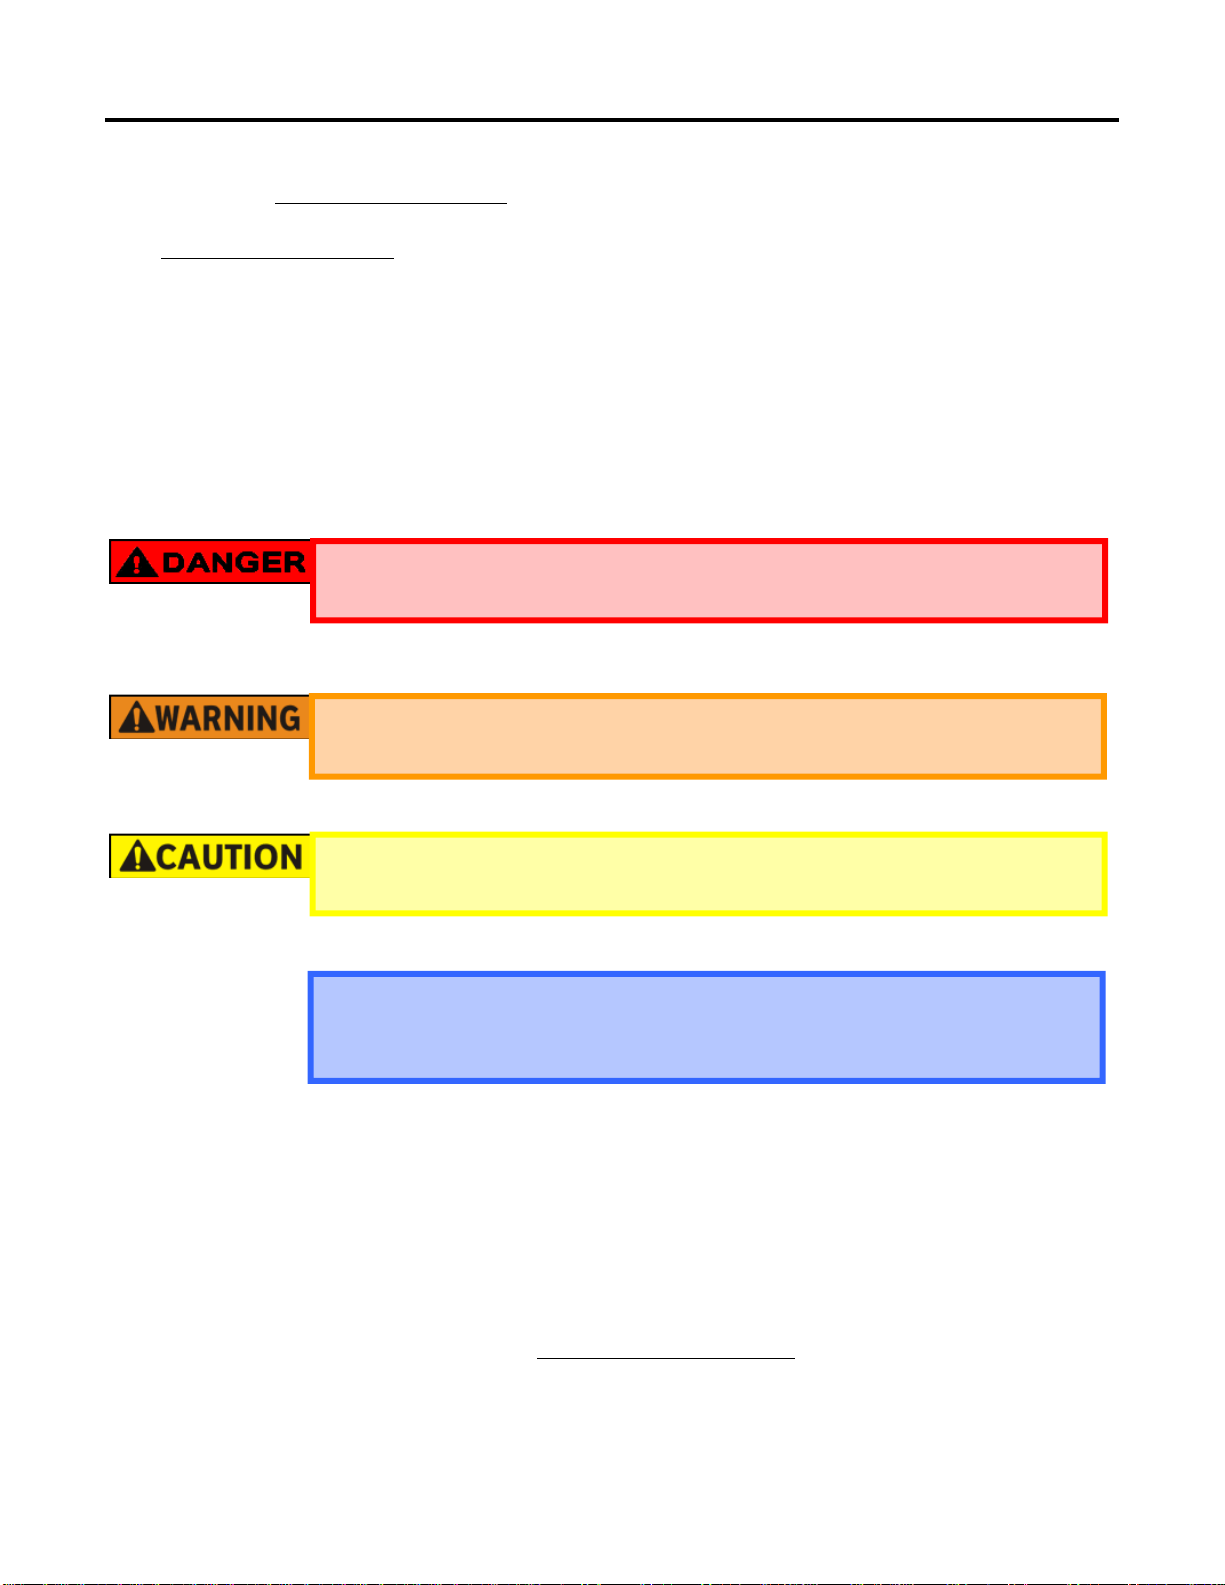
SAFETY INFORMATION
Shown below are various hazard warnings you will find throughout this manual. They are used to alert
you to potentially dangerous or hazardous situations. When you see these symbols, please read them
carefully, and follow their instructions to help prevent damage to your recreational vehicle and for your
personal safety as well as others nearby.
DANGER indicates an immediately hazardous situation that, if not
avoided, will result in death or serious injury.
WARNING indicates a potentially hazardous situation that, if not
avoided, could result in death or serious injury.
CAUTION indicates a potentially hazardous situation that, if not
avoided, may result in minor or moderate injury.
NOTICE is used to address particularly important information that is
not necessarily injury related and may include situations involving
property damage or issues which may void warranty.
The following warning is provided to comply with California's Proposition 65 regulation to warn the
consumer of the potential exposure to chemicals that may cause cancer, birth defects or other
reproductive harm:
WARNING: Cancer and Reproductive Harm -
www.P65Warnings.ca.gov
2

Warranty 1 of 2
OUTDOORS RV 1−2−3 WARRANTY
1 Year - Limited Bumper to Bumper Warranty - Transferable
Outdoors RV Manufacturing warrants for a period of one (1) year from the date of purchase that the RV manufactured and assembled by Outdoors RV
Manufacturing shall be free from defects in materials and workmanship supplied and attributable to Outdoors RV except as specifically excluded below. If a
defect occurs within the first year, please contact an Outdoors RV Mfg. authorized dealer and schedule an appointment for an inspection of the defect.
Outdoors RV Mfg., at its sole discretion, reserves the right to substitute parts or components of substantially equal quality, touch-up cosmetic flaws, make
design and or manufacturing improvements as the remedy under this Limited Warranty. All owners (original or subsequent) must be properly registered with
Outdoors RV Manufacturing to be considered for eligibility.
This Limited Warranty may be transferred during the one (1) year term by the original owner to a subsequent purchaser. The limited one (1) year warranty,
however, shall in no way be extended beyond the one (1) year from the original date of purchase by reason of the transfer from the original consumer
purchaser to any subsequent purchaser(s). The subsequent purchaser(s) also has an obligation to notify Outdoors RV Mfg. immediately upon the transfer of
the warranty and to provide proof of purchase within the one (1) year.
2 Year - Limited Structural Fiberglass Wall Warranty - Non-Transferable
A customer must have followed the maintenance section of the owner’s manual and provide documentation of exterior roof, window, door, luggage doors,
and moldings seal maintenance along with proper fiberglass care maintenance to an Outdoors RV Mfg. authorized dealer in order to be considered for the
fiberglass wall warranty. The best method for proper documentation is to have your local authorized Outdoors RV dealer perform the inspection and work
for you. If a structural fiberglass defect occurs after the first year and within the second year please contact the Outdoors RV Service Department in La
Grande, OR to schedule an appointment at the factory for an inspection of the defect. You will be responsible for transporting the RV to and from the factory
in La Grande, OR. If correct maintenance was performed and documented properly and the defect is valid, Outdoors RV Mfg. will authorize the repair at the
factory in La Grande, OR at no expense to the customer (Travel costs not included).
3 Year - Limited Custom-Built Chassis Warranty - Non-Transferable
A customer must have followed the maintenance section of this owner’s manual and provide documentation from an Outdoors RV Mfg. authorized dealer of
the following: Inspection of the chassis hardware (regularly tighten as necessary) along with maintenance records of proper care of the trailer A-frame,
bumper and overall chassis in regards to cleaning, and touch-up paint, to be considered for the chassis warranty. If a chassis defect occurs after the first year
and within the third year please contact the Outdoors RV Service Department in La Grande, OR to schedule an appointment at the factory for an inspection
of the defect. You will be responsible for transporting the RV to and from the factory in La Grande, OR. The best method for proper documentation is to
have your authorized Outdoors RV Mfg. dealer perform the inspection and work for you. If correct maintenance was performed and documented properly
and the defect is valid, Outdoors RV Mfg. will authorize the repair at the factory in La Grande, OR at no expense to the customer (Travel costs not included).
WARRANTY EXCLUSIONS
This Limited Warranty and the obligations stated herein shall not apply to:
1. RVs used for business, rental, commercial, or disaster relief purposes other than recreational travel and family camping.
2. RVs which are not originally sold through an authorized Outdoors RV Mfg. dealer (i.e. sold through auction, repossession, and salvage or
otherwise 'distressed' condition).
3. Equipment, products, components, appliances, or accessories not manufactured or installed by Outdoors RV Mfg. whether or not warranted,
including but not limited to, tires, batteries, and other installed equipment or accessories.
4. Damage or loss caused in whole or part by misuse, abuse, neglect, theft, vandalism, RV modification, improper customer or dealer installation,
incorrect line voltage, unauthorized repair or failure to follow instructions supplied with the recreational vehicle.
5. Damage or loss caused in whole or in part by any unauthorized attachments, modifications or alterations to the structure, body, pin-box, or frame
of the recreational vehicle including but not limited to trailer hitches for towing, or platforms for supporting cargo.
6. Any upholstery damage including, but not limited to tears, punctures, or misuse.
7. Any fading or discoloring of fabrics, carpet, or flooring roll goods.
8. Routine maintenance including, without limitation, caulking, re-caulking, and waxing of the body of the recreational vehicle, tightening screws,
brake adjustments, latches, locks, changing fuses, or light bulbs, and maintaining the air conditioning and heating systems.
9. Damage or loss caused in whole or in part by exposure to natural atmospheric elements, corrosive chemicals, ash, or fumes generated or released
by vehicles, collision, road hazards, rock chips, condensation, or any other source.
10. Damage or loss caused in whole or in part by overloading or the improper balancing of the load.
11. Damage or loss to the recreational vehicle caused in whole or in part by the tow vehicle selected by the owner to pull the recreational vehicle
including but not limited to the improper selection or installation of the towing hitch on the tow vehicle.
12. Damage or loss caused in whole or in part by the willful or negligent acts of the driver of the vehicle pulling the recreational vehicle, an accident
involving the recreational vehicle caused by the condition of any road surface over which the recreational vehicle is pulled or striking over a curb
or any other object.
13. Any injury, loss, or damage due to mold or fungi.
14. Any incidental and consequential damages including but not limited to transportation, fuel, food, lodging, telephone calls, towing charges, bus
and taxi fares, or car rentals, on-site service calls, as well as commercial use and loss of use.
15. Any
16. Damage to electronics due to voltage issues.
17. Damage or loss caused in whole or in part by the owners’ operation, use, or misuse of the tow vehicle.
18. Wheel alignment.
19. Any and all damage or loss to the owners’ tow vehicle.
RV licensed, registered, or primarily used outside of the United States or Canada.
3

Warranty 2 of 2
OWNER RESPONSIBILTY
1. Perform proper care and maintenance as outlined by this manual and corresponding component warranty information including taking whatever
preventable measures necessary to maintain the exterior sealants of the unit and to prevent foreseeable secondary moisture or water damage to the
unit from rain, plumbing leaks, condensation, and other natural accumulation of water in the unit. Examples of secondary damage include, but are
not limited to, stained upholstery, carpeting or drapes, mold formation and growth, furniture, cabinetry or floor deterioration, etc. Minor
adjustments (such as adjustments to interior or exterior doors, cabinet latches, etc.) will be performed by the selling dealer during the first 90 days
after delivery. Thereafter, such adjustments are the responsibility of the owner as normal maintenance.
2. Written notice of defects must be provided to the selling dealer or manufacturer within 30 days of discovery by owner but no later than 10 days
after the warranty expiration of the warranty period.
3. Returning your RV to an authorized dealer for any repairs or service that is required.
4. Reviewing the information contained within this manual and all supplied component information.
DEALER RESPONSIBILTY
1. By agreement with the manufacturer, the dealer is obligated to maintain the RV prior to retail sale, to perform a detailed pre-delivery inspection
and to repair or replace any parts necessary to correct defects in material or workmanship.
2. Explain and review the Limited Warranty provisions to the customer.
3. Assist the customer with all necessary registrations and warranty cards for your new RV.
4. Instruct the customer on how to obtain service and warranty on separately warranted components, whether in or out of warranty.
5. Service Outdoors RV products the dealer currently stocks.
6. Fill out and submit warranty registrations within 7 days from the date of delivery.
OUTDOORS RV RESPONSIBILTY
The distinction between 'defects' and 'damage' as used in this Limited Warranty is that a 'defect' item is covered under warranty and a 'damage' item is not.
We have no control over 'damage' items caused by such things as collision, misuse, and lack of maintenance which occurs after the recreational vehicle is
delivered to the owner. Therefore 'damage' for any reason which occurs after the recreational vehicle is delivered is not covered under warranty.
Maintenance services are also excluded from warranty as it is the retail owner responsibility to maintain the recreational vehicle.
Outdoors RV does not take any responsibility, to any owner, beyond the original cost of the recreational vehicle to Outdoors RV or for any undertaking,
representation, or warranty made by any dealer beyond the expressed herein.
WARRANTY DISCLAIMERS
The limited warranty provided by Outdoors RV Manufacturing in lieu of all other warranties, express or implied, including any implied warranty of
merchantability or fitness for any particular purpose, and in lieu of all other obligations or liabilities on the part of Outdoors RV Mfg. Implied warranties,
including the implied warranty of merchantability or fitness for a particular purpose, if any, given by law, shall be limited to and not extend beyond the
duration of the written warranty periods set forth herein. No person has the authority to enlarge, amend, or modify this Limited Warranty.
Outdoors RV will not be responsible or liable for loss of use of the recreational vehicle, onsite service calls or service charges, loss of time, inconvenience,
expenses for gasoline, towing charges or transportation costs, loss of use, rental of substitute equipment, telephone, travel, lodging, damage or loss of
personal property, loss of revenues or other commercial loss, or any other kind of nature resulting from any defect in the recreational vehicle.
In regard to the use and operation of Outdoors RV recreational vehicles, Outdoors RV customers and owners of Outdoors RV recreational vehicles are solely
responsible for the selection and proper use of tow vehicles. All customers should consult with your motor vehicle manufacturer or dealer concerning the
purchase and use of suitable tow vehicles for Outdoors RV recreational vehicles. Outdoors RV further disclaims any liability with respect to damages which
may be incurred by a customer or owner of Outdoors RV recreational vehicles as a result of the operation, uses or misuses of a tow vehicle.
Any action to enforce this Limited Warranty or any implied warranty shall not be brought more than one (1) year after the expiration of the terms of this
Limited Warranty.
Some states do not allow the exclusion or limitation of incidental or consequential damages so the above limitation or exclusion may or may not apply.
Further some states do not allow a reduction in the statute of limitations so the above reduction may not apply.
IN MATTERS OF DISPUTE
CHOICE OF LAW: The laws and jurisdiction of the state of Oregon shall govern any and all matters of dispute between you and Outdoors RV
Manufacturing. Any dispute or action you bring to enforce warranty rights against Outdoors RV Manufacturing must be brought in the County of Union, in
the State of Oregon. The parties irrevocably consent to jurisdiction in such courts.
4

Warranty
Proper maintenance will help avoid situations where this Limited Warranty will not cover items due to
neglect. As the owner of a new RV, you are responsible for regular care and proper maintenance.
Service should be performed in accordance with this manual, as well as corresponding manufacturer’s
warranty on components included in your unit.
The owner is responsible to return the RV to an authorized dealer for any repairs and service that may be
required. Your Outdoors RV dealer is responsible for proper service before delivery and will have
continued interest in your satisfaction. We recommend that warranty and maintenance services be
performed by your Outdoors RV Dealer.
Failure to follow proper procedures or install correct equipment can
result in property damage, injury, and or death. The instructions
included in this manual are intended as a guide, and in no respect
extend the responsibilities to Outdoors RV Manufacturing beyond
the standard written warranty as presented in this manual.
COMPONENT PRODUCT REGISTRATION
Your owner information packet contains individual product warranty registrations and should be
completed and mailed promptly. Your dealership will provide you with any assistance you may need to
complete the registration forms. These forms may be available as free downloads via each product
manufacturers website in the event that something may be missing from your packet.
HOW TO OBTAIN WARRANTY SERVICE
To obtain warranty service the retail owner must deliver the recreational vehicle to an authorized
Outdoors RV dealer with proof of purchase and freight pre-paid, (if having transported), within a
reasonable time after the discovery of the defect within the warranty period. Outdoors RV does not
cover any transportation cost incurred to transport the recreational vehicle to the dealer or to the
manufacturing plant. All towing and or transportation costs are the owner responsibility. Upon
requesting service, you will be asked for:
1. Your name
2. Date of purchase
3. Outdoors RV Vehicle Identification Number (VIN)
4. Provide explanation and list of required repairs.
Service must be obtained from Outdoors RV authorized dealers. If you cannot locate an authorized
Outdoors RV dealer please contact Outdoors RV Service Department at 541-962-1866 for assistance.
Do not pay for any services or use non-authorized dealers without obtaining Prior Authorization from
Outdoors RV Manufacturing. Your incurred costs may not be completely covered by Outdoors RV
Manufacturing.
5

Warranty
Appliance and Component Warranty Service/Administration
Appliance and component manufacturers may or may not provide their own warranties. These
warranties are separate from the Outdoors RV Limited Warranty and constitute the only warranty for
these specific appliances and components. The terms, conditions, and warranty periods of these items
may vary from the Outdoors RV Limited Warranty. All warranty claims for appliances and component
manufacturers providing warranties will be administered through the Outdoors RV dealer network.
Outdoors RV dealers will work with each individual appliance and component manufacturer. If the
Outdoors RV dealer and/or the retail owner need assistance they should contact the Outdoors RV
Service Department. Outdoors RV will directly contact the appliance and/or component manufacturer.
After the one-year warranty period, all appliance and component warranty must be directed to the
respective appliance component manufacturers providing warranties. All warranty claims for these
components will be administered by the appliance and/or component manufacturer. In no way shall the
Outdoors RV Manufacturing Limited Warranty be modified or amended.
PRE−DELIVERY INSPECTION
Your Outdoors RV dealer is required to review the limited warranty and inspect the unit along with you.
The dealer has been provided with a pre-delivery checklist. Review this checklist with the dealer. You
should not sign this checklist until the review is complete and any questions about anything you do not
understand have been answered.
OWNER REGISTRATION
The owner registration form is completed at the dealership at the time of delivery. The new owner signs
the form and the dealer will forward the completed registration form to Outdoors RV within seven (7)
days. Be sure this form has been completed and signed prior to leaving the dealership.
GETTING TO KNOW YOUR RV
Outdoors RV recommends a 'Trial' campout before heading out on your first real campout. Plan a short
trip near your home for the night or in your driveway and really use your RV as if you were actually
camping. By 'trial' camping for several days and using all components, appliances, etc. in your RV you
will have the opportunity to use and become familiar with the systems within your RV and find out what
items are needed and not needed while camping. If any questions, difficulties or problems occur during
your trial campout, contact your dealer to discuss or arrange for a visit, with your RV, to resolve any
issues before the actual first campout. Getting to know your RV before the first adventure can save a lot
of frustration and leave more time for fun.
MAKING AN APPOINTMENT
Call ahead
Contact your dealer to schedule an appointment preferably by phone or in person. If you are requesting
repairs to be made at a dealership other than where you purchased your RV the dealership service
manager may ask for your 'Date of Purchase' and 'Vehicle Identification Number' (VIN). This VIN
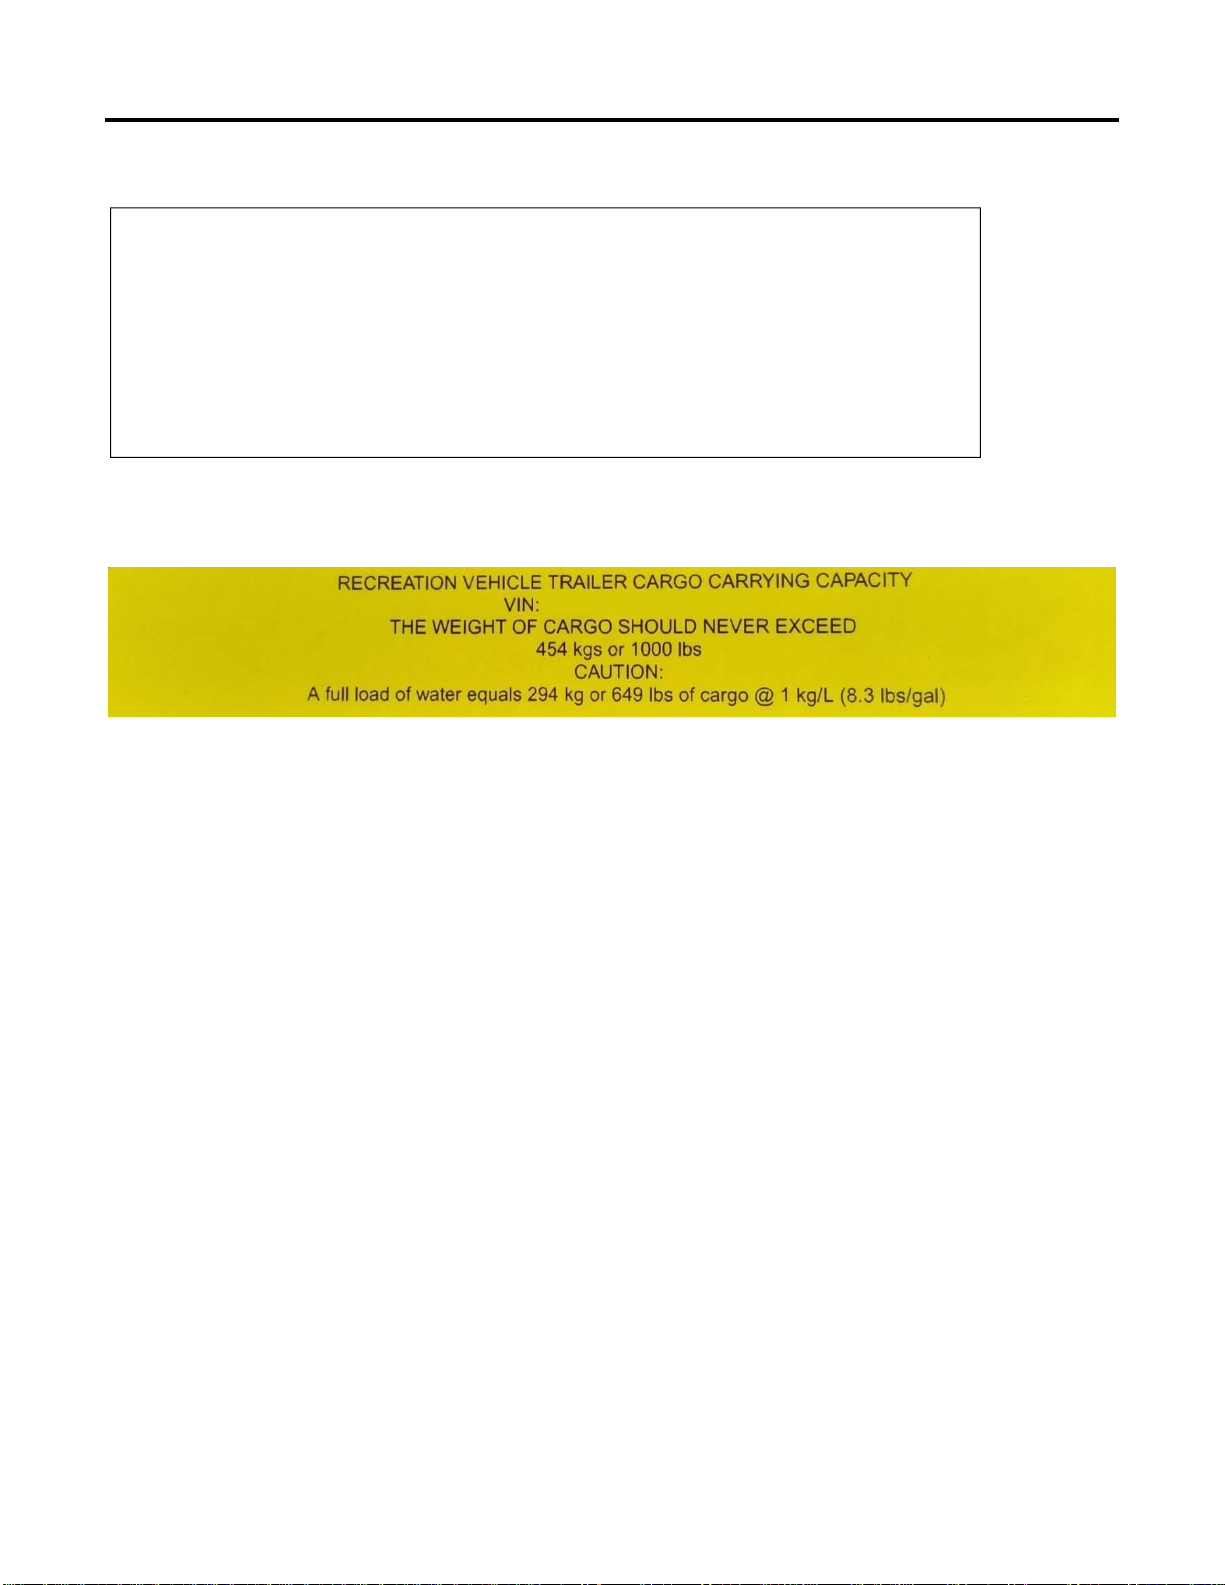
number is found in various locations including the Manufacturer Certification Label located on the
driver side at the front of the RV. Also, you will find it located on the yellow Cargo Carrying Capacity
Label inside the main entry door jamb.
6
Warranty
Example of Manufacturer Certification Label located at driver side front of RV.
Example of Cargo Carrying Capacity label located in door jamb of main entry.
Provide the dealer with a repair list
Have a repair list available including any known parts that are required to perform the repair(s). Your
repair(s) may require special parts that the dealer may need to order. Please explain what you would like
to be repaired or adjusted so that the service manager can discuss available appointment dates with you.
INSPECTING REPAIRS
Outdoors RV and your dealer want you to be satisfied with any repair. Have the dealer service personnel
review with you the repair that was performed. Thoroughly inspect the repair(s). Once satisfied, sign the
warranty repair work order. Your dealer should provide you with a copy of the work order for your
records.
7

On the Road
GUIDELINES FOR EQUIPMENT SELECTION AND PREPARATION
Your towing equipment, its adjustments, and how you load the RV will have a great effect on towing
stability and handling. The following rules will help you select and adjust your equipment in a manner
that will help produce acceptable towing characteristics. Also, you will want to check specific
requirements in the states and provinces where you will be traveling.
Before discussing equipment selection, we will explain some common weight terminology with their
abbreviations. You will occasionally see these abbreviations used though-out this manual.
CCC (Cargo Carrying Capacity) is the available weight capacity for cargo, not including fresh water
and LP gas however dealer added options may reduce this by the Load Carrying Capacity Reduction.
GAWR (Gross Axle Weight Rating) is the maximum permissible loaded weight a specific axle is
designed to carry.
GCWR (Gross Combination Weight Rating) is the value specified by the tow vehicle manufacturer as
the maximum allowable loaded weight of the tow vehicle with its towed trailer or towed vehicle.
GVWR (Gross Vehicle Weight Rating) is the maximum permissible weight of the fully loaded RV.
GVWR includes all weight at the RV axles and tongue or fifth wheel pin. The GVWR is equal to or
greater than the sum of the Unloaded Vehicle Weight plus the Cargo Carrying Capacity.
LCCR (Load Carrying Capacity Reduction) is the amount the Cargo Carrying Capacity is reduced
due to vehicle weight added by the dealer (dealer added options and accessories) between vehicle
certification and the first retail sale.
UVW (Unloaded Vehicle Weight) is the weight of the vehicle as built at the factory.
Use a tow vehicle with the appropriate axle capacity (GAWR) for your RV, and which has the
appropriate equipment such as heavy-duty radiator, transmission, final drive gearing, suspension, wheels
and tires. The tow vehicle must be rated by its manufacturer both to the gross weight (GCWR) and to
carry the tongue weight of your fully loaded RV. Please check with your tow vehicle manufacturer for
your towing specifications. Weigh your loaded RV and tow vehicle according to the instructions found
in this chapter on 'Loading Your RV' and 'Determining and Distributing Your RV Load'. Improper
loading can lead to possible tire, axle, and frame damage, and can lead to loss of towing stability and
control resulting in a vehicle crash.
Improper loading can lead to possible tire, axle, and frame damage,
and can lead to loss of towing stability and control resulting in a
vehicle crash.
8

On the Road
Consult with your RV dealer or tow vehicle dealer and towing equipment supplier to determine the
correct type of hitch assembly, hitch ball, brake controller, and other equipment you should use for
towing and leveling your RV.
Towing equipment to consider may include a weight distributing system, and a sway control system. A
weight distributing hitch system will redistribute a percentage of the loaded tongue weight of your RV
allowing the combination of tow vehicle and RV to sit level and will improve safe drivability. The
weight of your loaded RV in comparison to the towing capacity of your tow vehicle should be evaluated
during this consultation.
Installation of tow equipment must be performed by a competent installer. Make sure the installation
follows the tow vehicle and tow equipment manufacturers' instructions.
Conventional Travel Trailer: Use a weight distribution hitch rated to pull not less than the RV
GVWR and spring bars rated appropriately for your loaded tongue weights. The hitch must be equipped
with a 2 5/16" diameter ball as close as practical to the rear bumper to minimize rear overhang. Under
no circumstances add any hitch extenders to the rear of your tow vehicle.
Fifth Wheel Travel Trailer: Use a hitch and receiver assembly sized for the 2" SAE king pin and rated
to pull not less than the GVWR of the fifth wheel travel trailer. The receiver should be attached to the
truck chassis. No weight distribution or sway control devices are needed with a fifth wheel hitch.
Fifth wheel hitch extenders also called gooseneck tongue adapters
are not to be used with Outdoors RV fifth wheel travel trailers. Use
of a hitch extending device may cause structural damage to the
chassis pin-box assembly. Damage caused by the use of a hitch
extending device is not covered under Outdoors RV Warranty Policy.
Use a brake controller that automatically applies the brakes in proportion to the tow vehicle brake and
that also has a hand control for applying the travel trailer brakes only. See the 'Braking Systems' section
in this chapter for additional information.
Maintain proper tire pressure as listed on the 'Tire and Loading Information' label located at the driver
side front corner of your RV. When checking tire pressure, ensure that all tires are at the same pressure.
For additional tire information refer to the section in this chapter titled 'Tire Information and Safety'.
Use properly installed side mirrors adjusted to provide a clear view of the area at both sides of and
behind the RV. Locate them as close as possible to the driver to provide the maximum field of view. If
you are towing an RV that is wider than your tow vehicle, you will need extended side mirrors to see
rear and side approaching traffic. Many newer truck manufacturers install side mirrors that rotate or
extend to provide additional viewing angles for towing. Your factory side mirrors may be adequate if
they are of this design.
9

On the Road
OPERATOR LICENSING REQUIREMENTS
States, Canadian provinces and municipalities may require special permits and licenses based on the size
and weight of your RV especially if it is over eight feet wide.
Some states or Canadian provinces may require additional equipment for the tow vehicle such as side
and rear-view mirrors. Inquire at your local motor vehicle administration to find out what requirements
affect you. If you plan to travel in another state or Canadian province don't forget to check its
requirements also. For example, surge brakes may not be legal in some jurisdictions. In addition to
licenses and permits there may be weight, height, and width limits for using certain roads, bridges, and
tunnels. Also be aware of restrictions regarding the transport of propane and other volatile gases or fuels
in tunnels. And don't forget to contact your insurance company to make sure you have the proper
coverage.
HITCHING UP
The hitch, spring bars, sway control, safety chains, and breakaway switch are all important safety
devices that protect your investment as well as other people's lives and property. As an RV owner it is
your responsibility to be familiar with these devices and their proper use. Make sure you read and
understand the instructions furnished by the manufacturers of each of these devices. Hitching up your
RV will become routine with experience. Make it a habit to examine all hitch components before
hitching your RV. Always inspect the condition of wiring and connectors for damage and function. Test
breakaway switch to verify that the RV brakes do indeed lock up in the event of a disconnected hitch
while traveling. Remember that the breakaway switch emergency braking feature requires a fully
charged battery on the RV. This important safety item is required in most states.
Check for cracked or bent hitch components, cracked welds, and deformed or stripped bolts. Be sure the
hitch ball is tight and well lubricated. Check the tongue for cracks especially at the front cross member.
Be sure the coupler locking device works freely. Inspect the safety chains. If you have a fifth wheel
model check all truck mounted hitch components. Be sure the king pin locking device works properly.
Inspect the pin-box and king pin assembly. Periodically check pin-box mounting bolt torque. Be sure
that all moving parts of the hitch are well lubricated. If you find defects in any hitch component correct
it before towing the RV.
Before attempting to hitch up your RV read the instructions provided by the hitch manufacturer. The
following instructions are usable in most cases. If the instructions provided with your hitch are different
than the instructions below, follow the hitch manufacturer's instruction. Hitching up should be a twoperson job. One person should drive the truck and the second person should act as the spotter to assist
the driver when maneuvering the truck into position. The RV should be on flat ground when stored.
When hitching up it is recommended that a set of tire chocks be used on at least one tire (One chock in
front of the tire and one behind the tire). This will help reduce any unintentional movement of the RV.
It is highly recommended that tire chocks be placed in front and rear
of at least one tire to help prevent any unintentional movement.
10

On the Road
After every trip all hitching components on both the tow vehicle as
Conventional Travel Trailer:
1. Operate tongue jack to provide adequate clearance between coupler and hitch ball on tow
vehicle.
2. Locate spotter in a safe position that is clear from between the tow vehicle and the RV tongue yet
visible to both you and the coupler so that you will be able to see spotter directions for guiding
hitch ball under coupler socket as you back up.
3. Back the tow vehicle slowly until the hitch ball is directly under the coupler ball socket.
4. Put the tow vehicle transmission in park and set the parking brake.
5. Be sure the tongue coupler latch is fully open. Lower the tongue until the ball is firmly seated in
the socket. Close the coupler latch and secure it with a locking pin, bolt, or padlock. It may be
necessary to rock the RV or tow vehicle slightly to get the coupler latch to close completely.
Raise the jack leg until jack foot pad is off the ground.
6. Step back and check that the RV is level from front to rear. Do not permit the front of the RV to
be lower or higher than the rear as it may create unsafe handling characteristics as well as a hitch
connection or rear bumper that may drag while maneuvering uneven terrain. Adjust hitch ball
height if necessary, to achieve a level stance of the RV.
7. If using a weight distributing hitch, follow hitch manufacturer operating instructions.
8. Remove foot pad (if removable) and retaining pin and store for unhitching. Continue raising
tongue jack until it is fully retracted.
9. If using a sway control device follow device manufacturer operating instructions.
10. Adjust safety chain length by moving quick connect end link to an appropriate link along the
chain so that each chain is the same length and as short as possible but still allows full turning
angles without becoming tight. Chains should be crossed over each other and short enough to
cradle the coupler off the ground if the tongue ever accidentally becomes uncoupled. Attach each
chain hook to the chain connection loops provided on your hitch. WARNING - Never attach
safety chains to the hitch ball or to any removable part of the hitch.
11. Connect the breakaway switch lanyard loop using a quick connect coupler or carabineer at the
hitch safety chain loop. Be sure that the length of the lanyard is adjusted so the switch cannot be
activated during a full 'jackknife' turn. WARNING - Do not connect the breakaway switch
lanyard to the hitch ball, safety chains, or to any removable part of the hitch.
12. Plug the 12-volt electrical cord (7-pin) into the mating tow vehicle socket.
13. Run an operational check of stop lights, turn indicators, running lights, back-up lights (if
equipped), and electric brakes before driving away. See 'Braking System' in this chapter and
'Electrical System' chapter for more details about the electrical systems.
14. Remove tire chocks.
15. Reverse the procedure for unhitching.
well as the RV should be inspected for wear or damage. If any
excessive wear or cracking is observed, have the trailer inspected by
a qualified professional and if necessary, replace the affected parts
before any unnecessary travel.
11

On the Road
Fifth Wheel Travel Trailer:
Always ensure that the RV is stable before attempting to hitch up. Both the truck and RV should be on
near level ground. Connecting the receiver and pin-box will be much easier if both height and side-toside level is closely matched.
1. Lower the truck tailgate.
2. Slowly back the truck toward the pin-box until the king pin and coupler are in close proximity
then stop with the engine running, transmission in park, and the parking brake set.
3. Raise or lower the front of the fifth wheel using the landing gear so that the king pin height
closely matches that of the hitch plate assembly in the truck.
4. Open the coupler locking device so that the pin can engage the hitch plate jaws.
5. Continue backing and engage the king pin and coupler completely.
6. Place the truck transmission in park and set the parking brake.
7. Ensure that the coupler latch is locked in place and secure it with a locking pin, bolt, or padlock.
It may be necessary to rock the RV or tow vehicle slightly to get the coupler latch to close
completely
8. Plug in the 12-volt electrical cord (7-pin) to the mating receptacle in the truck bed.
9. Raise the fifth wheel landing gear to its fully retracted position.
10. Connect the breakaway switch lanyard loop using a quick connect coupler or carabineer at a
fixed location on the truck such as hitch mounting rails. Be sure that the length of the lanyard is
adjusted so the switch cannot be activated during a full 'jackknife' turn. WARNING - Do not
connect the breakaway switch lanyard to the king pin, pin-box, or to any removable part of
the hitch.
11. Close truck tailgate.
12. If this is your first hitching up, make sure that the height of the pin-box and truck hitch have been
adjusted so that the loaded RV is level when attached to the truck and ready to travel.
13. Remove tire chocks.
14. Run an operational check of stop lights, turn indicators, running lights, back-up lights (if
equipped), and electric brakes before driving away. See 'Braking System' in this chapter and
'Electrical System' chapter for more details about the electrical systems.
15. Reverse the procedure for unhitching.
Do not connect the breakaway switch lanyard to the hitch ball or to
any removable part of the hitch. Remember that the breakaway
switches' emergency braking feature requires a fully charged battery
on the RV.
Never attach safety chains to the hitch ball or to any removable part
of the hitch.
Periodically check pin-box attachment bolt torque with a torque
wrench. Torque to 135 ft/lbs. (5/8-11 Grade 5 bolts).
Damage may occur to your truck and/or RV if you fail to lower the
truck tailgate prior to hitching or fail to raise the tailgate afterwards.
12

On the Road
Do not connect the breakaway switch lanyard to the king pin, pin
box, or to any removable part of the hitch. Remember that the
breakaway switches emergency braking feature requires a fully
charged battery on the RV.
BRAKING SYSTEM
The electric brakes on your RV are similar to the drum brakes on many cars and trucks. The basic
difference between them is that your RV brakes are operated by 12-volt DC power from the tow vehicle
rather than by hydraulic action. The brakes have been factory calibrated for smooth, positive response.
During break-in they may squeak. This is normal and should cease after a few miles of wear. The brake
system on your RV consists of several major components all of which must function properly for safe
braking.
Brake System Components
Tow Vehicle Battery - The tow vehicle battery is the primary power source for the RV braking
system.
RV Battery - The RV battery provides power to activate the brakes in the event that the RV
unintentionally becomes disconnected from the tow vehicle while traveling. This is
accomplished via the breakaway switch.
RV Brakes - Your RV brakes are actuated by 12-volt power from the tow vehicle brake
controller. The greater the braking effort from the brake controller, the greater the breaking force
applied to the RV brakes. The RV brakes are also actuated by the breakaway switch in case the
tow vehicle and trailer become uncoupled. To ensure brakes are in good working order, brake
shoes, and drums should be checked for wear annually. The RV brakes are self-adjusting,
eliminating the need to adjust as a maintenance item.
Breakaway Switch - The breakaway switch is located on the RV tongue or pin-box. This
important safety item is required in most states. It has a steel cable (lanyard) which will reach to
the frame of the tow vehicle. This device is one of the most vital components on your RVs
braking system. It automatically applies the RV brakes if the tow vehicle and RV become
uncoupled while in motion. The breakaway switch operates when a pull pin linked by the cable
to the tow vehicle is separated from the switch. When the switch closes, power for brake
application is transferred from the onboard RV battery. The steel lanyard must be anchored to the
tow vehicle when the RV is hitched up. Secure this cable loop to the permanent frame of the tow
vehicle or a part of the hitch that is not removable. Do not fasten the breakaway switch lanyard
to the hitch ball, hitch pin, or any other removable part of the hitch.
Test the breakaway switch operation before each trip as follows:
1. Hitch the RV to the tow vehicle.
2. Pull out the breakaway switch actuating pin.
3. Test brakes by ensuring that they prevent the hitched RV and tow vehicle from rolling when the
tow vehicle is placed in 'Drive'. The breakaway switch is functioning properly if the RV brakes
are activated.
13

On the Road
4. If the brakes are not activated, check that the RV battery is connected and fully charged, and the
RV brakes are properly adjusted.
5. Obtain service repair if the RV brakes do not operate after making these checks.
6. Reinsert the breakaway switch activating pin immediately after testing. If the pin is left out for
an extended period of time your batteries will quickly become drained.
Remember that the breakaway switches emergency braking feature
requires a fully charged battery on the RV.
Do not use the breakaway switch as a parking brake. Do not leave
the actuating pin out of the breakaway switch for more than a few
minutes or the battery will be drained which will not provide
emergency braking when needed.
Do not tow your RV with a malfunctioning breakaway switch or a
dead or missing battery.
Check your breakaway system periodically to ensure that wiring and
connections are secure. A short or an open circuit can result in a nobrake condition.
Disconnect 12-volt power cord before testing breakaway switch.
Brake controller - The tow vehicle brake controller is not supplied with your RV. The RV
electric brakes are automatically applied by the brake controller which is mounted within easy
reach of the driver. This controller is connected to the tow vehicles brake system and is actuated
whenever the tow vehicles brakes are applied. It may also be used to manually apply the RV
brakes to control sway. See section on 'Safe Driving Guidelines' in this chapter for additional
info on brake controller usage. The controller should be adjustable for the amount of force
applied to the RV brakes when you apply pressure to the tow vehicle brake pedal. In time you
will learn to adjust the amount of safe braking force dependent upon road conditions and the load
you are pulling. During ice, snow and rain conditions, as well as lighter towing loads you will
not want as much braking force to the RV as you would with dry road conditions and heavier
loads. Consult your controller instructions or a professional installer for further information and
wiring instructions.
Failure to do so will result in severe damage to electronic brake
control.
14

On the Road
7 - Way Cable Connection - The 7-pin cable connection at the front of the RV transfers
electrical power from the tow vehicles battery to the RV brakes, exterior lighting system, and RV
battery. See diagram in 'Electrical System' chapter for specific wiring connections.
Grounding - The electrical circuit that operates your RV brakes can be reliably completed only
by proper grounding back to the tow vehicle. A poor ground circuit from the brakes to the tow
vehicle battery can hurt braking performance as much as a poor primary circuit from the battery
to the brakes. Do not rely on the hitch ball/coupler or fifth wheel hitch mechanism for a good
ground.
Braking Tips
Before moving your RV, inspect all external braking system components. Inspect all wiring
connections. Test the breakaway switch as outlined previously.
Never use the RV brakes alone (manually) for extended periods. They are designed to stop the
RV not the tow vehicle. This action places excessive loads on the brakes causing overheating,
fading, and premature wear.
Never use the tow vehicle brakes alone. The added weight of the RV will more than double the
load on the tow vehicle brakes causing overheating, fading, and premature wear. Driving control
can also be affected due to the force of the RV pushing against the tow vehicle. On slippery road
surfaces this can result in jackknifing.
Always use the automatic brake controller. The brake controller, when properly adjusted, will
apply just the right amount of braking force to the RV for your towing conditions.
Downhill grades and curves require reduced speeds. A downhill grade will also require using
lower gearing of the tow vehicle transmission to keep the brakes from overheating.
Rain or slippery conditions require reduced speeds. Whenever in doubt, reduce your vehicle
speed to ensure predictable, safe operation.
Do not install a non-self resetting fuse in the circuit between the tow
vehicle battery and the brake controller. A blown fuse would cause
the controller to cease operation of both automatic and manual
braking causing loss of trailer braking with possibly no advance
warning.
LOADING YOUR RV
The RV chassis and its components are designed to carry a certain maximum load. This load consists of
the empty RV itself plus weight added in the form of water, food, clothing, and anything else that may
be stored in or attached to the RV. The maximum load for which the RV is designed is called the Gross
Vehicle Weight Rating (GVWR) and is the total loaded weight over the axles combined with the weight
over the tongue or fifth wheel king pin. Another critical weight factor is the Gross Axle Weight Rating
(GAWR). This is the maximum weight a specific axle is designed to carry. This represents the empty
axle weight plus the maximum added load over the axle area. On RVs with two axles, the GAWR is
based on a combined rating of both axles.
15

On the Road
The total of all axle loads plus the tongue or king pin weight must not exceed the GVWR. The tires
equipped on your RV are designed to carry the loads specified. Tires need to be of sufficient capacity to
carry the load. Always maintain required tire pressure by checking frequently. Never replace or mix tires
with a lower capacity specification. In addition to knowing the overall weight that can be safely loaded
in or attached to the RV you must know how to distribute this weight so that correct amounts of weight
are placed on the axles and tongue.
Proper weight distribution is required for towing stability and will assure that the RV is not rear, front,
or side heavy. A light tongue/pin weight or heavy weights placed at the rear of the RV may cause sway.
On the other hand, too much weight on the tongue/pin can overload the tow vehicle and cause poor tow
vehicle braking, poor steering, poor cornering, and can damage the RV chassis.
Steps for Determining Correct Load Limit
1. Locate the statement "The weight of cargo should never exceed XXX kg or XXX lbs." on your
vehicles Cargo Carrying Capacity label. (Yellow label at door jamb of main entry).
2. This figure is the available amount of cargo and luggage load capacity.
3. Determine the combined weight of luggage and cargo being loaded on the vehicle. That weight
may not safely exceed the available cargo and luggage load capacity listed on this label.
This is the remaining available cargo capacity after the RV has been loaded with water and LP gas.
Water and propane weights are already adjusted into this Cargo Carrying Capacity so that you do not
have the additional calculations to perform in determining your correct load limit.
Before towing your RV consult this Owner’s Manual for proper
cargo loading, weighing procedures, and terminology definitions. Do
not exceed the GVWR and GAWR. Do not exceed the tow vehicle
GVWR, GAWR, GCWR or hitch rating. Failure to move cargo to
keep within the weight limits can result in damage and/or loss of
stability when towing resulting in serious injury or death. Please
follow all recommendations in this Owner’s Manual when loading
and towing your RV.
Please check with your tow vehicle manufacturer for your towing
specifications.
Do not exceed the specified tongue weight or spring bar rating.
Damage to the RV chassis and poor handling and braking may
result.
16

On the Road
HITCH RECEIVERS
If your RV is factory equipped with a hitch receiver attached to the rear, whether it is a cargo carrying
hitch or an actual tow rated hitch, you will need to account for any loading that you may add as cargo
weight. There are two factory installed hitch types offered as follows:
1. A 2" Cargo Carrying Only receiver which is designed for bike racks, cargo racks, and many
different accessory attachments. This receiver has a Maximum Load Rating of 250 LBS. and
should never be used to tow anything behind your RV.
2. A 2" Tow Rated (mid-profile fifth-wheel models only) receiver which is designed for towing
small boats, four-wheelers, motorcycles, and light weight trailers as well as bike and cargo racks.
A wiring harness connection has been provided for connecting taillights however it intentionally
does not include circuits for braking, back-up lighting, or charge line. This receiver has a
Maximum Load Rating of 300 LBS. Tongue Weight and 3000 LBS. Maximum Trailer Weight
(300/3000 LBS). If equipped with the tow rated receiver, never use a hitch bar longer than 10"
(254 mm). The maximum length of the hitch bar is measured from the center of the fastening pin
to the center of the ball. Do not use weight distribution bars or equipment with this receiver on
the second trailer. Check the state or province where your tow vehicle and RV are registered as
well as any state or province where travel is planned in the U.S. and/or Canada for braking
requirements and towing regulations.
If you do not have an Outdoors RV factory installed hitch receiver,
towing items behind your RV or overloading the rear may void
warranty and may result in damage to the tow vehicle and/or RV or
add-on items, towing difficulties, property damage and/or personal
injury.
The Tow Rated receiver (if equipped) on your RV is a weight
carrying hitch only. Do not use weight distribution bars or
equipment when towing. Use of this equipment with the hitch
receiver may void warranty and may cause damage that could lead to
adverse towing and handling, loss of control, or an accident
resulting in death or serious injury.
DISTRIBUTING YOUR LOAD
Using the information located on the Manufacturer Certification Label located at the driver side front of
your RV, you must compare the GVWR with the actual loaded weight of your RV. If the loaded weight
of your RV exceeds the GVWR, your RV is overloaded, and as such, you will need to remove items to
bring the weight below the GVWR. Follow the method outlined here to determine the weight
distribution of your RV. When weighing your RV or tow vehicle always use a platform scale such as
those used by trucking companies or highway weigh scales. The weigh station attendant can guide you
through the correct positioning of the RV and tow vehicle onto the scales.
17

On the Road
1. Weigh the RV by itself. After driving the tow vehicle and RV onto the scale disconnect the RV
from the tow vehicle and move the tow vehicle off the scale. The measured weight of the loaded
RV must not exceed its GVWR. If the GVWR is exceeded, cargo or equipment items must be
removed.
2. Find the tongue weight. When the total RV weight is under the rated GVWR, you next
determine the king pin or tongue/coupler weight. Re-hitch the tow vehicle to the RV. Move the
RV forward until the tow vehicle is off the scales. Ensure the system is level. You do not need to
unhitch the tow vehicle for this weight. Record this weight and subtract it from the total weight
(GVWR) previously noted. This weight difference is the approximate pin or tongue weight.
3. Calculate the percentage of tongue weight. Divide the loaded pin or tongue weight by the total
loaded RV weight. Multiply this by 100. This result is the percentage of the total weight the pin
or tongue is carrying. You need to know this to properly load your RV. If the tongue weight
exceeds the proper range for your tow vehicle, shift some of the load rearward to arrive at the
proper balance. If the tongue weight is below the proper range move some of the load forward. If
you have to shift the load to get the proper pin or tongue weight, check to be sure that you do not
exceed the weight rating of the axles, tires, pin, tongue, or hitch.
With the RV attached to the tow vehicle each wheel position should be weighed separately to be sure
individual axles and tires are not overloaded. If an overload condition exists on any axle or wheel
position, RV cargo loading must be redistributed or removed.
If an overload situation is not corrected, tire or mechanical failures may occur. The individual wheel
positions (particularly the rear positions) on the towing vehicle should also be weighed for possible
overloading while the RV remains attached.
The following procedures are to be performed after establishing the above recommended hitch/axle
loading and with the RV and tow vehicle loaded with all supplies, passengers, and equipment.
To obtain individual tow vehicle axle weights, Gross weights and Gross Combined Vehicle
Weights (GVWR):
1. Drive onto scale. Take a reading with the tow vehicle front half approximately halfway onto the
scale. This reading must not exceed the tow vehicles’ front GAWR.
2. The second reading will be with the tow vehicle fully onto the scale but with the RV axles off
scale. This reading must not exceed the tow vehicle GVWR.
3. Subtract the first reading from the second reading. The difference is the amount of weight on the
tow vehicles rear axle. This result must not exceed the tow vehicles’ rear GAWR.
Weight distributing hitches will change the weight balance of the RV
and tow vehicle axles. If equipped, it is recommended that the RV
and tow vehicle be re-weighed to ensure that all weight ratings are
not exceeded.
18
On the Road
To obtain tow vehicle individual wheel position weights:
1. Place the right front tire of the tow vehicle on the scale with RV off scale and take a weight
reading. Subtract this from the weight of the front axle to get the left front tire weight.
2. Place both right side tires on the scale with RV off scale and take a weight reading.
3. Subtract the weight of the right front tire from the weight of the right side of the tow vehicle to
find the weight on the right rear tire.
4. Subtract the weight of the right rear tire from the weight of the rear axle to get the weight of the
left rear tire.
5. Compare the weight on each tire to the tire load rating on its sidewall. The weights on the tires
must not exceed the tire rating.
To obtain RV individual axle weights:
1. Place all of the RV axles on the scale with tow vehicle off the scale and record the weight.
2. Pull the RV forward until the rear most axle is on the scale and the forward axle is off the scale.
Record the weight of the rear axle.
3. The difference between these two weights is the weight on the front axle.
4. Compare the weight of each axle to the GAWR. The weight on either axle must not exceed its
individual rating.
To obtain RV individual wheel position weights:
1. Place the right-side tires of the RV on the scale with tow vehicle off the scale and record the
weight.
2. Pull forward until only the RV right rear tire is on the scale and take a weight reading.
3. Subtract the weight of the right rear tire from the weight of both right-side tires to find the right
front tire weight.
4. Subtract the weight of the right front tire from the front axle weight to find the left front tire
weight.
5. Compare the weight on each tire to the tire load rating on its sidewall. The weights on the tires
must not exceed the tire load rating.
Do not exceed the rated load of the tow vehicle, the RV, or the rated
capacity of any axle or tire.
Please check with your tow vehicle manufacturer for your towing
specifications.
Periodically re-weigh your RV and tow vehicle. Different traveling
configurations may change your load and weight distribution. If
other equipment or options such as leveling jacks, awnings, roof
storage pods, etc, are installed after the RV leaves the factory, the
weight of these items must be subtracted from the load and CCC.
19

On the Road
Tire load ratings are dependent on the tire inflation pressures. Please
refer to the Tire and Loading Information label on your RV for
specific tire pressures. Under inflated tires can be damaged and
result in loss of inflation pressures.
Remember that your tow vehicle is an integral part or your total
towing combination. Weigh and load it with the same considerations
as your RV. Gross weight and axle weight ratings will be found on
labels on the drivers' door pillar or inside the glove compartment
door. Consult your tow vehicle owner’s manual or towing guide for
more information. If you do not have a towing guide, you can
request one from your tow vehicle manufacturer.
Please check with your tow vehicle manufacturer for your towing
specifications.
Your RV contains a label listing the Cargo Carrying Capacity (CCC).
Please note that the stated CCC may be limited by the tow rating of
your tow vehicle. Ask your tow vehicle manufacturer for more
information about tow ratings.
How Overloading Affects Your Tires
The results of overloading can have serious consequences in terms of passenger safety. Too much
weight for your vehicles suspension system can cause spring, shock absorber or brake failure, handling
or steering problems, irregular tire wear, tire failure, or other damage. In cases of serious overloading,
brakes can fail completely, particularly on steep hills. The load a tire will carry safely is a combination
of the size of the tire, its load range, and corresponding inflation pressure. Excessive load and/or under
inflation can cause tire overloading. As a result, abnormal tire flexing occurs, which can generate an
excessive amount of heat within the tire. Excessive heat may exceed the tires capabilities, which may
lead to tire failure. It is the air pressure which enables a tire to support the load, so proper inflation is
critical. Never exceed the tire limitation for load or air pressure. If you discover that your tires cannot
support the actual weights, you must lighten the load.
Installing tires with a higher carrying capacity only solves the problem of tire overload. It has no
effect on the over-loading of other components (i.e., wheels, axles, shocks, or bearings). Wheels may
not be capable of withstanding the higher pressures necessary to support the load.
If you decide to install a tire size other than that originally provided on your RV, care must be taken to
ensure adequate load carrying capacity and compatibility between tire and wheel size.
There is a danger of serious injury or death if a tire of one bead
diameter is installed on a wheel of a different diameter. Always
replace a tire with another tire of exactly the same size.
20
On the Road
Loading Tips
After you have determined how much weight you can carry and have selected those items to make up
that weight, make a list, and keep it for future reference. Load your RV so that you get proper weight
distribution on the axles and tires. Make a loading diagram representing your properly loaded RV. It will
help you locate where specific items are stored and will help speed the loading process. Secure and
brace items so they won't move during travel. Do not load heavy items near either end of the RV or on
the rear bumper. Adjust cargo to keep the side to side tire load as equal as possible. Keep in mind that
towing with full holding tanks after a trip can radically change the handling characteristics versus what it
was prior to the trip.
During the design and development of your RV, the number and size of storage compartments and the
liquid tank capacities are maximized for value and conveniences. If the RV operator fills all liquid tanks
to capacity and fills all storage compartments and cupboards to maximum volume with heavy items, the
RV could potentially be overloaded. The operator is responsible for analyzing the conditions under
which the RV will be used for each trip.
Thoughtful consideration of the weight placed in the RV can yield important benefits:
Maximum flexibility in use of the available storage space provided in the RV.
Improved tow vehicle and RV handling characteristics.
Better tow vehicle fuel mileage.
Reduced tire wear.
Exceeding the GAWR or GVWR of your tow vehicle or RV can cause
undesirable handling characteristics and may create a safety hazard.
Do not install any type of weight carrying rack, frame, or hitch to the
rear bumper, A-frame assembly, chassis, or body component of the
RV unless specified by Outdoors RV. Add-ons such as these may void
your warranty on structural components.
Do not store or carry propane containers, gasoline, or other
flammable liquids inside your RV.
Move cargo to maintain proper balance. Do not exceed GVWR (total
weight rating) or GAWRs (axle weight ratings) of the trailer or tow
vehicle.
Please check with your tow vehicle manufacturer for your towing
specifications.
Use extra care in packing and storing dishes, utensils, canned foods,
and liquids in rear kitchen models as this is an area that is easily
overloaded.
21

On the Road
SAFE DRIVING GUIDLINES
Outdoors RV does not recommend transporting passengers in your RV while traveling.
Your tow vehicle will have very different handling and stopping characteristics when it is towing an RV.
The following guidelines will help you develop needed driving skills for safe towing.
Know the height of your RV. This is very important as there are many low-clearance
overpasses that your RV may not completely clear. Hitting a bridge overpass could potentially
cause an extreme amount of damage to your RV. Have a friend help you measure the overall
height at the air conditioner or highest point to the ground. This should be done with the RV
unloaded; tires aired up properly and hitched up. Make note of this to keep handy in the tow
vehicle in the event you encounter a low overpass.
Travel very slowly if you are new to towing, or if you have a new RV or tow vehicle, until you
have learned the handling and stopping characteristics of the tow vehicle and RV combination.
Practice turning, stopping, and backing in a secluded place away from traffic.
Do not permit a driver who is inexperienced at towing to operate your tow vehicle and RV
combination without your direct supervision. Remember its slow speed for beginners.
Tow at moderate speeds allowing for adverse highway and wind conditions. Even under the
best of conditions, do not exceed posted speed limits for vehicles towing trailers. As speed
increases, trailer sway stability, stopping ability, and the ability to make emergency maneuvers
are greatly reduced.
Reduce speed before starting down hills, even short ones, and avoid heavy tow vehicle braking
on downgrades. RV towing stability is reduced when traveling downhill and is further reduced
by tow vehicle braking.
Slow down before entering turns and avoid heavy braking in turns. RV stability is reduced in
turns, and the weight of the RV tends to push the back of the tow vehicle outwards in turns,
which can cause loss of control and jackknifing.
If it is windy or passing vehicles are affecting handling, slow down until full, comfortable
control can be maintained. RV sway can be started by crosswinds and winds from passing
vehicles, especially trucks and busses passing from the rear. Reduced speed improves RV
stability and handling.
Do not use cruise control while towing. These devices can interfere with your ability to slow
down in an emergency.
Avoid quick steering movements that can start the RV swaying.
Close, lock and dead bolt entry doors and secure all windows and slide-outs before traveling.
Plan your trip and map out the roads you plan to use. Find out any hill grades in the areas
you will be traveling. Some mountain passes have extreme change in elevation and curves you
may prefer to avoid.
Rain or snow/ice conditions require extreme caution when towing. Vehicle speed should be
reduced, and, in some cases, towing should be avoided.
Maintain at least twice the normal stopping distance while towing your RV. The increased
weight of the combination of vehicle requires greater stopping distances.
22

On the Road
Use lower gears on long grades. Downshift on uphill grades to avoid overheating or undue
engine loads. Downshift on downhill grades to allow engine breaking to assist in controlling
vehicle speed. Avoid continuous or frequent brake application. The weight of the combination of
vehicles can cause brakes to overheat and fade.
Allow ample time for passing. Your acceleration will be much slower, and your combination of
vehicles is much longer than the tow vehicle alone.
Once you become accustomed to the feel of your tow vehicle/RV combination, you will find that it
becomes very second nature. Become familiar with the position of the RV in traffic and be cautious
when maneuvering to allow for its length and width. Always allow extra room to corner and to change
lanes. Learn to use the side mirrors to view the road behind and to the sides, check them often.
When traveling off the highway in the country or mountains you must be careful of overhanging tree
limbs and other overhead or side obstacles. Light branches will brush aside, but heavier branches and
limbs may cause damage to the roof or sidewall of your RV. Consider your roof height, vents, jacks,
antennas, air conditioner, and other equipment attached to the roof or side or your tow vehicle and RV
when you are calculating clearance.
Avoid parking to close to the curb as signs, telephone poles, and other obstructions can cause
interferences. Watch for overhead and side clearance at drive-in restaurants and gas stations or other
drive-thru areas so you do not damage the side or roof of your RV. Watch for sharply crowned roads
which can tip your RV into obstructions when parking close to a curb or roadside.
If Your RV is Swaying
1. Steer as little as possible while maintaining control of the vehicle. Because of your natural
reaction time lag, quick steering movements to counter trailer sway can actually cause increased
sway and loss of control. Try to hold the wheel as straight as possible until stability is regained.
2. Slow down but avoid strong tow vehicle braking. Reduce speed gradually whenever possible.
Use the hand control to gradually apply the trailer brakes; this will help keep the vehicles
aligned. Tow vehicle braking reduces trailer stability and sliding tow vehicle tires causes loss of
control and jackknifing.
3. If a reduction in trailer stability has occurred, slow down immediately and stop as soon as
possible. Check tire pressures, sway control adjustment (if equipped), and hitch spring bar
adjustment (if equipped), cargo weight distribution, and look for any signs of mechanical failure.
Until the problem has been identified and corrected, travel at reduced speeds that permit full
control.
Backing Up
Place your hand at the bottom of the steering wheel. The back of the RV will move in the same direction
that your hand moves. The rear of the tow vehicle will go the opposite way you want the RV to turn. Be
careful as the RV/tow vehicle angle gets large, the hitch and/or tow vehicle and RV may be damaged by
jackknifing.
You will need a much greater turning radius than the tow vehicle itself requires. When backing, be sure
to watch not only the rear, but also both sides of the tow vehicle.
23

On the Road
Before backing up, you should designate a person to 'spot' you to ensure that you will not bump the RV
into anything out of your field of view. In time, and with a little practice, you will be able to back your
RV with little effort. Always be aware that you have poor visibility to the rear. Always have your spotter
standing safely outside at the rear of the RV to guide you in safe backing. Use both rear view mirrors
when backing. If you are in doubt, stop, place the vehicle in park, shut the engine off, engage the
parking brake, and go look for yourself at the RV to ensure it is going where you intend it to go.
Parking
When parking parallel to a curb, be sure to allow for poles or other obstructions beyond the curb as the
front and rear portions of the RV swing wider than the tow vehicles body. Always shift the transmission
to PARK with automatic transmissions, or low or reverse for manual transmissions, and set the parking
brake.
Parking on a Grade
Try to avoid parking your hitched RV/tow vehicle on a hill or grade. However, if you must park on a
grade, follow these steps:
1. Apply and hold the tow vehicle brakes.
2. Have someone place wheels chocks under the RV wheels.
3. When the wheel chocks are in place and the assistant is clear, release the tow vehicle brakes until
the chocks absorb the load.
4. Apply the tow vehicle parking brake.
5. Shift the transmission to PARK, with an automatic transmission or low or reverse for manual
transmissions.
If the vehicle you are parking on a grade is equipped with an automatic transmission, do not shift into
PARK until the RV wheels are chocked and the tow vehicle parking brake is set. If you do, the weight of
the vehicle and RV may put so much strain on the transmission that it may be hard to shift out of PARK.
When starting after being parked on a grade:
1. Apply and hold the tow vehicle brakes.
2. Start engine in PARK for automatic transmissions or NEUTRAL with parking brake set for
manual transmissions.
3. Shift into gear and release the tow vehicle parking brake.
4. Release the tow vehicle brakes and move the RV until the chock are free.
5. Apply and hold the tow vehicle brakes and have an assistant remove the chocks.
Ensure that small children are not present anywhere near your RV
when backing up.
24

On the Road
TIRE SAFETY AND INFORMATION
Your RV is equipped with quality tires made by a major tire manufacturer. Under normal circumstances
and with proper maintenance, you should receive thousands of miles of trouble-free service. For safety,
RV stability, and maximum tire life, proper vehicle speeds and inflation pressures must be maintained.
Tread depth and wear must also be monitored. Refer to the tire manufacturers' information provided in
your owner information packet for information on maintenance and tire care. Always consult with your
tire supplier when replacing tires to ensure that you are installing the correct size and load range based
on the requirements of your RV.
Tire Labeling
Federal law requires tire manufacturers to place standardized information on the sidewall of all tires.
This identifies and describes the fundamental characteristics of the tire and also provides a tire
identification number for safety standard certification and in case of a recall.
The following diagram will help you locate the specific information for your tires. The info in this
diagram may not be representative of your particular RV tire.
In this example we will use ST225/75R15 for the sake of photo reference. Your tires may be similarly
identified with a LT235/85R16.
ST - 'Special Trailer' - indicates the tire is designed specifically for trailer use only.
LT - 'Light Truck' - indicates the tire is designed for light truck or trailer use.
225 - This three-digit number provides the section width in millimeters of the tire from sidewall
edge to sidewall edge. In general, the larger the number, the wider the tire is.
75 - This two-digit number, known as the aspect ratio, gives the tires ratio of height to width.
Typically, a tire with a larger number will have a taller section height however this is not a direct
indicator to a tire’s overall height.
R - Indicates that the tire has radial ply cord construction as opposed to bias ply cord
construction.
15 - This two-digit number indicates the wheel diameter in inches that the tire is designed for. If
you change your wheel size, you will have to purchase new tires to match the new wheel
diameter.
25

On the Road
117/112 - This is the 'Load Index' rating. A numerical code associated with the maximum load a
tire can carry at the speed indicated by its speed symbol (rating) under specified service
conditions. In this instance 117=2833lbs. You will not need to be concerned with the 112 as it
refers to loading in a dual wheel configuration.
N - This is the tires 'Speed Rating'. An indexed alphabetical code that refers to the maximum
speed that a tire is rated by the tire manufacturer. In this instance N=87mph.
Load Range 'E'- An alphabetic code that designates for a specific tire size the maximum load a
tire can carry at a defined inflation pressure.
Additional information you may find on your tires:
US DOT - Tire Identification Number (TIN) - This begins with the letters DOT and indicates
that the tire meets federal standards. The next two numbers or letters are the plant code where it
was manufactured, and the last four numbers represent the week and year the tire was made. For
example, the numbers 3197 means the 31st week of 1997. The other numbers are marketing
codes used at the manufacturers' discretion. This information is used to contact consumers if a
tire defect requires a recall.
Tire Ply Composition & Materials - The number of plies indicates the number of layers of
rubber coated fabric in the tire. In general, the greater the number of plies, the more weight a tire
can support. Tire manufacturers also must indicate the materials in the tire, which may include
steel, nylon, polyester, and others.
Treadwear, Traction, & Temperature Grades - These numbers are a numeric index guide to
help the consumer make an informed decision in choosing replacement tires. These ratings are
not typically found on trailer service type tires and will not be explained in detail here.
Load Limit & Maximum Cold Inflation - This is the designated maximum load limit that the
tire was designed to carry measured in lbs. & kg. based on a maximum cold air pressure
measured in psi and kPa. The listed pressure is the maximum air pressure that should ever be put
in the tire under normal driving conditions.
Additionally, you will find on (LT) & (ST) tires a (Max. Load Single) and (Max. Load Dual)
weight/pressure rating listed. The (Max. Load Dual) is used when running four wheels/tires per axle in
a 'dually' configuration such as that seen on a semi-truck. The Max. Load Dual application does not
apply to your RV.
Tire Pressure and Load Limits
Tire inflation pressure is the level of air in the tire that provides it with load-carrying capacity listed on
the tire sidewall and affects the overall performance of the vehicle. The tire inflation pressure is a
number that indicates the amount of air pressure measured in pounds per square inch (psi) or kilo Pascal
(kPa - metric) in which a tire requires to be properly inflated. RV manufacturers determine this number
based on the vehicles designed load limit, that is, the greatest amount of weight a vehicle can safely
carry for the vehicles tire rating. The proper tire pressure for your RV is referred to as the
'Recommended Cold Inflation Pressure' (As you will read below, it is difficult to obtain the
recommended tire pressure if your tires are not cold). Because tires are designed to be used on more than
one type of vehicle, tire manufacturers list the 'maximum permissible inflation pressure' on the tire
sidewall. This number is the greatest amount of air pressure that should ever be put in the tire under
normal driving conditions.
26
 Loading...