

Page 1

SIENNA
37” FIRE PIT
OPT-RF37
PHONE: (909) 460-5579 | THEOUTDOORPLUS.COM | 235 E MAIN ST. ONTARIO, CA 91761 1
Page 2

SIENNA | FIRE PIT
TABLE OF CONTENTS
SAFETY WARNINGS 3
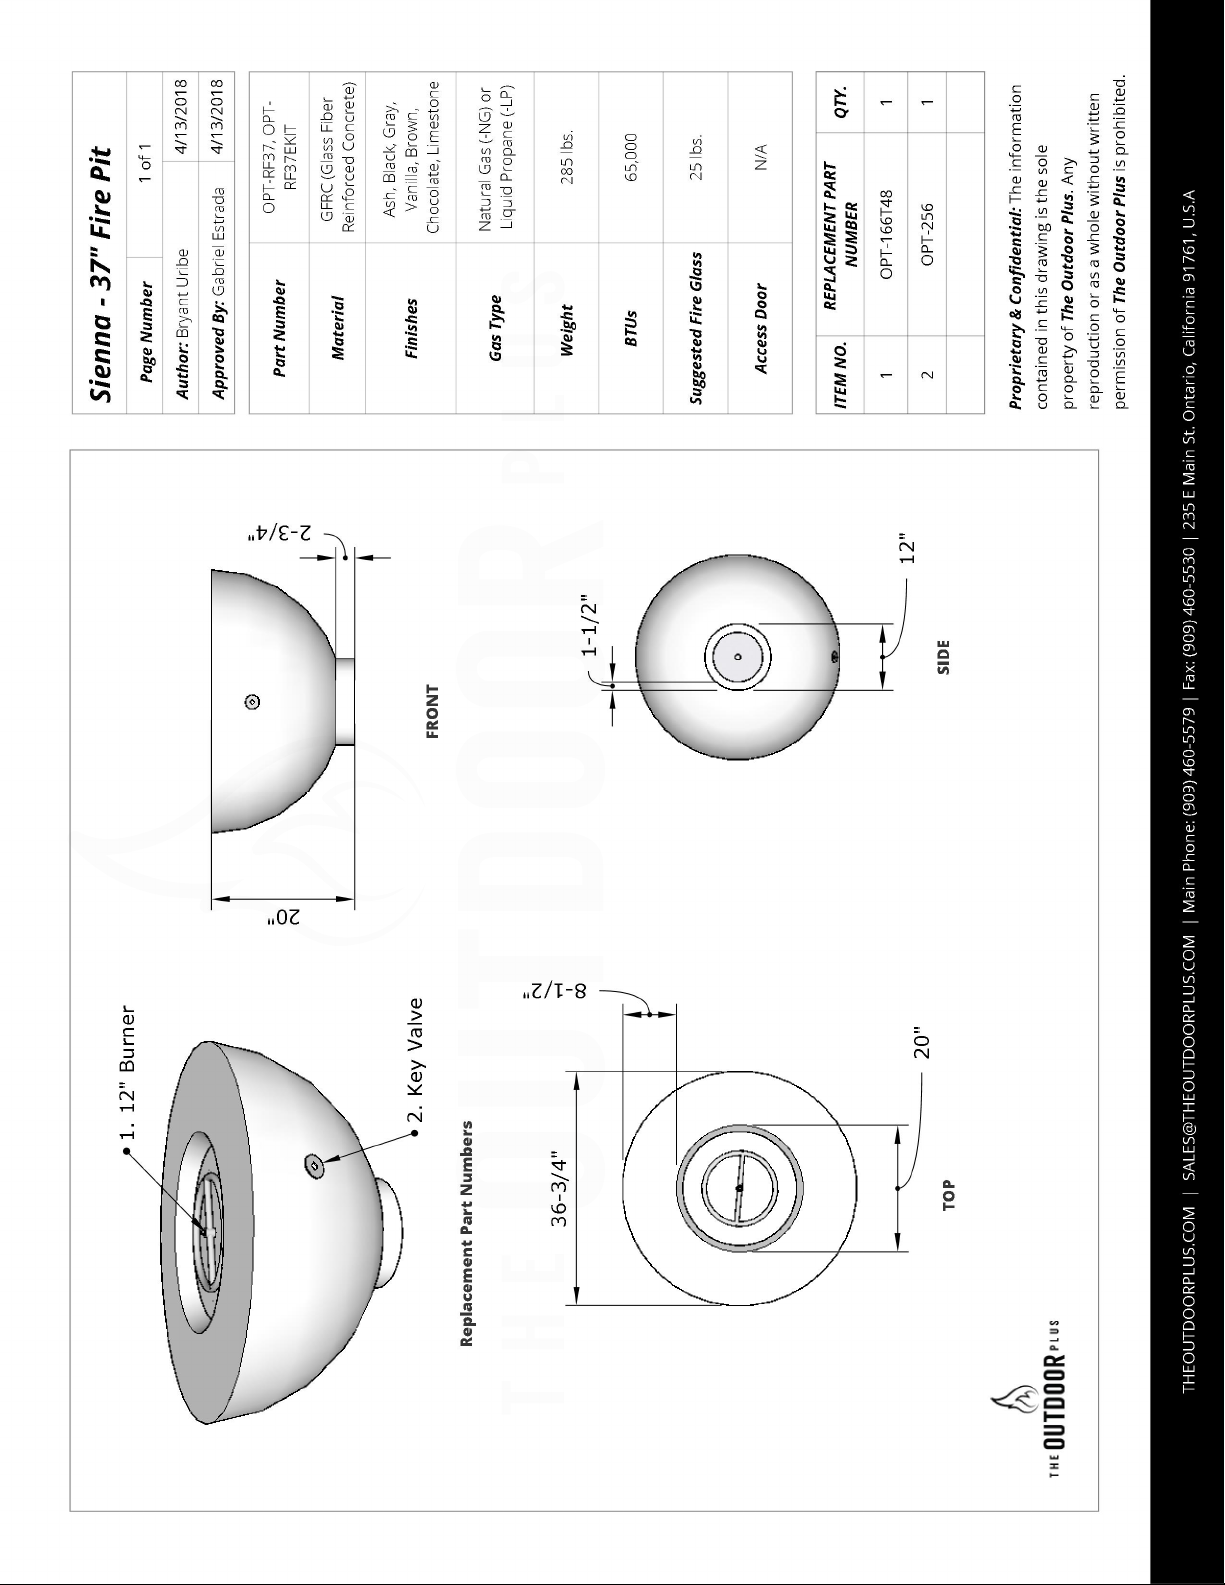
SPECIFICATION SHEETS/PART REPLACEMENTS 6
GAS REQUIREMENTS 7
LIQUID PROPANE 7
SPECIFICATIONS
NATURAL GAS 7
REQUIREMENTS
PRESSURE TESTING 7
SET-UP 8
STEP 1 8
PLACE THE FIRE PIT IN A DESIRED LOCATION
STEP 2 9
CONNECT THE GAS LINE
STEP 2.1 9
CONNECTION FOR LIQUID PROPANE
STEP 2.2 10
CONNECTION FOR NATURAL GAS
LOCATING THE GAS LINE
STEP 3 11
PERFORM A LEAK TEST
STEP 4 12
PLACING DECORATIVE STONE
GAS SPECIFICATIONS 12
NG TO LP PARTS 12
LP TO NG PARTS 12
OPERATING THE FIRE PIT 13
PURGE GAS LINES 13
FOR YOUR SAFETY, READ BEFORE LIGHTING. 13
LIGHTING INSTRUCTIONS 13
TURNING OFF GAS 13
GAS CONVERSION 14
FOR LIQUID PROPANE: 14
FOR NATURAL GAS: 14
CLEANING, MAINTENANCE & STORAGE 15
CLEANING 15
MAINTENANCE 15
STORAGE 15
REPLACEMENT PARTS 16
ONE YEAR LIMITED WARRANTY 16
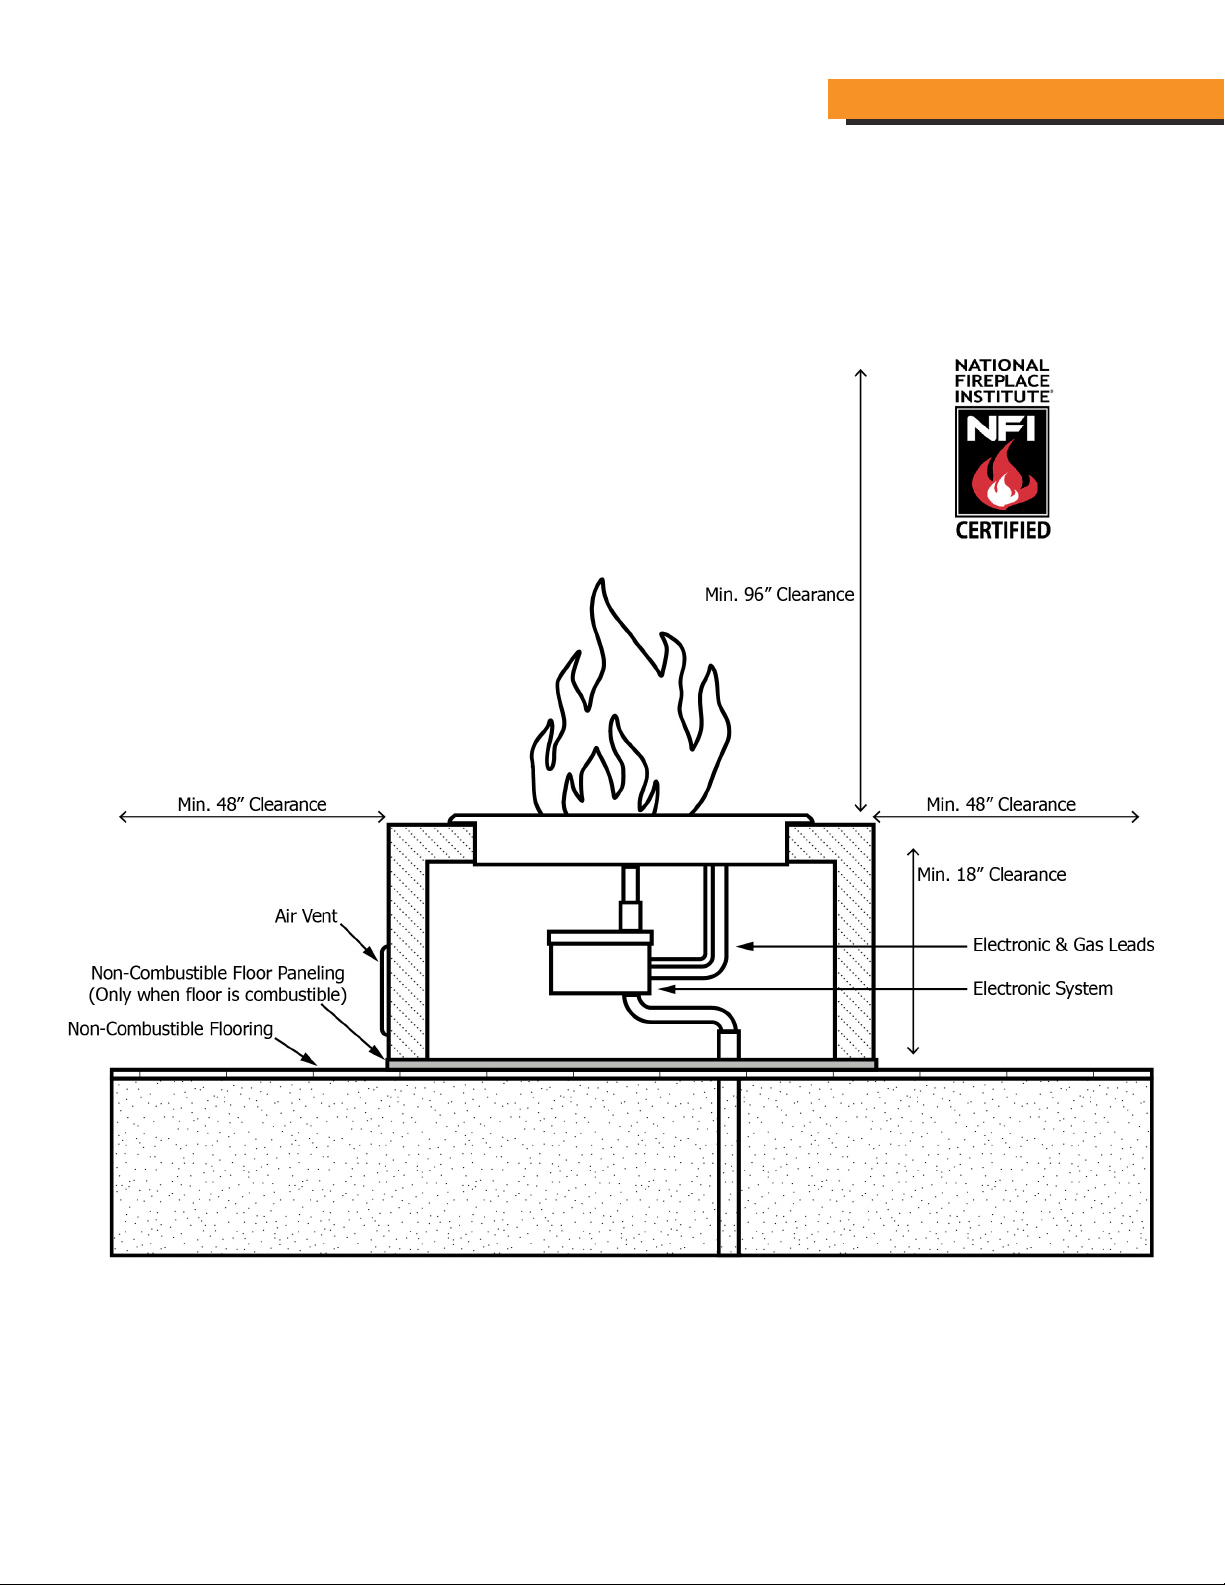
CLEARANCE FROM COMBUSTIBLES 17
INSTALLATION 17
FLOORING 17
SERVICE 17
Sienna, an earth shade that represents our
environment. Its hemispherical structure
accentuates the beauty of itself. Our Fire
Pits are individually handmade and proudly
manufactured in the U.S.A. e re pits we
manufacture are durable and long-lasting in a
variety of environments. Because of its handmade
nature slight variations in color and texture may
occur.
PHONE: (909) 460-5579 | THEOUTDOORPLUS.COM | 235 E MAIN ST. ONTARIO, CA 91761 2
Page 3

SAFETY WARNINGS
SIENNA | FIRE PIT
WARNING
Do not store or use gasoline, or other
ammable vapors and liquids, in the vicinity of
this or any other appliance.
An LP-cylinder not connected for use shall not
be stored in the vicinity of this or any other
appliance.
DANGER
If you smell gas:
õ Shut o gas to the appliance
õ Extinguish any open ame
õ If odor continues, keep away from the
appliance and immediately call your gas
supplier or re department.
AVERTISSEMENT
Ne pas entreposer ne utilizer de l’essence ni
d’autres vapuers ou liquids inammables dans
le voisinage de l’appareil, ne de tout autre
appareil. Une bouteille de propane qui n’est
pas raccordee en vue de son utilisation, ne doit
pas etre entreposee dans le voisiange de cet
appariel ou de tout autre appreil.
AVERTISSEMENT
Si’l y une odeur de gaz:
õ Coupez l’admission de gaz de l’appareil.
õ Éteindre toute amme nue.
õ Si l’odeur persiste, éloignez-vous de
l’appareil et appelez immédiatement le
fournisseur de gaz ou le service d’incendie.
WARNING
FOR OUTDOOR USE ONLY.
WARNING
Carbon Monoxide Hazard
This appliance can produce carbon monoxide
which has no odor.
Using it in an enclosed space can kill you.
Never use this appliance in enclosed
space such as a camper, tent, car or
home.
AVERTISSEMENT
POUR USAGE A L’EXTERIEUR SEULEMENT.
AVERTISSEMENT
MONOXYDE DE CARBONE
Cette appareil peut produire du monoxyde de
carbone, un gaz inodore.
L’utilisation de cet appareil dan des espaces
clos peut entrainer la mort.
Ne jamais utiliser cet appareil dans
un espace clos comme un véhicule de
camping, une tente, une automobile ou
une maison.
PHONE: (909) 460-5579 | THEOUTDOORPLUS.COM | 235 E MAIN ST. ONTARIO, CA 91761 3
Page 4

SAFETY WARNINGS
SIENNA | FIRE PIT
AVERTISSEMENT WARNING
Improper installation, adjustment, alteration,
service or maintenance can cause injury
or property damage. Read the installation,
operating and maintenance instructions
thoroughly before installing or servicing this
equipment.
Une installation, un ajustement, une
modication, une réparation ou un entretien
inapproprié peuvent être la cause de blessure
ou de dommages. Veulliez lire attentivement
les instructions d’installation, d’utilisation et
d’entretien avant d’installer ou de réparer ce
matériel.
WARNING
California Proposition 65 Warning: Chemicals known to the State of California to cause cancer, birth
defects or other reproductive harm are found in and/or created by the combustion of natural gas, propane,
butane and other fuels. Always operate this unit as described in the owner’s manual and in well ventilated
areas.
WARNING
Do not use charcoal or other solid fuel in gas burning appliances.
Do not use your re pit for cooking.
Do not heat any unopened glass or metal container of food in the re pit.
Pressure may build up and cause the container to burst, possibly resulting in serious personal injury or
damage to the re pit.
Never use the re pit in windy conditions.
If used in a consistently windy area a windbreak will be required.
Always adhere to the specied clearances listed in this manual.
Never allow clothing or other ammable materials come in contact with any hot surface until it has fully
cooled.
Never wear loose tting or hanging garments while using your re pit. Fabric may ignite and result in
personal injury.
PHONE: (909) 460-5579 | THEOUTDOORPLUS.COM | 235 E MAIN ST. ONTARIO, CA 91761 4
Page 5

SIENNA | FIRE PIT
SAFETY WARNINGS
DANGER
Propane gas source to the re pit must be regulated.
Do not operate if regulator has been removed. Fire or explosion can occur.
BURN HAZARD
While the re pit is operating, the outside surface may reach high temperatures which may cause burns.
Never leave children unattended in the area where the re pit is being used. Close supervision of children is
necessary when any appliance is used near children. Never leave the re pit unattended when in use.
When using the re pit, do not touch the rock, re screen, or immediate surroundings, as these areas
become extremely hot and could cause burns.
Do not reach over your re pit when hot or in use.
Do not store items of interest to children around or below the re pit.
Never allow children to sit or stand on any part of the re pit.
GAS SAFETY
In the event that a burner goes out, turn burner knobs to the full OFF position and let the gas dissipate.
Do not attempt to use the re pit until the gas has had time to dissipate.
SAFETY
Keep all electrical supply cords away from the heated areas of the re pit.
Clothing or other ammable materials should not be hung from the appliance, or placed on or near the
appliance.
PHONE: (909) 460-5579 | THEOUTDOORPLUS.COM | 235 E MAIN ST. ONTARIO, CA 91761 5
Page 6
Page 7

GAS REQUIREMENTS
SIENNA | FIRE PIT
LIQUID PROPANE
Your Outdoor Plus re pit is not provided with a
propane tank. You will need to provide one. Use these
specication for purchasing your propane tank:
SPECIFICATIONS
The 20 lb propane gas supply cylinder is constructed
and marked in accordance with the specications
for propane gas cylinders as required by the U.S.
Department of Transportation (DOT), Specications for
LP-Gas Cylinders, or the Standard for Cylinders, Spheres
and Tubes for Transportation of Dangerous Goods and
Commission, CAN/CSA B339, as applicable.
Manifold Pressure: For plumbed-in liquid propane
installation, use a regulator.
Supply Pressure:
Natural Gas:
Minimum 3.5” W.C. Maximum 7.0” W.C.
Liquid Propane:
Minimum 8.0” W.C. Maximum 11.0” W.C.
NATURAL GAS
Ensure that the service supplying the re pit is tted
with a conveniently positioned shut o valve with easy
access. The shut o valve MUST NOT be inside the
appliance!
REQUIREMENTS
Always check the rating plate to make sure the gas
supply you are hooking up to is the gas type the re pit
is manufactured for.
The installation of this appliance must conform with
local codes or, in the absence of local codes, to the
National Fuel Gas Code, ANSI Z223.1, NFPA 54; National
Fuel Gas Code; Natural Gas and Propane Installation
Code, CSA B149.1; or Propane Storage and Handling
Code, CSA B146.2, as applicable. Natural gas connection
must be performed by a licensed contractor or local gas
company representative.
Ensure that the service supplying the re pit is tted
with a conveniently positioned shut o valve with easy
access.
Pressure Regulator: The unit must be used with the
supplied gas pressure regulator and hose assembly.
The regulator will control and maintain a uniform gas
pressure in the manifold. The burner orice has been
sized for the gas pressure delivered by the regulator.
Replacement pressure regulator and hose assemblies
must be those specied in this manual.
Cylinder Specication: Any propane gas supply
cylinder used with this re pit must be approximately 12
inches in diameter and 18 inches high. The maximum
fuel capacity is 20 lbs. of propane, or 5 gallons. Full
cylinder weight should be approximately 38 lbs. (43.7
lbs. nominal water capacity.) Always use the cylinder
dust cap on the cylinder valve outlet during transport
and when the cylinder is not connected to the re pit.
The 20 lb propane gas cylinder used must include a
collar to protect the cylinder valve.
Filler Valve: If you do not have an updated ller valve
on your existing propane tank, you will need to purchase
one at your local hardware store, as you will not be
allowed to rell the tank at any lling station.
PRESSURE TESTING
If this re pit is installed with a xed fuel piping
system and equipped with an appliance gas
pressure regulator, the re pit and its individual
shuto valve must be disconnected from the gas
supply piping system during any pressure testing
of the system at test pressures in excess of 1/2 psi
The re pit must be isolated from the gas supply
piping system by closing its individual manual
shuto valve during any pressure testing of the
gas supply piping system at test pressures equal
to or less than 1/2 psi
PHONE: (909) 460-5579 | THEOUTDOORPLUS.COM | 235 E MAIN ST. ONTARIO, CA 91761
7
Page 8

SIENNA | FIRE PIT
SET-UP
1. Place the re pit in a desired location
2. Connect the gas line:
2.1 Connection for Liquid Propane
2.2 Connection for Natural Gas
3. Perform a leak test
4. Place the decorative stone in the re pit
If you use natural gas, you are responsible for ensuring that a gas line is installed and safe for use. We recommend
that a licensed contractor install your re pit.
This appliance, when installed, must be electrically grounded in accordance with local codes or, in the absence of
local codes, with the National Electrical Code, ANSI/NFPA 70; or the Canadian Electrical Code, CSA C22.1, if applicable.
STEP 1
PLACE THE FIRE PIT IN A DESIRED LOCATION
The Outdoor Plus re pits are designed for outdoor
use only.
Never place this appliance in a building, garage, or
any other enclosed room or under a sealed overhead
structure, or in any type of enclosed area such as a
garage, shed, or breezeway. Keep clear of trees and
shrubs.
Do not place re pit under or near windows or vents
that can be opened into your home.
Maintain sucient distance as to not overheat any
overhead combustible material such as a patio cover.
The area surrounding your re pit should be kept clean
and free from ammable liquids and other combustible
materials such as mops, rags or brooms, as well as
solvents, cleaning uids, and gasoline.
Do not block the vents located near the base of your re
pit as gas may build up in case of leak and cause serious
damage.
Do not locate appliance where it can get excessively
wet. Do not use this appliance if any part has been
underwater. Immediately call a qualied service
technician to inspect the unit and to replace any part of
the control system and any gas control which has been
underwater.
Place your re pit on a at and stable surface in an
outdoor location such as a patio deck.
Maintain the following clearances to combustible
materials:
Sides and back 48 inches (122 cm)
measured from side
Top 96 inches (244 cm)
measured from hearth
Ventilation
Fresh air must be able to pass though installed vents
to safeguard against residual gas accumulation. Failure
to allow proper ventilation may cause re or explosion.
Place the re pit on a solid platform such as concrete
to allow air ow through vents in the bottom. The
vents must never be allowed to be obstructed. (See
the Clearance from Combustibles page at the end of the
manual.)
Placement for Natural Gas
If you are planning to use natural gas, you may choose
to locate the re pit in a permanent location in order to
hide the gas line. If you bury the gas line, you will need a
gas riser about 10” above the ground. You will also need
to have a gas valve located OUTSIDE the re pit in order
to shut o gas to the re pit.
We strongly recommend having a licensed contractor
install your gas line.
PHONE: (909) 460-5579 | THEOUTDOORPLUS.COM | 235 E MAIN ST. ONTARIO, CA 91761 8
Page 9
SET-UP
STEP 2
CONNECT THE GAS LINE
Location of Gas Inlet
This applies to both liquid propane and natural gas
installation.
Your re pit will come Pre-Plumbed for the appropriate
gas feature that has been ordered
STEP 2.1
SIENNA | FIRE PIT
FIGURE A
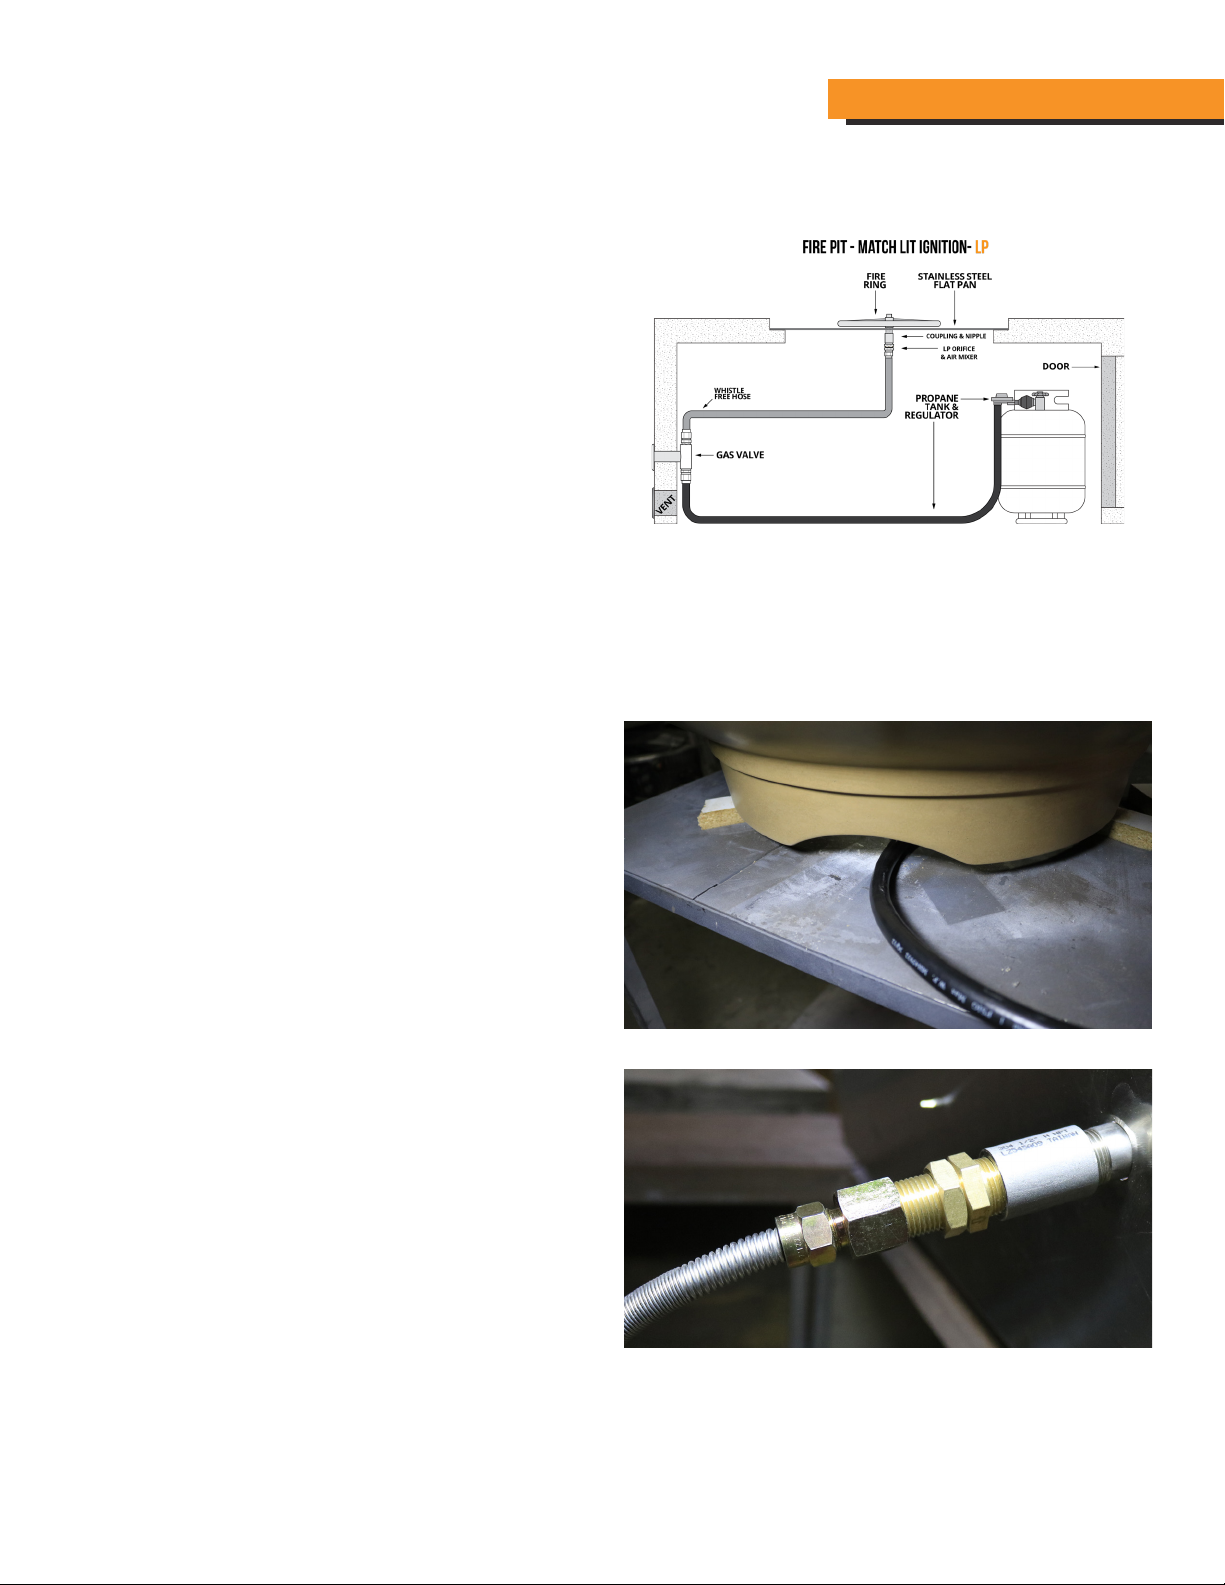
*This diagram is for units with access doors, NOT units without
access doors. You may have to place a propane tank EXTERNALLY.
CONNECTION FOR LIQUID PROPANE
Unless you have a permanent liquid propane gas line
installed, you will need to bring the black gas line under
the re pit through the ventilation. See Figure B.
For LP applications all you will have to do is connect the
LP regulator to your propane tank. Please ensure you
perform a leak test as items may have shifted during
transit.
Before you set the burner plate in place, check the air
mix xture connected under the burner plate. The air
mix xture has six holes that regulate the amount of air
that goes to the burner. When the nut is rotated forward
to cover the six holes, the burner is congured for liquid
propane. Make sure the air mix appears the way it does
in Figure C.
Perform a leak test before you replace the burner plate.
(See Step 3.)
Connect the black liquid propane hose to a gas cylinder.
Use a QCC-1 propane connector with a regulator. When
you connect the regulator to the tank valve, hand tighten
the black QCC-1 nut clockwise. DO NOT use a wrench to
tighten.
FIGURE B
FIGURE C
PHONE: (909) 460-5579 | THEOUTDOORPLUS.COM | 235 E MAIN ST. ONTARIO, CA 91761 9
Page 10
SIENNA | FIRE PIT
SET-UP
STEP 2.2
CONNECTION FOR NATURAL GAS
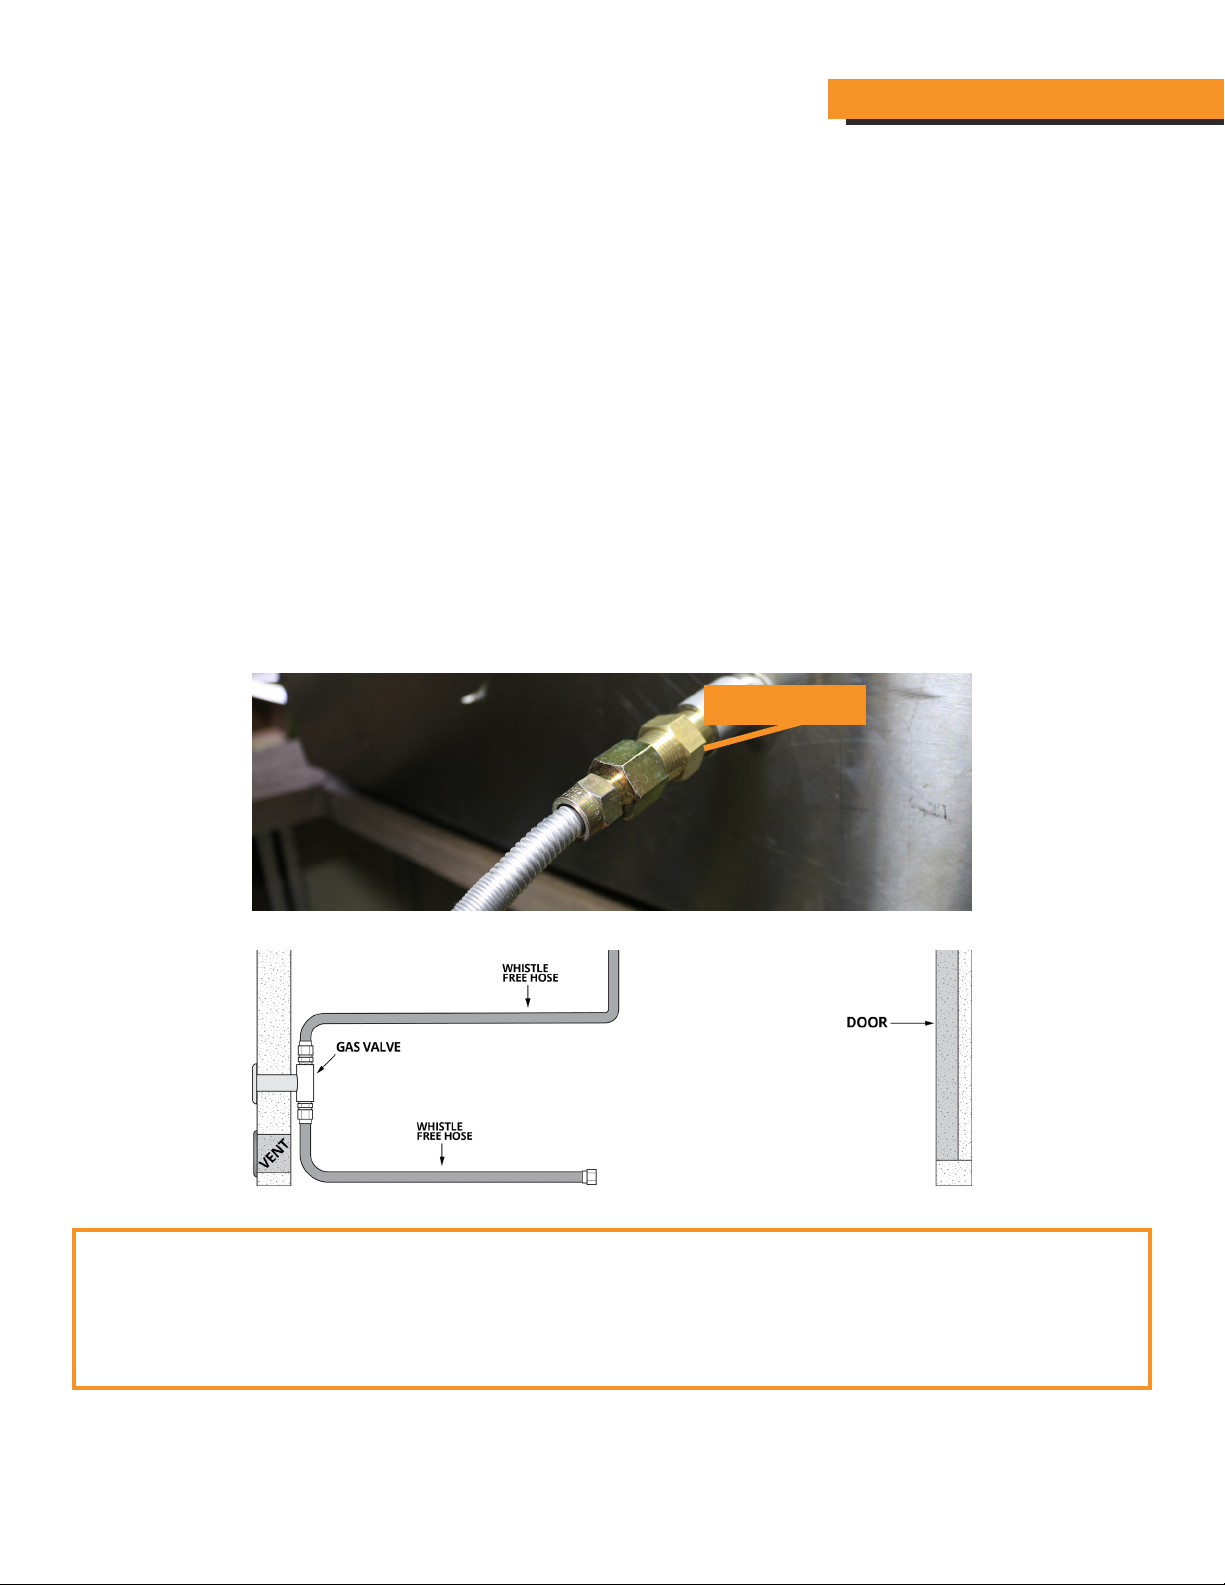
The Outdoor Plus re pits are shipped from the factory equipped to burn on the gas that has been ordered.
The ex line that runs from the igniter to the burner has been connected at the factory. You will only need to
connect the natural gas line from the igniter to the gas source, as shown in the Figure D.
Before you set the burner plate in place, make sure the air mix xture is connected undereath the pan max 6” away
from an open ame. The air mix xture is required for liquid propane but not for natural gas. (See Step 2) Make sure
the ex hose is connected to the burner as shown in Figure E.
Perform a leak test before you replace the burner plate. (See Step 3)
Connect to the gas source.
NG ORIFICE
FIGURE D
FIGURE E
LOCATING THE GAS LINE
Make sure the gas line is out of pathways where people may trip over it and not in areas where the hose
may be subject to accidental damage. This applies to both natural gas and liquid propane gas lines.
PHONE: (909) 460-5579 | THEOUTDOORPLUS.COM | 235 E MAIN ST. ONTARIO, CA 91761 10
Page 11
SET-UP
STEP 3
PERFORM A LEAK TEST
Perform a leak test at least once a year whether the
gas supply cylinder has been disconnected or not. In
addition, whenever the gas cylinder is connected to the
regulator or whenever any part of the gas system is
disconnected or replaced, perform a leak test.
SIENNA | FIRE PIT
As a safety precaution, remember to always leak test
your re pit outdoors in a well-ventilated area. Never
smoke or permit sources of ignition in the area while
doing a leak test. Do not use a ame, such as a lighted
match to test for leaks. Use a solution of soapy water.
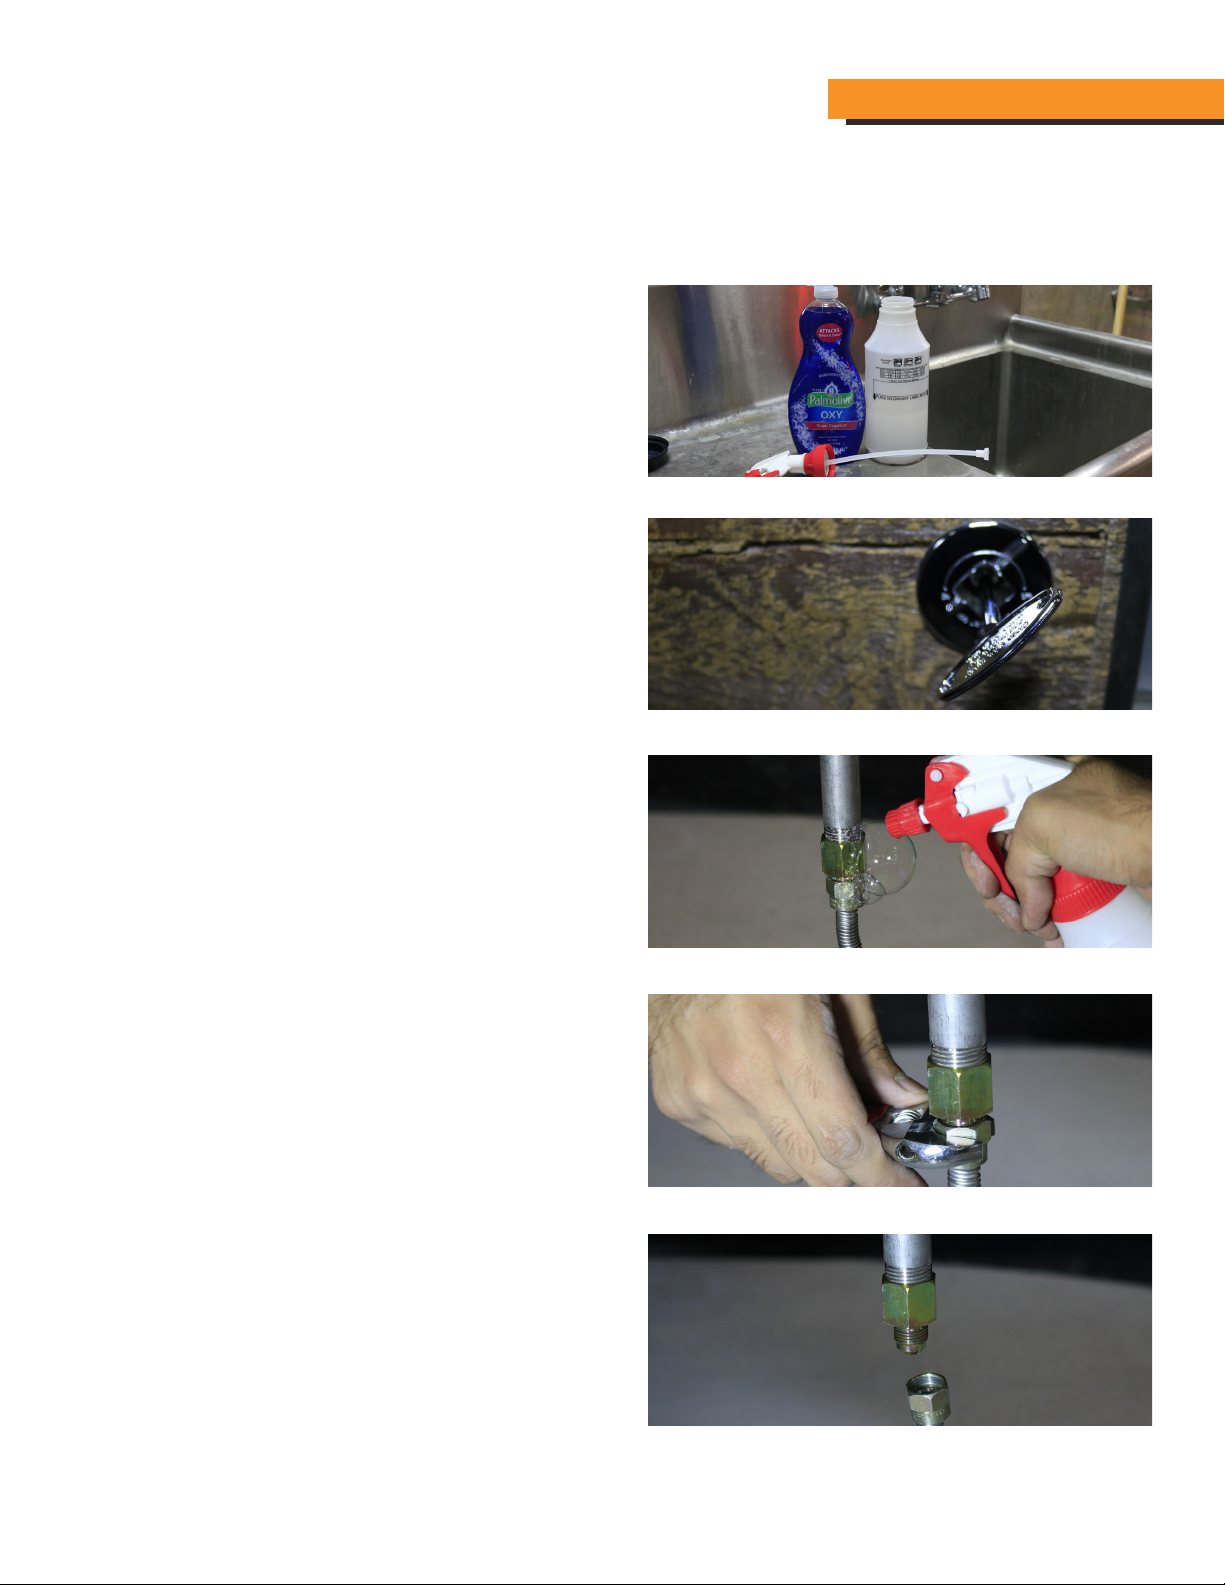
1. Prepare a leak testing solution of soapy water by
mixing in a spray bottle one part liquid soap to one
part water.
2. Make sure all the control knobs are in the OFF
position.
3. Turn on the gas.
4. Apply the leak-testing solution by spraying it on joints
of the gas delivery system. Blowing bubbles in the
soap solution indicates that a leak is present.
5. Stop a leak by tightening the loose joint or by
replacing the faulty part with a replacement part
recommended by the manufacturer. Do not attempt
to repair the cylinder valve if it is damaged. The
cylinder must be replaced.
FIGURE F
FIGURE G
FIGURE H
6. Turn the control knob back to the full OFF position.
If you are unable to stop a leak: Please consult a gas
specialist.
8. Shut o the gas supply to the re pit and release
pressure in the hose and manifold.
9. On propane systems, remove the cylinder from the
re pit.
10. Call/consult an authorized gas appliance service
technician or an liquid propane gas dealer.
Do NOT use the appliance until the leak is corrected.
PHONE: (909) 460-5579 | THEOUTDOORPLUS.COM | 235 E MAIN ST. ONTARIO, CA 91761 11
FIGURE I
FIGURE J
Page 12
SET-UP
STEP 4
PLACING DECORATIVE STONE
After you have completed all plumbing installation, you
can ll the re bowl with the decorative ller material.
Type of ller placement, such as lava rock, decorative
stone or glass, is entirely your choice according to your
preferences, but it needs to be rated for use with re.
It will not aect the operation of the re pit in any way.
You can place the ller material on the burner, but no
higher than 1” thick above the burner. Excessive ller
material may impede gas ow and cause gas build-up
and potentially cause an explosion.
GAS SPECIFICATIONS
SIENNA | FIRE PIT
FIGURE K
PRESSURE NATURAL GAS PROPANE
MINIMUM 3.5⁰ W.C. 8.0⁰ W.C.
NOMINAL 7.0⁰ W.C. 11.0⁰ W.C.
MAXIMUM 1/ 2 psi (14.0⁰ W.C) 1/2 psi (14.0⁰ W.C)
NG TO LP PARTS
NAME PART NUMBER QUANTITY
AIR MIX ORIFICE OPT-232A 1
LP REGULATOR HOSE OPT-1300 1
LP TO NG PARTS
NAME PART NUMBER QUANTITY
NATURAL GAS ORIFICE OPT-NG012 1
1/2” 36” WHISTLE-FREE HOSE OPT-241 1
PHONE: (909) 460-5579 | THEOUTDOORPLUS.COM | 235 E MAIN ST. ONTARIO, CA 91761 12
Page 13

OPERATING THE FIRE PIT
WARNING
DO NOT USE SOLID FUEL, SUCH AS WOOD OR CHARCOAL, IN GAS FUELED FIRE PITS.
SIENNA | FIRE PIT
PURGE GAS LINES
Upon completing the gas line connection, a small
amount of air will be in the lines. When the rst lighting
the burner, it will take a few seconds for the lines to
purge themselves of this air.
Once the purging is complete, the burner will light
and operate as indicated in the instruction manual.
Subsequent lighting of the appliance will not require
purging unless the gas supply has been disconnected.
Inspect the gas hose before each use of the re pit. If
the hose shows evidence of excessive abrasion or wear
or if the hose is damaged, it must be replaced before
using the re pit. Inspect the burner before each use of
the appliance. If there is any evidence that the burner
is damaged, it must replaced before operating. Upon
completing the gas line connection, a small amount of
air will be in the lines. When rst lighting the burner, it
will take a few minutes for the lines to purge themselves
of this air. Subsequent lighting of the appliance will not
require such purging. Never allow the ON / OFF valve to
remain in the open position without placing a burning
match on top of the burner FIRST!
LIGHTING INSTRUCTIONS
1. Turn the ON/OFF valve located on the side of re pit
completely to the ON position.
2. Make sure fuel supply (LP or NG) is properly
connected and turned on at the source. This will be
either the LP tank or the NG valve.
3. When you hear gas owing, using either a long stem
wooden match or a butane replace lighter, place the
ame near the burner.
4. If the burner does not light, does not stay lit, or the
ame is very low, shut o all gas supply and wait
ve minutes to allow all gas fumes to clear. Start again
from step 1, making sure all gas valves are completely
opened.
TURNING OFF GAS
For NG units: Turn the ON/OFF valve to the OFF position
at the unit for natural gas unit, then close the valve at
the NG source.
For propane units: Turn the ON/OFF valve to the OFF
position at the unit and then close the valve on the
propane tank.
You must have clear and easy access to the ON
/ OFF valve AFTER the appliance is installed and
connected to the gas supply in order to safely turn of
the burner. Make sure the burner is in place prior to
using the appliance. If the burner is damaged, install a
replacement burner as specied by the manufacturer.
FOR YOUR SAFETY, READ BEFORE LIGHTING.
õ Before operating smell all around the appliance
area for gas odors and next to the oor because some
gases are heavier then air and will settle on the oor.
õ Use only your hand to turn the manual gas control
valve. Never use tools. If the valve will not turn by
hand, do not try to repair it. Call a qualied service
technician. Force or attempted repair may result in a
re or explosion.
PHONE: (909) 460-5579 | THEOUTDOORPLUS.COM | 235 E MAIN ST. ONTARIO, CA 91761 13
Note:
The propane regulator in this appliance is equipped
with a low ow protection device. Unless the propane
cylinder valve is opened before the valve, the gas ow
will be reduced resulting in a very small ame. To reset
this device, shut o the valve, disconnect the hose
from the cylinder to relieve the pressure, then close the
propane cylinder valve.
Page 14
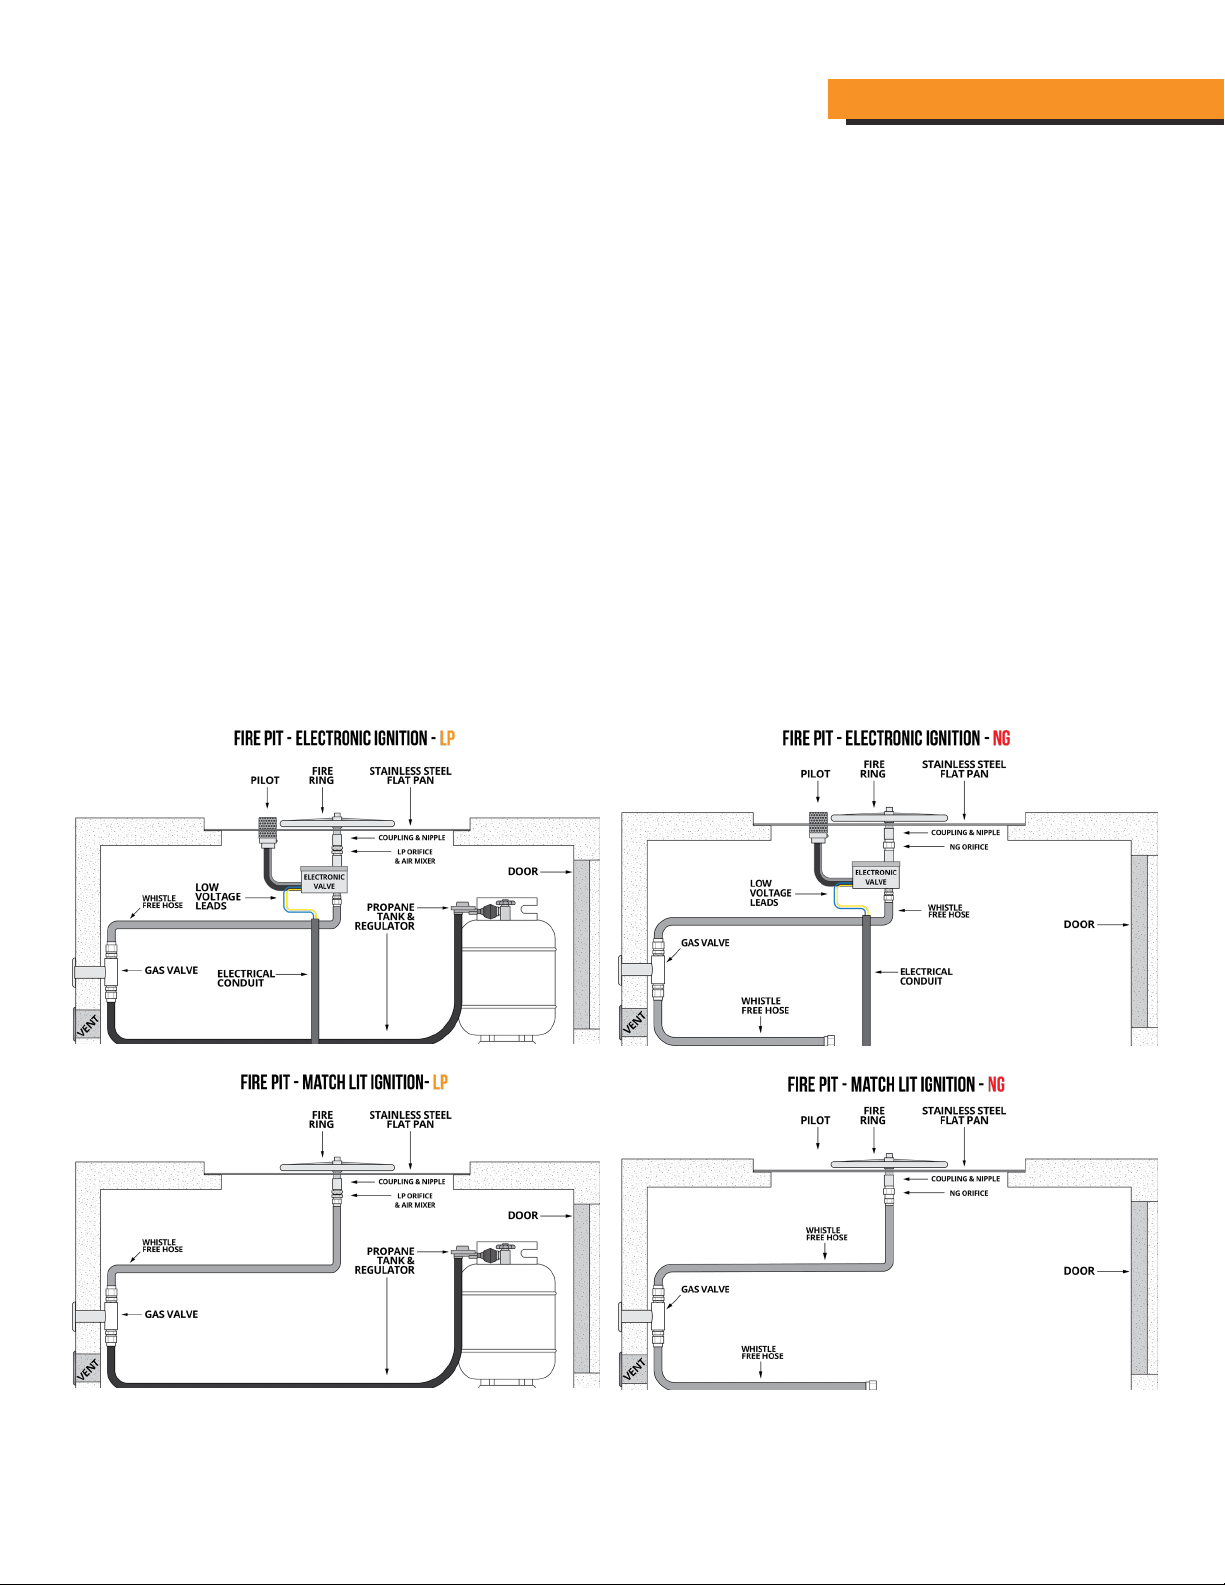
SIENNA | FIRE PIT
GAS CONVERSION
If you have been using your re pit and choose to use a dierent type of fuel, you can convert your re pit to use
either liquid propane or natural gas any time you wish.
Before you begin, read the gas requirement on page page 4. Fire pit owners who convert from liquid propane need
to have a proper natural gas line installed, preferably by a licensed contractor.
Make sure the re pit is cool and all gas lines have been shut o. Remove the decorative stone from the re pit. Lift
the burner plate out of the re pit and locate the air mix connector attached to the burner.
After you have nished, set the burner plate back in place and connect to a fuel source. Perform a leak check before
you use the re pit.
FOR LIQUID PROPANE:
Liquid propane requires the air mix xture connected to
the burner.
Make sure the brass ring back is rotated back to expose
the six holes in the air mix xture. (See Figure L.)
FIGURE L FIGURE M
FOR NATURAL GAS:
Remove the air mix xture and replace it with an NG
orice.
The NG orice is required to prevent excessive gas ow.
(see Figure M.)
Attach the NG ex line to the burner with a 1/2” adapter.
*This diagram is for units with access doors, NOT units without
access doors. You may have to place a propane tank EXTERNALLY.
PHONE: (909) 460-5579 | THEOUTDOORPLUS.COM | 235 E MAIN ST. ONTARIO, CA 91761 14
Page 15
CLEANING, MAINTENANCE & STORAGE
SIENNA | FIRE PIT
CLEANING
Inspect the appliance before initial use. Clean the
appliance at least annually and have it inspected by a
qualied eld service person.
Periodically examine the burner. If the burner is dirty,
clean it with a soft wire brush. Remove any dirt or debris
in this area. This will ensure long life and trouble-free
operation.
The easiest way to clean the re pit is to let it cool
completely o. Spray the enclosure o with water. Note:
Do NOT spray water directly onto the burner and igniter.
and wipe clean with a dry cloth.
When not in use and after cooling, cover your re pit
with a full length cover. The cover will help protect
your re pit from detrimental eects of weather and
environmental pollutants (see your local Outdoor Plus
dealer for details).
Before placing the cover on the re pit, make sure the
unit is shut o, that the gas lines are disconnected and
that the unit has had sucient time to cool.
Do not repair or replace any part of your re pit. Have
a qualied technician perform all service. Any repairs
made by a non-approved service technician will void
your warranty.
STORAGE
When your re pit is not in use, turn o the gas at the
source.
This appliance can be store indoors only if it has been
disconnected from its fuel supply.
Store propane cylinders outdoors in a well-ventilated
area out of reach of children. Disconnected cylinders
must have threaded valve plugs tightly installed and
must not be stored in a building, garage, or any other
enclosed area.
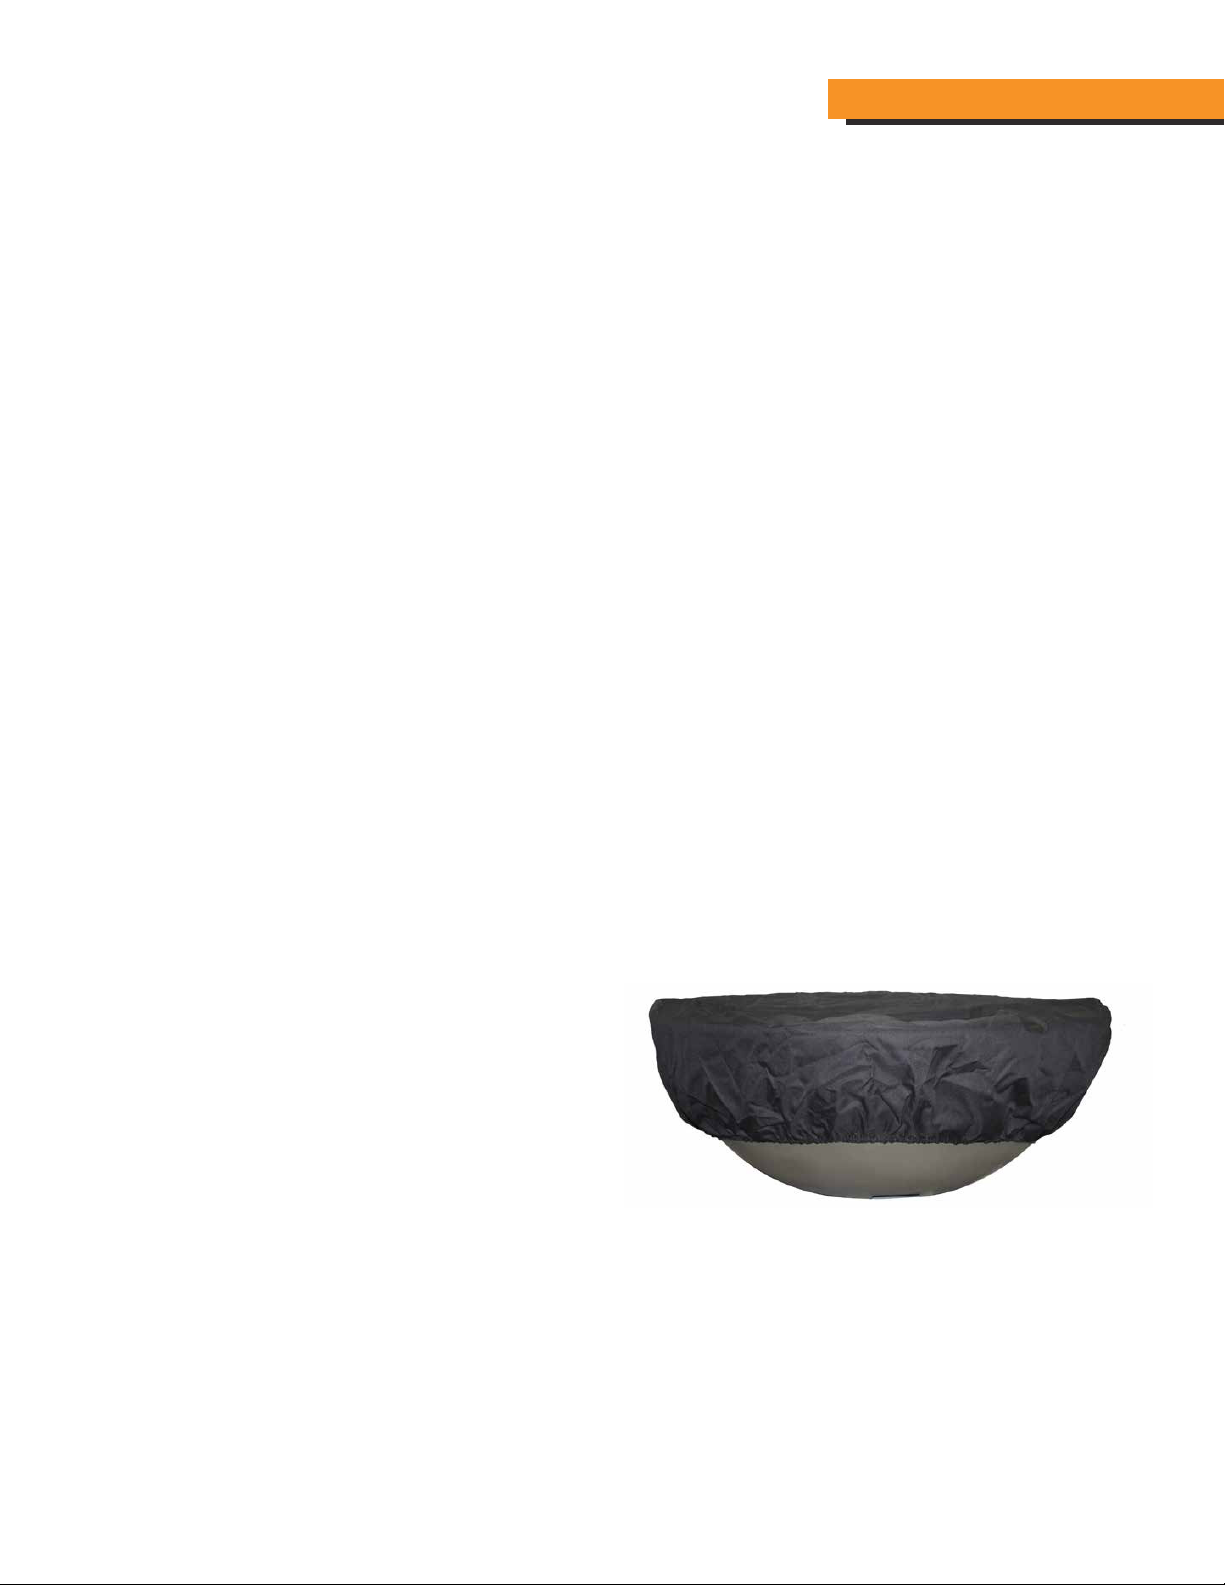
To extend the life of your re pit, protect and cover it
from the elements when not in use. (See Figure N) Ensure
the appliance has ample time to cool o after use and
prior to installing storage cover. Damage caused to
storage cover due to heat or burns are not covered by
warranty.
More frequent cleaning may be required as necessary.
It is imperative the control compartment, burner and
circulation air passageways of the appliance be kept
clean and free.
MAINTENANCE
Periodically check the hose connecting the propane gas
cylinder to ensure it is not cracked or damaged in any
way. All natural gas hook-ups should be serviced and
inspected only by qualied installers only.
Spiders and other insects can nest in the burners and
block the gas and airow to the burner ports. This
creates a dangerous condition that can result in a re
from behind the valve panel. Inspect and clean the
burners periodically.
Any guard or other protective device removed for
servicing the appliance must be replaced prior to
operating the appliance.
Inspect the fuel supply connection for signs of leakage
(including the hose for propane models) before each use
of the appliance.
FIGURE N
PHONE: (909) 460-5579 | THEOUTDOORPLUS.COM | 235 E MAIN ST. ONTARIO, CA 91761 15
Page 16
REPLACEMENT PARTS
A complete catalog of products and replacement parts
available from The Outdoor Plus can be found online at
www.theoutdoorplus.com You can nd a full range of
products and accessories, including:
õ Burners: Pan burners, H burners, re pit rings.
õ Decorative glass and ecoglass.
õ Fireplaces, re pits, re tables, re bowls, custom
re burners and custom pan burners.
õ BBQ islands.
Custom items are always available contact us at (909)
460-5579 or send us a message at
[email protected]
ONE YEAR LIMITED WARRANTY
SIENNA | FIRE PIT
FIGURE O
This product is warranted to be free from defects in
material and workmanship for one year from the date of
purchase.
If a part proves to be defective under normal use, the
part will be repaired or replaced. Our obligation under
this warranty is to repair or replace defective parts at
our discretion. If we determine that repair of a covered
item is not feasible, we reserve the right to replace
the defective merchandise with merchandise equal in
value to the original purchase price. Warranty repair or
replacement are the sole discretion of The Outdoor Plus
and this warranty does not cover costs therein, including
but not limited to: freight, removal, re-installation, etc.
There will be no charge for parts on a covered item,
however, cost of labor is the responsibility of the
owner. Shipping and handling charges will apply to all
warranted replacement parts. The service agent may
assess a reasonable travel or mileage charge per service
call.
This warranty is non-transferable.
Decorative stones and decorative glass are not covered
by this warranty.
This warranty is void if the re pit has been subject to
negligence, alteration, misuse, repairs, dings, dents,
scratches, or incorrect and / or prohibited applications
as specied in the owner’s manual. Natural gas lines
must be installed by a licensed plumber only or local gas
company agent.
For more information regarding the warranty please
send any questions to [email protected].
PHONE: (909) 460-5579 | THEOUTDOORPLUS.COM | 235 E MAIN ST. ONTARIO, CA 91761 16
Page 17
CLEARANCE FROM COMBUSTIBLES
SIENNA | FIRE PIT
INSTALLATION
We suggest that our products be installed by
professionals that are locally licensed by the authority
having jurisdiction in gas piping.
FLOORING
All re pits and re features must be installed on noncombustible ooring. If the re feature is installed
on a combustible oor, such as wood decking, a noncombustible oor paneling MUST be properly installed
underneath the re unit.
SERVICE
We suggest that our products be serviced by a
professional certied in the US by the National Fireplace
Institute (NFI) as NFI Gas Specialists.
PHONE: (909) 460-5579 | THEOUTDOORPLUS.COM | 235 E MAIN ST. ONTARIO, CA 91761 17
 Loading...