

Page 1
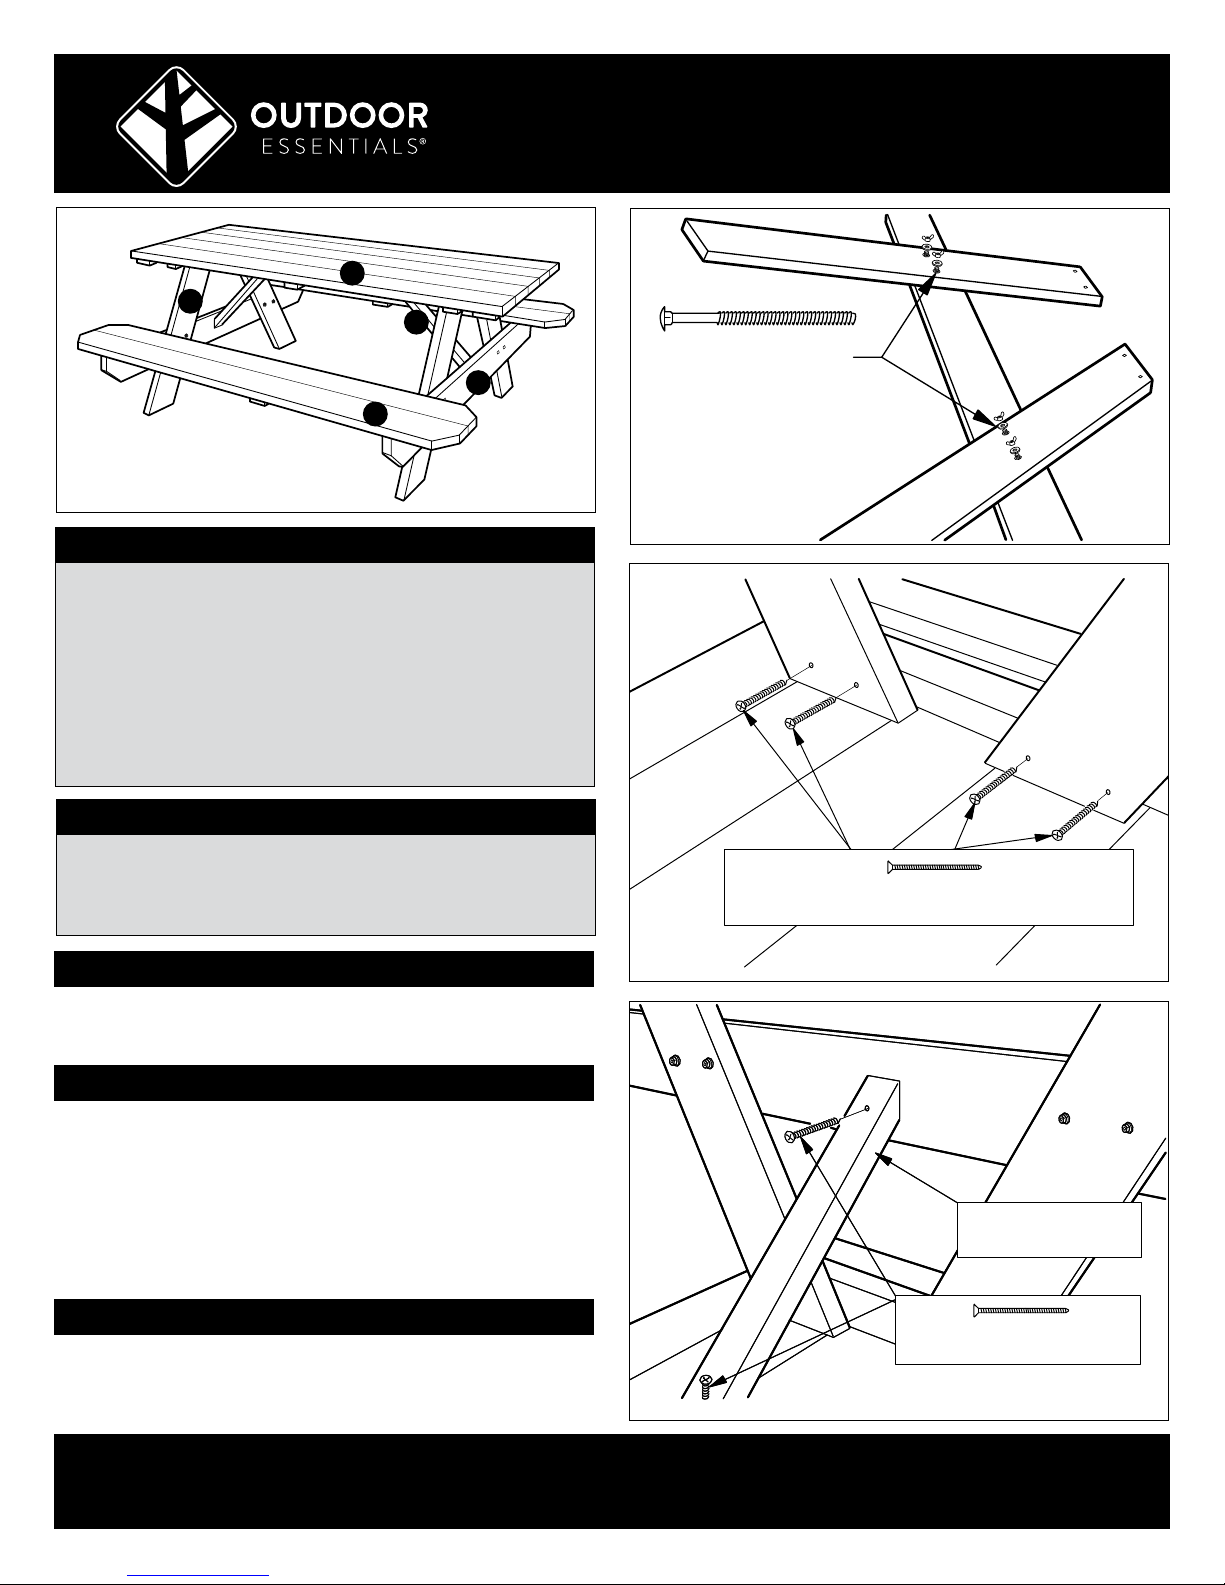
3-1/2" Carriage bolt
2-1/2" wood screw / predrilled holes
Beveled edge
A
B
C
E
D
A
(4) 3-1/2" carriage
bolts through
crossmember
and legs
D
C
B
Contents
• 1 – Preassembled table top (A)
• 2 – Preassembled seats (B)
• 2 – 2"x 3"x 23-1/2" diagonal braces (C)
• 4 – Predrilled table legs (D)
• 2 – Predrilled seat crossmembers (E)
• 8 – 3-1/2" carriage bolts with nuts and washers
• 36 – 2-1/2" wood screws
PICNIC TABLE
ASSEMBLY INSTRUCTIONS
E
fig. 1
Items you will need
• Drill
• 1/8" drill bit
• Tape measure
• Adjustable wrench
Optional
To maintain the appearance of your table, apply two coats of
water repellent to wood components every two years.
Insert four (4) 3-1/2" carriage bolts into the predrilled seat
crossmember (E). Position so that the bolt heads are on the
ground and the threads are exposed. Make sure the beveled edge
of the seat crossmember is facing down. Position the legs (D) so
that the predrilled holes align with the bolts and the tops of the
legs are level and straight. Add the washers and secure with a
wing nuts. Repeat step for the second leg assembly (fig. 1).
Step 1
Step 2
Place the preassembled table top (A) upside down and position
the preassembled leg frame, making sure the seat crossmember
is facing out.
©2017 Universal Forest Products, Inc. Outdoor Essentials is a registered trademark of Universal Forest Products, Inc.
Assembled in the USA with imported fasteners. All rights reserved.
2801 East Beltline NE, Grand Rapids, MI 49525 | 800.598.9663 | 9333_4/17
OutdoorEssentialProducts.com
Diagonal brace
Diagonal brace
Entretoise
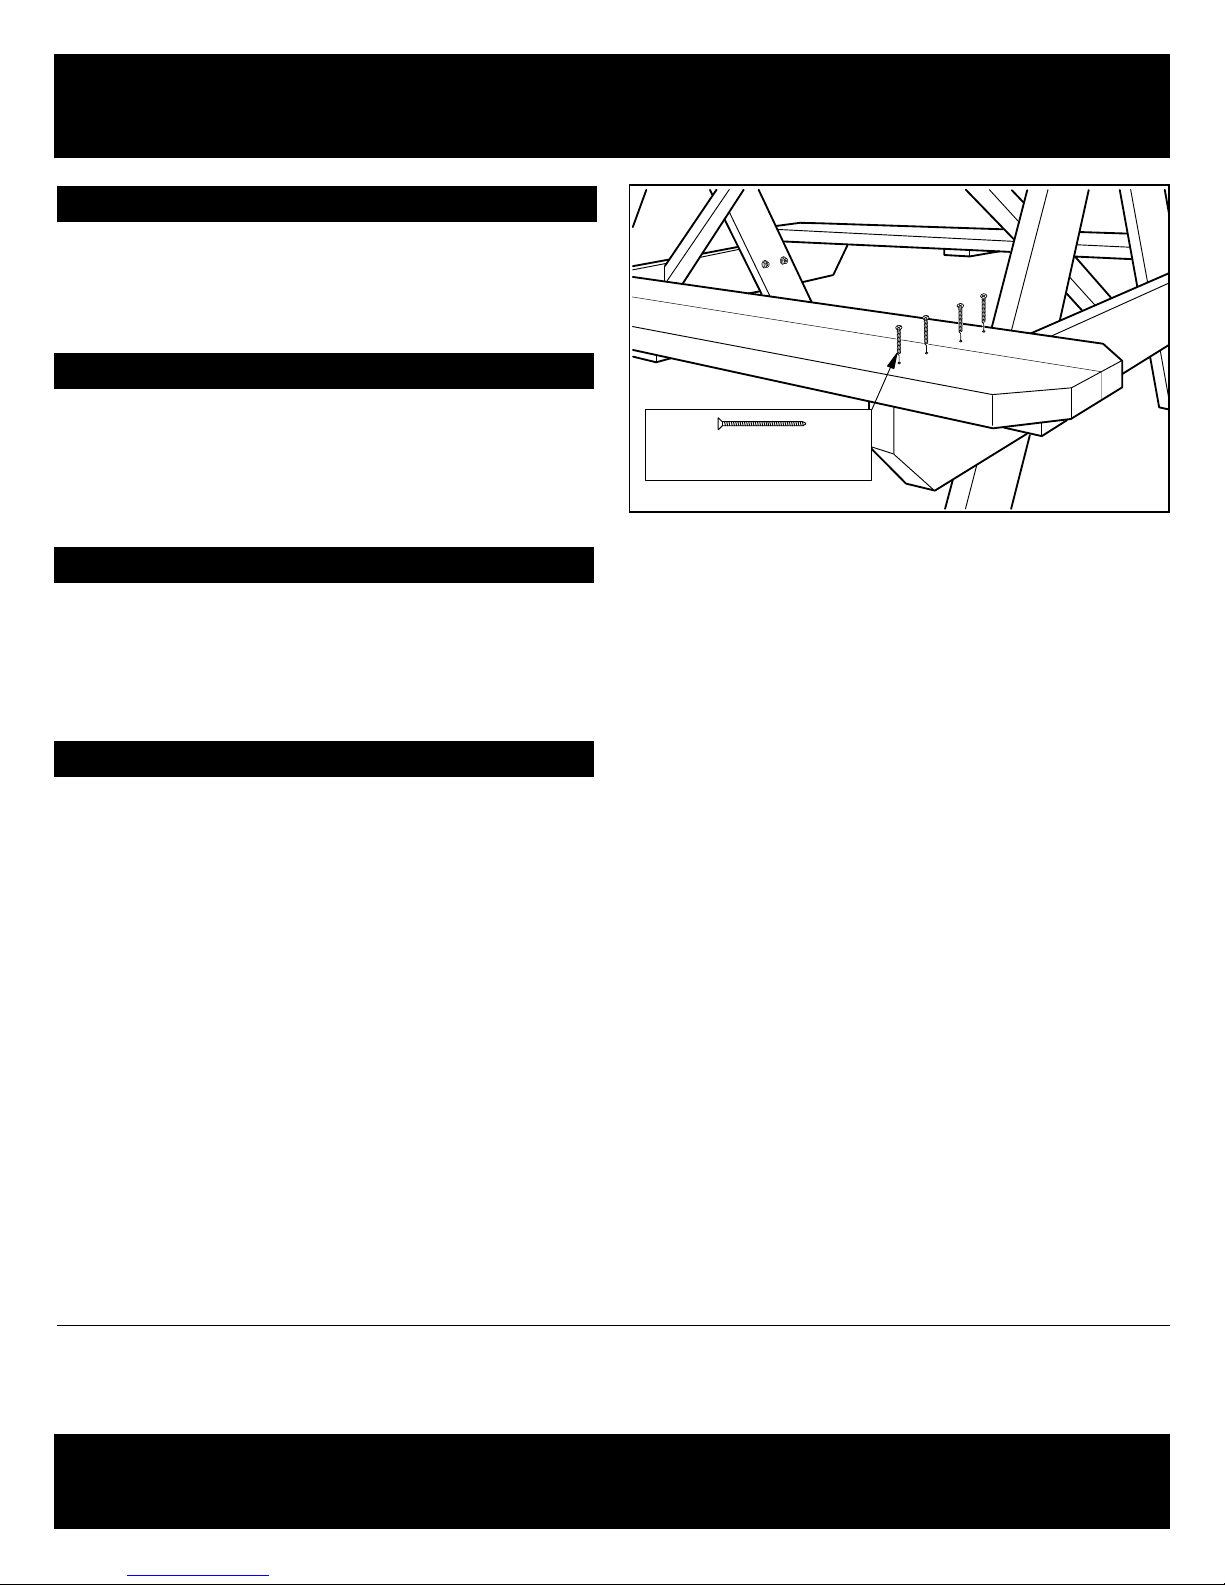
2-1/2" Wood screw
2-1/2" wood screw
Vis à bois 2-1/2"
fig. 2
fig. 3
Page 2
PICNIC TABLE ASSEMBLY INSTRUCTIONS, CONT.
2-1/2" Wood screw / Pre-drilled holes
2-1/2" wood screw
Step 2, cont.
Attach using four (4) - 2-1/2" wood screws through the predrilled
holes (fig. 2). Repeat step to attach other leg frame assembly.
Once the leg assemblies are attached, tighten 3-1/2" carriage
bolts using a wrench.
Step 3
Predrill and attach diagonal braces (C) using the 2-1/2" wood
screws (fig. 3). Before attaching diagonal brace, make sure the
legs are perpendicular to the table top. This will ensure that the
table top is level and the seat benches can be attached correctly.
Turn the table right side up.
Step 4
Place the outside edges of the seats (B) flush with the ends of the
seat crossmembers and align the ends of the seats with the ends
of the table top. To avoid splitting, predrill screw holes using a
1/8" drill bit. Attach the seats to the crossmembers using four (4)
2-1/2" wood screws at each end of both seats (fig. 4).
fig. 4
Step 5
Ensure all wing nuts and screws are fully secured and tightened.
THE DIAGRA MS AND INSTRUCTIONS IN THIS BROCHURE ARE FOR ILLUSTRATION PURPOSES ONLY AND ARE NOT MEANT TO REPLACE A LICENSED PROFESSIONAL. ANY CONSTRUCTION OR USE OF
THE PRODUCT MUST BE IN AC CORDANCE WITH ALL LOCAL ZONIN G AND/ OR BUILDING CODES. THE CON SUMER ASSUMES ALL RISKS AN D LIABILITY ASSOCI ATED WITH THE CONSTRUCT ION OR USE
OF THIS PRODUCT. THE CONSUMER OR CONTRACTOR SHOULD TAKE ALL NECESSARY STEPS TO ENSURE THE SAFETY OF EVERYONE INVOLVED IN THE PROJECT, INCLUDING, BUT NOT LIMITED TO,
WEARING THE APPROPRIATE SAFET Y EQUIPMENT. EXCEPT AS CONTAINED IN THE WRI TTEN LIMITED WARRANTY, THE WARRANTOR DOES NOT PROVIDE AN Y OTHER WARRANT Y, EITHER EX PRESS
OR IMPLIED, AND SHALL NOT BE LIABLE FOR ANY DAMAGES, INCLUDING CONSEQUENTIAL DAMAGES. FOR DETAILS ON SAFE HANDLING AND WARRANTY INFORMATION, GO TO UFPI.COM / PT INFO.
©2017 Universal Forest Products, Inc. Outdoor Essentials is a registered trademark of Universal Forest Products, Inc.
Assembled in the USA with imported fasteners. All rights reserved.
2801 East Beltline NE, Grand Rapids, MI 49525 | 800.598.9663 | 9333_4/17
OutdoorEssentialProducts.com
Page 3
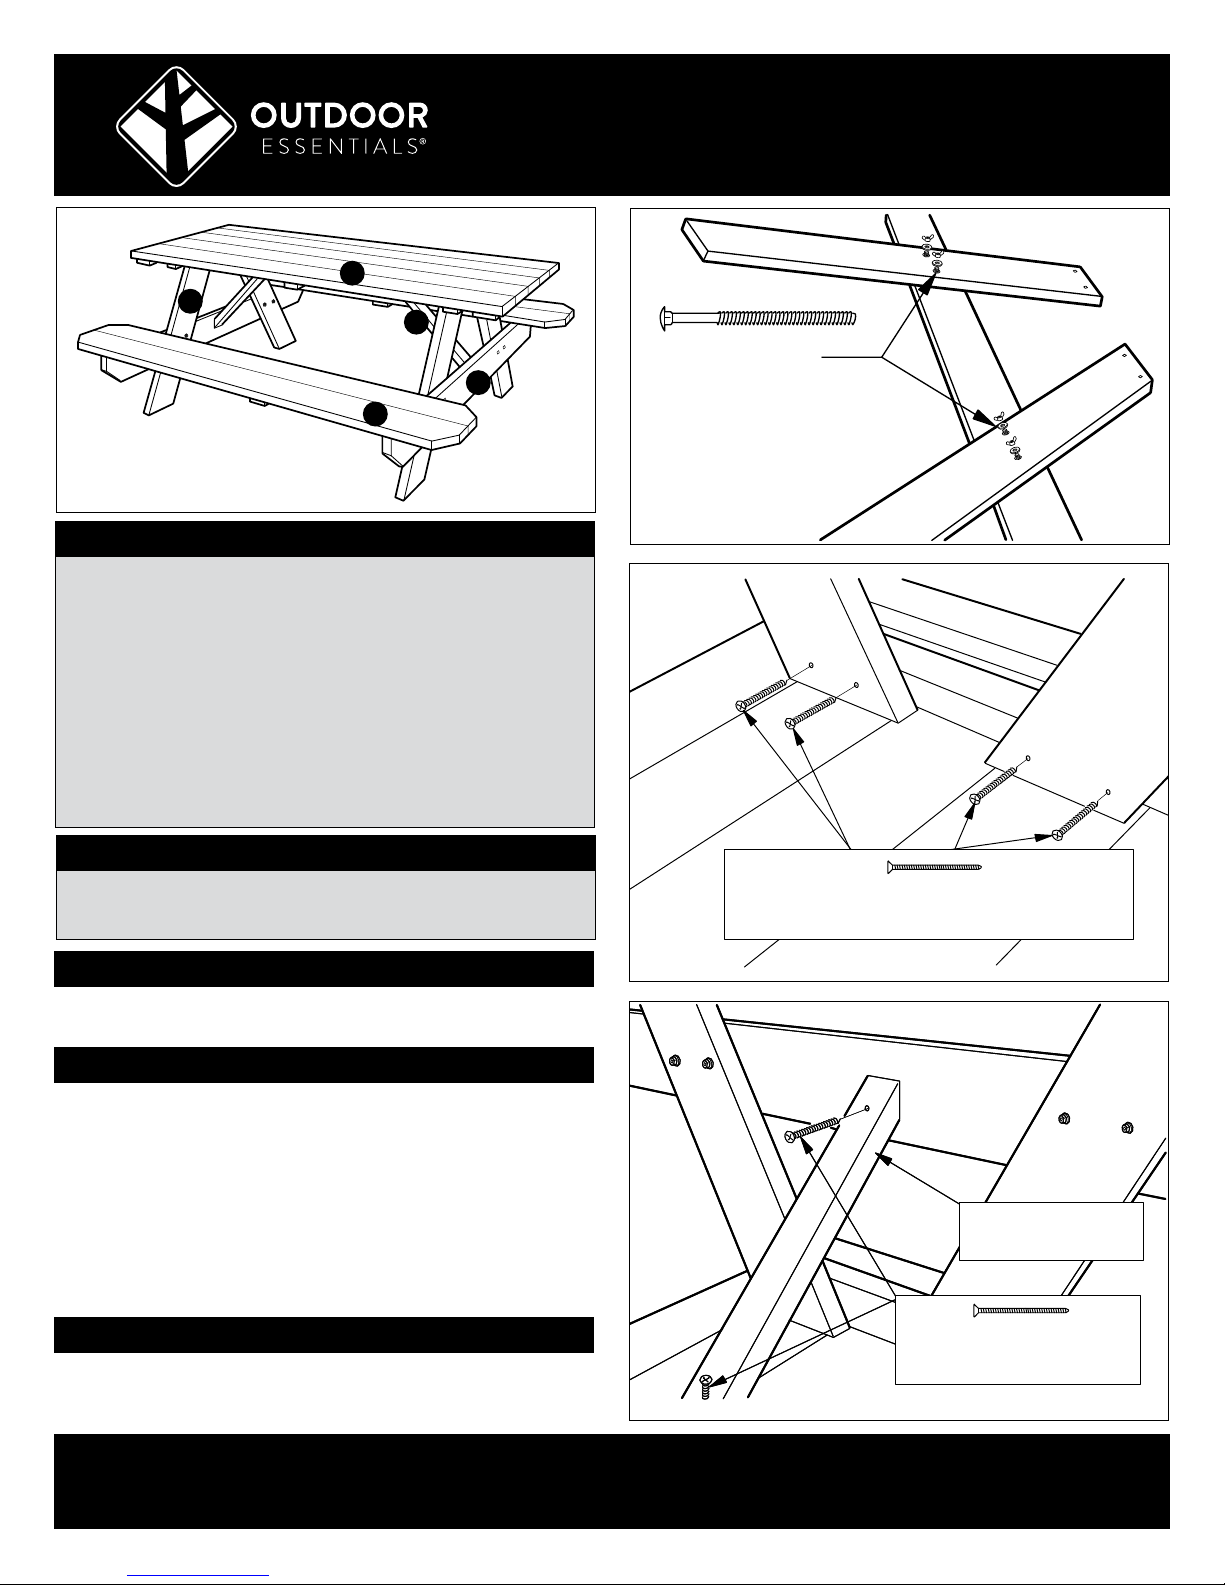
Tornillos para madera de 6.4 cm. (2-1/2 pulg.) /
agujeros pretaladrados
Tirafondo de 3-1/2"
Bordes biselados
A
B
C
E
D
A
(4) pernos de
carrocería de 8.9 cm.
(3-1/2 pulg.) a través
del travesaño y las patas
D
C
E
B
Contenido
• 1 – Cubierta de mesa prearmada (A)
• 2 – Asientos prearmados (B)
• 2 – Soportes diagonales de 5.1 x 7.6 x 59.7 cm.
(2 x 3 x 23-1/2 pulg.) (C)
• 4 – Patas de mesa pretaladradas (D)
• 2 – Travesaños de asiento prearmados (E)
• 8 – Pernos de carrocería de 8.9 cm. (3-1/2 pulg.)
con tuercas y arandelas
• 36 – Tornillos para madera de 6.4 cm. (2-1/2 pulg.)
MESA PARA PICNIC
INSTRUCCIONES DE ARMADO
fig. 1
Elementos que necesitará
• Taladro
• Broca de 0.32 cm. (1/8 pulg.)
Opcional
Para conservar el aspecto de su mesa, aplique dos capas de
repelente de agua a los componentes cada dos años.
• Cinta métrica
• Llave de tuercas
Paso 1
Inserte cuatro (4) pernos de carrocería de 8.9 cm. (3-1/2 pulg.)
en los agujeros pretaladrados del travesaño de asiento (E).
Posiciónelo de modo que las cabezas de los pernos estén en el
piso y las roscas queden expuestas. Asegúrese de que el borde
biselado del travesaño de asiento esté volteando hacia abajo.
Coloque las patas (D) de modo que los agujeros pretaladrados
se alineen con los pernos y las partes superiores de las patas
esté alineadas y parejas. Coloque las arandelas y sujete con las
tuercas mariposa. Repita los pasos para la segunda pata (fig. 1).
Coloque la cubierta de mesa prearmada (A) boca abajo y coloque
el marco previamente armado de las patas, asegurándose de que
el travesaño de asiento esté volteando hacia afuera.
Paso 2
©2017 Universal Forest Products, Inc. Outdoor Essentials es una marca comercial registrada de Universal Forest Products, Inc.
Armado en los Estados Unidos con sujetadores importados. Todos los derechos reservados.
2801 East Beltline NE, Grand Rapids, MI 49525 | 800.598.9663 | 9333_4/17
OutdoorEssentialProducts.com
Diagonal brace
Soporte diagonal
Entretoise
2-1/2" Wood screw
Tornillos para madera de
Vis à bois 2-1/2"
6.4 cm. (2-1/2 pulg.)
Tornillo para madera de 2-1/2"
fig. 2
fig. 3
Page 4
INSTRUCCIONES DE ARMADO DE LA MESA DE PICNIC, CONT.
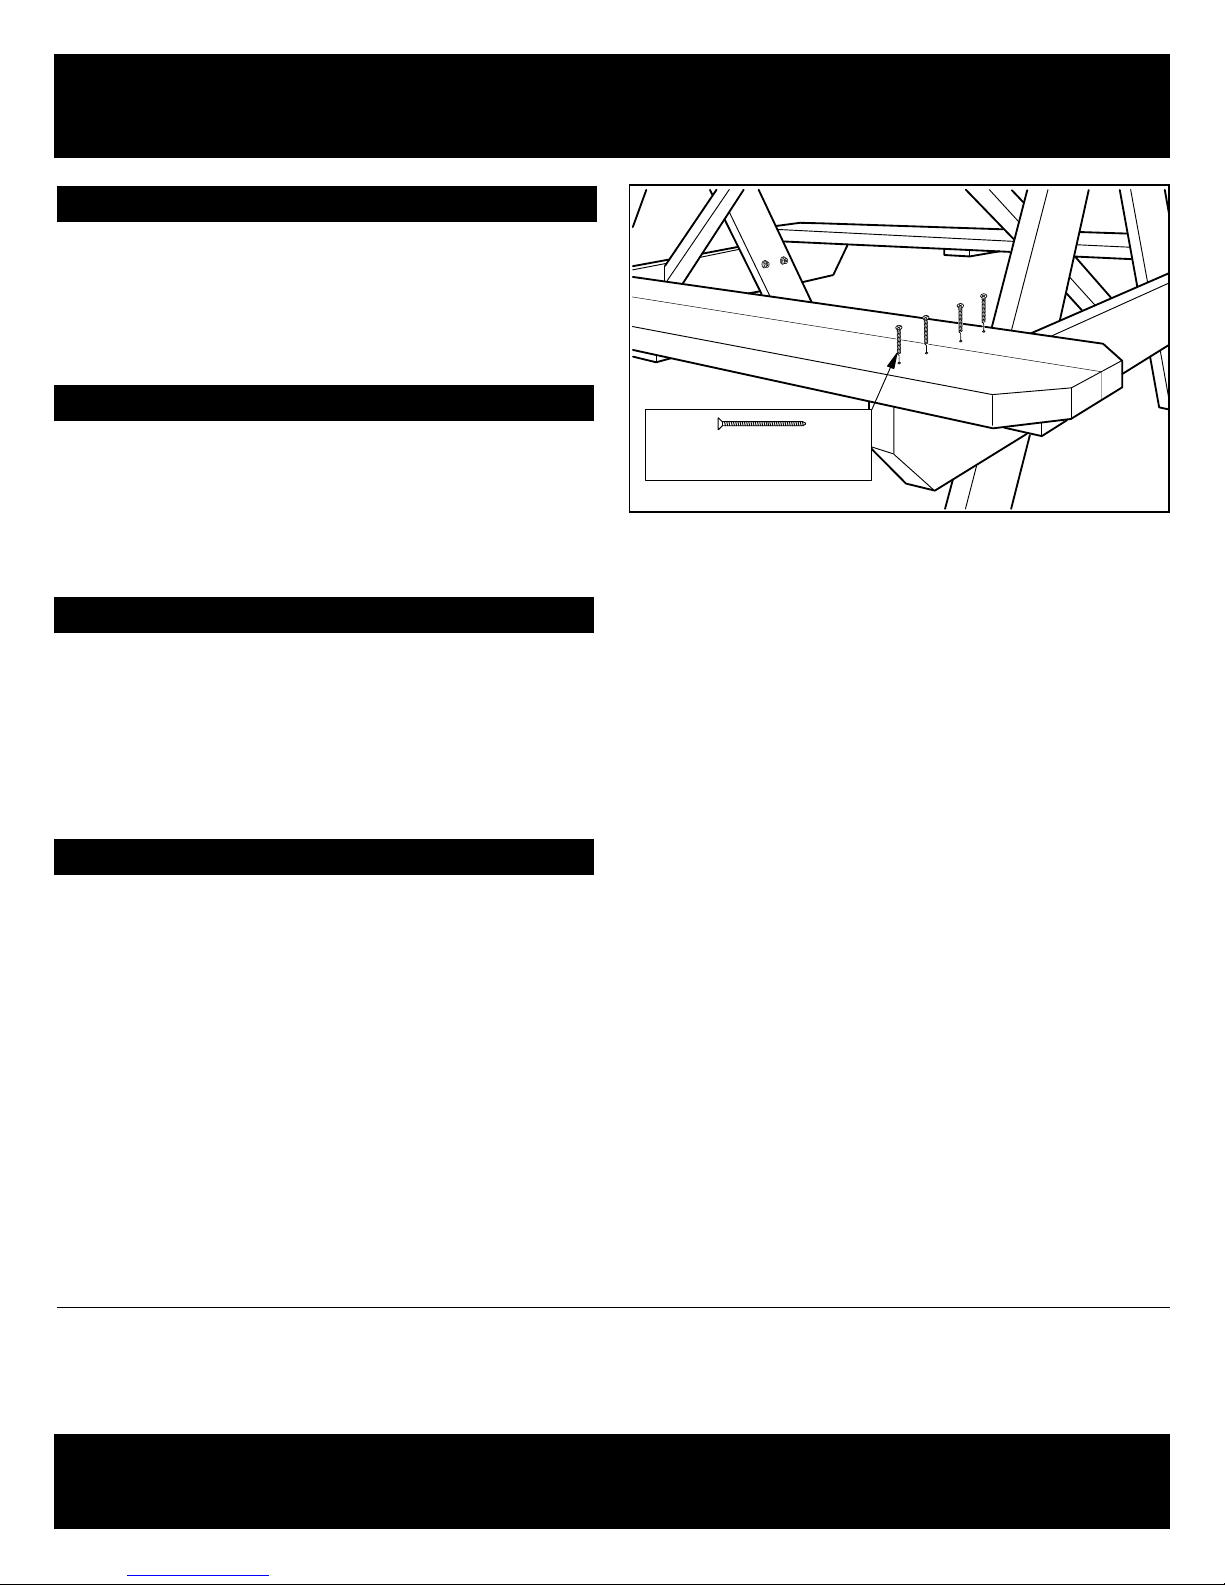
Tornillo para madera de 2-1/2" / Agujeros pre-perforados
tornillos para madera de
6.4 cm. (2-1/2 pulg.)
Paso 2, cont.
Sujételo pasando cuatro (4) tornillos para madera de 6.4 cm.
(2-1/2 pulg) a través de los agujeros pretaladrados (figura 2).
Repita el paso para sujetar el otro conjunto de marco de la pata.
Una vez que los conjuntos de las patas estén armados, apriete
los pernos de carrocería de 8.9 cm. (3-1/2 pulg.) con una llave de
tuercas.
Paso 3
Pretaladre y sujete los soportes diagonales (C) utilizando los
tornillos para madera de 6.4 cm. (2-1/2 pulg) (fig. 3). Antes de
sujetar el soporte diagonal, asegúrese de que las patas están
perpendiculares a la cubierta. Esto garantizará que la cubierta
esté a nivel y que puedan colocarse correctamente los asientos.
Coloque la mesa al derecho.
Paso 4
Coloque los bordes exteriores de los asientos (B) al nivel de los
extremos de los travesaños de los asientos y alinee los bordes de
los asientos con los bordes de la cubierta de la mesa. Para evitar
rajaduras, pretaladre los agujeros con una broca de taladro de
0.32 cm. (1/8 pulg.). Sujete los asientos a los travesaños utilizando
cuatro (4) tornillos para madera de 6.4 cm. (2-1/2 pulg) en cada
extremo de ambos asientos (fig. 4).
fig. 4
Paso 5
Asegúrese de que todas las tuercas mariposas y los tornillos
estén bien sujetos y apretados.
LOS DIAGRAMAS E INSTRUCCIONES DE ESTE FOLLETO SON PARA FINES ILUSTRATIVOS SOLAMENTE Y NO ESTÁN DESTINADOS A REEMPLAZAR A UN PROFESIONAL MATRICULADO. CUALQUIER
CONSTRUCCIÓN O USO DEL PRODUCTO DEBE ESTAR DE ACUERDO CON TODOS LOS CÓDIGOS LOCALES DE CONSTRUCCIÓN O DE ZONIFICACIÓN. EL USUARIO ASUME TODOS LOS RIESGOS Y
RESPONSABILIDADES ASOCIADOS CON LA CONSTRUCCIÓN O EL USO DE ESTE PRODUCTO. EL USUARIO O CONTR ATISTA DEBE TOMAR TODAS LAS MEDIDAS NECESARIAS PARA GARANTIZAR LA
SEGURIDAD DE TODAS LAS PERSONAS INVOLUCRADAS EN EL PROYECTO, QUE INCLUY EN PERO NO SE LIMITAN A, EL USO DEL EQUIPO DE SEGURIDAD APROPI ADO. A EXCEPCIÓN DE LO CONTENIDO
EN LA GARANTÍA LIMITADA POR ESCRITO, EL GAR ANTE NO PROPORCIONA NINGUNA OTRA GARANTÍA, YA SEA EXPRESA O TÁCITA, Y NO SER Á RESPONSABLE DE NINGÚN DA ÑO, INCLUIDOS DAÑOS
CONSECUENTES. PARA OBTENER DETALLES SOBRE UN MANEJO SEGURO E INFORMACIÓN DE LA GARANTÍA, VISITE UFPI.COM / PTINFO.
©2017 Universal Forest Products, Inc. Outdoor Essentials es una marca comercial registrada de Universal Forest Products, Inc.
Armado en los Estados Unidos con sujetadores importados. Todos los derechos reservados.
2801 East Beltline NE, Grand Rapids, MI 49525 | 800.598.9663 | 9333_4/17
OutdoorEssentialProducts.com
 Loading...