

Page 1
Parts List & Assembly
MAILBOX POST KIT
ASSEMBLY INSTRUCTIONS
ACTUAL SIZE: 24 in. L x 3-1/2 in. W x 72-1/8 in. H
Kit Includes:
(1) 6' Post
(1) Cross arm
(3) Screws
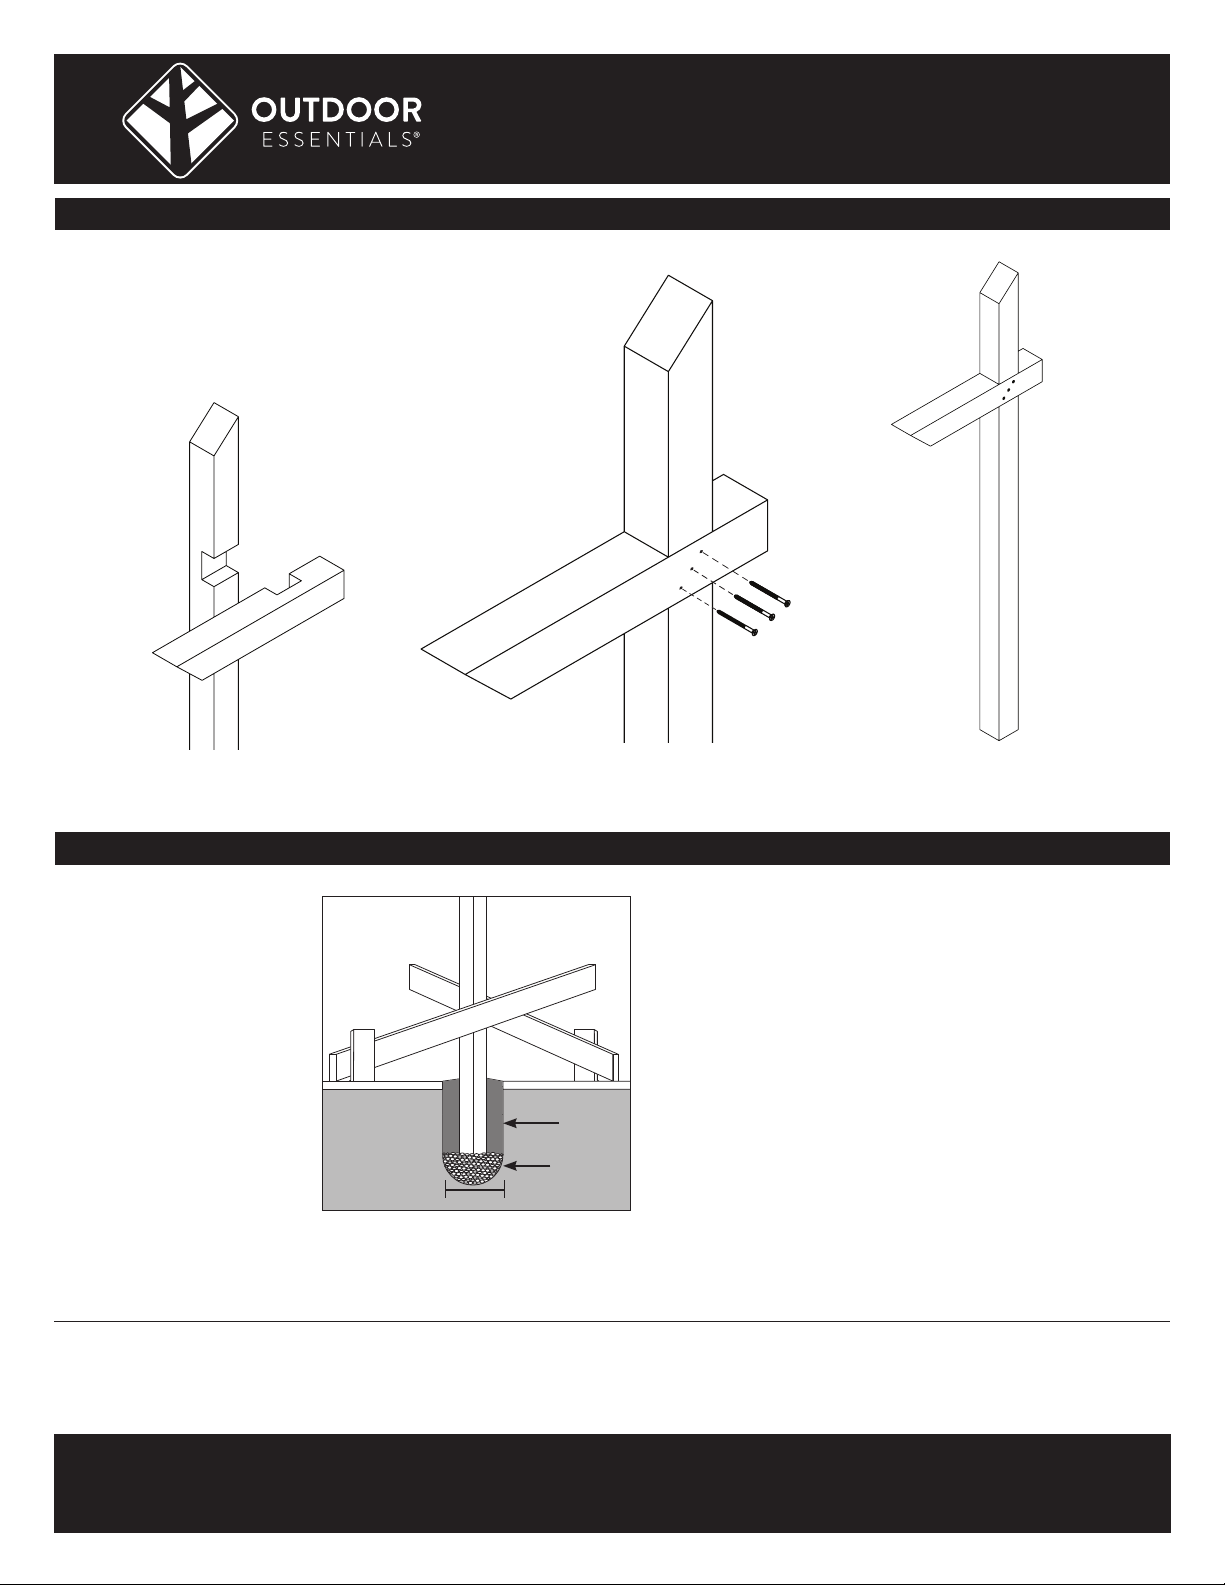
1. Connect cross arm to post. 2. Secure with 3 screws (included)
You Will Need:
- Cordless drill with Phillips bit
- Work gloves and protective
eyewear
as shown.
3. Install in desired location and
attach your choice of mailbox.
Digging Post Hole & Setting the Post
Recommended Items:
• Hammer
• Level
• Posthole digger
• Power drill
• Tape measure
• Grade stakes
• Concrete and gravel
• 2x4s for bracing posts
• Nails or screws
10" - 12" wide
Before you Start
We recommend reviewing general mailbox requirements for
curbside residential mailboxes before you dig.
THE DIAGRAMS AND INSTRUCTIONS IN THIS BROCHURE ARE FOR ILLUSTRATION PURPOSES ONLY AND ARE NOT ME ANT TO REPLACE A LICENSED PROFESSIONA L. ANY CONSTRUCTION
OR USE OF THE PRODUCT MUST BE IN ACCORDANCE WITH ALL LOCAL ZONING AND/OR BUILDING CODES. THE CONSUMER ASSUMES ALL RISKS AND LIABILIT Y ASSOCIATED WITH
THE CONSTRUCTION OR USE OF THIS PRODUCT. THE CONSUMER OR CONTR ACTOR SHOULD TAKE ALL NECESSARY STEPS TO ENSURE THE SAFE TY OF EVERYONE INVOLVED IN THE
PROJECT, INCLUDING, BUT NOT LIMITED TO, WEARING THE APPROPRIATE SAFETY EQUIPMENT. EXCEPT AS CONTAINED IN THE WRITTEN LIMITED WARR ANTY, THE WARRANTOR DOES
NOT PROVIDE ANY OTHER WARRANTY, EITHER E XPRESS OR IMPLIED, AND SH ALL NOT BE LIABLE FOR AN Y DAMAGES, INCLUDING CONSEQUENTIAL DAMAGES.
Cement
6" Gravel
Digging the Post Hole
A general rule of thumb is to place 1/3 of the length of the
post in the ground. Using a posthole digger or power auger,
dig the hole 10-12" wide and 6" deeper than needed. Backfill
the hole with 6" of gravel to drain water away from the bottom
of the post. Keep the height of your mailbox post in mind
when digging your postholes.
Setting the Post
Brace the post using 2x4s nailed to both the post and stakes
in the ground. This will keep them straight while the concrete
sets. Check for plumb (90º angle) on two adjacent sides prior
to pouring concrete. Fill hole with ready-mix concrete following the package instructions. Tamp the concrete to remove
any air pockets. Overfill the holes at the top and slope the
concrete away from the post to keep water from collecting
around it. Recheck plumb and alignment of the post and
allow concrete to cure for 24 to 48 hours.
©2022 UFP Retail Solutions, LLC. Outdoor Essentials is a registered trademark of UFP Industries, Inc.
All rights reserved. 2801 E. Beltline NE, Grand Rapids, MI 49525 14143_4/22
OutdoorEssentialProducts.com
 Loading...