

Page 1
VINYL RANCH RAIL FENCE – INSTALLATION INSTRUCTIONS
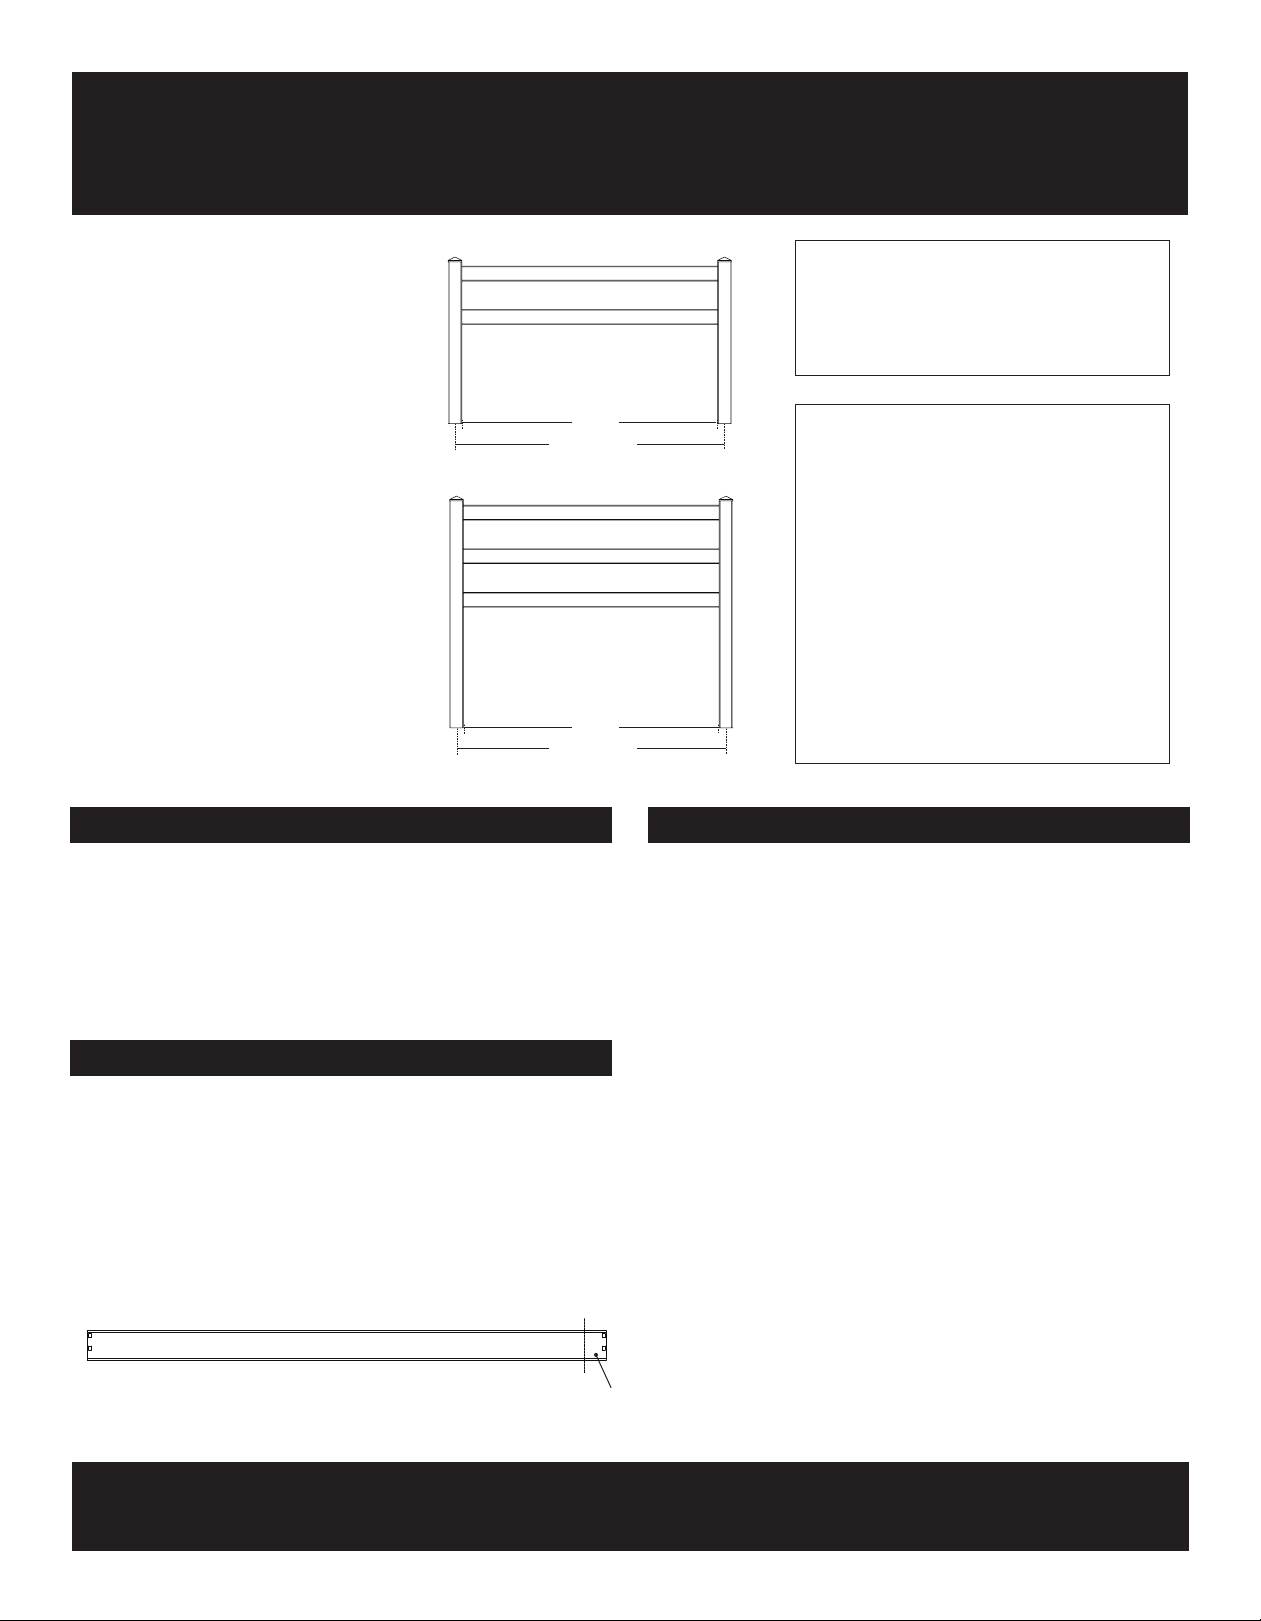
2-RAIL:
8 ft. Rail - 96" on-center, 91" span
16 ft. Rail - 192" on-center, 187" span
3-RAIL:
8 ft. Rail - 96" on-center, 91" span
16 ft. Rail - 192" on-center, 187" span
Step 3 Step 3
Before you begin: Design and layout:
span
on-center
span
on-center
ITEMS REQUIRED:
• Ranch rails
• Routed 2-Rail or 3-Rail ranch rail posts
• Post caps
ITEMS YOU MAY NEED:
• Post hole digger and shovel
• Tape measure
• PVC cement
• Circular saw or hand saw
• Rail clips (if shortening the rail)
• String line, Stakes and Level
• Concrete and Gravel
• Shims
• Pencil
• Safety Glasses
• Gloves
• Ranch Rail Gate (sold separately)
• Check local ordinances and regulations to ensure compliance.
• Contact your local utility companies to mark any underground
cables and pipelines before digging any postholes.
• It’s a good idea to discuss plans with any neighbors along
your proposed fence line.
Rail length and shortening:
• Vinyl Ranch Rails are available in 8 ft and 16 ft lengths
• Rails can be shortened to desired length using a circular saw
or hand saw.
• If you shorten a rail, you will lose the locking tabs that secure
the rail into the routed hole. We recommend installing rail clips
(sold separately) on the end of the cut side of the rail prior to
inserting into the routed hole.
Step 3
cut
• Determine the number of posts, rails, and gates needed to
complete the job based on the total linear footage. Take into
consideration post, rail, and gate widths and whether you are
building a 2-rail, 3-rail or 4-rail fence when determining the total
number of each.
• Locate property boundaries and drive stakes into the ground at
corners and ends of the fence line, based on local municipality
regulations.
• Stretch twine or heavy string between stakes and pull tight to
mark the layout of fence line.
• Be sure to measure your rails and gates prior to determining
the locations of the post holes. Mark post hole locations in the
following order along the string line:
- End/corner posts
- Gate posts
- Line posts
locking tab
©2019 Universal Forest Products, Inc. All rights reserved.
©2019 Universal Forest Products, Inc. All rights reserved.
68956 U.S. Hwy 131, White Pigeon, MI 49099 616.365.4201 10736_8/19
68956 U.S. Hwy 131, White Pigeon, MI 49099 616.365.4201 10736_8/19
www.ufpi.com
www.ufpi.com
Page 2
VINYL RANCH RAIL FENCE – INSTALLATION INSTRUCTIONS
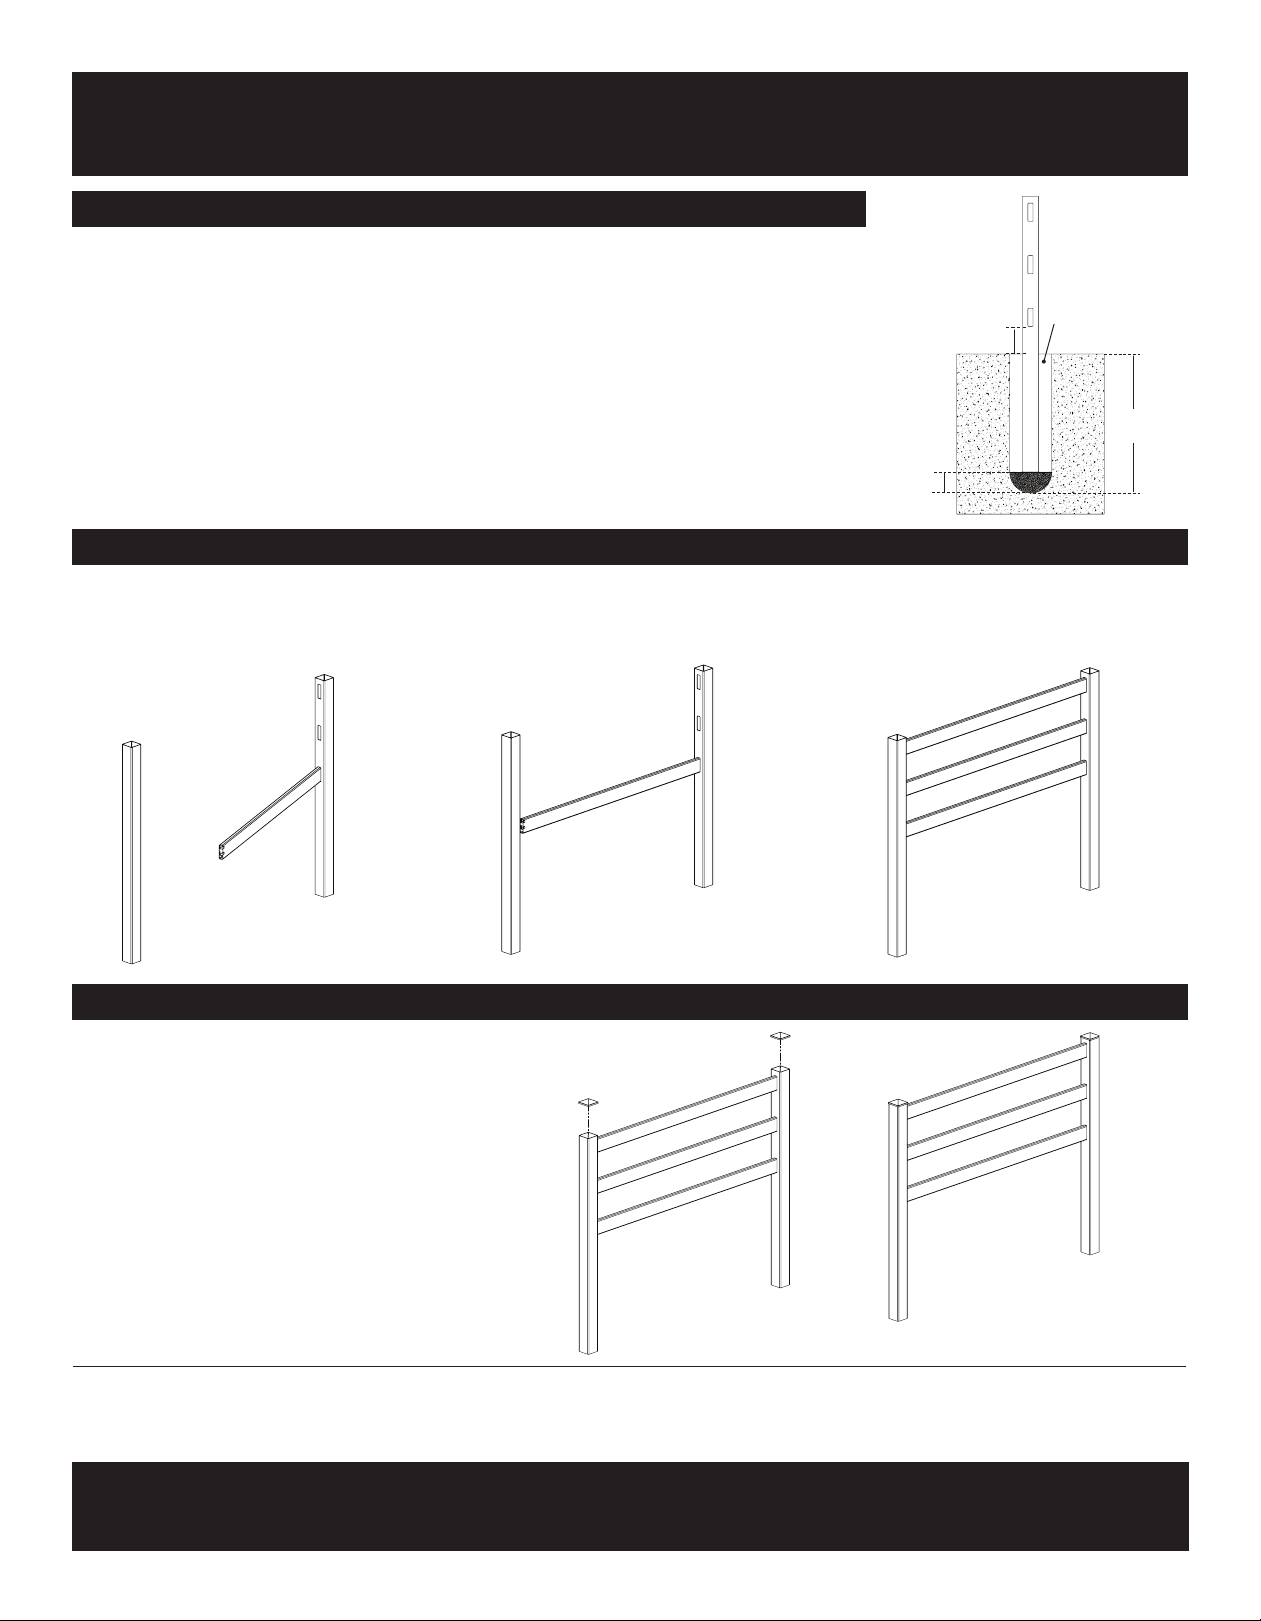
STEP 1 – Dig Post Holes and Set Posts
• Dig post holes 12" – 18" in diameter and 30" to 45" deep (depending on local ordinance or
expected frost depth in winter). Keep the height of the rails in mind when digging your post
holes. We recommend a minimum of 6" between the bottom rail and the ground.
• Backfill the holes with 6" of gravel.
• Starting in the corner, mix concrete in the first hole per the instructions on the bag. Mix
thoroughly and install the post into the hole and tap the post to the proper depth.
• Using a level, ensure post is plumb. Brace the post with temporary supports as the concrete
sets (per the instructions).
• Follow these steps to install the remaining posts.
STEP 2 – Install Rails
6" of gravel
6" minimum
12"-18" hole
diameter
30"– 45"
deep
• Insert the rail into the bottom hole
in the first routed post, as far as it
will go.
• Slide the other side of the rail into
the bottom hole in the next routed
post, engaging the locking tab.
STEP 3 – Attach Post Caps
• Attach one post cap to each post using PVC cement.
• Work your way up, sliding rails into
the remaining routed holes. Repeat
steps until all rails in each section
are installed.
THE DIAGRAMS AND INSTRUCTIONS IN THIS BROCHURE ARE FOR ILLUSTRATION PURPOSES ONLY AND ARE NOT MEANT TO REPLACE A LICENSED PROFESSIONAL. ANY CONSTRUCTION
OR USE OF THE PRODUCT MUST BE IN ACCORDANCE WITH ALL LOCAL ZONING AND/OR BUILDING CODES. THE CONSUMER ASSUMES ALL RISKS AND LIABILITY ASSOCIATED WITH THE
CONSTRUCTION OR USE OF THIS PRODUCT. THE CONSUMER OR CONTRACTOR SHOULD TAKE ALL NECESSARY STEPS TO ENSURE THE SAFETY OF EVERYONE INVOLVED IN THE PROJECT,
INCLUDING, BUT NOT LIMITED TO, WEARING THE APPROPRIATE SAFETY EQUIPMENT. EXCEPT AS CONTAINED IN THE WRITTEN LIMITED WARRANTY, THE WARRANTOR DOES NOT
PROVIDE ANY OTHER WARRANTY, EITHER EXPRESS OR IMPLIED, AND SHALL NOT BE LIABLE FOR ANY DAMAGES, INCLUDING CONSEQUENTIAL DAMAGES.
©2019 Universal Forest Products, Inc. All rights reserved.
68956 U.S. Hwy 131, White Pigeon, MI 49099 616.365.4201 10736_8/19
www.ufpi.com
Page 3
CERCA DE LARGUEROS RECTOS DE VINILO: INSTRUCCIONES DE INSTALACIÓN
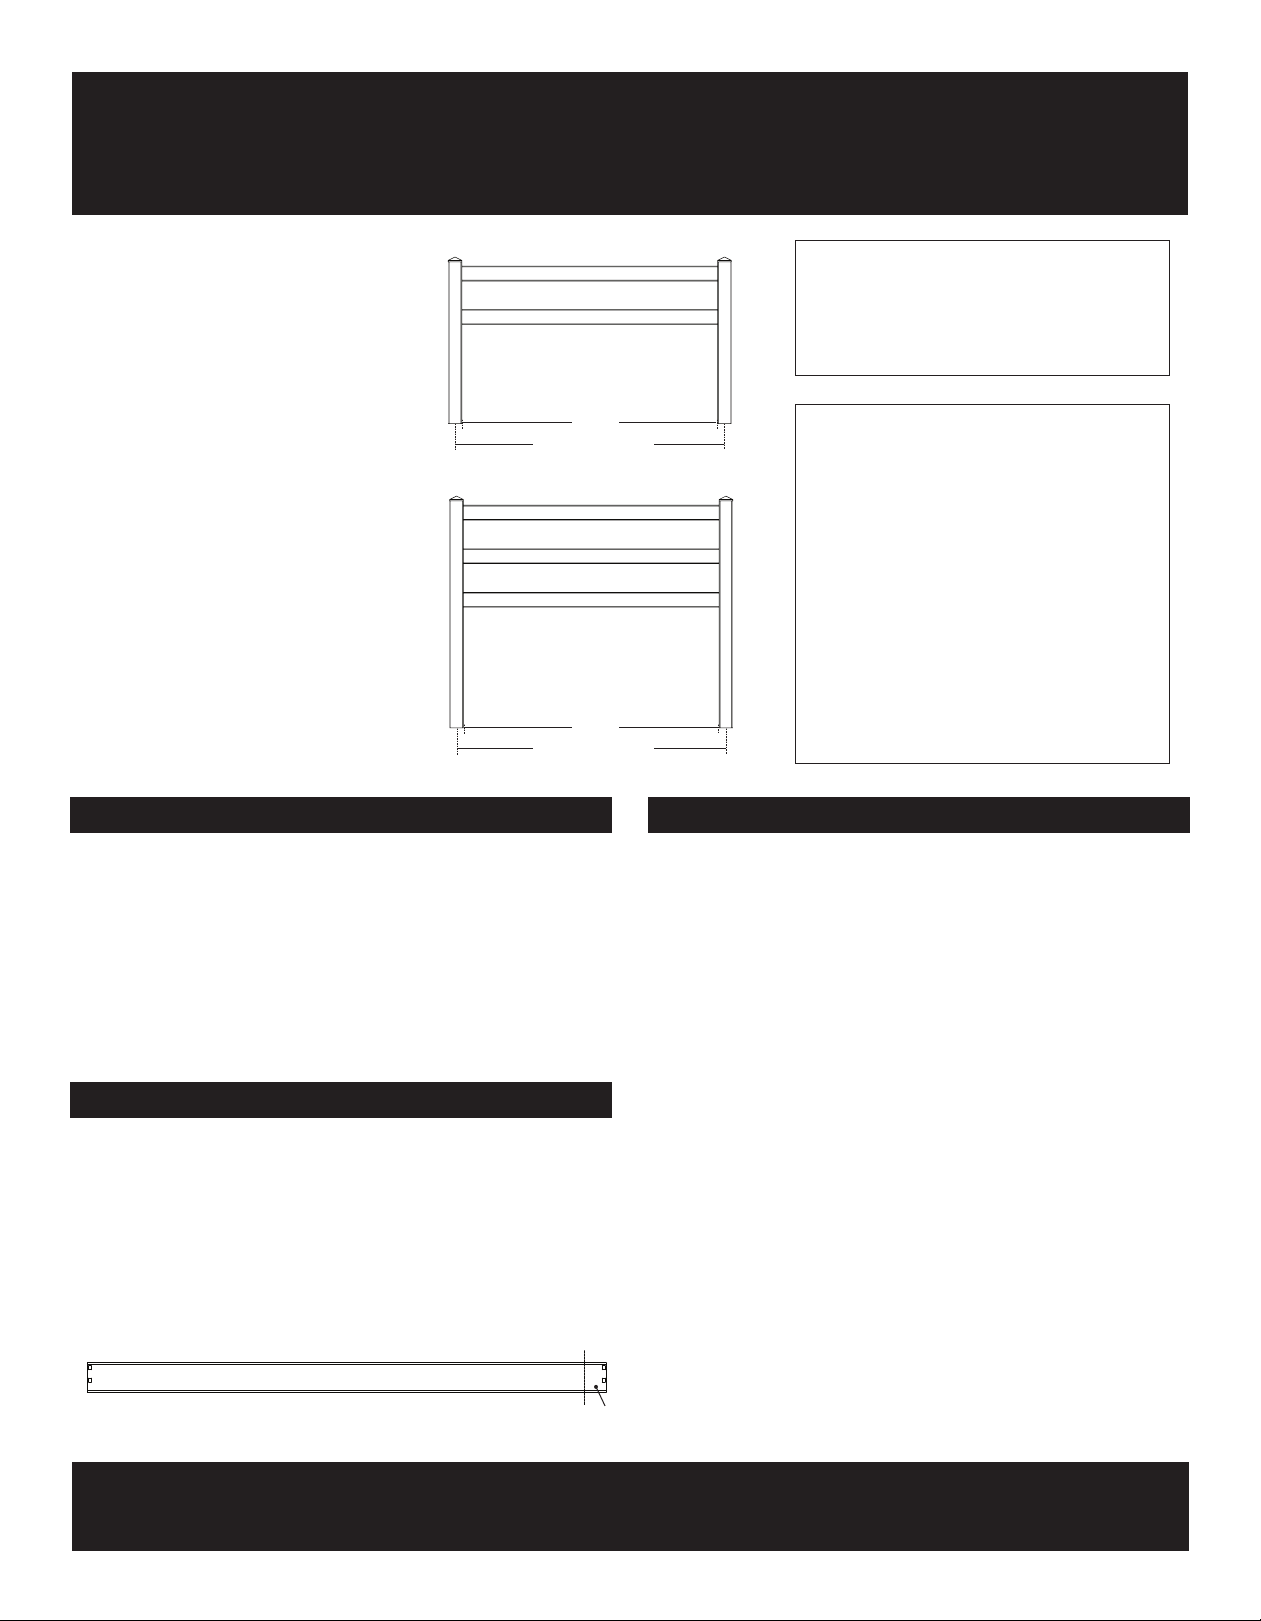
2 Largueros:
8 pies Larguero: 96" centro a centro,
vano de 91"
16 pies Larguero: 192" centro a centro,
vano de 187"
3 Largueros:
8 pies Larguero: 96" centro a centro,
vano de 91"
16 pies Larguero: 192" centro a centro,
vano de 187"
Step 3 Step 3
Antes de comenzar: Diseño y disposición:
vano
centro a centro
vano
centro a centro
ARTÍCULOS NECESARIOS:
• Largueros rectos
• Postes de largueros rectos de 2 o 3 largueros
• Topes para postes
ARTÍCULOS QUE PODRÍA NECESITAR:
• Excavadora y pala para postes
• Cinta métrica
• Cemento claro para PVC
• Sierra circular o sierra de mano
• Clips para largueros (si se acorta el larguero)
• Cordel para marcar, estacas y nivel
• Concreto y grava
• Cuñas
• Lápiz
• Lentes de seguridad
• Guantes
• Puerta de largueros rectos (se vende por
separado)
• Revise las ordenanzas y regulaciones locales para asegurarse
de cumplirlas.
• Contacte a las compañías de servicios públicos de su localidad
para identificar la presencia de cualquier sistema subterráneo
de cables o tuberías antes de hacer algún agujero para los
postes.
• Es una buena idea hablar con los vecinos colindantes sobre sus
planes con el sitio donde planea colocar su cerca.
Longitud y acortamiento del larguero:
Step 3
• Los largueros rectos de vinilo están disponibles en longitudes
de 8 pies y 16 pies
• Los largueros se pueden acortar a la longitud deseada usando
una sierra circular o una sierra de mano.
• Si acorta el larguero, perderá las pestañas de bloqueo que
aseguran el larguero en el agujero. Recomendamos instalar
clips para largueros (se venden por separado) en el extremo
del lado cortado del larguero antes de insertarlo en el orificio.
cortar
pestaña de
bloqueo
• Determine la cantidad de postes, largueros y puertas necesarios
para completar el trabajo con base en la distancia lineal total. Si
está construyendo una cerca de 2, 3 o 4 largueros considere el
ancho del poste, larguero y puerta al determinar el número total
de cada uno.
• Ubique los límites de la propiedad y coloque estacas en el suelo
en las esquinas y extremos de la cerca, con base en las regulaciones municipales locales.
• Tienda una cuerda o cordón grueso entre las estacas y estírelo
para marcar la disposición de la cerca.
• Asegúrese de medir sus largueros y puertas antes de determinar
las ubicaciones de los agujeros para los postes. Marque las
ubicaciones de los agujeros para los postes en el siguiente
orden a lo largo de la línea marcada por el cordón:
- Postes terminales y de esquinas
- Postes para puerta
- Postes de línea
©2019 Universal Forest Products, Inc. All rights reserved.
©2019 Universal Forest Products, Inc. Todos los derechos reservados.
68956 U.S. Hwy 131, White Pigeon, MI 49099 616.365.4201 10736_8/19
68956 U.S. Hwy 131, White Pigeon, MI 49099 616.365.4201 10736_8/19
www.ufpi.com
www.ufpi.com
Page 4
CERCA DE LARGUEROS RECTOS DE VINILO: INSTRUCCIONES DE INSTALACIÓN
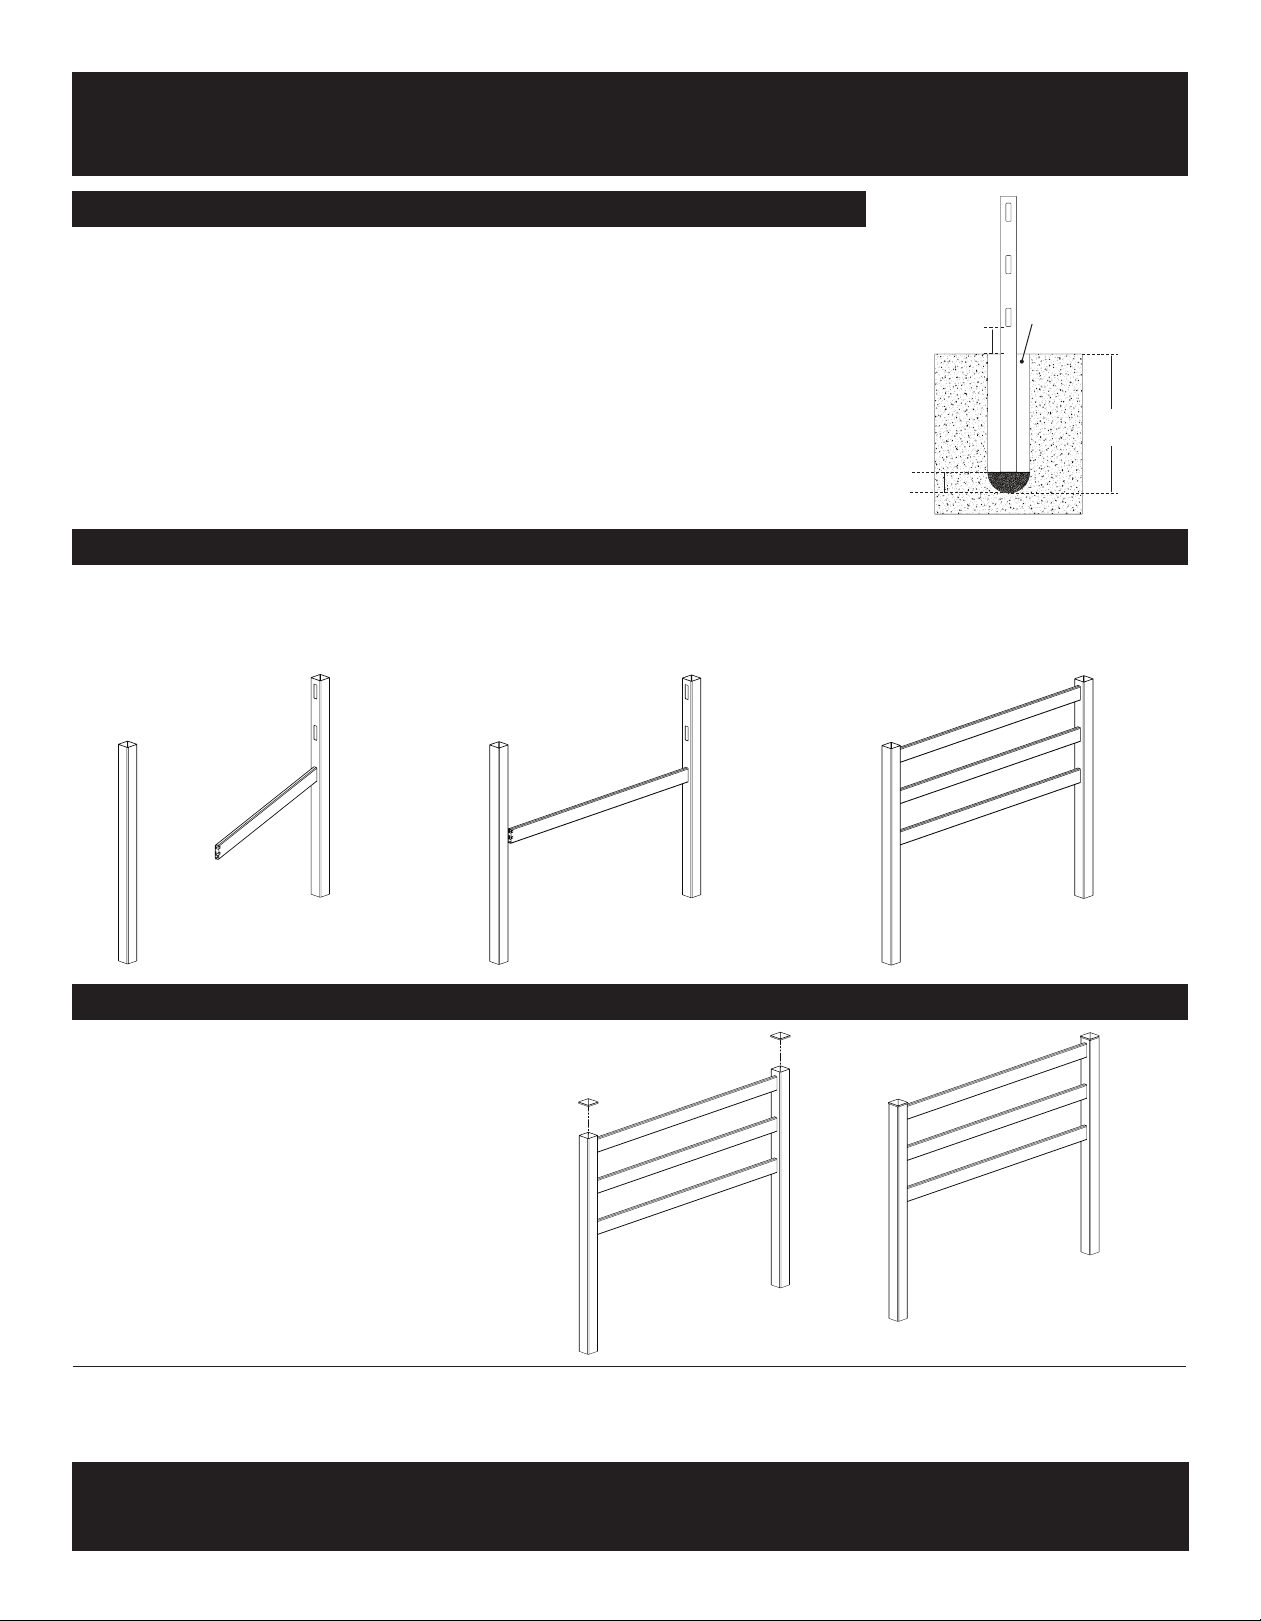
PASO 1: Excavar agujeros para postes y colocar los postes
• Cave agujeros de 12" – 18" de diámetro y de 30" a 45" de profundidad (dependiendo de la ordenanza
local o la profundidad de la helada esperada en invierno.) Tenga en mente la altura de sus largueros al
excavar sus agujeros para postes. Recomendamos un mínimo de 6" entre el larguero inferior y el suelo.
• Rellene los agujeros con 6" de grava.
• Comenzando en la esquina, mezcle concreto en el primer agujero siguiendo las instrucciones de la
bolsa. Mezcle completamente e instale el poste dentro del agujero, entierre el poste hasta la profundidad
apropiada.
• Asegúrese de que el poste está perfectamente vertical usando un nivelador. Sujete el poste con
soportes temporales mientras el concreto seca (de acuerdo con las instrucciones).
• Siga estos pasos para instalar los postes restantes.
PASO 2: Instale los largueros
6" de grava
6" mínimo
Agujeros de 12"18" de diámetro
30"– 45" de
profundidad
• Inserte el larguero en el agujero
inferior del primer poste, hasta el
máximo.
• Deslice el otro lado del larguero en el
agujero inferior en el siguiente poste,
enganchando la pestaña de bloqueo.
PASO 3: Agregue los topes de poste
• Coloque un tope a cada poste con cemento de PVC.
• Continúe gradualmente, deslizando los
largueros en los agujeros restantes. Repita
los pasos hasta que todos los largueros en
cada sección estén instalados.
LOS DIAGRAMAS E INSTRUCCIONES EN ESTE FOLLETO SÓLO TIENEN FINES ILUSTRATIVOS Y NO PRETENDEN SUSTITUIR A UN PROFESIONAL CON LICENCIA. CUALQUIER CONSTRUCCIÓN O USO DEL
PRODUCTO DEBE ESTAR EN CONFORMIDAD CON TODOS LOS CÓDIGOS DE CONSTRUCCIÓN Y/O URBANISMO LOCALES. EL CONSUMIDOR ASUME TODA LA RESPONSABILIDAD, ASÍ COMO LOS RIESGOS
RELACIONADOS CON LA CONSTRUCCIÓN O EL USO DE ESTE PRODUCTO. EL CONSUMIDOR O EL CONTRATISTA DEBEN TOMA R TODAS LAS MEDIDAS NECESARIAS PAR A GARANTIZAR L A SEGURIDAD DE
TODAS L AS PERSONAS QUE PARTICIPAN EN EL PROYECTO, INCLUYENDO, ENTRE OTROS, EL USO DE LOS EQUIPOS DE SEGURIDAD ADECUADOS. SALVO EN LOS CASOS QUE FIGURAN EN EL ESCRITO DE
GAR ANTÍ A LIMITADA , EL GAR ANTE NO OF RECE NINGU NA OTRA G ARA NTÍA, E XPRESA O I MPLÍCITA , NI SE CONSI DERAR Á RESPONS ABLE DE CU ALQUIER D AÑO, INCLU YENDO LOS D AÑOS CONS IGUIENT ES.
©2019 Universal Forest Products, Inc. Todos los derechos reservados.
68956 U.S. Hwy 131, White Pigeon, MI 49099 616.365.4201 10736_8/19
www.ufpi.com
 Loading...