

Outdoor Cameras Australia Swift 3C-3G Instruction Manual

3G
MODEL

Contents
1.0 Introduction .................................................................................................................. - 4 -
1.1 Power Supply ......................................................................................................................................................- 4 -
1.2 SD Card Selection ................................................................................................................................................- 5 -
1.3 USB Connection ..................................................................................................................................................- 6 -
1.4 Attention ............................................................................................................................................................- 6 -
1.5 Key Features .......................................................................................................................................................- 7 -
2.0 Whole View and Details of Camera ............................................................................... - 8 -
2.1 Figure 1: Front View of Camera; ..........................................................................................................................- 8 -
2.2 Figure 2: Bottom View of Camera; ......................................................................................................................- 9 -
2.3 Figure 3: Internal, Side and Back View of Camera .............................................................................................- 10 -
2.4 Function Keys & Other Details ..........................................................................................................................- 11 -
3.0 Quick Start ................................................................................................................... - 11 -
3.1 How to Start the Camera ..................................................................................................................................- 12 -
3.2 How to Set the Functions..................................................................................................................................- 12 -
3.3 Camera Default Settings in Red Letters ............................................................................................................- 12 -
3.4 How to Enable Camera to Send Photos ............................................................................................................- 13 -
4.0 Operation List .............................................................................................................. - 13 -
4.1 Video/Photo Playback .......................................................................................................................................- 13 -
4.2 Delete ...............................................................................................................................................................- 13 -
4.3 Format of SD Card .............................................................................................................................................- 13 -
4.4 PIR Test .............................................................................................................................................................- 13 -
4.5 Auto Power O .................................................................................................................................................- 14 -
4.6 Operation Menu................................................................................................................................................- 14 -
5.0 Trail Camera APP ......................................................................................................... - 20 -
6.0 Specication ................................................................................................................ - 23 -
7.0 Trouble Shooting .........................................................................................................- 25 -
7.1 Photos Do Not Capture Subject of Interest .......................................................................................................- 25 -
7.2 Camera Stops Taking Images or Won’t Take Images .........................................................................................- 25 -
7.3 Night Vision Flash Range Doesn’t Meet Expectation ........................................................................................- 26 -
7.4 Camera Takes Too Many Images .......................................................................................................................- 26 -
7.5 Sent images are not being received..................................................................................................................- 26 -
8.0 Warranty .....................................................................................................................- 16 -
32

1.0 Introduction
The OCA Swift 3C 3G digital motion camera is an extremely versatile unit which you may nd more uses for than your
original intent. It is perfect for surveillance on farms, large commercial premises, illegal roadside dumping, and residential
areas. Due to their exceptional speed they are also great for wildlife monitoring both recreationally and for scientic
studies. They also have a time-lapse function which when combined with their long battery life, and weatherproof shell
make them popular for long term time-lapse photography of construction projects. The addition of the 3G capabilities to
transmit images to your phone or email or via FTP to a remote website increases their abilities even more.
Make yourself familiar with the functions of the camera and if you need assistance know that you can contact Outdoor
Cameras Australia Mon-Fri 9-5.
1.1 Power Supply
a. Batteries
The camera runs on 8 AA size batteries (12V power supply to ensure camera performs on all functions). It can
work with high quality alkaline, high-quality NiMH, and high quality Lithium rechargeable batteries. We suggest
running the camera on either NiMH and Lithium batteries only as the performance with alkaline batteries is
much poorer than with NiMH or Lithium batteries -especially for night time photo and video.
Batteries should be inserted as indicated inside the battery case. Upside down batteries may cause a malfunction.
Also, we strongly recommend changing the batteries when the power icon on the camera screen or photo stamp
is empty.
Note: Don’t mix batteries types! Dierent battery types in the camera may cause permanent damage
which also violates warranty policy!
Due to dierent settings, the objects activities within camera detection zone, dierent brands and quality of batteries,
and environment, etc. we’re not able to determine the exact number of photos and videos that the camera can take.
The table below only shows approximate number of photos or videos the camera can take with 8AA alkaline batteries.
Better performance can be given by 8 AA rechargeable NiMH and Lithium batteries. We have found that battery
brand signicantly alters the number of images you can get. If you are using alkaline batteries we highly recommend
Duracell or Energizer. The below table applies to the camera taking photos and video only. Not with it’s 3G function
turned on.
Photos shot per day Working time Video clips shot per day Working time
Max.Range 100 pics 36 days
Balanced 100 pics 31 days
Min. Blur 100 pics 21 days
Photo 100 pics 89 days 10secs video clips 10 clips 179 days
The camera will use more battery life in 3G mode because it is then sending the image after taking it. The better the
IR LEDs 56
10secs video clips 10 clips 37 days
IR LEDs 25
3G reception in the area the less battery life the camera will use. If the camera is struggling for reception it will use a
lot more battery life because it is taking a lot longer to send the image.
b. Solar Panel
Our engineers have designed this camera to function with most standard 12V/1~2A built in lithium battery solar
panels. However, as rechargeable AA NiMH batteries need a higher voltage for charging, the solar panel cannot charge
the batteries in the camera. Outdoor Cameras Australia have designed a solar panel and battery set up to work with
the unit. Just ask us for more information.
c. Power Adaptor—Security Surveillance Purpose
This camera can also be powered by an external 12V/ 1~2A DC adapter. Remove the AA batteries when the power
adapter is used.
1.2 SD Card Selection
A memory card is required to operate the camera. When the camera is “ON” and no memory card is used, the screen
displays “Pls insert memory card”. The SD slot of the camera has a 32 GB memory capacity. Before inserting or removing
the memory card, the camera must be turned “OFF”. Failing to do so may cause loss of or damage of the pictures already
recorded from the memory card. When the SD card is full, the viewing screen indicates “Memory Full”. SD cards must not
have les or folders from other devices on them. This can stop the camera from recording data onto the card and then
atten the batteries. The following data shows an approximate quantity of photos which can be recorded by the camera
depending on the memory card capacity.
The Chart below will show you the approximate capacity of dierent size SD cards. Please check to see which size card
can t your needs best.
8AA Alkaline Batteries
54

Size
SD
Capacity
5MP 3585 7492 15307 30936
8 MP 2294 4798 9794 19795
12 MP 1613 3371 6887 13919
640x480 00:22:28 00:46:57 01:35:56 03:13:52
HD 00:16:13 00:33:53 01:09:14 02:19:56
FHD 00:08:31 00:17:48 00:36:20 01:13:21
4 GB 8 GB 16 GB 32 GB
Photo (pictures)
Video (hours)
1.3 USB Connection - PC Camera
When the camera is connected via the USB cable; screen display “MSDC”, press “Menu” once, “MSDC” turns to “PC Cam”,
camera now can be used as a PC camera; press “Menu” again, camera exits PC camera mode.
1.4 Attention
1. Inser t the SD memory card correctly. The camera must be turned o to have the SD card inserted or removed.
2. Please use high- quality AA batteries to prevent battery leaks. Remove batteries when the camera is not in use. Battery
leaks are not covered under Warranty. Do not put batteries in the wrong way around.as it can damage the camera.
3. Ensure you use the correct adaptor (12V/1A or 2A )if you use a power supply.
4. In Test mode, the camera will automatically enter PIR Auto mode if there are no buttons pressed within 60 sec. Please
manually turn ON as if you want to do further conguration.
5. Don’t interrupt the power supply during system upgrade, please return it back to Outdoor Cameras Australia if the
device doesn’t work after upgrading.
6. Do not frequently insert or pull out SD c ard and battery or plug in and out the adaptor when the camera is on.
7. Do not have any oating objects, such as leaves, grass, strings, or ribbons in the motion detection zone of cameras.
8. Do not keep camera next to hot irrelevant objects, air conditioner exhaust vents, and light, etc. to avoid mistaking
photos or videos.
9. The wide angle camera model has a 90° FOV lens which means more ash is needed to get better night time images
than the average 52° FOV lens; that’s why the 56pcs 60° IR LEDs are used on this camera. To ensure these 56pcs IR LEDs
can give enough ash for the wide angle lens - high quality AA batteries must be used to deliver enough amperage to
power the illuminator consistently in dark environments.
10. Programmed Date/Time can be saved in the camera for 12 hours without batteries.
1.5 Key Features
1. 0.35 seconds triggerspeed;
2. Wide lens model: 92 degreeFOV lens; 110degreePIRangle;
3. Regular lens model: 52 degree FOV lens; 52 degree PIR angle;
4. 12MP/1080P@30FPS;
5. Programmable 5/8/12 Megapixel high-quality resolution;
6. 56pcs invisible IR LEDs, oer15metres (50feet)realnightvisiondistance;
7. Cr ystalclearday&nightphoto/videoquality;
8. 1photosburstwithin1second;
9. With MMS/3G/SMTP/FTP function, camera can transmit photos to 1-2 preset mobile phones and 1-2 emails
per trigger.
10. SMS to remotely change camera settings;
11. SMS to enable camera to shoot a photo and send back instantly;
12. Supports 3G SIM cards;
13. Optional small size (640*480) and large size (1920*1440) Email/FTP photos;
APP available in IOS & Android APP store.to enable easy remote control of camera functions via 3G network
14. Support multiple functions: adjustable PIR sensitivity, Multi-shot (1~5 photos per trigger), programmable delay
between motions, Time Lapse, Timer, Audio Recording, TV out, stamp of (camera ID, date/time, temperature, moon
phase) on every single photo;
15. Available operation temperature: -30°C to 60°C;
16. Built-in 2.0” TFT colour screen;
76
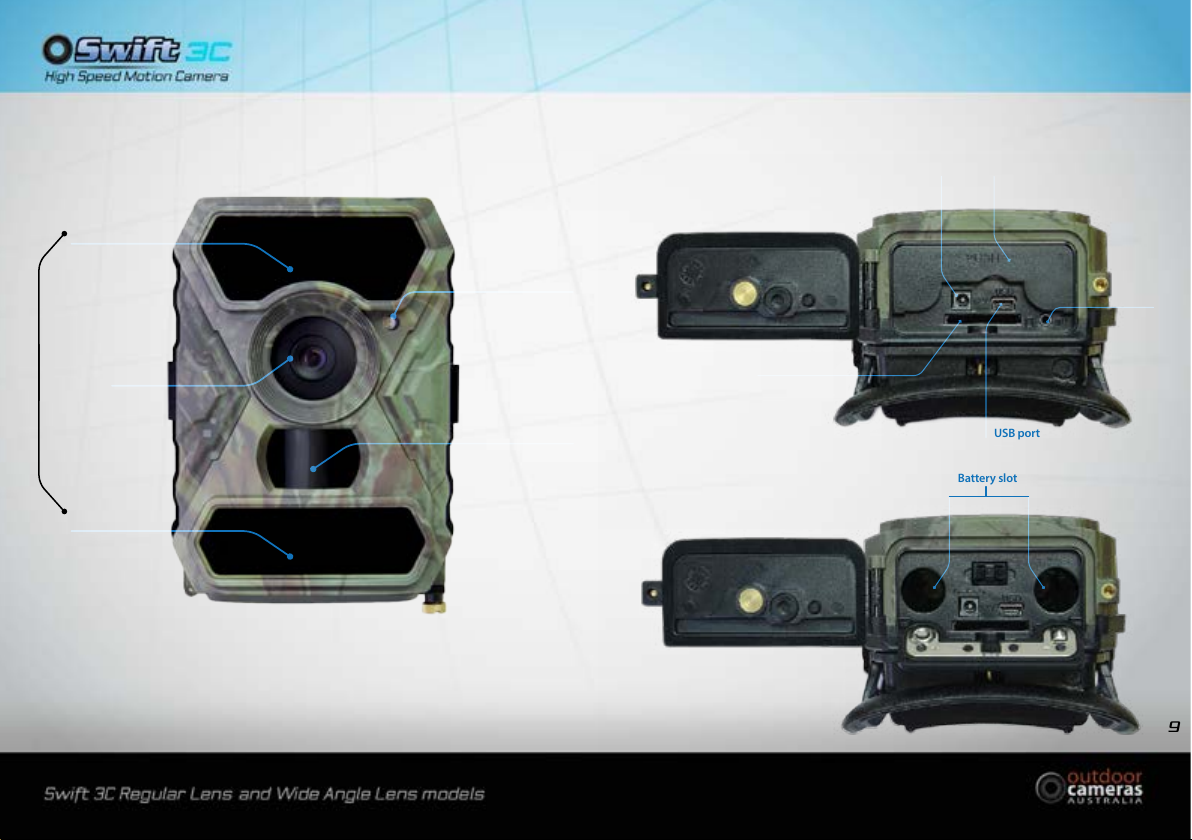
2.0 Whole View and Details of Camera
2.1 Figure 1: Front View of Camera;
25 IR LEDs
Light Sensor
2.2 Figure 2: Bottom View of Camera;
DC in
Push slightly to
open this cover
TV out
Lens
56 IR LEDS
in Total
31 IR LEDs
(Can be turned o)
PIR Sensor
SD card slot
USB port
Battery slot
98
 Loading...