

Page 1
INSTALLATION INSTRUCTIONS
OUTDECO USA Indoor/Outdoor Panels
Follow these instructions and recommendations for a professional installation within
warranty, and to avoid damaging the panel.
PLEASE READ BEFORE YOU BEGIN:
in accordance with their intended purpose. Examples shown in this document are installation suggestions. Adjust installation
congurations to meet your specic project requirements. If in doubt, consult a professional. We recommend checking with proper
authorities about building codes/standards that may apply to your project.
OUTDECO USA panels have a 10-Year Limited Warranty for material integrity when installed on a vertical plane, as on a wall or fence.
Installations on a horizontal plane, as a roof or ceiling, are not covered by the warranty. Installers assume responsibility for the installation.
Easy to
Install
Suitable for pro builders
and DIY crafters.
A typical project uses
12-24 panels.
Frames &
Support
Structures
We recommend following best building practices for installing OUTDECO USA panels
OUTDECO USA Decorative Modular Panels are an engineered hardwood product
similar to fencing lumber that can be cut, drilled, and sanded. Available in manageable
sizes, the panels are easy to install with standard woodworking tools and methods using
typical exterior decking screws, nails, and/or exterior-grade construction adhesive.
OUTDECO USA panels are specifically created for outdoor vertical cladding and are
weather-proof throughout North America.
OUTDECO USA panels must be mounted to a frame or an existing surface or
structure. They are not a stand-alone structural product.
Timber or metal frames can be attached to walls, fences, and other flat surfaces, or
built as free-standing structures with panels mounted.
BENEFITS OF USING A FRAME
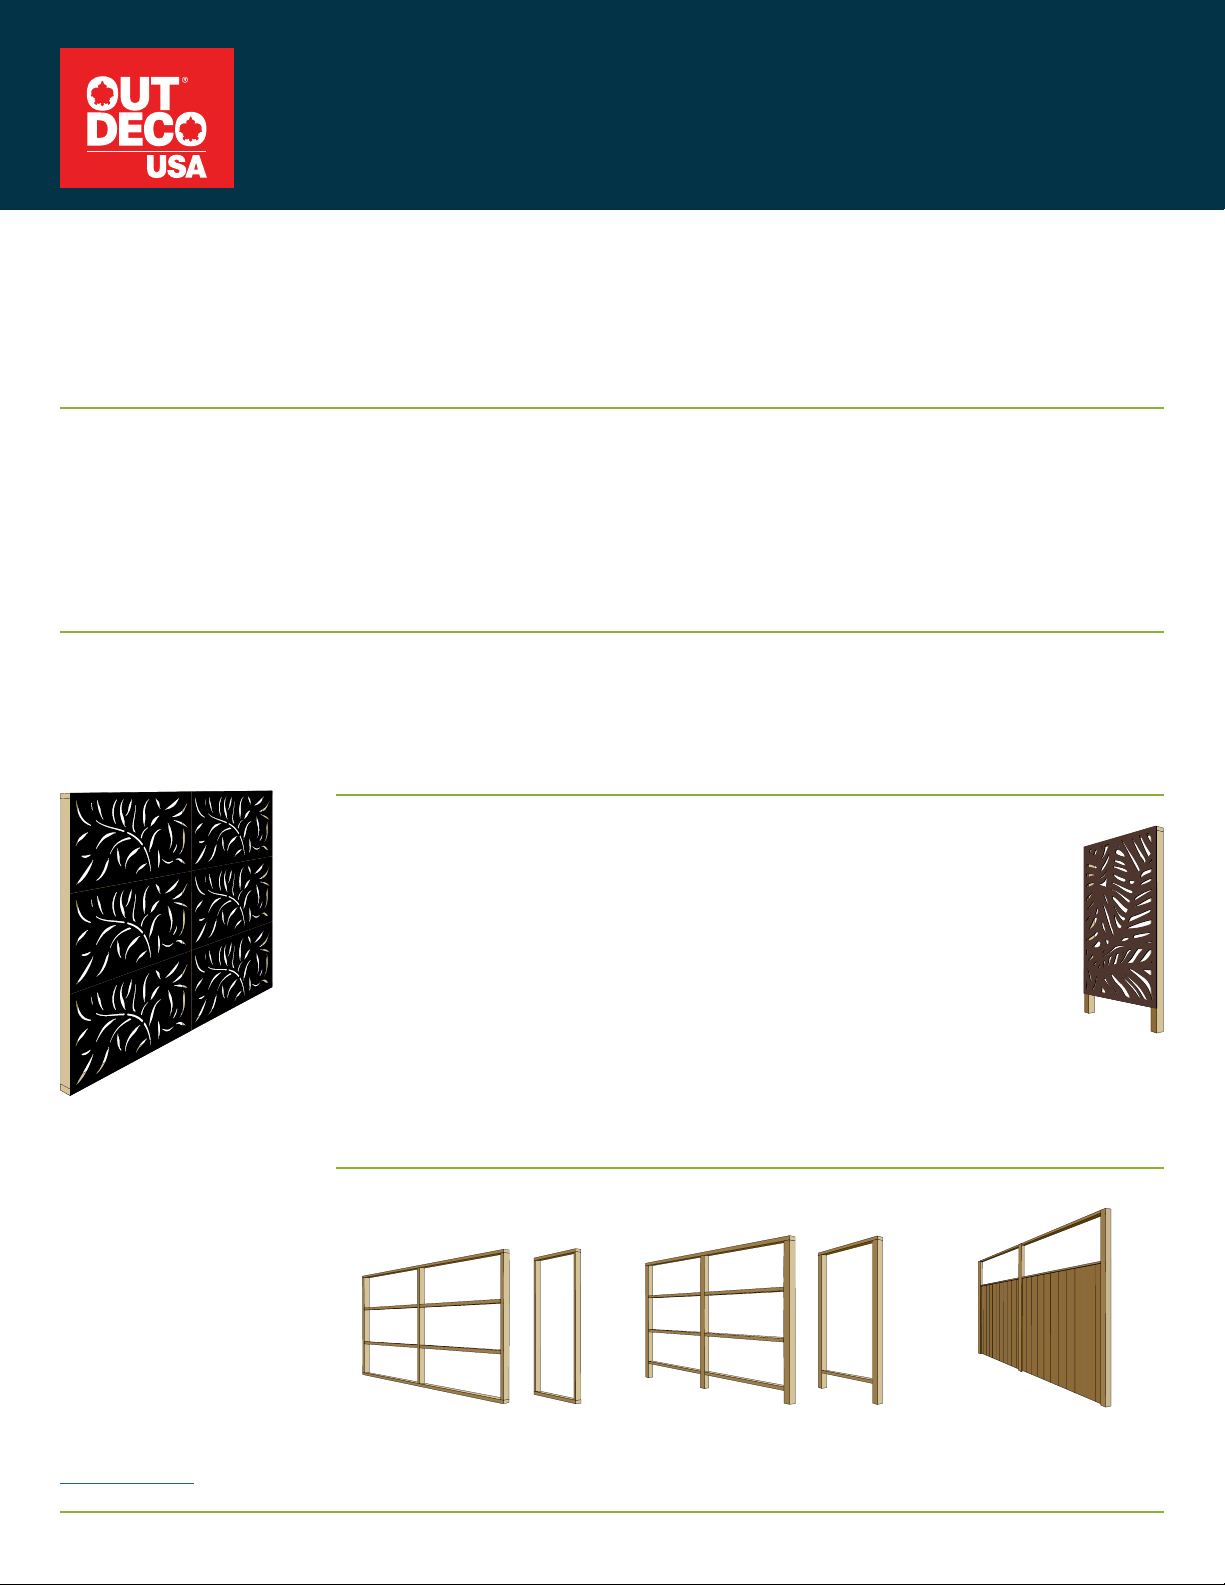
Multiple-Panel
Frame
10-Year Limited Warranty
OUTDECO panels are
warranted against peeling,
rotting, cracking, blistering,
and warping under
normal atmospheric and
weather conditions. This
limited warranty does not
cover damage resulting
from misuse, improper
storage or handling,
improper installation, or
any horizontal roong/
ceiling applications. (See
full warranty statement at
outdecousa.com.)
Using a frame allows for the sturdiest and most versatile panel installation
and results in a professional, polished look. Frame structures can be built
to almost any size, orientation, or form – as simple or sophisticated as your
project requires.
• Facilitates precise panel alignment and squared edges before attaching.
• Prevents damage to surfaces when adjusting, adding, or removing panels.
• Minimizes the number of fasteners going into an existing structure and
reduces the number screws or nails visible along the edges of your panels.
Single-Panel
Frame
• Offsets panels from surfaces, allowing for airflow and expansion/contraction space;
creates a dimensional shadow effect and provides space for backlighting.
FRAME TYPES – For installations with multiple or single panels
Surface-Mount
Mount panels on fences, walls,
and other flat surfaces.
frame with posts set in cement.
Free-Standing
Create a divider or fence on a
Fence/Wall Extension
Mount panels above a fence
or wall for additional height.
outdecousa.com
Page 2
Mounting
Styles &
Methods
Examples shown are
installation suggestions.
Adjust for your specic
project's requirements.
Some installations may
require professional
assistance.
Panel Specs
Find panel weights, sizes,
and other details on our
website’s Patterns page
and click on your panel's
pattern name.
outdecousa.com/patterns
Panel Fitting
Cut panels to t
installation specs. Add a
face cap to cover cut edge
if desired (see top right).
Cut to t
Pattern Orientation
Panels can be mounted
in any orientation. Check
for pattern repeats and
ows before cutting and
installing. Learn more at
outdecousa.com/patterns.
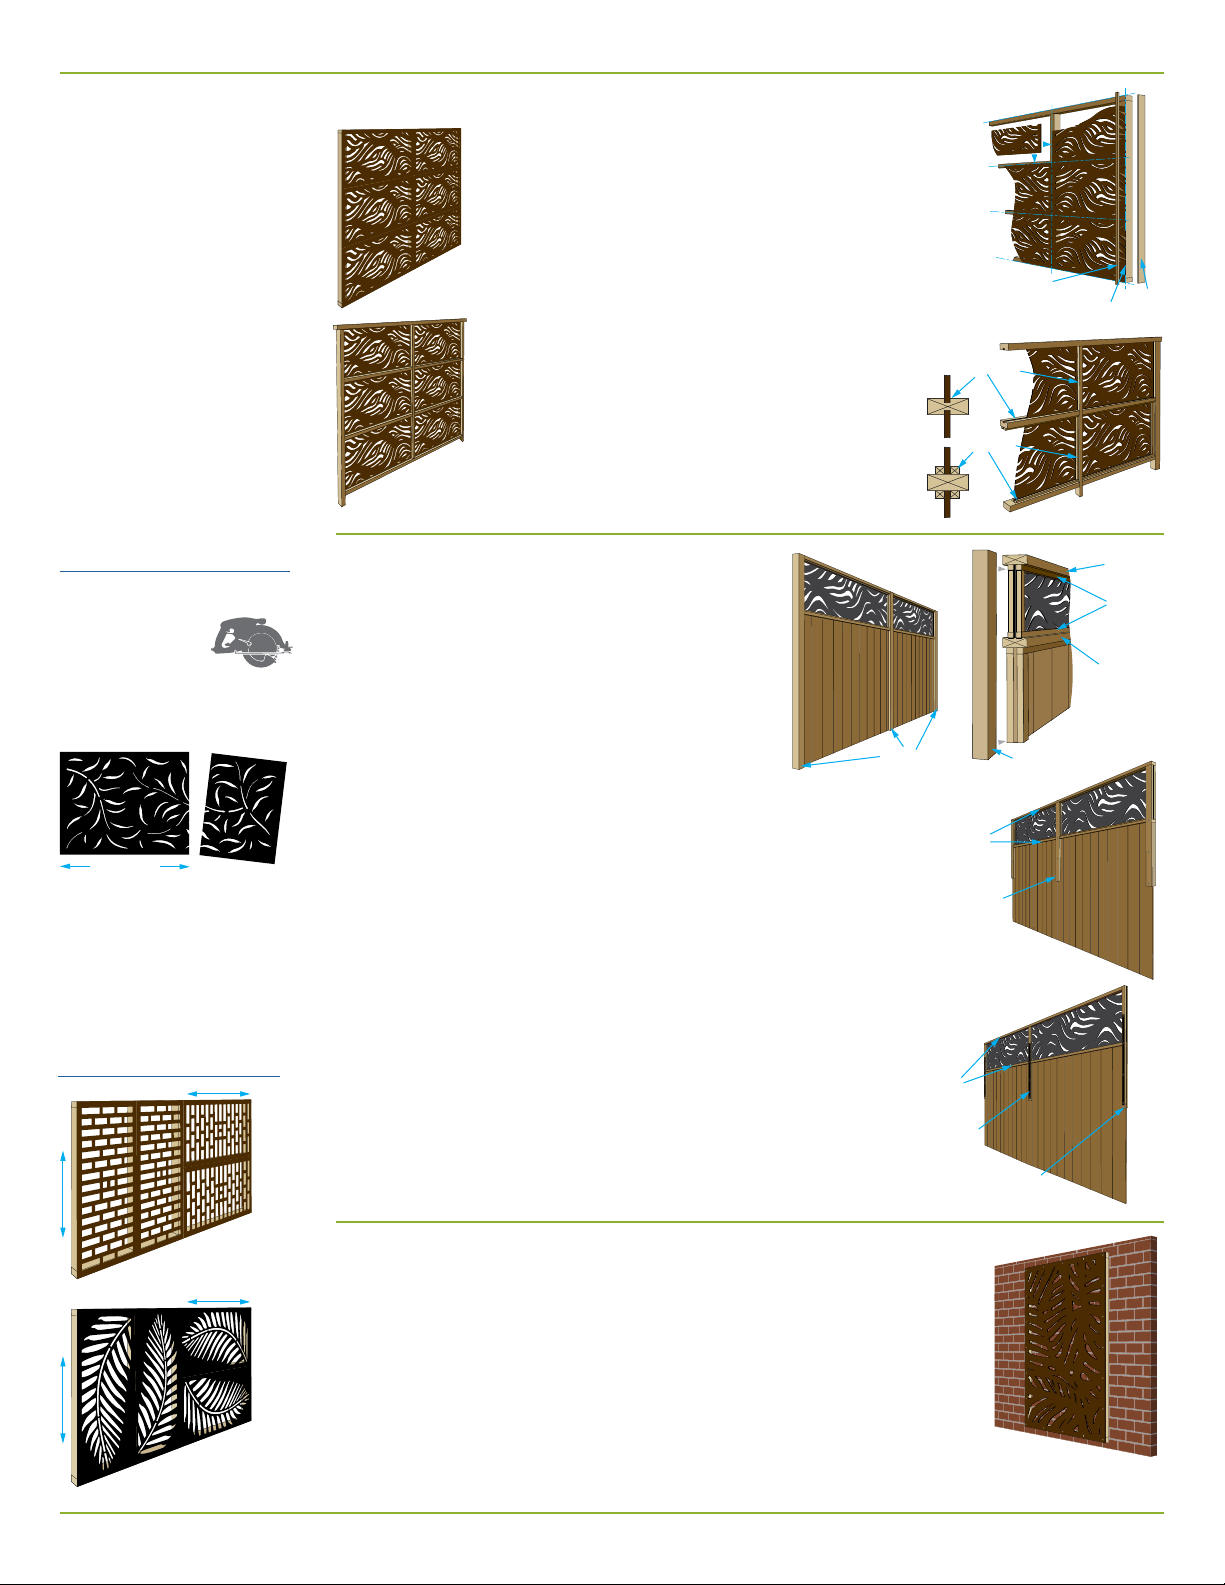
MOUNTING STYLES
FACE-MOUNT – Attach panels to front of frame
• Easiest method for covering a fence or wall.
• Effective for making panels straight and square.
• Add a face cap piece to conceal a cut panel
edge; or use an end-mounted cap to cover an
exposed frame edge.
WINDOW-FRAME – Set panels inside frame
OPTION 1:
Cut a recessed channel in all
posts and rails to hold panel edges.
OPTION 2:
Build a 1" x 1" or 2" x 2"
border casing and attach to frame with
the panel secured inside the casing.
FENCE EXTENSIONS
Use timber or metal posts in windy areas.
OPTION 1: Fence with 4" x 4" posts
extending above the fence
1. Add 2" x 4" cross rails between posts to
create top and bottom of extension frame.
2. Create a 1" x 1" or 2" x 2" border casing
and attach to frame securing the panel
4" x 4"
Posts
between the casing.
OPTION 2: Existing fence without extended posts
1. Attach 2" x 4" timber extension posts to one or
both sides of the fence extending 16"– 24" down
from top of the fence. Fasten with bolts every 12"–18".
Cross Rails
2" x 4" Post
Extensions
2. Attach a 2" x 4" top rail to top of posts and 2" x 4" cross
rails between posts along top of fence to create frame.
3. Build border casing and secure panels per Option 1, #2 above.
4. In non-windy areas, 1" x 2" or 2" x 2" post extensions
and rails can be used to build a frame to hold panels
with 16"–24" metal straps added. Use straps
on both sides of fence for a more secure installation.
Fence extension installation examples are suggestions only.
Modify for your fence requirements or consult a professional.
Frame Top
& Cross
Rails
Straps
Channel
Casing
2" x 4"
Top &
Metal
Face
Cap
4" x 4"
Post
Frame
Extensions
Panel
Cut Edge
Cross Rail
End
Cap
2" x 4"
Top Ra il
Casing
2" x 4"
ATTACHING TO AN EXISTING MASONRY WALL
Check that wall is flat, square, and level, and can support the
panels' weight. Build a timber or metal frame. Pre-drill wall with
masonry bit and use masonry screws to attach frame. Mount
panels to frame. Use this method for mounting panels on large
gates, heavy garage doors, or other sizable moving structures.
ATTACHING TO A SKELETAL STRUCTURE OR STUD WALL
Use the framing method above and attach your frame to the structure’s studs.
outdecousa.com page 2 of 4
Page 3
Frame
Construction
Please read through
ALL instructions
before starting.
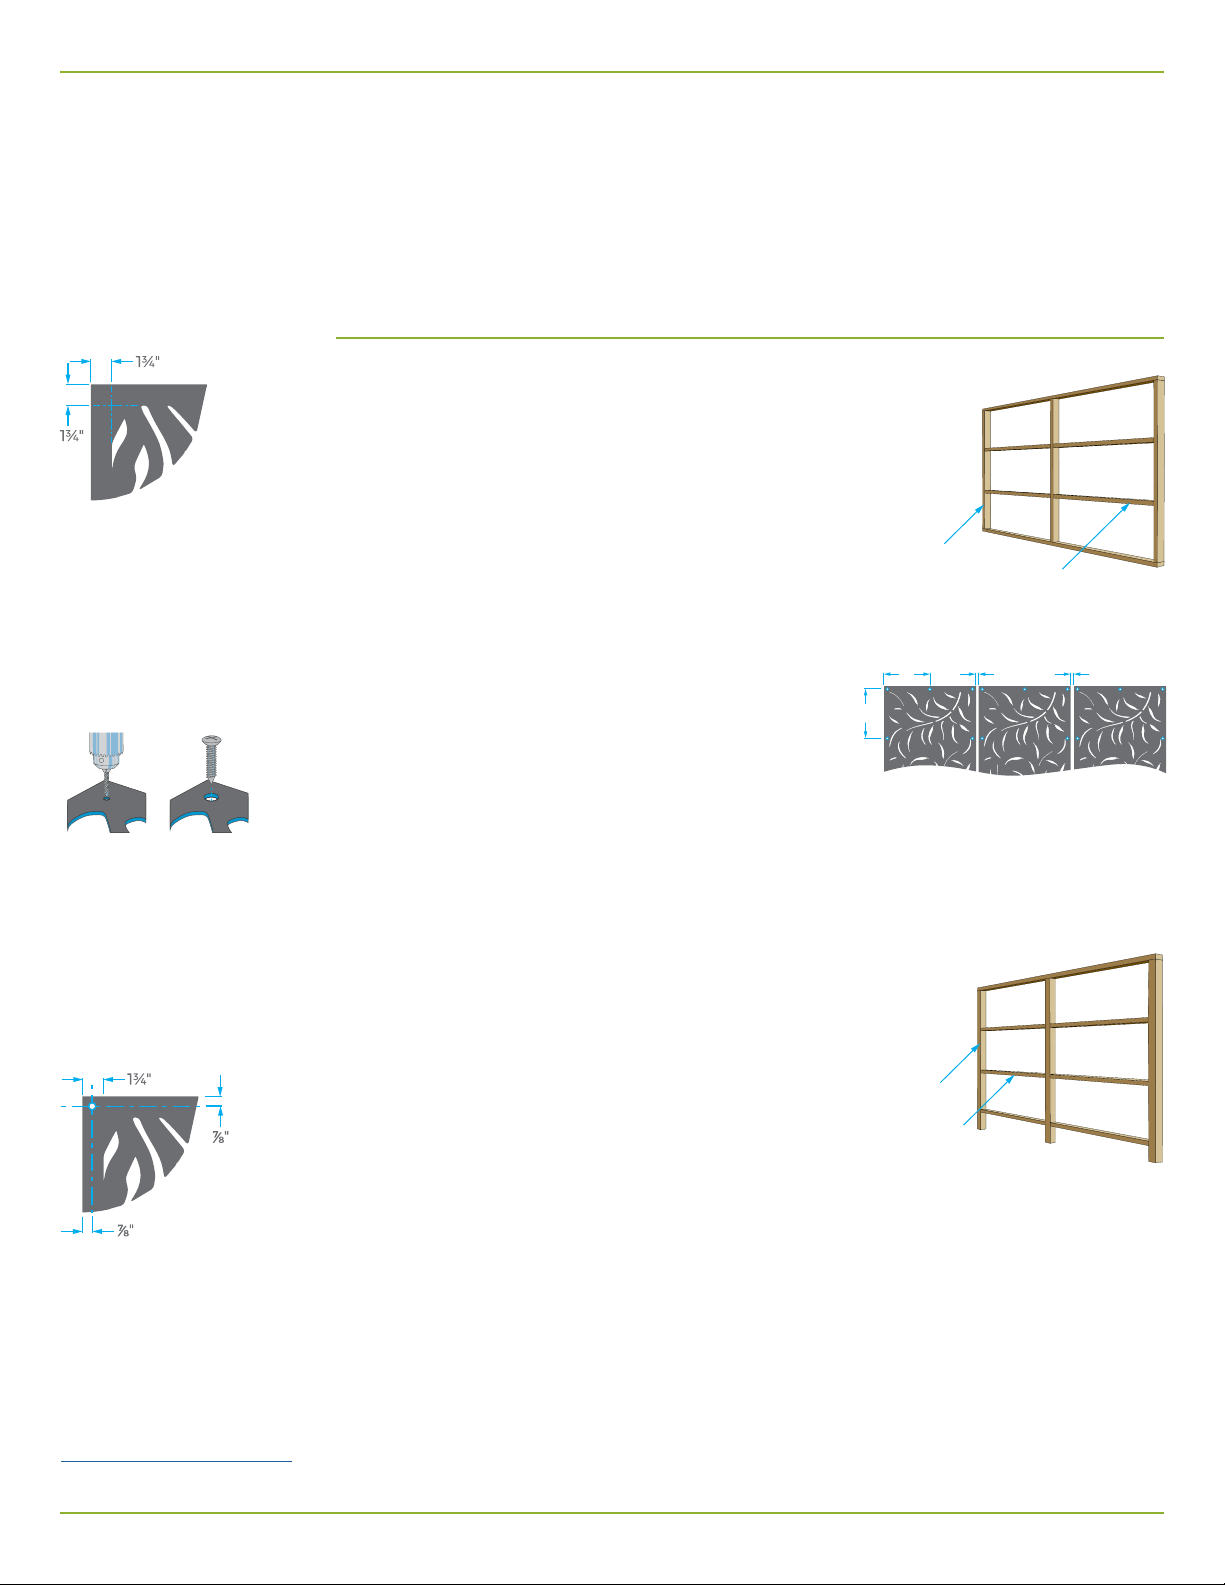
Border Spacing
FRAME MATERIALS
• For existing walls, fences, gates, garage doors, pergolas, balustrades, bench seats,
or planter boxes, create a light frame using 1" x 2", 2" x 2", or 2" x 4" wood. Select
lumber size appropriate for number and weight of panels.
• For free-standing structures, use 4" x 4" timber or metal posts with 2" x 4" rails.
• For heavy or large gates and other moving structural or more substantial applications,
use aluminum or RHS (rectangular hollow steel) for frame posts and cross rails.
BASIC FRAME CONSTRUCTION
Build your frame laying on a flat surface so you can check
dimensions, square alignment, and panel joint spacing. This
allows you to easily raise/lower, reposition, or level your frame.
All panels have a 1w"
nominal border that will
conceal most frames.
Pre-Drilling
Measure, draw-up, and
pre-drill screw holes in
the panel border.
Measure, draw-up, and
pre-drill screw holes
halfway into the panel
border:
• every 12" on all 4 sides
of each panel
• ⁷/₈" from panel edge
Drilling Guide
Panel Specs
Find panel weights, sizes,
and other details on our
website’s Patterns page
and click on your panel's
pattern name.
outdecousa.com/patterns
1. Measure so your frame will match the exact width
and height of your panel area, including a z"
expansion gap between panels.
2. Create a frame of vertical and horizontal studs,
2" x 2" or
2" x 4" Posts
1" x 2", 2" x 2 " or
2" x 4" Cross Rails
positioning the center lines of the interior studs
where the panel edges will meet, with the z"
gaps between them.
3. With a helper, lift your frame into place and adjust
¹⁄₁₆" Gap between Panel Edges
¹⁄16
12"
12"
"
¹⁄16
"
so the entire piece is level. Attach the frame to
the fence, wall, or other surface.
4. Measure, draw-up, and pre-drill the panels with screw holes z" larger than your
screws or nails, every 12" on all four sides. (See border and drilling guides at left.)
5. Position your panels using z" spacers to create consistent expansion joints
between panels. Clamp panels to your frame and attach them. (See page 4.)
FREE-STANDING FRAME CONSTRUCTION
A free-standing installation requires a strong structural frame.
OUTDECO panels are not intended for use as a free-standing
structure without a frame.
4" x 4"
Build a frame laying down on a flat surface using lumber
that's minimum 4" x 4" for posts and 2" x 4" for rails.
Posts
2" x 4"
Cross Rails
1. Measure so your frame will match the exact width and
height of your panel area, including a z" expansion gap between panels, and add
the length of post extensions for legs and footings. (Post height, weight, and footing
requirements vary, so measure and consider load weight carefully. Check for any
underground services and features before digging.)
2. Create a frame of vertical posts and horizontal studs, positioning the center lines of
the interior studs where the panel edges will meet, with the z" gaps between them.
3. With a helper, lift your frame into footing holes, adjust so the entire piece is level,
and add concrete.
4. Position your panels using z" spacers to create consistent expansion joints
between panels. Clamp panels to your frame and attach them. (See page 4.)
outdecousa.com page 3 of 4
Page 4
Attaching
& Fasteners
Please read through
ALL instructions
before starting.
Mounting hardware
is not included with
OUTDECO panels.
Panel Specs
Find panel weights, sizes,
and other details on our
website’s Patterns page
and click on your panel's
pattern name.
outdecousa.com/patterns
Attach with screws
every 12" on all 4 sides
of each panel.
SCREWS
• Use screws with a x" diameter
or smaller, long enough to
penetrate a minimum of 1"
into the frame.
• Good options include deck screws,
Phillips wood screws, and flat-head
countersink screws. Some deck screws
are available in wood-like colors.
• Use galvanized screws for outdoor
applications.
• Use washers where appropriate.
• Attach frame to brick and masonry
using an expansion anchor.
• For a metal frame, use pop-rivets or
other suitable fasteners.
MOUNTING WITH SCREWS OR NAILS
• Ask a hardware professional about the
right fasteners for your frame material,
panel weight, and attachment surface.
NAILS
• Pre-drill a slightly undersized
hole to locate your nail spot
and to prevent blistering or
gouging the panel surface.
• Use galvanized nails in the appropriate
size for the weight of your panel.
Use nails long enough to penetrate a
minimum of 1" into the frame.
• With a nail gun, use a rubber stopper.
Fire carefully leaving the heads just at
or below the surface for inconspicuous
nail holes.
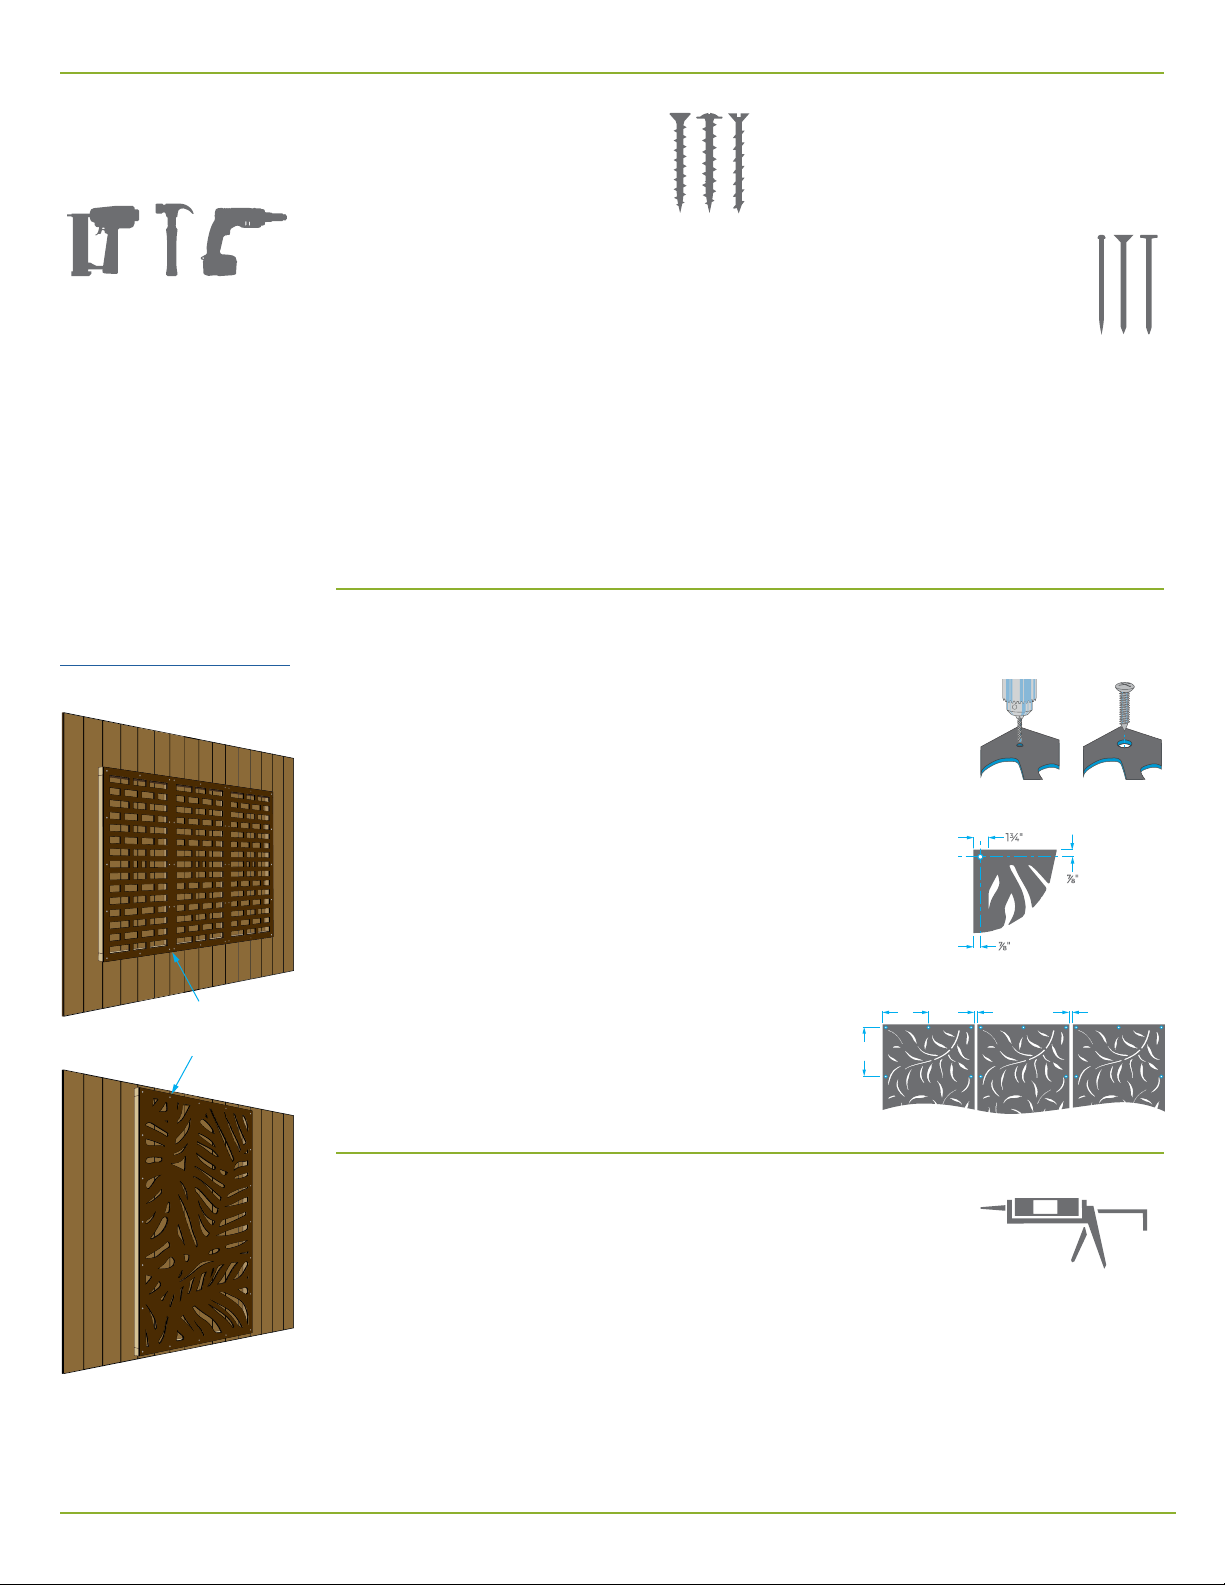
1. Pre-drill holes before mounting. (See page 3.)
2. Drill holes at least z" larger than the screw
or nail diameter to allow for expansion and contraction.
3. Position drill holes d" from the panel edge, in the center of
the panel border, every 12" on all four sides of each panel.
4. Where multiple sheets adjoin (at sides or top/bottom),
use z" spacers between panel edges on all sides
to allow for thermal expansion.
5. Attach panels with screws or nails every 12" all four sides.
This will secure the panels and help keep them straight.
6. To avoid damaging panels, do not overtighten screws
or counter-sink nails too deeply.
7. For aesthetics, paint screw or nail heads to
match the panel color.
12"
8. For a backlit effect, install LED light strips
behind the panels, inside the frame.
Pre-Drill for
Screws or Nails
1¾" Panel Border
¹⁄₁₆" Gap between Panel Edges
12"
¹⁄16
"
¹⁄16
"
7⁄8"
Drilling
Boundary
MOUNTING WITH CONSTRUCTION ADHESIVE
Construction adhesive is an easy-to-use option, however, in many
applications, reinforcement with additional fasteners like screws or nails
may be required.
• We highly recommended the use of screws in addition to adhesive. Follow instructions
#4, #5, and #6 above for attaching with screws.
• Ensure both the panel surface and the frame or mounting surface are clean and clear
of dust, paint, oil, or water.
• Use a large bead (or double bead) of adhesive and sturdy clamps to ensure maximum
bonding to the attachment surface.
outdecousa.com page 4 of 4
 Loading...