

Page 1
Outback® Spectrum 2 Burner, Spe ct rum 3 Burne r Gas Barb ecu es
Photograph is not to scale.
Specifications subject to change
without prior notice.
Gas Barbecues
Assembly and Operating Instructions for
0359
WARNING
• For outdoor use only.
• Read instructions before using the appliance. Failure to follow instructions could
result in death, serious bodily injury, and/or property loss.
• Warning: accessible parts may be very hot. Keep young children away.
• Do not move the appliance during use.
• Turn off the gas supply at the gas bottle after use.
• Any modification of the appliance, misuse, or failure to follow the instructions may be
dangerous and will invalidate your warranty. This does not affect your statutory rights.
• Retain these instructions for future reference.
• Leak test your barbecue annually. Check the hose connections are tight and leak test
each time you reconnect the gas bottle.
If you smell gas:
1. Shut off gas to the appliance.
2. Extinguish any open flame.
3. Open barbecue lid or hood.
4. If odour continues, disco ntinue use and
FOR YOUR SAFETY
contact your local dealer.
FOR YOUR SAFETY
1. Do not store or use petrol or other flammable
vapours or liquids in the vicinity of this or any
other appliance.
2. A gas bottle not connected for use shall not be
stored in the vicinity of this or any other
appliance.
Page 2
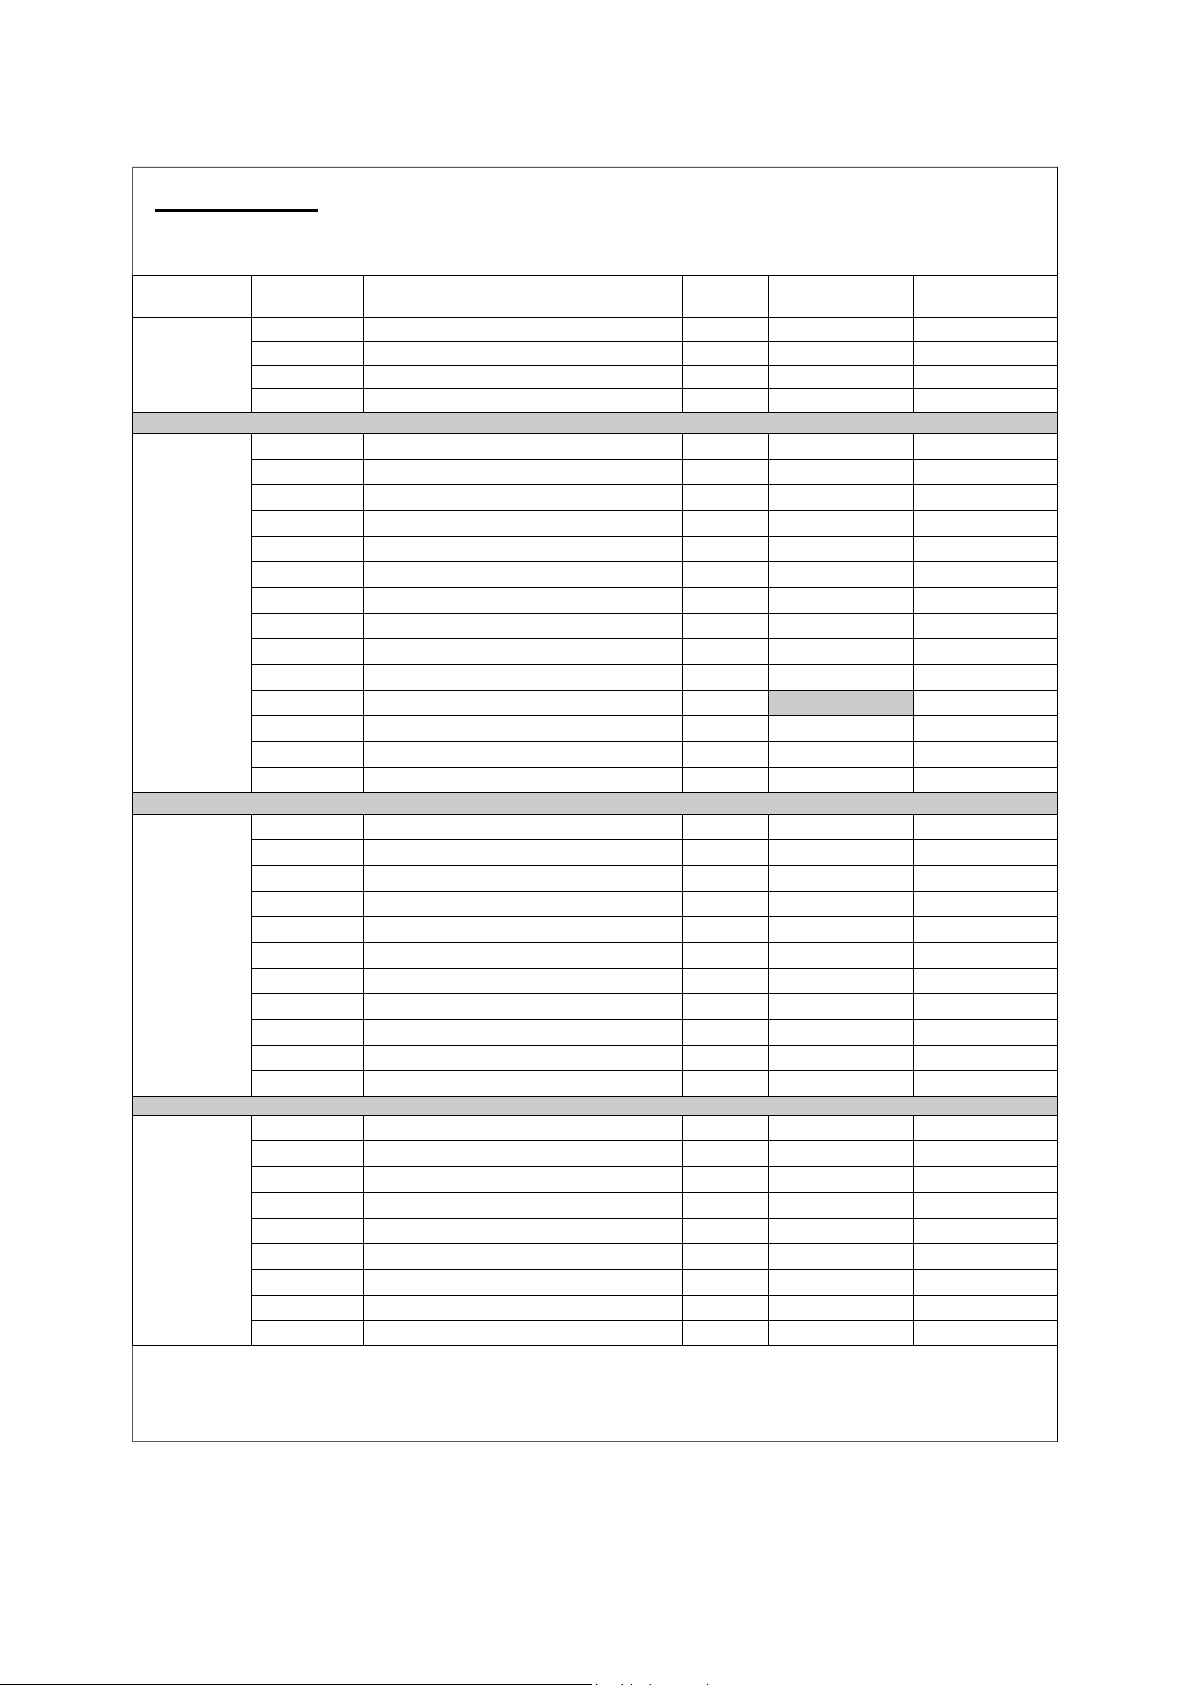
A. Parts List
Quantities vary according to model purchased. Specifications subject to change without prior notice. For more
details on hardware, please see Hardware Reference Diagram.
CODE PART QTY
A1 Lid Handle 1
LID
BODY
TROLLEY
HARDWARE
A2 Flat Lid (Pre-Assembled to Body) 1
A3 L/H Lid Handle Bracket 1
A4 R/H Lid Handle Bracket 1
B1 Body (see Part A2: Flat Lid) 1
B2 Burner
B3 Control Panel 1
B4 Knob
B5 Drip Tray 1
B6 Drip Tray Handle 1
B7 Drip Tray Left Bracket 1
B8 Drip Tray Right Bracket 1
B9 Large Cooking Grill (With Cut-out) 1
B10 Small Cooking Grill (2 Burner Cut-out) 1
B11 Small Cooking Griddle (With Cut-out)
B12 Flame Tamer 2
B13 Hose and Regulator 1
B14 Warming Rack 1
C1 Side Shelf 2
C2 Front Left Leg 1
C3 Rear Left Leg 1
C4 Front Right Leg 1
C5 Rear Right Leg 1
C6 Screen 1
C7 Leg Endcap 2
C8 Wheel 2
C9 Hubcap 2
C10 Axle 1
C11 Trolley Base 1
D1 M5x10 Bolt 2
D2 M5x15 Bolt 4
D3 Ø5 Washer 4
D4 M5 Nut 4
D5 M6x25 Bolt 24
D6 M6x145 Bolt 8
D7 Ø6 Spacer 8
D8 Axle Washer 2
D9 Locknut 2
Outback®
Spectrum 2
2 3
2 3
1
Outback®
Spectrum 3
Pre-Assembled Component
Quantity varies according to model purchased
Appearance, size, and construction may differ according to model purchased
2
Page 3
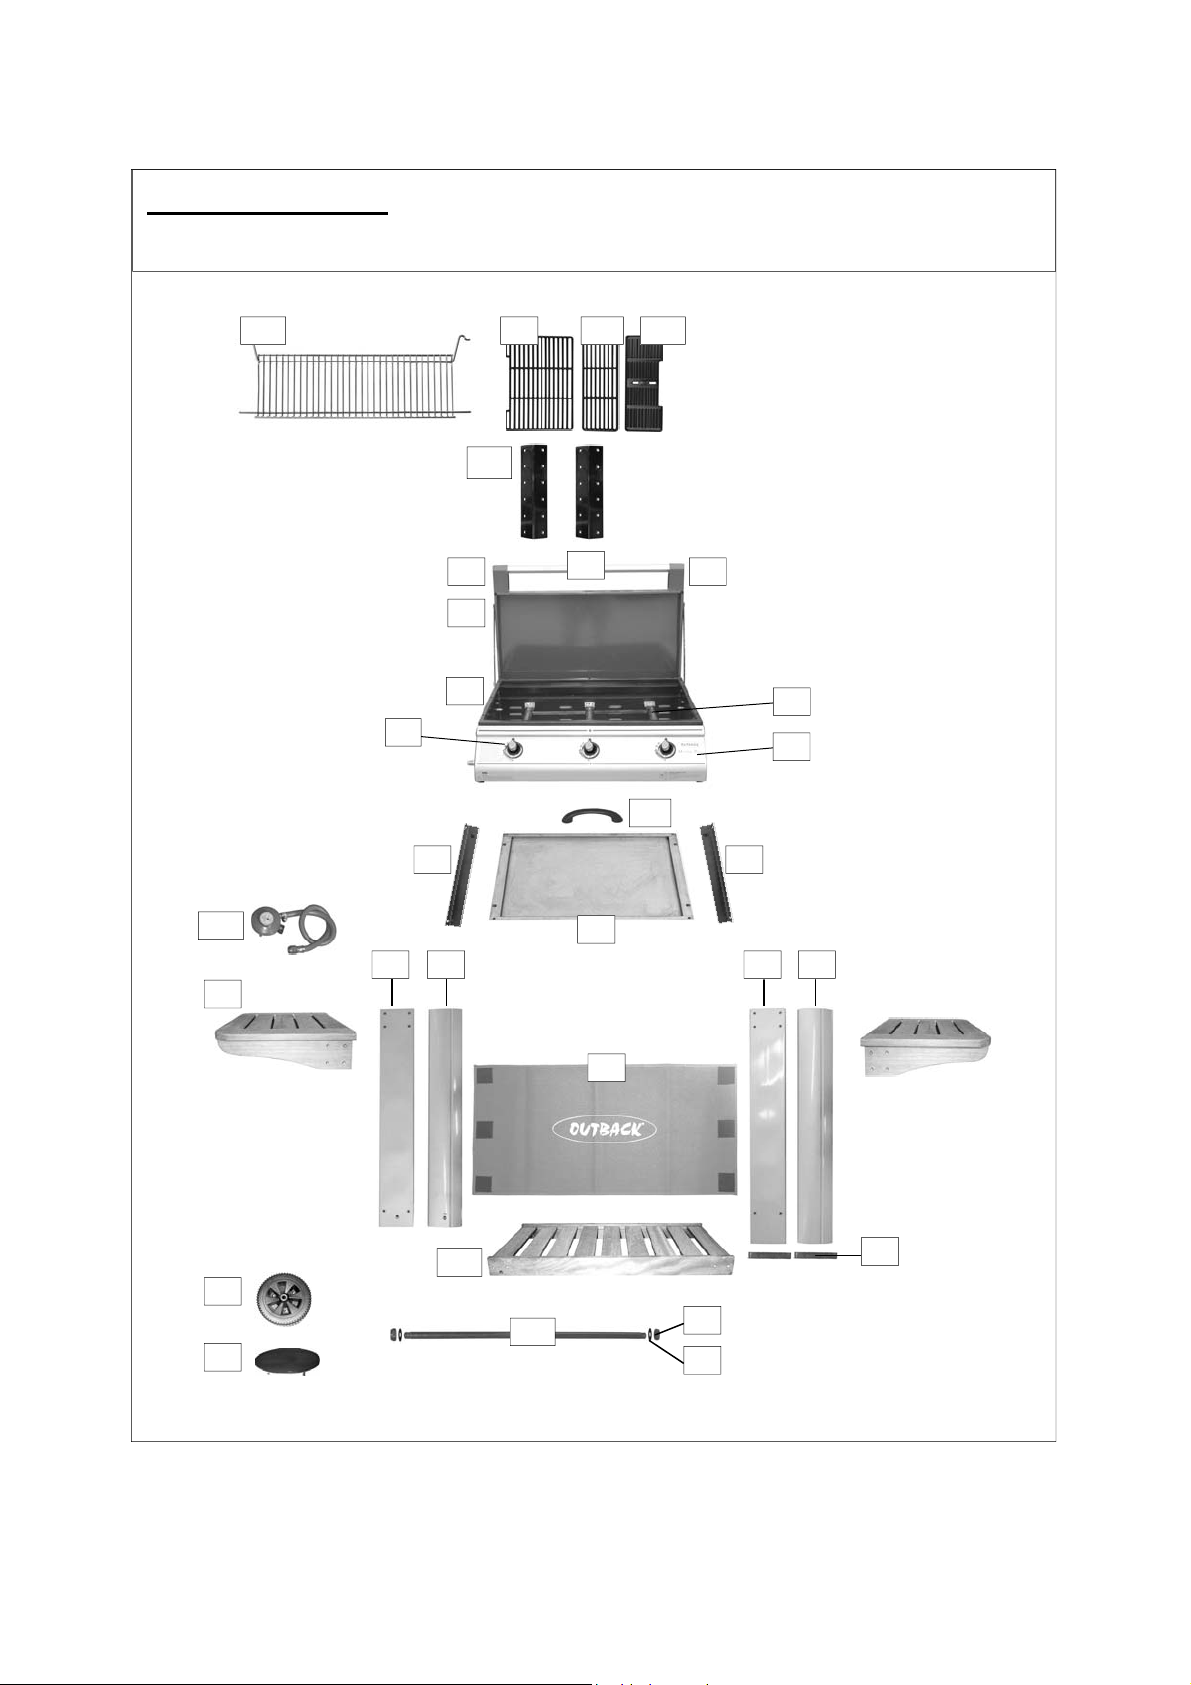
B. Parts Diagrams
Quantities vary according to model purchased. Specifications subject to change without prior notice. For more
details on hardware, please see ‘Hardware Reference Diagram.’
B14 B10
B4
B7 B8
B9
B12
A3 A4
A2
B1
A1
B11
B2
B3
B6
B13
C1
C8
C9
B5
C2 C3 C4 C5
C6
C11
C10
D9
D8
3
C7
Page 4
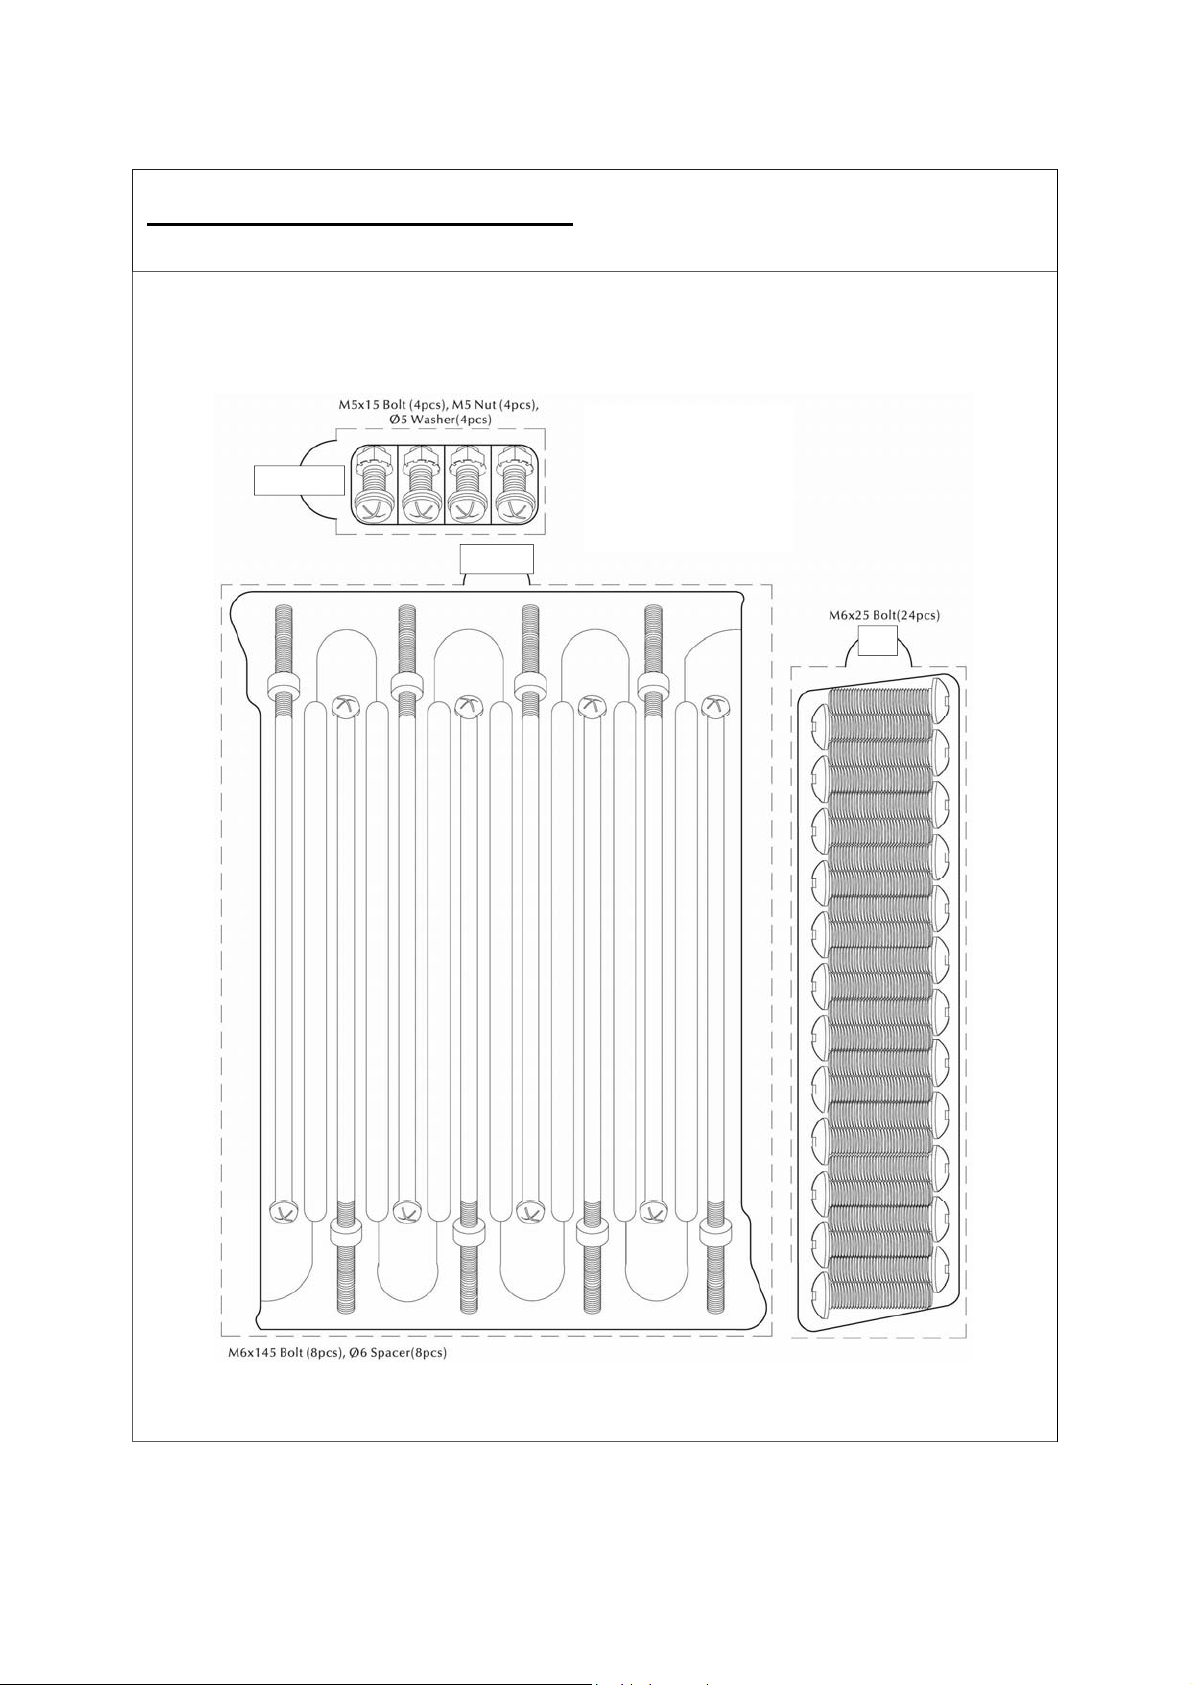
C. Hardware Reference Diagram
Specifications subject to change w ithout prior noti ce.
D2,D3,D4
D6,D7
D5
4
Page 5

D. Assembly
TOOLS NEEDED FOR ASSEMBLY:
Medium size flat blade or Phillips/crosspoint screwdriver, adjustable spanner or metric spanner set.
The assembly of this barbecue requires 2 people.
Whilst every care is taken in the manufacture of this product, care must be taken during assembly in case sharp
edges are present.
1
D5
C11
C2
C4
C3
Attach the legs (C2,C3,C4,C5) to the trolley base (C11) using the M6x25 bolts (D5). Take
care to fix the legs with Velcro attached as shown in the illustration.
2
D8 C10
(Photo depicts trolley
from the reverse side)
C9
D9
C8
Slide the axle (C10) through the corresponding holes in the short legs. Place a washer (D8)
on each end of the axle. Slide the wheels (C8) over each end of the axle. Secure the wheels
into place with the locknuts (D9). Snap the hubcaps (C9) into the wheels.
5
Page 6
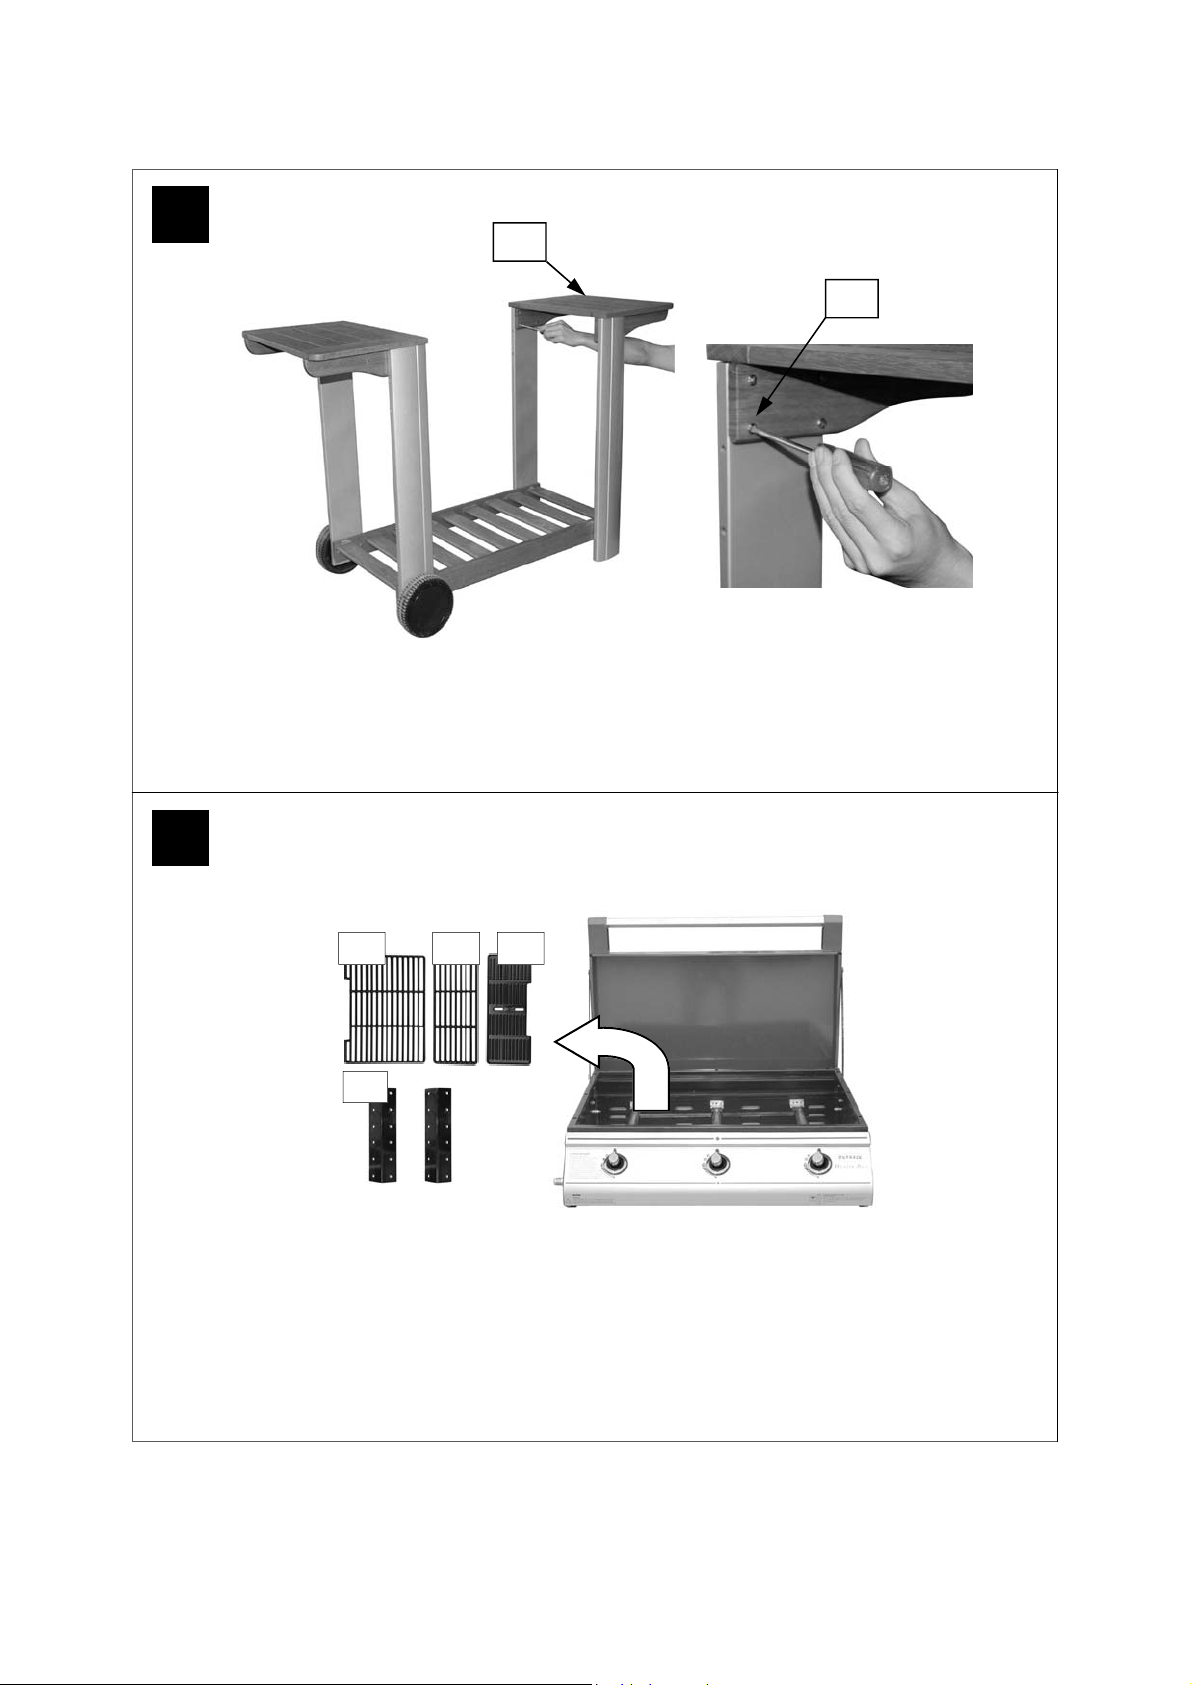
3
C1
D5
Attach the side shelves (C1) to the front/rear left legs (C2,C3) and front/rear right legs
(C4,C5) using the M6x25 bolts (D5).
4
B9 B11 B10
B12
Remove all cast iron cooking components, flame tamer, drip tray, and any internal packaging
from the barbecue body.
6
Page 7

5
B1
B1
Lay the assembled trolley on its side. Lay the body (B1) on its back and slide into position between
the trolley legs. Warning: Care must be taken to ensure lid does not fall open unexpectedly.
6
D6 D7
With the barbecue laid on the ground, insert a M6x145 bolt (D6) through the short leg,
through a spacer (D7), and secure the bolt into the sidewall of the body. repeat the process
for all the legs until the body is completely fixed to the trolley.
NOTE:
the same side as the legs with Velcro fastenings
When positioni ng the body of the barbecue, ensure the control pa nel is on
.
7
Page 8

7
Remove the plastic wrap from the flame tamer (B12) and lay them carefully into the body ensuring
they lie level within the body. Lay the cooking grill(s) (B9, B10)and griddle (B11) into place.
2 burner model configuration: Left — Large Cooking Grill, flame tamer, Right — Small Cooking
Grill, flame tamer;
3 burner model configuration: Left — Large Cooking Grill, flame tamer, Middle — Small Cooking
Grill, flame tamer, Right — Small Griddle Plate.
NOTE: The flame tamers must be laid over the burners.
B9 B11 B10
B12
8
D2
D3
Attach drip tray right bracket (B8) to barbecue body using M5x15 bolts (D2), washers (D3) and
M5 nuts (D4) as shown. Repeat above process for drip tray left bracket (B7).
NOTE: Ensure that the tabs of the brakets which stop the drip tray are located at the
back of the barbecue.
8
Page 9

9
D1
10
B6
B5
B5
Attach the drip tray handle (B6) to the drip tray (B5) using the M5x10 bolts (D1). Put the
drip tray underneath the body (B1) from back side.
Attach the warming rack (B14) to the flat lid as shown.
9
Page 10

11
12
C6
(Rear view of the barbecue trolley.)
Attach the screen (C6) to the front left/right legs as shown.
Connect the gas hose and regulator (B13) to the
BBQ. Ensure the mating faces of the connection
are clean and not damaged. Do not use any
sealing tape, paste or liquid on the joint. The nut
must be tightened with a spanner. Do not use
force which may damage the assembly.
Leak Test Diagram
ALL JOINTS AND CONNECTIONS
MUST NOW BE LEAK TESTED BEFORE USING THE BBQ. FOR DETAILS OF LEAK TESTING, PLEASE
REFER TO INSTRUCTIONS ON
PAGE 11.
PROCEED TO THE NEXT PAGE FOR INSTRUCTIONS ON OPERATION AND MAINTENANCE.
ASSEMBLY IS NOW COMPLETE.
10
Page 11

E. Important Information
Please read these instructions carefully
before assembly and use.
nRetain these instructions for future
reference.
nFor outdoors use only – do not use
indoors. Do not use below ground level.
nFor use with LPG bottled gas only. A
fixed pressure regulator of 28-30mbar
must be used for butane or 37mbar for
propane. The use of an adjustable
regulator is dangerous and must never
be used with this barbeque.
nLPG bottles should not be stored
indoors.
nRemove plastic wrap from any part
before lighting.
nDo not use within 1m of any flammable
structure or surface.
nLP gas cylinders should not be placed
directly underneath the barbecue.
nLP gas cylinders must not be stored or
used in the horizontal position. A leak
would be very serious and liquid could
enter the gas line.
nOpen the barbecue lid before lighting.
The barbecue should never be lit or
used while the lid is closed.
nDo not move the barbecue while alight.
nThis barbecue must not be left
unattended when lit.
nParts of this b arbecue become very hot
– care must be taken when children,
elderly people, and animals are present.
nAlways turn off the gas bottle when the
barbecue is not in use.
nNever cover a barbecue until it has
completely cooled.
nLeak test the barbecue an nually. Check
that the hose connection to the barbecue
is tight and leak test whenever the gas
bottle is reconnected.
nDo not store flammable materials near
this barbecue.
nDo not use aerosols near this barbecue.
nFailure to follow the manual’s
instructions coul d result in serious injur y
or damage.
nIf you have any queries regarding these
instructions, contact your local dealer.
F. Gas and Regulator
This barbecue, hose and regulator are
approved for use in t he UK. The barbecue
is also approved for use in other countries
as listed on the control panel and in the
Technical Specifications included in the
barbecue manual. If the barbecue is
intended to be use d outside of the UK, the
consumer MUST s eek advice f rom the loc al
qualified gas supplier as to the suitability of
the barbecue and with regards to the
correct hose and regulat or that they should
be using.
This barbecue can use either propane or
butane LPG bottled gas. Propane bottles,
normally red coloured, will supply gas all
year round, even on cold winter days. A
spanner may be
bottles. Butane bottles, normally blue, will
supply sufficient gas in summer, but
performance of the barbecue may be
affected once the gas tem perature starts to
fall below +10°C. The bottle should never
be stood on the trolley base and placed
directly under the barbecue. Gas bottles
should never be stored or used la id on their
side. Never store gas bottles indoors.
For optimal performance, we suggest the
following:
Model Butane Minimum
Outback®
Spectrum
2 Burner
Outback®
Spectrum
3 Burner
Suitable regulat ors f or buta ne m ust have a n
outlet pressure of 2 8-30mbar. For propane,
the regulator mus t have an outlet pressure
of 37mbar. YOU MUST HAVE THE
PROPER REGULATOR AND BOTTLE IN
ORDER FOR THE BARBECUE TO
OPERATE SAFELY AND EFFICIENTLY.
USE OF AN INCORRECT OR FAULTY
REGULATOR IS DANGEROUS AND W ILL
INVALIDATE ANY W ARRANTY. If in doubt,
please consult your gas dealer/distributor.
required to change gas
Bottle Size
15kg 6kg
15kg** 10kg
Propane Minimum
Bottle Size
11
Page 12

G. Installation
G1. Selecting a Location
This barbecue is for outdoor use only and
should be placed in a well-ventilated area.
Take care to ensure that it is not placed
UNDER any combustible surf ac e. T he s ides
of the barbecue should NEVER be closer
than 1 metre from any combustib le surface.
Keep this barbecue away from any
flammable materials!
G2. Precautions
Do not obstruct any ve ntilation openings in
the barbecue body. Position the gas supply
bottle on level gr ound next to the barbec ue
and safely away from any source of heat.
Should you need to chang e the gas bottle,
confirm that the barbecue is switched off,
and that there are no sources of ignition
(cigarettes, open flame, sparks, etc.) near
before proceeding. Ins pect the gas hose to
ensure it is free of any twisting or tension.
The hose should hang freel y with no bends ,
folds, or kinks that could obstruct free flow
of gas. Apart fr om the connection point, no
part of the hose should touch any hot
barbecue parts. Al ways ins pect the h ose f or
cuts, cracks, or ex cessive wear befor e use.
If the hose is damaged, it m ust be replaced
with hose suitable for use with LPG and
meet the national standar ds for the country
of use. The length of the hose shall not
exceed 1.5m. N.B.-The dat e on U. K. or an ge
hose is the date of manufacture, not the
expiry date.
G3. Fixing the Regulator to the Gas
Bottle
Confirm all barbecue control knobs are in
the off position. Co nn ec t th e regu la tor to th e
gas bottle according to your regulator and
bottle dealer’s instructions.
G4. Leak Testing (To be performed in a
well-ventilated area.)
Confirm all control knobs are in the off
position. Detach the barbec ue control pa nel
located across the front of the barbecue
body by pulling off the control knobs and
removing the control panel retaining
screws. Open the gas control valve on the
bottle or regulator. Check for leaks by
brushing a solution of ½ water and ½ soap
over all gas system joints, including all
valve connections, hose connections and
regulator connections. NEVER USE AN
OPEN FLAME to test for leaks at anytime. If
bubbles form over an y of the joints, there is
a leak. Turn off the gas supply and retighten
all joints. Repeat tes t. If bu bbl es form again,
do not use the barbecue. Please contact
your local dealer for assistance. Leak test
the barbecue annuall y. Check that the hose
connection to the bar becue is tight an d leak
test whenever the gas bottle is
reconnected.
H. Operation
H1. nWarnings
nBefore proceeding, make certain that
you understand the IMPORTANT
INFORMATION section of this manual.
nThis barbecue is not designed to be
used with more than 50% of the cook ing
area as a solid plate. Full coverage of
plates will cause excessive build-up of
heat and damage the barbecue.
H2. Preparation Before Cooking
Line the drip tray with aluminium foil and fill the
drip tray with dry sand. This will absorb excess
cooking fat and make cleaning easier. To
prevent foods from sticking to the porcelain,
please use a long handled brush to apply a light
coat of cooking or vegetable oil before each
barbecuing session.
H3. Lighting the Barbecue Using the IntegraSpark Integrated Ignition System
• Open the roasting hood of your
barbecue before lighting.
• Open the gas control valve on the gas
bottle or regulator.
• Push the control k nob of the burn er you
wish to light and turn it anti-clockwise
until you feel resistance to the turning.
Pause 4 seconds, t hen cont inue turnin g
the control knob until a click is heard
and the burner is lit. If burner does not
light, turn off the gas by pushing and
12
Page 13

holding in the control knob in at the
“High” position and tur ning to “Of f”. The
lighting sequence c an then be re peated
4-5 times until the burner is lit. Ignite
any of the remaining burners in any
order, as needed. Conf irm each burner
is alight before igniting another burner.
If any burner fails to ignite after
following above procedure, turn all the
knobs to the off pos ition. Close the gas
valve on the gas bottle. Wait five
minutes. Reattempt all of the above
steps. If the barbecue still fails to light,
please refer to the manual ignition
instructions below.
• After ignition, turn the burners to the
high position for 3-5 m inutes in ord er to
pre heat the barbecue. This should be
done before each cooking session.
When pre heating is c omplete, cooking
can begin, taking extra care if burners
are left in the high position
H4. Manual lighting instructions
.
• Insert lit match through the leftmost
match-lighting hole o n the underside of
the control panel and place near
leftmost burner porthole.
• Push and turn the lef tmost control k nob
anti-clockwise to the high position.
• When the left burner is lit, turn the
remaining burners on from left to right.
• Confirm that each burner is alight
before turning on the next burner.
• If leftmost burner fails to light, contact
your local dealer for assistance.
• After lighting, turn the burners to the
high position for 3-5 m inutes in ord er to
pre heat the barbecue. T his should be
done before each cooking session.
When pre heating is c omplete, cooking
can begin, taking extra care if burners
are left in the high position.
H5. Grill Cooking
The burners heat t he flam e tamers bene ath
the grill that, in turn, heats the food. The
natural juices produced during cooking fall
onto the flame tam ers and vaporise to form
smoke. The sm oke then rises and ‘bastes’
the food, giving it that unique barbecued
flavour.
Do not attempt to cook with the lid closed. This
will result in severe damage to your barbecue.
Ensure all burners are turned off and the
barbecue has cooled down before closing the lid.
H6. Griddle Plate Cooking
The burners heat t he griddle plate directly,
which then cooks the food on contact.
Plates allow for the cooking of smaller
items, such as seafood, which could fall
through the spaces of a grill. They are also
suitable for cook ing items that requir e hightemperature/short-duration cooking, such
as vegetables and smaller cuts of fish.
Similarly, it can be us ed in exactl y the sam e
way as a griddle in the kitchen, for searing
steaks, cooking eggs, etc. Alternatively, it
can be used for heating pans or keeping
food warm.
H7. Warming Rack.
Warming racks are a convenient way to
keep cooked food warm or to warm items
such as bread rolls. Care should be taken
to ensure that any items placed on the
warming rack are cooked through and do
not continue to cook and drip fat or meat
juices, which could drip onto the lid and
down the back of the barbecue.
H8. Flare-Up Control
Flare-ups occur when meat is barbecued,
and its fat and juices fall up on the hot f lame
tamers. Smoke helps give food its
barbecued flavour, but a vo i d exc es sive f lar e
-up to prevent food being b urned. To control
flare-up, it is advisabl e to trim away excess
fat from meat and p oultry befor e grilling. T o
reduce flare-ups, the burners should be
turned down to the low setting. Flare–ups
can be extinguished by applying baking
soda or salt directly onto t he flame tamers.
Always protect your hands when handling
anything near the cooking surface of the
barbecue. Flare-ups oc cur more at the start
of cooking, particular ly with proces sed m eat
products, and it may be necessary to turn
the burners down to their lowest setting to
start with and then turning up at a later
stage in the cook ing pr ocess . The bar becue
should also not be overloa ded. Some parts
of the cooking area are hotter than others.
13
Page 14

The hottest areas will be above the b urners
which will be where the flare ups will
normally start. By leaving free space you
can simply move the food away from the
flare up to a cooler area until the flare up
has subsided.
If a fat fire should occur in t he drip tra y, turn
all knobs to the off position , turn off the gas
at the bottle, and wait f or the fire to go out.
Do not pull out the drip tray or douse with
water.
H9. End of Cooking Session
After each cooking session, turn the
barbecue burners to t he “high” position an d
burn for 5 minutes. T his procedure wil l burn
off cooking residue, thus making cleaning
easier. Make sure the hood or lid is open
during this process.
H10. Turning Off Your Barbecue
When you have finished using your
barbecue, turn all the control valves fully
clockwise to the “Off” position. To do this,
push and hold in the control knob at the
“High” position and turn to “Off”. The gas
must then be turned off at the bottle.
I. Care and Maintenance
Regularly clean your barbecue between
uses and especiall y after extended periods
of storage. Ensure the barbecue and its
components are sufficiently cool before
cleaning. Do not leave the barbecue
exposed to outside weather conditions or
stored in damp, moist areas.
nNever douse the barbecue with water
when its surfaces are hot.
nNever handle hot parts with unprotected
hands.
In order to extend the life and m aintain the
condition of your barbecue, we strongly
recommend that the unit be covered when
left outside for an y lengt h of time, es pecia lly
during the winter months. Heavy-duty
Outback® barbecue covers and other
accessories are available from your local
Outback® stockist.
Even when your barbec ue is covered for its
protection, it m us t be ins p e cted on a regular
basis as damp or condensation can form
which may result in damage to the
barbecue. It may be necessary to dry the
barbecue and the inside of the cover. Any
rust that is found that does not come into
contact with the food sho uld be treated wit h
a rust inhibitor and painted with barbecue
paint or a heat resistant paint. Wooden
parts may also need to be cleaned and re
oiled. Chrome plated warming racks etc.
should be coated with cooking oil.
I1. Porcelain Coated Cast Iron Cooking
Surfaces
Enamel is a thin, gl ass based c oating fused
onto metal and as such needs to be treated
with care Cooking oil, toget her with fat from
food being cooked c an turn to carbon as a
result of heating and result in black flakes
coming away from the cooking surfaces.
These are not harm ful. Porcelain shoul d be
cleaned using hot soapy water or with the
use a suitable cleaning product following
the manufactures instructions. Due to the
weight of the grills and griddle, we do not
recommend cleaning in a dishwasher.
I2. Burner Maintenance
Your burners hav e been preset for optimal
flame performance. You will nor mally see a
blue flame, poss ibly with a small yellow tip
when the burner is alight. If the flame
pattern is signific antly yellow, this could be
a problem caused by grease from cooking
blocking the burner or spiders or other
insects in the burner vent uri. T his can res ult
in the flow of the gas and air mixtur e being
restricted or bloc ked which may result in a
fire behind the control panel causing
serious damage to your barbecue. If this
happens, the gas should be immediately
turned off at the bottle. Burners should be
inspected and clea ned on a regular basis in
addition to the following conditions:
• Bringing the barbecue out of storage.
• One or more of the burners do not
ignite.
• The burner flame pattern is
significantly yellow.
14
Page 15

• The gas ignites behind the control
panel.
To clean a burner, remove it from the
barbecue. The outs ide of the burner can be
cleaned with a wire brush.
Clean the portholes with a pipe cleaner or
piece of wire. T ake care not to enlarge the
portholes. Clean the insect screen on the
end of the ventur i tube with a bristle brush
(i.e. an old toothbrush). Clean the venturi
tube with a pipe cleaner or piece of wire.
You may need a torch to see into the
venturi tube to make sure it is clear.
Turn the burner up on end and lightly tap
against a piece of wood to dislodge any
debris from inside.
1
3 4
2
I3. Flame Tamer
Remove any food residue from the flame
tamer surface with a plastic or wooden
scraper or brass wire brush. Do not use a
steel scraper or wire brus h. Clean with hot
soapy water and rinse well.
I4. Drip Tray
After every use, check the drip tray for fat
build up in the sand . Discard any saturate d
sand and replace it with fresh sand. Failure
to carry out this procedure can result in a fat
fire in the tray. This can severely damage
the barbecue and is not covered by the
warranty. If the bar becue is being used for
extended periods the burners should be
turned off and th e drip tray checked bef ore
the end of the cooking session.
I5. Barbecue Body
Regularly remove ex cess gr ease or f at fr om
the barbecue body with a soft plastic or
wooden scraper. It is not necessary to
remove all the grease f rom the body. If you
need to clean fully, use hot soapy water and
a cloth, or nylon-bristled brush only.
Remove cooking surfaces and burners
before full cleaning. Do not immerse the
gas controls or manifold in water. Check
burner operation af ter carefully refittin g into
body.
I6. LPG Hose
The LPG hose does n ot have a tim e-limited
in-service life but it is essential that the
hose and end connections are regularly
inspected and replaced if showing signs of:
• Physical damage such as – cuts or
abrasion, cracking, stretching, flattening
or kinking;
• Environmental deterioration such as –
stiffening, cracking, de-lamination of
outer covering, chem ical degrad ation i.e.
softening of outer coating by contact with
oil;
• Hose service failure such as – blistering,
soft spots, rupture or corrosion or
loosening of the s waged fittings or worm
drive clips attaching the hose.
I7. Trolley
Your trolley is manufactured using a
hardwood suited t o outdoor use, pr ovided it
is treated with Teak oil or similar after
assembly and on a regular basis ther eafter.
Hardwood will naturally weather and
change its appeara nce. It is quite natura l f or
small cracks to appear on the s urf ace of the
wood.
I8. Fixings
All screws and bolts, etc. should be
checked and tightened on a regular basis.
I9. Storage
Store your barbecue in a cool dry place. It
must be inspected on a regular basis as
damp or condensation c an form which m ay
result in damage to the b arbecue. It m ay be
necessary to dry the barbecue and the
15
Page 16

inside of the co ver if used. Mo uld can grow
under these conditions and should be
cleaned and treated if required. Any rust
that is found that does not come into
contact with the food sho uld be treated wit h
a rust inhibitor and painted with barbecue
paint or a heat resistant paint. Wooden
parts may also need to be cleaned and re
oiled. Chrome plated warming racks etc.
should be coated with cook ing oil. W rap the
burners in aluminium foil to help prevent
insects or other d ebris from obstr ucting the
burners.
The gas bottle must be always be
disconnected fr om the barbec ue and store d
in a well ventilated area at least 1 metre
away from any fixed ignition sourc e. Do not
store inside residential accommodation.
Never store cylinders below ground level
(e.g. cellars). Do not let children tamper
with bottles.
J. Technical Specifications
Outback®
Spectrum
2 Burner
Outback®
Spectrum
3 Burner
Countries of Use:
I
3+ (28-30/37)
CH, GB, RO
I
BG, CY, CZ, DK, EE, FI, GR, HR, LV, LT, LU, MT, NL, NO,
3B/P(30)
SK, SI, SE, TR, IS
Specifications are subject to change without prior notice
CE
Approval
0359
359AS128
0359
359AS128
BE, CY, CZ, EE, FR, GR, IE, IT, LV, LT, LU, PT, SK, ES,
Heat
Burners
Input
8.8kW 2
13.2kW 3
Injector
Size
1.1
Pressure
Butane/28
-30mbar
Propane/
Gas /
37mbar
.
16
Page 17

K. Troubleshooting
Problem Possible Cause Solution
Burners will not light us-
ing the ignition sy stem
Faulty regulator Have regulator checked or replace
Obstructions in burners Clean burners
Obstructions in gas jets or gas hose Clean jets and gas ho se
Electrode wire is loose or disconnected
Electrode or wire is damaged Change electrode and wire
Faulty integral ignitor Change ignitor
Burner will not light with
a match
Faulty regulator Have regulator checked or replace
Obstructions in burners Clean burners
Obstructions in gas jets or gas hose Clean jets and gas ho se
Low flame or flashback
(fire in burner tube— a
hissing or roaring noise
may be heard)
Obstructions in burners Clean burners
Obstructions in gas jets or gas hose Clean jets and gas ho se
Windy conditions Use BBQ in a more sheltered posit ion
Gas valve knob difficult t o
turn
LP gas bottle is empty Replace with full bottle
Reconnect wire
on electrode or ignition unit
LP gas bottle is empty Replace with full bottle
LP gas bottle too small Use larger bottle
Integral ignition system jammed Replace gas valve
Gas valve jammed Replace gas va lve
For reference and correspondence,
record your serial number here.
(See sticker on side of barbecue body.)
Serial No.__________________
This number may be required when
ordering spare par ts or accessories. A
part reference number may also be
required where applicable.
17
Page 18

OUTBACK UK LTD
LIMITED 10 YEAR WARRANTY
OUTBACK barbecues ar e warrante d to the origin al purc haser agains t defects in mater ials and
workmanship. Porcelain coated barbecue bodies, porcelain coated roasting hoods and
stainless steel roas tin g ho o ds are warranted for a period of ten (10) years from the date of pur chase. Stainless steel burner s are warra nted for a period of two (2) years f rom the date of pur chase. OUTBACK U K will, within this period, supply replac ements for defecti ve parts free of
charge provided that:
♦ The product has not been used for trade, professional or hire purposes.
♦ The product has not been subjected to misuse or neglect, including fat fires and flare ups
or use of a faulty or incorrect regulator.
♦ The product has not sustained damage through foreign objects, substances or accidents.
♦ The care and maintenance instructions given in your Outback manual have been followed.
This warranty is offered as an extra benefit and is in addition to the customers’ statutory rights.
Outback UK does not warranty in any way the gas cylinder.
If you have an y queries regarding the assembly or use of your bar becue please con tact Out-
back UK
In the unlikely event that you experience
problems with this barbeque, please contact:
Custome r Service
Outback UK
Unit 2 Farleigh Hill
Tovil
Maidstone
Kent ME15 6RG
Tel: 01622 671771
Fax: 01622 673101
e-mail: customerservice@o utb ack uk. co m
website: www.outbackuk.com
18
Published November 2008
 Loading...