

Page 1
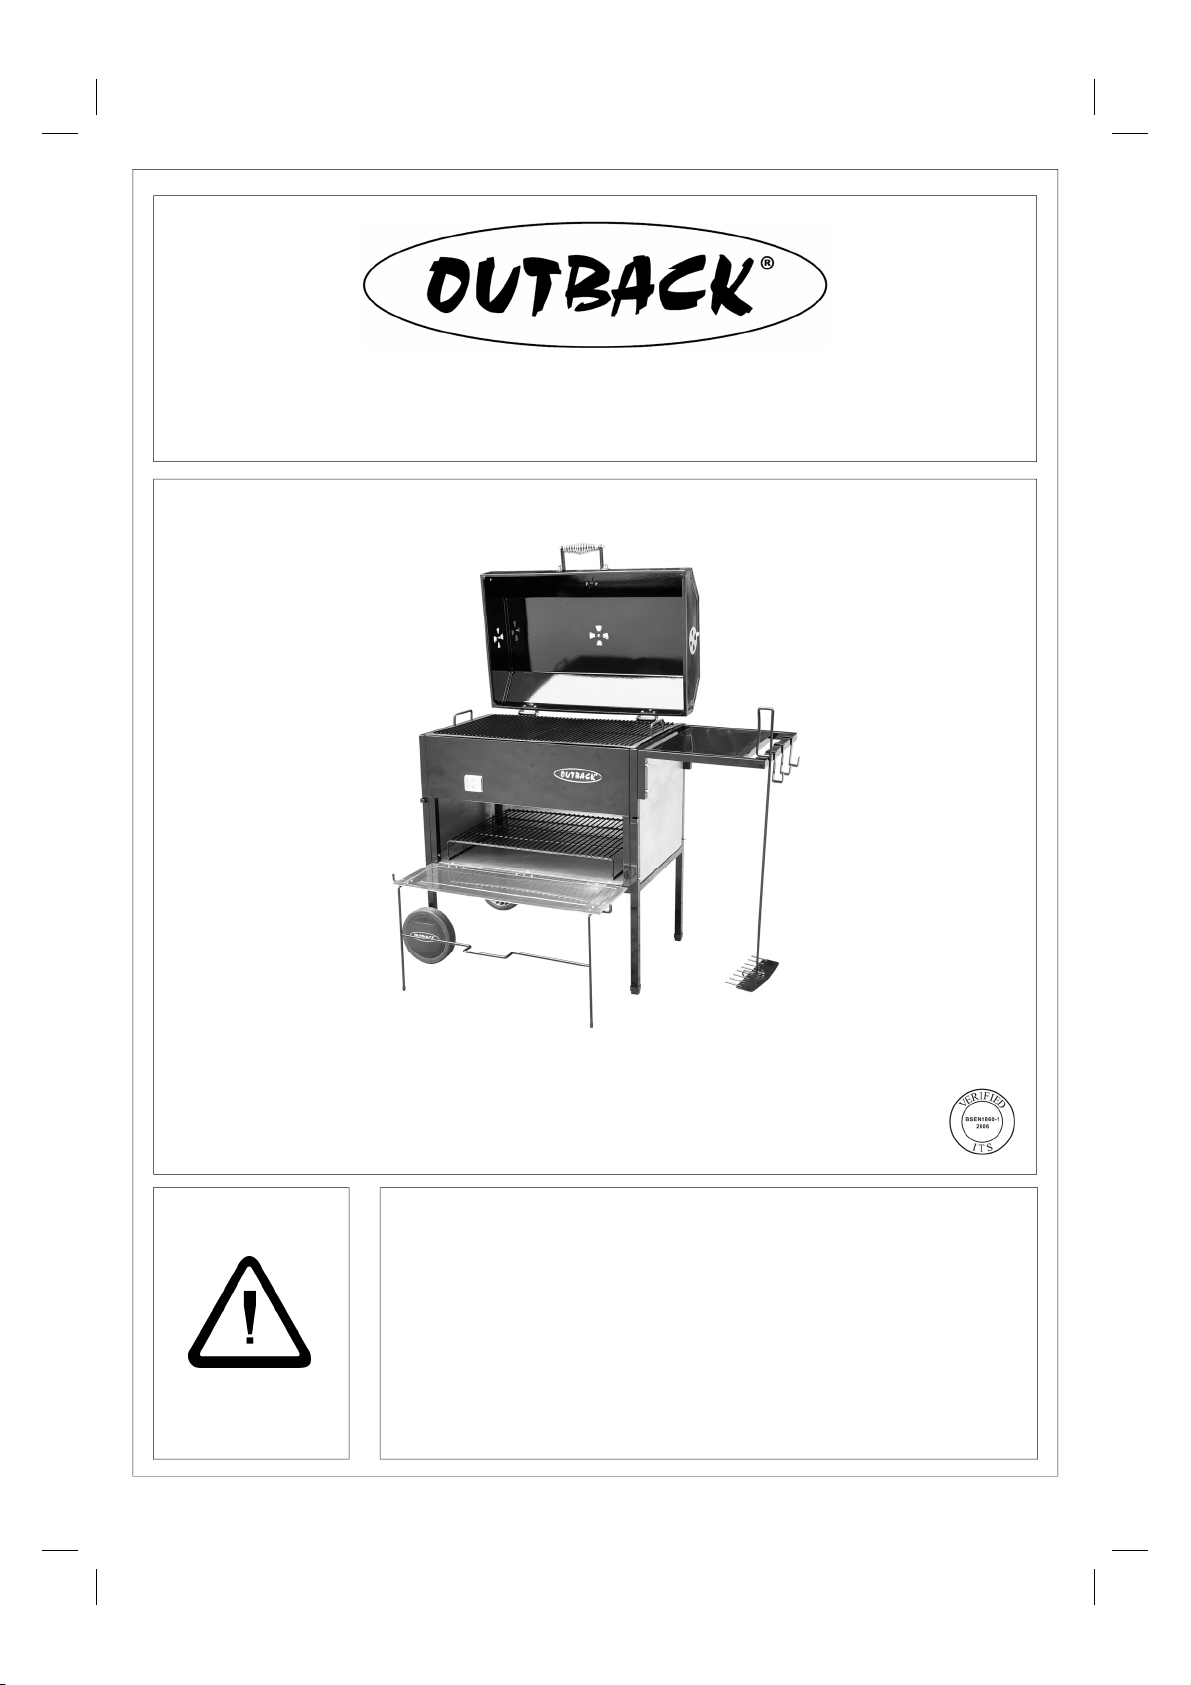
Assembly and Operating Instructions for
Outback® Oven Grill
Photographs are not to scale.
Specifications subject to change
without prior notice.
WARNING
RB-H5060
• For outdoor use only. Not for commercial use.
• Read instructions before using the appliance. Failure to follow instructions could
result in death, serious bodily injury, and/or property loss.
• Warning: accessible parts may be very hot. Keep young children and pets away.
• CAUTION: Do not use spirit or petrol for lighting or re-lighting! Use only
firelighters complying to EN1860-3!
• Do not move the appliance during use.
• Any modification of the appliance, misuse, or failure to follow the instructions
may be dangerous and will invalidate your warranty. This does not affect your
statutory rights.
• Retain these instructions for future reference.
• For Flare-up control please refer to the ‘OPERATION’ section of this manual.
Page 2
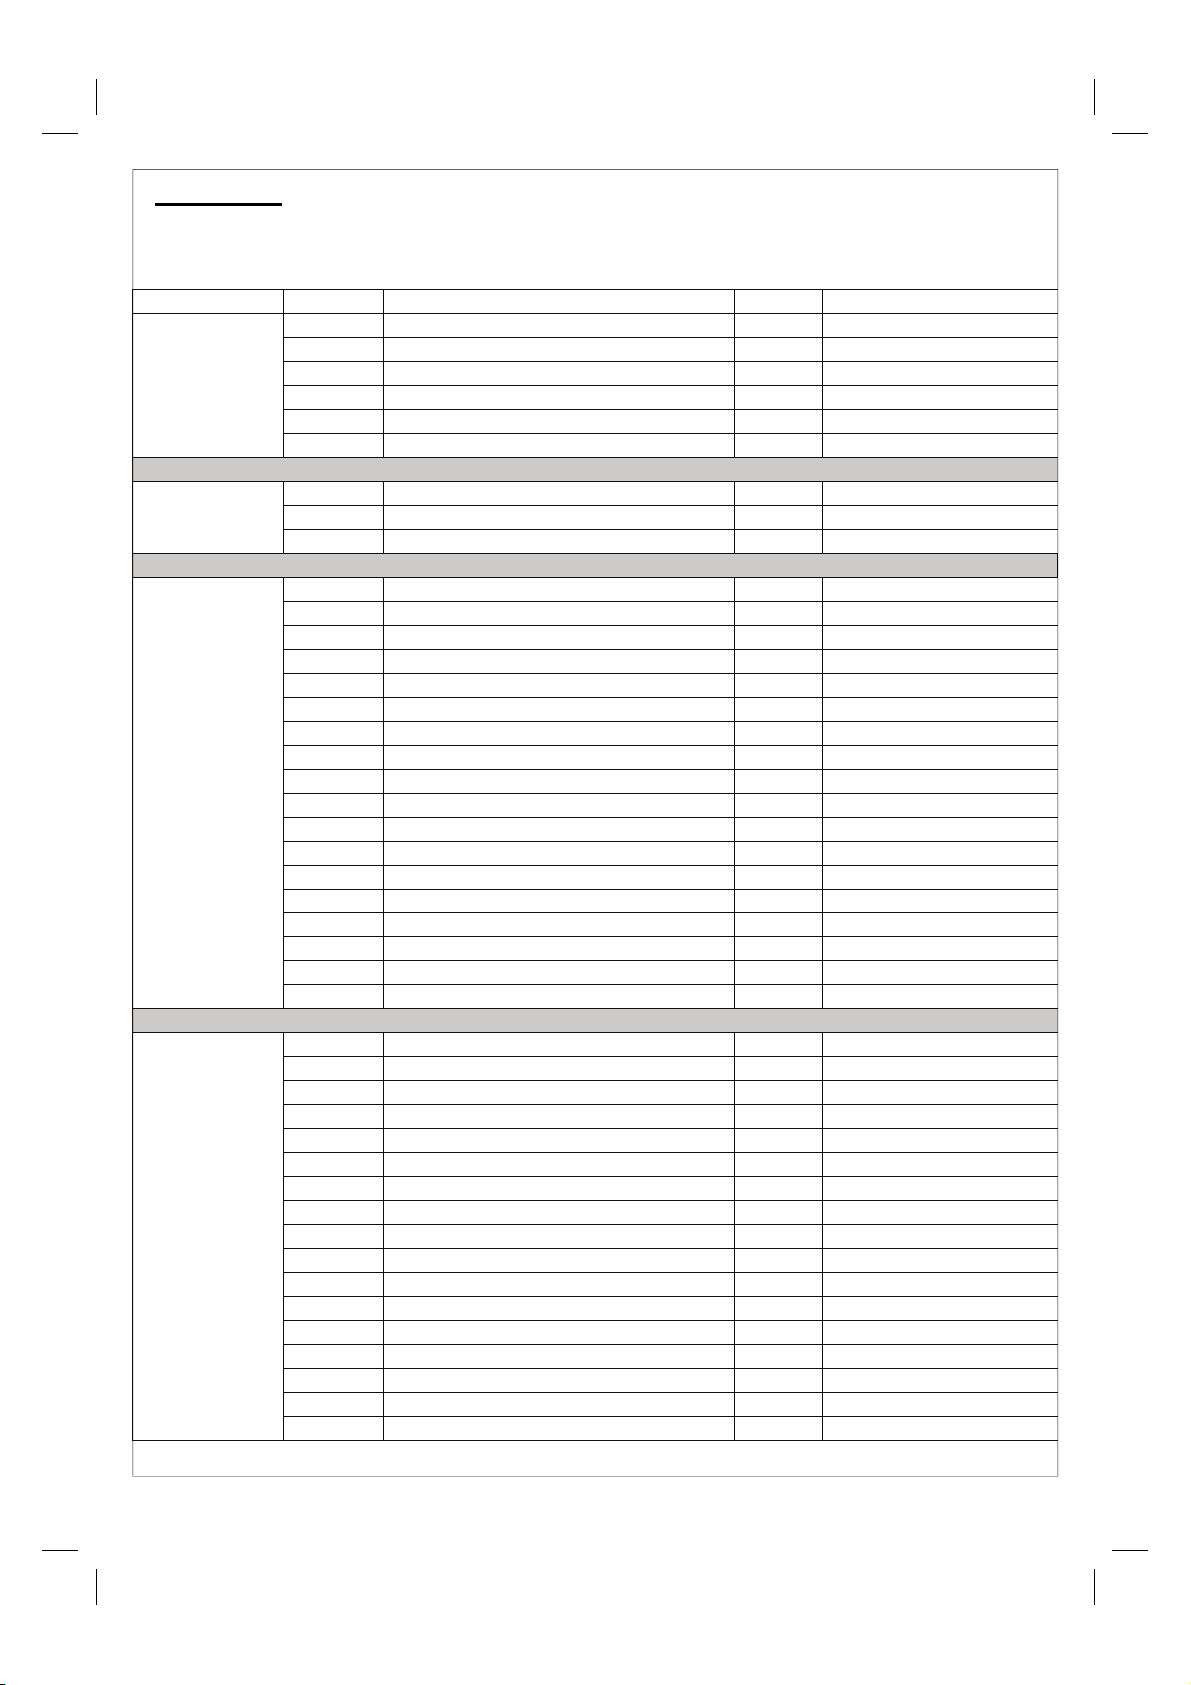
Parts List
Quantity varies according to model purchased. Specifications subject to change without prior notice. For
more details on hardware, please see the corresponding ‘Hardware Reference Diagram’.
HOOD
BODY
TROLLEY
HARDWARE
CODE PART QTY Outback® Oven Grill
A1 Hood 1
A2 Hood Handle 1
A3 Hood Heat Indicator and Nuts Assembly 1
A4 Vents and Nuts Assembly 3
A5 Hood Hinge and Nuts Assembly 2
A6 Hood Hinge Support 2
B1 Barbecue Body 1
B2 Cooking Grill 2
B3 Oven Cooking Grill 1
C1 Side Shelf 1
C2 Oven Upper Door 1
C3 Oven Heat Indicator and Nuts Assembly 1
C4 Oven Logo Badge 1
C5 Oven Door 1
C6 Oven Door Support 1
C7 Oven Door Support Fixing Pieces 2
C8 Oven Left Panel Assembly 1
C9 Oven Right Panel Assembly 1
C10 Oven Rear Panel Assembly 1
C11 Oven Bottom Panel 1
C12 Oven Bottom Panel Support 2
C13 Charcoal Harrow 1
C14 Charcoal Harrow Handle 1
C15 Body Hinge 2
C16 Tool Hook 3
C17 Wheel 2
C18 Hubcaps 2
D1 ST4.0x12 Screw 3
D2 M4x8 Bolt 4
D3 M6x12 Bolt 4
D4 M6x15 Bolt (White) 4
D5 M6x15 Bolt (Black) 2
D6 M4x32 Bolt 9
D7 M6x33 Bolt 4
D8 M6x58 Bolt 6
D9 M6x83 Bolt 4
D10 Axle 2
D11 Hinge Pins 2
D12 "O" Shaped Spring Washer 8
D13 M4 Cap Nut 13
D14 M6 Cap Nut 18
D15 M6 Nut 2
D16 Axle R-Spring Clips 2
D17 Hood R-Spring Clips 2
Pre-Assembled Component
2
Page 3
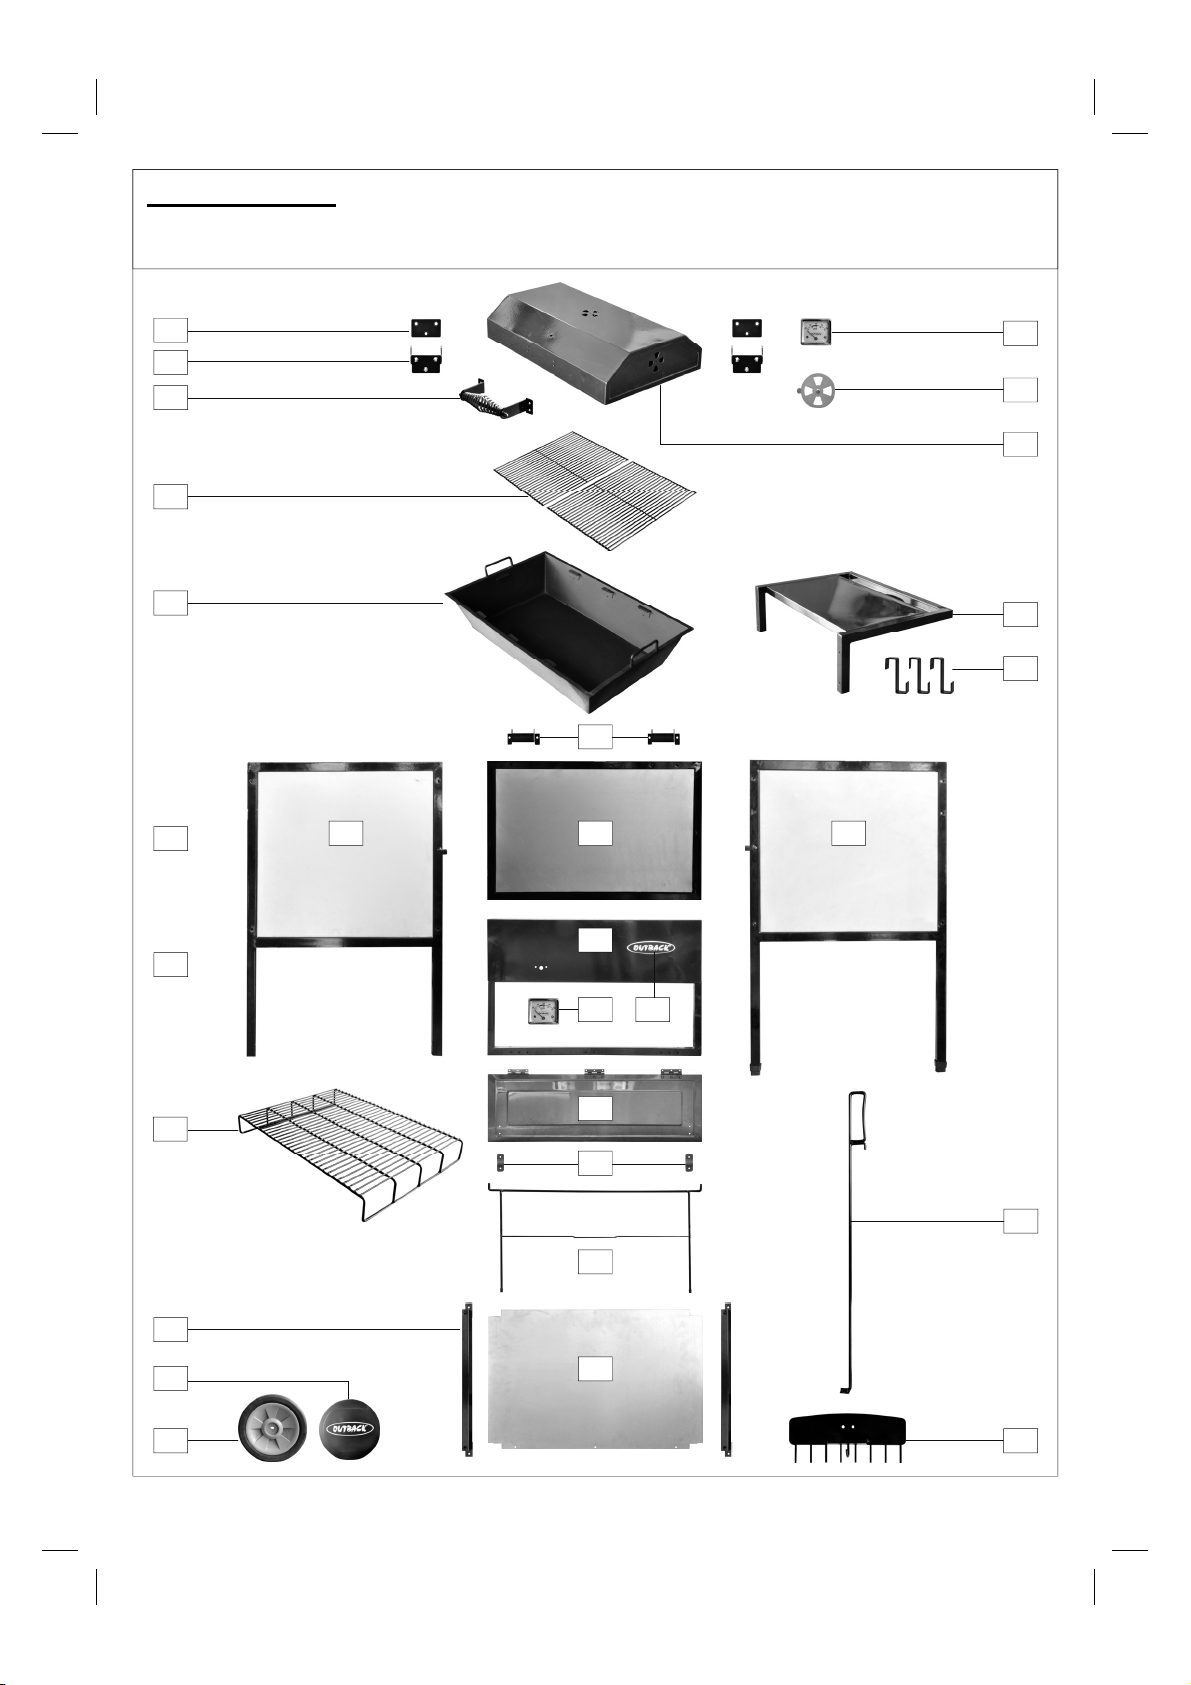
Parts Diagram
Quantity varies according to model purchased. Specifications subject to change without prior notice. For
more details on hardware, please see the corresponding ‘Hardware Reference Diagram’.
A6
A5
A2
B2
B1
B4
A3
A4
A1
C1
C16
C15
C8 C9 C10
B1
B3
C12
C18
C2
C3 C4
C5
C7
C14
C6
C11
C13 C17
3
Page 4
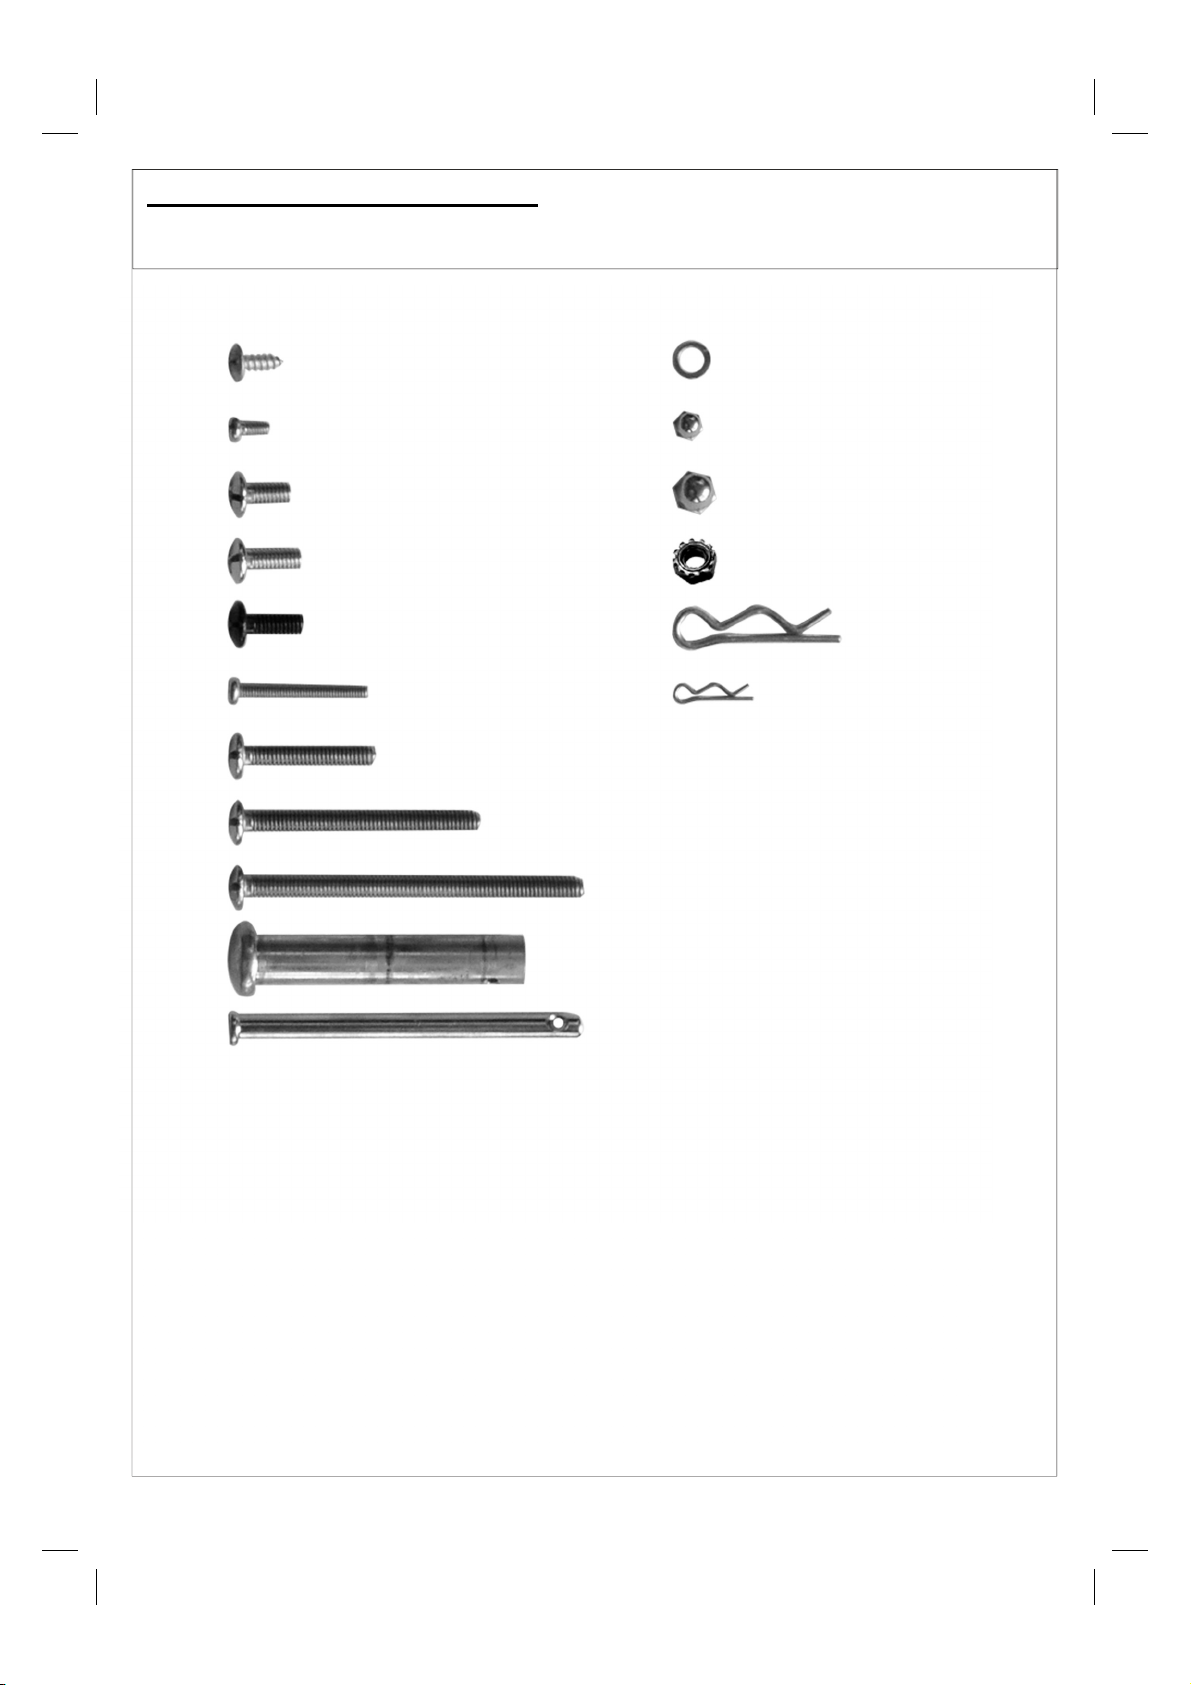
Hardware Reference Diagram
Specifications subject to change without prior notice.
D1 ST4.0x12 Screw
D2 M4x8 Bolt
D3 M6x12 Bolt
D4 M6x15 Bolt (White)
D5 M6x15 Bolt (Black)
D6 M4x32 Bolt
D12 "O" Shaped Spring Washer
D13 M4 Cap Nut
D14 M6 Cap Nut
D15 M6 Nut
D16 Axle R-Spring Clips
D17 Hood R-Spring Clips
D7 M6x33 Bolt
D8 M6x58 Bolt
D9 M6x83 Bolt
D10 Axle
D11 Hinge Pins
4
Page 5
Assembly
IMPORTANT!
• TOOLS NEEDED FOR ASSEMBLY: Medium size flat blade or Phillips/Crosspoint screwdriver,
adjustable spanner or metric spanner set.
• Remove any internal components or packaging from the barbecue body.
• Whilst every care is taken in the manufacture of this product, care must be taken during assembly in
case sharp edges are present.
• Please read the Important Information section carefully before assembly and use of your
barbecue.
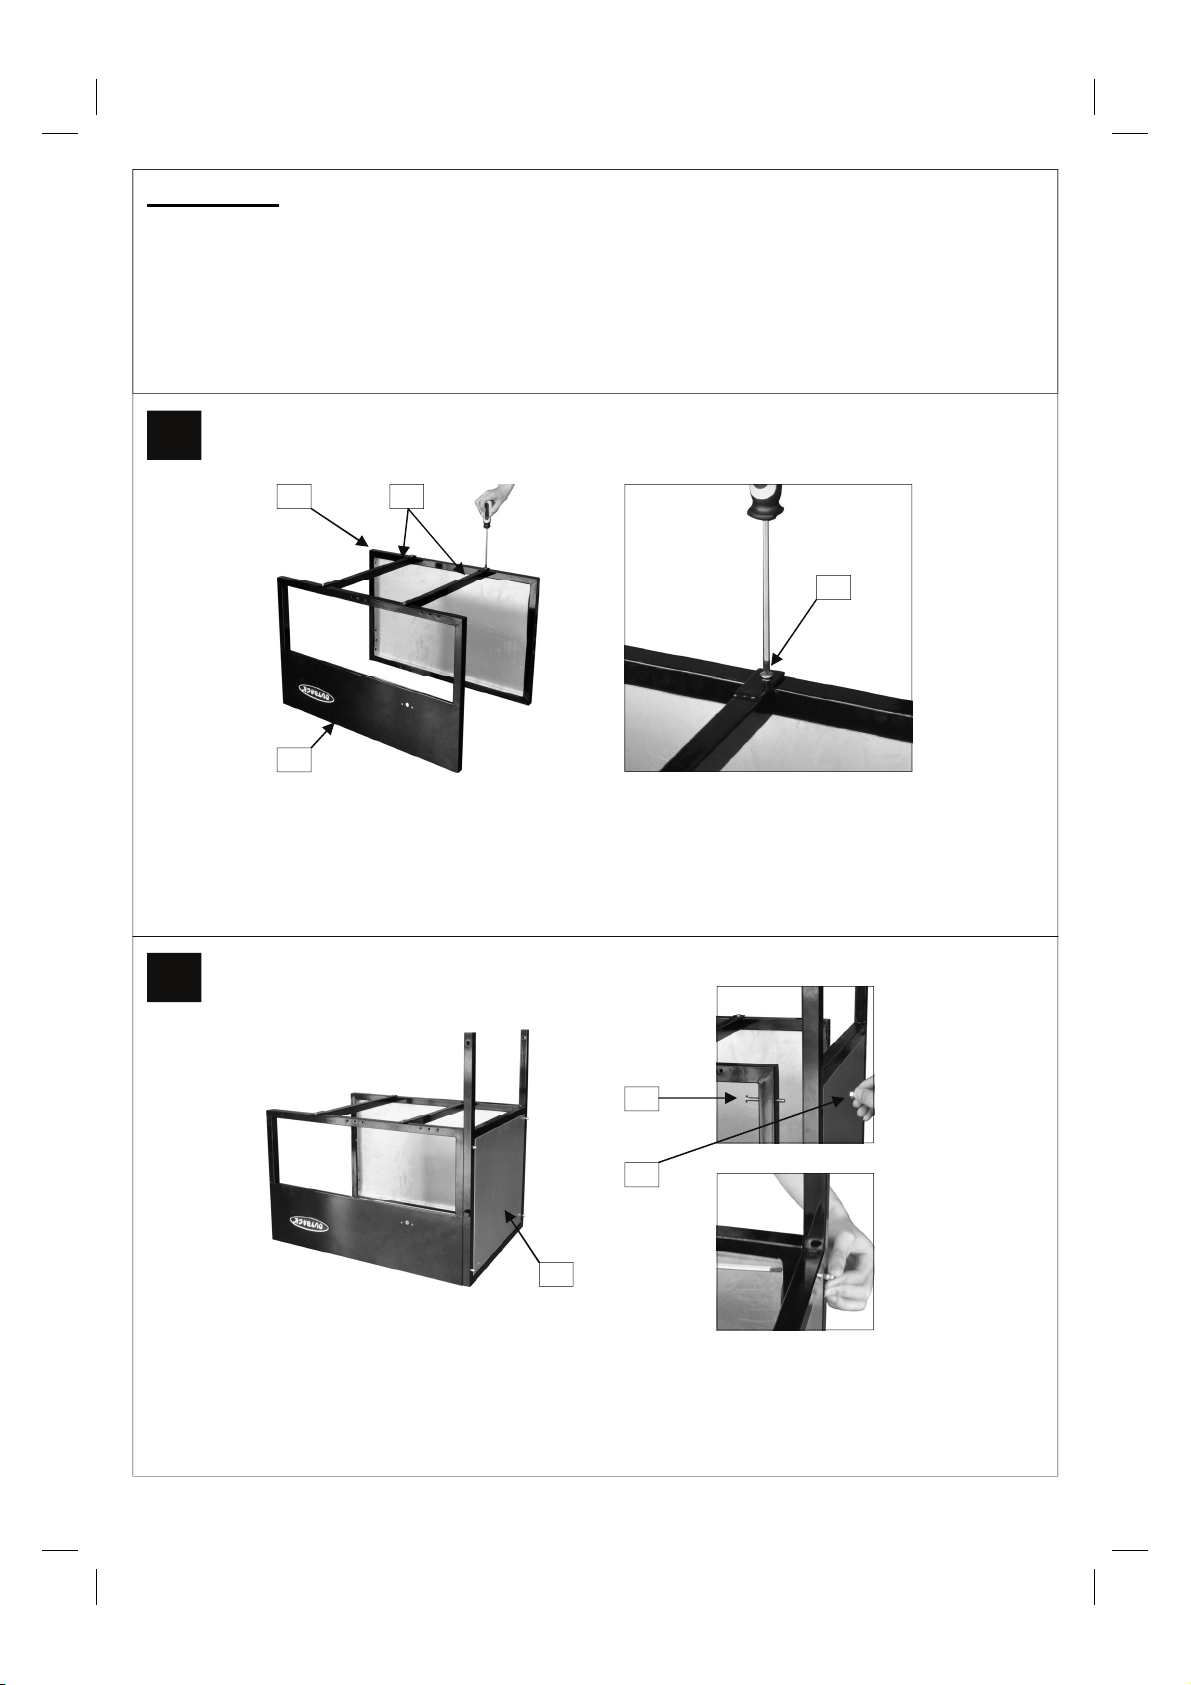
1
C10 C12
D4
C2
Secure the Oven Bottom Panel Support (C12) to the Oven Upper Door (C2) and Oven Rear Panel
Assembly (C10) using the M6x15 Bolts (D4x4pcs).
2
D8
D14
C8
Install the Oven Left Panel Assembly (C8) to the assembled cabinet using the M6x58 Bolts
(D8x4pcs) and M6 Cap Nuts (D14x4pcs).
5
Page 6

3
C11
D1
Place the Oven Bottom Panel (C11) into the assembled cabinet, as shown. Using ST4.0x12
screws (D1x3pcs) fixed onto the Oven upper door.
4
C1
C9
A
A
B
Attach the Oven Right Planel Assembly (C9) and Side Shelf (C1) to the assembled cabinet
using M6x83 Bolts (D9x4pcs),M6x58 Bolts (D8x2pcs) and M6 Cap Nuts (D14x6pcs),as shown.
B
D9
D14
D8
A
B
6
Page 7
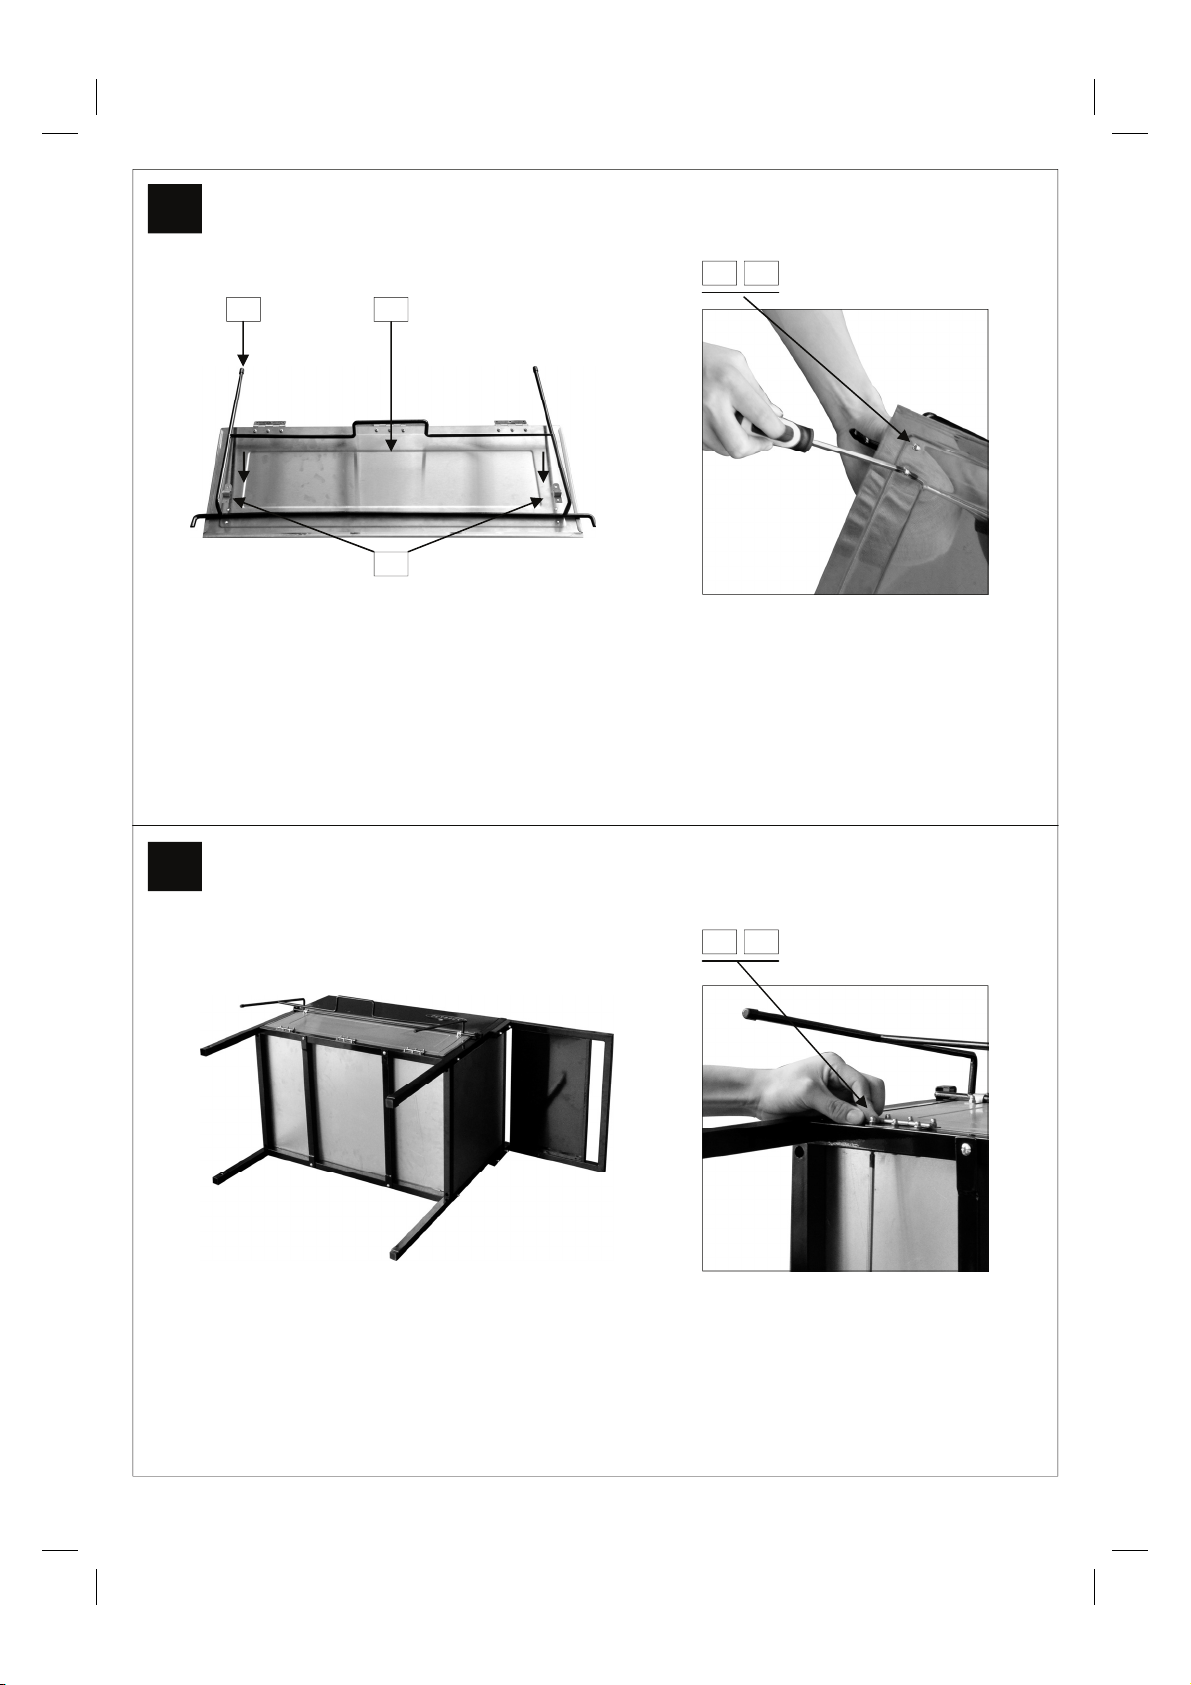
5
D13
D2
C5 C6
C7
Attach the Oven Door Support (C6) to the Oven Door (C5) using Oven Door Support Fixing
Pieces (C7x2pcs) , M4x8 Bolts (D2x4pcs) and M4 Cap Nuts (D13x4pcs).
6
D13 D6
Attach the Oven door assembly to the assembled cabinet using M4x32 Bolts (D6x9pcs) and
M4 Cap Nuts (D13x9pcs) , as shown.
7
Page 8
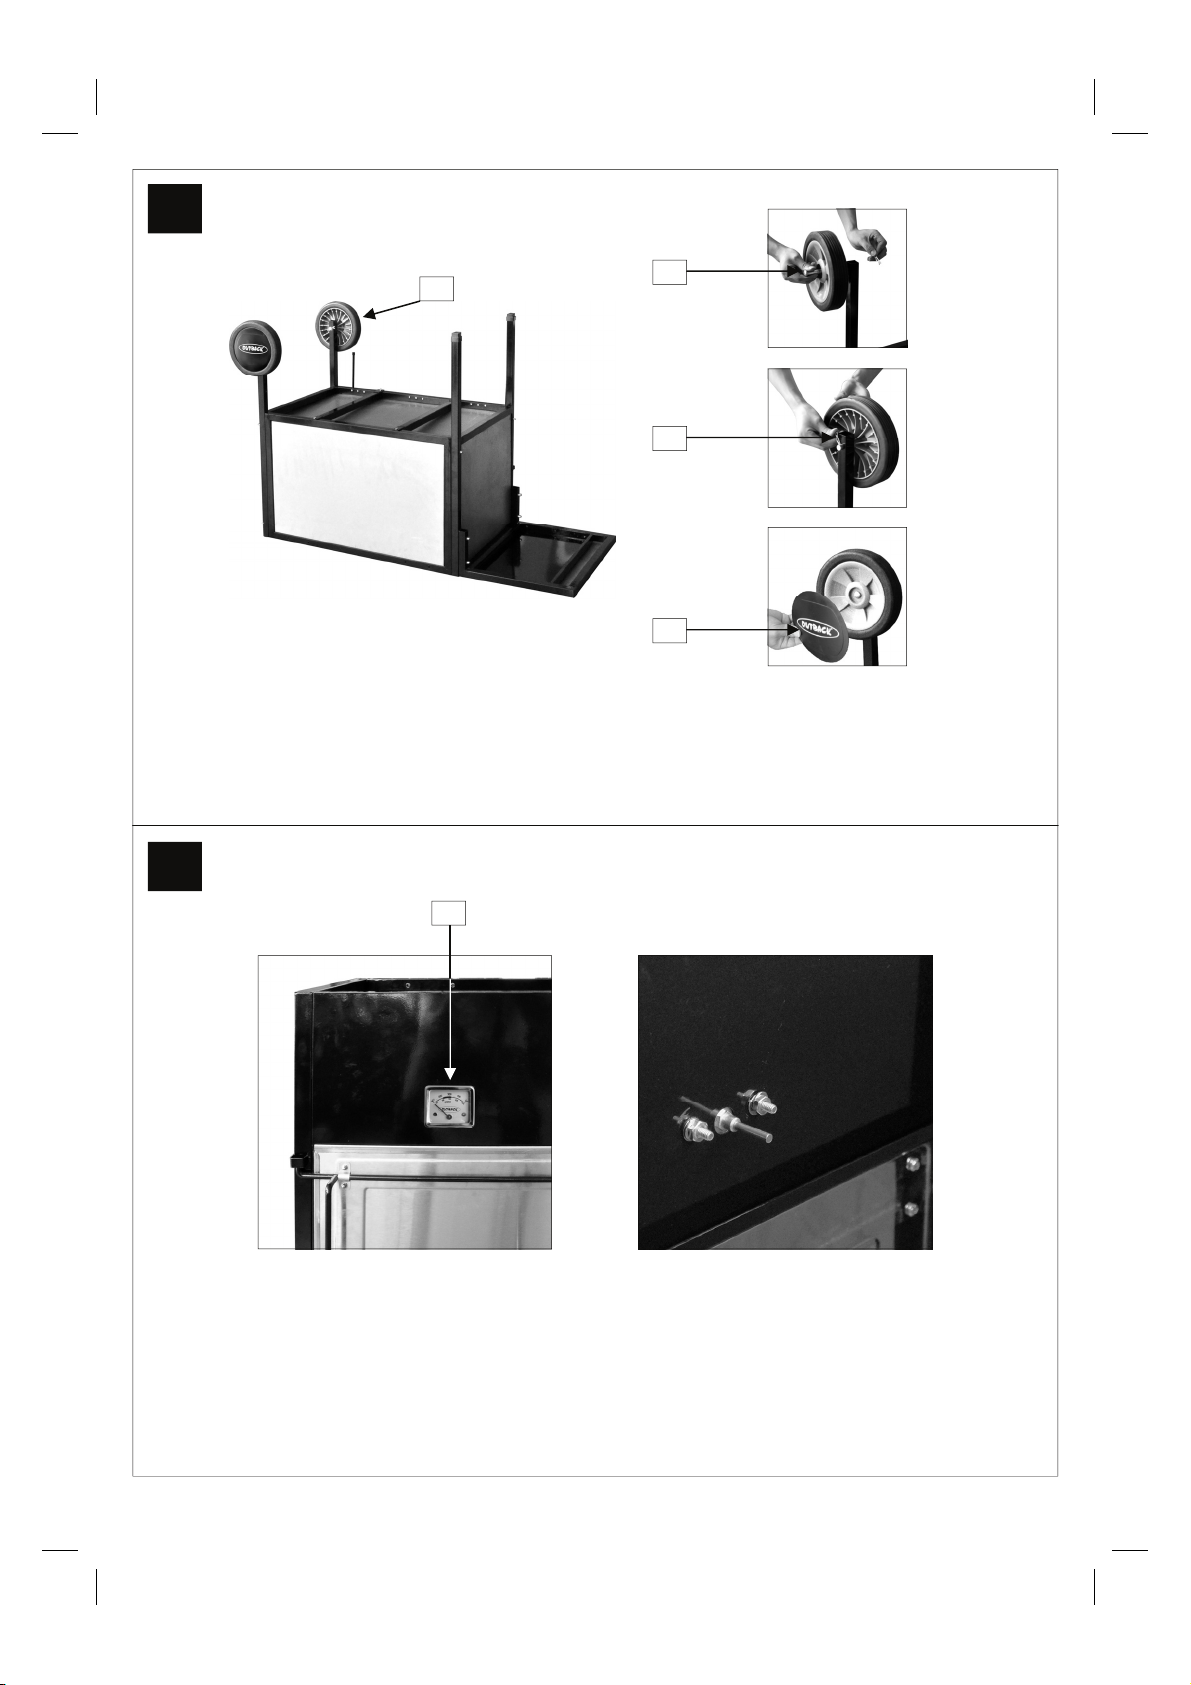
7
C17
Align the Wheels (C17) and Legs, and fixed them with Axles (D10x2pcs) and R clips (D16x2pcs).
Place the wheel Hubcaps (C18) onto the outsides of the wheels.
D10
D16
C18
8
C3
Remove the nut and washer pre-set on the Heat Indicator, attach the Heat Indicator (C3) on the
Oven upper door, as shown.
8
Page 9
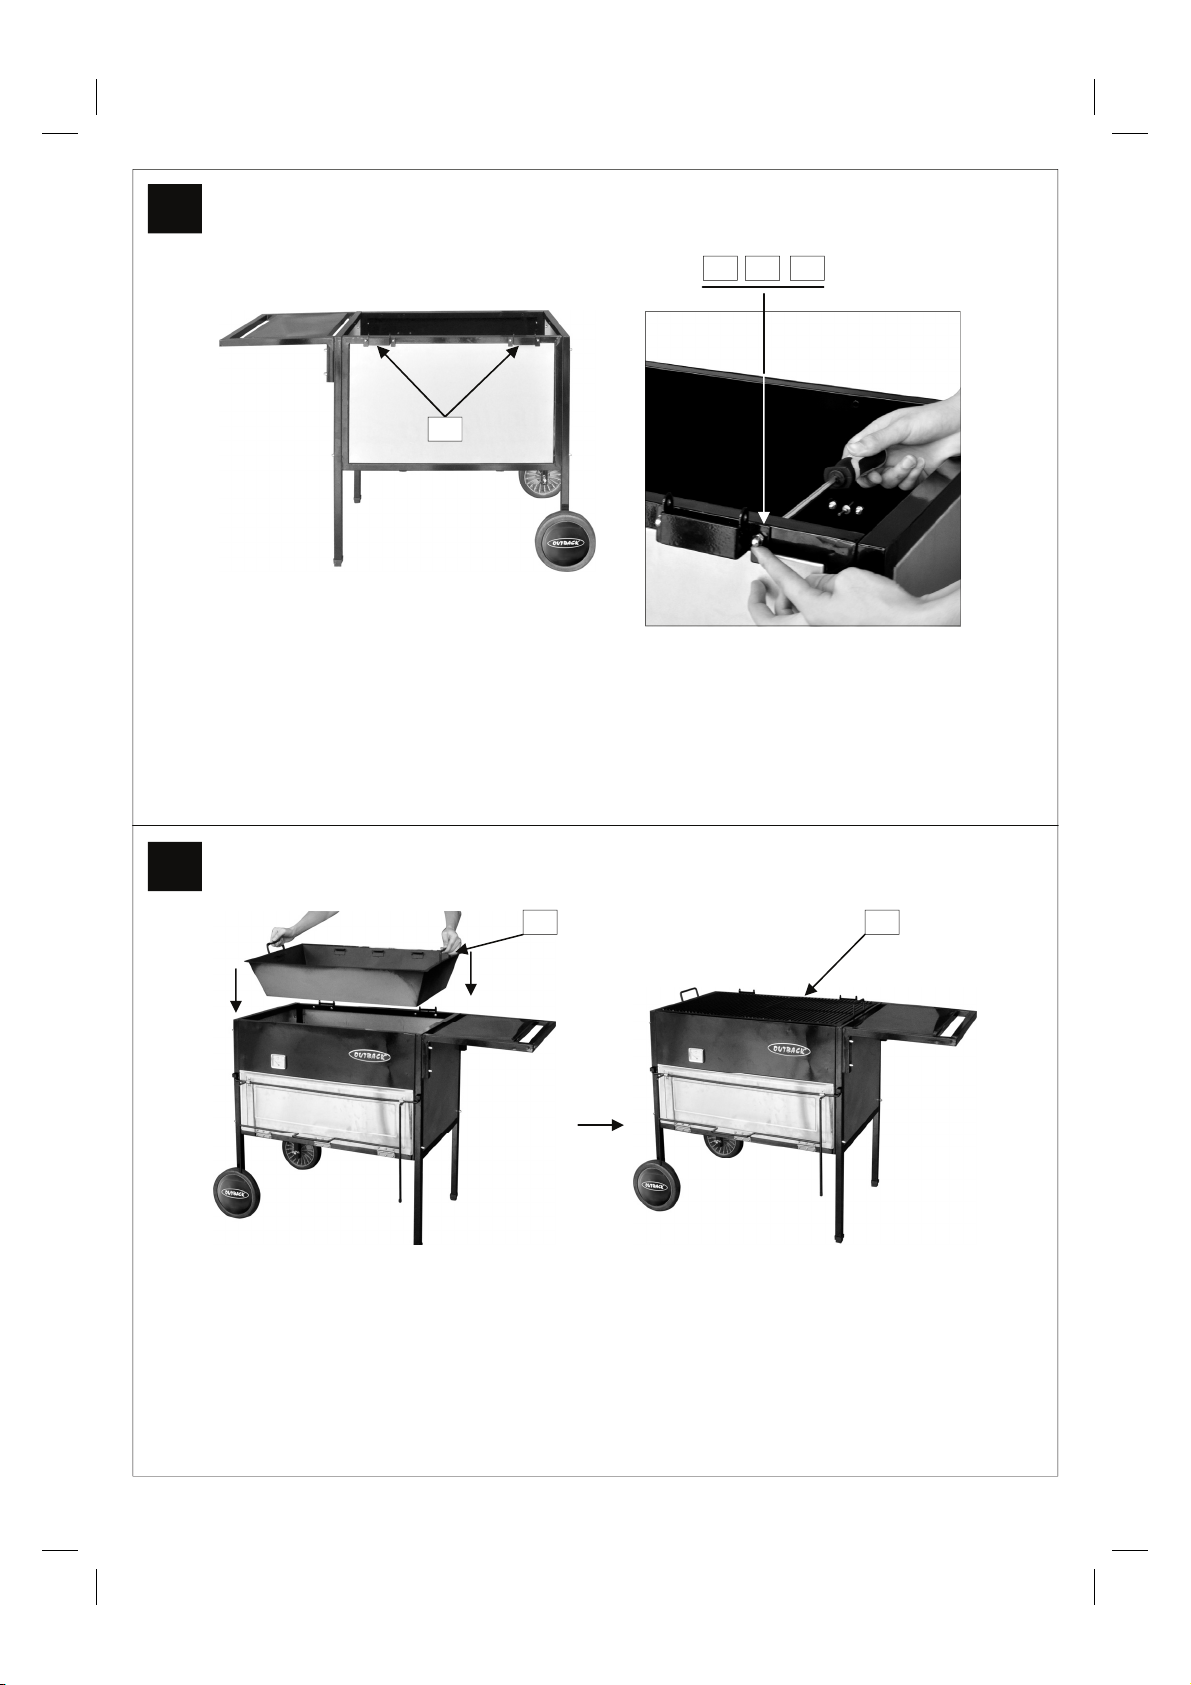
9
D7 D14 D12
C15
Attach the Body Hinges (C15) to the assembled cabinet using M6x33 Bolts (D7x4pcs), “O”Shaped
Spring Washers (D12x4pcs) and M6 Cap Nuts (D14x4pcs).
10
B1 B2
Carefully place the Barbecue body (B1) into the oven, then place the Cooking grill (B2) onto the
Barbecue body, as shown.
9
Page 10
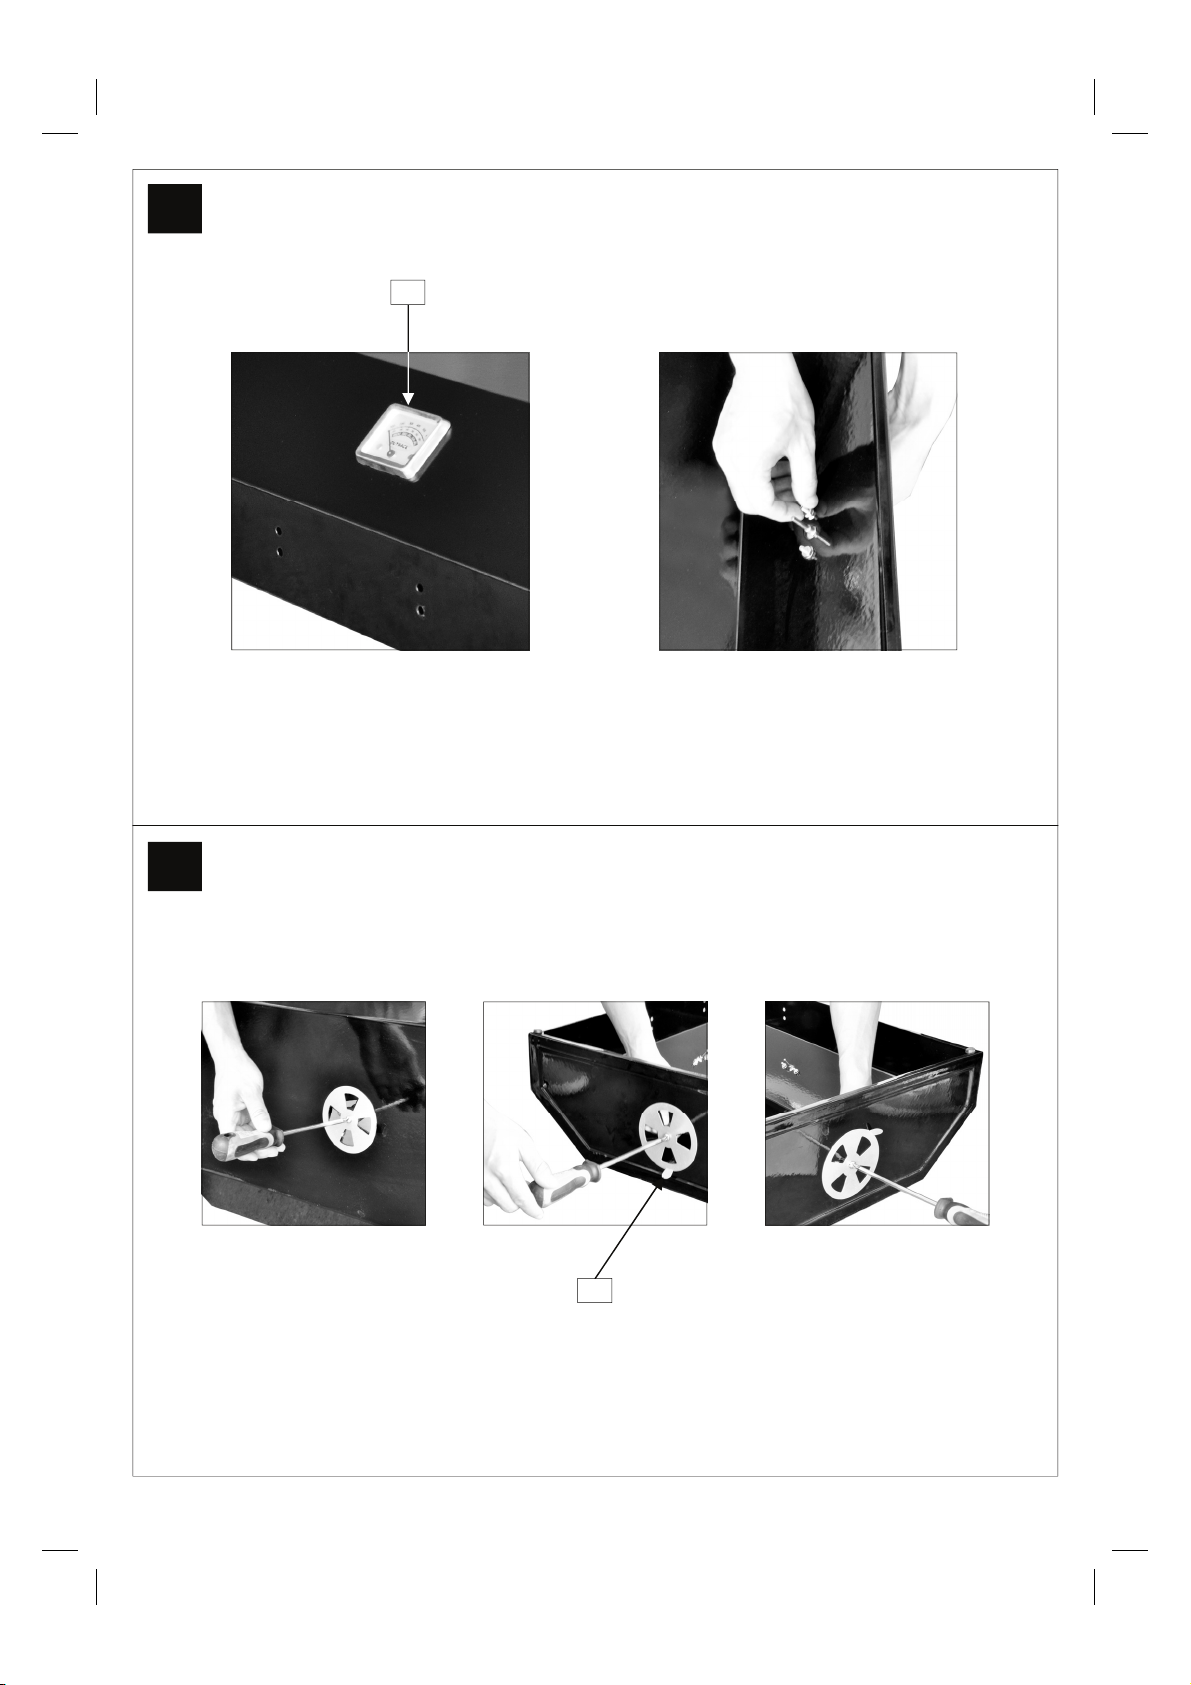
11
A3
Remove the nut and washer pre-set on the Heat Indicator, attach the Heat Indicator (A3) on the
Hood, as shown.
12
Upside Left Right
A4
Remove the nut and washer pre-set on the Vents, attach the Vents (A4) on the Hood, as shown.
Attention! Please make sure that all is Vents clockwise rotation.
10
Page 11
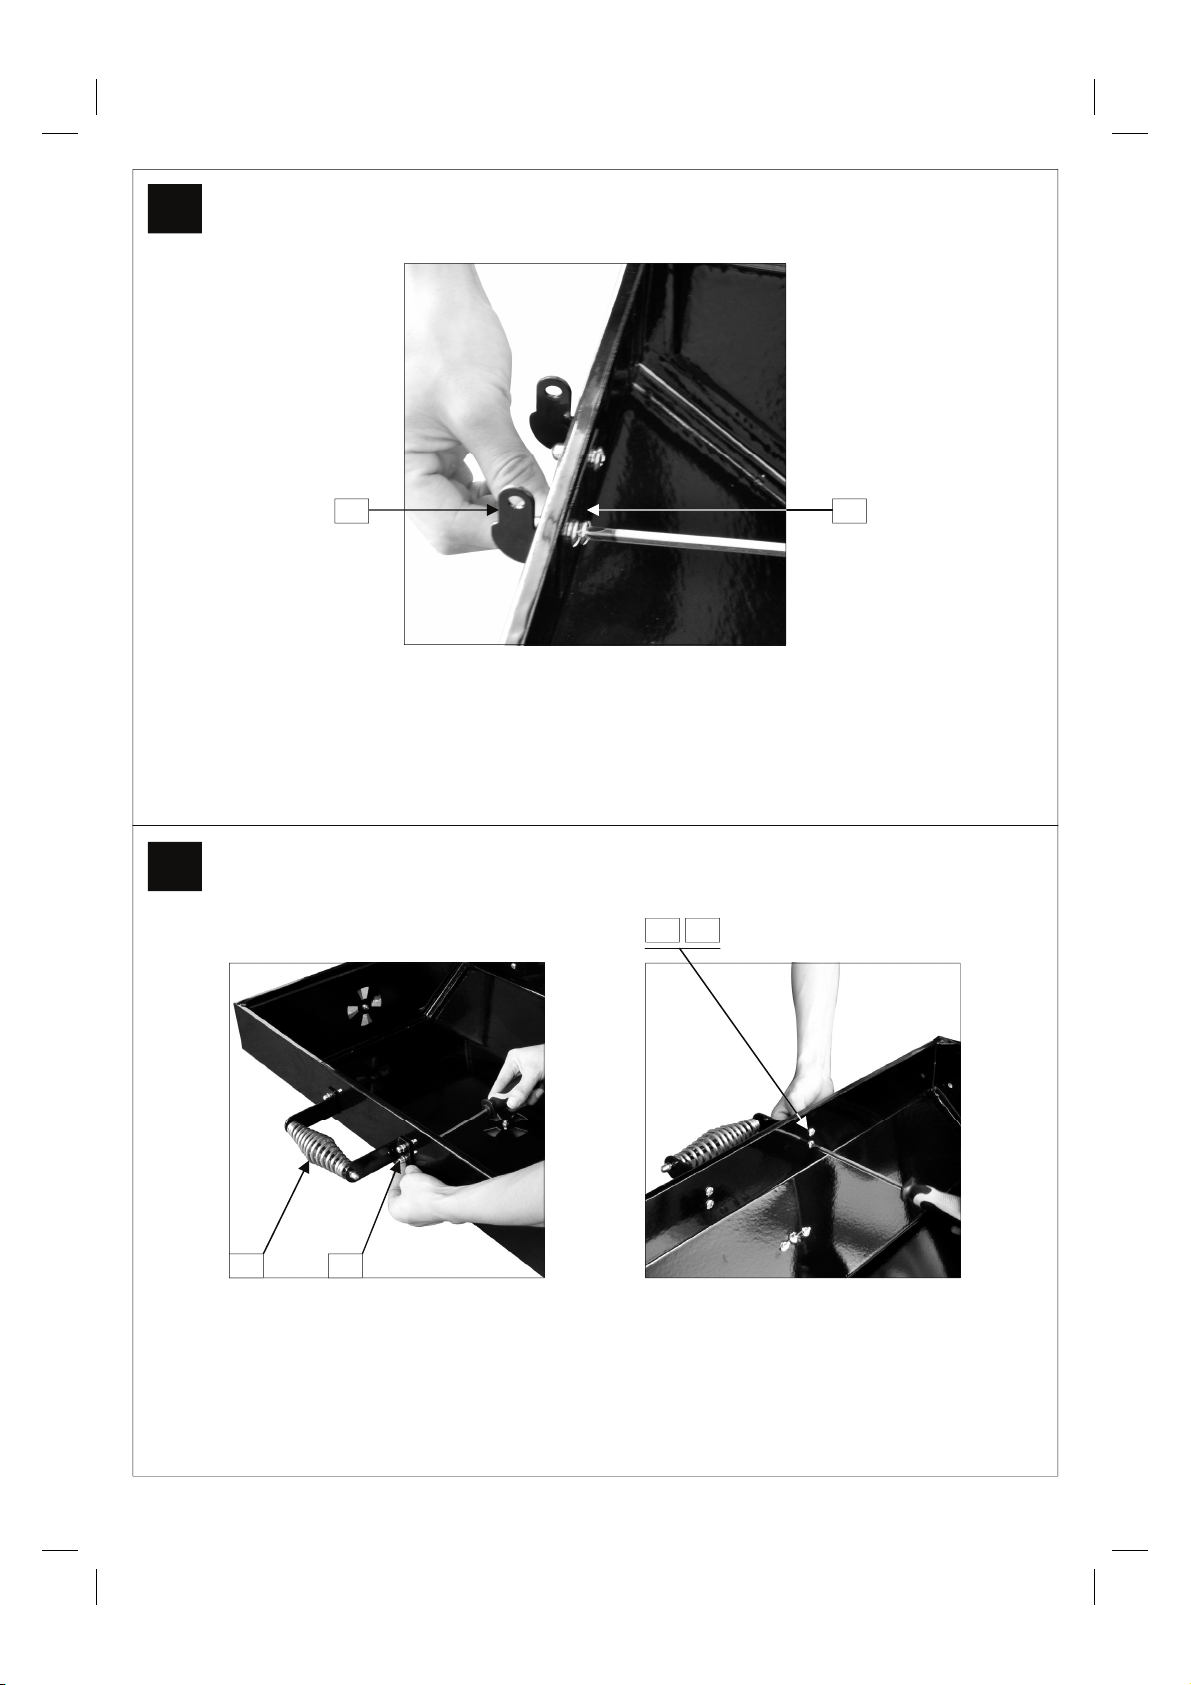
13
A5 A6
Remove the nut and washer pre-set on the Hood Hinge , attach the Hood Hinge (A5) and Hood
Hinge Support (A6) on the Hood, as shown.
14
D3 D12
A2 D14
Attach the Hood Handle (A2) to the Hood using M6x12 Bolts(D3x4pcs), “O”Shaped Spring
Washers (D12x4pcs) and M6 Cap Nuts (D14x4pcs), as shown.
11
Page 12
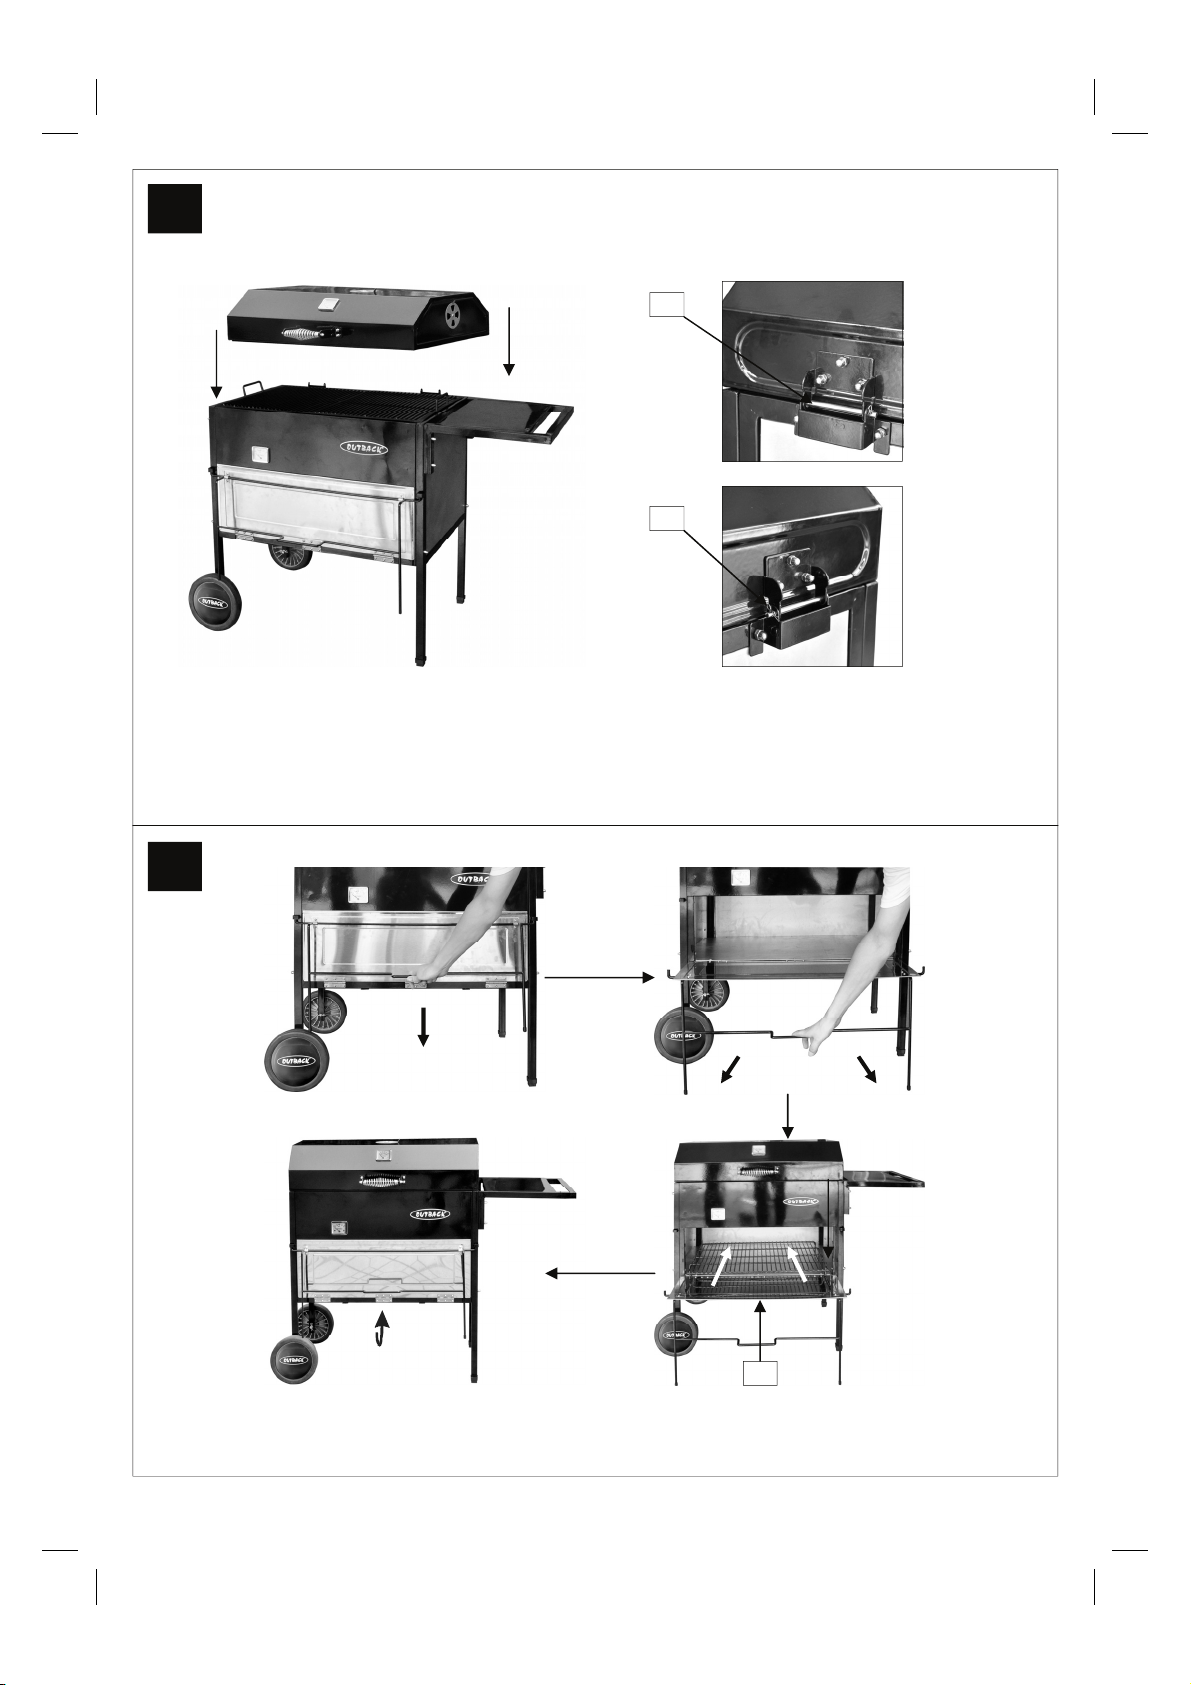
15
D11
D17
Carefully place the Hood assembly onto the barbecue body.
Align the Hood hinge and Body hinge, and fixed them with Hinge Pins (D11) and R Clips(D17).
LEFT
RIGHT
16
B3
Open the oven door, Place Oven Cooking Grill (B3) into the oven as shown.
12
Page 13
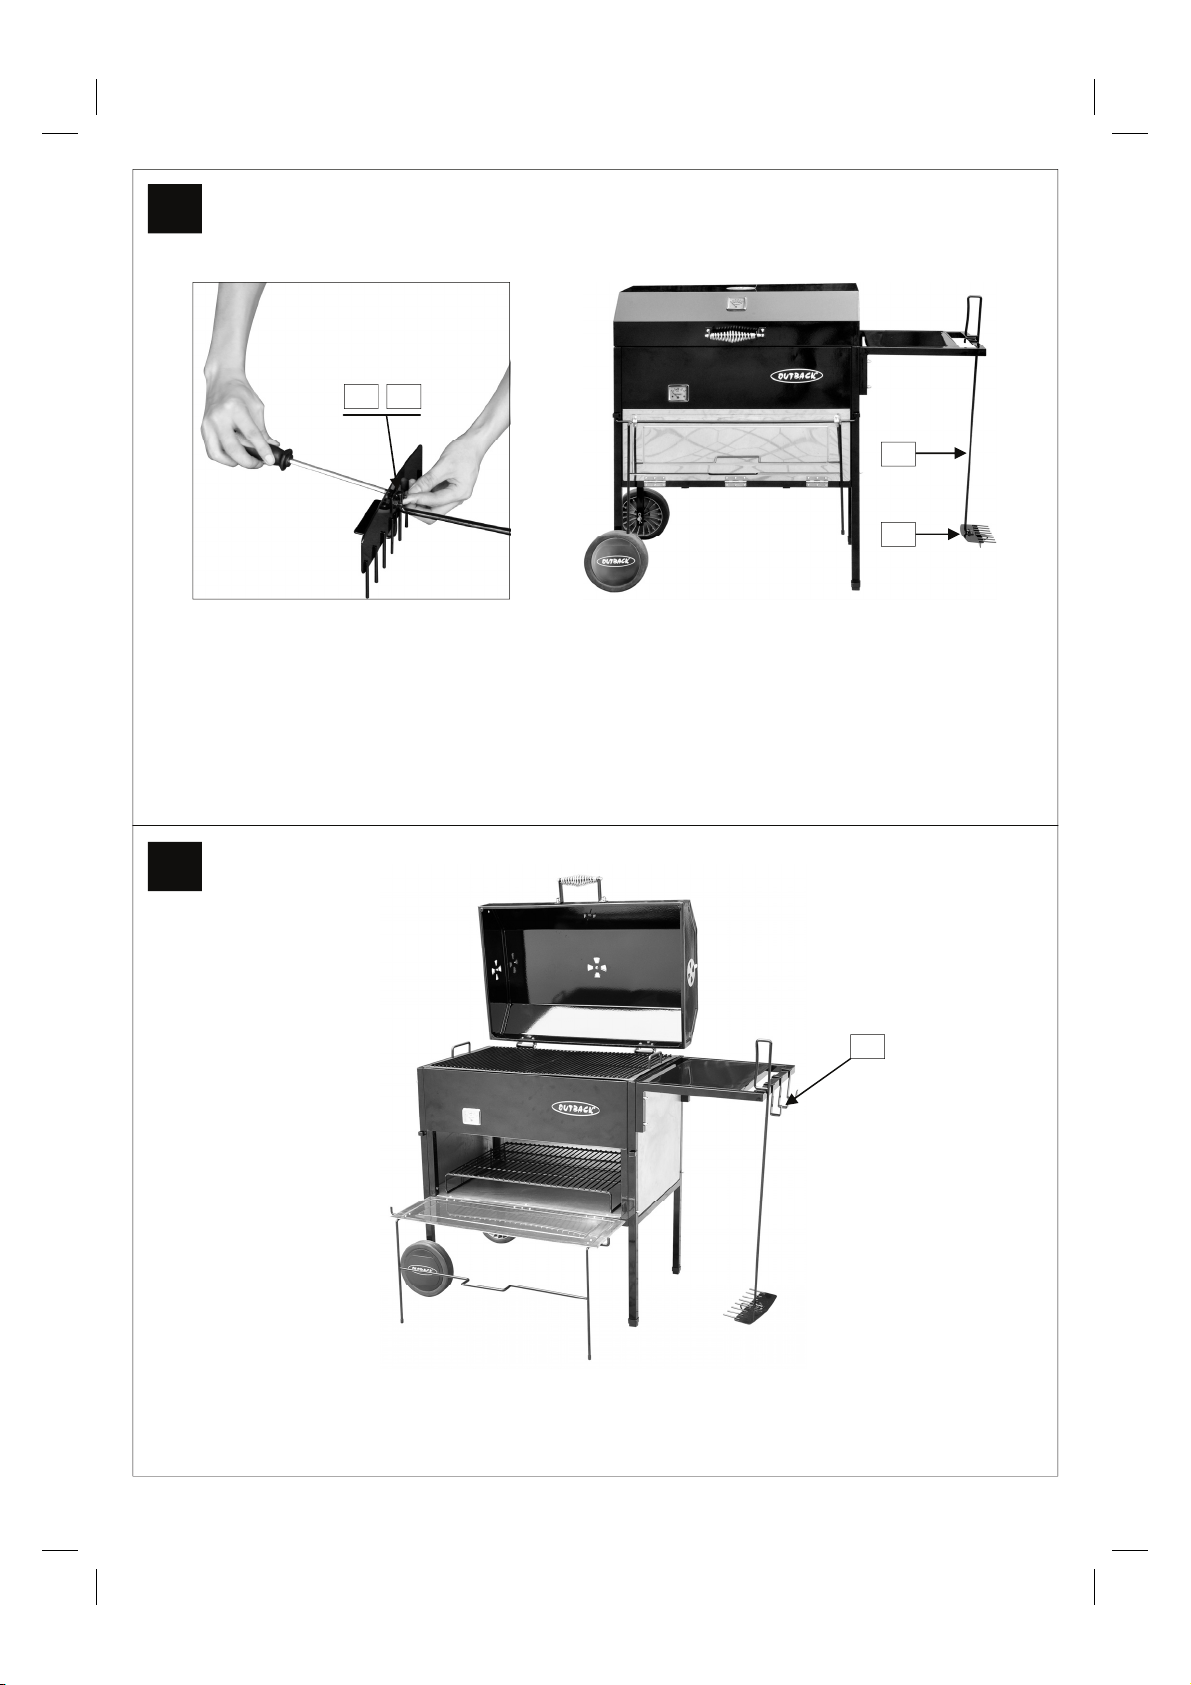
17
D5 D15
C14
C13
Attach the Charcoal Harrow Handel (C14) onto the Charcoal Harrow (C13) using M6x15 Bolts
(D5x2pcs) and M6 Nuts (D15x2pcs).
18
C16
Place the Tool Hooks (C16) onto the Side shelf.
13
Page 14
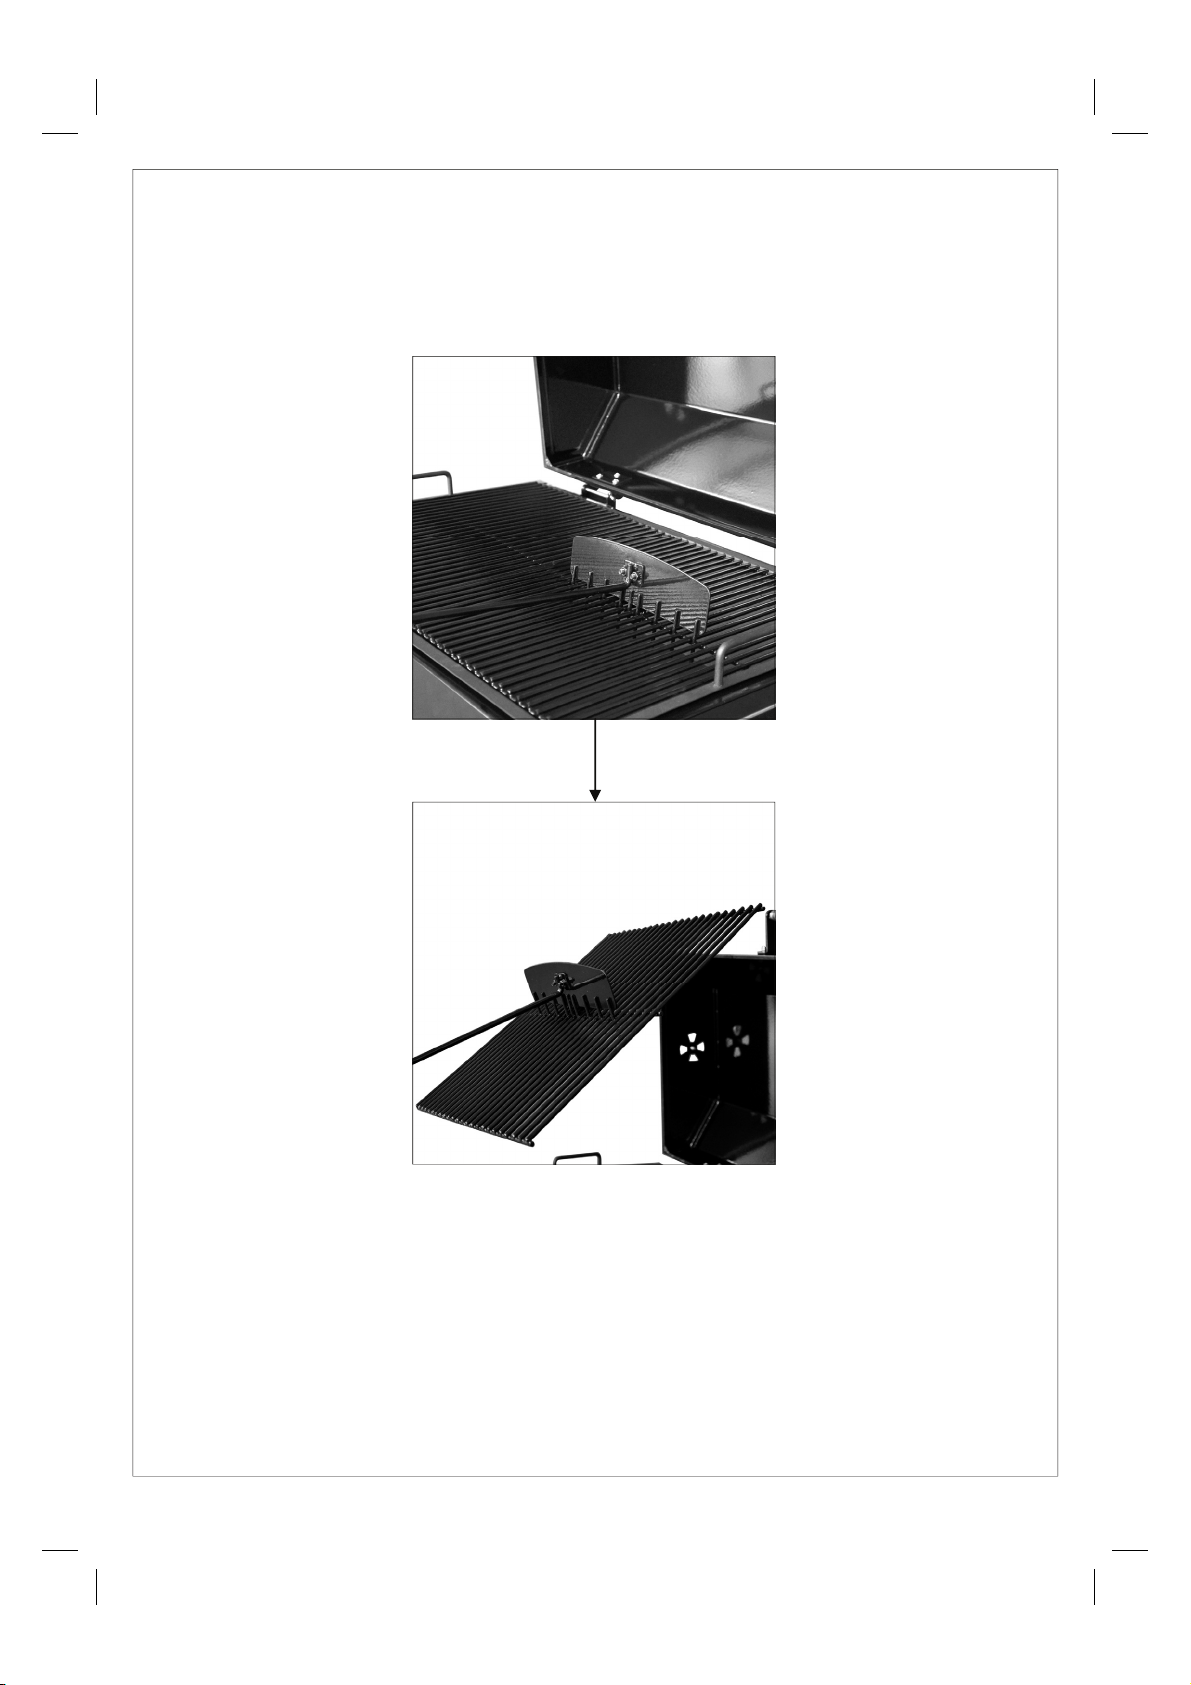
*Cooking grill extract the instructions*
The Charcoal harrow into the gap at the Cooking grill, with the Charcoal harrow to Cooking grill
above hook hooked, then lift Cooking grill, as shown!
14
Page 15

Important Information
Please read these instructions carefully
before assembly and use of your barbecue.
nRetain these instructions for future
reference.
nThis product is for outdoors use only. Do not
use indoors.
nRemove plastic wrap from any part before
lighting.
nDo not use within 1m of any flammable
structure or surface. Do not use under any
combustible surface.
nOpen the barbecue hood or lid before
lighting.
nOnce lit, do not move the barbecue until it
has completely cooled, after use.
nThis barbecue must not be left unattended
when lit.
nThe hood or lid handle can become very hot.
Grip only the centre of the handle. Always
use oven gloves when cooking or carrying
out any adjustments to the barbecue.
nAlways use the grill lifting handle and ash
tray / vent tool provided.
nUse purpose designed barbecue tools with
long, heat resistant handles.
nUse caution when opening the hood or lid,
as hot steam inside is released upon
opening.
nParts of this barbecue become very hot –
care must be taken, especially when
children, elderly people, and animals are
present.
nNever cover a barbecue until it has
completely cooled.
nUse this barbecue only on a stable, flat
surface.
nDo not store flammable materials near this
barbecue.
nDo not use aerosols near this barbecue.
nFailure to follow the manual’s instructions
could result in serious injury or damage.
nModification of the barbecue may be
dangerous, is not permitted and will nullify
any warranty.
nCAUTION! Do not use spirit or petrol for
lighting or re-lighting! Use only firelighters
complying to EN1860-3. Do not add starter
fluid to charcoal that is already alight.
nDo not use in high winds. Hot embers could
be blown out of the barbeque and cause
damage or serious injury.
nAlways place charcoal in the charcoal grill,
not the ash tray.
nEnsure the ash tray is in place before use.
nDo not move the cooking grill and charcoal
grill until after the appliance has completely
cooled down.
nNever remove the ash tray whilst the
barbecue is in use. Wait until the barbecue
is completely cooled before removing it.
nIf you have any queries regarding these
instructions, contact your local dealer.
Installation
Selecting a Location
This barbecue is for outdoor use only and
should be placed in a well-ventilated area, and
on a safe and even surface. Never place your
barbecue below ground level. Take care to
ensure that it is not placed UNDER any
combustible surface. The sides of the barbecue
should NEVER be closer than 1 metre from any
combustible surface, including trees and fences
and that there are no heat sources near the
barbecue (cigarettes, open flames, spark etc.).
Keep this barbecue away from any flammable
materials!
Precautions
Do not obstruct any ventilation openings in the
barbecue body.
Operation
Warnings
nBefore proceeding, make certain that you
understand the IMPORTANT
INFORMATION section of this manual.
nYour barbecue is not designed to be used
with any part of the cooking area as a solid
plate — this includes baking dishes. Full
coverage will cause excessive build-up of
heat and damage the barbecue. This is not
covered by warranty.
• This barbecue is designed for charcoal use
only. It is not designed to be used with lump
wood charcoal, including lump wood based
lighting bags, as it burns too quickly. We
recommend the use of charcoal briquettes.
• Use only enough briquettes to cover the
charcoal grill in a single layer. Do not
overload the charcoal grill.
• The maximum amount of briquettes to be
used at any one time is 10kg.
• When placing charcoal, never allow charcoal
to be closer than 5cm to the surrounding
sides of the barbecue body.
15
Page 16

Preparation Before Cooking
To prevent foods from sticking to the cooking
surface, please use a long handled brush to
apply a light coat of cooking or vegetable oil
before each barbecuing session. (Note:
When cooking for the first time, paint colours
may change slightly as a result. This is normal
and should be expected.)
Starting the Charcoal
• Open the barbecue hood or lid before
lighting. Never
hood or lid closed.
• Take the barbecue grills out of the barbecue
body.
• Block Type Starters – Form charcoal in a
pyramid around it. Light the starter block.
When charcoal is well lit, using a heat
resistant tool, spread the charcoal around
the grid, adding more as necessary.
• Liquid Starters – Place charcoal in a shallow
tin. Pour liquid starter onto charcoal and wait
5-10 minutes to allow the starter to
penetrate into the charcoal. Then using a
heat resistant tool, place charcoal onto the
grid in a pyramid formation.
• Light the charcoal and allow time for it to
become well lit (red hot). Using a heat
resistant tool, spread charcoal in a uniform
layer, so that each lump is just touching.
• The barbecue grills can now be replaced
using the charcoal harrow supplied. Be
careful to keep yourself safety away from lit
charcoal.
• When the charcoal is ashed over (grey
coating of ash over each lump) you are
ready to begin cooking.
• It is recommended to operate the barbecue
with red-hot charcoal for at least 30 minutes
before use.
• Do not begin cooking until charcoal has an
ashed-over coat.
• Do not attempt to cook whilst charcoal is
flaming.
Heat Control
The adjustable vents in the hood can be used to
control the burning of the charcoal. With the
vents open, more air will circulate and the
charcoal will burn faster than with the vents
closed. Caution—the appliance may become
very hot. Oven gloves and the charcoal harrow,
or vent tool should always be used when
adjusting the vents. Do not close the hood or lid
whilst the charcoal is still flaming. Wait until it
has ashed over.
light your barbecue with the
Grill Cooking
The food on the grill is cooked by the heat
produced from the hot charcoal below. The
natural food juices produced during cooking fall
onto the hot charcoal below and vaporise. The
subsequent rising smoke bastes the food, as it
travels upwards, imparting that unique
barbecued flavour.
Roasting Hood Cooking
Barbecues equipped with a roasting hood give
the option to form an ‘oven’ for roasting or
baking food, such as joints of meat or whole
chickens, etc. More even cooking of food will
actually be achieved by using the barbecue with
the hood down.
Close the hood to cook the food ‘indirectly’.
Avoid lifting the hood unnecessarily as heat is
lost every time the hood is opened. If the hood
is opened during cooking please allow extra
time for the barbecue to regain its temperature
and complete the cooking. Use the temperature
gauge (if applicable) to monitor the heat of the
barbecue.
DO NOT ALLOW YOUR BARBECUE TO
OVERHEAT. Take care when opening the hood
as hot steam can be released on opening.
Flare-Up Control *Very Important Notice*
Flare-ups occur when meat is barbecued and
its fat and juices fall upon the hot charcoal.
Smoke of course helps give food its barbecued
flavour, but it is best to avoid excessive flare-up
to prevent food being burned. To control flareups, it is ABSOLUTELY ESSENTIAL to trim
away excess fat from meat and poultry before
grilling, use cooking sauces and marinades
sparingly and try to avoid very cheap cuts of
meat or meat products as these tend to have a
high fat and water content.
When flare-ups do occur, they can usually be
extinguished by applying baking soda or a salt
directly onto the charcoal. Always protect your
hands when handling anything near the cooking
surface of the barbecue and take care to protect
yourself from the flames.
If a fat fire occurs, please see the instructions
given below.
Fat Fires
Empty and clean the ash tray of food debris
after each cooking session. If the barbecue is to
16
Page 17

be used for large gatherings, additional care will
be required to ensure excessive build up of fat
does not occur and cause a fat fire. The time
between cleaning may need to be reduced if
very fatty foods or cheap meat products are
being cooked. Failure to do this may result in a
fat fire, which may cause injury and could
seriously damage the barbecue.
In the event of a fat fire:
• Keep everyone at a safe distance from the
barbecue and wait until the fire has burnt
out.
• Do not close the hood or lid of the barbecue.
• NEVER DOUSE A BARBECUE WITH
WATER. IF AN EXTINGUISHER IS USED,
IT SHOULD BE A POWDER TYPE.
• DO NOT REMOVE THE ASH TRAY.
• If the fire does not seem to be abating or
appears to be worsening, contact your local
Fire Brigade for assistance.
Replenishing the Charcoal
To replenish the charcoal during use, remove
the food from the grill. With protected hands,
use the charcoal harrow provided to lift out the
grill. Once the grill is removed, add the
charcoal, carefully replace the grill, and
continue cooking when the charcoal is ready.
When using the handles to move the grill, take
care to position them correctly so that the grill is
stable.
End of Cooking Session
Ash can be shaken from the charcoal basket
where it will drop into the ash tray. Ash should
not be disposed of until you are certain it is cold
and will not be able to re-ignite. Dispose of any
unburned charcoal and remove remaining
residue with a brass wire brush.
Wait until the barbecue is sufficiently cool
before closing its hood or lid.
Care and Maintenance
Regularly clean your barbecue between uses
and especially after extended periods of
storage. Ensure the barbecue and its
components are sufficiently cool before
cleaning. Do not leave the barbecue exposed
to outside weather conditions or stored in damp,
moist areas.
nNever handle hot parts with unprotected
hands.
nNever douse the barbecue with water when
its surfaces are hot.
In order to extend the life and maintain the
condition of your barbecue, we strongly
recommend that the unit be covered when left
outside for any length of time, especially during
the winter months. Heavy-duty barbecue covers
and other accessories are available from your
local stockist.
Even when your barbecue is covered for its
protection, it must be inspected on a regular
basis as damp or condensation can form which
may result in damage to the barbecue. It may
be necessary to dry the barbecue and the
inside of the cover. It is possible for mould to
grow on any fat remaining on parts of the
barbecue. This should be cleaned off smooth
surfaces with hot soapy water.
Any rust that is found that does not come into
contact with the food should be treated with a
rust inhibitor and painted with barbecue paint or
a heat resistant paint.
A chrome cleaner may be used on chrome
parts if required. To prevent rusting, wipe
chrome plated parts with cooking oil after
rinsing and drying.
Cooking Surfaces
When the barbecue has cooled, clean with hot
soapy water. To remove any food residue, use
a mild cream cleaner on a non-abrasive pad.
Do not use scouring pads or powders as they
can permanently damage the finish. Rinse well
and dry thoroughly. Due to the weight of the
cooking surfaces, we do not recommend
cleaning in a dishwasher.
Barbecue Body
Regularly remove excess grease or fat from the
barbecue body using a cloth wrung out in hot
soapy water and dry thoroughly. Excess fat and
food debris can be removed from inside the
body using a soft plastic or wooden scraper. It
is not necessary to remove all the grease from
the body. If you need to clean fully, use hot
soapy water and a cloth, or nylon-bristled brush
only. Do not use abrasives. Remove cooking
surfaces before full cleaning.
Barbecue Hood or Lid & Trolley
Use a non-abrasive cloth or pad and clean with
hot, soapy water. Do not use scouring pads or
powders as they can permanently damage the
finish.
17
Page 18

Fixings
All screws and bolts, etc. should be checked
and tightened on a regular basis.
Storage
Ensure the barbecue is properly cooled before
covering or storing. Store your barbecue in a
cool dry place.
When using the barbecue after extended
periods of storage follow the cleaning
procedures.
Specifications subject to change without prior notice
NOTE:
Manufacturer:
TPA Industrial (DG) Co. Ltd.
Xingguang Rd., Huangjiang, Dongguan
Guangdong, China 523768
18
Page 19

OUTBACK® WARRANTY
OUTBACK® barbecues are warranted to the original purchaser against defects in materials
and workmanship. OUTBACK® will supply replacements for defective parts free of charge
provided that:
♦ The product has not been used for trade, professional or hire purposes.
♦ The product has not been subjected to misuse or neglect, including fat fires and flare ups
or use of a faulty or incorrect regulator.
♦ The product has not sustained damage through foreign objects, substances or accidents.
♦ The care and maintenance instructions given in your OUTBACK® manual have been
followed.
Any warranty and guarantee claims shall be rendered void in the event of improper use of the
barbecue or the use of non-approved fuels. Discolouration, rusting or slight deformation of
parts exposed directly to the flames (grill, griddle, flame tamer, burner, etc.) do not impair the
function of the barbecue and do not form a basis for any claims.
This warranty is offered as an extra benefit and is in addition to the customers’ statutory rights.
OUTBACK® does not in any way warranty the gas cylinder.
In the unlikely event that you experience problems with this barbecue, please fill in our
warranty form at:
http://www.outbackbarbecues.com/warranty-form
One of our colleagues will be in contact with you shortly.
For reference and correspondence, record your
serial number here.
(See sticker on side of barbecue body.)
Serial No.__________________
This number may be required when ordering
spare parts or accessories. A part reference
number may also be required where applicable.
HELPLINE NUMBER: 0345 388 6032
19
 Loading...