

Page 1
0359
Assembly and Operating Instructions for Outback®
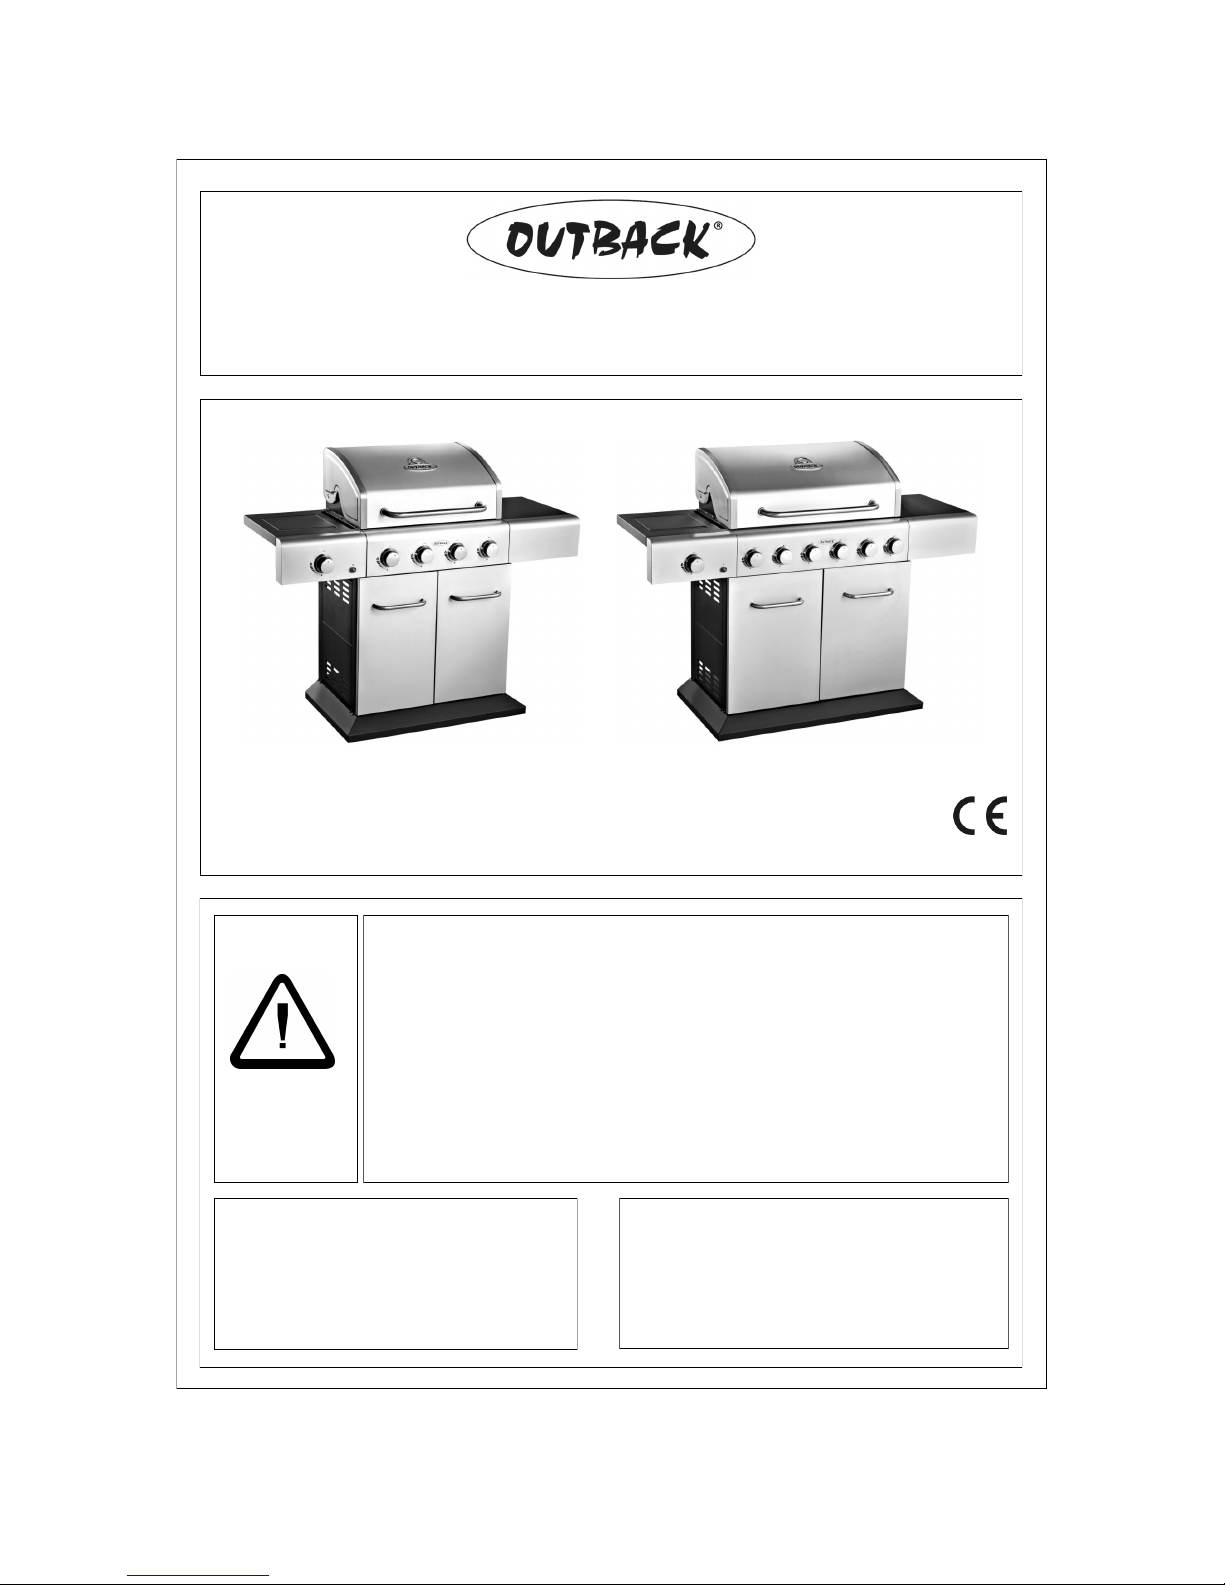
Meteor Select Stainless Steel 4 and
Meteor Select Stainless Steel 6 Burner Gas BBQ
Drawings are not to scale.
Specifications subject to change
without prior notice.
WARNING
For outdoor use only. Not for commercial use.
Read instructions before using the appliance. Failure to follow instructions could
result in death, serious bodily injury, and/or property loss.
Warning: accessible parts may be very hot. Keep young children and pets away.
Do not move the appliance during use.
Turn off the gas supply at the gas bottle after use.
Any modification of the appliance, misuse, or failure to follow the instructions may
be dangerous and will invalidate your warranty. This does not affect your statutory
rights.
Retain these instructions for future reference.
Leak test annually, and whenever the gas bottle is removed or replaced. Check that
the hose connections are tight and leak test each time you reconnect the gas bottle.
For Flare-up control please refer to the ‘OPERATION’ section of this manual.
FOR YOUR SAFETY
If you smell gas:
1. Shut off gas to the appliance.
2. Extinguish any open flame.
3. Open barbecue lid or hood.
4. If odour continues, discontinue use and
contact your local dealer.
FOR YOUR SAFETY
1. Do not store or use petrol or other flammable
vapours or liquids in the vicinity of this or any
other appliance.
2. A gas bottle not connected for use must not be
stored in the vicinity of this or any other
appliance.
MS4464 MS5664
Page 2
2
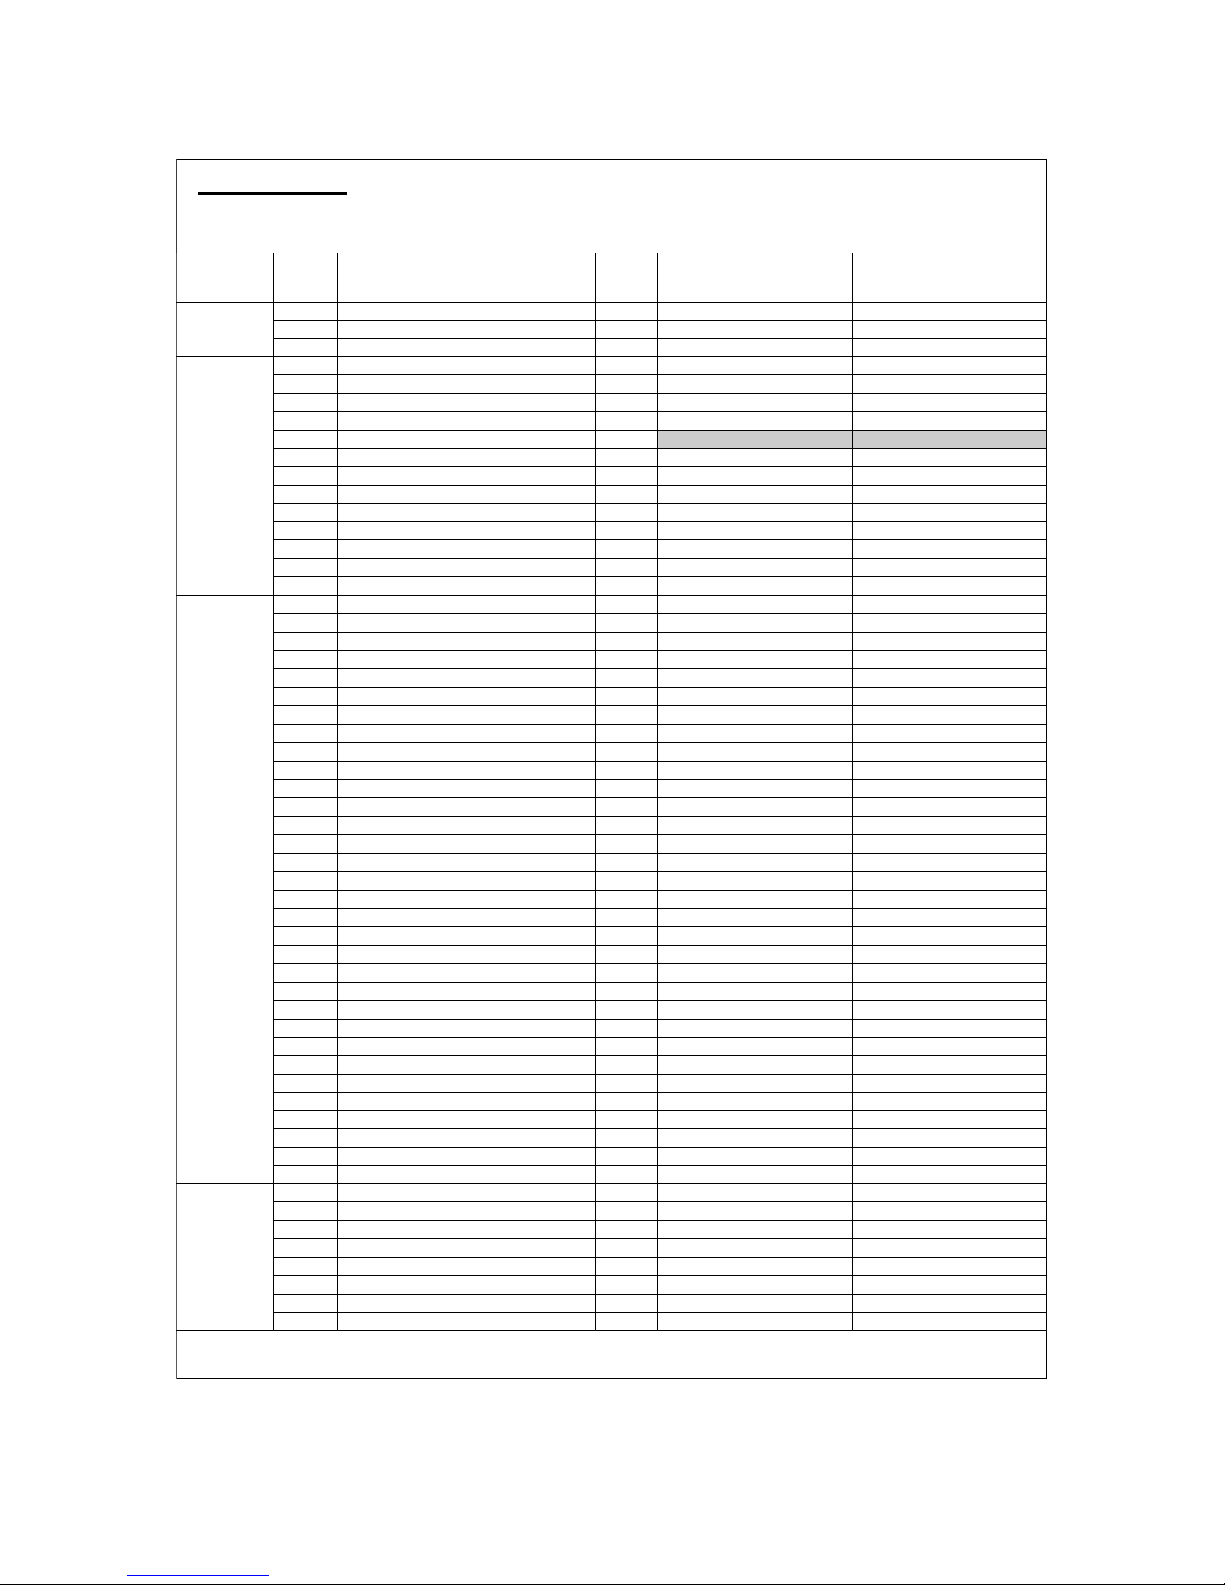
CODE PART QTY
Outback®
Meteor Select Stainless Steel
4 Burner Gas BBQ
Outback®
Meteor Select Stainless Steel
6 Burner Gas BBQ
HOOD
A1 Hood (Pre-Assembled to Body) 1
A2 Hood Handle
1
A3 Warming Rack 1
BODY
B1 Barbecue Body
1
B2 Burner
4 6
B3 Control Panel
1
B4 Knob
4 6
B5 Hose (if supplied)
B6 Lava Rock in Basket / Flame Tamer
B7 Cooking Grill
1
B8 Cooking Griddle
1
B9 Drip Tray Left Bracket 1
B10 Drip Tray Right Bracket
1
B11 Drip Tray
1
B12 Drip Pan
1
B13 Ignition Button
1
TROLLEY
C1 Side Burner Shelf
1
C2 Side Burner Shelf Panel
1
C3 Side Shelf
1
C4 Side Shelf Panel
1
C5 Side Burner Grid
1
C6 Side Burner Lid
1
C7 Side Burner Lid Axle
1
C8 Side Burner Firebox
1
C9 Side Burner Electrode
1
C10 Knob Bezel
1
C11 Side Burner Knob
1
C12 Sear Burner
1
C13 Side Burner Drip Tray
1
C14 Body Support A
2
C15 Body Support B
2
C16 Left Front Leg
1
C17 Left Rear Leg
1
C18 Right Front Leg
1
C19 Right Rear Leg
1
C20 Side Panel
4
C21 Upper Support
1
C22 Door Handle
2
C23 Left Door
1
C24 Right Door
1
C25 Basket
1
C26 Bottom Panel
1
C27 Front Cabinet Skirt 1
C28 Left Cabinet Skirt
1
C29 Right Cabinet Skirt
1
C30 Balance Weight
1
C31 Lockable Caster
2
C32 Caster 2
HARDWARE
D1 ST4.0x10 Screw
16
D2 ST4.0x10 Screw F#
1
D3 M4x10 Bolt
21
D4 M4 Nut
7
D5 M5x15 Bolt
2
D6 M6x15 Bolt
20
D7 M6x40 Bolt
16
D8 M6 Nut 12
Pre-Assembled Component Quantity varies according to model purchased
Appearance, size, and construction may differ according to model purchased
1. Parts List
Quantity varies according to model purchased. Specifications subject to change without prior notice. For
more details on hardware, please see the corresponding ‗Hardware Reference Diagram‘.
Page 3
3
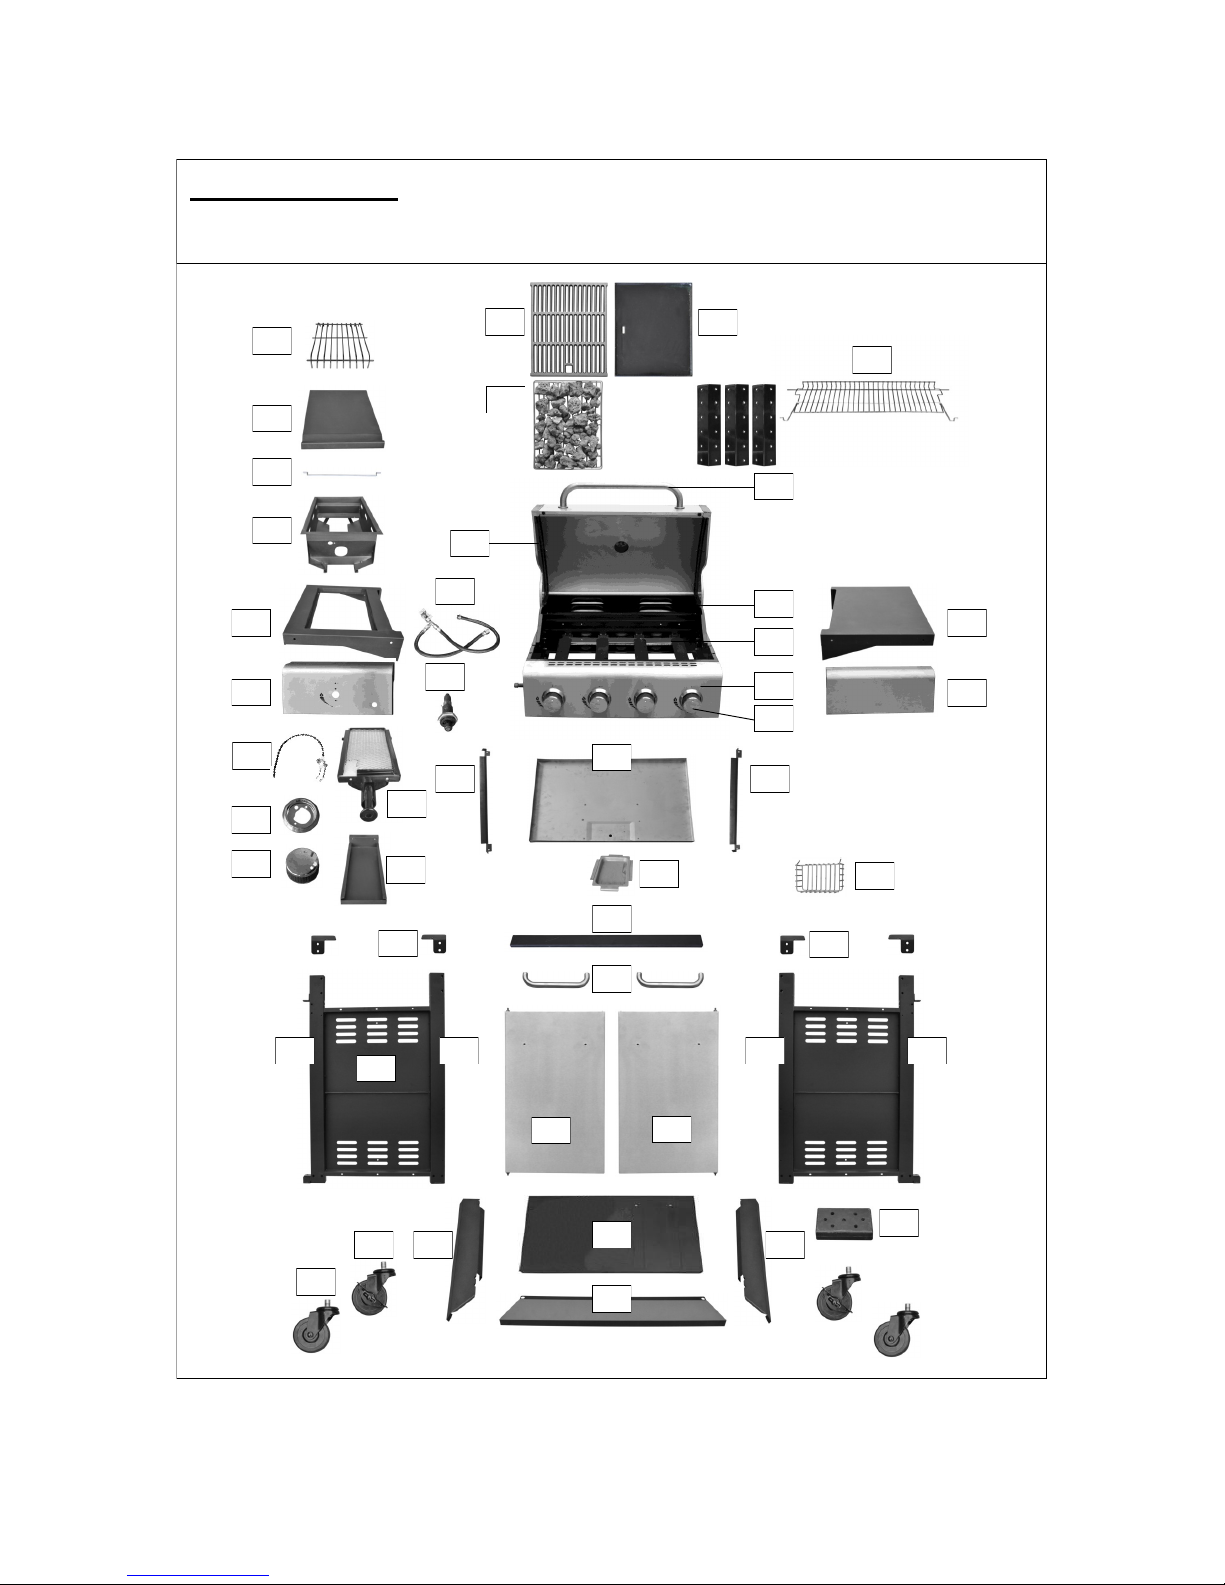
2. Parts Diagram
Quantity varies according to model purchased. Specifications subject to change without prior notice. For
more details on hardware, please see the corresponding ‗Hardware Reference Diagram‘.
A3
B9 B10
C5
C29
B6
B7
B8
B11
C26
C22
C27
C12
C11
C10
C28
C23
C24
B12
A2
B1
B2
B4
B3
A1
C1 C3
C32
C31
C25
C30
C21
C2
C4
C6
C7
C8
C9
C13
C17 C16 C18 C19
C20
C15
C14
or
B5
B13
Page 4
4
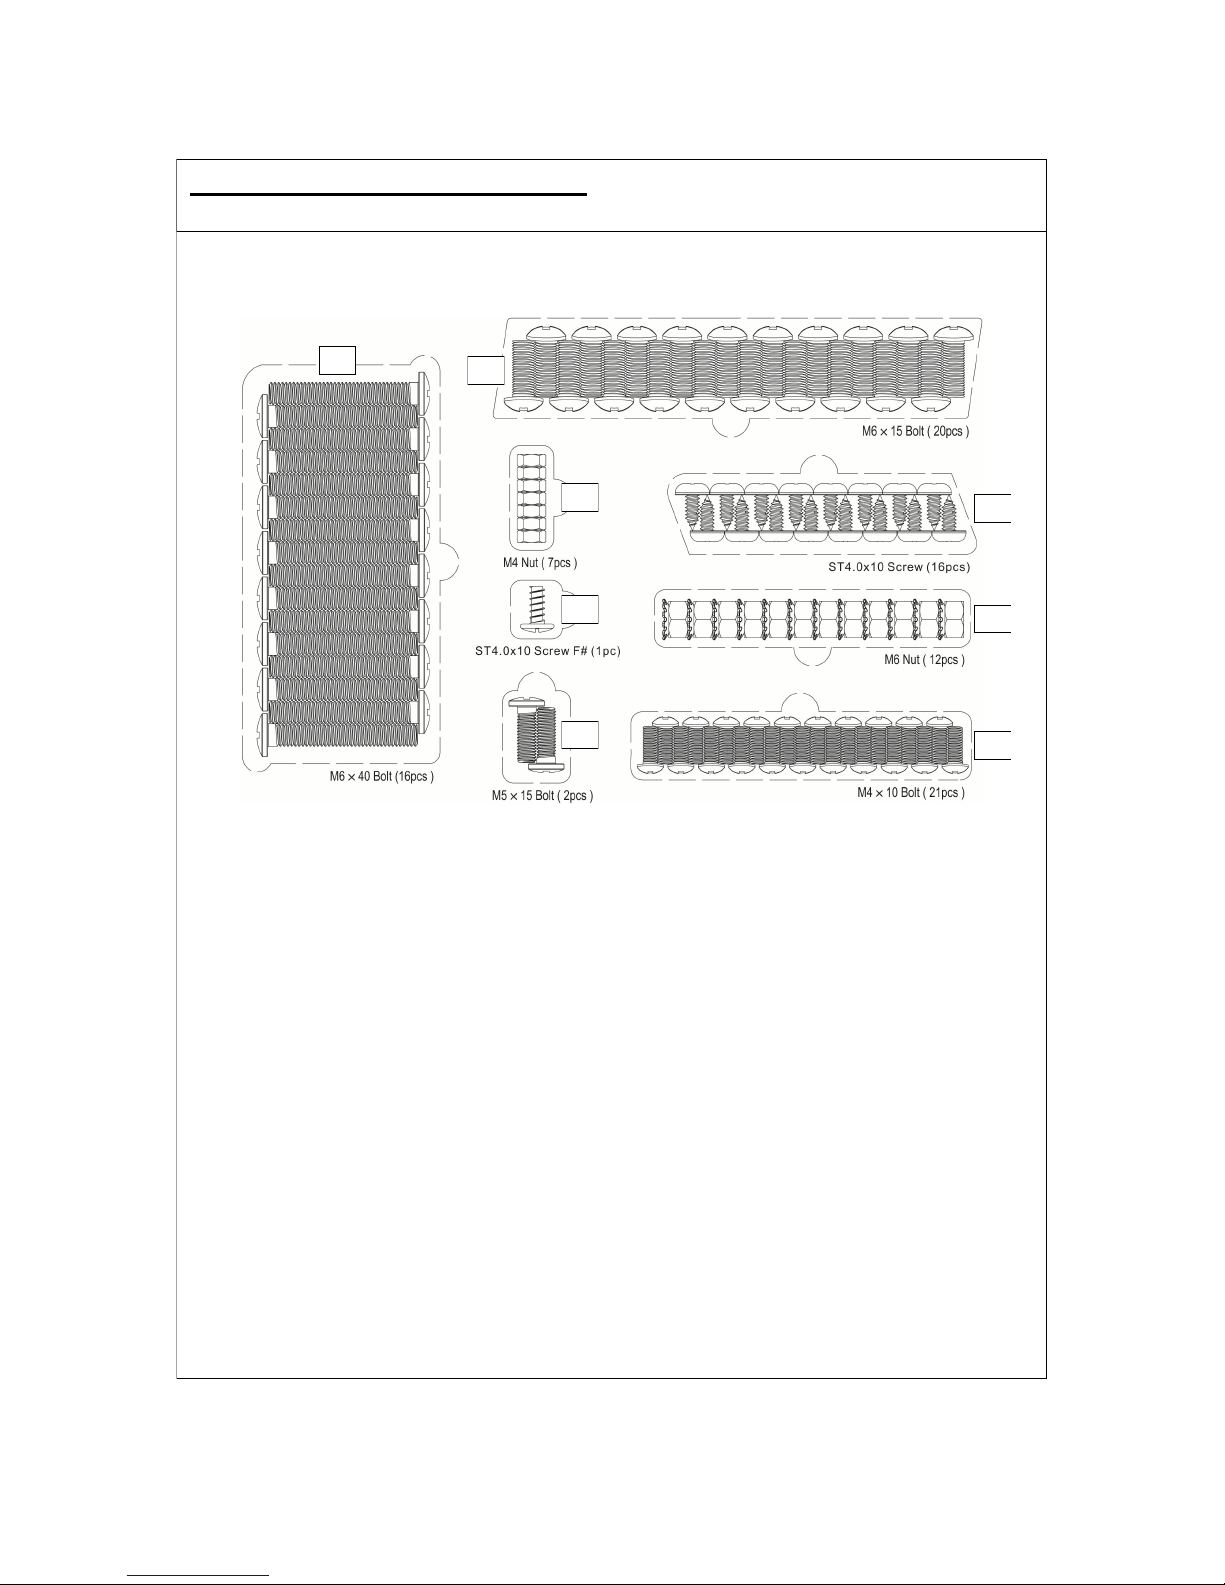
3. Hardware Reference Diagram
Specifications subject to change without prior notice.
D7
D6
D1
D8
D4
D3
D2
D5
Page 5
5
4. Assembly
IMPORTANT!
TOOLS NEEDED FOR ASSEMBLY: Medium size flat blade or Phillips/Crosspoint screwdriver,
adjustable spanner or metric spanner set.
Remove any internal component or packaging from the barbecue body.
Whilst every care is taken in the manufacture of this product, care must be taken during assembly in
case sharp edges are present.
Please read the Important Information section carefully before assembly and use of your
barbecue.
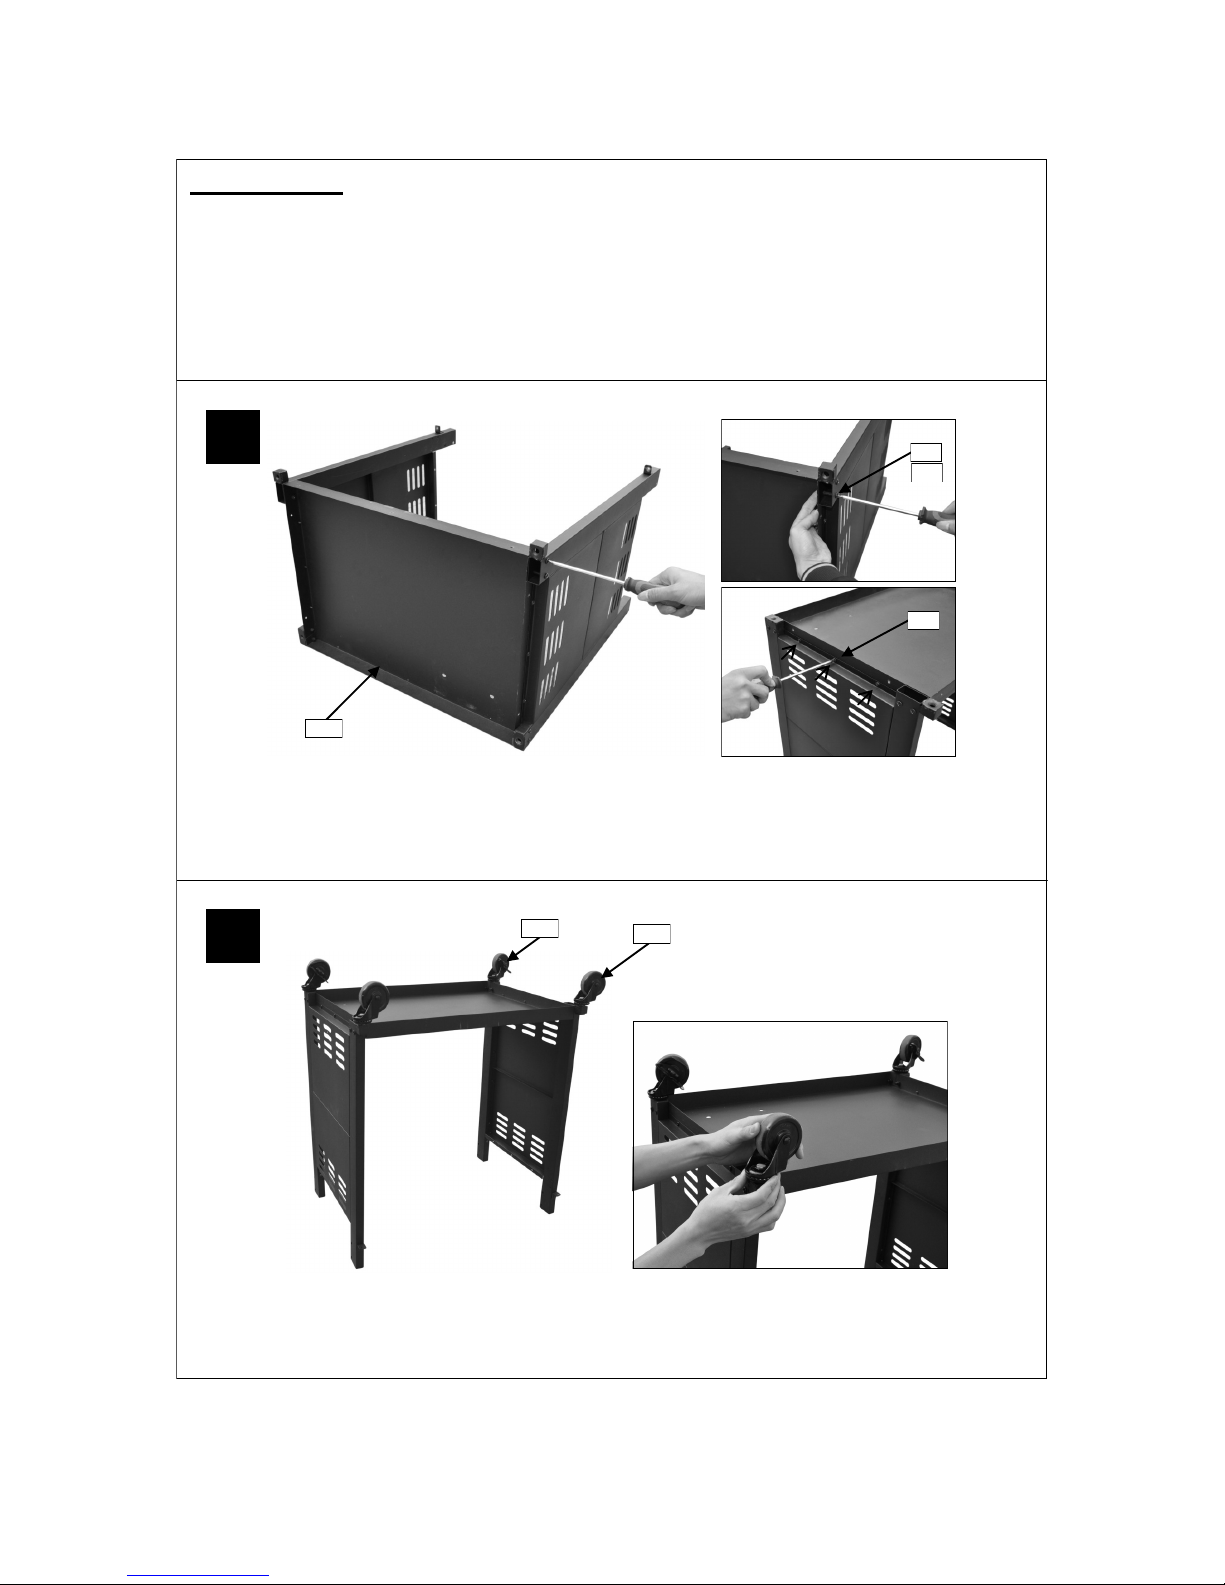
1
2
Attach the left cabinet panel assembly (C16, C17, C20) and right cabinet panel assembly (C18,
C19, C20) to the Bottom Panel (C26) using M6x40 Bolts (D7x8pcs), M6 Nuts (D8x8pcs), and
ST4.0x10 Screw (D1x6pcs) as shown.
Carefully turn the cabinet upside down.
Attach the Casters (C32) into the front legs and the Lockable Casters (C31) into the rear legs.
C32
C31
C26
D7
D1
D8
Page 6
6
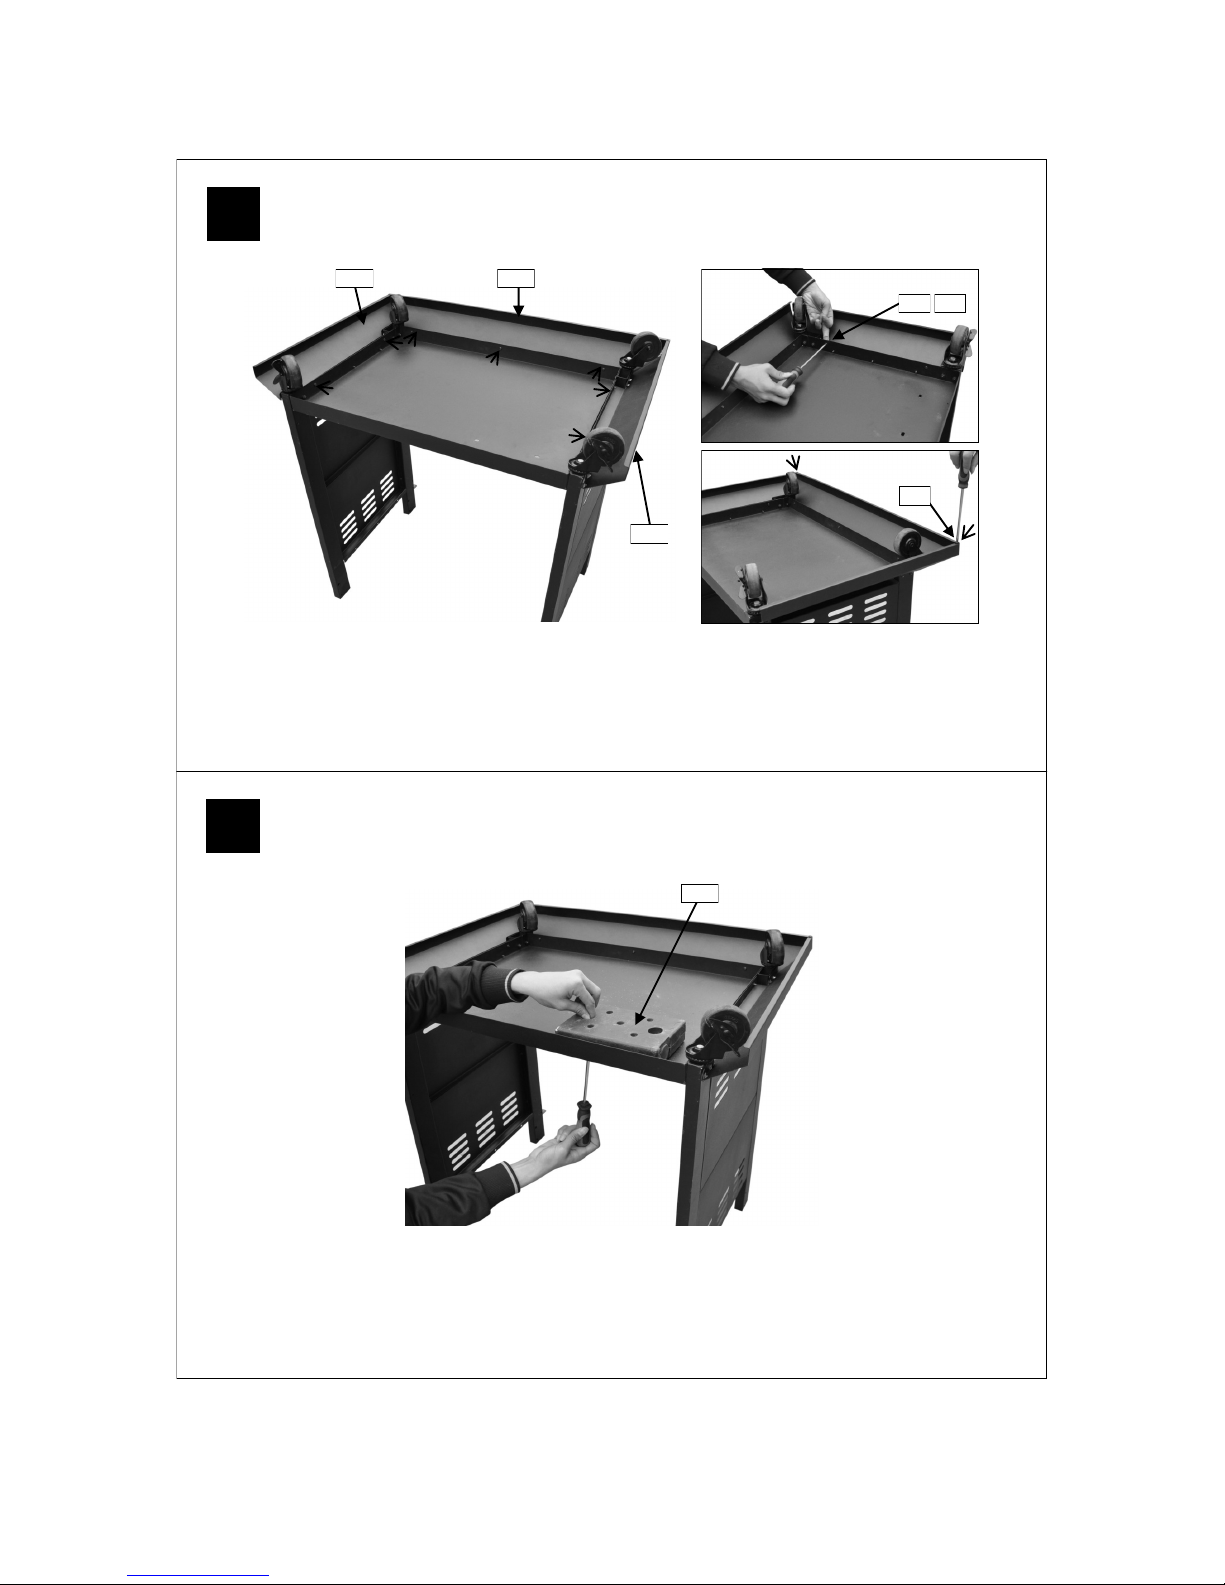
Attach the Cabinet Skirts (C27, C28, C29) to the bottom panel using M4x10 Bolts (D3x7pcs)
and M4 Nuts (D4x7pcs) as shown. Then fix the left / right cabinet skirts onto the front cabinet
skirt using ST4.0x10 Screws (D1x2pcs) as shown.
Unscrew the retaining bolts and retaining nuts from the Balance Weight (C30). Attach
the balance weight onto the bottom panel using the retaining bolts and retaining nuts
as shown.
3
4
C30
C27 C28
C29
D3 D1D4
Page 7
7
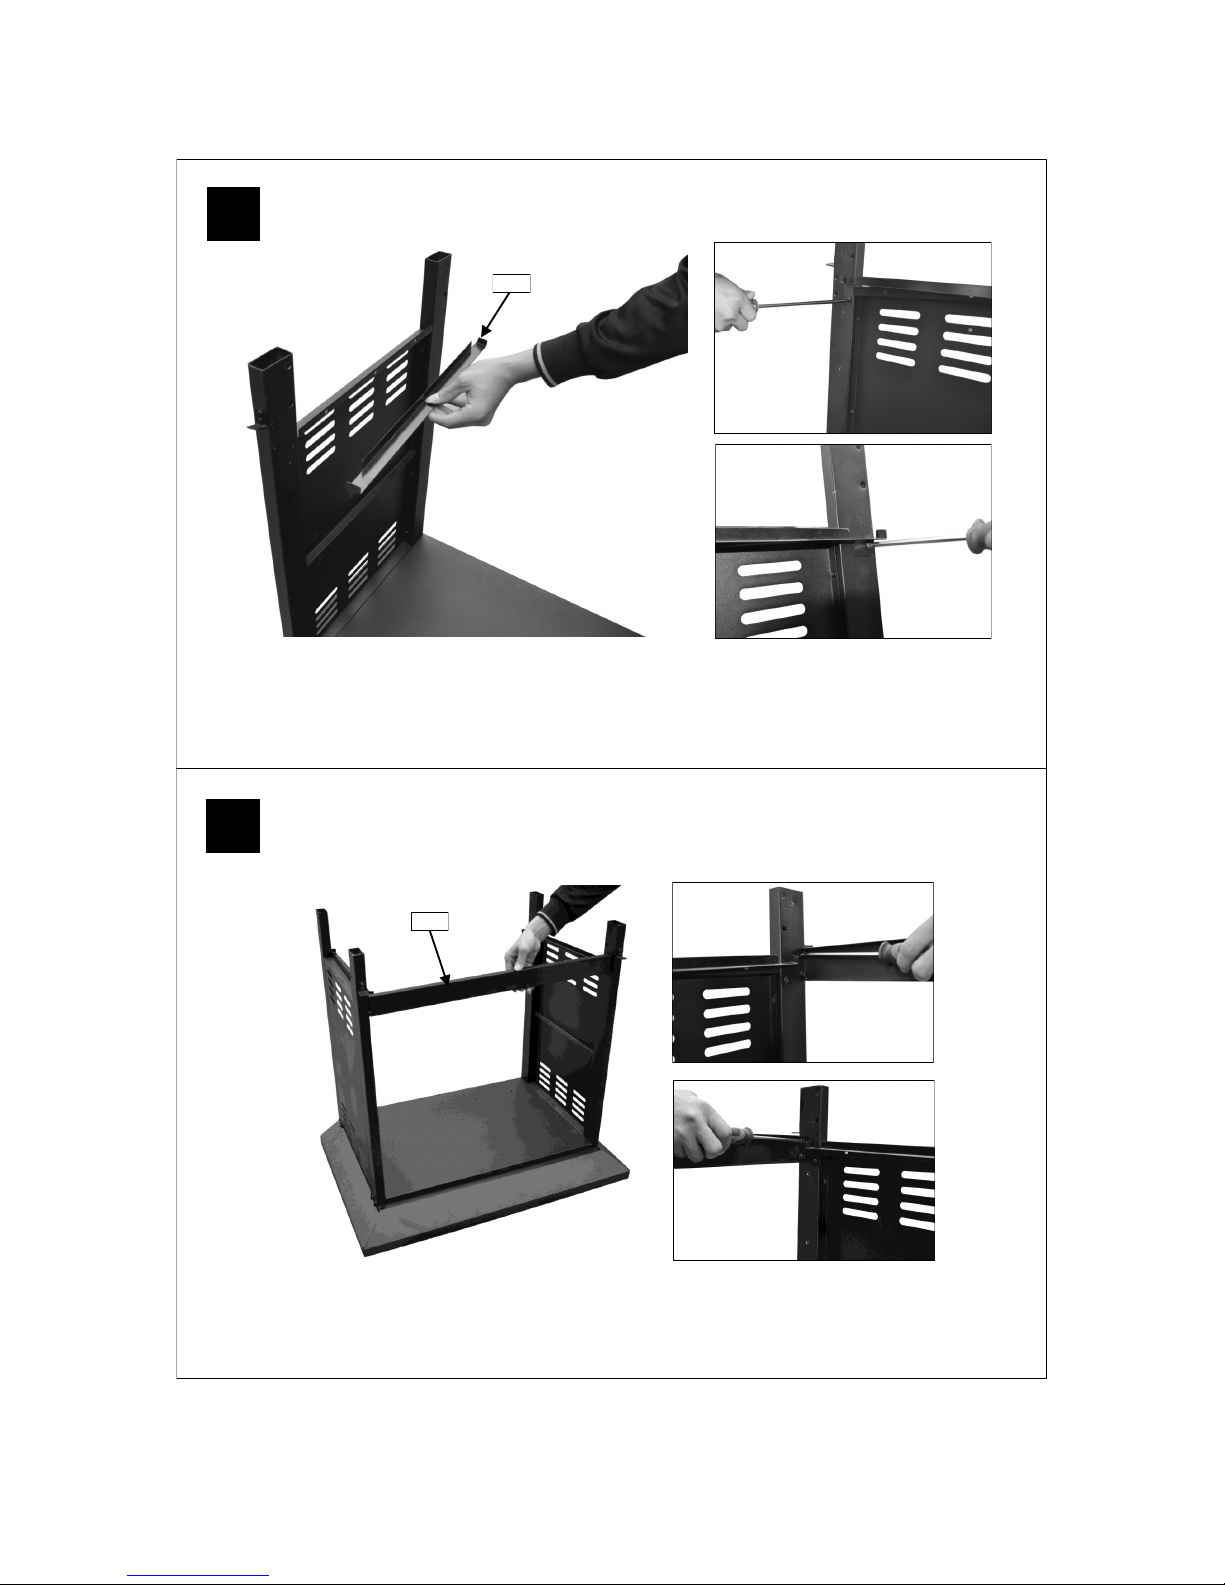
Carefully turn the cabinet assembly over, right side up.
Attach Drip Tray Left Bracket (B9) to the right legs using ST4.0x10 Screws (D1x2pcs) as shown.
Repeat the above process for Drip Tray Right Bracket (B10).
6
Front Side
Rear Side
B10
Attach the Upper Support (C21) to the front legs using M6x15 Bolts (D6x4pcs).
C21
5
Page 8
8
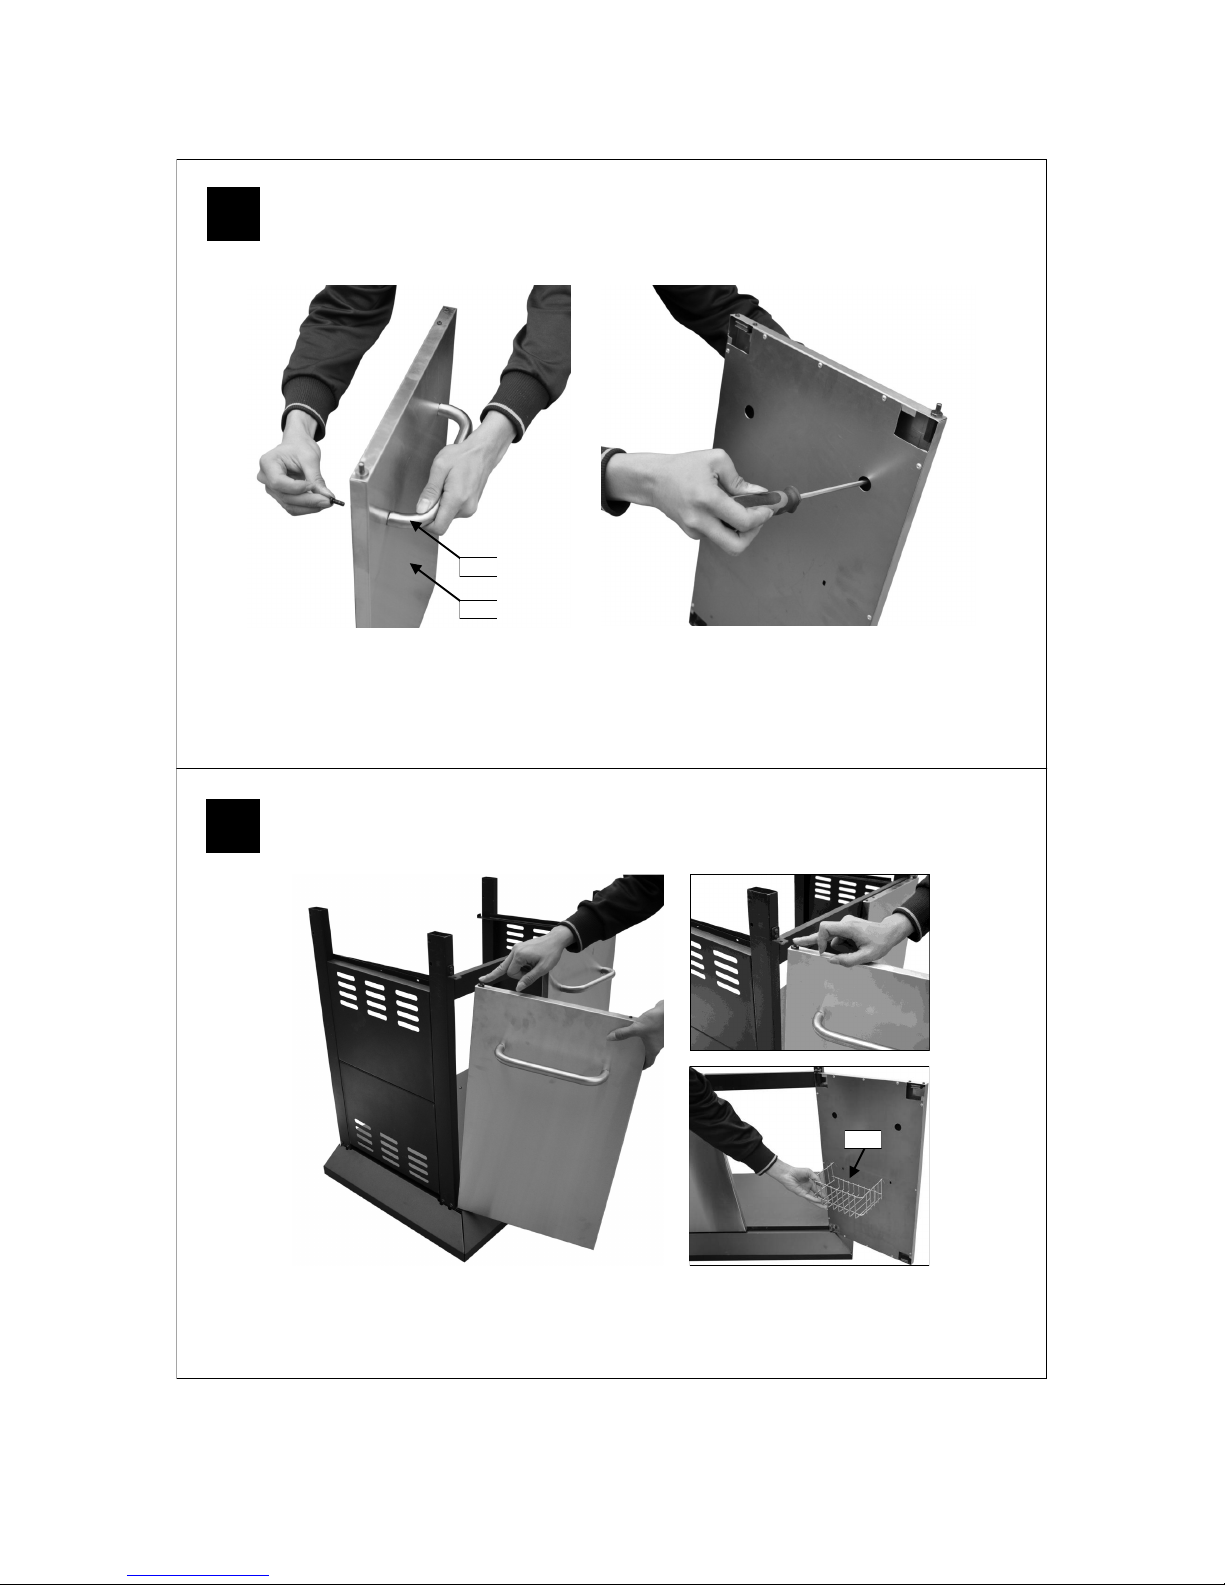
Attach the Door Handle (C22) onto the Left Door (C23) using M6x15 Bolts (D6x2pcs).
Repeat the above process for Right Door (C24).
7
8
C22
C23
Fit the doors to the cabinet by depressing the spring pins and placing into the cabinet.
Attach the Basket (C25) onto the right door as shown.
C25
Page 9
9
9
10
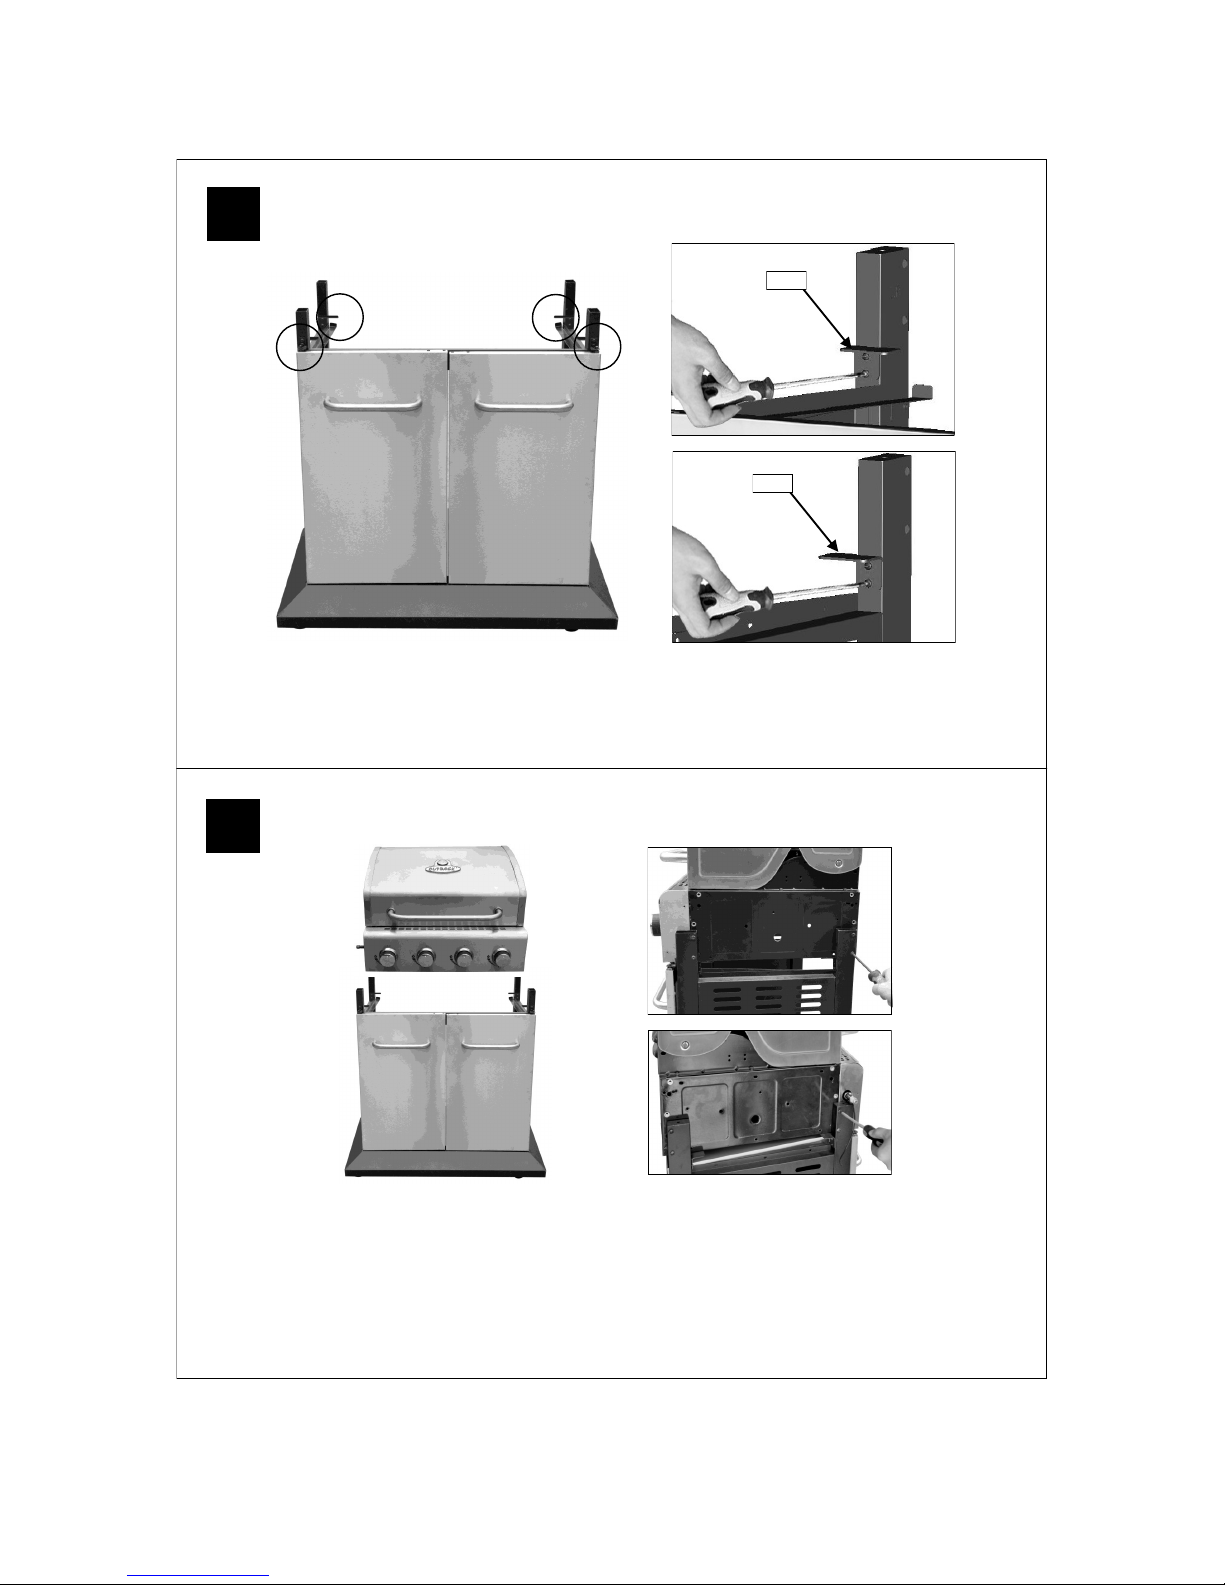
Attach the Body Support A (C14) onto the left rear leg and right front leg using M4x10 Bolts
(D3x4pcs) , and attach the Body Support B (C15) onto the right rear leg and left front leg
using M4x10 Bolts (D3x4pcs) as shown.
C14
C15
A
A
B
B
A
B
Carefully place the Barbecue Body (B1) onto the body supports and fix using M6x40 Bolts (D7x8pcs)
as shown.
WARNING: DO NOT RELEASE THE BARBECUE BODY WHILE THE BARBECUE HAS NOT BEEN
PROPERLY SEATED. THIS MAY RESULT IN INJURY OR DAMAGE TO YOUR BARBECUE.
CAUTION! Care must be taken to ensure the hood or lid does not fall open unexpectedly or
becomes damaged when it is set on the ground.
Page 10
10
11
12
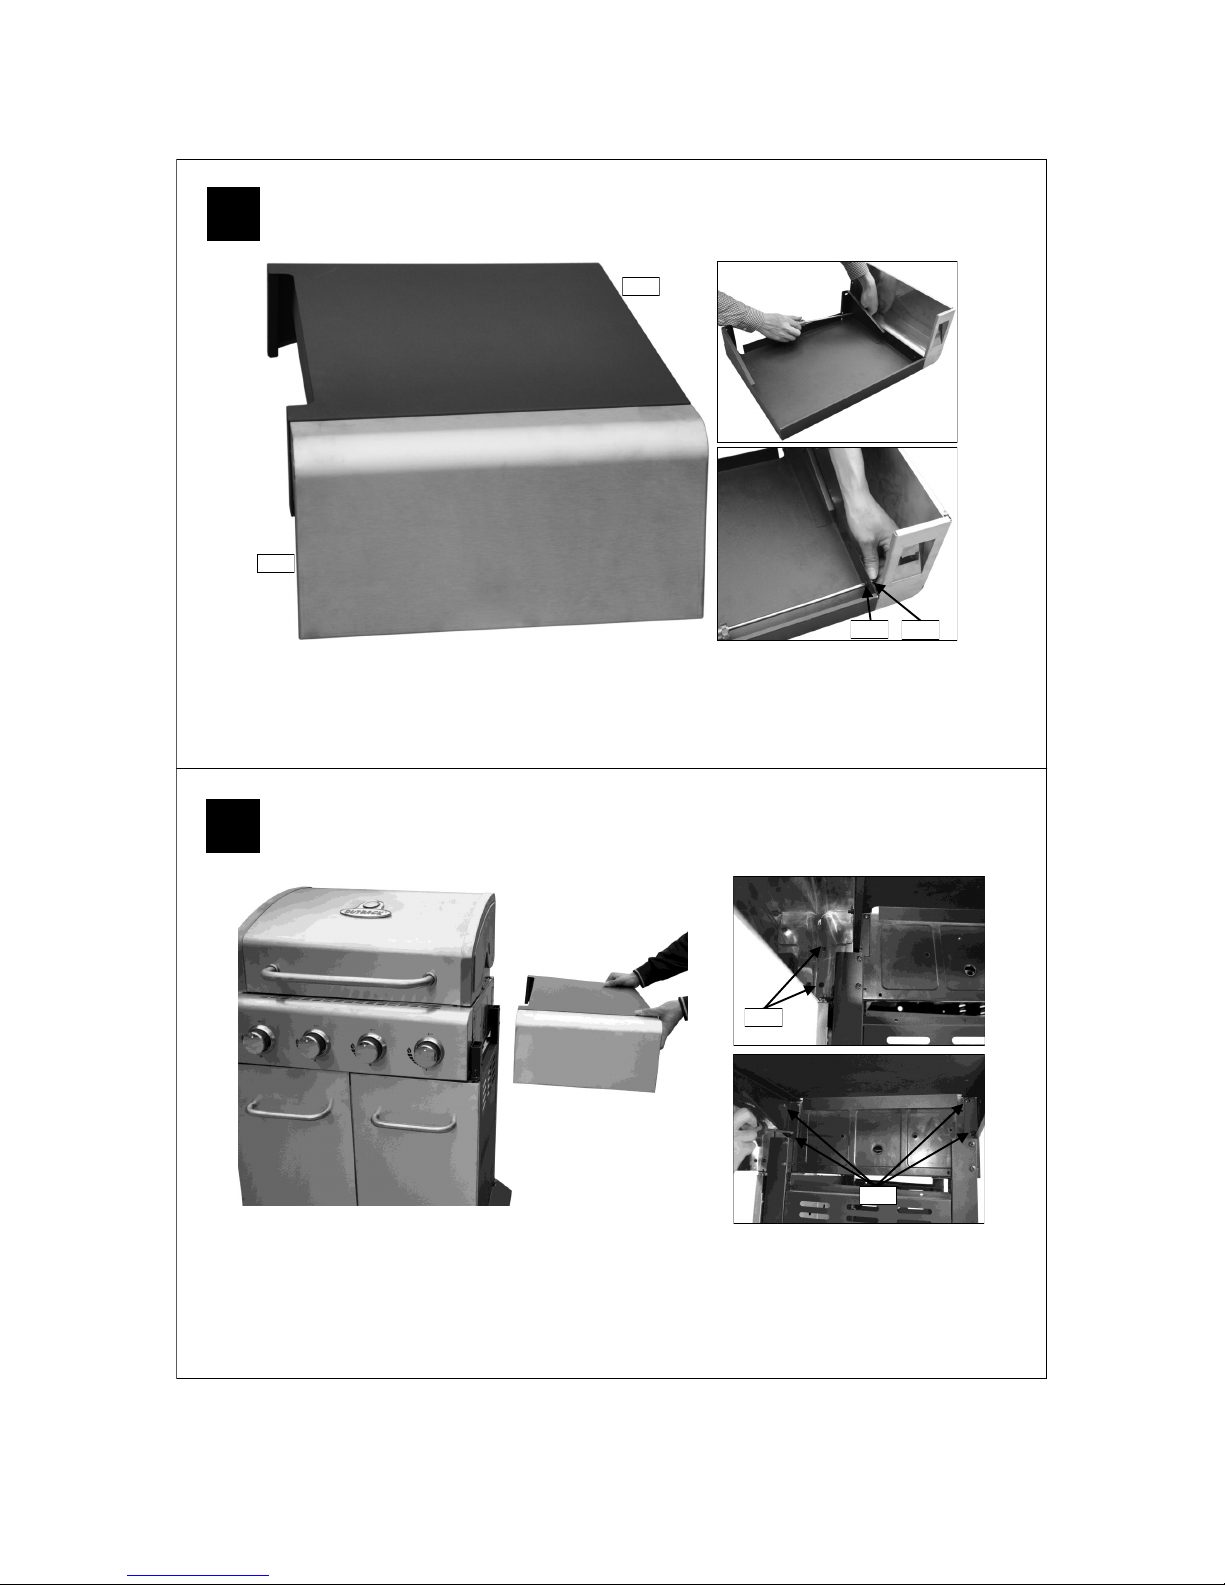
Attach the Side Shelf Panel (C4) onto the Side Shelf (C3) using M6x15 Bolts
(D6x2pcs) and M6 Nuts (D8x2pcs) as shown.
Attach the side shelf assembly to the barbecue body using ST4.0x10 Screws (D1x2pcs) and
M6x15 Bolts (D6x4pcs) as shown.
C3
C4
D1
D6
D8
D6
Page 11
11
13
14
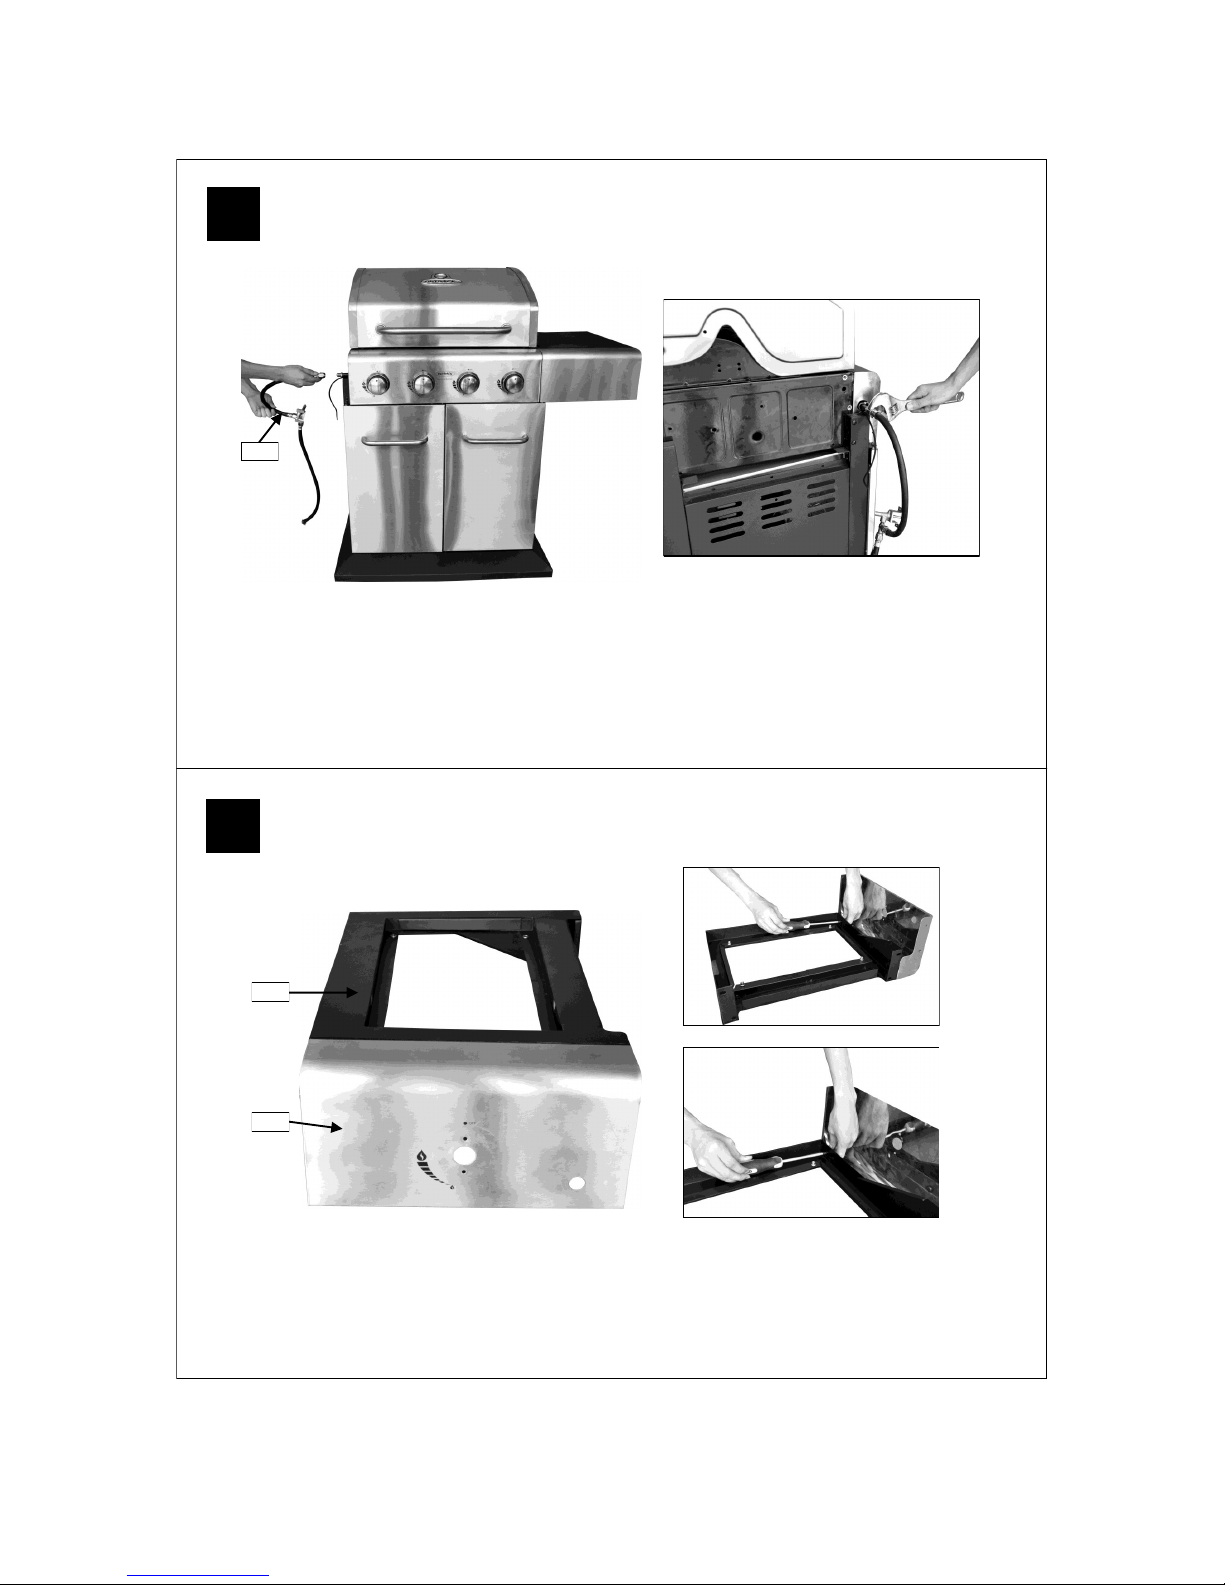
Attach the Side Burner Shelf Panel (C2) onto the Side Burner Shelf (C1) using M6x15 Bolts
(D6x2pcs) and M6 Nuts (D8x2pcs) as shown.
Connect the gas Hose (B5) to the barbecue.
Ensure the mating faces of the connection are clean and not damaged. Do not use any sealing
tape, paste, or liquid on the connection. The nut must be tightened with the use of a spanner.
Do not use force which may damage the assembly.
C1
C2
B5
Page 12
12
15
16
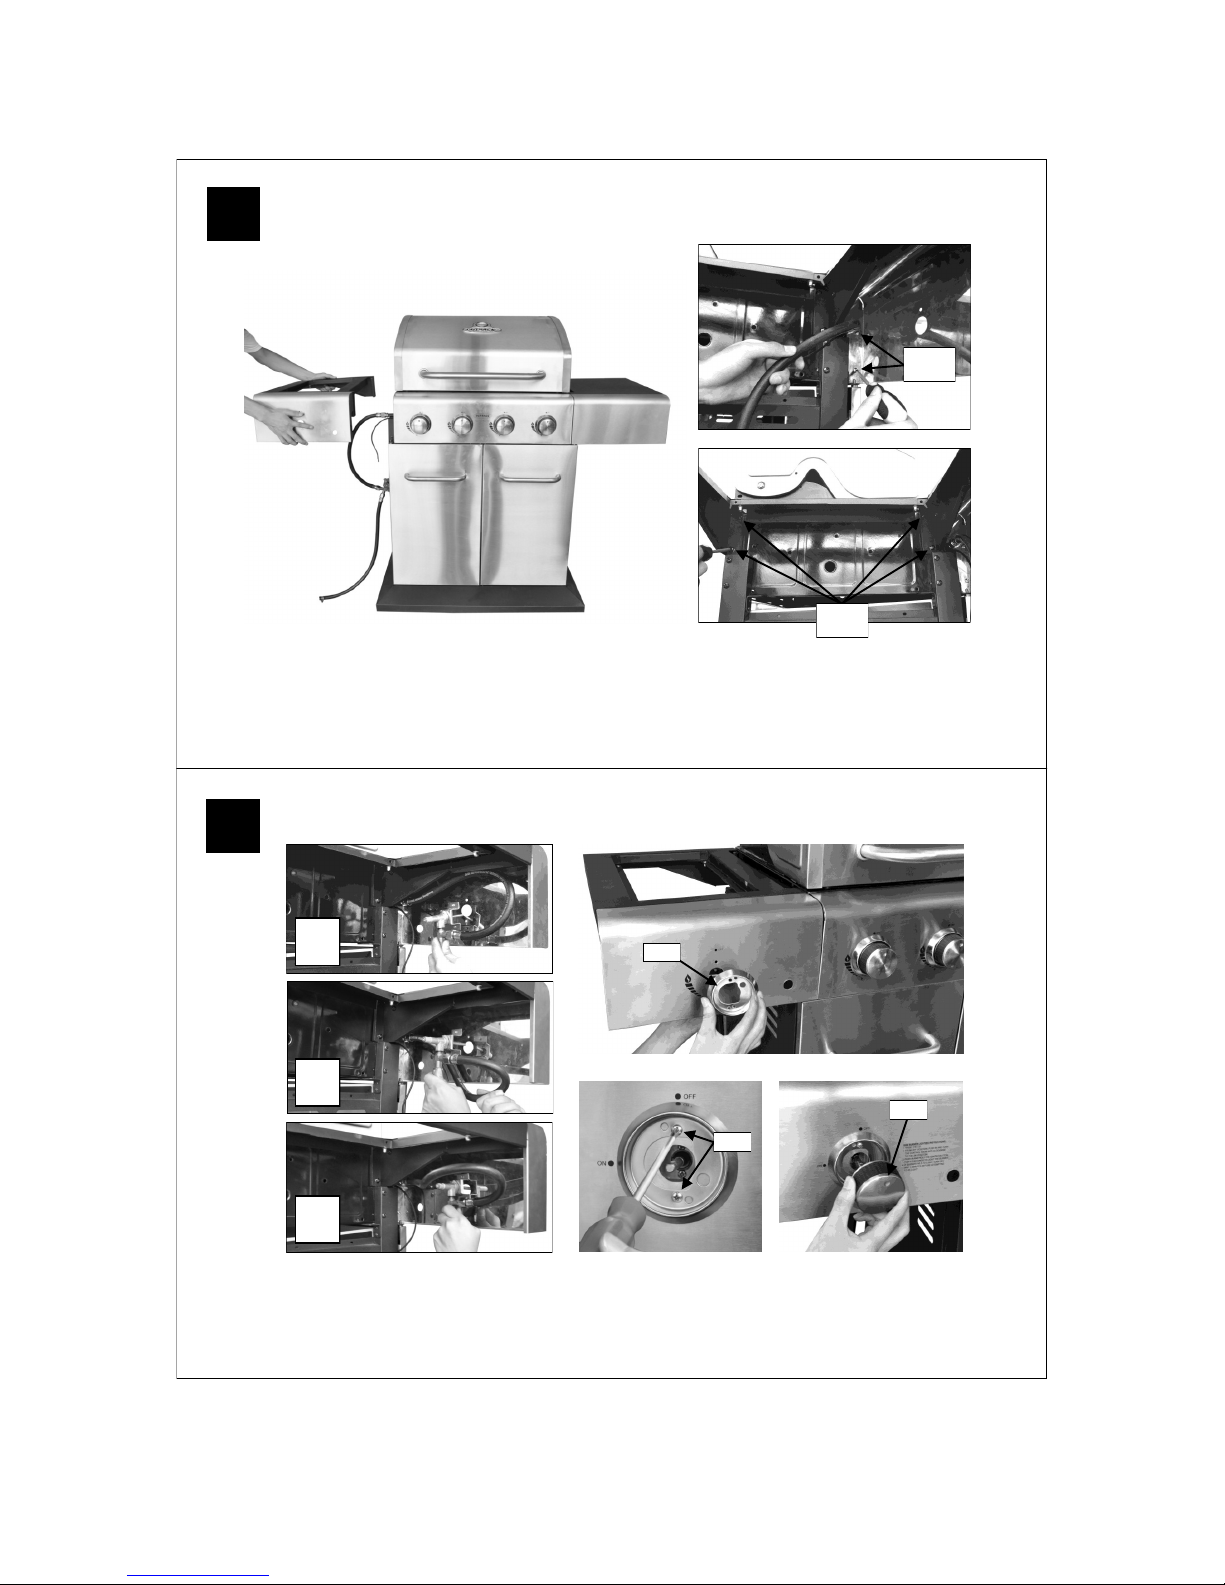
Attach the side burner valve and Knob Bezel (C10) onto the side burner shelf using M4x10 Bolts
(D3x2pcs) as shown. Press the Side Burner Knob (C11) onto side burner valve stem.
D1
D6
Attach the side burner shelf assembly to the barbecue body using ST4.0x10 Screws (D1x2pcs)
and M6x15 Bolts (D6x4pcs) as shown.
C10
C11
D3
Page 13
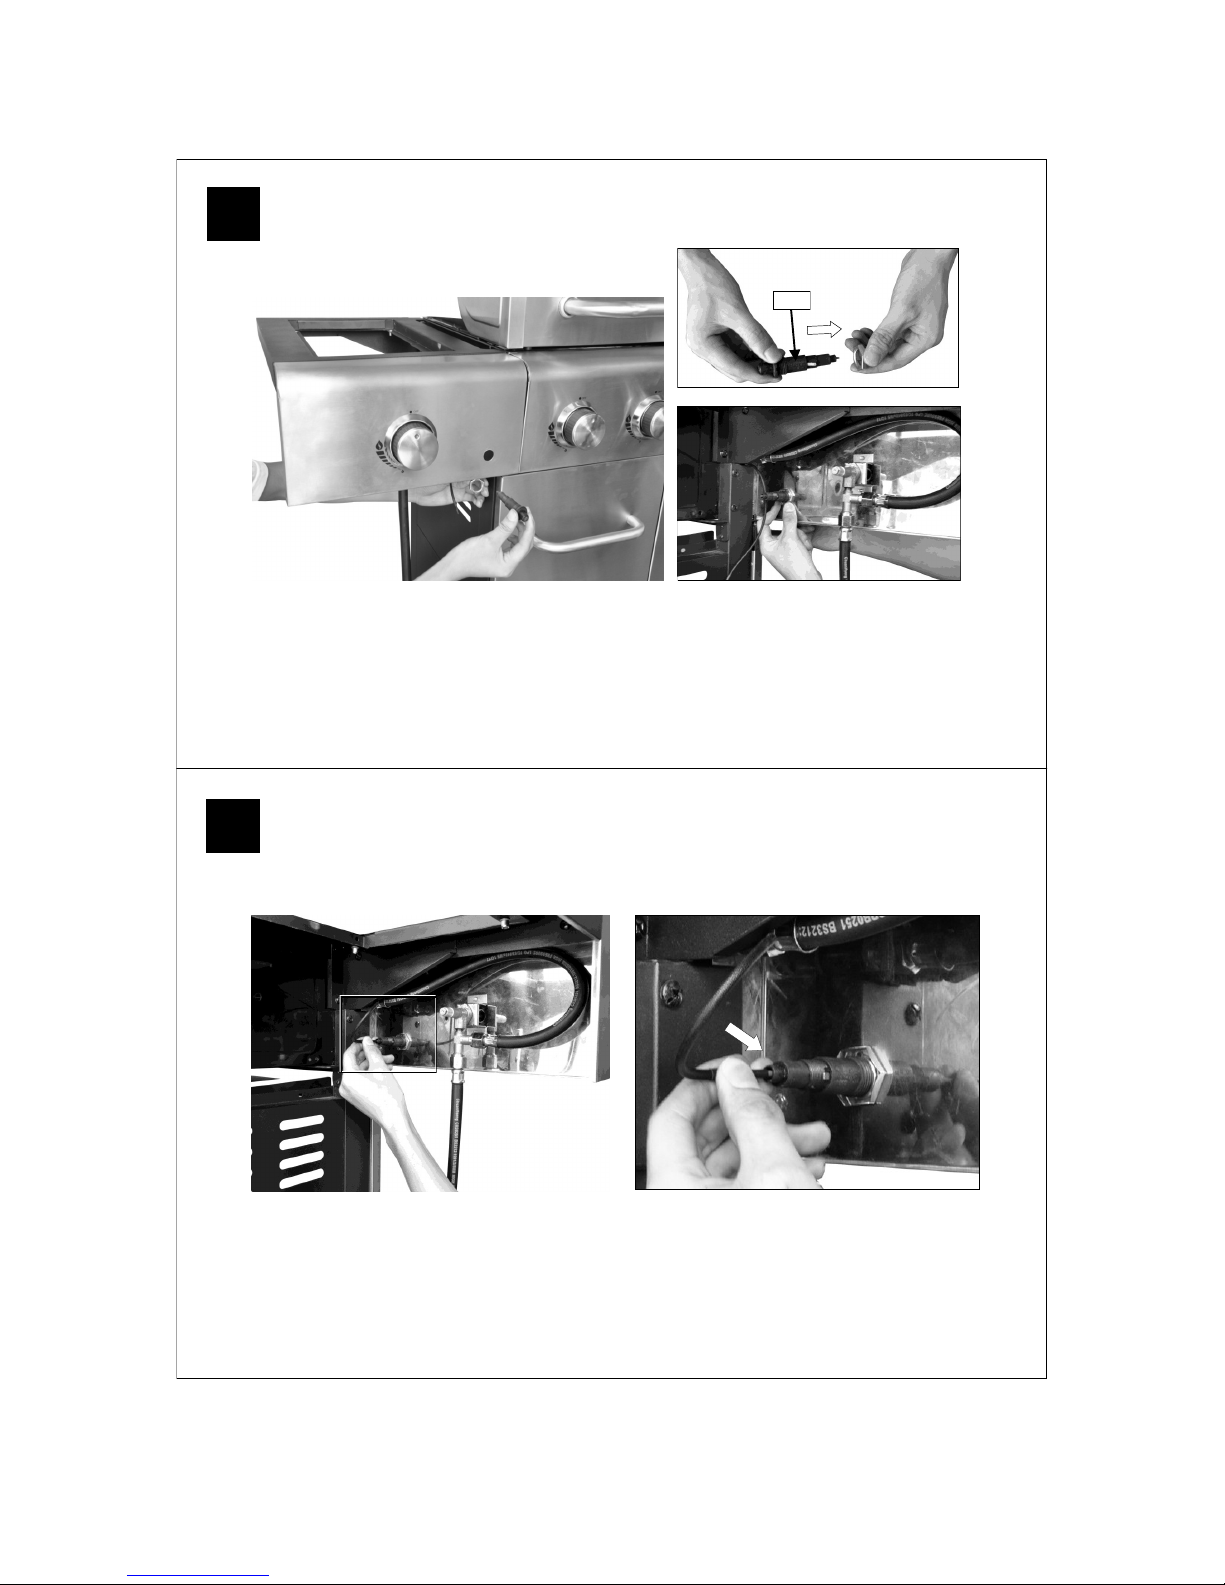
13
17
18
B13
Unscrew the pre-assembled nut of the Ignition Button (B13).
Insert the Ignition Button (B13) into the hole on the side burner shelf panel and secure with
the pre-assembled nut.
Connect the electrode wire to the Ignition Button (B13).
Page 14
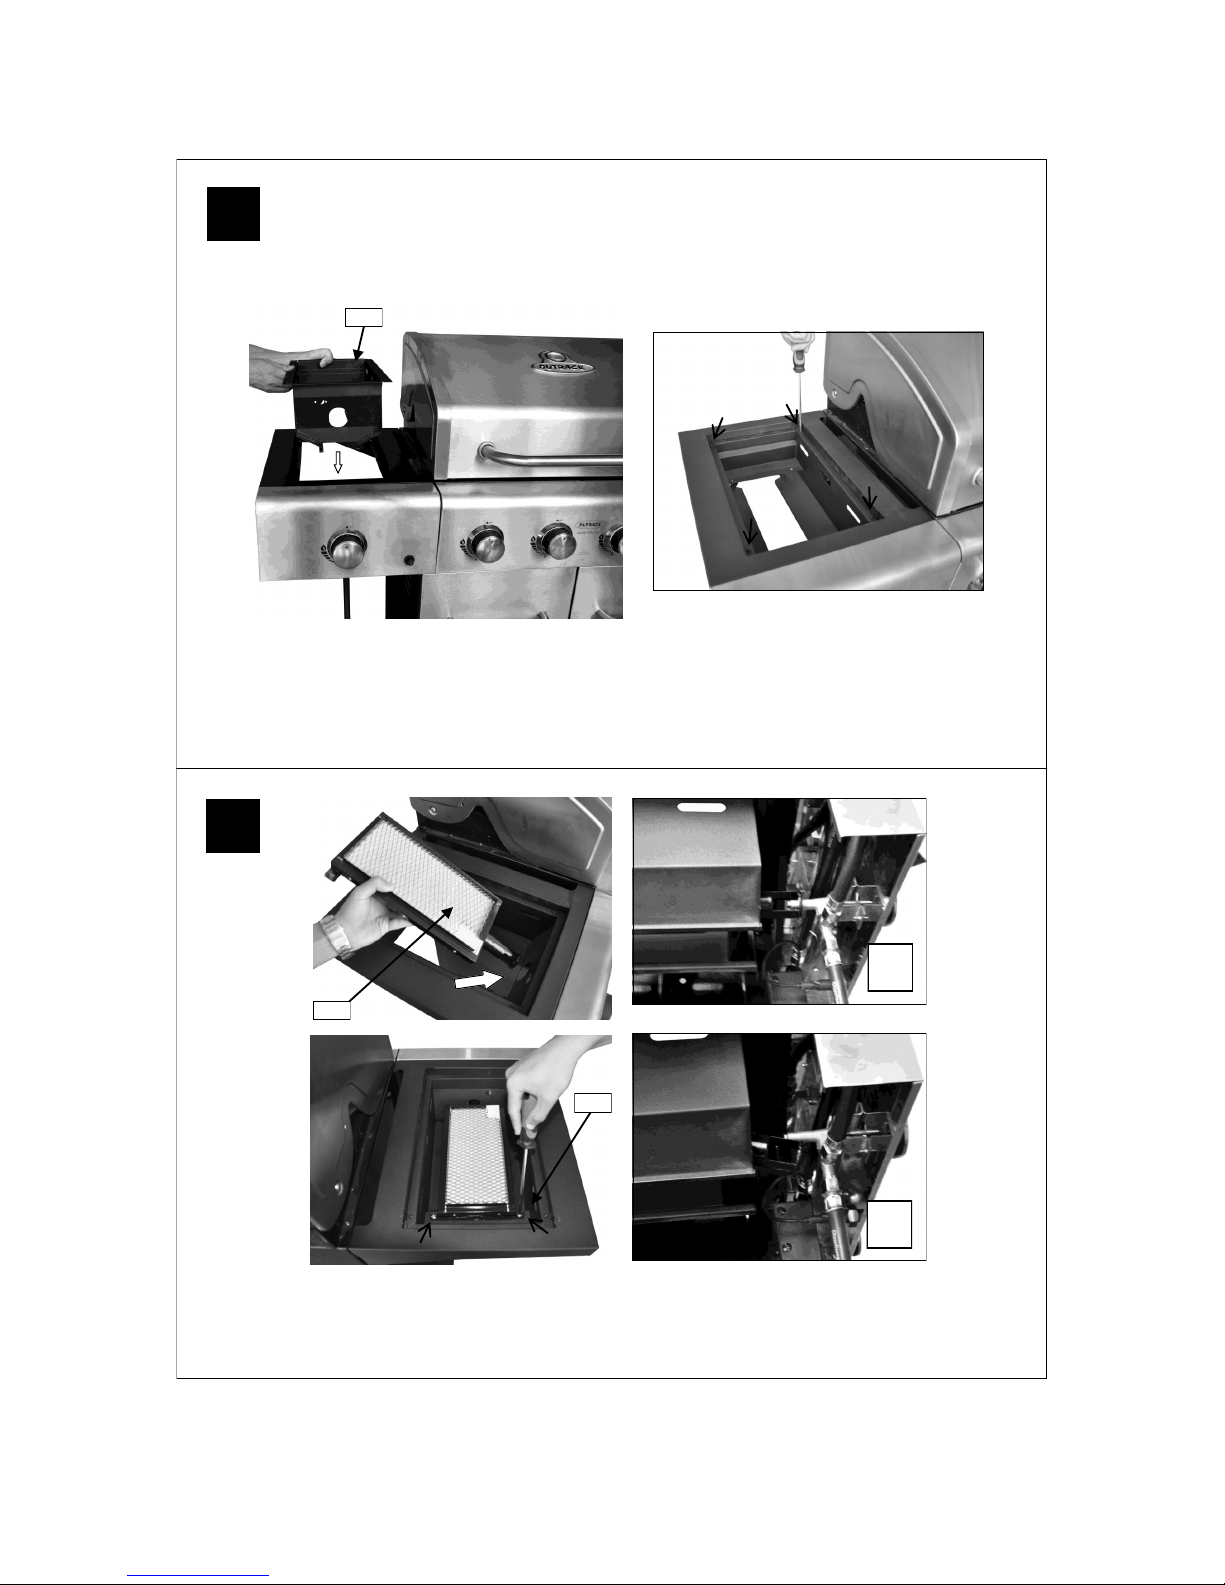
14
19
20
C8
Attach the Side Burner Firebox (C8) into the side burner shelf using M4x10 Bolts (D3x4pcs) as
shown.
C12
D5
Feed the tube of the Sear Burner (C12) through the guide hole in the side burner firebox, and
fix it onto the side burner firebox using M5x15 Bolts (D5x2pcs) as shown. Make sure that the
end of tube is set over the gas outlet of the side burner valve.
Page 15
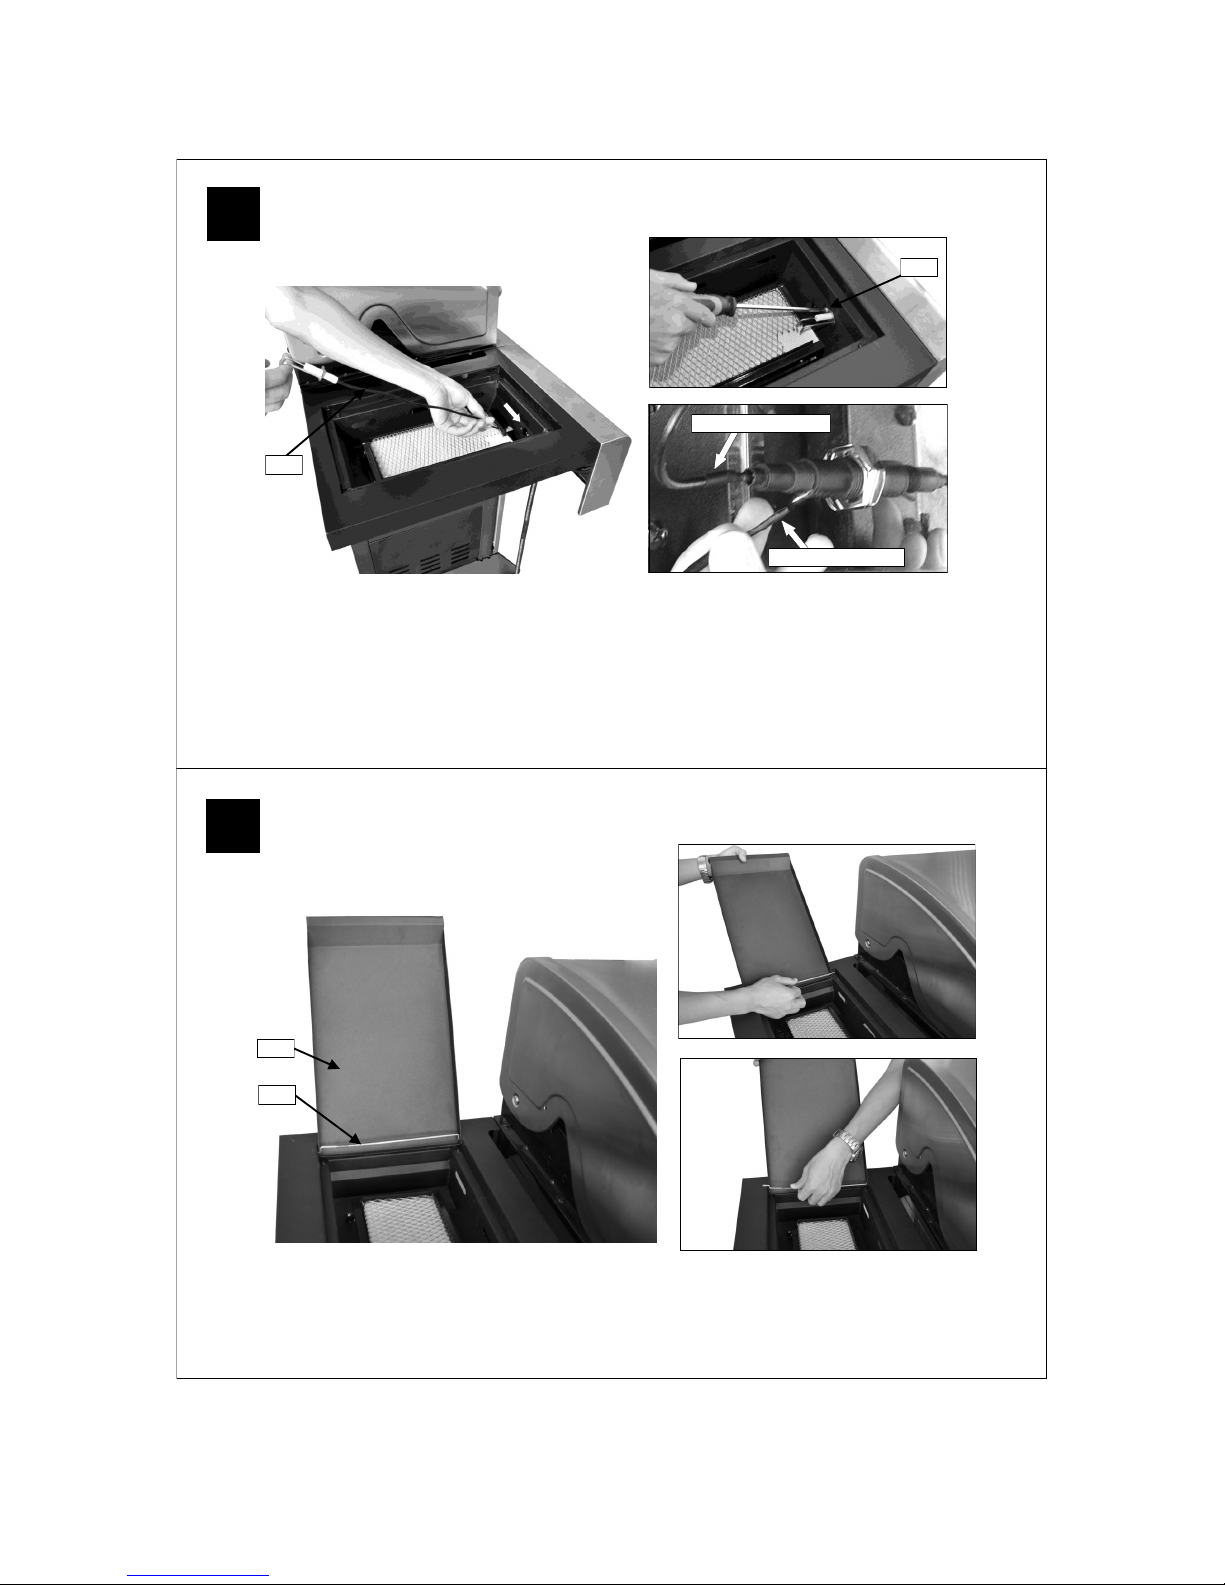
15
21
22
D2
C9
Main burner wire
Side burner wire
Attach Side Burner Electrode (C9) into the side burner firebox using a ST4.0x10 Screw F# (D2)
as shown. Connect the electrode wire to the Ignition Button (B13).
WARNING: BEFORE OPERATION, ENSURE BOTH THE MAIN BURNER AND SIDE BURNER
WIRES ARE CONNECTED TO THE PUSH BUTTON IGNITOR.
IF THE CIRCUIT IS NOT COMPLETED, THE IGNITOR WILL NOT SPARK!
C6
C7
Attach the Side Burner Lid (C6) onto the side burner shelf using the Side Burner Lid Axle (C7)
as shown.
Page 16
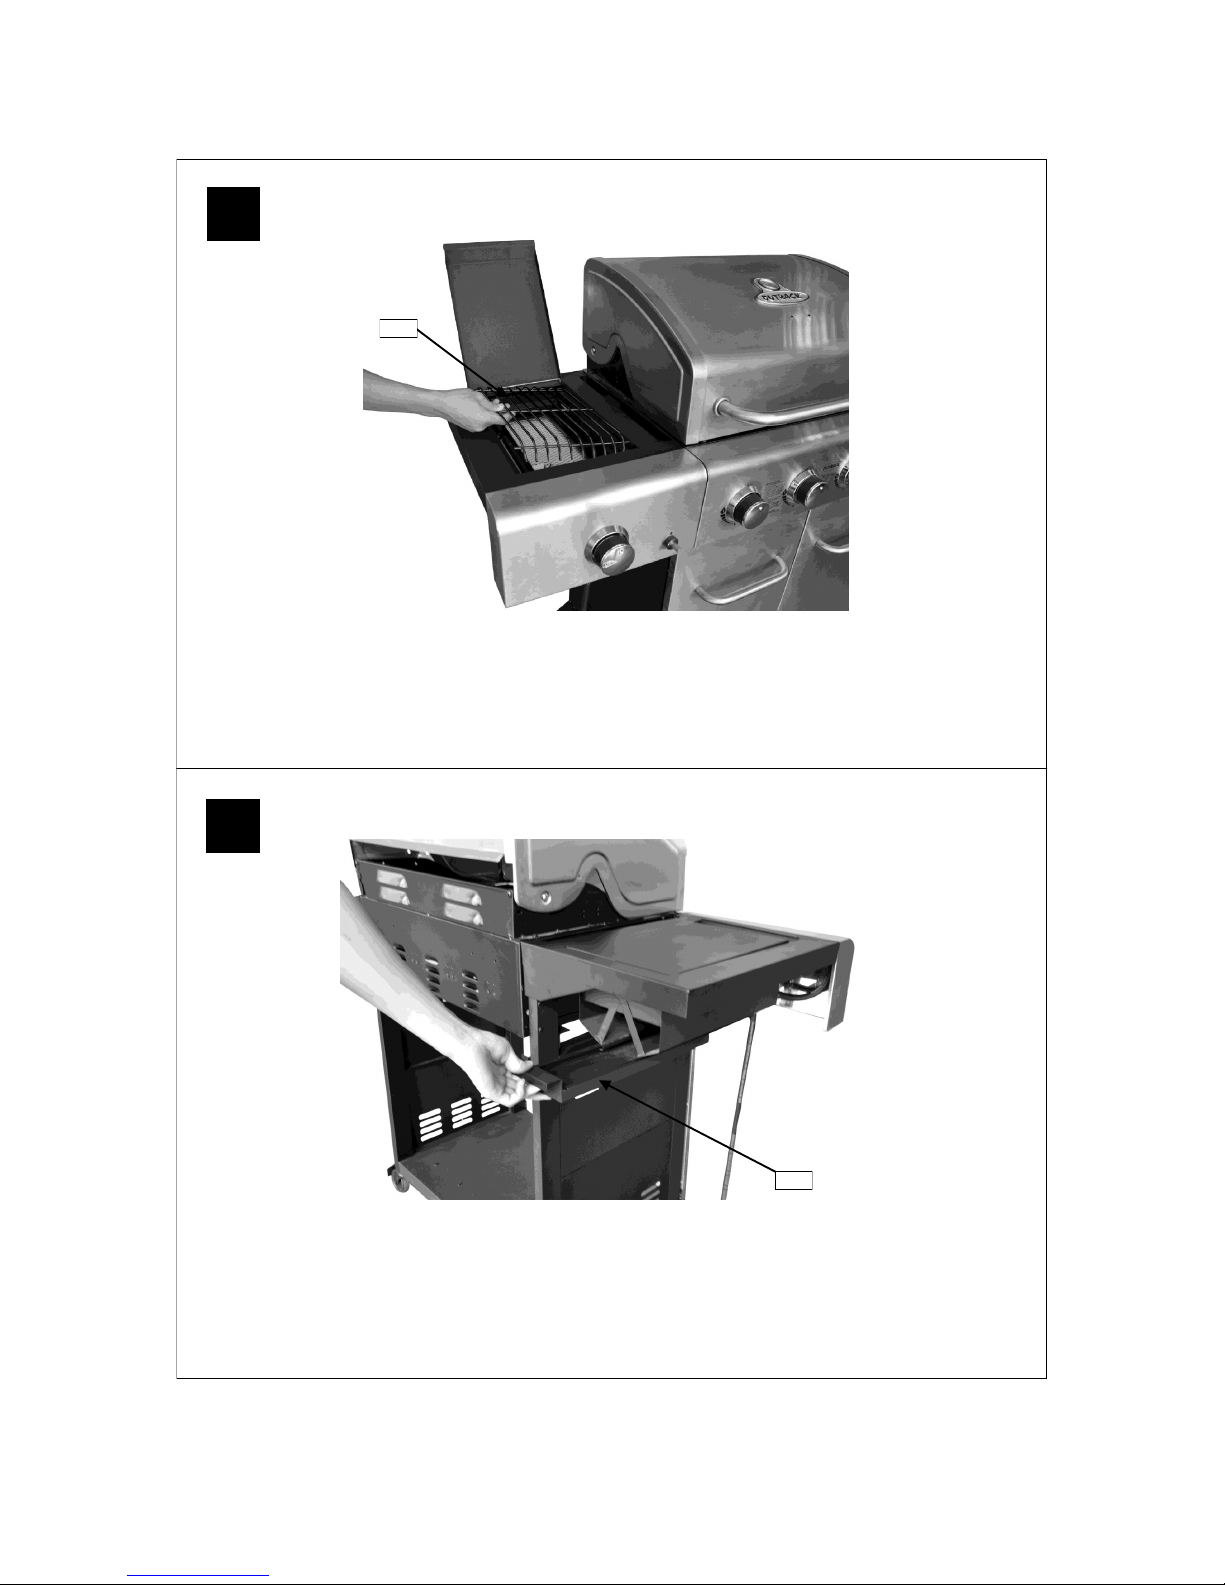
16
23
24
C5
C13
Place the Side Burner Grid (C5) onto the side burner shelf.
Note: Only use cookware with a base diameter of between 150mm and 220mm on the side
burner.
Insert the Side Burner Drip Tray (C13) by sliding it underneath the side burner frame as
shown.
Page 17
17
25
26
B11
B12
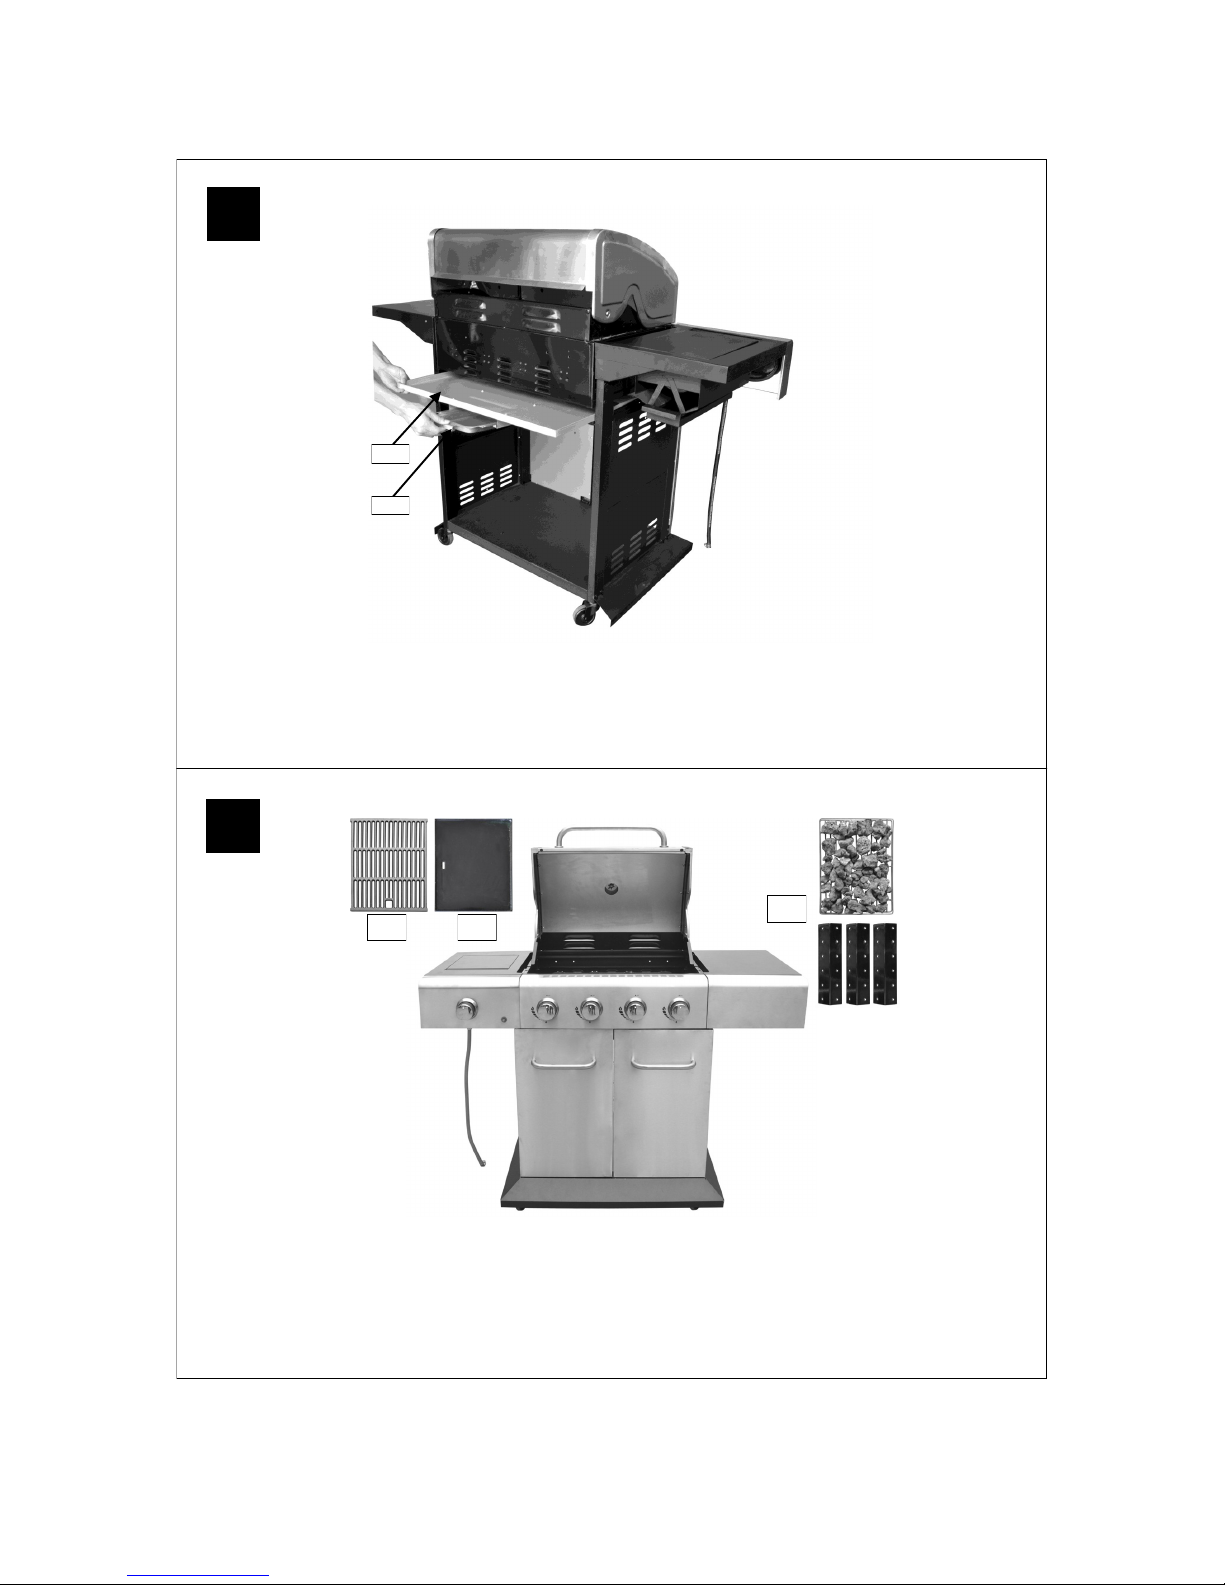
Insert the Drip Tray (B11) by sliding it underneath the barbecue body. Place the Drip Pan (B12) in
position as shown.
B6
B7 B8
or
Carefully insert the Lava Rock / Flame Tamer (B6) into the barbecue body ensuring it lies level
within the body. Place the Grill (B7) and Griddle (B8) into place.
Model configuration: Left — Cooking Grill, Right — Cooking Griddle.
NOTE: Ensure that the lava rock lies directly underneath the grills.
No lava rock is required when using the flame tamer.
Page 18
18
A3
Step 1
Step 2
Step 3
Step 4
27
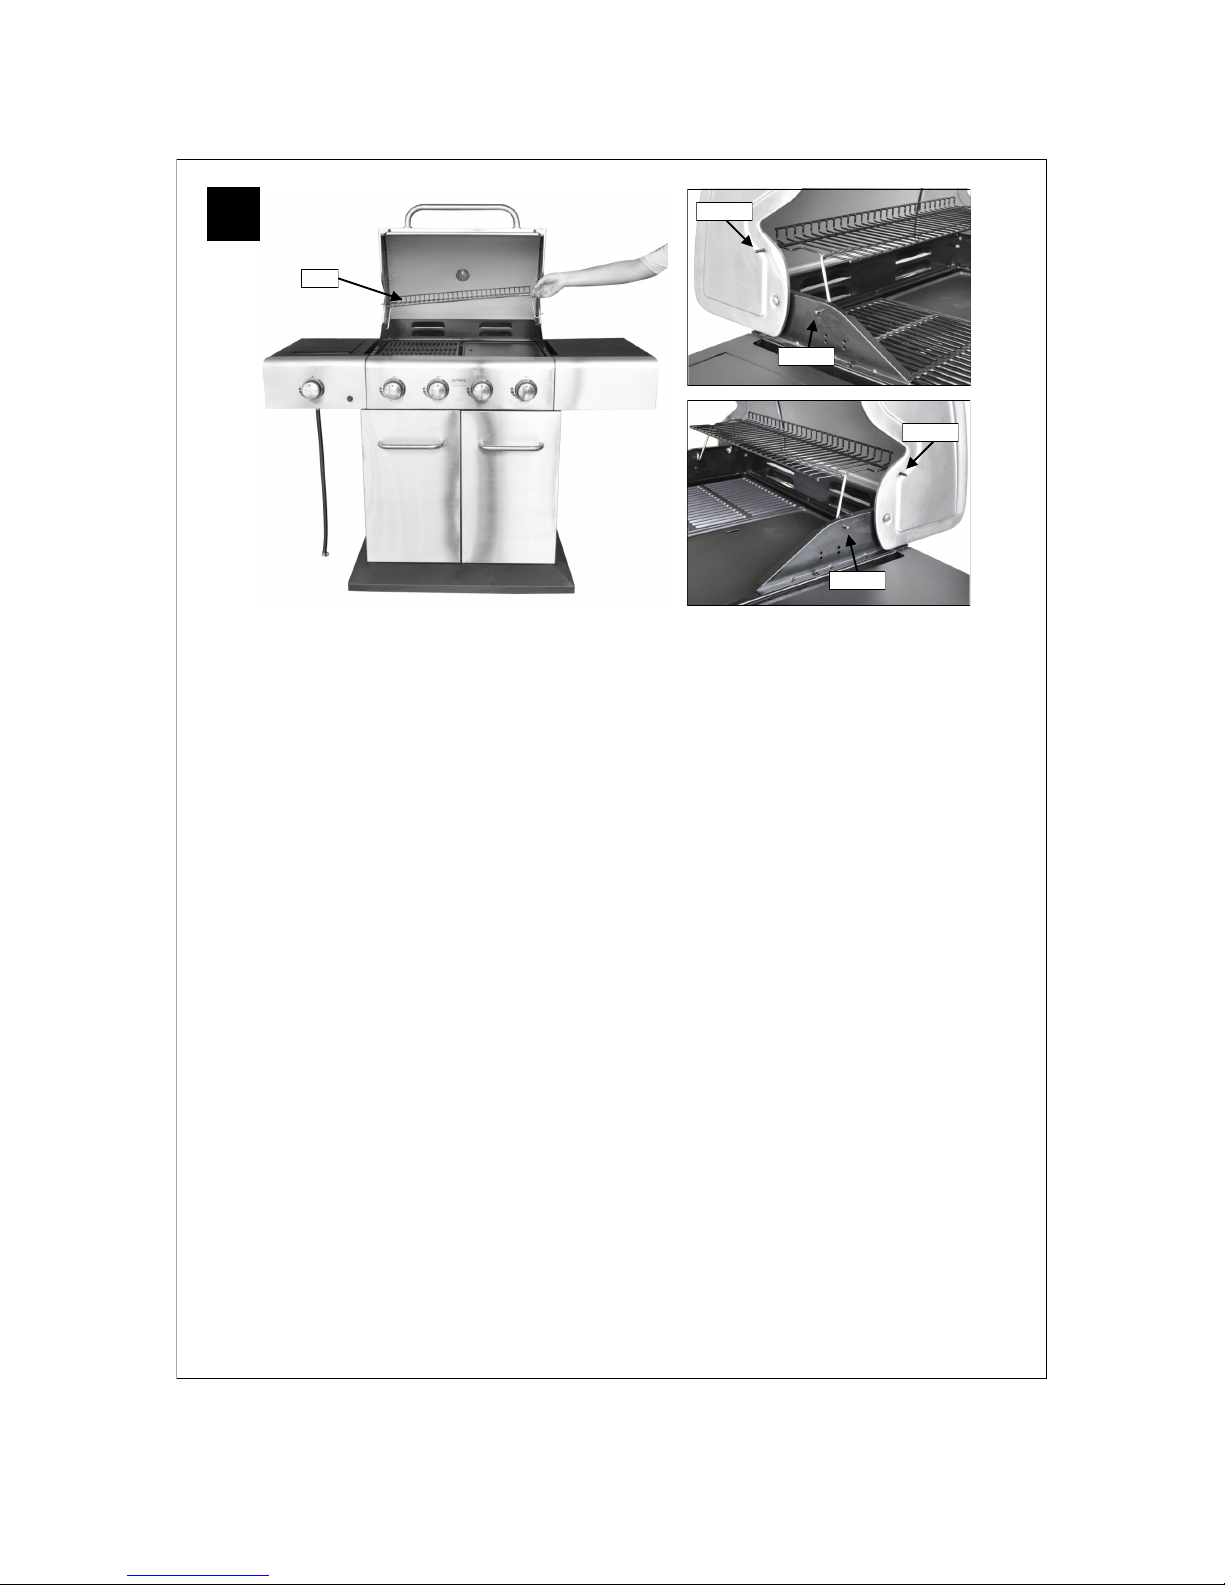
Attach the Warming Rack (A3) to the Hood (A1) and Barbecue Body (B1) as shown. Make sure
that the swing legs fix to the body of the barbecue and the shorter fixed legs go through the holes
in the hood.
Page 19
19
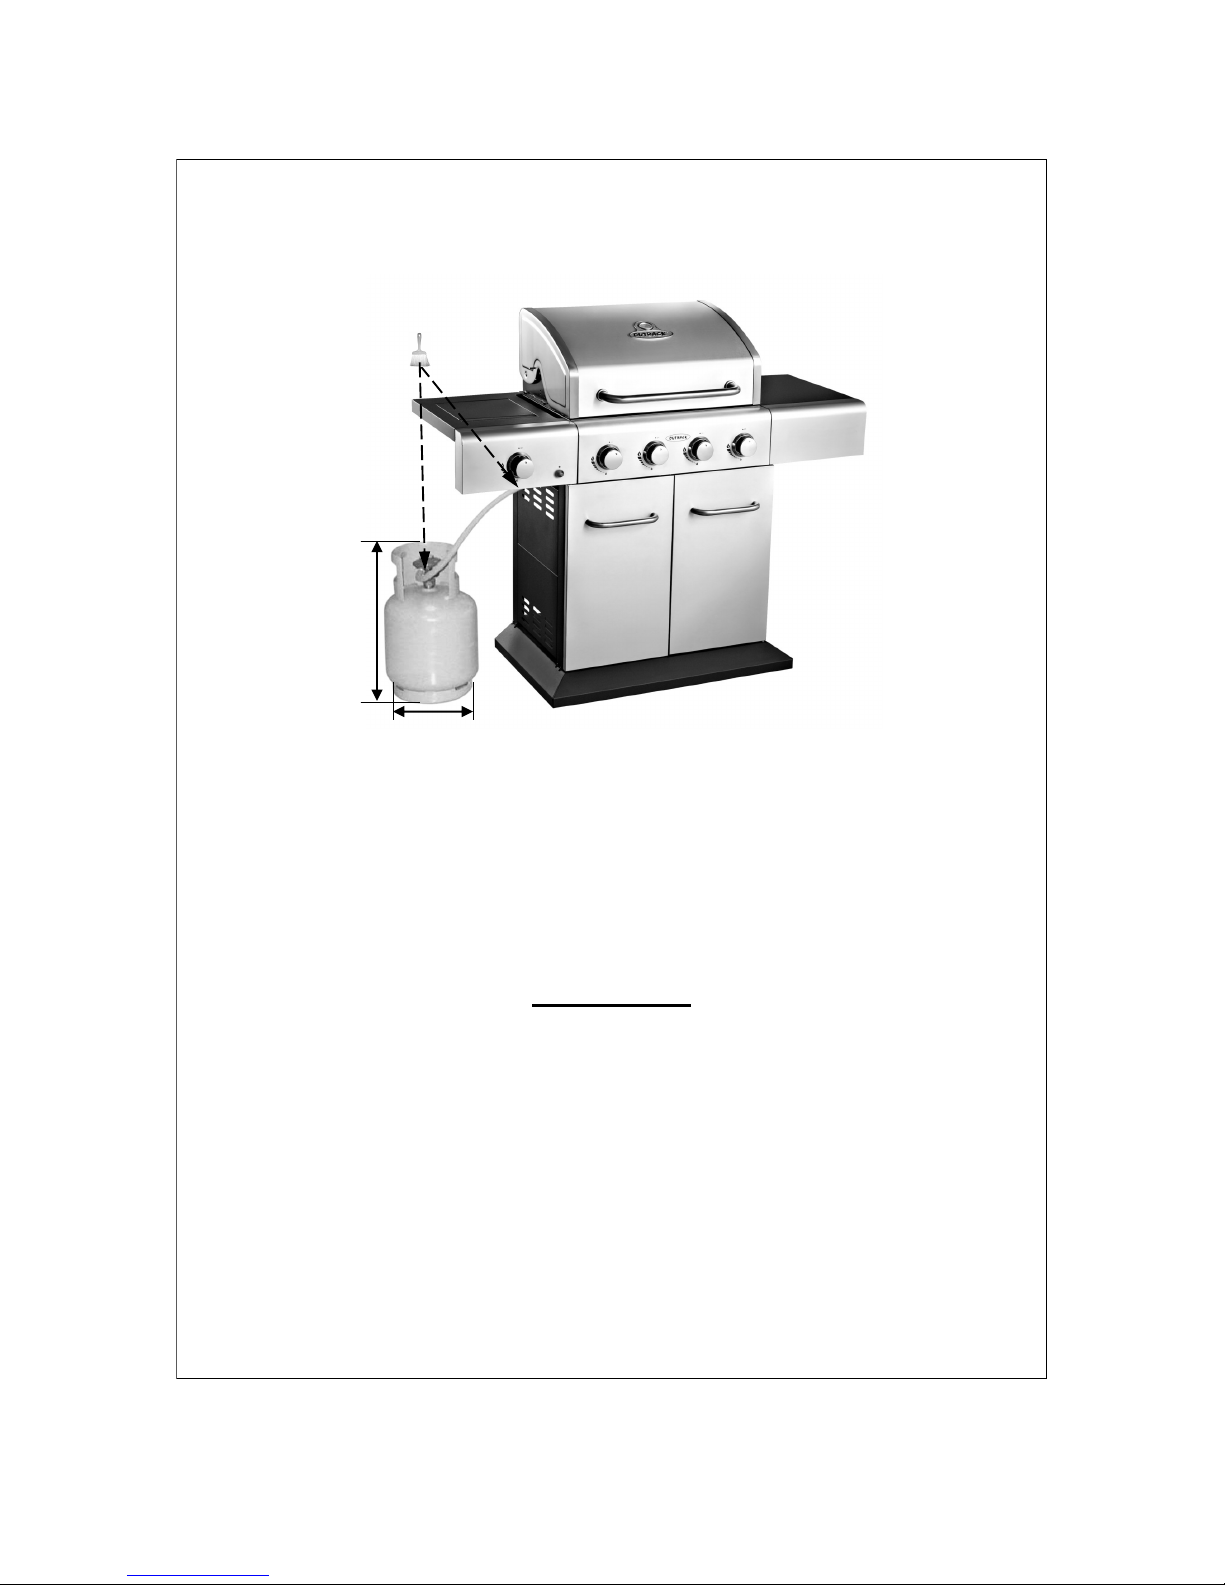
Leak Testing
Always perform a leak test in a well-ventilated area.
Step 1 - Confirm all control knobs are in the off position.
Step 2 - Turn the gas on / open the gas control valve on the gas bottle or regulator.
Step 3 - Check for leaks by brushing a solution of ½ water and ½ liquid detergent / soap over all
the gas system joints, including gas bottle valve connections, hose connections, and regulator connections.
Step 4 - NEVER USE AN OPEN FLAME to test for leaks at any time.
Step 5 - If bubbles form over any of the joints there is a leak
Turn off the gas supply at the gas bottle
Retighten all joints
Repeat test
If bubbles form again do not use the barbecue and contact your local distributor for assistance.
Always wipe the mixed solution (½ water and ½ liquid detergent / soap) from all joints and connections after leak testing.
ASSEMBLY IS NOW COMPLETE.
PROCEED TO THE NEXT PAGE FOR INSTRUCTIONS ON OPERATION AND MAINTENANCE
ALL JOINTS AND CONNECTIONS MUST NOW BE LEAK TESTED BEFORE USING THE
BARBECUE.
Leak test annually, and whenever the gas bottle is removed or replaced.
Leak Test Diagram
1. Maximum diameter or breadth is 320mm.
2. Maximum height (regulator included) is 700mm.
2
1
Page 20

20
5. Important Information
Please read these instructions carefully
before assembly and use of your barbecue.
Retain these instructions for future
reference.
This product is for outdoor use only. Do not
use indoors.
Do not use the barbecue or store gas bottles
below ground level. LP gas is heavier than
air so if a leak occurs the gas will collect at a
low level and could ignite in the presence of
a flame or spark.
For use with LPG bottled gas only. A
suitable regulator must be used for butane,
propane or mixes.
Remove plastic wrap from any part before
lighting.
Do not use within 1m of any flammable
structure or surface. Do not use under any
combustible surface.
LP gas bottles should never be placed
directly underneath the barbecue.
LP gas bottles should never be stored or
used laid on their side, in the horizontal
position. A leak would be very serious and
liquid could enter the gas line with serious
result.
Never store gas bottles indoors.
Open the barbecue hood before lighting.
Once lit, do not move the barbecue until it
has completely cooled, after use.
This barbecue must not be left unattended
when lit.
The hood or lid handle can become very hot.
Grip only the centre of the handle. Always
use oven gloves when cooking or carrying
out any adjustments to the barbecue.
Use purpose designed barbecue tools with
long, heat resistant handles.
Use Caution when opening hood or lid, as
hot steam inside is released upon opening.
Parts of this barbecue become very hot –
care must be taken, especially when
children, elderly people, and animals are
present.
Turn off the gas supply at the gas bottle
after use.
Never cover a barbecue until it has
completely cooled.
Use this barbecue only on a stable, flat
surface.
Before you use your barbecue, perform a
leak test. This is the only safe and sure way
to detect any gas leaking from joints and
connections of the barbecue after assembly.
Leak test annually, and whenever the gas
bottle is removed or replaced.
Do not store flammable materials near this
barbecue.
Do not use aerosols near this barbecue.
Failure to follow the manual‘s instructions
could result in serious injury or damage.
Parts sealed by the manufacturer or its
agent must not be altered by the user.
Modification of the barbecue may be
dangerous, is not permitted and will nullify
any warranty.
If you have any queries regarding these
instructions, contact your local dealer.
6. Gas, Regulator and Hose
This barbecue can use either propane or
butane or propane-butane mixed LPG (liquid
petroleum gas) bottled gas. Propane bottles will
supply gas all year round, even on cold winter
days. Butane bottles will supply sufficient gas in
summer, but it may affect the performance of
the barbecue and restrict the heat output
available from the burners, particularly once the
gas temperature starts to fall below +10°C. A
spanner may be required to change gas bottles.
The hose should hang freely with no bends,
twisting, tension, folds, or kinks that could
obstruct free flow of gas. Always inspect
the hose for cuts, cracks, or excessive wear
before use.
Apart from the connection point, no part of
the hose should touch any hot barbecue
parts. If the hose shows any sign of
damage it must be replaced with a hose
suitable for use with LP gas which meets
the national standards for the country of
use.
A suitable hose must comply with EN16436
-1 or local regulation, and the length should
not exceed 1.5 metres.
For optimal performance, we suggest to use a
13kg gas bottle. A suitable regulator must
comply with EN12864 or EN16129. YOU MUST
HAVE THE PROPER REGULATOR AND
BOTTLE IN ORDER FOR THE BARBECUE TO
OPERATE SAFELY AND EFFICIENTLY. USE
Page 21

21
OF A N I NCORREC T O R F AUL TY
REGULATOR IS DANGEROUS AND WILL
INVALIDATE ANY WARRANTY. Please consult
your local gas dealer for the most suitable gas
bottles and regulators.
7. Installation
7.1. Selecting a Location
This barbecue is for outdoor use only and
should be placed in a well-ventilated area, and
on a safe and even surface. Never place your
barbecue below ground level. Take care to
ensure that it is not placed UNDER any
combustible surface. The sides of the barbecue
should NEVER be closer than 1 metre from any
combustible surface, including trees and fences
and make sure that there are no heat sources
near the barbecue (cigarettes, open flames,
spark etc.). Keep this barbecue away from any
flammable materials!
7.2. Precautions
Do not obstruct any ventilation openings in the
barbecue body.
Position the gas bottle on level ground next to
the barbecue and safely away from any source
of heat.
Should you need to install or change the gas
bottle, confirm that the barbecue is switched off,
and that there are no sources of ignition
(cigarettes, open flame, sparks, etc.) near
before proceeding.
The casters should always have the brakes on
when the barbecue is in use.
7.3. Connecting a Gas Hose to the Barbecue
Connect the gas hose to the gas rail inlet on the
left hand side of the barbecue. Do not
overtighten. Do not use any sealing tape, paste
or liquid on the connection.
7.4. Fixing a Regulator to the Gas Bottle
Confirm all barbecue control knobs are in the off
position. Connect the regulator to the gas bottle
according to your regulator and bottle dealer‘s
instructions.
8. Operation
8.1. Warnings
Before proceeding, make certain that you
u n d e r s t a n d t h e I M P O R T A N T
INFORMATION section of this manual.
Your barbecue is not designed to be used
with more than 50% of the cooking area as a
solid plate — this includes baking dishes.
Full coverage will cause excessive build-up
of heat and damage the barbecue. This is
not covered by warranty.
Only use cookware with a base diameter of
between 150mm and 220mm on the side
burner.
8.2. Preparation Before Cooking
To prevent foods from sticking to the cooking
surface, please use a long handled brush to
apply a light coat of cooking or vegetable oil
before each barbecuing session. (Note:
When cooking for the first time, paint colours
may change slightly as a result. This is normal
and should be expected.) During use, the
protective coating may come off the cooking
surface. This is normal and is not harmful.
Line the drip pan with aluminium foil. This will
make cleanup easy.
8.3. Lighting the Barbecue
Open the barbecue and side burner hood or
lid before lighting. Never light your barbecue
or side burner with the hood or lid closed.
Ensure all knobs are in the off position.
Open the gas control valve on the gas bottle
or regulator.
Push and turn the control knob of the
leftmost burner to the high position. Press
the ignition button rapidly several times until
burner is lit.
If burner fails to ignite after following above
procedure, turn all the knobs to the off
position. Close the gas valve on the gas
bottle. Wait 5 minutes. Reattempt all of the
above steps. If the barbecue still fails to
light, please refer to the manual ignition
instructions below.
After successful lighting of the leftmost
burner, ignite the remaining burners in
sequence from left to right. Confirm each
burner is alight before igniting another
burner.
After ignition, turn the burners to the high
position for 3-5 minutes in order to pre-heat
the barbecue. This should be done before
each cooking session. The hood or lid
should be open during preheating.
After completion of preheating, turn all
Page 22

22
burners to the low position for best cooking
results.
8.4. Manual Ignition Instructions
Open the barbecue and side burner hood or
lid before lighting. Never light your barbecue
or side burner with the hood or lid closed.
Ensure all knobs are in the off position.
Open the gas control valve on the gas bottle
or regulator.
Insert lit match through the right match-
lighting hole on the right side of the
barbecue body and place near rightmost
burner porthole.
Push and turn the rightmost control knob
anti-clockwise to the high position, taking
care to protect yourself from the flames.
When the right burner is lit, turn the
remaining burners on from right to left.
Confirm that each burner is alight before
turning on the next burner.
To light the side burner, place the lit end of a
long match alongside the side burner. Push
and turn the side burner knob anti-clockwise
to the high position, taking care to protect
yourself from the flames.
If a burner fails to ignite, contact your local
dealer for assistance.
After ignition, turn the burners to the high
position for 3-5 minutes in order to pre-heat
the barbecue. This should be done before
each cooking session. The hood or lid
should be open during preheating.
After completion of preheating, turn all
burners to the low position for best cooking
results.
8.5. Grill Cooking
The burners heat up the flame tamer / lava rock
underneath the grill, which in turn heats the
food on the grill. The natural food juices
produced during cooking fall onto the flame
tamer / lava rock below and vaporise. The
subsequent rising smoke bastes the food, as it
travels upwards, imparting that unique
barbecued flavour.
8.6. Griddle Plate Cooking
The burners heat the griddle plate directly,
which then cooks the food on contact. Griddle
plates allow for the cooking of smaller items,
such as seafood, which could fall through the
spaces of a grill. They are also suitable for
cooking items that require high-temperature/
short-duration cooking, such as vegetables and
smaller cuts of fish. Similarly, it can be used in
exactly the same way as a griddle in the
kitchen, for searing steaks, cooking eggs, etc.
Alternatively, it can be used for heating pans or
keeping food warm.
8.7. Roasting Hood Cooking
Barbecues equipped with a roasting hood give
the option to form an ‗oven‘ for roasting or
baking food, such as joints of meat or whole
chickens, etc. More even cooking of food will
actually be achieved by using the barbecue with
the hood down. However, this should only be
done with the burners on low.
For best results, place the food you wish to
bake or roast on a metal baking tray and set it
on one side of the cooking grill.
Turn the burner directly under the food to the
OFF position and turn all other burners to a
LOW to MEDIUM position.
Close the hood to cook the food ‗indirectly‘.
Avoid lifting the hood unnecessarily as heat is
lost every time the hood is opened. If the hood
is opened during cooking please allow extra
time for the barbecue to regain its temperature
and complete the cooking. Use the temperature
gauge to monitor the heat of the barbecue.
If the internal heat becomes too high, turn the
burners down to the low position. It is not
necessary or advisable to have all of the
burners on high when the hood is closed.
DO NOT ALLOW YOUR BARBECUE TO
OVERHEAT. Be careful of hot steam when
opening the hood.
8.7. Warming Rack
Warming racks are a convenient way to keep
cooked food warm or to warm items such as
bread rolls. It is advisable to place food
(particularly fatty foods) to the front of the
warming rack to avoid the possibility of juices
and fat running down the back of your
barbecue. Always check that your warming rack
is properly fitted before use.
8.9. Rotisserie Operating Instructions
(Optional accessory, hooded models only)
1. Carefully remove the cooking surfaces and
the warming rack (where supplied) from the
barbecue.
2. If applicable, slide the lava rock in baskets
to the centre of the barbecue body. It is
over this area that the meat will be cooked.
Page 23

23
3. Slide one of the spit forks onto the spit rod
and tighten its thumb screw to secure it into
place. Insert the pointed end of the spit rod
into the meat being cooked and slide the
meat towards the centre of the rod. Make
sure the fork is fully into the meat. Slide the
other fork onto the rod, into the meat, and
tighten the thumb screw once in place. For
optimal rotisserie cooking, food must be
placed securely onto the middle of the spit
rod and balanced so that the rotisserie can
rotate freely without interference from any
barbecue surfaces. Any loose sections of
meat should be secured so they do not
hang down and interfere with the rotation of
the spit rod. Do not overload the rotisserie.
A chicken or joint of meat of approximately
2kg should be the maximum.
4. Insert the pointed end of the spit rod into
the motor. Lay the other end of the spit rod
onto the opposite bracket.
5. Light the grill as specified in your
barbecue‘s instructions.
6. Turn on the rotisserie motor to begin
rotisserie cooking. The hood has been
designed so that it may be closed during
rotisserie cooking.
7. Always cook foods on the lowest flame
setting to avoid burning or overcooking.
8.10. Flare-Up Control
*** Very Important Notice ***
Flare-ups occur when meat is barbecued, and
its fat and juices fall upon the hot flame tamer /
lava rock. Smoke of course helps give food its
barbecued flavour, but it is best to avoid
excessive flare-up to prevent food being
burned. To control flar e-ups, it i s
ABSOLUTELY ESSENTIAL to trim away
excess fat from meat and poultry before grilling,
use cooking sauces and marinades sparingly
and try to avoid very cheap cuts of meat or
meat products as these tend to have a high fat
and water content. Also, the burners should
always be placed on the low setting during
cooking.
When flare-ups do occur, they can usually be
extinguished by applying baking soda or salt
directly onto the flame tamer / lava rock. Always
protect your hands when handling anything
near the cooking surface of the barbecue and
take care to protect yourself from the flames.
If a fat fire occurs, please see the instructions
given below.
8.11. Fat Fires
Empty and clean the drip tray and drip pan (and
foil liner, if applicable) of food debris after each
cooking session. If the barbecue is to be used
for large gatherings, it will be necessary to turn
off and cool the barbecue every two hours to
remove food debris from the drip tray and drip
pan (and foil liner, if applicable), and clean it out.
The time between cleaning may need to be
reduced if very fatty foods or cheap meat
products are being cooked. Failure to do this
may result in a fat fire, which may cause injury
and could seriously damage the barbecue.
In the event of a fat fire:
If safe to do so, turn all control knobs to the
‗off‘ position.
Turn off the gas supply at the gas bottle.
Keep everyone at a safe distance from the
barbecue and wait until the fire has burnt
out.
Do not close the hood or lid of the barbecue.
NEVER DOUSE A BARBECUE WITH
WATER. IF AN EXTINGUISHER IS USED,
IT SHOULD BE A POWDER TYPE.
DO NOT REMOVE THE DRIP TRAY.
If the fire does not seem to be abating or
appears to be worsening, contact your local
Fire Brigade for assistance.
8.12. End of Cooking Session
After each cooking session, turn the barbecue
burners to the ―high‖ position and burn for 5
minutes. This procedure will burn off cooking
residue, thus making cleaning easier. Make
sure the hood or lid is open during this process.
8.13. Turning Off Your Barbecue
When you have finished using your barbecue,
turn all the control valves fully clockwise to the
―Off‖ position, then switch off the gas supply at
the bottle.
Wait until the barbecue is sufficiently cool
before closing its hood.
9. Care and Maintenance
Regularly clean your barbecue between uses
and especially after extended periods of
storage. Ensure the barbecue and its
components are sufficiently cool before
cleaning. Do not leave the barbecue exposed to
outside weather conditions or stored in damp,
Page 24

24
moist areas.
Never handle hot parts with unprotected
hands.
Never douse the barbecue with water when
its surfaces are hot.
In order to extend the life and maintain the
condition of your barbecue, we strongly
recommend that the unit be covered when left
outside for any length of time, especially during
the winter months. Heavy-duty barbecue covers
and other accessories are available from your
local stockist.
Even when your barbecue is covered for its
protection, it must be inspected on a regular
basis as damp or condensation can form which
may result in damage to the barbecue. It may
be necessary to dry the barbecue and the
inside of the cover. It is possible for mould to
grow on any fat remaining on parts of the
barbecue. This should be cleaned off smooth
surfaces with hot soapy water.
Any rust that is found that does not come into
contact with the food should be treated with a
rust inhibitor and painted with barbecue paint or
a heat resistant paint.
9.1. Cooking Surfaces & Warming Rack
When the barbecue has cooled, clean with hot
soapy water. To remove any food residue, use
a mild cream cleaner on a non-abrasive pad.
Do not use scouring pads or powders as they
can permanently damage the finish. Rinse well
and dry thoroughly. Due to the weight of the
cooking surfaces, we do not recommend
cleaning in a dishwasher.
9.2. Burner
Provided that they are operating correctly, in
normal usage, burning off the residue after
cooking will keep the burners clean.
The burners should be removed and cleaned
annually, or whenever heavy build-up is found,
to ensure that there are no signs of blockage
(debris, insects) in either the burner portholes or
the primary air inlet of the burners. Use a pipe
cleaner to clear obstructions.
When refitting the burners, be careful to check
that the neck of the burner fits over the valve
outlet.
It is quite normal for surface rust to be present
on the burners. If rust appears between uses or
in storage, clean with a soft brass wire brush.
9.3. Flame Tamer (where supplied)
Remove any food residue from the flame tamer
surface with a plastic or wooden scraper or
brass wire brush. Do not use a steel scraper or
wire brush. Clean with hot soapy water and
rinse well.
9.4. Lava Rock (where supplied)
It is not necessary to remove and wash the lava
rock in order to keep it clean. Burning off the
residue for 3 to 5 minutes after each cooking
session should be sufficient. Heavily
impregnated lava rock should be turned over so
that the dirty side faces the burners in order to
burn off any residue. Replacement lava rock is
available from your local stockist.
9.5. Drip Tray
After every use, empty and clean the drip tray
(and foil liner, if applicable) of any fat or food
particles, using a plastic or wooden scraper if
necessary.
Failure to keep it clean, and excessive build up
can result in a fat fire. This can be hazardous
and severely damage the barbecue. This is not
a fault in the barbecue and is therefore not
covered by the terms of the warranty. If
required, the tray can be washed in hot soapy
water.
9.6. Barbecue Body
Regularly remove excess grease or fat from the
barbecue body using a cloth wrung out in hot
soapy water and dry thoroughly. Excess fat and
food debris can be removed from inside the
body using a soft plastic or wooden scraper. It
is not necessary to remove all the grease from
the body. If you need to clean fully, use hot
soapy water and a cloth, or nylon-bristled brush
only. Do not use abrasives. Remove cooking
surfaces and burners before full cleaning. Do
not immerse the gas controls or manifold in
water. Check burner operation after carefully
refitting into body.
A stainless steel cleaner may be used on
stainless steel parts if required.
9.7. Barbecue Hood or Lid
Use a non-abrasive cloth or pad and clean with
hot, soapy water. Do not use scouring pads or
powders as they can permanently damage
Page 25
25
the finish.
9.8. Fixings
All screws and bolts, etc. should be checked
and tightened on a regular basis.
9.9. Storage
Ensure the barbecue is properly cooled before
covering or storing. Store your barbecue in a
cool dry place.
Cover the burners with aluminium foil in order to
prevent insects or other debris from collecting in
burner holes.
If the barbecue is to be stored indoors, the gas
bottle must be disconnected and left outside.
The gas bottle should always be stored outside,
in a dry, well-ventilated area, away from any
sources of heat or ignition. Do not let children
tamper with the bottle.
When using the barbecue after extended
periods of storage follow the cleaning
procedures.
10. Technical Specifications
Specifications subject to change without prior notice.
CE
Approval
Heat
Input
Burners
Injector
Size
Gas /Pressure
Outback®
Meteor
Select
Stainless
Steel 4
Burner Gas
BBQ
0359
359BR665
12.96
kW
4
0.89mm
0.89mm
28-30 mbar Butane
or 37 mbar Propane
30 mbar LPG mixture
Outback®
Meteor
Select
Stainless
Steel 6
Burner Gas
BBQ
0359
359BR665
17.28
kW
6
0.84mm
0.84mm
28-30 mbar Butane
or 37 mbar Propane
30 mbar LPG mixture
Side
Burner
0359
359BR665
4.5
kW
1
1.04mm
1.04mm
28-30 mbar Butane
or 37 mbar Propane
30 mbar LPG mixture
Gas Consumption:
Outback® Meteor Select Stainless Steel 4 Burner Gas BBQ: 943g/hr
Outback® Meteor Select Stainless Steel 6 Burner Gas BBQ: 1258g/hr
Side Burner: 328g/hr
Countries of Use:
I
3+ (28-30/37)
BE, CH, CY, CZ, ES, FR, GB, GR, IE, IT, LT, LU, LV, PT,
SK, SI
I
3B/P(30)
BE, CY, CZ, DK, EE, FI, FR, HU, IT, LT, NL, NO, SE, SI,
SK, RO, HR, TR, BG, IS, LU, MT
Page 26
26
11. Troubleshooting
Problem Possible Cause Solution
Burner will not light using
the ignition system
LP gas bottle is empty Replace with full bottle
Faulty regulator Have regulator checked or replaced
Obstructions in burner Clean burner
Obstructions in gas jets or gas hose Clean jets and gas hose
Electrode or ignition button wire is loose
or disconnected on electrode or ignition
unit
Reconnect wire
Electrode or wire is damaged Change electrode and wire
Faulty ignition button Change ignitor and / or button
Burner will not light with a
match
LP gas bottle is empty Replace with full bottle
Faulty regulator Have regulator checked or replaced
Obstructions in burner Clean burner
Obstructions in gas jets or gas hose Clean jets and gas hose
Low flame or flashback (fire
in burner tube— a hissing or
roaring noise may be heard)
LP gas bottle too small Use larger bottle
Obstructions in burner Clean burner
Obstructions in gas jets or gas hose Clean jets and gas hose
Windy conditions Use barbecue in a more sheltered posi-
tion
Gas valve knob difficult to
turn
Gas valve jammed Replace gas valve
For reference and correspondence, record your serial number here.
(See sticker on side of barbecue body.)
Serial No.__________________
This number may be required when ordering spare parts or accessories.
A part reference number may also be required where applicable.
Published October 2014
 Loading...