

Page 1
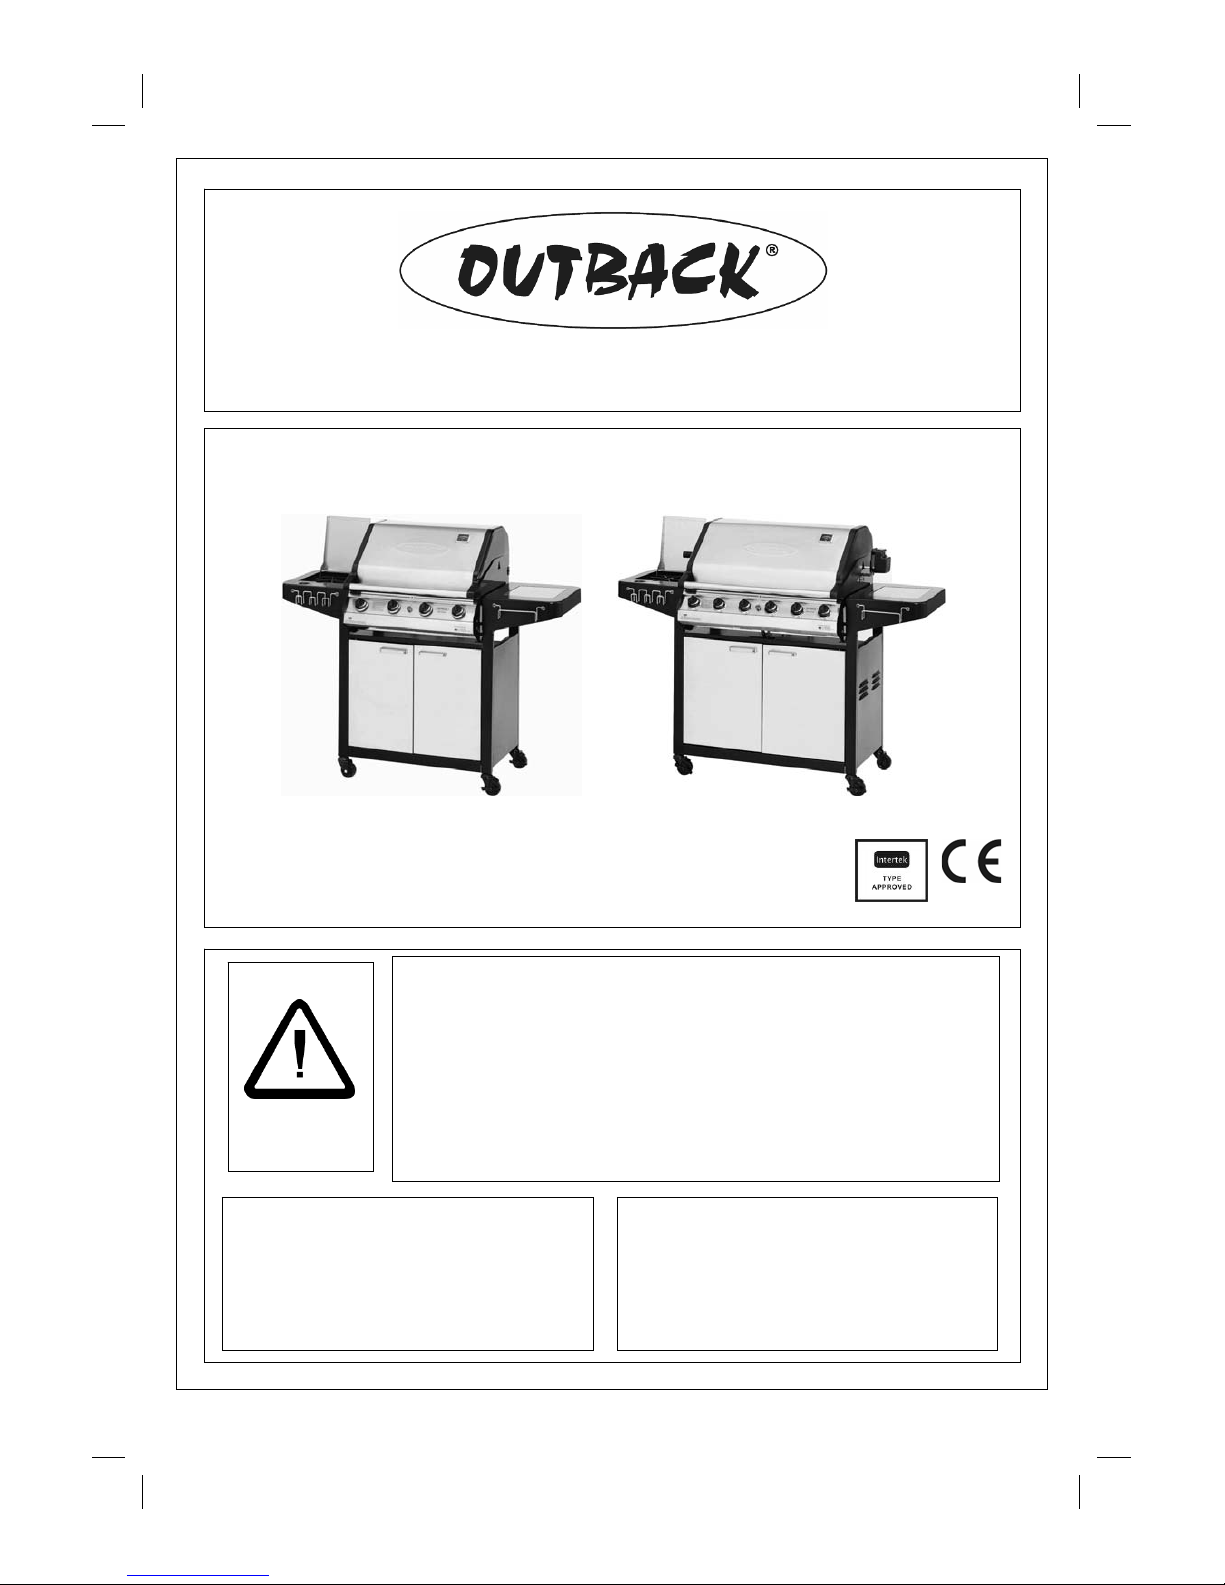
Gas Barbecues
Assemb ly and Op erating Inst ructions f or
Outback® Cuisine and Outb ack® Conno isseur Gas Barbecue s
EN (Europe)
WARNING
• For outdoor use only. Not f or comm e r ci al use .
• Read instr uc t ions befor e us i ng t he appli ance . Fail ur e to follow instructi ons
could res ul t in death, seri ous bodi ly injur y, and/ or pr oper ty loss.
• Warning: accessibl e par t s m ay be ver y hot. Keep young chi l dr en away.
• Do not move t he applianc e dur ing use.
• Turn off t he ga s supply at the gas bottle after use.
• Any modificat i on of the appliance, misuse, or failure t o follow the instructions
may be dangerous and will invalidate your warranty. This does not affect your
statutory rights.
• Retain these inst r uctions for future r eference.
• Leak test annual l y, and whenever the gas bot t l e is rem oved or repl aced.
• For Flare-up contr ol please refer to the ‘OPERATION’ section of this m anual.
FOR YOUR SAFETY
If you smell gas:
1. Shut off gas to the appliance.
2. Exti ngui sh a ny open flam e.
3. Open bar bec ue l id or hood.
4. If odour cont inues, discontinue use and
contact your local deal er.
FOR YOUR SAFETY
1. Do not stor e or use petr ol or other fla m m able
vapours or liqui ds in the vici ni ty of this or any
other appliance .
2. A gas bottle not connected for use shall not be
stored in the vicinity of this or any other
appliance.
0359
Photographs are not to scale.
Specifications subject to
change without prior notice.
Page 2
2
Pre- Assem bled Compon ent
Quantity varies according to model purchased
Appearanc e, siz e, and construction m ay differ accordin g to model purchased
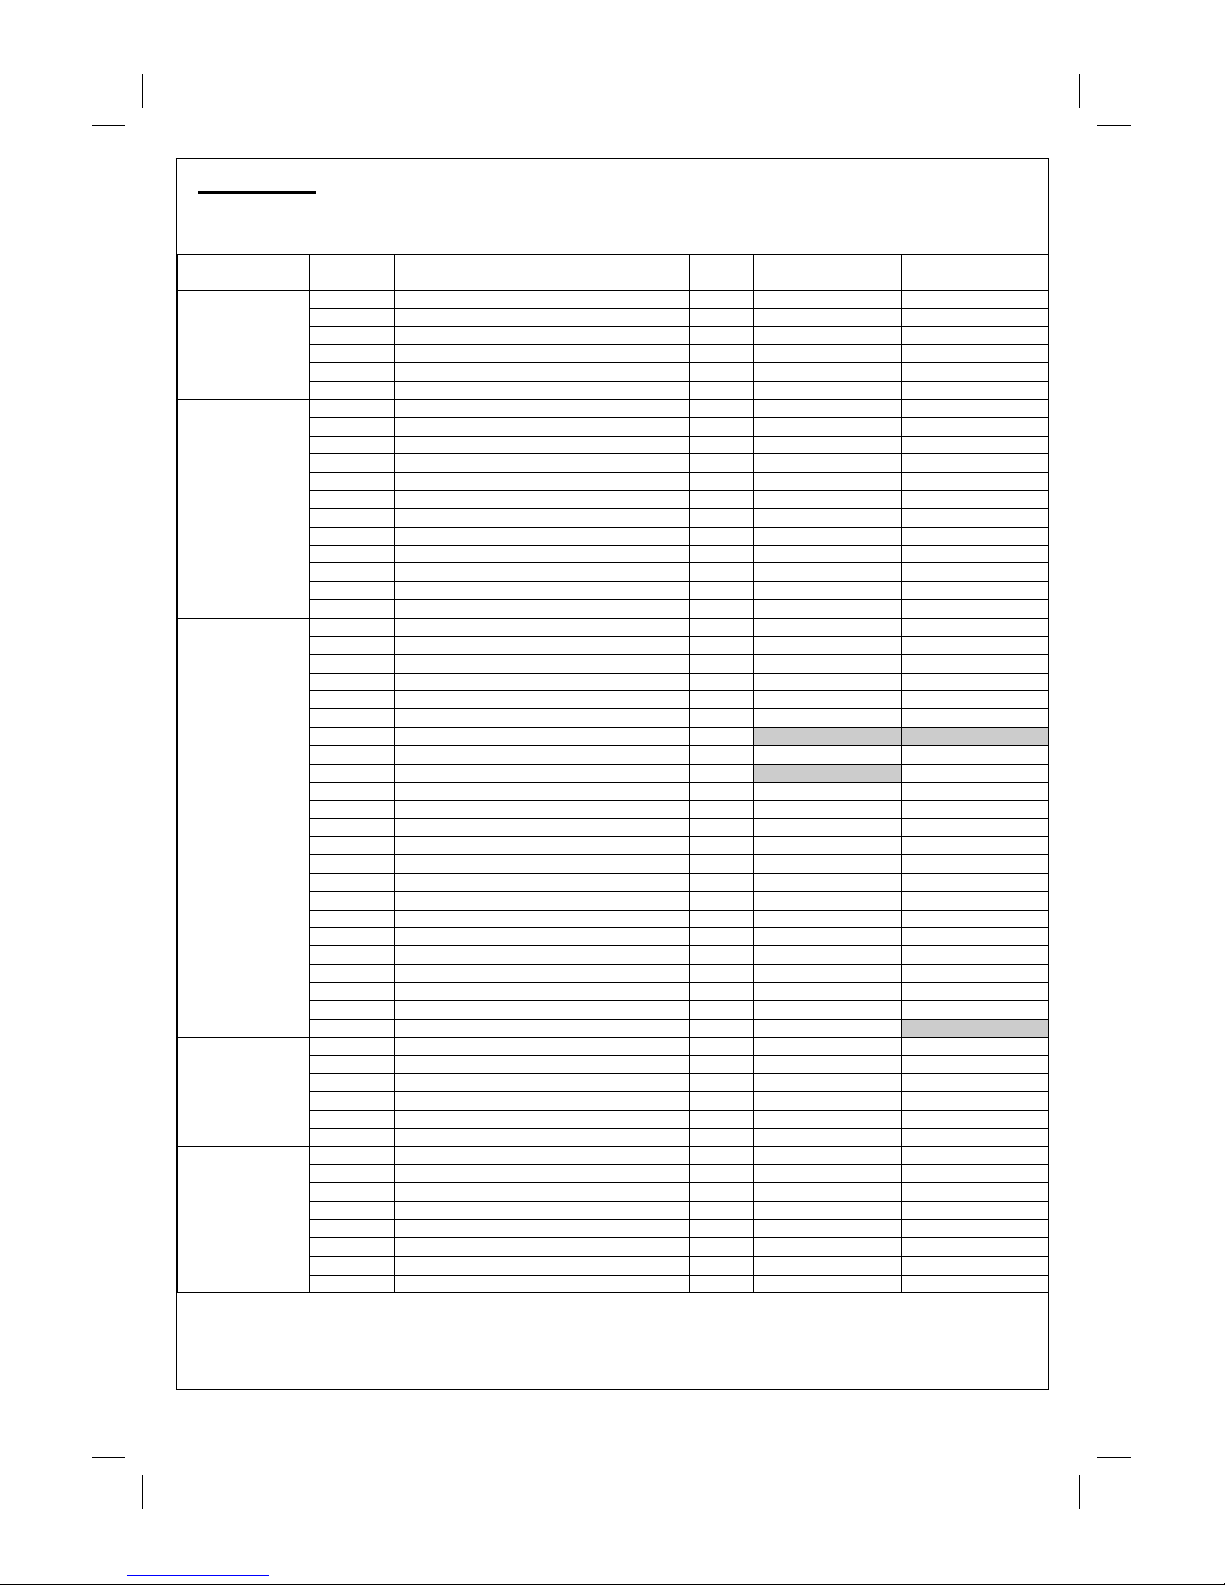
Parts Lis t
Quantities vary according to model purchased. Specifications subject to change without prior notice. For
more details on h ardware, please see ‘Hardw ar e Reference D iagram’.
CODE PART QTY
Outback®
Cuisine
Outback®
Connoisseur
HOOD
A1 Hood Handl e 1
A2 Hood 1
A3 Hinge Pin 2
A4 Hinge Pin Clip 2
A5 Heat Indicator with Nuts 1
A6 Warming Basket 1
BODY
B1 Barbecue Body 1
B2 Burner
4 6
B3 Burner Clip
4 6
B4 Control Panel 1
B5 Knob
4 6
B6 Drip T r ay 1
B7 Drip Pan 1
B8 Foil Liner 1
B9 Briquette Basket 2
B10 Briquettes 2
B11 Griddle 1
B12 Grill 2
TROLLEY
C1 Side Burner 1
C2 Side Burner Grill 1
C3 L/H Side Burner Shelf with Lid 1
C4 Tool Hook 1
C5 R/H Side Shelf 1
C6 Towel Rail 1
C7 Hose (if supplied)
C8 L/H Panel 1
C9 Divider 1
C10 R/H Panel 1
C11 Top Panel 1
C12 Back Pa nel 1
C13 Bott om Panel 1
C14 L/H Door 1
C15 R/H Door 1
C16 Door Handle 2
C17 Magnet Strip 2
C18 Caster 2
C19 Lockable Caster 2
C20 Heat Shield 1
C21 Mounting Bracket 1
C22 Ignition Ass em bly 1
C23 Support 1
ROTISSERIE
D1 Rotisserie Handle 1
D2 Fo rk 2
D3 Spit Rod 1
D4 Motor 1
D5 L/H Bracket 1
D6 R/H Bracket 1
HARDWARE
E1 Scr ew, M6x15 28
E2 Nut, M6 22
E3 Bolt, M6x90 8
E4 Washer 8
E5 Spacer 8
E6 Wing Nut, M6 8
E7 Scr ew, M5x10 4
E8 Nut, M5 4
Page 3
3
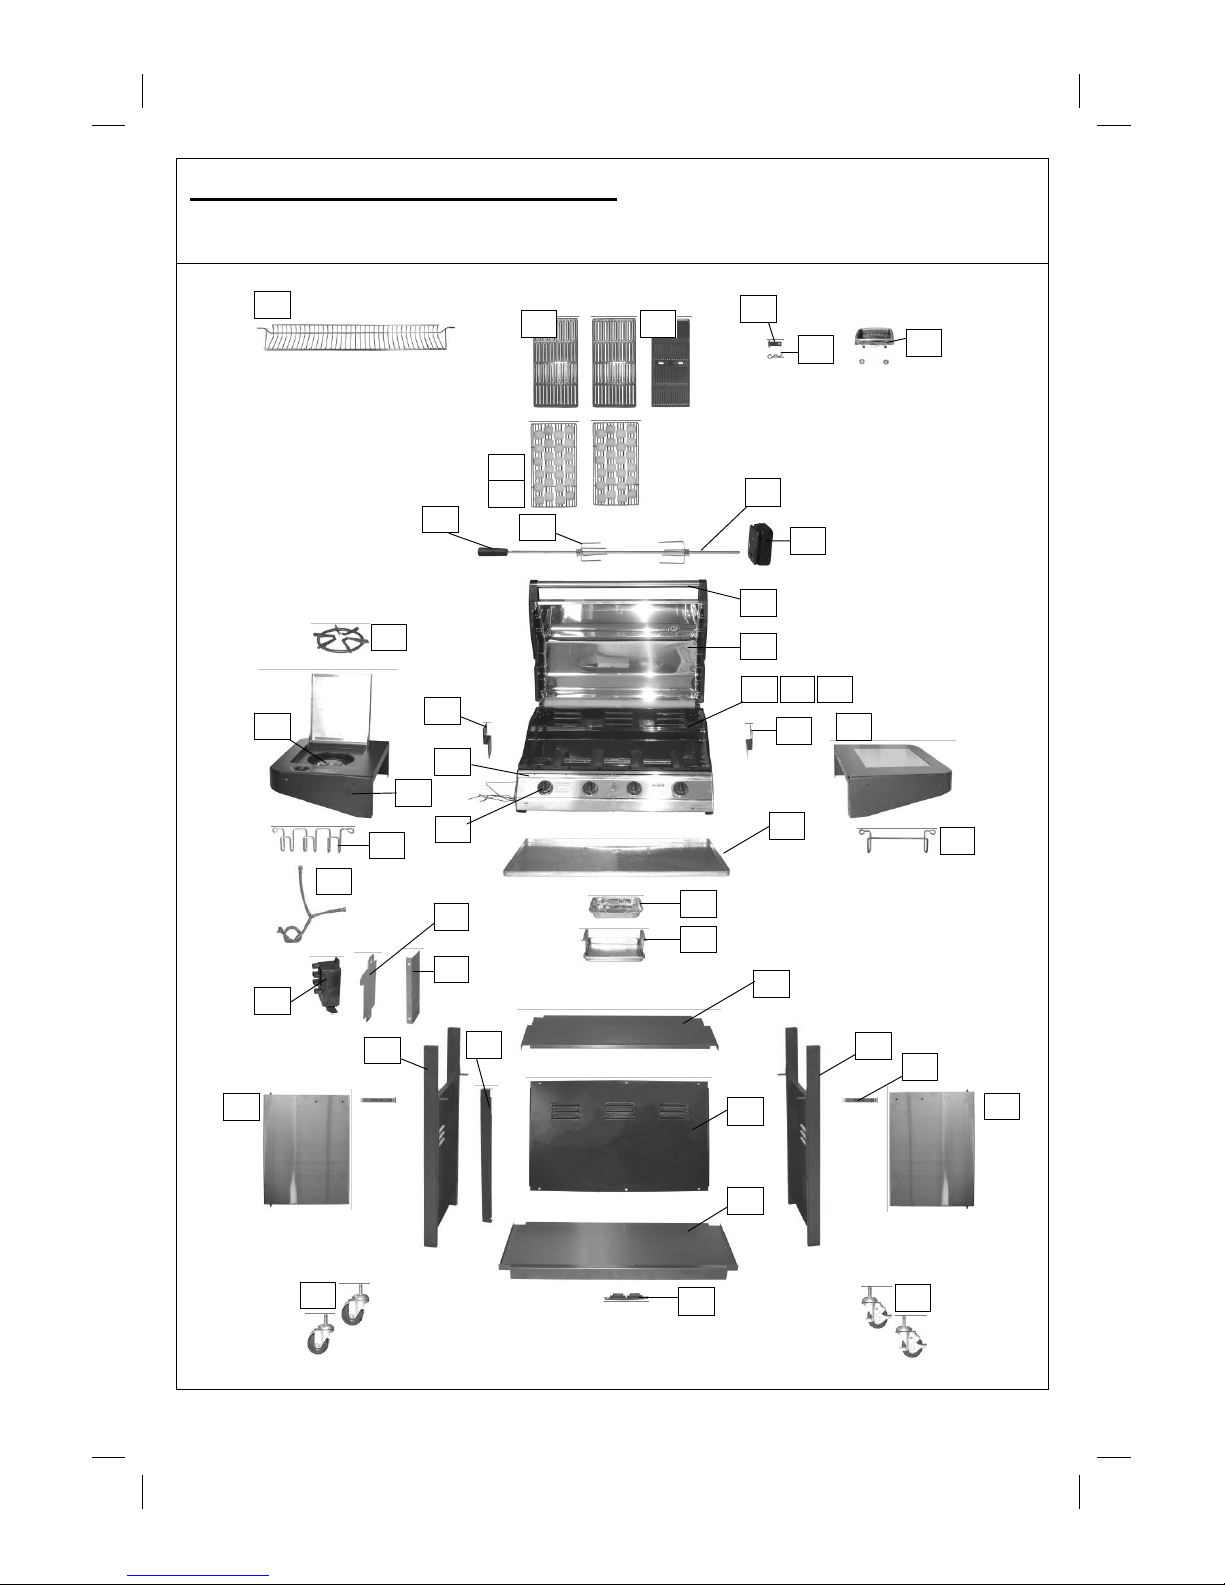
Outback® Cuisine Parts Diagrams
Quantities vary according to model purchased. Specifications subject to change without prior notice. For
more details on h ardware, please see ‘Hardw ar e Reference D iagram’.
A6
A4
A3
A5
B11 B12
B9
B10
D1
C5
C2
D4
B6
B8
B7
B4
B5
C8
C10
C14
C19
A1
A2
B3
B1
C1
C3
C4
C6
C11
C7
C23
C12
C13
C17
C15
C16
C20
C21
C22
D3
D2
D5
D6
C18
B2
Page 4
4
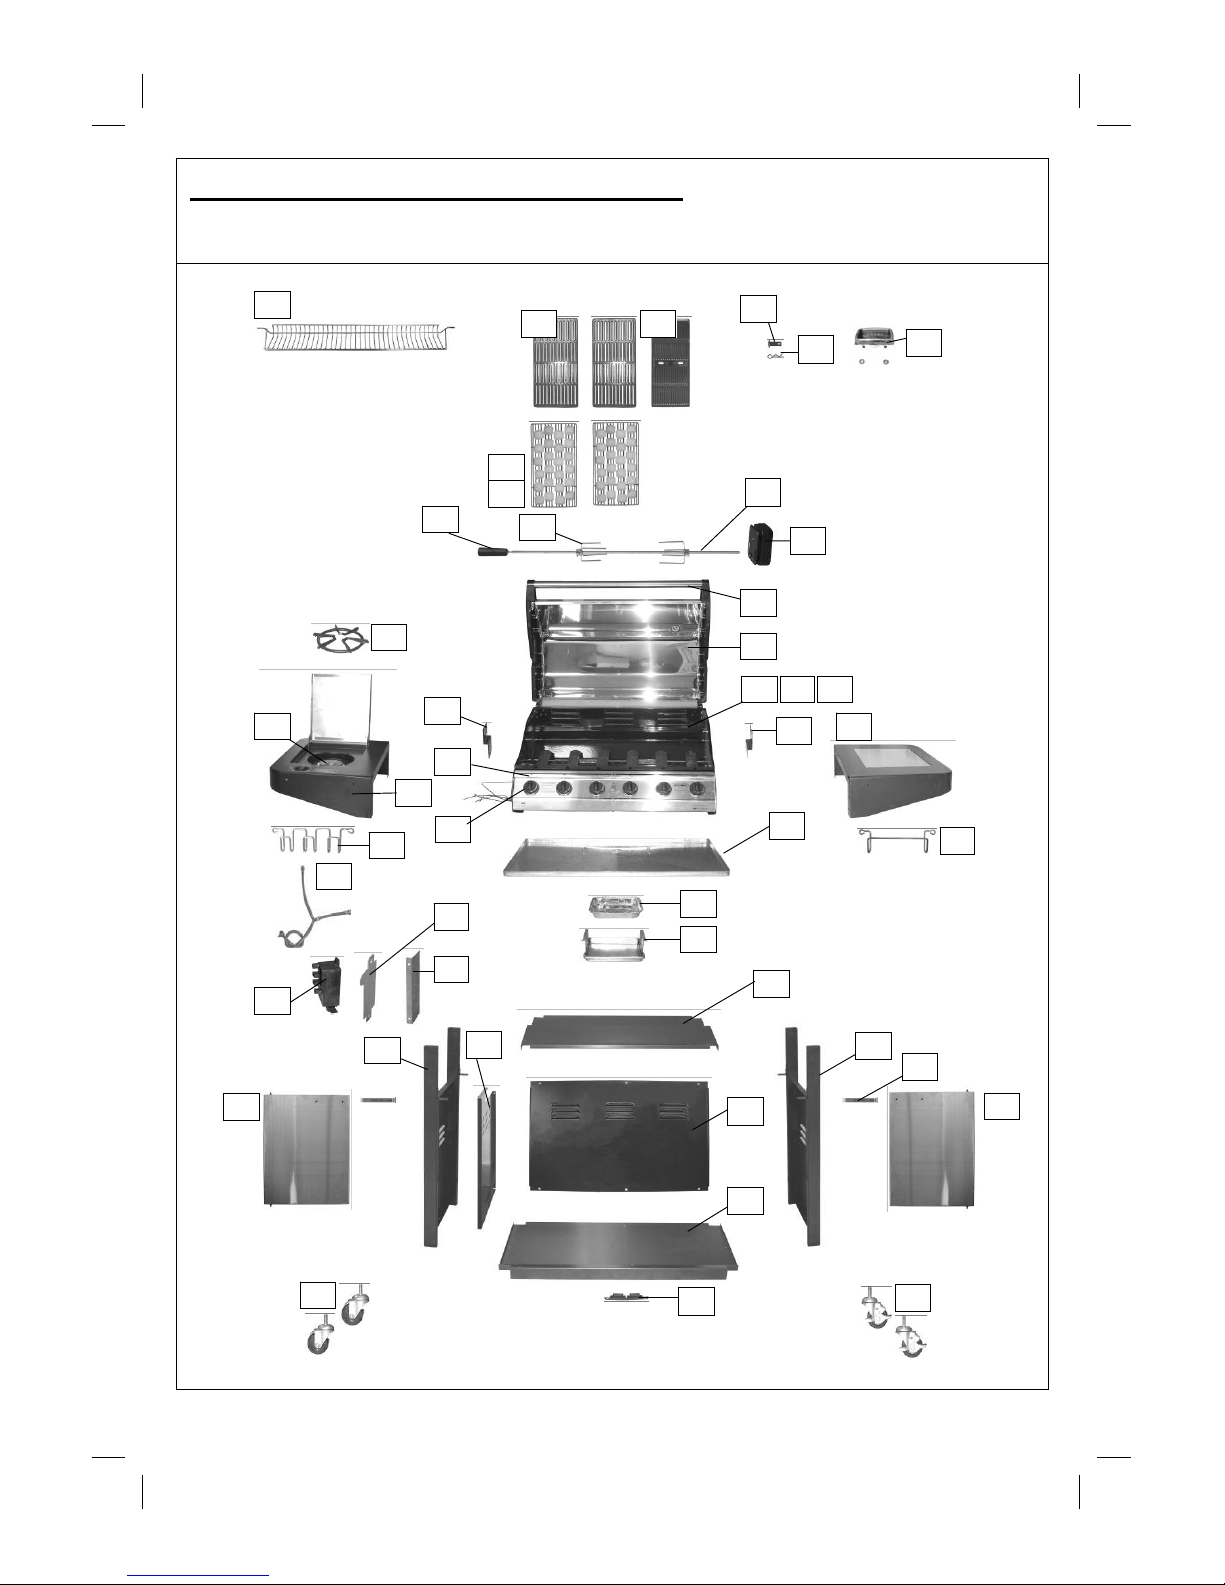
Outback® Connoisseur Parts Diagrams
Quantities vary according to model purchased. Specifications subject to change without prior notice. For
more details on h ardware, please see ‘Hardw ar e Reference D iagram’.
A6
A4
A3
A5
B11 B12
B9
B10
D1
C5
C2
D4
B6
B8
B7
B4
B5
C8
C10
C7
C14
C19
A1
A2
B3 B1
C1
C3
C4
C6
C11
C9
C12
C13
C17
C15
C16
C20
C21
C22
D3
D2
D5
D6
C18
B2
Page 5
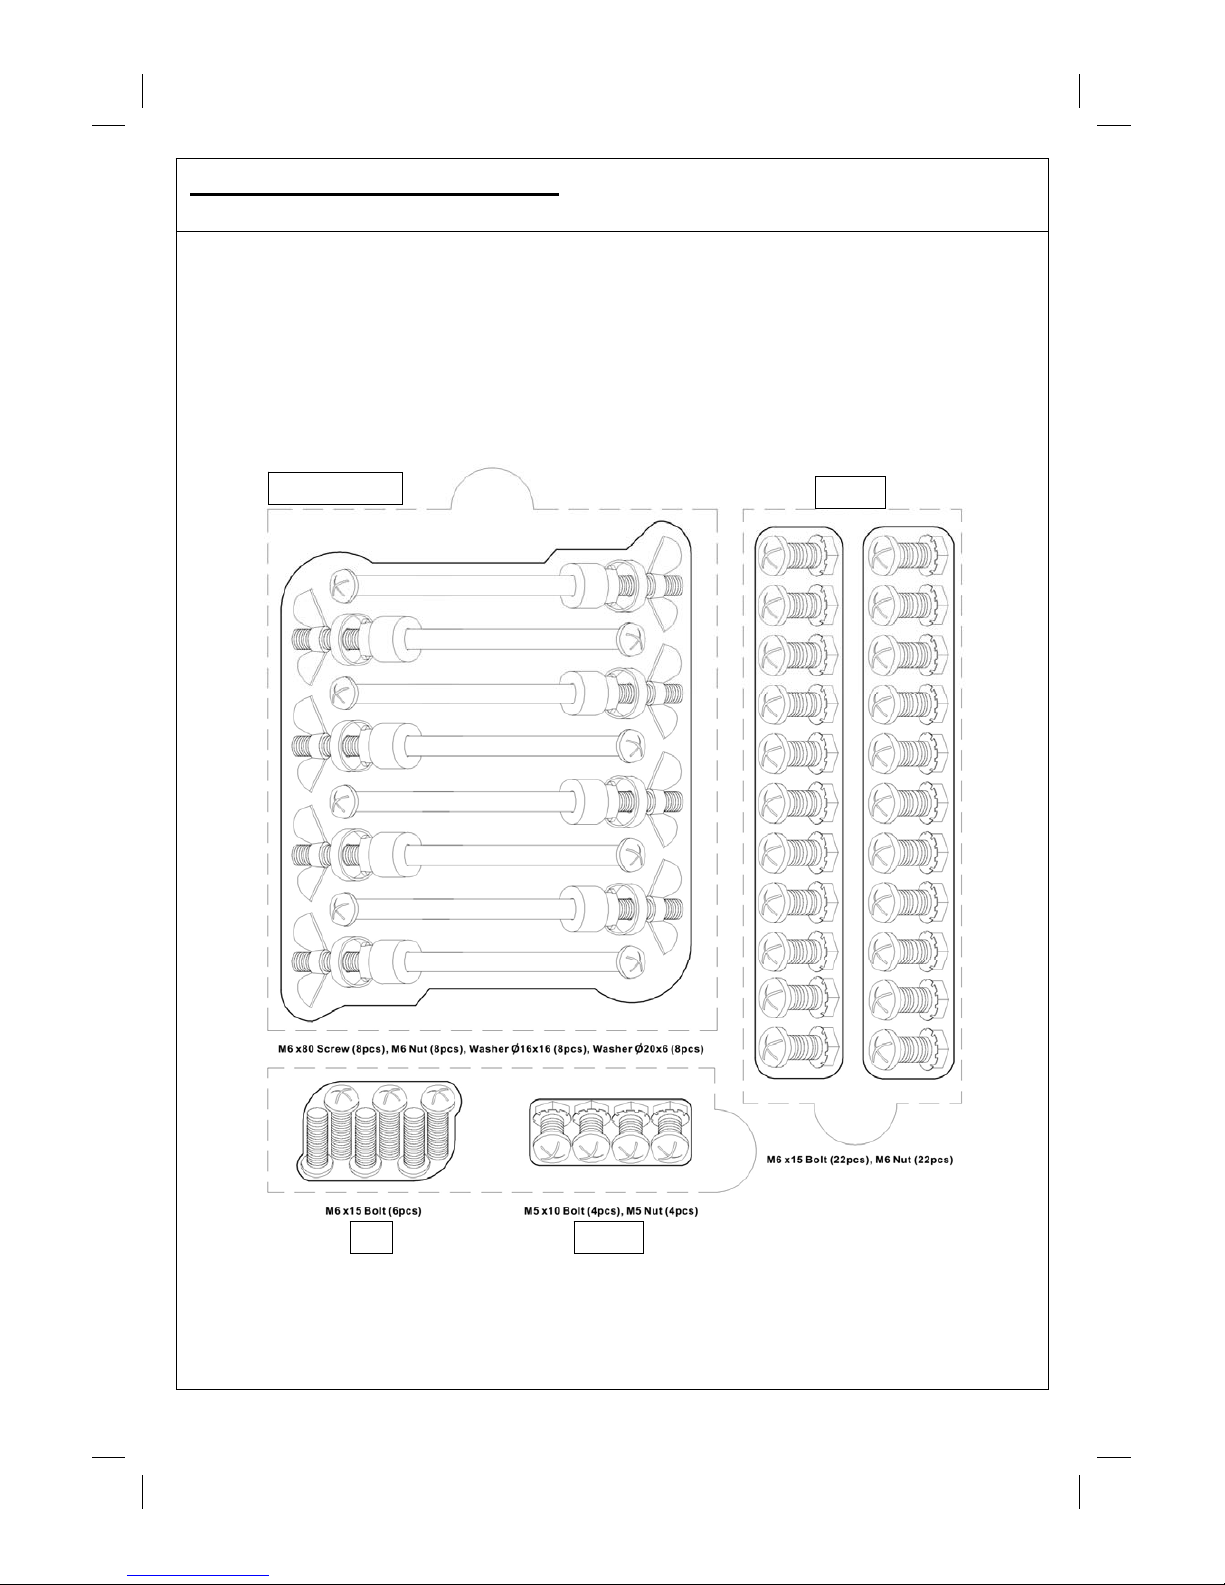
5
Hardware Reference Diagram
Specifications subject to change without prior notice.
E3, E4, E5, E6
E1, E2
E1 E7, E8
Page 6
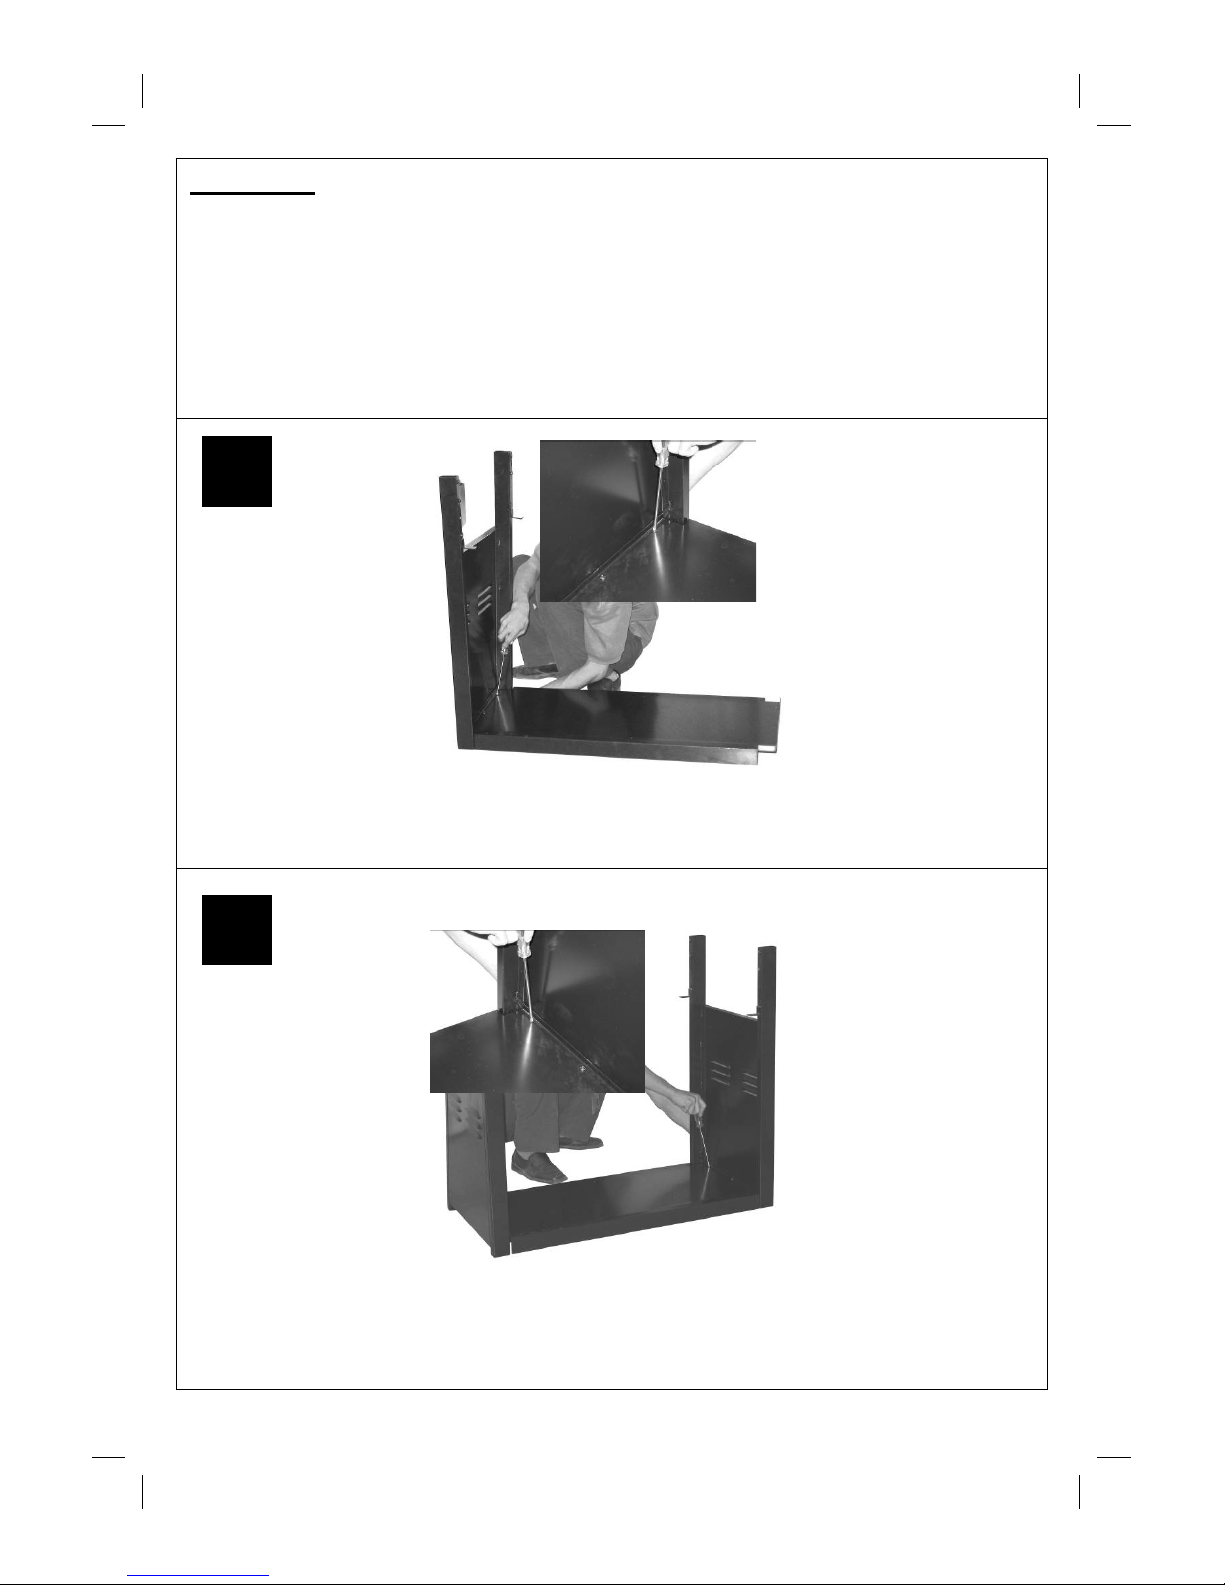
6
Assembly
IMPORTANT!
• Tools Required: Medium size flat blade or Phillips/Crosspoint screwdriver, adjustable spanner or metric
spanner set
• The assembl y o f this ba rbecu e requ ires 2 peopl e.
• Carefully un pack th e trolley box a nd remove all internal packaging before commen cin g assembly.
• Carefully un pack th e body box and rem ove all intern al packaging before commencing asse m bly. All
loos e item s in clu ding th e grills/griddl e, briqu ette baskets an d wa rmi ng basket must be removed from th e
body.
• Whilst every care is taken in the manufacture of this produ ct, car e m ust be tak en dur in g assem bly in
case sha rp edg es are present.
1
2
Att ach the L/H Pa nel (C 8) to the Bottom Pan el (C13) u sing the Scr ews (E1) and Nuts (E2) .
Att ach the R/H Panel (C10) to the Bot tom Panel (C13) usi ng th e Screws (E1) and N ut s (E2).
* A sticker on the
panels indicates the
position for easy
assembly.
L/H
L/H R/H
Page 7
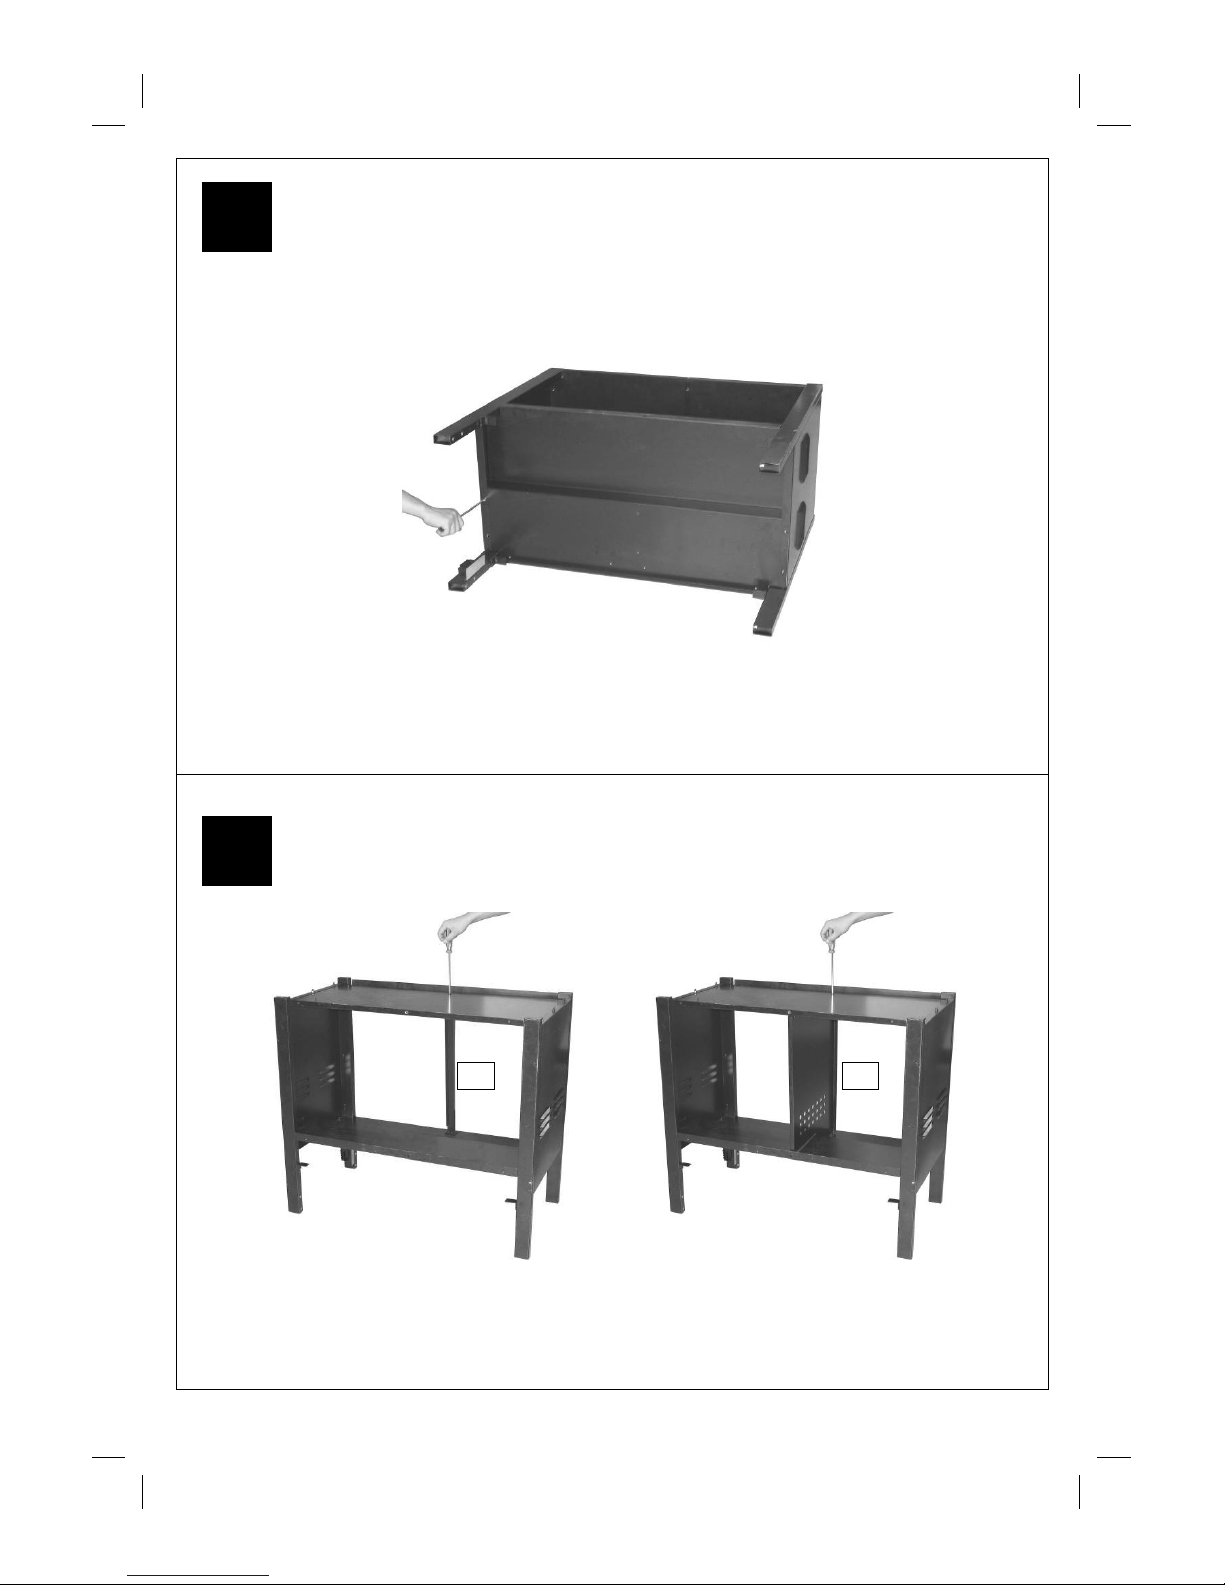
7
Att ach the Top Panel ( C 11) to th e L/H (C8) and R/H (C10) Pa nel s with th e Screw s (E1) and
Nuts (E2).
Cuisine Users: Attach th e Suppor t (C 23) between the Top and Bottom Panels usin g the Screws (E1) and
Nuts (E2).
Connoiseur Users: At ta ch t he Div ider (C9) betw een th e Top and Bottom Panels u sing the Screws (E1)
and Nuts (E2 ).
C9
L/H R/H
L/H
R/H
4
3
C23
Cuisine Connoisseur
Page 8
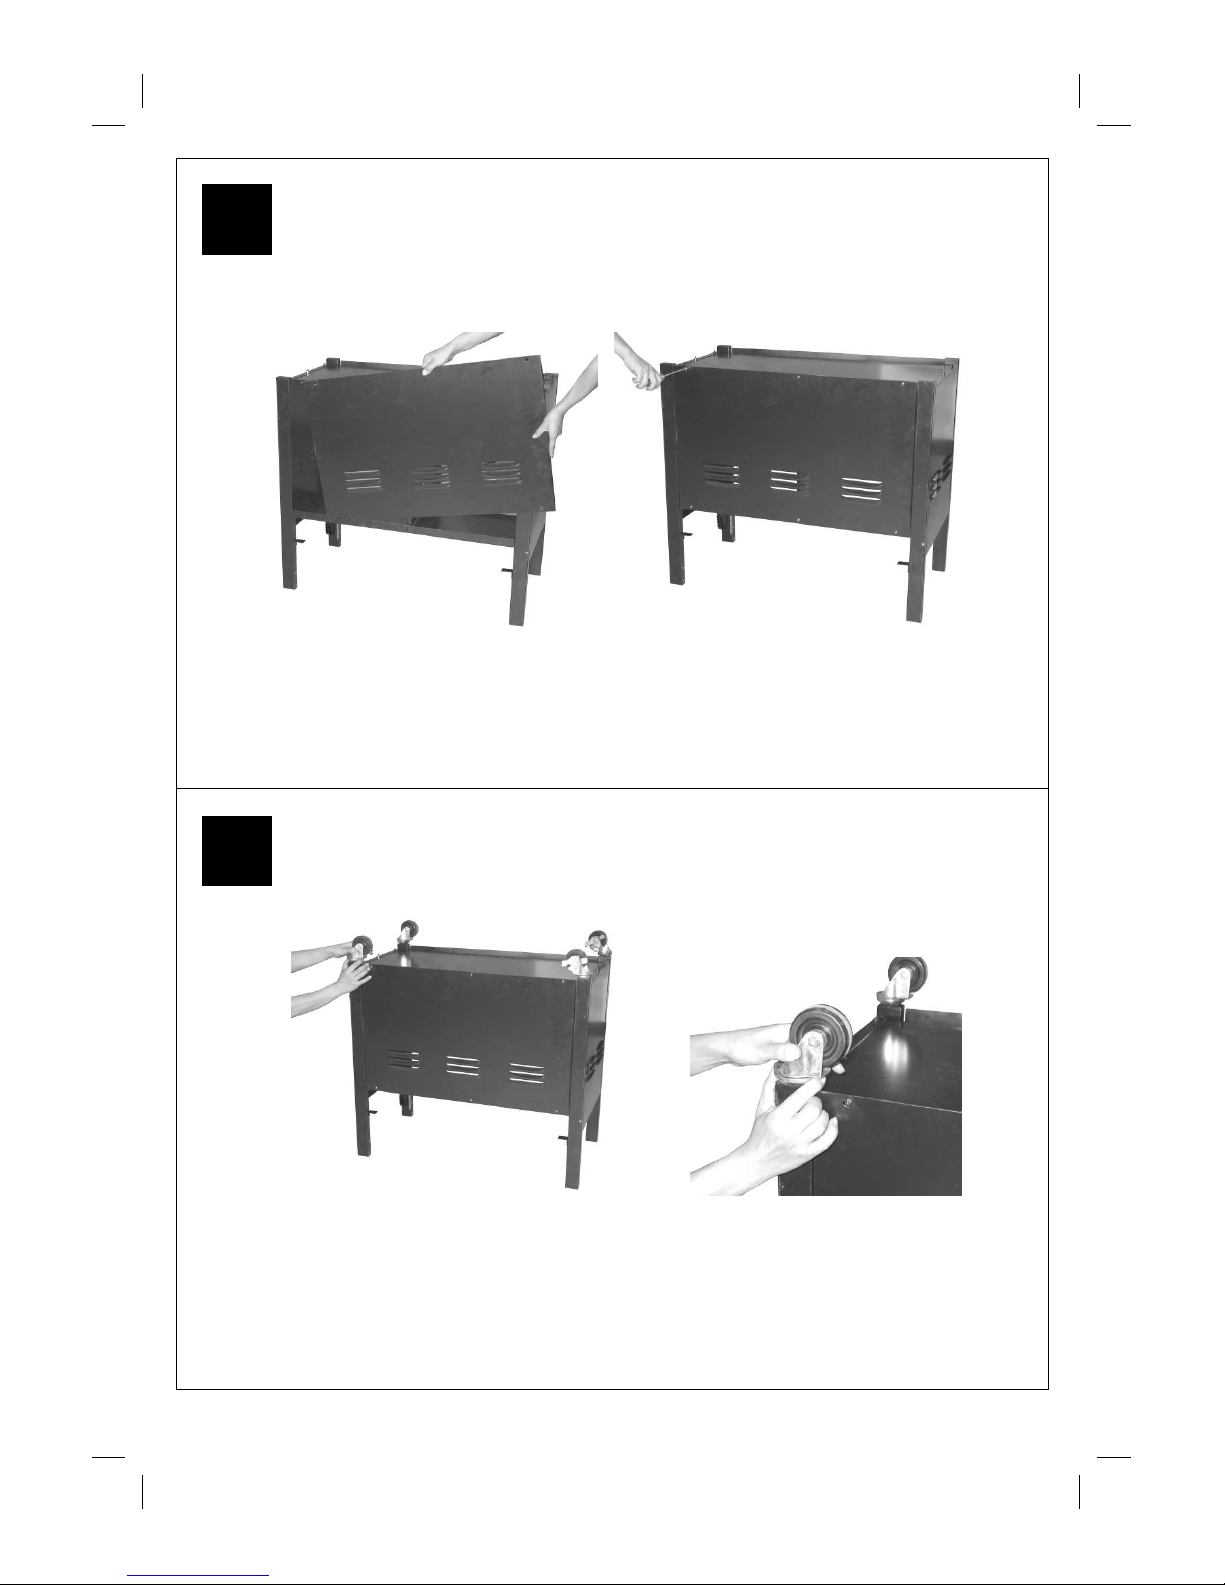
8
Att ach the Back Pan el (C12) to the assembled por tion of the cabinet usin g th e Screws (E1).
Screw the Casters (C 18) int o the L/H Panel and t he Lockable Casters (C19) int o the R/H
Panel.
L/H
R/H
L/H
R/H
6
5
Page 9
9
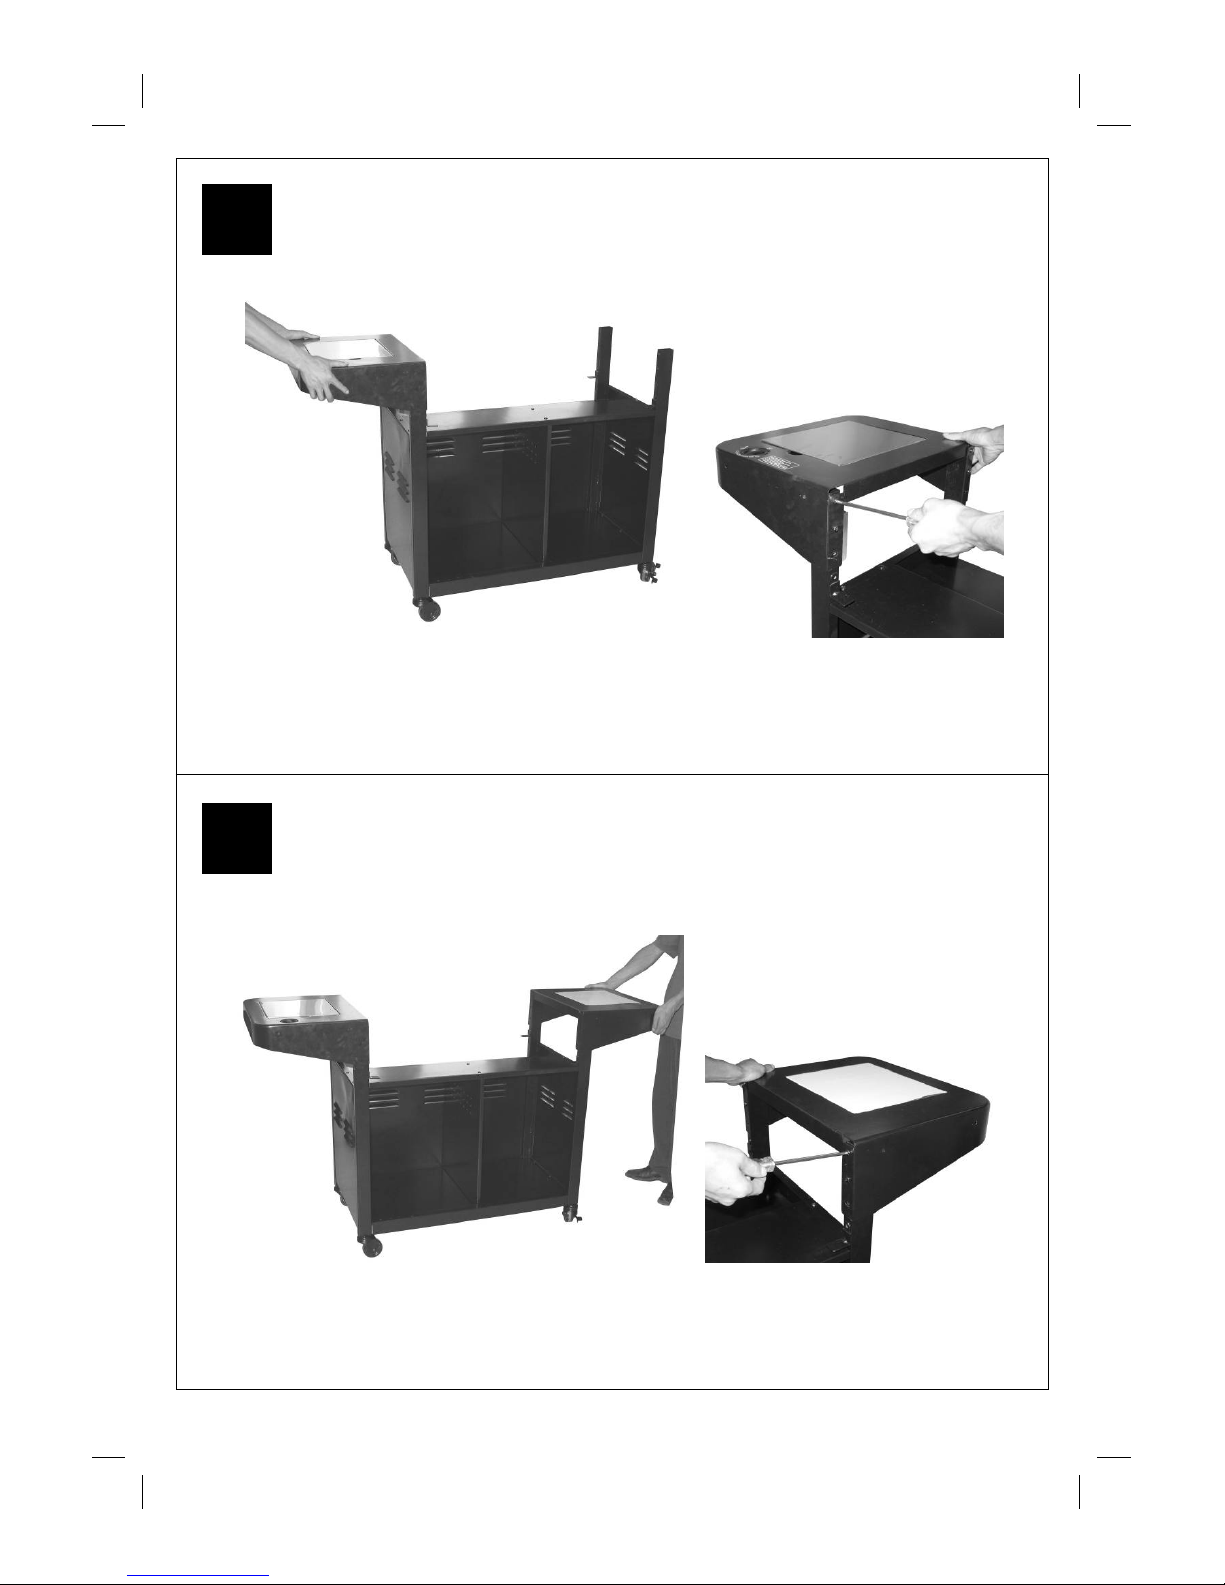
Remove th e S crew s from th e L/H P anel . Attach the L/H S ide Bu rn er Shelf
(C3) to the L/H Panel by replacing th e Screws.
Remove the Screws from the R/H Panel. Attach the R/H Side Shelf
(C5) to the R/H Pan el by replacin g th e Screw s.
8
7
Page 10
10
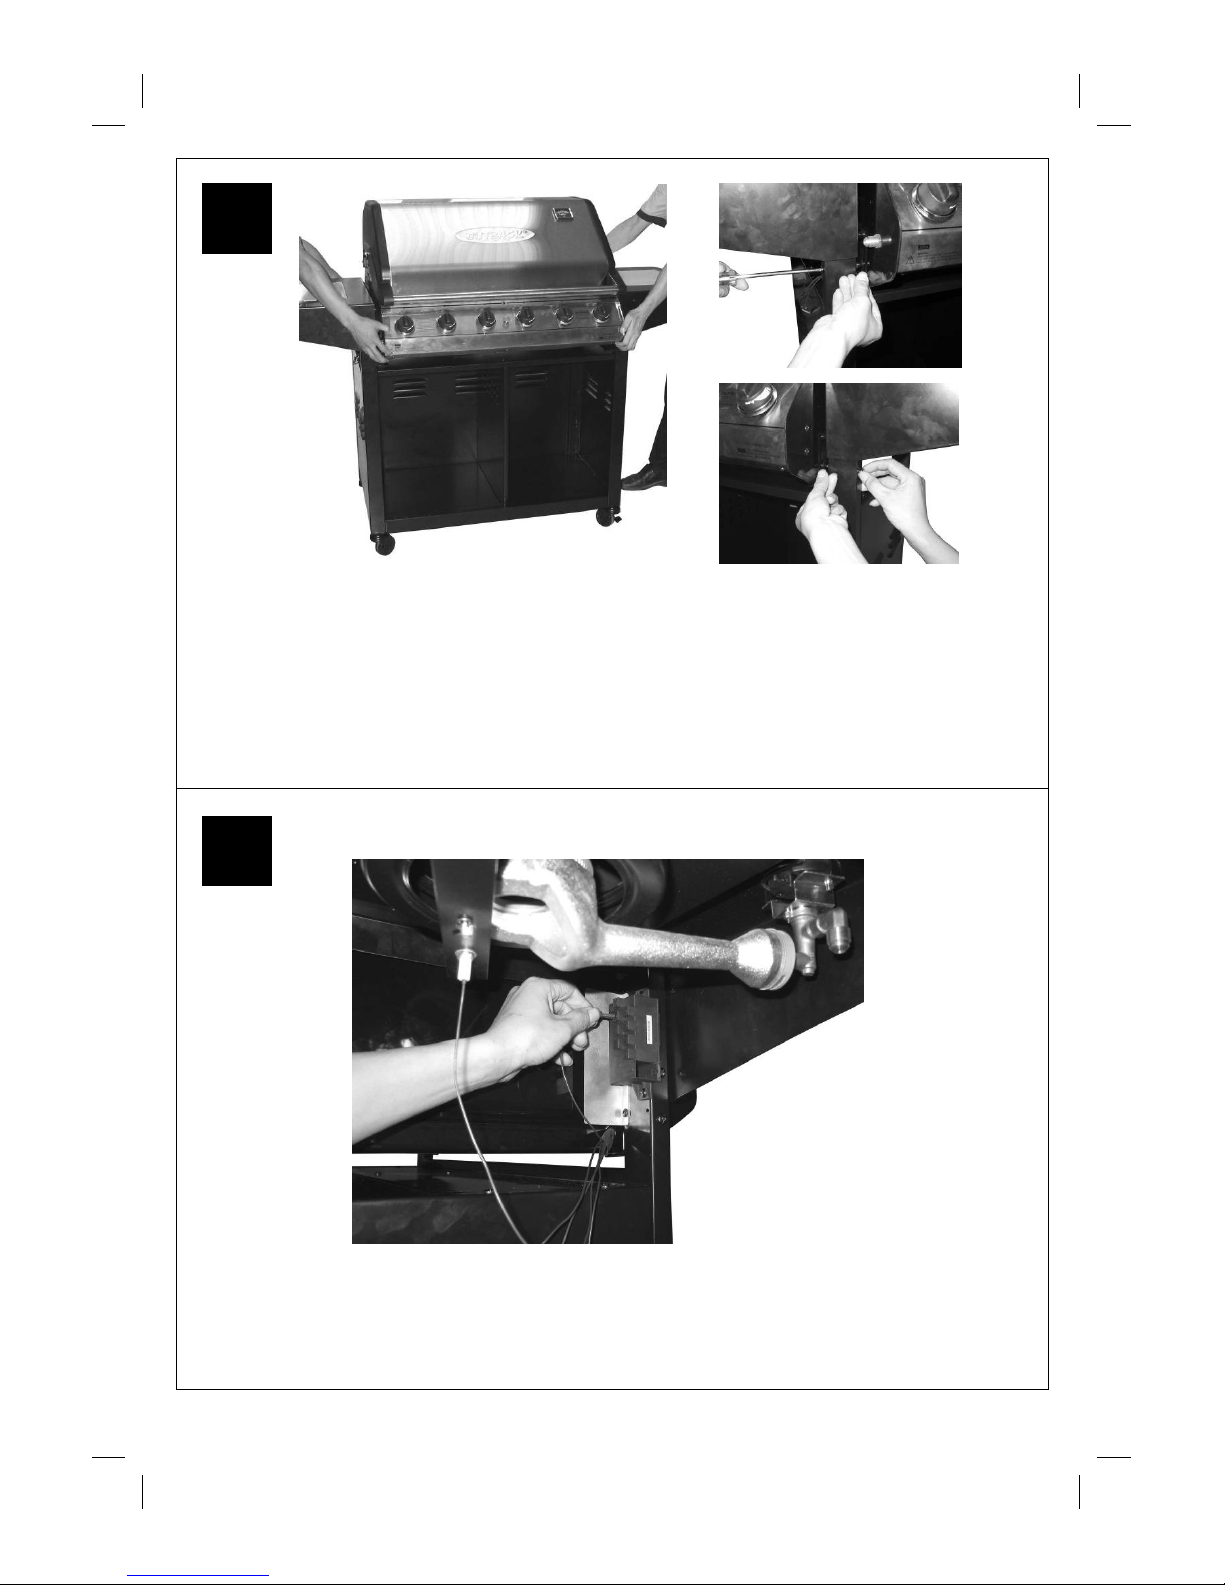
Inser t Spa cers (E5) into holes in the sidewall of the body and turn 90 degrees to lock in pla ce.
Carefully lay the Barbecu e Body (B1) onto the supports on the cabin et. WARNING: DO NOT RELEASE
THE BARBECUE BODY WHILE THE BARBECUE HAS NOT BEEN PROPERLY SEATED. THIS MAY
RESULT IN INJURY OR DAMAGE TO YOUR BARBECUE.
Att ach the body by inserting the Bolt (E3) through the leg of t he side panel and then through the Spacer
(E5) which has been previously inserted into the sidewall of the body. Place the Washer (E4) over the
bolt (E3) and protruding part of the Spacer (E5) and secure with the Wing Nut (E6). Repeat for all 8
bolts.
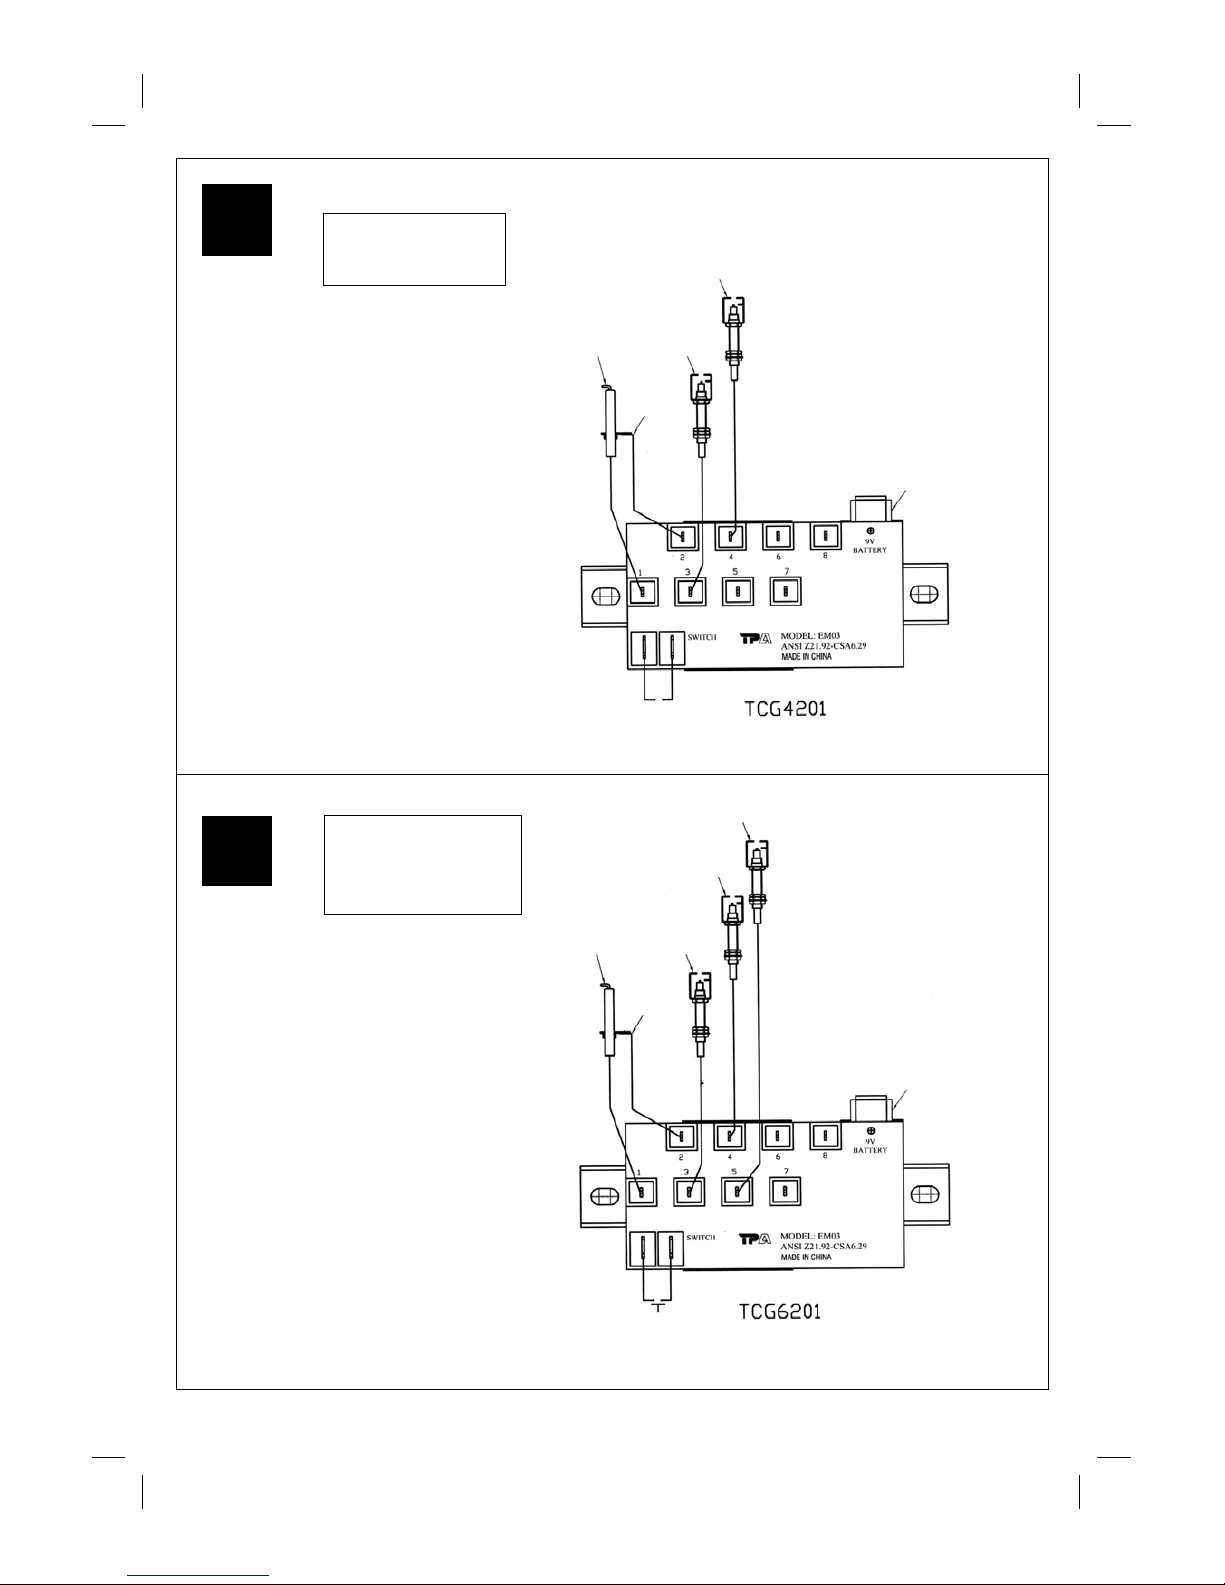
Connect th e w ires to the Ignition Assembly (C22) a s shown on the next page.
10
9
Page 11
11
Black
9V Battery
(not included)
Outback® Cuisine
Electronic Ignition
Assembly Diagram
Connect the wires as shown in the
diagram.
12
11
9V Battery
(not included)
Outback®
Connoisseur
Electronic Ignit ion
Assembly Diagram
Connect the wires as shown in the
diagram.
Black
Yellow
Blue
Black
Black
Black
Green
Red
Ignition
Pushbutton
Ignition
Pushbutton
Side
Burner
Side
Burner
Page 12
12
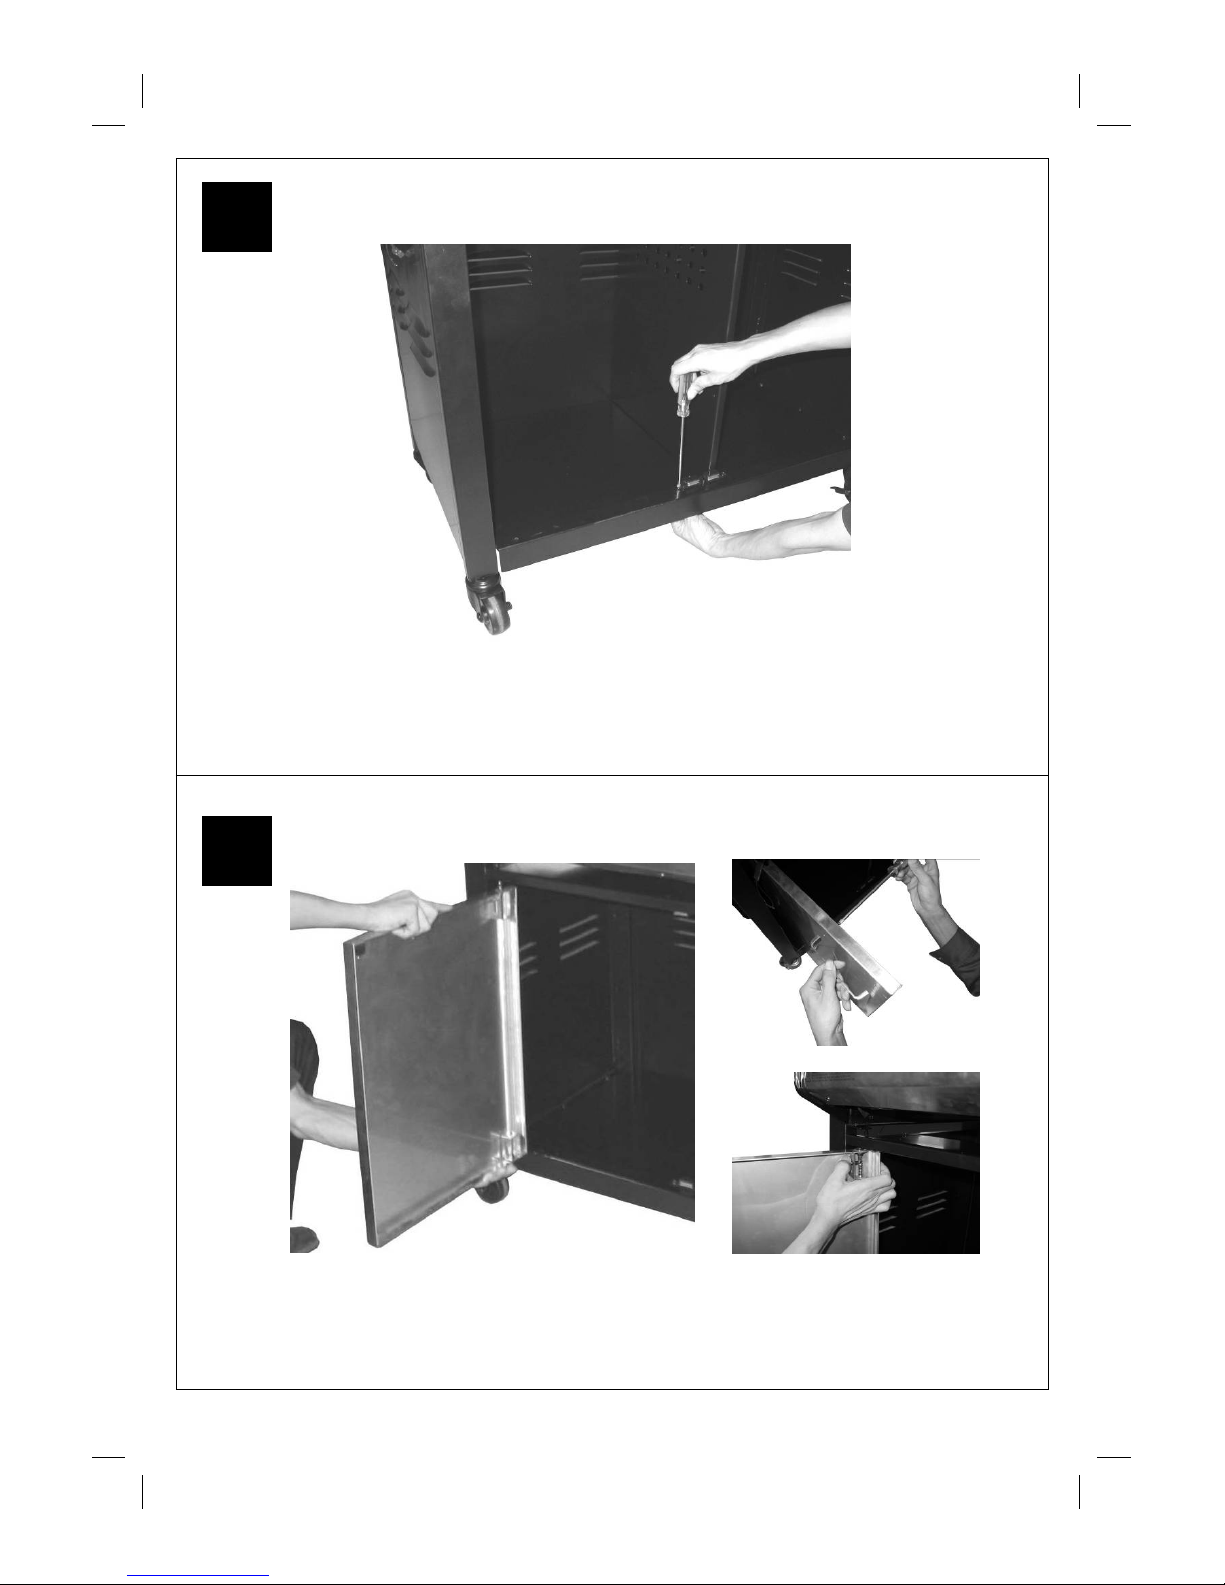
Att ach the Magnet Strips (C17) to the Top Panel (C11) and Bottom Panel ( C 13) using
the Screws (E1) and Nuts (E2).
Fit the Door Handles ( C16) to th e L/H and R/H Doors ( C 14, C15) by using the pre-a ssem bled
Door Handle Screws.
Fit the Doors (C14, C15) to the cabi net by depr essing th e spring pins and placing into the
Cabinet.
14
13
Page 13
13
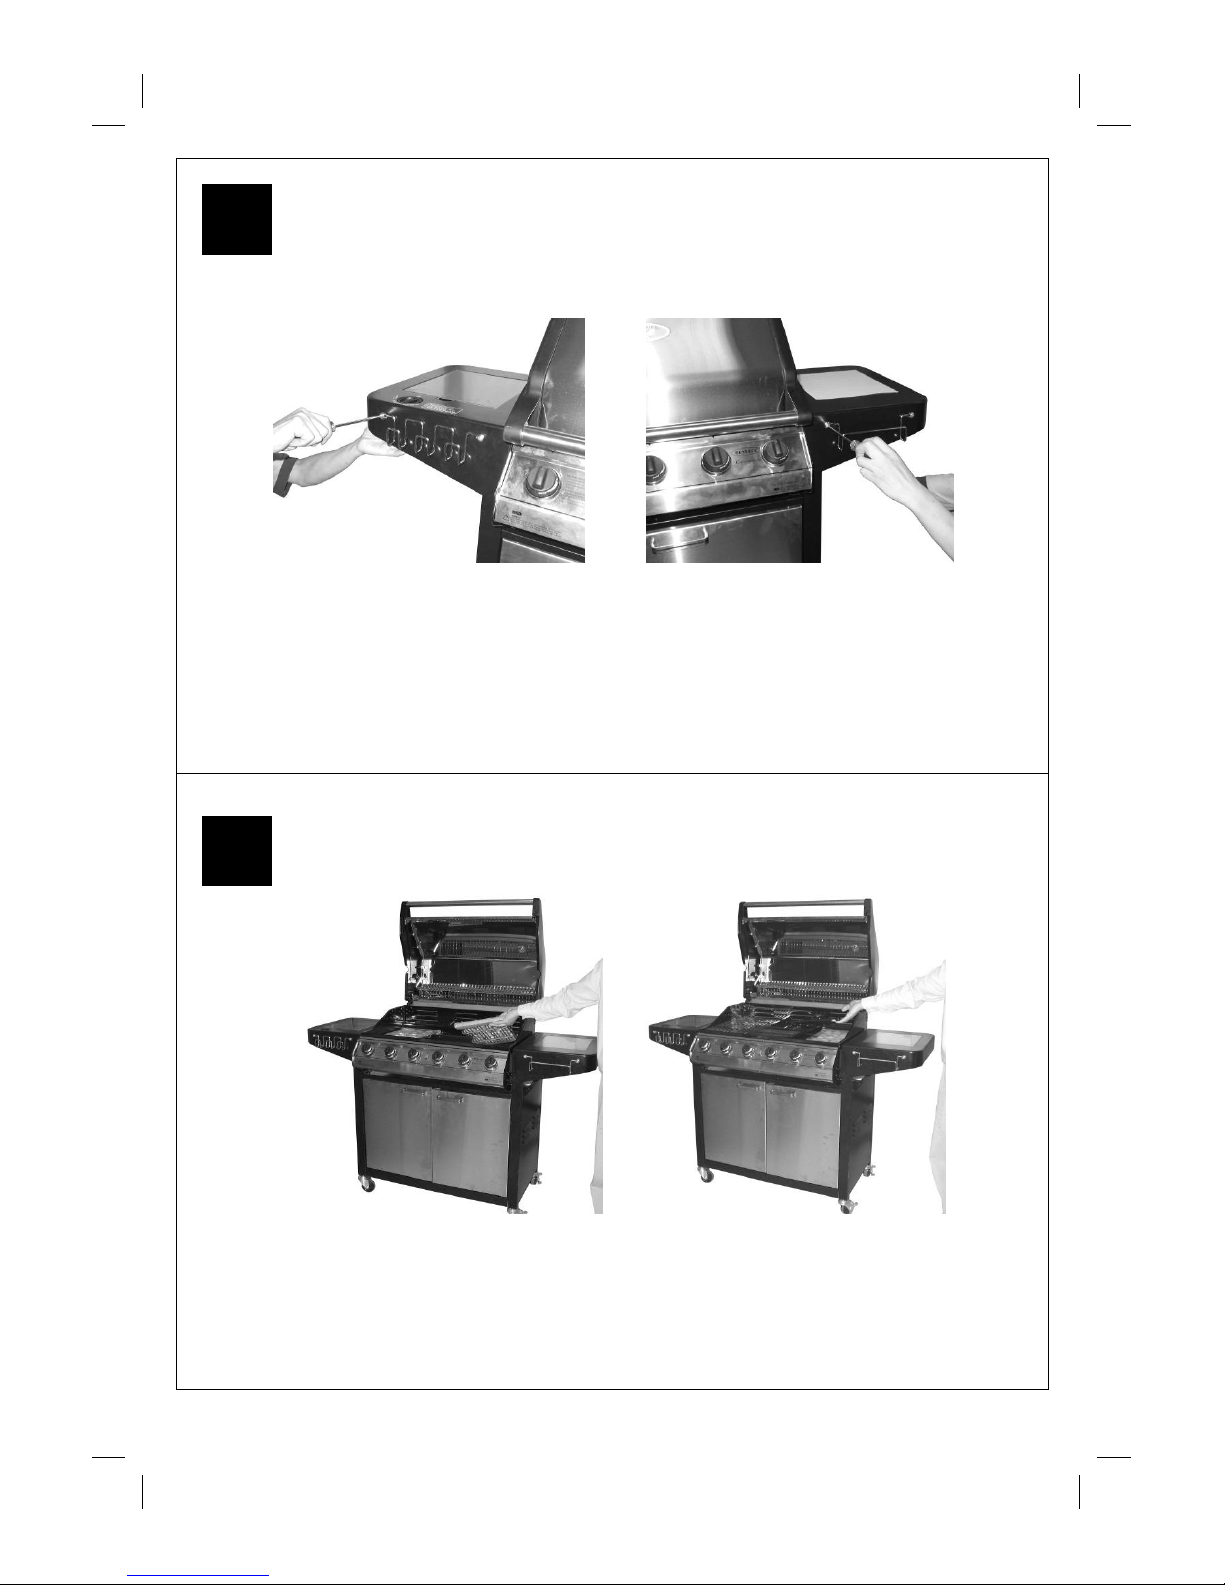
Attach the Tool Hook (C4) to the L/H Side Burner Shelf using the Screws (E1) and Nuts (E2).
Att ach the Towel Rail (C6) to the R/H Side Shel f using the Screws (E1) and Nuts (E2).
Remove the pla stic wrap from the Briquette Basket s (B9) and l ay them int o the body
ensuring that they li e level within the body. Lay th e G rills (B11) and Griddle (B12) i nto place.
4/6 Burner C onfiguration - Left t wo-thi rds - Grill s, Briqu ette Basket s; Right third - Griddle
16
15
Page 14
14
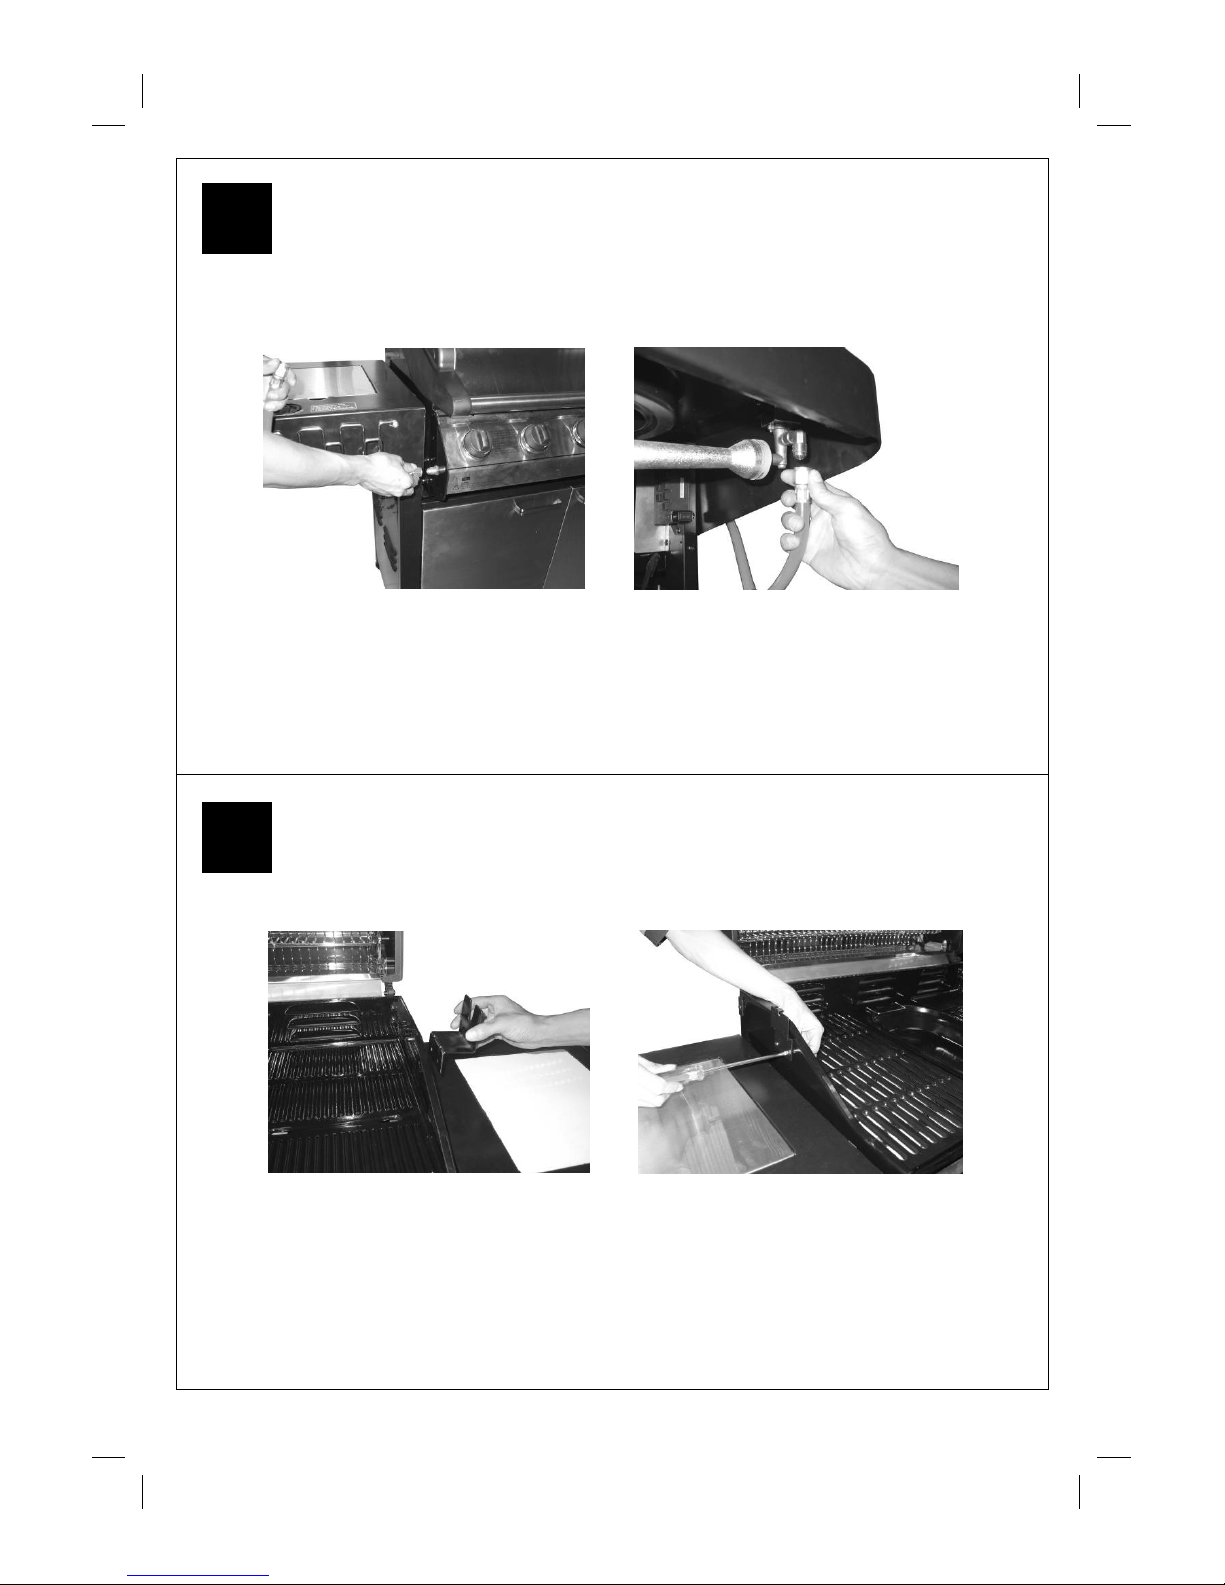
Connect th e gas hose to the BBQ Body and L/H Side Burner Shelf. Ensure the m ating fa ces of
the connection are clean and not damaged. Do not use any sealing tape, paste, or liquid on
the j oin t. T he nu t mus t b e ti gh tene d with the us e of a s panne r. Do not us e fo rc e whic h m ay
damage the assembly.
Att ach the L/ H and R/H Brackets (D 5, D6) to the Barbecue Body usin g the Screws (E7) an d Nuts (E8).
18
17
Page 15
15
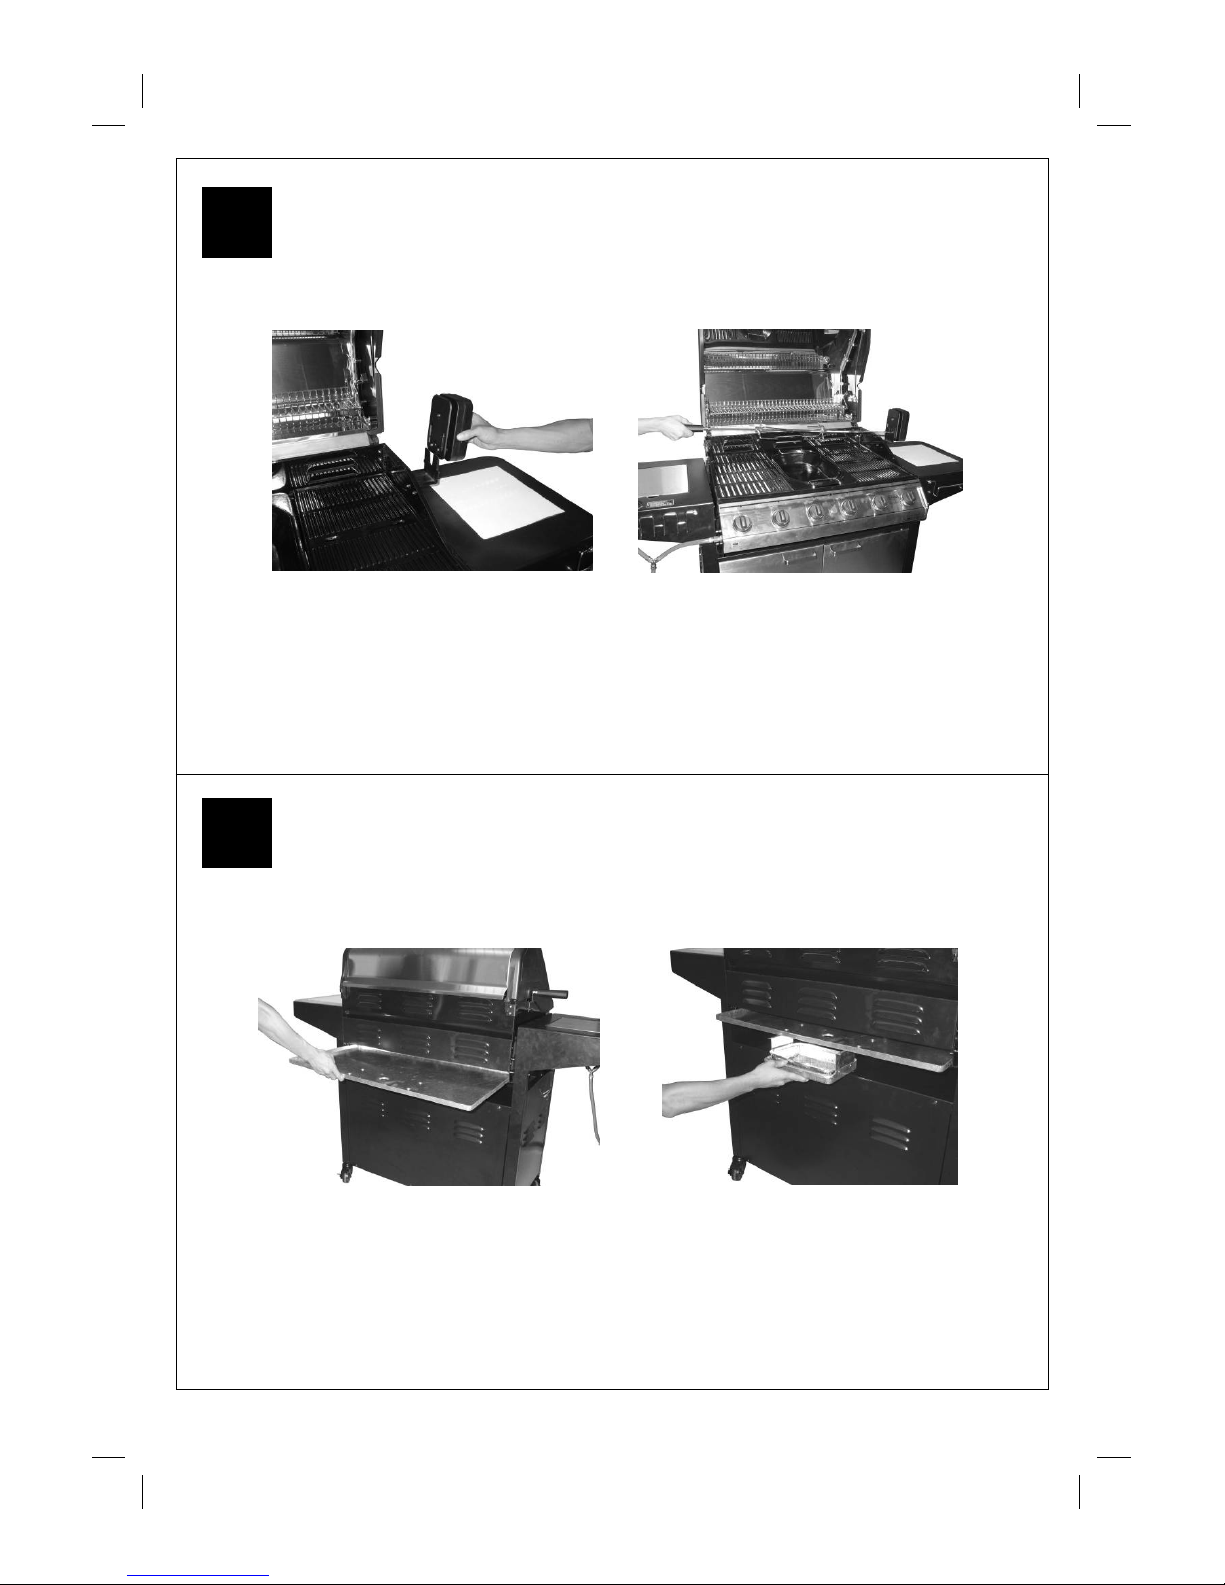
Hang the Rotisserie Mot o r (D4) to the R/H Bracket. Place the Forks (D2) onto the Spit R od
(D3) and insert the Spit R od into the Slot in the Motor.
Slide the Dri p Tray (B6) into place underneath the barbecu e body.
Place the Foil Liner ( B8) into the Drip Pan (B 7) and slide into place
underneath the
drip tray.
20
19
Page 16
16
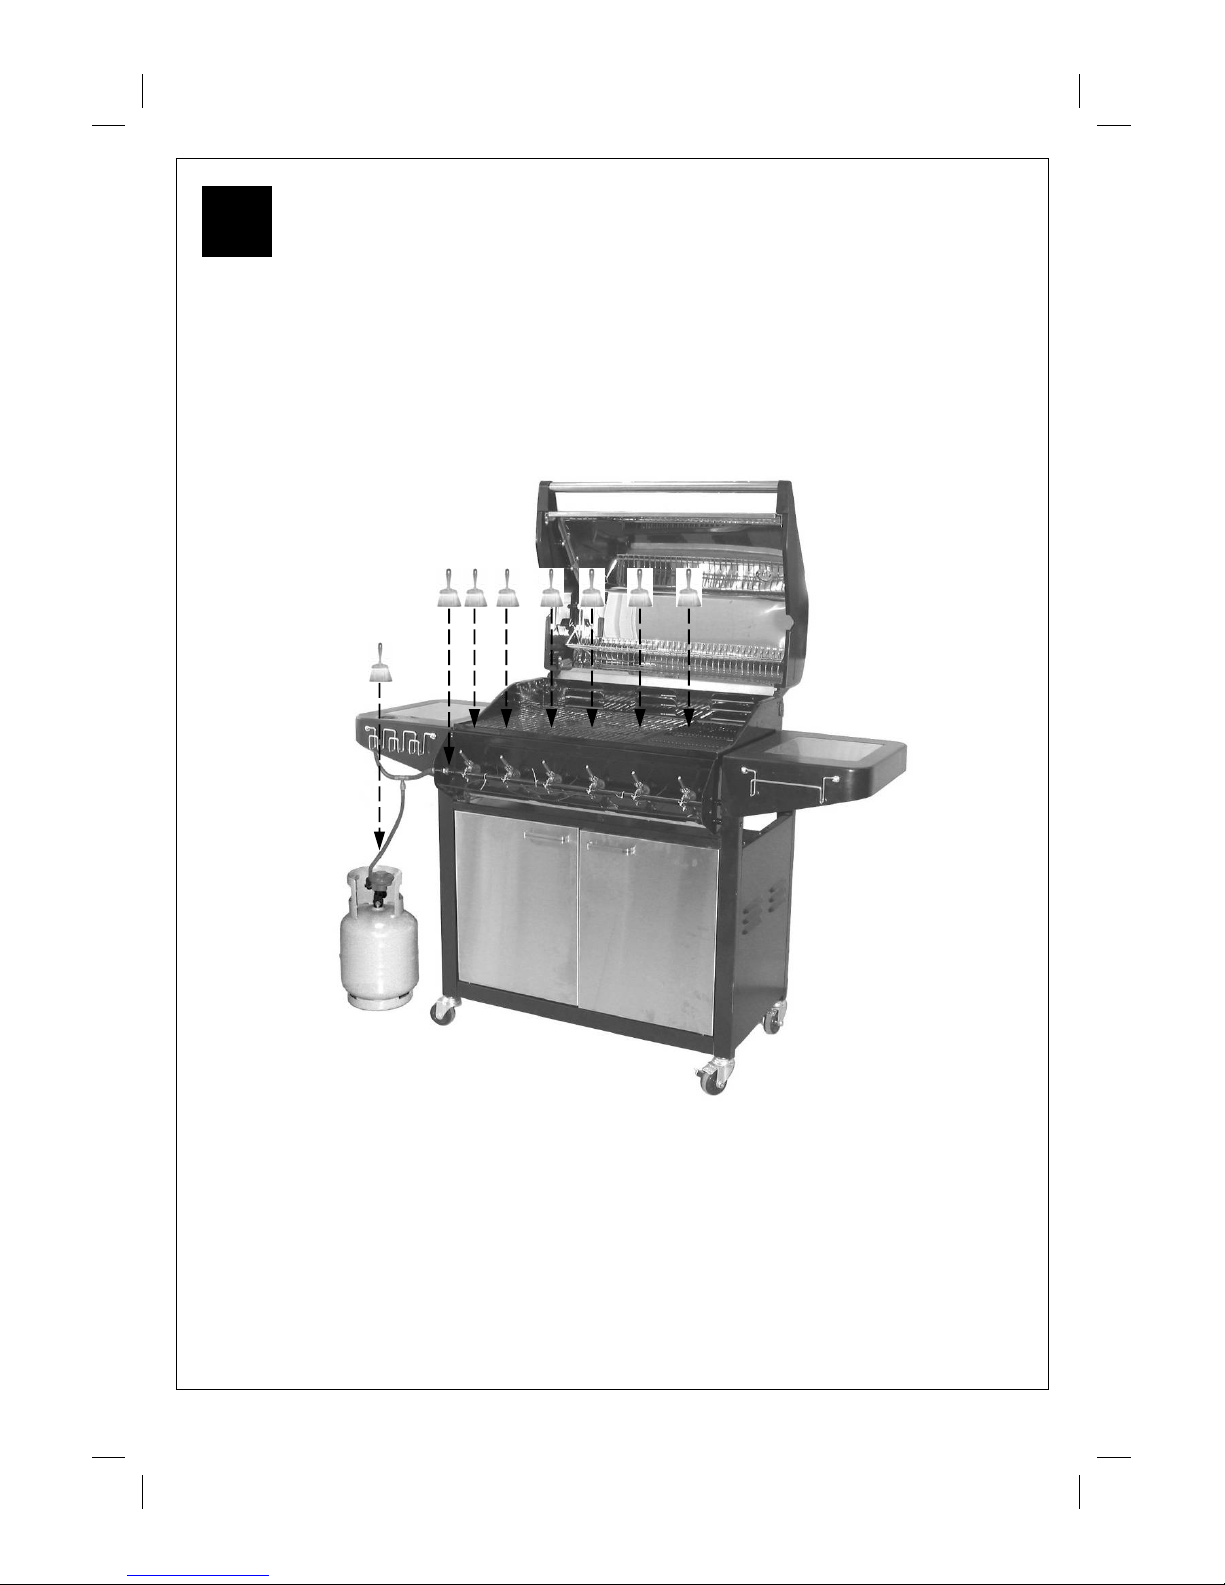
Assembly is now complete.
All joints and connections must now be leak tested before u sing th e barbecue.
For det ails of leak testing, please refer to instruction s on Page 20.
21
Leak Test Diagram
Page 17
17
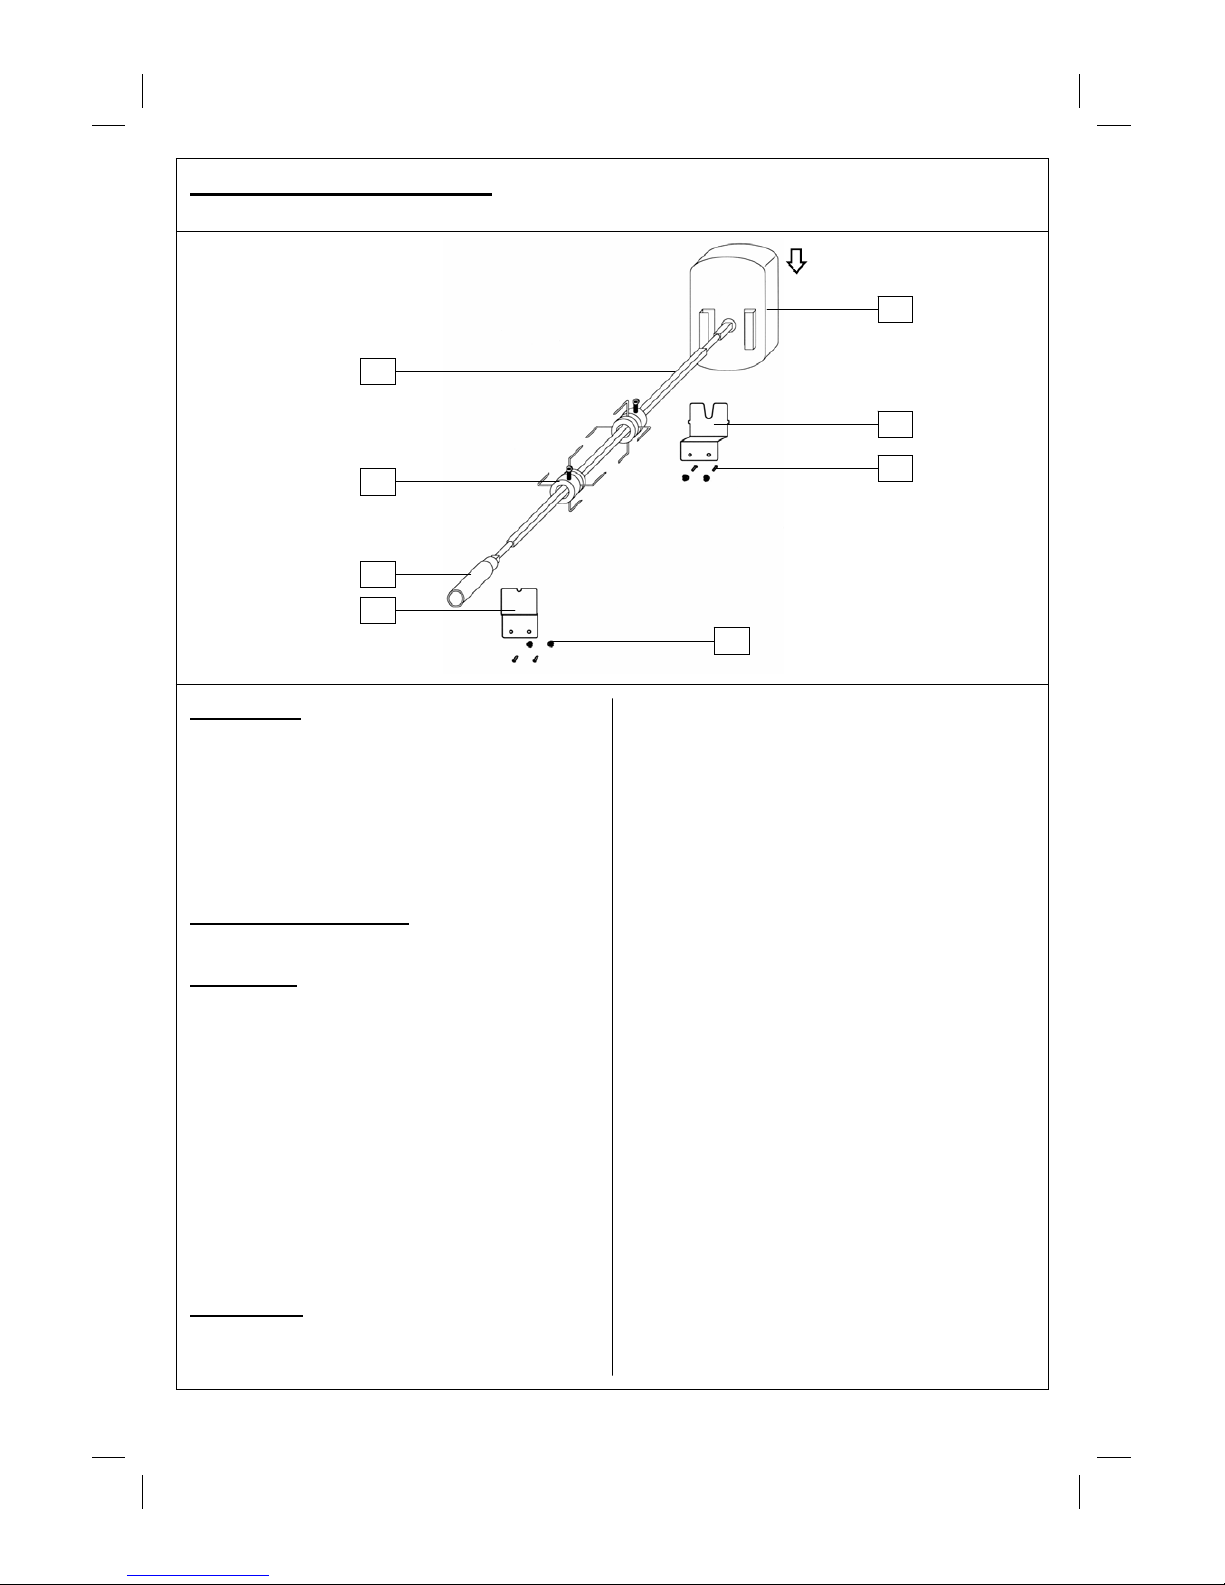
Rotisserie Kit Assem bly
The rotisserie kit is packed in the barbecue trolley carton. Specifications subject to change without prior notice.
PARTS LIST:
D1 Rotisserie Handle 1
D2 Fork 2
D3 Spit Rod 1
D4 Motor 1
D5 L/H Bracket 1
D6 R/H Bracket 1
E7 Screw, M5x10 4
E8 Nut, M5 4
OT HER RE Q UIRE ME NTS:
2 D-Size Batteries (1.5V) (Not Included)
ASSEMBLY:
1. Mount the R/H motor mounting bracket (D6) on
the right hand side of the barbecue body . Mount
the L/H mounting bracket (D5) on the other
side of the barbeque body. Both brackets
should point outwards from the outer sides of
the barbecue body.
2. Insert batteries into motor. N.B. Motor c an be
also run using 3V DC adaptor.
3. Slide the motor (D4) onto the R/H motor
mounting bracket ( D6).
NOTE: The rotisserie motor should never be used in
the event of rain. We recommend the motor is
detached from the mounting bracket when not in
use.
OPERATION:
1. Carefully remove the cast iron cooking surfaces
and the war m ing basket from the barbecue.
2. Slide the ceramic briquettes baskets to the
centre of the barbecue body. I t is over this area
that the meat will be cooked.
3. Slide one of the spit forks onto the spit rod and
tighten its thumb screw to secure it into place.
Insert the pointed end of the spit rod into the
meat being cooked and slide the meat towards
the centre of the rod. Make sure the fork is full y
into the meat. Slide the other f ork onto the rod,
into the meat, and tighten the thumb screw
once in place. For optimal rotisserie cooking,
food must be placed securel y onto th e m iddle of
the spit rod and balanced so that the rotisserie
can rotate freely without interference from any
barb e cue surf ac es. Any lo os e sec tio ns of me at
should be secured so they do not hang down
and interfere with th e rotation of th e spit rod. Do
not overload the rotisserie. A chicken or joi nt of
meat of approximately 2kg should be the
maximum.
4. Insert the pointed end of the spit rod into the
motor. Lay the other end of the spi t rod onto the
opposi te brack et.
5. Light the grill as specified in your barbecue’s
instructions.
6. Turn on the rotisserie motor to begin rotisserie
cooking. The hood has been designed so that it
may be closed during rotisserie cooking.
7. Always cook foods on the lowest f lame setting
to avoid burnin g or overcook ing.
8. The handle of the spit rod can be unscrewed to
al low for simu ltaneous use of the side burn er.
D3
D2
D5
D4
D6
D1
E7
E8
Page 18

18
nESSENTIAL INFORMATION
Please read instru ctions before using y o ur barbecu e.
BEFORE YOU USE YOU R BARBECUE (also se e instal latio n)
• Perform a leak test. This is the only safe and sure way to detect any gas leaking from joints and
connections of the barbecue af ter assembly. Follow the leak test instructions on page 20. Check
that the gas hose is free of any tension, twisting, cuts, or cracks.
• Make sure your barbecue is in a safe place. It must be outdoors, on level ground and not below
ground level. Ensure that the barbecue is at least 1 metre away from any flammable materials,
including trees and fences and that there are no heat sources near the barbecue (cigarettes, open
flames, spark etc.)
• Check that you have the correct gas bottle and regulator f or your barbecue. Never place the gas
bott le inside the trolley ca binet.
GET TING STARTED (also see operat ion)
• Main Burners - Open the hood of your barbecue. Never light your barbecue with the hood closed.
Turn the ga s regulator or gas bottle valve to the ‘on’ position. Push the control knob i n on the burn er
you wish to light and turn it to the high position. Push and hold in the igniter button in the center of
the control panel for 4 to 5 seconds to light the burner. Light all other burners in the same way
making sure each burner is alight before attempting to light the next. IF ANY BURNER FAILS TO
LIGHT, TURN OFF THE GAS AT THE BURNERS AND THE BOTTLE, WAIT 5 MI NUTES AND
TRY AGAIN. If the burners cannot be lit using the ignition system, turn to t he manual lighting
instruction s under OPE RATIO N.
• Once the burn ers are lit, turn all the main burner s to the high setting for 3-5 mi nutes to pre-heat the
barbecue. This should be done before each session. When pre-heating is complete, cooking can
begin takin g extra car e if the burners are used in the high position.
• To prevent food sticking we recommend that you use a long handled brush to apply a light coat of
cooking oil to the grills and griddles before each barbecue session.
• Side Burner - Open the lid of the side burner. Never light the side burner with the lid closed. Turn
the gas regulator or gas bottle valve to the ‘on’ position. Push the side burner control knob in and
turn it to the hi gh position. Push and hold in the ign iter button i n the center of the control panel for 4
to 5 seconds to ligh t th e burner. IF THE BURNER FAILS TO LIGH T, TURN O FF THE GAS AT THE
BUR NER, WAIT 5 MIN UTES AND TRY AG AIN. If the burner ca nnot be lit usin g the ignition system,
turn to the manual lighting instructions under OPERATION.
• Fla re-ups may occur during cooking and can be con trolled by apply ing salt directly onto th e ceramic
bri quettes making sure your ha nds are prot ected from the heat.
• If a fat fire should occur during cooking, and if safe to do so, turn off the burners and the gas at the
bottle and wait for the fire to go out. Do not pull out the drip tray or douse with water.
• Never douse a barbecu e with wat er.
• Never move a barbecue when lit.
• Never leave a lit barbecue unattended
• Never handle hot parts with unprotected hands
• Keep children, ani m als, and elderly people a safe distance from a lit barbecue.
WHEN YOU HAVE FINIS H E D COOKING (also see care and mainten ance)
• Turn all the main burners to the high position for 3 to 5 minutes to burn off any food residue from
the cooking surfaces and burners. When the barbecue has cooled, the burnt residue can be easily
removed using a damp, non abrasive cloth on the cooking surfaces and a wire brush on the
burners. Never us e any abrasi ve materi al o n porcelain finishes. T he grills and grid dles are not
dishwasher safe.
• We do not recommend washing ceramic briquettes, the step described above should remove most
Page 19

19
food r esidue from the ceramic briquettes.
• When the barbecue has cooled, scrape away any food and fat residue from the drip tray and
disca rd. Empty and cl ean the Foil Liner. These rout ines must be completed a fter each session.
STORAGE
• Ensure th e barbecue is properly cooled.
• Always disconnect the gas bottle and store it in a safe place, never store a gas bottle indoors or on
it s side.
• Stor e the barbecue in a cool dry place
• Cover the bu rners with foil to keep the bur ner holes free from in sects or other debri s.
• If you inten d to leave your barbecue outside mak e sure it is pr otected from the element s by a heavy
duty cover, these ar e availa ble from most Outback ® stockists.
IMPORTANT INFORM ATION
• Modification of the bar becue may be dangerous, is not permitted and wil l nullify an y warrant y.
• Thi s product is for outdo or use onl y. Do not u se indoors. Do n ot use below ground l evel.
• Do not store Gas bottles below ground level. LP gas is heavier than air so if a leak occurs the gas
will collect at a low level and could ignite in the presence o f a flame or spark.
• Do not store or use LP gas bottles on their side as this could allow liquid gas into t he supply pipes
with serious r esults
• Never pla ce the gas bottle inside the tr olley cabinet.
• Leak test your barbecue annually. Leak test the hose connections each time you reconnect the gas
bottle.
• Always turn off the gas at t he bottl e when not in u se.
• Do not use aerosols near this barbecue.
GAS, RE GULATOR AND HOSE
Thi s barbecue can run on pr opane butane or bu tane/propane mixed LPG (liquid petroleum gas) bottled
gas. For optimal performance we recommend the use of propane gas which is supplied under a
number of different names and bottle colours. Butane gas can be used but it may restrict t he heat
output available from the burners, particularly when the gas temperature falls below +10 degrees
Celsi us. If in doubt, please consult your gas deal er/distributor.
Hose
• Check that the gas hose does not touch any part of the barbecue that may become hot during
operation.
• If the hose shows any sign of damage it must be replaced with a hose that is suitable for use with
LPG (liquid petroleum gas) and meets th e national standards for the country of use.
• The l ength of hose should not exceed 1.5 metres.
Please note: the date on the orange hose (if supplied) is the date of manufacture – not the expiry date.
You must have the correct gas bottle, regulator, and hose for the barbecue to operate safely
and efficiently. Use of an incorrect or faulty regulator is dangerous and will invalidate the
warranty on this product . If you are unsure, please check with your local gas deal er.
INSTALLATION
Precautions:
• Only use this barbecue in a well- ventilated outdoor area.
• Check that the barbecu e is not placed UNDER any combustible surfa ce.
• The si des of the barbecu e should never be closer tha n 1 m etre to an y combustible material.
• Do not obstruct any ventilat ion openings in the barbecu e body
Page 20

20
• Confi rm all control knobs are in the off position before connecting the r egulator.
• Should you need to change the gas bottle, confirm that the barbecue is switched off, and that there
are no sour ces of i gnition (ciga rettes, open flame, sparks, etc.) nea r before proceeding
• Always connect the regulat or in accordance with the regulat or and gas bot tle suppliers in structions.
• The casters sh ould al ways have the brak es on w hen the bar becue is in use.
LEAK TESTING
Always perform a leak test in a well-ventilated area.
Step 1 - C onfirm a ll control knobs are in the off position.
Step 2 - Detach the barbecue con trol panel loca ted across t he front of the bar becue body by pulling off
the control knobs and removing the control panel retaining screws.
Step 3 - Turn on the gas at the gas bott le or regulator
Step 4 - Check for leaks by brushing a solution of ½ water and ½ liquid detergent over all the gas
system joints, including all valve connections, hose connections, and regulator connections.
Step 5 - If bubbles form over any of the join ts th ere is a leak
• Turn off the gas
• Retighten all joints
• Repeat test
• If bubbles form again do not use the barbecue and contact your local Outback distributor for
assistance.
OPERATION
Your barbecue is not designed to be used with more than 50% of the cooking area as a solid plate –
this includes baking dishes. If more than 50% of your cooking area is covered by a solid cooking
surfa ce, the ba rbecue coul d overheat causing damage that is not covered by warranty.
Grill cooking
The c ast iron b urners heat the c eramic brique ttes bene ath the grill t hat, i n tur n, heats t he f ood. T he
natural juices produced during cooking fall o nto t he ceramic briquettes and vaporise to form smoke.
The smoke then rises and ‘bast es’ the food, gi ving i t that unique barbecued flavour.
Griddle pl at e cookin g
The cast iron burners heat the griddle plate directly, whic h then cooks the food on contact. Griddle
plates enable the cooking of smaller items that would, otherwise, f all through the gril l. They can also
be used f or seari ng cuts of meat or cooking food li ke eggs that would not be possible to cook on a grill.
Griddles can also be used to heat pans.
Roasting
This barbecue is supplied with a roasting hood rat her than a lid, so you are able to roast or bake in a
similar way as in a conventional gas oven. It is advisable not to place fatty f ood onto the warming
baske t to avoid the poss ib ility of juice s and fat run ning do wn t he back of your barb ecue. Fo r best
results place the food you wish to bake or roast in a metal baking tray and set it on one side of the
co oking grill. T urn the burners dire ctly unde r the f ood to the ‘OFF’ p osition and the b urners oppo site
the food to the ‘Medium’ setting. Close th e hood and thi s will form an oven to cook the food ‘indirectl y’.
Monitor the temperature using the temperature gauge on the hood. If the internal heat becomes too
hi gh, turn the burners t o the ‘low’ position. It is not necessary or a dvisabl e to have al l of the burners on
high when the hood is closed. If the hood is opened during cooking to check on the progress of the
food, please allow extra cooking time for the barbecue to regain its temperature. Take care when
openi ng the hood as hot steam can be released on opening.
Warm ing Basket
Warming baskets are a convenient way to keep cooked food warm or to warm items such as bread
rol ls. Care should be t a ken to ensure fat does not drip fr om the warming bask et when the hood i s open
which could then drip from the barbecue. Always check that your warming basket is properly f itted
befor e use.
Page 21

21
Flare- up control ***Very Import ant Notice ***
Flare-ups occur when meat is barbecued, and its fat and juices fall upon the hot lava rock. Smoke of
course helps give food its barbecued flavour, but it is best to avoid excessive flare-up to prevent food
bein g burned. To control flare-ups, it is ABSOLUTELY ESSENTIAL to trim away excess fat from meat
and poult ry bef ore grilling, use c oo king sauces and mari nades sp aringly and try to a void ve ry c heap
cuts of meat or meat products as these tend to have a high fat and water content. Also, the burners
should always be placed on the low setti ng during cooking. When flare-ups do occur, they can usually
be ext inguished by applying baki ng soda or salt directly onto th e lava rocks. Always prot ect your hands
when handling anything near the cooking surf ace of the barbecue, and take care to protect yourself
fr om the flame s. A lways pr otec t your hand s when hand ling an ything near the coo king surf ace of the
barbecue and take care to protect yourself from the flames. If a fat fire occurs, please see the
instructions under the following heading of this manual.
Fat Fi res
The foil liner must be emptied an d the drip tray cleaned of food debr is after each cooki ng session. If the
barbecue is to be used for large gatherings, it wil l be necessary to tur n off a nd cool the bar becue every
two hours to remove food debris from the drip tray and clean out the foil liner, the time between
clea ning may need to be reduced i f very fatty foods or cheap meat products are bein g cooked. Failure
to do t his may result in a fa t fi re, whi ch ma y cause inj ury and could seriously da ma ge the barbecue.
In t he event of a fat fire;
• If safe to do so, turn all control knobs to the ‘off’ position
• Turn off the gas at the bottle
• Keep everyone at a safe distan ce fr om the barbecue an d w ait until the fire has burnt ou t.
• Do not close the hood of th e barbecue.
• NEVER DOUSE A BARBECUE WITH WATER. IF AN EXTINGUISHER IS USED, IT SHOULD BE
A POWDE R TYPE.
• DO NOT REMOVE THE DRIP TRAY
• If the fire does not seem to be abating or appears to be worsening, contact your local Fire Brigade
for a ssistance.
Manual igniti on instructions
• Open the bar becue hood
• Insert a lo ng lit match t hrough the m atch-lighting hole in the right hand side of the body of the
barbecue until the lit end is alongside the right hand burner. Push and turn the right hand control
knob anti-clockwi se to the high position takin g care to pr otect you rself from fla m es.
• When the burner is lit turn on the remain ing burners from righ t to left.
• Confi rm that ea ch burner is li t before turning on the next burner
• To light the side burner place the lighted end of a long match alo ngside the side burner. Push and
tur n the side burner control knob anti-clockwise to the high position taking care to protect yourself
from flam es.
• If the right hand burner fails to light, turn off the gas and contact your local Outback dealer.
CARE AND MAINTENANCE
nNever handle hot parts of the BBQ with unprotected hands.
nNever douse t he BBQ wi th water when i ts surfa ces are hot .
General
• Regularly clean your BBQ between uses and especia lly after extended periods of storage.
• Do not leave the BBQ uncovered and exposed to the element s w hen not in u se. Heavy duty cove rs
are available as an accessory from your Outback ® stockist. Even when stored outside or inside
wit h a cover it is possible for mould to grow on any fat remaining on parts of the BBQ. This should
be cleaned off smooth surfaces with hot soapy water.
• Ceramic briquettes can be cleaned by lighting the burners on full for 3 to 5 minutes. Heavily
impregnated briquettes should be turned over so that the dirty side faces the burners in order to
burn off any residue. We do not recommend washing cerami c briquet tes.
• All screws and bolts sh ould be checked and t ighten ed if necessa ry on a regular basis.
Page 22

22
Cleaning
Material Where used Cleaning Method Recommended
Porcelain
Enamel
Grills
Griddles
Body
Enamel is a thin, glass based coating fused onto metal and as such
needs to be treated with care. Cooking oil, together with fat from
food being cooked can turn to carbon as a result of heating and
result in black flakes coming away from the cooking surfaces. These
are not harmful. Porcelain should be cleaned using hot soapy water
or with the use a suitable cleaning product following the
manufactures instructions. Due to the weight of the grills and griddle,
we do not recommend cleaning in a dishwasher.
Excess fat and food debris can be removed from inside the body
using a plastic or wooden scraper.
Chrome plated Warming basket
Tool/Towel rail
Wash with hot soapy water. A chrome cleaner may be used if
required. To prevent rusting, wipe with cooking oil after rinsing and
drying.
Paint
Aluminium
Hood ends
Hood handle
Door handles
Side burner
Wipe with a cloth wrung out in hot soapy and dry.
Do not use abrasives.
Stainless
Steel
Centre of hood
Doors
Side burner lid
Shelf insert
Control panel
Wipe with a cloth wrung out in hot soapy water.
A stainless steel cleaner may be used if required.
Galvanised
steel
Drip tray Excess fat and food debris must be removed using a plastic or
wooden scraper. This needs to be carried out between each use of
the BBQ. Excessive build up is likely to lead to a fat fire which can be
hazardous and damage the BBQ. This is not a fault in the BBQ
and therefore is not covered by the terms of the warranty.
If required, the drip tray and foil liner can be washed in hot soapy
water.
Cast Iron Burners
Side burner grid
Any food debris should be r emoved on a regular basis. It is
normal for rust to form on the cast iron. This can be cleaned
usi ng a wire br ush. Burners shou ld be removed on a regu lar
basis for inspection and cleaning. They should be checked f or
general condition and to ensure the portholes a re not becom ing
block ed. These can be clea ned with the use of a wire brush and
a pi pe cleaner. Care should be taken not to damage the gas
valv e or igniti on electrode when removing or replacing the
burners.
Page 23

23
Troubleshooting
Problem
Possible Cause
Solution
Burners will n ot light
using the ignition
system
LP gas bottle is empty Replace with full gas bottle
Faulty regulator Have regulator checked or replaced
Obstructions in burners Clean bur ners
Obstructions in gas jets or
gas hose
Clean jets and gas hose
Electrode or p ushbutto n
Ig nition wire i s lo ose or
disconnected
Reconnect wire
Electrode or w ire is damaged C hange elect rod e and wir e
Incorrec t elect ro de gap/ Be nt
col l ector box
The gas collector box around the
electrode needs to be in li ne wi th the
burners with a gap of 3 to 4mm
between the end of the electrode and
th e tag on the bottom of the collector
box . R eali gn the coll ector box as
required.
Flat battery in ignition assem bly Rep l ace battery
Poor connection of battery in
Ignition assembly.
Ensure battery is firmly
Pushed onto co nnect ors.
Burner will no t light
with a match
LP gas bottle is empty Replace with full gas bottle
Faulty regulator Have regulator checked or replaced
Obstructions in burners Clean bur ners
Obstructions in gas jets or
gas hose
Clean jets and gas hose
LP gas bottle too small Use larger gas bottle
Obstructions in burners Clean bur ners
Obstructions in gas jets or
gas hose
Clean jets and gas hose
Wind y c onditions Us e B BQ in a more sheltere d posit i on
Gas valve knob
difficult to turn
Gas va l v e j ammed R eplac e gas va l v e
Low flame or
flashback (fire In
burner tube - a
hissi ng or roarin g
noi se may b e heard)
Page 24

24
T echn ical Specifications
For ref er ence and corresponde nce, recor d y our serial number here.
(See sticker on side of barbecue body.)
Serial No.__________________
This number may be required when ordering spar e parts or accessories.
A part reference number may also be required where app licab le.
Model Name
CE
Approval
Heat Input Burners
Injector
Size
Gas /Pressure
Outback®
Cuisine
13kW 4 0.91
Butane/ 28mbar
Propane/ 37mbar
Butane/Propane
30mbar
Butane/Propane
50mbar
Buta ne / Pro p ane
36mbar
Outback®
Connoisseur
15.75kW 6 0.81
Side Burner 2.8kW 1 0.84
Countries of Use:
I
3+ (28-30/37)
BE, CY, CZ, EE, FR, GR, IE, IT, LV, LT, LU, PT, SK, ES, CH, GB, RO
I
3B/P(30)
BG, CY, CZ, DK, EE, FI, GR, LV, LT, LU, MT, NL, NO, SK, SI, SE, TR, IS
I
3B/P(50)
AT, DE, HU, SK, CH
I
3B/P(36)
PL
0359
359AS128
Published November 2007
 Loading...