

Oursson MO2610 User Manual [ru]
MO2305, MO2610, MO3020
DE
Bedienungsanleitung
EN
Instruction manual
ES
Manual de instrucciones
FR
Manuel d’instructions
IT
Manuale di istruzioni
LV
Lietošanas pamācība
PL
Instrukcja manuał
RO
Instrucțiuni de utilizare
RU
Руководство по эксплуатации
UA
Керівництво з експлуатації

220-240 V
~
10 сm
4,5 сm
4,5 сm
1 2
MO2305 MO2610 MO3020
1
2
3
4
5
3
MO2305 MO2610 MO3020
6
7
8
9
1
1
3
2
4
2
7
5
6
8
1
4
MO2305, MO2610 MO3020
4
145
190
230
100 230
1
Р Р
2
3
2
190145
0
10
MIN
60 20
50
30
40
3
4
1
2
3
4
5
5
D
5
SICHERHEITSHINWEISE – Abbildung A
Gefahrensymbol
Weist auf hohe elektrische Spannungen hin.
Warnsymbol
Weist darauf hin, dass Bedienschritte genau wie
in der Anleitung beschrieben ausgeführt werden
müssen.
Beim Umgang mit Elektrogeräten sollten Sie stets fol-
gende Regeln beachten:
• Benutzen Sie das Gerät so wie in der
Bedienungsanleitung beschrieben.
• Stellen Sie das Gerät auf einer stabilen Unterlage auf.
• Benutzen Sie ausschließlich die im Lieferumfang ent-
haltenen Werkzeuge und Zubehörteile.
• Damit es nicht zu Stromschlägen kommt, hal-
ten Sie das Netzkabel von Wasser und anderen Flüssigkeiten fern. Falls aus irgendwelchen
Gründen Wasser oder andere Flüssigkeiten in
das Gerät eindringen sollten, ziehen Sie sofort
den Netzstecker, benutzen das Gerät nicht weiter, sondern wenden sich an den autorisierten
Kundendienst (ASC) der OURSSON AG.
• Schließen Sie das Gerät an eine passende Stromquelle
an.
• Benutzen Sie das Gerät nicht an Stellen, an denen
leicht entzündliche Dämpfe in der Luft liegen können.
• Versuchen Sie niemals, das Gerät eigenmächtig zu
öffnen – zum einen droht Stromschlaggefahr, zum
anderen können dadurch schwere Fehlfunktionen
eintreten; zusätzlich erlischt die Garantie. Wenden
Sie sich bei Reparatur und Wartung nur an den
autorisierten Kundendienst, der Reparaturen von
OURSSON-Markenprodukten ausführt.
• Wenn Sie das Gerät von einem kühlen zu einem war-
men Ort oder umgekehrt bringen, packen Sie es aus
und war ten 1 – 2 Stunden ab, bevor Sie es einschalten.
So kann kondensierte Feuchtigkeit verdunsten und kei-
nen Schaden anrichten.
• Damit es nicht zu Stromschlägen kommt, tau-
chen Sie das Gerät und das Netzkabel niemals in
Wasser oder andere Flüssigkeiten.
• Gehen Sie besonders umsichtig vor, wenn Sie das
Gerät in der Nähe von Kindern benutzen.
• Berühren Sie keine heißen Teile; ansonste1n kann
es zu Verbrennungen kommen.
• Das Netzkabel wurde bewusst kurz gehalten, damit es
nicht zur Stolperfalle werden kann.
• Achten Sie darauf, dass das Kabel nicht über
Tischkanten herabhängt oder heiße Gegenstände be-
rührt.
• Schließen Sie das Gerät nicht an Stromkreise an, an
die bereits andere Geräte angeschlossen wurden,
die viel Strom verbrauchen: In diesem Fall können
Leitungen überlastet werden, das Gerät funktioniert
eventuell nicht mehr richtig.
• Stellen Sie das Gerät nicht in der Nähe von Gas- oder
Elektroöfen und -herden auf.
• Ziehen Sie nach Gebrauch immer den Netzstecker aus
der Steckdose.
Verbrennungsgefahr
- Symbol
Weist auf hohe Temperaturen
hin.
• Sorgen Sie dafür, dass das Gerät keinen
Erschütterungen, Vibrationen und anderen mechanischen Belastungen ausgesetzt wird, nicht umkippt
oder stürzt.
• Ziehen Sie immer den Netzstecker, bevor Sie das
Gerät reinigen oder Zubehörteile wechseln.
• Benutzen Sie das Gerät nicht im Freien.
• Das Gerät ist nicht für Personen geeignet, die unter
körperlichen oder geistigen Einschränkungen leiden
oder denen es an der nötigen Erfahrung im Umgang
mit Elektrogeräten mangelt. Dies gilt natürlich auch
für Kinder. Solche Personen dürfen das Gerät nur
unter erfahrener Aufsicht nutzen und/oder nachdem
sie gründlich mit der Bedienung des Gerätes und den
eventuell damit verbundenen Gefahren vertraut gemacht wurden. Lassen Sie Kinder nicht mit dem Gerät
spielen.
• Das Gerät ist für den reinen Hausgebrauch vorgesehen.
• Falls das Netzkabel beschädigt wird, muss es von
Fachleuten des autorisierten Kundendienstes (ASC)
der OURSSON AG ausgetauscht werden, damit es
nicht zu Gefährdungen kommt.
• Benutzen Sie ausschließlich die im Lieferumfang ent-
haltenen Werkzeuge und Zubehörteile.
• Verzichten Sie bei der Reinigung des Gerätes
unbedingt auf Scheuermittel und organische
Reinigungsmittel (Alkohol, Benzin und dergleichen).
Bei hartnäckigen Verschmutzungen können Sie ne-
ben einem feuchten Tuch auch ein wenig mildes
Reinigungsmittel benutzen.
DE
EMPFEHLUNGEN
• Lesen Sie die Anleitung gut durch, bevor Sie das
Gerät benutzen. Bewahren Sie die Anleitung auf, da-
mit Sie später darin nachlesen können.
• Sämtliche Abbildungen in dieser Anleitung dienen nur
zur Veranschaulichung, können daher etwas vom tatsächlichen Aussehen Ihres Gerätes abweichen.
• Bewegen Sie das Gerät nicht im laufenden Betrieb.
• Verwenden Sie das Gerät ausschließlich zum
Erwärmen von Speisen.
• Missbrauchen Sie das Gerät nicht als Heizung.
• Versuchen Sie niemals, das Gerät mit geöffneter
Gerätetür zu benutzen.
• Verwenden Sie ausschließlich hitzebeständiges, für
Miniöfen geeignetes Geschirr.
• Stellen Sie keine Konservendosen, Flaschen, dicht
schließende Behälter oder (zu) große Gegenstände in
das Gerät. Andernfalls kann es zu Verletzun gen sowie
6

zu Beschädigungen des Gerätes kommen.
• Legen Sie Fleisch oder Fisch niemals direkt auf den
Rost; Öle und Fette können sich entzünden. Geben
Sie Lebensmittel auf eine geeignete Unterlage. Achten
Sie darauf, dass Folien nicht mit den Heizelementen in
Berührung kommen.
• Garen Sie in Folie verpackte Speisen auf der mittleren
oder unteren Ebene.
• Lassen Sie das Gerät nicht unbeaufsichtigt arbeiten.
• Geben Sie kein Papier, keine Pappe, Kunststoffe,
Textilien und dergleichen in das Gerät; es besteht
Brandgefahr.
• Nehmen Sie erhitzte Speisen mit Topappen oder
Ofenhandschuhen aus dem Gerät.
• Knallen Sie die Gerätetür nicht zu, stellen sie nichts
auf der Tür ab, achten Sie darauf, dass die erhitzte
Gerätetür nicht mit kaltem Wasser in Berührung kommt.
Abbildung A-1.
• Falls Speisen beim Erhitzen zu rauchen beginnen oder
gar Feuer fangen, schalten Sie das Gerät sofort ab und
ziehen den Netzstecker aus der Steckdose. Öffnen Sie
die Gerätetür nicht, bevor die Flammen erloschen sind
– Frischluftzufuhr liefert Feuer zusätzlichen Sauerstoff.
Gießen oder sprühen Sie kein Wasser auf das Gerät;
es kann zu Kurzschlüssen kommen, zudem kann das
Glas springen.
KOMPONENTEN – Abbildung C-1
1
Türgriff
2
Drehspießhalterung
3
Einschübe für Rost und Bleche
4
Tür
5
Bedienfeld
6
Belüftungsöffnungen
7
Betriebsanzeige
8
Entnehmenbares Krümelblech
Innenbeleuchtung – Abbildung C-1-2
Obere und untere Heizelemente – Abbildung C-1-1
BEDIENUNG
Bedienfeld – Abbildung C-2
Betriebsartwähler – Abbildung C-2-4
• STOPP- einstellung, stoppt den Betrieb
• Heißluft (Umluftgaren)
• Drehspieß (bräunt das Gargut gleichmäßig von
allen Seiten)
• Heißluft- und Drehspieß
Wenden Sie bei der Bedienung des Gerätes
niemals Gewalt an. Andernfalls kann es zu
Schäden kommen, die nicht durch die Ga-
rantie abgedeckt werden.
AUFSTELLEN – Abbildung A-2
• Stellen Sie das Gerät auf eine achen, ebenen und
hitzebeständigem Unterlage auf. Achten Sie darauf,
dass das Gerät nicht von Kinderhänden erreicht
werden kann, halten Sie den nötigen Abstand zu
Wänden und Möbeln ein. Das Gerät muss an mindestens einer Seite komplett frei bleiben. Das Gerät
darf nicht eingebaut werden!
• Stellen Sie das Gerät niemals unter oder in der
Nähe von brennbaren Gegenständen wie Gardinen,
Vorhängen und dergleichen auf – Brandgefahr!
LIEFERUMFANG – Abbildung B
Hauptgerät .............................................................1Stk.
Emailleblech ...........................................................1 Stk.
Rost ........................................................................1 Stk.
Blech- und Rostgriff ................................................1 Stk.
Drehspießgriff .........................................................1 Stk.
Drehspieß ...............................................................1 Stk.
Rundblech, 22,8 cm ................................................1 Stk.
Krümelblech ...........................................................1 Stk.
8
Fischkorb ................................................................1 Stk.
9
Grillkorb ..................................................................1 Stk.
Bedienungsanleitung ..................................................1 Stk.
Temperatureinstellung – Abbildung C-2-1
• Zum Einstellen der Temperatur von 100 – 230°C
Betriebsartwähler. Abbildung C-2-2
Р
• STOPP - Stellung
• Oberhitze (oberes Heizelement)
• Unterhitze (unteres Heizelement)
• Oberhitze und Unterhitze
• Oberhitze und Drehspieß
(Modelle MO2305, MO2610)
Timer, Abbildung C-2-3
• Timer zur Zeitauswahl von 0 – 60 Minuten
• STOPP stoppt das Erhitzen
Drehspieß – Abbildung C-5
1
Halterung
2
Haken
3
Fixierer
4
Spieß
5
Motorkupplung
Vorbereitungen vor dem ersten Einsatz
Vor dem ersten Einsatz wischen Sie das Gerät mit einem
weichen, trockenen Tuch gründlich ab. Waschen Sie die
restlichen Teile mit warmem Wasser und etwas Spülmittel
ab. Ziehen Sie immer den Netzstecker aus der Steckdose,
7
bevor Sie Teile vom Gerät abnehmen oder wieder anbringen. Trocknen Sie alle Teile gründlich.
Lassen Sie das Gerät in der Betriebsart bei maximaler
Temperatur 15 Minuten lang leer arbeiten. So verschwin-
det der typische Neugerätegeruch. Lüften Sie den Raum
gut durch. Lassen Sie das Gerät abkühlen.
Bedienung – Abbildung C-2
1. Sorgen Sie dafür, dass das Krümelblech installiert,
der Timer auf eingestellt ist. Stecken Sie den
Netzstecker ein.
2. Stellen Sie die gewünschte Temperatur mit dem Regler
ein.
3. Drehen Sie den Timer auf 5 Minuten, wählen Sie
zum Vorheizen die Betriebsart . Der Timer dreht sich
im laufenden Betrieb wieder automatisch zurück.
4. Wählen Sie die gewünschte Betriebsart:
5. Legen Sie die Speisen auf das Blech oder den Rost,
alternativ stecken Sie die Speisen auf den Spieß.
Achten Sie darauf, dass zwischen den Speisen und den
Heizelementen immer mindestens 2 cm Platz verbleibt.
6. Schieben Sie Blech oder Rost in das Gerät oder setzen
Sie den Drehspieß ein – Abbildung C-3. Schließen Sie
die Gerätetür.
7. Stellen Sie den Timer auf die gewünschte Garzeit
ein. Wir raten davon ab, die Gerätetür beim Garen zu
öffnen.
HINWEIS: Im laufenden Betrieb leuchtet die
Innenbeleuchtung, die Betriebsanzeige (Abbildung C-1)
blinkt.
8. Nach Ablauf der Garzeit schaltet der Timer das Gerät
automatisch ab, Sie hören ein Tonsignal. Stellen Sie alle
Regler wieder in die Stellung zurück.
9. Öffnen Sie vorsichtig die Tür, nehmen Sie die erhitzten
Speisen heraus. Dazu benutzen Sie am besten einen
Topappen, Ofenhandschuhe oder den speziellen Griff
für Blech oder Rost – Abbildung C-4.
Drehspieß verwenden – Abbildung C-5
1. Nehmen Sie den Drehspieß zur Hand, ziehen Sie einen
Fixierer vom Spieß ab .
2. Schieben Sie das vorbereitete Gargut bis in die Mitte
des Spießes, xieren Sie das Gargut von beiden Seiten
mit den Fixierern. Das gesamte Gargut muss fest eingeklemmt werden, nichts darf sich lösen oder herabhän-
gen.
3. Drehen Sie den Timer auf 10 Minuten, wählen Sie
zum Vorheizen die Betriebsart .
4. Setzen Sie den Spieß in die Halterungen ein: Das spitze
Ende gehört in die rechte Halterung, das andere Ende in
die rechteckige Halterung auf der linken Seite .
5. Schieben Sie ein Blech in den unteren Einschub, damit
der Saft aus dem Gargut hineintropfen kann.
6. Stellen Sie die gewünschte Temperatur mit dem Regler
ein.
7. Wählen Sie die gewünschte Betriebsart: (Modelle
MO2305, MO2610) oder , und (Modell
MO3020).
8. Stellen Sie den Timer auf die gewünschte Garzeit
ein.
9. Nach Ablauf der Garzeit schaltet der Timer das Gerät
automatisch ab, Sie hören ein Tonsignal. Stellen Sie alle
Regler wieder in die Stellung zurück.
10. Nehmen Sie den Spieß mit dem speziellen Griff 4
(Abbildung B) aus dem Gerät, achten Sie dabei darauf,
dass die Haken des Griffes den Spieß an beiden Seiten
packen. Heben Sie den Spieß zuerst vorsichtig aus
der linken, dann aus der rechten Halterung. Schieben
Sie das Gargut vom Spieß auf einen Teller oder ein
Schneidbrett.
HINWEIS: Grillkorb 9 und Fischkorb 8 (Abbildung. B) nutzen Sie auf ähnliche Weise.
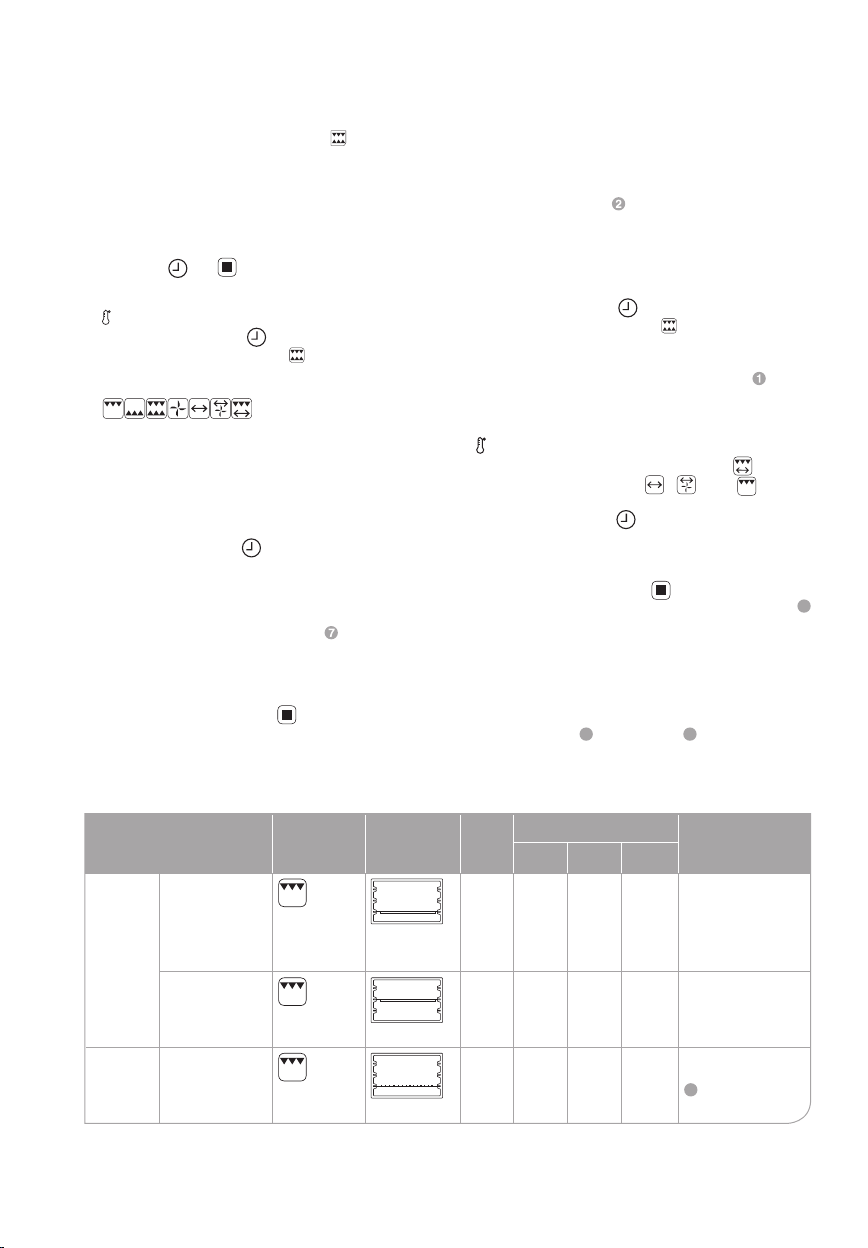
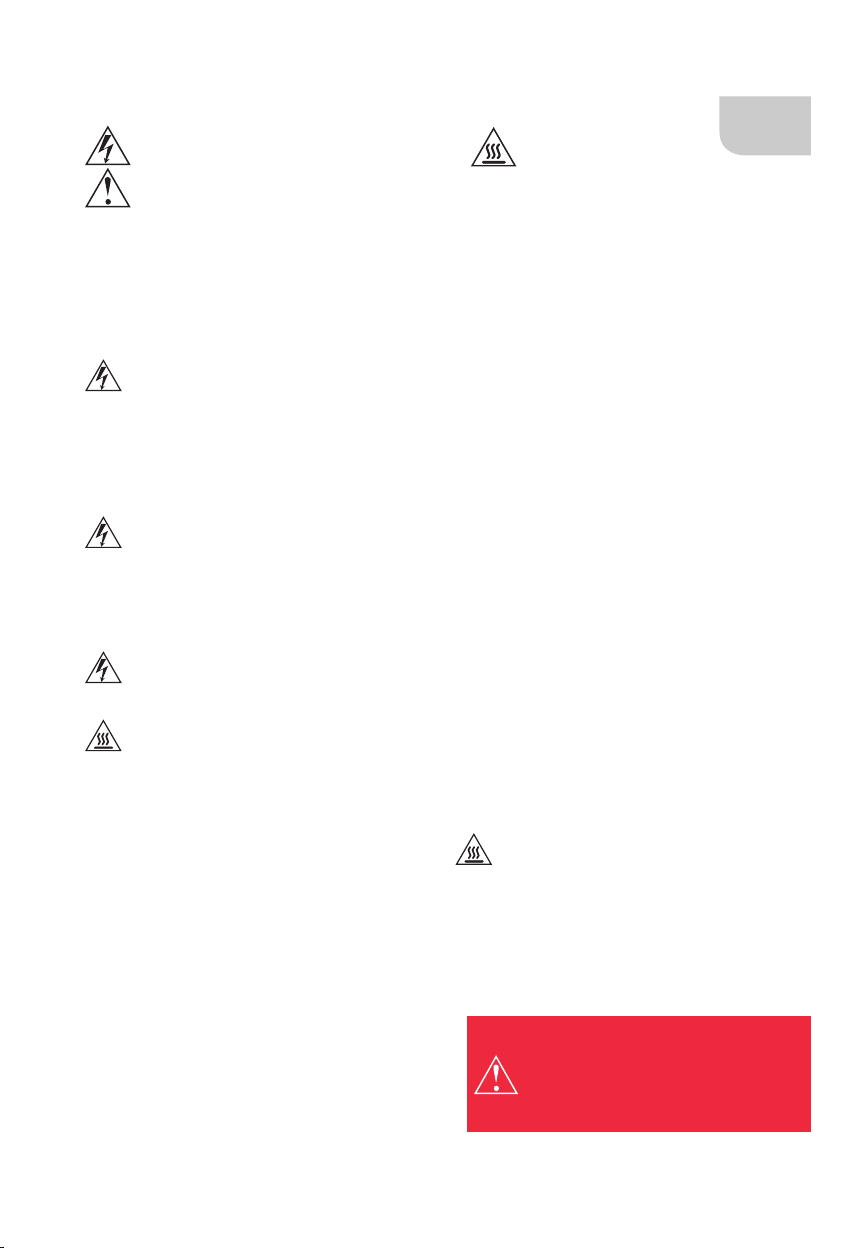
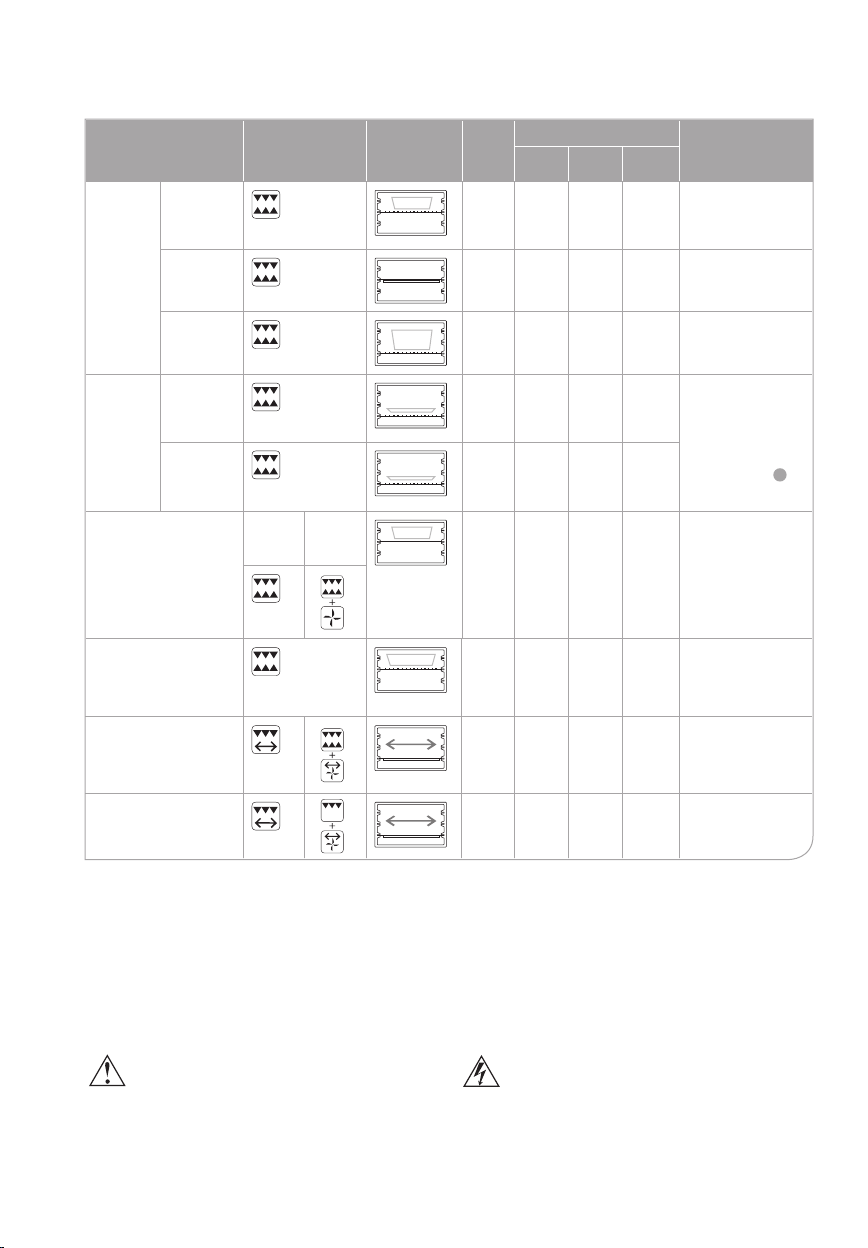
ZUBEREITUNGSEMPFEHLUNGEN
Lebensmittel Betriebsart Blech-/Ro-
Fleisch Schweineeisch
FleischFertig
gerichte
(80 0g)
Rindeisch/
Lamm (800g)
Würstchen
(50 0g)
steinschub
8
Tem -
Garzeit Hinweise
pera-
MO2305
tur
200°C
200°C
160°C
MO2610
(23 l)
(26 l)
35
35
min
min
40
40
min
min
15
min15min20min
MO3020
(30 l)
40
min
45
min
Vor dem Garen in
3 cm große Würfel
schneiden, marinieren.
Vor dem Garen in
3 cm große Würfel
schneiden, marinieren.
Leicht einschnei-
den. Krümelblech
einsetzen.
7
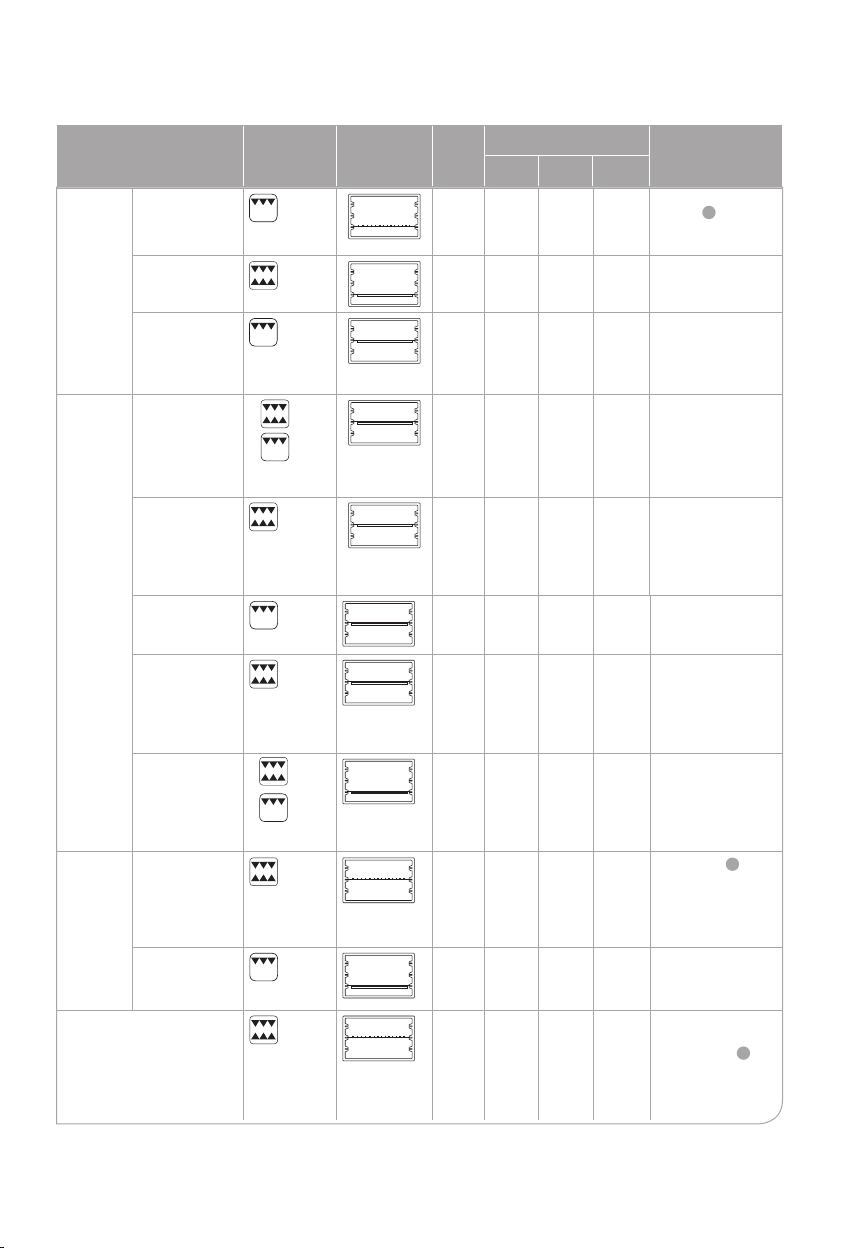
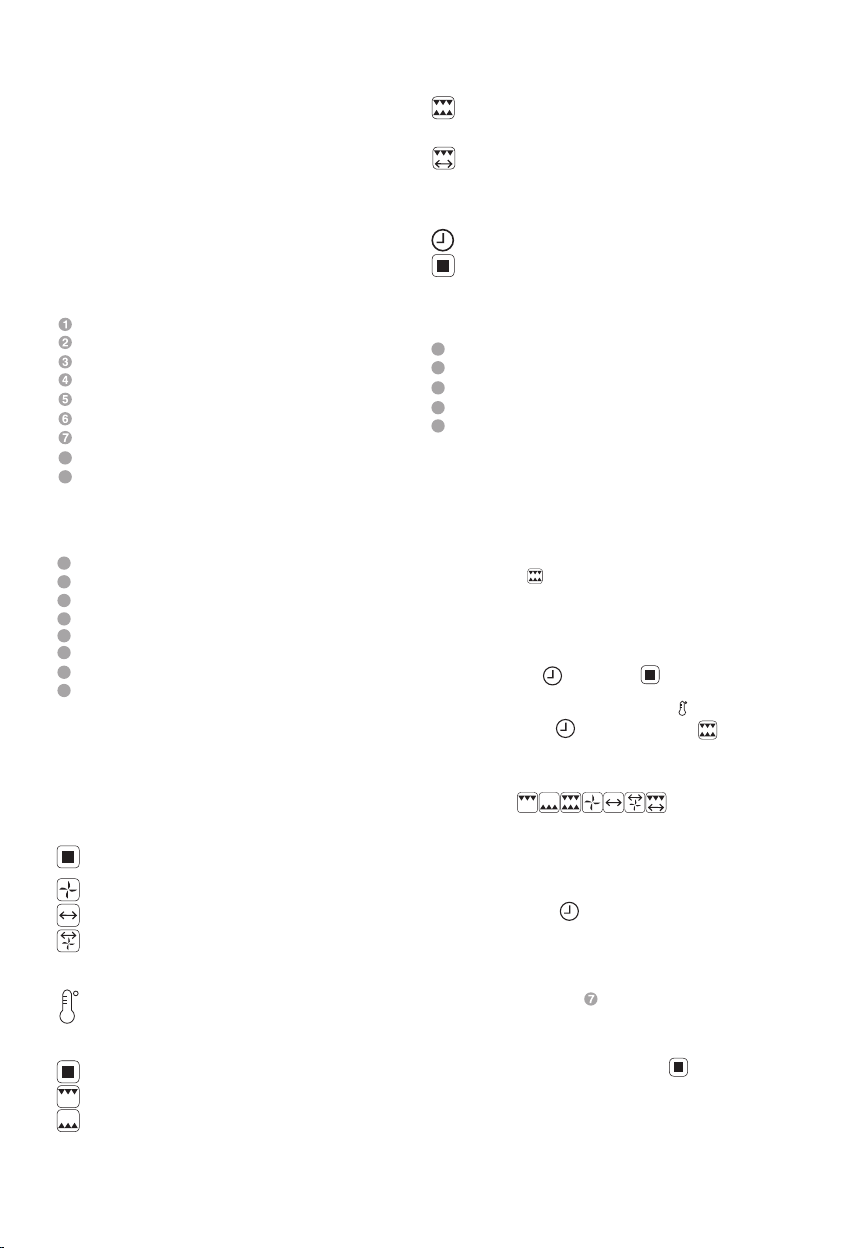
ZUBEREITUNGSEMPFEHLUNGEN
Lebensmittel Betriebsart Blech-/Ro-
FleischFertig
gerichte
Hotdog-
Würstchen
(50 0g)
steinschub
Tem -
Garzeit Hinweise
pera-
MO2305
tur
160°C
(23 l)
15
min
MO2610
(26 l)
15
min20min
MO3020
(30 l)
Krümelblech ein-
7
setzen.
Frikadellen
(80 0g)
Beefsteak
(350g)
Geügel Filet
Fisch
(500g)
Keulen
(500g)
Flügel
(500g)
Ganze Keule
(500g)
Ganzes
Hähnchen
(900g)
Ganz
(600g)
Portionierte
Stücke
(500g)
Toast (4 Stück)
1.
(z um
2.
Ende der
Garzeit,
sorgt für knusprige
Haut)
1.
(zum
2.
Ende der
Garzeit,
sorgt für knusprige
Haut)
120°C
160 °C
160°C
160 °C
180°C
160°C
160°C
130°C
150°C
180°C
20
min20min25min
15
min15min20min
25
25
min
25
min
25
min
30
min
15
min
15
min
30
min
30
min
20
min
30
min
40
min
20
min
20
min
10
min
min
25
min
15
min15min
25
min
30
min
15
min
15
min
7
min7 min
Krümelblech einsetzen, 150 ml Wasser
hineingießen.
In Streifen schneiden, mit Salz,
Gewürzen und
Kräutern einreiben.
Damit das Fleisch
saftig bleibt, in einen
Bratschlauch geben.
Mit Salz, Gewürzen
und Kräutern ein-
reiben.
Damit das Fleisch
saftig bleibt, in einen
Bratschlauch geben.
Mit Salz, Gewürzen
und Kräutern ein-
reiben.
Mit Salz, Gewürzen
und Kräutern ein-
reiben.
Mit Salz, Gewürzen
und Kräutern einrei-
ben. Krümelblech
einsetzen, 150 ml
Wasser hineingie-
ßen.
Krümelblech einset-
zen, 150 ml Wasser
hineingießen.
Mit Salz, Gewürzen
und Kräutern ein-
reiben.
Krümelblech 7
einsetzen. In
Alufolie einwickeln.
Zitronenscheiben hinzugeben; so werden
kleine Gräten weich.
Krümelblech einsetzen, 150 ml Wasser
hineingießen.
Brot in Scheiben
schneiden.
Krümelblech 7
einsetzen. Toasts
vor dem Ser vieren
mit Butter bestrei-
chen.
9

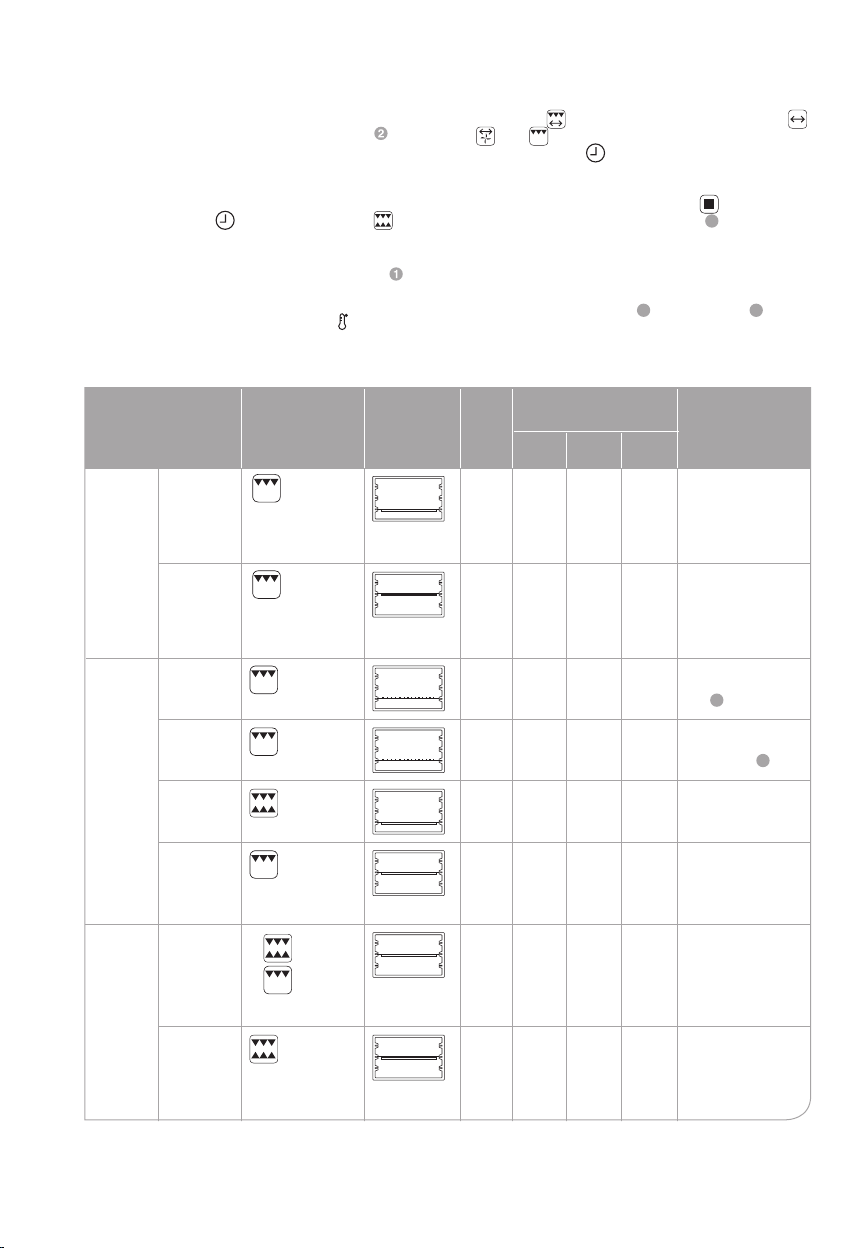
ZUBEREITUNGSEMPFEHLUNGEN
Lebensmittel Betriebsart Blech-/Ro-
Französische Toasts
(50 0g)
MO2305
(23 l)
MO2610
(26 l)
MO3020
(30 l)
steinschub
Tem -
Garzeit Hinweise
pera-
MO2305
tur
120°C
(23 l)
15
min
MO2610
(26 l)
15
min
MO3020
(30 l)
20
min
Brot in 1 cm große
Würfel schneiden.
Vor dem Backen
mit Panzenöl, Salz,
Pfeffer und Kräutern
besprenkeln.
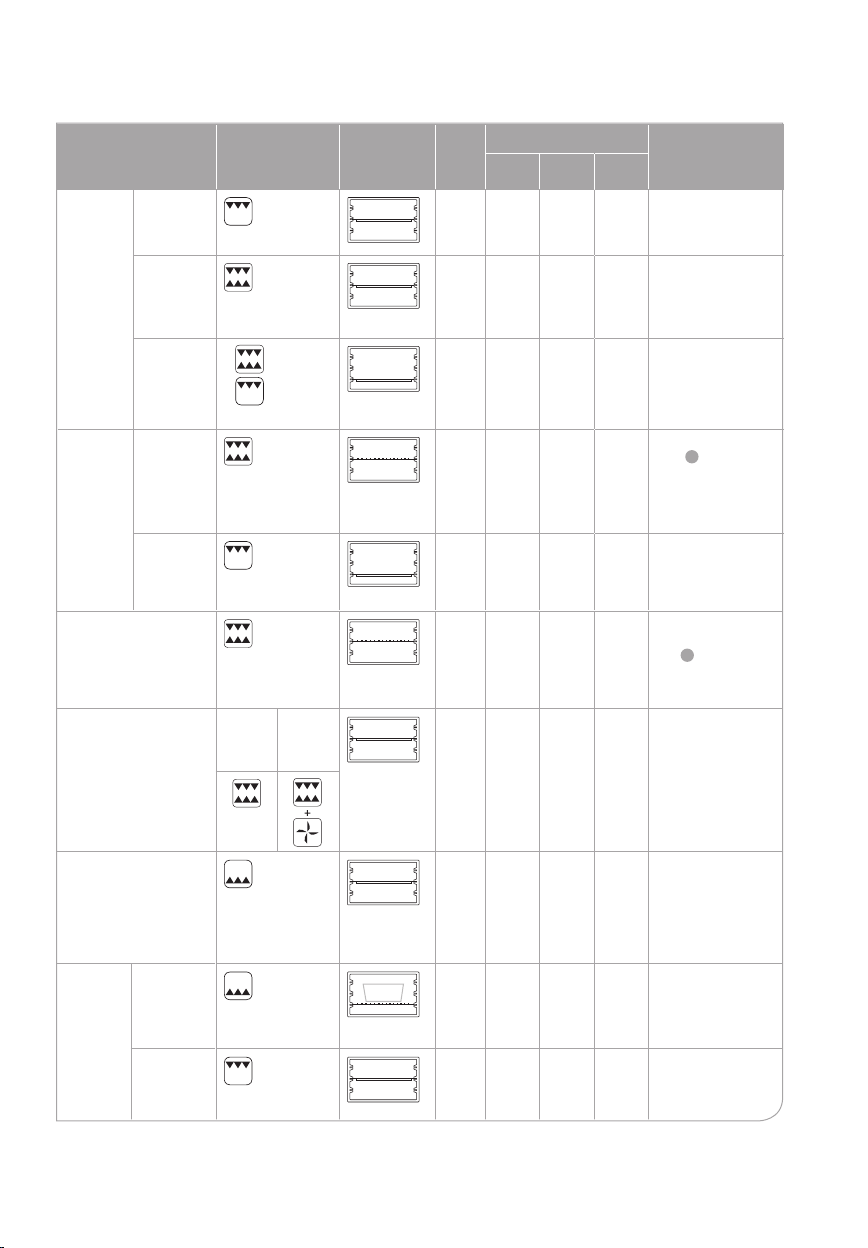
Bratkartoffeln
(50 0g)
Gemüse
Gebäck Kuchen
Gebäck Kekse
Pizza
(Rohteig/
vorgebacken)
Geschmort
(500g)
Gegrillt
(250g)
(300g)
(200g)
Cupcake
(300g)
15 cm
20 cm
Lasagne
MO2305
(23 l)
MO2610
(26 l)
MO3020
(30 l)
150°C
100°C
120°C
120°C
160°C
100°C
180°C
180°C
100°C
25
25
min
30
min
10
min
30
min
15
min
30
min
6
min6 min8 min
8
min8 min
25
min
30
min
min
30
35
min
min
15
15
min
min
30
35
min
min
15
20
min
min
30
35
min
min
10
min
25
min30min
Kartoffeln in dünne
Scheiben schneiden.
(0.5 x 0.5 x 4cm)
Salzen, zum Ende
der Garzeit Zwiebeln
hinzugeben.
Gemüse kleinschneiden. In einen
hitzebeständigen
Behälter geben.
Zum Ende der
Garzeit salzen.
Runde Backform mit
erhöhten Rändern
verwenden.
Auf Backpapier
legen.
Spezielle Form
verwenden.
Pizzaränder mit
Tomatensoße,
Mayonnaise oder ähn-
licher Soße bedecken,
damit sie nicht aus-
trocknen. Rundblech
verwenden.
6
Backform mit
erhöhten Rändern
verwenden.
Auäufe – Gemüse-,
Käse-, Fleisch-,
Kartoffelauauf (500g)
Fleisch/Geügel am
Spieß (900g)
Würstchen am Spieß
(250g)
10
100°C
150°C
150°C
30
min
40
min
15
min
30
min
40
min
15
min
35
In einen hitzebeständigen Behälter
min
geben. Mit einem
Gemisch aus Sahne
und Ei bedecken.
40
Speisen mit
min
Panzenöl einstreichen.
20
Speisen mit Panzenöl
min
einstreichen.
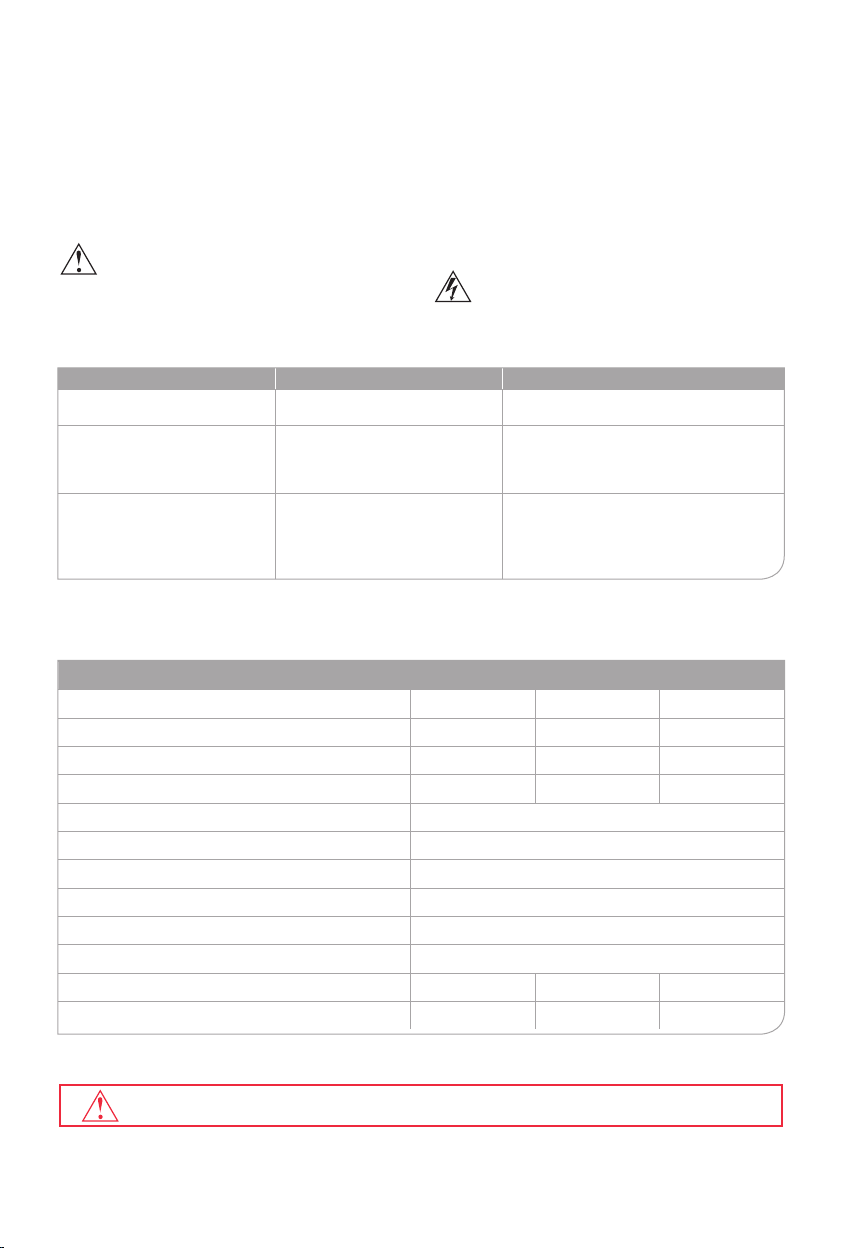
HINWEIS: Garzeiten und Temperaturangaben in der
Problem Mögliche Ursachen Lösung
Das Gerät lässt sich nicht
einschalten.
Die Steckdose liefert keinen Strom.
Ziehen Sie den Netzstecker, warten Sie ab,
bis es wieder Strom gibt.
Beim Erhitzen bildet sich Dampf
Wenn Sie Speisen mit einem
hohen Flüssigkeitsanteil garen,
kann eine gewisse Menge Dampf
entstehen.
Öffnen Sie die Gerätetür möglichst vorsichtig, damit Sie sich nicht am Dampf verbrü-
hen.
Verbrannter Geruch
1. Auf dem Krümelblech benden
sich Speisereste.
2. Am Rost, auf dem Blech oder
im Inneren des Gerätes hat sich
Fett angesammelt.
1. Reinigen Sie das Krümelblech nach je-
dem Einsatz des Gerätes.
2. Wischen Sie das (gründlich abgekühlte)
Gerät innen aus, spülen Sie Rost und
Blech immer gleich nach dem Einsatz.
Tabelle dienen nur zur Orientierung, können je nach
Rezept etwas abweichen.
ENTSORGUNG
• Schneiden Sie das Netzkabel aus Sicherheitsgründen
ab, bevor Sie Ihr Altgerät entsorgen.
REINIGUNG UND PFLEGE – Abbildung D
• Ziehen Sie den Netzstecker aus der Steckdose.
• Lassen Sie das Gerät vor dem Reinigen gründ-
lich abkühlen.
• Öffnen Sie die Tür vollständig, nehmen Sie das Krümelblech aus. Fassen Sie das Blech dazu an der
Kante, heben Sie es leicht an, ziehen Sie es dann
nach vorne heraus.
• Spülen Sie Rost, Blech, Rundblech, Fischkorb,
Grillkorb, Blech- und Rostgriff, Drehspießgriff und
Drehspieß mit warmem Seifenwasser. Die Teile kön-
nen Sie auch in der Spülmaschine reinigen. Wählen
Sie ein Spülprogramm mit maximal 60 °C.
• Wischen Sie das Gehäuse, das Krümelblech und
die Innenächen (ausgenommen Heizelemente) mit
einem weichen, leicht feuchten Tuch sauber.
• Tauchen Sie das Gerät niemals in Wasser
oder andere Flüssigkeiten – es besteht Stromschlaggefahr!
• Trocknen Sie alle Teile gründlich.
MÖGLICHE PROBLEME UND LÖSUNGEN
ZERTIFIZIERUNG
Hinweise zur Produktzertizierung nden Sie unter http://www.oursson.com; Sie können auch Ihren
Händler danach fragen.
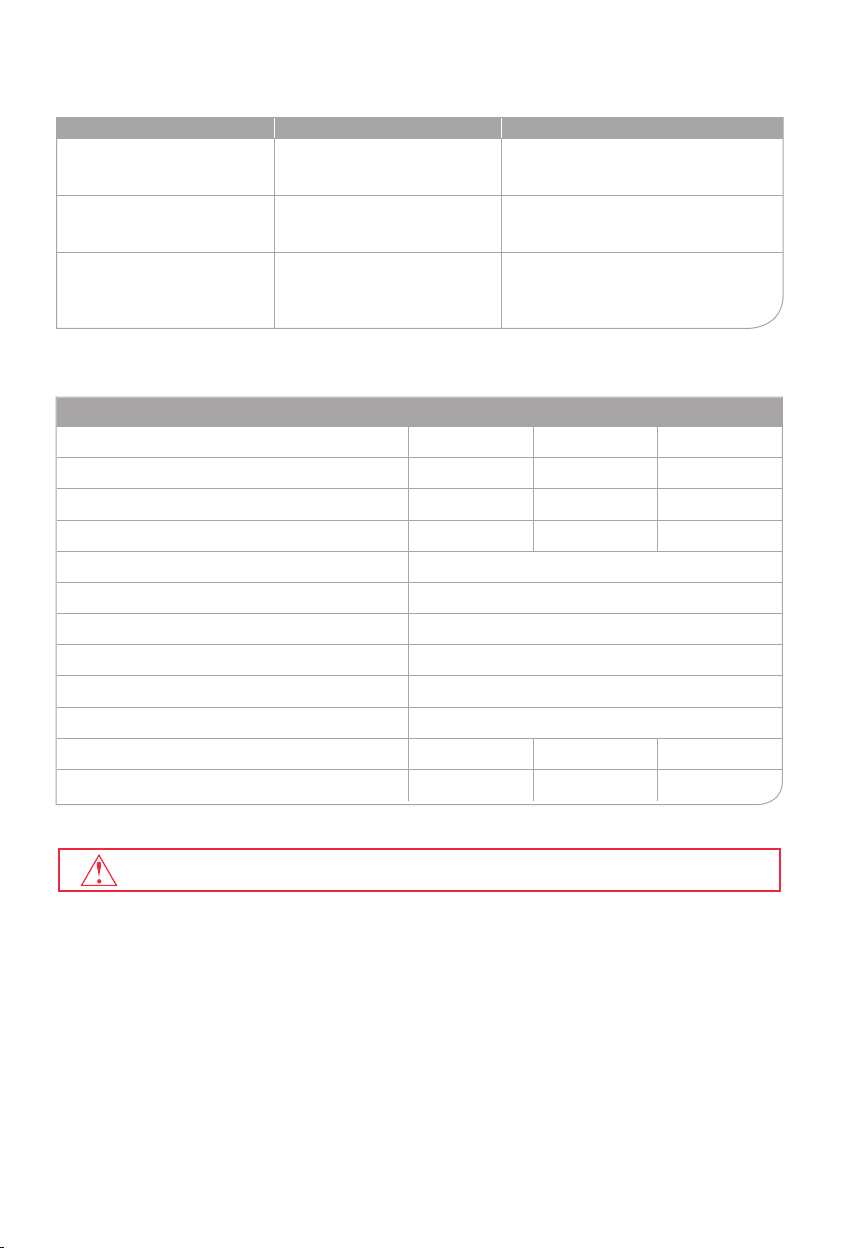
Technische Daten
MODELL МO2305 МO2610 МO3020
Volumen, L 23 26 30
Heißluft - - +
Blechgröße (L × B, mm) 336,2×260 349,5×250 377,6×267
Stromverbrauch (W) Maximal 1500
Netzspannung 220-240 V~, 50/60 Hz
Temperatur bei Lagerung und Transport -25°C bis +35°C
Temperatur im Betrieb 5°C bis 35°C
Luftfeuchtigkeit
Schutzklasse I
Abmessungen (H × B × L, mm) 467×350×290 489×340×322 522x360x322
Gewicht (kg) 6,66 7,14 8,52
* Die Geräte sollten an einer trockenen, gut belüfteten Stelle bei Temperaturen nicht unter -25°C
gelagert werden.
Reparaturen des Gerätes dürfen nur über den autorisierten Kundendienst der OURSSON AG ausgeführt werden.
15 – 75%, nicht kondensierend
11

REPARATUREN
Pr odukt bezei chnu ng
Einsatzzeit
in Monaten
Garantiezeit in
Monaten
Mikrowellengeräte, Brotbackautomaten, Induktion-
sherde
60 12
Multikochgeräte, Küchenmaschinen, Wasserkocher,
Elektrogrills, Handmixer,
Mixer, Fleischwölfe, Toaster,
Thermobehälter, Röstgeräte,
Saftbereiter, Dampfgarer,
Kaffeebereiter, Zerhacker,
Dörrgeräte, Joghurtbereiter,
Fermentiergeräte, Miniöfen,
Tiefkühlgeräte, Kühlgeräte,
automatische Kaffeemaschinen, Milchaufschäumer, Kaffeemühlen
36 12
K ü c h e n w a a g e n , S i p h o n s 24 12
Wir freuen uns, dass Sie sich für ein hochwertiges Produkt
der OURSSON AG entschieden haben. Wir achten darauf,
Ihnen stets sinnvolle, wirklich praxistaugliche Geräte zu bieten.
Auch bei der Qualität gehen wir keine Kompromisse ein. Falls
Ihr OURSSON-Produkt doch einmal repariert werden muss,
wenden Sie sich bitte an unseren autorisierten Kundendienst
(nachstehend einfach Kundendienst genannt). Eine voll-
ständige Liste mit Kundendienstniederlassungen und ihren
Anschriften nden Sie auf unseren Internetseiten: www.oursson.com
Garantiebedingungen der OURSSON AG:
1. Die Garantiebedingungen der OURSSON AG, die
über den Kundendienst der OURSSON AG erbracht
werden, gelten ausschließlich in dem Land, in dem
die Geräte der OURSSON AG vertrieben werden, da
Garantieleistungen nach landesspezischen Vorschriften
und Konformitätsvorgaben erbracht werden müssen.
2. Die OURSSON AG erbringt Garantieleistungen
gemäß den im jeweiligen Vertriebsland gültigen
Verbraucherschutzgesetzen. Garantieleistungen können
nur in Anspruch genommen werden, wenn das jeweilige
Produkt ausschließlich zu persönlichen, familiären Zwecken
sowie im Haushalt eingesetzt wird. Die OURSSON AG ist
nicht zur Erbringung von Garantieleistungen verpichtet,
wenn Produkte für gewerbliche Zwecke, in Unternehmen,
Institutionen, Organisationen oder in einem ähnlichen
Umfeld eingesetzt werden.
3. Folgende Nutzungsbedingungen und Garantiezeiten gelten
für Produkte der OURSSON AG:
4. Die Garantieleistungen der OURSSON AG erstrecken
sich nicht auf folgende Produkte, bei denen es sich um
Verschleißteile handelt oder die nicht mit dem Hauptprodukt
in Verbindung stehen:
• Batterien.
• Mit dem Produkt gelieferte Hüllen, Kordeln, Tragekordeln und
- Gurte, Befestigungszubehör, Werkzeuge, Dokumentation.
12
5. Die Garantie deckt keine Defekte ab, die durch falsche
Nutzung, falsche Lagerung oder falschen Transport der
Waren, durch Eingriffe Dritter oder Höhere Gewalt verursacht
werden. Dazu zählen:
• Defekte, die durch nachlässige Handhabung, Einsatz
für Fremdzwecke, Nichteinhaltung der Anweisungen
der Bedienungsanleitung, zu hohe oder zu geringe
Temperaturen, Feuchtigkeit und Staub, eigenmächtiges
Öffnen oder eigenmächtige Reparaturversuche, Betrieb
mit ungeeigneter Stromversorgung, Eindringen von
Flüssigkeiten, Insekten, sonstigen Fremdkörpern und
Substanzen sowie Langzeiteinsatz des Produktes unter
extremen Einsatzbedingungen entstehen.
• Defekte, die durch nicht autorisierte Versuche zum Testen
oder Prüfen des Produktes, durch physische Veränderung
oder Veränderung von Software, durch nicht autorisierte
Wartung oder Reparatur verursacht werden.
• Defekte, die durch Einsatz nicht standardisierter oder
minderwertiger Ausrüstung, Zubehörteile, Ersatzteile oder
Batterien verursacht werden.
• Defekte, die durch den Einsatz in Verbindung mit
Zusatzteilen (Zubehör) entstehen, die nicht von der
OURSSON AG zum Einsatz mit dem Produkt emp-
fohlen werden. Die OURSSON AG übernimmt keine
Haftung für die Qualität von Zusatzteilen (Zubehör)
von Drittanbietern und damit verbundenen Produkten.
Zusätzlich gewährleistet die OURSSON AG nicht, dass
Produkte einwandfrei mit Produkten anderer Hersteller
zusammenarbeiten.
6. Produktdefekte, die während der regulären Einsatzzeit eines
Produktes auftreten, werden vom autorisierten Kundendienst
behoben. Innerhalb der Garantiezeit werden Defekte kostenlos behoben. Dazu müssen das Garantiezertikat sowie ein
Kaufbeleg (aus dem das Kaufdatum hervorgeht) im Original
vorgelegt werden. Fehlen solche Nachweise, beginnt die
Garantiezeit mit dem Herstellungsdatum der jeweiligen
Waren. Bitte beachten:
• Einrichtung und Installation (Zusammenbau,
Anschluss und dergleichen) des Produktes gemäß Bedienungsanleitung fallen nicht unter den
Garantieleistungsumfang der OURSSON AG. Solche
Tätigkeiten müssen vom Anwender selbst ausgeführt,
können gegen Gebühr auch von Spezialisten der meisten
Kundendienstniederlassungen übernommen werden.
• Wartungstätigkeiten (wie Reinigen und Schmieren
beweglicher Teile, Austausch von Verschleißteilen,
Verbrauchsgütern und dergleichen) werden gegen
Gebühr ausgeführt.
7. Die OURSSON AG haftet nicht für jegliche direkten oder indi-
rekten Schädigungen von Menschen oder Tieren sowie nicht
für Sachschäden, sofern diese durch Nichtbeachtung der
Nutzungsbedingungen, unsachgemäße Lagerung, unsachgemäßen Transport, falsche Installation, beiläuge falsche
oder fahrlässige Handlungen von Verbrauchern oder Dritten
entstehen.
8. Unter keinen Umständen haftet die OURSSON AG für jegliche
speziellen, beiläugen, indirekten oder Folgeschäden, zu denen
auch Folgendes zählt: entgangener Gewinn, Schädigungen
durch Geschäfts- und andere Unterbrechungen, verursacht
durch Nutzung oder Nichtnutzbarkeit des Produktes.
9. Im Zuge ständiger Produktverbesserungen können sich
Designelemente und bestimmte technische Spezikationen
ohne Vorankündigung durch den Hersteller ändern.

Nutzung des Produktes über seine reguläre Einsatzzeit hi-
1 2 3 4
naus:
1. Die von der OURSSON AG für dieses Produkt festgelegte
Einsatzzeit gilt nur dann, wenn das Produkt ausschließlich für den persönlichen, familiären sowie Haushaltsbedarf
eingesetzt wird und sich der Anwender an die Vorgaben
zu ordnungsgemäßem Betrieb, Transport sowie zur richtigen Lagerung hält. Bei sachgerechter Handhabung und
Einhaltung der Betriebshinweise kann die tatsächliche
Lebenserwartung des Produktes die von der OURSSON AG
festgelegte Einsatzzeit überschreiten.
2. Wenden Sie sich nach Ablauf der regulären Einsatzzeit an
den autorisierten Kundendienst, lassen Sie eine vorsorgliche
Wartung ausführen und ermitteln, ob sich das Produkt für
eine weitere Nutzung eignet. Vorsorgliche Wartungsarbeiten
werden vom Kundendienst auch während der regulären
Einsatzzeit gegen Gebühr ausgeführt.
3. Die OURSSON AG rät vom Einsatz dieses Produktes
über die reguläre Einsatzzeit hinaus ab, sofern keine vorsorgliche Wartung über den autorisierten Kundendienst
vorgenommen wird, da das Produkt in diesem Fall eine
mögliche Gefahr für Leben, Gesundheit und Eigentum des
Anwenders darstellen kann.
Recycling und Entsorgung
Dieses Gerät erfüllt die Vorgaben der europäischen Direktive
2002/96/EG zu elektrischen und elektronischen Altgeräten –
WEEE. Nach Ende seiner Einsatzzeit darf das Produkt nicht mit
dem regulären Hausmüll entsorgt werden. Stattdessen muss es
bei einer geeigneten Sammelstelle zum Recycling elektrischer
und elektronischer Altgeräte abgegeben, dort nach gesetzlichen Vorgaben verarbeitet, recycelt oder entsorgt werden.
Durch sachgerechte Entsorgung des Produktes leisten Sie
einen kleinen, aber dennoch wichtigen Beitrag zur
Bewahrung unserer natürlichen Ressourcen, zum
Schutz unserer Umwelt und unserer Mitmenschen.
Weitere Hinweise zu Sammelstellen und zum
Recycling dieses Produktes erhalten Sie von Ihrer
Stadtverwaltung oder Ihrer Entsorgungsgesellschaft
für Haushaltsabfälle.
Herstellungsdatum
Jedes Produkt trägt eine eindeutige Seriennummer aus
Buchstaben und Ziffern sowie einen Barcode, der folgende Angaben enthält: Produktgruppe, Herstellungsdatum,
Seriennummer des Produktes.
JM1225011234567
MO
Die Seriennummer nden Sie an der Rückseite
des Produktes, auf seiner Verpackung und auf der
Garantiekarte.
Die ersten beiden Buchstaben bezeichnen die
Produktgruppe (Miniöfen – MO).
Die ersten beiden Ziffern geben das
Herstellungsjahr an.
Die nächsten beiden Ziffern stehen für die
Herstellungswoche.
Die restlichen Ziffern bilden die Seriennummer des
Produktes.
Um Missverständnissen vorzubeugen, empfehlen wir Ihnen dringend, die Bedienungsanleitung und die Garantiebedingungen aufmerksam
durchzulesen. Vergewissern Sie sich, dass die
Angaben auf der Garantiekarte stimmen. Die
Garantiekarte ist nur dann gültig, wenn folgende Dinge richtig und klar angegeben wurden:
Modell, Seriennummer, Kaufdatum, lesbarer
Stempel, Unterschrift des Käufers. Modell- und
Seriennummer des Gerätes müssen mit den
Angaben auf der Garantiekarte übereinstimmen.
Falls diese Bedingungen nicht erfüllt oder die Angaben auf der Garantiekarte geändert werden,
verliert die Garantiekarte ihre Gültigkeit.
Falls Sie Fragen zu oder Probleme mit Produkten der OURSSON AG haben sollten, wenden Sie sich bitte einfach
per E-Mail an uns: support@oursson.com
Diese Anleitung wird durch internationale und EU-Urheberrechtsgesetze geschützt. Eine nicht autorisierte Verwendung der Anleitung einschließlich Kopieren, Ausdrucken und Verteilen kann strafrechtliche Verfolgung nach sich
ziehen.
Kontakt:
1. Produkthersteller – OURSSON AG (Orson AG), Seefeldstrasse 56, 8008 Zürich, Schweiz.
2. Zertizierungsangaben zum Produkt nden Sie auf unseren Internetseiten: www.oursson.com
OURSSON AG
In China hergestellt
13
SAFETY INSTRUCTIONS, Pic. A
Danger symbol
A reminder to user about high voltage.
Warning symbol
A reminder to user about the necessity of operating exactly according to the instructions.
When using electrical appliances should take the following
precautions:
• Use the device according to the following instructions
manual.
• Install the device on a stable sur face.
• Use only the tools, which are included in the product
set.
• To protect against risk of electr ical shock do not put
the cord in water or other liquid. If for some reason
the water got into the unit, contact an authorized
service center (ASC) OURSSON AG.
• For power supply, use a power grid with proper characteristics.
• Do not use the device in areas where the air can con-
tain vapors of ammable substances.
• Never attempt to open the device by yourself – it
could possibly be the reason of an electrical shock
can lead to product malfunction and will invalidate
the manufacturer’s warranty. For repair and maintenance, contact only authorized service centers
meant for repair of products under the trademark
OURSSON.
• When moved from a cool to a warm place and vice
versa unpack it before use and wait 1-2 hours without
turning it on.
• In order to prevent electrical shock do not immerse
the entire product or the wires into the water.
• Be particularly careful and cautious when using the device near children.
• Do not touch any hot parts, as this may cause injury.
• The power cord is specially made relatively short in or-
der to avoid the risk of injury.
• Do not allow the cord to hang over the sharp edge of the
table or touch hot surfaces.
• Do not connect this device to a grid which is overloaded
with other appliances: it can lead to the fact that the device will not function properly.
• Do not install the device near gas and electric stoves
and ovens.
• After use, make sure to disconnect the device from the
power grid.
• Keep the device from bumps, falls, vibration and other
mechanical inuences.
• Make sure to disconnect the device from the power grid
before cleaning or changing accessories.
• Do not use the device outdoors.
• This appliance is not intended for use by persons (in-
cluding children) with reduced physical, sensory or
mental capabilities, or lack of experience and knowledge. They can only use the device under the supervision of the person responsible for their safety, or after
instruction on the safe use of the device. Do not allow
14
Risk of burn symbol
Reminder for user of high
temperatures
children to play with the product.
• This product is intended only for use in the home.
• If the power cord is damaged, it must be replaced by
a specialist from the authorized service center ( ASC )
OURSSON AG to avoid danger.
• Use only the tools, which are included in the product
set.
• When cleaning the appliance do not use abrasives and
organic cleaners (alcohol, gasoline, etc.). When cleaning the device it is allowed to use a small amount of
neutral detergent.
EN
RECOMMENDATIONS
• Please read the instruction manual before using the
device. Keep the manual after reading for further use.
• All illustrations in this manual are schematic
representations of real objects, which may differ from
the actual images.
• Do not shift the device when utilizing it.
• Use the device only for cooking and heating food.
• Do not use the device as a heat source.
• Do not try to use the device with an open door.
• Use only heat resistant kitchenware, suitable for mini-
ovens.
• Do not place into device cans, bottles, tight closed
containers and too big objects. This may lead to a
personal injury or breakage of the device.
• Do not place raw meat / sh directly onto the grid,
because fat and oil can ignite. Use a baking mold,
wrapping products beforehand. Make sure that foil isn’t
contacting with the heating elements.
• When using foil, place the pan on a medium or low level.
• Do not leave the working device unattended.
• Do not put in/on the device paper, cardboard, plastic,
towels, etc., as this can cause a re.
• Use potholders or oven gloves to take the product
out of the oven.
• While using the device do not slam the door, do not put
trays or other objects on the door, avoid contact of cold
water with the heated open door. Pic. A-1.
• If while preparing, food caught on re or began to emit
smoke, turn off the device and unplug it. Do not open
the door until re is stopped, because the oxygen
supply will intensify the ame. Do not pour water over
the device, the glass may crack.
The operation of this device in any case
does not imply application of any force to
it, as this may damage the product due to
user fault.
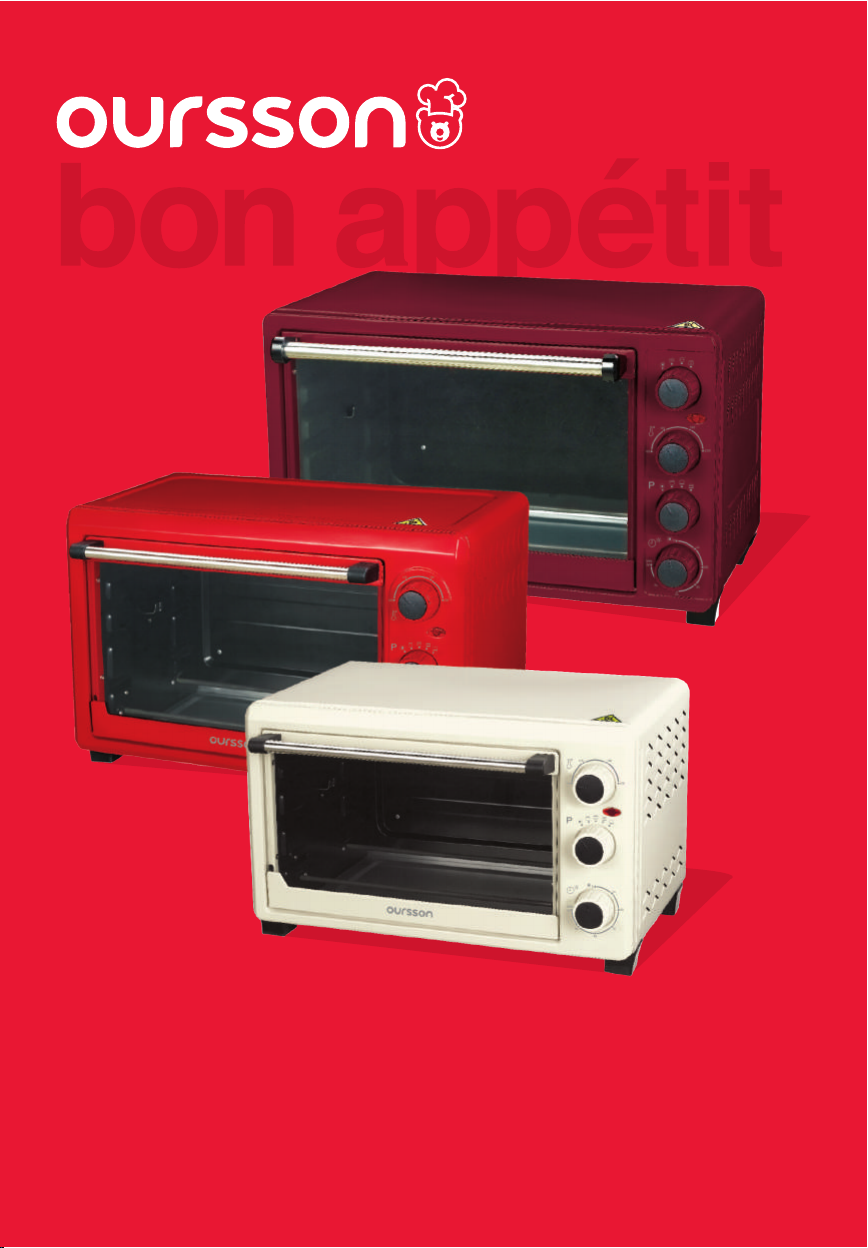
POSITION, Pic. A-2
• Place the device on a at horizontal heat resistant
surface, high from children’s reach, keeping the
distance from walls/furniture. One side must be
completely free. It is forbidden to embed this
device.
• Do not place the working device under/near curtains
or other ammable materials, as this may cause a re.
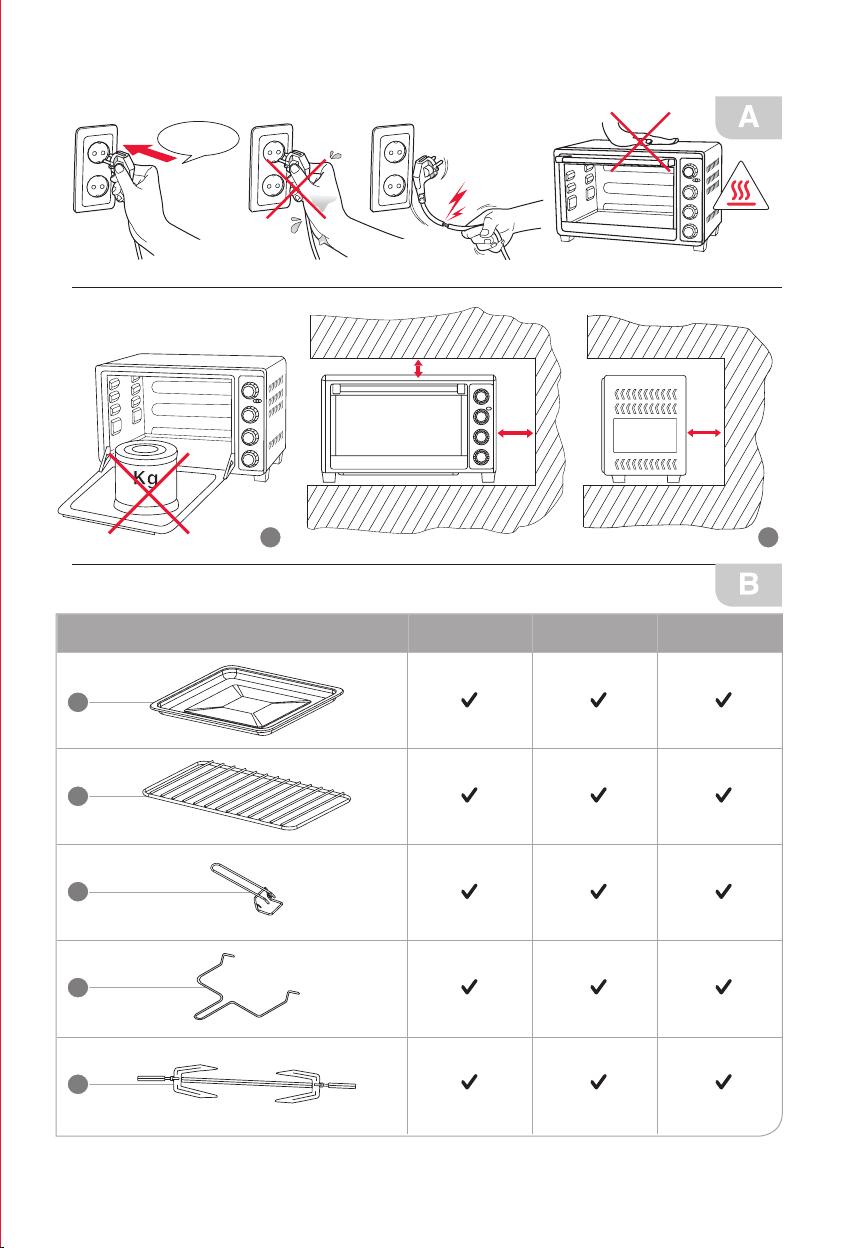
PRODUCT SET, Pic. B
Body...........................................................................1 ps.
Enameled pan........................................................1ps.
Grid.......................................................................1ps.
Handle for pan and grid.........................................1ps.
Handle for spit........................................................1ps.
Spit...................................................................1ps.
Round pan 9"/22,8 cm............................................1ps.
The crumb tray for lids.............................................1ps.
Fish basket............................................................1ps.
8
Grill-basket.........................................................1ps.
9
Instructions manual.......................................................1 ps.
ELEMENTS OF DESIGN, Pic. C-1
1
Door handle
2
Spit bracing
Slots for grid and pans
3
Door
4
5
Control panel
6
Ventilation openings
Work indicator
7
Removable tray for crumbs
8
Inner backlight, Pic. C-1-2
Upper and lower heating elements, Pic. C-1-1
UTILIZATION
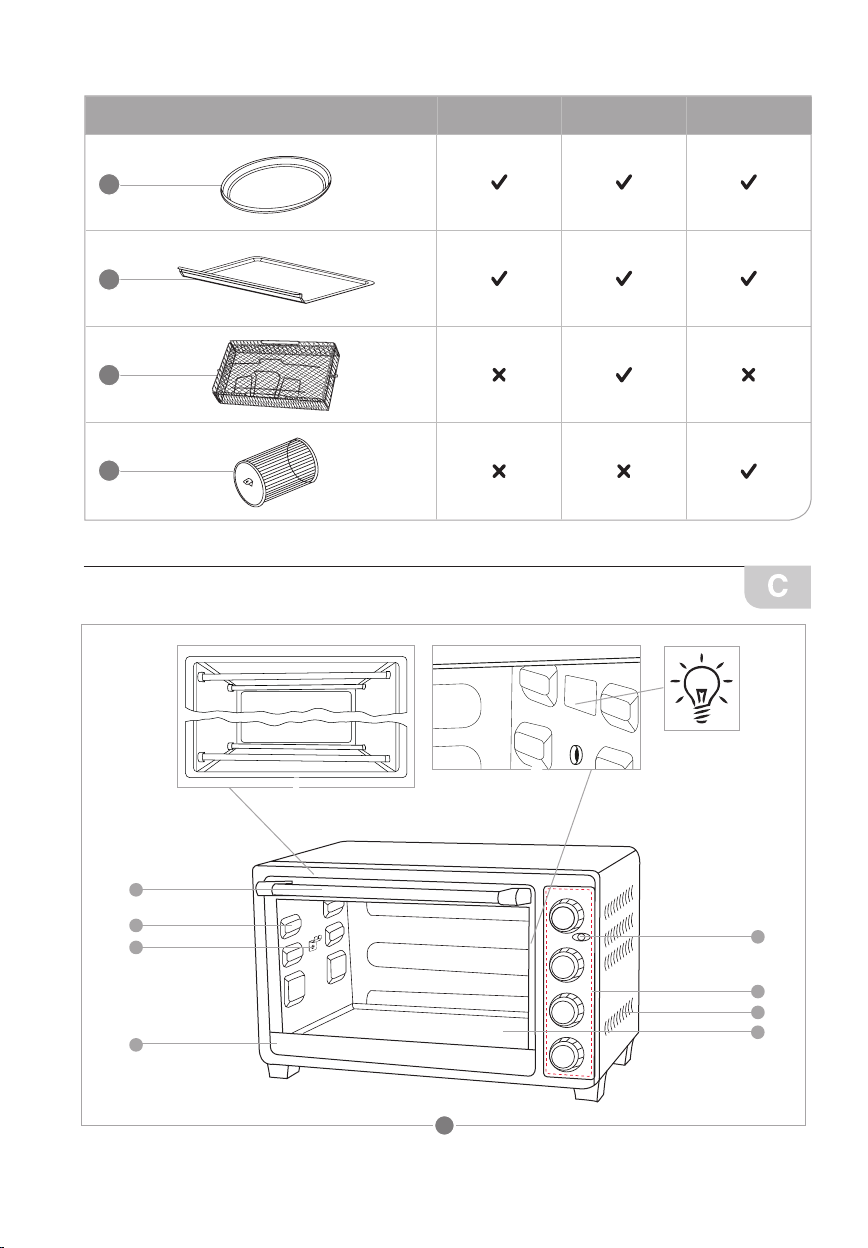
Control panel, Pic. C-2
Function switch, Pic. C-2-4
• STOP position, turning off the convection / spit op-
eration
• Convection (hot air circulation around the product)
• Spit (spit rotates, uniformly browning on all sides)
• Convection and spit
Temperature regulator, Pic. C-2-1
• Adjusting the temperature from 100°C to 230°C
Preparation mode switch. Pic. C-2-2
Р
• STOP position
• Upper heating element (upper heating)
• Lower heating element (lower heating)
• Upper and lower heating elements, imultaneous
operation of both upper and lower heating element.
• Upper heating element and spit.
(For MO2305, MO2610 models)
Timer, Pic. C-2-3
• Timer, time selection from 0 up to 60 minutes.
• STOP position, utilized for stopping the cooking
process.
Spit construction, Pic. C-5
1
Hook
2
Clamp
3
Fastener
Bayonet
4
5
Motor coupling
Preparation for operation
Before rst use, wipe the body with a soft, dry cloth.
Wash the other parts with warm water and detergent.
Before assembling or disassembling the make sure that
the device is unplugged. Thoroughly dry all parts.
Turn on the empty device for 15 minutes, set the maximum
temperature in , mode, to remove the smell of a new
device. Ventilate the room. Allow the device to cool.
Order of operation, Pic. C-2
1. Make sure that the crumb tray is completely installed,
and timer knob is set in the position. Plug in the
device.
2. Set the required temperature with the regulator.
3. Turn on the timer for 5 minutes in the , mode, for
the device to heat up. Timer knob will turn automatically
in the cooking process.
4. Choose a required mode with the help of corresponded
regulators:
5. Place prepared beforehand products on the pan/grid/
spit. Do not place products closer than 2 cm. from the
heating elements.
6. Carefully install grid, pan or spit into the device, Pic.
C-3. Close the door.
7. Turn on the timer , setting the required time. It isn’t
recommended to open the door in the preparation
process.
NOTE: When the device is working, the inner backlight is
on and working indicator , Pic. C-1 is ashing.
8. When the preparation process is completed, the timer
(device) turns off automatically, you will hear a sound
signal. Set all the regulators into the position.
9. Carefully open the door and take out prepared product
with the help of potholders or a special handle for pan,
Pic. C-4.
15
Use of spit, Pic. C-5
1. Take the spit and remove one clamp from it .
2. Impale beforehand prepared meat or poultry onto the
center of the spit and tighten the clamp on both sides.
All the parts of the meat or poultry must be clamped,
nothing should hang or dangle.
3. Turn on the timer for 10 minutes in the , mode
for the device to heat up.
4. Install the spit into the slots, sharp end into the right
socket, left end onto a special square support .
5. On the lower level, place a pan, so that the juice from
the meat/poultry dripped into it.
6. Set the required temperature with the regulator.
RECOMMENDATION ON PREPARATION:
7. Choose a required mode with the help of corresponded
regulators: ( for MO2305, MO2610 models) or ,
and, (for MO3020 model).
8. Turn on the timer , set the required time.
9. When the preparation process is completed, the timer
(device) turns off automatically, you will hear a sound
signal. Set all the regulators into the position.
10.Take out the spit with a special handle 4, Pic. B, pla cing
its hooks on both sides of the spit. First, carefully raise
the spit from the left slot and pull, then remove the spit
from the right socket. Take off the meat or poultry from
the spit and put it on a cutting board or platter.
NOTE: Using the grill-basket 9 and sh basket 8 (Pic. B)
is similar.
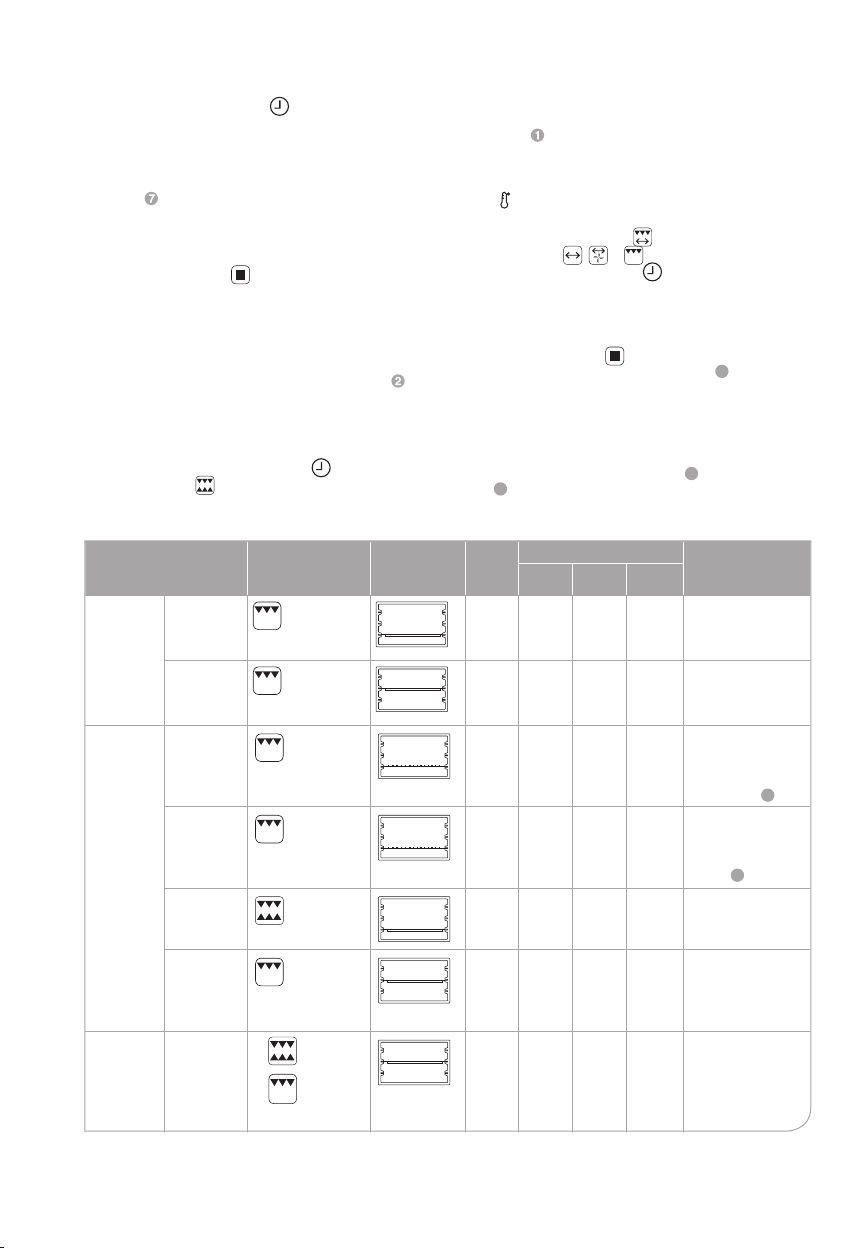
Product name Preparation
mode
Meat Pork
Meat
semi-
nished
products
Poultry Fillet
(80 0g)
Beef/
Lamb
(80 0g)
Sausages
(50 0g)
Sausages
for hotdogs
(50 0g)
Meatballs
(80 0g)
Beefsteak
(350g)
(500g)
1.
2.
crispy crust)
(at the end
of preparation for a
Position
of the grid/
pan
Tem-
Cooking time Note
perature
MO2305
MO2610
(23l)
(26l)
200оС
200оС
160оС
160оС
120оС
160оС
160оС
35
35
min
min
40
40
min
min
15
min15min20min
15
15
min
min20min
20
min20min25min
15
min15min20min
25
25
min
min
MO3020
(30l)
40
min
45
min
30
min
Marinate before
cooking, cut into
small pieces
(3x3x3 cm).
Marinate before
cooking, cut into
small pieces
(3x3x3 cm).
Make a small cut
line. Install crumbs
tray 7 .
Remove the
sausage skin. Install
crumbs tray 7.
Pour 150 ml of
water into the pan.
Make small cut
lines (mesh), rub
with salt, spices
and herbs.
To preserve
juiciness use a
baking sleeve. Rub
with salt, spices
and herbs.
16
Drumstick
(500g)
160оС
25
min
25
min
30
To preserve
min
juiciness use a
baking sleeve. Rub
with salt, spices
and herbs.
RECOMMENDATION ON PREPARATION:
Product name Preparation
mode
Poultry Wings
(500g)
Position
of the grid/
pan
Tem-
Cooking time Note
pera-
MO2305
ture
180оС
MO2610
(23l)
(26l)
15
min15min
MO3020
(30l)
20
min
Rub with salt, spices
and herbs.
Whole leg
(500g)
Whole
chicken
(900g)
Fish
Whole
(600g)
Portion
pieces
(500g)
Toasts (4 pc)
French toast (500g)
1.
2.
crispy crust)
MO2305
(23l)
MO2610
(26l)
(at the end
of preparation for a
MO3020
(30l)
160оС
160оС
130оС
150оС
180оС
120оС
25
25
min
min
30
30
min
min
15
15
min
min
15
15
min
min
7
min7 min
15
15
min
min
30
Rub with salt, spices
min
and herbs. Pour
150 ml of water into
the pan
40
Pour 150 ml of water
min
into the pan
Rub with salt, spices
and herbs
20
Install crumbs
tray 7. Wrap the
min
product in aluminum
foil. To soften small
sh bones lay slices
of lemon.
20
Pour 150 ml of water
min
into the pan
10
Cut bread for toast.
min
Install crumbs
tray 7. Before
preparation brush
the toasts with
butter.
20
Cut the bread into
min
cubes
(1x1x1 cm). Before
cooking sprinkle
with vegetable oil,
salt, pepper and
herbs.
Fried potatoes
(50 0g)
Vegeta-
bles
Stewed
(500g)
Grill
(250g)
150оС
100оС
120оС
25
min
30
min
10
min
25
min
30
min
15
min
30
Cut the potatoes
min
into strips
(0.5x0.5x4 cm)
Season with salt
and add onion at
the end of cooking.
35
Cut the vegetables.
min
Use a heat-resistant
container.
15
Add salt at the end
min
of cooking.
17
RECOMMENDATION ON PREPARATION:
Product name Preparation
mode
Baking Pie
(300g)
Position
of the grid/
pan
Tem-
Cooking time Note
pera-
MO2305
ture
120оС
(23l)
30
min
MO2610
(26l)
30
min
MO3020
(30l)
35
min
Use a round baking
mold with high
ends.
Cookies
(200g)
Cupcake
(300g)
Pizza
(fresh
/ semi-
nished)
Lasagna
Casseroles - Vegetable,
curd, meat, potatoes.
(50 0g)
Meat/poultry on the spit
(90 0g)
Sausages on the spit
(250g)
6 inch/
15 cm
8 inch/
20 cm
MO2305
(23l)
MO2610
(26l)
MO3020
(30l)
160оС
100оС
180оС
180оС
100оС
100оС
150оС
150оС
15
15
min
30
min
6
min6 min8 min
8
min8 min
25
min
30
min
40
min
15
min
20
min
min
30
35
min
min
10
min
25
min30min
30
35
min
min
40
40
min
min
15
20
min
min
Use a baking sheet.
Use a cupcake
mold.
Coat the edges of
pizza with tomato
sauce, mayonnaise
or other sauce
of your choice to
prevent drying out.
Use round pot 6.
Use a baking mold
with high ends.
Use a heat-resistant
container. Rup the
top with a mix of
cream and eggs.
Rub the surface of
the product with a
vegetable oil.
Rub the surface of
the product with a
vegetable oil.
NOTE. Cooking time and temperature in the table are
advisor y in nature and can var y depending on th e recipe.
DISPOSAL
• Before disposing of the old device, for safety, cut the
cord to prevent further use.
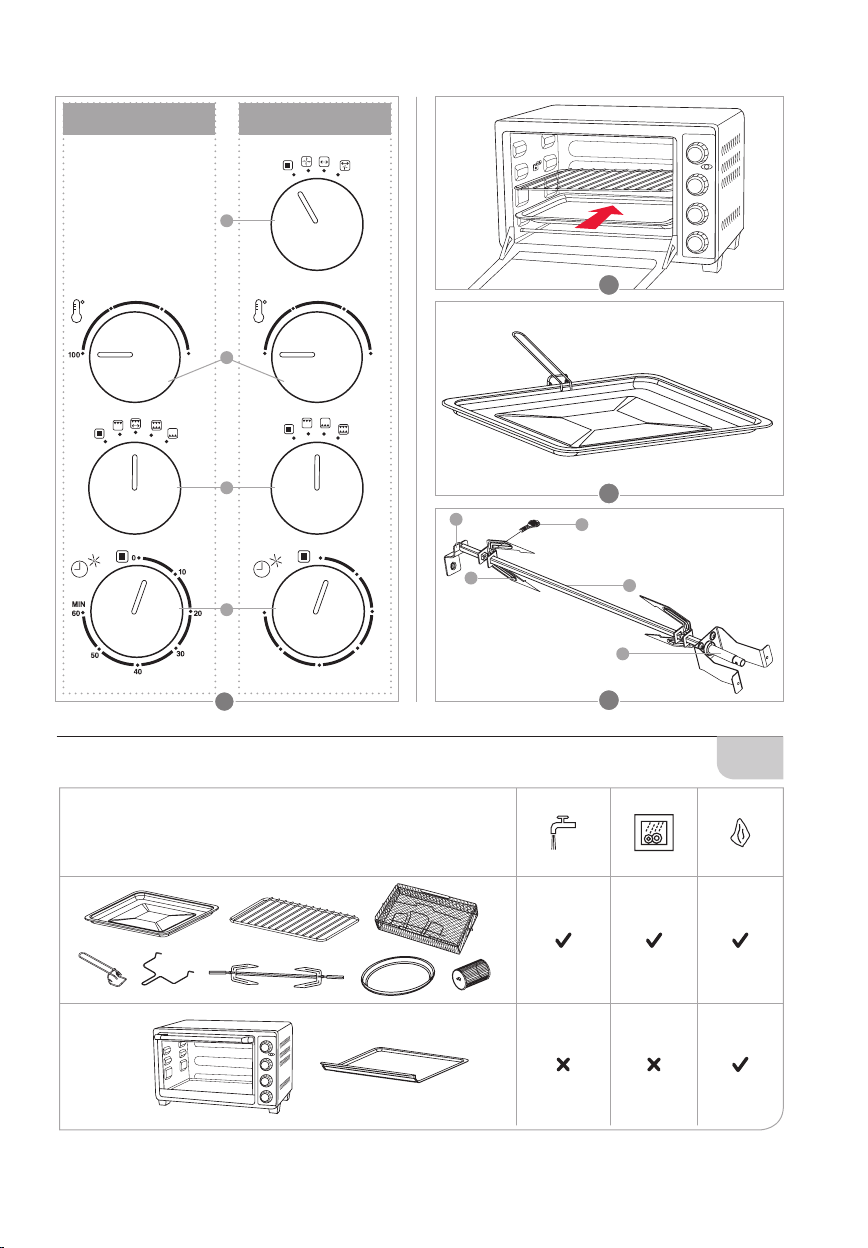
CLEANING AND MAINTENANCE, Pic. D
• Unplug the device.
• Let the device to cool, before cleaning it.
• Open the door completely and remove the crumb tray.
18
For this, grab the edge of the tray, lift it slightly and
gently pull it toward you.
• Wash the grid, pan, round pan, sh basket, grill-basket, handle for pan and grid, handle for spit, spit in a
warm soppy water. They can be washed in a dishwasher. The temperature in the dishwasher must
not exceed 60 oC.
• Wipe the body of the device, crumbs tray and inner
surface (besides heating elements) with a damp soft
cloth.
• Never immerse the device into the water be
cause of the danger of electric shock.
• Thoroughly dry all parts.
POSSIBLE PROBLEMS AND SOLUTIONS
Possible problems Possible causes Solutions
Device doesn’t turn on. There is no voltage in the mains.
Unplug the device and wait for the voltage to
normalize.
There is steam
When cooking food with a high
amount of liquid, certain amount of
steam can appear.
Be careful when opening the door, not to get
burn from steam.
Burning smell
1. There are crumbs on the tray.
2. Fat accumulated on the grid, pan
or on the inside of the device.
1. Clean the crumbs tray after every use of
the device.
2. Wipe the device inside (cooled) and wash
the grid and pan immediately after use.
PRODUCT CERTIFICATION
For information on product certication, see http://www.oursson.com or ask seller for a copy.
Specications
MODEL МO2305 МO2610 МO3020
Volume, L 23 26 30
Convection - - +
Pan size, mm(LxW) 336,2x260 349,5x250 377,6x267
Power co nsu mpt ion, W Max 1500
Rated voltage 220-240 V~ ; 50/60
Storage and transportation temperature up -25°C to +35°C
Operating temperature up +5°C to +35°C
Humidity Requirements
Cl ass o f pro tect ion I
Dimensions, mm (HxWxL) 467х350х290 489х340х322 522х360х322
Weight, kg 6,66 7,14 8,52
15-75% without condensate
Hz
*Products should be stored in dry, ventilated warehouses at temperatures below - 25°C.
Only a qualied specialist of an authorized service center OURSSON AG can repair the device.
SERVICING
Company OURSSON AG expresses great appreciation to you for choosing our products. We have done
everything possible so that this meets your needs, and
the quality corresponds to the best world standards. If
your OURSSON branded product will need maintenance, please contact one of the authorized service center
(hereinafter - ASC). A complete list of ASC and their
exact addresses can be found on the website www.ours-
son.com.
Warranty obligations OURSSON AG:
1. Warranty obligations OURSSON AG, provided ASC
OURSSON AG, apply only to models designed
OURSSON AG for the production or supply and
sale within the country where the warranty service is
provided, purchased in this country, certied for compliance with the standards of this country, and also
marked the with ofcial marks of conformity.
19

1. Warranty obligations OURSSON AG operate within
Product name
Terms of
use, months
Warranty
Period,
months
Microwave ovens, breadmakers, induction stoves
60 12
Multicookers, kitchen processors, kitchen machines,
electric kettles, electric grills,
blenders, mixers, meat grinders, blenders, toasters, ther-
mopots, roasters, juice makers, steamers, coffee makers,
choppers, dehydrators, yogurt
makers, fermenters, mini
ovens, freezers, refrigerators,
automatic coffee machines,
milk frother, coffee grinder
36 12
Kitchen scales, siphons 24 12
the law on protection of consumer rights and are regulated by the laws of the country in which they are
provided, and only when the product is used exclusively for personal, family or household purposes.
War ranty obligations OURSSON AG shall not apply to
uses of goods for business purposes or in connection
with the acquisition of goods to meet the needs of en-
terprises, institutions and organizations.
2. OURSSON AG sets for its products the following
terms of use and warranty periods:
3. Warranty obligations OURSSON AG shall not apply to
the following products, if their replacement is assumed
and is not connected with disassembling products:
• Batteries.
• Cases, straps, cords for carrying, mounting acces-
sories, tools, documentation that came with the
product.
4. Warranty does not cover defects caused due to
violations of the rules of consumer use, storage or
transportation of the goods, actions of third parties or
force majeure, including but not limited to the following cases:
• If the defect was a result of careless handling,
used for other purposes, violations of conditions
and rules of operation set forth in the instruction
manual, including as a result of exposure to high
or low temperatures, high humidity or dust, traces
of opening the device independently and/ or selfrepair, mismatch state standards for power grids,
getting liquids, insects or other foreign objects, substances inside the device, as well as long-term use
of the product in extreme operational modes.
• If the defect of the product was a result of unau-
thorized attempts to test the product or make any
changes in its construction or software programs,
including repair or maintenance in unauthorized
service centers.
• If the defect of the product was a result of use of
20
non-standard and/or low quality equipment, accessories, spare parts, batteries.
• If the defect of the product is associated with
its use in conjunction with additional equipment
(accessories), other than additional equipment
recommended by OURSSON AG for use with this
product. OURSSON AG is not responsible for the
quality of the additional equipment (accessories)
manufactured by third parties, for the quality of its
products together with such equipment, as well as
the quality of the work of the additional equipment
of OURSSON AG together with the products of
other manufacturers.
6. Product defects detected during the lifetime of the
product are eliminated by the authorized service centers (ASC). During the warranty period, elimination of
defects is free of charge with the presentation of the
original certicate of guarantee and documents that
conrm the fact and date of the contract of retail purchase. In the absence of such documents, warranty
period is calculated from the date of manufacture of
goods. It should be taken into account:
• Setup and Installation (assembly, the connection,
etc.) of the product described in the documentation
attached to it, does not enter the scope of warranty
OURSSON AG and can be performed by the user
as well as the specialists of most authorized service
centers on a paid basis.
• Work upon maintenance of products (cleaning and
lubricating the moving parts, replacement of consumables and supplies, etc.) are made on a paid
basis.
7. OURSSON AG is not responsible for any damage directly or indirectlycaused by their products to people,
pets, property, if it occurred as a result ofnon-observance of the rules and conditions of use, storage,
transportation or installation of the product, intentional
or negligent actions of consumer or third parties.
8. Under no circumstances, OURSSON AG is not
responsible for any special, incidental, indirect or consequential loss or damage, including but not limited
to: lost prots, damages caused by interruptions in the
commercial, industrial or other activities, arising from
the use of or inability to use the product.
9. Due to continuous product improvement, design elements and some technical specications are subject
to change without prior notice from the manufacturer.
Using the product when after the terms of use (lifetime):
1. Lifetime set by OURSSON AG for this product applies
only when the product is used exclusively for personal,
family or household needs, as well as the consumer
observes the correct operation, storage and trans-
portation of products. Under thecondition of careful
handling of the product and compliance with the rules
of operation the actual life may exceed the lifetime set
by OURSSON AG.
2. At the end of the product lifetime, you should con-
tact an authorized service center for to conduct a

1 2 3 4
preventive maintenance of the product and determine
the suitabilityfor further use. Work on conducting a
preventive maintenance of the products is also made
in service centers on paid basis.
3. OURSSON AG does not recommend the use of this
product after the end of its lifetime without its preventive maintenance by the authorized service center,
since inthis case, the product can be dangerous to the
life, health or property of the consumer.
Date of manufacture
Each product has a unique serial number in the form of
alphanumeric row and is duplicated with a barcode that
contains the following information: name of the product
group, date of manufacture, serial number of the product.
JM1225011234567
MO
Product Recycling and Disposal
This appliance has been identied in accordance with
the European directive 2002/96/EG on Waste Electrical
and Electronic Equipment – WEEE. After the expiration
of the lifetime, the product cannot be disposed with another household waste. Instead, it shall be deposited
in the appropriate recycling collection point for electri-
cal and electronic equipment for proper treatment and
disposal in accordance with federal or local law. By disposing correctly this product, you will help to conserve
natural resources and preventing the product
from damaging the environment and human
health. For more information on the collec-
tion point and recycling of this product, please
contact your local municipal authorities or the
enterprise for household waste disposal.
Serial number is located on the rear of the product, on
the package and the warranty card.
The rst two letters-correspondence to the product
group (MO – Mini-Oven).
The rst two digits – year of manufacture.
The second two digits – week of manufacture.
The last two digits – serial number of product.
To avoid misunderstandings, we highly rec-
ommend you to read carefully the instruc-
tion manual and the warranty obligations.
Check the correctness of the warranty card.
Warranty card is valid only if the following
are correctly and clearly stated: model, serial number, date of purchase, clear stamps,
buyer’s signature. The serial number and
the model of the device must be the same
as in the warranty card. If these conditions
are not fullled or the data specied in the
warranty card was changed, the warranty
card is invalid.
If you have questions or problems with OURSSON AG products - please contact us by e-mail: support@oursson.com
This manual is under protection of international and EU copyright law. Any unauthorized use of the instructions, including copying, printing and distribution, but not limited to, involves the application of the guilty person to civil liability
and criminal liability.
Contact information:
1. Manufacturer of goods - OURSSON AG (Orson AG), Seefeldstrasse 56, 8008 Zurich, Switzerland.
2. Certication information product available on the website www.oursson.com.
OURSSON AG
Made in China
21
INSTRUCCIONES DE SEGURIDAD, Fig. A
Símbolo de peligro
Recuerda al usuario el peligro de la alta tensión.
Símbolo de advertencia
Un recordatorio para el usuario sobre la necesidad de seguir las instrucciones al pie de la letra.
Al usar aparatos eléctricos, es preciso tomar las siguientes precauciones:
• Use el aparato según se indica en el siguiente manual
de instrucciones.
• Coloque el aparato sobre una supercie estable.
• Use únicamente los accesorios incluidos junto con el
producto.
• No permita que el cable eléctrico entre en con-
tacto con agua u otros líquidos para protegerse
del riesgo de descarga eléctrica. Si por cualquier
razón penetrara agua en el aparato, póngase
en contacto con un centro técnico autorizado
OURSSON AG.
• Use una red de alimentación eléctrica de características adecuadas para el suministro de corriente.
• No use el aparato en zonas en donde el aire pueda
contener vapores de sustancias inamables.
• Nunca trate de abrir el aparato por su cuenta, ya
que podría provocar una descarga eléctrica que
podría averiar el aparato e invalidar la garantía
del fabricante. Deje las tareas de mantenimiento
y repara ción únicame nte en mano s de los centr o s
técnicos autorizados por la marca OURSSON.
• Cuando traslade el aparato de una zona caliente una
fría y viceversa, desembálelo antes de usarlo y espere entre 1 y 2 horas antes de conectarlo.
• Para evitar las descargas eléctricas, evite sumergir el aparato o sus cables en agua.
• Tenga especial cuidado cuando use el aparato con
niños cerca.
• No toque las partes calientes del aparato, ya que
podría sufrir lesiones.
• El cable de corriente es relativamente corto expresa-
mente con el n de evitar el riesgo de sufrir lesiones.
• No deje que el cable de corriente quede colgando
sobre el borde alado de una mesa o que entre en
contacto con super cies calientes.
• No conecte este aparato a una red sobrecargada con
otros aparatos, ya que podría causar que no funci ona-
ra correctamente.
• No instale el aparato cerca de cocinas y hornos eléc-
tricos y de gas.
• Tras su uso, asegúrese de desconectar el aparato de
la red eléctrica.
• Evite que el aparato sufra golpes, caídas, vibraciones
y otros efectos mecánicos.
• Asegúrese de desconectar el aparato de la red eléctrica antes de limpiarlo o cambiar accesorios.
• No use el aparato en exteriores.
• Este aparato no está diseñado para su uso por personas discapacitadas física, sensorial o mentalmente
(incluidos niños), o carentes de la experiencia y los
22
Símbolo de riesgo de
incendio
Recordatorio para el uso de
altas temperaturas
conocimientos necesarios. Dichas personas solo
pueden usar este aparato bajo la vigilancia de una
tercera persona responsable de su seguridad o tras
recibir formación acerca de su uso. No permita que
los niños jueguen con el producto.
• Este producto está únicamente indicado para uso do-
méstico.
• Si el cable eléctrico presenta daños, deberá solicitar
su sustitución a un especialista de un centro técnico
autorizado OURSSON AG para evitar cualquier pe-
ligro.
• Use únicamente los accesorios incluidos junto con el
producto.
• No use limpiadores abrasivos u orgánicos tales como
alcohol o gasolina para limpiar al aparato. Puede limpiar el aparato con una pequeña cantidad de detergente neutro.
ES
RECOMENDACIONES
• Lea atentamente el manual de instrucciones antes de
usar este aparato. Conserve el manual tras su lectura
para futuras consultas.
• Todas las ilustraciones contenidas en este manual son
representaciones esquemáticas de objetos reales, que
pueden diferir de las imágenes presentadas.
• No mueva el aparato mientras esté en funcionamiento.
• Utilice el dispositivo únicamente para cocinar y calentar
alimentos.
• No use el aparato como fuente de calor.
• No intente usar el aparato con una puerta abierta.
• Use únicamente utensilios de cocina resistentes al calor,
aptos para mini hornos.
• No lo coloque en las latas del dispositivo, botellas, enva-
ses bien cerrados ni objetos demasiado grandes. Esto
podría causar daños personales o la rotura del aparato.
• No coloque carne / pescado crudos directamente en la
parrilla, pues la grasa y el aceite podrían prenderse. Use
un molde para hor nea do, y productos de emb alaje de antemano. Asegúrese de que el papel de aluminio no esté
en contacto con los elementos calefactores.
• Cuando use papel de aluminio, colóquelo en la cacerola
a medio o bajo nivel.
• No descuide el aparato mientras esté en funcionamiento.
• No ponga papel, cartón, plástico, toallas, etc. dentro/so-
bre el aparato, pues podrían causar un incendio.
• Utilice manoplas o guantes para horno para sacar
los alimentos del horno.
• No cierre la pue r ta de golpe, no coloque bandejas u otros
objetos en la puerta y evite el contacto del agua fría con
la puerta abierta caliente cuando use el aparato. Fig. A-1.
• Apague el aparato y desenchúfelo si los alimentos se

prenden o empiezan a sacar humo mientras los está
preparando. No abra la puerta hasta cuando cese el
fuego, dado que el oxigeno intensicará la llama. No
ponga agua encima del aparato, pues el cristal podría
romperse.
No manipule el aparato usando para ello la
fuerza bruta, ya que podría dañarlo.
POSICIÓN , Fig. A-2
• Coloque el dispositivo en una supercie plana horizontal resistente al calor, alta para el alcance de
los niños, manteniendo la distancia de las paredes/
muebles. Un lado debe estar totalmente libre. Está
prohibido empotrar este aparato.
• No coloque el aparato en funcionamiento debajo/
cerca de cortinas u otros materiales inamables, ya
que esto podría ocasionar un incendio.
PARTES DEL PRODUCTO, Fig. B
Cuerpo ..................................................................... 1 ud.
Cacerola esmaltada .......................................... 1 ud.
Rejilla ................................................................1 ud.
Asa para la cacerola y la rejilla ..........................1 ud.
Asa para el asador ............................................1 ud.
Asador ............................................................... 1 ud.
Cacerola redonda 9"/22,8 cm............................1 ud.
bandeja recogemigas ......................................... 1 ud.
8
Cesta para pescado .......................................... 1 ud.
9
Cesta de parrilla ................................................ 1 ud.
Manual de instrucciones ........................................ 1 ud.
ELEMENTOS DE DISEÑO, Fig. C-1
1
Asa de la puerta
2
Puntal del asador
3
Ranuras para la rejilla y las cacerolas
4
Puerta
5
Panel de control
6
Aperturas de ventilación
7
Indicador de funcionamiento
8
Bandeja extraíble para migas
Luz posterior inferior, Fig. C-1-2
Elementos calefactores superior e inferior, Fig. C-1-1
USO
Panel de control, Fig. C-2
Interruptor de función, Fig. C-2-4
• Posición de PARO, desactivar el asador / convec-
ción
• Convección (circulación de aire caliente alrededor del aparato)
• Asador (el asador gira uniformemente dorando
todos los lados)
• Convección y asador
Regulador de temperatura, Fig. C-2-1
• Ajustar la temperatura de 100 a 230°C
Interruptor del modo Preparación. Fig.
Р
C-2-2
• Posición de PARO
• Elemento calefactor superior (calefacción supe-
rior)
• Elemento calefactor inferior (calefacción inferior)
• Elementos calefactores superior e inferior, fun-
cionamiento simultáneo de ambos elementos
calefactores superiores e inferiores.
• Elemento calefactor superior y asador.
(Para los modelos MO2305 y MO2610)
Temporizador, Fig. C-2-3
• Temporizador, selección de tiempo de 0 hasta
60 minutos.
• Posición de PARO, utilizada para detener el pro-
ceso de cocción.
Instalación del asador, Fig. C-5
1
Soporte
2
Abrazadera
3
Sujetador
4
Asador
5
Acoplador del motor
Preparación para el funcionamiento
Antes del primer uso,pase un paño suave y seco por el
aparato. Lave las otras partes con agua tibia y detergente. Antes de montar o desmontar el aparato, asegúrese
de que esté desenchufado. Seque completamente todas
las piezas.
Encienda el aparato vacío durante 15 minutos, je la temperatura máxima en el modo para eliminar el olor de
aparato nuevo. Ventile la habitación. Deje que el aparato
se enfríe.
Funcionamiento, Fig. C-2
1. Asegúrese de que la bandeja para migas esté completamente instalada y que la perilla del temporizador
esté jada en la posición . Enchufe el aparato.
2. Ajuste la temperatura necesaria mediante el regula-
dor .
3. Ponga en macha el temporizador durante 5 minutos en el modo , para que el aparato se caliente. La
perilla del temporizador girará automáticamente en el
proceso de cocción.
4. Escoja un modo necesario con la ayuda de los regu-
ladores correspondientes:
5. Coloque alimentos preparados de antemano en la cacerola/rejilla/asador. No coloque los alimentos más
cerca de 2 cm de los elementos calefactores.
6. Coloque la rejilla, la cacerola o el asado en el dispositivo, Fig. C-3. Cierre la puerta.
23
7. Encienda el temporizador , para ajustar el tiempo
necesario. No se recomienda abrir la puerta durante
el proceso de preparación.
NOTA:Mientras esté funcionando, la iluminación interna
se encenderá y el indicador de potencia (Fig. C-1) parpadeará.
8. Una vez nalizado el proceso de preparación, el temporizador (dispositivo) se apagará automáticamente y
escuchará una señal acústica. Fije todos los reguladores en la posición .
9. Abra la puerta con cuidado y saque los alimentos pre-
parados con la ayuda de manoplas o un asa especial
para cacerolas, Fig. C-4
Uso del asador, Fig. C-5
1. Coja el asador y retire una de sus abrazaderas .
2. Empale carne o pollo preparadas de antemano en el
centro del asador y apriete la abrazadera en ambos lados. Deben jarse todas las partes de la carne o pollo,
nada debe colgar.
3. Ponga en marcha el temporizador durante 10 minutos en el modo , para que el aparato se caliente.
RECOMENDACİONES DE PREPARACİÓN:
Nombre del producto Modo de prepa-
Carne Cerdo
Productos
cárnicos
semiaca-
bados
Pollo Filete
(80 0g)
Carne de
vacuno
Cordero
(80 0g)
Salchichas
(50 0g)
Salchichas
para
perritos
calientes
(50 0g)
Albóndigas
(80 0g)
Bistec
(350g)
(500g)
ración
1.
(al nal de la
2.
preparación
para obtener
una piel crujiente)
Posición
de la rejilla/
cacerola
4. Coloque el asador en las ranuras, el borde alado en la
ranura correcta y el izquierdo en un soporte cuadrado
especial .
5. En nivel inferior, coloque una cacerola para que el jugo
de la carne/pollo gotee en él.
6. Ajuste la temperatura necesaria mediante el regulador .
7. Escoja un modo necesario con la ayuda de los regula-
dores correspondientes: ( para modelos MO2305
y MO2610 ) o , y, (para el modelo MO3020).
8. Encienda el temporizador , ajuste el tiempo nece-
sario.
9. Una vez nalizado el proceso de preparación, el temporizador (dispositivo) se apagará automáticamente y
escuchará una señal acústica. Fije todos los reguladores en la posición .
10. Saque el asador con un asa especial 4, Fig. B, coloque sus ganchos en ambos lado s del asador. Primer o,
levante el asador de la ranura izquierda con cuidado
y tire de él, luego retire el asador de la toma derecha.
Saque la carne o el pollo del asador y póngalos en
una tabla de cortar o en una bandeja.
NOTA: El uso de la cesta de parrilla 9 y la cesta de pes-
cado 8 ( la Fig. B) es similar.
Tem-
Tiempo de cocción Nota
pera-
MO2305
MO2610
tura
200оС
200оС
160оС
160оС
120оС
160оС
160оС
(23 l)
35
min
40
min
15
min15min20min
15
min
20
min20min25min
15
min15min20min
25
min
MO3020
(26 l)
(30 l)
35
min
min
40
min
min
15
min20min
25
min
min
40
Marinar antes de
cocinar, cortar en
pedazos pequeños
(3x3x3 cm).
45
Marinar antes de
cocinar, cortar en
pedazos pequeños
(3x3x3 cm).
Realice una
pequeña línea de
corte Instale la
bandeja extraíble
para migas 7 .
Retire la piel
de la salchicha.
Instale la bandeja
extraíble para
migas 7.
Vierta 150 ml
de agua en la
cacerola.
Realice pequeñas
líneas de corte (en
rejilla), friegue con
sal, especias y
hierbas.
30
Use una bolsa
para horno para
preservar la jugosidad. Sazónelo
con sal, especias y
hierbas.
24

RECOMENDACİONES DE PREPARACİÓN:
Nombre del producto Modo de prepa-
Pollo Muslo
(500g)
Alas
(500g)
ración
Posición
de la
rejilla/cacerola
Tem-
Tiempo de cocción Nota
pera-
MO2305
tura
160оС
180оС
MO2610
(23 l)
(26 l)
25 min 25
min
15
min15min
MO3020
(30 l)
30
min
20
min
Use una bolsa para
horno para preser-
var la jugosidad.
Sazónelo con sal,
especias
y hierbas.
Sazónelo con sal,
especias y hierbas.
Pata
entera
(500g)
Pollo
entero
(900g)
Pescado
Entero
(600g)
Porciones
(500g)
Tostadas (4 ud.)
Tostada francesa
(50 0g)
1.
(al nal de la
2.
preparación
para obtener
una costra crujiente)
MO2305
MO2610
(23l)
(26l)
MO3020
(30l)
160оС
160оС
130оС
150оС
180оС
120оС
25
30
15
15
15
25
min
30
min
15
min
15
min
7
15
min
min
min
min
min
min7 min
min
30
Sazónelo con sal,
min
especias y hierbas.
Vierta 150 ml de
agua en la cacerola
40
Vierta 150 ml de
min
agua en la cacerola
Friegue con sal,
especias y hierbas
20
Instale la bandeja ex-
min
traíble para migas 7.
Envuelva el producto
en papel de aluminio.
Ponga rodajas de
limón para ablandar
las espinas.
20
Vierta 150 ml de
min
agua en la cacerola
10
Corte pan para
min
hacer tostadas.
Coloque la bandeja
para migas 7. Unte
las tostadas con
mantequilla antes de
la preparación.
20
Corte el pan en
min
cuadrados
(1x1x1 cm). Antes
de cocinar, esparza
aceite vegetal, sal,
pimienta y hierbas.
Patatas fritas
(50 0g)
Verduras Estofadas
(500g)
Parrilla
(250 g)
150оС
100оС
120оС
25
min
30
min
10
min
25
min
30
min
15
min
30
Corte las patatas en
tiras (0,5x0,5x4 cm)
min
Al nal de la cocción,
sazónelas con sal y
añada cebolla.
35
Corte las verduras.
min
Utilice un recipiente
resistente al calor.
15
Añada sal al nal de
min
la cocción.
25
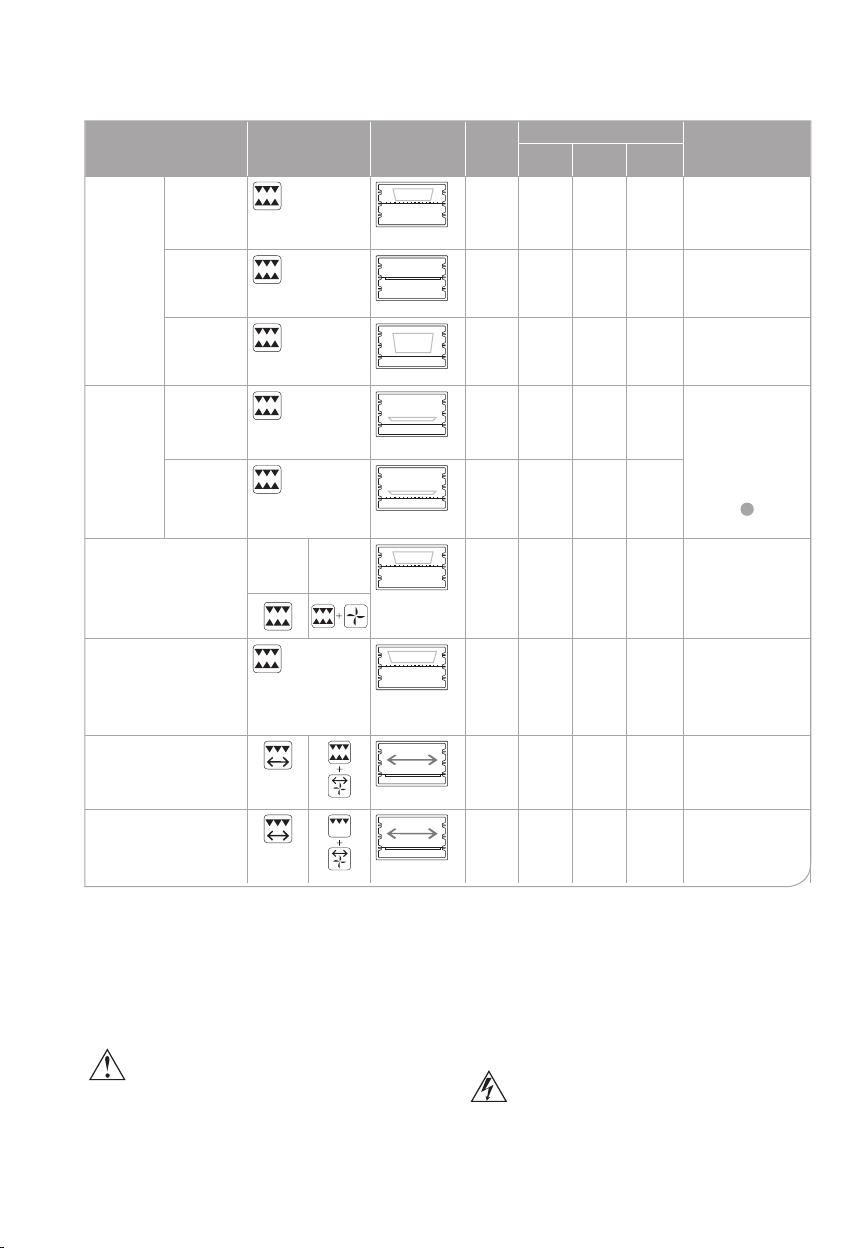
RECOMENDACİONES DE PREPARACİÓN:
Nombre del producto Modo de prepa-
Horneado Tarta
(300g)
ración
Posición
de la rejilla/
cacerola
Tem-
Tiempo de cocción Nota
pera-
MO2305
tura
120оС
MO2610
(23 l)
(26 l)
30 min 30
min
MO3020
(30 l)
35
min
Use un molde para
hornear redondo
con bordes altos.
Galletas
(200g)
Cupcake
(300 g)
Pizza
(fresca /
semiaca-
bada)
Lasaña
Cazuela - verduras,
cuajada, carne, patatas.
(50 0g)
Carne/pollo en el asador
(90 0g)
Salsichas en el asador
(250 g)
6 pulgadas/
15 cm
8 pulgadas/
20 cm
MO2305
(23l)
MO2610
(26l)
MO3020
(30l)
160оС
100оС
180оС
180оС
100оС
100оС
150оС
150оС
15 min 15
30 min 30
25 min 25
30 min 30
40 min 40
15 min 15
min
min
6
min6 min8 min
8
min8 min
min30min
min
min
min
20
Use una hoja para
min
hornear.
35
Use un molde para
min
cupcakes.
Cubra los bordes
de la pizza con
salsa de tomate,
mayonesa u
otra salsa de su
elección para evitar
10
que se sequen.
min
Use una cacerola
redonda 6.
Use un molde para
hornear redondo
con bordes altos.
35
Utilice un recipien-
min
te resistente al
calor. Unte la parte
superior con una
mezcla de crema y
huevos.
40
Unte la supercie
min
del producto con
aceite vegetal.
20
Unte la supercie
min
del producto con
aceite vegetal.
NOTA. El tiempo de cocc ión y la tem per atura son ori entativos y pueden variar según la receta.
ELIMINACIÓN
• Antes de deshacerse del aparato viejo, corte el cable
para evitar un uso futuro.
LIMPIEZA Y MANTENIMIENTO, Fig. D
• Desenchufe el aparato.
• Deje que el aparato se enfr íe ante s de limp iarl o.
• Abra la puerta completamente y retire la bandeja para
migas. Para ello, coja el borde de la bandeja, levánte-
26
lo ligeramente y tírelo hacia usted con cuidado.
• Lave la rejilla, la cacerola, la cacerola redonda, la
cesta para el pescado, la cesta de parrilla, el asa
de la cacerola y la rejilla, el asa del asador y el asa-
dor en agua tibia y jabonosa. Se pueden lavar en el
lavavajillas. La temperatura en el lavavajillas no
debe ser superior a 60 оС.
• Limpie el cuerpo del aparato, la bandeja para migas
y la supercie interior (además de los elementos calefactores) con un paño húmedo y suave.
• Jamás sumerja el aparato en agua, ya que existe riesgo de descarga eléctrica.
• Seque completamente todas las piezas.
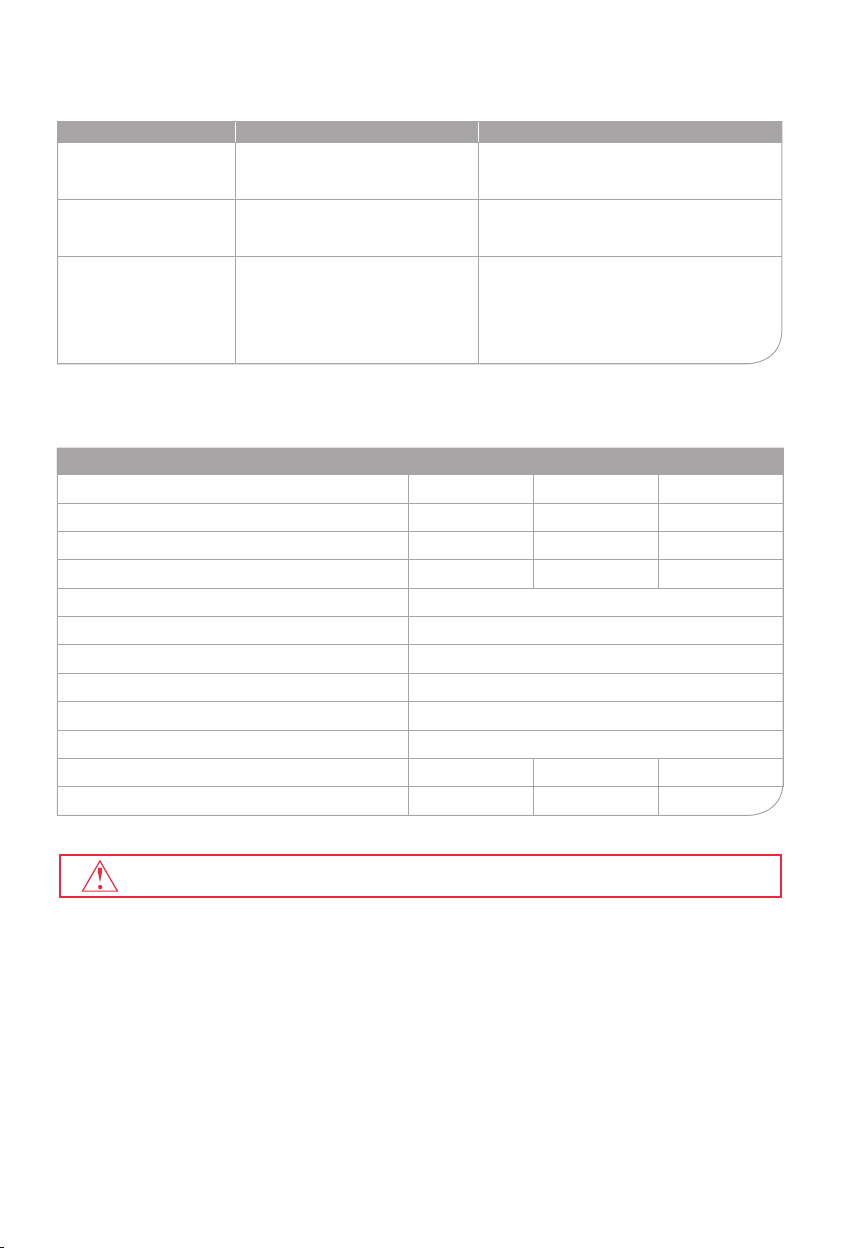
POSIBLES PROBLEMAS Y SUS SOLUCIONES
Posibles problemas Posible causa Soluciones
El aparato no se enciende La toma no recibe corriente.
Desenchufe el aparato y espere hasta que el
suministro de corriente se normalice.
Hay vapor
Cuando cocine alimentos con una
alta cantidad de liquido, puede aparecer cierta cantidad de vapor.
Tenga cuidado cuando abra la puerta para no
quemarse debido al vapor.
Olor a quemado
1. Hay migas en la bandeja.
2. Hay gasa acumulada en la rejilla,
en la cacerola o dentro del aparato.
1. Limpie la bandeja para migas después de
casa uso.
2. Limpie el interior del dispositivo (una vez
enfriado) y lave inmediatamente la rejilla y la
cacerola después de su uso.
CERTIFICADO DEL PRODUCTO
Para obtener información sobre certicado del producto, visite http://www.oursson.com o solicite una
copia a su vendedor.
Especicaciones
MODELO МO2305 МO2610 МO3020
Volumen, L 23 26 30
Convección - - +
Tamaño de la cacerola, mm (LxW) 336,2x260 349,5x250 377,6x267
Consumo energétic o (W) Max 1500
Tensión nominal
Temperatura de almacenamiento y transporte
Temperatura de funcionamiento
Requisitos de humedad
Clas e de pr otección I
Dimensiones (mm) (HxWxL) 467х350х290 489х340х322 522х360х322
Peso, kg 6,66 7,14 8,52
220-240 V~ ; 50/60 Hz
-25°C a +35°C
+5°C a +35°C
15-75% sin condensación
*Los productos deben almacenarse en lugares secos y ventilados, a temperaturas no superiores a - 25ºC.
Deje cualquier reparación del aparato en manos de un centro de servicio técnico autorizado por
OURSSON AG.
MANTENIMIENTO
La compañía OURSSON AG le agradece enormemen-
te la elección de sus productos. Hemos hecho todo lo
posible para que estos productos satisfagan sus necesidades con la calidad que demandan las normas
internacionales más exigentes. Si su producto de marca OURSSON precisa de mantenimiento, póngase en
contacto con el centro de asistencia técnica autorizado
(en adelante, CAT). Encontrará una lista de los CAT y
sus direc ciones en nuest ro sitio web, www.oursson.com.
Obligaciones de la garantía de OURSSON AG:
1. Las obligaciones de la garantía OURSSON AG,
satisfechas por los CAT de OURSSON AG, son válidas únicamente para los modelos diseñados por
OURSSON AG para la producción o suministro y
venta en el país en donde el servicio de garantía se
proporcione, adquiridos en este país, homologados
según las normativas de este país y dotados de las
marcas de conformidad ociales.
27
 Loading...