

Page 1
Page 2
Our K9 Royal Blue Vibration Collar User's Manu al
Congratulations on buying this Our K9 Bark Collar, if for any reas on you are not 100 %
completely sat is fied with your Bark Collar, pleas e c ontact me immediately so that I may h elp you..
Once you have bee n through the users man ual and watched all the videos if you ar e unsure about
anything, Please contact me at [email protected]
.
WATCH THIS VIDEO NOW… IT IS VITAL THAT YOU UNDERSTAND HOW YOUR COLLAR
WORKS…. https://www.youtube.com/watch?v=ERq0pR0O2tI
Mary Jo Ellis
Owner and Found er Our K9
What is in The Box
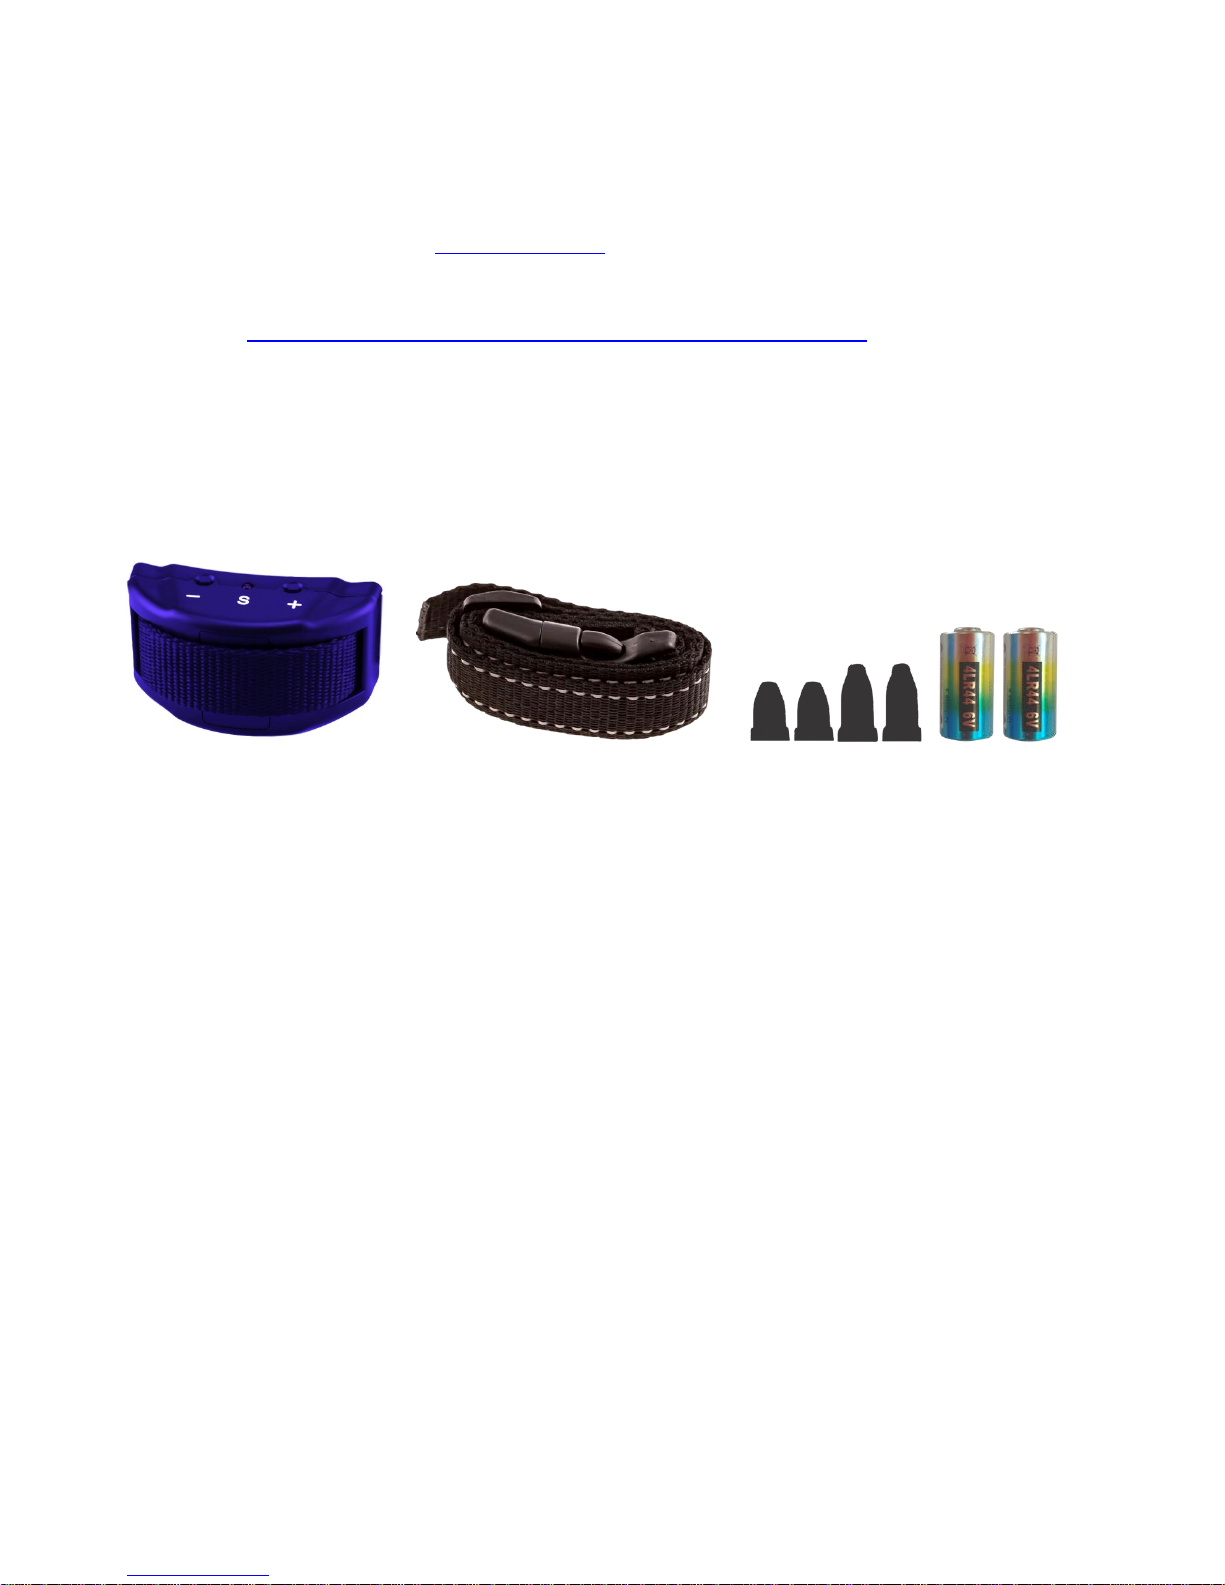
. Royal Control Unit Adjustable Strap Long Prongs & Batteries
Short Prongs
Introduction:
The Our K9 Vibration Bark Coll ar stops bar ki ng wi t h progre s si v el y incr e a si ng Sound
and Vibration which is controlled by a Microprocessor and automatica lly delivers
correction after eac h bar k. It doe s not work of f the sound of your dogs bark but from air
pressure deliv er e d thr ough a small hole in the back of t he collar. Therefore the fitting of
the collar is VITAL if the coll ar i s to work c orre c tl y… Whe n the coll ar is fit t e d corr ectly
IT DOES NOT MOVE… You can slide just one finger under t he collar. If it is NOT FITTED
CORRECTLY it will go on randomly and NOT when your dog bar ks…
To buy batteries when you need the m jus t go to this link, it is on Amazon
and you will get 10 Batteries for just $5.40
http://www.amazon.com/10-4LR44-476A-PX28A-
COLLAR/dp/B002B8WJPI?ie=UTF8&redirect=true&ref_=cfb_ai_prodpg
Page 3

What The Bark Collar Ac tually does when Your Dog Barks
On the 1st Bark 1.5 Second Beep
2
nd
Bark within 40 seconds 2.5 Second Beep
3
rd
Bark within 40 seconds 4 Second Beep t hen .5 sec Vibration
4
th
Bark within 40 seconds 4 Second Beep then 1 sec Vibration
5
th
Bark within 40 seconds 4 Second Beep then 1.5 sec Vibration
6
th
Bark within 40 seconds 4 Second Beep then 2 sec Vibration
7
th
Bark within 40 seconds 4 Second Beep then 3 sec Vibration
The collar will now enter sleep mode for 1 minute
If your dog does not bark within the 40 sec limit then the collar will revert back to number 1
The use of the warning tone followed by increasingly intense tones and vibration stimuli sets
up
A pattern that your dog w ill quickly learn is caused by its own barking. It takes time to break
bad habits.
When your dog forgets and barks again, the warning tone reminds your pet without
immediately
Applying any stimulus. At each step, y our dog gets to choose whether it's w orth the increasing
Discomfort to bark again. We have found this technique of progressively increasing sound and
Vibration is not only more human e, it is more EFF ECT IV E in brea king the barking habit than
Conventional shocking bark con trol c ollars.
Our K9 Vibration Bark Collar can be ad justed to con trol the sen sitivity of y our dog s bar k,
According to the size of dogs barking.
Page 4

Putting the Colla r on Y our Dog:
Remove the battery so the collar has been disabled. And put the collar together and adjust to
the correct length, And screw on the correct size prongs, these prongs MUST be against your
dog’s skin to work, Short prongs for short haired dogs, long prongs for long haired dogs…
To Put your collar together correctly please watch this video, When the collar has been
assembled correctly the collar DOES NOT SLIP, IT WILL NOT LOOSEN.. If you are
experiencing problems with the collar loosening please re-watch the video using the pause
button. Click this link to correctly assemble your collar…
https://www.youtube.com/watch?v=3DdbMexrnwY
If the Collar is too long then cut the excess and trim the end, then seal using a flame, watch
this v ideo to do it c orrectly….
https://www.youtube.com/watch?v=7SEBi8Sfgkw
Place the collar around your dog’s neck, it must not move, if it does then adjust and tighten the
collar. Hold the unit and try to move it, when it does not move and you can slide just one finger
under the collar that is now correctly fitted.
Now leave the collar on your dog, Do Not put the battery back in…. Wait for 24 – 48 hours until
your dog totally ignores the collar, initially they will scratch at it and just paw at it, when that
completely stops we are ready to start the training.
You must be pr e sent whe n y ou put the batter y into the c ol l ar and star t the
training...
To put the battery into the collar correctly watch this video:
https://www.youtube.com/watch?v=jrokbOQemj0
Now you have the battery in t he collar let’s test it to make sure everyt hing is OK.
Watch t his video to learn how to test your collar correctly…
DO NOT UNDER ANY CI RCUMSTANCES PUT THE COLLAR ON Y OUR DOG
WITHOUT FIRST TESTING IT….
Testing the Collar, No you do not have to bark at it… Just hold it up with the back of the collar
facing you, there is a small hole between the two prongs, just puff into the hole and the collar
will beep, do it again, and the collar will beep again. Now do it a third time and the collar will
beep and then vibrate. Now you know you collar is working correctly. We have this video
which shows you exactly how to do it… please r efer to Fig 1 On what your collar should do.
https://www.youtube.com/watch?v=uK3XAJlB6JI
Now You have t ested the collar tak e the se nsitivity all the way down to number 1
by pres sing the – button on the collar… If your dog bar ks and the collar does not
beep, press t he + button onc e this will increase the sensitivit y to num ber 2, if your
dog barks agai n and no be e p, once again press the + button, conti nue this until
the collar beeps imm ediately after your dog s bar k. NOW YOUR COLLAR IS SET
UP CORREC TLY ….
Page 5

Now we are going to start the Training, under no circu m stanc es should you
just put the c ollar on your dog and leave it them to figure out, your dog will
get confused and extremely upset. You MUST teach them what you expect
from th em. Now plea se watc h this video, THIS IS THE MOST IM PORTANT
STEP OF T HE TRA INING…
https://www.youtube.com/watch?v=zq25NbCLWVE
Remember every time your dog b ark s you give the com mand NO the collar
will reinforce that command… If your do g continues to bark then you give a
much m ore forceful NO and t he collar will do the same, again continuation
you give a muc h more forceful NO! Again the collar will mimic you ... This
way your dog will un derstand that the be ep means no and the beep an d
vibr ati on me an s NO! And the way to stop the discomfort is to stop
barking….
DO NOT JUST PUT THE COLLAR ON Y O UR DOG AND EXPECT THEM TO
UNDERSTAND WHAT IT IS SUPPOSED TO MEAN, I WI LL A DM IT SO ME
DOGS ARE SUPER SMART AND WILL UNDERSTAND ALMOST
IMMEDIATELY , BUT WHAT IF YOUR DOG DOESN’T UN DERSTAND, HELP
THEM UNDERSTAND, TEACH THEM …
ALWAYS ALWAYS REMOVE THE COLLAR WHEN YOUR DOG IS PLAYING… Please
remember that this collar is a behavio ral aid and you do not want to be telling your dog
off while they are playing.
Caution Notes:
1. Do not allow your dog to chew this collar. You should also attempt to minimize scratching or
Clawing at the casing.
2. This device is made up of plastic and electronic components that are not digestible.
Consult your local vet if your dog swallows any part of this product.
3. The collar is not intended for use as a restraining collar. If you are using a leash, use it with
a
Separate restraining type of collar.
4. Although the Anti-bark Collar's microprocessor is designed to differentiate your dog's
Individual bar, the unit may occasionally be activated by other vibrations or sounds.
This is normal but, it should not happen so often as to be confusing to your pet. I f t he unit is
falsely triggered by excessive scratching shaking of the head or rolling on the ground, plea se
remove the collar immediately and do not put the collar back on for a couple of days, when
you do put the collar back on do not turn it on, wait for your dog to ignore the collar before you
resume training.
Page 6

FAULT FINDING GUIDE
Q. The Collar Just Keeps Going Off
A 1. The se nsitiv ity is set too hig h… adjus t t he sensitivity by pres sing the m inus butt on
all the way done to one, then test….
A 2 The Collar is not tight enough, You should be able to slide just one finger under
the collar, It may seem tight to you and you may think that it is uncomfortable for
your dog, its Ok to think that.. Because the collar works of the air between the
collar and your dogs throat… As your dog barks his throat will go in and out
pushing air into the small hole at the back of the collar this is what will activate
the bark collar. If the collar is not tight enough then the air will not get pushed
in…. So why does it keep going off… because the collar is moving towards the
throat and closing that gap thereby triggerin g the collar. .
Q. My Dog Shakes his Head and the Collar Goe s Off.
A. Did You Follow the Guidelines in the Video “How to Use Your Our K9 Vibration
Collar Correctly” About NOT putting the Battery in the Collar for One to Two Days
BEFORE Your Start Training? Because the Collar Feels Unusual to Your Dog
They Will Keep Shaking Their Heads and scra tching forcing the Collar to
Activate…
If You Have Followed the Guidelines Now Check That the Collar is not too
loose… Tighten the Collar. Ensure That You Have the Correct Prongs Suited To
Your Dogs Coat, Longs Prongs For Long Coats and Short Prongs for Short
Coats... The Colla r Sh oul d Not Mov e…
Please remember that It is Air Pr es s ure that Activ ates the Collar S o a Loose
Collar Being Shaken Will Activate.
Q. My Dog Barks But the Collar Does Not Acti vat e. ..
A. Check the Battery by Performing a Full Test. Please Check Our Video on How to
Perform a Full Test Correc tly. If the Collar Tests Correct l y Then You Will Need to
either Increase the Sensitivity of the Collar. Mak ing it More Sens itive + Will Make
it Activate Easier. Or the collar is too loose, please tighten the collar.
Q. My Collar Keeps Comi ng Loos e…
A. You have put the Collar together incorrectly. The collar has been tested to 90lb
Breaking and slippage. Please Watch our Video Showing How to Put the Collar
Together Correctly.
https://www.youtube.com/watch?v=3DdbMexrnwY
Page 7

Q. The Collar is Diffic ult to undo…
A. The Buckle Has Been Put Together Back to Front… the Buckle has Been D esign
to Snap Apart.
https://www.youtube.com/watch?v=3DdbMexrnwY
Q. The Red light keeps flashi ng…
A. Please change the battery.
Q. Coll ar Jus t Does Conti nuous Beep
A. Change Battery… There is Not Enough Charge to Perform Normal Operations.
Please Check Our Video on How to Change the Battery Correctly.
Q. Collar Will Beep but Will Not Vibrate
A. There is Enou gh Charge in the Battery to make it Beep but Not Vibrate. Please
Check Our Video on How to Change the Battery Correctly.
Q. The Collar Goes Off when my dog doesn’t bar k.
A The collar will sometimes give false alerts…. Do not worry about this your dog will
lear n v ery quickly th at it is ex ac tly tha t… a false alert. All dogs very very quickly
learn that the two beeps are exactly that, just two beeps, so they will bark. But
you as a responsible dog owner want that, you want it so that they can talk…
What the coll ar is designed to do is to STOP the excessive barking….
Page 8
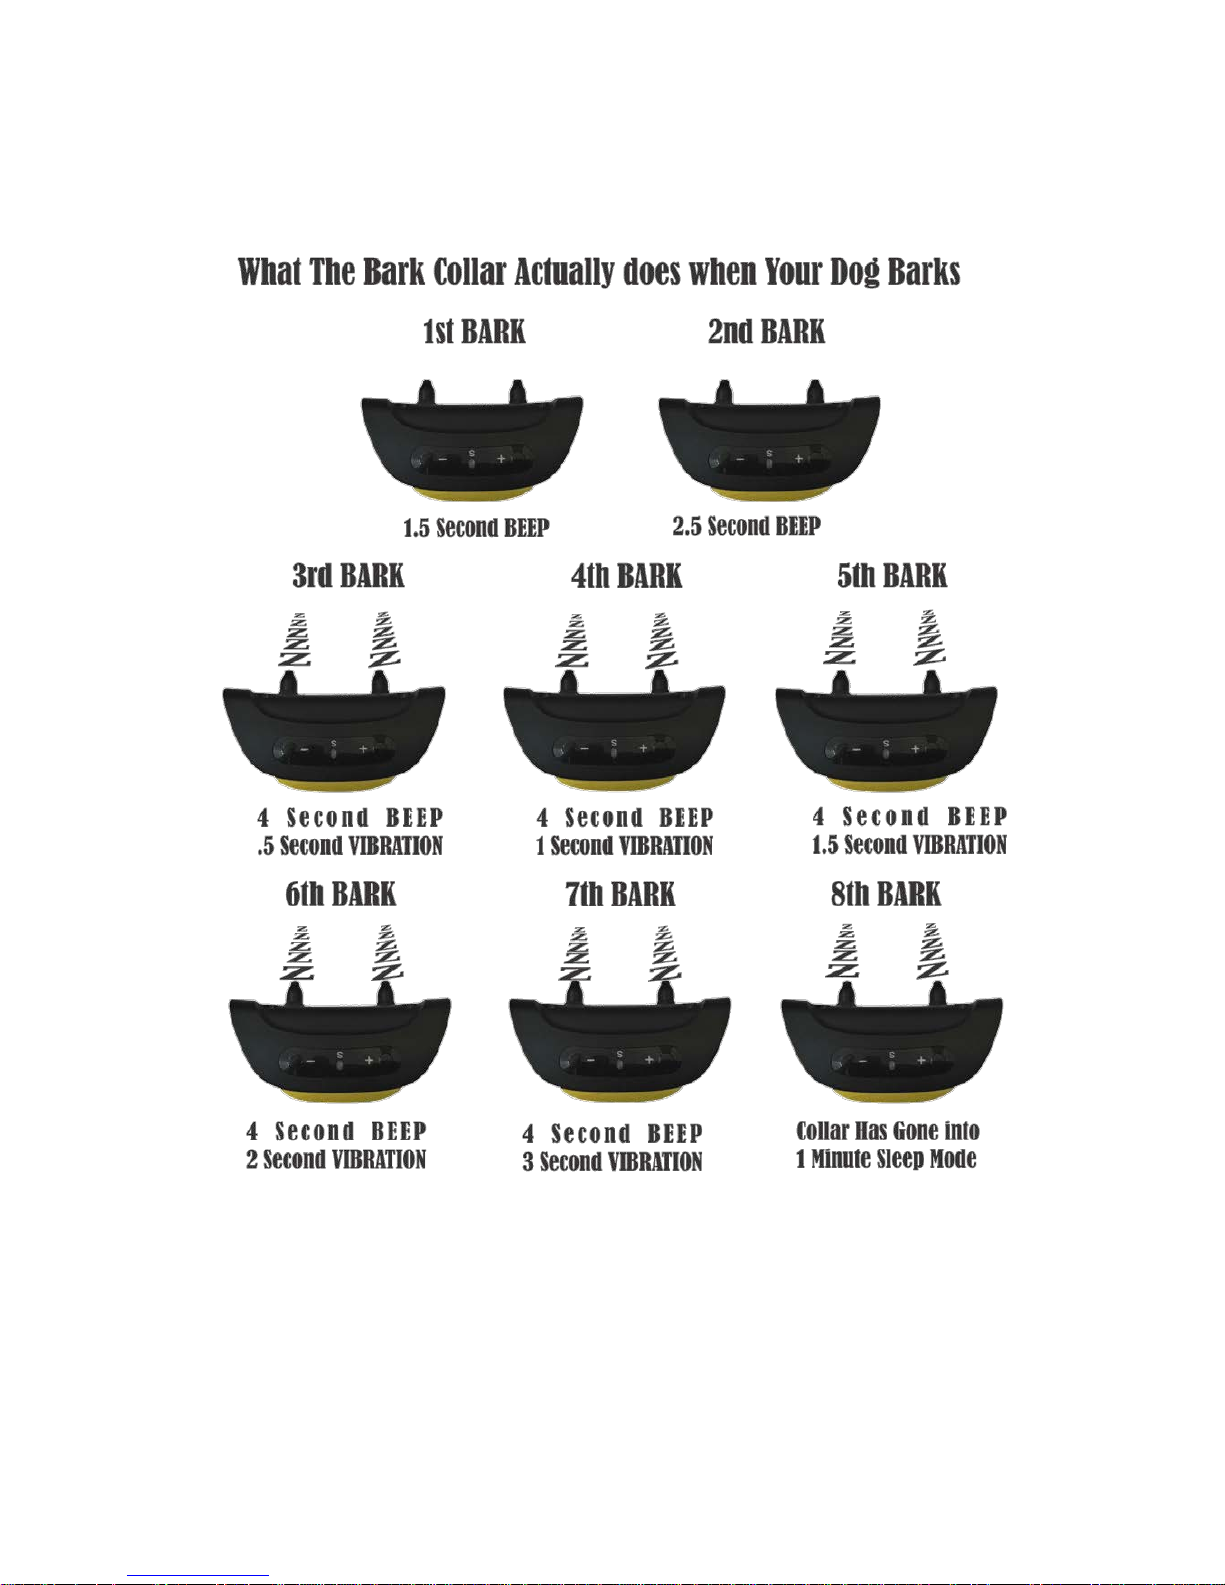
FIG 1
 Loading...