


Last Update: 2011-June INSTRUCTION MANUAL FOR THERMOSYPHONIC SYSTEMS 1/35
©TANSUG MAKİNA LTD. 2008
TECHNICAL MANUAL FOR
THERMOSYPHONIC SYSTEMS
“CLOSEST TO THE SUN”
SOLAR THERMAL SYSTEMS

Last Update: 2011-June INSTRUCTION MANUAL FOR THERMOSYPHONIC SYSTEMS 2/35
©TANSUG MAKİNA LTD. 2008
INDEX
CHAPTER I ................................................................................................................................................................................... 3
INSTRUCTIONS FOR INSTALLER ............................................................................................................................................. 3
1. INTRODUCTION .................................................................................................................................................................... 3
2. COMPONENTS AND PHYSICAL CHARACTERISTICS ................................................................................................ 4
2.3 Solar panel ....................................................................................................................................................................................... 6
2.3.1 Technical Spec Sheet ........................................................................................................................................... 6
2.3.2 Efficiency Curve ..................................................................................................................................................... 6
2.3.3 Cross Section of the Solar Panels .................................................................................................................... 8
2.4 Technical Specifications of Horizontal Boilers ....................................................................................................................... 9
3. GENERAL INSTRUCTIONS- PREPERATIONS FOR INSTALLATION .................................................................... 13
4. INSTALLATION OF PANELS ........................................................................................................................................... 14
4.1 Placement of Panels .................................................................................................................................................................... 14
4.2 Panel Angle .................................................................................................................................................................................... 14
4.3 Avoiding Shades ........................................................................................................................................................................... 14
5. INSTALLATION OF THE SYSTEM .................................................................................................................................. 15
5.1 Installation of Single- Panel Systems ...................................................................................................................................... 15
5.2 Installation of Double- Panel Systems .................................................................................................................................... 16
5.3
Mounting of Expansion Tank in Inclined Roof ..................................................................................................................... 16
6. MODULAR ROOF-TOP STAND ....................................................................................................................................... 17
6.1 Compatibility .................................................................................................................................................................................. 17
6.2 List of Components used in the structures. .......................................................................................................................... 17
6.3 Description of screws that are used in the mounting of the stands................................................................................ 18
6.4 Assembly of Thermosyphonic Flat Roof Stand (TFR45) ................................................................................................ 18
6.5 Assembly of Thermosyphonic Flat Roof Stand (TFR35) ................................................................................................ 21
Assembly of Thermosyphonic Flat Roof Stand (TFR35) ................................................................................................ 22
7. FILLING THE BOILER..........................................................................................ERROR! BOOKMARK NOT DEFINED.
8. ELECTRICAL ELEMENT ................................................................................................................................................... 27
9. AFLU-S HEAT TRANSFER FLUID .................................................................................................................................. 30
10. CHARGING THE CLOSE LOOP CIRCUIT ..................................................ERROR! BOOKMARK NOT DEFINED.
11. DISCHARGING THE SYSTEM ..................................................................................................................................... 30
CHAPTER II .................................................................................................................................................................. 31
INSTRUCTIONS FOR USER ...................................................................................................................................................... 25
12. SAFETY & SECURITY COMPONENTS ..................................................................................................................... 31
12.1 Primary Circuit (Closed Loop Line): ....................................................................................................................................... 31
12.2 Secondary Circuit (Cold Water Line): ..................................................................................................................................... 31
13. MAINTENANCE .............................................................................................................................................................. 31
13.1 Cleaning Panels ............................................................................................................................................................................ 32
13.2 Pipe Insulation ............................................................................................................................................................................... 32
13.3 Magnesium Anode ........................................................................................................................................................................ 32
14. TROUBLESHOOTING & IMPORTANT POINTS ...................................................................................................... 32
ANNEX 1: PARALLEL CONNECTION OF MULTIPLE SYSTEMS ...................................................................................................... 34
ANNEX 2: SERIAL CONNECTION OF MULTIPLE SYSTEMS ............................................................................................................ 34

Last Update: 2011-June INSTRUCTION MANUAL FOR THERMOSYPHONIC SYSTEMS 3/35
©TANSUG MAKİNA LTD. 2008
CHAPTER I
INSTRUCTIONS FOR INST ALLER
1. INTRODUCTION
Thank you for your choosing an OURASET Solar Water Heating System. Not only
you secured the cleanest, safest and probably the most economic way to obtain hot
water but also you have fulfilled your responsibility against the environment. Buying
an OURASET is a gift to the “PLANET EARTH” as well as to the future generations.
OURASET solar water heater system is designed to provide problem free hot water
for many many years.
This manual has been prepared for two purposes:
• Assist the installation teams for the correct assembly of the system.
• Inform the home-owner about the capabilities of the system, and ensure that
they receive maximum benefit from their OURASET systems throughout its
life time by carrying out correct maintenance.
The manual consists of two chapters:
• Chapter 1 focuses on the characteristics of the system as well as the
assembly of the compa ct system.
• Chapter 2 sets the guidelines for both the installer and the homeowner for
maintenance of and maximizing the benefit from the Ouraset solar water
heating system.
All you need to do is read this manual and follow the installation instructions
carefully.
OURASET has been manufacturing solar boilers, solar panels and integrated
domestic hot water systems for over three decades. Thousands of home owners
around the world are enjoying hot water that comes as a gift of sun.
Until today you have probably been a consumer of energy - now you are a
generating energy on your roof!
Congratulations with your choice and happy sunny days with OURASET on your
roof!

Last Update: 2011-June INSTRUCTION MANUAL FOR THERMOSYPHONIC SYSTEMS 4/35
©TANSUG MAKİNA LTD. 2008
2. COMPONENTS AND PHYSICAL CHARACTERIS TICS
Thermosyphonic Systems at a glance
*Capacity is estimated based on average daily hot water generation capacity calculated on the insulation values between 36th-38th parallel - Mediterranean climate.
Last Update: 2011-June INSTRUCTION MANUAL FOR THERMOSYPHONIC SYSTEMS 5/35
©TANSUG MAKİNA LTD. 2008
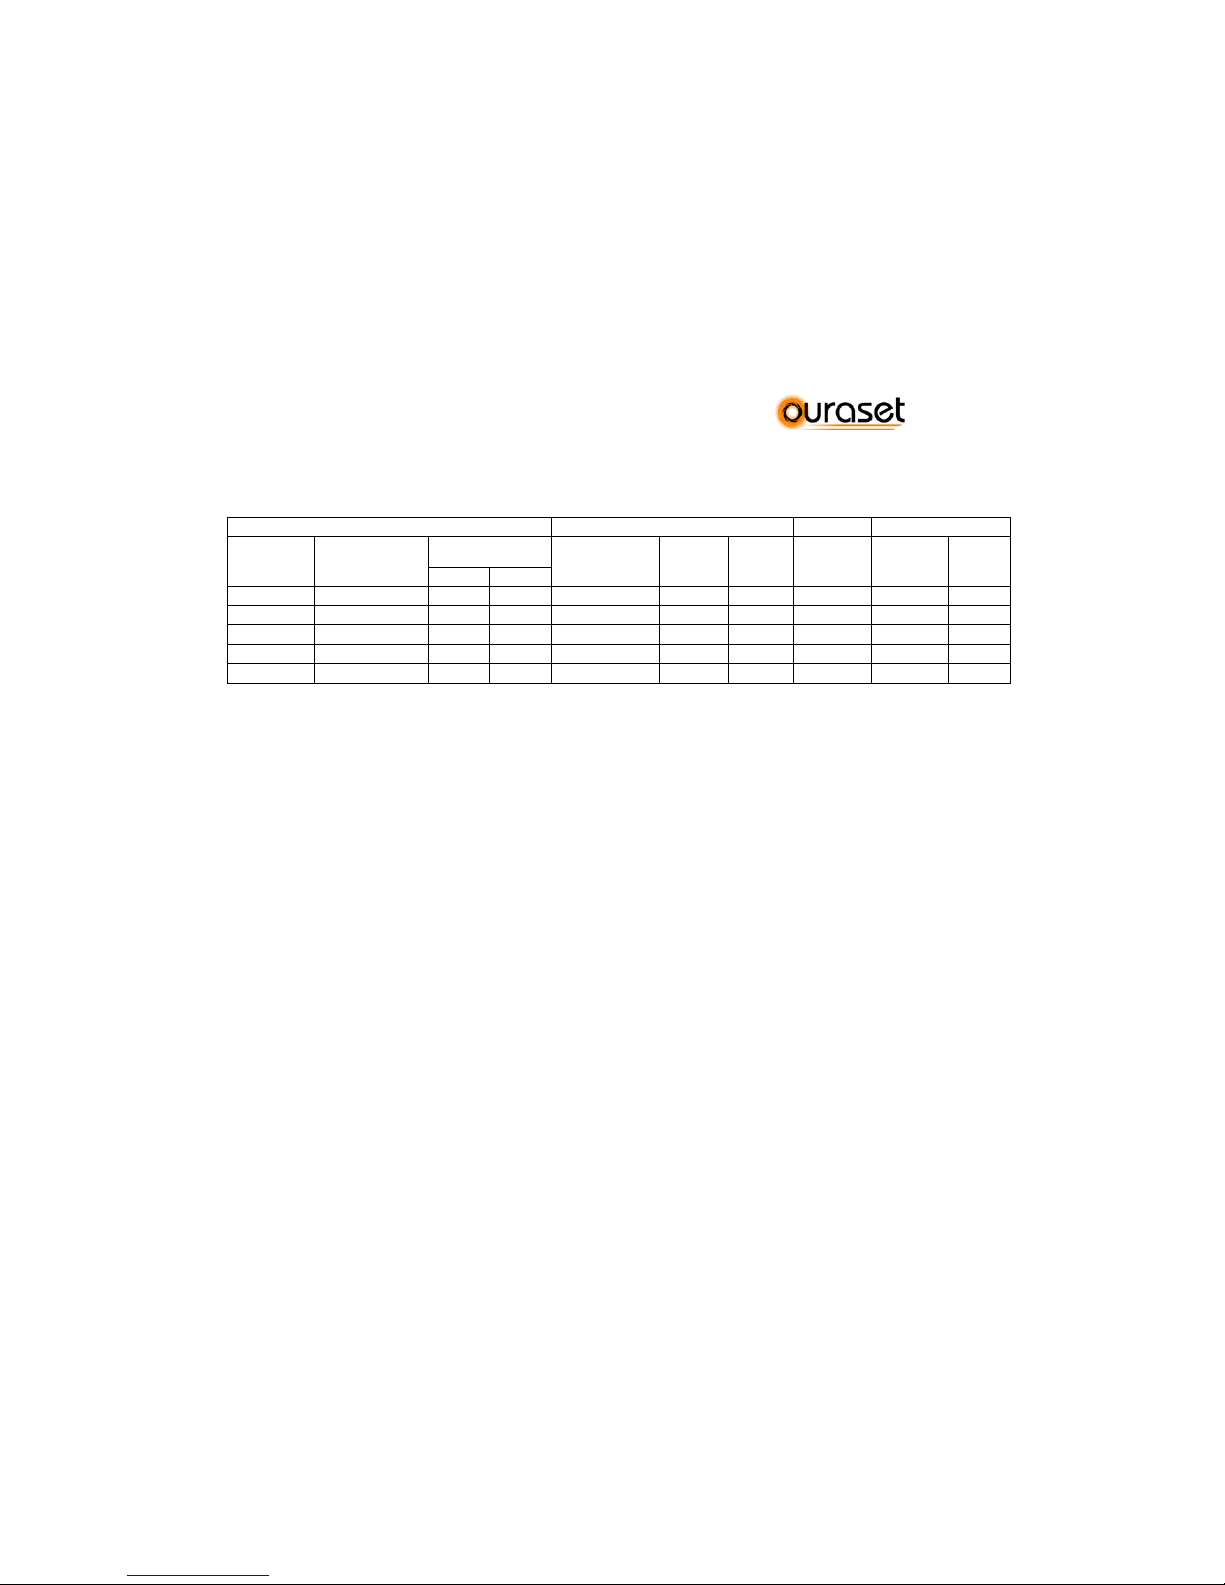
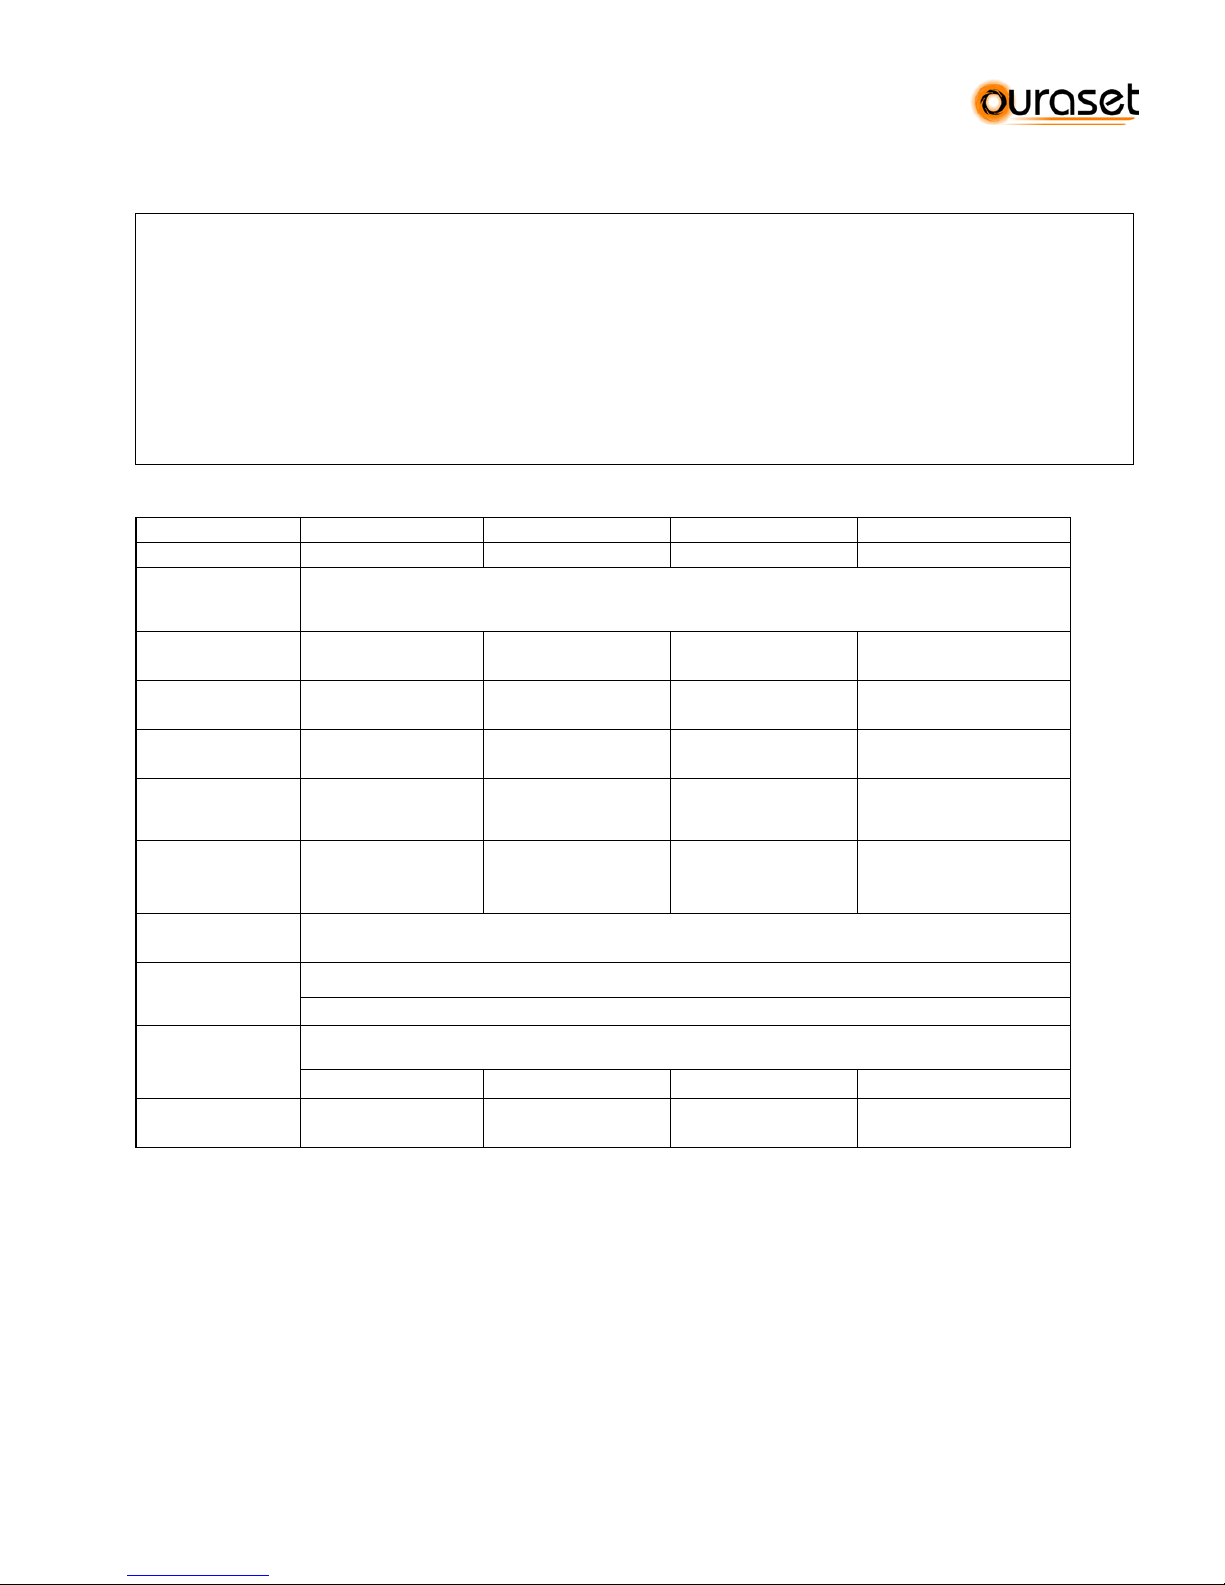
2.2 System Dimensions and Weights*
*Refer to Section 4 : “Shading Scheme” to identify distances for placement of multiple units.
TANK SOLAR PANEL STAND TOTAL WEIGHT
MODEL
DIMENSIONS
(mm.)
Empty
WEIGHT (kg)
DIMENSIONS
(mm.)
QUANTITY
WEIGHT
(kg)
WEIGHT
(kg)
EMPTY
(kg.)
FULL
(kg)
Close
Open
P 121
Ø 500 X 1200
58,0
-
1945x1200
1
40,5
27
125,0
252,0
P 151
Ø 600 X 1000
66,5
53,0
1945x1200
1
40,5
27
134,0
284,0
P 191
Ø 600 X 1200
73,7 62,0
1945x1200
1
40,5
27
141,2
331,2
P 192
Ø 600 X 1200
73,7 62,0
1945x1970 2 65
31
168,7
358,7
P 302CL
Ø 600 X 1800
115,0 90,0
1945x2480 2 81
31
227,0
527,0
* In addition to to standard sets illustrated at section 2, various configurations are shown above. These schemes are illustrative only.
OURASET manufactures systems with different tank configurations only on an OEM basis with sufficient volume.
Last Update: 2011-June INSTRUCTION MANUAL FOR THERMOSYPHONIC SYSTEMS 6/35
©TANSUG MAKİNA LTD. 2008
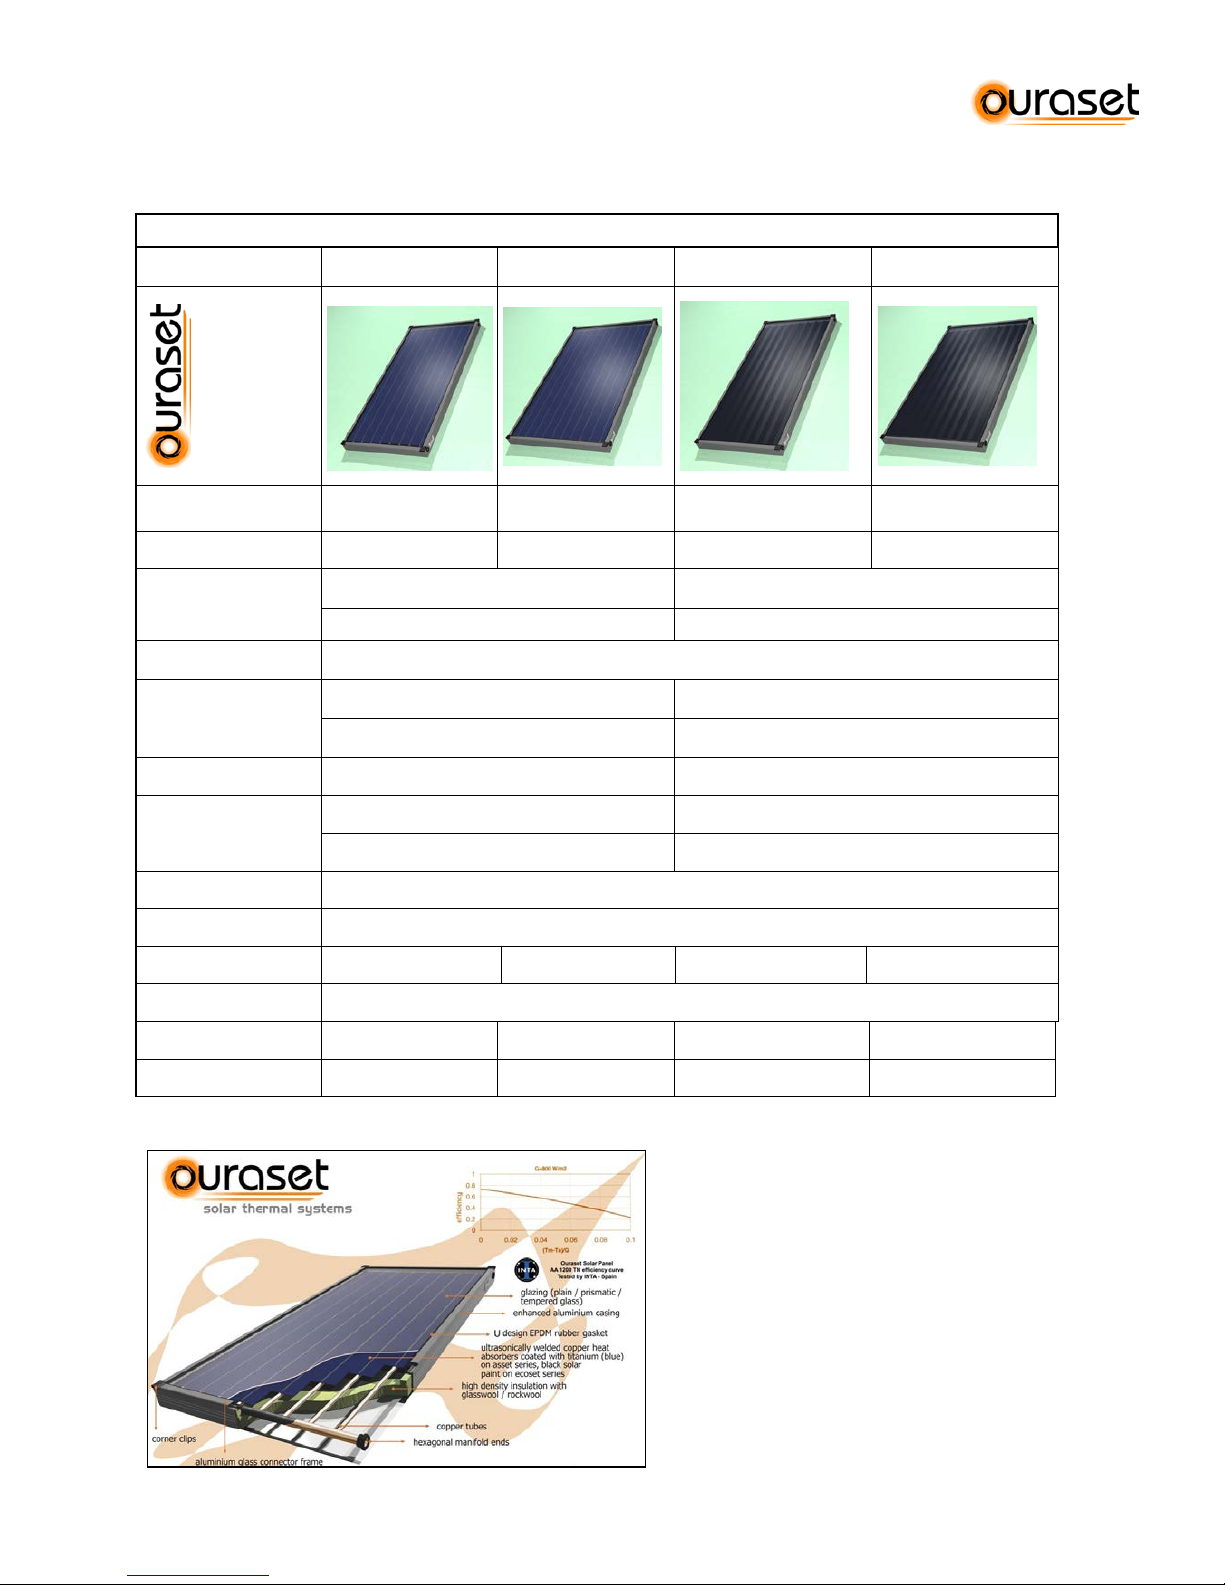
2.3 Solar panel
2.3.1 Technical Spec Sheet
Technical Specifications of the Panels – AA a nd AE S
MODEL AA 950 AA 1200 AES 950 AES 1200
Dimensions
950x1950 x105 mm. 1200x1950x105 mm. 950x1950x105 mm. 1200x1950 x105 mm.
Net absorption area
1,57 m2 2,07 m2 1,57 m2 2,07 m2
Insulation
Bottom : 50 mm Rockwool coated with glass
tissue
Bottom : 50 mm glasswool coated with glass
tissue
Sides : 20 mm glasswool with glass tissue Sides : 20 mm. glasswool with glass tissue
Conductor
Copper absorbers welded to copper tubes by ultrasonic welding method
Absorber Coating
Highly selective blue-sputtered coating Solar matt paint
a: ,95 e: ,05 a:,95 e:,70-90
Glass (4 mm.)
4 mm Low-iron tempered (Prismatic) Tempered
Glass
Characteristics
transmissivity %91 transmissivity %83
reflexivity + absorbtivity %9 reflexivity + absorbtivity %17
Casing
Electrostatic painted extra-durable aluminum extruded prof il e
Bottom
Embossed Aluminum Sheet
Number of Tubes
8 10 8 10
Headers / Tubes
Ø 22 - 10 mm
Weight
33 kg. 43 kg. 33 kg. 43 kg.
Fluid Capacity
1,6 lt. 2,2 lt. 1,6 lt. 2,2 lt.
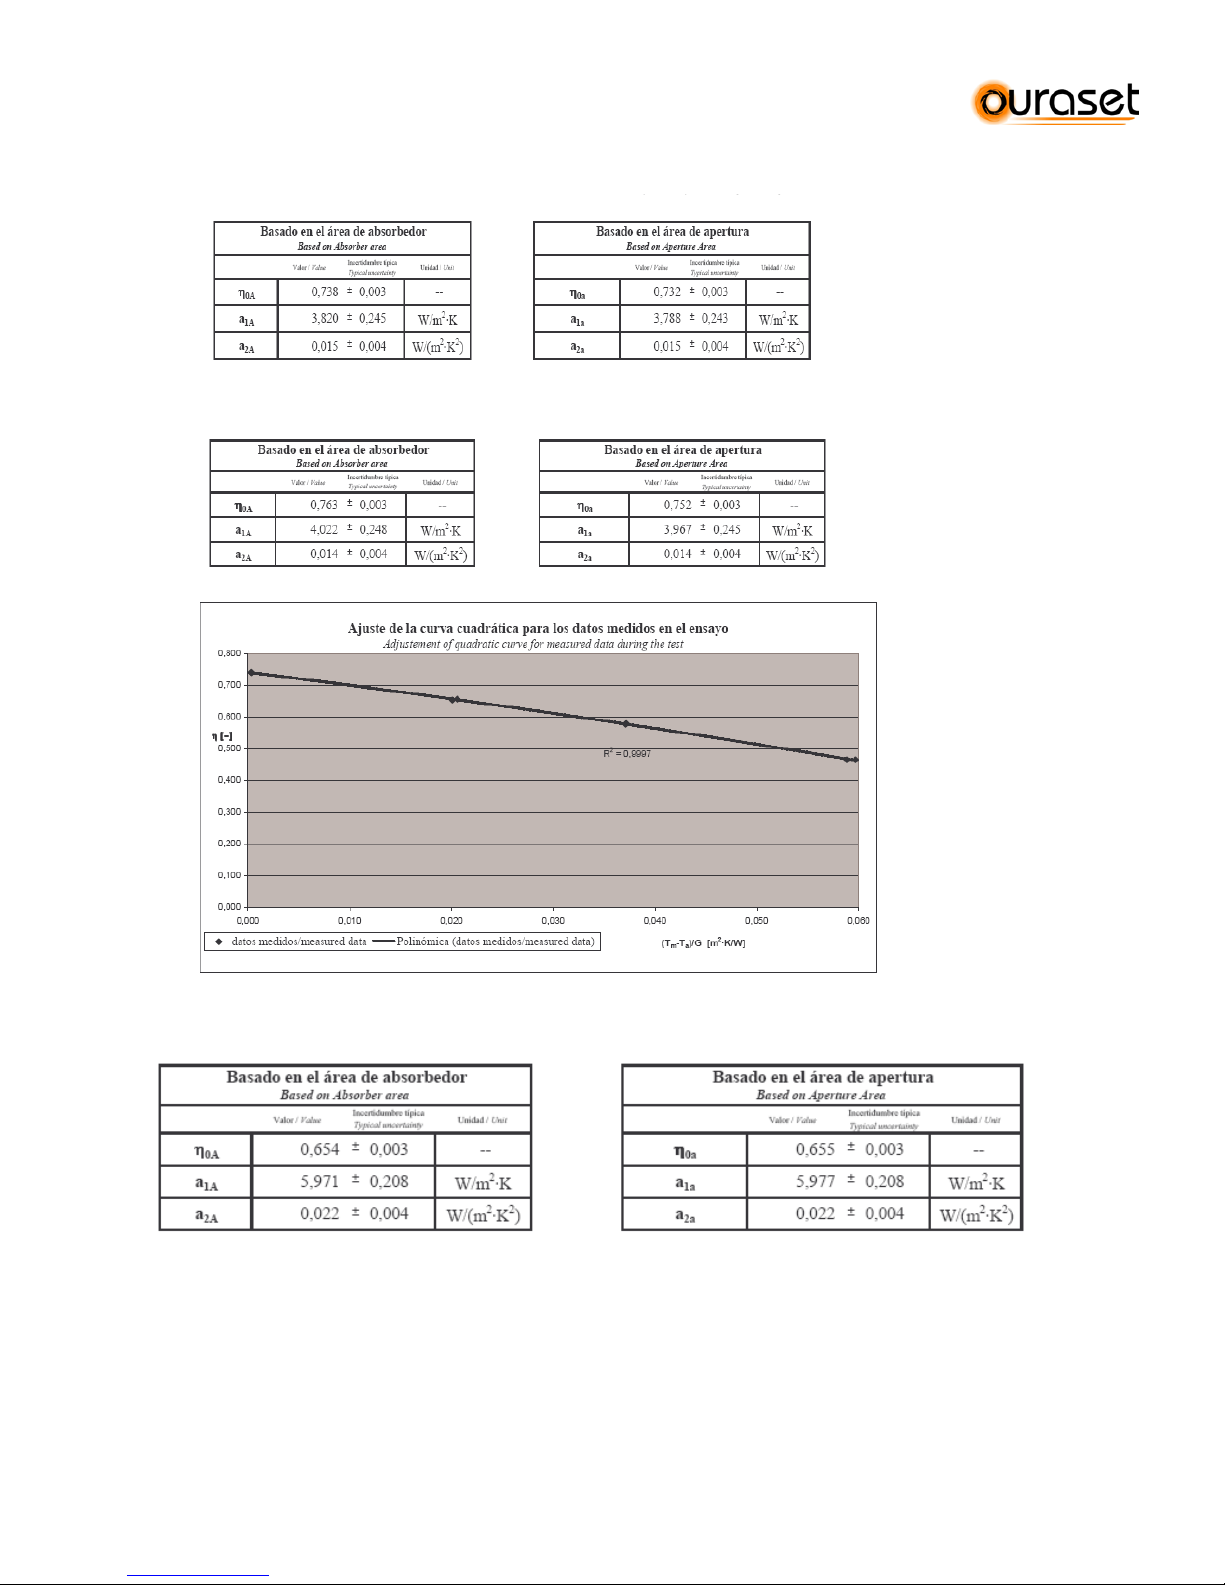
2.3.2 Efficiency Curve
Last Update: 2011-June INSTRUCTION MANUAL FOR THERMOSYPHONIC SYSTEMS 7/35
©TANSUG MAKİNA LTD. 2008
Test Report for AA 1200, by CENER under SOLAR KEYMARK Scheme
Test Report and efficency curve for AA 950, by CENER under SOLAR KEYMARK Scheme
Test Report and efficency curve for AES 1200, by CENER under SOLAR KEYMARK
Last Update: 2011-June INSTRUCTION MANUAL FOR THERMOSYPHONIC SYSTEMS 8/35
©TANSUG MAKİNA LTD. 2008
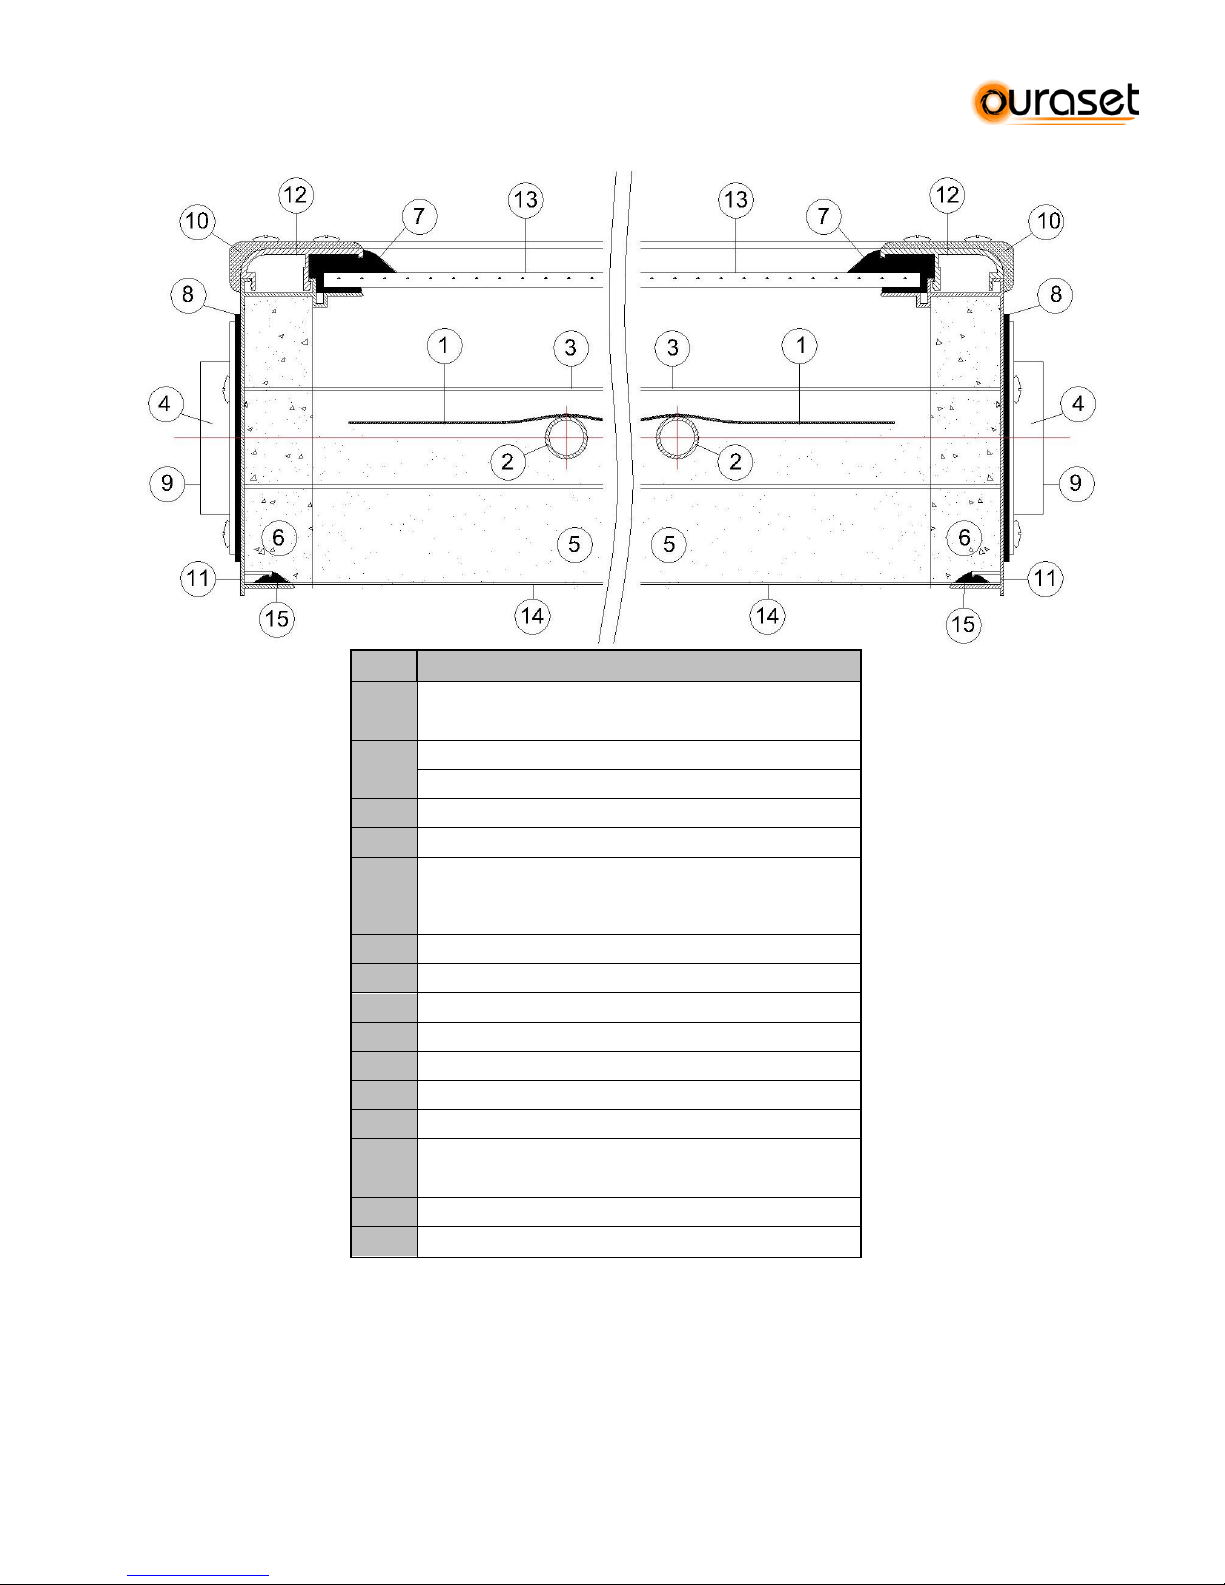
2.3.3 Cross Section of the Solar Panels
ITEM
SOLAR PANEL
1
Black painted (AES) / selective coated (AA)
copper absorber
2
10 channel (1200) - 8 channel (950)
Ø 10 Copper tubes
3
Ø 22 Copper tube header manifold
4
Hexagonal brass union
5
Insulation 50mm
Rock wool W/m °C:0,055 (AA)
Glasswool W/m °C:0,036 (AES)
6
Glasswool insulation 20mm
7
Glass sealing rubber (U-Type)
8
Manifold outlet scaling rubber
9
Manifold hexagonal union outlet cover
10
Corner supports
11
Alum. Extruded profile
12
Alum. Extruded trim
13
Low - iron tempered prismatic glass (AA)
Tempered solar glass (AES)
14
Al. Embossed sheet 0.40mm
15
Back plate sealing rubber
Last Update: 2011-June INSTRUCTION MANUAL FOR THERMOSYPHONIC SYSTEMS 9/35
©TANSUG MAKİNA LTD. 2008
2.4 Technical Specifications of Horizontal Boilers
HIGHLIGHT S OF OU RASET P SERIES
*
Aesthetic Uv resistant ABS Plastic Caps designed for easy handling
*
Minimum heat loss due to dense polyurethane insulation
*
Enatech porcelain enamel coating to ensure hygienic water
*
Electrical heater inlet and cap available
*
Extra-durable external case, color coated galvanized, suitable to locate outdoors
*
Mg anode, enamel protection and inspection/cleaning hole for extended tank life
Code
P 120 P 150 P 190 P 300
Net Capacity
120 lt. 150 lt. 190 lt. 300 lt.
External Casing
*Case: Colorcoated® galvanized steel, coated with transparent folio for protection during
transport
* Caps: UV-Proof ABS plastic
Diameter ( ø )
(mm)
500 mm
600 mm
600 mm
600 mm
Length (L) (mm)
1200 mm
1000 mm
1500 mm
1800 mm.
Tank Body
Material (mm)
Low carbon steel
3 mm
Low carbon steel
3 mm
Low carbon steel
3 mm
Low carbon steel
3 mm
Jacket material
(mm)
Low carbon steel Low carbon steel Low carbon steel Low carbon steel
1,5 mm
1,5 mm
1,5 mm
1,5 mm
Tank Internal
Protection
enatech porcelain
Enamel coating
150-400 micrones
enatech porcelain
Enamel coating 150400 micrones
enatech porcelain
Enamel coating 150400 micrones
enatech porcelain
Enamel coating 150400 micrones
Cathodic
Protection
Magnesium anode rod 50 cm
Test Pressure
(bar)
Body: 9 bar
Jacket: 4 bar
Insulation (mm)
ASSET - Polyurethane Injection (42 kg/m³)
40 -50 mm 40 -50 mm 40 -50 mm 40 -50 mm
Water Inlet –
Outlet
¾” ¾” ¾” ¾”
Last Update: 2011-June INSTRUCTION MANUAL FOR THERMOSYPHONIC SYSTEMS 10/35
©TANSUG MAKİNA LTD. 2008
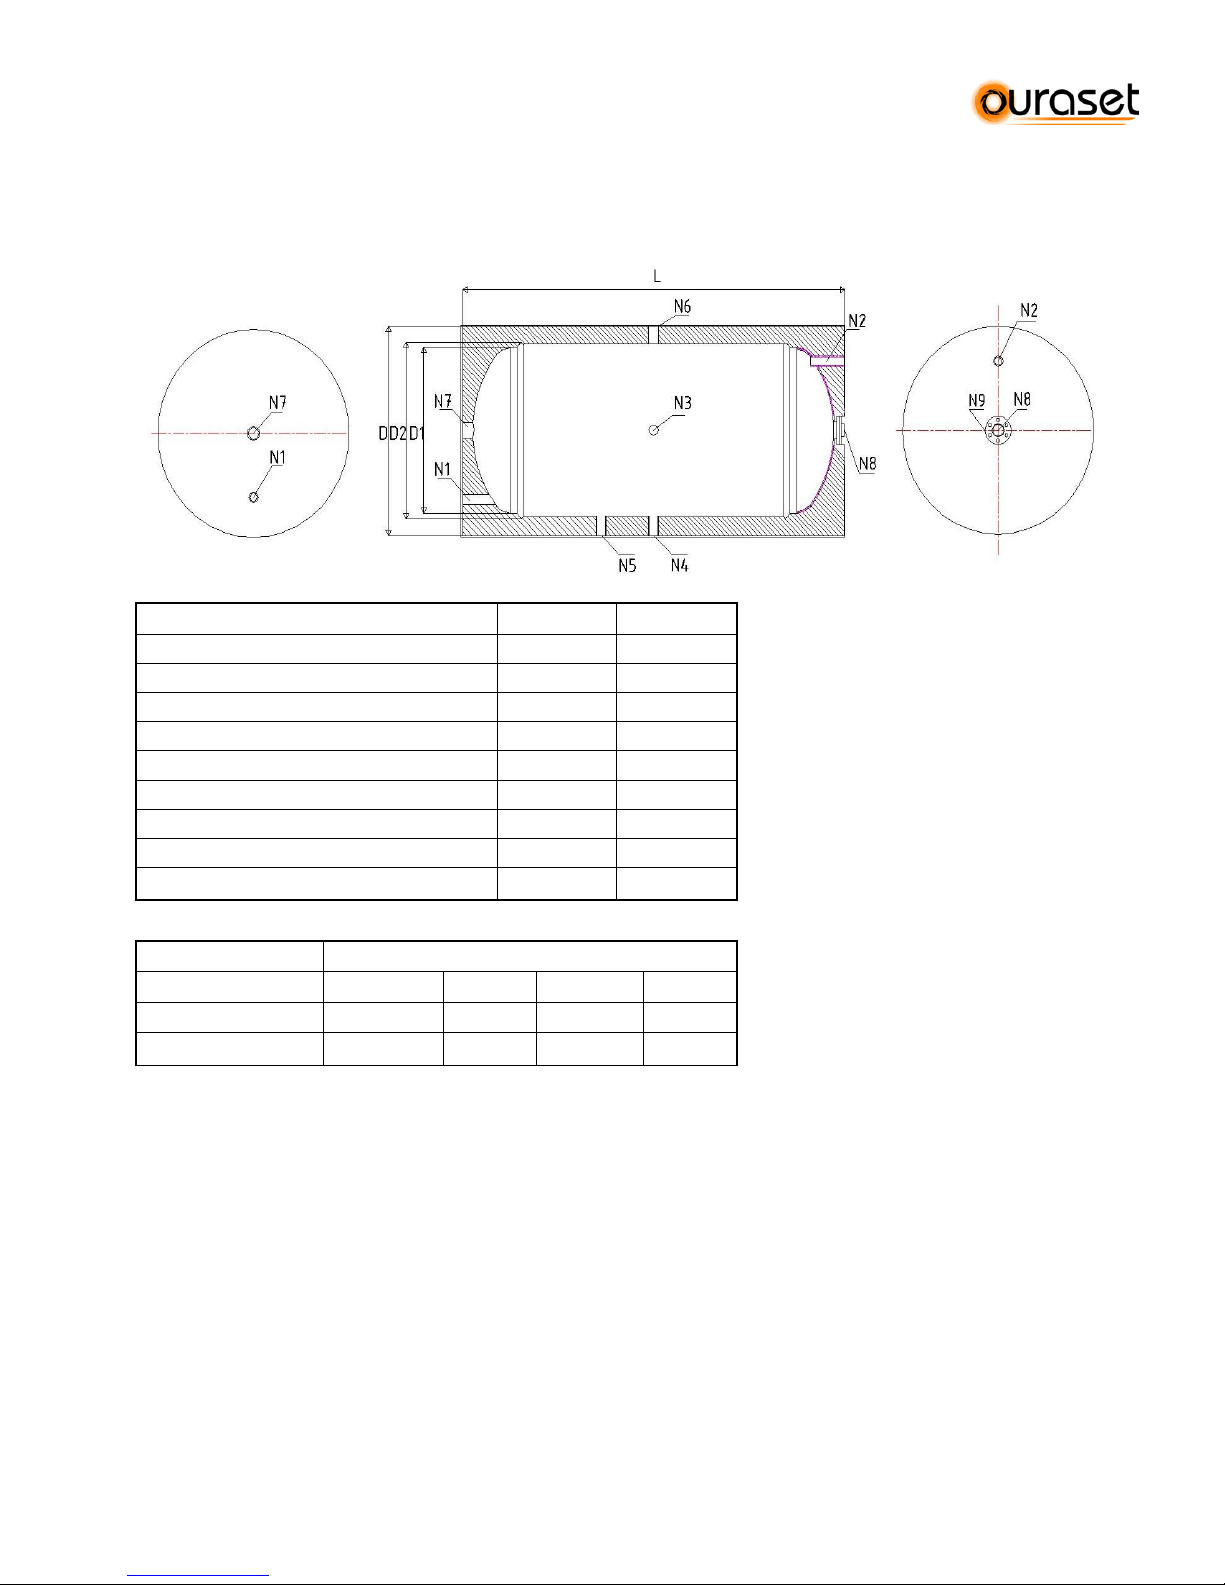
2.4.1 Horizontal Boilers, Middle connection (M), CLOSE loop (CL)
P 190M / CL
P 300M / CL
DESCRIPTION
NOZZLE
Ф
Cold water inlet
N1
3/4"
Hot Water Outlet
N2
3/4"
Solar Collector Outlet
N3
3/4"
Return to Collector
N4
3/4"
Expansion Tank Kit Connection
N5
3/4"
Air Vent
N6
3/4"
Anode
N7
1"
Electric Resistance Connection
N8
1 1/4"
Cleaning Flange
N9
DN80 TYPE
DIMENSIONS(mm)
ØD
ØD1
ØD2 L P190M
600
480
500
1200
P300M
600
480
500
1795
Last Update: 2011-June INSTRUCTION MANUAL FOR THERMOSYPHONIC SYSTEMS 11/35
©TANSUG MAKİNA LTD. 2008
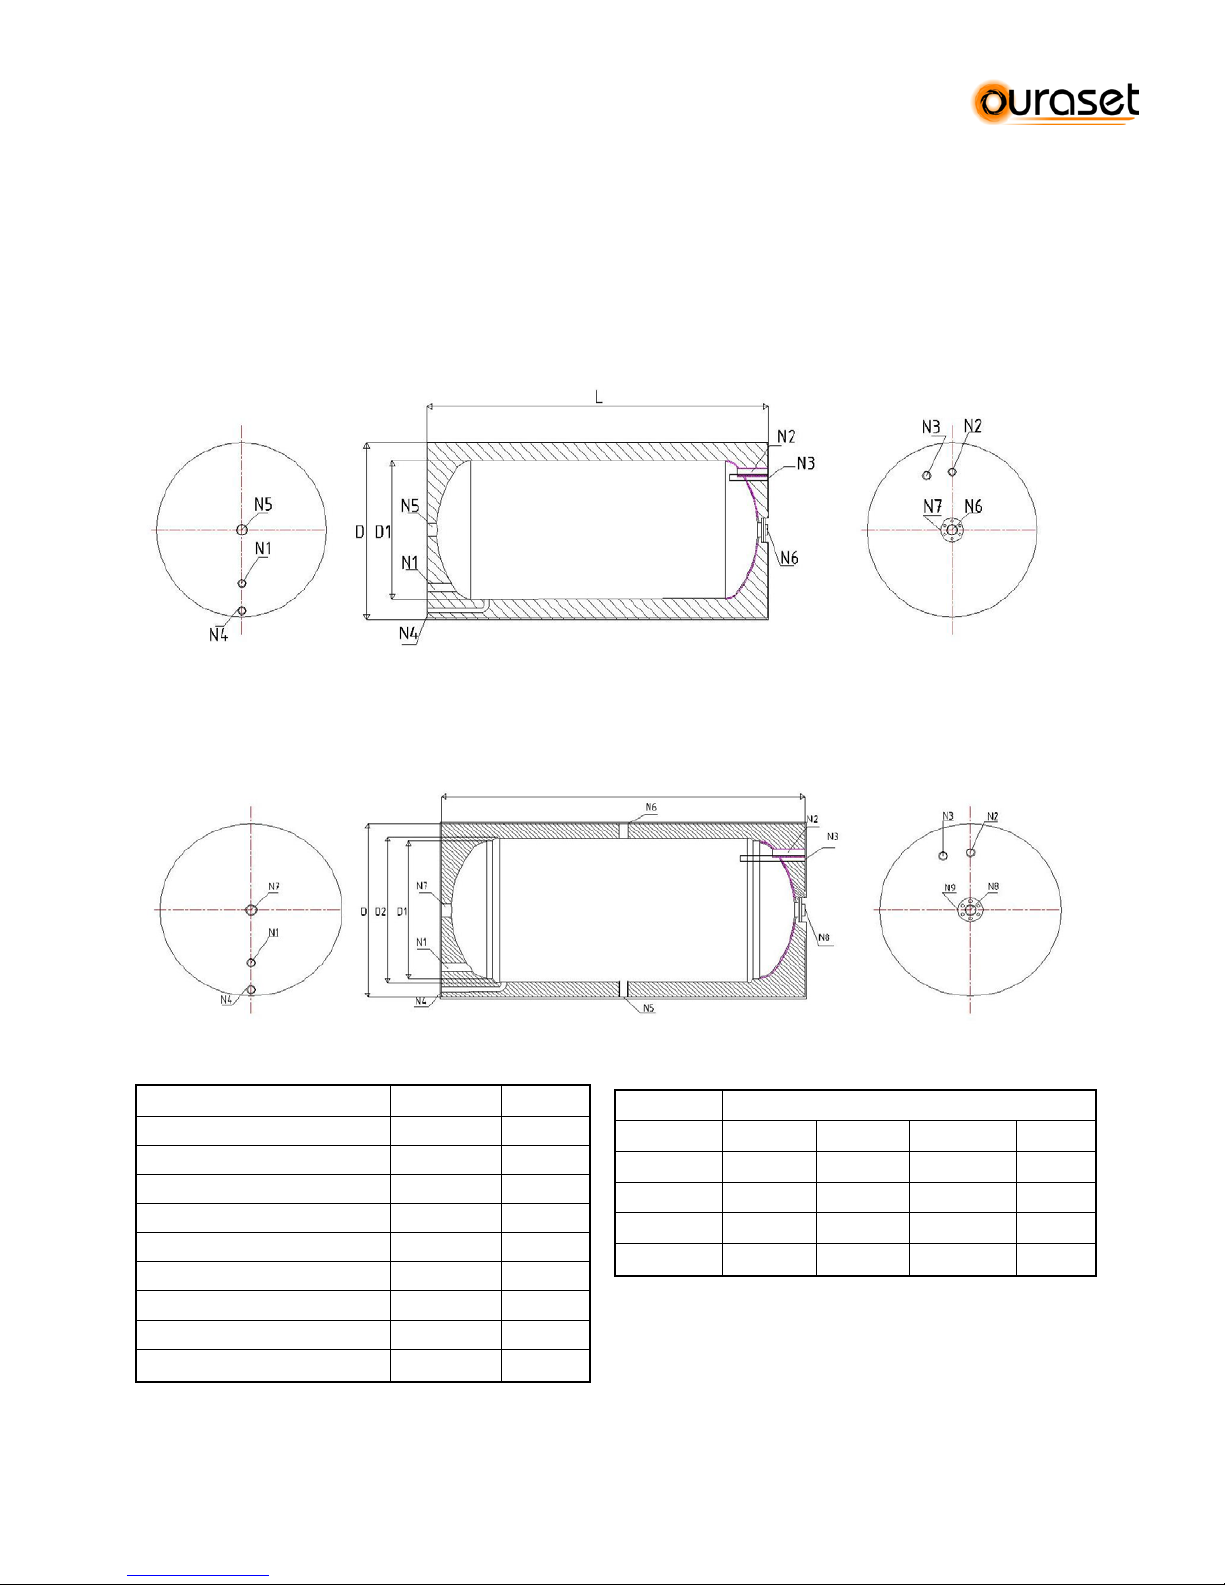
2.4.2. Horizontal Boilers, Side connection (S), OPEN (OL) or CLOSE (CL) loop
P 120S / CL
P 120S / OL
P 150S / CL
P 150S / OL
P 190S / CL
P 190S / OL
P 300S / CL
P 300S / OL
OPEN LOOP
CLOSE LOOP
DESCRIPTION
NOZZLE
Ф
Cold water inlet
N1
3/4"
Hot Water Outlet
N2
3/4"
Solar Collector Inlet
N3
3/4" Solar Collector Outlet
N4
3/4" Expansion Kit Inlet
N5
3/4" Air Vent
N6
3/4" Anode
N7
1" Electric Element Inlet
N8
1 1/4"
Cleaning Flange
N9
DN80
TYPE
DIMENSIONS(mm)
ØD
ØD1
ØD2
L
P120S
500
380
480
1200
P150S
600
480
500
1000
P190S
600
480
500
1200
P300S
600
480
500
1795

Last Update: 2011-June INSTRUCTION MANUAL FOR THERMOSYPHONIC SYSTEMS 12/35
©TANSUG MAKİNA LTD. 2008
2.5 Components and Accessories
*Brands indicated are actual brands used at the date of preparation of this manual. Manufacturer may use any other brand which is same
or similar in technical features without any notice to its customers.
**
Supplied only if system is requested with expansion tank
Component
Brand*
Technical Features
More Specs
Structures
• 40x40x4 mm, perforated L profile,
electrogalvanized
• Extruded aluminum profile
See Section 6 for details
Expansion Tank **
Varem
6 or 7 lt capacity, precharged to 1 bar,
max. pressure 4 bars
temperature -10 + 99° C
Dimensions: Ø385x92 mm
Inlet: ¾”
Volume: 0,076 m
3
Manometer **
Pakkens
0-6 bar
G ¼” B
• EN 837
• Plastic Body
Electrical Element
& Thermostat
Thermowatt
2 kw, copper resistance See section 8 for details
Pressure Relief
Valve
Watts
3 bar, PN 10 bar,
T -10 + 110° C
¾” in – 1 “ out
• EN 12165-99 CW617N
• brass
• Manual discharge knob in
shockproof resin
• Nicr steel spring
Security Group
Air Vent **
Watts
10 bar, 160°C
Pressure Reducer
F.A.R.G.
Calibrated at 3 bars, ¾” in,
Max working pressure 10 bar
Outflow pressure adjustment field:
1,2- 5 bars
Max. using temperature 80°C
• EN 12165, EN 12164
• nickel
Non-return Valve
KVS
¾” DN 20
• brass
Flexible Hoses
Kuzuflex /
Ayvaz
Standard pitch metal hoses at different
dimensions
Operating Temperature 196°C + 800°C
Operating Pressure 64 bar
Nominal Diameters DN8 (5/16.) -
DN150 (2.)
• En 10380, EN 14800
Unions, T, Elbow,
etc
Various
All brass material
• Only major manufacturers
with ISO 9001:2008
certification and relevant En
norms are used.

Last Update: 2011-June INSTRUCTION MANUAL FOR THERMOSYPHONIC SYSTEMS 13/35
©TANSUG MAKİNA LTD. 2008
3. GENERAL INSTRUCTIONS- PREPERATIONS FOR INSTALLATION
3.1 Installation should be carried out according to this manual, as well as in complete accordance
to your local and national standards and regulations.
3.2 Installation should be carried out by an authorized Ouraset installer.
3.3 Before you reach to the address of installation make sure that all the components in the
packages are complete.
3.4 System Design: All points concerning the correct installation of the solar system should
carefully be investigated before installation. Before starting the installation, determine the
location of the system and prepare a sketch of the site. Location of the installation, static
resistance of the base where the system will be installed, piping and wiring requirements
should be taken into account before starting the installation. Remember that it is best to
locate the system as close as possible to the consumption point.
3.5 You may need the following tools and devices for the installation of your OURASET system:
a. Small crane - for the lift of panels and stand on the roof
b. Safety equipments -harness, carabines, helmet, etc. to ensure safety of installation
crew during installation.
c. Drill Kit – you may need to do additional drilling on the roof to fit the panel stand to
the roof. You should be prepared to what you can possibly see when you remove
the tile to install the support legs of the stand.
d. Additional screws
e. 2 x 0, 75 – 1 mm signal cable – long enough to reach from solar panels to the
location where the boiler is going to be located.
f. Copper pipe - long enough for installation between the panels and the boiler.
g. Copper pipe plumbing eq ui pme nts .
h. Stand: The system comes with stands that include standard sets of anchorage
supports. However extra wires, bolts or frames to stabilize the system on your roof
may be required for different roof structures, or heavy climatic conditions.
3.6 Make sure that you ask for the consent of the home-owner for every action you take.
Removal of tiles on the roof, the route that tank-panel piping will follow, the location of the
boiler, etc.

Last Update: 2011-June INSTRUCTION MANUAL FOR THERMOSYPHONIC SYSTEMS 14/35
©TANSUG MAKİNA LTD. 2008
4. INSTALLATION OF PANELS
4.1 Placement of Panels: The panel should face the direction of the equator. Panel should face
South in the Northern and North in the Southern Hemispheres. Use a compass to det er mi n e
the true south.
4.2 Panel Angle: The general application is that the panel is installed at the same angle as the
latitude of your location at all locations outside of the Tropic Zone. In complying to this rule,
a discrepancy of plus or minus 15 degrees is acceptable. Decreasing the angle will increase
the summer-time energy output while increasing will increase the winter time energy output.
4.3 Avoiding Shades: Shades are one of the biggest threats to your system’s energy output.
Make sure that the panels are not shaded especially between 10:00 - 15:00 when the sun is
most powerful. During a summer-time installation take into acc ou nt that shades will grow
bigger during winters.
4.4 Refer to the “Shading Scheme” below, for the assembly of multiple units.
DISTANCES
UNIT MODEL
121-151
191-192-302
B
A X 1,85
C
D X 1,50
D
35°
1660 mm.
1760 mm.
45°
1930 mm.
2030 mm.
E
35°
1980 mm.
45°
1749 mm.

Last Update: 2011-June INSTRUCTION MANUAL FOR THERMOSYPHONIC SYSTEMS 15/35
©TANSUG MAKİNA LTD. 2008
5. INSTALLATION OF THE SYSTEM
5.1 Installation of Single- Panel Systems
Nº
Descripción
Sistemas de
1 captador
Sistemas
de 2
captadores
Cantidad
Cantidad
1
Ouraset Collector
1 2 2
Ouraset Tank
1
1
3
Blind Plug ¾´´
3
5
4
Security valve 3 bar ½´´
female
1
1
5
Security Group 6 bar ½ ´´
1 1 6
Elbow ¾ ´´ MM
2 1 7
Adapter ¾ ´´ - ½´´
1 1 8
Ball valve ½´´ MF
1 1 9 a
Long Copper pipe
1
1
9 b
Short flexible stainless pipe -
insulated
1
1
10
Short flexible stainless pipe insulated
1
1
11
Elbow ½´´ MF
1 1 12
T ¾´´ H conica
0 2 13
Elbow ¾ ´´ MF
2
0

Last Update: 2011-June INSTRUCTION MANUAL FOR THERMOSYPHONIC SYSTEMS 16/35
©TANSUG MAKİNA LTD. 2008
5.2 Installation of Double- Panel Systems

Last Update: 2011-June INSTRUCTION MANUAL FOR THERMOSYPHONIC SYSTEMS 17/35
©TANSUG MAKİNA LTD. 2008
5 MODULAR ROOF-TOP STAND
5.2 Your Modular Compact System Structure is designed to be compatible among different
models. By changing only 1-2 parts you can build up all the different models of structures
that you may require.
NOTE: There are also many common parts in the ther mosyphonic stand parts that you can
also use to build up Villaset Stands. Refer to the Villaset Manual or ask for our “Manual
for Stands.”
5.3 List of Components used in the structures.
PARTS LIST FOR
Size
FORCE CIRCULATED
SYSTEMS
THERMOSYPHONIC SYSTEMS
STRUCTURES
VIR-2
VIR-3
VFR45-2 VFR45-
3
TFR
TFR
TFR
TFR
TIR-1
TIR-2
45-1
45-2
35-1
*
1
35-2
A
BASE FRAME
2000 mm
2 3 2 3 2 2 2 2 2
2
B35
VERTICAL FRAME
1220 mm
- - 2 3 2 2 -
-
B45
VERTICAL FRAME
1415 mm
2 2
C35
SIDE FRAME
780 mm
- - 2 3 2 2 2
2
C45
SIDE FRAME
585 mm
2 2
D1
ALUM.PANEL.FRAME
1000 mm
- - -
-
2 - 2 - 2
-
D2
ALUM.PANEL.FRAME
2000 mm
2 - 2 - - 2 - 2 -
2
D3
ALUM.PANEL .FRAME
3000 mm
- 2 - 2 - - - - -
-
E
BACK & SIDE DIAGONALS
1500 mm
2 4 4 7 4 4 4 4 2
4
F5
TANK SUPPORT BED*
Ø500
- - -
-
- - - - -
-
F6
TANK SUPPORT BED
Ø600
- - -
-
2 2 2 2 2
2
G
TANK WIND BELT
-
- - -
-
2 2 2 2 2
2
H
PANEL WIND GRIP
- 4 6 4 6 2 4 2 4 2
4
I
GROUND SUPPORTS
100 mm
- - 4 6 4 4 4 4 -
-
J
ROOF ANCHORS
4 6 - - - - - - 6
6
K2
SCREW TYPE 2 *2
M8x20mm
17
28
27
29
27
29
27
29
17
28
K3
SCREW TYPE 3
M8x15mm
- - - -
4 4 4 4 4 4 Compact System Models that use the
201,
202,
301/2,
302 /2
301/3,
302/3,
501,
502
201,
202,
301 /2 ,
302/2
301/3,
302/3,
501, 502
151
192
151
192
151
192
corresponding structure
191
302
191
302
191
302
*1
By changing only two parts B & C to B35 & C35 you can easily convert your thermosyphonic flat roof structure
from 45° inclination to 35°.
(See Section 5)
*2
30 units of K2 screws are supplied with all packages regardless of the exact amount of screws used.

Last Update: 2011-June INSTRUCTION MANUAL FOR THERMOSYPHONIC SYSTEMS 18/35
©TANSUG MAKİNA LTD. 2008
6.3 Description of screws that are used in the mounting of the stands.
You will use two kinds of screws that will be sent with your structure.
6.4 Assembly of Thermosyphonic Flat Roof Stand (TFR45)
6.4.1 Connect the base frame (A) with the tank support beds (F6), then the support beds (F6)
to the vertical frame (B) and side frame (C). Use side diagonal (E) to complete one leg of
the structure. Measure the dimensions illustrated at Figure A.
6.4.2 Put together the second leg of the structure in the same way described at step 4.1.1.
6.4.3 Use back diagonals (E) to connect the two legs of the structure together. Measure 880
mm. between the center of tank beds for structure type TFR45-1 for systems 121-151191 when connecting the back diagonals. (See Figure A). Use the holes on the vertical
frames (B) that correspond to this distance between the two legs.
6.4.4 The distance between the center of tank beds is 1260 mm. for structure type TFR45-2 for
systems 192-302. (See Figure B)
6.4.5 Install the aluminum panel frames on the base frames (A) , first the bottom aluminum
frame(D) to the first hole of the base frame from the bottom. Then put the top aluminium
panel frame (D) on the correspondi ng hol e on the bas e fra me tha t measur es 19 50 m m.
Remember t hat solar panel will be located between these two aluminium frames.
6.4.6 Screw the tank wind belt (G) on the tank beds (F) from the front. Screw the belts from the
back of the stand only after you have placed the tank on the tank beds, after when you
have finished all steps of the installation of the structure.
TYPE 2 TYPE 3
TYPE 2 : Standard Structure
Assembly Screws
TYPE 3 : Flat Head Screws- used for
connection of tank support
bed to wind belt

Last Update: 2011-June INSTRUCTION MANUAL FOR THERMOSYPHONIC SYSTEMS 19/35
©TANSUG MAKİNA LTD. 2008
6.4.7 Put your structure on the desired location on the roof to mark the points on which you
want to anchor the ground support (I).
6.4.8 Put the structure aside and drill the holes on the roof and insert plugs and nuts. Anchor
the ground supports (I) on the roof.
6.4.9 Move the structure on top of the ground supports (D) Install the ground supports on each
four points of the structure that touch the ground.
6.4.10 After you have placed the panels on the stand, install the panel grips. (H)
6.4.11 Put the tank on the support beds and screw the tank wind belt from the back of the
structure.

Last Update: 2011-June INSTRUCTION MANUAL FOR THERMOSYPHONIC SYSTEMS 20/35
©TANSUG MAKİNA LTD. 2008
235 mm
FIGURE A: TFR45-1: T. Syphonic flat Roof Structure for 1 Panel
515 mm
210 mm
880 mm
235 mm.

Last Update: 2011-June INSTRUCTION MANUAL FOR THERMOSYPHONIC SYSTEMS 21/35
©TANSUG MAKİNA LTD. 2008
515 mm
210 mm
FIGURE B: TFR45-2: T. Syphonic Flat Roof Structur e for 2 Panels
235 mm.

Last Update: 2011-June INSTRUCTION MANUAL FOR THERMOSYPHONIC SYSTEMS 22/35
©TANSUG MAKİNA LTD. 2008
6.5 Assembly of Thermosyphonic Flat Roof Stand (TFR35)
By changing only two parts (B,C) that are listed at Section 2, you can easily convert your flat
roof structure from 45° inclination to 35°. During your installation you just need to take into
account the dimensions illustrated in Figure C, below:
6.5 Assembly of Thermosyphonic Inclined Roof Stand (TIR)
The way the inclined roof stand is assembled depends on whether you use the
components for 35° or 45° (C35 or C45) in your flat roof installations. The assembly is
very similar with a small difference which is illustrated at Figure E & F.
6.5.1 Put the base frame (A) and the side frame (C) together to form one straight frame as
seen on Figures E & F. The frames will be connected by the use of two screws
6.5.2 Put together the second leg of the structure in the same way described at step 4.3.1.
6.5.3 Connect the tank beds (F) from the outer surface of the straight frame you have obtained
by putting together parts A and C together. You can count the holes to identify the exact
location of connection. Use back diagonals (E) to connect the two frames together. The
distance between the center of tank beds must be 880 mm. for structure type TIR45-1
FIGURE C: TFR35-1 /2: T. Syphonic flat Roof Structure for 1-2 Panel 35°

Last Update: 2011-June INSTRUCTION MANUAL FOR THERMOSYPHONIC SYSTEMS 23/35
©TANSUG MAKİNA LTD. 2008
for systems 121-151-191 when connecting the back diagonals. Use the
holes on the vertical frames (B) that correspond to this distance between the two legs.
(See Figure A)
6.5.4 The distance between the two legs must be 1260 mm. for structure type TIR45-2 for
systems 192-302.
6.5.5 Install the aluminum panel frames on the base frames (A). First the top aluminum frame
(D) as illustrated at Figure E. Then put the bottom aluminum panel frame (D) on the
corresponding hole as shown in the Figure. It is crucial that you measure exactly 1950
mm. between the top and bottom aluminum frames. This is the distance required for
accurate placement of the solar panels.
6.5.6 Screw the tank wind belt (G) on the tank beds (F) from the front. Screw the belts from the
back of the stand only after you have placed the tank on the tank beds, after when you
have finished all steps of the installation of the structure.
FIGURE D: TIR-1 OR TIR-2: T. Syphonic Inclined Roof Structure for 1 or 2 Panel(s)

Last Update: 2011-June INSTRUCTION MANUAL FOR THERMOSYPHONIC SYSTEMS 24/35
©TANSUG MAKİNA LTD. 2008
6.5.7 Remove the tiles on the roof and identify the location on the wooden, steel
or concrete beams on which it is possible to screw the roof anchors (J). Install the roof
anchors on the suitable locations alongside the beams. Try to locate the anchors in a way
that one pair is at the bottom and the other two pairs are closer to the top.
6.5.8 Put the structure aside and drill the holes on the roof and insert plugs and nuts. Anchor
the roof supports (I) on the roof.
6.5.9 Move the structure on top of the ground supports (D) Install the ground supports on each
four points of the structure that touch the ground.
6.5.10 After you have placed the panels on the stand, install the panel grips. (H)
6.5.11 Put the tank on the support beds and screw the tank wind belt from the back of the
structure.

Last Update: 2011-June INSTRUCTION MANUAL FOR THERMOSYPHONIC SYSTEMS 25/35
©TANSUG MAKİNA LTD. 2008
FIGURE F:
Connection Details for
Inclined Roof Assembly – Using C35
FIGURE E: Connection Details for Inclined Roof Assembly – Using C45

Last Update: 2011-June INSTRUCTION MANUAL FOR THERMOSYPHONIC SYSTEMS 26/35
©TANSUG MAKİNA LTD. 2008
5. CHARGING THE SYSTEM
5.1 Important points in the connection of the system to the house plumbing:
5.1.1 Install the equipment in such a way that the thermotank stays the closest possible to
the consumption points. The maximum distance between the collector and the most
distant consumption points should be around 30m, linear.
5.1.2 If the existing pipes network is made of steel or galvanized iron, that connection
should be made in latticed polyethylene or copper, adding dielectric sleeves of this
material so to avoid the par galvanic effect.
5.1.3 If the house pipes and tubes have a maximum temperature supported that is lower
than 100°C it’s convenient that you add a mixing valve to the installation so to avoid
the rise of the temperature to non supported levels. Examples of this are the
galvanized steel pipes that should not undertake more than 55 degrees.
5.1.4 All the pipes enduring hot water circulation should be insulated with minimum 20mm
for external pipes and 10mm for internal pipes. In the external pipes, such insulation
should be protected against the radiation effects.
5.2 Charging the secondary circuit
When charging the system always respect the filling order!
5.2.1 Open the gate valve on the cold water inlet to fill in the boiler. However hot water
outlet should be left open to let the air escape easily. ( You can leave a tap open in the
house.)
5.2.2 Verify that once the tank is filled there’s no leakage in any of the connections.
6.3 Char gi ng the Primary (heating) Circuit
6.3.1 Install the system as illustrated on the drawings.
6.3.2 Before putting the security valve, fill the secondary (heat exchangers and
collectors) with the respective amount of anti-freeze liquid according to the above diagram.
Refer to the below diagram for the amount of antifreeze to put in the system.

Last Update: 2011-June INSTRUCTION MANUAL FOR THERMOSYPHONIC SYSTEMS 27/35
©TANSUG MAKİNA LTD. 2008
6.3.3 Proceed to fill the rest of the system with water. Take into account that the
maximum fluid capacity of the secondary circuit is approximately 10lt. (If the system is to be
put in an area risk free of frost, this filling can be made entirely with water).
6.3.4 Install the security valve. When the fluid in primary circuit reaches high
temperature, its pressure will raise as well. When this pressure exceeds 3 bar, the security
valve will open and some of the heat transfer fluid will be disposed through the valve. This
process will happen several times until finally when there is enough air in the upper part of
the jacket. After that, this space in the jacket will serve as an “expansion tank” and the
security valve will not work again.
6.3.5 Make sure there’s no leakage in the connections and repeat such test once
temperature, therefore pressure, rises.
6. ELECTRICAL ELEMENT
6.1 Your thermosyphonic system can be incorporated with an optional electrical heater of
2000 W, to be used as an auxiliary heating system during low irradiation or high consumption
seasons. (Remember that in some European markets auxiliary system is not allowed).
6.2 To connect the resistance to electrical net, the directives marked by the Low Tension
ElectroTechnical Regulation must be followed. For that, it is essential to use a three thread hose
with 2.5 mm section and it must be assured that proper grounding is established.
MODEL
P 101
P 121
P 151
P 191
P 192
P242
P 302
Close Loop Volume (lt.)
9,00
12,00
13,00
14,00
15,00
20,00
21,00
Temperature ºC
%
-5
AFLUS
1,35 lt
1,80
1,95
2,10
2,25
3,00
3,15
WATER 7,65 lt 10,20 10,20 11,90 12,75 17,00 17,85
-9
AFLUS
1,80 lt
2,40
2,40
2,80
3,00
4,00
4,20
WATER
7,20 lt
9,60
9,60
11,20
12,00
16,00
16,80
-13
AFLUS
2,25 lt
3,00
3,00
3,50
3,75
5,00
5,25
WATER
6,75 lt
9,00
9,00
10,50
11,25
15,00
15,75
-17*
AFLUS
2,70 lt
6,60
3,60
4,20
4,50
6,00
6,30
WATER
6,30 lt
8,40
8,40
9,80
10,50
14,00
14,70

Last Update: 2011-June INSTRUCTION MANUAL FOR THERMOSYPHONIC SYSTEMS 28/35
©TANSUG MAKİNA LTD. 2008
6.3 On the side of your electrical element, there is a screw that goes through
the body of the element. The third hose is reserved for grounding. Connect this hose to the
screw attached to the body of the electrical element. Make sure that your home’s electrical
circuit has grounding.
6.4 The electrical heater comes with a built-in thermostat. The adjustment interval for
the thermostat is 0–80°C. Before installation the thermostat should be adjusted to the requested
temperature. Remember that setting a high
temperature on the thermostat can mean the
use of your electrical heater for longer time,
thereby consuming high levels of electricity. It
is recommended that a thermostat
temperature setting of minimum 45° C is set
on your electrical element. This is
important to avoid prolifer ati on of the
Legionella bacteria. Additionally, remember
that most people can not shower under more than 45º C.
6.5 The following photos illustrate the installation of electrical heater.
Insert the power
cable through the
cable gate of the
heater service cap.
WARNING
ALL INSTALLATION OF ELECTRICAL DEVICES MUST BE CARRIED
ONLY BY AN AUTHROZIED ELECTRICIAN ACCORDING TO THE
INTERNATIONAL AND NATION AL REGULATIONS.

Last Update: 2011-June INSTRUCTION MANUAL FOR THERMOSYPHONIC SYSTEMS 29/35
©TANSUG MAKİNA LTD. 2008
Connect the
grounding line on
the cable.
Screw the heater cap on the tank.
Then connect the
negative and positive
poles to the respective
lines on the cable.

Last Update: 2011-June INSTRUCTION MANUAL FOR THERMOSYPHONIC SYSTEMS 30/35
©TANSUG MAKİNA LTD. 2008
Freezing Point: - 60 ° C
Boiling Point: + 187° C
Purity: % 99,69
Acidity: % 0,001
7. AFLU-S HEAT TRANSFER FLUID
Aflu-S is a special non toxic propylene glycol heat transfer fluid
used in the close circuit of your system to provide better heat
transfer at the same time protecting your system from
corrosion and frost.
11. DISCHARGING THE SYSTEM
11.1 Discharging the secondary circuit. : Rotate the pressure relief valve silghtly to
discharge the pressure in the circuit. Discharge the water by opening the gate valve at the
inlet.
11.2 Discharging the closed loop: Discharge pressure through the air vent. Remove the air
vent and then remove blind plug at the bottom of the solar panel.

Last Update: 2011-June INSTRUCTION MANUAL FOR THERMOSYPHONIC SYSTEMS 31/35
©TANSUG MAKİNA LTD. 2008
CHAPTER II
INSTRUCTIONS FOR THE USER
WARNING: Make sure that all installation is carried out by your authorized installer. Check all
valves are properly working and the system is completely filled with water and antifreeze fluid.
In case of failure, read the instructions at the troubleshooting section. Always call your
authorized service store before taking any action.
12. SAFETY & SECURITY COMPONENTS
Your system has two circuits, each secured by a number of safety and security components.
The system comes equipped with safety components for the primary circuit. All safety
components required for the secondary circuit must also installed by your authorized installer.
12.1 Primary Circuit (Closed Loop Line):
• Expansion tank: preset 1,5 bar, working pressure 4 bar
• Pressure relief valve: 5 bar
• Air vent 160° C
12.2 Secondary Circuit (Cold Water Line):
• Pressure reducer : preset to 3 bars
• Non-return valve
• Pressure relief valve 5 bars
• Control Valve
13. MAINTENANCE
The following table lists the key components of your system that require regular inspection
and maintenance.
INSPECTION
Correct Status
Period of Control
Average Life
Mg Anode Must be complete Annually 2 years
Antifreeze Fluid
Must be full
Annually
1 year
Pipe Insulation
Must be intact and solid
Annually
3 years
Fittings Accessories
Must function properly & not leak
Annually
2 - 5 years
Panels
(Closed Loop)
Inside panel must remain completely water and
weather proof
Every 2 years 12-20 years
Boiler –closed circuit
No leakage and corrosion should occur in the tank
Annually 8-10 years

Last Update: 2011-June INSTRUCTION MANUAL FOR THERMOSYPHONIC SYSTEMS 32/35
©TANSUG MAKİNA LTD. 2008
13.1 Cleaning Panels: Regular rainfall keeps your panels clean. In dusty or
drought areas, it is recommended that panels are cleaned by the help of warm water and
sponge when necessary.
13.2 Pipe Insulation: Insulation material for piping may worn out in time due to strong UV rays.
Renew when necessary.
13.3 Magnesium Anode: Depending on the quality of the water, the life of a magnesium anode
varies between 2 – 4 years. Make sure that the Mg anode is checked regularly and
replaced when required.
13.3.1 Replacing the Mg anode Only authorized installer should change the Mg anode.
13.3.2 Turn the water supply off and empty the water from the storage tank.
13.3.3 Remove the Mg anode.
13.3.4 Fix the new rod inside the tank and make sure that complete tightness is maintained.
13.3.5 Turn the water supply on and let the tank fill with water.
13.4 Heat Transfer Fluid The level of the heat transfer fluid in the closed circuit should be
checked regularly (once a year). Decrease of fluid in the close loop of the system may
cause dramatic decrease in the performance of the tank. When the anti -freeze fluid is
inadequate in the system, it can also result in the freezing of water in the close loop circuit
and damaging the collector.
13.5 Holiday Leave If you leave your house for a long period during the summer months put a
cover on your panel to avoid overheating. In case of overheating pressure relief valve
discharges water. Make sure that the system is located in a way that hot water discharge
will not cause any damage.
14. TROUBLESHOOTING & IMPORTANT POINTS
Complaints for Insufficient hot water may arise from a number of factors:
14.1 Design and Expectations
14.1.1 Please note that the performance of your solar thermal system is directly parallel to the
availability of sunlight. Note that a day time is the ideal time to consume hot water from
your solar water heating system. If the consumption is primarily during night, your
system performance may be lower.
14.1.2 Your system can meet all your hot water needs during summer months. However it is
normal that your system meets a fraction of your requirements during cloudy winter
days.
14.1.3 Note the following consumption patterns that can help you save hot water:

Last Update: 2011-June INSTRUCTION MANUAL FOR THERMOSYPHONIC SYSTEMS 33/35
©TANSUG MAKİNA LTD. 2008
o Do not let the water running when there is no need.
o Use the hot water at a reasonable temperature (around 42 ° C)
o If the water pressure at your house is excessive, install a pressure reducer.
14.2 Proper Installation
When properly located (facing the right direction, installed in the right angle, located on an
unshaded spot, etc) your system should work at its best. Ensure that tank and panel
connections are proper and there is no water leakage in the system.
14.3 Common Problems
Some of the most frequently encountered problems are listed here:
OCCASION: No Hot Water despite a sunny day
1. Check all connections for possible leakage
2. Check the heat transfer fluid in the close loop. Make sure it is full.
3. Make sure that the connection piping is not damaged in a way that it prevents the flow of
fluid. ( Too many curves on the piping line dramatically decreases the performance of
your system) Check if possible air loops occurred inside your boiler or collector during
charging of your system.
4. Check that connections and placement of boiler and panels are carried out in the right
way as shown in diagrams in this manual.
5. Make sure that your system is exposed to direct sun light for at least a few of hours during
noon time. Make sure that your system has been exposed to at least 3 hours of direct
sun light after when your system is first taken into operation.
OCCASION: No ho t water at all from the hot water tap
1. Check your pressure reducer.
2. Check if the non-return valve functions properly. The lid of the non-return valve can
sometimes get stuck.
3. Check that there is water in the mains.
OCCASION: Manometer Displays “0” in the closed loop circuit
1. Heat transfer fluid may be missing in the closed loop. Charge the close loop as shown in
the relevant section.
2. After step 1, if the manometer still reads “0” check the expansion tank for possible f ail ur e.
Replace expansion tan k if nec ess ary.

Last Update: 2011-June INSTRUCTION MANUAL FOR THERMOSYPHONIC SYSTEMS 34/35
©TANSUG MAKİNA LTD. 2008
ANNEX 1: PARALLEL CONNECTION OF MULTIPLE SYSTEMS
ANNEX 2: SERIAL CONNECTION OF MULTIPLE SYSTEMS

Last Update: 2011-June INSTRUCTION MANUAL FOR THERMOSYPHONIC SYSTEMS 35/35
©TANSUG MAKİNA LTD. 2008
CONTACT DETAILS
TANSUĞ MAKİNA INDUSTRIAL FACILITIES
ADANA-CEYHAN YOLU 10. KM 01340
INCIRLIK ADANA
TURKEY
90-322-3464900
90-322-3465008
info@ouraset.com
WWW.OURASET.COM
“CLOSEST TO THE SUN”
 Loading...