

Page 1
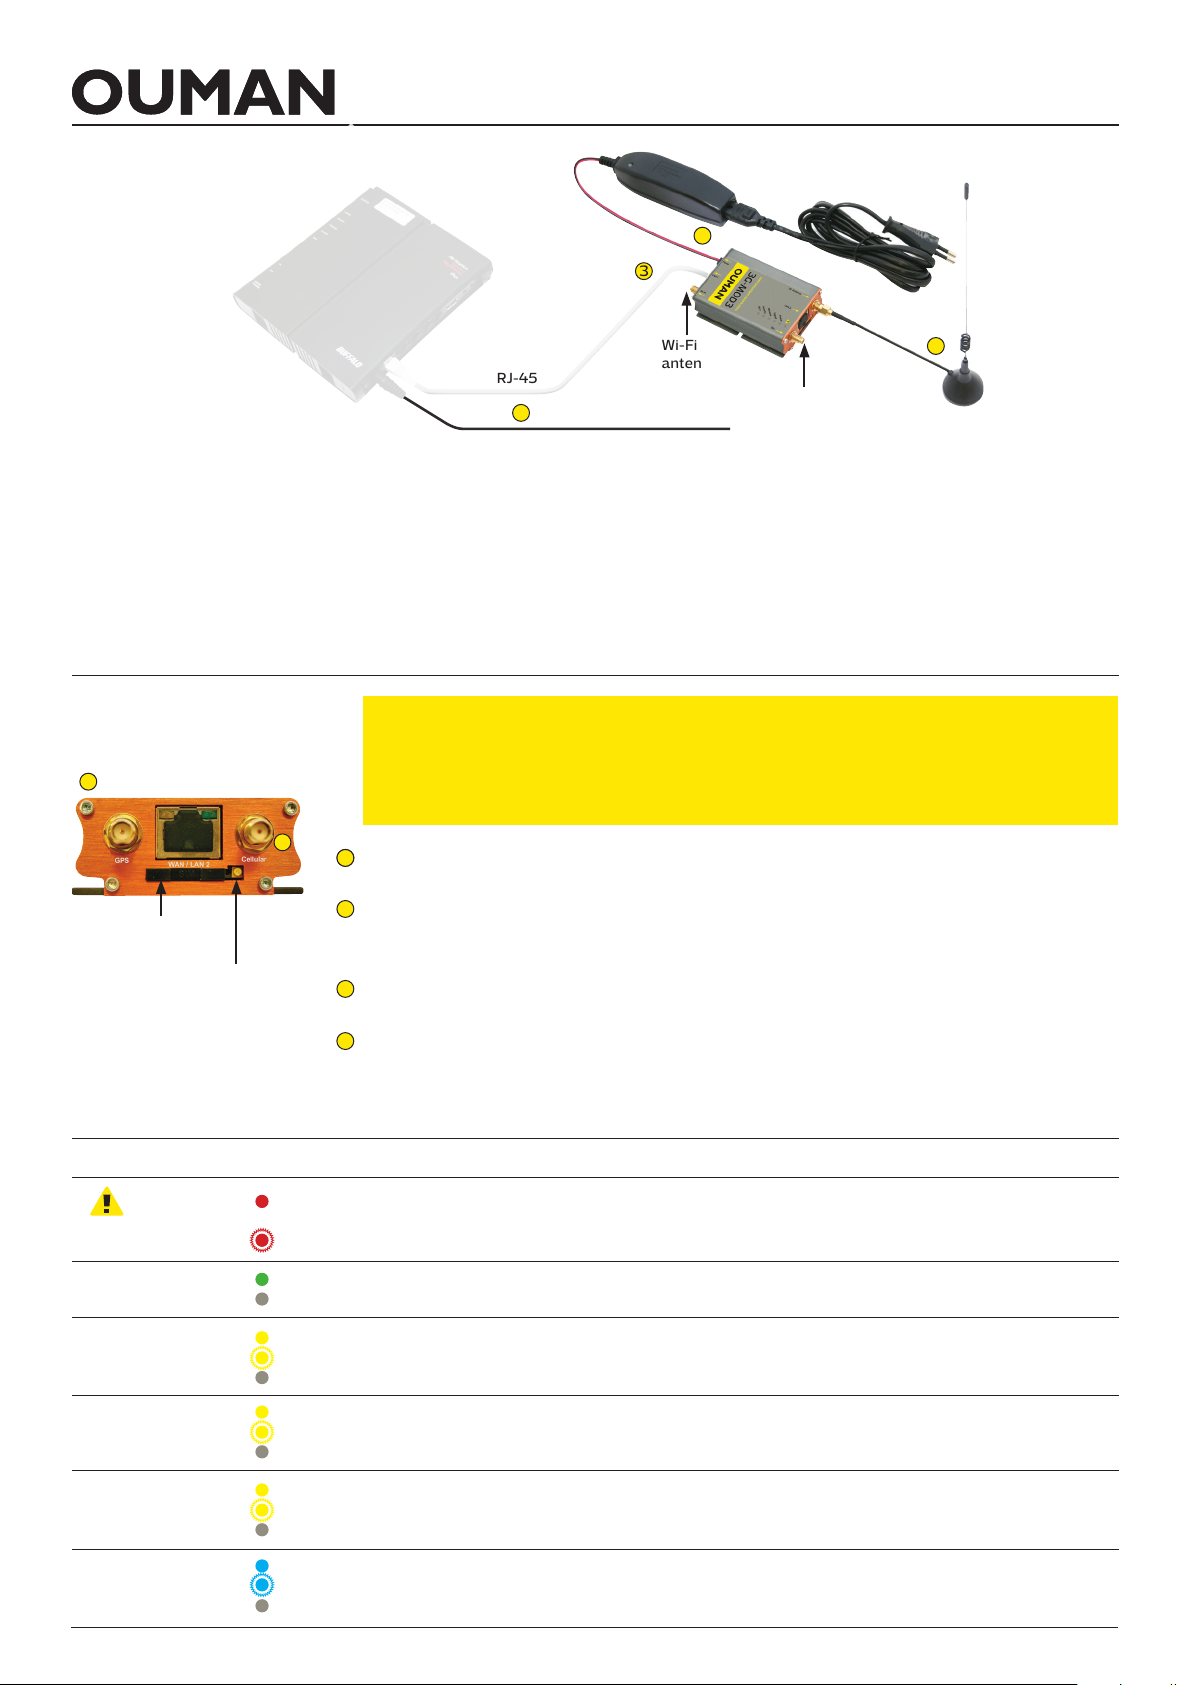
3G-MOD3
Power supply
4
Access-device
3
RJ-45
4
Power supply
Wi-Fi
antennin liitin
3G auxiliary
antenna connector
2
External antenna
Ouman 3G-MOD3 is a 3G modem which can be used to create a mobile network in premises where such a network does
not readily exist. Connection requires a SIM card with data connectivity (preferably with unrestricted data roaming. PIN
code query must be disabled). The product package includes a 3G modem, power source and an antenna. SIM card with
data connectivity can be acquired from Ouman (3G-L1 or 3G-L2) or your own operator.
In addition, Ouman Access service and an Ouman Access compatible terminal such as Oulink, Ouflex A or external Access device, are needed to establish a secure connection from the Internet to automation devices. For more information
about the Ouman Access service, please visit our website at www.ouman.fi/dokumenttipankki
Installation
and start-up:
3G-MOD3 is delivered with the Ouman connection settings installed. If using the
Ouman 3G-L1 or 3G-L2 connection, default settings can remain as set. If some
other operator’s SIM card is used, connection settings may need to be changed.
1
For the correct data trac settings, please contact your own service provider. To
change connection settings, see the instructions on p. 2-4.
2
1
1
Insert SIM card into the 3G-MOD3 device (see attached picture). The card must be a
mini-SIM (25 mm x 15 mm). Press the release button with e.g. the tip of a pen.
2
SIM card
slot
SIM card holder
release button
Connect the external antenna to 3G-MOD3’s 3G Antenna connector. Avoid placing
the antenna close to thick stone walls. In demanding conditions, place the antenna
as high as possible or next to a window.
3
With an RJ-45 cable, connect LAN1 port of the 3G-MOD3 to Access-compatible
device’s internet / WAN connector. The cable must be CAT-5E or more.
4
Plug in the power cords to both devices (power on). The system is now ready for use.
When connecting your computer to 3G-MOD3, make sure the computer is adequately
secured.
Modem signal lights:
Indicator light
Power
Signal
Network
Activity
Wi-Fi
Red on
Red blinking
Green on
No light
Yellow light on
Yellow light blinking
No light
Yellow light on
Yellow light blinking
No light
Yellow light on
Yellow light blinking
No light
Blue light on
Blue light blinking
No light
Functional descriptionIndicator light status
Hardware failure (Note! When the modem is connected to power, indicator
light comes on for a moment and then goes off. This is totally normal.)
Software error
Modem connected to power
Modem not connected to power
Radio network connection OK
Radio network connection weak
No connection to radio network
SIM card in place
Device has registered to radio network
No SIM card in place
Mobile data service connected
Network sends and receives mobile data
Mobile data service not activated
Wi-Fi network activated
Wi-Fi sends and receives data
Wi-Fi not activated
1
Page 2
Changing connection settings:
If you have acquired an Ouman 3G connection, the modem is directly ready for use (Sonera, Elisa and DNA mobile
subscriptions). If you are using another operator’s subscription, APN address may need to be changed. In factory
configuration, modem’s APN is ”internet”. Check your own operator’s APN address and change if necessary (see section 4 of the manual).
Other modem settings can normally stay as they are. If factory settings are for some reason lost, they can be restored following the instructions below.
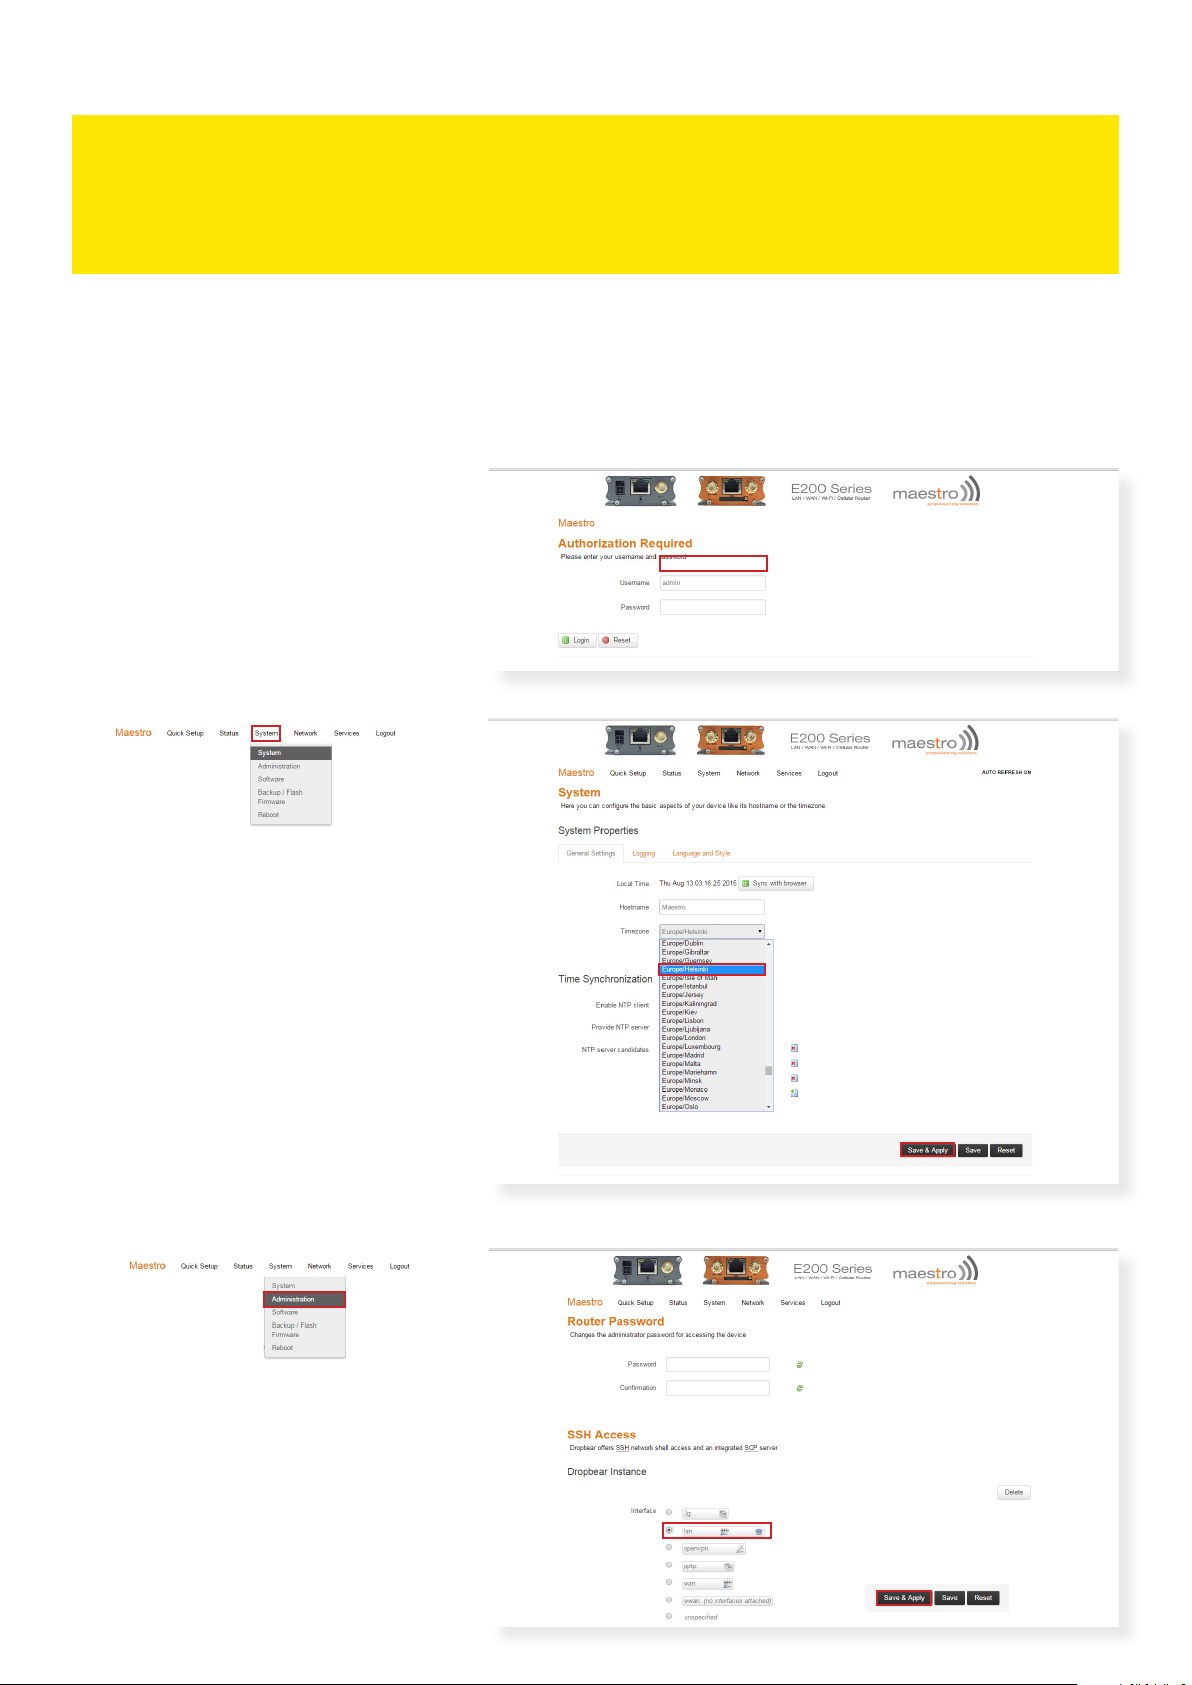
1. To reset the modem to factory settings, press the RESET button at the end of the device with, for example, a partially opened paper clip. The modem must be turned on.
2. DHCP on your computer must be enabled. If you have connected 3G-MOD3 to your computer using an RJ-45 cable, open your browser and go to address 192.168.1.1. The 3G-MOD3 management page opens. Type admin in the
Username field, then admin in the Password field, and click ”log in”.
3. In the top menu bar, select System → System
On System tab, change Timezone to Europe/Helsinki. Save by clicking Save &
Apply.
4. Go to System → Administration
Under Dropbear Instance, change Interface to “lan”. Scroll down to the bottom
of the page and save by clicking Save &
Apply.
2
Page 3
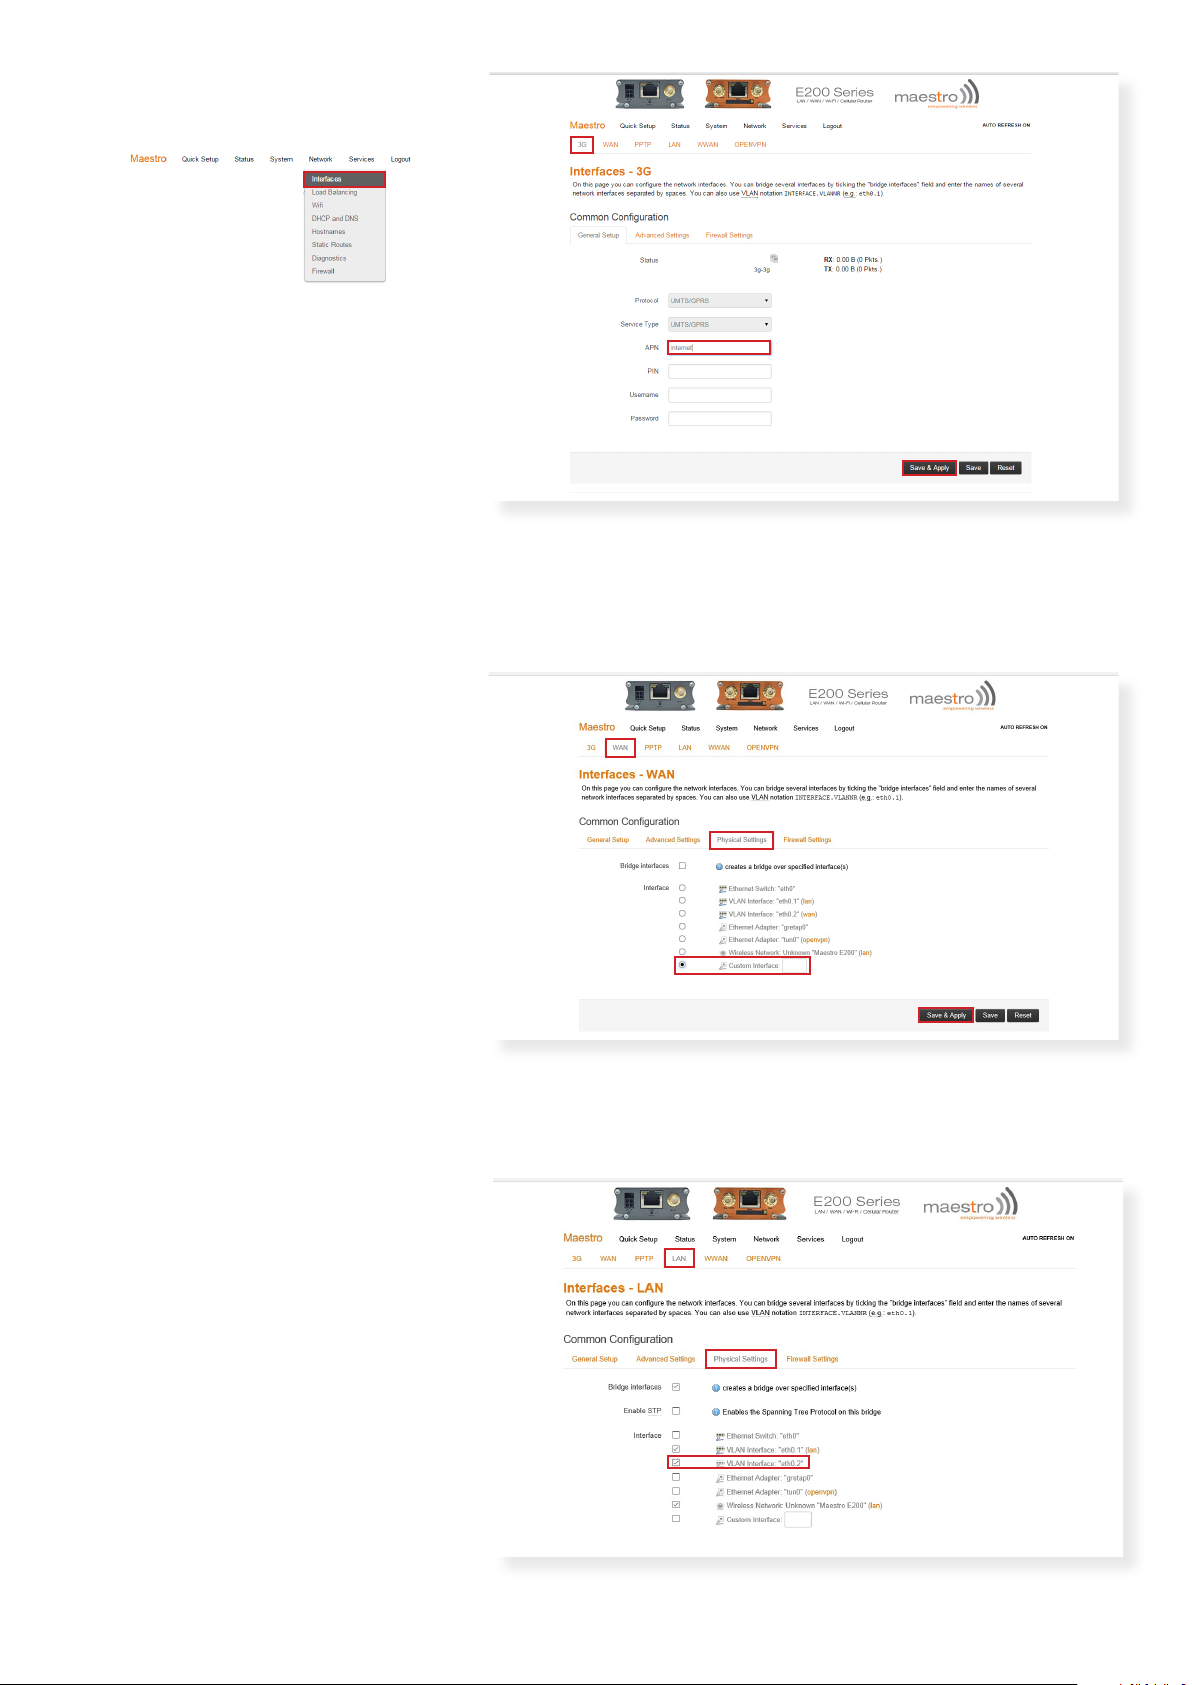
5. Next go to Network → Interfaces.
Select 3G tab, tap on the APN field, and
enter “internet”. If your operator uses a
dierent address, type it in this field. Save
by clicking Save & Apply.
6. Select WAN tab and then
Physical Settings.
Under Interfaces selection click Custom
Interface and leave the name field blank.
Save by clicking Save & Apply. A warning will appear on the screen, but you can
ignore it.
7. Select LAN tab and then
Physical Settings.
Select Interfaces and activate VLAN
Interface: “eth0.2”. Also VLAN Interface:
“eth0.1” and Wireless Network must be
active. Save by clicking Save & Apply.
3
Page 4
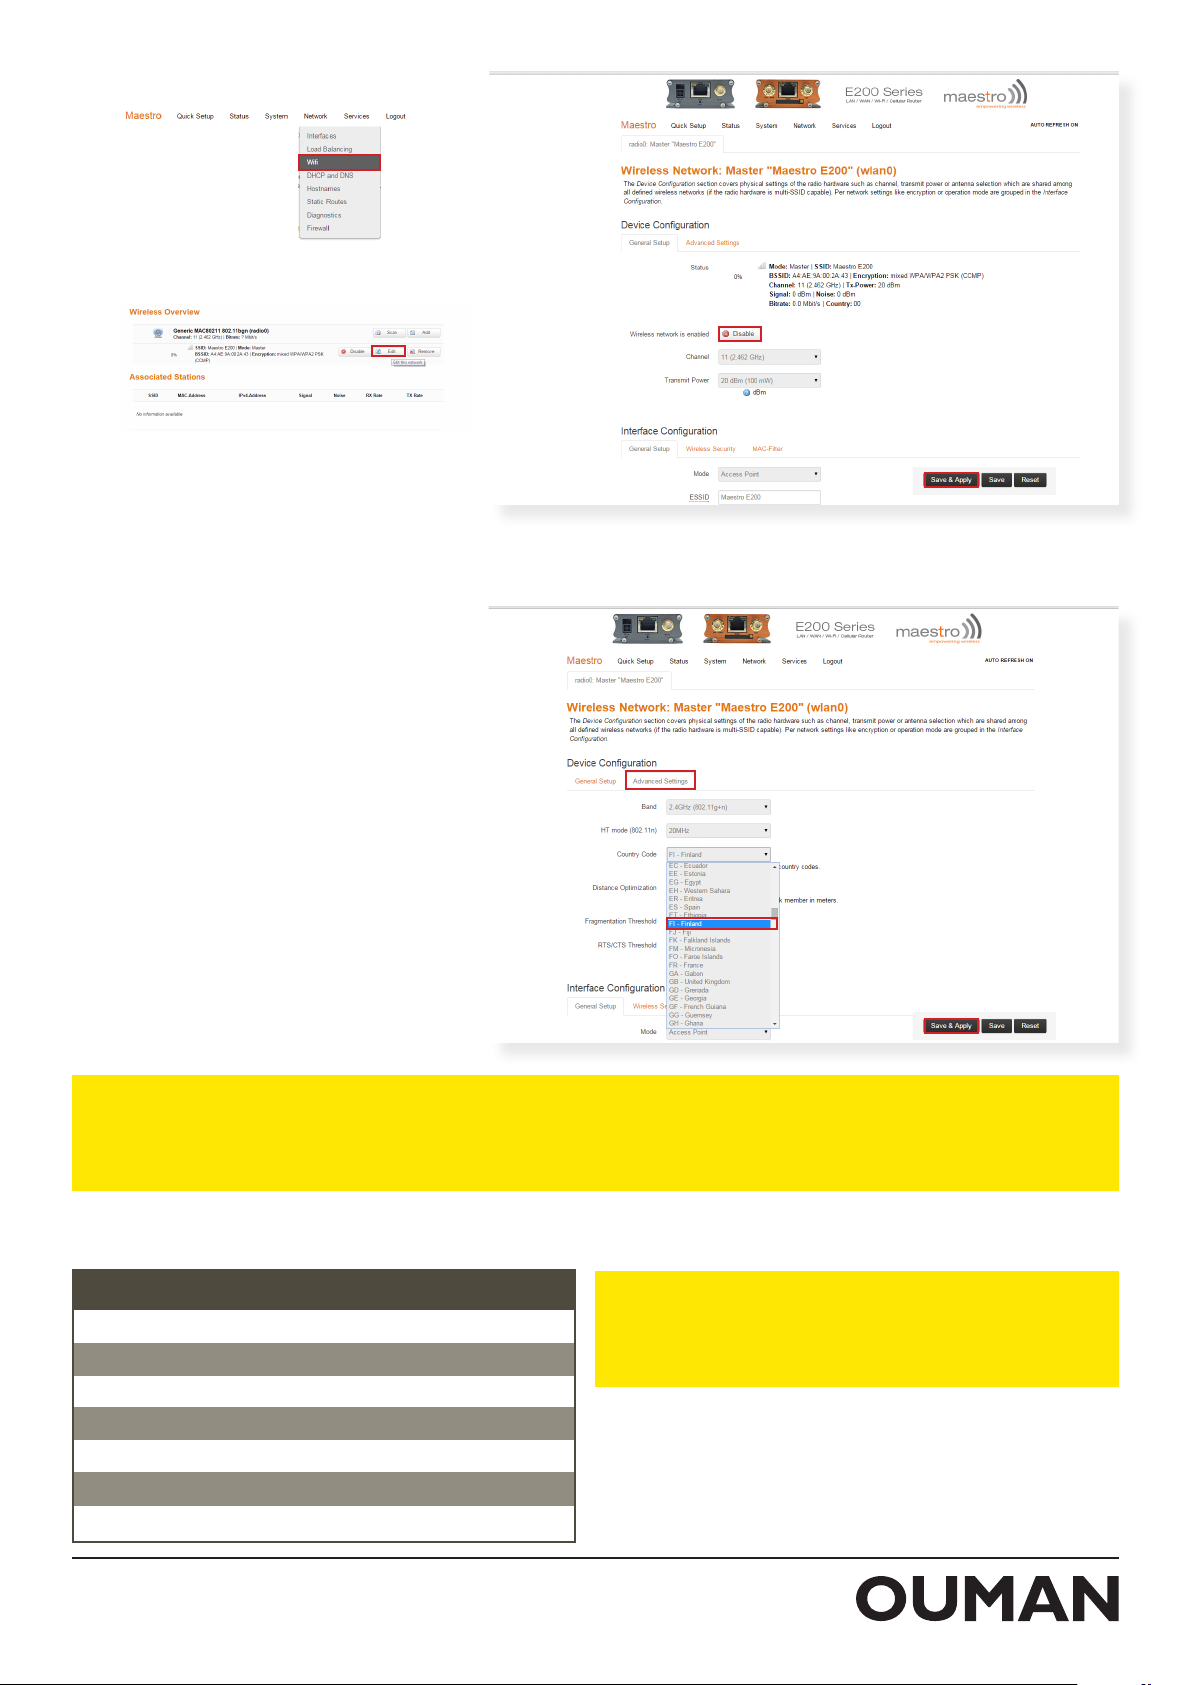
8. Go to Network → Wifi.
Select Edit
In the window that appears, go to wireless
network status and click “Disable”. Save
by clicking Save & Apply.
9. Select Advanced Settings tab. Under
Country Code, click FI-Finland. Save by
clicking Save & Apply.
10. To finish, click ”Logout”.
To activate Wi-Fi connection, under item 8, change wireless network status to ”Enable”. Save by clicking Save &
Apply. If Wi-Fi is enabled, we recommend changing the name of the Wi-Fi network and the password. Name of the
network is entered under General Setup in ESSID field. The default value is Maestro E200. To change the password,
go to Wireless Security, tap on Key and enter the new password. Save by clicking Save & Apply.
Operators’ APN addresses (see p. 3, phase 4)
Operator APN
DNA
Elisa
Saunalahti
Saunalahti Prepaid
Sonera
Tele Finland
Welho
internet
internet
internet.saunalahti
internet
internet
internet
internet.welho.fi
NOTE! Operators’ connection settings may have changed
after the printing of these instructions. If the connection
does not work with the APN settings given, check the
valid settings from your own operator.
06102015
OUMAN OY
Voimatie 6, FI-90440 Kempele
Tel.. +358 424 8401
Fax +358 8 815 5060
Espoo Sales Oce:
Lars Sonckin Kaari 12,
FI-02600 Espoo
Tel. +358 424 840 202
 Loading...