

Page 1
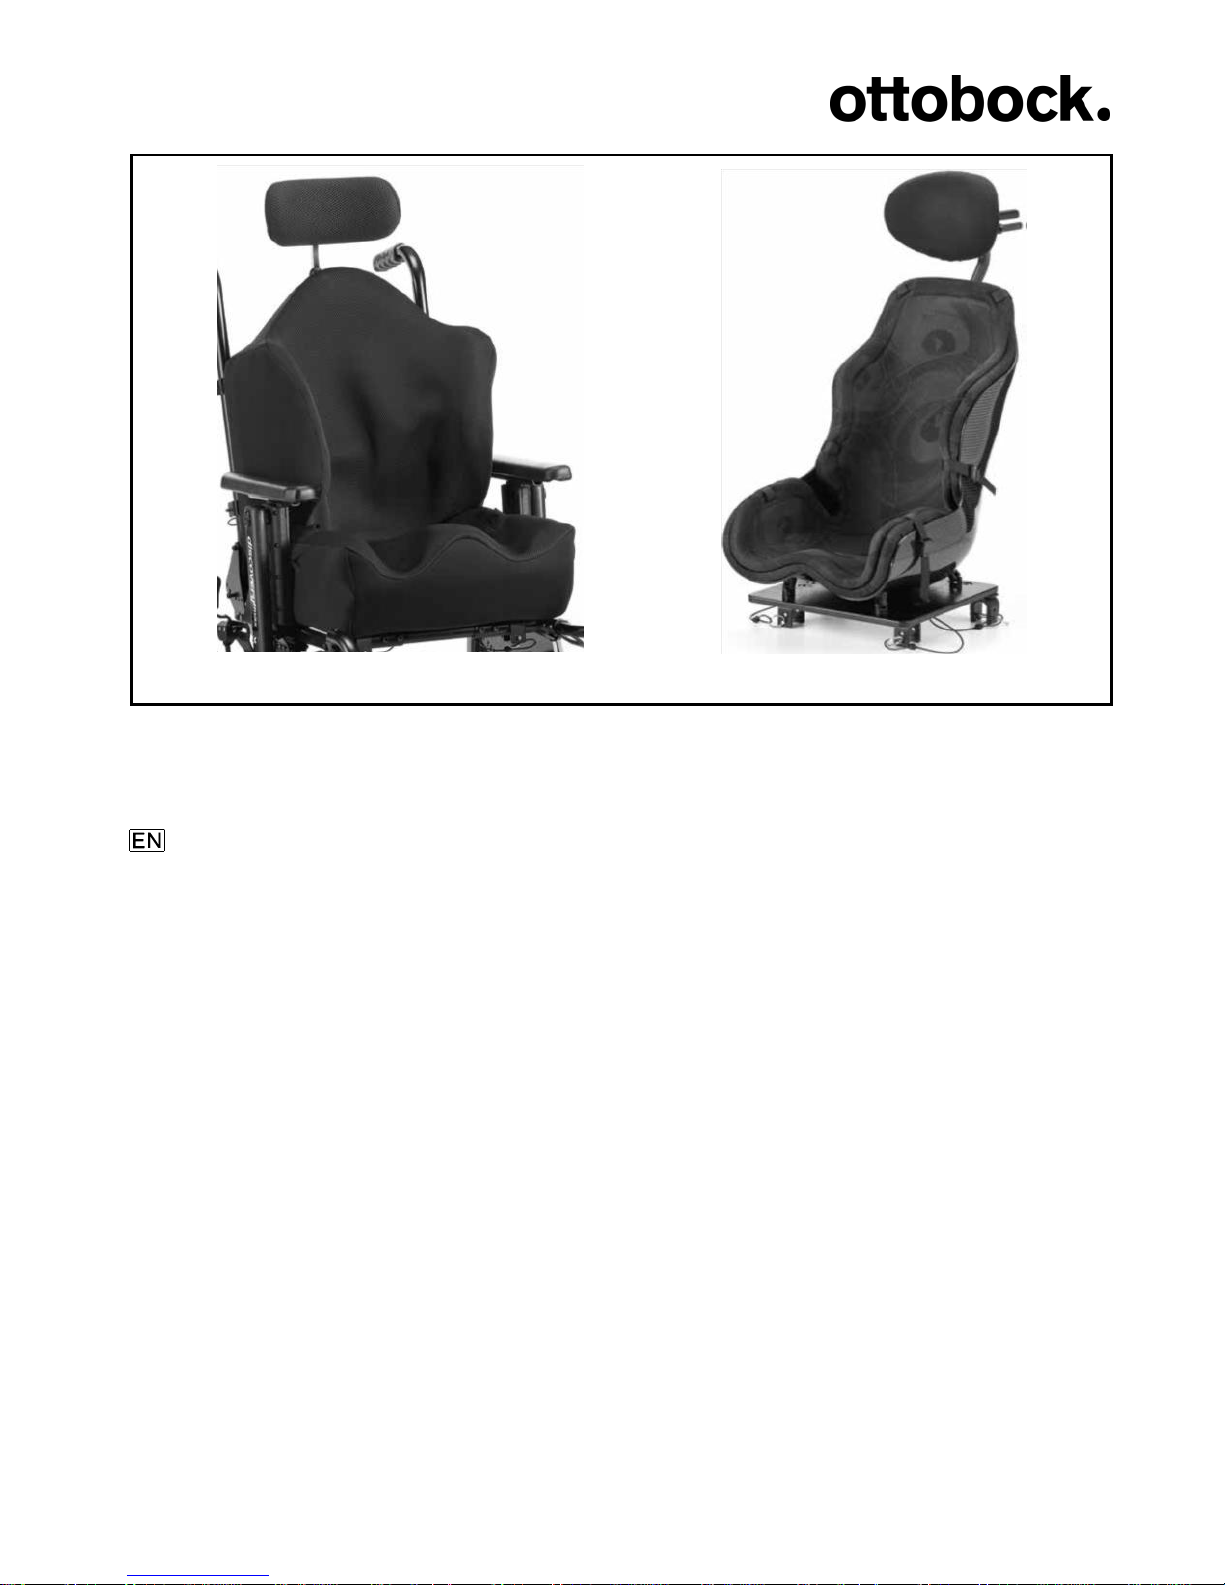
OBSSTM Tru-Shape, OBSSTM Ortho-Shape
Instructions for use .......................................................................................... 3
INFORMATION FOR PROVIDER & DAILY CAREGIVER/USER
We want to help you get the most from your seating system; this user manual will help you
become familiar with your custom seating system. Ottobock provides a range of custom
made seating systems including: OBSS Tru-Shape (carved foam seats) and OBSS OrthoShape (molded seats).
Page 2
2 | Ottobock
3 2 5 1 4
A
B
A A B
C
6
Page 3
3 | Ottobck
7
8
9
10
13
12
11
A A B
Page 4
Ottobock | 4
1. Product Description
Date of last update: 2016-04-30
Please read this document carefully before using the product.
Follow the safety instructions to avoid injuries and damage to the product.
Instruct the user or nursing staff in the proper and safe use of the product.
Hand these instructions over to the user or nursing staff.
New information regarding product safety and product recalls can be obtained from the
Customer Care Center (CCC) at [email protected] or from the manufacturer's service
department (see inside back cover or back page for addresses).
You can request this document as a PDF file from the Customer Care Center (CCC) at
[email protected] or from the manufacturer's service department (see inside back
cover or back page for addresses). It is possible to increase the display size of the PDF
document.
1.1 Function
Custom made seats are contoured to the specific body shape of the user. The user’s body
shape is captured with either a vacuum bean bag or plaster process by an appropriately
trained professional. The captured shape data is transferred to the fabrication site together
with additional design specifications. Shape, size and design features will differ according
to the medical and functional requirements of the user. The final decisions regarding fit,
function and design features must be made by an appropriately trained professional.
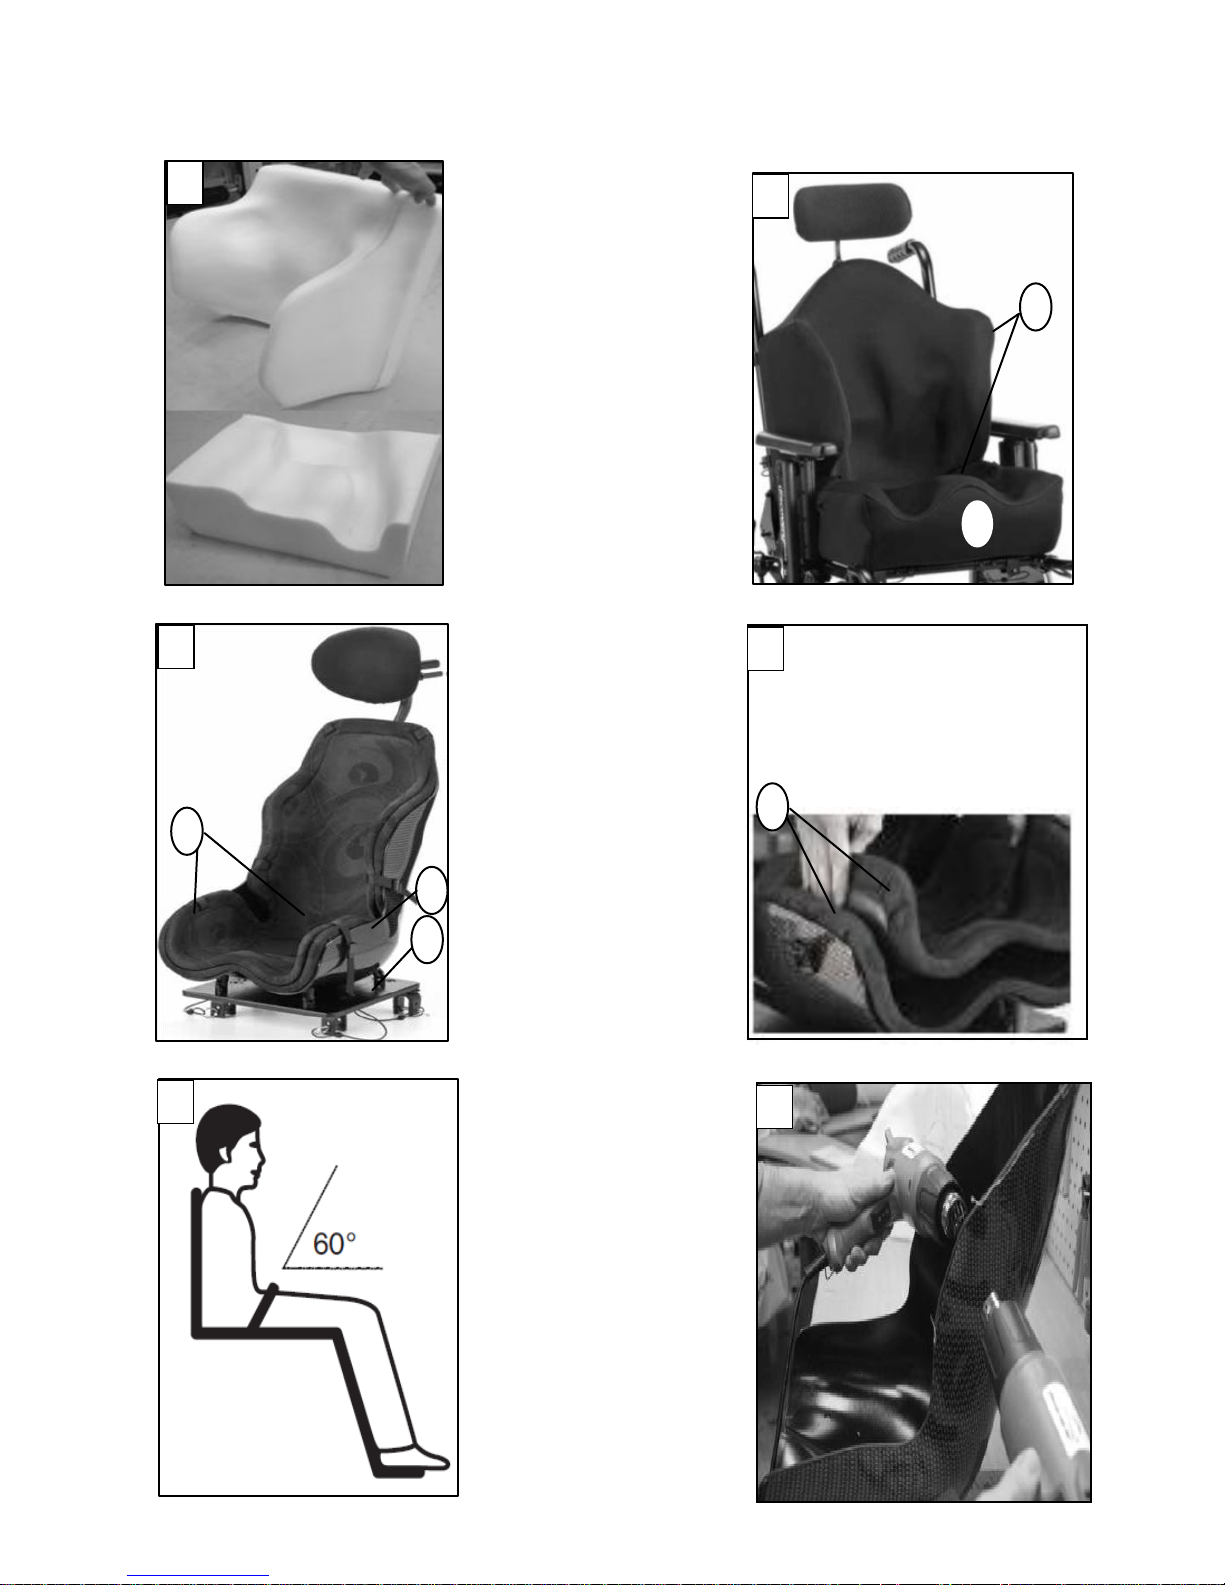
OBSS Tru-Shape (fig. 1 & 2): High quality urethane foam is carved to create an intimate fit
with the user (fig. 1). The intimate fit creates optimal surface area and improved pressure
redistribution. The custom shape (example: medial thigh support (fig. 2A)) created by the
fitting professional during the molding process ensures additional functional support as
necessary for the user. The foam is most often sprayed with a water resistant coating in
order to protect the foam from fluid ingress and to make cleaning easier. A wood or ABS
mounting shell adds additional structural support to the foam and creates a mounting surface for the connection of additional positioning products and also attachment to a mobility
base. A textile cover (fig. 2B) is the direct interface to the user and, based on the fitting
professional’s specifications, can provide stretch for perfect interface with the complex foam
shape, breathability, water resistance or easy cleaning.
Page 5
5 | Ottobck
OBSS Ortho-Shape (fig. 3 & 4): A Plastizote foam liner (fig. 4A) is molded to create an intimate
fit with the end-user. The intimate fit creates optimal surface area and improved pressure redistribution. One or more liners are provided with the product to customer specification. The inner
liner can be removed (fig. 4) to compensate for those occasions when the user wears thicker
clothes, if they have gained weight or otherwise grown in size. The custom shape (example:
lateral thigh support (fig.3A)) created by the fitting professional during the molding process
ensures additional functional support as necessary for the user. An ABS shell (fig. 3B) adds
additional structural support to the foam and creates a mounting surface for the connection of
additional positioning products and also attachment to a mobility base. A textile cover is the
direct interface to the user creates a slight cushioning effect and comfortable upholstered surface for the user. The ABS shell and Plastizote liners can be reshaped in the field by a qualified
technician (following the instructions in this manual) to accommodate changing positioning
needs.
For all products additional positioning accessories may be included with the product or
ordered separately to the trained professional’s specifications. Typical selections include a
head support, positioning belt and torso positioning device/harness.
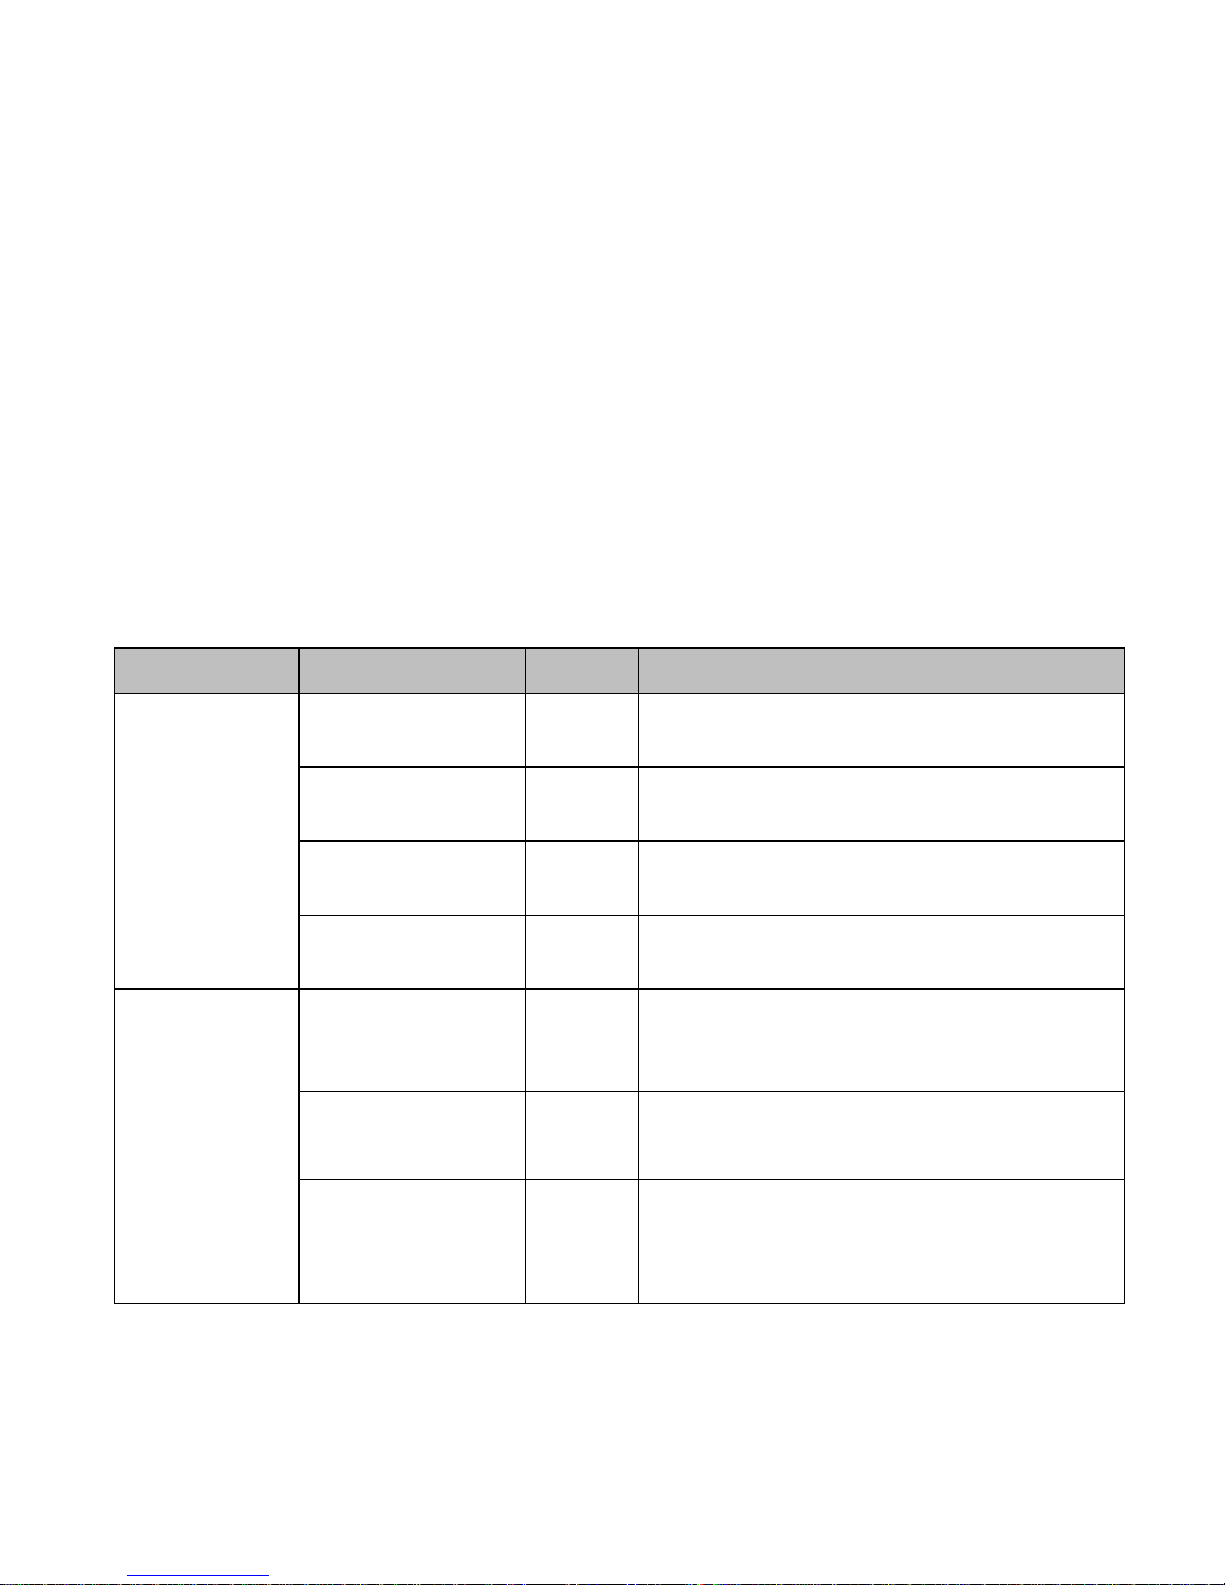
Seat Model
Component
Figure
Function
OBSS
Tru-Shape
Carved urethane
foam
1
Pressure redistribution and custom support
Vinyl spray foam
coating
Not
shown
Prevent liquid ingress into foam, easy
cleaning
Wood or ABS
mounting shell
Not
shown
Foam support, attachment surface (mobility base or positioning accessories)
Removable textile
cover
2B
Comfort, breathability, washability depending on customer’s material selection.
OBSS
Ortho-Shape
Molded Plastizote
foam with textile
cover
3 & 4
Pressure redistribution and custom support
ABS mounting
shell
3B
Foam support, attachment surface for
positioning accessories
Wood mobility
base mounting
surface
3C
Foam support, attachment surface for
mobility base or positioning accessories
Page 6

Ottobock | 6
2. Application
2.1 Intended Use
Custom made seats are contoured to a specific user’s form and, as such, are intended to be
used by a single individual with asymmetric postural and pressure care needs. The seats are
suitable for moderate to complex positioning needs and preventing pressure injuries in patients with paraplegia, hemiplegia, neurological deficits and rheumatic nerve and muscle
disorders.
Please note that the most appropriate wheelchair seating solution for an individual should
always be determined by a suitably qualified or experienced person based on a full risk
assessment and used in conjunction with a full program of care.
2.2 Area of Application
Because the seat is individually fabricated, it can be adapted for a wide range of users. The
order form includes options for additional reinforcements for users who are heavier or experience high tone or strong muscle spasms.
2.3 Contraindication
Seek professional advice before selecting an appropriate seating support where there
is an existing case or history of pressure injuries.
2.3.1 Absolute Contraindications
Not known.
2.3.2 Relative Contraindication
If redness of the skin or other problems occur during use, consult a doctor or therapist as
soon as possible.
2.4 Further Usage Restrictions
The product is designed for use by one person only. Re-use of the product is not permitted
due to hygiene considerations.
2.5 Qualification
This product may only be selected and adapted by trained qualified personnel.
Page 7
7 | Ottobck
3. Safety
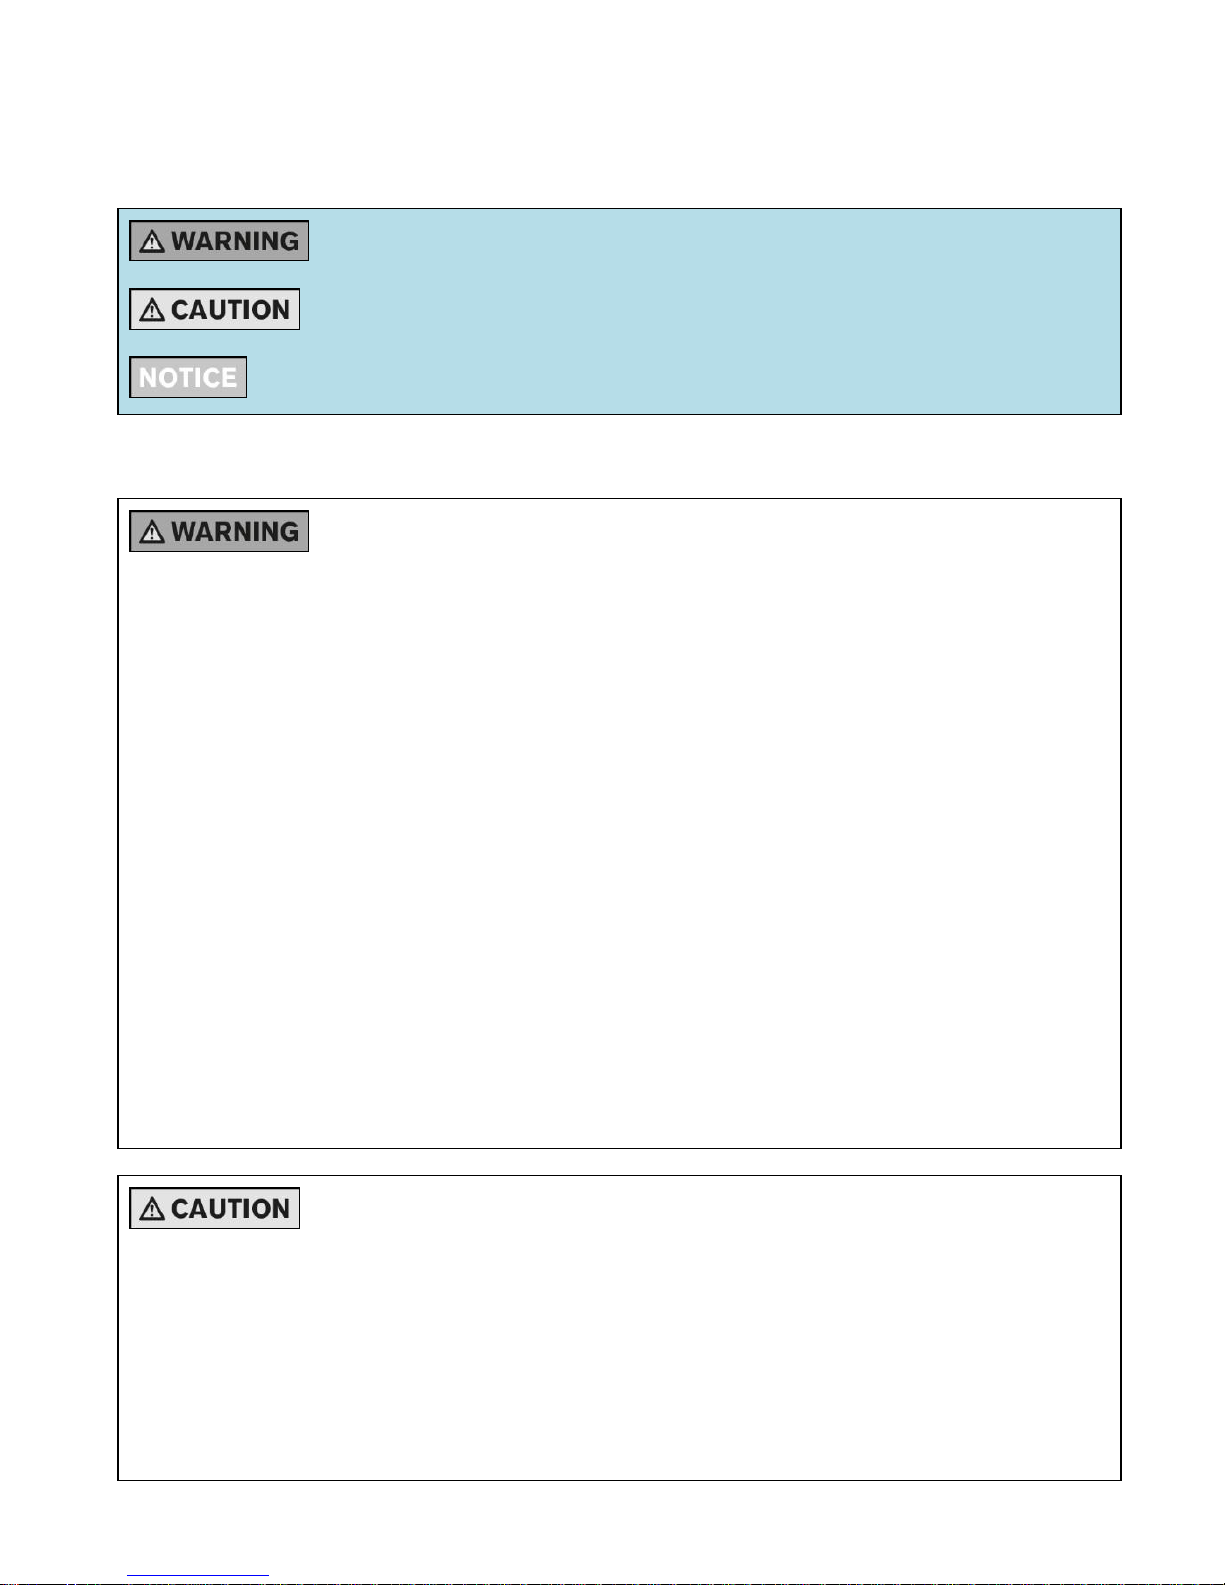
3.1 Explanation of warning symbols
Warning regarding possible serious risks of accident or injury
Warning regarding possible risks of accident or injury.
Warning regarding possible technical damage.
3.2 General Safety Instructions for both Provider and Client
Incorrect application & use of lap belts, positioning belts and harness systems.
Choking, suffocation or strangulation due to sliding forward in the product
Qualified personnel are responsible for individual positioning and fitting of the belt &
harness positioning systems and for training the carer in the proper use of the device.
Observe the manufacturer’s instructions for proper application and adjustment of the
product in use to prevent the user sliding into a hazardous position.
Adjusting the belt system too loosely can cause the user to slide into a dangerous posi-
tion. In addition, the fastening snaps could open unintentionally if they slide against
hard parts of clothing (e.g. buttons).
Excessively tight adjustment of the belt system may lead to unnecessary pain or illness
of the user.
The positioning system must fit closely but not too tightly so the user is not injured.
Sliding two fingers comfortably between the positioning system and body should be
possible.
When using an upper body positioning harness always use a correctly applied position-
ing lap belt to stabilize the pelvis.
Upper body positioning harnesses must be applied/positioned so that the neck and
area of the throat remain free at all times.
Lack of testing prior to long-term use
Risk of skin reddening or pressure injury formation due to incorrectly selected seating system.
Any seating system should be tried out by the user under medical supervision for sever-
al hours prior to long-term use. The skin should be monitored for redness and/or damage during this time.
Page 8
Ottobock | 8
Careful monitoring is required over the first few weeks to ensure the client adjusts to
the new shape.
The length of time will depend on the individual. During this introductory period, gradu-
ally increase the time spent in the seat and regularly check the skin for signs of marking
or abrasion.
It is not uncommon to find some marking with a new seat as the client may be in contact
on an area previously unsupported.
Careful monitoring is required over the first few weeks to ensure the client adjusts to
the new shape.
Altered center of gravity resulting from use of the seating system
Tipping over or falling due to unstable set-up
When fitting a seat unit to the host mobility product, ensure the user is not seated in it.
Once the seat is fitted a pull test should be carried out to ensure the seat is correctly fitted and fully secured before the user is seated.
If required, adjust the sitting position or axle position to optimize stability, or alternatively
assess the suitability of anti-tip devices.
After installing any seating into a wheelchair, always check that the user’s sitting posi-
tion and the wheelchair's center of gravity are appropriate for the intended use and the
user’s abilities. Work with the user to find the optimal sitting position.
Do not leave system unattended especially on hills or ramps even when brakes are
engaged.
Incorrect assembly or settings
Risk of injury
Combinations of the seating systems with options/add-on parts which have not been
approved by Ottobock, especially with wheelchairs and seat frames from manufacturers
other than Ottobock, have to be tested and fall within the responsibility of the specialist
dealer/combiner.
Ensure that all screws of the mounting elements are properly tightened after any ad-
justments are completed, and ensure the stability of the wheelchair/mobility base is
checked.
Do not over tighten screws to avoid damaging components.
Make sure to mount screw connections at a distance from the body to avoid any risk of
injury for the user by protruding screws.
Page 9
9 | Ottobck
Therapist/fitting professional does not train carer in proper use & maintenance of
device.
Injuries, malposition, illness of the user due to information errors
The qualified personnel is responsible for making sure that the user and/or attendant/
nursing staff has understood the proper adjustment, use, maintenance and care of the
seating system.
In particular, ensure that the user and/or attendant/nursing staff knows how to quickly
loosen and open belts and upper body positioning harnesses to avoid delays in case of
emergency.
Discuss daily operation and preventative maintenance with daily carer along with all
manufacturers’ instructions and safety information.
3.3 Information to be provided to the Patient/Attendant
Incorrect application & use of lap belts, positioning belts and harness systems.
Choking, suffocation or strangulation due to sliding forward in the product
The positioning belt and harness is an important part of an individual seating solution.
Do not modify the installation position and basic settings established by the qualified
personnel who provided your system.
Make sure you understand the appropriate use of these systems. Make sure that all
carers understand the appropriate use (teachers, parents, grand-parents, etc.).
In case of problems with these adjustments (such as an unsatisfactory sitting position),
promptly contact the qualified personnel who fitted the product.
Immediately consult the qualified personnel if you detect signs of discomfort or fear
when using the product.
Have the basic settings of the belt system checked regularly. Adjustments may be re-
quired due to the growth of the user or because of changes in the course of the disease.
Do not leave the user unsupervised if the cognitive abilities of the user could lead to
unintentional opening of the positioning system.
Skin damage
Risk of skin reddening during long-term use
Do not use the seating system until it has been adjusted by a suitably qualified or expe-
rienced person.
Page 10
Ottobock | 10
Examine the skin for redness on a regular basis. Skin reddening is a clinical indicator of
tissue damage.
If redness of the skin or other problems occur during use, stop using the seating sys-
tem immediately. Only start using the seating system again after consulting the prescribing doctor or therapist.
Tipping risk of mobility device
Falls or injury if device tips during use
If an anti-tipping device has been fitted to the wheelchair, it should be deployed when-
ever there is any doubt as to the safety or stability of the unit. This could be particularly
important when transferring the client to or from the unit especially if the client is being
hoisted into or out of the seat.
Wherever possible try to park on a flat, level surface.
Do not hang items such as bags from the push handles.
Be aware that the user leaning far out of the system (forward or to the side) can lead to
instability and tipping.
Use caution when operating the Tilt in Space mechanism on gradients/slopes.
Do not leave system unattended especially on hills or ramps even when brakes are
engaged.
Improper handling of ignition sources
Risk of burns due to seat cushions, padding and upholstery catching on fire
The seat cushions, padding and upholstery are not highly flammable, but can catch fire.
Therefore the utmost caution must be exercised in the vicinity of an open flame.
Do not expose the wheelchair cushion to excessive heat or open flame.
Keep away from all ignition sources, especially lit cigarettes.
Improper use
Risk of damage to the cushion surface due to user error
Do not allow the wheelchair cushion to come into contact with sharp objects. This also
applies to animals such as pet cats with sharp claws.
If the wheelchair cushion is expected to come into contact with liquid, such as spilt
drinks or episodes of incontinence, always use it in conjunction with a liquid-repellent
Page 11
11 | Ottobck
cover.
When transferring care to a new person always make sure to inform carer of all safety
instructions.
4. Delivery
4.1 Scope of Delivery
The finished product is delivered to customer specifications most often including the following components. Because the products are custom fabricated, no two configurations of
product are identical. The healthcare professional may also request partial or complete
assembly of the product to meet the needs of a specific client. Example: partial assembly of
the product may be requested in order to allow a trial fit before the product is completed.
Seat Model
Component
Figure
OBSS
Tru-Shape
Carved urethane foam
1
Vinyl spray foam coating
Not shown
Wood or ABS mounting shell
Not shown
Removable textile cover
2B
OBSS
Ortho-Shape
Molded Plastizote foam with textile cover
3 & 4
ABS mounting shell
3B
Wood mobility base mounting surface
3C
ALL
Attachment hardware
Various positioning accessories
Example: head support
shown in figures 2&3
5. Preparation for Use (for healthcare provider)
5.1 Assembly
Exposure to fumes from vinyl spray coating
The procedures described in this section may not be carried out by the user of the
product.
These instructions for use must be given to the user along with the seating system.
Page 12
Ottobock | 12
Discomfort, rash or respiratory distress
The vinyl spray coating is fully cured before leaving the factory. During shipping in air-
tight packaging residual volatiles can build up. It is recommended to remove the product from the packaging and allow it to air in a well-ventilated room for 24 hours before
fitting the user in the system.
In rare cases, the user may have a special sensitivity to the residual smell of the vinyl
spray coating. When this happens, remove the user from the system and contact the
manufacturer for alternative solutions.
Incorrect application & use of positioning belts and harness systems.
Throttling, suffocation or strangulation due to sliding forward in the product
Qualified personnel are responsible for individual positioning and fitting of the belt &
harness positioning systems.
Observe the manufacturer’s instructions for proper application and adjustment of the
product in the use so that the user cannot slide into a hazardous position.
Adjusting the belt system too loosely can cause the user to slide into a dangerous posi-
tion. In addition, the fastening snaps could open unintentionally if they slide against
hard parts of clothing (e.g. buttons).
Excessively tight adjustment of the belt system may lead to unnecessary pain or illness
of the user.
The positioning system has to fit closely but not too tightly so the user is not injured.
Sliding two fingers comfortably between the positioning system and body should be
possible.
When using an upper body positioning harness always use a correctly applied and
adapted positioning lap belt to stabilize the pelvis.
Upper body positioning products harnesses must be applied/positioned so that the
neck and area of the throat remain free at all times.
Altered center of gravity resulting from use of the seating system.
Risk of tipping over or falling due to unstable settings
When fitting a seat unit to the host mobility product, ensure the user is not seated in it.
Once the seat is fitted a pull test should be carried out to ensure the seat is correctly fitted and fully secured before the user is seated.
If required, adjust the sitting position or axle position to optimize stability, or alternatively
assess the suitability of anti-tip devices.
After installing any seating into a wheelchair, always check that the user’s sitting posi-
Page 13
13 | Ottobck
tion and the wheelchair's center of gravity are appropriate for the intended use and the
user’s abilities. Work with the user to find the optimal sitting position.
Incorrect assembly or settings
Risk of injury
Combinations of the seating systems with options/add-on parts which have not been
approved by Ottobock, especially with wheelchairs and seat frames from manufacturers
other than Ottobock, have to be tested and fall within the responsibility of the specialist
dealer/combiner.
Ensure that all screws of the mounting elements are properly tightened after any ad-
justments are completed, and ensure the stability of the wheelchair/mobility base is
checked.
Do not over tighten screws to avoid damaging components.
Make sure to mount screw connections at a distance from the body to avoid any risk of
injury for the user by protruding screws.
1. Allow the finished seating system to air out in a well-ventilated space for 24 hours before
fitting to the client.
2. Ensure that the cover is installed on both the seat and back cushions.
3. Install all positioning elements appropriate for the needs of the individual client. Follow
manufacturer’s instructions and warnings for all devices. Provide these user manuals to
the client.
4. Check all connections to confirm they are not loose and that there are no protruding
edges or points which could come in contact with the user.
5. Connect the seating system to the mobility base following the manufacturers’ instruc-
tions.
5.2 Positioning User in Seating System.
Medical Risk
Injuries, pressure injuries due to application errors
It is recommended that the client is introduced to their new seating system over a peri-
od of time.
The length of time will depend on the individual.
During this introductory period, gradually increase the time spent in the seat and regu-
larly check the skin for signs of marking or abrasion.
Page 14
Ottobock | 14
It is not uncommon to find some marking with a new seat as the client may be in contact
on an area previously unsupported.
Careful monitoring is required over the first few weeks to ensure the client adjusts to
the new shape.
Should skin irritation and/or skin reddening occur, consult the qualified personnel who
adapted and adjusted the product. Do not continue using the product without consultation.
Altered center of gravity resulting from use of the seating system
Risk of tipping over or falling due to unstable settings
When fitting a seat unit to the host mobility product, ensure the user is not seated in it.
Once the seat is fitted a pull test should be carried out to ensure the seat is correctly fitted and fully secured before the user is seated.
If required, adjust the sitting position or axle position to optimize stability, or alternatively
assess the suitability of anti-tip devices.
After installing any seating into a wheelchair, always check that the user’s sitting posi-
tion and the wheelchair's center of gravity are appropriate for the intended use and the
user’s abilities. Work with the user to find the optimal sitting position.
1. Ensure the seat is well attached to the mobility base.
2. Ensure the brakes and anti-tippers are engaged on the mobility base.
3. Transfer the user into the seat with care.
4. Confirm appropriate set up of the positioning belt across the thighs and in front of the
user’s pelvis (fig. 5).
5. Adjust head support following manufacturer’s instructions and to the needs of the indi-
vidual client.
6. Adjust the foot support in line with the client’s needs and to manufacturer’s instructions.
7. Inform care-givers and patient about appropriate use of all elements of the seating sys-
tem mobility base and accessories.
8. Allow client to sit in the new device for about 1 hour, less if they appear anxious or agi-
tated.
9. Plan, together with the caregivers, an appropriate schedule for allowing the user to
adapt to the new device. Start with multiple short periods of use and gradually increase
time when no adverse effects are noted.
6. Use (for carer)
Page 15
15 | Ottobck
Use of cushion without a cover
Risk of user picking at and ingesting foam materials.
The product should always be used with a cover to prevent users with ‘picking’ behav-
iors from pulling off pieces of the product and eating it.
6.1 Use
6.1.1 General use
Exposure to fumes from vinyl spray coating
Discomfort, rash or respiratory distress
In rare cases, the user may have a special sensitivity to the residual smell of the vinyl
spray coating. When this happens, remove the user from the system and contact your
healthcare provider.
Incorrect use of lap belts, positioning belts and harness systems.
Choking, suffocation or strangulation due to sliding forward in the product
The positioning belt and harness is an important part of an individual seating solution.
Do not modify the installation position and basic settings established by the qualified
personnel who provided your system.
Make sure you understand the appropriate use of these systems. Make sure that all
carers understand the appropriate use (teachers, parents, grand-parents, etc.).
In case of problems with these adjustments (such as an unsatisfactory sitting position),
Be sure to ask your healthcare provider about appropriate use of your individual seating
system.
It is important to understand daily use and care of the device.
Request the manufacturer’s safety instructions to keep for your records. These can be
helpful when transferring care to a new attendant, teacher or relative.
Page 16
Ottobock | 16
promptly contact the qualified personnel who fitted the product.
Immediately consult the qualified personnel if you detect signs of discomfort or fear
when using the product.
Have the basic settings of the belt system checked regularly. Adjustments may be re-
quired due to the growth of the user or because of changes in the course of the disease.
Do not leave the user unsupervised if the cognitive abilities of the user could lead to
unintentional opening of the positioning system.
Improper uses or adjustments
Falls, user falling out, malposition, illness of the user due to adjustment changes due to
improper use
The lap belt must be put on when getting into the product and used at all times while
using the product.
Only open the lap belt when the user is ready to get out of the product.
Medical risk
Injuries, pressure injuries due to application errors
Regular measures for pressure redistribution and skin examinations are required.
Should skin irritation and/or skin reddening occur, consult the qualified personnel who
adapted and adjusted the product. Do not continue using the product without consultation.
1. A variety of user-specific positioning accessories are issued with the seating system.
You should be made aware of the accessories and how to adjust them by your
healthcare provider. If you are unsure about any aspect of your seating system please
contact your healthcare provider.
6.1.2 Use - on slopes and inclines
Tipping risk of mobility device
Falls or injury if device tips during use
Page 17
17 | Ottobck
If an anti-tipping device has been fitted to the wheelchair, it should be deployed when-
ever there is any doubt as to the safety or stability of the unit. This could be particularly
important when transferring the client to or from the unit especially if the client is being
hoisted into or out of the seat.
Wherever possible try to park on a flat, level surface.
Do not hang items such as bags from the push handles.
Be aware that the user leaning far out of the system (forward or to the side) can lead to
instability and tipping.
Use caution when operating the Tilt in Space mechanism on gradients/slopes.
Do not leave system unattended especially on hills or ramps even when brakes are
engaged.
1. During handover of the wheelchair/mobility wheelbase, the overall stability was as-
sessed by the healthcare provider with the user seated in the unit, thus highlighting potential dangers that could cause the chair to become unstable, such as hanging bags
from the push handles or allowing the user to drop forward and/or overhang the sides of
the wheelchair.
2. Other dangers include negotiating slopes which may be too steep to maintain stability.
An indication of an incline being too steep is when the castor wheels become very light
or when going down a slope, the rear wheels become light.
3. Should either of these occur, we would recommend you traverse (zigzag) across the
slope so as to reduce the risk of the chair becoming unstable. If in any doubt about the
safe use or stability of the unit, an alternative safe route should be found.
6.1.3 Removal and refitting the seat to the wheelbase
Improper use or set-up
Falls, user falling out, malposition, illness of the user due to adjustment changes due to
improper use
When fitting a seat unit to the host mobility product, ensure the user is not seated in it.
Once the seat is fitted a pull test should be carried out to ensure the seat is correctly fitted and fully secured before the user is seated.
1. It is important that you understand how to remove the seat from the wheelchair / wheel-
base and refit it safely. This should have been demonstrated to you by your healthcare
provider. If you are unsure how to remove the seat please refer back to the healthcare
provider.
2. Some wheelchairs have a specific interface. The instructions for this type of interface
can be found in the user manual for the wheelchair.
Page 18
Ottobock | 18
3. Where there is no specific interface for the chair then drop hooks or location hooks may
be fitted to the bottom of the seat. (Fig 6). These are fitted to ensure that the seat is located securely on the wheelchair, and/or to lower the system to improve stability.
4. We recommend that weekly checks are carried out to ensure the straps are kept at the
correct tension not loose, frayed or damaged.
6.1.4 Use – In transport
Use in
vehicles for transporting persons with
reduced
mobility
Falls, user falling out due to improper use
Always use transport approved tie-downs and follow chassis instructions for transport.
Do not use the lap belts and positioning systems for the upper body as part of a per-
sonal restraint system during transportation in vehicles for transporting persons with reduced mobility.
These products do not replace the existing passenger restraint system in vehicles for
transporting persons with reduced mobility.
1. Whenever possible, transfers the user to a seat installed in the motor vehicle and uses
the corresponding vehicle restraint systems.
2. When the user cannot be transferred to the motor vehicle seat, always use the appropri-
ate wheelchair and passenger restraint systems in the motor vehicle during transport.
3. The seating system is only to be used in conjunction with the mobility base(s) it has been
supplied with and should be transported in the forward facing direction. However it may
be transported in the rearwards direction when used in conjunction with a suitable device that supplements the seatback and head restraint (Rear Impact Protection system –
RIP Seats). Under NO circumstances should the seat unit be used solely as a car seat,
seated on a vehicle seat.
4. Information on the correct procedure for the use of the wheelchair tie down system can
be found in the manufacturer’s user manual for the wheelchair (when a new wheelchair
is issued a copy of the manufacturer’s user manual will be supplied) or from your re-
straint system supplier.
5. Care should be taken to ensure that good contact is made between the occupant and
the occupant restraint system belt and that the belt is not impeded by the seating unit or
any part of the wheelbase.
6.2 Cleaning
6.2.1 Cover
Page 19
19 | Ottobck
Improper cleaning of the wheelchair cushion cover
Risk of damage to cushion due to user error
Never wash the cover at a temperature higher than the recommended as this may cause
it to shrink. This could impede the cushion's ability to redistribute pressure or it could
damage the fabric.
Do not use any bleaching agents for cleaning.
Replace the cover when it shows signs of advanced wear.
Should it be necessary to disinfect the cover, add a standard hygiene detergent during
washing (e.g. Sagrotan® laundry hygiene detergent).
For OBSS Tru-Shape removable covers:
1. Remove the cover for separate washing.
2. The cover can be washed at 60 °C [140 °F] using a mild, environmentally friendly deter-
gent.
Recommendation: Wash the cover using the delicate cycle at 40 °C [104 °F] to prevent
excessive wear.
3. Allow to air dry. DO NOT tumble dry, use a hair dryer or place near a hot radiator to dry.
4. Ensure the cover is fully dry before replacing on the foam and placing the user in the
system.
For OBSS Ortho-Shape non-removable covers:
1. Wash or wipe down with warm water and detergent, air dry at room temperature.
2. Make sure the seating system is fully dry before placing the user in the system.
6.2.2 Belts & Strapping
The belt straps can be cleaned by being gently dabbed with warm soapy water (with
some disinfectant) or carefully wiped with a dry, clean, absorbent cloth.
Follow manufacturer’s instructions. Below are general guidelines.
1.
Belts with metal buckles are not machine washable, clean
the belt straps by gently
dabbing them with warm soapy water (with some disinfectant) or carefully wiped with a
dry, clean, absorbent cloth.
2.
Belt with plastic buckles are
Machine washable between 40 °C [104 °F] and 60 °C
[140 °F]. Recommendation: Use a laundry bag or net and mild detergent.
Page 20
Ottobock | 20
3. Allow the belts to air dry. Ensure that the belts and pads are completely dry before instal-
lation.
4. Do not expose the belts to direct heat (e.g. sunshine, stove or radiator).
5. Do not iron or bleach the belts.
6.2.3 Foam components
Improper cleaning of the wheelchair cushion foam components
Risk of damage to cushion due to user error
Never dry the foam components or inserts in a dryer.
1. DO NOT immerse foam components in water. This includes components coated with
our water repellent.
2. To clean, wipe with a damp cloth and mild detergent or disinfectant, dry naturally.
7. Maintenance
Should you experience any problems with your wheelchair seating system or mobility
base, please contact your healthcare provider.
Only have repairs carried out by qualified personnel.
Damage caused by wear and tear
If the padding is worn or damaged, replace it immediately.
All worn or damaged components have to be replaced with original components from
the manufacturer as quickly as possible by qualified personnel. If the functionality of the
belt system is impaired, further use of the overall product is not recommended.
7.1 Before each use
Unstable connection between cushions and shell and/or shell and mobility base.
Risk of tipping over or falling due to unstable settings
Page 21
21 | Ottobck
When fitting a seat unit to the host mobility product, ensure the user is not seated in it.
Once the seat is fitted a pull test should be carried out to ensure the seat is correctly fitted and fully secured before the user is seated.
1. Check the function of the product especially the connection between the cushions, shell
and mobility base.
7.2 Weekly
1. Remove the seat from the wheelchair.
2. Visually inspect the seat for damage. Note signs of wear on the seams, pads and
straps, and the mounting materials.
3. Clean all aspects of the shell with warm water and detergent, removing liners or cush-
ions as necessary.
4. Launder and change the covers on your cushions.
5. Clean the liners in your molded seat insert.
6. Inspect the belt system for wear and damage. The inspection interval should be in-
creased heavy users.
7. Check the operation of the lap belt buckle.
8. Clean the wheelchair.
9. Refit the seating system to the mobility base and ensure that all connections are secure.
7.3 Repair or Modification
Should you experience any problems with your wheelchair seating system or mobility
base, please contact your healthcare provider.
Only have repairs carried out by qualified personnel.
7.3.1 Modify OBSS Ortho-Shape Contours (Provider)
The Plastizote liner and/or at the ABS shell component can be modified to change the shape
of the device to better fit the user.
1. Add foam to the liner to increase contact area.
a. Alternatively mark the foam to indicate where you would like foam to be added
if returning to supplier for finishing.
b. Foam added to front surface of liner will be covered by textile during seat fin-
ishing and cannot later be further modified.
c. Foam added to the back surface will be accessible later for further modifica-
tions.
Page 22
Ottobock | 22
d. Do not add foam within 1 inch of the liner edge as this will prevent later finish-
ing of the edges.
2. Modify the ABS shell using a heat gun (750 °F-900 °F).
Too much heating of ABS shell, especially in localized areas near attachments
points.
Risk of shell breakage or disconnection from mounting surface.
This modification method should be used cautiously. The heating of the ABS material
can change/weaken the structural properties of the material at the localized area.
Do not heat the plastic within 3 inches of the attachment points of the shell.
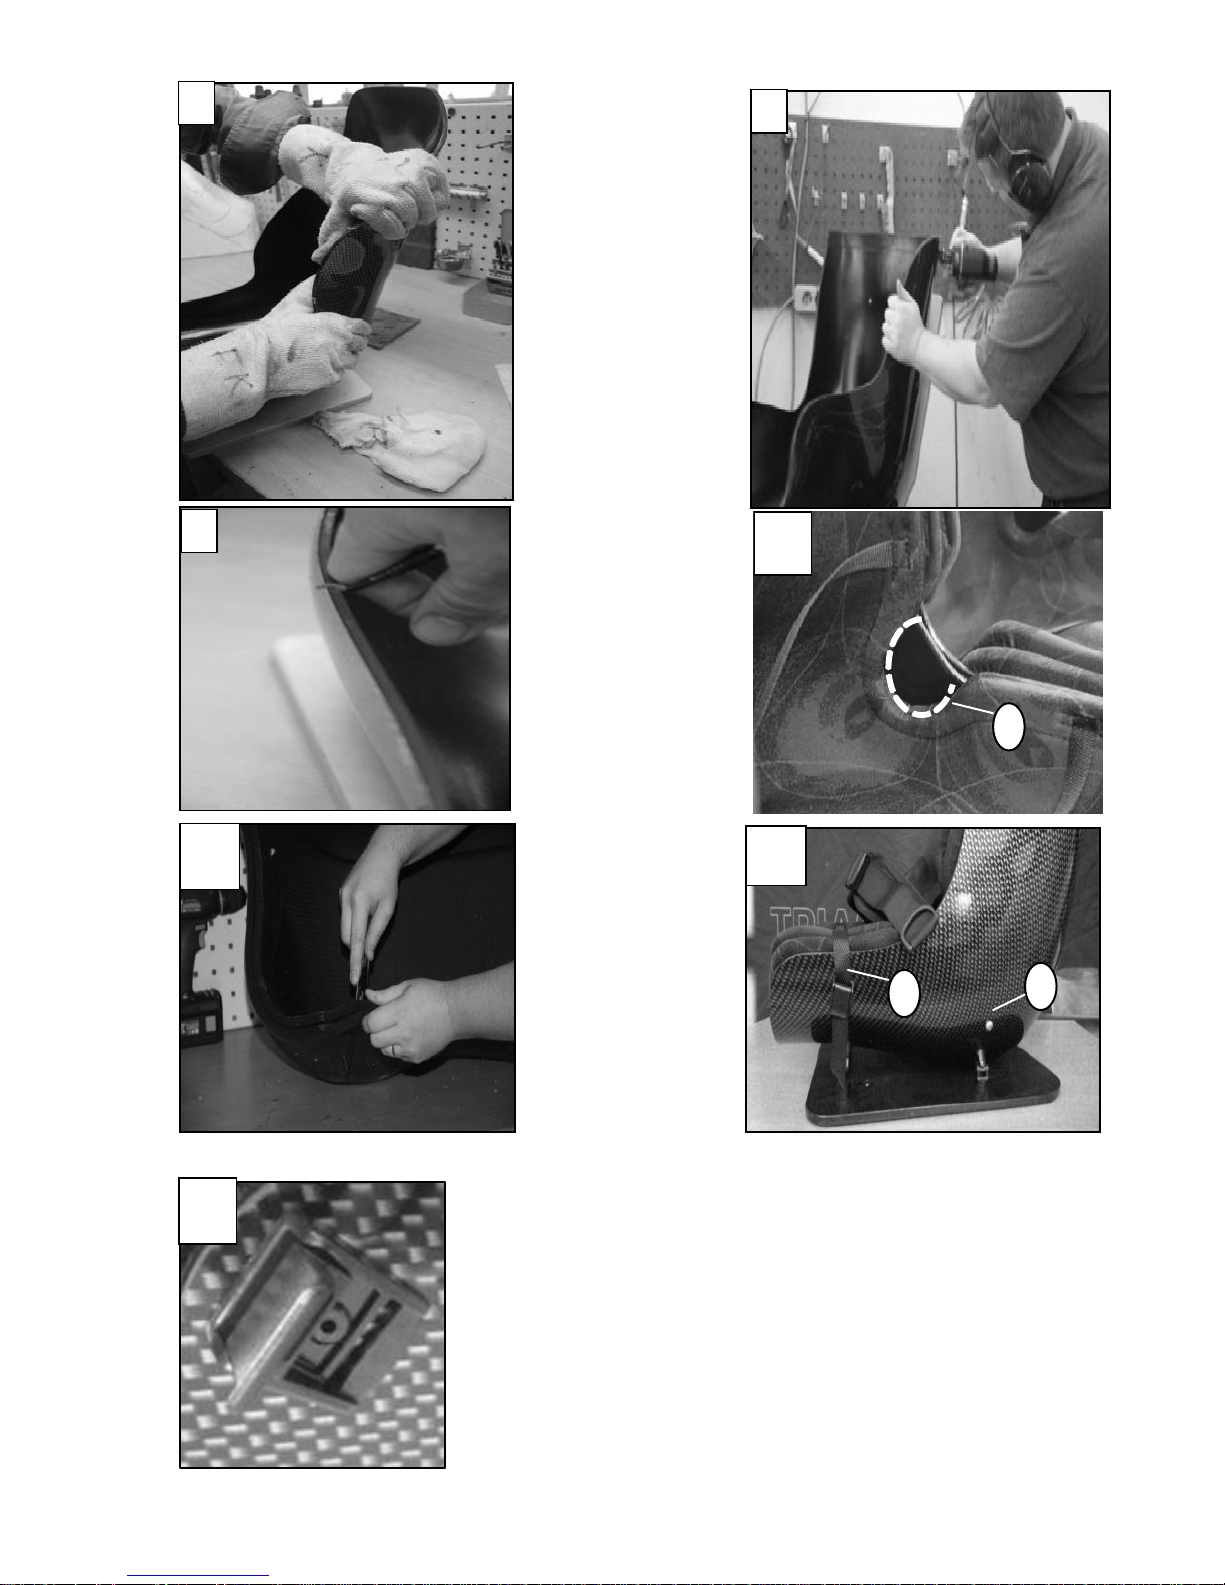
a. Heat both the inside and outside of the ABS simultaneously if possible (fig.6).
If not, alternate between the in/out surfaces to heat the material evenly.
b. Heat until the material is malleable but not too hot. If you can smell the materi-
al, then it is too hot.
c. Heat an area approximately 2-3 inches. larger than what you want to change to
allow for a smooth transition.
d. With heat protective gloves (fig. 7) push the ABS material into your wished po-
sition.
e. Your change region should be gradual with no sharp edges.
f. Your changes take effect when the ABS cools, after just a few minutes.
7.3.2 Modify the trim lines of the ABS shell.
Modification of shell support area at seat-back transition
Risk of injury due to shell cracking.
The seat-back transition area can experience high-stress especially with users who have
high tone or spasms. Maximize the shell support area in this region.
The ABS shell may be modified at the final fitting of the seating system or returned to the
supplier for finishing after a trial fit.
1. Mark the area to be removed with a water-based or silver colored pen.
Page 23

23 | Ottobck
2. Avoid cutting the ABS shell back to far especially at the transition zone between the
seat and back.
3. When you wish to create a notch for a lap belt, create the notch in the liners, not the
ABS shell (fig.10 ).
4. Trim the ABS shell with a jigsaw using a large toothed blade. Always use caution and
the appropriate protective equipment when using power tools (fig. 8).
5. Smooth the edges using wet-dry sandpaper or a deburring tool (fig. 9).
7.3.3 Modify the liners
The liners may be modified at the final fitting of the seating system or returned to the supplier for finishing after a trial fit.
1. Mark liners for trimming using a highly visible marker/pen.
2. For belt notches, notch the liner so the strap will lie across the body and in front of the
pelvis. As shown in fig. 5, the angle of the belt should be 60°-90°.
3. The liners should extend ½ in. longer than the edge of the ABS shell except at the posi-
tion of the belt notches (fig.10A).
4. Use caution when cutting the liners (fig. 11). A utility knife or very sharp scissors are
recommended.
7.3.4 Marking strap, buckle and belt position
The strap, buckle and belt positions are finished at the supplier.
1. Clearly mark buckle and belt position on the ABS shell using a highly visible marker.
a. The belt connection point must be at least 2 in. from the edge of the shell.
This is to maintain structural strength at the seat: back transition.
2. Clearly mark the liner adjacent to the buckles to indicate strap position (fig. 12A).
a. The position should be selected to avoid interference with the user especially
at the arms.
b. 8 straps are recommended to securely hold the liners in place. This can vary
with the size of the seat.
3. The straps will be sewn directly to the liners. The buckles are riveted to the ABS shell
(fig. 13).
4. At the belt attachment position, a T-Nut will be inserted (fig. 12B).
8. Legal Information
All legal conditions are subject to the respective national laws of the country of use and may
vary accordingly.
Page 24
Ottobock | 24
8.1 Liability
The manufacturer will only assume liability if the product is used in accordance with the
descriptions and instructions provided in this document. The manufacturer will not assume
liability for damage caused by disregard of this document, particularly due to improper use
or unauthorized modification of the product.
8.2 Trademarks
All product names mentioned in this document are subject without restriction to the respective applicable trademark laws and are the property of the respective owners. All brands,
trade names or company names may be registered trademarks and are the property of the
respective owners. Should trademarks used in this document fail to be explicitly identified as
such, this does not justify the conclusion that the denotation in question is free of third party
right.
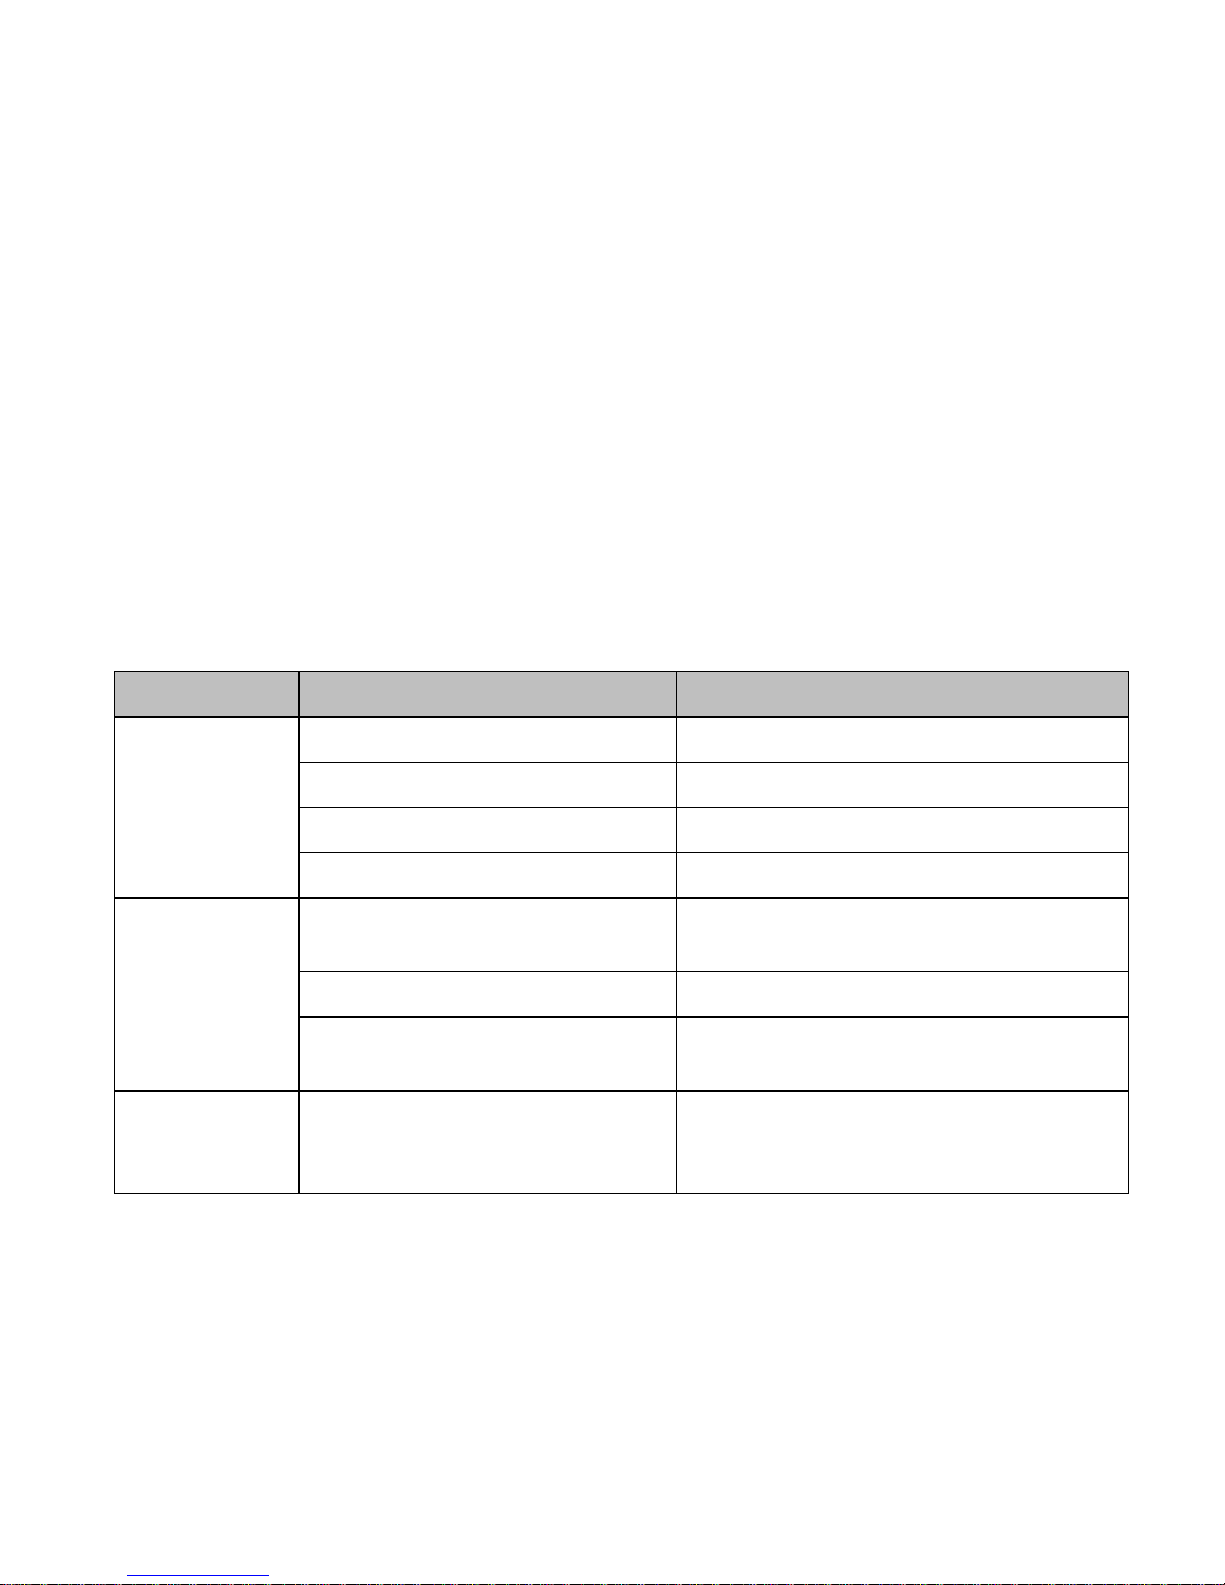
9. Technical data
Seat Model
Component
Technical Info
OBSS
Tru-Shape
Carved urethane foam
Non-latex, 50-75kg/m3, 5.5-9.5kPa
Vinyl spray foam coating
Low volatile vinyl based coating
Wood or ABS mounting shell
Baltic Birch or ABS sheet
Removable textile cover
Dartex®, Neoprene, Lycra, spacer
OBSS
Ortho-Shape
Molded Plastizote foam with
textile cover
Polyethylene foam with textile laminated
foam surface layer.
ABS mounting shell
ABS sheet, carbon aesthetic
Wood mobility base mounting
surface
Baltic Birch
ALL
System height & weight
Varies with each individual seating
system based on size of user and component selection.
Page 25

25 | Ottobck
Page 26
26 | Ottobock
Page 27

27 | Ottobock
Your specialist dealer
Ottobock HealthCare LP
3820 West Great Lakes Drive
Salt Lake City, UT 84120 USA
T +1 800 328 4058 F +1 800 655 4963
© Ottobock 647G1240=EN-01-1604
QR-Code
 Loading...