

Page 1
INSTRUCTION MANUAL
DRY/SPRAY/STEAM/BURST IRON
MODEL: CEA-10-01 (SR 7125270) EAN: 6001001759137
INDOOR HOUSEHOLD USE ONLY
Please save and read this instruction manual carefully before use.
Page 2

1
ENGLISH
INTRODUCTION
Thank you for purchasing our ottimo steam iron. Each unit has been manufactured to ensure safety,
reliability and ease of use. Before use, please read these instructions carefully and keep safely for future
reference.
IMPORTANT SAFEGUARDS
When using your ottimo steam iron, basic safety precautions should always be followed, including the
following:
This appliance is not intended for use by persons (including children) with reduced physical, sensory
or mental capabilities, or lack of experience and knowledge concerning the use of this product,
unless they are supervised or have been given instruction concerning use of the appliance by a
person responsible for their safety.
Children should be supervised to ensure that they do not play with the appliance.
Always ensure that the voltage on the rating label corresponds to the voltage in your home.
Check the power cord and plug regularly for any damage. If the cord or the plug is damaged, it must
be replaced by the manufacturer or a qualified person in order to avoid an electrical hazard.
This appliance is intended for household use only. Industrial or commercial use will void the
warranty, and the supplier cannot be held responsible for injury or damage caused when using the
appliance for any purpose other than that for which it is intended.
Incorrect operation and improper use can damage the appliance and cause injury to the user.
Do not use the appliance if it has been dropped or damaged in any way. In case of damage, take
the unit in for examination and/or repair by an authorized service agent.
To reduce the risk of electric shock, do not immerse or expose the motor assembly, plug or the
power cord to water or any other liquid.
Never immerse the unit in water or any other liquid for cleaning purposes.
Remove the plug from the socket by gripping the plug. Do not pull on the cord to disconnect the
appliance. Always unplug the unit when not in use or before cleaning or when adding or removing
parts.
The use of accessory attachments that are not recommended or supplied by the manufacturer may
result in injuries, fire or electric shock.
Do not let the cord hang over the edge of a table or counter. Ensure that the cord is not in a position
where it can be pulled on inadvertently.
Do not allow the cord to touch hot surfaces and do not place on or near a hot gas or electric burner
or in a heated oven. Please keep it in a cool and dry place away from direct sunshine.
Never use this unit near bathtubs, showers, basins or other water containers.
Page 3

2
ENGLISH
Use of an extension cord with this appliance is not recommended. However, if it is necessary to use
an extension cord, ensure that the cord is suited to the power consumption of the appliance to avoid
overheating of the extension cord, appliance or plug point. Do not place the extension cord in a
position where it can be pulled on by children or animals or tripped over.
This appliance is not suitable for outdoor use. Do not use this appliance for anything other than its
intended use.
Do not carry the appliance by the power cord.
Do not leave this appliance unattended during use. Always unplug the unit when not in use. Allow it
to cool before cleaning the appliance.
Always operate the appliance on a smooth, even and stable surface. Do not place the unit on a hot
surface.
Iron only on an ironing board.
The manufacturer does not accept responsibility for any damage or injury caused by the improper or
incorrect use of the appliance, or by repairs carried out by unauthorized personnel.
In case of technical problems, switch off the appliance and do not attempt to repair it yourself.
Return the appliance to an authorized service facility for examination, adjustment or repair. Always
insist on the use of original components. Failure to comply with the abovementioned precautions
and instructions could affect the safe operation of this appliance.
When you have finished ironing or when you are leaving the iron unattended:
a. Set the steam control button and the temperature control to 0.
b. Stand the iron upright.
c. Disconnect the iron from the power point.
Do not touch hot metal parts, hot water or steam. These components become hot and may cause
burns. Take care if you turn the iron upside down. There may be hot water in the water tank.
The plug and cord should not be allowed to touch the hot soleplate. Allow the iron to cool before
removing it.
The iron must not be left unattended while it is connected to the power point.
The plug must be removed from the power point before the water reservoir is filled with water.
The water inlet aperture must not be opened during use. Instructions for the safe refilling of the water
tank will be provided.
The iron must be used and rested on a stable surface.
When placing the iron on its heel rest, ensure that the surface on which the rest is placed, is stable.
The iron is not to be used if it has been dropped, if there are visible signs of damage or if it is leaking.
Page 4
3
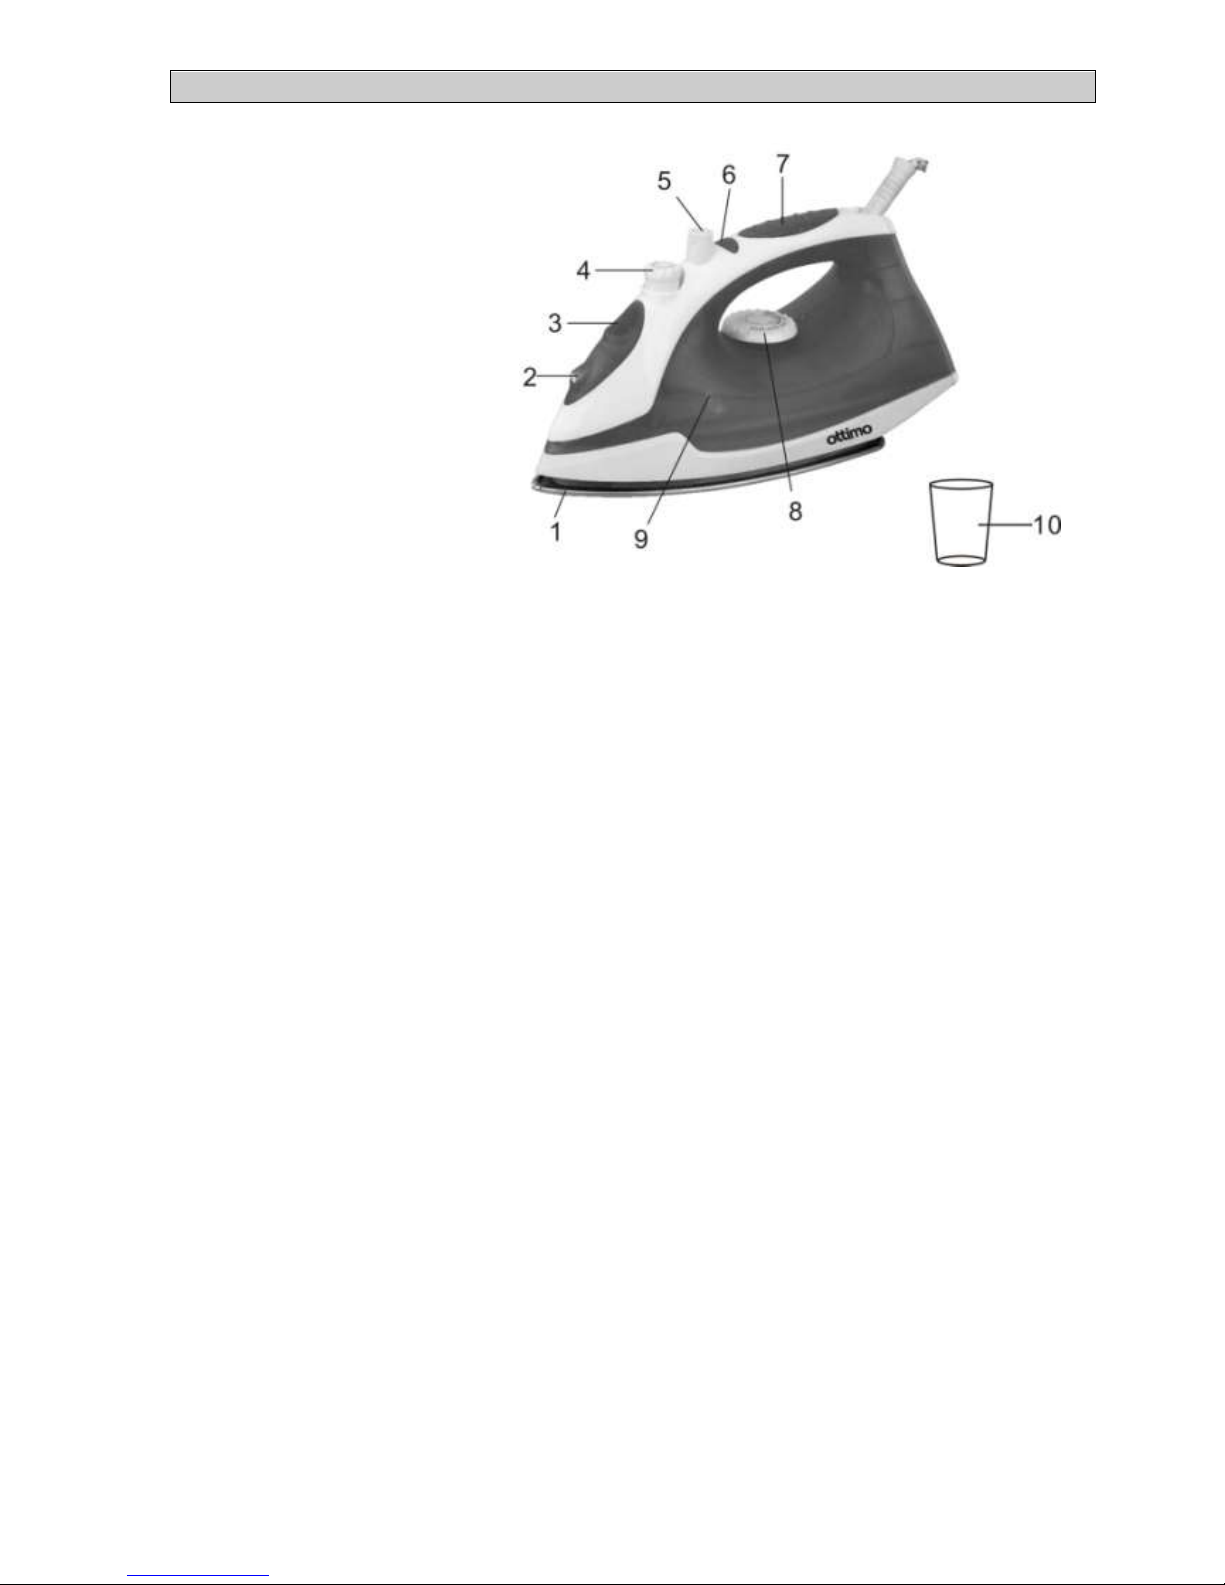
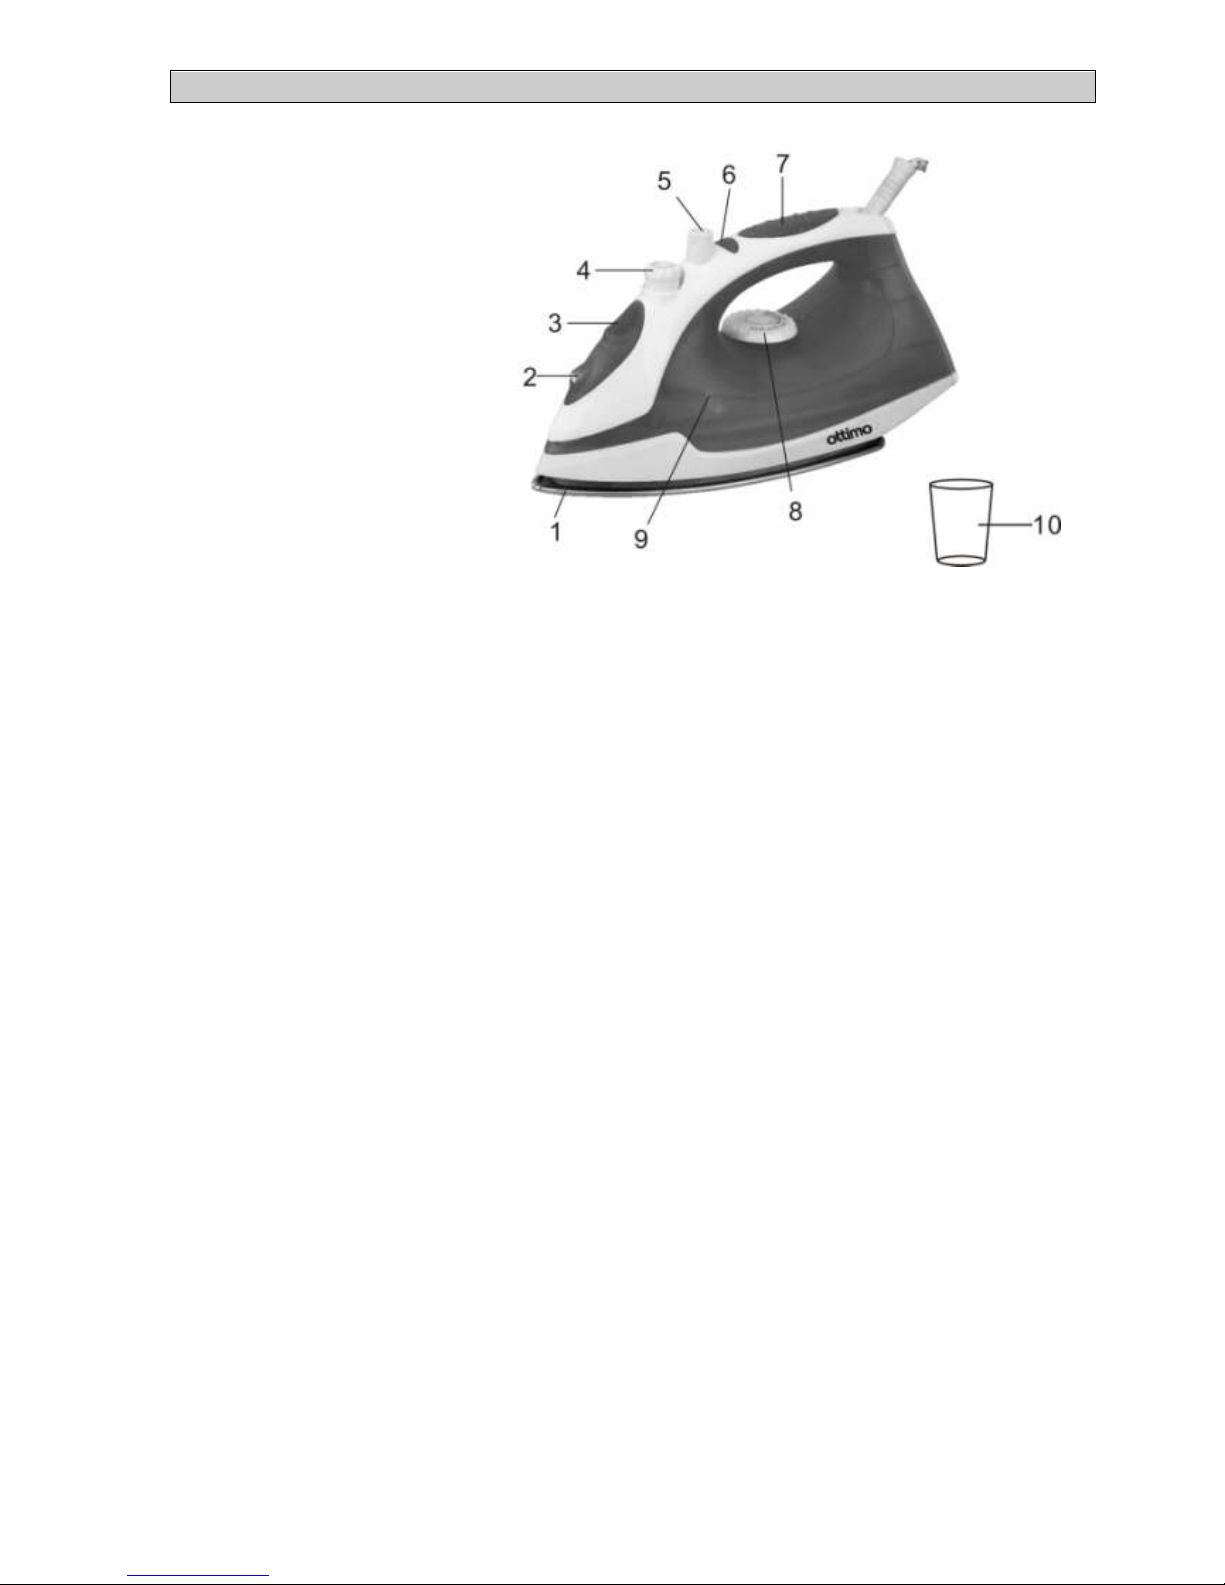
KNOW YOUR STEAM IRON
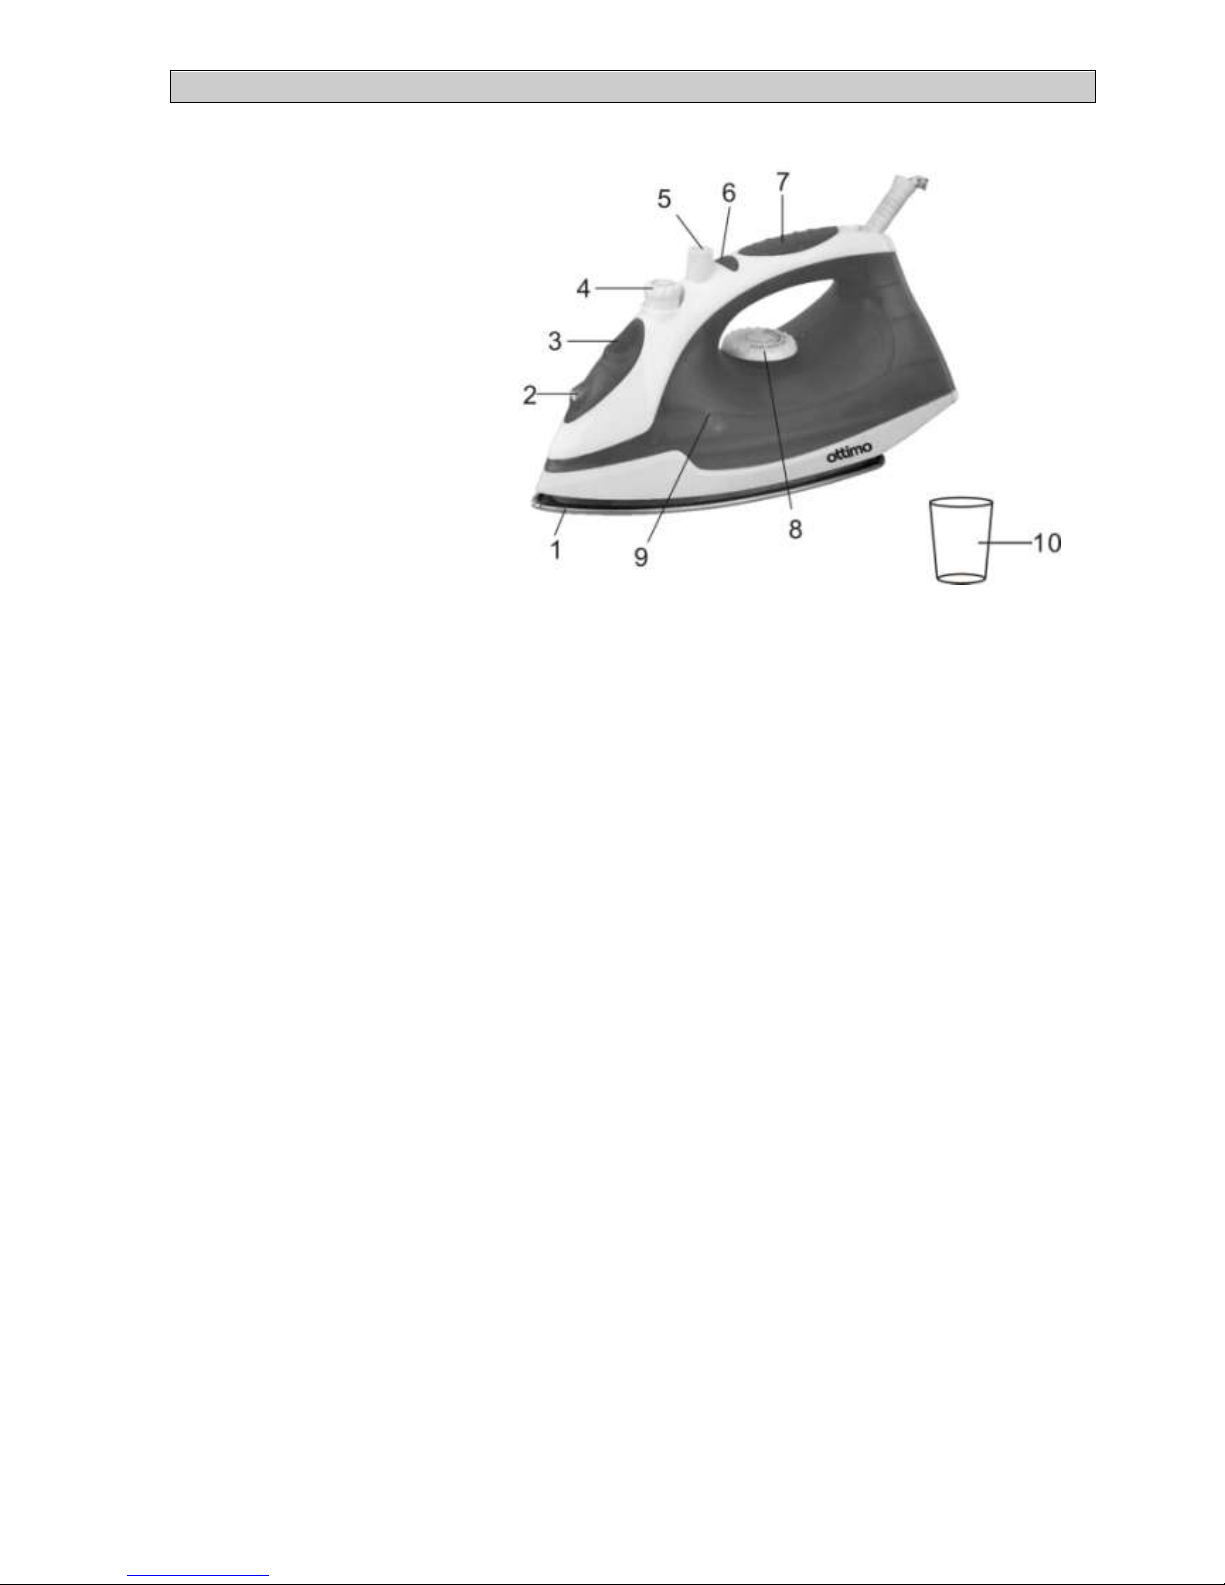
1. Stainless steel soleplate
2. Spray nozzle
3. Water inlet cover
4. Steam control button
5. Water spray & steam burst button
6. Temperature indicator light
7. Non-slip handle
8. Temperature control
9. Water tank
10. Jug
SPECIFICATIONS
Capacity
:
230 ml (water tank only)
Voltage
:
AC 230 V/50 Hz
Wattage
:
1600 W
Cord
:
3-pin earthed plug (to reduce risk of electric shock)
FUNCTIONS
1. Steam ironing.
2. Water spray and steam burst.
PRE-USE RECOMMENDATIONS
1. Some of the iron components have been slightly greased and could cause the iron to smoke slightly
when switched on for the first time. This will only happen the first few times of use.
2. Remove protective wrappings and labels from the soleplate and clean it with a soft, damp cloth.
3. When using the iron for the first time, test it on an old piece of fabric to ensure that the soleplate and
water tank are completely clean.
4. Wait for about three minutes before ironing heat-sensitive fabrics. The temperature needs some
time to adjust to the required level, whether higher or lower.
5. Delicate fabrics such as silk, wool, velour, etc. are best ironed with an ironing cloth to prevent shine
marks.
6. Turn the temperature control to the desired setting by aligning the setting on the dial with the
temperature indicator. The indicator light will go on to indicate that the iron is heating to the selected
temperature. When the indicator light goes off, the iron is at the selected temperature and ready for
use.
ENGLISH
Page 5
4
SETTING THE TEMPERATURE
1. Always check garment labels for ironing instructions before ironing a garment.
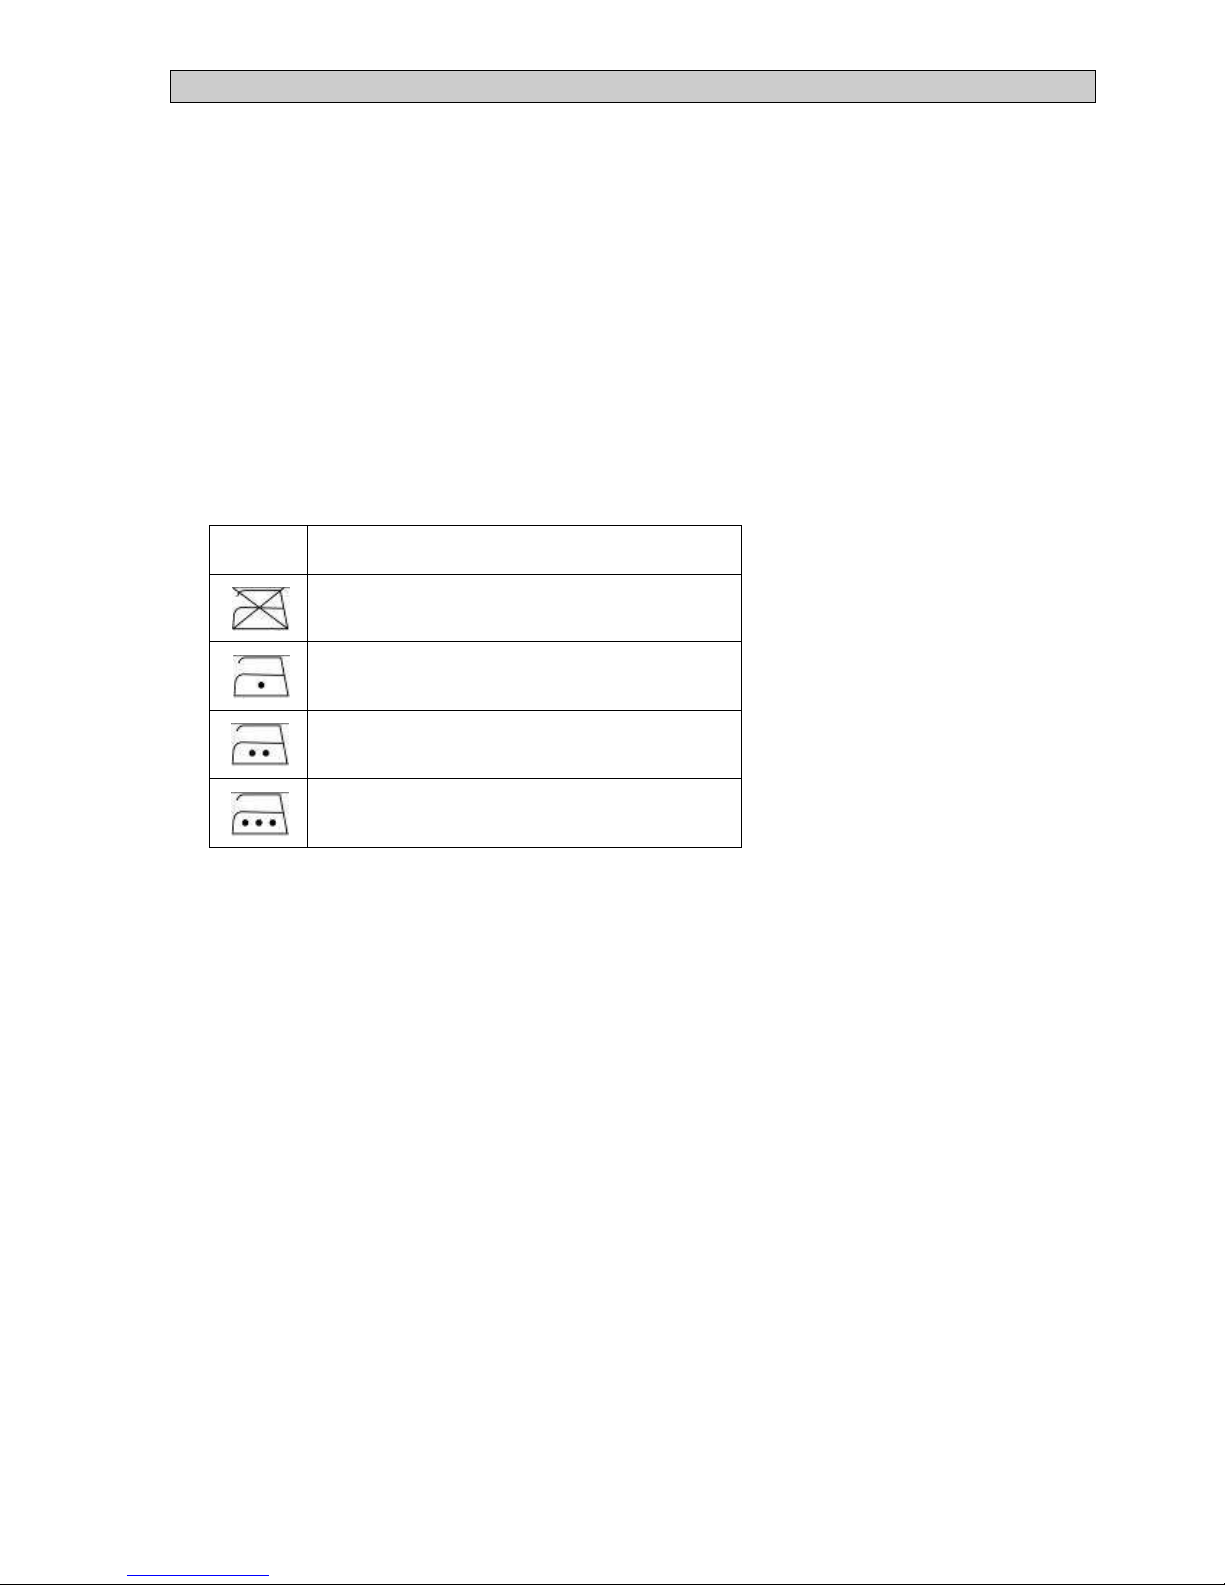
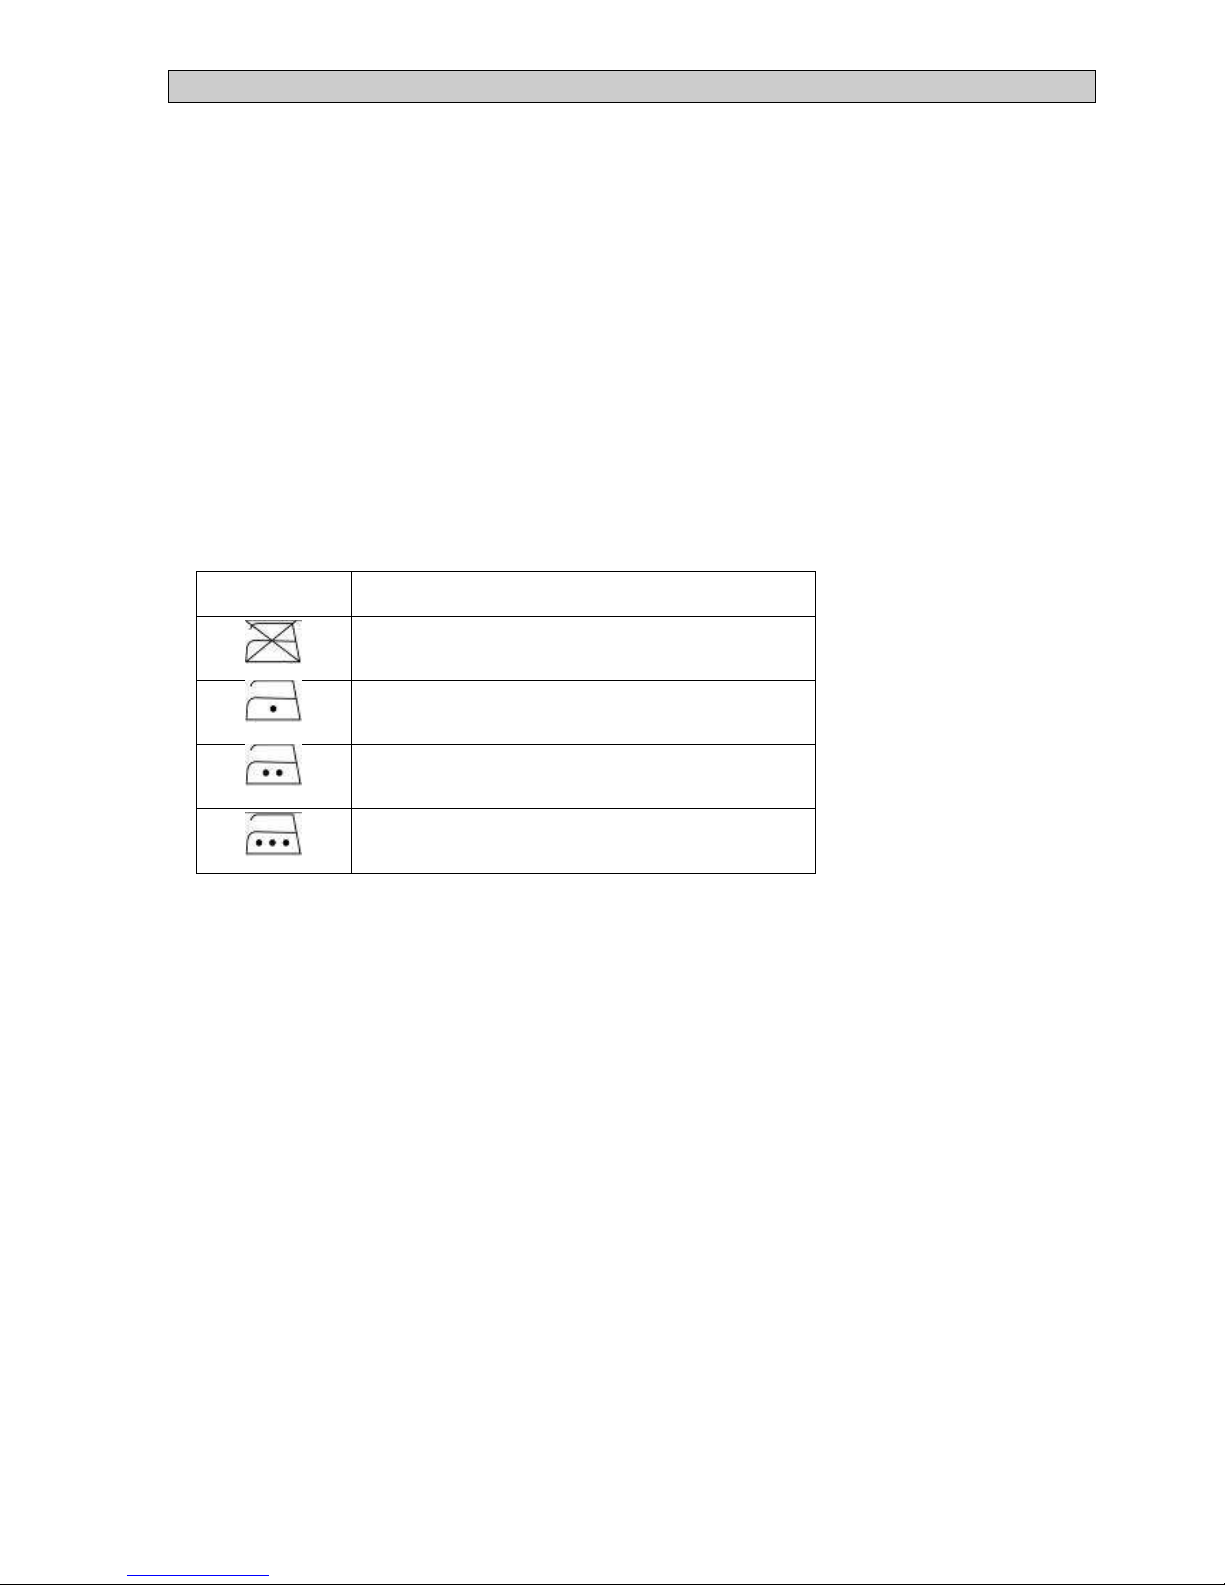
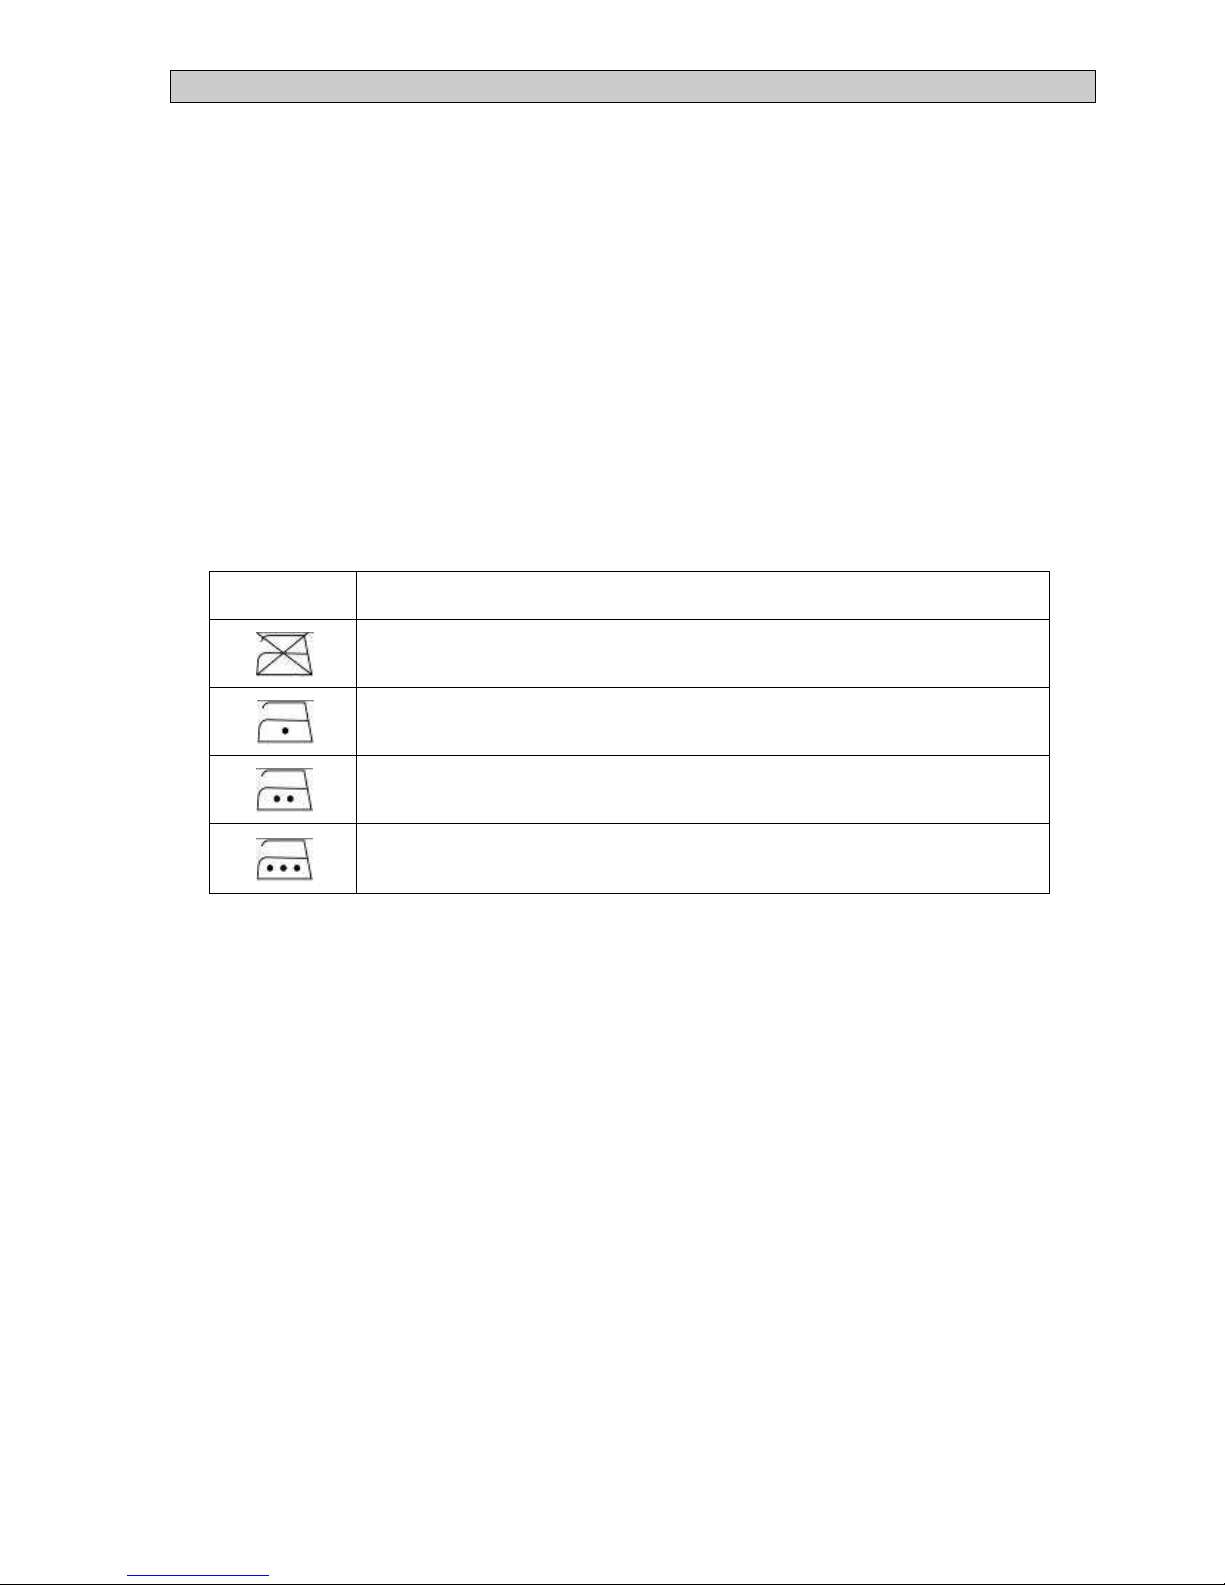
2. If you do not have the ironing instructions at hand, the table below may help you.
3. Sort laundry before ironing: wool with wool, cotton with cotton etc. Start ironing the fabrics requiring
the lowest temperature and then progress to those requiring a higher temperature as it takes more
time for the iron to cool down than to heat up.
4. If the fabric consists of various kinds of fibres (e.g. cotton with polyester) you must always select the
ironing temperature for the fabric with the lowest recommended temperature.
5. Pure wool garments (100% wool) should preferably be ironed with the iron on the steam setting.
Select a high steam setting and use a dry ironing cloth.
6. Turn the temperature control to the desired temperature setting.
7. The desired temperature has been reached when the indicator light has gone off. The indicator light
will turn on and off from time to time, indicating that the selected temperature is being maintained.
LABEL
FABRIC
Do not iron this article
Synthetic (nylon, acrylic, rayon, polyester)
Wool, silk
Cotton, linen
HOW TO FILL THE WATER TANK
1. Unplug your iron before filling the tank with water.
2. Set the steam control button to 0.
3. Fill water through the inlet to the MAX level of the water tank with the jug.
4. If the water in your area is particularly hard, it is advisable to use distilled or demineralized water.
5. Do not use chemically descaled water or any other liquids to refill the water tank.
6. Unplug the iron after ironing and allow it to cool. Turn the iron upside down and allow the water to
drain out.
DRY IRONING
1. Plug into the power point.
2. Turn the temperature control in a clockwise direction, selecting ● (1 dot), ●● (2 dots) or ●●● (3 dots)
according to the heat requirement indicated on the garment label.
3. Once the indicator light goes on, stand the iron on a smooth and stable surface.
4. Once the required temperature has been reached, the indicator light will go off and the iron is ready
for use.
ENGLISH
Page 6

5
SPRAY FUNCTION
1. This function can be used at any time and does not affect the ironing temperature.
2. Fill the water tank with water.
3. Aim the nozzle toward the garment.
4. Press the spray button.
5. It may be necessary to press the spray button a few times to start this function.
STEAM FUNCTION
1. Fill the water tank with water.
2. Plug iron into the power point.
3. Turn the temperature control in a clockwise direction to the ●●● (3-dot) setting. (Do not use the 1dot or 2-dot setting for steam ironing.) The indicator light will go on to indicate that the iron is
switched on.
4. When the indicator light goes off, it indicates that the selected temperature has been reached.
5. Turn the steam control knob to the required position. Steam will be emitted and you can start ironing.
6. Stand the iron upright when taking short breaks during ironing.
7. Once you have finished ironing, unplug the from the power point and allow to cool. Turn the iron
upside down and allow the water to drain out.
STEAM BURST FUNCTION
1. This function provides an additional amount of steam to remove stubborn creases.
2. Fill the water tank with water.
3. Plug iron into the power point.
4. Set the temperature control to the MAX position to prevent water from leaking from the soleplate if
the temperature is low. The indicator light will go on to indicate that the iron is switched on.
5. The indicator light switches off when the required temperature is reached.
6. Press the steam burst button once.
7. It may be necessary to press the steam burst button a few times to activate the function.
8. Steam will penetrate the fabric to remove creases.
9. Wait a few seconds before pressing the steam burst button again to remove stubborn wrinkles.
10. For optimum steam quality, do not use the steam burst function more than three times after the
indicator light goes off.
ENGLISH
Page 7
6
SELF-CLEANING FUNCTION
1. This function removes scale and mineral buildup in the steam chamber. Your iron will remain in
optimal condition if this function is performed at least once a month or more regularly depending on
the hardness of the water used.
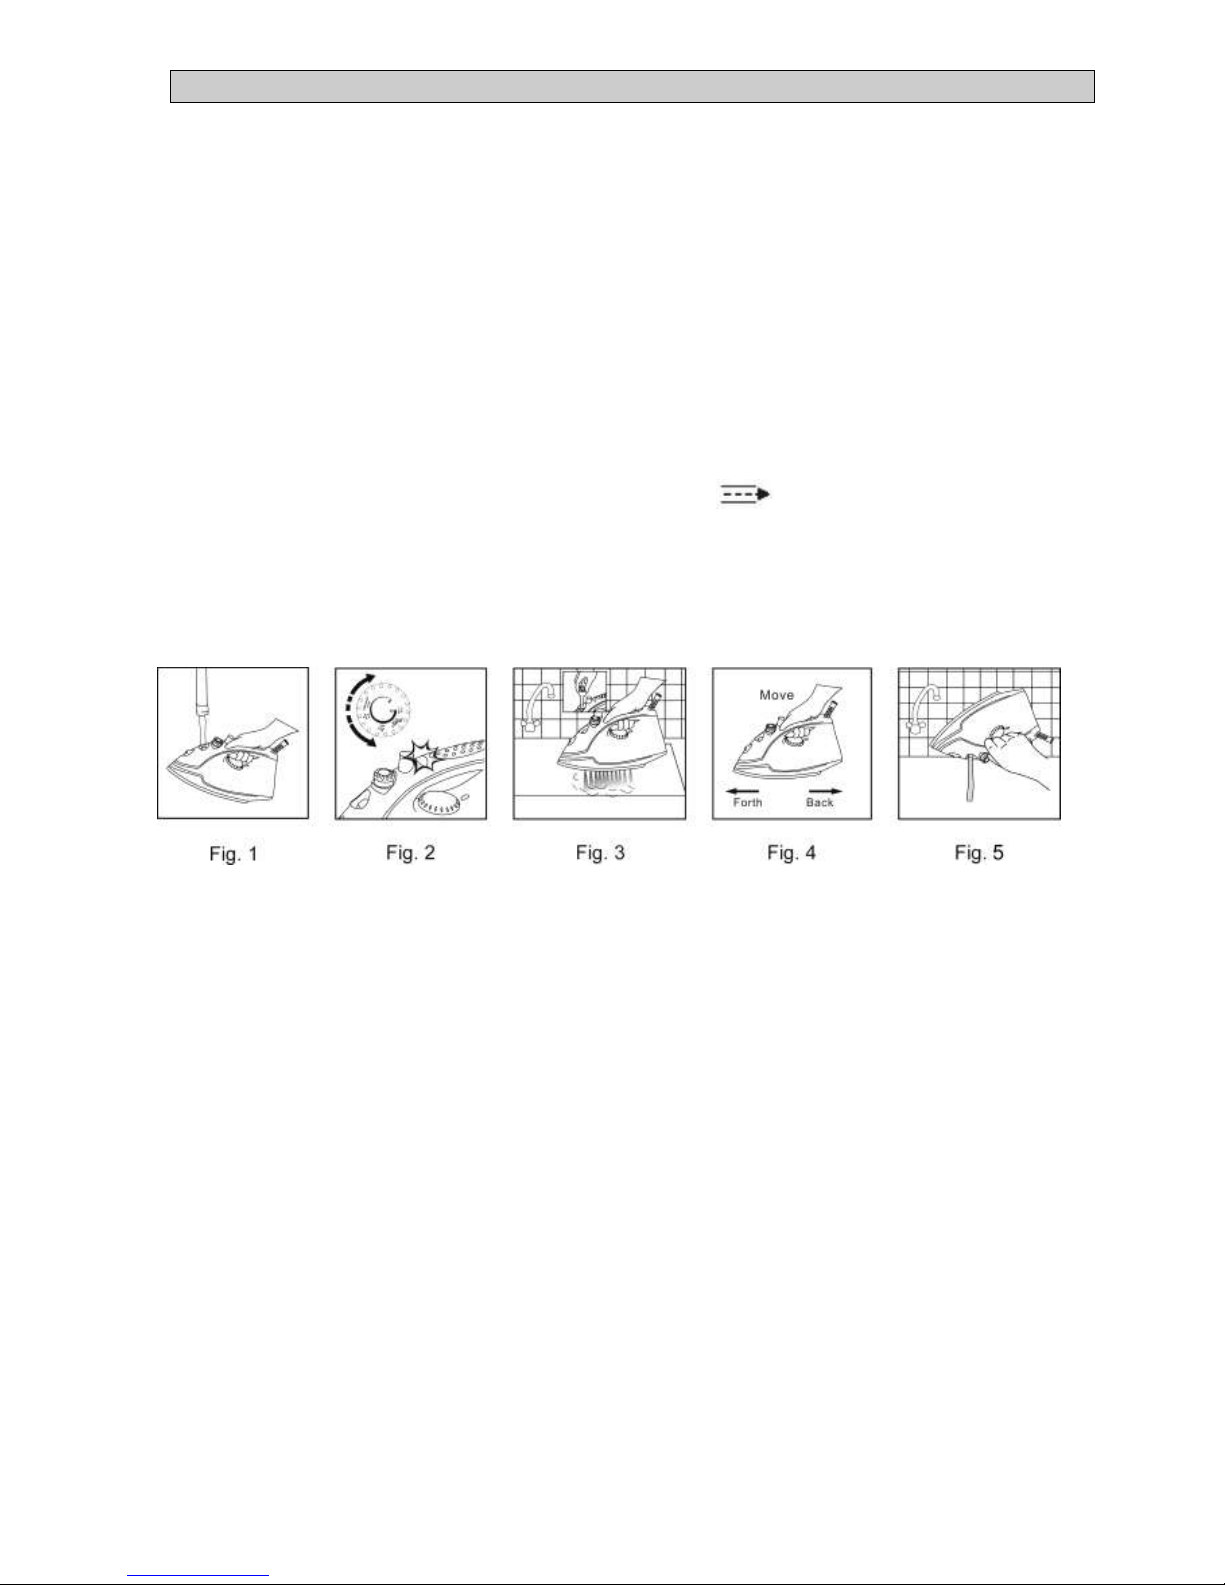
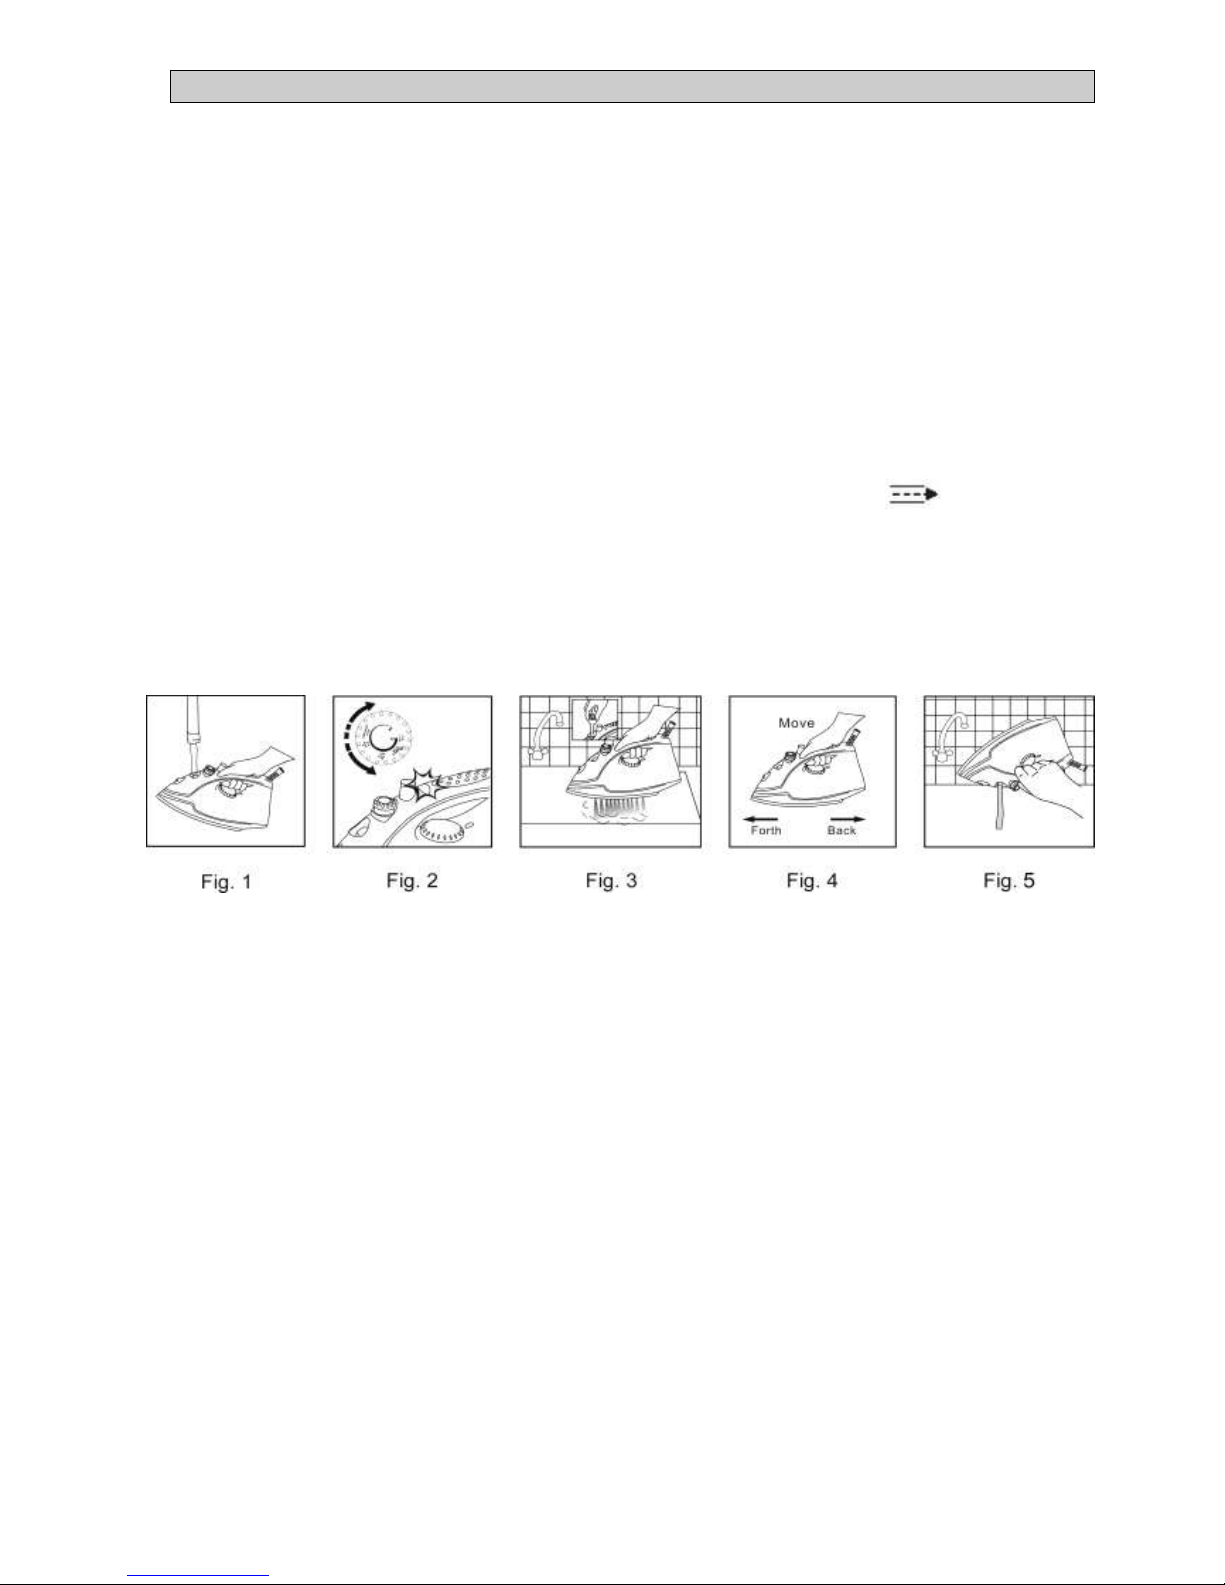
2. Fill the water tank halfway and stand the iron upright (Fig.1).
3. Plug the iron into the power point.
4. Set the temperature control to the MAX position. The indicator light will go on to indicate that the iron
is switched on (Fig.2).
5. The indicator light will go off when the required temperature has been reached.
6. Unplug the iron from the power point.
7. Hold the iron horizontally over a sink.
8. Turn the steam control button to the self-cleaning position and pull it out. Gently move the iron
back and forth for a while to allow steam and boiling water to escape from the holes of the soleplate,
rinsing away the scales and minerals deposited in the steam chamber (Fig.3 and 4).
9. Once you have completed the self-cleaning action, turn the steam control button to the 0 position.
Turn the Iron upside down and allow water to drain (Fig.5).
Caution: Keep skin/body away from hot surfaces.
CARE AND CLEANING
1. Turn the temperature control to 0, disconnect the iron from the power point and allow to cool down
completely.
2. Deposits and other residues on the soleplate can be removed with a cloth soaked in a diluted
vinegar/water solution.
3. To clean the exterior of your iron, wipe with a damp soft cloth and wipe dry.
4. Do not use scouring pads, abrasives or harsh cleaners to clean the soleplate.
5. To keep the soleplate smooth, do not iron over sharp objects such as buttons, studs and zippers.
STORAGE
1. Turn the steam control button and temperature control to 0.
2. Disconnect the iron from the power point.
3. Hold the iron upside down and gently shake it to remove any remaining water in the water tank.
4. Stand the iron upright and allow to cool down completely.
5. Always store the iron on its heel rest.
6. Do not store the iron with the soleplate facing down or in its box.
ENGLISH
Page 8
7
WARRANTY
PLEASE AFFIX YOUR RECEIPT/PROOF OF PURCHASE HERE.
IN THE EVENT OF A CLAIM UNDER THIS WARRANTY THE AFORESAID RECEIPT/PROOF OF
PURCHASE MUST BE PRODUCED TOGETHER WITH THIS WARRANTY.
Model number
(Lot number : )
Product name
Date of purchase
Place of purchase
1. The party selling the product (“the seller”) to the original purchaser of this product (“the customer”)
hereby warrants that this product will be of good quality, in good working order, free of defects and
suitable for its intended purpose under normal household use, for a period of 1 (one) year from the
date of purchase (“warranty period”) of this product.
2. In the event that the product is not of a good quality or in good working order, defective or unsuitable
for its intended purpose under normal household use before the warranty period has lapsed, the
customer may, subject to paragraph 3 below, return the product to the seller on the following terms:
2.1 Within the first 6 (six) months of the warranty: receive a refund of the actual price paid
or exchange the product for the same or similar product of the same purchased value;
2.2 After 6 (six) months of the warranty have lapsed: exchange the product for the
same or similar product of the same purchased value.
3. The seller will not replace the product or refund the customer in terms of this warranty if the product:
3.1 has been altered contrary to the instructions provided in the product manual;
3.2 has been misused, abused or tampered with;
3.3 is defective or not in working order due to ordinary wear and tear;
3.4 is damaged due to the customer’s gross negligence, recklessness, malicious
behavior or criminal conduct;
3.5 has been utilized for commercial or industrial use.
4. This warranty applies only to a product that has been purchased from the seller and not to any
expendables attached to or installed on the product by the customer.
5. Any claim in terms of this warranty must be supported by the original proof of purchase.
6. Note that the exchange item will only carry the balance of the warranty period as from the original
date of purchase.
ENGLISH
Page 9

8
FRANÇAIS
INTRODUCTION
Merci de d'avoir acheté notre fer à vapeur de "Ottimo". Chaque unité a été fabriquée pour assurer la
sécurité, la fiabilité et la facilité d'utilisation. Avant d’utiliser, lisez attentivement ces instructions et les
conservez pour référence future.
PRÉCAUTIONS IMPORTANTES
Lorsque vous utilisez votre fer à vapeur de" Ottimo ", il faut respecter les précautions de base, y compris
ce qui suit:
Cet appareil n'est pas destiné à être utilisé par des personnes (enfants compris) dont les capacités
physiques, sensorielles ou mentales sont réduites, ou avec le manque d'expérience et de
connaissance, sauf si elles sont surveillées ou ont été données des instructions concernant
l'utilisation de l'appareil par une personne responsable de leur sécurité.
Les enfants doivent être surveillés pour assurer qu'ils ne jouent pas avec l'appareil.
Toujours s'assurer que la tension sur la plaque signalétique correspond à la tension dans votre
maison.
Vérifiez le cordon d'alimentation et la prise régulièrement pour éviter tout dommage. Si le cordon ou
la fiche est endommagé, il doit être remplacé par le fabricant ou une personne qualifiée afin d'éviter
un risque électrique.
Cet appareil est destiné à un usage domestique. L’utilisation industrielle ou commerciale annulera la
garantie, et le fournisseur ne peut être tenu responsable des blessures ou des dommages causés
lors de l'utilisation de l'appareil à des fins autres que celles destinées.
Une mauvaise manipulation ou une utilisation incorrecte peut endommager l'appareil et causer des
blessures à l'utilisateur.
Ne pas utiliser l'appareil s'il est tombé ou endommagé de quelque façon. En cas de dommages,
l'examen et/ou la réparation doit être réalisé par un technicien agréé.
Pour réduire le risque de choc électrique, ne pas immerger ou exposer l'ensemble moteur, la fiche
ou le cordon d'alimentation à l'eau ou tout autre liquide.
Ne jamais plonger l'appareil dans l'eau ou tout autre liquide pour le nettoyage.
Retirez la fiche de la prise en saisissant la fiche. Ne tirez pas sur le cordon pour débrancher
l'appareil. Toujours débranchez l'appareil lorsqu'il n'est pas utilisé, avant de le nettoyer ou lorsque
vous ajoutez ou retirer des pièces.
L'utilisation d'accessoires qui ne sont pas recommandés ou fournis par le fabricant peut entraîner
des blessures, un incendie ou un choc électrique.
Ne laissez pas le cordon pendre sur le bord d'une table ou un comptoir. Assurez-vous que le cordon
n'est pas dans une position où il peut être tiré par inadvertance.
Ne pas laisser le cordon toucher des surfaces chaudes et ne le placez pas sur ou près d'un brûleur à
gaz ou électrique ou dans un four chauffé.
Ne jamais utiliser cet appareil à proximité de baignoires, douches, lavabos ou autres récipients
contenant de l'eau.
Page 10

9
FRANÇAIS
L’utilisation d'un cordon de rallonge avec cet appareil n'est pas recommandée. Toutefois, s'il est
nécessaire d'utiliser une rallonge, assurez-vous que la rallonge est adaptée à la consommation
d'énergie de l'appareil pour éviter la surchauffe de la rallonge, de l’appareil ou du point prise. Ne
placez pas la rallonge dans une position où il peut être tiré par des enfants ou des animaux ou
trébuchée.
Cet appareil n'est pas adapté pour une utilisation en extérieur. Ne pas utiliser cet appareil pour autre
chose que son utilisation prévue.
Ne pas transporter l'appareil par le cordon d'alimentation.
Ne pas toucher les surfaces CHAUDES directement. Utilisez les poignées ou les boutons.
Ne pas laisser cet appareil rester sans surveillance pendant l'utilisation. Toujours débranchez
l'appareil lorsqu'il n'est pas utilisé. Laissez refroidir avant de mettre ou enlever des pièces, et avant
de le nettoyer.
Toujours faites fonctionner l'appareil sur une surface lisse, plane et stable. Ne pas placer l'appareil
sur une surface chaude.
Le fabricant n'accepte aucune responsabilité pour tout dommage ou blessure causé par l'utilisation
impropre ou incorrecte de l'appareil, ou par des réparations effectuées par le personnel non autorisé.
En cas de problèmes techniques, éteignez la machine et ne pas tenter de réparer vous-même.
Retournez l'appareil à un centre de service autorisé pour examen, ajustement ou de réparation.
Toujours insistez sur l'utilisation de pièces de rechange originales. Le défaut de se conformer avec
les précautions mentionnées ci-dessus et les instructions, pourrait affecter le bon fonctionnement de
cet appareil.
Quand vous avez fini le repassage ou vous avez quitté le fer à repasser sans contrôle;
a. Régler le bouton de commande de vapeur et mettre la commande de température à "0" .
b. Mettre le fer à repasser debout.
c. Déconnecter le fer à repasser de la prise du mur.
Ne pas toucher les pièces métalliques chaudes, l’eau ou la vapeur chaude. Ces pièces deviennent
chaudes et peuvent entraîner des brûlures. Faites attention si vous tournez le fer à repasser à
l’envers. Il existe de l’eau chaude dans le réservoir.
La prise et le câble ne doivent pas toucher la semelle chaude. Laisser le fer refroidir avant de
l’emporter.
Ne pas laisser le fer à repasser sans contrôle s’il est connecté au réseau d’alimentation
Déplacer la prise du socle avant de remplir l’eau dans le réservoir.
L’orifice de remplissage ne doit pas être ouvert pendant l’utilisation. Les instructions pour le
remplissage en sécurité du réservoir d’eau seront données.
Le fer doit être utilisé et posé dans une surface stable.
Au moment de placer le fer à repasser sur son support, s’assurer que la surface sur laquelle le
support est posé est stable.
Le fer à repasser n’est pas utilisé s’il est tombé, s’il existe des signes de dommage ou s’il existe des
fuites.
Page 11
10
CONNAÎTRE VOTRE FER À VAPEUR
1. Semelle en acier inox
2. Nez de pulvérisation
3. Orifice d’entrée d’eau
4. Bouton de commande de vapeur
5. Bouton de pulvérisation de vapeur
6. Témoin indicateur
7. Poignée antidérapante
8. Commande de température
9. Réservoir d’eau
10. Verre
SPÉCIFICATION
Capacité
230 ml (Réservoir d'eau seulement)
Tension
AC 230V / 50Hz
Puissance en watts
1600W
Cordon
3 broches de prise de mise à la terre.
(Pour réduire le risque de choc électrique)
FONCTION
1. Repassage en vapeur. Repassage sec.
2. Pulvérisation d’eau. Pulvérisation de vapeur.
CONSEILS AVANT LA PREMIERE UTILISATION
1. Certaines parties du fer ont été légèrement graissées et, par conséquent, le fer peut fumer
légèrement quand il est allumé pour la première fois. Il ne se reproduira plus après quelques
utilisations.
2. Enlever les emballages de protection et les étiquettes à partir de la semelle et le nettoyer avec un
chiffon doux et humide.
3. Lorsque vous utilisez le fer pour la première fois, le tester sur un vieux morceau de tissu pour
s'assurer que la semelle et le réservoir d’eau sont complètement propres.
4. Attendez environ trois minutes avant de repasser des tissus chauds sensibles. Le réglage de la
température a besoin d'un certain temps pour atteindre le niveau requis - peu importe si elle est
supérieure ou inférieure.
5. Tissus délicats comme la soie, la laine, le velours, etc. sont mieux repassés avec un chiffon à
repasser à prévenir les marques brillantes.
6. Tournez le contrôle de la température sur le réglage désiré en alignant la mise sur le cadran de
l'indicateur de température. Le voyant s'allume pour indiquer que le fer chauffe à la température
choisie. Quand la lumière s'éteint, le fer est à la température choisie et est prêt à l'emploi.
FRANÇAIS
Page 12
11
CONFIGURATION DE LA TEMPERATURE
1. Vérifiez toujours l'étiquette du vêtement pour les instructions du repassage avant de repasser le
vêtement.
2. Si les instructions du repassage sont manquantes, alors le tableau ci-dessous peut vous aider.
3. Premièrement, vous devez trier le linge: laine avec de la laine, de coton avec du coton etc.
Commencer à repasser les tissus nécessitant la température la plus basse et continuer à ceux plus
élevés parce que le fer se réchauffe plus vite qu'il refroidisse.
4. Si le tissu se compose de différents types de fibres (coton-polyester), vous devez toujours
sélectionner la température de repassage pour le matériel avec la température la plus basse
recommandée.
5. Tissus de laine pure (100% laine) peuvent être repassés avec l'appareil dans la position de la vapeur
de préférence, choisir une haute position de vapeur et utiliser un chiffon du repassage à sec.
6. Tournez la commande de température à la température désirée.
7. La température souhaitée est atteinte lorsque le voyant est éteint. Le voyant s’allume et s’éteint de
temps en temps, ce qui indique que la température sélectionnée est maintenue.
ÉTIQUETTE
TYPE DE TEXTILE
Ne pas repasser cet article
Synthèse (Nylon, acrylique, rayonne, polyester)
Laine, soie
Coton, lin
COMMENT REMPLIR L’EAU
1. Avant de remplir l’eau, veuillez débrancher la prise d’abord.
2. Mettre le bouton de commande de vapeur à la position "0".
3. Remplir l’eau à travers l’orifice au niveau "MAX"du réservoir en utilisant le verre.
4. Si l’eau dans votre region est partièrement dure, il est conseillé d’utiliser l’eau distillée ou
déminéralisée.
5. Ne pas utiliser l’eau détartrée chimiquement ou tout autre liquide pour le remplissage.
6. Après le repassage, débrancher et laisser le fer refroidir. Tourner le fer vers le bas et laisser l’eau
sortir.
REPASSAGE SEC
1. Brancher le câble d’alimentation.
2. Tourner la commande de température en sens horaire ; sélectionner ● (1 dot), ●● (2 dots) ou ●●●(3
dots)en fonction de la recommandation de l’étiquette du vêtement.
3. Le témoin d’indicateur va s’allumer, ensuite mettre le fer sur une surface lisse et stable verticalement.
4. Quand la température requise est atteinte ; le témoin d’indicateur d’éteint. Le fer est prêt à l’emploi.
FRANÇAIS
Page 13

12
FONCTION DE PULVERISATION
1. Cette fonction peut être utilisée à tout moment et elle ne dérange pas la température du repassage.
2. Remplir le réservoir d’eau par l’eau.
3. Aligner le nez vers le vêtement.
4. Appuyer sur le bouton de pulvérisation.
5. Il est possible d’appuyer sur le bouton de pulvérisation quelque temps pour lancer cette fonction.
FONCTION DE VAPEUR
1. Remplir le réservoir d’eau par l’eau.
2. Brancher le câble d’alimentation.
3. Tourner la commande de température en sens horaire à position“●●●”(3 dots).(Ne pas utiliser 1 dot
ou 2 dots pour le repassage en vapeur). Le témoin d’indicateur s’allume pour indiquer que le fer est
allumé.
4. Après que le témoin d’indicateur s’éteint, qui indique que la température choisie est atteinte.
5. Tourner le bouton de commande de vapeur à la position souhaitée. La vapeur sera pulvérisée et
vous pouvez commencer le repassage.
6. Au cours d’arrêt du repassage, mettre le fer debout.
7. Quand vous avez fini le repassage, débrancher le câble d’alimentation et laisser refroidir. Tourner le
fer vers le bas et laisser l’eau sortir.
FONCTION DE PULVERISATION DE VAPEUR
1. Cette fonction fournit une quantité supplémentaire de vapeur pour éliminer les plis tenaces.
2. Remplir le réservoir d’eau par l’eau.
3. Brancher le câble d’alimentation.
4. Mettre le commande de température à position "MAX", sinon, l’eau peut se fuir de la semelle si la
température est basse. Le témoin d’indicateur s’allume pour indiquer que le fer est allumé.
5. Le témoin d’indicateur s’éteint quand la température requise est atteinte.
6. Appuyer sur le bouton Pulvérisation de vapeur un fois.
7. Il est possible d’appuyer sur le bouton de pulvérisation de vapeur quelque temps pour lancer cette
fonction.
8. La vapeur va pénétrer dans le vêtement qui élimine les plis.
9. Attendre quelques secondes avant d’appuyer sur le bouton Pulvérisation de vapeur encore une fois
quand il existe des plis tenaces.
10. Pour la meilleure qualité de vapeur, ne pas utiliser la Pulvérisation de vapeur plus de trois fois après
que le témoin d’indicateur s’éteint.
FRANÇAIS
Page 14
13
FONCTION DU NETTOYAGE AUTOMATIQUE
1. Cette fonction supprime les échelles et les minéraux accumulés dans la chambre à vapeur. Le fer
restera dans les meilleures conditions, si cette fonction est exécutée au moins une fois par mois ou
plus régulièrement en fonction de la dureté de l'eau utilisée.
2. Remplir le réservoir d’eau à la moitié et mettre le fer debout.(Fig.1)
3. Brancher le câble d’alimentation.
4. Mettre le commande de température à position "MAX". Le témoin d’indicateur s’allume pour indiquer
que le fer est allumé.
5. Le témoin d’indicateur s’éteint quand la température requise est atteinte.
6. Débrancher le fer de la prise électrique.
7. Tenir le fer horizontalement sur un évier.
8. Tourner le bouton de commande de vapeur à la position de l’auto-nettoyage et tirer. Déplacez
doucement le fer avant et en arrière pendant un moment, la vapeur et l'eau bouillante va émettre par
des trous de la semelle emportant les échelles et les minéraux déposés dans la chambre à
vapeur.(Fig. 3 et 4)
9. Lorsque l'auto-nettoyage est terminé, tournez le bouton de commande de vapeur sur le fer et tourner
vers la position "0" . Retournez le fer vers le bas et laisser l'eau s'écouler.
Attention : Eloigner la peau/le corps loin des surfaces chaudes.
ENTRETIEN ET NETTOYAGE
1. Tourner la commande de température à "0" , ensuite débrancher le fer de la prise du mur et le
laisser refroidir complètement.
2. Les dépôts et d’autres résidus sur la semelle peuvent être enlevés avec un chiffon imbibé de
vinaigre dilué dans une eau / solution.
3. Pour nettoyer l’extérieur de votre fer, essuyer avec un chiffon doux et humide et essuyer à sec.
4. Ne pas utiliser des tampons à récurer, abrasifs ou des produits nettoyants pour nettoyer la semelle.
5. Garder la semelle lisse ; ne pas repasser des objets pointus tels que des boutons, des clous, et des
chaînes.
STOCKAGE
1. Tourner le bouton de vapeur et la commande de température à la position "0" .
2. Débrancher le fer de la prise du mur.
3. Tourner le fer vers le vers et l’agiter doucement pour sortir l’eau restante dans le réservoir d’eau.
4. Mettre le fer debout et le laisser refroidir complètement.
5. Stocker toujours le fer sur son talon d’appui.
6. Ne pas stocker le fer avec la semelle vers le bas , ou dans le carton.
FRANÇAIS
Page 15
14
FRANÇAIS
GARANTIE
APPOSEZ VOTRE REÇU/PREUVE D´ACHAT À CET EMPLACEMENT.
EN CAS DE RÉCLAMATION COUVERTE PAR LA GARANTIE, LE REÇU /LA PREUVE
D´ACHAT MENTIONNÉS AUPARAVANT DOIVENT ÊTRE JOINTS À CETTE GARANTIE.
Numéro de modèle
(Numéro de lot: )
Nom du produit
Date d´achat
Lieu d´achat
1. La partie qui vend le produit (“le vendeur”) à l´acheteur original de ce produit (“le client”)
assure que ce produit sera de bonne qualité et, en bon état de fonctionnement et, sans
défaut, et adapté à l´usage pour lequel il est prévu, sous des conditions normales
d´utilisation domestique, pendant une période d´1 (un) an à partir de la date d´achat du
produit (période de garantie).
2. Au cas la période de garantie ne soit pas écoulée et que le produit ne soit plus en bon
état ou en état de marche, qu’il soit défectueux ou ne soit plus approprié à son usage
prévu dans des conditions normales d´utilisation domestique, le client peut, sous
réserve de remplir les conditions du Paragraphe 3 ci-dessous, retourner le produit au
revendeur et dispose des possibilités suivantes :
2.1 Durant les 6 (six) premiers mois de garantie: être remboursé à hauteur du
prix d’achat ou échanger le produit contre un produit identique ou similaire
dont le prix correspond au prix payé.
2.2 Après les 6 (six) premiers mois de garantie: échanger le produit contre un
produit identique ou similaire dont le prix correspond au prix payé.
3. Dans les conditions de cette garantie, le produit ne sera ni remplacé, ni remboursé si
celui-ci:
3.1 a été modifié contrairement aux instructions fournies dans le manuel du
produit;
3.2 a été mal utilisé, maltraité ou altéré;
3.3 est défectueux ou en mauvais état de fonctionnement suite à une usure
normale.
3.4 est endommagé suite à une faute grave du client, ou à un comportement
insouciant, malintentionné ou délictueux;
3.5 a été employé pour un usage commercial.
4. Cette garantie ne s´applique qu´au produit qui a été acheté au vendeur et non pas à un
quelconque accessoire attaché ou installé sur le produit par le client.
5. Toute réclamation liée à cette garantie doit être accompagnée par la preuve originale
d´achat.
6. Remarquez que l'élément d'échange portera le solde de la durée de la garantie à partir
de la date d'achat d'origine.
Page 16

15
PORTUGUÊS
INTRODUÇÃO
Obrigado por comprar o nosso Ferro a Vapor “Ottimo”. Cada unidade foi fabricada para assegurar uma
utilização segura, confiável e simples. Antes de utilizar, leia atentamente estas instruções e guarde-as
para futura referência.
INSTRUÇÕES IMPORTANTES
Quando utilizar o seu Ferro a Vapor "Ottimo", as precauções de segurança básicas devem ser sempre
seguidas, incluindo:
Este aparelho não é recomendado para utilização por pessoas (incluindo crianças) com
capacidades físicas, sensoriais ou mentais reduzidas, ou falta de experiência e conhecimento sobre
a utilização deste produto, a menos que tenham supervisão ou tenham sido instruídas sobre a
utilização do aparelho pela pessoa responsável pela sua segurança.
As crianças devem ser supervisionadas para assegurar que não brincam com o aparelho.
Certifique-se de que a voltagem usada na casa corresponde à voltagem indicada na etiqueta.
Verifique regularmente o cabo de força e o plugue para ver se há todos os danos Se o cabo de
alimentação ou o plugue estiver danificado, deve ser substituído pelo fabricante, ou por pessoa
qualificado a fim de evitar um perigo elétrico.
Este aparelho serve unicamente para utilização doméstica. A utilização industrial ou comercial
anula a garantia, e o fornecedor não será responsável por ferimentos ou danos causados quando
utilizar o aparelho para qualquer utilização para além da pretendida.
Operação e uso incorretos podem danificar o aparelho e causar danos ao usuário.
Não utilize o aparelho se tiver caído ao chão ou se estiver danificado de qualquer forma. Em caso
de danos, leve a unidade para examinação e/ou reparação por um agente de assistência autorizado.
Para reduzir o risco de choque eléctrico, não mergulhe ou exponha a montagem do motor, ficha ou
cabo de alimentação à água ou qualquer outro líquido.
Nunca mergulhe a unidade na água ou qualquer outro líquido durante a limpeza.
Retire o plugue da tomada segurando o plugue. Não puxe o cabo para desconectar o aparelho.
Sempre desligue o aparelho quando não estiver em uso, antes de limpar ou quando adicionar ou
remover peças.
O uso dos acessórios não recomendado pelo fabricante do dispositivo pode causar os ferimentos,,
incêndio ou choque elétrico.
Não deixe o cabo pendurar sobre a borda da mesa ou do balcão. Garantir que o cabo não está em
uma posição onde ele pode ser puxado descuidadosamente.
Não deixe o cabo tocar em superfícies quentes e não coloque sobre ou perto de um gás quente ou
queimador elétrico ou em forno aquecido.
Nunca utilize esta unidade perto de banheiras, chuveiros, bacias ou outros recipientes que
contenham água.
Page 17

16
PORTUGUÊS
O uso de um cabo de extensão com este aparelho não é recomendado. No entanto, se for
necessário usar um cabo de extensão , certifique-se que o cabo é apropriado para o consumo de
energia do aparelho para evitar o sobreaquecimento do cabo de extensão, equipamento ou ponto.
Não coloque o cabo de extensão em uma posição onde ele pode ser puxado por crianças ou
animais
Este produto destina-se ao uso doméstico somente. Não use este aparelho para outra finalidade.
Não transporte o aparelho pelo cabo de alimentação.
Não toque as superfícies quentes diretamente. Use os punhos ou os botões.
Não deixe este aparelho sem supervisão durante o uso. Sempre desligue o aparelho quando não
estiver em uso. Deixe esfriar antes de colocar ou retirar peças e antes de limpar o aparelho.
Sempre opere o aparelho sobre uma superfície lisa, plana e estável. Não coloque o aparelho sobre
uma superfície quente.
O fabricante não se responsabiliza por qualquer dano ou prejuízo causado pelo uso indevido ou
incorreto do aparelho, ou reparações efectuadas por pessoal não autorizado.
Em caso de problemas técnicos, desligar o aparelho e não tente repará-lo para si mesmo. Retorno o
aparelho a uma assistência técnica autorizada para exame , ajuste ou reparo. Sempre use as peças
sobresselentes originais..A falha de operar de acordo com as precauções e as instruções
mencionadas acima, podia afetar a operação segura desta máquina.
Quando você terminar a operação de passar roupa ou quando você está deixando o ferro não
vigiado .
a. Configurar o botão de controle de vapor e Controle de Temperatura para "0".
b. Coloque o ferro de passar na posição vertical.
c. Desligue o ferro de passar da tomada de parede.
Não toque nas partes metálicas quentes, água quente ou vapor. Estas peças ficam quentes e
podem causar queimaduras. Tome cuidado se você colocar a parte superior do ferro de passar
para baixo. Pode haver água quente no tanque.
A ficha e o cabo não deve ser permitido tocar base do ferro quente. Permitir que o ferro esfriar antes
de tirá-la.
O ferro não deve ser deixado não vigiado enquanto estiver conectado à fonte de alimentação.
A ficha deve ser removido da tomada antes de o reservatório de água cheio de água.
A abertura de abastecimento não deve ser aberto durante uso. Instruções para recarga seguro do
reservatório de água devem ser dadas.
O ferro de passar deve ser usado e colocado em cima de superfície estável.
Quando colocar o ferro no seu suporte, garantir que a superfície do suporte é estável.
O ferro de passar não deve ser usado se ele tiver caído, se houver sinais visíveis de danos ou se
está vazando.
Page 18
17
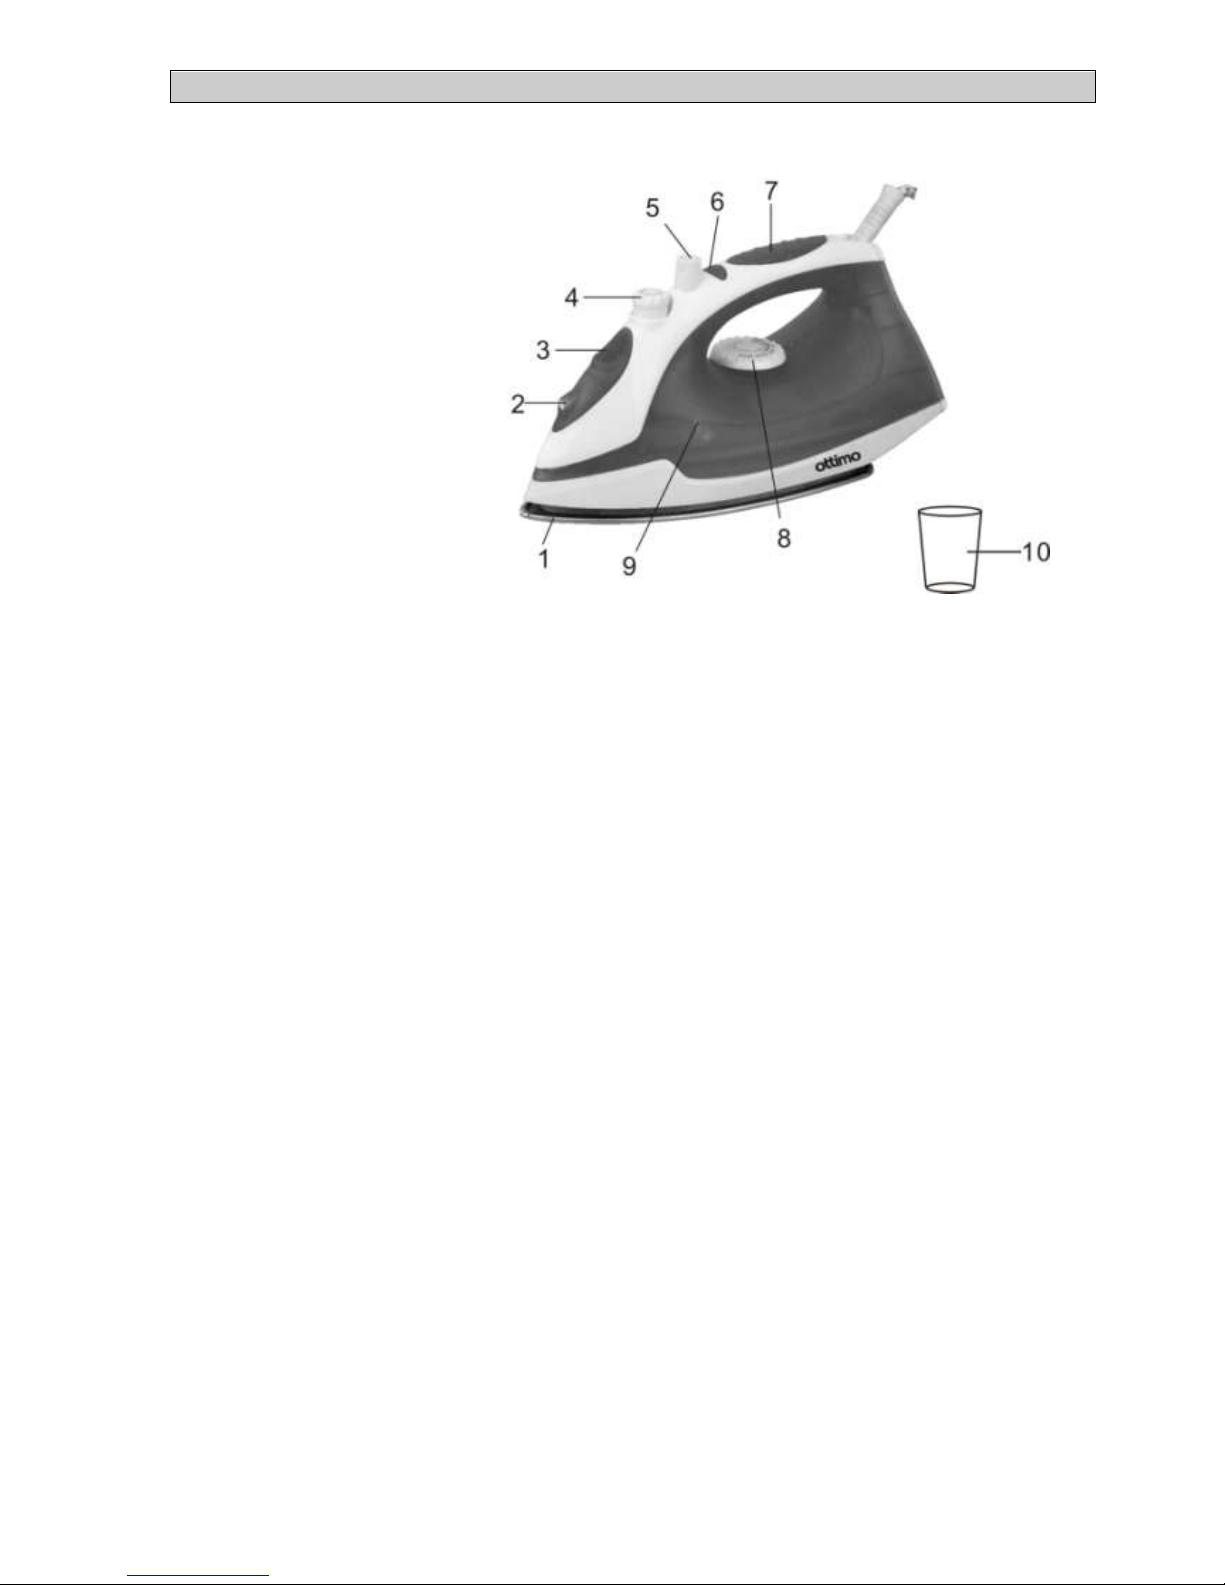
CONHEÇA SEU FERRO A VAPOR
1. Base de ferro de aço inoxidÁvel
2. Bocal De pulverização
3. Orifício de entrada de água
4. Butão de Controle de vapor
5. botão de pulverizar & rebentar
vapor
6. Lâmpada de indicador
7. punho antiderapante
8. Controle de temperatura
9. Tanque de água
10. Jarro
ESPECIFICAÇÃO
Capacidade
:
230 ml (só tanque de água)
Voltagem
:
AC 230V / 50Hz
Potência
:
1600W
Cabo
:
Ficha aterrada de 3 pinos. (para reduzir o risco de choque eléctrico)
FUNÇÃO
1. Passar a vapor passar a ferro seco.
2. Pulverizar água , rebentar vapor.
CONSELHOS ANTES DO PROMEIRO USO
1. Algumas partes do Ferro de passar foram ligeiramente engorduradas e, como resultado, o ferro de
passar pode fumar um pouco quando ligado pela primeira vez. Isso não acontecerá outra vez
depois de alguns uso.
2. Remover invólucros preventivos e etiquetas de base do ferro e limpar com um pano macio e úmido.
3. Ao usar o ferro de passar pela primeira vez, testá-lo em um velho pedaço de tecido para assegurar
que a base do ferro e o tanque de água são completamente limpas.
4. Aguarde cerca de três minutos antes de passar tecidos sensíveis ao calor. Ajuste de temperatura
precisa de alguns tempo para atingir o nível requerido - não importa se é maior ou menor.
5. Tecidos delicados, como seda, lã, veludo, etc, são melhor passados a ferro com um pano de passar
a ferro para impedir marcas óbvias.
6. Gire o controle de temperatura para a configuração desejada, alinhando a configuração no
mostrador com o indicador de temperatura. A lâmpada de indicador se ligará para indicar que o ferro
de passar esta esquentando para a temperatura selecionada. Quando a lâmpada de indicador
fecha-se, o ferro está na temperatura selecionada e está pronto para uso.
PORTUGUÊS
Page 19
18
CONFIGURAÇÕES DE TEMPERATURA
1. Sempre verifique etiqueta de roupa para instruções de passar antes de passar roupa.
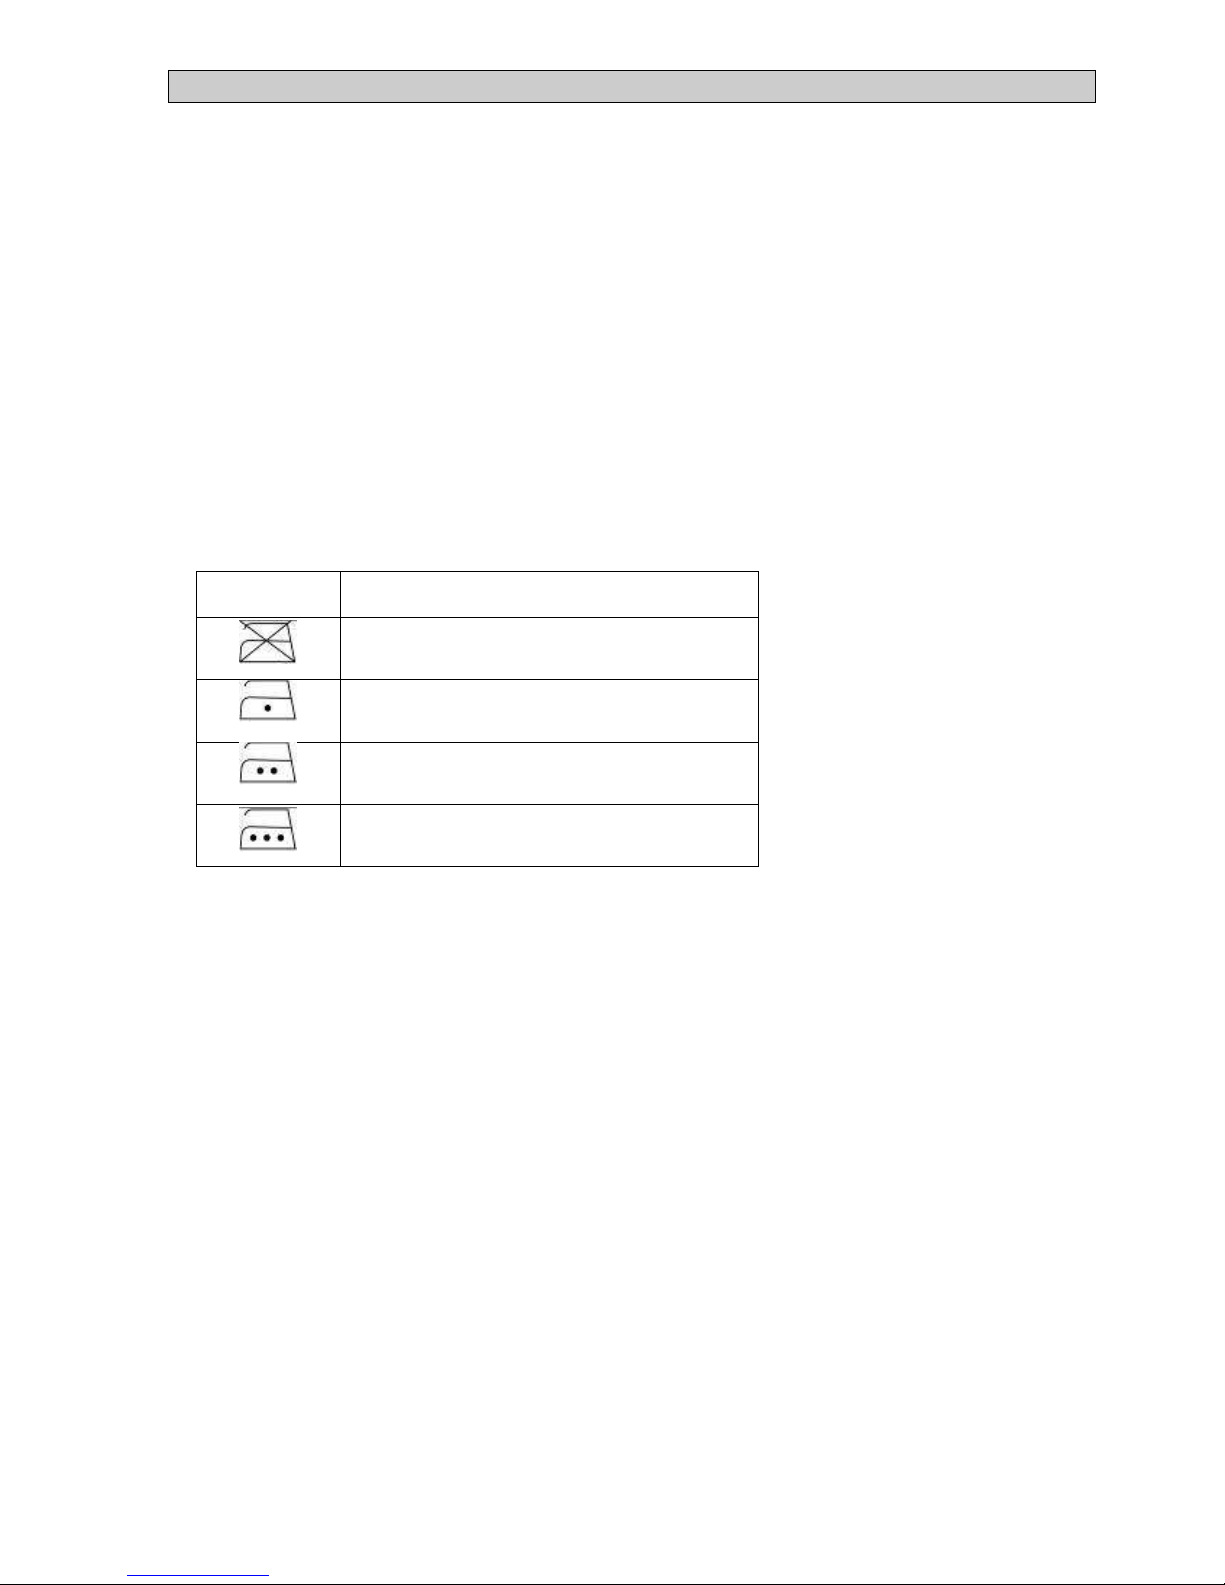
2. Se as instruções de passar a ferro estão perdidas, então a tabela abaixo pode ajudá-lo.
3. Primeiro você deve classificar as roupas para lavar. lã com lã, algodão com algodão etc. Começo de
passar os tecidos exige a temperatura mais baixa e progresso para os mais altos porque o ferro se
aquece mais rápido do que arrefeça.
4. Se o tecido é composto de vários tipos de fibras (por exemplo, algodão com poliéster) você deve
sempre selecionar a temperatura de passar para o material com a temperatura recomendada mais
baixa.
5. Tecido de pura lã (100% lã) podem ser passado com o aparelho na posição de vapor por
preferência, selecione uma posição alta de vapor e use um pano seco de passar.
6. Configurar o controle de temperatura para a temperatura desejada.
7. A temperatura desejada foi atingida quando a lâmpada de indicador está fechada. A lâmpada de
indicador se ligará e desligará de vez em quando para indicar que a temperatura selecionada está
sendo mantida.
ETIQUETA
TIPO DE TECIDO
Não passe este artigo a ferro
Sintético (Nylon, Acrílico, Raiom, Poliéster)
Lã, Seda
Algodão, Linho
COMO ENCHER DE ÁGUA
1. Antes de encher de água, por favor puxe plugue primeiramente
2. Configurar o botão de controle de vapor para a posição de "0".
3. Encha .de água através da entrada até o nível de "MAX" do tanque de água usando o jarro.
4. Se a água em sua área é particularmente pesada, é aconselhável de usar água destilada ou
desmineralizada.
5. Nunca utilize água quimicamente descalcificada ou qualquer outros líquidos para enchimento.
6. Depois de passar roupa, desligue e deixe o ferro de passar esfriar. Coloque a parte superior do
ferro de passar para baixo e deixe a água escorrer para fora.
PASSAR A FERRO SECO
1. Inserir no Plugue de alimentação
2. Gire o controle de temperatura no sentido horário; selecionar ● (1 ponto), ● ● (2 pontos) ou ● ● ● (3
pontos) de acordo com a recomendação da etiqueta da roupa.
3. Lâmpada de indicador liga-se, então colocar o ferro de passar em uma superfície lisa e estável na
vertical.
4. Quando a temperatura desejada é atingida; lâmpada de indicador desliga-se. O ferro de passar
está pronto para uso.
PORTUGUÊS
Page 20

19
FUNÇÃO DE PULVERIZAR
1. Esta função pode ser usada a qualquer momento e isso não afeta a temperatura de passar.
2. Encha o tanque de água
3. Depois equipe o bocal do assoalho.
4. Pressionar o botão de pulverizar.
5. Pode ser necessário pressionar o botão de pulverizar algumas vezes para iniciar esta função.
FUNÇÃO DE VAPOR
1. Encha o tanque de água.
2. Inserir no Plugue de alimentação
3. Gire o controle de temperatura no sentido horário para configuração de “●●●” (3 pontos). (Não use
configuração de 1 ponto ou 2 pontos para ferro de passar a vapor). Lâmpada de indicador liga-se
indicando o ferro de passar está ligado.
4. Após a lâmpada de indicador desliga-se, o que indica que a temperatura selecionada foi atingida.
5. Gire o botão de controle de vapor para a posição desejada. Vapor será pulverizado e você pode
começar a passar.
6. Durante os intervalos de passar, coloque o ferro em posição vertical.
7. Quando você terminar de passar, puxe a ficha da fonte de alimentação e deixe esfriar. Coloque a
parte superior do ferro de passar para baixo e deixe a água escorrer para fora.
FUNÇÃO DE EXPLOSÃO DE VAPOR
1. Esta função fornece uma quantidade extra de vapor para eliminar rugas teimosas.
2. Encha o tanque de água.
3. Inserir no plugue de alimentação.
4. Defina o controle de temperatura na posição de "MAX", caso contrário, a água pode vazar de base
do ferro se a temperatura é baixa. Lâmpada de indicador iluminará para indicar que o ferro está
ligado.
5. Lâmpada de Indicador desliga quando a temperatura desejada seja atingida.
6. Pressione o botão de Explosões de vapor de uma vez.
7. Pode ser necessário pressionar o botão de Explosões de vapor algumas vezes para iniciar a função.
8. Vapor penetrará na roupa removendo as rugas.
9. Aguarde alguns segundos antes de pressionar o botão de Explosões de vapor novamente quando
existem rugas teimosas.
10. Para a qualidade de vapor ideal, não use a explosão de vapor mais de três vezes depois de a
lâmpada de indicador fecha-se
PORTUGUÊS
Page 21
20
FUNÇÃO DE AUTO-LIMPEZA
1. Esta função remove as escamas e minerais acumuladas na Câmara de vapor. O ferro de passar
permanecerá na melhor condição, se esta função é realizada pelo menos uma vez por mês ou mais
regularmente, dependendo da dureza da água utilizada.
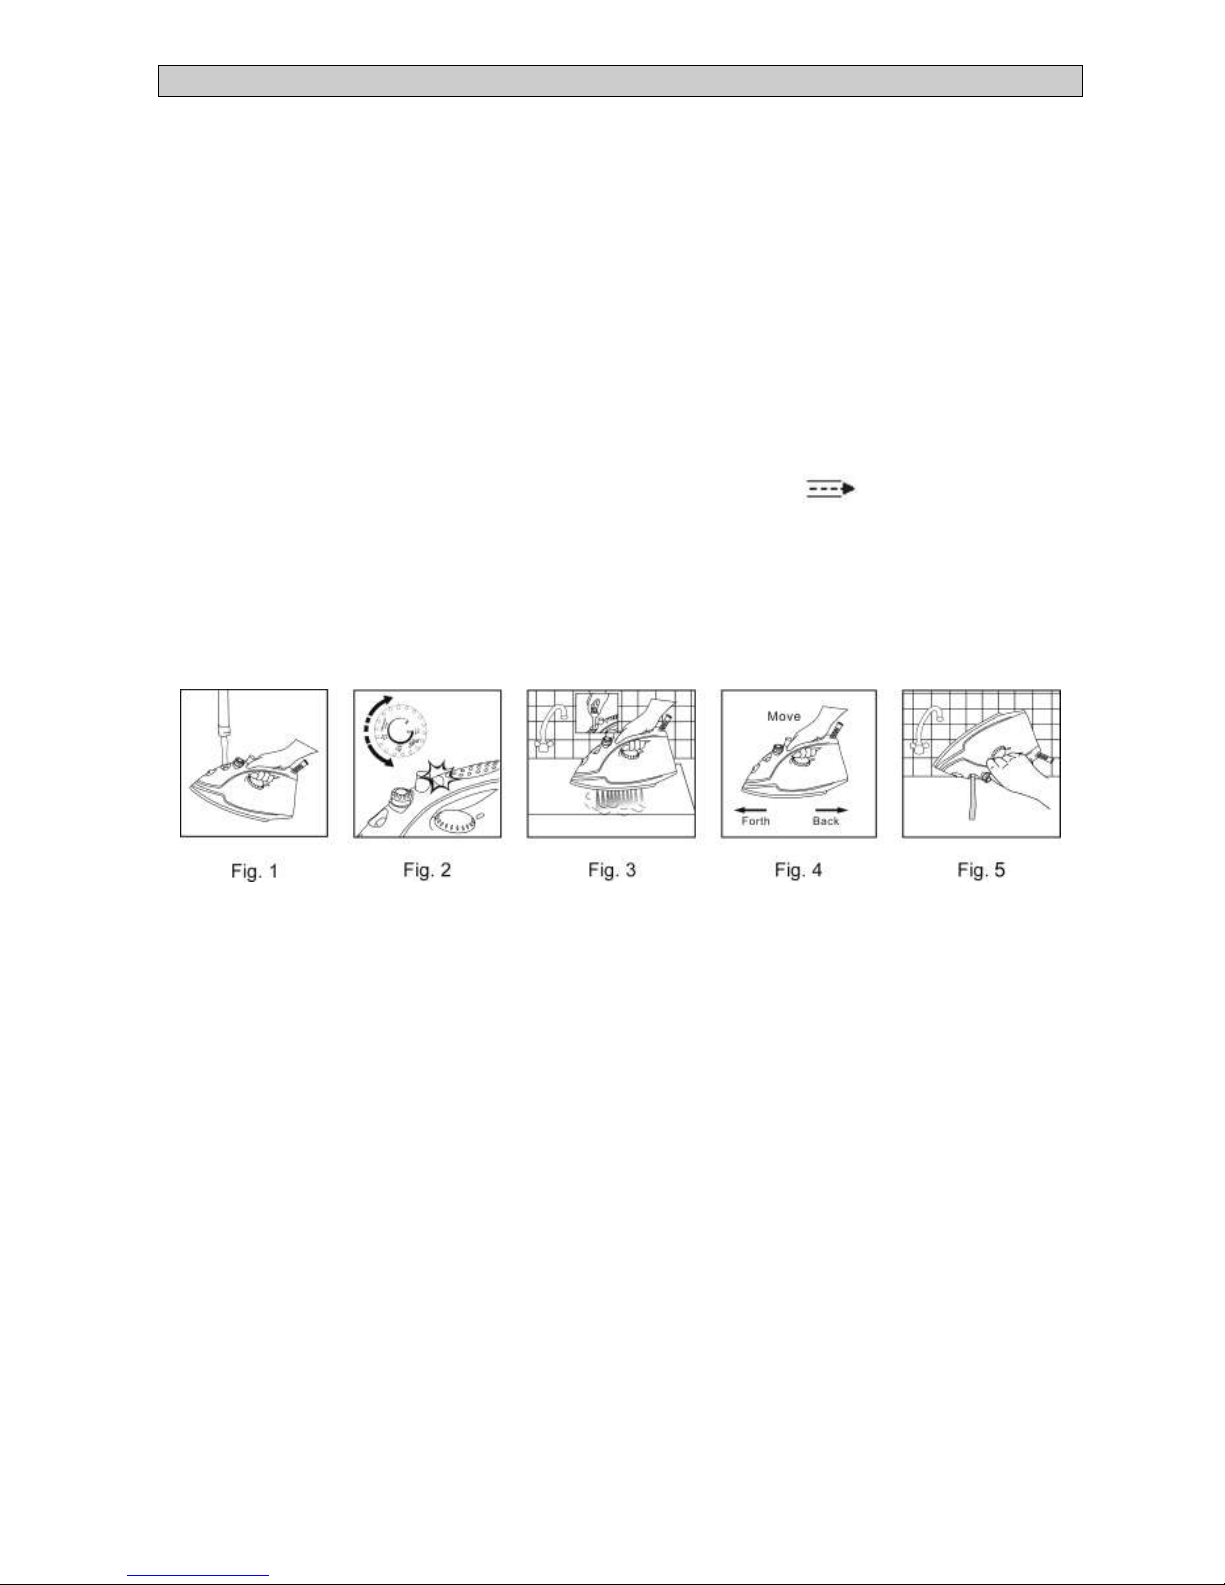
2. Enche o tanque de água até a metade e coloque o ferro na posição vertical. (Fig.1)
3. Inserir no plugue de alimentação.
4. Configurar o controle de temperatura na posição de "MAX", A Lâmpada de indicador iluminará para
indicar que o ferro está ligado.(Fig.2)
5. Lâmpada de Indicador desliga quando a temperatura desejada seja atingida.
6. Desligue o ferro da tomada elétrica.
7. Segure o ferro horizontalmente sobre uma pia.
8. Gire o botão de controle de vapor para posição de auto-limpeza e retire-o. Delicadamente
move o ferro para trás e para frente por um tempo, vapor e água fervente emitirá a partir da orifícios
da base do ferro ,lavando as escalas e minerais depositadas na Câmara de Vapor. (Fig.3 e 4).
9. Quando auto-limpeza está completa, gire o botão de controle de vapor para passar e vire para a
posição de "O". Coloque a parte superior do ferro para baixo e permite que a água escorrer para
fora.
Caução; Mantenha a pele / corpo afastado das superfícies quentes.
CUIDADO E LIMPEZA
1. Gire o controle de temperatura para "0", então desligue o ferro de passar da tomada de parede e
deixe esfriar completamente.
2. Depósitos e outros resíduos na base do ferro podem ser removidos com um pano embebido numa
solução de vinagre / água diluída.
3. Para limpar o exterior do seu ferro, limpe com um pano úmido e macio e deixe secar.
4. Não utilize escovas de polir; abrasivos ou produtos ásperos de limpeza para limpar a base do ferro.
5. Manter a base do ferro lisa, não passe sobre objetos pontiagudos como botões, tachas e zíperes.
ARMAZENAMENTO
1. Gire o botão de controlo de vapor e controle de temperatura para a posição de "0".
2. Desligue o ferro da tomada de parede.
3. Segure a parte superior do ferro para baixo, agite-a gentilmente para remover a água restante no
tanque de água.
4. Coloque o ferro na posição vertical e deixe esfriar completamente.
5. Armazenar sempre o ferro no seu descanso para o calcanhar.
6. Não guarde o ferro com base de ferro virada, ou na embalagem.
PORTUGUÊS
Page 22
1
PORTUGUÊS
TERMO DE GARANTIA
FAVOR ANEXAR AQUI SEU RECIBO/FISCAL DE COMPRA.
EM CASO DE RECLAMAÇÃO DURANTE O PRAZO DA GARANTIA ESTE RECIBO/
FISCAL DE COMPRA DEVE SER APRESENTADO JUNTAMENTE COM ESTA
GARANTIA.
Número do modelo
(Número do lote: )
Nome do produto
Data da compra
Local da compra
1. A parte vendedora do produto (“vendedor”) ao comprador original deste produto
(“comprador”) garante por meio deste que o produto é de boa qualidade e, está em
perfeitas condições de funcionamento e, sem defeitos e adequado para uso doméstico
normal por um período de 1 (um) ano a partir da data da compra (‘período da garantia”)
deste produto.
2. No caso em que o período de garantia não expirou e o produto não é de boa
qualidade, ou em bom estado de funcionamento ou, está com defeito ou não é
adequado para a sua finalidade em uso doméstico normal, o cliente pode, de acordo
com o Paragrafo 3 º abaixo, devolver o produto ao vendedor e ter as seguintes opções
disponíveis:
2.1 Nos primeiros 6 (seis) meses da garantia: para receber um reembolso do
preço efetivamente pago ou a troca do produto para o mesmo produto ou
similar do mesmo valor adquirido;
2.2 Dentro dos segundos 6 (seis) meses da garantia: ter o produto trocado para o
mesmo produto ou similar do mesmo valor comprado.
3. O vendedor não irá substituir o produto ou reembolsar o comprador de acordo com os
termos desta garantia se o produto:
3.1 for modificado contrariando as instruções fornecidas no manual do produto;
3.2 sofrer uso inadequado, abuso ou modificação;
3.3 for defeituoso ou não em condições de funcionamento devido ao desgate
natural
3.4 for danificado devido a negligencia, imprudencia, comportamento malicioso
ou criminoso por parte do comprador.
3.5 for utilizado para fins comerciais.
4. Esta garantia aplica-se somente ao produto adquirido do vendedor, não cobrindo
quaisquer itens agregados ou instalados no produto pelo comprador.
5. Qualquer reclamação nos termos desta garantia deve ser acompanhada da prova
original de compra.
6. Note que o item de troca só irá transportar o saldo do período de garantia a partir da
data de compra original.
Page 23

2
ISIXHOSA
INTSHAYELELO
Enkosi ngokuthenga iAyini yoMphunga yethu i-Ottimo” Steam Iron. Iyunithi nganye yenzelwe
ukuqinisekisa ukhuseleko, ukuthembeka nokusebenziseka lula. Phambi kokuyisebenzisa, nceda
uyifunde ngenyameko le miyalelo kwaye uyilondolozele ukureferensa kwixesha elizayo.
ISILUMKISO ESIBALULEKILEYO
Xa usebenzisa iAyini yoMphunga yakho i-“Ottimo” amanyathelo angundoqo angaphambili kumele
asoloko elandelwe, ukuquka okulandelayo:
Esi sixhobo asenzelwanga ukusetyenziswa ngabantu (ukuquka abantwana) abanobuchule obuncinci
ngokwenyama, ngengqiqo okanye ngengqondo, okanye ukuswela amava nolwazi, ngaphandleni
kokuba bayakhokelwa okanye banikezwe umyalelo ophathelele ekusetyenzisweni kwesixhobo
ngumntu onoxanduva ngokhuseleko lwabo.
Abantwana kumele bakhokelwe ukuqinisekisa ukuba abadlali ngesixhobo.
Soloko uqinisekisa ukuba ivoltheji esetyenzisiweyo iyahambelana nevoltheji eyalathwe kwikhaya
lakho.
Khangela ukuba intambo yombane kunye neplagi rhoqo ukuba akho monakalo. Ukuba intambo
okanye iplagi yonakele, kumele kufakwe entsha ngumenzi okanye umntu oneempepha ukuze
kuphetswe ingozi yombane.
Esi sixhobo senzelwe ukusetyenziswa kwikhaya kuphela. Ukusetyenziselwa ezorhwebo okanye
ezoqoqosho kuya kusenza singasebenzi isiqinisekiso kwaye umboneleli akayi kuba nabutyala
ngomonzakalo okanye umonakalo obangelwe kukusetyenziswa kwesixhobo ngayo nayiphi na
injongo ngaphandle koko senzelwe kona.
Usetyenziso olungachanekanga nokusetyenziswa okungafanelekanga kungonakalisa isixhobo senze
ingozi kumsebenzisi.
Musa ukusisebenzisa isixhobo ukuba siwisiwe okanye sonakele nangayiphi na indlela. Kwimeko
yomonakalo, yithabathe iyunithi uye kuyivavanyisa kwaye/okanye uyilungisise ngearhente yenkonzo
egunyazisiweyo.
Ukunciphisa ubungozi bokukhatywa ngumbane, musa ukutshonisa okanye uveze injini, iplagi okanye
intambo yombane emanzini okanye naziphi ezinye ezingamanzi.
Musa ukutshonisa esi sixhobo emanzini okanye naziphi na ezinye izinto ezingamanzi ezenzelwe
ukucocisa.
Susa iplagi kwisokethi ngokubamba iplagi. Musa ukutsala intambo ukukhupha isixhobo. Soloko
uyikhupha iyunithi kwiplagi xa ingasetyenziswa okanye phambi kokuyicoca okanye xa usongeza
ushenxisa amalungu.
Usetyenziso lwezifakelelo ezongezelelweyo ezingacetyiswanga okanye ezinganikezwanga ngumenzi
kungabangela ukwenzakala, umlilo okanye ukhatywa ngumbane.
Musa ukuyivumela intambo ijinge kwisiphelo setafile okanye sekhawuntala. Qinisekisa ukuba
intambo ayikho kwisikhundla apho ingatsalwa ngengozi.
Musa ukuvumela intambo isondele kumphandle oshushu kwaye musa ukuyibeka kwi okanye
kusondelo kwirhasi eshushu okanye isitovu sombane okanye isitovu esishushu. Nceda uyigcine
kwindawo epholileyo neyomileyo kude nelanga elithe ngqo.
Ungaze uyisebenzise le yunithi kufutshane neebhafu, iishawala, kwezitya zangasese okanye ezinye
izikhongozelo eziqulethe amanzi.
Page 24

3
ISIXHOSA
Ukusetyenziswa kwentambo eyongezelelweyo nesi sixhobo akucetyiswa. Ngoko ke ukuba
kubalulekile usebenzise intambo eyongeziweyo, ukuqinisekisa ukuba intambo ifanele usetyenziso
lombane ukuphepha ukuba shushu ngokugqithisekileyo yentambo yombane, isixhobo okanye
indawo yokuplaga. Musa ukubeka intambo eyongeziweyo kwindawo apho ingatsalwa ngabantwana
okanye izilwanyana okanye zikhubeke kuyo.
Esi sixhobo asikulungelanga ukusetyenziswa ngaphandle. Musa ukusisebenzisela nayiphi na enye
into kunento esenzelwe yona esi sixhobo.
Musa ukuphatha esi sixhobo ngentambo yombane.
Musa ukusishiya singahoywanga esi sixhobo ngexesha lokusetyenziswa. Soloko uyikhupha eplagini
iyunithi xa ingasetyenziswa. Sivumele siphole phambi kokusicoca isixhobo.
Soloko usebenzisa isixhobo kumphezulu othambileyo, olinganayo nozinzileyo. Musa ukubeka
iyunithi kumphezulu oshushu.
Ayina kuphela kwibhodi yokuayina.
Umenzi akalwamkeli uxanduva lwawo nawuphi na umonakalo okanye ukwenzakala okubangelwa
kukusetyenziswa ngokungafanelekanga okanye ngokungalunganga kwesixhobo, okanye ulungiso
olwenziwe ngumsebenzi ongagunyaziswanga.
Kwimeko iingxaki zobuchwepheshe, cima isixhobo kwaye musa ukuzama ukusilungisa ngokwakho.
Buyisela isixhobo kwisibonelelo senkonzo egunyazisiweyo ukuze zivavanywe, silungelelaniswe
okanye silungiswe. Soloko ugxininisa ekusetyenzisweni kwamalungu amatsha. Ukungaphumeleli
ukuthobela izilumkiso ngentla nemiyalelo kwaye kungachaphazela ukusebenza okukhuselekileyo
kwesi sixhobo.
Xa ugqibile ukuayina okanye xa ushiya iayini ingahoywanga:
d. Seta iqhosha lokulawula umphunga kunye noLawulo lweQondo lobushushu luye ku-“0”.
e. Yimise nkqo iayini.
f. Yikhuphe iayini kunxibelelwano lwendawo ephuma umbane eludongeni.
Musa ukuwachukumisa amalungu ashushu entsimbi, amanzi ashushu kwaye angabangela ukutsha.
Lumka ukuba uyayiguqula ijonge ezantsi iayini. Kunokuba khona amanzi ashushu etankini.
Iplagi nentambo akumele zivunyelwe ziyichukumise ipleyiti yesoli eshushu. Yiyeke iphole iayini
phambi kokuba uyithathe.
Musa ukuyishiya iayini ingahoywanga ngelixa inxibelele kwisibonelelo esikhulu.
Iplagi kufuneka ishenxiswe kwindawo ephuma umbane yesokethi phambi kokuba isitya samanzi
sizaliswe ngamanzi.
Imbobo yokuzalisa akufuneki ivulwe ngexesha lokusetyenziswa. Imiyalelo yokuzalisa isitya samanzi
ngokukhuselekileyo iya kunikezwa.
I-ayini kufuneka isetyenziswe kwaye iphunyuliswe kumphezulu ozinzileyo.
Xa ubeka iayini kwisitendi sayo, qiniseka ukuba umphezulu esime kuwo isitendi ubekwe
ngokuzinzileyo.
I-ayini akufuneki isetyenziswe ukuba iwisiwe, ukuba kukho iimpawu ezibonakalayo zomonakalo
okanye ukuba iyavuza.
Page 25
4
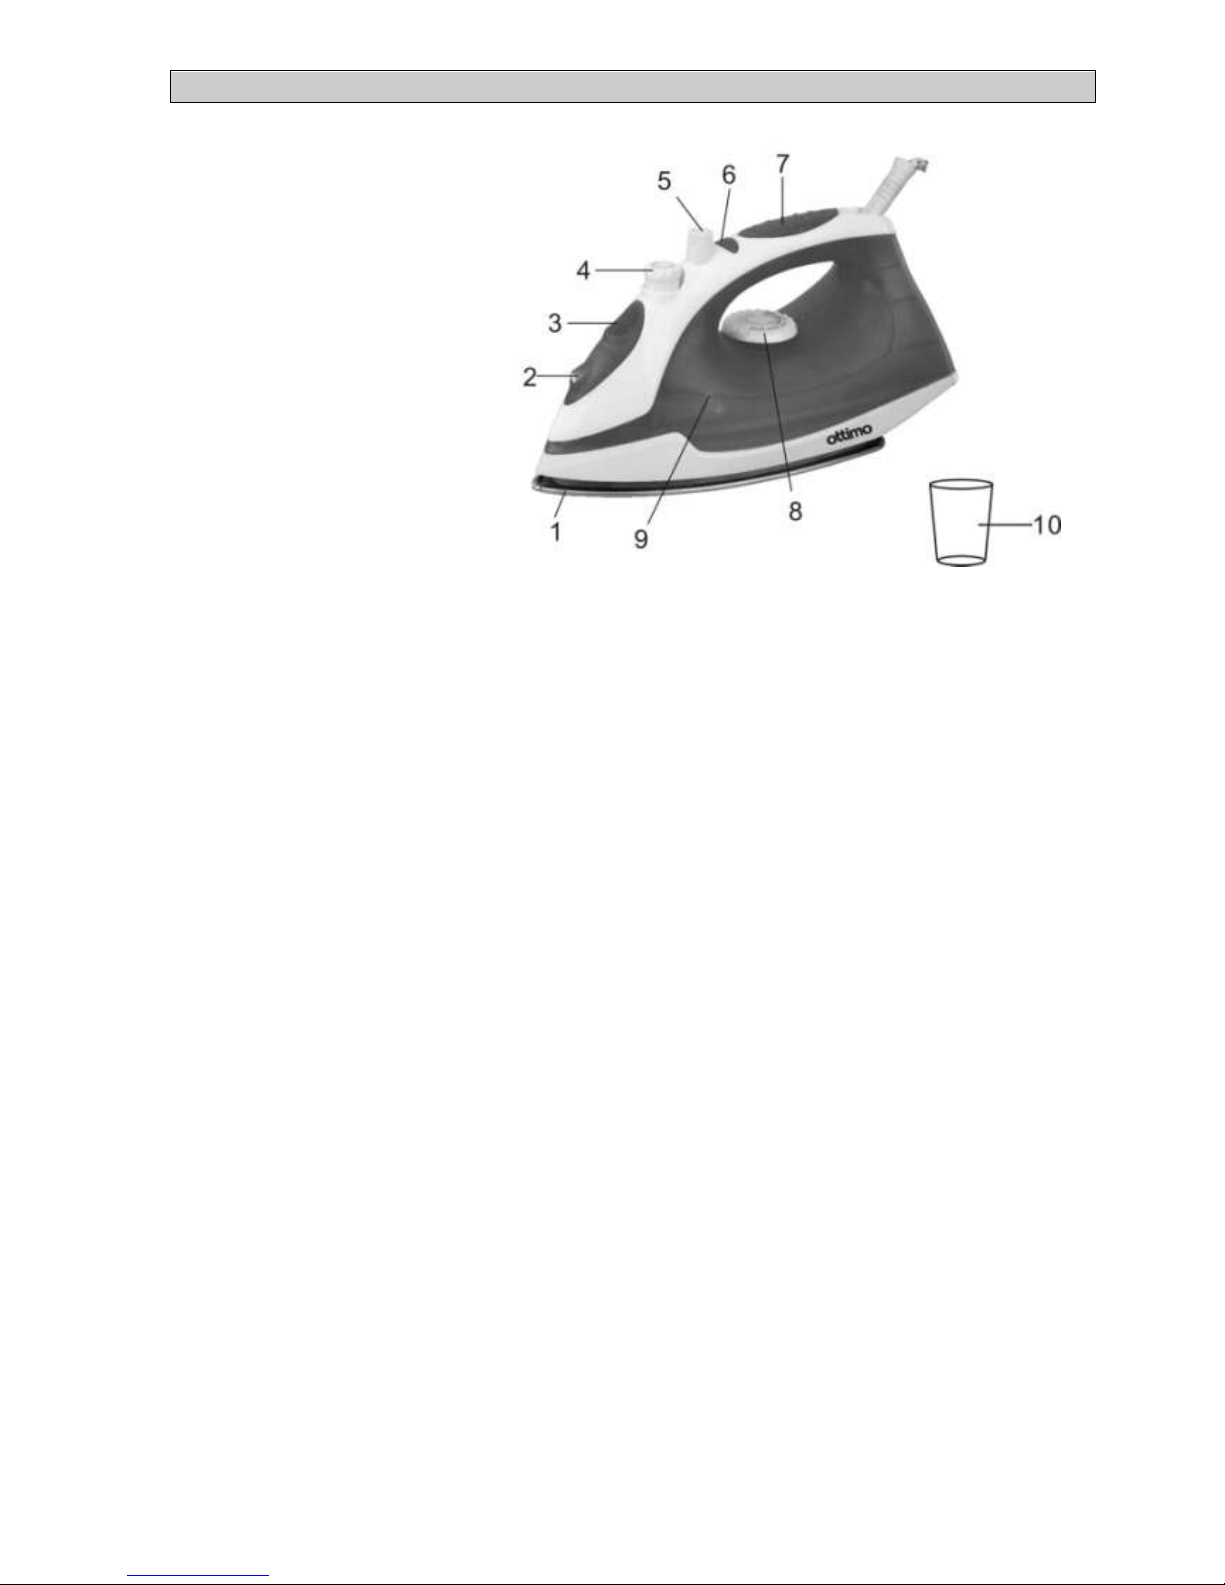
YAZI IAYINI YAKHO
YOMPHUNGA
1. Ipleyiti yesoli ye-stainless steel
2. Umlonyana wokufafaza
3. umngxuma wangaphakathi
wamanzi
4. Iqhosha lokulawula umphunga
5. Iqhosha lokufafaza & ukutsazisa
6. Isibane sesalathisi
7. Umqheba ongatyibilikisiyo
8. Isilawuli seqondo lobushushu
9. Itanki yamanzi
10. Ijagi
INKCUKACHA
Umthamo
:
230 ml (itanki yamanzi kuphela)
Ivolteji
:
AC 230 V/50 Hz
Iwattage
:
1600 W
Ikhodi
:
iplagi yomhlaba eyi-3-pin, (ukunciphisa ukukhatywa ngumbane)
UMSEBENZI
1. Ukuayina ngomphunga.
2. Ukufafaza amanzi, Ukutsaza komphunga.
AMACEBISO PHAMBI KOKUSETYENZISWA OKOKUQALA
1. Amanye amalungu eayini athanjiswe kancinci kwaye ngesizathu soko, iayini inokuqhuma kancinci xa
ilayitiwe okokuqala. Ayiyi kuphinda yenzeke kwakhona emva kokusetyenziswa kambalwa.
2. Shenxisa izisongelo zokukhusela neeleyibheli kwipleyiti yesoli uyicoce ngelaphu elithambileyo
elifumileyo.
3. Xa usebenzisa iayini okokuqala, yivavanye kwisijungqu esidala selaphu ukuqinisekisa ukuba ipleyiti
yesoli netanki yamanzi zicoceke ngokupheleleyo.
4. Linda malunga nemizuzu emithathu phambi kokuba uayine amalaphu anochuku. Ulungelelaniso
lweqondo lobushushu ludinga ixesha elithile ukufikelela kwinqanaba elifunekayo – akukhathaliseki
nokuba liphezulwana okanye lisezantsana.
5. Amalaphu anochuku anjengesilika, iwulu, umxube wesilika nomqhaphu, njl. a-ayineka ngcono
ngelaphu lokuayina ukuthintela iimpawu ezikhanyayo.
6. Jika ulawulo lweqondo lobushushu liye kwisetingi enqwenelekayo ngokulungelelanisa isetingi
ekwidayali ngesalathisi seqondo lobushushu. Isibane sesalathisi siya kujika sibonise ukuba iayini
iyatshisa kwiqondo lobushushu elikhethiweyo. Xa isibane sesalathisi sicimayo iayini ikwiqondo
lobushushu elikhethiweyo kwaye ilungele ukusetyenziswa.
ISIXHOSA
Page 26
5
UKUSETA IQONDO LOBUSHUSHU
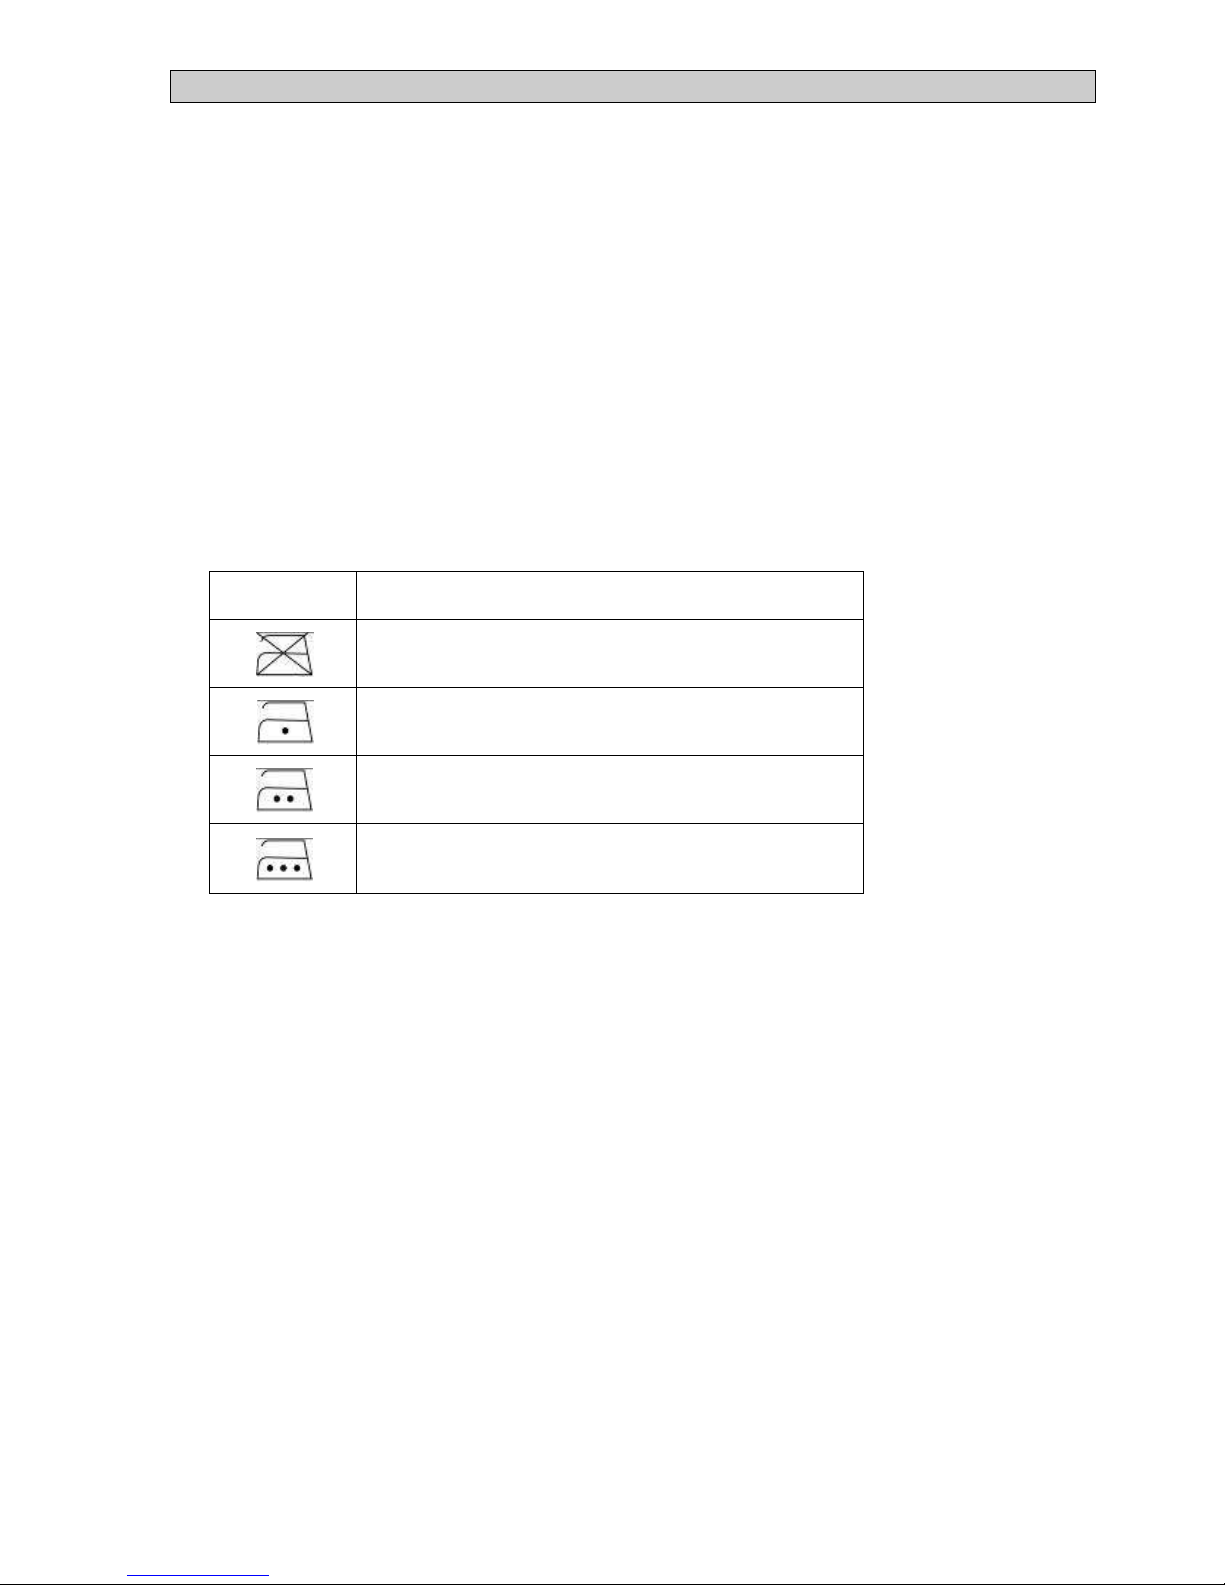
1. Soloko uyikhangela imiyalelo yokuayina isambatho kwileyibheli phambi kokusiayina isambatho.
2. Ukuba imiyalelo yokuayina ayikho, ngoko ke itafile engezantsi ingakunceda.
3. Okokuqala kumele uyisote indawo ekuhlanjelwa kuayinelwe kuyo impahla: iwulu newulu, umqhaphu
nomqhaphu njl. Qala ukuayina izambatho ezifuna elona qondo lobushushu liphantsi uze uqhubeke
kwezo zingaphezulu ngenxa yokuba iayini itshisa ngokukhawuleza kunokuba iphole.
4. Ukuba isambatho siquka iintlobo ezahlukeneyo zeefayibha (umz. umqhaphu ne-polyester) kufuneka
usoloko ukhetha iqondo lobushushu lokuayina kwezo mathiriyeli zinelona qondo lobushushu
liphantsi licetyisiweyo.
5. Isambatho esinewulu emsulwa (iwulu eyi-100%) singa-ayinwa ngesixhobo kwisikhundla somphunga
ngokukhethwa, khetha isikhundla somphunga ophezulu uze usebenzise ilaphu lokuayina elomileyo.
6. Jika ulawulo lweqondo lobushushu liye kwisetingi yeqondo lobushushu elinqwenelwayo.
7. Iqondo lobushushu elinqwenelwayo lifikelelwe ukuba isibane sesalathisi sicimile. Iisibane sesalathisi
siya kulayita futhi sicime amaxesha ngamaxesha, sibonisa ukuba iqondo lobushushu elikhethiweyo
liyagcinwa.
ILEYIBHELI
ISAMBATHO
Musa ukuyiAyina le mpahla
Edityanisiweyo (inayiloni, iakhriliki, i-rayon, i-polyester)
Iwulu, isilika
Umqhaphu, ilineni
INDLELA YOKUZALISA AMANZI
1. Phambi kokuzalisa amanzi, nceda utsale ukukhupha kwiplagi kuqala.
2. Seta iqhosha lokulawula umphunga liye kwisikhundla esingu-“0”.
3. Zalisa amanzi ngesingenisi aye kwinqanaba elingu-“MAX” letanki yamanzi ngokusebenzisa ijagi.
4. Ukuba amanzi akwindawo yakho ngokukodwa anzima, kuyacetyiswa ukuba usebenzise amanzi
abilisiweyo okanye angenazo iiminerali.
5. Musa ukusebenzisa amanzi akhutshwe ikhemikali okanye nayiphi na enye into engamanzi okuzalisa.
6. Emva kokuayina, yikhuphe kwiplagi iayini uyiyeke iphole. Yijike iayini ijonge ezantsi uze uvumele
amanzi aphume.
UKUAYINA OKOMILEYO
1. Yiplage kwisibonelelo sombane.
2. Jika ulawulo lweqondo lobushushu liye kwicala lasekunene; khetha ● (ichokoza eli-1), ●●
(amachokoza ama-2) okanye ●●● (amachokoza ama-3) ngokwecebiso leleyibheli yesambatho.
3. Isibane sesalathisi siya kulayita, ngoko ke beka iayini ngkuthe nkqo kumphezulu othambileyo
nozinzileyo.
4. Xa iqondo lobushushu elinqwenelwayo lifikelelwe; isibane sesalathisi siyacima. I-ayini ikulungele
ukusebenza.
ISIXHOSA
Page 27

6
UMSEBENZI WOKUFAFAZA
1. Lo msebenzi ungasetyenziswa nangaliphi na ixesha kwaye awulichaphazeli iqondo lobushushu
lokuayina.
2. Zalisa itanki yamanzi ngamanzi.
3. Jolisa umlonyana ngakwisambatho.
4. Cinezela iqhosha lokufafaza.
5. Kunoba yimfuneko ukucinezela iqhosha lokufafaza amaxesha amabalwa ukuqalisa lo msebenzi.
UMSEBENZI WOMPHUNGA
1. Zalisa itanki yamanzi ngamanzi.
2. Plaga kwisibonelelo sombane.
3. Jika ulawulo lweqondo lobushushu liye kwicala lasekunene liye kwisetingi engu-“●●●”(amachokoza
ama-3). (Musa ukusebenzisa isetingi yechokoza eli-1 okanye yamachokoza ama-2 ekuayineni
ngomphunga). Isibane sesalathisi siya kulayita ukubonisa ukuba iayini ilayitile.
4. Emva kokuba isibane sesalathisi sicimile ukubonisa ukuba iqondo lobushushu elikhethiweyo
lifikelelwe.
5. Jika iqhosha lokulawula umphunga liye kwisikhundla esifunekayo. Umphunga uya kufafazwa kwaye
ungaqalisa ukuayina.
6. Ngexesha lamakhefu ekuayineni, yimise nkqo iayini.
7. Xa ugqibile ukuayina, yikhuphe kwiplagi iayini kwisibonelelo sombane uyiyeke iphole. Yijike iayini
ijonge ezantsi uze uvumele amanzi aphume.
UMSEBENZI WOKUTSAZA KOMPHUNGA
1. Lo msebenzi unikeza umthamo owongezelelweyo womphunga ukushenxisa okona kushwabana
kunenkani.
2. Zalisa itanki yamanzi ngamanzi.
3. Plaga kwisibonelelo sombane.
4. Seta ulawulo lweqondo lobushushu kwisikhundla esingu-“MAX”, kungenjalo, amanzi aya kuvuza
ukusuka kwipleyiti yesoli ukuba iqondo lobushushu liphantsi. Isibane sesalathisi siya kubaneka
ukubonisa ukuba iayini ilayitile.
5. Isibane sesalathisi siya kucima xa iqondo lobushushu elifunekayo lifikelelwe.
6. Cinezela iqhosha lokuTsaza koMphunga kube kanye.
7. Kunokuba yimfuneko ukucinezela iqhosha lokuTsaza koMphunga amaxesha ambalwa ukuqalisa
umsebenzi.
8. Umphunga uya kugqobhozela kwisambatho ushenxise ukushwabana.
9. Linda imizuzwana embalwa phambi kokucinezela iqhosha lokuTsaza koMphunga ngokunxamnye xa
kukho ukushwabana okunenkani.
10. Ukwenzela umgangatho ophezulu womphunga, musa ukusebenzisa ukuTsaza koMphunga
ngaphezulu kwamaxesha amathathu emva kokuba isibane sesalathisi sicimile.
ISIXHOSA
Page 28
7
UMSEBENZI WOKUZICOCA
1. Lo msebenzi ushenxisa izikali neeminerali ezakheke kwigumbi lomphunga. I-ayini iya kuhlala
ikwimeko entle ukuba lo msebenzi wenzwa kube kanye ngenyanga ubuncinane nangaphezulu
kuxhomekeke ekuqineni kwamanzi asetyenziswayo.
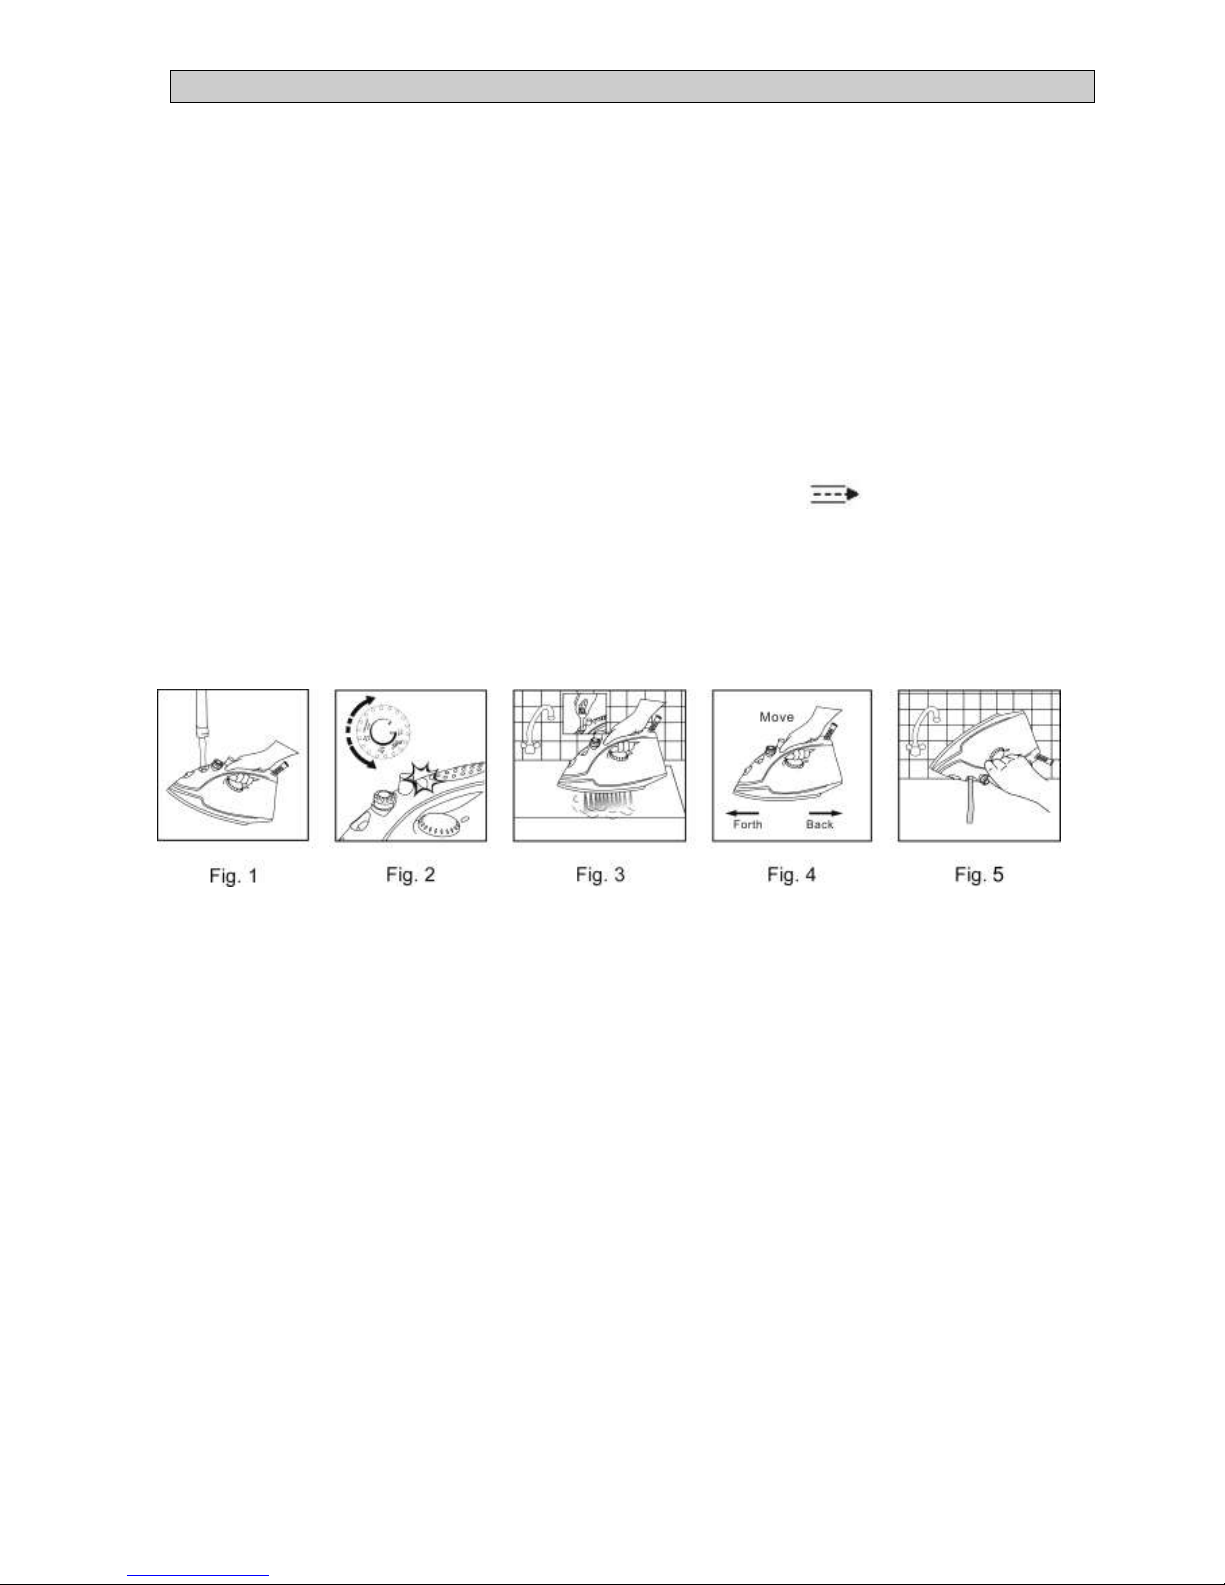
2. Zalisa itanki yamanzi iye ehafini uze uyimise nkqo iayini. (Umfanekiso {Fig.} 1).
3. Plaga kwisibonelelo sombane.
4. Seta ulawulo lweqondo lobushushu kwisikhundla esingu-“MAX”. Isibane sesalathisi siya kubaneka
okulayita ukubonisa ukuba iayini ilayitile.(Umfanekiso.2).
5. Isibane sesalathisi siya kucima xa iqondo lobushushu elifunekayo lifikelelwe.
6. Yikhuphe iayini kwindawo ephuma umbane.
7. Yibambe iayini ngokuthe tyaba phezu kwesinki.
8. Jika iqhosha lokulawula umphunga liye kwisikhundla sokuzicoca uze ulitsale. Ngobunono
iayini yise emva naphambili okwexeshana, umphunga namanzi abilayo aya kuphuma kwimingxuma
yepleyiti yesoli ahlambele kude izikali neeminerali ngokuxhomekeke kwigumbi lomphunga.
(Umfanekiso.3 and 4).
9. Xa ugqibile ukuzicoca, lijike iqhosha lokulawula umphunga kwiayini uze ulijikele kwisikhundla esingu-
“o”. Yijike iAyini ijonge ezantsi uze uvumele amanzi aphume. (Umfanekiso.5).
Isilumkiso: Ufele/umzimba mawube kude lee kwimiphezulu eshushu.
UKUYIKHATHALELA NOKUYICOCA
1. Jika ulawulo lweqondo lobushushu liye ku-“0”, uze uyikhuphe kunxibelelwano iayini kwindawo
ephuma umbane eludongeni uze uyiyeke iphole ngokupheleleyo.
2. Izinto ezishiyekeleyo neentsalela kwipleyit yesoli zingashenxiswa ngelaphu elifakwe kumxube
weviniga/wamanzi.
3. Ukucoca umphandle weayini yakho, yosula ngelaphu elithambileyo nelifumileyo uze uyosule yome.
4. Musa ukuzisebenzisa iiphedi zokuguxa, izikhuhli okanye izicoci ezirhabaxa ukucoca ipleyiti yesoli.
5. Yigcine ipleyiti yesoli ithambile, musa ukuayina ngaphezu kwezinto ezibukhali ezinjengamaqhosha,
izikhonkwane neeziphu.
UGCINO
1. Jika iqhosha lokulawula umphunga nolawulo lweqondo lobushushu liye kwisikhundla esingu-“0”.
2. Yikhuphe iayini kunxibelelwano lwendawo ephuma umbane eludongeni.
3. Yibambe iayini ijonge ezantsi uze ngobunono uyihlukuhle ukukhupha amanzi ashiyekileyo aphume
kwitanki yamanzi.
4. Yimise nkqo iayini uyiyeke iphole ngokupheleleyo.
5. Soloko uyigcina iayini iphumle ngesithende sayo.
6. Musa ukuyigcina iayini ijonge phantsi ngepleyiti yesoli yayo, okanye ikwibhokisi yayo.
ISIXHOSA
Page 29
1
ISIQINISEKISO
NCEDA UFAKELE IRISITHI YAKHO/UBUNGQINA BENTENGO APHA.
KWIMEKO YEBANGO NGAPHANTSI KWESI SIQINISEKISO IRISITHI/UBUNGQINA BENTENGO
OBUKHANKANYWE NGAPHAMBILI MABUVELISWE KUNYE NESI SIQINISEKISO.
Inombolo yemodeli
(Inombolo yeLothi : )
Igama lemveliso
Umhla wentengo
Indawo yentengo
7. Umntu uthengisa imveliso (“umthengisi”) kumthengi wokuqala wale mveliso (“umthengi") apha
uqinisekisa ukuba le mveliso iya kuba yeyomgangatho ophezulu kwaye, ikwimeko entle
yokusebenza, ayinaziphene kwaye iyifanele injongo eyenzelwe yona ngaphantsi kokusetyenziswa
emzini oqhelekileyo, kangangesithuba sexesha lonyaka om-1 (omnye) ukusukela kumhla
wentengiso ("isigaba sexesha lesiqinisekiso") yale mveliso.
8. Kwimeko yokuba isigaba sexesha lesiqinisekiso singekaphelelwa lixesha kwaye nemveliso
ingasekho semgangathweni omhle, okanye kwimeko entle yokusebenza okanye ineziphene okanye
ingasayilungelanga injongo eyenzelwe yona ngaphantsi kokusetyenziswa emzini oqhelekileyo,
umthengi unako, ngokuphantsi komhlathi 3 ngezantsi, ukuyibuyisela kumthengisi imveliso kwaye
kuyafumaneka oku kulandelayo kukhetho lwakhe:
2.3 Zingaphelanga iinyanga zokuqala ezi-6 (ezintandathu) zesiqinisekiso: unokufumana
imbuyekezo yexabiso lokwenene elihlawulweyo
okanye uyitshintshise imveliso ngenye efana nayo yexabiso elifanayo ngentengo;
2.4 Emva kweenyanga ezi-6 (ezintandathu) zokuphela kwesiqinisekiso: tshintshisa imveliso
imveliso ngenye efana nayo yexabiso elifanayo ngentengo.
9. Umthengisi akayi kuyitshintshisa imveliso okanye amnikeze imbuyekezo umthengi
ngokwemiqathango yesi siqinisekiso ukuba imveliso:
3.1 itshintshwe ngokuchaseneyo nemiyalelo enikezwe kwimanyuwali yemveliso;
3.2 isetyenziswe kakubi, ihlukunyeziwe okanye ibhucabhuciwe;
3.3 inesiphene okanye ayikho kwimeko yokusebenza ngenxa yokudleka okuqhelekileyo;
3.4 yonakele ngenxa yokungahoyi, ukungakhathali okukhulu komthengi, indlela yokuziphatha
ngolunya
okanye indlela yokuziphatha yolwaphulo-mthetho;
3.5 isetyenziselwe ukusebenzela ezorhwebo.
10. Esi siqinisekiso sisebenza kuphela kwimveliso ethengiswe kumthengisi ingasiyiyo nayiphi na
efakelwe ngenkcitho okanye efakelwe kwimveliso ngumthengi.
11. Naliphi na ibango kwimiqathango yesi siqinisekiso kufuneka sixhaswe bubungqina bokuqala
nentengo.
12. Qaphela ukuba into etshintshisiweyo iya kuthwala intsalela yesigaba sexesha lesiqinisekiso
njengaleyo yomhla wokuqala wentengo.
ISIXHOSA
Page 30

2
ISIZULU
ISINGENISO
Siyabonga ngokuthenga i-ayina yethu lesitimu yakwa-ottimo. Iyunithi ngayinye yakhiwe ngendlela
yokuqinisekisa ukuphepha, ukwethenjwa, nokusebenziseka kalula. Ngaphambi kokuthi uyisebenzise,
sicela ufundisise lemiyalelo bese uyayigcina ngokuphepha ukuze ubuye ubheke kuyo esikhathini esizayo.
OKUBALULEKILE UKUZE UYIVIKELE
Uma usebenzisa i-ayina yesitimuyakwa-ottimo, kumele ulandele imiyalelo yokuphepha, kubandakanya
lokhu okulandelayo:
Lento esebenza ngogesi ayihloselwe ukuthi isetshenziswe abantu (kubandakanya izingane)
abanemizimba, izinzwa noma imiqondo engasebenzi ngokuphelele, noma abangenalo ulwazi
mayelana nokusetshenziswa kwalo mkhiqizo, ngaphandle uma kukhona obaqaphile noma
beyinikeziwe imiyalelo umuntu okungumsebenzi wakhe mayelana nokusetshenziswa kwento kagesi
ukuze baphephe.
Izingane kumele kube khona oziqaphayo ukuze kuqinisekwe ukuthi azidlali ngento kagesi.
Njalo qinisekisa ukuthi amandla kagesi abhalwe kulebuli yesilinganiso ayahambisana nalawo
asekhaya lakho.
Jwayela ukubheka intambo kagesi kanye namapulaki ukuthi akulimele yini. Uma intambo noma
ipulaki ilimele, kumele umkhiqizi afake enye noma umuntu ongungoti kulokhu ukuze ugweme
ubungozi bukagesi.
Lento esebenza ngogesi ihloselwe ukusetshenziswa ekhaya kuphela. Ukuwusebenzisela ifemu
noma ukuhweba kuzoqeda iwaranti, kanti nomhlinzeki angeke abe necala uma kuba nokulimala
komuntu noma ukulimala okudalwe ukusebenzisa uhhavini ngezinye izinhloso ngaphandle
kwehloselwe khona.
Ukuyisebenzisa ngendlela okungeyiyo noma ukuyisebenzisela okungekhona kungayilimaza futhi
kulimaze nalowo oyisebenzisayo.
Ungayisebenzisi uma ike yawa noma yalimala ngandlela thize. Uma ilimele, hambisa iyunithi leyo
iyohlolwa bese/noma ilungiswe yi-ejenti yosizo egunyaziwe.
Ukunciphisa ubungozi bokushaywa ugesi, ungayifaki emanzini noma nakuliphi uketshezi noma
uyibeke obala imotho, ipulaki noma intambo kagesi.
Uma uyihlanza, ungayifaki emanzini noma nakuyiphi into ewuketshezi.
Susa ipulaki kusokhethi ngokuthi uyibambe ipulaki. Ungayidonsi intambo uma ukhipha into kagesi
lapho exhunywe khona. Njalo ikhiphe eplakini uma ingasebenzi, ngaphambi kokuyihlanza noma
uma kukhona izingxenye ozifakayo noma ozikhiphayo.
Ukusetshenziswa kwezinto zokwengeza ezinganconyiwe noma ezingahlinzekwa ngumhlinzeki
zingadala ukulimala, umlilo noma ukushaywa ugesi.
Ungayiyeki intambo ilenge ekugcineni kwetafula noma kwekhawunta. Qinisekisa ukuthi intambo
ayikho endaweni lapho ingadonseka khona ngephutha.
Ungayivumeli inatmbo ithinte indawo eshisayo futhi ungayibeki phezulu noma eduze kwegesi
eshisayo noma isitofu sikagesi noma kuhhavini oshisisiwe. Sicela uyigcine endaweni epholile
neyomile engekho elangeni.
Ungalokothi uyisebenzisele eduze kukabhavu wokugeza, ishawa, usinki, noma ezinye iziqukathi
zamanzi.
Page 31

3
ISIZULU
Ukusetshenziswa kwentambo yokunweba akuncomeki kulento. Kodwa-ke, uma kunesidingo sokuthi
usebenzise intambo yokunweba, qinisekisa ukuthi intambo iwalungele amandla asetshenziswa
yileyonto kagesi ukugwema ukuthi ingashisi kakhulu intambo yokunweba, into kagesi noma indawo
yepulaki. Ungayibeki intambo yokunweba endaweni lapho engadonswa khona izingane noma
izilwane noma ibaqhuzule.
Lento kagesi ayikulungele ukusetshenziswa ngaphandle. Ungayisebenziseli okunye lento
ngaphandle kwalokhu ehloselwe ukusetshenziselwa khona.
Ungayibambi into kagesi ngentambo kagesi.
Ungayishiyi kungenamuntu ngenkathi uyisebenzisa. Njalo ikhiphe iyunithi eplakini uma
ungasisebenzisi. Iyeke iphole ngaphambi kokuthi uyihlanze.
Njalo sisebenzisele endaweni ebushelelezi, eqondile enganyakazi. Ungasibeki endaweni eshisayo.
Ayinela phezu kwebhodi loku-ayinela kuphela.
Umkhiqizi angeke abe necala lokulimala noma ukulinyazwa okubangelwe ukusetshenziswa
ngendlela engalungile noma engeyiyo yalento kagesi, noma ukulungiswa owenziwe umuntu
ongagunyaziwe ukwenza lokho.
Uma kwenzeka kube nezinkinga zobuchwepheshe, cima ungazami ukuwulungisa ngokwakho.
Phindisela into kagesi endaweni egunyaziwe ezoyilungisa ukuze bayihlole, bayilungise noma
bayikhande. Njalo gcizelela ukusebenzisa izingxenye zokuqala. Ukuhluleka ukuthobela lesi
sixwayiso nemiyalelo ebalulwe ngenhla kungaphazamisa ukusebenza okuphephile kukahhavini
omncane.
Uma usuqedile uku-ayina noma uma ushiya i-ayina yodwa:
g. Beka ikinobho lokulawula isitimu kanye nelokulawula izinga lokushisa ku 0.
h. Beka i-ayina ibheke phezulu.
i. Khipha i-ayina eplakini.
Ungazithinti izindawo eziwuthayela ezishisayo, amanzi ashisayo noma isitimu. Lezi zingxenye
ziyashisa kanti zingabangela ukusha. Qaphela uma ubhekisa i-ayina phansi. Kungase kube namanzi
ashisayo ethangini lamanzi.
Iplaki nentambo akumele kuthinte ipuleti le-ayina elishisayo. Yeka i-ayina iphole ngaphambi
kokuyibeka.
Akumele i-ayina isale yodwa ngenkathi isaxhunyiwe.
Kumele kususwe iplaki kugesi ngaphambi kokuthi uthele amanzi ethangini lamanzi.
Akumele ivuleke indawo yokufaka amanzi ngenkathi usebenzisa i-ayina. Uzoyihlinzekwa imiyalelo
yokugcwalisa amanzi ngendlela ephephile.
I-ayina kumele isetshenziselwe futhi ibekwe phezu kwendawo eqondile.
Uma ubeka i-ayina ngesinqe sayo, qinisekisa ukuthi indawo obeka kuyo ayinyakazi.
Akumele isetshenziswe i-ayina uma ike yawa, uma kukhona izimpawu ezibonakalayo zokulimala
noma uma ivuza.
Page 32
4
YAZI I-AYINA YAKHO
ENESITIMU
1. Inepuleti eliyinsimbi engagqwali
2. Umlomo wokufutha
3. Isembozo sendawo yokufaka
amanzi
4. Inebhathini lokulawula isitimu
5. Ikinobho lokufutha ngamanzi
nelokusebenzisa isitimu esiphuma
ngamandla/ngokushesha
6. Ilambu lokukhombisa izinga
lokushisa
7. Inesibambo esingasheleleli
8. Iyakwazi ukulawula izinga
lokushisa
9. Inethangi lamanzi
10. Inojeke
UKUCACISWA
Umthamo
:
230 ml(ithangi lamanzi kuphela)
Amandla
kagesi
:
AC 230 V/50 Hz
Amawathi
:
1600 W
Intambo
:
iplaki enophini ama-3 (inciphisa ubungcuphe bokushaywa ugesi)
IMISEBENZI
1. I-ayina ngesitimu.
2. Ukufutha amanzi nesitimu esiphuma ngamandla/ngokushesha.
IZINCOMO NGAPHAMBI KOKUYISEBENZISA
1. Ezinye zezingxenye ze-ayina zifakwe owoyeli kancane kungabangela ukuthi i-ayina iphume intuthu
kancane uma ikhanyiswa okokuqala. Lokhu kuzokwenzeka izikhathi ezimbalwa uyisebenzisa.
2. Susa lokhu embozwe ngakho okuyivikelayo kanye namalebuli epuletini bese uyayihlanza
ngendwangu ethambile, eswakeme.
3. Uma uqala ukusebenzisa i-ayina, ihlole endwangini endala kuqala ukuze uqinisekise ukuthi ipuleti
kanye nethangi lamanzi kuhlanzeke ngokwanele.
4. Linda imizuzu emithathu ngaphambi koku-ayina izinto ezinendwangu ezwelayo. Izinga lokushisa
lidinga isikhashana ukuze lizilungise libe sezingeni olifunayo, kungaba eliphezulu noma eliphansi.
5. Izindwangu ezinobucayi ezifana nosilika, iwuli, nezinithiwe, njll. kumele zi-ayinwe kusetshenziswe
indwangu yoku-ayinela ukuvikela ukuthi zingabi nomaka ocwebezelayo.
6. Phendula izilawuli zezinga lokushisa uzibeke lapho ufuna khona ngokuthi uqondanise nenkomba
yezinga lokushisa. Ilambu eliyinkomba lizokhanya uma i-ayina ishisa ezingeni elikhethiwe. Uma
ilambu eliyinkomba licisha i-ayina isuke isezingeni lokushisa elikhethiwe futhi isikulungele
ukusebenza.
ISIZULU
Page 33
5
UKUSETHA IZINGA LOKUSHISA
1. Njalo bheka ukuthi ithini ilebuli yezimphahla emiyalelweni yoku-ayina ngaphambi kokuthi uyi-ayine
impahla.
2. Uma ungenayo imiyalelo yoku-ayina, ithebuli elingezansi lingakusiza.
3. Hlunga izimpahla ngaphambi kokuqala uku-ayina: iwuli ibe newuli, ukotini nokotini njll. Qala ngoku-
ayina izingubo ezidinga izinga eliphansi lokushisa bese uyaqhubeka uye kulezi ezidinga izinga
eliphezulu ngoba kuthatha isikhathi eside ukuthi i-ayina iphole kunokuba ishise.
4. Uma impahla inezindwangu ezihlukene (isib. ukotini nepholiyesta) kumele njalo ukhethe izinga
lokushisa kwe-ayina lempahla edinga ukushisa okuncane.
5. Izingubo zewuli kuphela (100% iwuli) kumele zi-ayinwe nge-ayina esitimayo. Khetha isitimu
esiphezulu bese usebenzisa indwangu eyomile yoku-ayinela.
6. Phendula isilawuli sezinga lokushisa usibeke ezingeni lokushisa olifunayo.
7. Uma ilambu eliyinkomba selicishile kusho ukuthi izinga lokushisa selifinyelele kuleli olifunayo.
Ilambu eliyinkomba lizolokhu likhanya libuye licishe, likhombisa ukuthi izinga lokushisa olikhethile
isaligcinile.
ILEBULI
INDWANGU
Ungayi-ayini lempahla
Okunekhemikhali ehlukile (inayiloni, i-akhrelikhi, i-rayon, ipholiyesta)
Iwuli, usilika
Ukotini, ilineni
ULIGCWALISA KANJANI ITHANGI LAMANZI
1. Khipha i-ayina eplakini ngaphambi kokuyifaka amanzi.
2. Beka isilawuli sesitimu ku 0.
3. Faka amanzi ngembobo yokufaka amanzi afike ku MAX ethangini lamanzi usebenzise ujeke.
4. Uma amanzi asendaweni yakho eqinile, kunconywa ukuthi usebenzise amanzi ahlanziwe noma
akhishwe amaminerali.
5. Ungasebenzisi amanzi anamakhemikhali noma olunye uketshezi ukugwalisa ithangi lamanzi.
6. Khipha i-ayina eplakini emva kokuqeda uku-ayina bese uyayilinda iphole. Phendula i-ayina ibheke
phansi ukuze ikhiphe amanzi.
UKU-AYINA OKOMILE
1. Xhuma kugesi.
2. Phendula isilawuli sezinga lokushisa sihambe njengewashi, ukhethe ● (1 ichashaza), ●● (2
amachashaza) or ●●● (3 amachashaza) ngokwezinga lokushisa olifunayo elibhalwe kulebuli
yempahla.
3. Uma ilambu eliyinkomba likhanya, beka i-ayina endaweni eshelelayo nenganyakazi.
4. Uma isifinyelele ezingeni lokushisa olifunayo, ilambu eliyinkomba lizocisha i-ayina izobe isilungele
ukusebenza.
ISIZULU
Page 34

6
UKUSEBENZA KOKUCHELA
1. Lokhu kungasebenza noma ingasiphi isikhathi futhi akunamthelela ezingeni lokushisa kwe-ayina.
2. Gcwalisa ithangi ngamanzi.
3. Bhekisa imbobo yokuchela ngasempahleni.
4. Cindezela ikinobho lokuchela.
5. Kungase kudingeke ukuthi ulicindezele izikhashana ezimbalwa leli kinobho ukuze lisebenze.
UKUSEBENZA KWESITIMU
1. Gcwalisa ithangi ngamanzi.
2. Xhuma i-ayina kugesi.
3. Phendula isilawuli sezinga lokushisa sihambe njengewashi sibe ku ●●● (3-amachashaza).
(Ungasebenzisi ichashaza eli-1 noma amachashaza ama-2 uma ufuna uku-ayina ngesitimu.) Ilambu
eliyinkomba lizokhanya likhombise ukuthi i-ayina iyakhanya.
4. Uma ilambu eliyinkomba licisha, kusho ukuthi izinga lokushisa elikhethiwe isifinyelele kulo.
5. Phendula ikinobho lokulawula isitimu ulibeke lapho ufuna khona. Kuzophuma isitimu bese uyaqala
uya-ayina.
6. Misa i-ayina iqonde uma usaphumula ngenkathi u-ayina.
7. Uma usuqedile uku-ayina, khipha iplaki kugesi bese uyayiyeka iphole. Iphendule uyibhekise phansi
ukuze kuphume amanzi.
UKUSEBENZA KWESITIMU ESIPHUMA NGAMANDLA/NGOKUSHESHA
1. Lokhu kusebenza ukukunika inani lesitimu osidingayo ukususa ukushwabana okunenkani.
2. Gcwalisa ithangi ngamanzi.
3. Xhuma i-ayina kugesi.
4. Beka isilawuli sokushisa ku MAX ukuvimbela ukuvuza kwamanzi epuletini uma izinga lokushisa
liphansi. Ilambu eliyinkomba lizokhanya ukukhombisa ukuthi i-ayinaiyakhanya.
5. Ilambu eliyinkomba liyacima uma izinga lokushisa elifunekayo selifinyelele.
6. Cindezela ikinobho lesitimu esinamandla/ esisheshayo kanye.
7. Kungase kudingeke ukuthi uyicofe kaningi ikinobho ukuze iqale ukusebenza.
8. Isitimu sizongena endwangwini sisuse ukushwabana.
9. Linda imizuzwana embalwa ngaphambi kokuphinda ukucofa ibhathini lesitimu esiphuma
ngamandla/ngokushesha ukuze ususe ukushwabana okunenkani.
10. Ukuze isitimu sisebenze kahle, ungayisebenzisi ikinobho lesitimu esiphuma
ngamandla/ngokushesha kuze kube kathathu emva kokuthi ilambu eliyinkomba licimile.
ISIZULU
Page 35
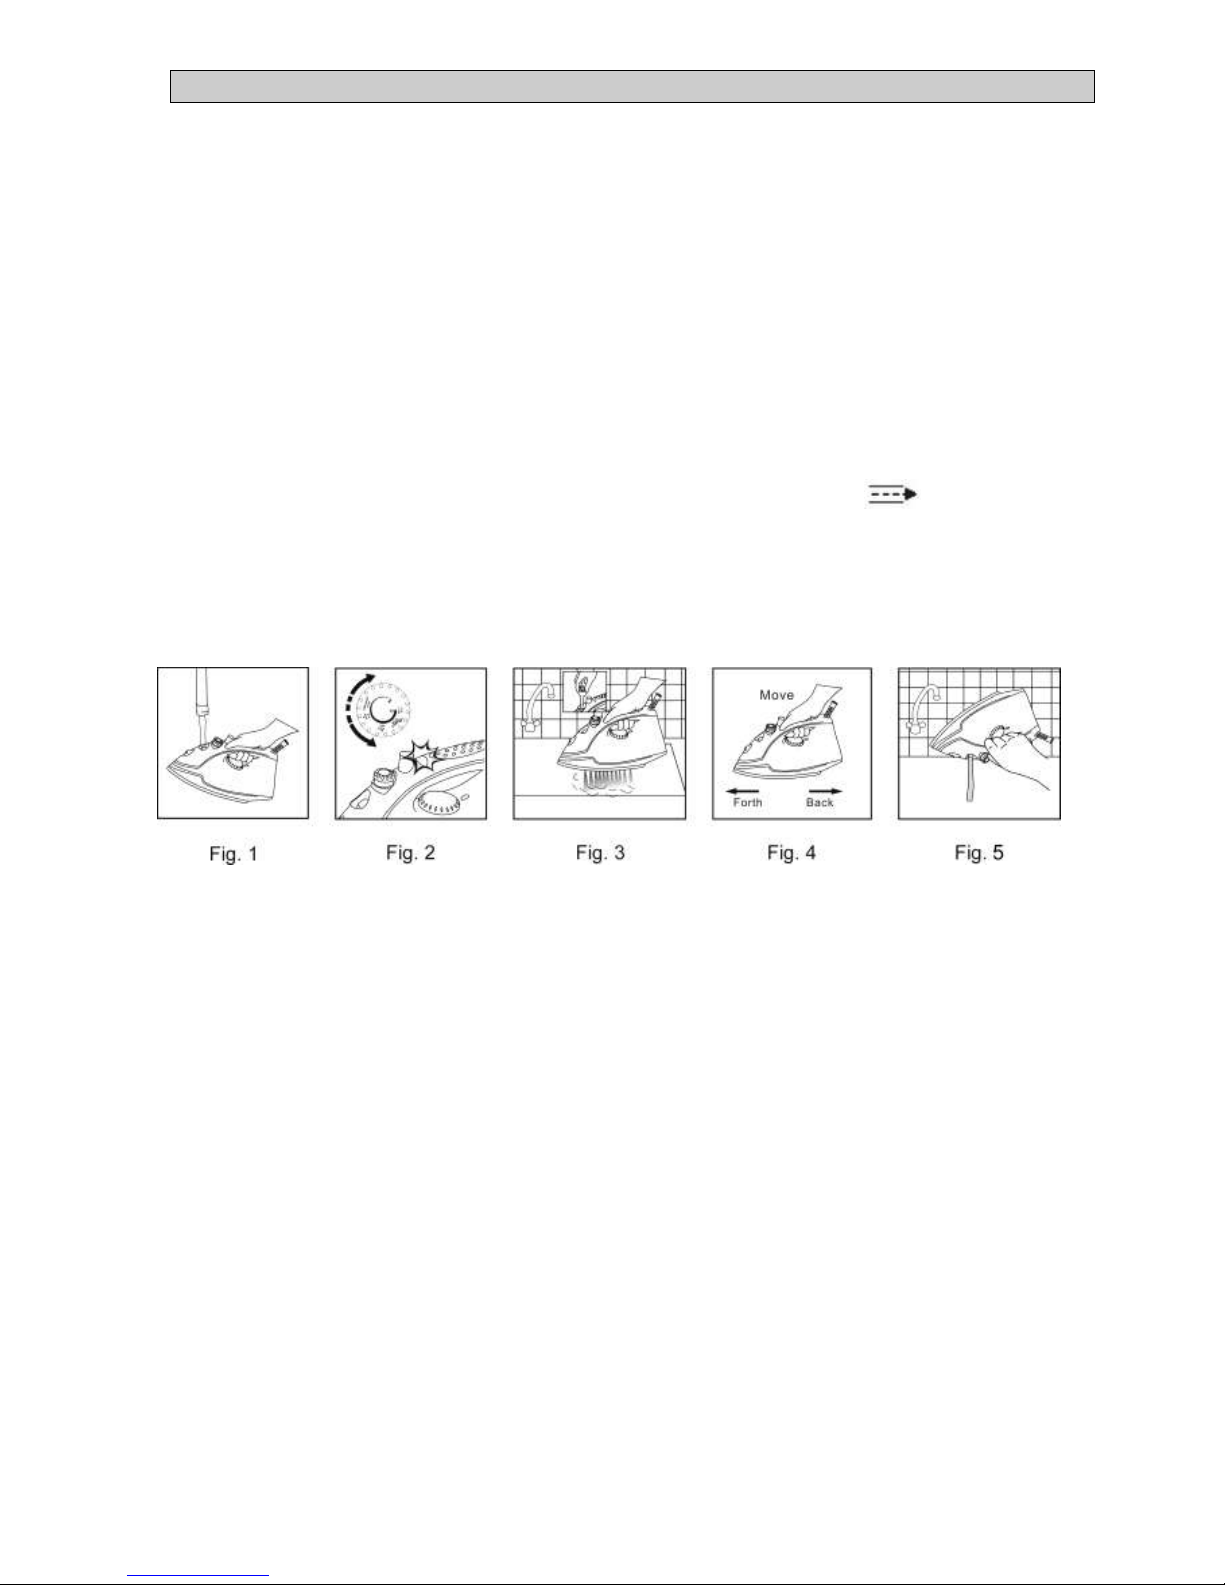
7
UKUSEBENZA KOKUZIHLANZA
1. Lokhu kususa ukungcola okwakhela ezimbobeni zesitimu. I-ayina izohlala isesimweni esihle uma
lokhu kwenziwa noma kanye ngenyanga noma njalo kuye ngokuthi amanzi asetshenziswayo anzima
kangakanani.
2. Gcwalisa ithangi lamanzi libe uhhafu bese umisa i-ayina ibheke phezulu (Isithombe 1).
3. Xhuma i-ayina kugesi.
4. Beka isilawuli sezinga lokushisa kuMAX. Ilambu eliyinkomba lizokhanya ukukhombisa ukuthi i-ayina
ikhanyisiwe (Isithombe 2).
5. Ilambu eliyinkomba lizocisha uma isifinyelele ezingeni elikhethiwe lokushisa .
6. Khipha i-ayina kugesi.
7. Bamba i-ayina ibheke phezulu phezu kukasinki.
8. Phendula ikinobho lokulawula isitimu ulibeke endaweni yokuzihlanza bese uyayikhipha.
Hambisa i-ayina iye emuva naphambili ngenkathi kuphuma isitimu namanzi abilayo ezimbobeni
zepuleti, lisusa ukungcola okwakhela ezimbobeni zesitimu (Isithombe 3 no-4).
9. Uma usuqedile ukuthi izihlanze, phendula isilawuli sesitimu sibe ku 0. Phendula i-ayina ibheke
phansi ukhiphe amanzi (Isithombe 5).
Qaphela:Isikhumba/umzimba wakho mawube kude nezindawo ezishisayo.
UKUNAKEKELA NOKUSIHLANZA
1. Phendula isilawuli sezinga lokushisa sibe ku 0, khipha i-ayina kugesi bese uyayiyeka iphole.
2. Ukungcola nokunye ukujuza okusepuletini le-ayina kungasuswa ngendwangu ecwiliswe emanzini
anoviniga/namanzi.
3. Ukuhlanza ingaphandle le-ayina yakho, sula ngendwangu eswakeme bese uyayomisa.
4. Ungasebenzisi izinto ezihayayo, ezilimazayo nezinzima zokuhlanza uma uhlanza ipuleti le-ayina.
5. Gcina ipuleti le-ayina libushelelezi, unga-ayineli phezu kwezinto ezicijile ezifana nezikinobho,
imihlobiso, kanye noziphu.
UKUBEKA
1. Phendula isilawuli sesitimu nesezinga lokushisa sibe ku 0.
2. Khipha i-ayina eplakini.
3. Bamba i-ayina ibheke phansi uyinyakazise kancane ukuze kuphume amanzi asele ethangini
lamanzi.
4. Beka i-ayina ibheke phezuli bese uyayiyeka iphole.
5. Njalo beka i-ayina ngesithende sayo.
6. Ungayibeki i-ayina ihlale ngepuleti phansi noma uyibeke ngebhokisi.
ISIZULU
Page 36
IWARANTI
SICELA UNAMATHISELE ISILIPHU/UBUFAKAZI BOKUTHENGA LAPHA.
UMA KWENZEKA UFAKA ISICELO SOKUKHOKHELWA NGAPHANSI KWEWARANTI KUZOFUNEKA
UVEZE ISILIPHU/UBUFAKAZI BUHAMBISANE NEWARANTI.
Inombolo yohlobo
(inombolo ye-lot: )
Igama lomkhiqizo
Usuku lokuthenga
Indawo othenge
kuyo
1. Umuntu odayisa umkhiqizo ("umthengisi") kumuntu wokuqala lomkhiqizo ("ikhasimende") unika
iwaranti yokuthi lo mkhiqizo uzoba seqophelweni elihle futhi, uzobe usebenza kahle, ungenawo
amaphutha futhi ukufanele lokhu ohloselwe khona ngaphansi kokusetshenziswa okujwayelekile
kwasendlini, isikhathi esingunyaka o-1 (owodwa) kusukela ngosuku othengwe ngalo ("isikhathi
sewaranti") salo mkhiqizo.
2. Uma kwenzeka ukuthi umkhiqizo awukho ezingeni elifanele noma awusebenzi ngendlela efanele,
unephutha noma ungakulungele lokhu ohloselwe khona uma usetshenziswa endlini singakapheli
isikhathi sewaranti, ikhasimende, ngemibandela esesigabeni 3 ngezansi, lingawubuyisela umkhiqizo
kumthengisi ngalemigomo:
2.5 Ezinyangeni zokuqala eziyi-6 (isithupha) zewaranti: ukuze ubuyiselwe inani lemali
owathenga ngayo
noma ukushintsha umkhiqizo ngomunye ofana nawo noma ocishe ufane nawo ngenani
elifana naleli owathenga ngalo;
2.6 Emva kwezinyanga ezi-6 (isithupha) iphelile iwaranti: ungawushintsha umkhiqizo
uthole ofanayo noma ocishe ufane nawo wenani elifana naleli owalikhokha.
3. Umthengisi angeke awubuyisele umkhiqizo noma abuyisele ikhasimende imali ngokwewaranti uma
umkhiqizo:
3.1 usishintshiwe ngokuphambanayo nemiyalelo ehlinzekwe ebhukwini lomkhiqizo;
3.2 usetshenziswe ngendlela engeyona, ihlukunyeziwe noma uthintiwe;
3.3 unephutha noma ungasasebenzi ngendlela efanele ngenxa yokulimala nokuguga
okujwayelekile;
3.4 ulimele ngenxa yobudedengu, ukunganaki, nokulimazwa yikhasimende
indlela yokuziphatha noma indlela yobugebengu;
3.5 ususetshenziselwe ukuhweba noma usebenze efemini.
4. Le waranti isebenza kuphela uma umkhiqizo uthengwe kumthengisi futhi kungekho lutho okufakiwe
emkhiqizweni kufakwa yikhasimende.
5. Noma yisiphi isicelo sokukhokhelwa ngaphansi kwewaranti kumele sihambisane nobufakazi
bokuqala bokuthenga.
6. Qaphela ukuthi into eshintshwayo izobalelwa isikhathi sewaranti ukusukela ngosuku eyathengwa
ngalo.
ISIZULU
 Loading...