

Page 1
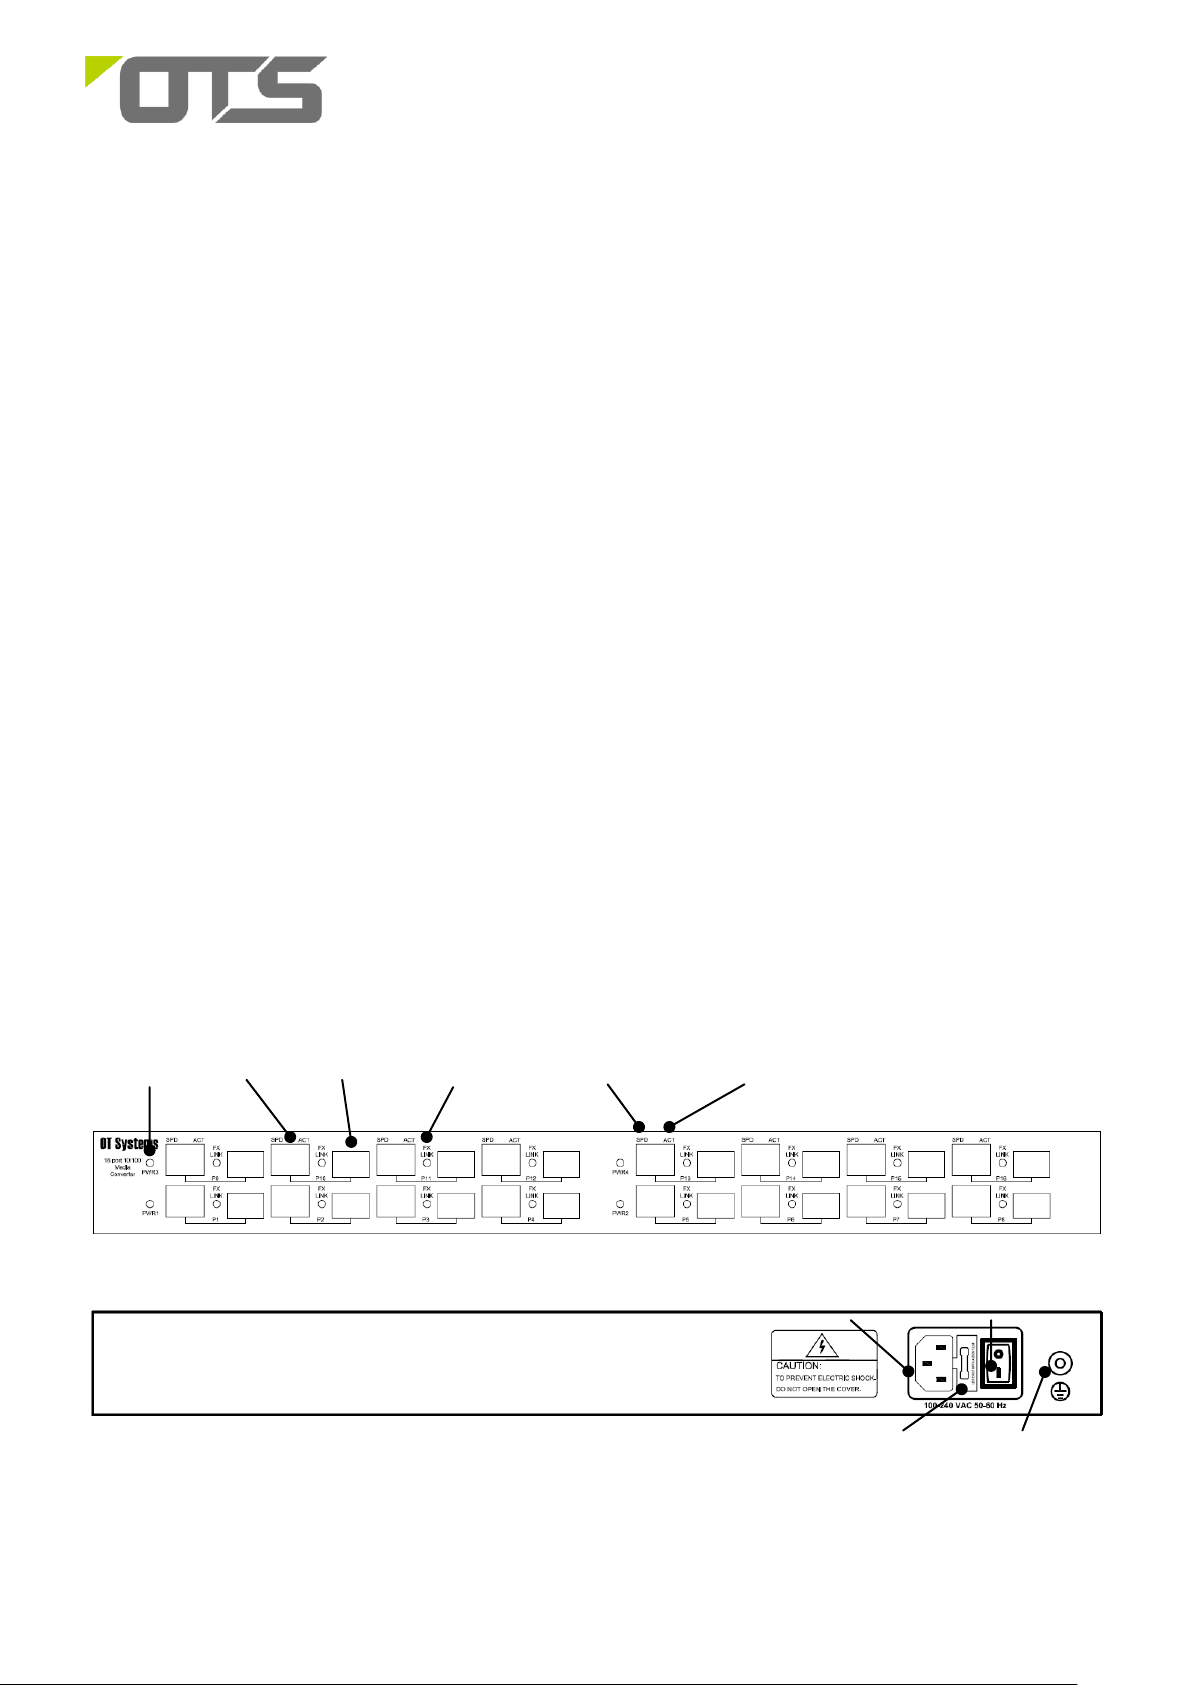
Power
Indicator
RJ45
SFP Port
FX LINK
SPD
LINK/ACT
Fuse Holder
Earth Terminal
AC Socket
Power Switch
ET8181/ET161161 Series
Rack Mount 8/16-port 10/100Base-TX to 8/16-port 100Base-FX SFP Media Converter
This quick start guide describes how to install and use the 8/16-port media converter. The converter operates at a
temperature range of -10˚C to 60˚C and supports external SFP employment. It is a perfect choice for harsh
environments with limited space.
Overview
ET8181-S / ET161161-S have 8 or 16 ports and provide 10/100Base-TX to 100Base-FX media conversion. The
converter provides SFP ports to support the use of SFP (Small Form-factor Pluggable) transceiver module. User
can chose different types of SFPs (100M only). The converter supports 1or2 core Single mode or Multi-mode fiber.
The product operates at temperatures ranging from -10°C to 60°C and at 1U high is designed to be installed in a 19”
rack cabinet.
General
To ensure trouble free transportation and storage, all OT Systems products must be thoroughly inspected, tested
and properly packed before delivery. Check the product upon receipt for any visible damage which may have been
caused during shipment.
Package Content
Rack Mount 8/16-port 10/100Base-TX to 8/16-port 100Base-FX SFP Media Converter x 1
AC Power Cord x 1
Quick Start Guide x 1
Physical Description
Front Panel
Rear Panel
1 V1.3
Page 2

Mounting
Holes
ET8181/ET161161 Series
Rack Mount 8/16-port 10/100Base-TX to 8/16-port 100Base-FX SFP Media Converter
Installation
SFP Transceiver Module
You can select different SFP modules as required (Please refer to our SFP selection list for the appropriate module).
To insert/remove the SFP, the procedures are as follow:
1. On the side panel, insert the SFP module into the
SFP port until it is securely locked.
2. Connect the optical fiber (1/2 core) to the LC
connector(s) of the SFP.
3. To remove the SFP module, press down the lock
of the LC connector of the optical fiber to pull out
the fiber cable.
4. Pull down the SFP lever and hold its position. Pull
out the SFP module from the SFP port.
Rack Installation
ET8181-S and ET161161-S can be installed on a rack. The product has 4 mounting holes. Use 4 rack mount screws
to securely install the product in a 19” rack cabinet.
2 V1.3
Page 3

Ethernet Port
RJ-45 Pin Assignment
.
Pin
MDI Signal Definition
MDIX Signal Definition
1
TD+
RD +
2
TD-
RD-
3
RD +
TD+
4
NC
NC
5
NC
NC
6
RD-
TD-
7
NC
NC
8
NC
NC
Interface Type
Support Description
Cable Type
RJ-45
10Base-TX
100Base-TX
Category 3 or above cable
Category 5 or above cable
SFP
1/2 core SM/MM Optical fiber interface (depends
on the SFP)
LC
Power
AC power interface with 100~240 V AC input
AC Power Socket
ET8181/ET161161 Series
Rack Mount 8/16-port 10/100Base-TX to 8/16-port 100Base-FX SFP Media Converter
Setup
a) There are 8/16 media converters (ET8181-S: P1-P8, ET161161-S: P1-P16) in the product. Connect the
Ethernet port of the media converter to be used to a PC or network device with a network cable.
b) Insert the appropriate SFP into the corresponding SFP port. Connect the fiber cable from the remote device
(media converter or switch) to the LC connector of the SFP.
c) After the device is powered on, the PWR indicator (PWR1-PWR4) will all be on. If the indicators are not on,
check the power supply connection.
d) After all cables are correctly connected, the indicators will be lit as per port status LEDs (page 4).
Interface
Power Connection
The power interface of ET8181-S/ET161161-S complies with the IEC60320-C14 standard and the AC power socket
complies with the IEC60320-C13 standard.
Cable Connection
IEC60320-C14 AC Power Socket
3 V1.3
Page 4

LED
State
Indication
PWR
(1-4)
Green
Power on.
Off
Power off.
FX Link
Green
The Fiber is linked
Flashing
Transmitting or receiving data.
SPD
Yellow
100Base-TX
Off
10Base-TX
LINK/ACT
Steady
A valid network connection established
Flashing
Transmitting or receiving data.
ACT Stands for Activity.
Top View
Side View
ET8181/ET161161 Series
Rack Mount 8/16-port 10/100Base-TX to 8/16-port 100Base-FX SFP Media Converter
The Port Status LEDs and dimension drawing of the unit
Functional Description
19” 1U Rack-mount cabinet
Converts 10/100Base-TX to 100Base-FX SFP.
Supports Full/Half duplex, Auto-Negotiation.
Supports Auto-MDI/MDIX.
Support external SFP
AC Power input (100VAC~240VAC, 50/60HZ).
-10℃ to 60℃ (14℉ to 140℉) operating temperature range.
Complies with EN55022 class A standard.
Extensive LED indicators for network diagnostics.
Assembly, Startup, and Dismantling
Installation
Assembly: The product can either be directly installed in a 19” cabinet rack.
Startup: Connect the supply voltage to start up the Media Converter via the AC jack.
Dismantling: Locate and remove the 4 rack mounting screws. Usually, but not limited to, at least 2 screws.
Manual Earth Green manual is available on our website www.ot-systems.com
4 V1.3
 Loading...