

Page 1
1
ET1100CPp Series
Industrial 10/100Base-TX Ethernet over Coaxial Converter with PoE+ & PoC
This quick start guide describes how to install and use the 10/100Base-TX Ethernet Extender over Coax with High
Power over Ethernet (PoE+) & Power over Coax (PoC). The EoC converter introduced here consists of a
transmitter (TX) and receiver (RX) and provides one channel for Ethernet over a coaxial cable with PoC & PoE.
Overview
The ET1100CPp Series product provides Ethernet Extension of 1-CH 10/100Base-TX over Coaxial cable (1Km
max.). The products provide high power PoE (30W max Power Sourcing Equipment (PSE)) to the network camera.
The products support PoC, hence, no power point is required for the transmitter and the network camera at the
transmitter side. The product is good for retrofit of analogue system by using the existing cable infrastructure.
General
To ensure trouble free transportation and storage, all OT Systems products must be thoroughly inspected, tested and
properly packed before delivery. Check the product upon receipt for any visible damage which may have been
caused during shipment.
Package Content
Industrial 10/100Base-TX Ethernet over Coaxial Converter x 1
Quick Start Guide x 1
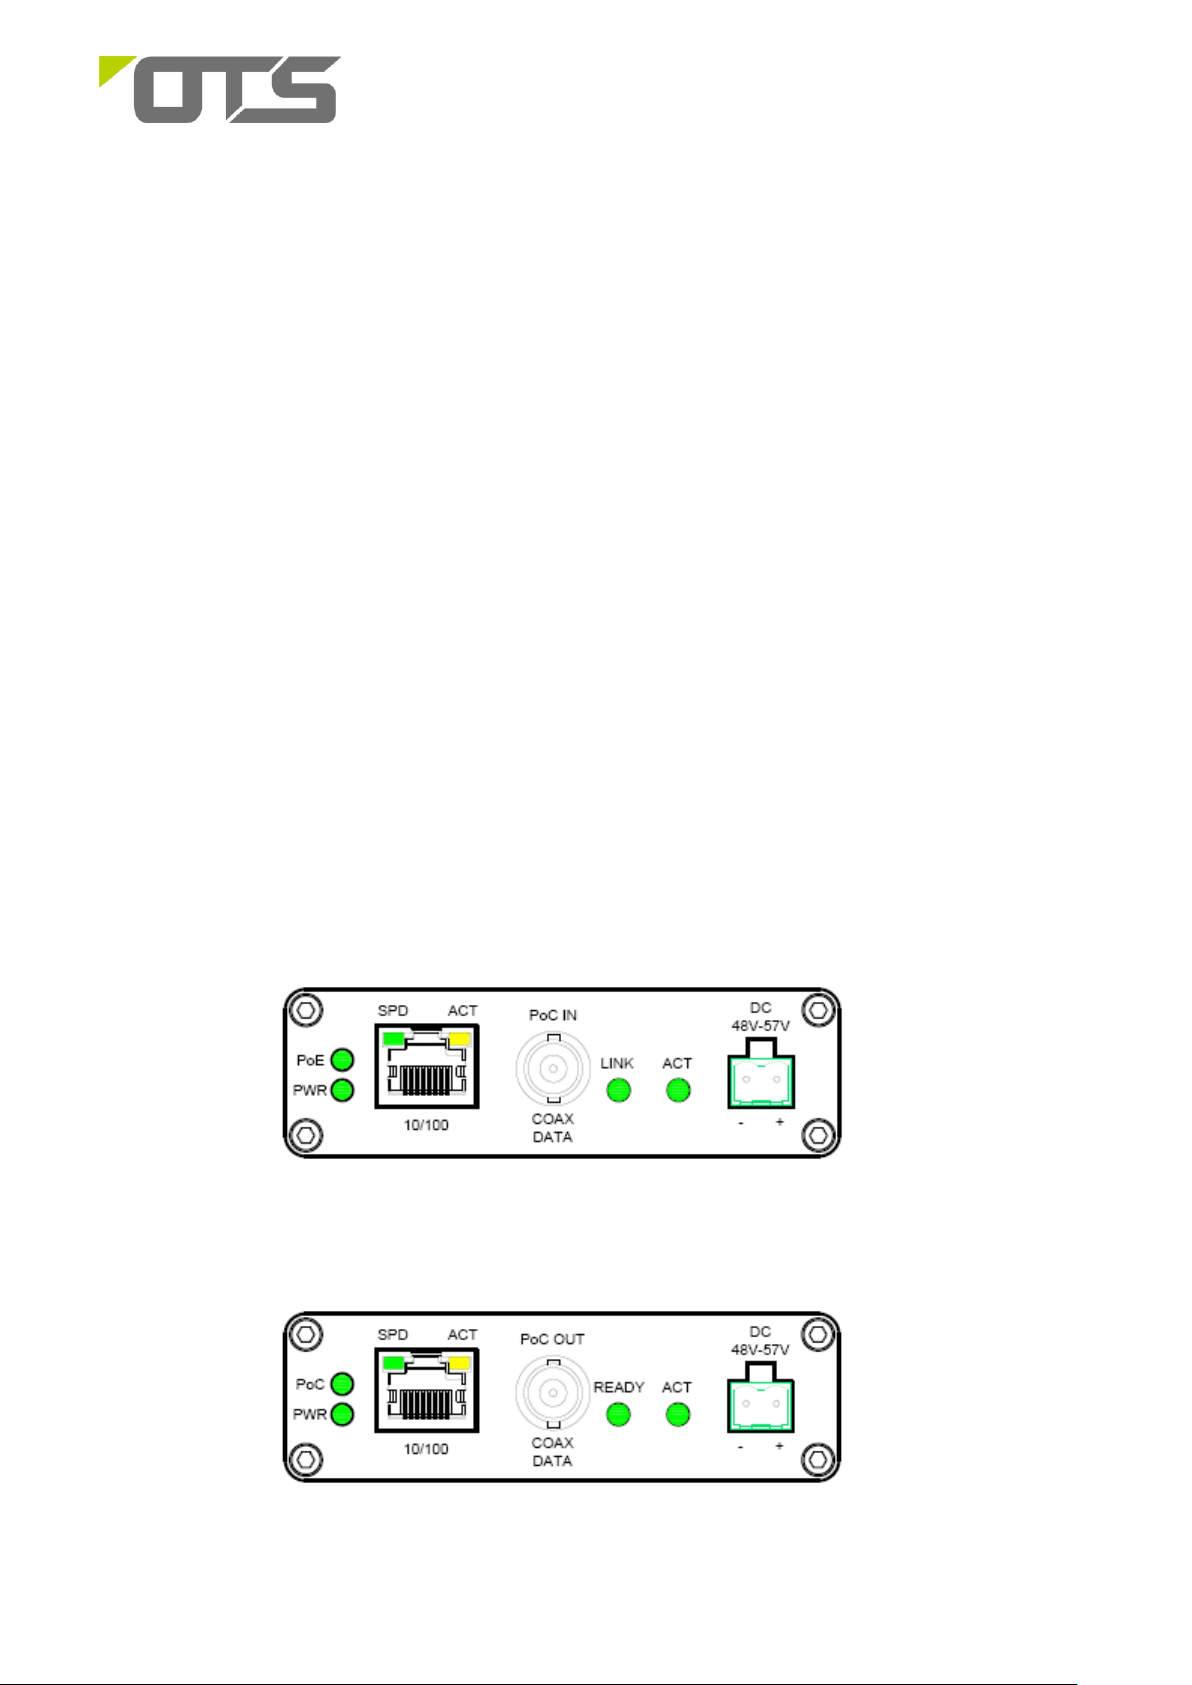
Hardware Description
Transmitter
ET1100CPp-T
Receiver
ET1100CPp-R
V1.3
Page 2

2
Pin
Description
-
+
Power Input
GND
48V~57V
(DC)
- +
ET1100CPp Series
Industrial 10/100Base-TX Ethernet over Coaxial Converter with PoE+ & PoC
Connecting to Power
The EoC converter is a plug-and-play device. The TX and RX support two type of power input.
Receiver (RX)
1. External Power Adapter - Connect an AC to DC power adaptor (48VDC output) to the power connector (2 pin
terminal block) of the receiver, and then attach the plug into a standard AC outlet. The PWR LED will then be lit.
2. Power over Ethernet (PoE) - Connect the Ethernet cable from an Ethernet switch with high power PoE (PoE+) to
the RJ45 (10/100) of the receiver, the PWR LED will then be lit. In this case, power adapter is not needed.
Transmitter (TX)
1. External Power Adapter - Connect an AC to DC power adaptor (48VDC output) to the power connector (2 pin
terminal block) of the transmitter, and then attach the plug into a standard AC outlet. The PWR LED will then be
lit.
2. Power over Coax (PoC) - If the transmitter has not connected with a power adapter, when the coaxial cable is
properly connected between the transmitter and receiver, the transmitter can get the power from the remote
receiver through the coaxial cable. The PWR LED will then be lit.
.
Connecting to Coax
Connect the coaxial cable to the female BNC connector (COAX DATA) of the transmitter and receiver. If the
transmitter and receiver are properly connected and communicated with each other, the Link LED (LINK) near the
COAX DATA port of the transmitter will be lit (ON). The PoC LED of the receiver will be lit too when the PoC is in use.
Connecting to Ethernet
Connect the Ethernet cable from the IP camera to the Ethernet port (10/100) of the transmitter. If the cable is
properly connected, the LINK/ACT LED of the Ethernet port of the transmitter will start flashing. When the connected
camera is a PoE IP camera, the transmitter will supply power to the camera through the Ethernet port via the
Ethernet cable and the PoE LED will be lit. Connect the Ethernet cable from the NVR or an Ethernet switch or similar
equipment to the Ethernet port (10/100) of the receiver. If the cable is properly connected, the LINK/ACT LED of the
Ethernet port of the receiver will be lit.
Power Connector
V1.3
Page 3

3
RJ45 pin assignment:
Pin
MDI
MDI-X
1
TD+
RD +
2
TD-
RD-
3
RD +
TD+ 4 Positive (VCC+)
Positive (VCC+)
5
Positive (VCC+)
Positive (VCC+)
6
RD-
TD-
7
Negative (VCC-)
Negative (VCC-)
8
Negative (VCC-)
Negative (VCC-)
Interface Type
Support Description
Cable Type
RJ45
10Base-TX
100Base-TX
Category 3 or above cable
Category 5 or above cable
BNC (Female)
Ethernet over Coax Data
RG-59/U or similar
2-pin Terminal
Block
Power input (48~57VDC)
2-wire
ET1100CPp Series
Industrial 10/100Base-TX Ethernet over Coaxial Converter with PoE+ & PoC
The 10/100Base-TX Connector
The transmitter, as a Power Sourcing Equipment (PSE), use the spare wires (alternative B) to supply power to the IP camera
( Power Device (PD)).
Cable Connection
Dimensions Drawing of the Product (Unit: mm)
V1.3
Page 4

4
LEDs
Colour
State
Indication
PWR
Green
Steady
Power on, PWR stands for POWER
Off
Power off
COAX
DATA
Link(TX)
Green
Steady
The transmitter and receiver communicate and lock with each others.
Off
The transmitter and receiver do not communicate or the coaxial cable is disconnected.
ACT
Green
Flashing
Data transfer within the coaxial cable
Off
No data transfer within the coaxial cable
READY
(RX)
Green
Steady
The converter is ready for data transfer
Off
The converter is not ready
PoC (RX)
Green
Flashing
Detection stage
ON: 1 sec,
OFF: 5 sec
(Repeat)
Un-connected or broken coaxial cable
ON: 2 sec
OFF: 4 sec
(Repeat)
TX is connected with power adaptor (PoC not required)
ON: 3 sec
OFF: 3 sec
(Repeat)
Overload
ON
Power over Coax in use
PoE (TX)
Green
Steady
Power is applied to the Power Device (PD)
Off
A non-PoE device is connected or Ethernet connection is not established
Ethernet
LINK/ACT
Green
Steady
A valid Ethernet connection established
Flashing
Transmitting or receiving Ethernet data, Act stands for ACTIVITY
Off
Neither valid Ethernet connection established nor transmitting/receiving Ethernet data
SPD
Yellow
Steady
Ethernet Connection transferring at 100Mbps
Off
Ethernet Connection transferring at 10Mbps
ET1100CPp Series
Industrial 10/100Base-TX Ethernet over Coaxial Converter with PoE+ & PoC
LEDs
The LED indicators give you instant feedback on status of the EoC Transmitter & Receiver:
Functional Description
PoE+(30W) and Power over Coaxial
802.3af/802.3at Compliant
Data Rate up to:90Mbps (Downlink), 90Mbps (Uplink)
Max.Distance:1km over Coaxial cable (RG-59/U)
Compatible with 4-port standalone Receiver (ET1200CPp-R4) & Rack Mount 8-port (ET2200CPp-R8) or 16-port
(ET2200CPp-R16) Ethernet over Coax receiver
Accept 48VDC external power input or PoE power input from RJ45 port
Manual Earth Green manual is available on our website www.ot-systems.com
V1.3
 Loading...