

OTOS Air Wing User Manual
Powered Air Purifying Respirators
Powered Air Purifying Respirators
R

Danger/Caution/Notice
How to Use
Spare Parts
PAPR Parts Description
Trouble Shooting upon Types of Malfunction
Please keep this instruction manual for your further reference.
- This product complies with the requirements of European standard EN12941.
- Please refer to the other instruction manual for the use of auto darkening welding helmet.
4
5
11
12
13~14
TABLE OF CONTENTS
Air Wing

Air Wing
This product with its attached dust filter purifies airborne dust, pollutants, fine particles as well as
other contaminants, welding dust, metal dust, and supplies clean air to the user’s facial area.
2. Danger
When NOT aware of; what the contaminant generated in workplace is and concentration of
the contaminant in the air, or in case of such concentration level (IDLH) that may occur
immediate danger for health and/or life, please do NOT use this product.
When the oxygen concentration of the air in workplace is 18% or lower, do NOT use this
product.
Without filter equipped, NEVER use this product. It may cause such danger for human life.
(Use those filters that OTOS Co., Ltd. sells.)
Only those parts and components included in product component table/picture must be
used and do NOT use them for other usage rather than this product.
Do NOT use this product in such place totally sealed.
Do NOT use this product in places with such dangers as fire and explosion.
Do not directly connect the filter to safety caps or face guards.
3. Caution
Do NOT use at workplace with strong wind. (as negative pressure generated inside the
hood, outside-air comes into the hood)
alarming, immediately get away from the contaminated area and check up the device. In
any cases below, please get away from that contaminated place.
-. When some problem is shown in any part of the product;
-. When the air supply is stopped or its amount is decreased;
-. When it gets hard to breathe;
-. When feeling dizzy or headache;
-. When feeling the smell or taste of the contaminants and its stimulus occurred;
Do NOT put the battery near fire and/or its heat.
Do not use the product with its power turned off since carbon dioxide concentration may
increase and oxygen level inside the face guard may decrease.
Do not use if the product does not supply enough air.(MIN - 160 / min)
Do not use the product in work environments where the level of contamination is too high
rendering the product to stop functioning and cause serious injury.
The product is designed to be used in the temperature range between -5 and +55 .
4. Notice
Please follow the direction described in this manual and be aware enough of how to use
and how to wear before using this product. If using this product in wrong direction, it may
cause danger.
Before use this product, please check up if the Air Wing s body is connected right with the
hood and the connecting hose. (See page 6 ~8)
Before use this product, please check up airflow with the flow-meter. (MIN 160 / min
See page 8)
Before get away from the contaminated area, do NOT take off the hood or do NOT stop
operation of the Air Wing.
Do NOT disassemble the product. It may cause malfunction and free of charge A/S
(warranty) service is not provided.
Make sure the connecting hosepipe stoops and is not entangled or is in the way of other
items in the area.
When verifying the protection grade of the product, make sure the user does not confuse
the European standard EN12941 label with those associated with other standards.
1. Usage
This product may be used in workplaces with sufficient amount of oxygen including welding
shops (grinding and polishing) where various airborne heavy metal dusts are generated, sanding or grinding workshops, workshops that handle hazardous materials such as asbestos, and
any other workshops where airborne dusts are generated.
5. Features
This product has particle filter and Odor Filter. Also, this product has alarming function
(sound and display panel) that gives notice when such dangers as low battery or lack airflow.
In order NOT to let the outer air come inside the hood, it generates positive pressure so it
blocks harmful objects getting into.
This product is suitable for prevention of respiratory contagious disease and such workplaces that have bad smell, normal dust, harmful objects, and particulate objects floating in
the air.
It guarantees smoother breath compared to facial mask and it protects worker from harmful
factors.
Ultra-light hood and shoulder-strap reduce feeling weight and fatigue when wearing for long
time.
Air Wing
7.
Filter
Particle filter : purifies fine particles and mote contaminant.
Odor Filter : After the particle filter process, the odor filter removes foul odor and odor
particles.
6. Check-up points before use;
If the filter is equipped right, (See page 5)
If the connecting hose has any problem and is connected to the Air Wing s body
exactly, (See page 6~7)
If right airflow is supplied upon taking airflow test, (See page 8 for airflow test)
If alarm sounds exactly and danger indication ( ) is displayed right blocking outlet when operating Air Wing.
If the hood has any problem,-check up any part being torn or any part with wrong
needlework
If the air is supplied into the facial part when operating Air Wing.
Hold
Push
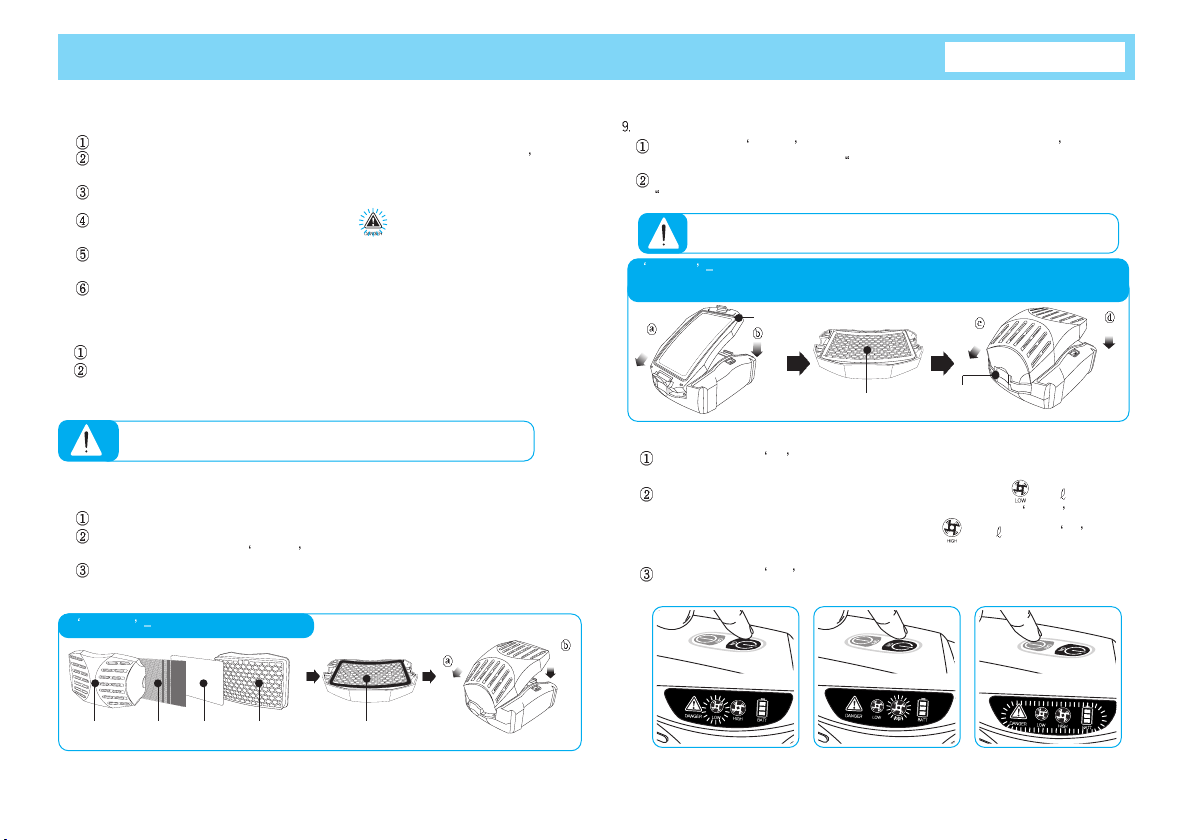
Picture 1 Assembling particle filter
Particle Filter Particle Filter
PreFilterSpark
Protection
Filter
Cover
Left
Right
8. How to equip the Particle Filter
The power must be turned off when replacing the filters.
Assemble the wire netting and pre-filter to the filter cover in order and then assemble the
particle filter as shown in the Picture 1
Place the filter cover on the main body of the Air Wing and lock it by turning it clockwise
until it clicks.
How to equip the Odor Filter
As shown in the Picture 2 , mount the Odor Filter to the left of the Air Wing s body first,
and then push the right until hearing Click sound.
Mount the filter cover on the left of the Odor Filter first, and then push the right until hearing
Click sound.
Hold
Push
Hold
Push
Particle Filter
Odor Filter
Picture 2 Assembling the Odor Filter
(Please equip the Particle Filter after equipping the Odor Filter first.)
Odor Filter
Do NOT use Odor Filter without Particle filter
Left
Right
10. How to operate
How to start : Press ON button on the body for 1~2 seconds then the product gets started
operating with warning alarm.(Picture 1)
Airflow Control : If the product is operated first, it starts with LOW (160 / min) at the
flow-meter. When more airflow is needed, press
FLOW button once
again and set the airflow at HIGH (200
/ min). If ON button is
pressed once again at HIGH, it becomes LOW again. (Picture 2)
How to stop : Press OFF button for 2~3 seconds then the product gets stopped operating
with warning alarm. (Picture 3)
Picture 1. How to Start
Picture 3. How to Stop
Picture 2. Airflow Control
Unsealed filter is valid for 5 years since the manufactured date.
Air Wing
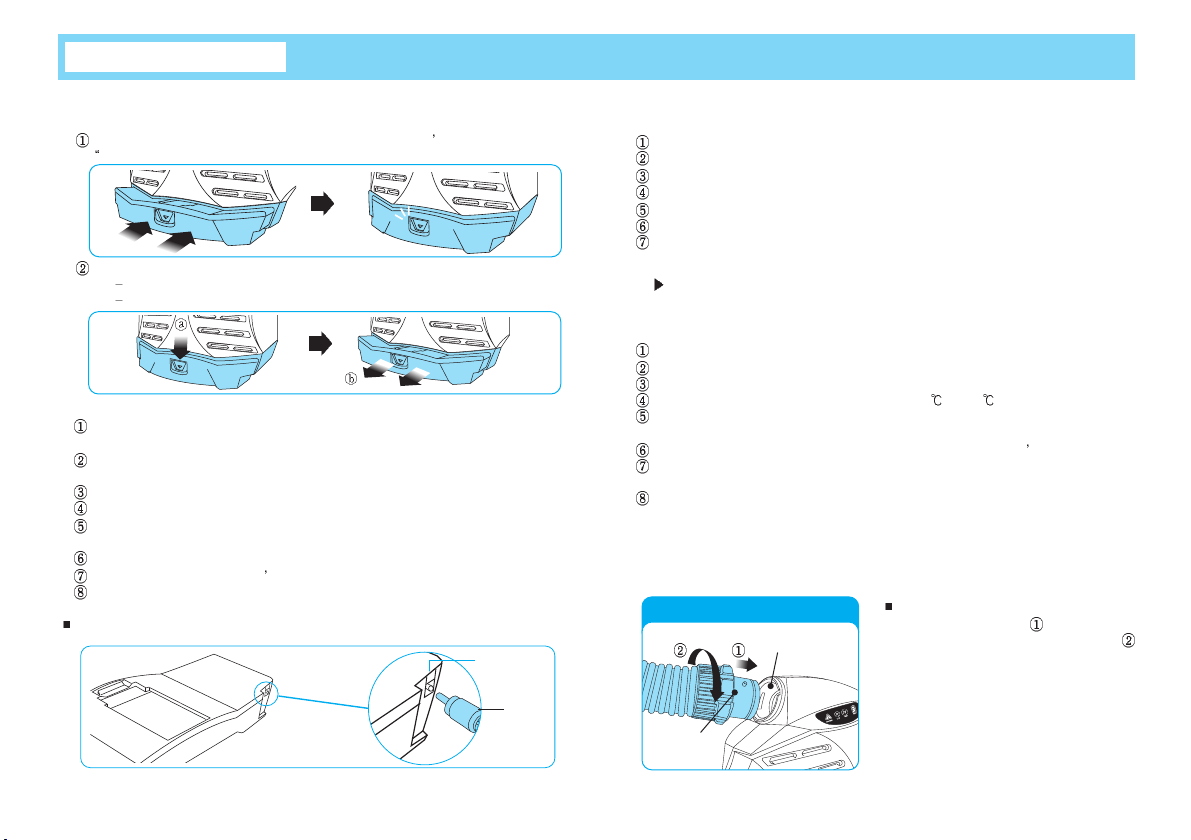
11. Assembling/Disassembling the Battery
How to assemble the battery : Fitting the battery to the Air Wing s body, push until hearing
Click sound.
How to change the battery:
a. while pushing down the button to separate the battery,
b. pull the battery and separate it from the body.
12. Battery-charging
When using the battery for the first time or reusing after not using for over 5 days, the battery must be charged again for use.
If the battery has not been used for 3 months or more, it needs to be fully charged twice for
maximum charging capacity.
The battery should be charged in a place that is electrically safe.
Please separate the battery from the body before charging.
Full-charging takes about 4 hours. Charging time depends on the remaining battery
capacity.
Please check out the voltage of the charger (220V).
Upon using-condition, the battery s life may be slightly different.
When the battery is fully charged, the Red light turns Green light.
13. Caution for battery use
Do not put PAPR unit with power-on in the bag.
Do not keep PAPR unit inside the car in hot summer season.
Do not throw or give the high impact to PAPR unit.
Do not keep PAPR unit with metallic things.
Do not put PAPR unit on the eletirc heat generating equipment.
Do not use any other battery charger.
When the fluid leakage from the battery or smell is detected, contact customer service center immediately.
Battery operation time: 8 hours (+/-5%) at nominal flow (160 l/min).
Charger
Cord
Battery
Charging
Terminal
Battery
How to charge the battery:
14. Battery-charger
Pay attention to the following exposition to reduce the dangers of fire and electric shock.
For power supply connection, use adequate plug adaptor for the electric outlet.
When fully charged, remove from the main power source.
Suggested temperature during charging is between 0 and 40 .
When being charged, red light is turned on signaling the charging is in process. When fully
charged, green light is turned on.
Do NOT use the charger for any other usage than charging this product s battery charging.
The charger has been made only for indoor use and it should be stored in a place without
humidity.
The charger type;
a. Model Name: AW-100-11 b. Input Voltage: AC 220V
c. Output Voltage: (when charged with standard capacity) DC 16.8V 800mA
Assembling with the body : Properly stick the
hose connector into the outlet. After that,
as shown in the above picture, turn the
connector halfway round to the right and
then mount to the body.
15. Assembling the connecting hose
Assembling with the body
Outlet
Hose Connector
 Loading...