

otometrics Madsen ZODIAC 901 User Manual

901
Middle Ear Analyzer
User Manual
Doc no. 7-25-1800/11
Part no. 7-25-180
0459

Copyright notice
No part of this Manual or program may be reproduced, stored in a retrieval system, or transmitted, in any form
or by any means, electronic, mechanical, photocopying, recording, or otherwise, without the prior written consent of GN Otometrics A/S.
©
Copyright
2011, GN Otometrics A/S
Printed in Denmark by GN Otometrics A/S, Denmark
All information, illustrations, and specifications in this manual are based on the latest product information
available at the time of publication. GN Otometrics A/S reserves the right to make changes at any time without notice.
Version release date
8. September 2011
Technical support
Please contact your supplier.
FM template version: 01- 02-2010

TABLE OF CONTENTS
1 INTRODUCTION..........................1
1.1 FEATURES OF THE ZODIAC 901 ....................1
1.2 APPLICATIONS OF THE ZODIAC 901.................3
1.3 ABOUT THIS MANUAL .........................5
1.4 STANDARDS ...............................5
1.5 SAFETY ...................................6
1.6 SERVICE AND REPAIR..........................6
2 INSTALLING THE ZODIAC 901 .................7
2.1 UNPACKING AND INSPECTION ...................7
2.2 STORAGE AND SHIPMENT ......................7
2.3 INSTALLATION ..............................8
2.4 CARE AND MAINTENANCE ......................10
2.4.1 CLEANING THE PROBE.......................10
2.5 FUSE REPLACEMENT ..........................11
3 GENERAL DESCRIPTION ....................13
3.1 GENERAL .................................13
3.2 FRONT PANEL LAYOUT & CONTROLS ...............13
3.2.1 MANUAL MODE ...........................15
3.2.2 AUTO MODE .............................15
3.2.3 SELECT .................................16
3.2.4 ALT. SELECT AND SETUP .....................16
3.2.5 OTHER FRONT PANEL CONTROLS ...............17
3.2.6 INDICATOR LAMPS .........................18
3.2.7 LIQUID CRYSTAL DISPLAY ....................18
3.3 START-UP .................................19
3.4 MAIN MENU ...............................20
3.4.1 NEW PATIENT ............................21
3.4.2 IDENTIFICATION ..........................22
3.4.3 DAILY CALIBRATION ........................23
3.4.4 DEFAULT CONFIGURATION ...................24
3.4.5 EASY AND ADVANCED MODES .................24
3.5 HEADSET AND PROBE .........................25
3.5.1 EARTIPS ................................26
3.5.2 USING THE HEADSET AND PROBE ...............26
4 MANUAL MODE ..........................29
4.1 TYMPANOMETRY ............................30
4.1.1 MANUAL
4.1.2 AUTO SWEEP
4.1.3 ETF-I, INTACT EARDRUM
4.1.4 ETF-P, PERFORATED EARDRUM
...............................
.............................
.....................
.................
31
33
36
37

4.2 REFLEX TESTING
4.2.1 MANUAL REFLEX
4.2.2 SCREENING
4.2.3 DECAY .................................43
4.2.4 USER 1 / USER 2 ...........................45
4.2.5 MARKER FUNCTION ........................45
.............................
..........................
..............................
39
40
42
4.3 THRESHOLD TESTING .........................46
4.3.1 THRESHOLD REFLEX ........................47
4.3.2 FAST SCREENING ..........................49
4.3.3 AIR CONDUCTION .........................51
5 SUPPLEMENTARY FUNCTIONS ................53
5.1 ALT. SELECT................................53
5.1.1 ERASE DATA .............................53
5.1.2 SMOOTH................................53
5.1.3 DATA TRANSMIT ..........................53
5.1.4 LEFT/RIGHT SHIFT .........................54
5.1.5 CONTRAST ..............................54
5.1.6 MARKER ................................54
5.2 SETUP ....................................56
5.2.1 TYMPANOMETRY (INCL. ETF-I)..................57
5.2.2 REFLEX TESTING...........................58
5.2.3 THRESHOLD .............................59
5.2.3.1 REFLEX .........................59
5.2.3.2 FAST SCREENING ...................60
5.2.3.3 AIR CONDUCTION ...................60
5.3 PRINTER ..................................60
5.3.1 PAPER LOADING ..........................61
5.3.2 PRINTOUT...............................62
5.3.2.1 SCREEN DUMP .....................62
5.3.2.2 PRINT DATA .......................62
5.3.2.3 PRINT ALL ........................62
6 AUTO MODE ............................63
6.1 MADSEN ELECTRONICS PRESET TEST MENU ...........63
6.2 USER-PROGRAMMABLE TESTS ....................64
7 POWER-ON OPTIONS ......................65
7.1 USER TEST PROGRAMMING ......................65
7.2 SYSTEM SETUP ..............................69
8 PRINCIPLES OF MIDDLE-EAR ANALYSIS ..........71
8.1 MECHANICAL IMPEDANCE ......................71
8.2 MISMATCHING OF MECHANICAL IMPEDANCES ........72
8.3 MATCHING OF MECHANICAL IMPEDANCES ...........72
8.4 RESISTIVE LOSS OF VIBRATION ENERGY ..............72
8.5 THE STRUCTURE OF THE EAR.....................73
8.6 THE EFFECT OF LOUD SOUNDS
....................
74

8.7 MEASURING ACOUSTIC IMPEDANCE
................
75
8.8 TENSIONING OF THE EARDRUM ...................76
8.9 THE PRINCIPLE OF TYMPANOMETRY................77
8.10 PRACTICAL CONSIDERATIONS....................78
8.11 TYMPANOGRAM CHARACTERISTICS ................79
9 DIAGNOSIS OF AUDITORY DISORDERS ..........81
9.1 DISORDERS AND THEIR SYMPTOMS.................81
9.1.1 MIDDLE-EAR FLUID AND EFFUSION ..............81
9.1.2 DISRUPTION OF THE OSSICULAR CHAIN ...........81
9.1.3 OTOSCLEROSIS............................81
9.1.4 PERFORATED EARDRUM .....................81
9.1.5 OCCLUDED EUSTACHIAN TUBE .................81
9.1.6 FLABBY TYMPANIC MEMBRANE.................82
9.1.7 IMPACTED CERUMEN (DRIED EAR WAX) ...........82
9.1.8 PATULOUS EUSTACHIAN TUBE .................82
9.1.9 COCHLEAR HEARING LOSS ....................82
A APPENDIX: TECHNICAL SPECIFICATIONS .........83
B APPENDIX: ZODICON™ PARAMETERS ...........85


GN Otometrics INTRODUCTION Chap. 1
ZODIAC 901 Middle-Ear Analyzer
FEATURES OF THE ZODIAC 901 1.1
1. INTRODUCTION
1.1 FEATURES OF THE ZODIAC 901
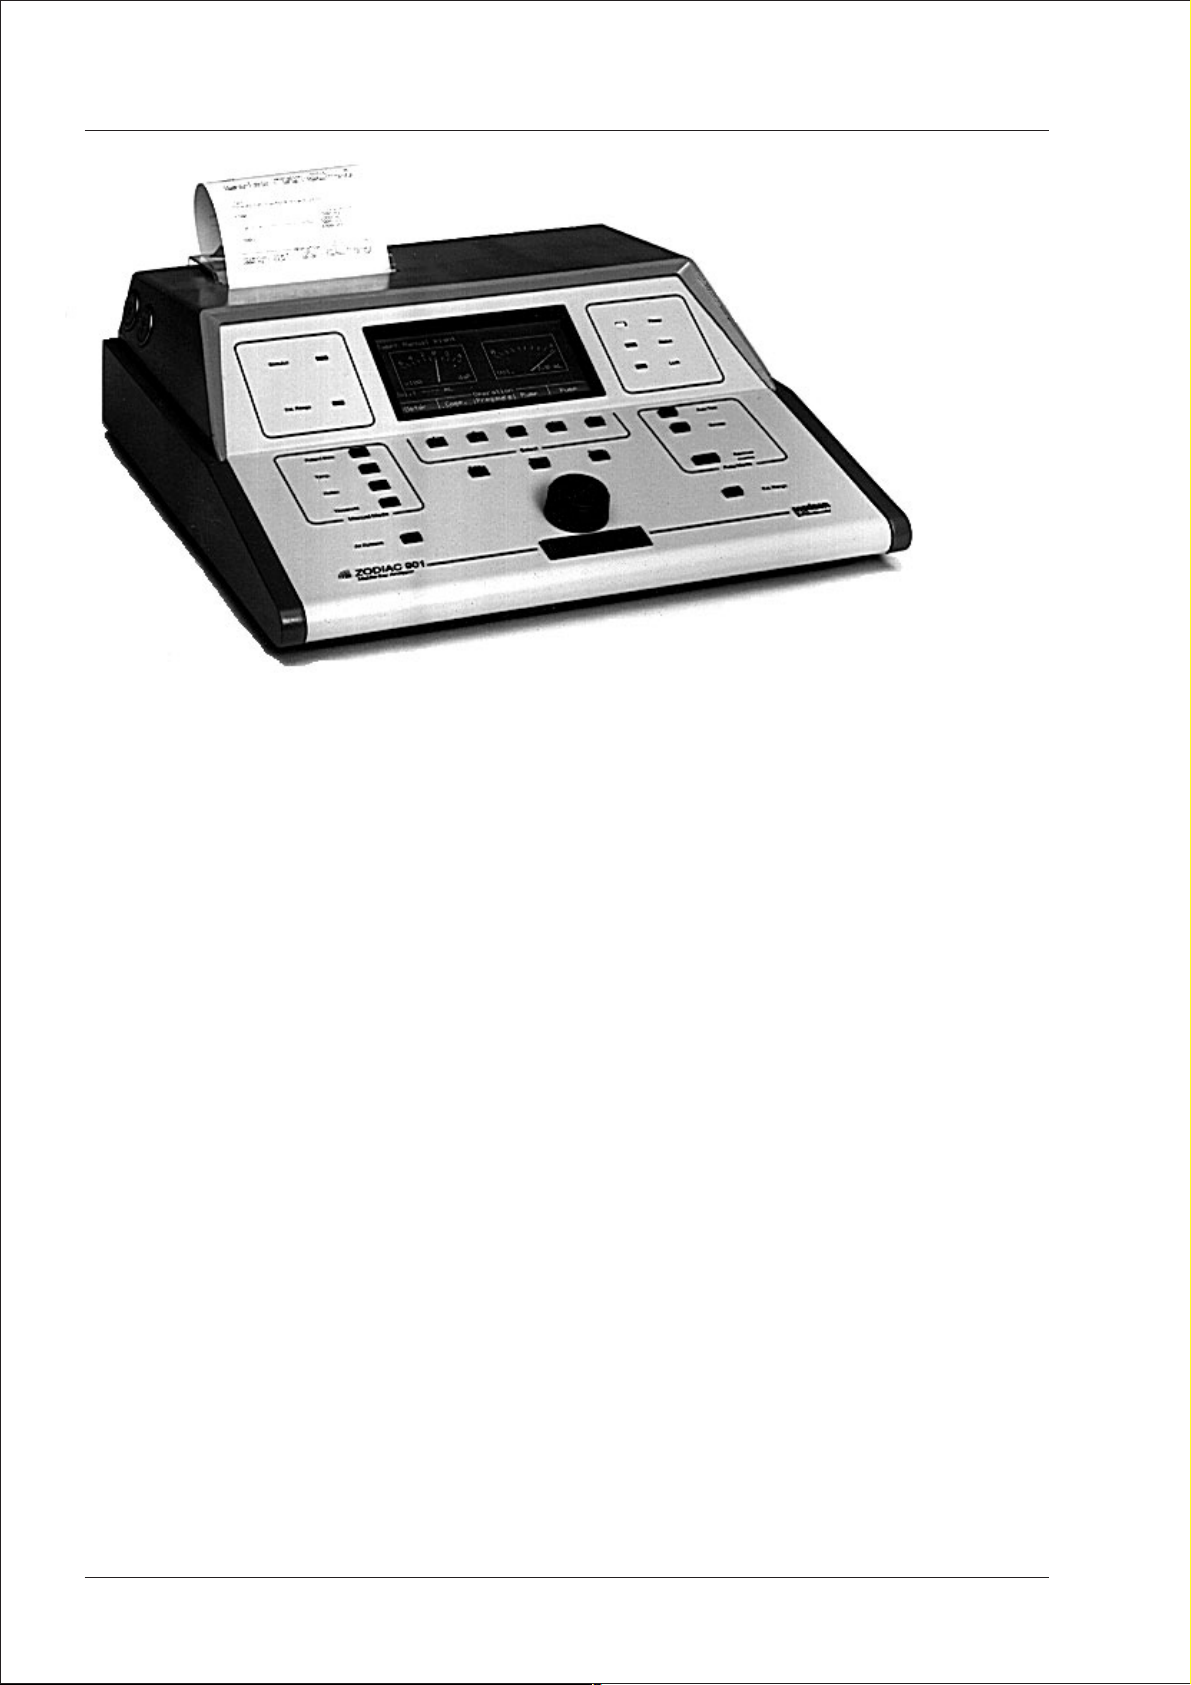
With the ZODIAC 901 Middle-Ear Analyzer, Madsen Electronics have
produced a precision impedance measuring instrument which offers the
busy audiologist an unprecedented level of automation, timesaving and
versatility. The Limited Version of the ZODIAC 901 is described in an
Addendum located at the back of this manual.
The unique multilingual Liquid Crystal Display (LCD) reduces the re-
·
quired measurement data instantly to graphical, analog and concise
numerical forms. The large, clear presentation of the data from each
test has been optimized for rapid diagnosis of patient condition.
All function selection and pre-setting of parameters are controlled by a
·
combination of single-function pushbuttons, plus softkeys. The five
softkeys are used together with multi-choice menus displayed on the
LCD. All functionsare drivenby the softwarebuilt intothe instrument.
Thanks to this style of user interface, using the ZODIAC 901 can be
learnt quickly and easily. This interface eliminates drudgery from the
tasks of calibration and pre-test setting-up, and allows the instrument
to be configured for a very wide variety of tests.
Liquid Crystal
Display
Multi-Choice Menus
·
Tympanometry and reflex testing may be performed with pressure
and compliance indicated in real time asa graphic Cartesian display or
on analog meters, if preferred (see the display in Fig.1.1).
·
The ZODIAC 901 is an intelligent instrument that can be taught which
tests to perform. Five Madsen Electronics Preset Tests plus the capability for four user-programmable test routines are built in, for optimal
operating efficiency. The ZODIAC 901 may also be operated entirely
manually or programmed for the user’s own combination of manual
and automatic operation. User-programmable tests enable the user to
select the default parametersof a particulartest. Theuser can alsoselect
a combination of tests to form a battery of preset tests.
·
Intelligence in the ZODIAC 901 is not confined to its memory. If a
measurement is interrupted by an air leak or acoustic interference, the
instrument not only erases the data for the aborted measurement, but
also keeps on re-trying the measurement from the beginning until it
completes it without interruption or until the operator intervenes.
·
The ZODICON™ (Madsen Electronics Zodiac Configuration) program enables your Madsen Electronics distributor to configure your
ZODIAC 901 to suit your own particular needs, thus customizing the
instrument into your “personal middle-ear analyzer”.
Analog Meter
Display Option
User-Programmable
Tests
Intelligent Response
To Interference
ZODICON™
Configuration
Program
·
User-programmable test routines and custom configuration changes
made using ZODICON™ are stored in non-volatile memory, and are
Operation Manual 1
Non-Volatile Memory
INTRODUCTION Chap. 1 GN Otometrics
FEATURES OF THE ZODIAC 901 1.1 ZODIAC 901 Middle-Ear Analyzer
Fig.1.1
ZODIAC 901 Middle-Ear Analyzer
preserved when the mainspower isswitched off. The built-in clockand
calendar also continue without interruption.
·
Volatile Memory
MateBaseI™
Software
Hard Copy Output
The ZODIAC 901—Version 2.x—can perform up to 36 different measurement curves ona patient(including bothears) and remember all the
results (in volatile memory) until a new patient is entered or the power
switched off. Version 3.x can perform/store 62 curves, and Version 4x
can perform/store 72 curves.
·
Connected via its RS232C serial interface to a personal computer running the MateBaseI™ software supplied, the ZODIAC 901 can be used
to store patient records in the form of a computer database.
·
The ZODIAC 901 can print out the contents of the current screen display, the results of the current test, or all the test results performed on
the current patient, on the instrument’s own built-in thermal printer
and/or an external printerconnected viathe ZODIAC 901’sCentronics
parallel port. Printouts can include the Madsen logo, time and date, the
patient’s I.D. data as well as the clinic’s name and address. It is especially beneficial to have the results of fast automatic screening with
tympanogram, reflex and allother relevant dataprinted outtogether.
·
Unique Probe &
Headset
2 Operation Manual
For the ZODIAC 901 Middle-Ear Analyzer, Madsen Electronics have
developed a unique lightweight probe that may either be worn com
-

GN Otometrics INTRODUCTION Chap. 1
ZODIAC 901 Middle-Ear Analyzer
fortably on the headset for clinical testing, or used asa hand-held probe
for fast screening purposes. A smaller headband is available for testing
children.
APPLICATIONS OF THE ZODIAC 901 1.2
Colored lights on the probe indicate when a measurement is in prog-
·
ress, and also give warning in the event of air leakage, instability in the
measured ear cavity volume, or measurement interruption owing to
air leakage.
The start/stop button on the probe permits remote operation of the
·
ZODIAC 901.
Each probe supplied by Madsen Electronics has its calibration parame-
·
ters and serial number stored electronically in the probe, permitting
exchange of probe and/or cable without recalibration.
The probe can be calibrated to both TDH39 and insert phone, and will
·
automatically change from one set of phone calibration data to the
other when one changes phone.
The built-in Madsen Electronics 2 cc (2 ml) Precision Cavity enables the
·
ZODIAC 901 to be calibrated on a daily basis to take account of barometric pressure, altitude, etc. The cavity incorporates a built-in rubber
seal, enabling calibration to be performed without the use of a separate
eartip.
Built-in Madsen Electronics’Ear Simulatorallows trouble-freetraining
·
and checking of the capabilities of the ZODIAC 901.
Remote indication
Remote Control
Built-In Calibration
Data
Calibration For Both
Types Of Phone
Precision Cavity
Ear Simulator
·
The comfortable, lightweight headset features a single integral cable
with specially developed connectors, which carry both the electrical
signals and the air-line from the pump. The stainless steel spring band
and genuine leather headband enable the headset to be adjusted
quickly and easily for each patient. A smaller headset for children is
also available as an optional accessory. The standard TDH 39 earphone
supplied may easily be replaced by an optional insert phone or bone
conductor.
1.2 APPLICATIONS OF THE ZODIAC 901
The ZODIAC 901 is designed for acoustic impedance and static pressure
measurements on the ear canal. These measurements (by themselves, or
in combination with pure tone audiometry) enable a variety of middle
ear and other disorders to be diagnosed.
The measurement techniques embodied in the ZODIAC 901 have the advantage of being objective. Unlike pure tone audiometry, they depend
only on passive co-operation from the patient, not on the patient’s subjective judgement. They can be performed more reliably than pure tone
audiometry measurements on children and other patients whose ability
to co-operate may be limited.
Headset
Operation Manual 3

INTRODUCTION Chap. 1 GN Otometrics
APPLICATIONS OF THE ZODIAC 901 1.2 ZODIAC 901 Middle-Ear Analyzer
Unlike pure tone audiometers, the ZODIAC 901 can be used successfully
in environments which are not perfectly quiet, since its measuring cir
cuits are immunized against external interference.
The ZODIAC 901 is intended for:
Clinical tests on patients
·
Screening of populations
·
The clinical tests which the ZODIAC 901 is designed to perform are:
Manual/Auto Tympanometry
·
Eustachian Tube Function
·
Ipsi and Contra Manual Acoustic Reflex
·
Ipsi and Contra Reflex Decay
·
-
Acoustic Reflex Latency
·
Pure tone audiometry (Air Conduction Threshold)
·
Gellé’s Test
·
The screening tests are:
·
Automatic Tympanometry
·
Ipsi and Contra Acoustic Reflex
·
Ipsi and Contra Fast Acoustic Reflex Threshold
·
Pure tone audiometry (Air Conduction Threshold)
The ZODIAC 901 complies with the international standards for acoustic
impedance measurement referred to in its Specifications (Appendix 1).
4 Operation Manual

GN Otometrics INTRODUCTION Chap. 1
EN 55022:1998
ZODIAC 901 Middle-Ear Analyzer
ABOUT THIS MANUAL 1.3
1.3 ABOUT THIS MANUAL
Operation of the ZODIAC 901 Middle-Ear Analyzer is extremely easy
and, consequently, easy to learn. This manual has therefore been designed for easy reference to specific questions or problems.
The margins contain corresponding “key words” to help you to quickly
find what you are looking for, and they are all listed under a subject index at the end of the manual.
on the screen, or are shown in “screen dumps” from ZODIAC 901. Pushbuttons on the instrument’s front panel are printed in the text in bold
script, and shown in the margin inside a box. For example:
Note that default settings of various setup parameters, etc., specified in
this manual, refer to those set at the factory—if your Middle-Ear
Analyzer differs, this is because the default settings have been changed
by your local distributor using ZODICON™.
be changed at any time, except when a test is actually in progress. Since
only those parameters valid for any particular test are displayed in the
measurement setup sub-menu when Setup is pressed, the relevant parameters are listed in bold script at the end of the description of each test
mode.
Key Words In
Margins
Manual ConventionsAll screen instructions are reproduced as far as possible as they appear
Auto TestPress Auto Test to access the User Test Menu.
Default Settings
Modified By
ZODICON™
Setup ParametersAnother feature of ZODIAC 901 is that test parameters for all tests may
If you have any questions or suggestions with regard to the ZODIAC
901 or this manual, please contact us at the following address:
GN Otometrics A/S,
9 Hoerskaetten
630
DK-2
T: +45 45 75 55 55, F: +45 45 75 55 59
www.otometrics.com
Taastrup,
Denmark.
1.4 STANDARDS
The ZODIAC 901 Middle-Ear Analyzer complies with the following
standards for audiometers:
EN 60645-1, -2
ANSI S3.6
The ZODIAC 901 and this manual are CE-marked according to the
Medical Devices Directive 93/42/EEC.
Operation Manual 5
INTRODUCTION Chap. 1 GN Otometrics
g
y
b
SAFETY 1.5 ZODIAC 901 Middle-Ear Analyzer
The ZODIAC 901 is marked with this symbol to indicate compliance with Type B
requirements of EN60601-1.
The device is marked with this symbol to indicate that it is electronic equipment covered
by the Directive 2002/96/EC on waste electrical and electronic equipment (WEEE).
In European countries the crossed-out wheeled-bin WEEE symbol reminds you that all
the electrical and electronic products, batteries, and accumulators must be taken to
separate collection at the end of their working life. This requirement applies in the
European Union. Do not dispose of these products as unsorted municip
You can return your device and accessories to Otometrics, or to any Otometrics supplier.
You can also contact your local authorities for advice on disposal.
al waste.
1.5 SAFETY
This operation manual contains information and warnin
ensure the safe performance of the ZODIAC901. Local government rules and regulations,
if applicable, should also be followed at all times.
Special note should be made of the following:
ZODIAC 901 is marked with this symbol when it is important that the user refers to
associated warnings given in this manual.
Any PC connected to the ZODIAC 901 must comply with the requirements of IEC 950
“Safety of information technology equipment, including electrical business equipment”.
s which must be followed to
1.6 SERVICE AND REPAIR
Service and repair of electromedical equipment should onl
equipment manufacturer or by authorized representatives. The manufacturer reserves the
right to disclaim all responsibility for the operating safety, reliability and performance of
equipment serviced or repaired by other parties.
ecarried out by the
6 Operation Manual

GN Otometrics INSTALLING THE ZODIAC 901 Chap. 2
ZODIAC 901 Middle-Ear Analyzer
UNPACKING AND INSPECTION 2.1
2. INSTALLING THE ZODIAC 901
2.1 UNPACKING AND INSPECTION
UnpackingThe ZODIAC 901 is shipped in its own custom-made carton together
with this Operation Manual, a Packing Specification and standard accessories. Please do NOT dispose of this carton, in case the instrument
needs to be returned to your Madsen Electronics distributor for service
or repair.
InspectionIf the shipping carton is visibly damaged, ask the carrier’s agent to be
present when the instrument is unpacked. If the instrument is damaged
or fails to operate, please notify the carrier and your Madsen Electronics
distributor immediately. The Madsen Electronics distributor will arrange for the repair or replacement of the instrument without waiting
for the claim against the carrier to be settled.
Please check that all accessories are complete and intact (referring to the
enclosed Packing Specification).
Note that the LCD is protected by a plastic cover, which may be
removed after unpacking the instrument. This cover should not be
discarded!
2.2 STORAGE AND SHIPMENT
ways use the best packing available. If it is necessary to return the instrument to the Madsen Electronics distributor or to the factory for
repair, use the original shipping cartons and replace the protective cover
on the LCD.
Always store the ZODIAC 901 in a clean, dry environment and never
leave the power on when the instrument is in an enclosed container!
Protective Cover
on LCD
Storage & ShipmentTo protect the instrument and accessories during storage or shipment al-
When shipping the ZODIAC 901, please remember the following:
1. Seal shipping container securely.
2. Mark container FRAGILE to ensure careful handling.
3. In any correspondence, please refer to the instrument by
model, serial number and software version.
Operation Manual 7
INSTALLING THE ZODIAC 901 Chap. 2 GN Otometrics
INSTALLATION 2.3 ZODIAC 901 Middle-Ear Analyzer
2.3 INSTALLATION
KEEP AWAY
FROM LIQUIDS!
Connections Connect the headset, and, if required, the optional external printer
PLEASE READ
BEFORE
SWITCHING ON!
Mains/Line
Connection
Site the instrument in a well-ventilated location away from all liquids
and sources of heat.
and/or a personal computer (PC) to their respective connectors in the
Connection Panel located on the rear of the instrument (see Figs. 2.1 and
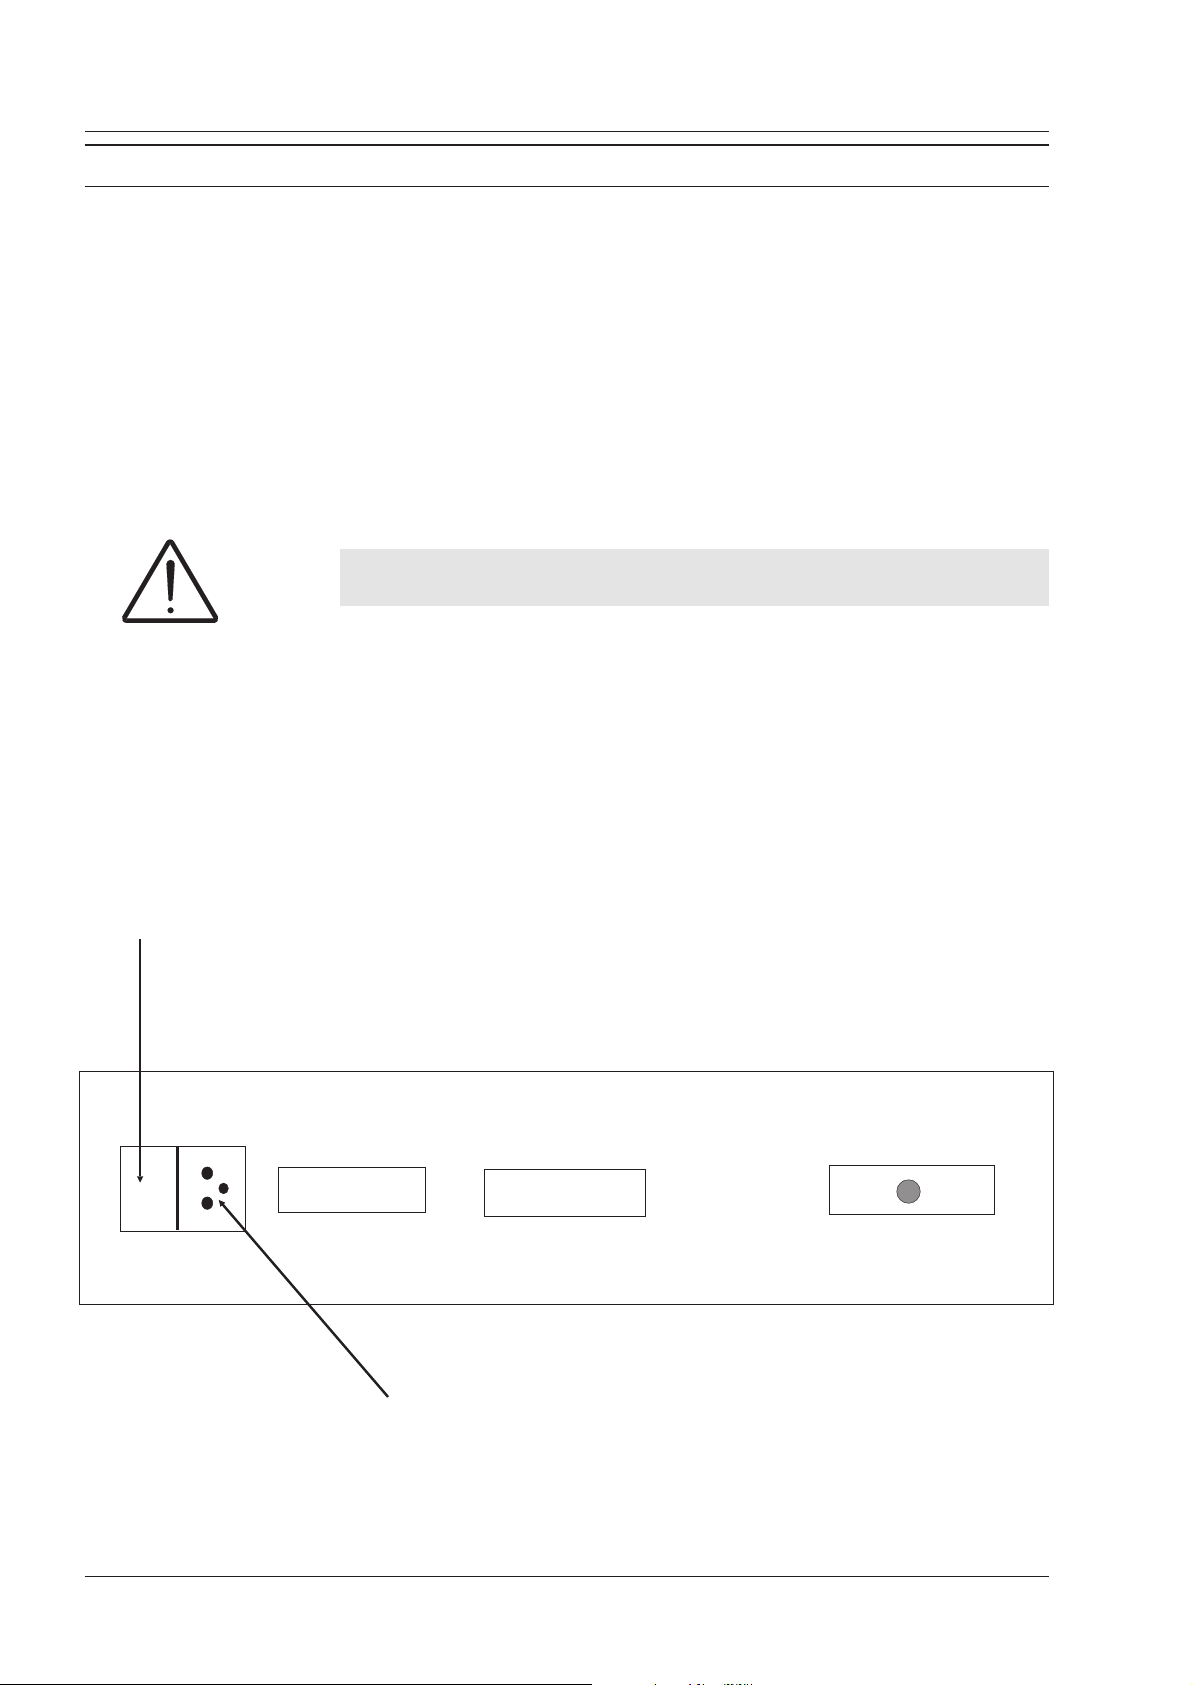
2.2).
Before connecting the power cord, please make sure that the voltage
from the electrical outlet matches the voltage shown on the identification
label stuck over the power inlet.
CAUTION!
Operating at the wrong voltage may blow the fuses!
Plug one end of the power cord supplied into the power inlet on the
back of the ZODIAC 901 and plug the other end directly into a threewire, protective ground, AC power outlet. If an extension cord is required, only use a cord with a three-prong connector.
On / Off Switch
200 - 240 V
50/60Hz
Fig.2.1
Data Interface
Power Inlet
Printer
Headset
ZODIAC 901 Connection Panel.
8 Operation Manual

GN Otometrics INSTALLING THE ZODIAC 901 Chap. 2
ZODIAC 901 Middle-Ear Analyzer
INSTALLATION 2.3
Fig.2.2
ZODIAC 901 Connections.
Operation Manual 9

INSTALLING THE ZODIAC 901 Chap. 2 GN Otometrics
CARE AND MAINTENANCE 2.4 ZODIAC 901 Middle-Ear Analyzer
2.4 CARE AND MAINTENANCE
Cleaning The ZODIAC 901 requires no preventive maintenance. However, it is
recommended that the following guidelines be observed.
The instrument should be kept clean and as free of dust as possible:
Display
Protective Cover
KEEP AWAY
FROM LIQUIDS!
Dust Cover If your ZODIAC 901 has been supplied with the optional plastic dust
Clean the LCD display periodically with an anti-static non-solvent solu-
·
tion using a soft lint-free cloth. Note that the display is laminated for
maximum readability and must therefore be treated with care.
The LCD can be protected against transport damage, i.e. scratching, by
means of the supplied protective plastic cover.
Remove dust using a soft brush and take special care to dislodge any
·
accumulations of dirt onor around thepushbuttons onthe front panel.
To clean the cabinet and the front panel, use a soft, slightly damp cloth
·
with a small amount of mild detergent on it. Do not allow any moisture
inside the instrument!
WARNING!
Chemical cleaning agents containing ammonia or alcohol will damage
the cabinet and display.
cover, you should keep the instrument covered at all times when it is not
in operational use.
CAUTION!
Eartips
However, the instrument should NOT be left switched on with the dust
cover in place, as this may cause severe overheating and damage to the
instrument. Avoid exposing the instrument to direct sunlight, and keep
it well-ventilated at all times to prevent overheating.
The headset is in constant contact with your patients so care should be
taken to ensure that it is kept clean, especially the earphone. Just wipe it
regularly with a moist cloth.
2.4.1 CLEANING THE PROBE
Please refer to §3.5.1 for further details.
·
The rubber eartips supplied with the instrument, and available as optional accessories, are disposable. However, they may be washed an
unspecified number of times in a commercial dishwasherbefore losing
their elasticity.
10 Operation Manual

GN Otometrics INSTALLING THE ZODIAC 901 Chap. 2
ZODIAC 901 Middle-Ear Analyzer
FUSE REPLACEMENT 2.5
There are no special requirements for disposal of the rubber eartips.
·
The probe tip mustbe frequentlychecked for cerumen (ear wax)—even
·
a partial blockage will affect the accuracy of your measure- ments. Cerumen may be removed by means of the supplied metal pin (cleaning
wire)—see below.
Do NOT attempt to clean any of the tubes in the probe tip without
first removing the attached plastic tubes as described below.
1. First detach the probe tip from the 3 plastic tubes.
2. Use the supplied metal pin (cleaning wire) to push out cerumen from
each metal tube in the probe tip.
3. Re-attach the 3 plastic tubes to the probe tip.
2.5 FUSE REPLACEMENT
Disposal
Probe Tip
Procedure For
Cleaning Probe Tip
TO REPLACE A FUSE OR TO CHANGE VOLTAGE:
WARNING!
Before replacing a fuse or changing voltage, first switch off
instrument and disconnect from mains power supply!
1. Switch off the instrument and disconnect from mains.
2. Remove the two Phillips screws at the back of the top panel.
3. Tilt the top panel forwards and remove.
next page). 115 V or 230 V may be selected.
current of the fuses varies according to the voltage, see below:
Voltage Select/ Fuse
Replacement
Voltage Select4. The voltage selector is located next to the power switch (see Fig. 2.3 on
Fuse Replacement5. Two identical fuses arelocated besidethe voltage selector(see Fig. 2.3). The
Component Voltage Fuses Type Dimensions
F301/F302 115 V 400 mA Slow Blow 5 x 20 mm
F301/F302 230 V 200 mA Slow Blow 5 x 20 mm
Operation Manual 11

INSTALLING THE ZODIAC 901 Chap. 2 GN Otometrics
FUSE REPLACEMENT 2.5 ZODIAC 901 Middle-Ear Analyzer
230V
Fig.2.3
Voltage Selector & Fuses Inside ZODIAC 901.
12 Operation Manual

GN Otometrics GENERAL DESCRIPTION Chap. 3
ZODIAC 901 Middle-Ear Analyzer
GENERAL 3.1
3. GENERAL DESCRIPTION
3.1 GENERAL
Unlike most other impedance audiometers, ZODIAC 901 has no
switches for selecting fundamental parameters nor potentiometers for
calibration of inputs, probe, liquid crystal display (LCD), etc. Instead,
parameters are selected by using pushbuttons on the front panel in combination with the display, while the conventional potentiometers have
been replaced by electronic level controls which are also operated by
means of pushbuttons and display.
Manual ModeZODIAC 901 may be operated manually or automatically: in Manual
Mode, either Tymp., Reflex or Threshold is selected, and the instrument
is then set up by means of the pushbuttons under the display.
Auto ModeIn Auto Mode, the various test combinations and parameters are prepro-
grammed (both by Madsen Electronics and the user), and may be selected by pressing Auto Test and then the corresponding softkey under
the display.
Test Menu and the User Test Menu, respectively.
Madsen Preset Tests may not be altered, but the User Tests may be programmed to suit individual requirements (see §7.1).
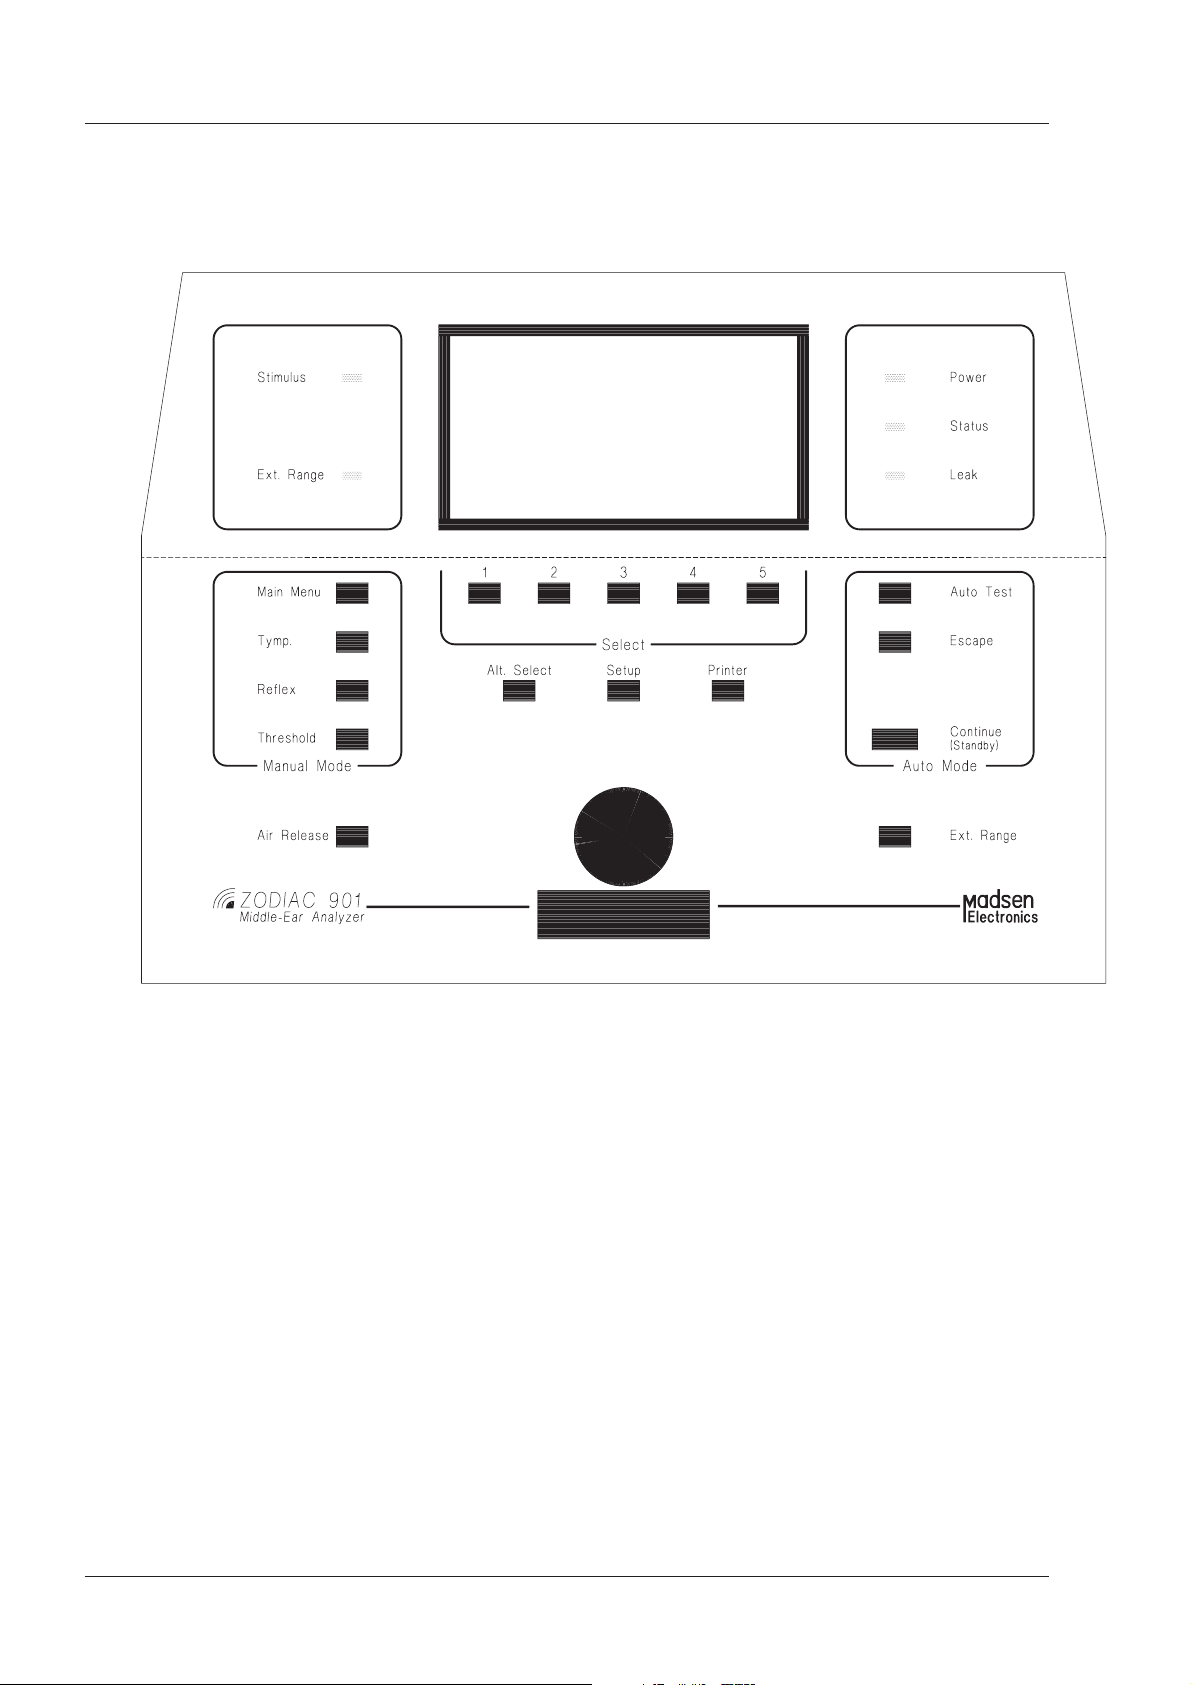
3.2 FRONT PANEL LAYOUT & CONTROLS
On the front panel there is a Rotary Knob for manual pump control,
stimulus level contol, and for setting up parameters, and a Tone Switch
(interrupter) for administering stimuli, starting reflex tests and for entering identification data.
There are a total of 17 pushbuttons with the following functions (please
refer to Fig.3.1 below).
·
Five softkeys, whosefunctions are identifiedin the lower sector of each
menu displayed
·
Four “hard” keys for selecting the Main Menu and the three Manual
Test Modes
Auto TestNote that toggling the Auto Test button accesses the Madsen Preset
·
Three keys for Auto Mode
·
Three keys for accessing the Alt. Select Menu, the context-sensitive
Setup Menu, and the Printer Menu
·
Keys for Air Release and Extended Range
Operation Manual 13
GENERAL DESCRIPTION Chap. 3 GN Otometrics
FRONT PANEL LAYOUT & CONTROLS 3.2 ZODIAC 901 Middle-Ear Analyzer
Fig.3.1
There are five indicator lamps showing Stimulus, Extended Range,
Power, Status, and Leak.
In Advanced Mode, ZODIAC 901 has six principal menus which can be
accessed by pressing the following pushbuttons: Main Menu, Tymp.,
Reflex and Threshold in the Manual Mode and Auto Test. The printout
submenu can be accessed from the Printer pushbutton.
These menus may be accessed from any point in the instrument’s opera
tion, enabling the operator to move quickly from one part of the program
to another (typically after pressing a maximum of two buttons).
14 Operation Manual
-

GN Otometrics GENERAL DESCRIPTION Chap. 3
ZODIAC 901 Middle-Ear Analyzer
The front panel has been laid out for optimal ergonomic efficiency, with
the different functions separated by boxes according to function.
The front panel control functions and indications are classified and described in detail in the following sub-sections.
FRONT PANEL LAYOUT & CONTROLS 3.2
3.2.1 MANUAL MODE
Main MenuPressing Main Menu displays the Main Menu. This is used to perform
the following functions (see §3.4):
Erase the current patient data and advance the patient counter ready
·
for a new patient
Enter identification details for patient and operator
·
Perform daily calibration
·
Restore default settings to cancel changes made using Measurement
·
Setup or Auto Test sequences
Select Easy Mode or Advanced Mode, which determine the facilities
·
available from the other Manual Mode pushkeys
In Easy Mode, intermediate menus are omitted, thus speeding access to
the following measurement screens:
Mode, or the Tymp. sub-menu, allowing additionally selection of Tymp.
Manual Sweep and Eustachian Tube Function Tests (ETF-I and ETF-P),
in Advanced Mode. See §.
Reflex sub-menu, allowing additionally selection of Reflex Screening, Reflex Decay, User 1 and User 2, in Advanced Mode. See §4.2.
or the Threshold sub-menu, allowing additionally selection of Fast
Screening and Air Conduction, in Advanced Mode. See §4.3.
may be altered by means of ZODICON™.
Tymp.Pressing Tymp. displays the Tymp. Automatic Sweep* screen in Easy
ReflexPressing Reflex displays the Reflex Manual* screen in Easy Mode, or the
ThresholdPressing Threshold displays the Threshold Reflex* screen in Easy Mode,
ZODICON™*These are the factory default test modes. Choice of test in Easy Mode
3.2.2 AUTO MODE
Auto TestToggling the Auto Test pushbutton displays, alternately, the Madsen
Electronics Preset Test or User Test Menu. See §6.1 and §6.2, respectively. When a user test is being programmed, pressing Auto Test is
used to terminate the program sequence. See §7.1. Auto Test is used to
execute test sequences.
Operation Manual 15

GENERAL DESCRIPTION Chap. 3 GN Otometrics
FRONT PANEL LAYOUT & CONTROLS 3.2 ZODIAC 901 Middle-Ear Analyzer
Escape Escape is used to terminate a pre-programmed test. See §7.1.
Continue This pushkey has two functions (as indicated on the front panel): when
running a pre-programmed auto test containing one or more pauses,
pressing Continue is used to resume the running of the program after it
has paused (see §6.2 and §7.1). When the program pauses, the screen
will display “Standby” and beep to show that it is waiting for a response.
Standby is used to insert a pause into a user test when required, while it
is being programmed (see §7.1).
3.2.3 SELECT
Softkeys 1 to 5 The functions of Softkey 1, 2, 3, 4 and 5 are determined at any time en-
tirely by whichever menu which is displayed on the LCD. Every menu
contains five panels, each of which identifies the current function of the
key below it. In some menus, not every key has a function assigned to it.
3.2.4 ALT. SELECT AND SETUP
Alt. Select The Alt. Select pushbutton accesses L/R (shift from left to right ear, or
vice versa), plus the following other functions, at any time except when
a test is in progress: Erase Data (but only if there is data to be erased),
Tymp Smooth (not applicable in versions of the ZODIAC 901 lower than
3.x), Reflex Marker, Data Xmit (Transmit), and Contrast (for adjusting
the display’s contrast using the Rotary Knob). Press Alt. Select again to
return to the function currently selected (except where this happens
automatically). See §5.1.
L/R Ear Shift
Setup The Setup pushbutton offers different sub-menus depending on which
function or mode you are in at any given time. For example, if you are
making a Reflex Decay measurement, pressing Setup will access the Reflex Decay Setup sub-menu, enabling you to alter the following Reflex
Decay parameters: attenuation step; optional use of a selection of measurement levels relative to the stored level of Reflex Threshold (THL)
which has previously been measured; Y-axis scaling; Y-axis origin position. Selecting More changes the sub-menu choices to: optional use of a
measurement pressure level a selected interval above or below MiddleEar Pressure (MEP), and Leak Detect on or off (Version 4.x). Press Setup
again to return to the function currently selected. See §5.2.
NOTE: To select the alternate ear,
press Alt. Select and then Softkey 4.
Setup is also used for the ZODIAC 901 System Setup, which is one of
the power-on options. This facility enables a large number of measure
ment parameters to be pre-set as required. The key is held down while
the power is switched on. See §7.2.
16 Operation Manual
-

GN Otometrics GENERAL DESCRIPTION Chap. 3
ZODIAC 901 Middle-Ear Analyzer
FRONT PANEL LAYOUT & CONTROLS 3.2
3.2.5 OTHER FRONT PANEL CONTROLS
tient identification (§3.4.2); to adjust pump pressure (§4.1.1, §4.1.49.1.4,
§4.2.1, §4.2.3, §4.3.1, §4.3.2); to vary Sound Pressure Level (§4.2.1, §4.2.3,
§4.3.1, §4.3.2, §4.3.3); to move the marker (§5.1.6); to adjust display contrast (§5.1.5, §7.2); and to set beeper level, time and date (§7.2). It may
also be used to adjust any other test parameter with more than two possible values: hold the corresponding Softkey down and turn the Rotary
Knob in either direction as required.
tient identification (§3.4.2); to start reflex test measurements (§4.2.2,
§4.2.3, §4.2.4, §4.3.1, §4.3.2); and to present stimuli for reflex testing
(§4.2.1) and for air conduction testing (§4.3.3).
only the five panels at the bottom of the screen, leaving any test results
visible. This allows selection of the internal printer (if fitted) or external
printer (if connected), and disabling of printout, which overrides preprogrammed printout in the Auto tests; control of the paper in the internal
printer; screen dump, which includes the relevant sub-menu; printout of
the data for the current test (including data not shown on the test screen,
but specified in the Measurement Setup, e.g. pump speed); and printout
of all data, including test results, for the current patient, together with
the Madsen Electronics’ logo and, if it has been programmed, the clinic’s
or audiologist’s custom header. See §5.3.
-
Rotary KnobThe Rotary Knob is used: to select the characters for operator and pa
Tone SwitchThe Tone Switch is used: to key in the characters for operator and pa-
PrinterPressing the Printer key displays the Printer sub-menu, which occupies
pressure in the ear canal of a patient who experiences sudden distress
during a test. Note that, for patient safety, this key is connected directly
to the air release valve, making it independent of the microprocessor.
The Air Release key also returns the pump to the middle position.
ing is from –400 daPa to +200 daPa. Pressing the Ext. Range button toggles between the normal range and an extended range from –600 daPa to
+400 daPa. The Ext. Range lamp lights red when the extended range is
selected. In Reflex Mode, when extended range is selected, the maximum Sound Pressure Level of the stimulus available in Reflex and
Threshold tests is also increased, from 100 dB to 115 dB in Ipsi, and from
100 dB to 120 dB in Contra.
Air ReleasePressing the Air Release key provides a means of rapidly relieving the
Ext. RangeIn Tymp Mode, the normal range of pump pressures for middle-ear test-
Operation Manual 17

GENERAL DESCRIPTION Chap. 3 GN Otometrics
FRONT PANEL LAYOUT & CONTROLS 3.2 ZODIAC 901 Middle-Ear Analyzer
3.2.6 INDICATOR LAMPS
Stimulus The Stimulus lamp lights green while a stimulus is being presented.
Ext. Range The Ext. Range lamp lights red when the extended pump-pressure
range of –600 daPa to +400 daPa or the extended sound pressure range
are selected.
Power The Power lamp lights green when the ZODIAC 901 is switched on.
Status The Status lamp lights steadily green when a measurement is in prog-
ress. It flashes green if the ZODIAC 901 is waiting to make a measurement when no cavity is detected. It lights red when a measurement has
been interrupted by a leak, a noise or the pump reaching the end position. This lamp is duplicated on the probe.
Leak The Leak lamp lights yellow if the seal between the eartip (also called
the “probe tip” or “probe cuff”) and the ear canal is not airtight. This
lamp is duplicated on the probe.
3.2.7 LIQUID CRYSTAL DISPLAY
Liquid Crystal
Display
Contrast The contrast of the LCD may be altered using Alt. Select (§5.1.5) or in
Menu Every display layout, however, contains a lower sector consisting of a
Main Display The second line of the (main) upper part of every display layout also
The Liquid Crystal Display (LCD) can show both textual and graphical
information about the functions of the ZODIAC 901 and the results of
tests. It can display tympanograms and other Cartesian graphs during
measurement. For Tympanometry and Reflex measurements, the display can also emulate accurately the panels of a pair of moving-coil meters (see, for example, Fig.4.3 and Fig.4.4). Each test mode and
supplementary function has its own screen display layout, which has
been optimized to convey information relevant to the function.
System Setup (§7.2). This value is saved to NOVRAM, i.e. the LCD will
have the new value next time the instrument is powered on.
menu with five panels. Each panel shows the function of the Softkey immediately below it. At the top of each menu in the centre is a descriptive
title such as “Operation” which identifies the current operating mode.
The operating modes are: Select, Operation, New Patient?, Erase Data?,
Select Default Configuration, Alt. Select, Setup, Printer, and Marker.
contains a descriptive title with several components, as follows:
Mode:[Activity] Ear [Earphone]
18 Operation Manual

GN Otometrics GENERAL DESCRIPTION Chap. 3
ZODIAC 901 Middle-Ear Analyzer
START-UP 3.3
The Modes are: Main Menu, Identification, Daily Calibration, Tymp., Re
flex, Threshold, User Test Menu, Program Mode, Real Time Clock Setup.
The Activities are: Manual, Sweep, Eustachian Tube Function (ETF-I,
ETF-P), Screening, Decay, Reflex, Fast Screening (FastSCR), Air Conduction (AirCond).
The Ear is identified as Left or Right, and, in tests where it is relevant,
additionally as CONTRA or IPSI. In tests which make use of an Ear-
phone, this will also be identified if it is connected and Contra is selected,
e.g.: “TDH39”. If Contra is selected and either an insert phone or nothing is plugged in, it will indicated “insert”.
the probe by the use of the ZODIAC 901’s built-in pump, a horizontal
scale appears at the top of the display during and immediately after
changes in the static pressure. The purpose of this is to show graphically
how much of the pump’s capacity is required at any instant.
ured, computed and shown continuously in milliliters (ml) in one corner
of the main sector of the display.
-
Pump capacityIn all tests where the ear canal may be pressurized or depressurized via
VolumeIn all tympanometric tests, the Volume (Vol.) of the ear canal is meas-
3.3 START-UP
WARNING!
To avoid damage to the probe’s electronics, NEVER connect or
disconnect the probe while the instrument is powered on!
connect the analyzer to a power source.
the left of the rear panel).
couple of seconds, and then which version of the software is installed
and the date and time of calibration while the instrument runs an
automatic self-test. The lowest line of the display indicates the status of
the test and error messages, if any.
pump is run (audible click and hum), probe data is loaded, and the
system memory and the calibration memory are checked. In addition,
analog and electrical circuits are checked and optimized.
ATTENTION!
Connect Headset!1. Connect the headset via its cable to the rear panel.
Connect AC Cable2. Plug the AC cable into the power inlet on the rear panel and then
Power-On3. Switch on the ZODIAC 901 by depressing the power switch (located on
Software Version4. The powerLED illuminates and thescreen displays “Memory test”for a
Automatic Self-Test5. The power-up process takes about a minute, during which time the
Operation Manual 19
GENERAL DESCRIPTION Chap. 3 GN Otometrics
MAIN MENU 3.4 ZODIAC 901 Middle-Ear Analyzer
Main Menu 6. When this process has been completed, the Main Menu is loaded and
you are ready to enter your I.D. together with the I.D. of your first
patient of the day (see §3.4). NO WARM-UP TIME IS REQUIRED.
Remember to Connect
Headset!
NOTE: If the headset has not been connected, the analyzer will not
continue and the following message will be displayed:
Headset not connected!
Error Messages If the self-test fails or displays a specific error, make a note of the error
message, call your Madsen Electronics distributor right away and report
exactly what was displayed (remember to state serial no. and software
version).
To Bypass Daily
Calibration
If the ZODIAC 901 has been programmed to do so by the ZODICON
software, it may give a warning that it has not been calibrated suffi-
TM
ciently recently. If it has been programmed to perform Daily Calibration
automatically during power-up, it may give a message requesting that
the probe be inserted into the Precision Cavity. In either case, you may
proceed by pressing Main Menu.
3.4 MAIN MENU
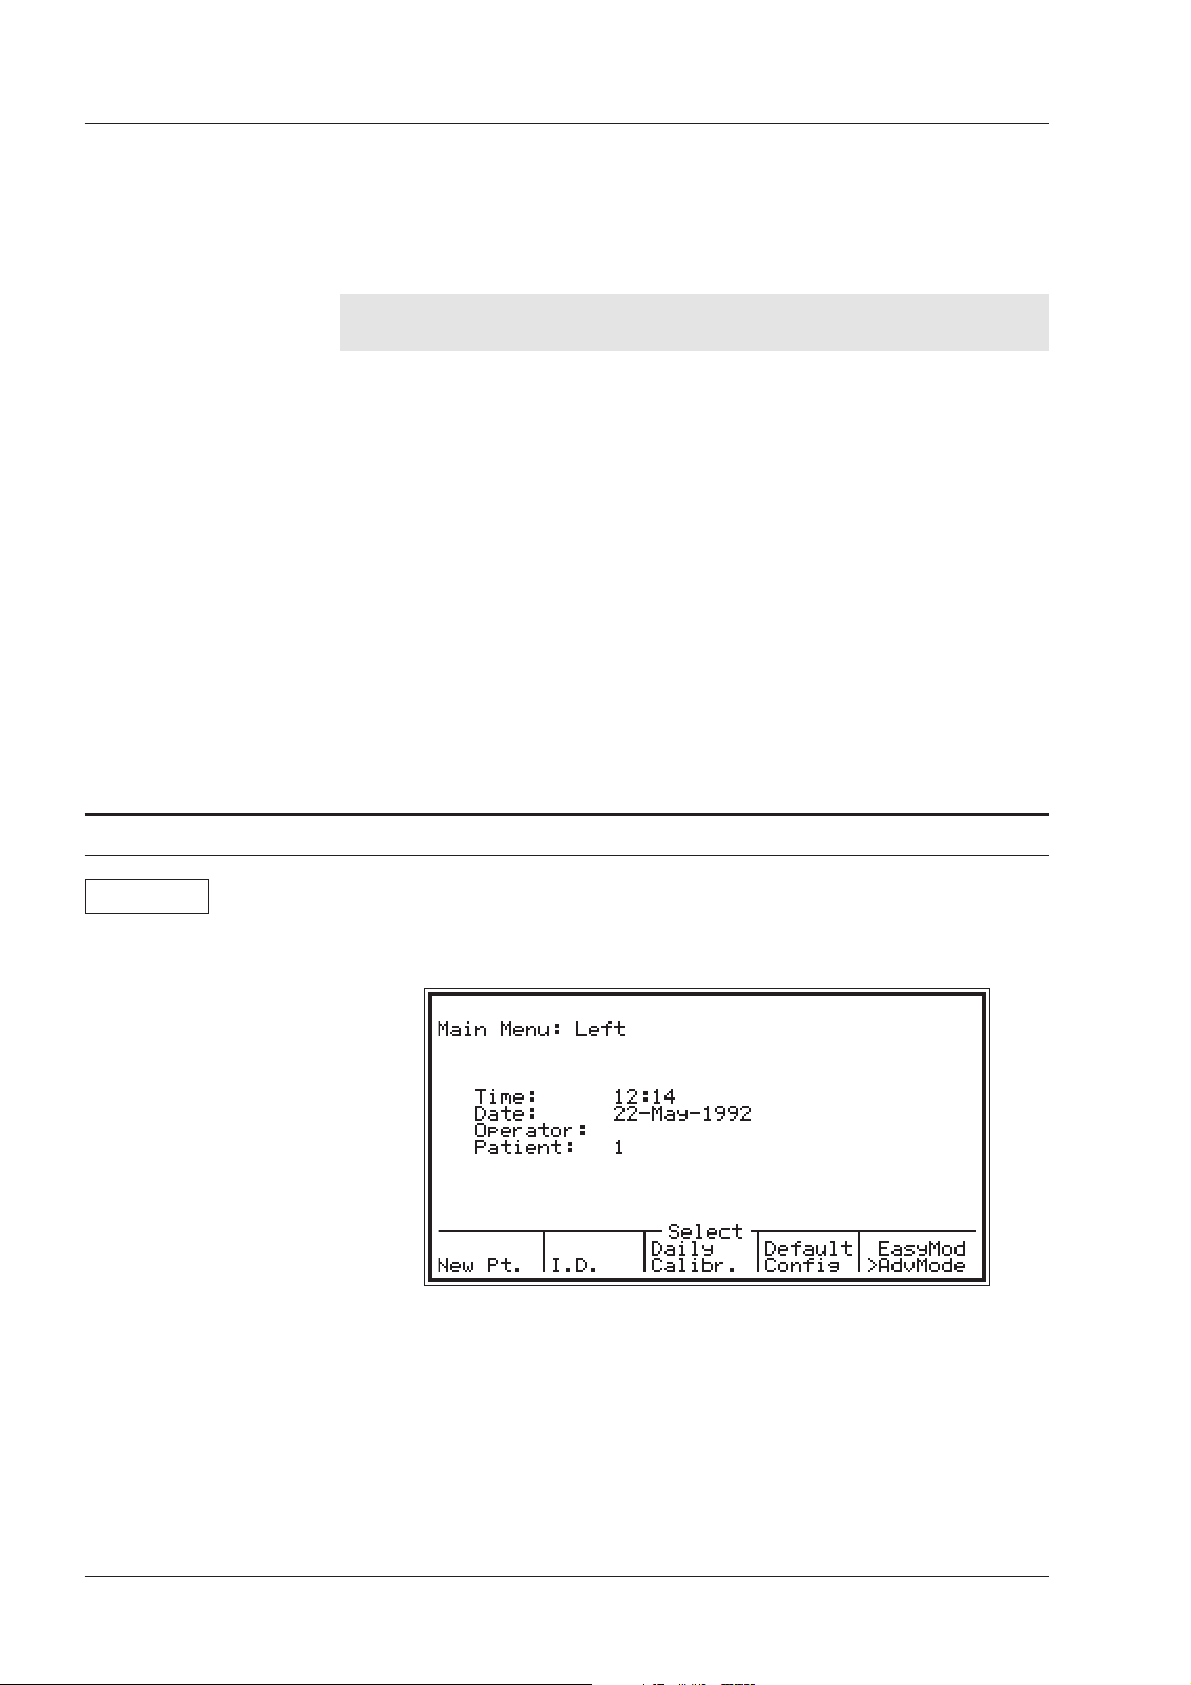
Main Menu Following power-on, or after selecting Main Menu, the screen shown in
Fig.3.2 is displayed, indicating which ear has been selected, time, date,
operator I.D., patient number or I.D., and a sub-menu.
Fig.3.2
TM
The default ear (left or right) may be set using the ZODICON
software,
and may be different from that shown in the illustration. The format of
the date may also differ from that shown if it has been modified using
ZODICON
TM
. The time and/or date setting may be altered using ZO-
DIAC 901 System Setup (see §7.2).
The following functions may be accessed from the Main Menu:
20 Operation Manual

GN Otometrics GENERAL DESCRIPTION Chap. 3
ZODIAC 901 Middle-Ear Analyzer
MAIN MENU 3.4
Data from lastpatient tested may be erased by pressing Softkey 1 to se
·
lect New Patient.
Selecting “I.D.” by pressing Softkey 2 enables both operator and pa-
·
tient identification to be entered.
Daily Calibration may be performed by pressing Softkey 3.
·
Softkey 4 enables youto “SelectDefault Configuration”, thusrestoring
·
the default configuration(which mayhave been modified using ZODI-
TM
CON
Softkey 5 may be used to toggle between Easy Mode and Advanced
·
Mode. This facility is used to configure the use of three of the Manual
Mode keys to suit the application. In Easy Mode, the three keys select
three measurement functions directly.Pressing the Tymp.key accesses
Automatic Sweep*, the Reflex key accesses Manual Reflex*, and the
Threshold key accesses Reflex Threshold*. In Advanced Mode, pressing any of these keys displays a related sub-menu which invites a
further selection of tests (see §3.4.5).
These facilities are described more fully in the following sub-sections.
software), and removing anychanges made usingSetup (§5.2).
-
Softkey 1
Softkey 2
Softkey 3
Softkey 4
Softkey 5
may be altered by means of ZODICONÔ.
3.4.1 NEW PATIENT
number opposite the item “Patient” in the Main Menu display. Each
time the instrument is powered on, the patient counter is reset at 1. If
preferred, the patient may be identified by name or healthcare number
(see Identification below). However, each time you finish testing a patient and wish to start a new patient, press Main Menu to enter the
Main Menu, press Softkey 1, New Pt. to display the “New Patient?”
sub-menu, and press Softkey 1 again to confirm your choice.
Note that the display indicates the next number on the patient counter,
which you may then change to an alphanumeric entry, if desired, by returning to the Main Menu (press Main Menu) and pressing Softkey 2 to
select I.D.
NOTE! Selecting New Patient
erases all data on previous patient!
ZODICON™*These are the factory default test modes. Choice of test in Easy Mode
Patient CounterZODIAC 901 has a built-in automatic patient counter indicated by a
WARNING!
The selection of New Patient must be confirmed because all the data
concerning the last patient is automatically erased from the instrument’s
memory whenever you confirm selection! If a mistake has been made,
pressing Softkey 2 from the “New Patient?” sub-menu prevents the data
from being erased.
Operation Manual 21
Previous Patient
Data Erased!
GENERAL DESCRIPTION Chap. 3 GN Otometrics
MAIN MENU 3.4 ZODIAC 901 Middle-Ear Analyzer
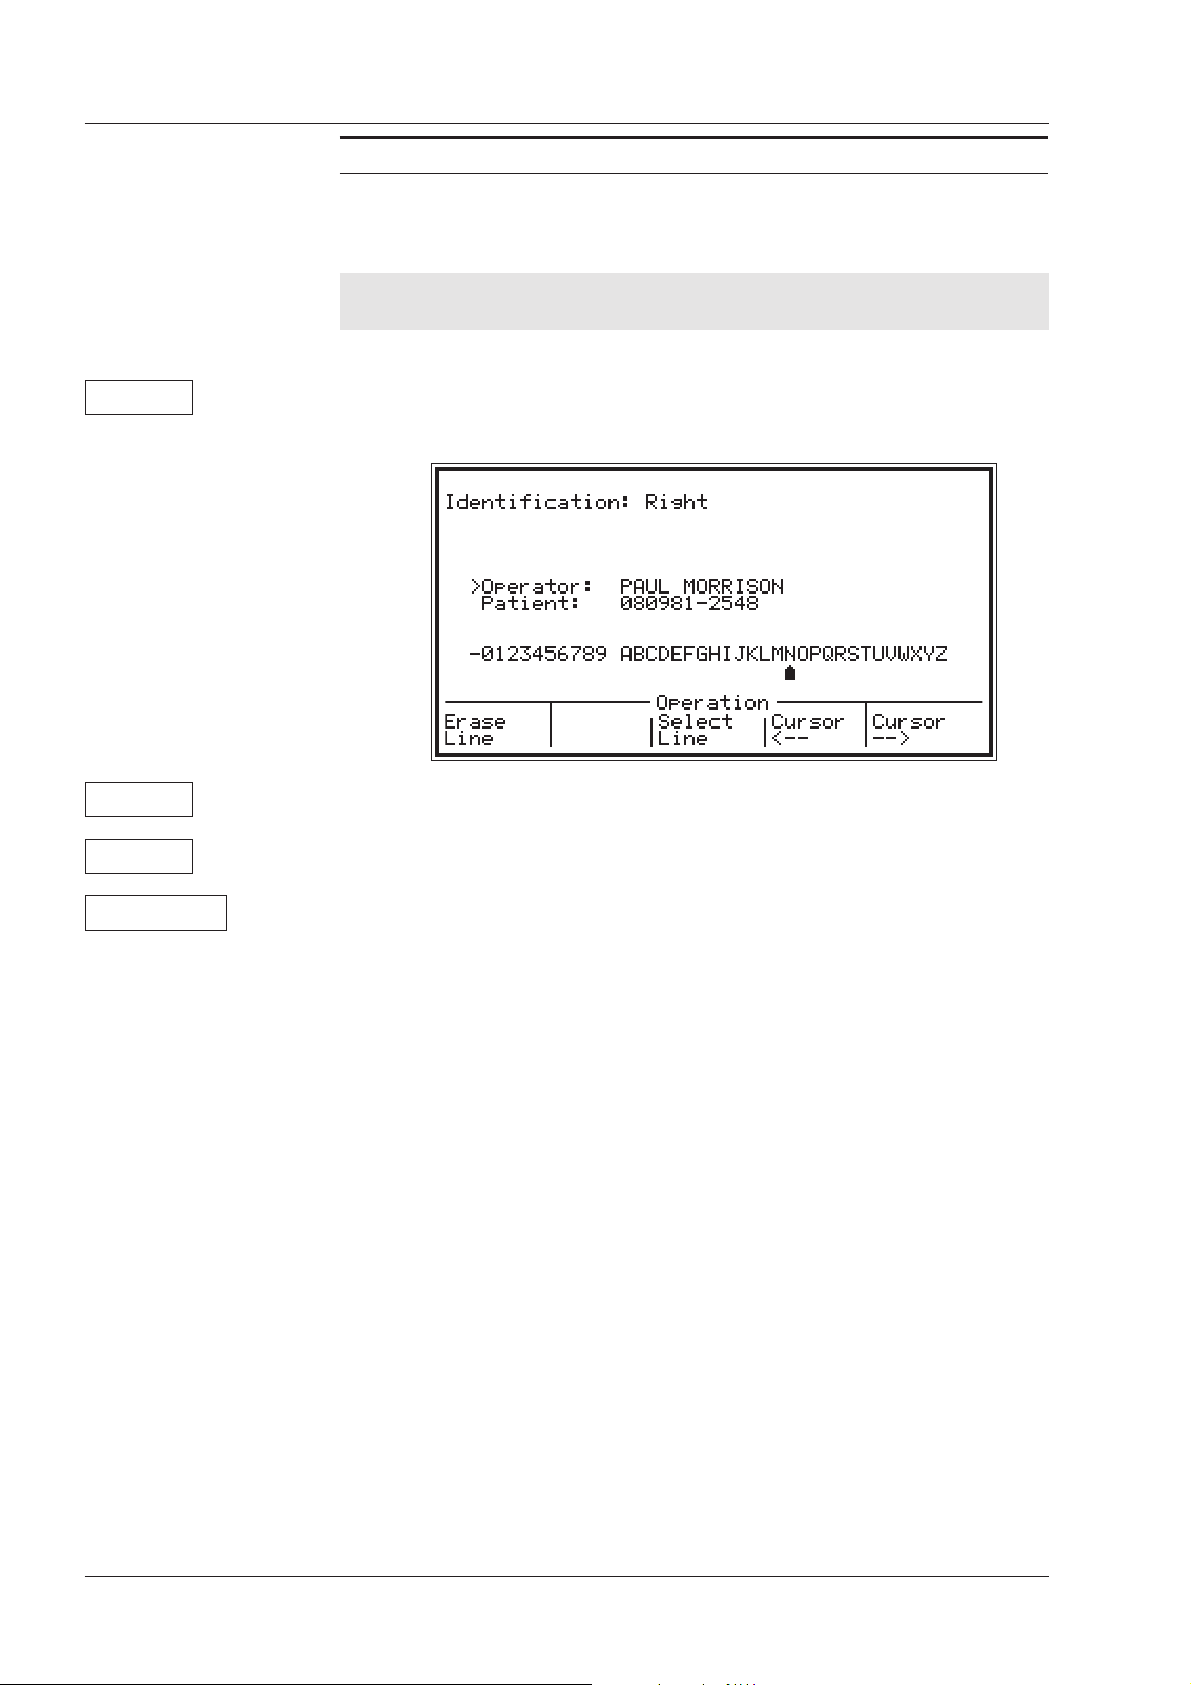
3.4.2 IDENTIFICATION
Patient I.D. Entry Entry of patient and operator identification data is enabled from the
Main Menu (Press the Main Menu key).
WARNING!
Softkey 2
Fig.3.3
Softkey 1
Softkey 3
NOTE! Changing Patient I.D.
erases all data on previous patient!
Press Softkey 2, I.D., and the Identification menu, shown in Fig.3.3, ap-
·
pears (without name and number)
Press Softkey 1, EraseLine, to clearany previousdata on selectedline.
·
·
Pressing Softkey 3, SelectLine, toggles betweenOperator andPatient.
Rotary Knob To enter I.D. data, press Softkey 3 if necessary to select the required line,
turn the Rotary Knob until you find the desired character, and press the
Tone Switch to enter the character. Pressing the Cursor arrow buttons
(Softkeys 4 and 5) moves the cursor to the right or left on each line
(max. 21 characters). If you make a mistake, return to the incorrect character(s) by means of the Cursor arrow buttons and overwrite the incorrect character(s).
The following characters are available: hyphen, 0-9, space, A-Z.
To Exit Identification
Sub-menu
Return to the Main Menu by pressing Main Menu.
22 Operation Manual
GN Otometrics GENERAL DESCRIPTION Chap. 3
ZODIAC 901 Middle-Ear Analyzer
MAIN MENU 3.4
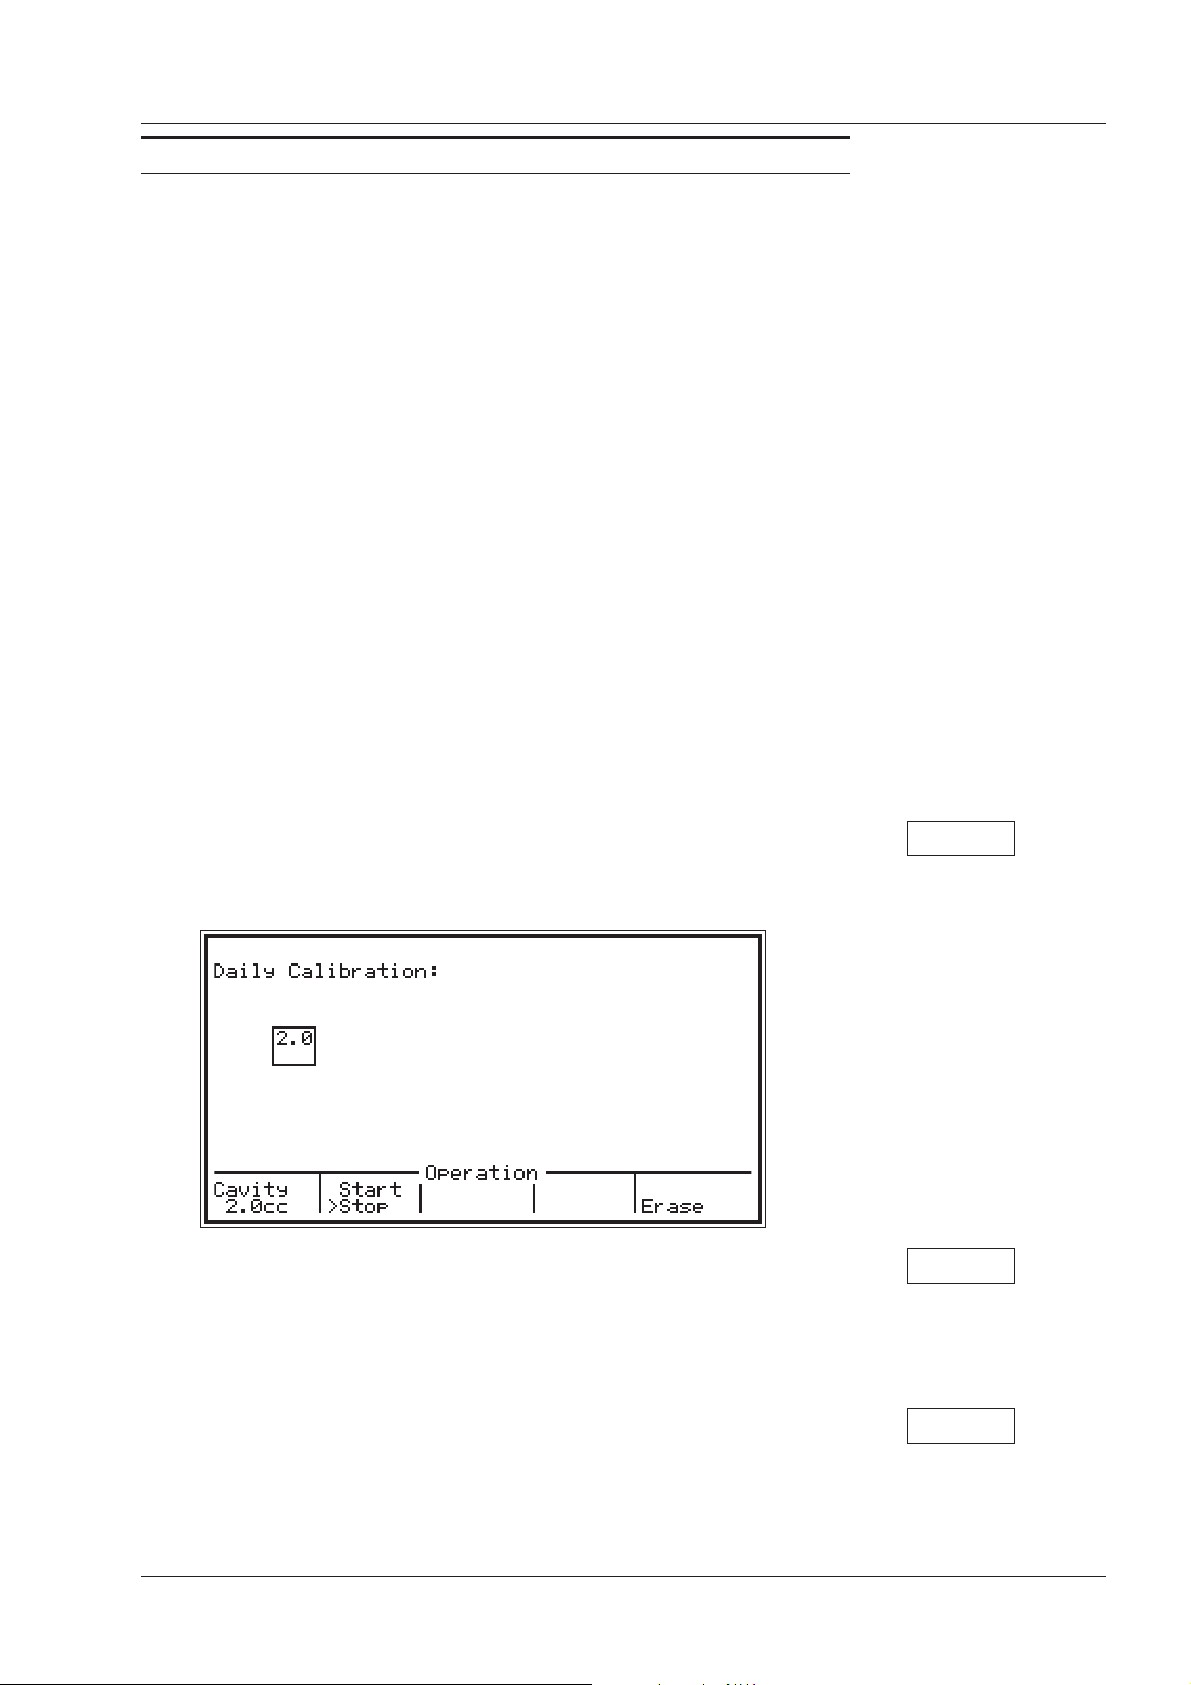
3.4.3 DAILY CALIBRATION
Your ZODIAC 901 is delivered to you fully calibrated, and should be re
calibrated annually by suitably qualified personnel, using the appropriate equipment. Your instrument may have been configured by means of
ZODICON™ to remind you when this period has expired.
with a Test Report (Calibration Certificate). The Test Report specifies
which transducers have been calibrated (i.e. those which have been supplied together with the instrument), according to which standards, and
what equipment was used for calibration. Results are listed for each
transducer at all standard frequencies.
In general, the instrument is calibrated in dB SPL or dB HL using the
stated reference equivalent thresholds; dB HL are related to sound pressure levels, db SPL = dB re 20 mPA. (1 cc = 1 ml).
Note that calibration has only been performed on the supplied transducers! If you wish to use any other transducer for testing with the
ZODIAC 901, please contact your local Madsen distributor first.
However, since the weather and barometric pressure vary from day to
day, the probe measuring system should be calibrated on a daily basis in
order to achieve the greatest possible measurement accuracy.
-
Annual
Recalibration
Test ReportYour ZODIAC 901 is dispatched from the factory in Denmark together
(maximum 15 seconds); just press Softkey 3 from the Main Menu to access the screen shown in Fig.3.4:
Fig.3.4
If provision for calibration with a second Precision Cavity having a different volume from the default has been programmed using ZODICON™, Softkey 1 may be used to toggle between the two cavities. The
volume of the cavity selected is shown in the small box on the left of the
display.
Softkey 3With the ZODIAC 901, this procedure is very quick and easy to perform
Softkey 1
Softkey 2Insert the probe into the 2.0 cc (= 2.0 ml) Madsen Electronics Precision
Cavity located in the left side of the ZODIAC 901’s cabinet. (Do not in
sert it into the Madsen Electronics Ear Simulator.) Press Softkey 2 (or
the Start/Stop Button on the Probe) to start the calibration. The Status
lamps on the Front Panel and the Probe light steadily green during cali
-
Operation Manual 23
GENERAL DESCRIPTION Chap. 3 GN Otometrics
MAIN MENU 3.4 ZODIAC 901 Middle-Ear Analyzer
bration. After a few seconds, an X appears under the cavity volume in
the box on the left of the display, indicating that the procedure has been
completed. If the Status lamps flash green slowly, check that the Probe
is not blocked with cerumen (wax), or has not been inserted into the Ear
Simulator by mistake.
Softkey 5 To re-calibrate without powering off the instrument, press Softkey 5 to erase
the existing calibration and repeat the procedure described above.
3.4.4 DEFAULT CONFIGURATION
Softkey 4 Pressing Softkey 4 invokes a menu called “Select Default Configura-
tion”. This allows changes made using Setup (see §5.2) to be cancelled,
in favour of the default. Press Softkey 1, “Yes”, to do this. (Note that
your default configuration may have been programmed using ZODICON™ software.) If cancelling changes which have been made using
Setup is not what is required, press Softkey 2, “No”.
3.4.5 EASY AND ADVANCED MODES
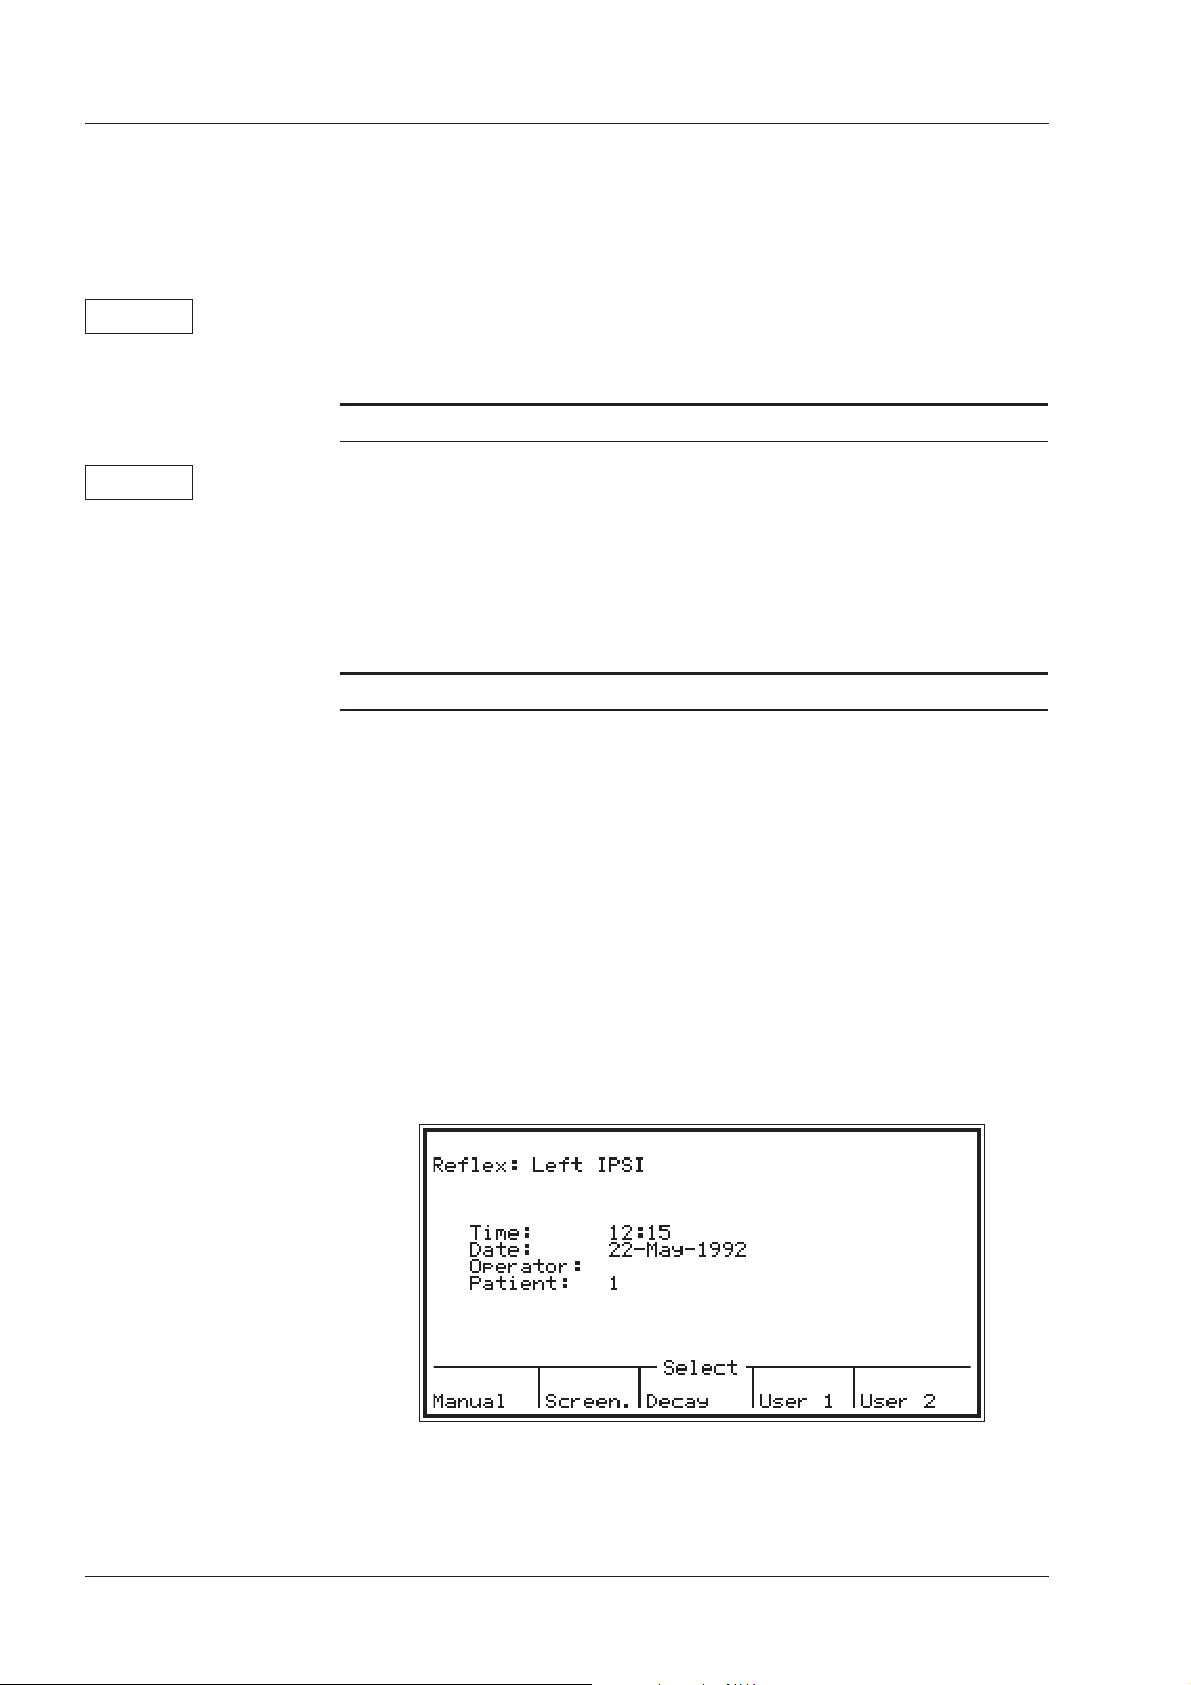
In Manual Mode, tympanometry, reflex and threshold testing are accessed
by pressing the appropriate pushbutton on the left of the front panel. However, the screen that appears in either one of these three test modes depends on whether Advanced or Easy Mode has first been selected in the
Main Menu. This selection is stored in NOVRAM, i.e. the instrument will
power on with the last selection active.
In Advanced Mode In Advanced Mode, an intermediate sub-menu appears at the bottom of
the screen offering you the following choices (for an example, see the Reflex sub-menu illustrated in Fig.3.5).
Tymp.: Manual Sweep, Auto Sweep, ETF-I ,ETF-P
Reflex: Manual, Screening, Decay, User 1, User 2
Threshold: Reflex, Fast Screening, Air Conduction
Fig.3.5
24 Operation Manual
 Loading...