

otometrics Madsen Xeta Reference Manual

MADSENXeta
Reference Manual
Doc. No.7-50-0870-EN/17
Part No.7-50-08700-EN

Copyright notice
© 2010,2019Natus MedicalDenmark ApS. Allrights reserved. ® Otometrics, the OtometricsIcon, AURICAL, MADSEN,Otoscan,
ICSand HORTMANN are registered trademarks of Natus MedicalDenmark ApSin the U.S.A.and/or other countries.
Version release date
2019-06-09 (214081)
Technical support
Please contactyour supplier.
2
Otometrics - MADSEN Xeta

Table of Contents
1 Introduction to MADSEN Xeta
1.1 The OTOsuite Audiometry Module
1.2 Intended use
1.3 About this manual
1.4 Typographical conventions
1.4.1 Navigation
2 Getting started
2.1 Patient data
2.1.1 Clearing test data
2.1.2 Viewing results
2.2 Preparing the patient
2.3 Automatic Air Conduction testing
2.3.1 Automatic Threshold testing
2.3.2 Automatic Screening
2.4 User-defined tests
3 Overview of MADSEN Xeta
3.1 Display
3.2 Front panel controls
3.2.1 Front panel layout
3.2.2 STIMULUS
3.2.3 MASKING
3.2.4 TEST
3.2.5 Signal indicators
3.2.6 Extended Range
3.2.7 Clear
3.2.8 Patient handling buttons
3.2.9 Setup
3.2.10 Change Ear (L <--> R)
3.2.11 Store/toggle threshold status
3.2.12 Response indicator
3.2.13 Stimulus/masking intensity knobs
3.2.14 Present signal buttons
3.2.15 Frequency
3.2.16 Talk Over
3.2.17 Mic. (microphone)
3.2.18 Start/Pause
3.3 Socket connections - rear panel
7
7
8
8
9
9
10
11
12
12
12
12
12
13
14
15
15
16
17
17
18
18
19
19
20
20
20
21
22
22
22
23
23
23
24
24
24
4 Navigating in the OTOsuite Audiometry Module
4.1 Audiometry Module features
4.2 The Audiometry Module menu system and toolbar
4.3 The Patient Responder indicator
4.4 The Masking Assistant
Otometrics - MADSEN Xeta
4.2.1 File menu
4.2.2 Edit menu
4.2.3 View menu
4.2.4 Tools menu
27
27
28
28
28
29
30
31
31
3

4.5 The Audiometry Module Control Panel
4.5.1 The Control Panel
4.6 The stimulus bar
4.6.1 The Tone stimulus bar
4.7 The Tone test screen
4.7.1 The work area in the Tone screen
4.7.2 The audiogram
4.7.3 Curves and symbols selection
4.7.3.1 Selecting a symbol or curve
4.7.3.2 Creating new symbols
4.7.4 Compare audiograms
4.7.5 The Legend box
4.7.6 Tone view options
4.8 Work-flow related features
4.8.1 Selecting orientation
4.8.2 Ear shift frequency and level setting
33
34
35
36
36
37
37
39
39
40
41
41
41
43
43
43
5 Preparing for testing
5.1 Preparing the test environment
5.2 Preparing the test equipment
5.2.1 Connecting the cables of the test equipment
5.2.2 Patient record lists
5.2.3 The patient responder
5.2.4 Preparing for air conduction testing
5.2.5 Preparing for bone conduction testing
5.2.6 Preparing for testing with masking
5.3 Listening check
5.4 Preparing the client
5.4.1 Hygienic precautions
5.4.2 Inspecting the client’s ear(s)
5.5 Preparing the Audiometry Module for testing
5.6 Proper transducer placement
5.7 The client/patient list
5.7.1 Create patients for the patient list
5.7.2 Transfer the patient list to the audiometer
5.8 Fetch test results from audiometer
5.9 Preparing the patient for testing
6 MADSENXeta Test Settings
6.1 Test-specific settings
6.1.1 Auto Threshold test settings
6.1.2 Auto Screening test settings
6.2 General settings
6.2.1 Return to default settings
6.3 Items in the Setup menu
45
45
45
46
46
47
47
48
49
49
50
50
50
50
50
52
52
52
52
53
55
55
55
56
58
58
59
7 Testing a patient with MADSENXeta
7.1 Automatic tone testing
7.2 Manual tone testing - getting started
7.3 Air Conduction threshold test (manual)
7.4 Bone Conduction threshold test (manual)
7.5 Testing with masking
7.5.1 Air conduction with masking - suggested procedure
67
67
67
67
70
72
72
4 Otometrics - MADSEN Xeta

7.5.2 Bone conduction with masking - suggested procedure
7.6 SISI (Short Increment Sensitivity Index)
7.6.1 Masking during SISI
7.6.2 Using STORE in the SISI test
7.7 ABLB (Alternate Binaural Loudness Balance)
7.7.1 Using STORE in the ABLB (Fowler) test
7.8 The Stenger test
7.9 Storing data
7.9.1 Registering “no response”
7.9.2 Overwriting stored values
7.9.3 Erasing a stored threshold
7.9.4 Viewing stored values
7.10 Deleting patient records
73
74
75
75
76
77
77
78
78
78
78
78
78
8 Configuring the Audiometry Module
9 Communicating with the device
9.1 Reconnecting to the device
9.2 Updating device firmware
10 Maintenance and calibration
10.1 Service and repair
10.1.1 Fuses
10.2 Cleaning
10.3 Calibration
11 Unpacking and installing
11.1 Unpacking
11.2 Storing
11.3 Installation
11.3.1 Powering
11.3.2 Connecting to a pc
11.3.3 Air conduction
11.3.4 Bone conduction
12 Maximum non-destructive voltage
12.1 Input and output sockets
12.2 RS232 interface sockets
13 Abbreviations
79
80
80
80
81
81
81
81
82
83
83
83
83
84
84
84
85
87
87
87
89
14 Standards and safety
14.1 Symbols used
14.2 Warning notes
14.3 The OTOsuite Audiometry Module
14.4 Manufacturer
15 Technical specifications
15.1 MADSEN Xeta
15.2 Accessories
15.3 Notes on EMC (Electromagnetic Compatibility)
Otometrics - MADSEN Xeta
14.4.1 Responsibility of the manufacturer
91
91
92
93
93
93
95
95
98
98
5

Index
103
6 Otometrics - MADSEN Xeta
1 Introduction to MADSEN Xeta
MADSEN Xeta is an audiometer for testing a person's hearing.
MADSEN Xeta offers air and bone audiometry as well as masking. Besides manual testing,
MADSEN Xeta employs fast automatic screening and threshold audiometry algorithms.
MADSEN Xeta incorporates multi-patient data storage and patient testing according to a preloaded patient list.
• MADSEN Xeta can be used in connection with the OTOsuite Audiometry Module software for online monitoring of
test results, data export and storage, printing, and NOAH compatibility.
Test intensities and frequencies as well as the current test settings and other information are shown on the PC monitor.
A patient list can be edited in the software and downloaded to MADSEN Xeta.
Operation
The front panel buttons have indicator lights, which clearly show the device's current settings.
Sound level, frequency and other information are shown clearly on the device display.
You can download new firmware to MADSEN Xeta, and if this involves no change to the transducers, MADSEN Xeta does
not need to be recalibrated.
1.1 The OTOsuite Audiometry Module
The OTOsuite Audiometry Module software provides a comprehensive overview of the current stimulus and masking choices both numerically and graphically in the displayed audiogram(s) while testing with a connected Otometrics audiometer.
As the module is part of OTOsuite, audiograms can be used directly in other OTOsuite modules such as AURICAL Counseling and Simulations for an optimized workflow independent of NOAH.
The OTOsuite Audiometry Module lets you work with NOAH or save and view results via XML files.
The current version supports
• basic tone audiometry and
• speech testing
• special tests, depending on the audiometer being used.
Masking Assistant
The special Masking AssistantTMfeature will notify you of thresholds that you might consider checking again with masking
applied. You may use this feature not only during testing but also to pinpoint possible masking issues with previously recorded audiograms. The applied masking rules match the general recommendations in the audiometry literature.
TM
Over the rim testing
Testing with the audiometer connected to a PC allows you to use the audiometer primarily as a handy control panel while
you follow the actual stimulus settings and test progress on your standard PC display. The large stimulus and patient
response graphics at the top of the display gives you a clear overview while keeping your focus on the patient.
Patient test planning
The OTOsuite Audiometry Module supports planning of patients for safe offline testing in the field. You can create a list of
patients which can then be downloaded to the audiometer. Each planned patient can now be safely identified, selected
Otometrics - MADSEN Xeta
7

1 Introduction to MADSEN Xeta
and tested with the audiometer based on name and personal identification. The results can be bulk uploaded to the PC
later on.
For specific information regarding audiometric test procedures and settings, please see the documentation for the specific
audiometer.
1.2 Intended use
MADSEN Xeta and the Audiometry module
Users: audiologists, ENTs and other health care professionals in testing the hearing of their patients.
Use: screening and diagnostic audiometric testing.
1.3 About this manual
Installation
See Unpacking and installing ► 83 and Overview of MADSEN Xeta ► 15 for a full description of unpacking instructions,
controls and socket connections.
Safety
This manual contains information and warnings which must be followed to ensure the safe performance of MADSEN Xeta.
Warning• Local government rules and regulations, if applicable, should be followed at all times.
• Standards and safety ► 91
gives you an overview of device labelling and standards.
• Warning notes ► 92
contains relevant warning notes.
Training
It is recommended that you read this manual and the OTOsuiteUser Guide, and make yourself familiar with MADSEN Xeta
before you begin testing a patient.
Note•If you are using the OTOsuite Audiometry Module with NOAH, we recommend that you are familiar with the
screens and functions provided in NOAH.
Terminology
The correct term for the person being tested/evaluated/serviced may depend on the setting in which the system is being
used. For this manual the term “Patient” was chosen, but you may configure OTOsuite to use another term.
8 Otometrics - MADSEN Xeta

1.4 Typographical conventions
The use of Warning, Caution and Note
To draw your attention to information regarding safe and appropriate use of the device or software, the manual uses precautionary statements as follows:
Warning• Indicates that there is a risk of death or serious injury to the user or patient.
Caution• Indicates that there is a risk of injury to the user or patient or risk of damage to data or the device.
Note•Indicates that you should take special notice.
1.4.1 Navigation
Menus, icons and functions to select are shown in bold type, as for instance in:
1 Introduction to MADSEN Xeta
• Click the Set Options icon on the toolbar or select Tools> Options...
Otometrics - MADSEN Xeta
9

2 Getting started
2 Getting started
1. If you are using OTOsuite, install OTOsuite from the OTOsuite installation disk. See the OTOsuiteInstallation Manual.
2. Install MADSEN Xeta as described in Unpacking and installing ► 83.
3. Connect the accessories, Installation ► 83:
Socket connections - rear panel ► 24 shows the location of the sockets for the various accessories required.
4. Customize your test setup and prepare the test equipment:
– User-defined tests ► 14
– Preparing for testing ► 45
5. Switch on MADSEN Xeta. MADSEN Xeta is ready for testing as soon as it is switched on.
6. Launch the OTOsuite Audiometry Module, if required.
7. MADSEN Xeta automatically starts in manual test mode. A new patient record is automatically available and is shown
briefly on the display.
Patients scheduled in the OTOsuite Audiometry Module and not yet tested are indicated by an empty set of parentheses: ().
See Patient data ► 11 for patient handling.
8. You are ready to start testing.
– Manual air conduction testing
To perform manual air conduction testing, see Air Conduction threshold test (manual) ► 67.
– Bone conduction testing
To perform bone conduction testing, see Bone Conduction threshold test (manual) ► 70.
– Special tests
To select other tests such as
SISI, see SISI (Short Increment Sensitivity Index) ► 74,
Stenger, see The Stenger test ► 77,
Fowler (ABLB), see ABLB (Alternate Binaural Loudness Balance) ► 76.
Press the function key below the test you wish to perform.
These tests are optional. To add any of these tests to your configuration, contact your local supplier.
9. To perform automatic testing, press:
– Auto Threshold for Automatic Threshold testing (Automatic Air Conduction testing ► 12).
– Auto Screening for Automatic Screening (Automatic Screening ► 13).
10. The tests settings are customised for the individual test types. To change these settings, see MADSENXeta Test Set-
tings ► 55.
MADSEN Xeta controls
Front panel controls ► 16
10 Otometrics - MADSEN Xeta
2 Getting started
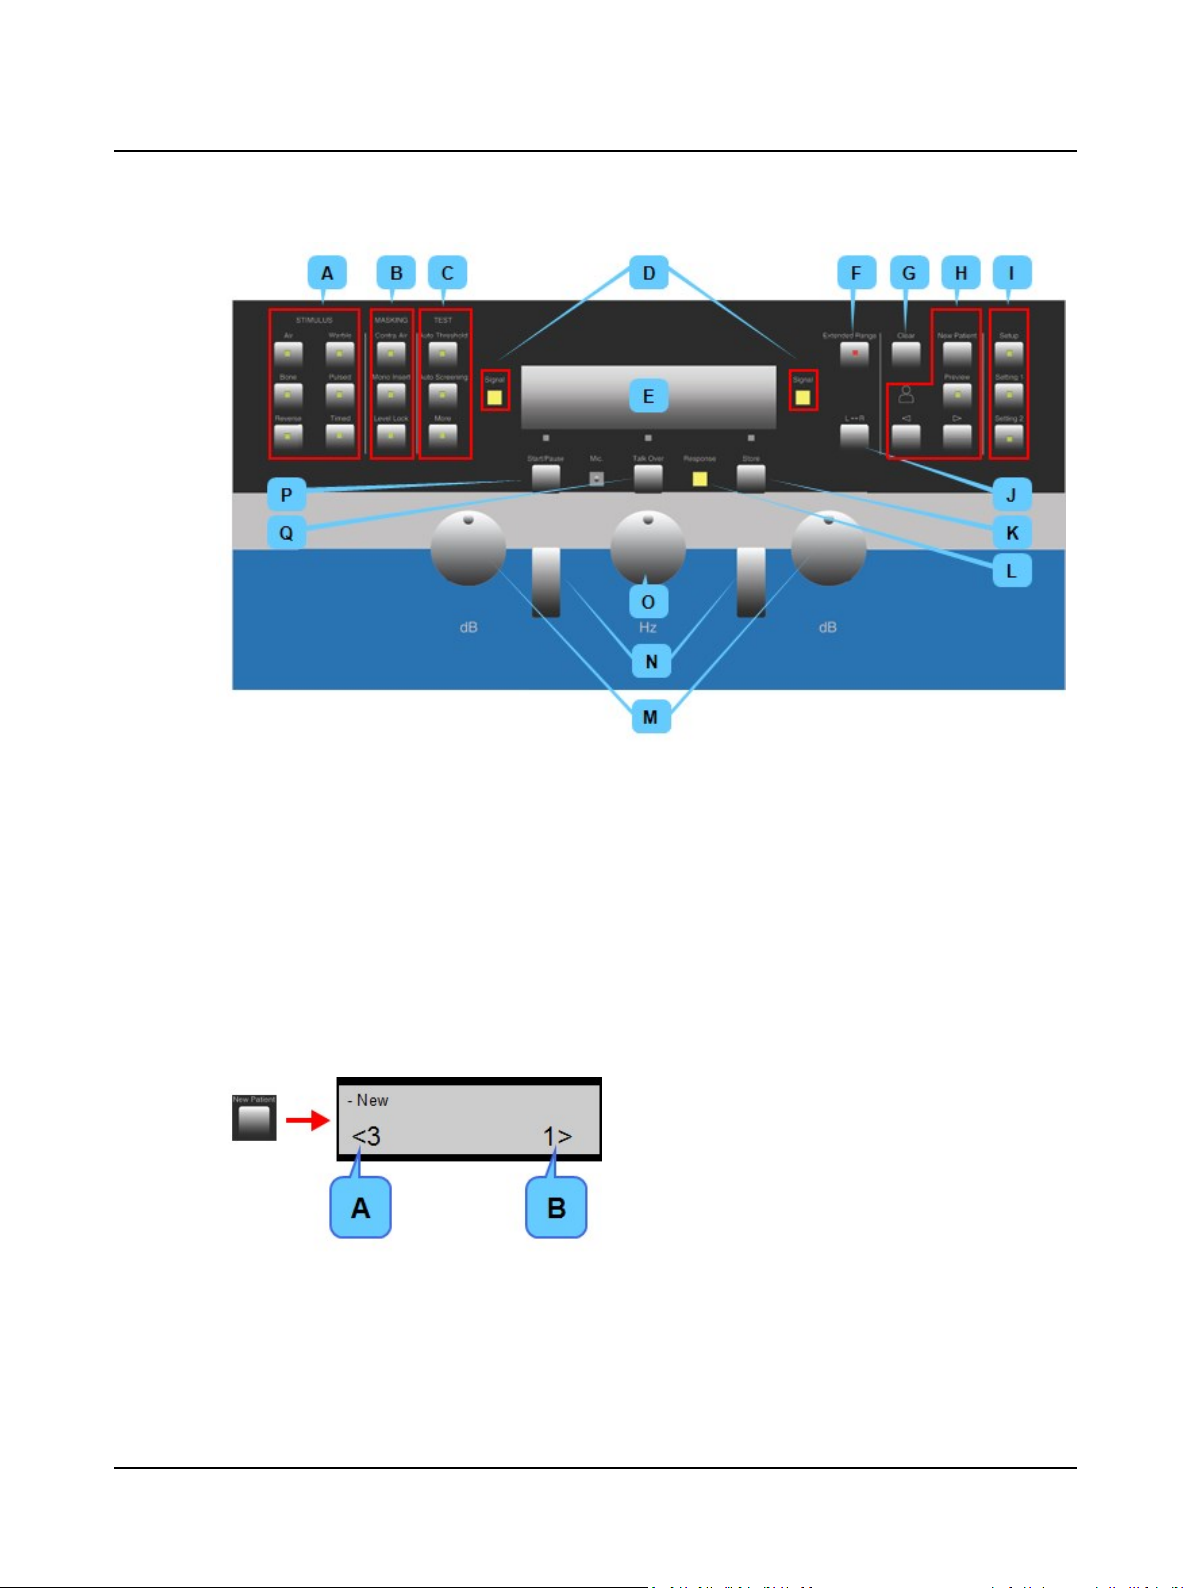
A. Stimulus
B. Masking
C. Tests
D. Signal indicators
2.1 Patient data
Patients are
• either scheduled and listed in OTOsuite (Scheduled patients) or
• stored in numbered patient records in MADSEN Xeta (Tested patients).
See also Patient record lists ► 46.
E. Display
F. Patient handling
G. Settings
H. Store/toggle status of thresholds
I. Stimulus/masking intensity knobs
J. Present/interrupt signal buttons
K. Frequency selection knob
L. Start/Pause
A. Tested patient records
B. Scheduled patients
Otometrics - MADSEN Xeta
11
2 Getting started
2.1.1 Clearing test data
If you want to clear the tests you just made without saving them, press the Clear button and choose Current. You will have
to confirm the data deletion.
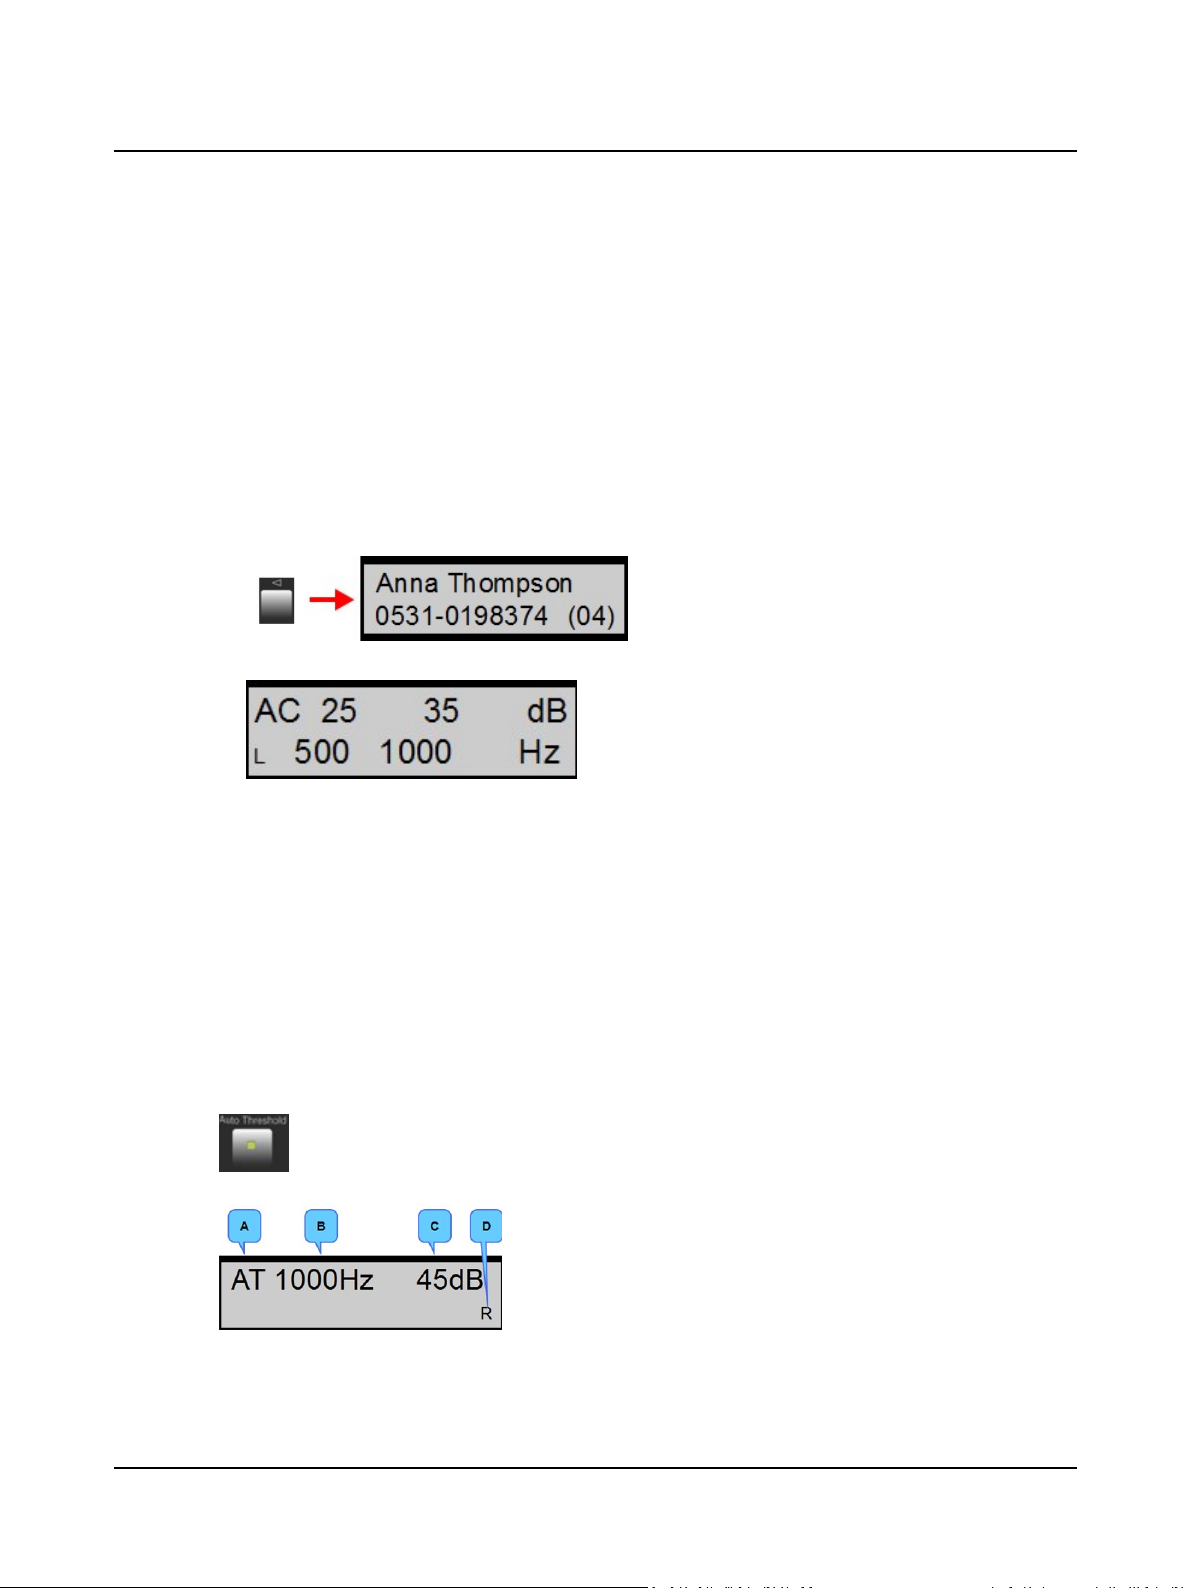
2.1.2 Viewing results
You can view results for tested patients:
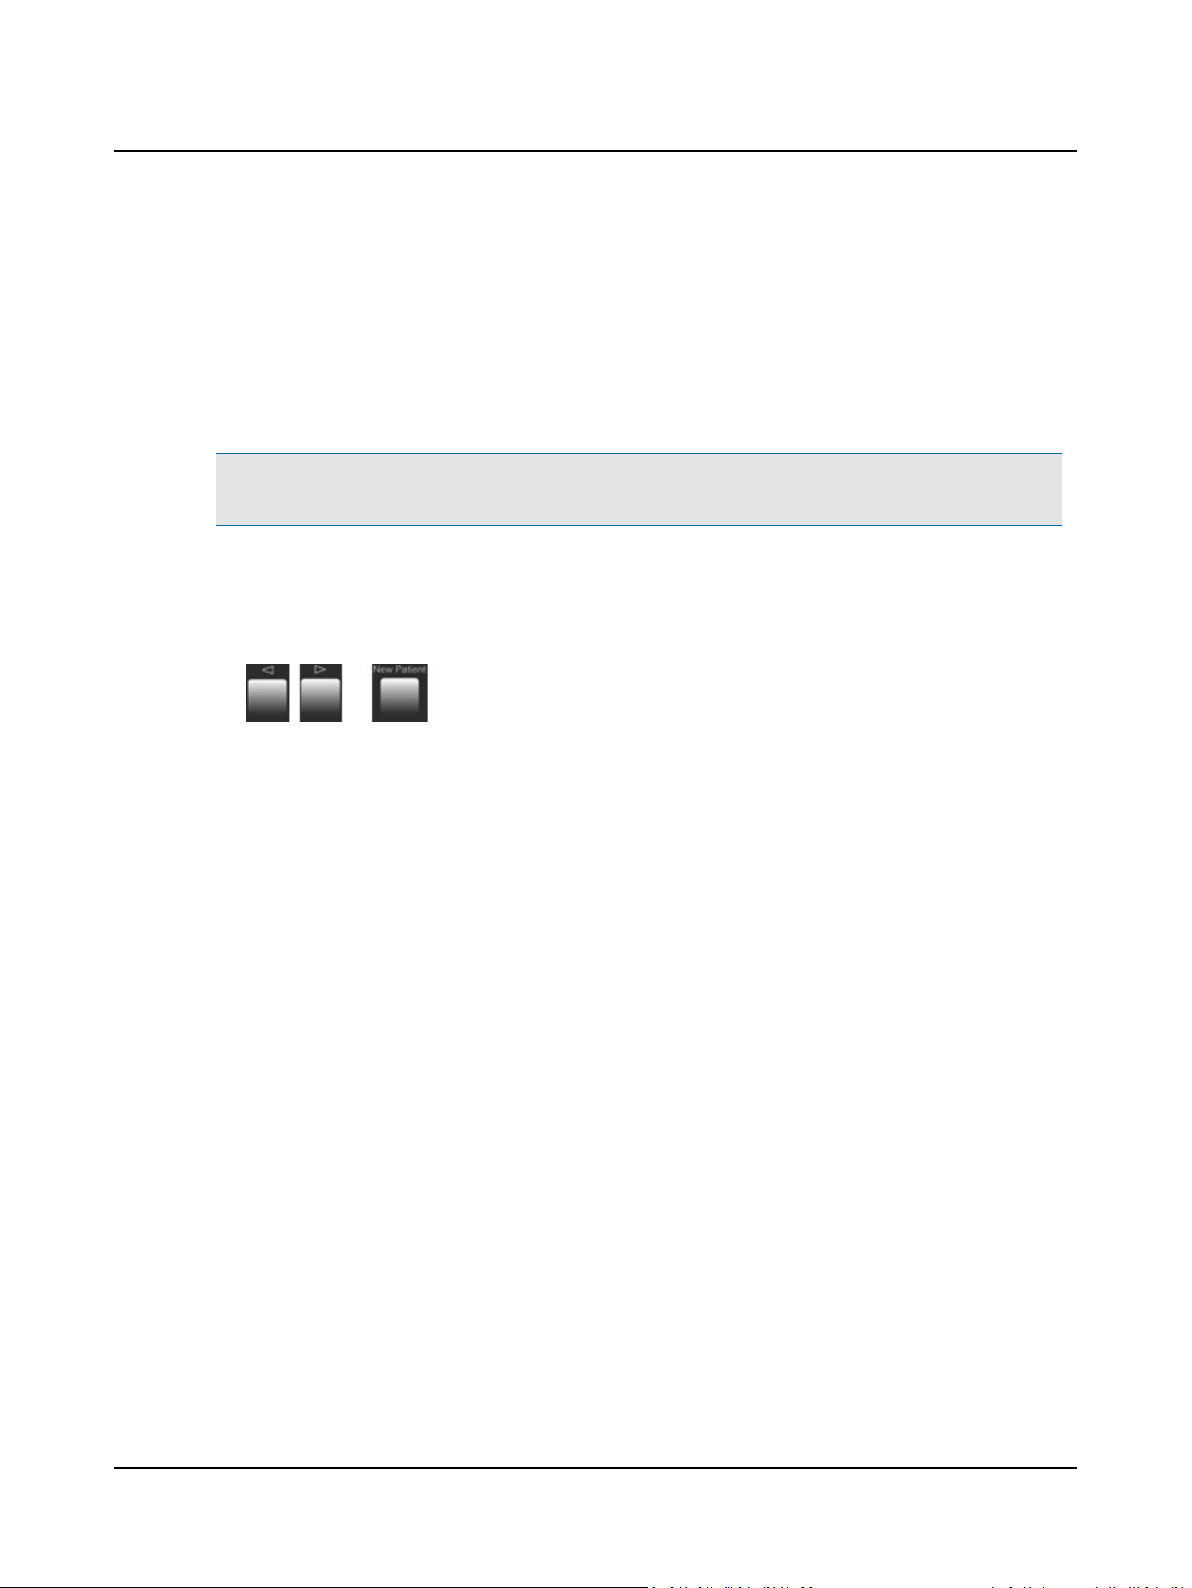
• Press Preview and scroll back and forth using the arrow buttons to select the patient record.
Already tested patients are indicated by a record number in parenthesis in the lower right corner of the display, e.g.
(16).
Example:
• Use the Left level knob to scroll through test results.
2.2 Preparing the patient
1. Instruct the patient in using the Patient Response Switch. See The patient responder ► 47.
2.3 Automatic Air Conduction testing
2.3.1 Automatic Threshold testing
The Automatic Threshold test presents tones to the patient at rising and falling levels in relation to the actual patient
response.
The test logic adheres to the modified (ascending) Hughson & Westlake method. See Air Conduction threshold test
(manual) ► 67 for a description of the method.
1. Select Auto Threshold testing: Press Auto Threshold. The button lights to indicate that you have selec-
ted the test.
For symbols used, see Symbols used ► 91.
2. Press Start or Setup.
A. Auto Threshold test
B. Current frequency
C. Starting Hearing Level
D. Starting ear selected
12 Otometrics - MADSEN Xeta
2 Getting started
– Start to start the test.
If the patient fails to respond to the presented signal, the level is automatically increased until the patient
responds to the signal.
The signal is by default presented for each tone in the following order:
1000Hz, 2000Hz, 4000Hz, and 8000Hz, followed by 1000Hz (if Cross Check is enabled), 500Hz and 250Hz.
If the patient responds before the signal is presented, the message Illegal resp.! flashes on the display and the
test is paused.
Note•You can use Talk Over at any time during the test. This will pause the test. The test is resumed when you
release the Talk Over button.
3. MADSEN Xeta beeps twice and the display shows that the test is completed. The results are stored automatically.
4. If the Masking Assistant flashes M, alternately ?, to indicate that masking may be recommended for specific frequencies, scroll through the frequencies. The audiogram symbol will flash at the specific frequencies where masking
may be recommended.
5. To retest any frequencies, see Air Conduction threshold test (manual) ► 67 and, if required, Testing with masking ►
72.
6. If required, select the next patient record (press Previous/Next) or press New Patient.
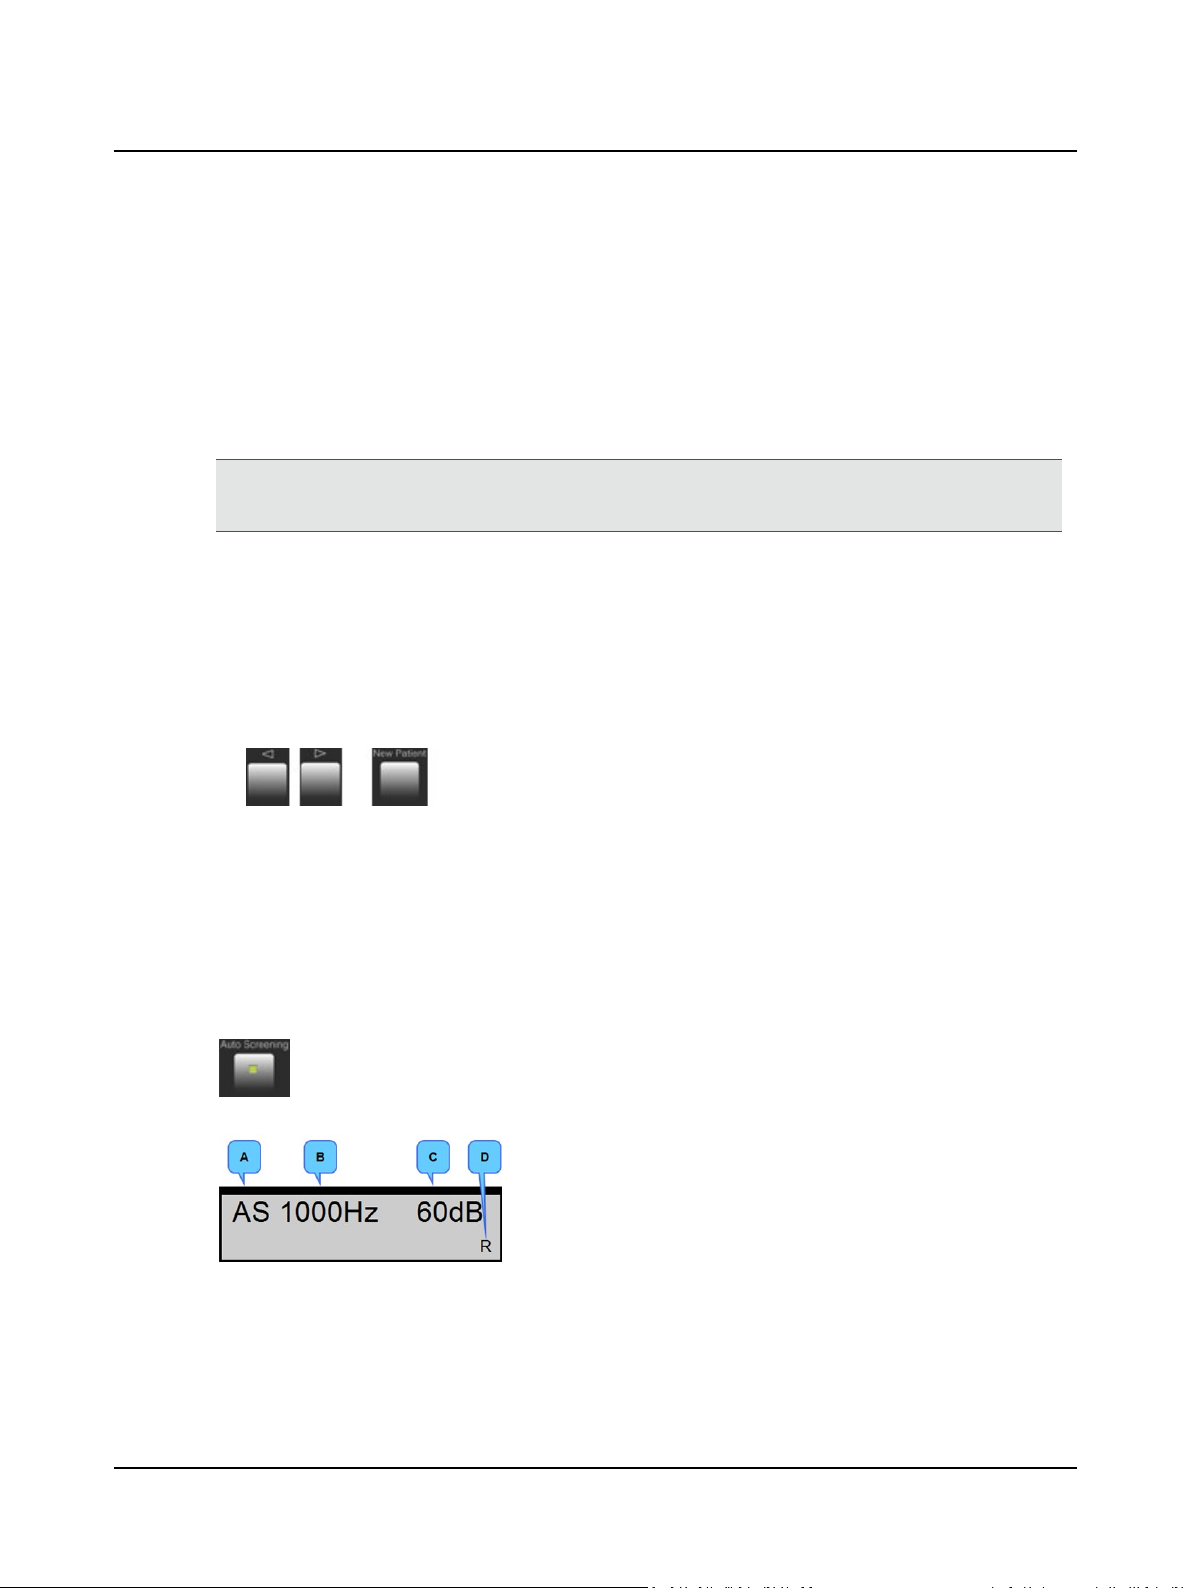
2.3.2 Automatic Screening
Screening audiometry is a quick and simple way to identify patients in need of thorough audiological evaluation.
The test involves presenting tones at a predefined Hearing Level, the screening level. The patient is either able or unable
to hear the presented tone. The results show whether the Hearing Thresholds are better or worse than the defined
screening level.
Screening audiometry can be combined with Threshold determination of the frequencies where the screening level is not
audible.
1. Press Auto Screening. The button lights to indicate that you have selected the test.
For symbols used, see Symbols used ► 91.
2. Press Start or Setup.
– Start to start the test.
– Setup to change the specific Auto Screening test settings (see Auto Screening test settings ► 56).
A. Auto Screening
B. Current frequency
C. Starting Hearing Level
D. Starting ear selected
Otometrics - MADSEN Xeta
13
2 Getting started
3. Xeta beeps twice and the display shows that the test is completed. The results are stored automatically.
4. To retest any frequencies, see Automatic Air Conduction testing ► 12 and Air Conduction threshold test (manual) ►
5. If required, select the next patient record (press Previous/Next) or press New Patient.
If the patient does not respond to the presented signal, the level is automatically increased until the patient
responds to the signal.
The signal is as default presented for each tone in the following order:
1000Hz, 2000Hz, 4000Hz, and 8000Hz, followed by 500Hz and 250Hz.
If AS Do AT when AS fails ► 57 is set to to Yes, the Auto Threshold test is activated immediately when a fre-
quency fails. The test returns to Auto Screening when a threshold has been determined for the specific frequency. See also Automatic Air Conduction testing ► 12.
Note•You can use Talk Over at any time during the test. This will pause the test. The test is resumed when you
release the Talk Over button.
67.
2.4 User-defined tests
With MADSEN Xeta you can quickly and easily customize your tests for maximum efficiency.
Make the changes you want in the setup of MADSEN Xeta and save these changes as a specific User Test. See Setup ► 20.
14 Otometrics - MADSEN Xeta
3 Overview of MADSEN Xeta
A. Rear panel connections
The rear panel contains the ON/OFF switch, the sockets for connecting
various accessories and the socket for power connection. See Socket
connections - rear panel ► 24.
B. Display
Settings and the test as it progresses are shown on the display. See Dis-
play ► 15.
C. Front panel controls
MADSEN Xeta is operated from the front panel. See Front panel con-
trols ► 16.
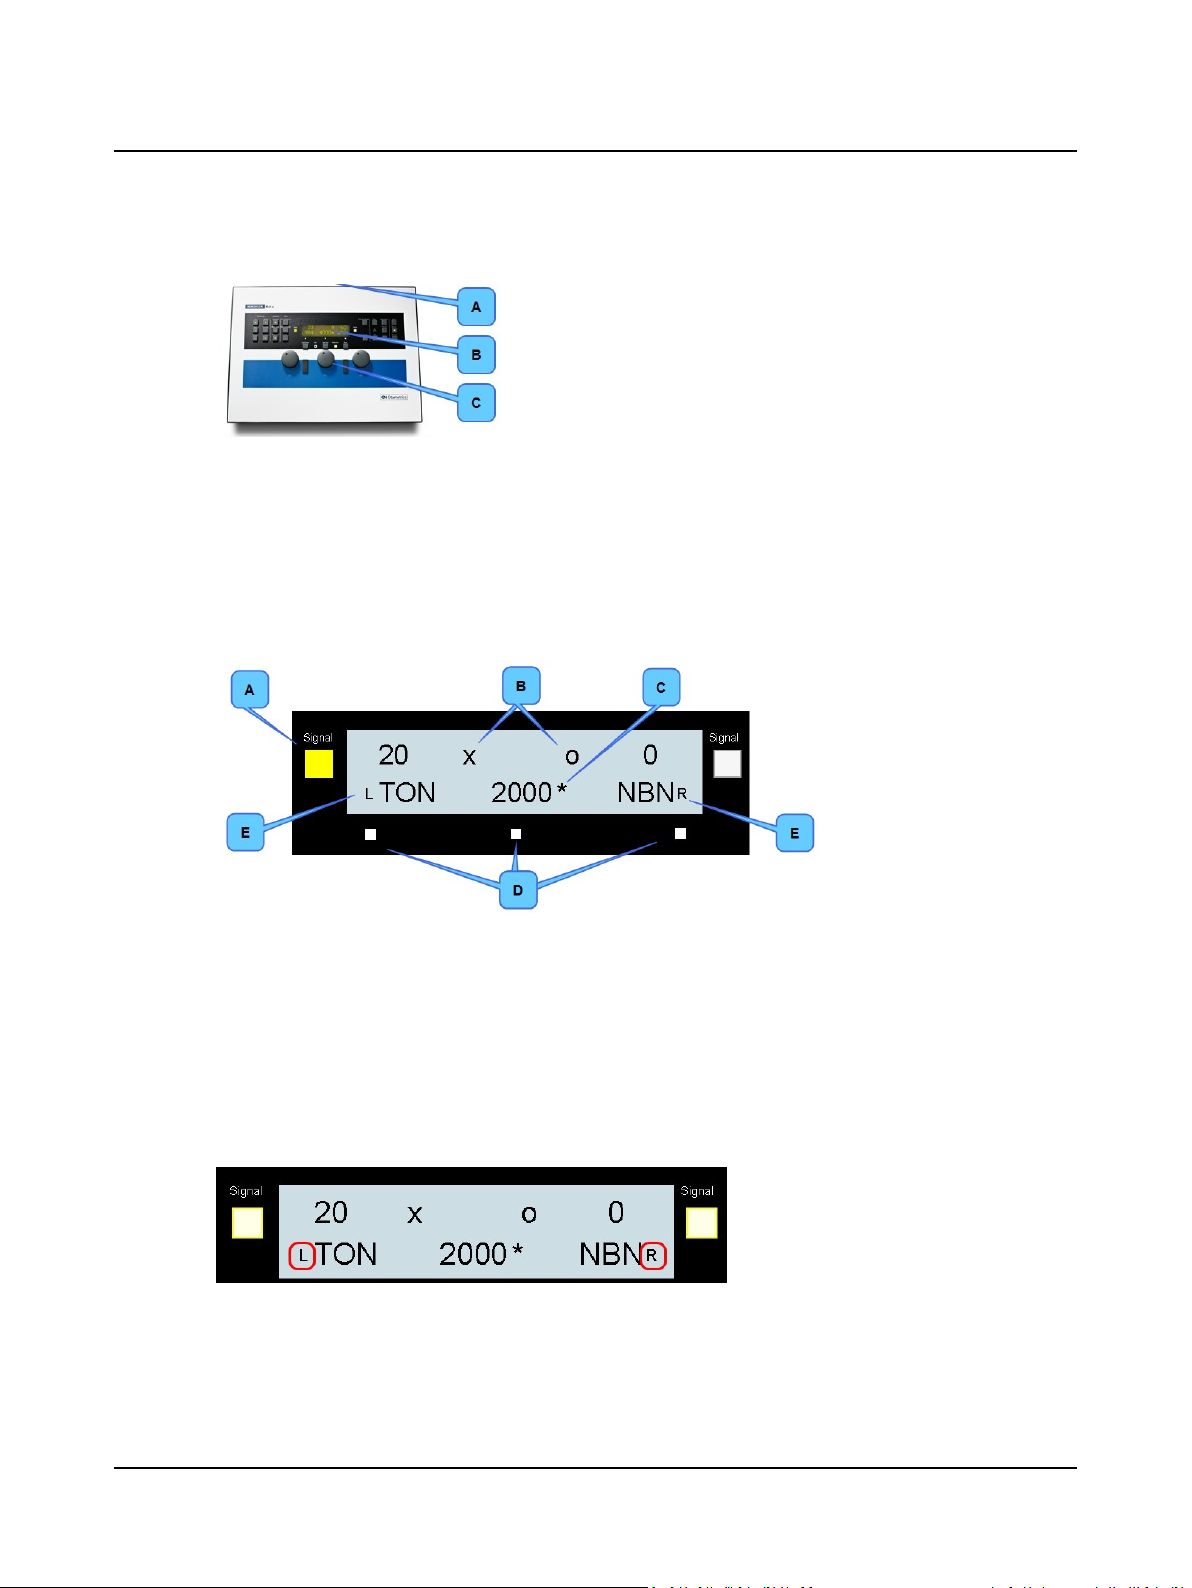
3.1 Display
A. Test signal indicator
B. Audiogram symbols
C. Stored threshold
D. Function key markers
E. Ear indicator
During start-up the display briefly shows information regarding the device type and version, followed by the test screen last
used.
The abbreviations used on the display are explained in Abbreviations ► 89.
Top line
During testing the top line in the display shows the intensity numerically in dBHL for the left and right ear.
Ear selection
The ear being tested is indicated with L or R in the display. The display side for L and R can be changed in the settings. See
Display ► 61.
Otometrics - MADSEN Xeta
15
3 Overview of MADSEN Xeta
Frequency
The selected test frequency for tone testing is shown at the center.
Masking
If masking for the contralateral ear is enabled, this is shown on the opposite side.
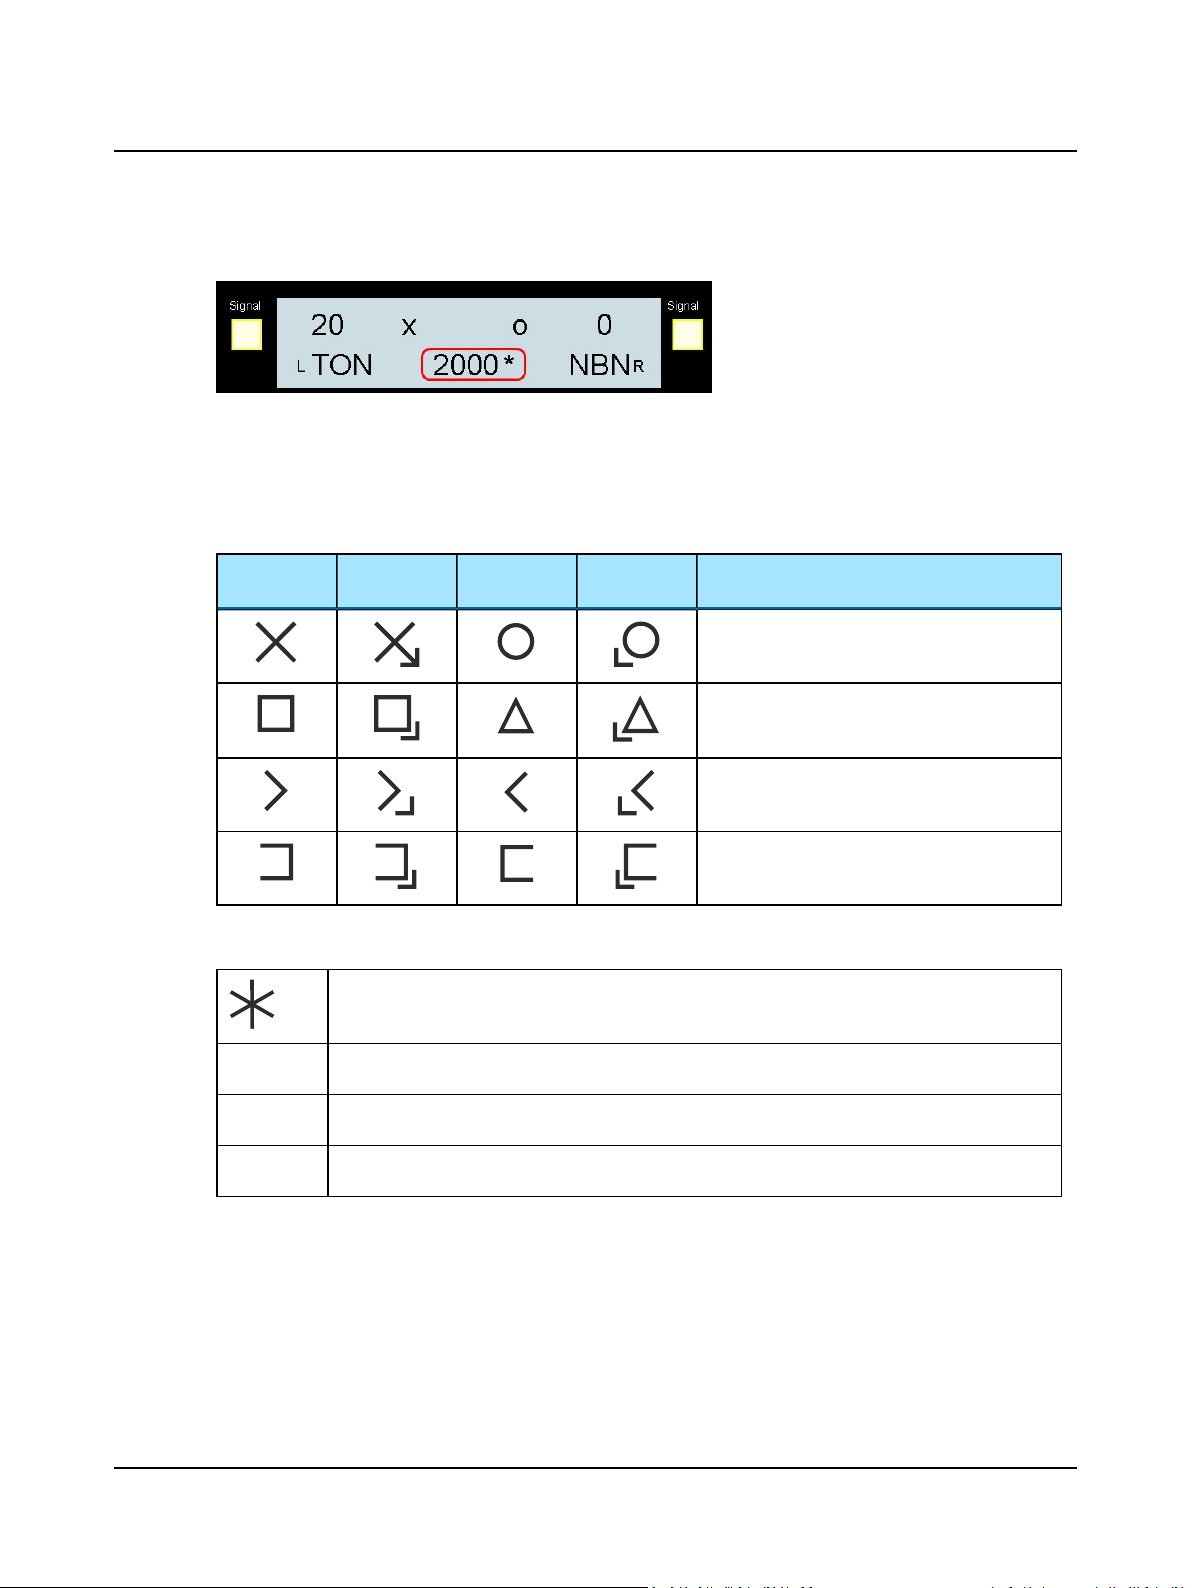
Symbols used
Left ear
Response
Other symbols
a
fs
Left ear
No response
Stored
Automatically tested (preceded by the relevant response symbol)
Failed screening level (Auto Screening only)
Right ear
Response
Right ear
No response
Air, unmasked
Air, masked
Bone, mastoid, unmasked
Bone, mastoid, masked
s
Screening level (preceded by the relevant response symbol)
3.2 Front panel controls
You can access all basic functions directly by using the buttons and knobs on the front panel.
The button light indicators
Each button has its own function. Some buttons have a light to indicate whether the function is currently active or not.
16 Otometrics - MADSEN Xeta
• Press the button to activate.
• Press the button again to deactivate.
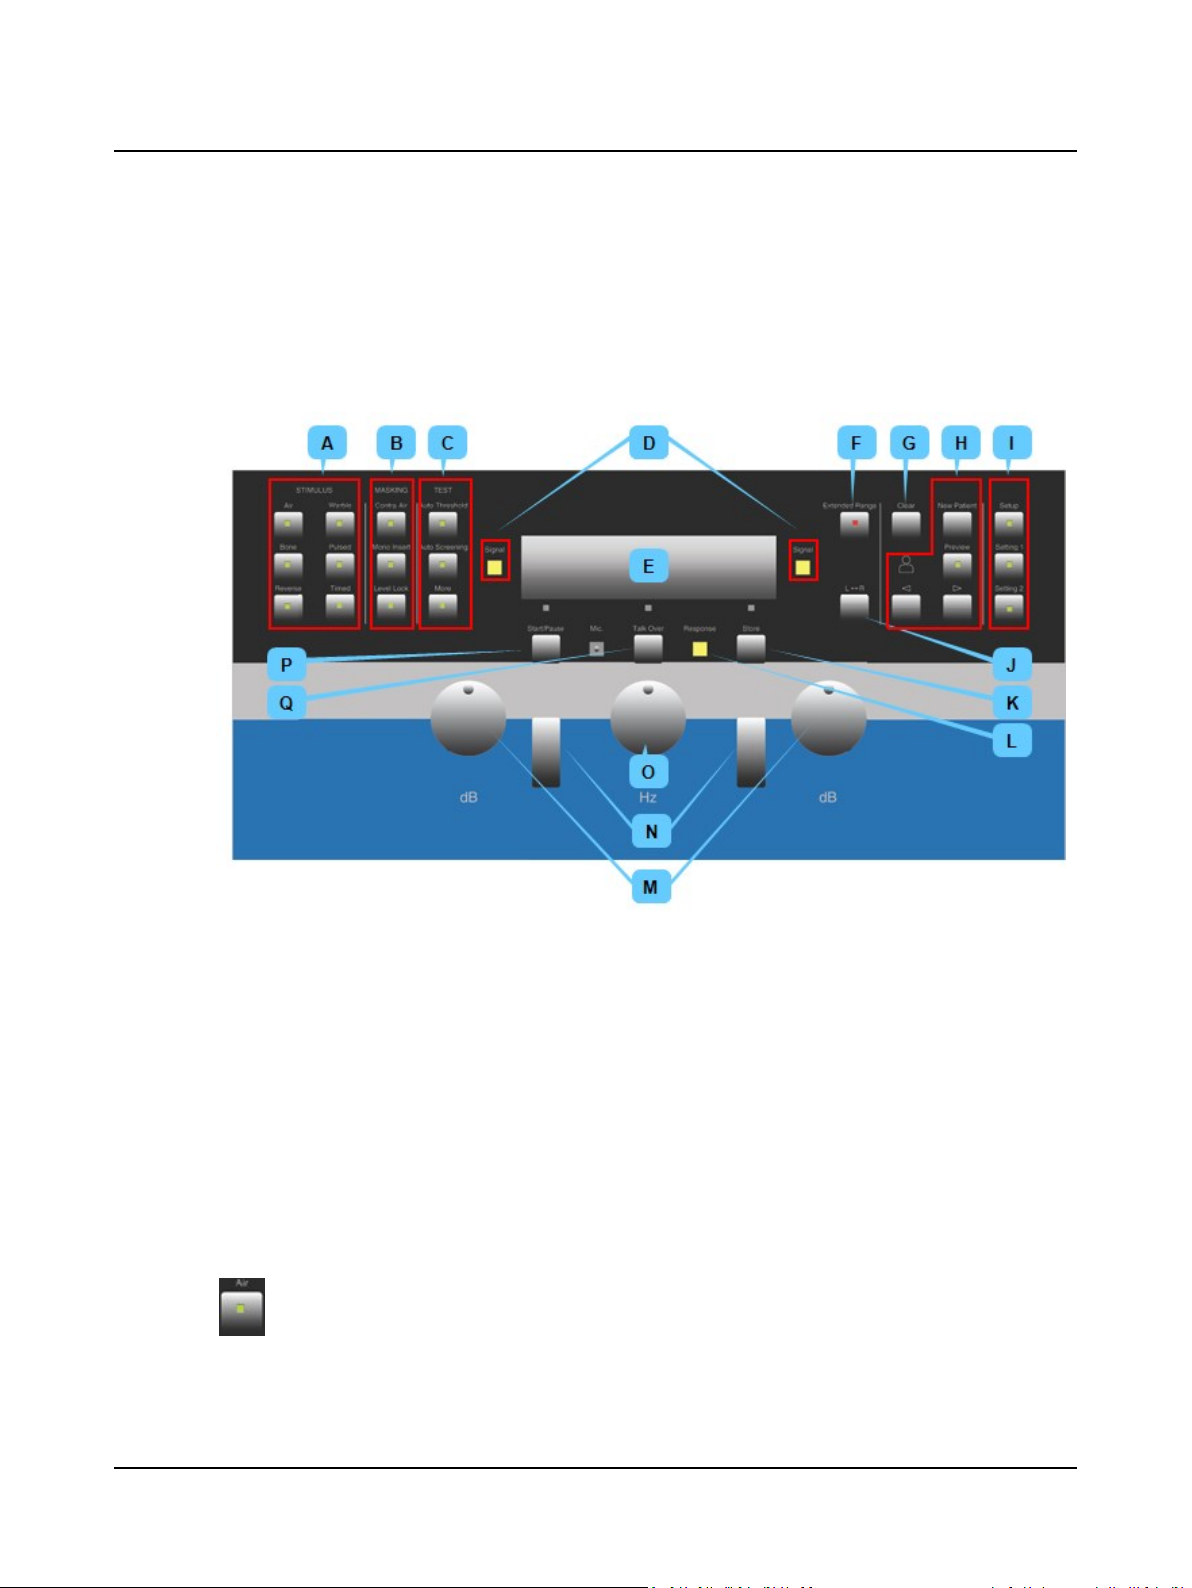
3.2.1 Front panel layout
The MADSEN Xeta buttons and controls are grouped according to their function and how frequently they are used.
The buttons and knobs most frequently used are placed directly below the display.
3 Overview of MADSEN Xeta
A. STIMULUS ► 17
B. MASKING ► 18
C. TEST ► 18
D. Signal indicators ► 19
E. Display ► 15
F. Extended Range ► 19
Beep
If you try to use a button which is not enabled, you will hear two short beeps.
MADSEN Xeta also beeps when an automatic test is completed and when settings are stored.
3.2.2 STIMULUS
Air
Selects air conduction (via headset or inserts).
The transducer selected under Setup is displayed as long as the button is pressed. See AC Transducer ► 62.
Otometrics - MADSEN Xeta
G. Clear ► 20
H. Patient handling buttons ► 20
I. Setup ► 20
J. Change Ear (L <--> R) ► 21
K. Store/toggle threshold status ►
22
L. Response indicator ► 22
M. Stimulus/masking intensity knobs ►
22
N. Present signal buttons ► 23
O. Frequency ► 23
P. Talk Over ► 23
Q. Mic. (microphone) ► 24
R. Start/Pause ► 24
17
3 Overview of MADSEN Xeta
Bone
Selects bone conduction (via bone conductor on mastoid).
Reverse
Reverses the function of the Present stimulus button:
• Active (indicator lit)
• Inactive (indicator not lit)
Note•The presentation only applies to the stimulus signal. The masking signal is normally always ON. To change the
masking interrupter's function see Mask. present. ► 60.
Warble
Frequency modulates the stimulus signal ±5% at a rate of 5Hz around the selected frequency.
The test signal is presented continuously and the stimulus is interrupted when you press the Present stim-
ulus button.
The test signal is presented when you press the Present stimulus button.
3.2.3 MASKING
• By default, you always adjust the stimulus signal level on the LeftLevel knob, regardless of whether you are testing
the right or left ear.
• To adjust the masking intensity use the RightLevel knob.
To change the default setting, see Level knob ► 62.
Pulsed
The stimulus signal is presented with a Pulse/Pause ratio of 50%.
Timed
The stimulus signal is presented with a preset duration. Does not apply in Reverse mode.
Contra Air
Contralateral masking via stereo Air Conductor (headset or insert phones).
Mono Insert
Contralateral masking via mono insert phone (for bone conduction test only).
Level Lock
Makes the masking level follow the stimulus signal level. You can adjust the difference between the stimulus
signal and the masking signal by using the Right level knob.
3.2.4 TEST
Manual Tone testing is active by default.
18 Otometrics - MADSEN Xeta
3 Overview of MADSEN Xeta
Auto Threshold
Selects the Automatic Threshold test. For a description, see Automatic Air Conduction testing ► 12.
When activated, the button flashes to indicate that you have selected the test, or that the test has been
paused by the user, by faulty responses or by talk-over.
Auto Screening
Selects the Automatic Screening test. For a description, see Automatic Screening ► 13.
When activated, the button flashes to indicate that you have selected the test, or that the test has been
paused by the user, by faulty responses or by talk-over.
More (tests)
Press to see the optional test types. Press the desired function key to select.
For a description of the additional tests, see
• SISI (Short Increment Sensitivity Index) ► 74
• The Stenger test ► 77
• ABLB (Alternate Binaural Loudness Balance) ► 76
These tests are optional. To add any of these tests to your configuration, contact your local supplier.
3.2.5 Signal indicators
The indicators are located on either side of the display. They light up when the selected test signal is presented
in the corresponding ear.
• Discreet mode
In the Auto Threshold and Auto Screening tests you can change the setting of the signal indicators to Dis-
creet mode, which means that they do not light up when the test signal is presented. If MADSEN Xeta is in
view of the patient, this will prevent the patient from knowing when a signal is presented.
This mode also prevents the patient from simulating hearing, because the stimulus level is hidden during
the automatic test.
3.2.6 Extended Range
Enables presentation of stimuli above the safety limit (approx. 100dB). The safety limit is set to 20dB
below the maximum dBHL for a given transducer and frequency.
Note•Automatic testing is always limited to 100dBHL.
Extended Range has 2 modes (to select, see Extended Range ► 61):
• Auto
All levels at all frequencies are always accessible, but the Extended Range button will start flashing when a level above
100dB HL is reached.
• Manual
The first time extended range above 100dBHL is reached after patient change or ear change, press the Extended
Range button once to allow for access to any level at any frequency with any selected manual test and signal type
Otometrics - MADSEN Xeta
19

3 Overview of MADSEN Xeta
(totally unrestricted after manually confirmed once). If active, the button is lit at lower levels to indicate that it is active, and starts flashing as a warning when entering the extended range.
You can manually deactivate the Extended Range button at any time, meaning that you must press it again, if the
extended range is reached again.
3.2.7 Clear
Deletes patient records:
• Press to clear current or all records.
You will be prompted to select current or all records. Select and confirm your selection.
3.2.8 Patient handling buttons
New Patient
Selects a new empty patient record. These records are numbered automatically.
See also Patient record lists ► 46.
Preview
If required, press Change Ear to view data for the other ear.
See also Viewing results ► 12 for examples.
Scroll Patient List
3.2.9 Setup
Press to view patient records and test data.
Displays the patient name and ID. If the name is too long, the display will show the first part briefly, then switch
to the second part.
When MADSEN Xeta is switched on, a new patient record is automatically available.
Scroll through the patient records list. The list may include patients scheduled from the PC.
Previous scrolls through patients already tested.
Next scrolls through scheduled patients.
When you have reached the start or the end of the list, the “New” record will be displayed once
more.
See also Patient data ► 11.
Changing the setup
• Test-specific settings ► 55.
• General settings ► 58.
20 Otometrics - MADSEN Xeta

3 Overview of MADSEN Xeta
Restoring factory default settings
To restore factory default settings:
1. To access the Setup menu of MADSEN Xeta, press Setup.
When the Setup function is active, the Setup button flashes. Most other buttons are deactivated and you cannot run
any tests.
2. Turn the Left level knob to scroll through the parameter list.
3. Select Device settings ► 64.
4. Press the Reset function key below the display.
5. Press Setup to exit.
Setting 1 and Setting 2 - customizing tests
Changing the setup
If you select a different function when you have selected a user-defined test, the Settingbutton will flash to indicate the
change.
• To return to your original setting, press the Setting button briefly.
• To add this new function to your setup, press and hold the Setting button until you hear a beep.
Using a user-defined test
1. Press Setting1 (or Setting2) .
2. You can now perform a test based on the settings selected in Setting1 (or Setting2) .
Automatic reload of the last used settings
MADSEN Xeta is optimized for testing patient after patient in the same consistent manner. To support this, MADSEN Xeta
remembers the settings you used for testing the previous patient, i.e. the settings selected when the first threshold was
stored. If Setting1 or Setting2 was used, that setting will automatically be reloaded and used for the next patient. Set-
tings are reloaded whenever you select New Patient, change patient using the right or left arrows, and when you switch
the power off and back on.
MADSEN Xeta has a third configurable setting. If neither Setting1 or Setting2 is selected (you can de-select Setting1 or
Setting2 by pressing the active Setting button twice) the audiometer uses the third setting. The third setting is defined as
the settings present when storing the first threshold for a patient while neither Setting1 or Setting2 were selected. The
third setting is also remembered and reloaded from patient to patient.
3.2.10 Change Ear (L <--> R)
• Press this button to switch between testing the left and right ear.
Note•Automatic tests automatically switch ear.
Otometrics - MADSEN Xeta
21
3 Overview of MADSEN Xeta
3.2.11 Store/toggle threshold status
Stores a threshold in the internal memory. Thresholds are stored indefinitely (even if the power is switched
off), unless you delete them by pressing Clear.
If a previously stored threshold is present, it will be replaced by the new threshold when you press Store.
Toggle threshold status and symbol
• If you press and hold Store, it toggles the threshold status and symbol shown on the display between “threshold
value”, “No response” or no symbol. Release the button when it shows the wanted status.
Change frequency after Store
• You can set up the Store button to automatically change the stimulus to the next test frequency.
See AC store: Change freq. ► 59.
When you select a frequency and intensity at which a threshold value has previously been found, this value is shown in the
display by means of an "*" symbol beside the frequency indication, and the applicable audiogram symbol beside the level
indication, depending on the selection of ear, masking and transducer type.
3.2.12 Response indicator
Lights up when the patient presses the patient responder. You will hear a “beep” at the same time.
See The patient responder ► 47.
3.2.13 Stimulus/masking intensity knobs
Left Level knob
The Left level knob
• changes the intensity of the test signal in 5dB steps,
• scrolls between values and functions shown in the display.
Intensity change - stimulus signal
• Changes the intensity for the stimulus signal regardless of whether the signal is being sent to the left
or right ear. Turn clockwise to increase the intensity and counter-clockwise to decrease.
To change this setting, see Level knob ► 62.
Masking and intensity
If the masking signal is in locked mode, the intensity of the masking signal is also changed.
22 Otometrics - MADSEN Xeta
Right Level knob
The Right level knob
• changes the intensity of the masking signal in 5dB steps
• scrolls between values and functions shown in the display.
Intensity change - masking signal
Changes the intensity for the masking signal. To change this setting, see Level knob ► 62.
Turn clockwise to increase the intensity and counter-clockwise to decrease.
3.2.14 Present signal buttons
Left Present Signal button
Presentation of stimulus signal. In normal mode, press to present the stimulus. If Reverse is enabled, press to
interrupt the stimulus.
3 Overview of MADSEN Xeta
Right Present Signal button
The right Present Signal button usually functions in total parallel with the left Present Signal button.
Controlling the masking signal
Controls the masking signal. See Mask. present. ► 60.
3.2.15 Frequency
Changing the frequency
Turn clockwise to increase the frequency and counter-clockwise to decrease it.
The selected frequency is shown on the display.
Standard audiometric frequencies
125Hz, 250Hz, 500Hz, 750Hz, 1000Hz, 1500Hz, 2000Hz, 3000Hz, 4000Hz, 6000Hz, and 8000Hz.
3.2.16 Talk Over
The Frequency knob
• changes the frequency,
• scrolls between values and functions shown in the display.
Enables talk-over via the built-in microphone while the button is pressed.
Automatic testing is temporarily paused during talk over.
Otometrics - MADSEN Xeta
23
3 Overview of MADSEN Xeta
Level adjustment
When you press and hold Talk Over, you can adjust the talk over output level in the headphone using the Left or Right
level knob.
The approximate dBHL is shown on the display.
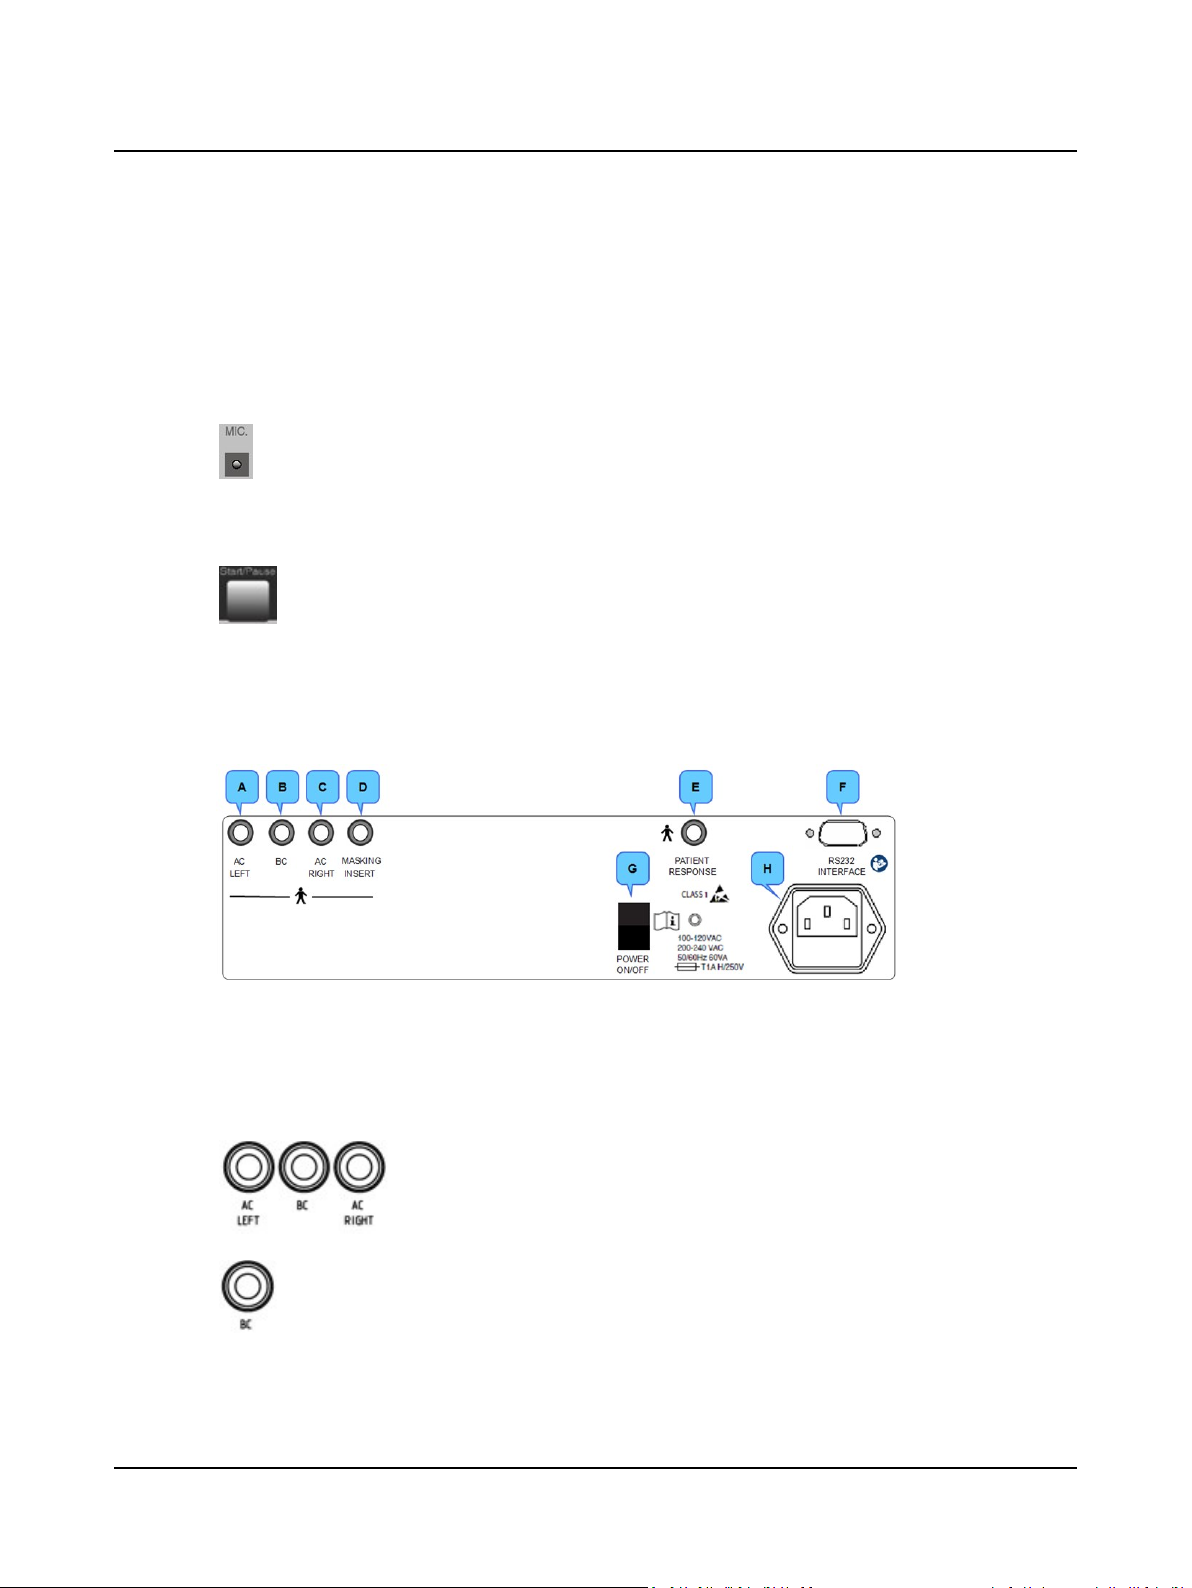
3.2.17 Mic. (microphone)
The internal microphone for Talk Over.
3.2.18 Start/Pause
Press Start/Pause to start, continue or pause a test.
Press the relevant test button to stop the test.
• SISI:
If you have paused the SISI test, press to stop test completely during the pause.
3.3 Socket connections - rear panel
A. AC left
B. BC
C. AC right
D. Masking insert
AC LEFT and AC RIGHT
Connection for the AC transducer to the enclosed headphone. Blue 1/4" jack plug for AC
Left and red 1/4" jack plug for right AC Right.
BC
Connection for the black 1/4" jack plug from the bone conductor.
E. Patient response
F. RS232 interface
G. On/off switch
H. Mains power socket
24 Otometrics - MADSEN Xeta
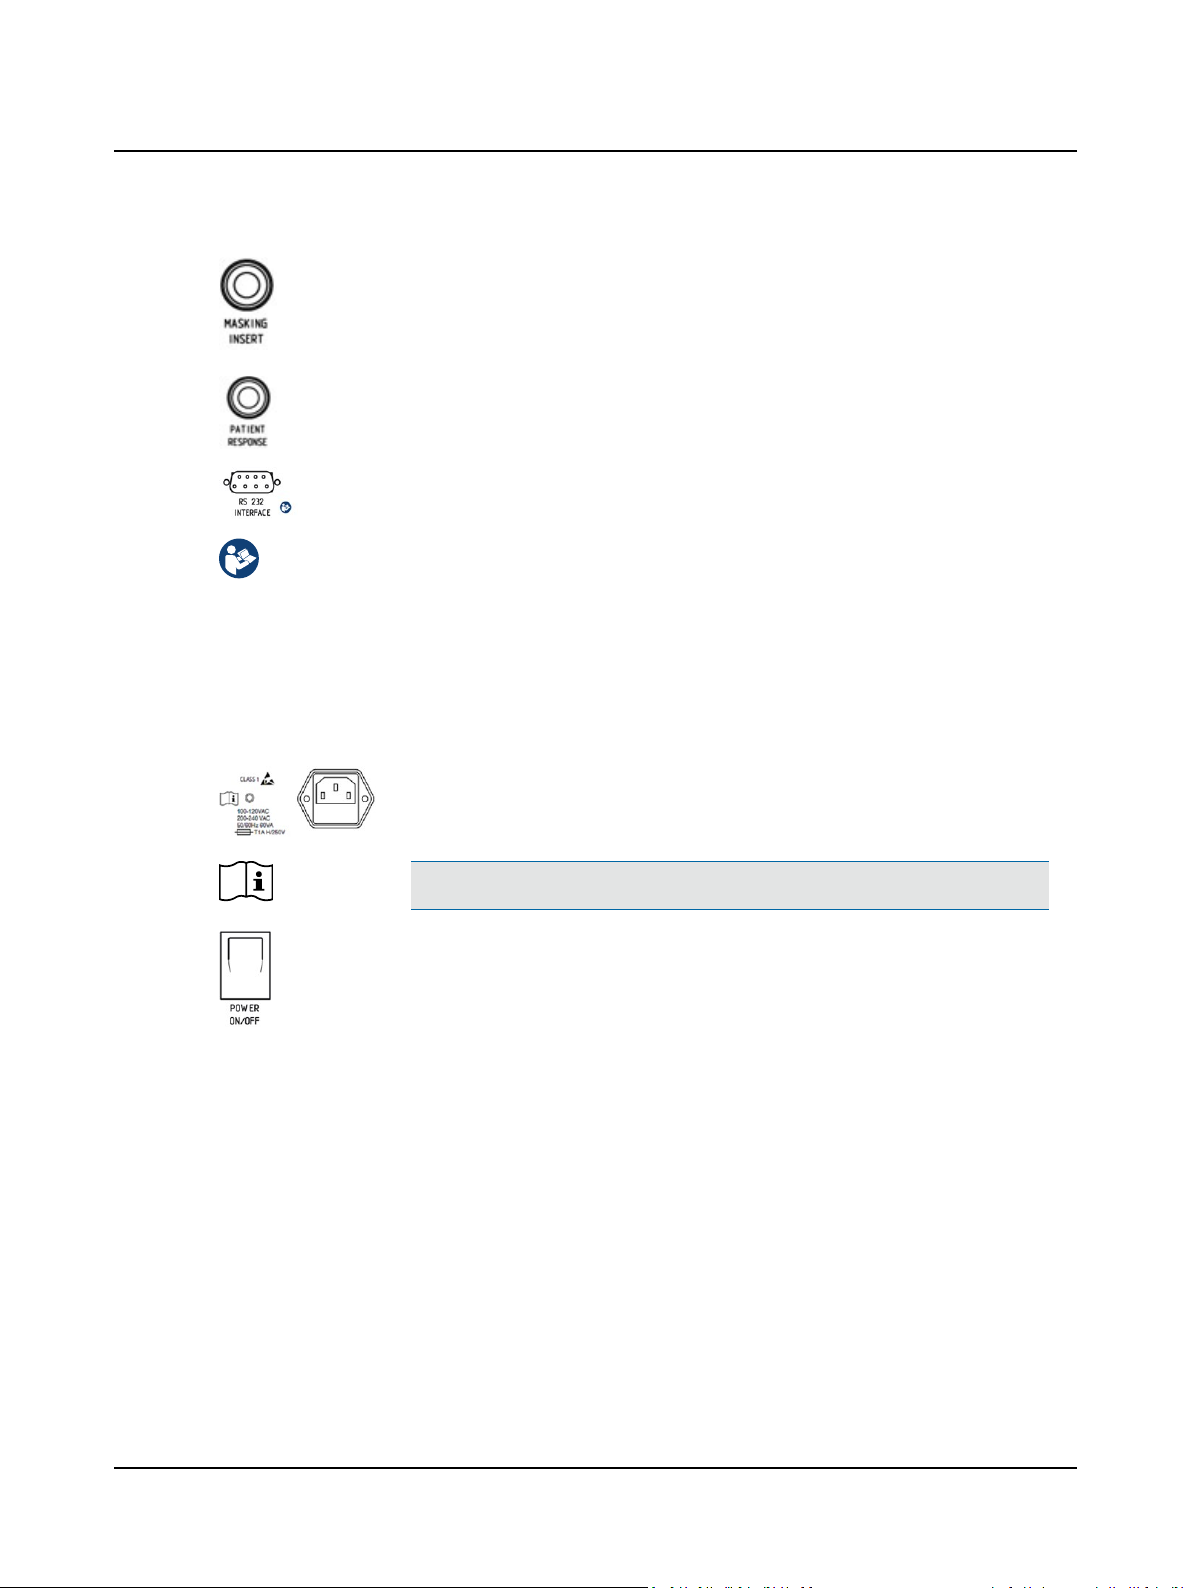
3 Overview of MADSEN Xeta
MONO INSERT
Connection for the black 1/4" jack plug from the EAR-3A mono insert phone.
Patient Response switch
Connection for the black 1/4" jack plug from the patient responder.
RS 232 interface
Connection for Xeta to a PC. 9-pole PC- RS232 interface cable.
The installation must be carried out in accordance with Medical Electrical Systems in IEC
60601-1 3.1 edition: 2012, ANSI/AAMI ES60601-1 (2005) + AMD 1 (2012) and CAN/CSAC22.2 No. 60601-1 (2014). The supplementary provisions on the reliability of electro-medical systems.
It is a general rule for all electrical equipment used in the proximity of the patient that:
• The connected equipment must comply with Medical Electrical Systems in IEC 60601-1 3.1:edition:2012.
Any PC connected to the Xeta must comply with the requirements of IEC 60950, "Safety of information technology equipment, including electrical business equipment".
Supply voltage connection
100-120 V AC, 200-240 V AC, 50/60 Hz, 60 VA
Fuses: 2 T 1 A H/250 V, 5 mm x 20 mm.
Warning• Before you replace a fuse, see Fuses ► 81.
Power ON/OFF
On/Off switch.
Otometrics - MADSEN Xeta
25

3 Overview of MADSEN Xeta
26 Otometrics - MADSEN Xeta
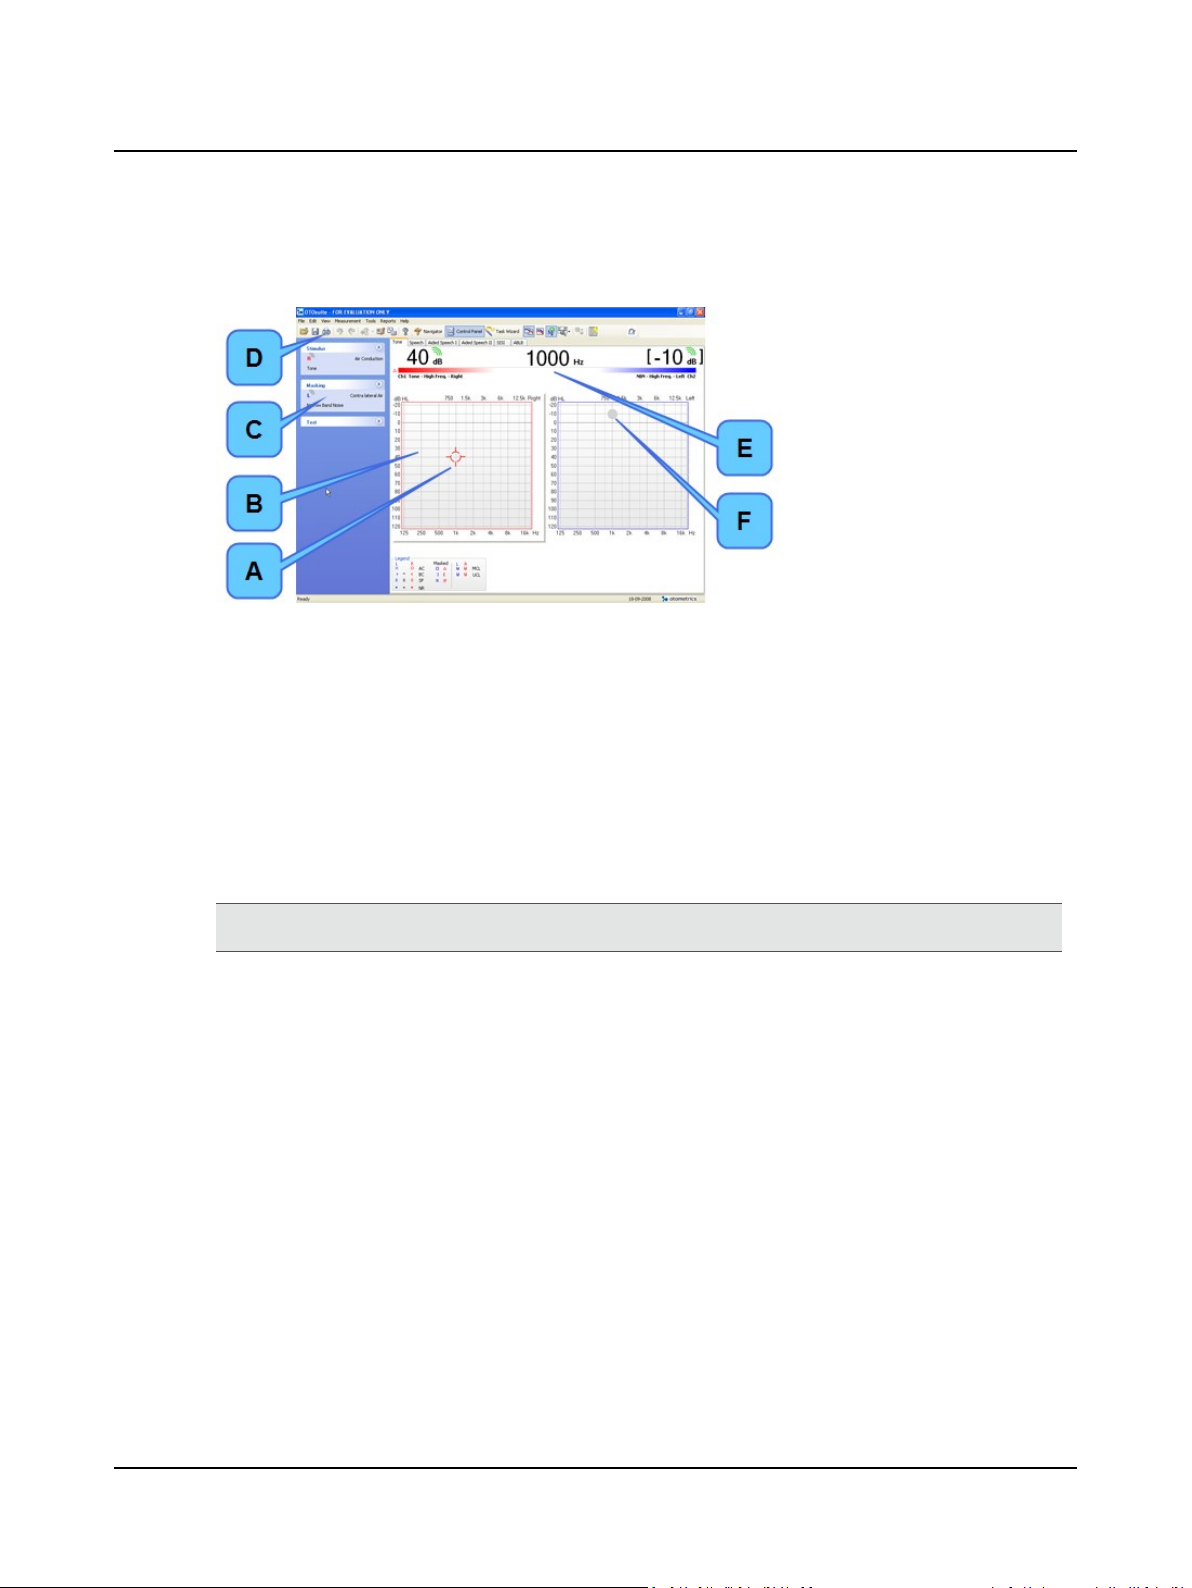
4 Navigating in the OTOsuite Audiometry Module
The general functions for navigating in the main window are described in the OTOsuite manual.
A. Stimulus marker
B. Work area
C. Control Panel
Screen descriptions
You will find descriptions of the actual screens and how to use and view them in:
The Tone test screen ► 36
4.1 Audiometry Module features
Note•Some of the features below are device-dependent.
With the Audiometry Module, you can
• perform testing while you follow stimulus settings and test progress on your PC display
• view and print test results
• view historic audiometry results from NOAH
• view online audiometry results during testing
• use the Masking Assistant to prompt when masking is recommended
• view the masking level indicator in audiogram
• view audiogram overlays
• enter tester details and test date entry for manually entered audiograms
• enter special test and tuning fork test results
• plan patients for offline testing
• upload test results from offline tests
D. Audiometry toolbar
E. Stimulus bar
F. Masking level indicator
Otometrics - MADSEN Xeta
27
4 Navigating in the OTOsuite Audiometry Module
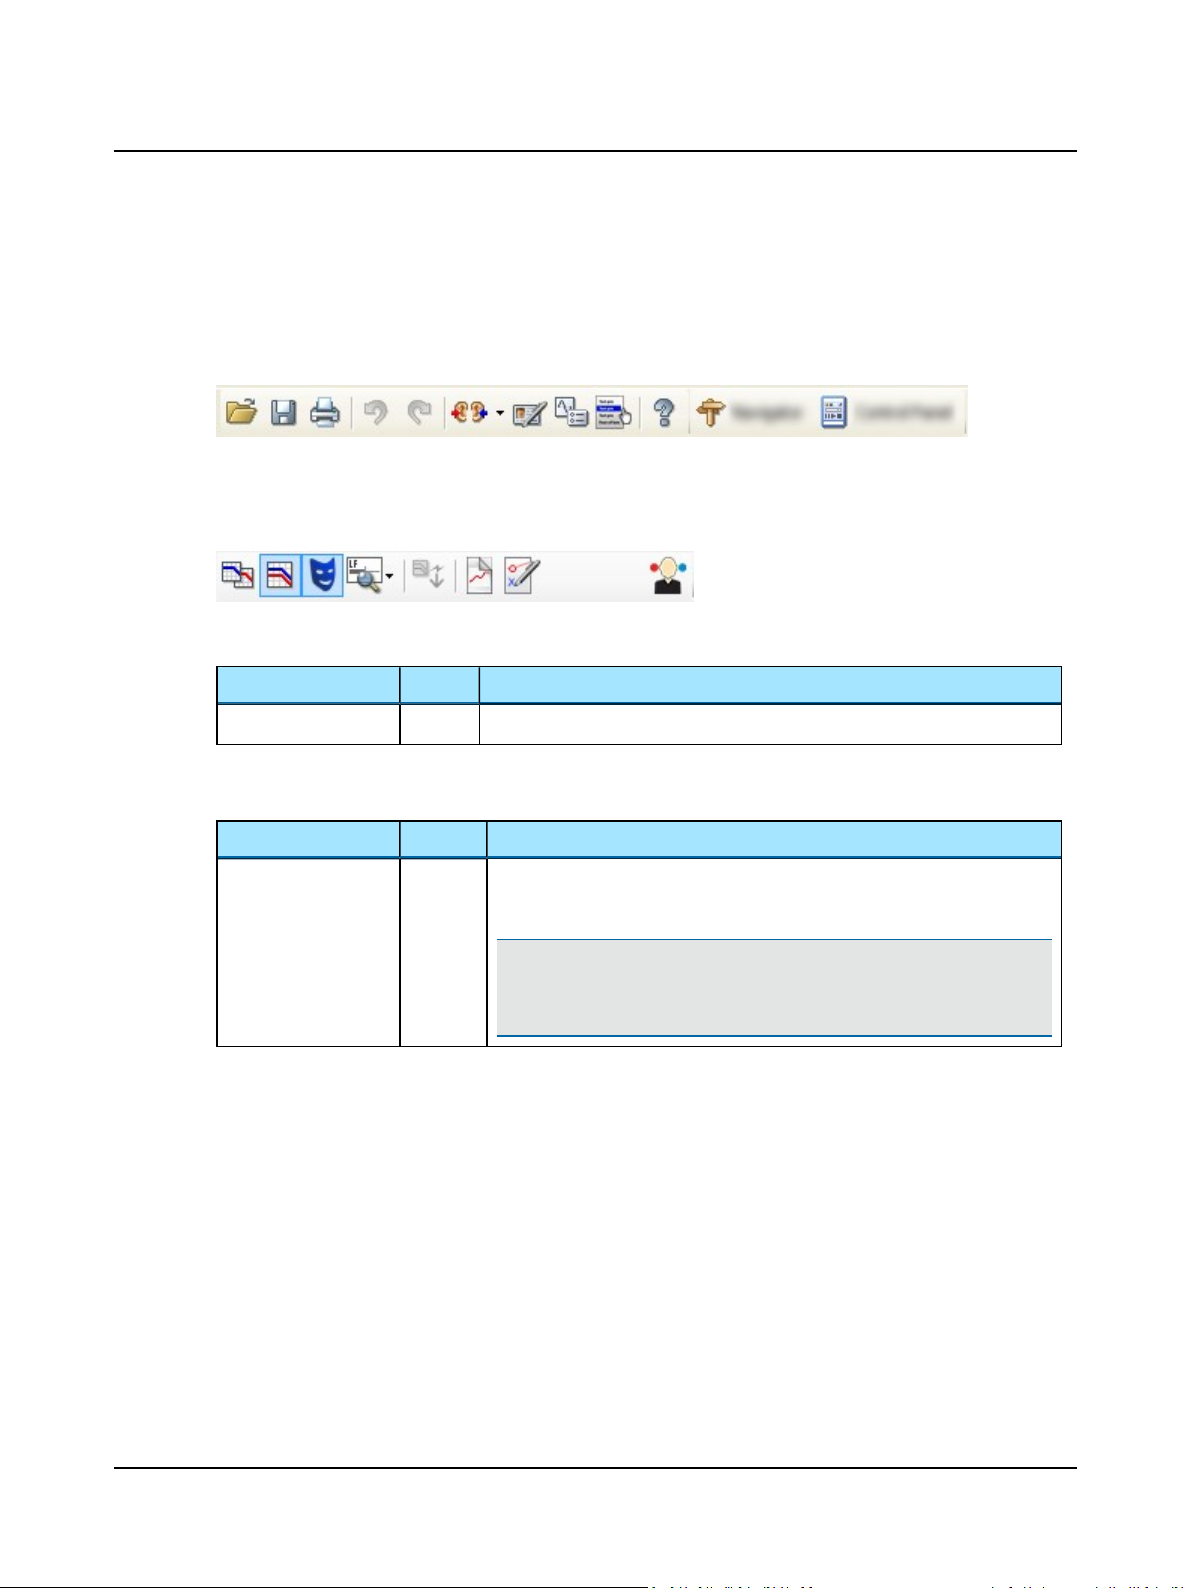
4.2 The Audiometry Module menu system and toolbar
General icons
See the OTOsuiteUser Guide.
Audiometry icons and menu selections
The icons and menu selections that are unique to Audiometry functionality depend on the test functions included in OTOsuite and/or whether a test device is connected.
4.2.1 File menu
Menu item Icon Description
New Audiogram
4.2.2 Edit menu
Menu item Shortcut Description
Audiometric prop-
...
erties
Ctrl+U
Select new audiogram. You will be prompted to save or cancel current data.
Click to enter Tester name, Test Date, and air conduction transducer for a manually entered audiogram.
Note•The air conduction transducer is stored when you have selected it in
the transducer section of the Control Panel (or with device controls, if
applicable) and data points are entered on the audiogram.
28 Otometrics - MADSEN Xeta
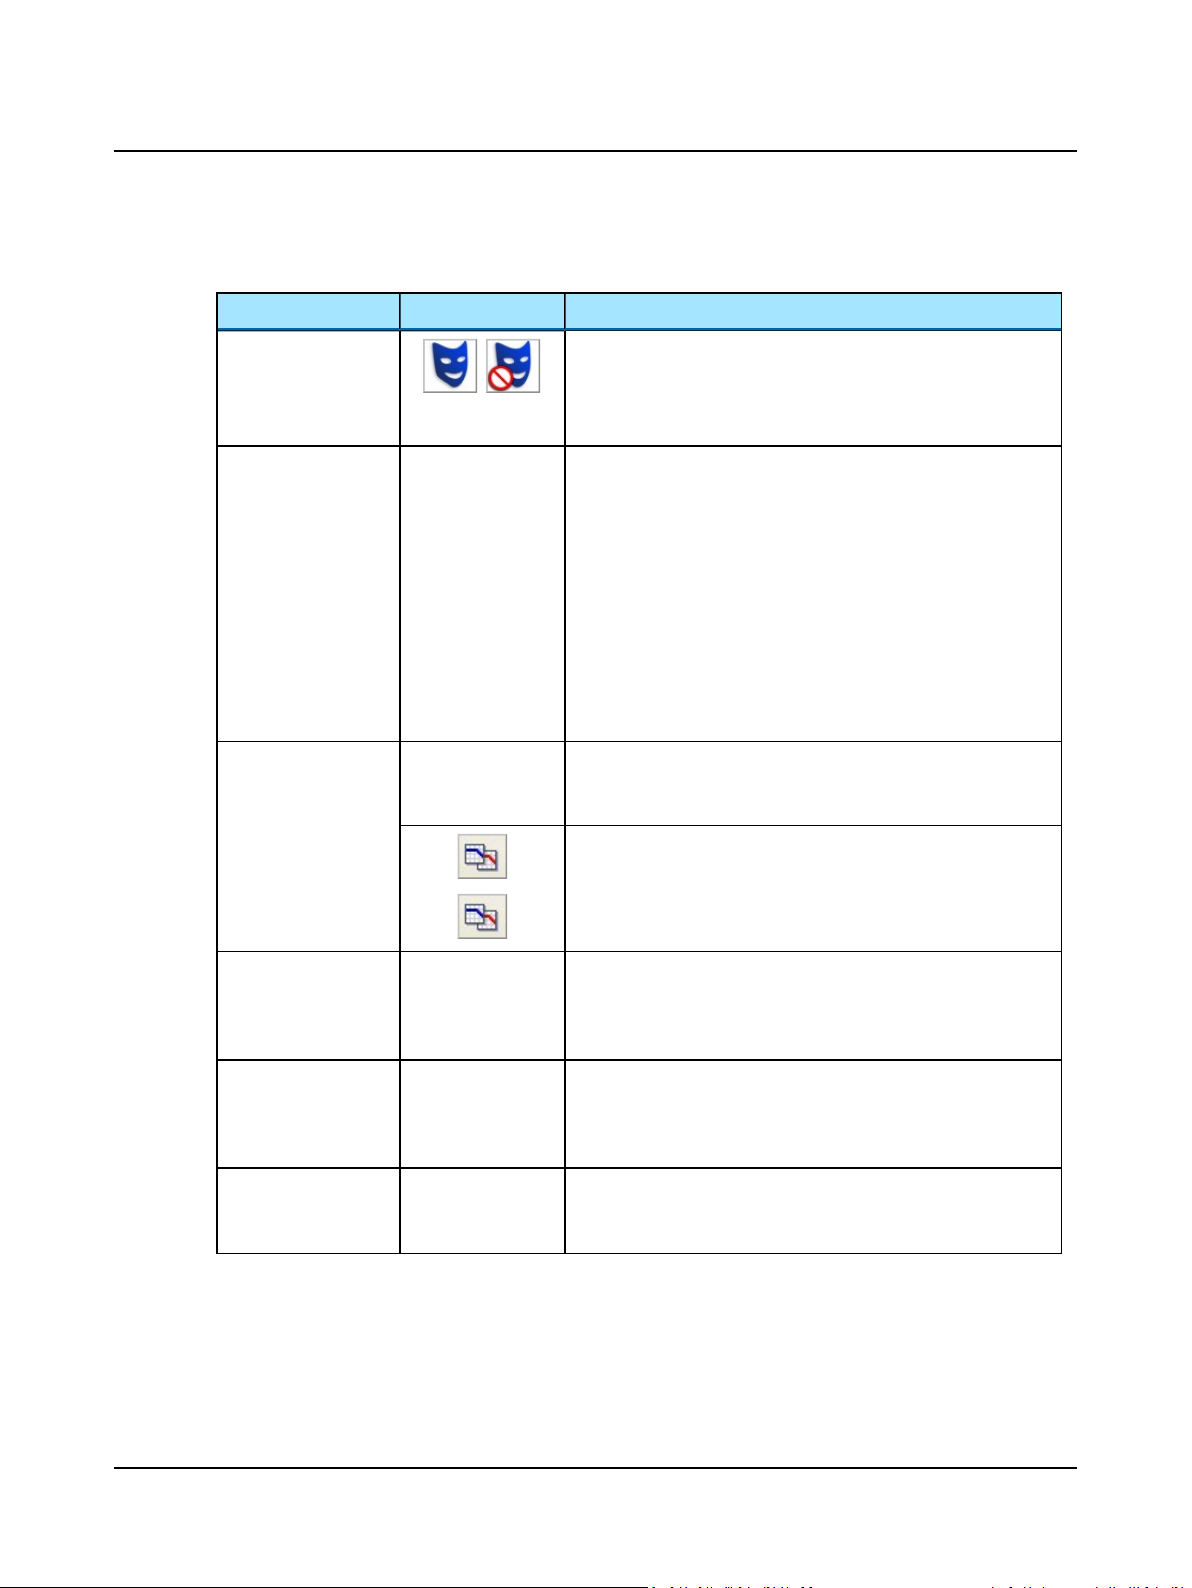
4.2.3 View menu
Menu item Icon Description
Masking Assistant
Overlays
4 Navigating in the OTOsuite Audiometry Module
Enable or disable the Masking Assistant.
The Masking Assistant causes an unmasked threshold to flash
repeatedly if masking is recommended.
• See The Masking Assistant ► 31.
Enables or disables the overlays. Overlays display
• pictures
• severity
• speech banana,
• speech letters,
• unusable area
on the audiogram.
Overlays can also be displayed by selecting them from the overlays
box below or next to the audiogram.
To view/hide the overlays box, select Tools> Options> General.
Combined Audiogram
Left - Right
Right - Left
Audiogram Legend
Click to toggle between viewing both ears in a single audiogram (combined audiogram) or both a left and a right audiogram on your
screen.
Combined View
• Click to view both ears in a single audiogram.
Split View
• Click to view separate audiograms for each ear.
Click to display the left ear audiogram on the left side of the window
and the right ear audiogram on the right side of the window (when
Dual Graph View is enabled in Options> Audiometry> Tone>
Misc).
Click to display the right ear audiogram on the left side of the window and the left ear audiogram on the right side of the window
(when Dual Graph View is enabled in Options> Audiometry>
Tone> Misc).
Click to enable or disable the display of the audiogram legend. The
legend contains the most commonly used symbols for the audiogram.
It is not configurable.
Otometrics - MADSEN Xeta
29

4 Navigating in the OTOsuite Audiometry Module
Menu item Icon Description
Standard / All / High
frequencies
The graph shows up to 20,000 Hz. MADSEN Xeta presents stimulus
up to 12,500 Hz.
• Click to choose between viewing:
Standard Frequencies
Displays the audiogram from 125 to 8000 Hz.
All Frequencies
Displays the audiogram from 125 to 20,000 Hz.
High Frequencies
Displays the audiogram from 8000 to 20,000 Hz.
Select Orientation
4.2.4 Tools menu
Menu item Description
Curves and Symbols Click to select the Curves and Symbols dialog box.
Manage Client List
Fetch Test Results
Options...
Additional icons
Menu item Description
Import Audiometry
Data
Click to select the perspective of the patient's ears as presented on
the screen for graph and table views.
This dialog box and its related function are specific to configuring the curves and symbols to
be displayed on the audiogram or speech graph during testing.
See Curves and symbols selection ► 39.
...
See description in The client/patient list ► 52.
...
See description in Fetch test results from audiometer ► 52.
See description of how to work with user options and User Tests in the OTOsuiteUser Guide.
Click to import audiometry data from AURICAL Plus and MADSEN Conera. See the OTOsuiteUser Guide.
30 Otometrics - MADSEN Xeta
 Loading...