

otometrics MADSEN OTOflex 100 Reference Manual

MADSEN OTOflex 100 &
OTOsuite Immittance Module
Reference Manual
Doc. No.7-50-0880-EN/22
Part No.7-50-08800-EN

Copyright notice
© 2010,2016GNOtometricsA/S. All rights reserved. ® Otometrics, the OtometricsIcon,AURICAL, MADSEN, ICSand HORTMANN
are registered trademarks of GNOtometricsA/S in the U.S.A. and/orothercountries.
Version release date
2016-10-10 (144154)
Technical support
Please contactyour supplier.
2
Otometrics - MADSEN OTOflex 100

Table of Contents
1 Introduction 9
1.1 MADSEN OTOflex 100 9
1.2 The OTOsuite Immittance module 9
1.3 Intended use 10
1.4 About this manual 10
1.4.1 Safety 11
1.4.2 Installation 11
1.5 Typographical conventions 11
1.5.1 Navigating this manual 11
2 Unpacking and storing 12
2.1 Unpacking 12
2.2 Storing 12
3 Installing MADSEN OTOflex 100 13
3.1 Views of MADSEN OTOflex 100 13
3.1.1 Front view 13
3.1.2 Top view 14
3.1.3 Bottom view 14
3.1.4 Reverse side view 14
3.1.5 The charger 15
3.2 The probe 16
3.3 Assembly and installation 16
3.3.1 Location 16
3.3.2 Desktop installation 17
3.3.3 Wall mount installation 18
3.4 Powering 18
3.4.1 Powering MADSEN OTOflex 100 18
3.4.2 Powering the charger 19
3.4.3 Batteries 19
3.4.3.1 Inserting batteries 20
3.4.3.2 Battery type setting 21
3.4.3.3 First time charging 21
3.4.3.4 Charging status 22
3.4.3.5 Powering status 22
3.4.4 Switching MADSEN OTOflex 100 on and off 23
4 MADSEN OTOflex 100 main description 24
4.1 Switching MADSEN OTOflex 100 on and off 24
4.2 Language setting 24
4.3 Keypad main functions 25
4.4 The display - test mode 27
4.5 Controls and menu selections 28
4.5.1 The MADSEN OTOflex 100 Menu 28
4.5.2 Test Selector mode 30
4.5.3 The Text Editor 31
4.5.4 The Tympanometric Curve Selector 33
4.6 MADSEN OTOflex 100 Icons 33
4.6.1 Navigation and editing symbols 33
4.6.2 Powering 34
4.6.3 Communication 35
Otometrics - MADSEN OTOflex 100
3

4.6.4 Messages 35
4.6.5 Leakage 35
5 Navigating in the OTOsuite Immittance module 36
5.1 Menus and toolbar icons 36
5.2 The control panels 37
5.2.1 Sequence selection 38
5.2.2 Test control buttons 38
5.3 The Tympanometry screen 39
5.4 The Acoustic Reflex screens 40
5.4.1 The Reflex Screening screen 40
5.4.2 The Reflex Threshold screen 41
5.4.3 The Reflex Decay screen 42
5.5 The ETF-P screen 43
5.5.1 The post-analysis tool 43
6 Communication between OTOsuite and MADSEN OTOflex 100 44
6.1 Bluetooth 44
6.2 Connecting a test device 44
6.3 Deleting a test device 45
6.4 Test device information 45
6.5 Firmware upgrade - test devices 45
7 Preparing for testing 47
7.1 Preparing the test environment 47
7.2 Hygienic precautions 47
7.3 Preparing MADSEN OTOflex 100 47
7.3.1 Preparing the probe 47
7.3.2 Connecting probe and insert phone 48
7.3.3 Using the cap 48
7.3.3.1 Mounting the cap 48
7.3.3.2 Removing the cap 50
7.3.4 Daily probe check 51
7.3.5 Users 51
7.3.6 Selecting patient folder and test type in MADSEN OTOflex 100 52
7.3.7 Test flow setup 53
7.3.8 Selecting the test ear 53
7.4 Preparing the patient 54
7.4.1 Inspecting the patient’s ear 54
7.4.2 Fitting the eartip on the probe 54
7.4.3 Fitting the probe in the patient’s ear 55
7.4.4 Leakage and other probe problems 56
7.5 Preparing for the next patient 56
7.6 Ready to start testing 57
8 Testing with MADSEN OTOflex 100 58
8.1 Fast routine testing 58
8.2 General keypad functions for testing 59
8.3 Sequence testing 60
8.3.1 Selecting a test sequence 60
8.3.2 Running a test sequence from MADSEN OTOflex 100 61
8.4 Screening 61
8.4.1 Screening tympanometry 62
4 Otometrics - MADSEN OTOflex 100

8.4.2 Reflex screening 63
8.4.3 The reflex screening result 65
8.5 Tympanometry 67
8.5.1 Diagnostic tympanometry 67
8.5.2 The diagnostic tympanometry result 68
8.5.3 Changing view settings 70
8.5.4 Settings - diagnostic tympanometry 70
8.6 ETF-I (Eustachian Tube Function - Intact) 70
8.6.1 Settings - ETF-I 71
8.7 Acoustic reflex testing 71
8.8 Reflex Threshold testing 72
8.8.1 Softkeys and functions 73
8.8.2 Reflex Threshold - procedure 74
8.8.3 Viewing Reflex Threshold results 76
8.8.4 Settings - Reflex Threshold 77
8.9 Reflex Decay testing 78
8.9.1 Softkeys and functions 79
8.9.2 Reflex Decay - procedure 80
8.9.3 Viewing Reflex Decay results 82
8.9.4 Settings - Reflex Decay 82
8.10 ETF-P (Eustachian Tube Function - Perforated) 83
8.10.1 Softkeys and functions 83
8.10.2 ETF-P - procedure 84
8.10.3 Viewing ETF-P results 85
9 Managing Test Results in MADSEN OTOflex 100 86
9.1 When testing is done 86
9.2 Swap ear results 86
9.3 Deleting measurements 86
9.4 Deleting test results 86
9.5 Communicating and synchronizing with OTOsuite 87
9.5.1 Synchronizing data 87
10 Printing 89
10.1 Printing from MADSEN OTOflex 100 89
11 Testing with the OTOsuite Immittance module 90
11.1 Sequence testing 90
11.1.1 Selecting a test sequence 90
11.1.2 Running a test sequence 90
11.2 Screening 91
11.2.1 Screening tympanometry 92
11.2.2 Reflex screening 94
11.3 Tympanometry 96
11.3.1 Diagnostic tympanometry 97
11.3.2 Settings - diagnostic tympanometry 99
11.3.3 The diagnostic tympanometry result 99
11.4 ETF-I (Eustachian Tube Function - Intact) 100
11.4.1 Settings - ETF-I 100
11.5 Acoustic reflex testing 101
11.6 Reflex Threshold testing 102
11.6.1 Reflex Threshold - procedure 102
11.6.2 Viewing Reflex Threshold results 106
Otometrics - MADSEN OTOflex 100
5

11.6.3 Settings - Reflex Threshold 107
11.7 Reflex Decay testing 108
11.7.1 Reflex Decay - procedure 109
11.7.2 Viewing Reflex Decay results 111
11.7.3 Settings - Reflex Decay 111
11.8 ETF-P - procedure 112
11.8.1 The ETF-P post-analysis tool 113
11.9 Managing test results 114
11.9.1 Swapping ear results 114
11.9.2 Deleting data 114
11.10 Leakage and other probe problems 114
11.11 Testing the other ear 115
11.12 Saving measurements 115
11.12.1 Tests and subtests 116
11.12.2 Standards used in NOAH 116
11.13 Preparing for the next patient 116
12 Data management in MADSEN OTOflex 100 118
12.1 Data handling 118
12.1.1 Interruption of communication 118
12.1.2 Synchronization 118
12.2 Uploading test results to OTOsuite 119
12.3 Data clean-up 119
13 Test settings in MADSEN OTOflex 100 120
13.1 Test setups 120
13.1.1 Changing individual settings 120
13.1.2 Uploading test settings to the Immittance module 122
13.1.3 Creating a setup 122
13.1.4 Editing a test setup 123
13.1.5 Using a test setup 123
13.2 General actions 124
13.2.1 Test result management settings 124
13.2.2 Procedure options 126
13.2.3 Advanced 128
13.2.4 Device settings 129
13.3 Tympanometry setup 131
13.3.1 Screening tympanometry 134
13.3.2 ETF-I setup 135
13.4 Acoustic Reflex Screening setup 135
13.5 Acoustic Reflex Threshold setup 137
13.6 Acoustic Reflex Decay setup 142
13.7 ETF-P setup 144
14 Immittance module settings 145
14.1 General settings 145
14.2 View settings 146
14.2.1 Tymp. and Reflex Scr. view settings 146
14.2.2 Reflex Threshold view settings 149
14.2.3 Reflex Decay view settings 149
14.2.4 ETF-P view settings 150
14.3 Measurement settings 150
14.3.1 Tympanometry setup 150
6 Otometrics - MADSEN OTOflex 100

14.3.1.1 Tympanometry: Control Panel settings 150
14.3.1.2 Tympanometry: Test settings 151
14.3.1.3 Screening tympanometry 152
14.3.2 ETF-I setup 152
14.3.2.1 ETF-I: Control Panel settings 152
14.3.2.2 ETF-I: Test settings 153
14.3.3 Reflex Screening setup 153
14.3.3.1 Reflex Screening: Control Panel settings 153
14.3.3.2 Reflex Screening: Test settings 153
14.3.4 Reflex Threshold setup 154
14.3.4.1 Reflex Threshold: Control Panel settings 155
14.3.4.2 Reflex Threshold: Test settings 156
14.3.5 Reflex Decay setup 157
14.3.5.1 Reflex Decay: Control Panel settings 158
14.3.5.2 Reflex Decay: Test settings 159
14.3.6 ETF-P setup 160
14.3.6.1 ETF-P: Control Panel settings 160
14.3.6.2 ETF-P: Test settings 160
15 Service and maintenance 161
15.1 Equipment failure 161
15.2 Service and repair 161
15.3 Maintenance 162
15.3.1 Calibration 162
15.3.2 Probe cleaning and maintenance 162
15.4 Cleaning and disinfecting the probe tip 163
15.4.1 Cleaning and disinfecting the probe tip 164
15.4.2 Changing the wax filter 165
15.5 Cleaning MADSEN OTOflex 100 166
15.5.1 Eartips 166
15.5.2 Disposable articles 167
15.5.3 Batteries and charger 167
15.5.4 Battery safety information 167
16 Configuring the Immittance module 168
17 Troubleshooting 169
17.1 Powering 169
17.2 Testing 169
17.3 Communication 169
17.4 Probe-fit related problems 170
18 Standards and safety 171
18.1 Symbols used 171
18.1.1 MADSEN OTOflex 100 symbols 171
18.1.2 Charger unit symbols 172
18.1.3 The OTOsuite Immittance module 173
18.2 Warning notes 173
18.2.1 MADSEN OTOflex 100 warning notes 173
18.2.2 Charger unit warning notes 174
18.3 Manufacturer 175
18.3.1 Responsibility of the manufacturer 175
Otometrics - MADSEN OTOflex 100
7

19 Technical specifications 176
App. 1 MADSEN OTOflex 100 Immittance methodology and features 181
App. 1.1 An introduction to immittance 181
App. 1.1.1 Immittance testing 181
App. 1.2 Tympanometry 182
App. 1.2.1 Tympanometry testing on infants 182
App. 1.2.2 Tympanometric features 182
App. 1.2.3 ETF-I (Eustachian Tube Function - Intact) 184
App. 1.2.4 Valsalva’s Maneuver 184
App. 1.2.5 Toynbee’s Maneuver 184
App. 1.3 Acoustic Reflex testing 185
App. 1.3.1 Acoustic Reflex Screening 185
App. 1.3.2 Acoustic Reflex Threshold 186
App. 1.3.3 Acoustic Reflex Decay 186
App. 1.3.4 Admittance monitoring 186
App. 1.4 ETF-P (Eustachian Tube Function - Perforated) 186
App. 1.5 Susceptance and Conductance, B/G 187
App. 1.5.1 Susceptance, B 187
App. 1.5.2 Conductance, G 188
App. 1.5.3 B/G viewing of tympanograms 188
App. 1.5.4 Component compensation 189
App. 2 Glossary 191
App. 2.1 Terminology 191
App. 2.2 Abbreviations 199
Index 201
8 Otometrics - MADSEN OTOflex 100
1 Introduction
1.1 MADSEN OTOflex 100
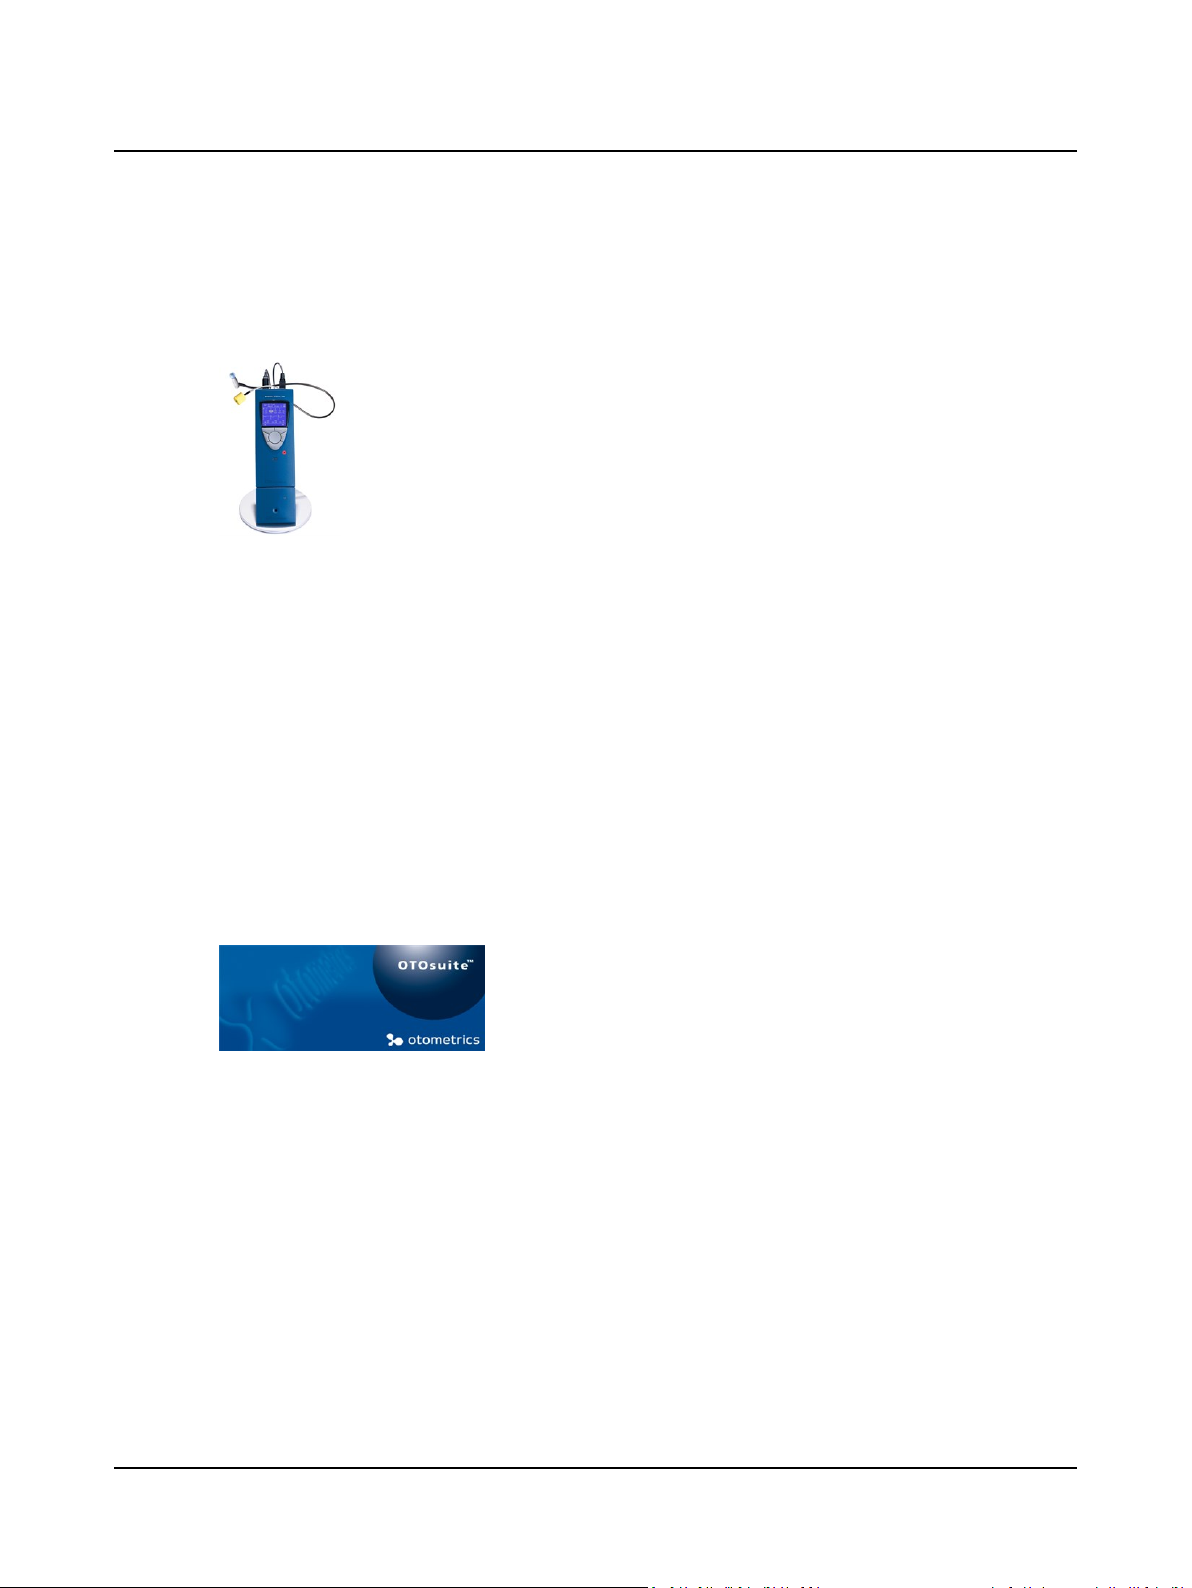
MADSEN OTOflex 100 is a compact and portable wireless immittance test device.
It offers a complete range of capabilities for middle ear diagnostics. MADSEN OTOflex 100 can be
operated anywhere as a stand-alone device or operated directly from OTOsuite.
MADSEN OTOflex 100 integrates closely with the OTOsuite Immittance module, with full test control from both the device and OTOsuite. When used with OTOsuite, you gain additional features
and diagnostic value offered by the comprehensive user interface and NOAH compatibility of OTOsuite.
MADSEN OTOflex 100 - OTOsuite interfacing
MADSEN OTOflex 100 is designed to operate with the OTOsuite Immittance module.
Bluetooth
MADSEN OTOflex 100 connects with OTOsuite via BluetoothTM, which provides wireless connection between MADSEN
OTOflex 100 and OTOsuite up to a range of approximately 10 metres (approx. 33 ft), and up to a range of 100 metres
(approx. 330 ft) for other electronic devices.
NOAH
The NOAH System is a HIMSA product for managing clients/patients, launching hearing test applications and fitting software, and storing audiological test results. MADSEN OTOflex 100 test results can be stored in the NOAH database via OTOsuite.
1.2 The OTOsuite Immittance module
The OTOsuite Immittance module offers real time presentation of test results
and full test control of MADSEN OTOflex 100 directly from a PC. Test devices
with integrated user interfaces can be operated independently of the Immittance module, although additional features and diagnostic value is offered by
the Immittance module's comprehensive user interface and NOAH compatibility.
When used for testing, the OTOsuite Immittance module adapts to the connected test device.The test functionalities of
the OTOsuite Immittance module depend on the connected device, as does the selection of test parameters, and remote
control.
The basic Immittance module functions are described in Navigating in the OTOsuite Immittance module ► 36.
The OTOsuite Immittance module lets you work with NOAH or save and view results via XML files. The OTOsuite Immittance module supports
• screening and diagnostic tympanometry
• Reflex Threshold testing
• Reflex Decay testing
• ETF-P
• user-defined tests.
Otometrics - MADSEN OTOflex 100
9

1 Introduction
MADSEN OTOflex 100 - OTOsuite interfacing
MADSEN OTOflex 100 is designed to operate with the OTOsuite Immittance module. From the OTOsuite Immittance module, which is NOAH compatible, you can perform tests, monitor test results, create User Tests, store and export data, and
print reports.
General features
Depending on the configuration of MADSEN OTOflex 100 and the Immittance module, you can
• view and print test results,
• view the progression of a range of tests online,
• view historic tympanometry results from NOAH or XML,
• view online tympanometry results during testing,
• perform “over the rim” testing, using the audiometer as a handy control panel while you follow stimulus settings and
test progress on your PC display,
• upload test results from offline tests.
1.3 Intended use
MADSEN OTOflex 100 and the Immittance module
Users: audiologists, ENTs and other health care professionals in testing the hearing of infants, children and adults.
Use: clinical, diagnostic and screening tympanometry and reflex measurements.
MADSEN OTOflex 100 uses technologies which are highly effective for clinical and screening purposes. Tympanometry and
acoustic reflex measurements measure the mechanical response of the middle ear and form a basis for evaluating whether
the related physiological structures are functioning correctly or not.
The MADSEN OTOflex 100 probe is extremely lightweight (only 4.5 grams), and comes with comfortable, easy to insert eartips. This makes it ideal for use with children and adults.
MADSEN OTOflex 100 can be configured for a wide variety of tests, and it can be operated entirely manually or programmed for the user’s own combination of manual and automatic operation. In user-programmable tests the user can
select the default parameters of a particular test, and combine tests to form a sequence of preset tests.
1.4 About this manual
This is your guide to using MADSEN OTOflex 100 and the OTOsuite Immittance module. It also introduces you to the key
features of the product by providing you with working scenarios for performing tests and viewing and printing test results.
We recommend that you read this manual and make yourself familiar with MADSEN OTOflex 100 and how it operates with
OTOsuite so that you become familiar with the device before testing on a client.
Note•If you are using OTOsuite with Noah, we recommend that you are familiar with the screens and functions
provided in Noah.
10 Otometrics - MADSEN OTOflex 100

1.4.1 Safety
Safety
This manual contains information and warnings which must be followed to ensure the safe performance of MADSEN
OTOflex 100.
Warning• Local government rules and regulations, if applicable, should be followed at all times.
Safety information is stated where it is relevant, and general safety aspects are described in Standards and safety ► 171.
1.4.2 Installation
• To install the new system, see Installing MADSEN OTOflex 100 ► 13.
• To install OTOsuite, see the OTOsuiteUser Guide.
Connecting to MADSEN OTOflex 100
• See Connecting a test device ► 44 and the OTOsuiteUser Guide.
1 Introduction
Configuring the OTOsuite Immittance module
• See Configuring the Immittance module ► 168.
Basic OTOsuite functions
The basic OTOsuite functions are described in the OTOsuiteUser Guide.
1.5 Typographical conventions
The use of Warning, Caution and Note
To draw your attention to information regarding safe and appropriate use of the device or software, the manual uses precautionary statements as follows:
Warning• Indicates that there is a risk of death or serious injury to the user or patient.
Caution• Indicates that there is a risk of injury to the user or patient or risk of damage to data or the device.
Note•Indicates that you should take special notice.
1.5.1 Navigating this manual
Menus, icons and functions to select are shown in bold type, as for instance in:
• Click the Set options icon on the toolbar or select Tools > Options
Otometrics - MADSEN OTOflex 100
11

2 Unpacking and storing
2 Unpacking and storing
To install and get started with MADSEN OTOflex 100 and the OTOsuite Immittance module, follow the sequence below:
• Install OTOsuite on the PC before you connect to MADSEN OTOflex 100 from the PC.
• Unpack MADSEN OTOflex 100 (see Unpacking ► 12).
• Assemble MADSEN OTOflex 100 (see Installing MADSEN OTOflex 100 ► 13).
• Run the OTOsuite Configuration Wizard to connect to and set up communication with MADSEN OTOflex 100. (See
Configuring the Immittance module ► 168).
2.1 Unpacking
1. Unpack the device carefully.
When you unpack the device and accessories, it is a good idea to keep the packing material in which they were
delivered. If you need to send the device in for service, the original packing material will protect against damage during transport, etc.
2. Visually inspect the equipment for possible damage.
If damage has occurred, do not put the device into operation. Contact your local distributor for assistance.
3. Check with the packing list to make sure that you have received all necessary parts and accessories. If your package is
incomplete, contact your local distributor.
2.2 Storing
If you need to store MADSEN OTOflex 100 before you put it into operation, follow the guidelines below:
• Store MADSEN OTOflex 100 and accessories in the boxes provided to protect the equipment from damage.
• Store MADSEN OTOflex 100 and accessories in a dry environment.
Temperature range, humidity and air pressure requirements for storage and handling are stated in Technical spe-
cifications ► 176.
12 Otometrics - MADSEN OTOflex 100

3 Installing MADSEN OTOflex 100
1. Install OTOsuite from the OTOsuite installation disk. See the OTOsuiteInstallation Manual.
2. Install MADSEN OTOflex 100 as described in Installing MADSEN OTOflex 100 ► 13.
3.1 Views of MADSEN OTOflex 100
This section provides you with views of MADSEN OTOflex 100 and its charger from various angles, as well as instructions on
how to assemble the charger.
Front view ► 13
Top view ► 14
Bottom view ► 14
Reverse side view ► 14
The charger ► 15
Desktop installation ► 17
You will find a description of the keypad and how to navigate and enter data in MADSEN OTOflex 100 in Controls and
menu selections ► 28.
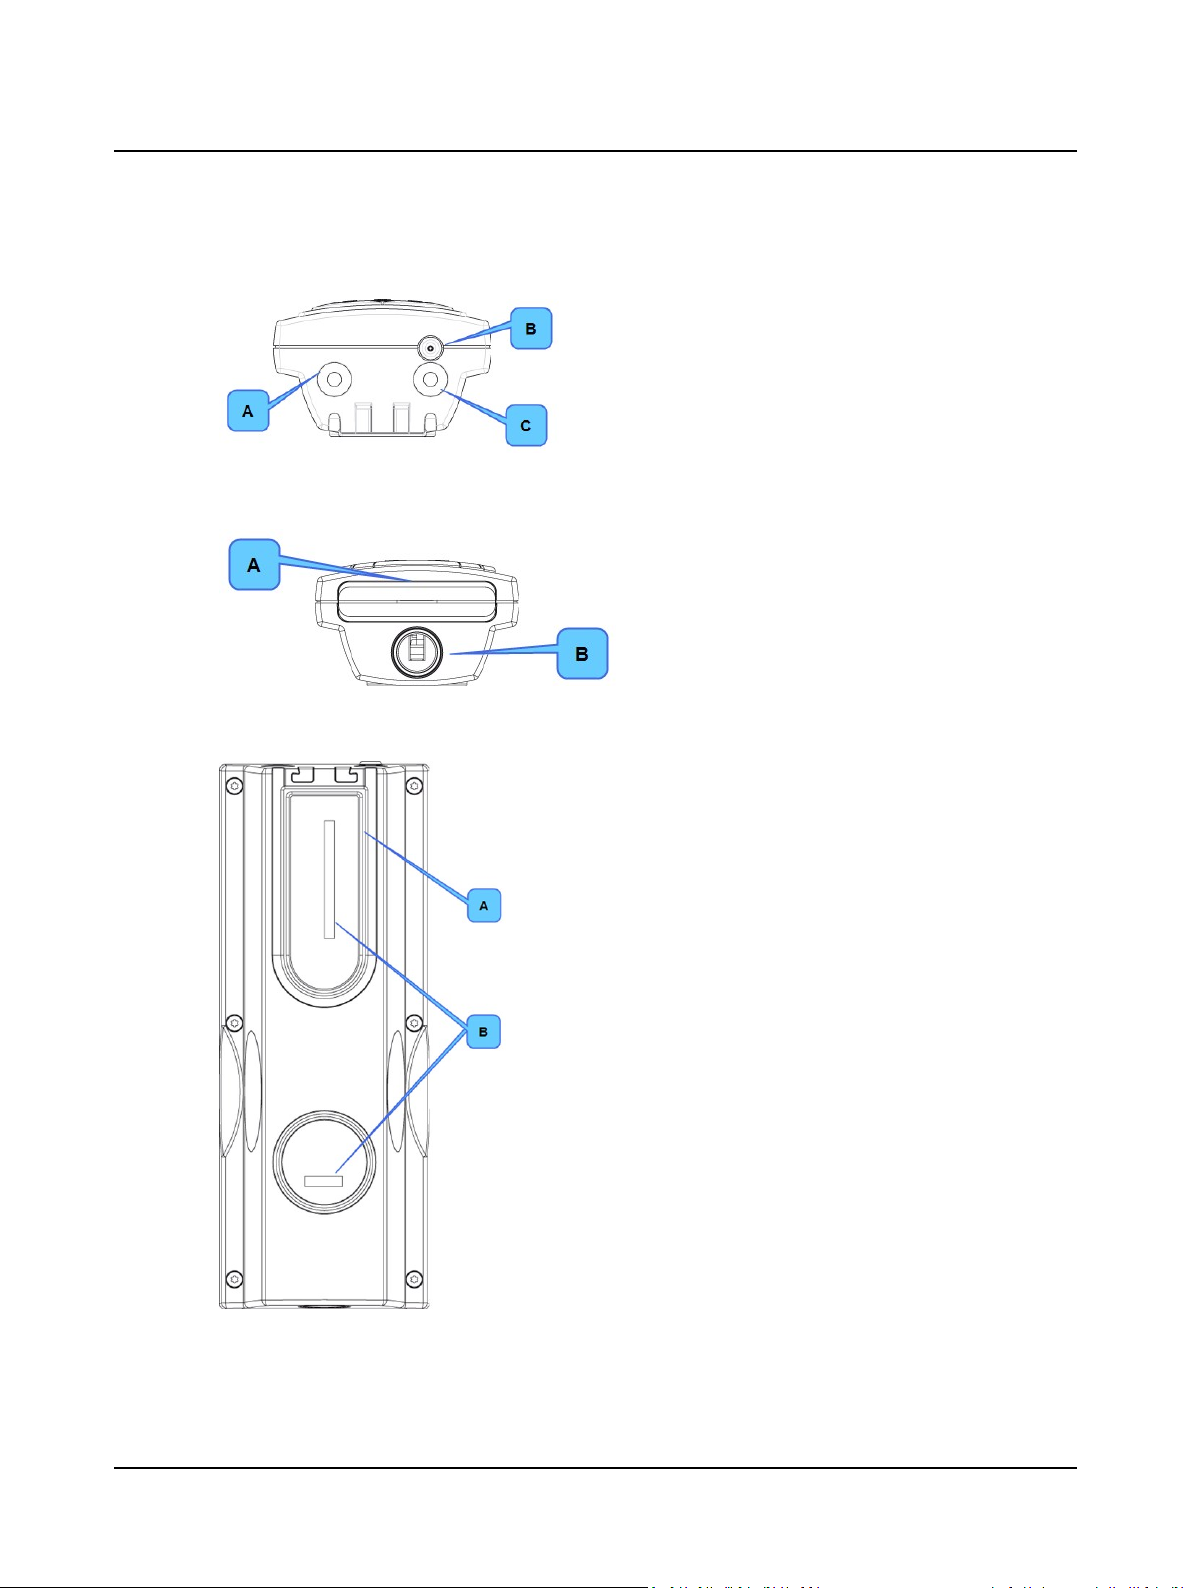
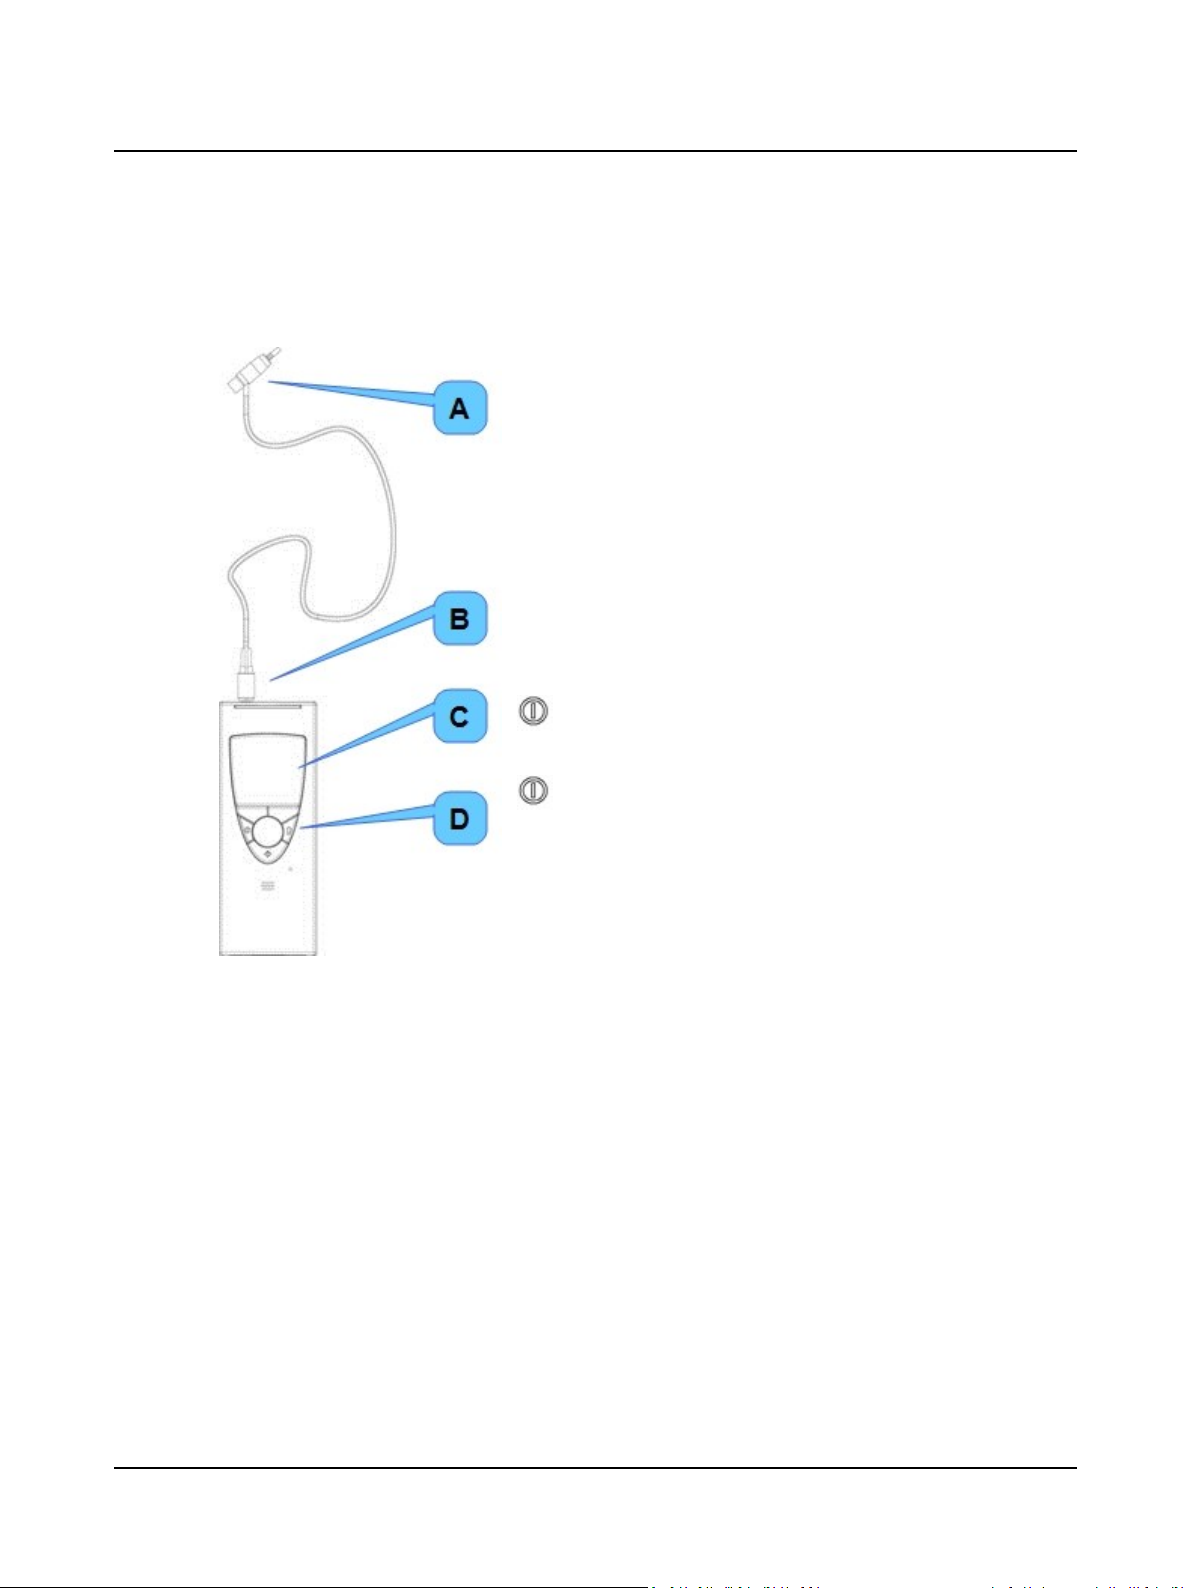
3.1.1 Front view
A. Probe
B. Probe plug
C. Screen
D. Keypad
3 Installing MADSEN OTOflex 100
Otometrics - MADSEN OTOflex 100
13
3 Installing MADSEN OTOflex 100
3.1.2 Top view
3.1.3 Bottom view
A. Contralateral socket
B. Pneumatic connection
C. Probe socket
A. Battery casing with cover
B. Charger cavity
3.1.4 Reverse side view
A. Track for probe cable
B. Labels
14 Otometrics - MADSEN OTOflex 100
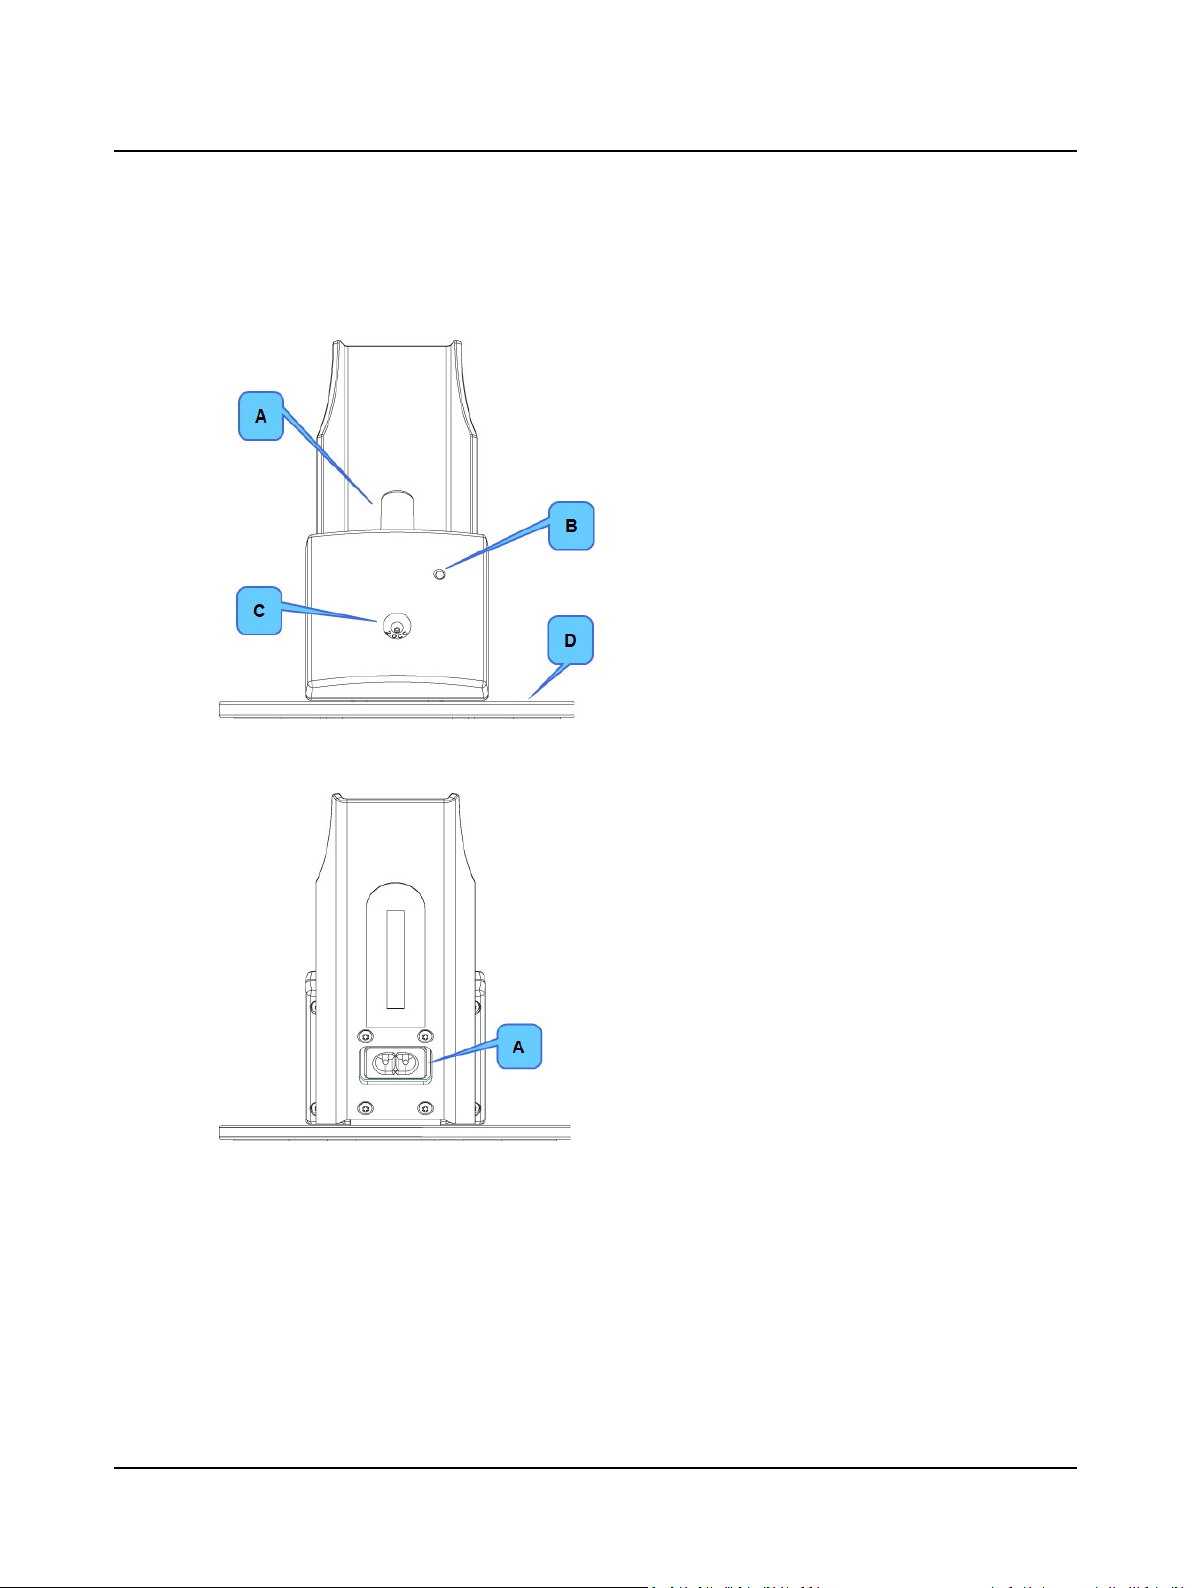
3.1.5 The charger
Front view
3 Installing MADSEN OTOflex 100
A. Charger tab for charging the device
B. Charging indicator
C. Probe test cavity
D. Base
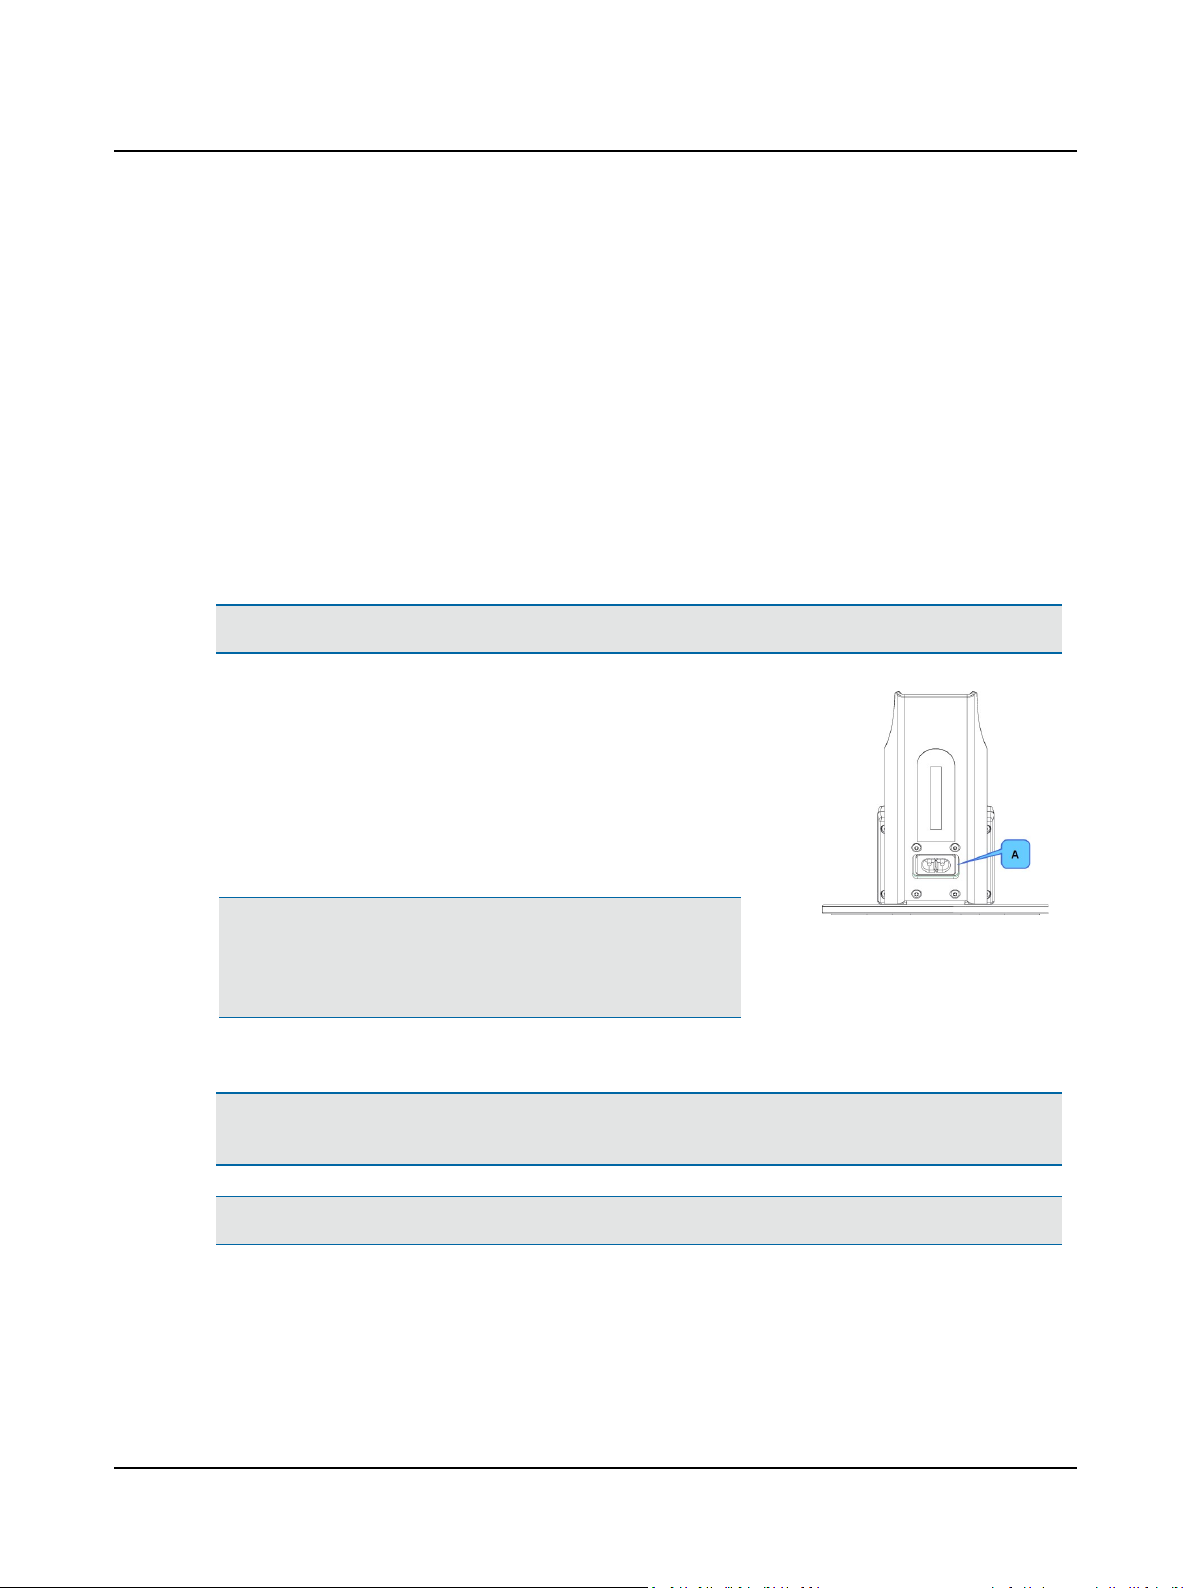
Rear view
A. Power socket
Otometrics - MADSEN OTOflex 100
15
3 Installing MADSEN OTOflex 100
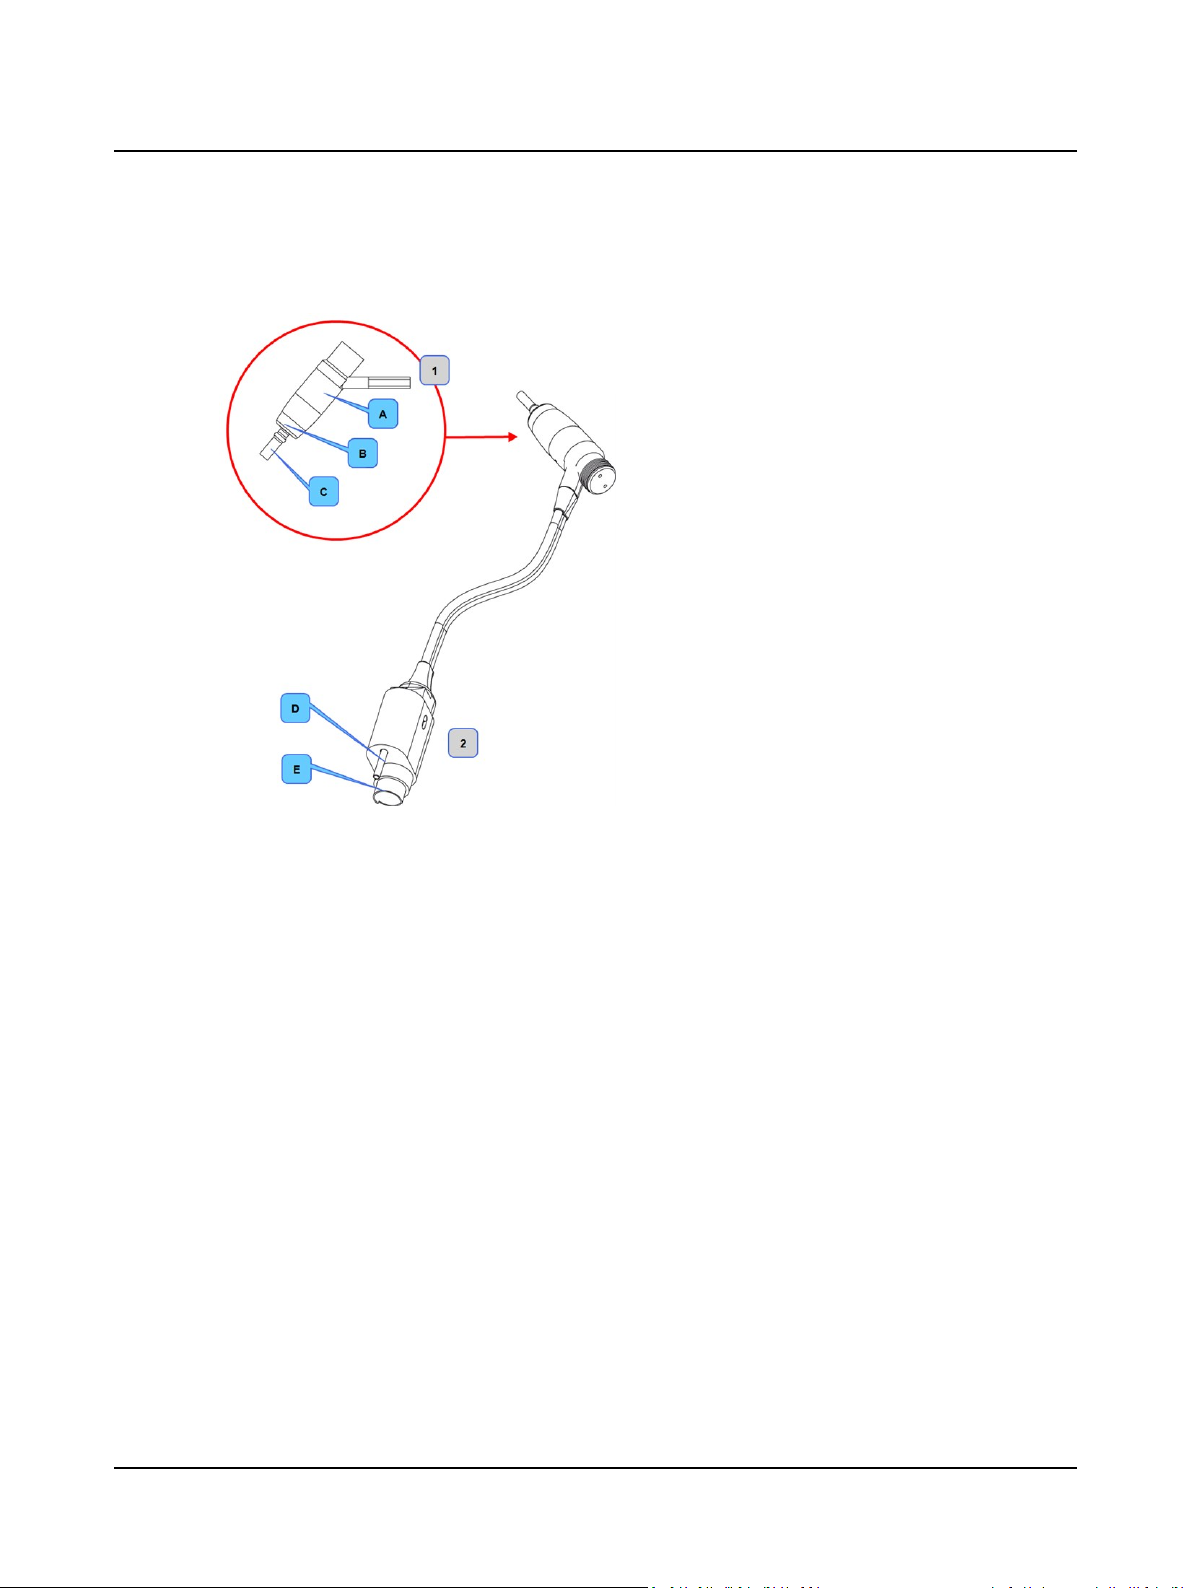
3.2 The probe
1. Probe
A. Probe body
B. Threaded ring
C. Probe tip
2. Probe plug
D. Air connector
E. Transducer connector
3.3 Assembly and installation
3.3.1 Location
Immittance testing is facilitated by a moderately quiet room. A sound cabin or sound treated room is not necessary.
To ensure safe performance, you must make sure that MADSEN OTOflex 100 is correctly installed and that the requirements listed in Standards and safety ► 171 are complied with.
MADSEN OTOflex 100 can be used as a hand-held device with no specific requirements to location. However, keep
MADSEN OTOflex 100 away from all liquids and sources of heat (for detailed specifications, see Technical specifications
► 176.
16 Otometrics - MADSEN OTOflex 100
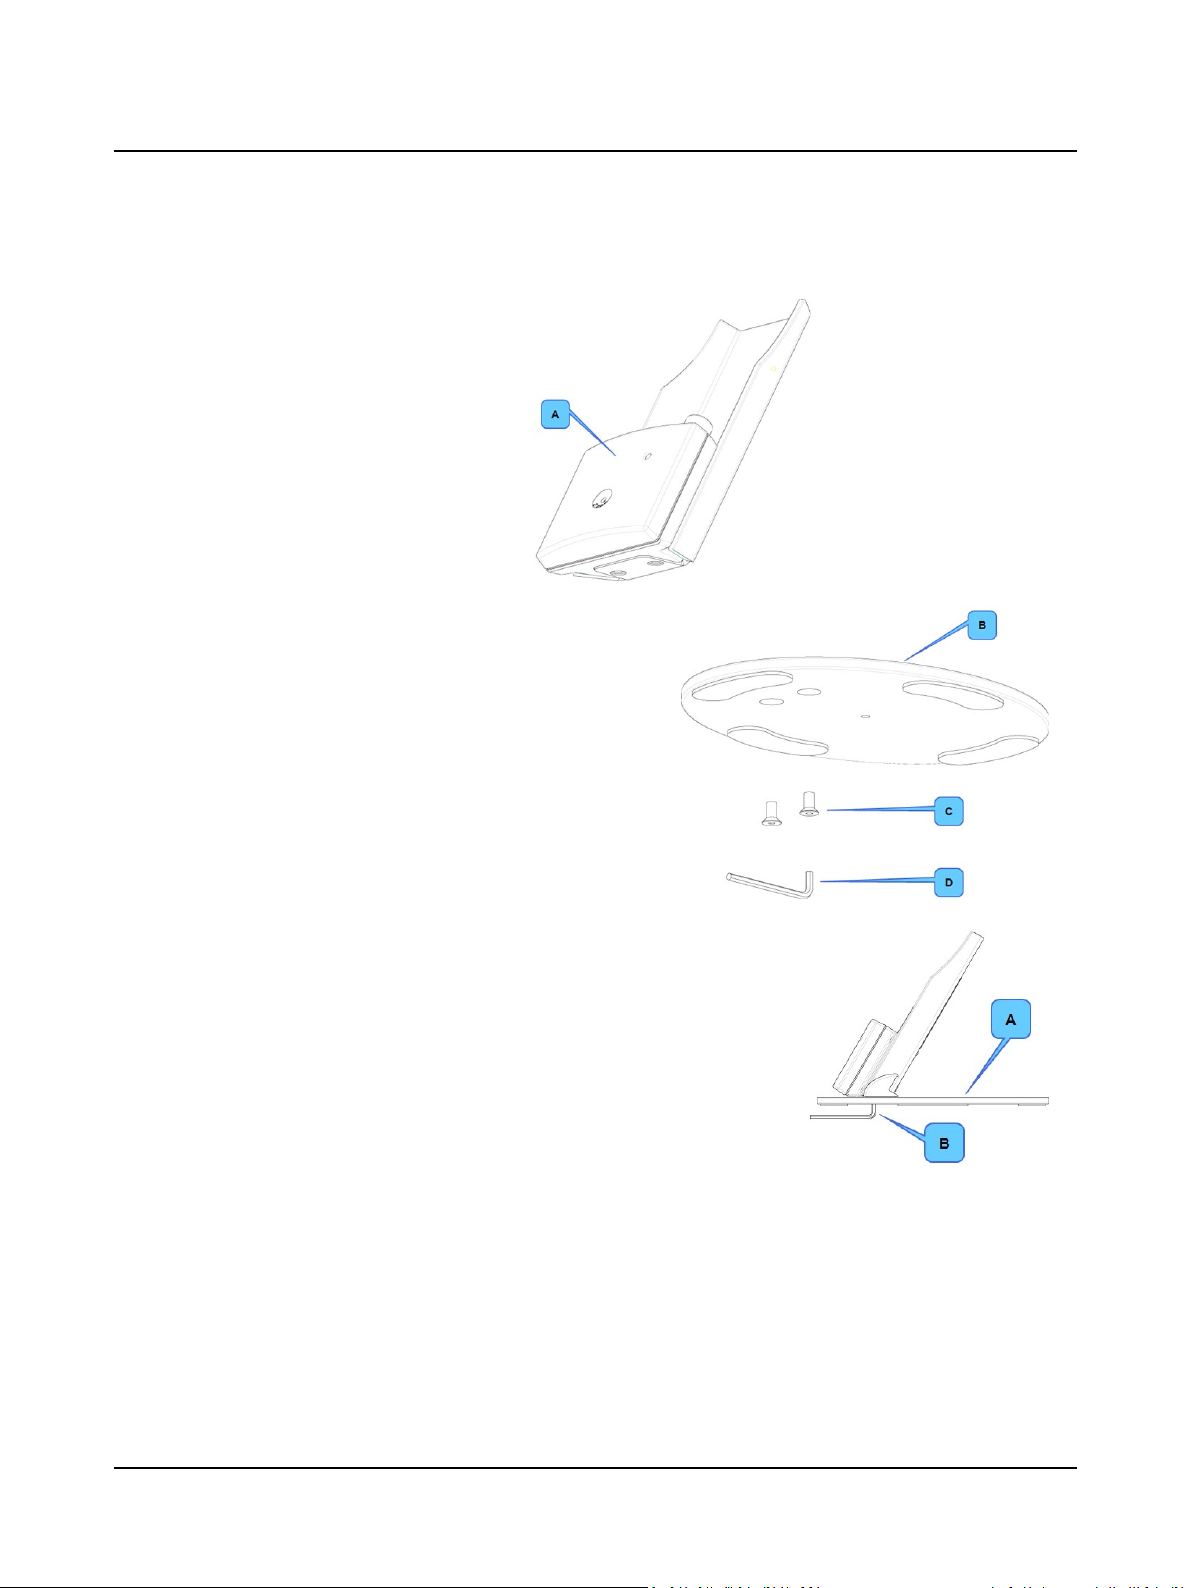
3.3.2 Desktop installation
Mount the charger on the charger base
as shown below.
1. Use the hexagonal key to screw the
hexagonal screws into place.
2. Tighten the screws well so that the
charger is stable when you place
MADSEN OTOflex 100 in the charger.
A. Charger body
B. Charger base
C. Hexagonal screws
D. Hexagonal key
3 Installing MADSEN OTOflex 100
A. Base
B. Hexagonal key
Otometrics - MADSEN OTOflex 100
17
3 Installing MADSEN OTOflex 100
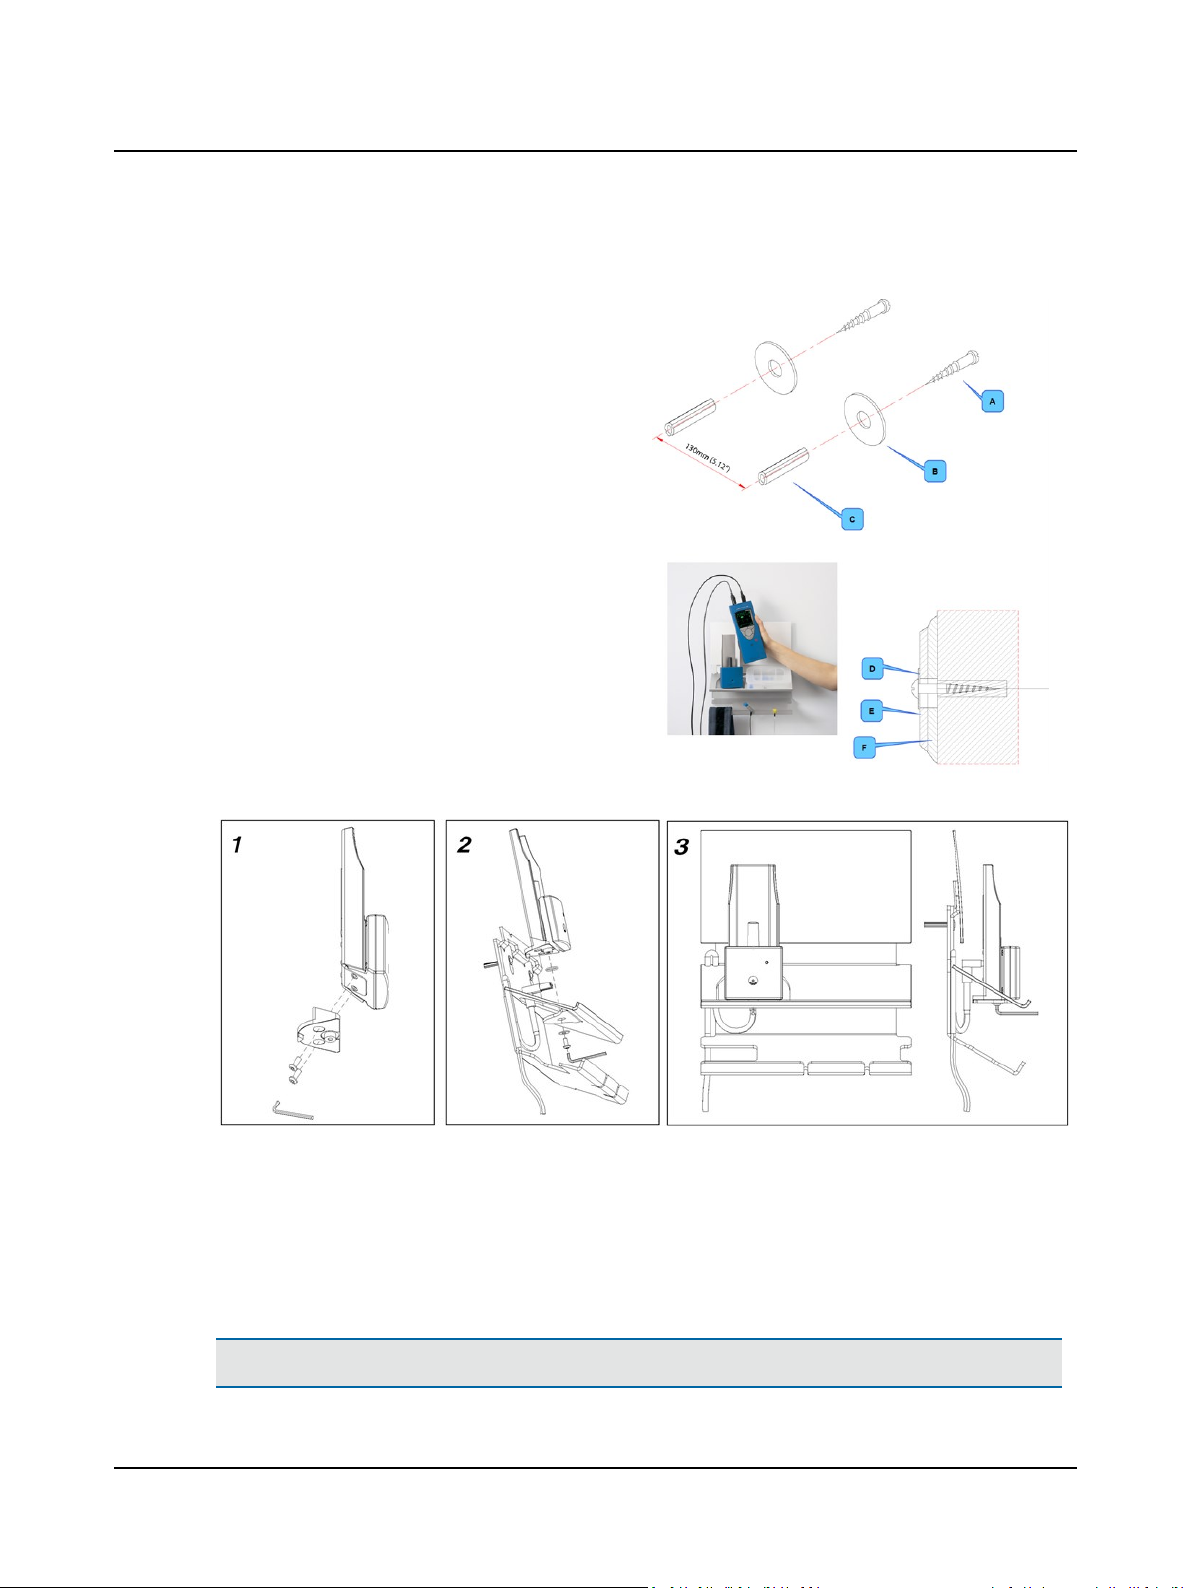
3.3.3 Wall mount installation
1. Drill 2 x 6 mm diameter holes 130mm (5.12") apart.
2. Insert rawl plugs.
3. Insert the screws with the washers mounted, through
the backplates of the wall mount.
A. 2 screws
B. 2 washers
C. 2 rawl plugs
D. washer
E. wall mount backplate
F. plastic shelf
3.4 Powering
3.4.1 Powering MADSEN OTOflex 100
MADSEN OTOflex 100
MADSEN OTOflex 100 is powered by batteries.
Caution• Use only the battery types listed in Technical specifications ► 176.
18 Otometrics - MADSEN OTOflex 100
See Batteries ► 19.
Power-related settings
You can customize the various power-related settings in MADSEN OTOflex 100 to suit your purposes and save power and
batteries. See Device settings ► 129.
3.4.2 Powering the charger
Charger
The MADSEN OTOflex 100 charger is connected to the electrical power outlet.
It is recommended that you leave MADSEN OTOflex 100 in the charger when not in use. This ensures that the device is
always ready for testing.
Connecting the charger to the mains power outlet
Warning• Operating at the wrong voltage may blow the fuses!See the label on the charger for input voltage.
1. Before you connect the power cable to the charger, make sure that the
voltage from the electrical power outlet matches the voltage shown on
the identification label on the charger.
2. Connect the charger to the mains power outlet. The device is
delivered preset for rechargeable NiMH batteries.
3. When you are not using the device, leave it in the charger so that it is
always ready for testing.
3 Installing MADSEN OTOflex 100
Warning• If you use the device with Alkaline batteries, always
switch off the mains power supply to the charger. Failure to do so
may cause the Alkaline batteries to leak and cause damage to the
device.
3.4.3 Batteries
Note•Do not insert the battery cover in the battery compartment if the battery compartment is empty. If you do,
the cover will lock in place inside the device.
Caution• Use only the battery types listed in Technical specifications ► 176.
MADSEN OTOflex 100 checks the battery type when you switch it on or place it in the charger, and will prompt you for
the battery type if it seems to be wrongly configured.
If this is the case, change the battery type setting in the device to reflect the battery type you have inserted. See Battery
type setting ► 21.
Otometrics - MADSEN OTOflex 100
A. Power socket
19
3 Installing MADSEN OTOflex 100
NiMH rechargeable batteries
MADSEN OTOflex 100is delivered with rechargeable NiMH batteries.
• Before you can operate MADSEN OTOflex 100, insert the batteries in MADSEN OTOflex 100.
• Leave it to charge in the MADSEN OTOflex 100 charger for at least 14 hours, and preferably overnight, before you
switch on MADSEN OTOflex 100.
Rechargeable batteries will reach full capacity when they have been recharged a couple of times.
Alkaline batteries
• If needed, MADSEN OTOflex 100 can be powered by non-chargeable Alkaline batteries.
• Remember to change the battery type setting.
Warning• If you use the device with Alkaline batteries, always switch off the mains power supply to the charger.
Failure to do so may cause the Alkaline batteries to leak and cause damage to the device.
When you are using Alkaline batteries the battery icon in the top right corner of the screen will show the status of the
Alkaline batteries, even if you place the device in the charger.
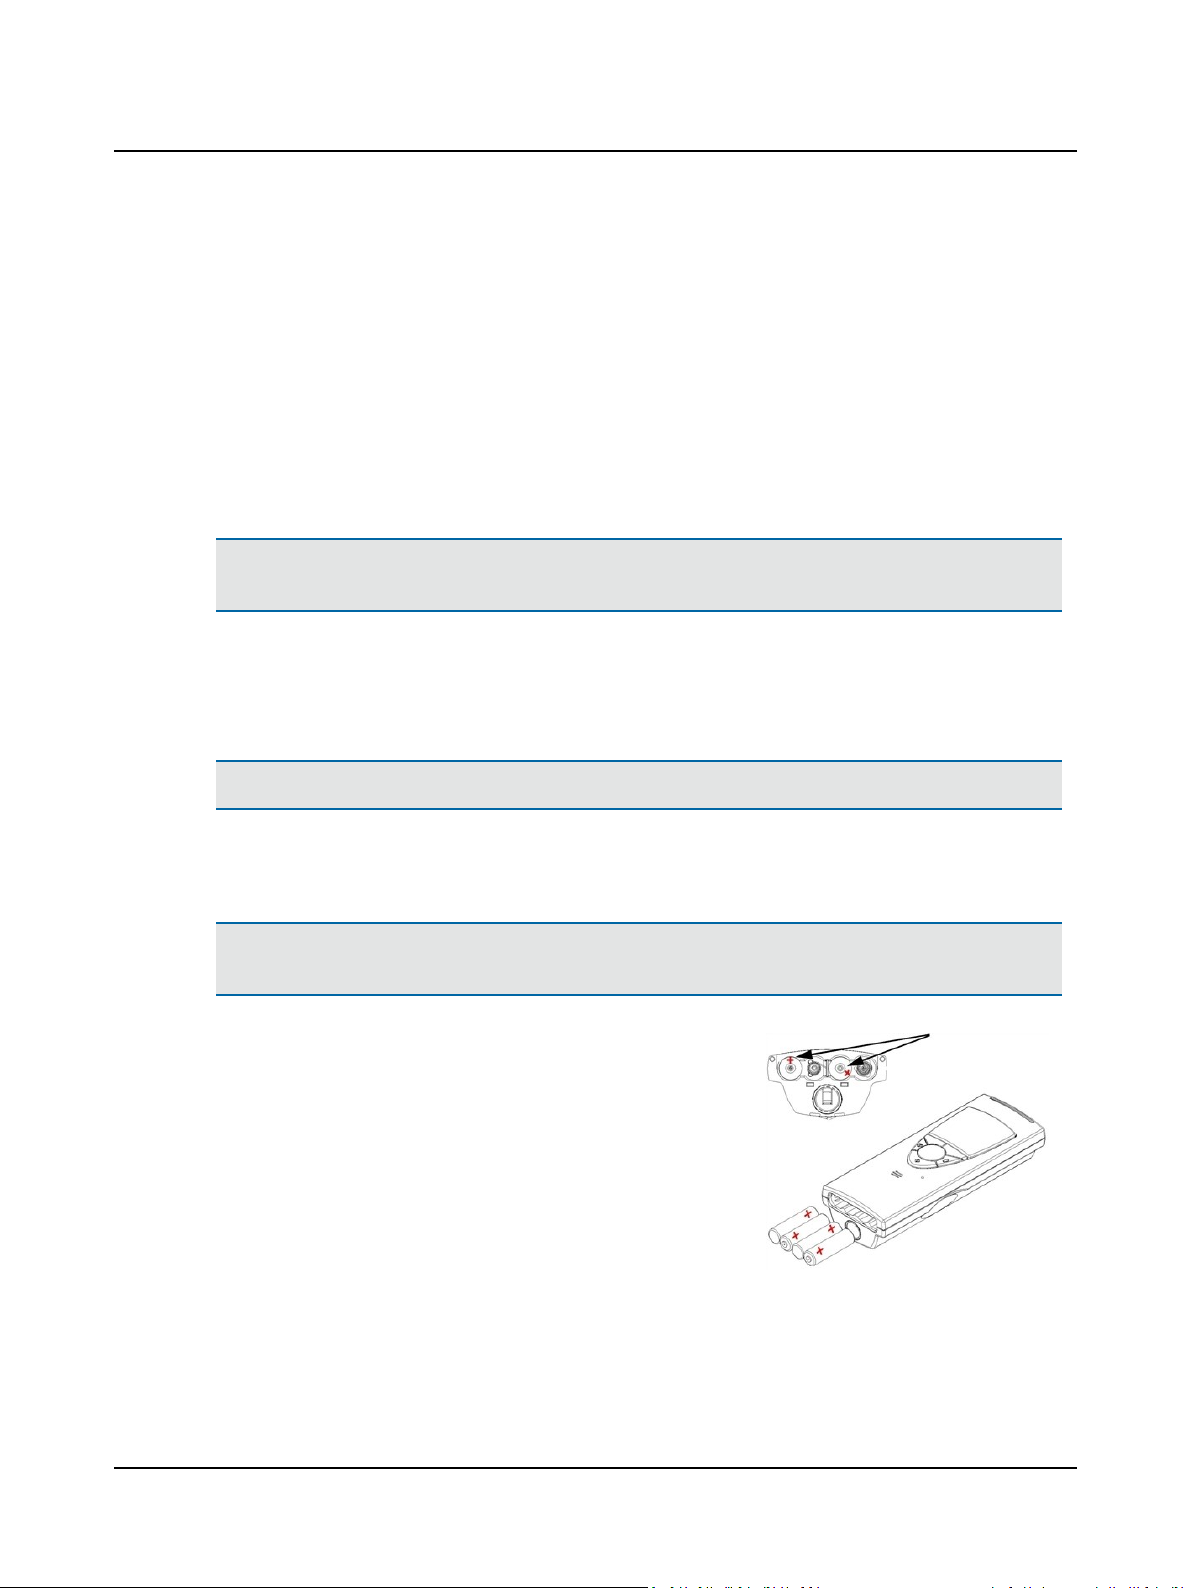
3.4.3.1 Inserting batteries
Caution• Use only the battery types listed in Technical specifications ► 176.
Inserting batteries
1. The batteries and the battery cover are delivered in a small bag.
Note•Do not insert the battery cover in the battery compartment if the battery compartment is empty. If you do,
the cover will lock in place inside the device.
2. Insert the batteries as shown. If you are in
doubt, look inside the battery compartment where you will see small red plus
signs indicating which way the batteries fit.
20 Otometrics - MADSEN OTOflex 100
3. To put the battery cover back in place,
insert the cover with the curved edge
facing upwards in the opening. Press the
cover inwards and downwards until it clicks
into place.
4. The next time you change batteries, press
the cover inwards and upwards until it is
released and snaps out of place.
5. Check the battery type setting in MADSEN OTOflex 100: See Battery type setting ► 21.
6. If you are using rechargeable batteries, leave MADSEN OTOflex 100 to charge for at least 14 hours, and preferably
overnight, before you put it into use (see Powering the charger ► 19 for details).
3.4.3.2 Battery type setting
The device is delivered preset for rechargeable NiMH batteries.
3 Installing MADSEN OTOflex 100
Warning• If you use the device with Alkaline batteries, always switch off the mains power supply to the charger.
Failure to do so may cause the Alkaline batteries to leak and cause damage to the device.
1. If you are in doubt of the setting, or if you are using Alkaline batteries, check the battery type and the setting in the
device: When MADSEN OTOflex 100 is ready for use, switch it on: Press and hold the On/Off key on the keypad.
2. Press Select to access the Menu followed by Advanced.. > Device Settings.. and scroll to Battery type.
3. Press Select to toggle to the correct battery type. You can choose between NiMH (rechargeable) and Alka(line).
4. Press the left softkey to exit.
5. If needed, press and hold the On/Off key on the keypad to switch off the device.
Power indicator
An icon in the the top right corner of MADSEN OTOflex 100 shows the type of powering used.
MADSEN OTOflex 100 receives power from the charger.
MADSEN OTOflex 100 is powered by batteries.
3.4.3.3 First time charging
Charging applies only if you use rechargeable batteries.
Otometrics - MADSEN OTOflex 100
21
3 Installing MADSEN OTOflex 100
1. Insert rechargeable NiMH batteries in the device.
1. Place the device in the charger.
2. Leave the device to charge for at least 14 hours, and preferably
overnight, before putting it into use.
The batteries will reach full capacity when they have been recharged a
couple of times.
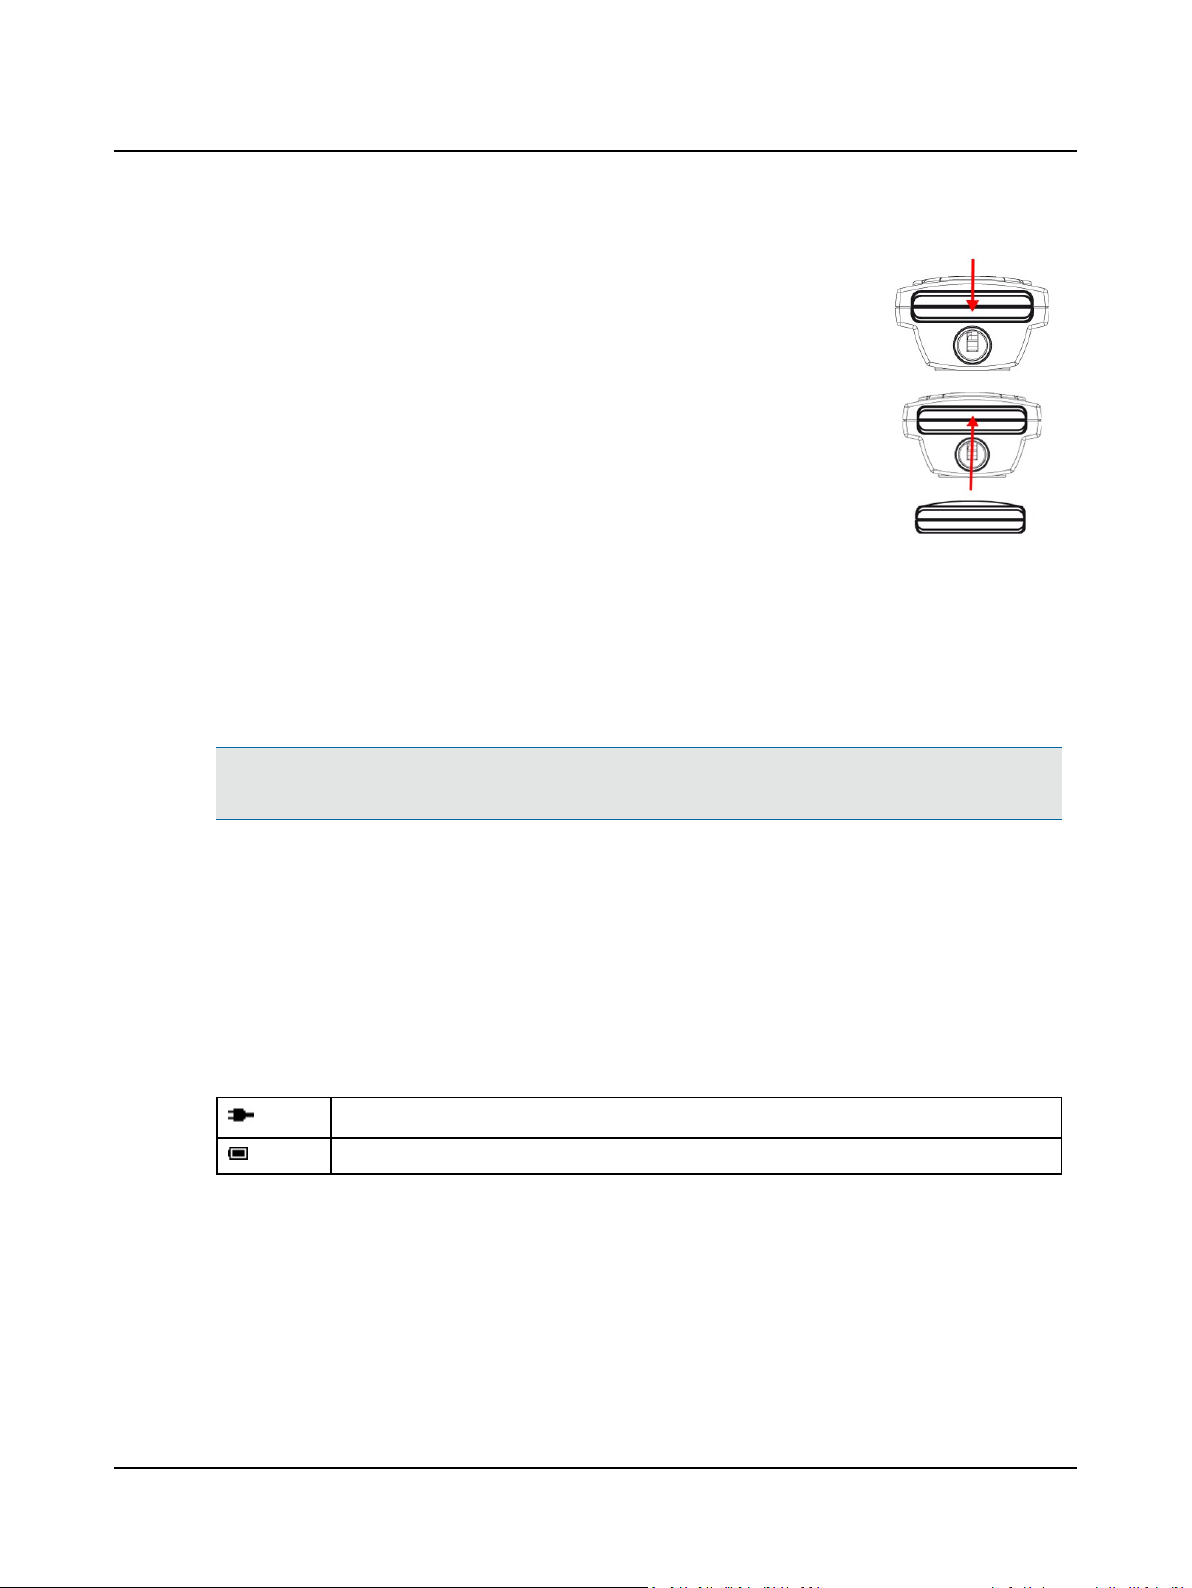
3.4.3.4 Charging status
Charging status
When the device is charging, the charging indicator on the front of the charger indicates the following:
A. Charger tab for charging the device
B. Charging indicator
C. Probe test cavity
D. The charger base
Green, steady:
Amber, steady:
Amber, flashing:
Device status
Powered by charger
Powered by batteries
only
3.4.3.5 Powering status
Device powered by charger
When the device is charging, a small power plug icon is
shown in the top right corner of the screen.
The device is not charging. Charging is resumed when the device is reinserted into the charger or the device is turned on.
The device is charging. Charging is discontinued automatically based on a timer to ensure
that batteries are not over-charged.
The charger is faulty. Contact your supplier.
When the device is charging, a small power plug icon is shown in the top
right corner of the screen.
When the device is powered by batteries only, i.e. when it is not placed in
the charger or when Alkaline batteries are used, it shows the approximate
remaining capacity of the batteries in the top right corner of the screen.
22 Otometrics - MADSEN OTOflex 100
Device powered by batteries only
When the device is powered by batteries only, i.e. when
it is not placed in the charger or when Alkaline batteries
are used, it shows the approximate remaining capacity of
the batteries in the top right corner of the screen.
3.4.4 Switching MADSEN OTOflex 100 on and off
Switching on
Press and hold the On/Off key on the keypad until the start-up screen appears (approximately 2-3 seconds).
Switching off
Press and hold the On/Off key on the keypad until the message “Power Off” appears.
3 Installing MADSEN OTOflex 100
Otometrics - MADSEN OTOflex 100
23
4 MADSEN OTOflex 100 main description
4 MADSEN OTOflex 100 main description
4.1 Switching MADSEN OTOflex 100 on and off
A. Probe
B. Probe plug
C. Screen
D. Keypad
Handling
To operate MADSEN OTOflex 100, hold it with one hand (left or right). Use
your thumb to press the keys on the keypad and turn the scroll wheel.
Switching on
Press and hold the On/Off key on the keypad until the start-up
screen appears (approximately 2-3 seconds).
Switching off
Press and hold the On/Off key on the keypad until the message
“Power Off” appears.
When you have installed MADSEN OTOflex 100, there are a number of settings you can customize for your use.
See Device settings ► 129.
• Check the specific device settings.
• If needed, adjust the altitude setting.
• Set up the user(s) who will be using MADSEN OTOflex 100. See Users ► 51
• Check the default test settings to acquaint yourself with the various settings. See Test setups ► 120.
• If needed, create new test settings to suit your methods of testing.
4.2 Language setting
If the language setting in your MADSEN OTOflex 100 has not been set to the desired language, you can do so yourself:
24 Otometrics - MADSEN OTOflex 100
4 MADSEN OTOflex 100 main description
1. Switch on the device.
– If the “Patient & User” screen appears, press the softkey Return to previous menu to go to the Tym-
panometry test screen.
– If the “Load Settings” screen appears (depending on setting in Menu > Procedure options.. > ‘Settings’
prompt), press the Cancel softkey to go to the Tympanometry test screen.
2. Use the scroll wheel to highlight the Menu icon.
3. Press Select on the keypad.
4. Use the scroll wheel to scroll to Advanced.. and press Select.
5. Scroll to Device Settings.. and press Select.
6. Scroll to Localization.. and press Select.
7. Scroll to Language, and press Select.
8. Scroll to the language of your choice and press Select.
9. Press the softkey Return to test screen to go to the Tympanometry test screen.
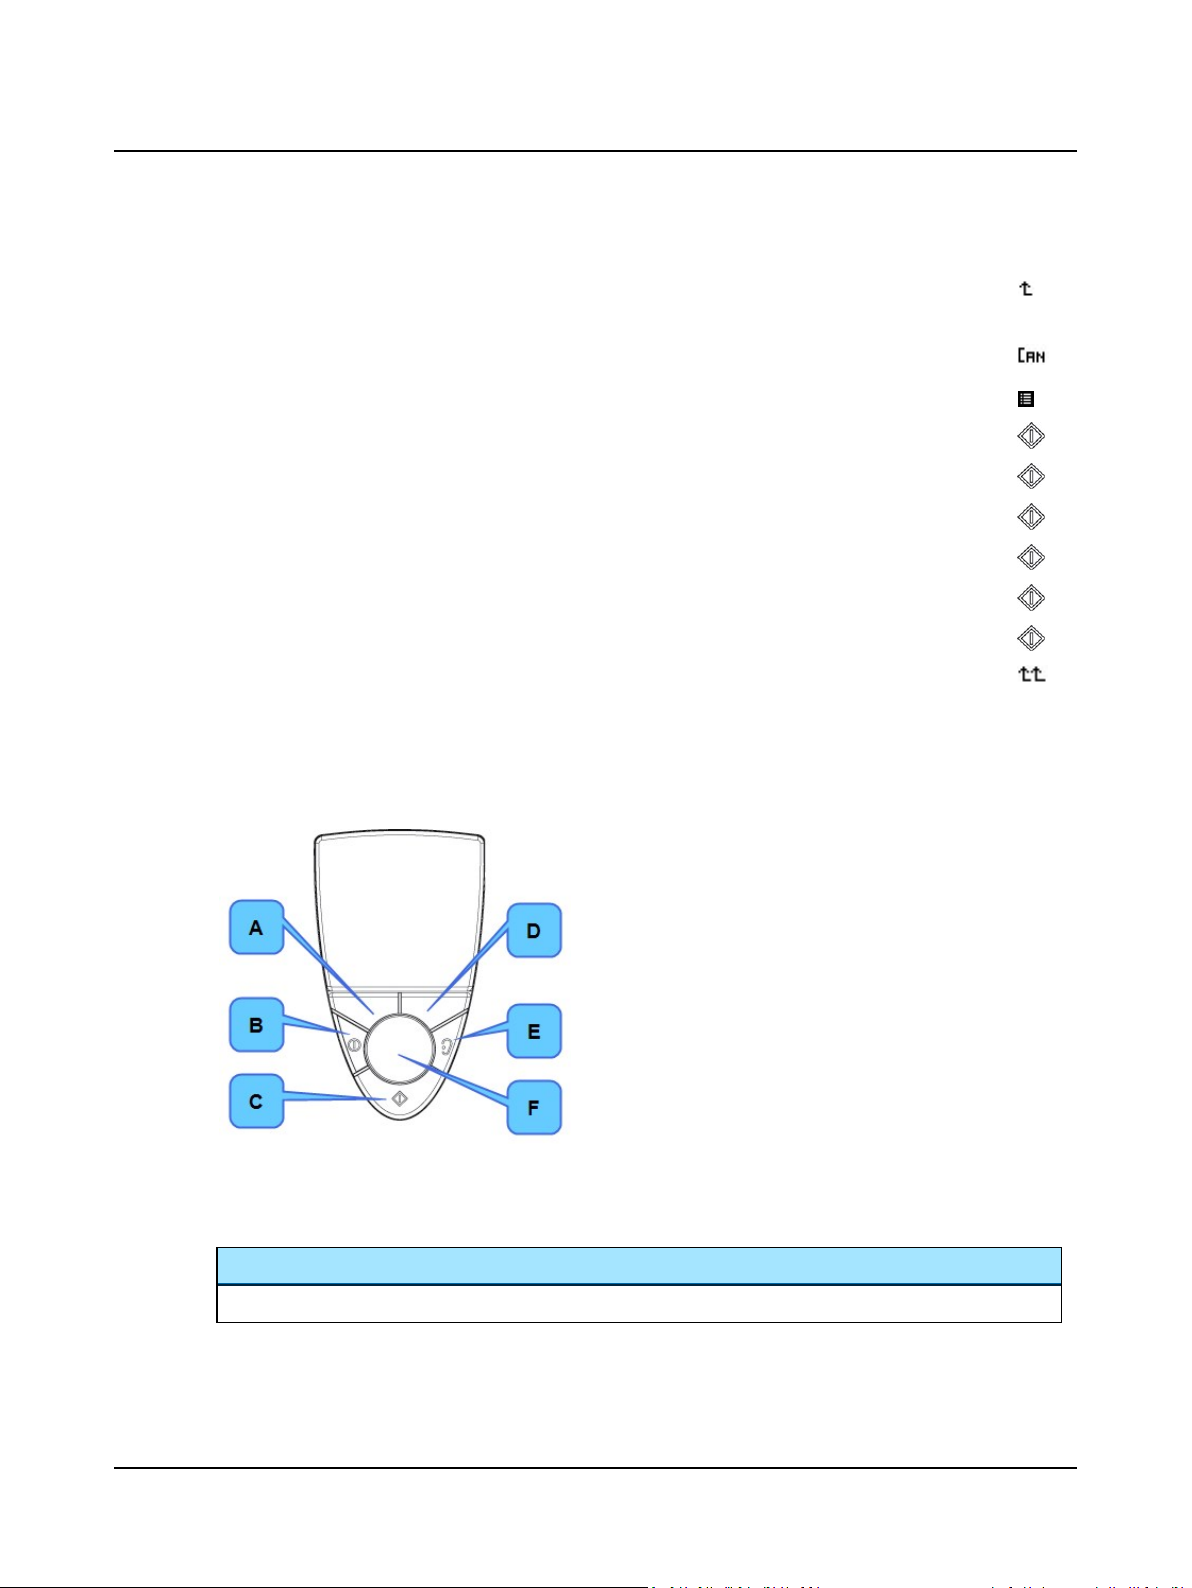
4.3 Keypad main functions
You can access most of the functions in MADSEN OTOflex 100 from the menu, or by pressing one or more keys and
softkeys.
Scroll wheel
Turn the scroll wheel to shift the focus on the screen or change values:
A. Left softkey
B. On/Off
Press & hold
Press & hold to switch on/off.
Press to toggle between test modes
C. Select key
Select highlighted item.
Toggle value settings
Press & hold to activate:
–Test Selector
– Character Select in text editor mode
D. Right softkey
E. Ear Selector
Pressure release
F. Scroll wheel
Scroll to highlight item
Change intensity level
Scroll to value setting
Scroll between test types
Otometrics - MADSEN OTOflex 100
25
4 MADSEN OTOflex 100 main description
Scroll wheel
• Scroll up
Moves the focus up or to the left, or decreases a selected value
• Scroll down
Moves the focus down or to the right, or increases a selected value
• Select
Press and hold to activate the Test Selector (see Test Selector mode ► 30)
• Menu
Press to access the menu
• Activate item
Press to activate the selected item
Test Selector mode
Scroll between test types (Test Selector mode ► 30)
Text Editor mode
Scroll to select characters (The Text Editor ► 31)
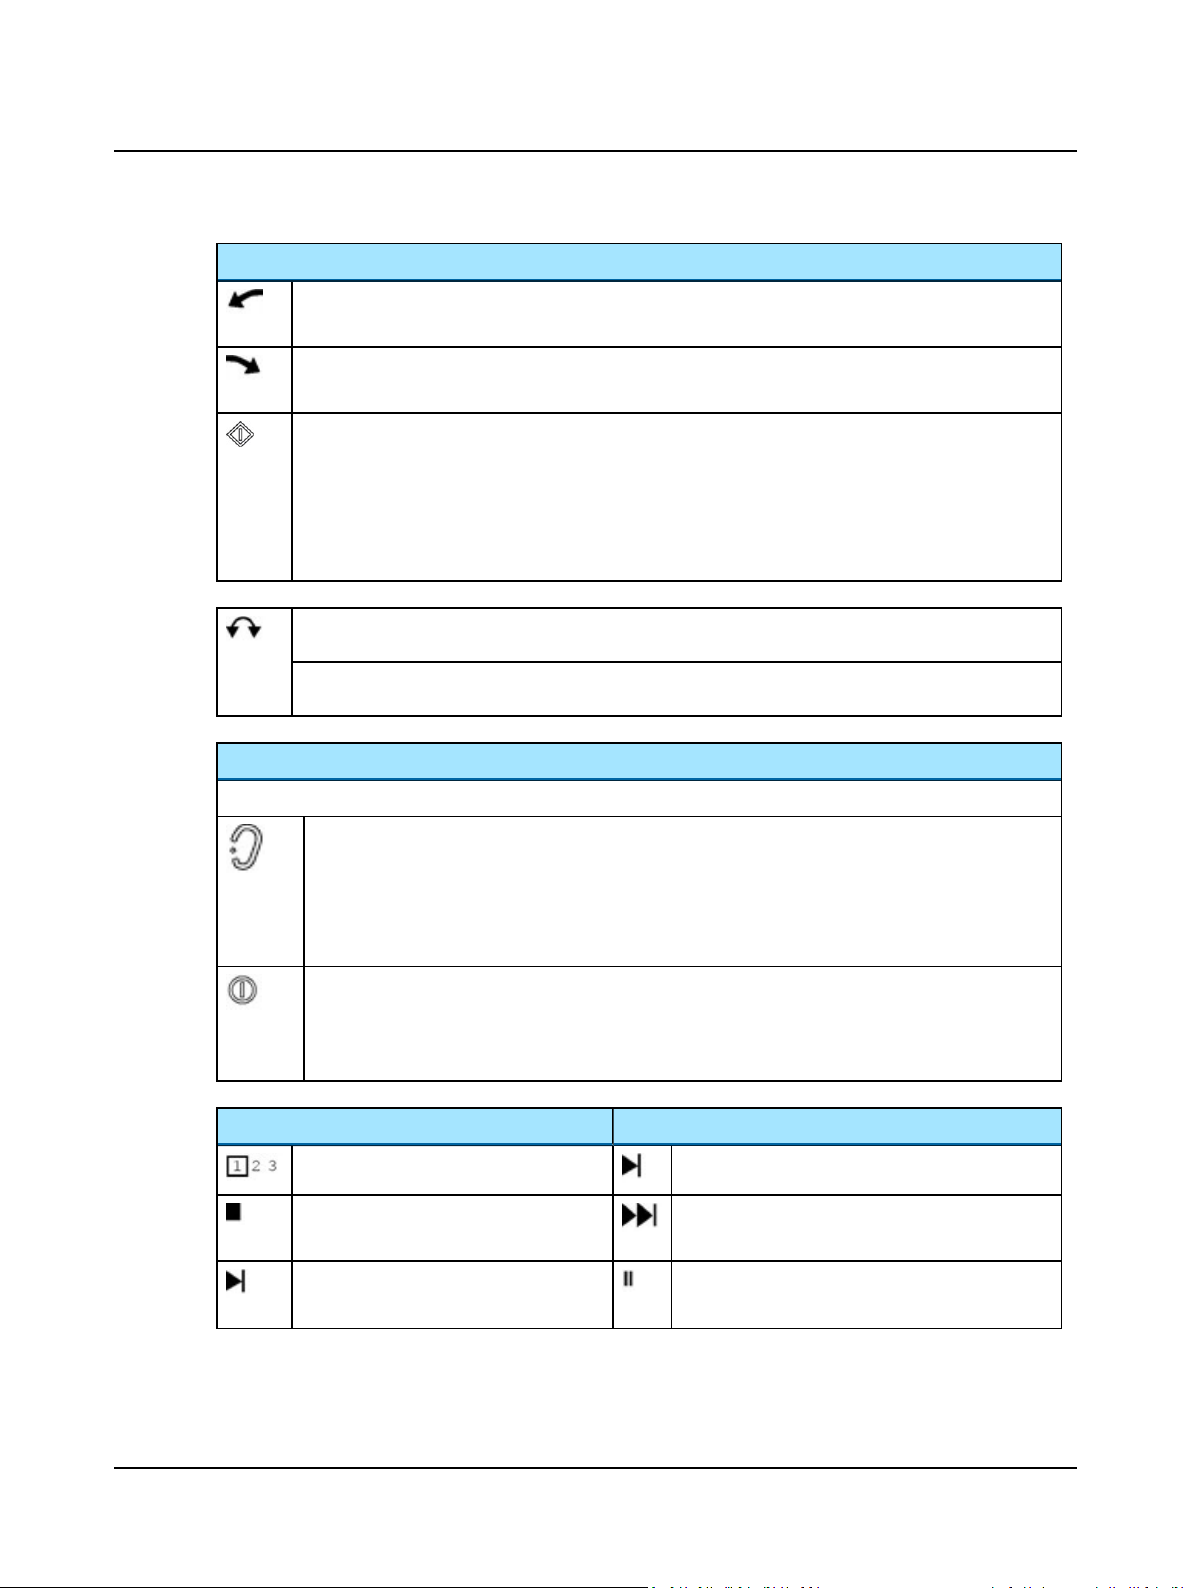
Softkeys
The current functions of the two softkeys are shown at the bottom of the screen, just above each softkey.
During testing
• Pressure release
Press for immediate release of air pressure and stop/pause of measurement.
Between measurements
• Ear selection
Press to toggle the ear selection associated with the current measurement
• On/Off
Press and hold 3-5 seconds to turn the device on or off
• Toggle test type
Press to toggle between test types
Left softkey Right softkey
Tymp curve selector Start tymp measurement
Stop reflex measurement Start automatic measurement
Start automatic reflex measurement.
Start semi-automatic measurement.
Start reflex search for selected stimulus.
Pause measurement
Flashing: resume measurement
26 Otometrics - MADSEN OTOflex 100
Left softkey Right softkey
Mark threshold Start single stimulus
Unmark threshold Stop tymp measurement
Return to previous menu Automatically pump to positive pressure in ETF-P
4 MADSEN OTOflex 100 main description
Menu
Press & hold for patient info Return to test screen
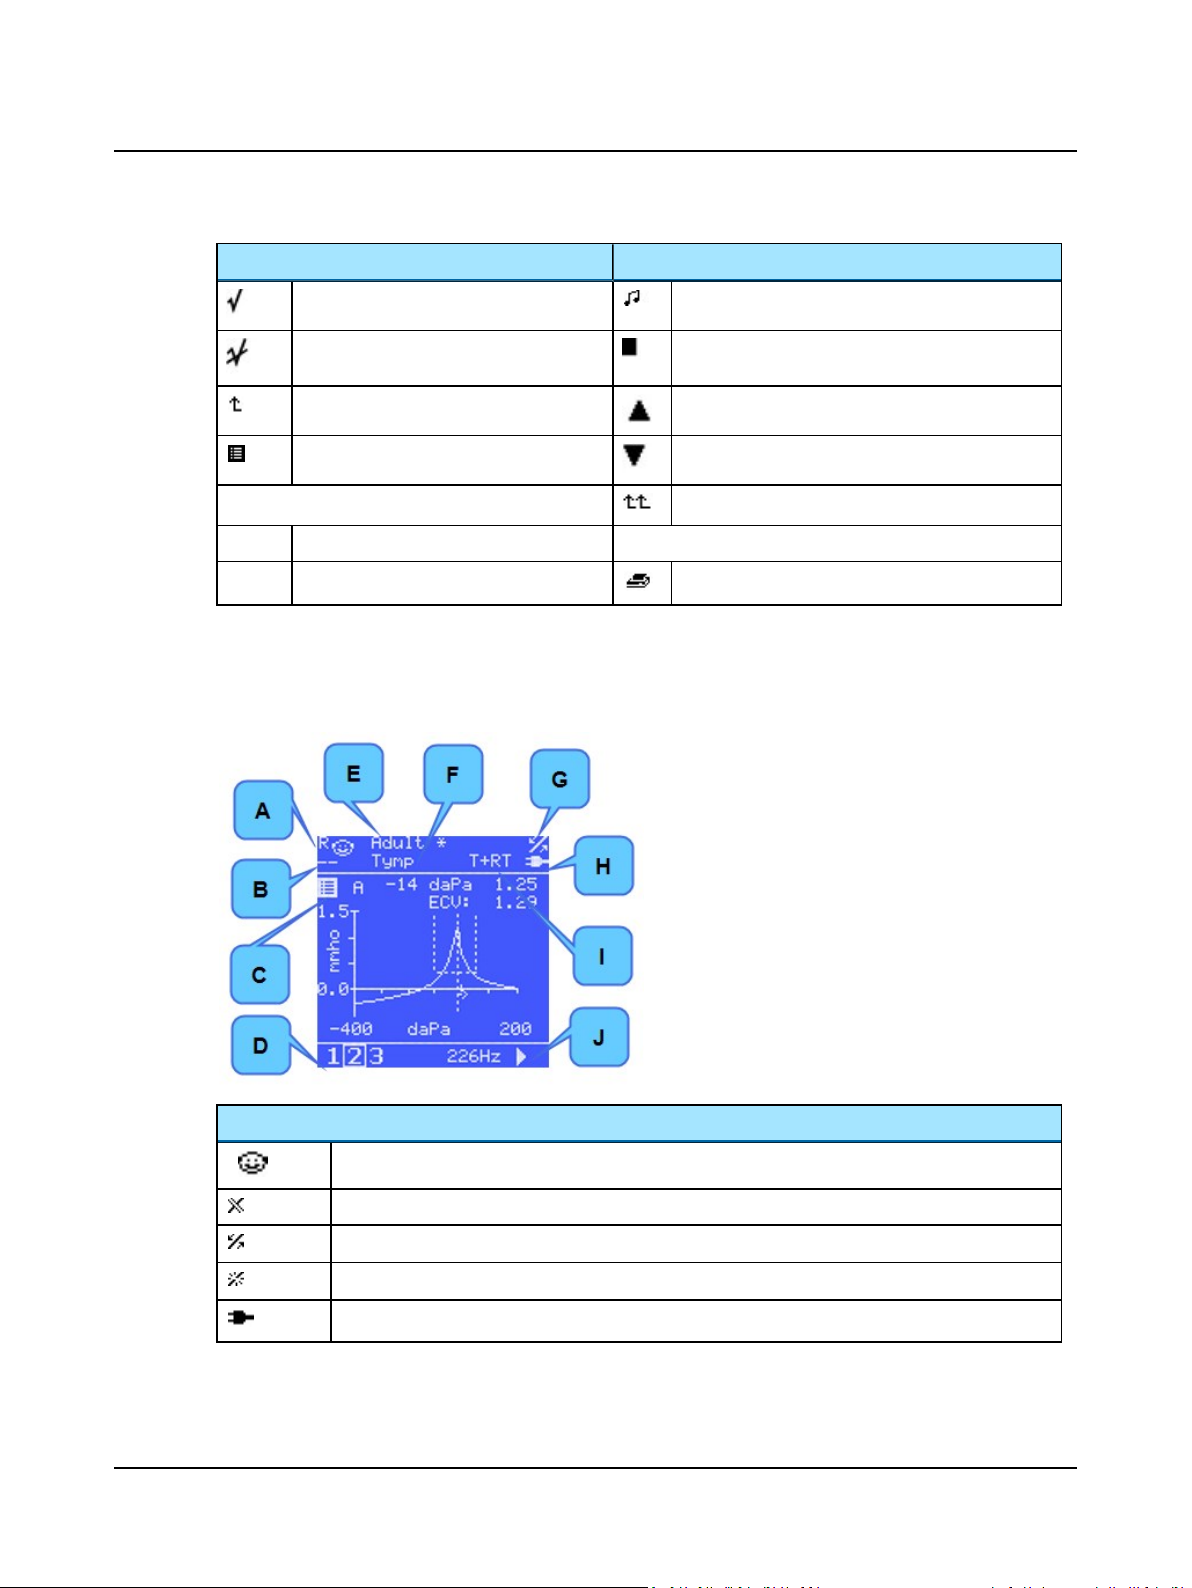
4.4 The display - test mode
The test screens display a number of icons:
Automatically pump to negative pressure in ETF-P
Press & hold to start test sequence
Print (Printing ► 89)
A. Ear selection
L = Left
R = Right
B. Patient
C. Menu and settings
D. Tympanometric curve selector
E. Selected test setting
F. Selected test
G. Connection indicator
H. Power indicator
I. Selected test sequence
J. Start measurement/test sequence
Icons
R L
Otometrics - MADSEN OTOflex 100
Ear selection: the ear selection icon shows the ear selected for testing.
Connection indicator: Bluetooth communication disabled in menu.
Connection indicator: Bluetooth communication is established.
Connection indicator: Bluetooth communication is interrupted.
Power indicator. MADSEN OTOflex 100 receives power from the charger.
27
4 MADSEN OTOflex 100 main description
Icons
Power indicator. MADSEN OTOflex 100 is powered by batteries.
Menu and settings icon. Press Select to access when highlighted.
Curve selector. See the specific test procedures.
4.5 Controls and menu selections
You can access most of the functions available in MADSEN OTOflex 100 via the menu, or by pressing one or more keys and
softkeys.
There are a number of shortcuts and softkeys available for quick and easy navigation of MADSEN OTOflex 100.
See Testing with MADSEN OTOflex 100 ► 58.
Test specific shortcuts and softkeys are listed in the specific test sections.
4.5.1 The MADSEN OTOflex 100 Menu
1. Scroll to the Menu icon. From the menu you can access most functions available in MADSEN OTOflex 100..
2. Press Select to access the menu. From the menu you can access most functions available in MADSEN
OTOflex 100.
When you navigate the menu, the following functions are available:
A. Left softkey: Return to previous menu
B. Scroll bar
Use the scroll wheel to navigate
C. Right softkey: Return to test screen/Test Selector
Menu >
From the menu you can select menus and menu items for accessing general and Test management related actions, test specific and procedure related settings, as well as general procedure and device settings.
28 Otometrics - MADSEN OTOflex 100

4 MADSEN OTOflex 100 main description
Start sequence (Sequence testing ► 60)
Test selector (Test Selector mode ► 30)
Printers.. (Printing ► 89)
Patient & User..
My settings..(Test setups ► 120)
> Load Settings..
> Save Settings
> Save Settings As
> Delete Settings..
> Load Factory Settings..
Done! (Test flow setup ► 53)
Probe Check (Daily probe check ► 51)
- - - - - - - - - - - - - - - - - - - - - - - - - - -
Probe Tone
...
...
More settings..
- - - - - - - - - - - - - - - - - - - - - - - - - - -
Manage Test Results.. (Sequence testing ► 60)
> Swap Ear Results
> Del(ete) Sub-test..
> Del(ete) Current Test..
> Del(ete) Patient..
> Del(ete) All Printed Patients
> Del(ete) all Patients
Actions
Settings specific to the selected test type
General settings
Procedure options..
>Sequence (Sequence testing ► 60)
> Auto start on seal
> Auto resume on seal
> Auto free memory
> First ear to test
> 226 Hz tymp unit
> 226 Hz deflection unit
> Reflex adjustment
> Intensity safety (see Procedure options ► 126)
> “Done!” prompt (see Preparing for testing ► 47)
> Print when done (see Preparing for testing ► 47)
> “Patient” prompt (see Preparing for testing ► 47)
> “Setting” prompt (see Preparing for testing ► 47)
Otometrics - MADSEN OTOflex 100
General settings
29

4 MADSEN OTOflex 100 main description
Advanced..
> Dissociate from PC
> Users..
>
Device settings..
>
Service..
(password protected)
Advanced settings and actions
Device info,
Brightness
Bluetooth
Battery type
Altitude ab(ove) sea (level)
Bat(tery) power save
Bat(tery) power off
Charger powersave
Charger poweroff
No power off before
Localization.. (> Language)
Date format
Decimal separator
Probe standard
Set time..
Calib. old warning
Load factory settings..
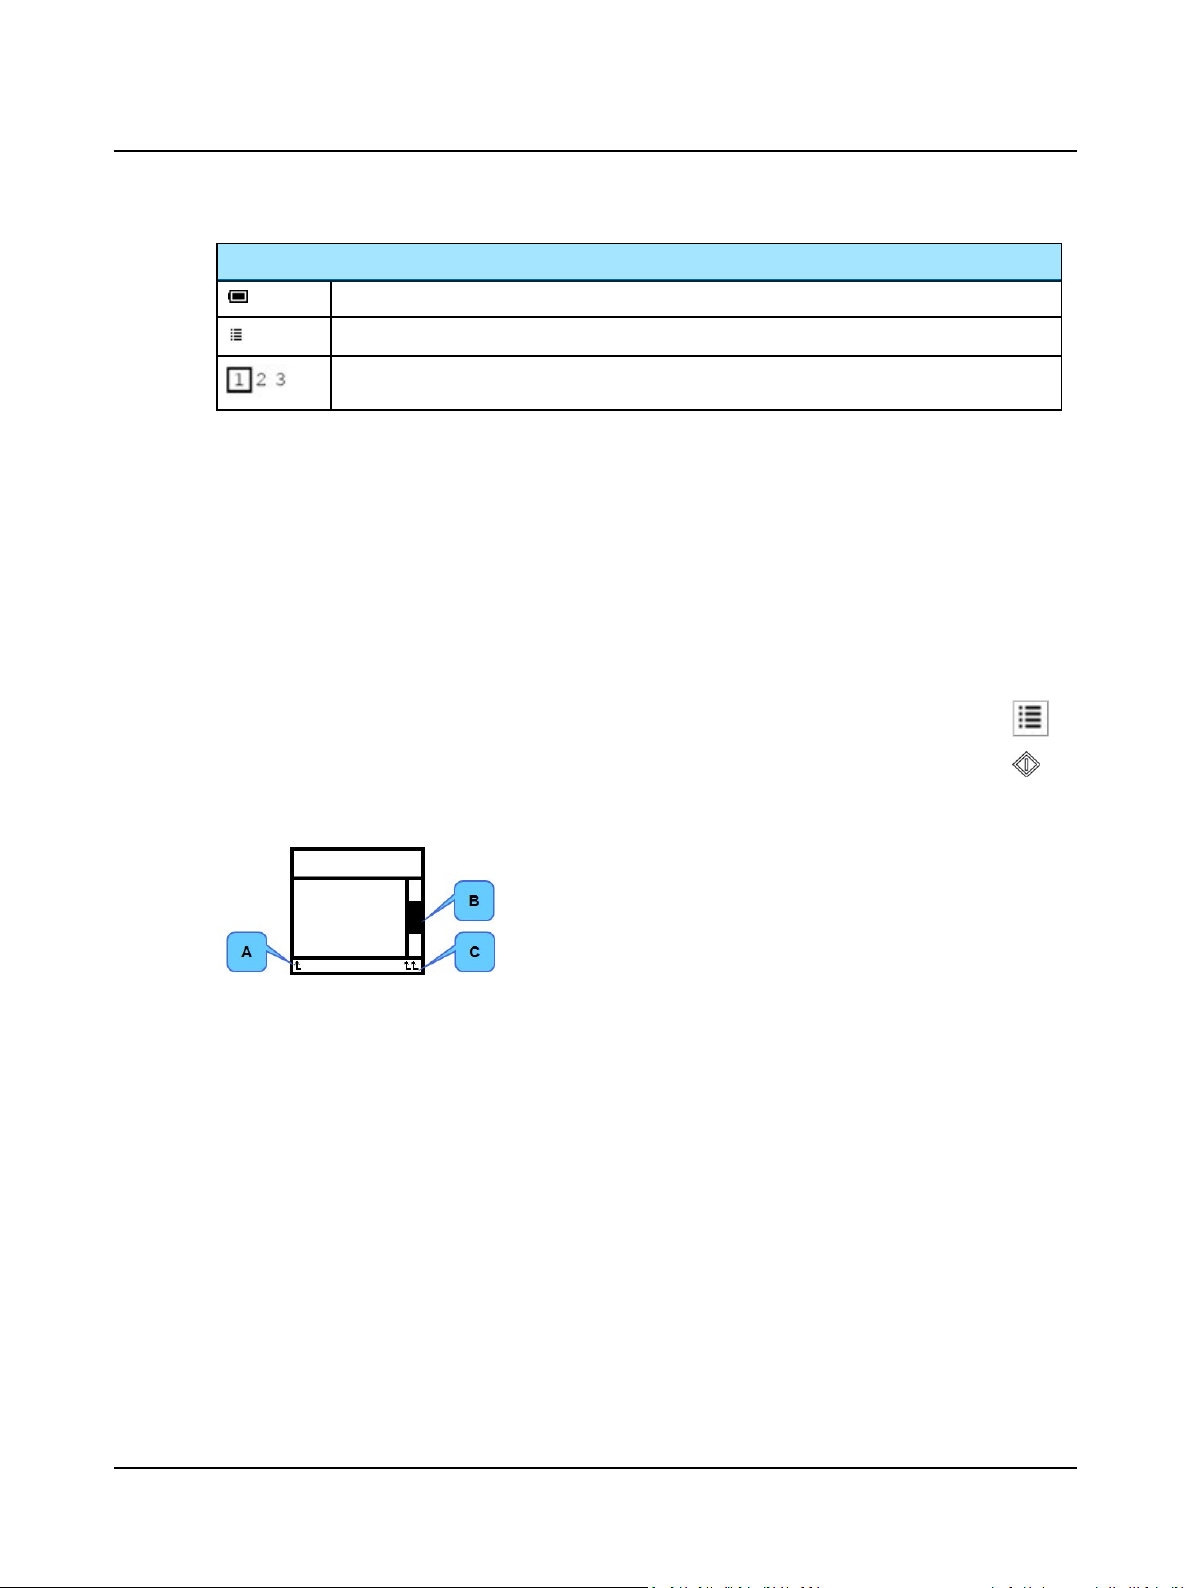
4.5.2 Test Selector mode
Note•The easiest way to change from one test to another is to briefly press the On/Off button.
In Test Selector mode, you can scroll through each of the displays for the individual tests types. For tympanometry this
includes a Tymp Data screen with additional results.
In Test Selector mode no screen items can be selected and no deflection curves are displayed.
1. Press and hold the Select key to see the double arrows at the bottom of
the screen.
The double arrows indicate that you can use the scroll wheel to scroll in
either direction to view the specific test types.
30 Otometrics - MADSEN OTOflex 100
 Loading...