

otometrics MADSEN AccuScreen OAE, ABR Screener, MADSEN AccuScreen User Manual

MADSENAccuScreen
OAE & ABR Screener
User Manual
Doc. No. 7-50-0920-GB/11
Part No. 7-50-09200-GB

Copyright notice
© 2010,2018Natus Medical Denmark A/S. All rights reserved. ® Otometrics, the OtometricsIcon, AURICAL, MADSEN, ICS and
HORTMANN are registered trademarks of Natus Medical Denmark A/S in the U.S.A. and/or other countries.
Version release date
2018-07-03 (191357)
Technical support
Please contact your supplier.
2
Otometrics - MADSEN AccuScreen

Table of Contents
1 Introduction
1.1 Brief description
1.2 The docking station
1.3 The AccuLink software program
1.4 Printing
1.5 Intended Use
1.6 Physical operating principle
1.7 About this manual
1.8 Typographical conventions
1.8.1 Navigating this manual
2 Unpacking and Installation
2.1 Unpacking
2.2 Overview of AccuScreen
2.2.1 Front and rear of AccuScreen
2.2.2 Top and bottom of AccuScreen
2.2.3 The docking station
2.2.4 Display
2.2.5 Ear probe
2.2.6 Electrode cable (ABR only)
2.2.7 Ear coupler cable
2.3 Storage
2.4 Assembly
2.5 Powering
2.5.1 The battery
2.5.2 Inserting the battery in AccuScreen
2.5.3 Battery status
2.5.4 Powering the docking station
2.5.5 Charging the battery from the docking station
2.5.6 Charging the battery with the external charger
7
7
7
7
7
8
8
9
9
10
11
11
11
11
12
12
14
14
15
15
15
16
16
16
17
17
18
18
19
3 Getting Started with AccuScreen
3.1 Switch on AccuScreen
3.1.1 Power-saving mode and automatic power-off
3.1.2 The AccuScreen screens
3.1.3 Selecting the user
3.1.4 Entering password
3.1.5 Incorrect password
3.1.6 Optional screens
3.1.7 The Home menu
3.2 Patient handling in AccuScreen
3.2.1 Adding a new patient
3.2.2 Finding a patient
3.2.3 Editing patient data
4 Preparing for testing
4.1 Preparing AccuScreen
4.2 Preparing the equipment
4.2.1 Preparing the probe for testing
Otometrics - MADSEN AccuScreen
20
20
20
20
21
22
22
22
22
23
23
26
27
28
28
28
28
3

4.2.2 Connecting the probe
4.2.3 Connecting the electrode cable for ABR testing
4.2.4 Connecting the ear coupler cable for ABR testing
4.3 Preparing the test environment
4.4 Preparing the patient
4.4.1 Preparing the patient for insertion of the ear probe
4.4.2 Fitting the eartip on the probe
4.4.3 Inserting the probe with eartip in the patient’s ear canal
4.4.4 Placing the electrodes for ABR testing
4.4.5 Fitting the ear couplers
28
29
29
30
31
31
31
32
32
33
5 Testing with AccuScreen
5.1 Ready to test
5.2 The TEOAE test
5.2.1 Starting the test
5.2.2 The TEOAE test
5.2.3 TEOAE test results
5.3 The DPOAE test
5.3.1 DPOAE test protocol
5.3.2 Starting the test
5.3.3 The DPOAE test
5.3.4 DPOAE test results
5.4 The TEOAE test
5.4.1 TEOAE test protocol
5.4.2 Starting the test
5.4.3 The TEOAE test
5.4.4 TEOAE test results
5.5 The ABR test
5.5.1 Starting the test
5.5.2 Impedance testing and calibration
5.5.3 The ABR test
5.5.4 ABR test results
5.6 Options in the test result screens
5.7 Adding comments to a test
5.7.1 Adding a standard comment
5.7.2 Adding a new comment
5.7.3 Viewing comments
5.8 Continuing testing on the other ear
5.9 Viewing a patients test record
5.10 Test View
5.11 The Test View screen
36
36
37
37
38
39
41
41
41
42
44
45
45
45
46
47
49
49
50
51
53
55
55
55
56
56
56
57
57
58
6 Quick Test
6.1 Performing a Quick Test
7 Printing
7.1 Printing from AccuScreen
7.2 Printouts from label printer
8 Quality Tests
8.1 Performing Quality Tests
8.2 Probe test
8.2.1 Performing the probe test
59
59
60
60
62
65
65
65
66
4 Otometrics - MADSEN AccuScreen

8.2.2 From the Quality Tests menu
8.3 Electrode cable test
8.4 Ear coupler cable test
8.5 Combined (Electrode Cable - Ear Coupler Cable)
67
67
68
70
9 AccuScreen settings
9.1 The Settings menu
9.2 Time and Date setting
9.3 Language setting
9.4 Sound setting
9.5 Display Brightness
9.6 System Info
10 Handling Data in AccuScreen
10.1 Entering data in AccuScreen
10.1.1 Using the keypad
10.2 Function buttons
10.3 General buttons
10.4 Deleting data
10.4.1 Deleting one patient
10.4.2 Deleting by date
10.4.3 Deleting all patients
10.5 Memory full
11 Maintenance and Cleaning
11.1 The probe tip and probe body
11.1.1 Cleaning and disinfecting the probe tip
11.1.2 Cleaning the probe body
11.1.3 Probe calibration
11.2 Eartips
11.3 The ear coupler cable
11.3.1 Cleaning the ear coupler cable
11.3.2 Ear coupler cable calibration
11.4 Cleaning AccuScreen
11.4.1 Cleaning and disinfecting the built-in test cavity
11.5 Battery safety and maintenance
11.5.1 Safety information
11.5.2 Increasing service life
11.5.3 Disposal of old batteries
72
72
73
74
74
75
75
76
76
76
77
78
78
78
79
80
81
82
82
82
83
84
84
84
84
84
85
85
86
86
86
86
App. 1 Standards and Safety
App. 1.1 AccuScreen symbols
App. 1.2 Accessory symbols
App. 1.3 Docking station symbols
App. 1.4 Warning notes - AccuScreen
App. 1.5 Warning notes - docking station
App. 1.6 Warranty
App. 1.7 Repair, after-sales service and regular checks
App. 1.7.1 Declaration
App. 1.8 Manufacturer
App. 1.8.1 Responsibility of the manufacturer
App. 2 Status and Error Messages
Otometrics - MADSEN AccuScreen
88
88
88
89
89
90
90
91
91
91
91
92
5

App. 2.1 Device related messages
App. 2.2 Usage and test related messages
92
92
App. 3 Technical Specifications
App. 3.1 Accessories
App. 3.2 Measurement techniques
App. 3.3 Device
App. 3.4 Power supply and battery
App. 3.5 1077 docking station
App. 3.6 OAE probe
App. 3.7 ABR electrode cable
App. 3.8 ABR ear coupler cable (optional)
App. 3.9 Device class
App. 3.10 Notes on EMC (Electromagnetic Compatibility)
Index
94
94
94
95
98
98
99
100
100
100
101
104
6 Otometrics - MADSEN AccuScreen
1 Introduction
1.1 Brief description
Thank you for purchasing the AccuScreen handheld Otoacoustic Emissions and Automated ABR
Screener.
We also recommend that you take particular note of the cleaning and maintenance instructions.
Failure to use and maintain AccuScreen correctly may void your warranty.
AccuScreen is a fast, reliable, easy to use, and lightweight hearing screener, optimised for
neonatal screening.
AccuScreen provides for easy navigation using its touch screen function.
1 Introduction
Note• This manual is your guide to the use and maintenance of AccuScreen. We strongly
recommend that you read it carefully before using AccuScreen for the first time.
1.2 The docking station
AccuScreen is supplied with a docking station, which provides for:
• easy recharging of the battery
• transferring data between AccuScreen and PC
• printing from a label printer
1.3 The AccuLink software program
AccuLink is a software program providing data management handling with result review and configuration capabilities in a
single PC application.
From AccuLink you can create, edit, view and print data relating to patients and tests, users, sites and connected locations
and facilities.
From AccuLink you can configure AccuScreen to suit your purposes. This includes defining mandatory fields in patient handling, defining which screens are to be shown in AccuScreen, and uploading and downloading data.
AccuScreen is operated independently of AccuLink, although additional features and configuration value are provided by
AccuLink’s user interface.
1.4 Printing
For printing instructions see Printing ► 60.
Otometrics - MADSEN AccuScreen
7

1 Introduction
AccuScreen
With AccuScreen you can upload data to AccuLink and print test results from the PC, or you can place AccuScreen in the
docking station and print directly to a label printer connected to the docking station.
1.5 Intended Use
The Type 1077 device is indicated for use in the recording and automated analysis of human physiological data (screening
auditory brainstem responses and/or otoacoustic emissions) necessary for the diagnosis of auditory and hearing-related disorders.
Distortion Product Otoacoustic Emissions and Transient Evoked Otoacoustic Emissions:
The Type 1077 DPOAE module and TEOAE module can be used for patients of all ages, from children to adults, including
infants and geriatric patients. It is especially indicated for use in testing individuals for whom behavioral audiometric results are deemed unreliable, such as infants, young children, and cognitively impaired adults.
Auditory Brainstem Response:
The Type 1077 ABR module is especially intended for infants from 34 weeks (gestational age) up to 6 months of age.
When the device is used to screen infants, they should be asleep or in a quiet state at the time of screening.
The device is intended for use by audiologists, ENT's and other healthcare professionals.
1.6
Important • Natus Medical Denmark A/S does not guarantee the accuracy of the test results or the tests themselves, if
accessor-ies other than those supplied by Natus Medical Denmark A/S are used for this device (i.e. eartips, electrodes, ear
couplers, etc.).
Physical operating principle
AccuScreen uses TEOAE (Transiently Evoked Otoacoustic Emissions) and DPOAE (Distortion Product Otoacoustic Emissions)
technologies, which are highly effective for neonatal hearing screening. Otoacoustic Emissions measure cochlear mechanics and indicate whether the cochlea is functioning correctly or not.Children's emissions are typically strong, which
makes them easy and fast to detect. Emission strength usually decreases with age or hearing impairment.
Automated ABR (Auditory Brainstem Response) is available in AccuScreen. This technology measures responses to sound
in the auditory pathways. It provides a valuable supplement to TEOAE and DPOAE screening, and is an essential tool for
screening infants with a risk of hearing loss.
The simple yet reliable technology ensures that hearing loss can be detected and that intervention can be implemented
at an early age. With early intervention, hearing-impaired children are given the possibility of developing normal speech
and language skills.
8 Otometrics - MADSEN AccuScreen

1.7 About this manual
Important • Please note that menu selections and screen shots in this manual may not reflect the configuration of
your test device.
This manual contains a description of the main functions of AccuScreen.
We recommend that you make yourself familiar with the following issues:
Installation
Unpacking and Installation ► 11, and Preparing for testing ► 28 describes how to unpack AccuScreen, prepare and con-
nect cables, and set up the device.
Safety
This manual contains information and warnings which must be followed to ensure the safe performance of AccuScreen.
Local government rules and regulations, if applicable, should also be followed at all times.
Please see the overview of device labeling in Overview of AccuScreen ► 11 and read the warning notes in Standards and
Safety ► 88.
1 Introduction
1.8
Training
It is recommended that you read this manual before you start operating AccuScreen so that you become familiar with the
device before testing on a client.
To obtain a free printed copy of the user documentation, contact Natus Medical Denmark A/S (www.otometrics.com).
Maintenance and cleaning
For instructions on how and when to clean AccuScreen and accessories, please see Maintenance and Cleaning ► 82.
Typographical conventions
The use of Warning, Caution and Note
To draw your attention to information regarding safe and appropriate use of the device or software, the manual uses precautionary statements as follows:
Warning• Indicates that there is a risk of death or serious injury to the user or patient.
Caution • Indicates that there is a risk of injury to the user or patient or risk of damage to data or the device.
Note• Indicates that you should take special notice.
Otometrics - MADSEN AccuScreen
9

1 Introduction
1.8.1 Navigating this manual
Menus, icons and functions to select are shown in bold type, as for instance in:
• Press the OK button.
10 Otometrics - MADSEN AccuScreen
2 Unpacking and Installation
2.1 Unpacking
1. Unpack the device carefully.
When you unpack the device and accessories, it is a good idea to keep the packing material in which they were
delivered. If you need to send the device in for service, the original packing material will protect against damage during transport, etc.
2. Visually inspect the equipment for possible damage.
If damage has occurred, do not put the device into operation. Contact your local distributor for assistance.
3. Check with the packing list to make sure that you have received all necessary parts and accessories. If your package is
incomplete, contact your local distributor.
2.2 Overview of AccuScreen
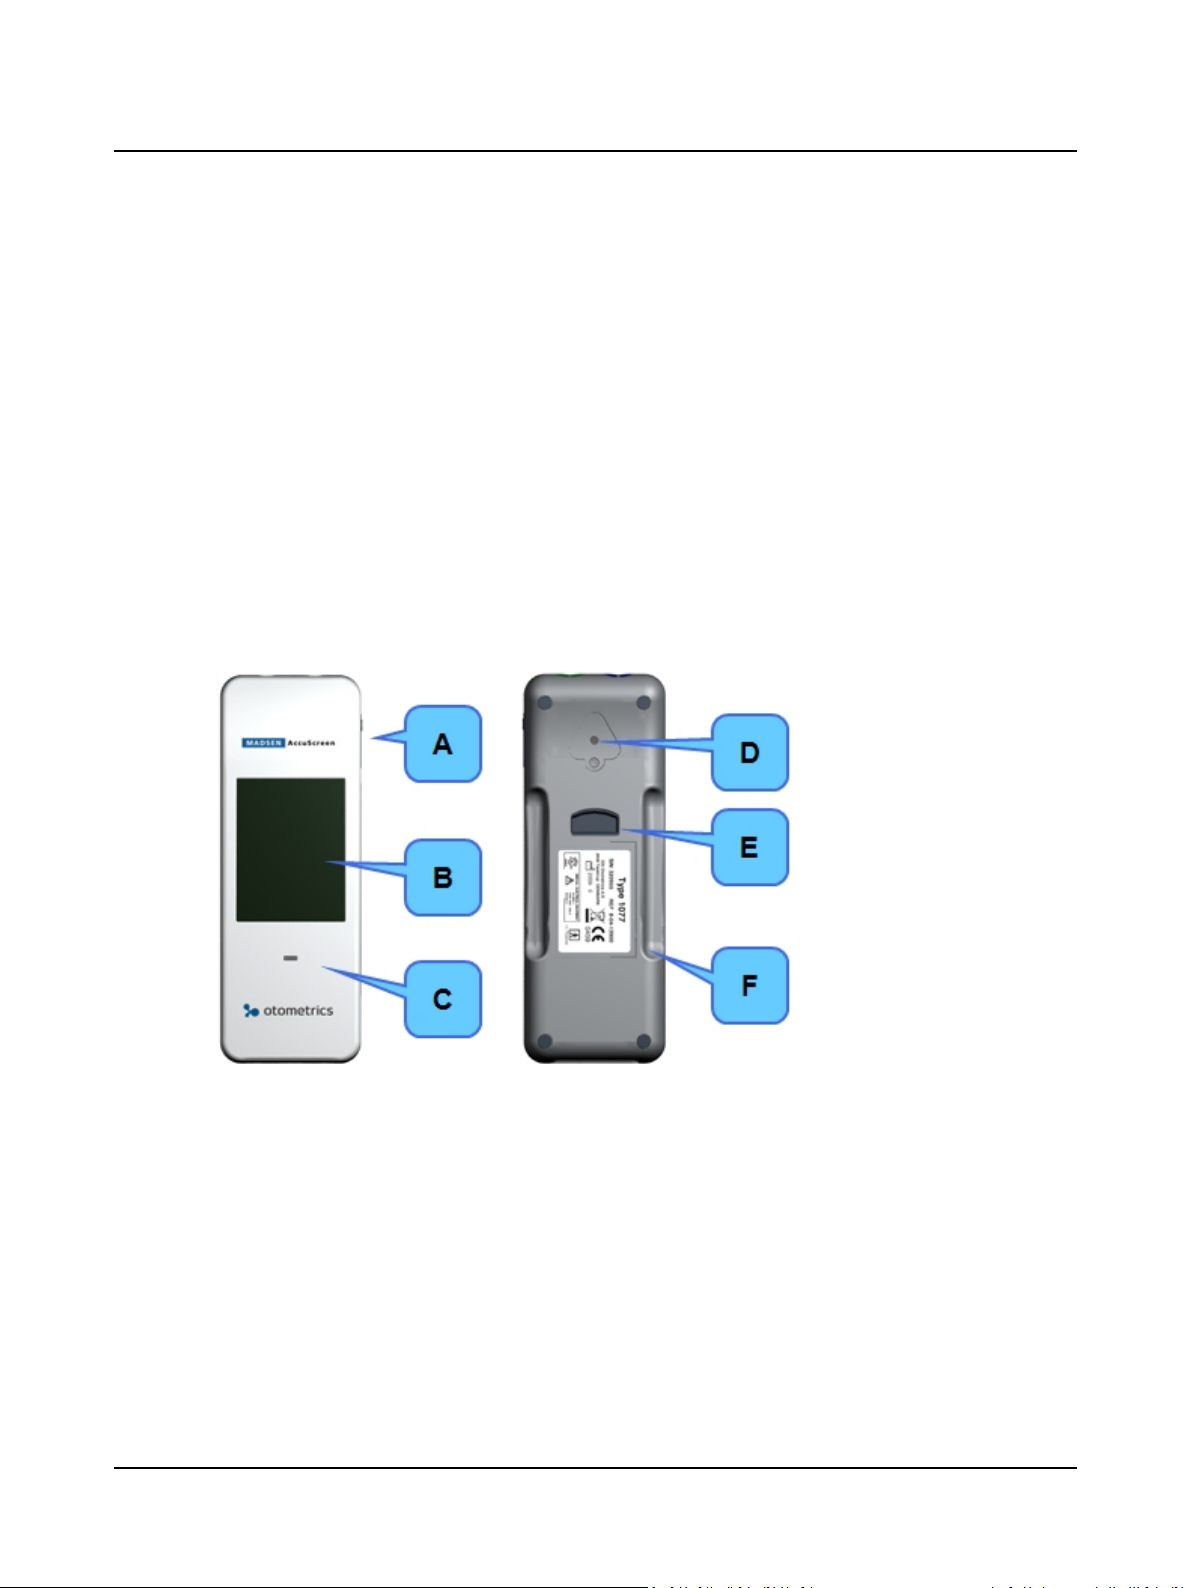
2.2.1 Front and rear of AccuScreen
2 Unpacking and Installation
A. On/Off switch
B. Touch screen display
C. Power and charging status light indicator
Otometrics - MADSEN AccuScreen
D. Test cavity
E. Button for opening battery compartment
F. Cover on battery compartment with serial number label
11

2 Unpacking and Installation
2.2.2 Top and bottom of AccuScreen
Top Bottom
A. Electrode cable socket
B. Probe socket & ear coupler cable socket
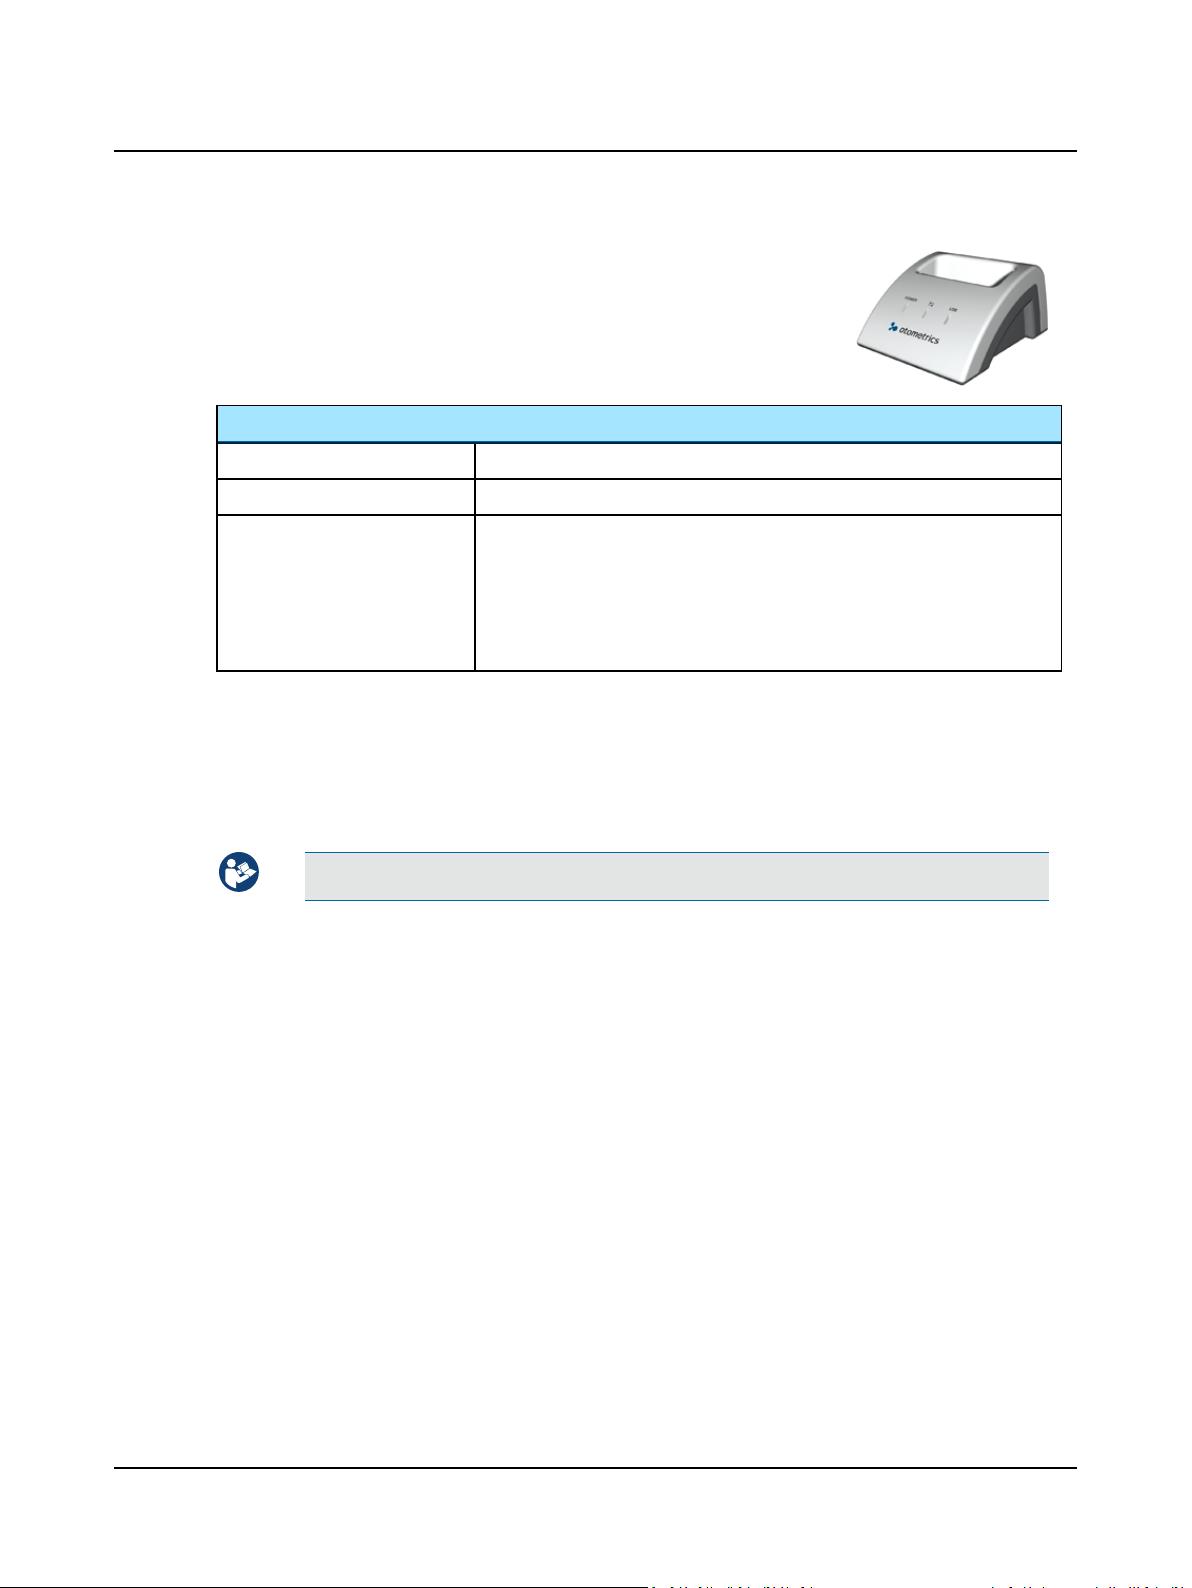
2.2.3 The docking station
Front indicators
POWER
Lit when power is supplied to the docking station.
Lit when data is being transferred as follows:
• during transfer of data between AccuScreen and AccuLink.
• during printing from label printer
USB
Lit when docking station is connected to the PC via a USB cable.
C. Docking Station connectors
12 Otometrics - MADSEN AccuScreen
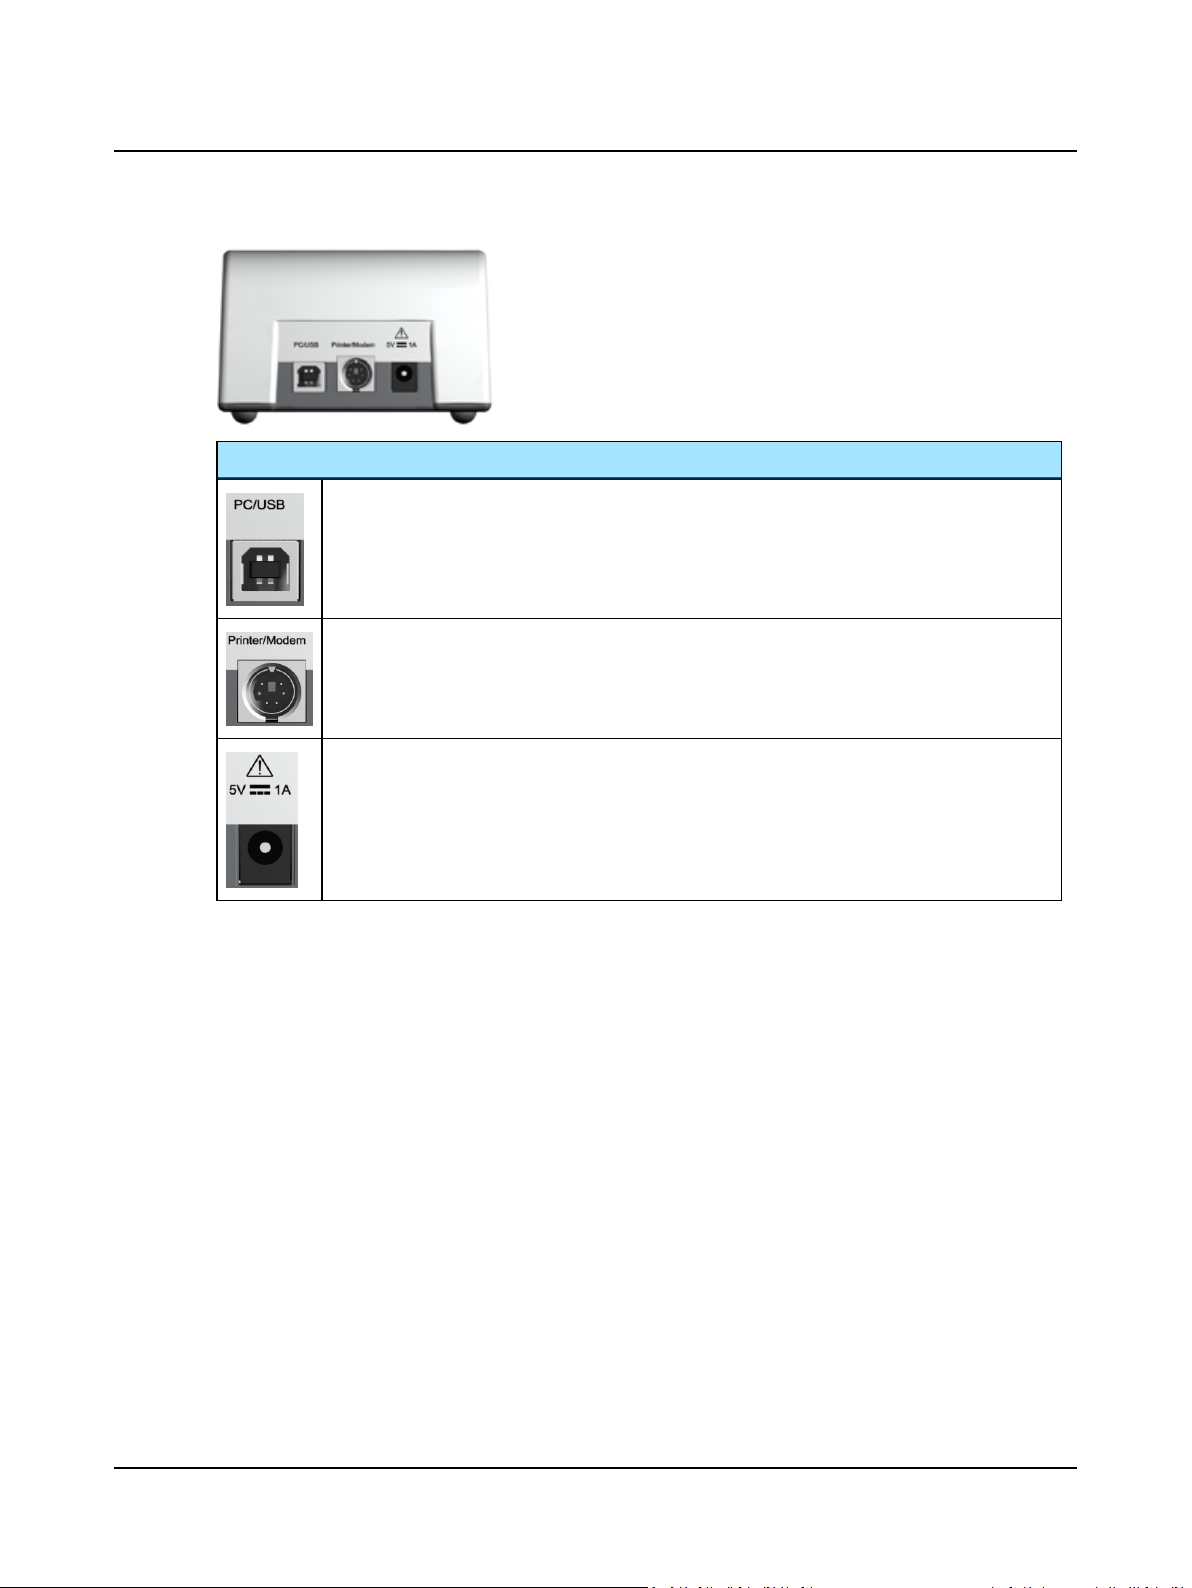
Rear sockets
2 Unpacking and Installation
PC/USB
Socket for USB connection to the PC
Printer/Modem
Socket for printer/modem connection
Socket for power adapter
Otometrics - MADSEN AccuScreen
13
2 Unpacking and Installation
2.2.4 Display
The display is a touch-screen display, where the icons and fields shown serve as buttons.
• Touch the buttons to activate a function.
Caution • Never use any type of sharp instrument on the display. If you do, reliable operation of AccuScreen can no
longer be guaranteed.
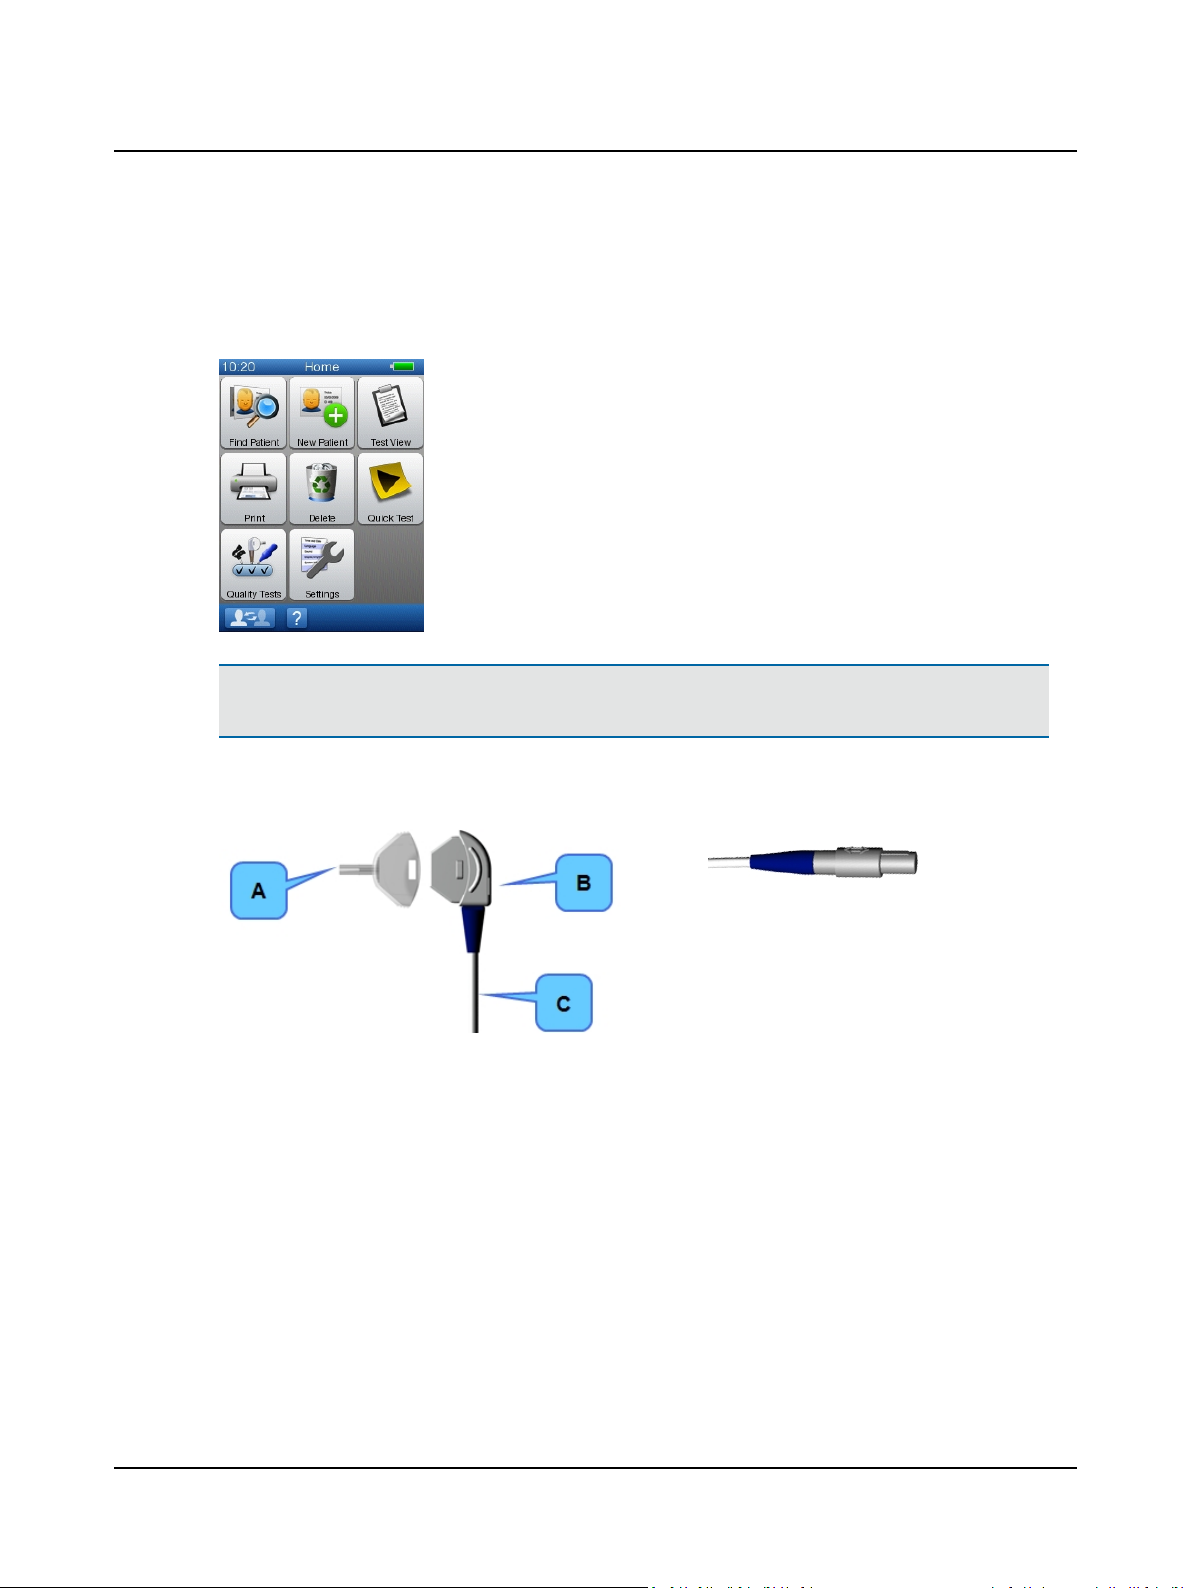
2.2.5 Ear probe
A. Probe tip B. Probe body
Probe cable plug
C. Probe cable
14 Otometrics - MADSEN AccuScreen

2.2.6 Electrode cable (ABR only)
A. Electrode cable plug B. Electrode clips
2 Unpacking and Installation
C. Electrode cable
2.2.7 Ear coupler cable
A. Cable connector
B. Ear coupler cable
2.3 Storage
Store AccuScreen and accessories in the soft case provided to protect the equipment from damage. See also Operating
environment in Technical Specifications.
Ear couplers
C. Blue ear coupler adapter for left ear
D. Red ear coupler adapter for right ear
Otometrics - MADSEN AccuScreen
15

2 Unpacking and Installation
2.4 Assembly
When you receive AccuScreen, do the following before you connect the probe.
1. Insert the battery in the battery compartment. See Inserting the battery in AccuScreen ► 17.
We recommend placing AccuScreen in the docking station and charging the battery fully before use. See Charging the
battery from the docking station ► 18.
2. Turn on AccuScreen. See Switch on AccuScreen ► 20.
3. Set the date on the device. See Time and Date setting ► 73.
Now you can connect the probe, the ear coupler cable and the electrode cable as needed. See Preparing for testing ► 28.
2.5 Powering
AccuScreen is powered by a rechargeable battery. The battery is charged:
• when AccuScreen is placed in the docking station. See Charging the battery from the docking station ► 18.
• by the AccuScreen external charger (optional accessory). See Charging the battery with the external charger ► 19.
2.5.1 The battery
The battery used in AccuScreen:
• is a Lithium-Ion rechargeable battery
• has a high capacity
• is lightweight
• has a low rate of self discharge
• can be charged continuously
• guarantees approximately 8 hours of operating time
On delivery, the battery is charged approximately 50%. We recommend to charge the battery fully before starting to test.
Use only the battery type, docking station and charger stated in Power supply and battery ► 98 and 1077 dock-
ing station ► 98.
Use only the battery type and docking station stated in Power supply and battery ► 98 and 1077 docking sta-
tion ► 98.
See Battery safety and maintenance ► 86.
Battery Storage
If the battery is to be stored for a long time, it is recommended that it is stored with approximately 50% remaining battery
capacity and in a dry and cool place. Storing the battery in a refrigerator can be recommended.
If the battery is stored with full battery capacity and at room temperature or warmer, the battery will permanently
degrade with about 10-20% after one year.
16 Otometrics - MADSEN AccuScreen
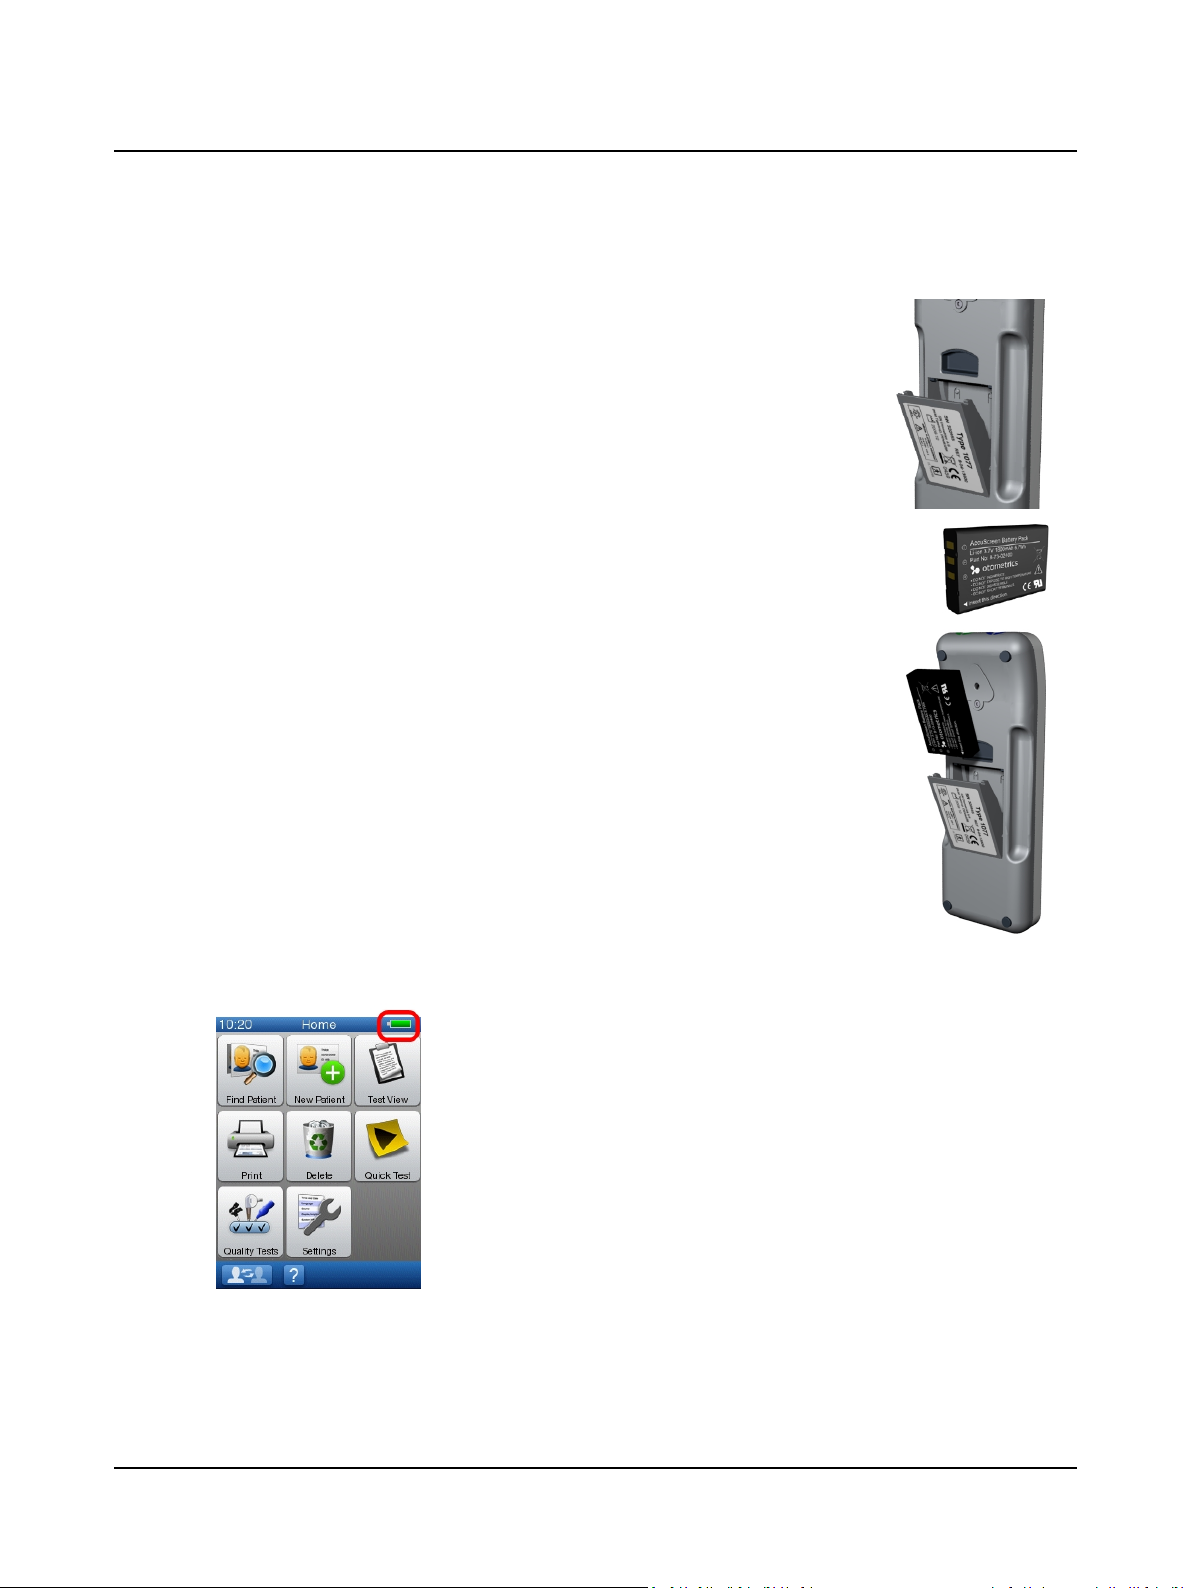
2.5.2 Inserting the battery in AccuScreen
1. Push the button of the battery compartment upwards.
The battery compartment pops out.
2. If needed, remove the battery.
3. Place a new, charged battery in the compartment.
– Hold the battery so that the arrow with the text “Insert this direction” points
downwards towards the bottom of the compartment.
4. Close the compartment.
2 Unpacking and Installation
2.5.3 Battery status
• The battery symbol is shown in the top right corner of the display, enabling you to view the status of the battery at all
times.
Otometrics - MADSEN AccuScreen
17
2 Unpacking and Installation
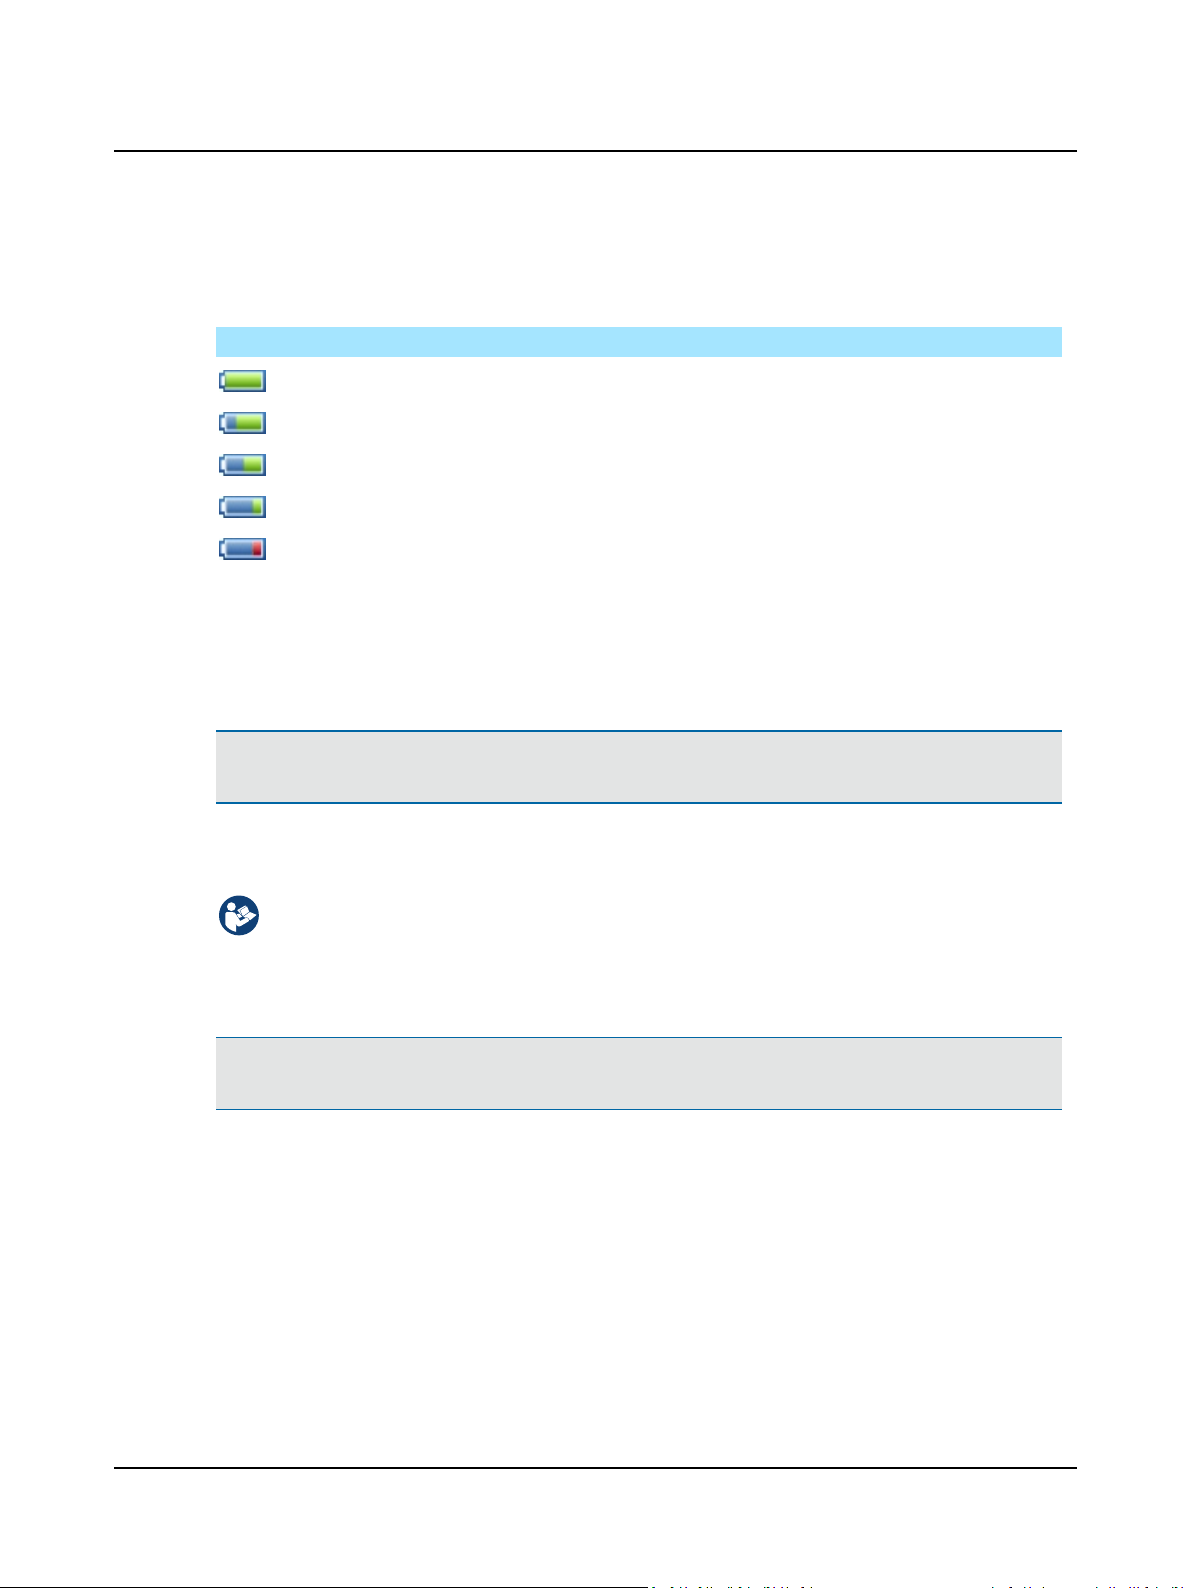
• When less than 25% of the battery capacity remains, we recommend that you change the battery and recharge it as
soon as possible.
• When the battery level drops below 10%, test results can be viewed, but testing is no longer possible.
Symbol Remaining battery capacity
100 - 75% The battery is fully charged.
75 - 50%
50 - 25%
25 - 10% The battery should be charged.
10 - 0% The battery is very low and testing is not possible.
If the necessary minimum voltage should drop, AccuScreen switches off automatically. Recharge or change the battery
as soon as possible.
2.5.4 Powering the docking station
The AccuScreen docking station is powered through an adapter from the mains outlet.
Warning• In order to comply with the safety requirements for a medical device system, connection to the docking sta-
tion must always be done outside the patient area (min. 1.5meters/5ft from the patient).
You will find an adapter plug kit when you unpack AccuScreen. The adapter plug kit contains a range of adapter plugs you
can choose from to fit your mains outlet.
Connecting to the mains supply
1. Select the adapter plug appropriate to your mains outlet and fit it on the adapter.
2. Connect the adapter to the docking station and the mains supply. The POWER indicator will light up
green.
Caution • Electrical equipment must be positioned so that there is easy access to disconnect the power supply from
the mains.
Disconnecting from the mains supply
To disconnect AccuScreen docking station from the mains supply, simply remove the adapter plug from the mains outlet.
2.5.5 Charging the battery from the docking station
The battery in AccuScreen charges automatically when you place AccuScreen in the docking station.
18 Otometrics - MADSEN AccuScreen
1. Place AccuScreen in the docking station.
The light indicator on the front of AccuScreen will light up.
Front light indicator
Green • Fully charged
Orange - steady • Charging
Orange - flashing • During start-up
• When there is a battery error, for example:
– No battery inserted
– Battery inserted incorrectly
– Defective battery
Charging a fully discharged battery from the docking station takes approximately:
80% charged 4½ hours
Fully charged 6 hours
2 Unpacking and Installation
2.5.6 Charging the battery with the external charger
Caution • Use only the charger supplied by Natus Medical Denmark A/S.
The battery for AccuScreen can be charged by an external charger (optional accessory).
See the charger manufacturer’s documentation for specifications and instructions for use.
Otometrics - MADSEN AccuScreen
19
3 Getting Started with AccuScreen
3 Getting Started with AccuScreen
In the following, you will find quick instructions for how to use AccuScreen:
• Switching on AccuScreen
• Adding new patients
• Finding patients
• Editing patient data
You will find detailed instructions for preparing and testing in:
• Preparing for testing ► 28
• Testing with AccuScreen ► 36
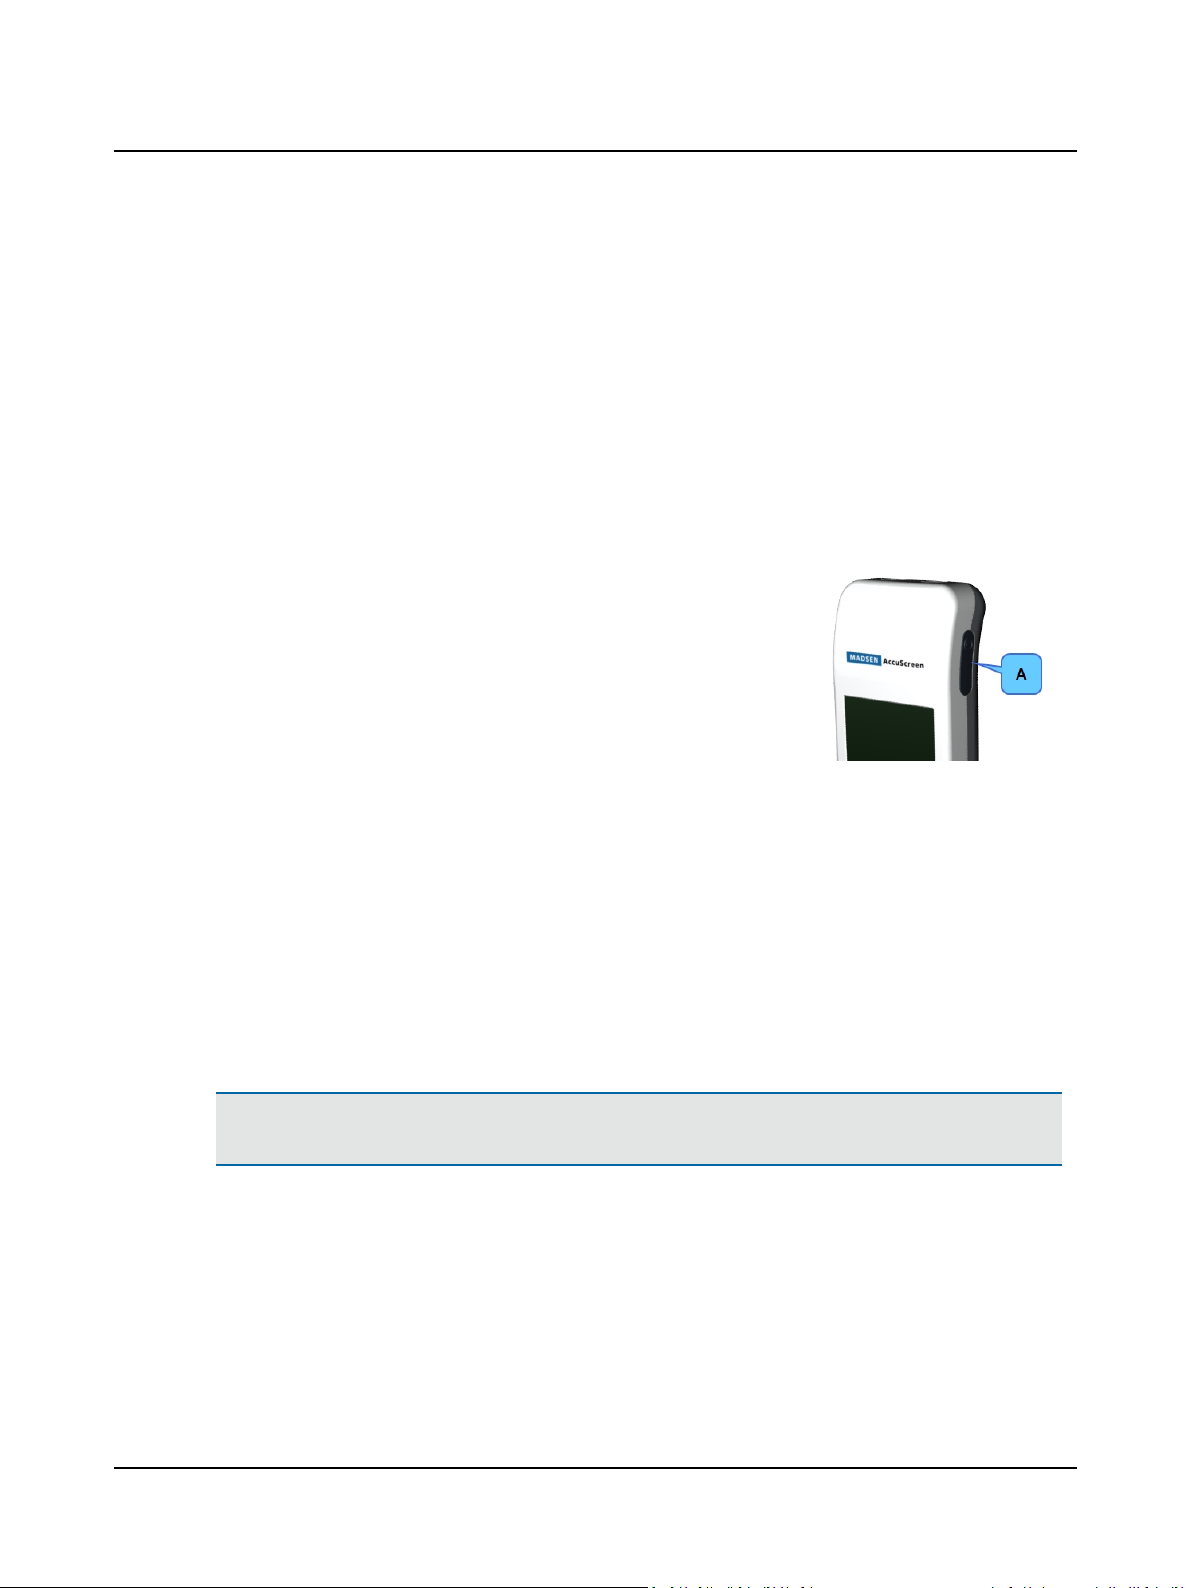
3.1 Switch on AccuScreen
1. Switch on AccuScreen: Press the On/Off switch.
A start-up screen is shown, while AccuScreen performs a self-test.
The start-up screen shows the name of the device.
The AccuScreen name is configurable (see the AccuLink User Manual).
3.1.1 Power-saving mode and automatic power-off
If you do not use AccuScreen for a certain period of time, AccuScreen will first switch to power-saving mode, and finally
switch off automatically. These periods are configurable (see the AccuLink User Manual).
• When AccuScreen is in power-saving mode, the display goes black and the power indicator lights up green.
• Simply touch the screen to reactivate AccuScreen.
3.1.2 The AccuScreen screens
Important • The screens shown in your AccuScreen depend on the configuration of AccuScreen. In the following, the
default selection and sequence of screens is shown. This is configurable; see the AccuLink User Manual.
• Main instructions for data entry screens are described in
– Entering data in AccuScreen ► 76.
• Buttons are described in
– Function buttons ► 77
– General buttons ► 78
A. On/Off switch
20 Otometrics - MADSEN AccuScreen
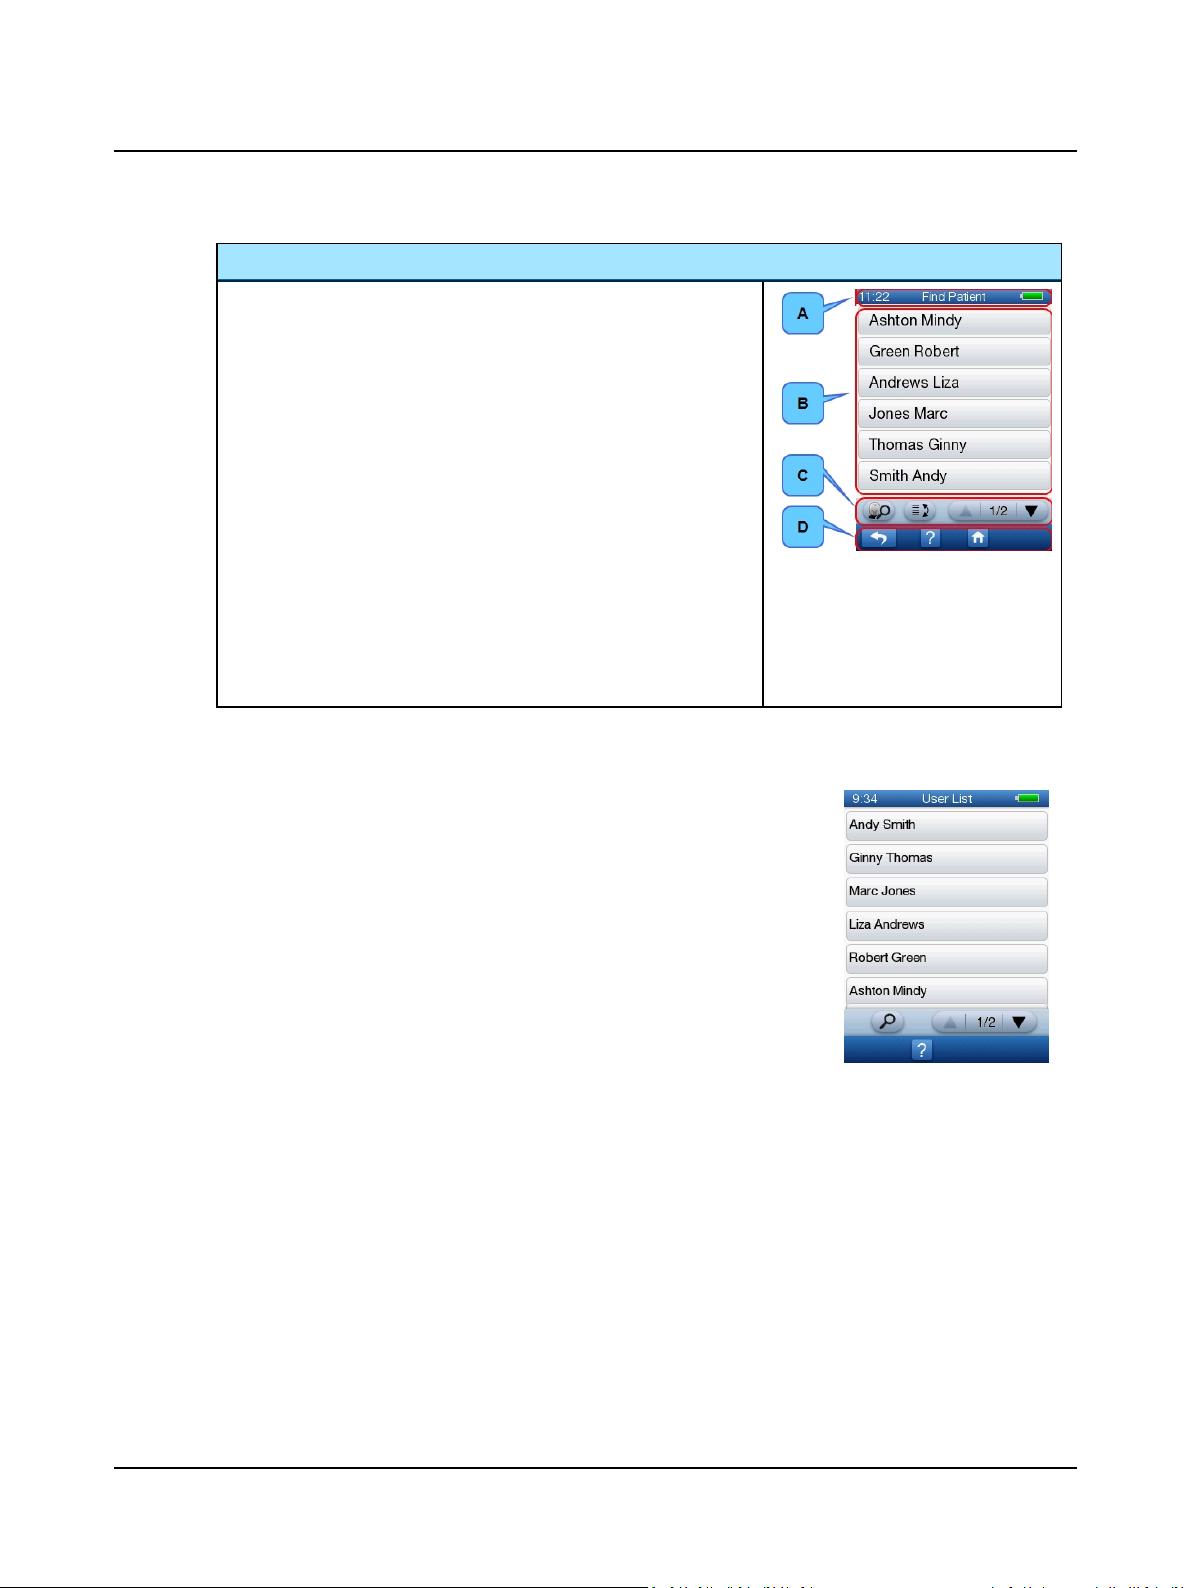
Navigating the screens in AccuScreen
The screens in AccuScreen are usually divided into 3 or 4 main areas:
A. The title bar, showing
– the time
– the screen title
– the battery status
B. The main screen where you will typically find
– test screens
– patient buttons
– keypad for entering data, etc.
C. The function bar with available function buttons
D. The footer with available buttons for main functions such as
– returning to the previous screen,
– accessing help,
– returning to the Home screen.
3 Getting Started with AccuScreen
3.1.3 Selecting the user
1. Select a user from the User List.
The User List is configurable (see the AccuLink User Manual).
Otometrics - MADSEN AccuScreen
21
3 Getting Started with AccuScreen
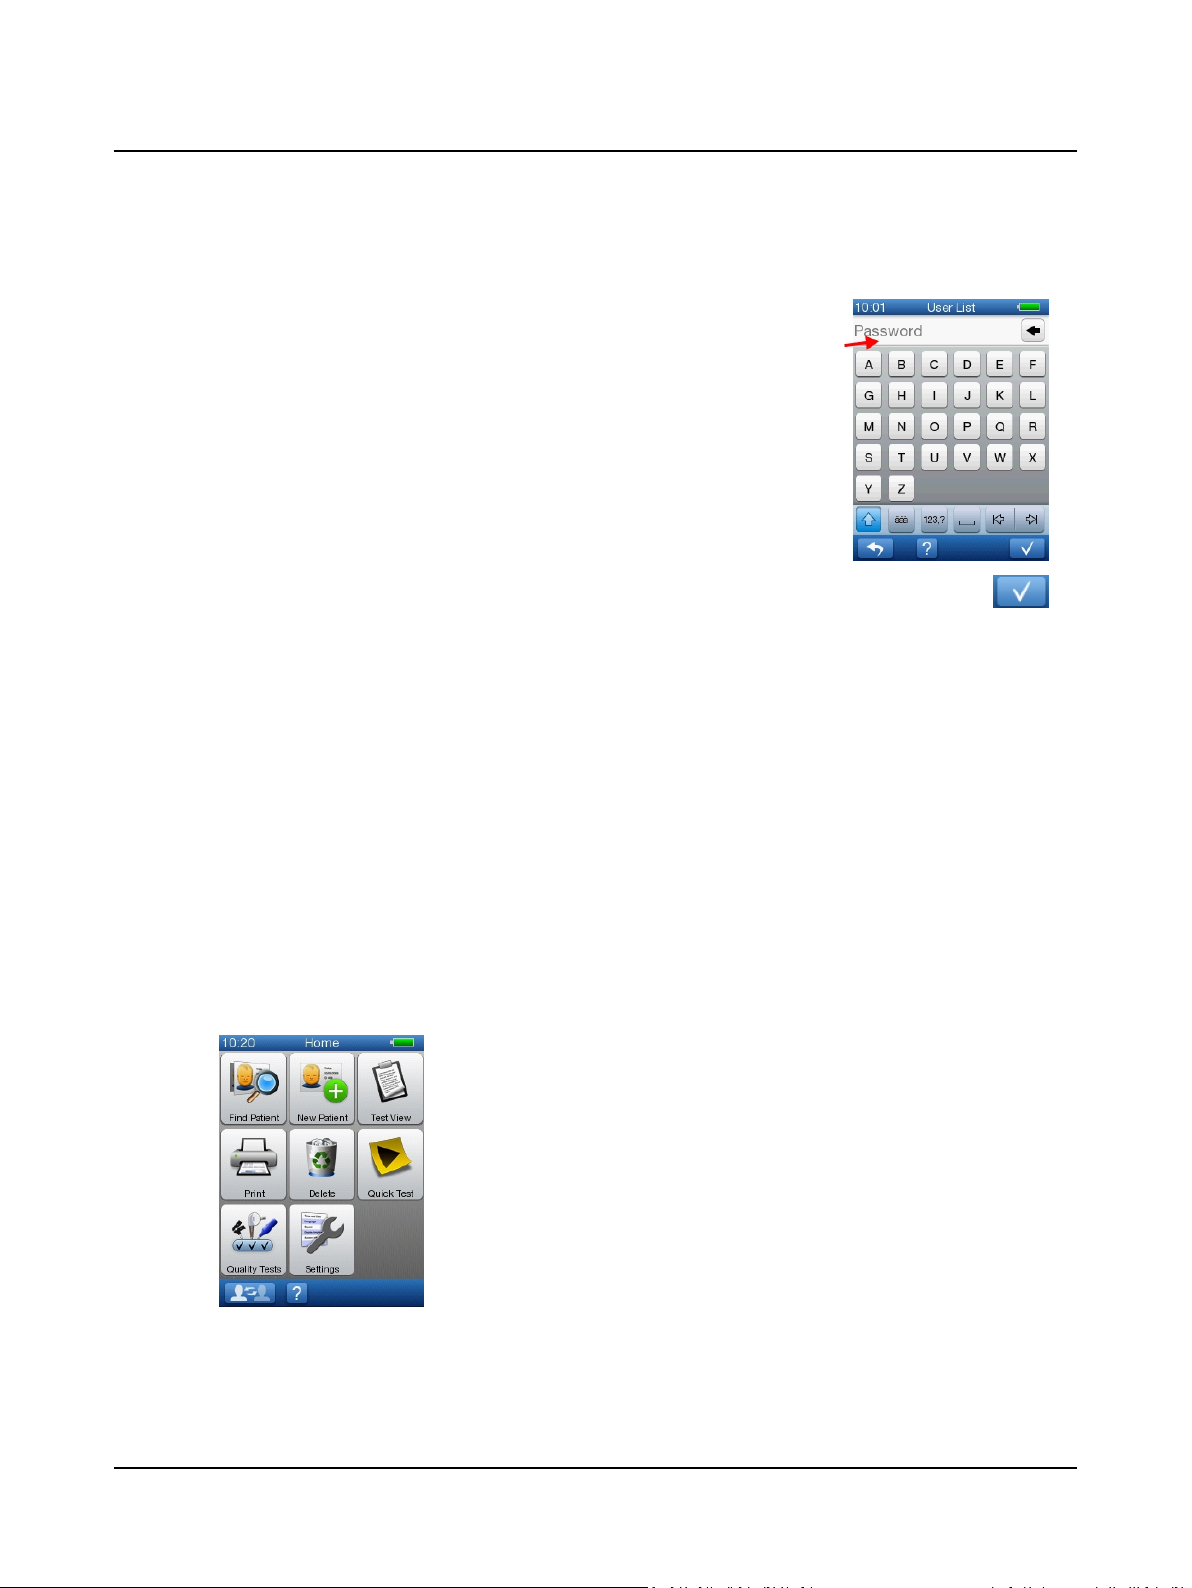
3.1.4 Entering password
1. In the Password screen you will be prompted for a password.
– To enter your password, select the characters and/or digits from the keypad.
Passwords and the use of passwords are configurable (see the AccuLink User
Manual).
2. Press the OK button to activate your password.
3.1.5 Incorrect password
If you enter your password incorrectly 3 times in a row, AccuScreen will be locked and cannot be used by you.
Another user can log into AccuScreen. This means that only the user with the 3 incorrect attempts is locked out.
An AccuLink user with the Reset users permission can unlock AccuScreen by connecting to the device from AccuLink,
either to update the device configuration or to send or receive data. See the AccuLink User Manual for details.
3.1.6 Optional screens
The following screens are optional, and not part of the default AccuScreen configuration.
The Location list is configurable (see the AccuLink User Manual).
The Facility List is configurable (see the AccuLink User Manual).
3.1.7 The Home menu
The Home menu
From the Home menu, you can select all main functions in AccuScreen.
22 Otometrics - MADSEN AccuScreen
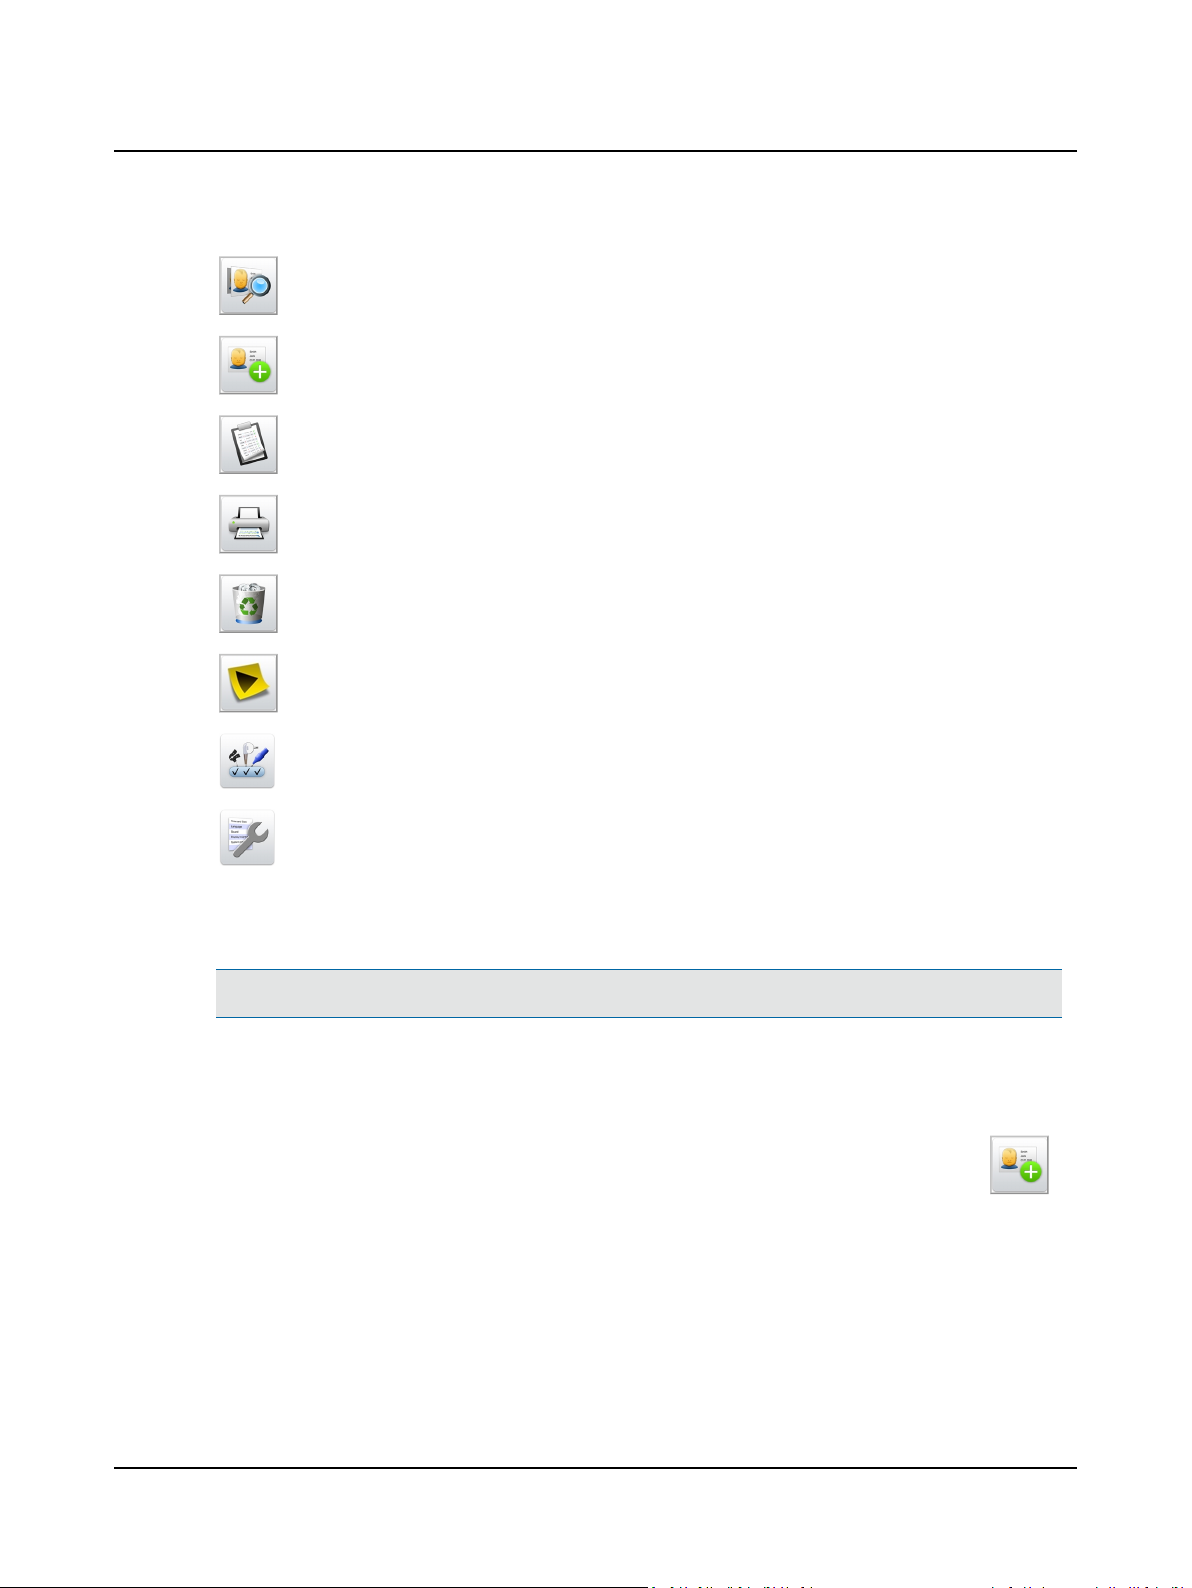
• See Finding a patient ► 26.
• See Adding a new patient ► 23.
• See Viewing a patients test record ► 57.
• See Printing ► 60.
• See Deleting data ► 78.
• See Quick Test ► 59.
3 Getting Started with AccuScreen
• See Quality Tests ► 65.
• See AccuScreen settings ► 72.
3.2 Patient handling in AccuScreen
Note• If you wish to perform a Quick Test, adding or finding a patient is not necessary.
You can download patient data in advance from AccuLink (see the AccuLink User Manual for instructions).
3.2.1 Adding a new patient
1. To add a new patient, press the New Patient button on the Home menu.
Otometrics - MADSEN AccuScreen
23
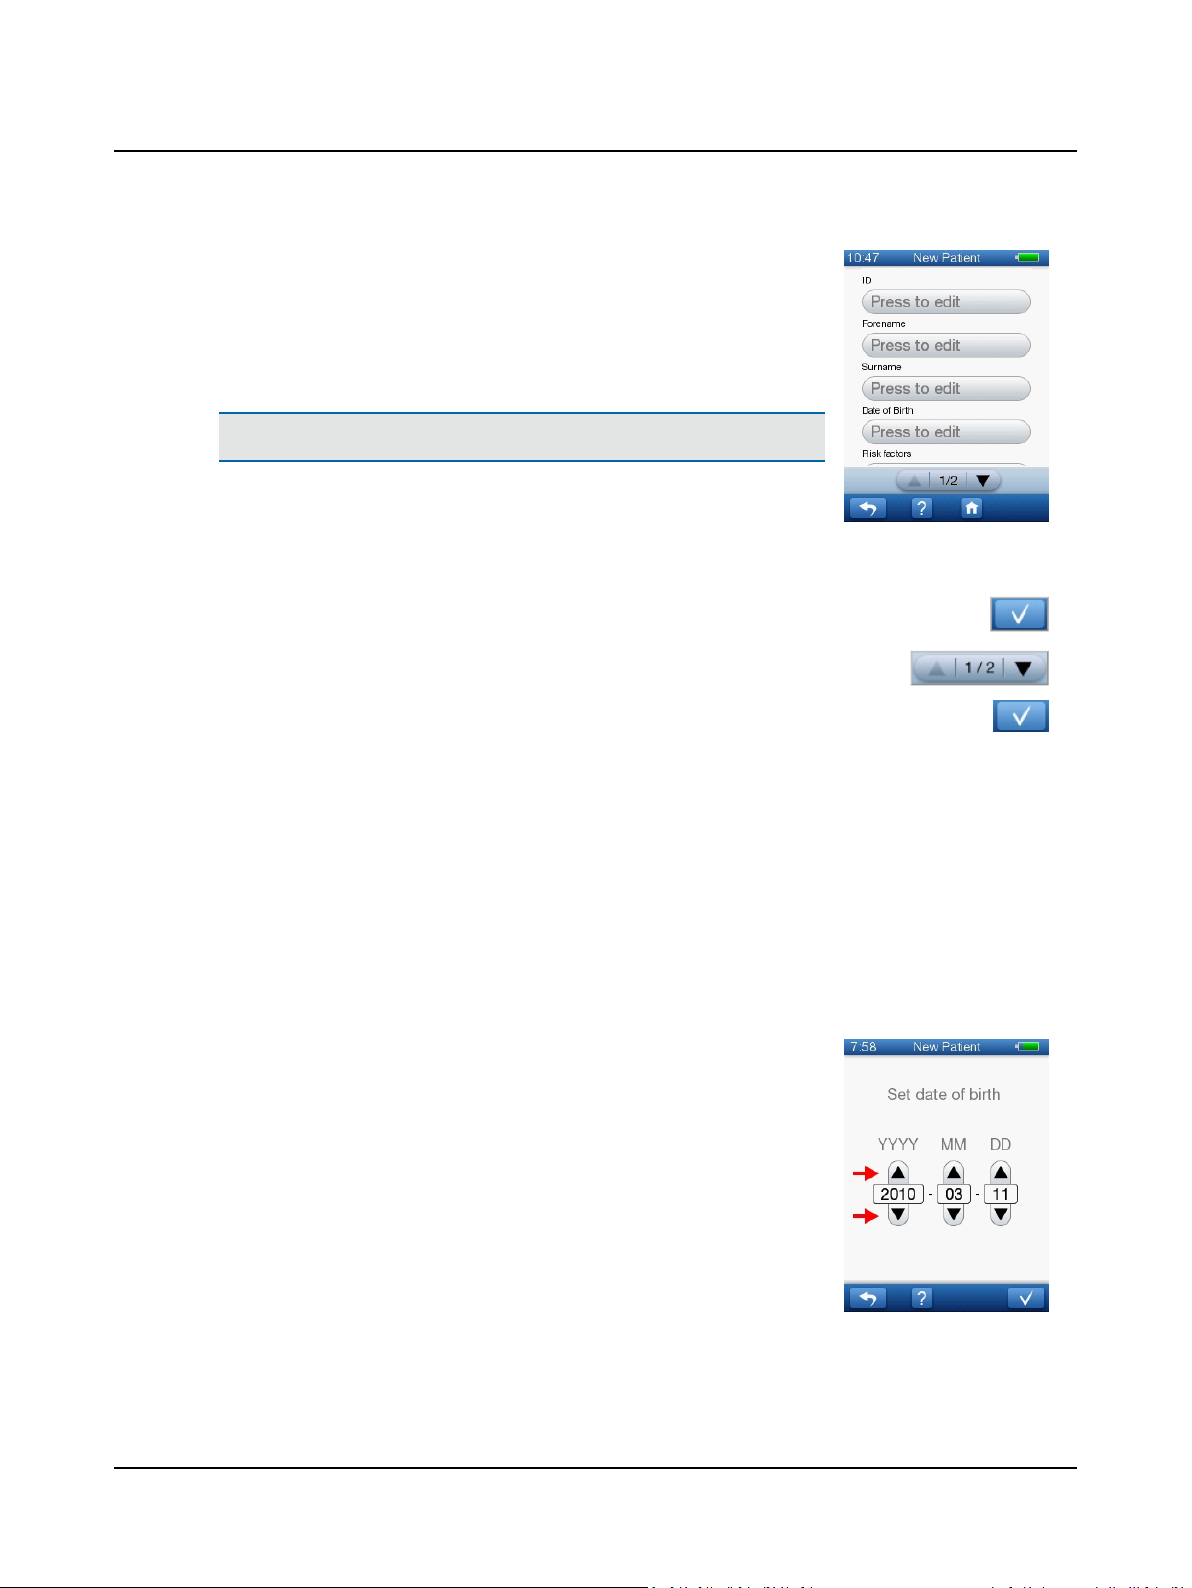
3 Getting Started with AccuScreen
The New Patient screen shows a list of buttons you can press to select screens for
entering patient data.
There are two types of fields for data entry:
– Mandatory fields
In mandatory fields the text Press to edit is shown in red.
Note• You must always enter a value in the mandatory fields.
Mandatory fields are defined in AccuLink (see the AccuLink User Manual).
– Optional fields
2. Press a field to enter patient data.
When you have entered data in a field, press the OK button and then press the
next button in the list.
3. To view more fields in the New Patient screen, press the arrow buttons.
4. When you have entered data in the required fields and press the OK button, the
data is saved, and the Test Menu screen is shown.
Regular data entry screens
In most of the screens, simply use the keypad to enter data. For more information, see Using the keypad ► 76.
• The ID screen
• The Forename screen
• The Surname screen
Special data entry screens
Screens with special data entry features are described in the following.
The Date of Birth screen
In the Date of Birth screen, press the arrow buttons to set the correct date of birth.
DD = Day
MM = Month
YYYY = Year
• If you pass the end or the beginning of a month in the day (DD) column, the MM
value is stepped up or down accordingly.
• If you step up the MM value to 01, (i.e. to a new year) the YYYY value is stepped
up accordingly.
24 Otometrics - MADSEN AccuScreen
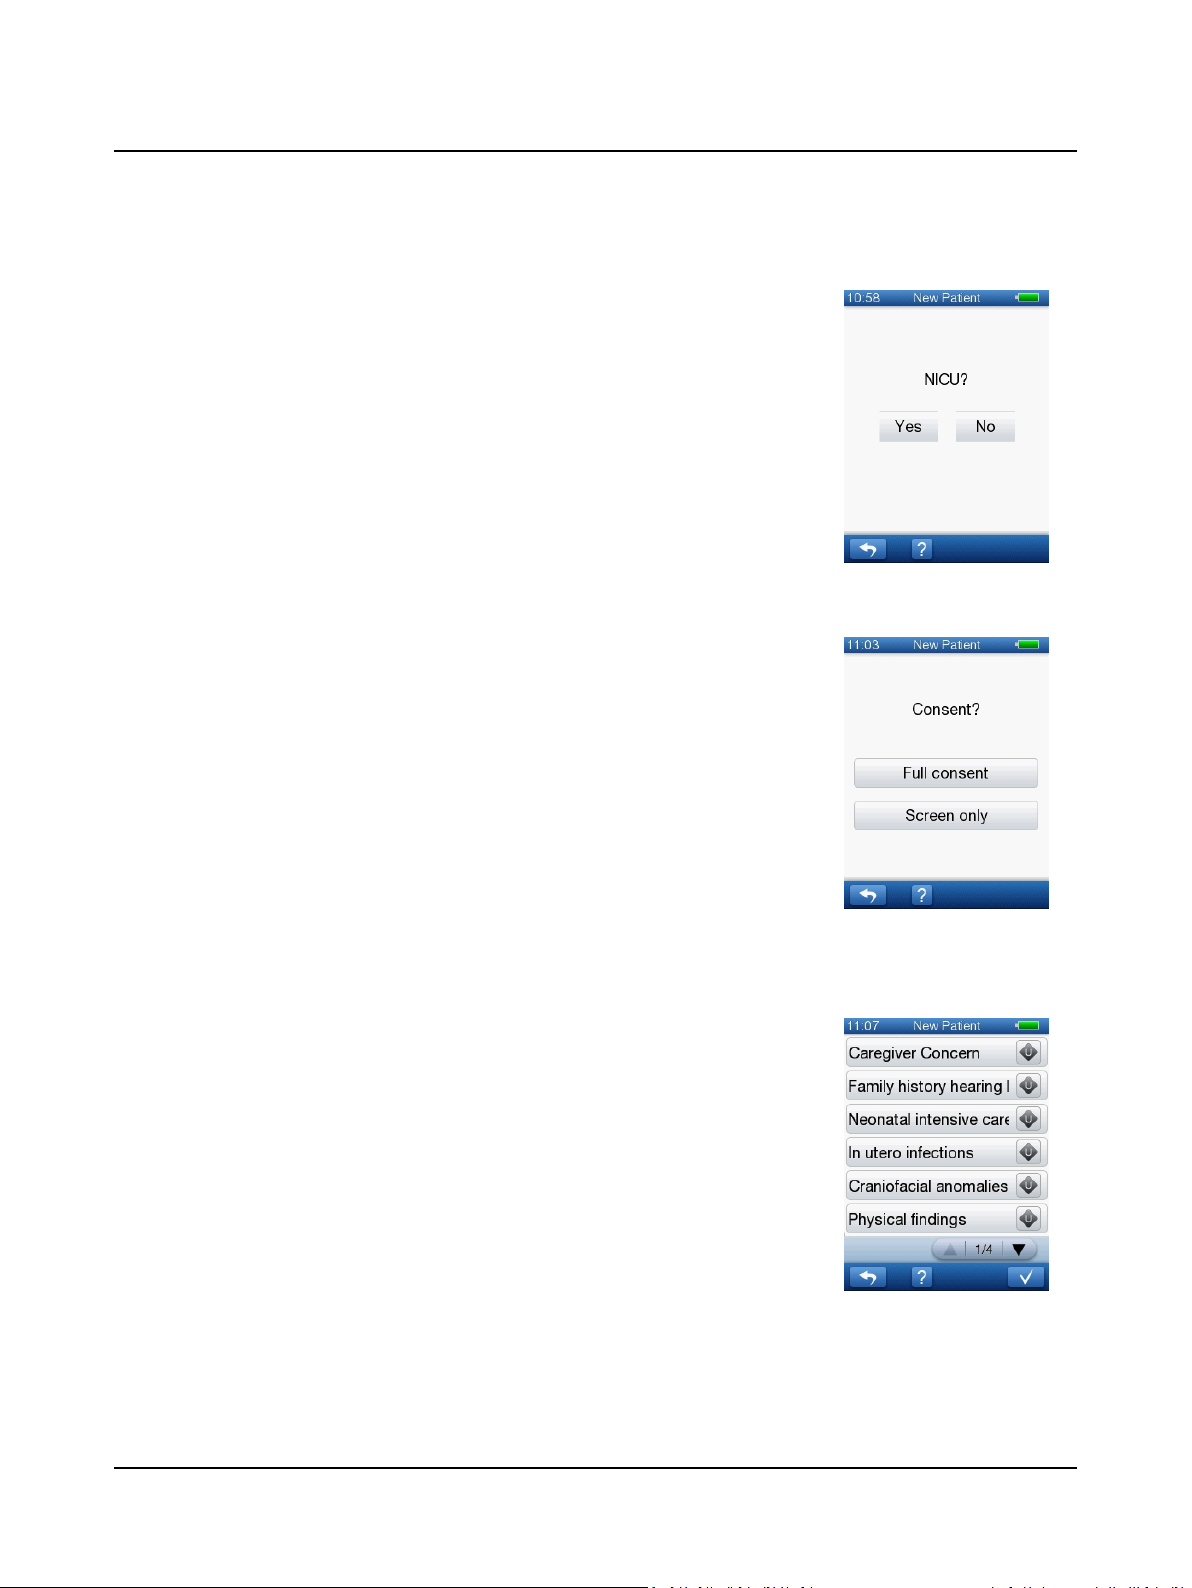
The NICU Status screen
NHSP England only
In the NICU Status screen, select the NICU (Neonatal Intensive Care Unit) status of
the baby.
• Yes
The baby is/has been in a Neonatal Intensive Care Unit
• No
The baby is not/has not been in a Neonatal Intensive Care Unit.
The NICU Status screen is configurable (see the AccuLink User Manual).
The Consent Status screen
NHSP England only
In the Consent Status screen, press the relevant button to indicate whether par-
ental consent has been obtained:
• Full consent
Screening and data will be identifiable in the national database.
• Screen only
Screening and data will be saved in the national database, but will appear as
anonymous to all viewers except for the local screening programme responsible
for the baby.
3 Getting Started with AccuScreen
The Consent Status screen is configurable (see the AccuLink User Manual).
The Risk Factors screen
In the Risk Factors screen, you can assign one or more risk factors that may apply to this
patient or the test condition.
The risk factors are by default set to U (Unknown).
The Risk Factors screen is configurable (see the AccuLink User Manual).
Otometrics - MADSEN AccuScreen
25

3 Getting Started with AccuScreen
• Assigning a risk factor
Press the toggle button one or more times until the desired value is shown.
The toggle button will toggle between the values:
– Unknown
– Yes
– No
3.2.2 Finding a patient
1. To find a patient, press the Find Patient button on the Home screen.
This will take you to the Find Patient screen.
2. You can change the sort order. Press the Change sort order button until the list is
sorted according to the category that you wish to use.
3. If needed, press the arrow buttons to scroll in the list of patients.
4. Select the patient from the list.
Searching in an extended patient list
1. To search in an extended list of patients, press the Find Patient button in
the Find Patient screen.
2. The default search criteria is the patient's surname. If you wish to change
the search criteria, press the Search Criteria button. If needed, press
repeatedly until you see the name of the data field you wish to use for
searching.
3. Enter the patient’s data (for example, surname or record number) according to the search criteria you have chosen.
If needed, see Using the keypad ► 76.
4. Press the OK button to start the search.
The search will produce a list of patients matching the search criteria.
5. Press the button showing the name of the patient you wish to select.
26 Otometrics - MADSEN AccuScreen

The Patient Details screen is shown.
6. If you wish to view the tests performed on the patient, press the Test View
button.
3.2.3 Editing patient data
1. Find a patient as described in Finding a patient ► 26.
2. In the Patient Details screen press the field you wish to edit.
3. Edit the field.
3 Getting Started with AccuScreen
4. When you have edited data in a field, press the OK button to save.
5. If needed, select the next field you wish to edit.
Otometrics - MADSEN AccuScreen
27
4 Preparing for testing
4 Preparing for testing
4.1 Preparing AccuScreen
• Follow the instructions in Getting Started with AccuScreen ► 20.
• You can download patient data in advance from the AccuLink database (see the AccuLink User Manual).
• See Testing with AccuScreen ► 36 on how to proceed with the specific tests.
4.2 Preparing the equipment
Every day before you start testing on patients, we recommend that you perform whichever quality tests that may be necessary to make sure that probe, electrode cable and ear coupler cable function correctly. See Quality Tests ► 65.
Caution • Insert only disinfected probe tips in the test cavity. See Cleaning and disinfecting the built-in test cavity ►
85.
4.2.1 Preparing the probe for testing
Inspect the probe for deterioration (colour changes, surface changes) of the reusable probe parts before every usage. If
deterioration occurs, contact your distributor.
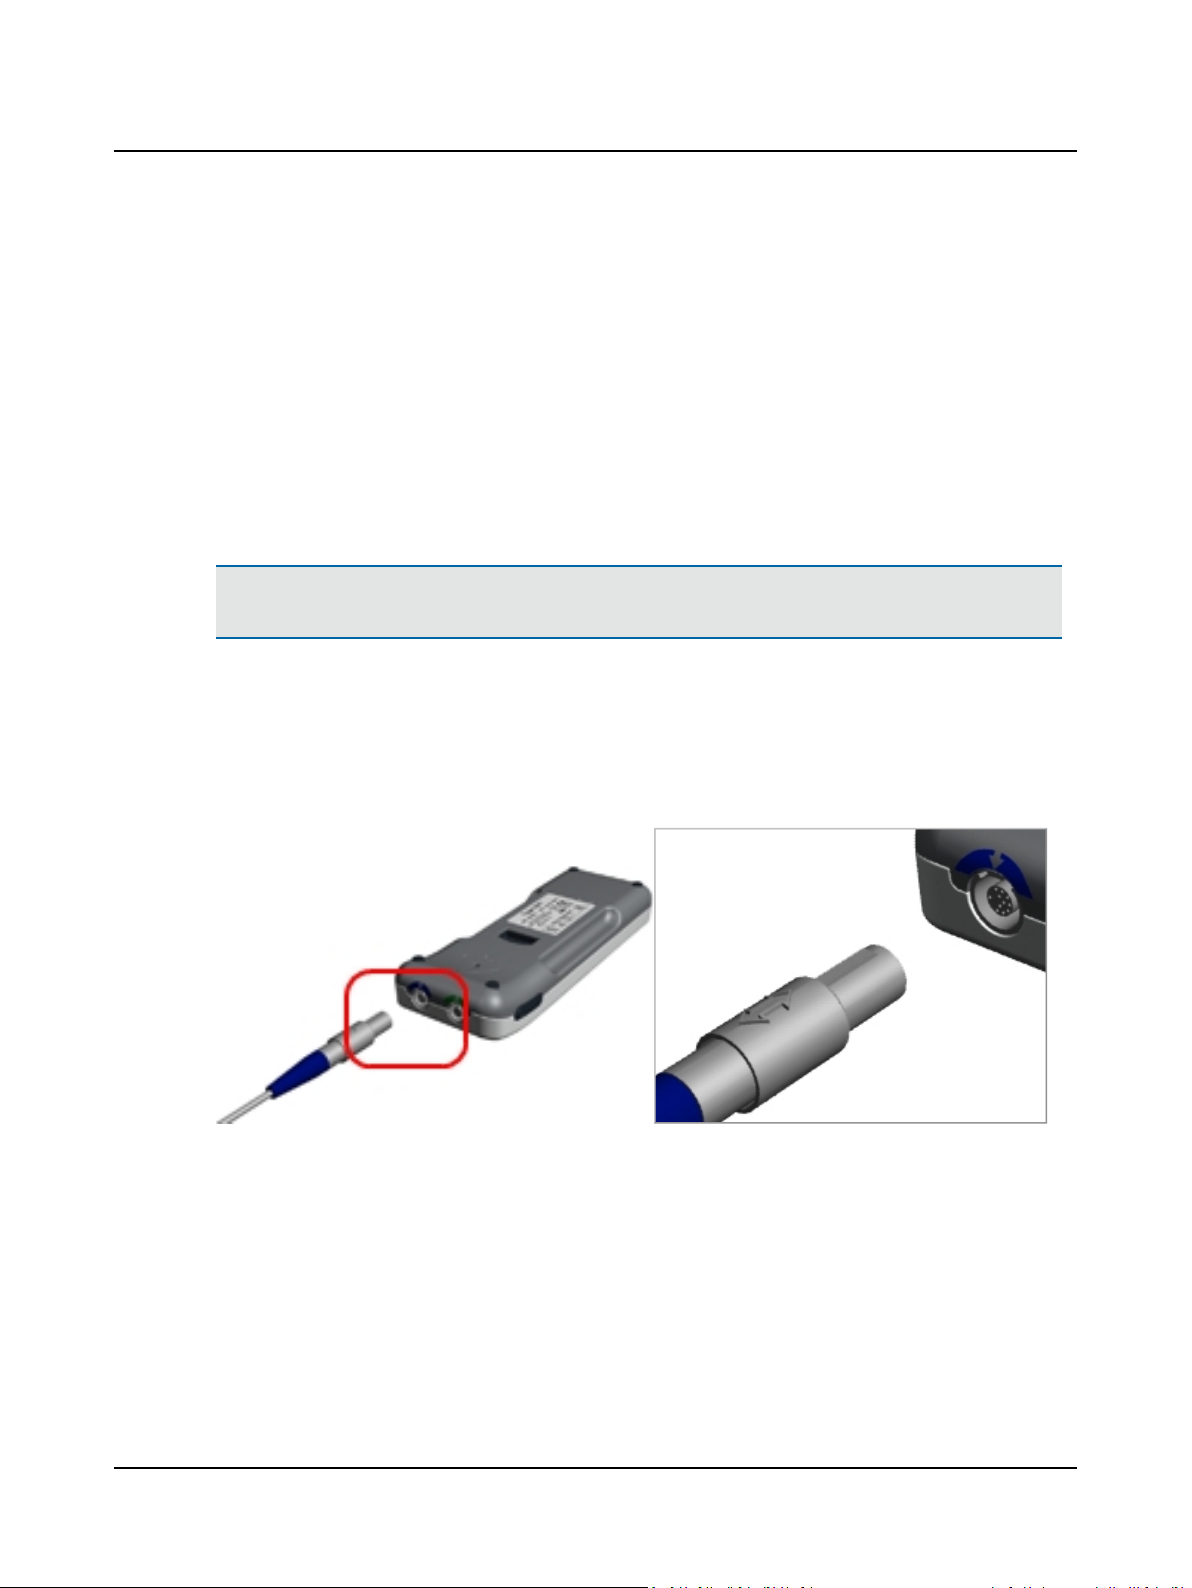
4.2.2 Connecting the probe
1. Place AccuScreen face down.
The probe plug sleeve and the colouring around the probe socket are blue.
2. Align the ridges on the plug with the notches in the blue-bordered socket on the top end of AccuScreen.
3. Gently insert the probe plug into the probe socket. The plug does not require force to be inserted properly.
28 Otometrics - MADSEN AccuScreen
Disconnecting the probe
Caution • Do not pull the plug by the cable when you disconnect the probe. Instead, pull the sleeve of the grey con-
nector.
When disconnecting the plug, do not twist it. Instead, hold the sleeve of the plug and release it by pulling it straight out of
the socket.
The probe will not be released if you pull anywhere else than on the sleeve of the plug.
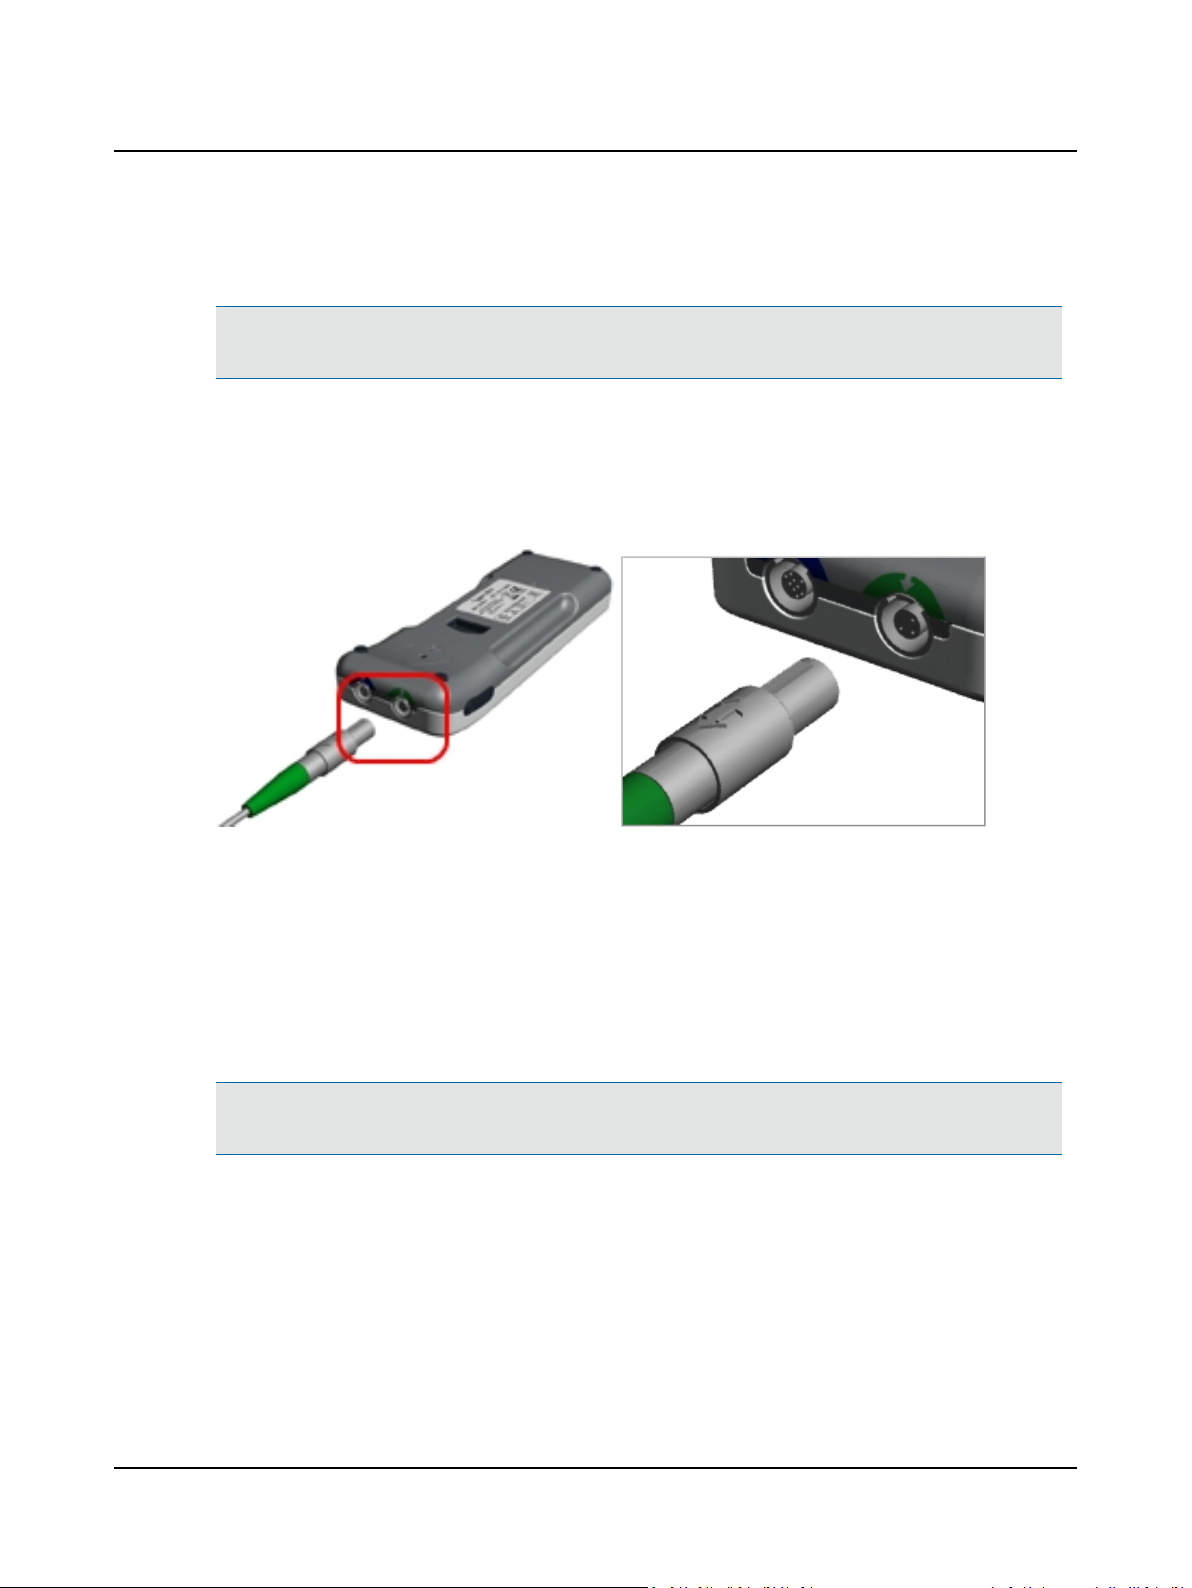
4.2.3 Connecting the electrode cable for ABR testing
4 Preparing for testing
1. Place AccuScreen face down.
The electrode cable plug sleeve and the colouring around the electrode plug socket on AccuScreen are green.
2. Align the ridge on the electrode cable plug with the notch in the green-bordered socket on the top end of
AccuScreen.
3. Gently insert the electrode cable plug into the electrode cable socket. The plug does not require force to be inserted
properly.
Disconnecting the electrode cable
Caution • Do not pull the plug by the cable when you disconnect the electrode cable. Instead, pull the sleeve of the
grey connector.
When disconnecting the plug, do not twist it. Instead, hold the sleeve of the plug and release it by pulling it straight out of
the socket.
The cable will not be released if you pull anywhere else than on the sleeve of the plug.
4.2.4 Connecting the ear coupler cable for ABR testing
For ABR-measurements you can use either the ear probe or the ear coupler cable with ear couplers. A major advantage in
using the ear coupler cable is that once the test starts, both ears can be tested simultaneously or consecutively. For ABR
Otometrics - MADSEN AccuScreen
29
4 Preparing for testing
measurement, use the ear coupler cable. The main advantage of the ear coupler cable is that you can test both ears at the
same time or in sequence after starting the test.
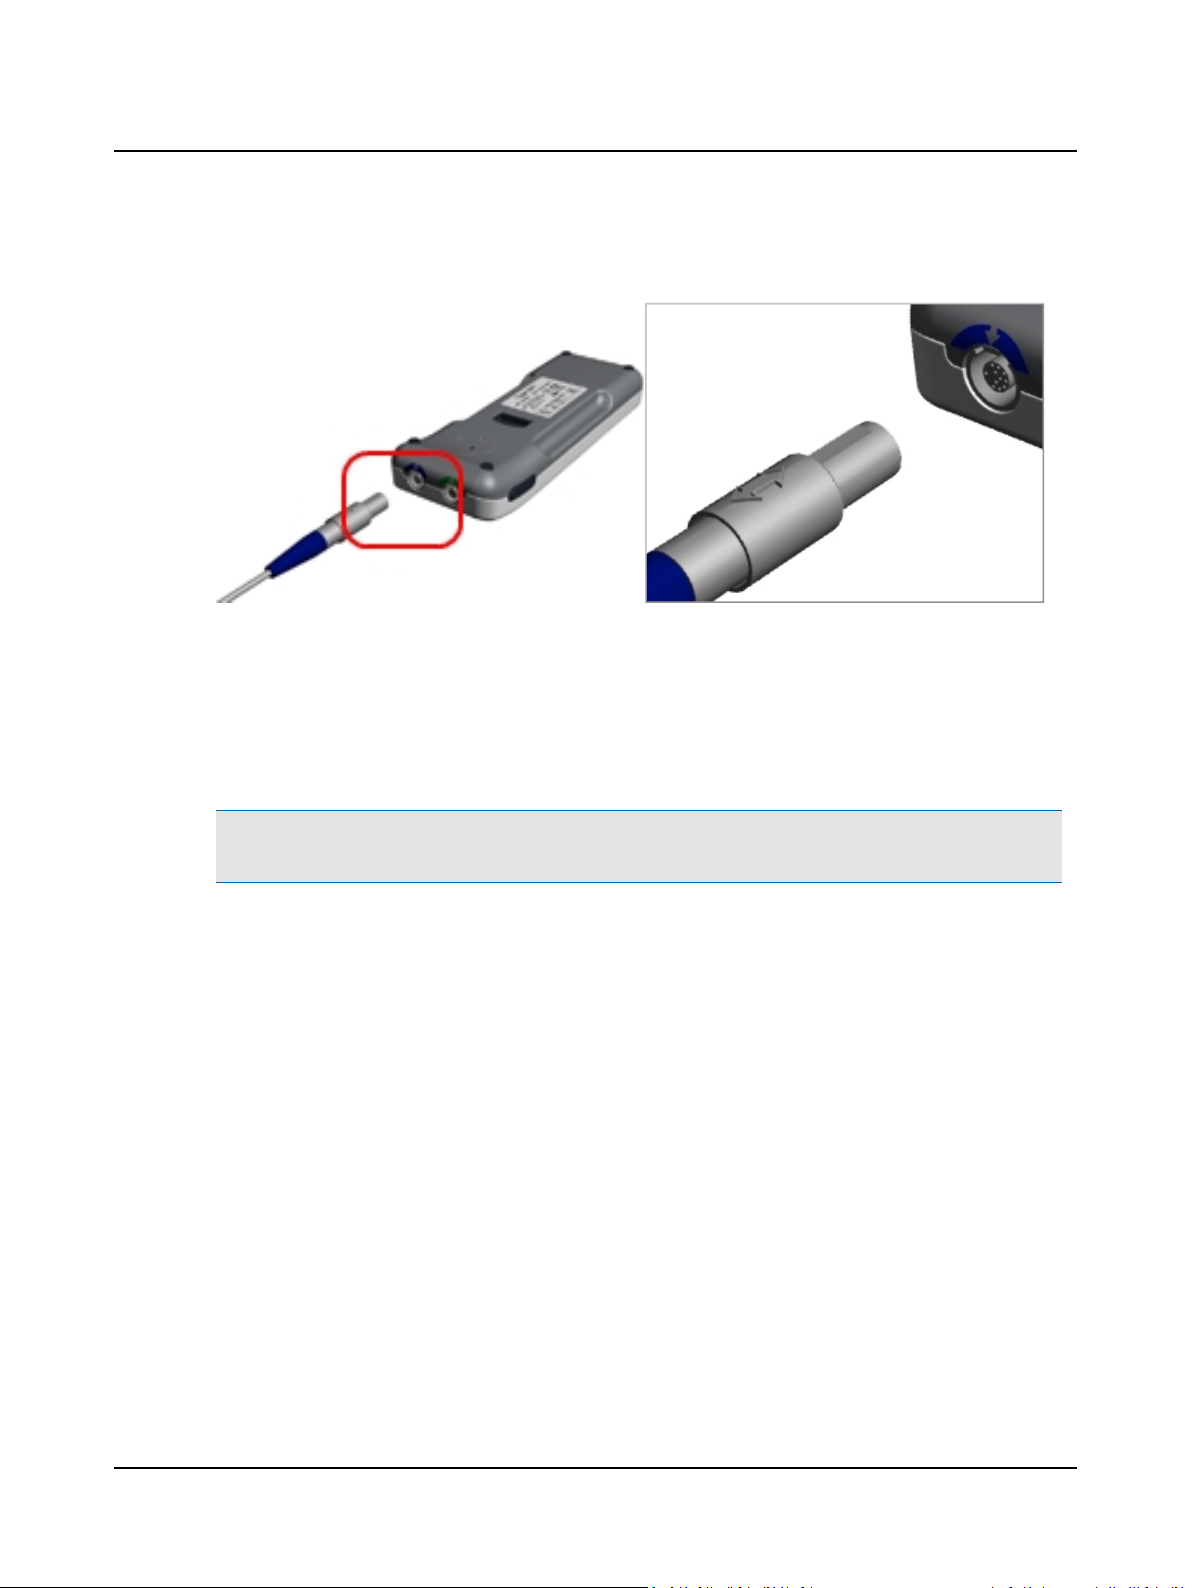
1. Place AccuScreen face down.
The sleeve on the plug of the ear coupler cable and the colouring around the ear coupler socket are blue.
2. Align the ridges on the plug with the notches in the blue-bordered socket on the top end of AccuScreen.
3. Gently insert the plug into the probe socket. The plug does not require force to be inserted properly.
Disconnecting the cable
Caution • Do not pull the plug by the cable when you disconnect the ear coupler cable. Instead, pull the sleeve of the
grey connector.
When disconnecting the plug, do not twist it. Instead, hold the sleeve of the plug and release it by pulling it straight out of
the socket.
The cable will not be released if you pull anywhere else than on the sleeve of the plug.
4.3 Preparing the test environment
Physical environment
• Make sure that the test environment is as quiet as possible. The quieter the room is, the more accurate and quick
your testing will be.
• Check that testing is not being done under an air conditioner or in front of a fan or ventilator.
• Check that there are no mobile phones in the vicinity, people talking etc.
Hygienic precautions
• Be sure to follow any established infection control procedures for the setting in which you are working.
• Clean probe body, probe cable and probe plug before each patient or if surface is visibly contaminated.
• Clean ABR electrode cable and electrode cable plug before each patient or if surface is visibly contaminated.
• Use a sterile alcohol wipe to clean the surfaces and wait until the probe body, probe cable and probe plug are completely dry.
30 Otometrics - MADSEN AccuScreen
 Loading...