


RITE Power
INSTRUCTIONS FOR USE

Thank you
Thank you for choosing our product as your means to better hearing.
To support your efforts, we have put great care and attention into
making sure that your new hearing instruments are of the highest
quality and that they are easy to use and maintain.
We recommend that you read this manual carefully to achieve the
maximum benefit of your new hearing instruments.
Congratulations on your decision to actively improve your hearing
with today’s most advanced hearing technology in the market.

Contents
Instrument view RITE with Power Dome
Instrument view Power RITE with Ear Mold 7
Turning your instruments ON and OFF 8
Left/Right ear marking
Putting on your instrument
Push-button
Programs (Optional)
Volume Control
Standby (Optional)
Changing batteries
Tamper-resistant battery door (Optional)
Telecoil (Optional)
Auto Phone (Optional)
DAI (Direct Audio Input)
Daily care of your hearing instrument
Daily maintenance Power Mold
Daily maintenance with Power Domes

Using your hearing instrument 38
Common problems and their solutions
Warnings Yellow Pages
IMPORTANT NOTICE
Please familiarize yourself with the entire contents of this booklet
before using your hearing instruments. It contains instructions
and important information about the use and handling of your
hearing instruments and batteries.
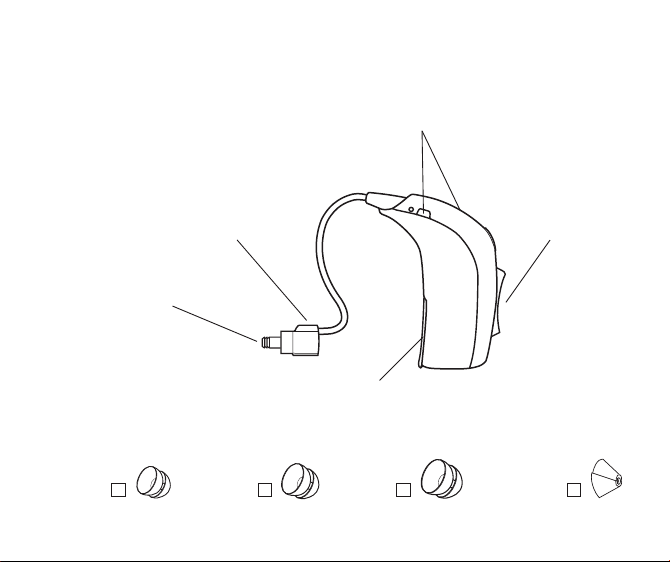
Instrument view RITE
with Power Dome
Microphone
openings
Speaker unit
Sound outlet
Battery door
Push-button
Your ear piece
Power Domes:
8mm 10mm 12mm Plus dome

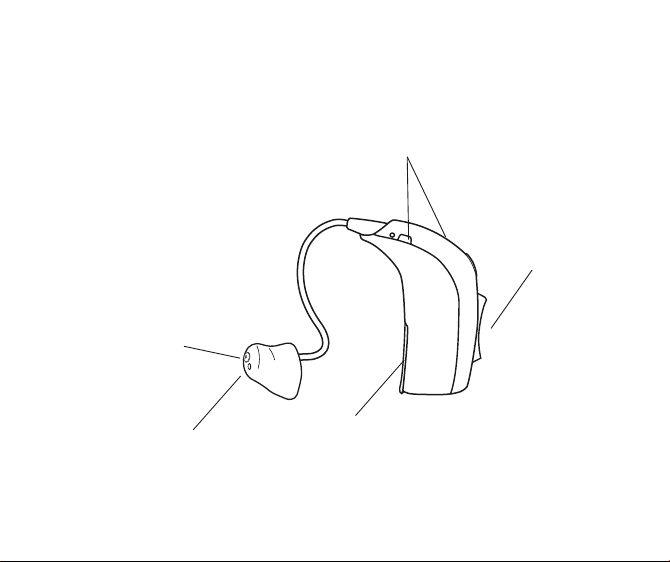
Instrument view Power RITE
with Ear Mold
Microphone
openings
Sound outlet +
wax protection
system
Push-button
Ventilations
openings
Battery door

Turning your instruments ON and OFF
Turn ON your hearing instrument by closing the battery door
completely with the battery in place. When the battery door is
closed the instrument will start up by playing a jingle. This indicates
that the battery is working and the instrument is operating.
Turn OFF your hearing instrument by opening the battery door
slightly until a click is felt.
To preserve the battery, make sure your hearing instrument is
switched off when you are not wearing it.
IMPORTANT NOTICE
Open the battery compartment fully to allow air to circulate
whenever you are not using your hearing instrument, especially
at night!
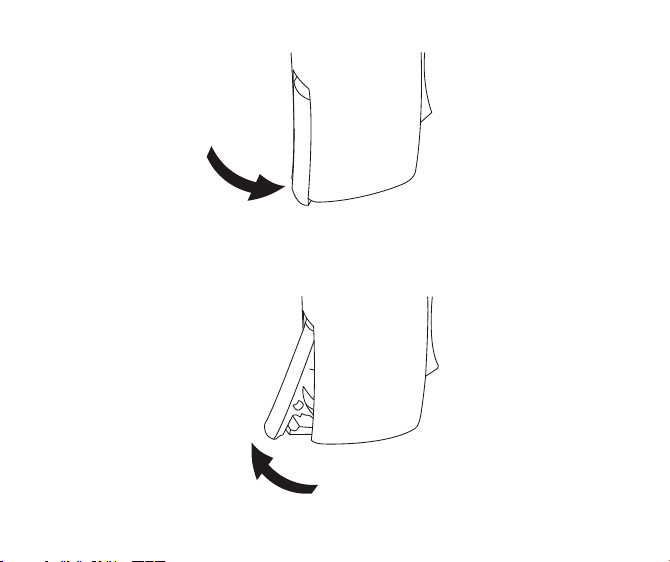
ON
Click
OFF
Click
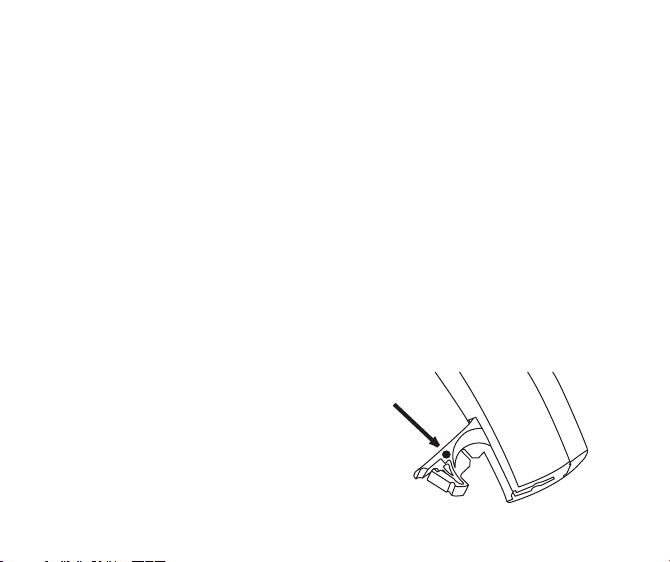
Left/Right ear marking
Hearing instruments are fitted to the uniqueness of each ear, which
means if you have two instruments then your left hearing instrument
is programed differently from your right. That is why it is important to
distinguish between the left hearing instrument and the right.
In order to easily identify whether it is left ear or right ear instrument,
color markings may be applied inside the battery door.
A blue dot marks the LEFT instrument
A red dot marks the RIGHT instrument

Putting on your instrument
Place the speaker, with the ear piece
attached, into your ear first (1) and then
place the instrument behind your ear (2).
If the power instrument has a Power Mold as
ear piece, make sure it is positioned in the
ear so it perfectly fits the ergonomics of the
ear canal in a tight and comfortable way.
Make sure that the ear piece is placed so
that the tube follows the contour of the skin.
1
2
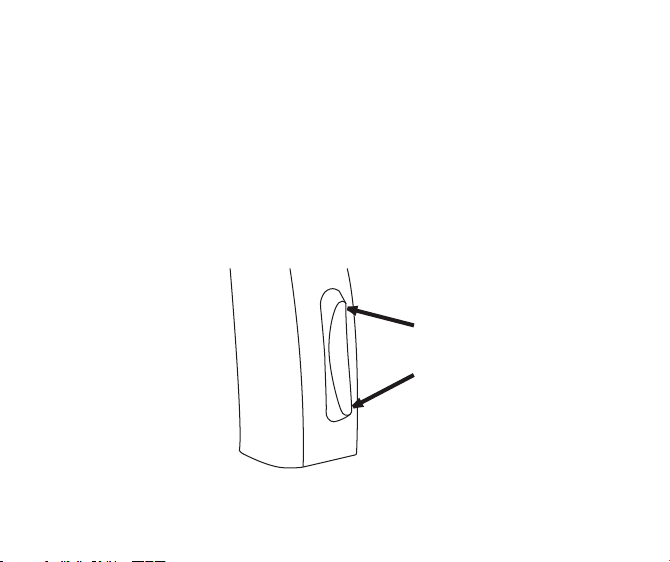
Push-button
Your hearing instrument has an ergonomic designed push-button for
volume adjustment and switching between different programs.
The push-button can be pressed and activated on either the upper
part (UP) or the lower part (DOWN).
UP
DOWN
The push-button on your hearing instrument can be programmed to
one of 3 functionalities.
Left Right
Program shift:
Short press to change program.
Volume control:
Short press to adjust the volume.
Both volume control and Program shift:
Short press and (about 2 seconds) to shift program.
Binaural Interchange enabled (see “Using 2 instruments”).
To be filled out by your Hearing Care Professional!
Programs (Optional)
Your hearing instrument can have up to 4 different programs.
When switching between the different programs, your hearing
instrument will beep. The number of beeps will indicate which
program you are using.
One beep, when you switch to program 1
e
Two beeps, when you switch to program 2
ee
Three beeps, when you switch to program 3
eee
Four beeps, when you switch to program 4
eeee
Press the upper part to go forwards in the program cycle e.g from
P-P. Press the lower part to go backwards in the program cycle e.g
from P-P.

Below you can see a description of the programs available in your
hearing instrument.
Prg. 1: __________________________________
Prg. 2: __________________________________
Prg. 3: __________________________________
Prg. 4: __________________________________
Using 2 instruments
For ease of use, the push-button can be programed to change to the
equivalent program in the other instrument also, by using the
wireless communication between the instruments. This is referred
as binaural interchange.

Volume Control
The volume control allows you to adjust the volume in specific
listening situations to the level you feel comfortable with.
To increase volume, short press on the upper part of the push-button.
To decrease volume, short press on the lower part of the push-button.
When the hearing instrument is turned on, it starts up at a preferred
volume level. When adjusting the volume control to the preferred
level, this is indicated by a beep.

Using 2 instruments
For ease of use, the push-button can be programed to adjust the
volume in the other instrument equivalently, by using the wireless
communication between the instruments. This is referred as
binaural interchange.

Standby (Optional)
)
Standby (Optional
Press the button for a minimum of 3 seconds to set the instrument
in standby mode.
To reactivate the instrument, push the button shortly again.
Use the standby function if you need to silence the
instrument while you have the instrument on.
Note: pushing either side of the
button will set the instrument on
standby.
Push
3 sec

WARNING
Do not use the standby function as a switch off as the hearing
instruments still draws current from the battery in this mode.
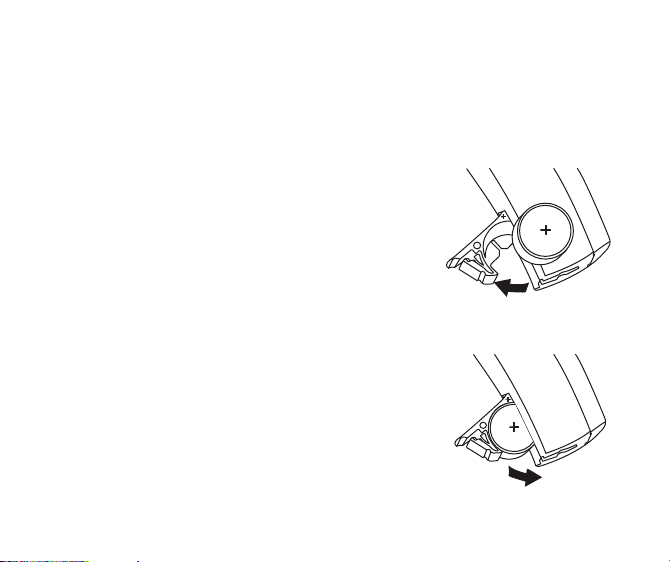
Changing batteries
Your hearing instrument battery size is 312.
A worn out battery should be removed
immediately.
When the battery power is low, you will hear
2 beeps. This pre-warning starts when the
battery has only a few hours of operation
left. The pre-warning will be repeated with
moderate intervals to indicate it is time to
change the battery.
If the battery runs out the instrument turns off.
When that happens, 4 beeps are played to
indicate that the instrument is no longer
operating.
It is not an indication of a malfunction.
 Loading...