

Page 1
INSTRUCTIONS FOR USE TV 2.0
Page 2

Thank you
Thank you for choosing our product as your means to better hearing.
To support your eorts, we have put great care and attention into making sure that your
new TV adapter has the highest quality and is easy to use.
The complete system description is documented online at
connectline
Here you will also nd interactive presentations, “how to” videos and a support section
with frequently asked questions.
We recommend that you read this manual carefully to achieve the maximum benet of
your new TV adapter, before you start to use it. If you have any questions about the use
of the TV adapter, please contact your Hearing Care Professional.
Manufactured under license from Dolby Laboratories.
Dolby Digital and the double-D symbol are registered trademarks of Dolby Laboratories.
www.oticonusa.com/
Page 3

Indications for Use
The TV adapter is intended to be used together with the Oticon Streamer or Oticon
Streamer Pro and Oticon wireless hearing instruments.
This enables the hearing instrument user to listen to the TV, by wirelessly sending the TV
sound from the TV adapter through the Streamer direct to the hearing instruments.
INSTALLATION GUIDE
Page 4
IMPORTANT NOTICE
Please familiarise yourself with the entire content of this booklet before using your TV
adapter. It contains instructions and important information about the use and handling
of your TV adapter.
Page 5

Contents
Package content 7
TV adapter overview 8
Warnings 10
Installation 13
Placing the TV adapter 14
Connecting the TV adapter to a power outlet 16
Connecting the TV adapter to the TV 18
Connecting using TOSLINK 20
Connecting using RCA 22
Connecting using mini jack adapter 24
Connecting using SCART 26
Pairing the Streamer to the TV adapter 28
Turn on the TV sound 34
Turn o the TV sound 34
SelectMe, using more than one TV adapter 36
Technical information 38
INSTALLATIONUSER GUIDE
Page 6
Package content
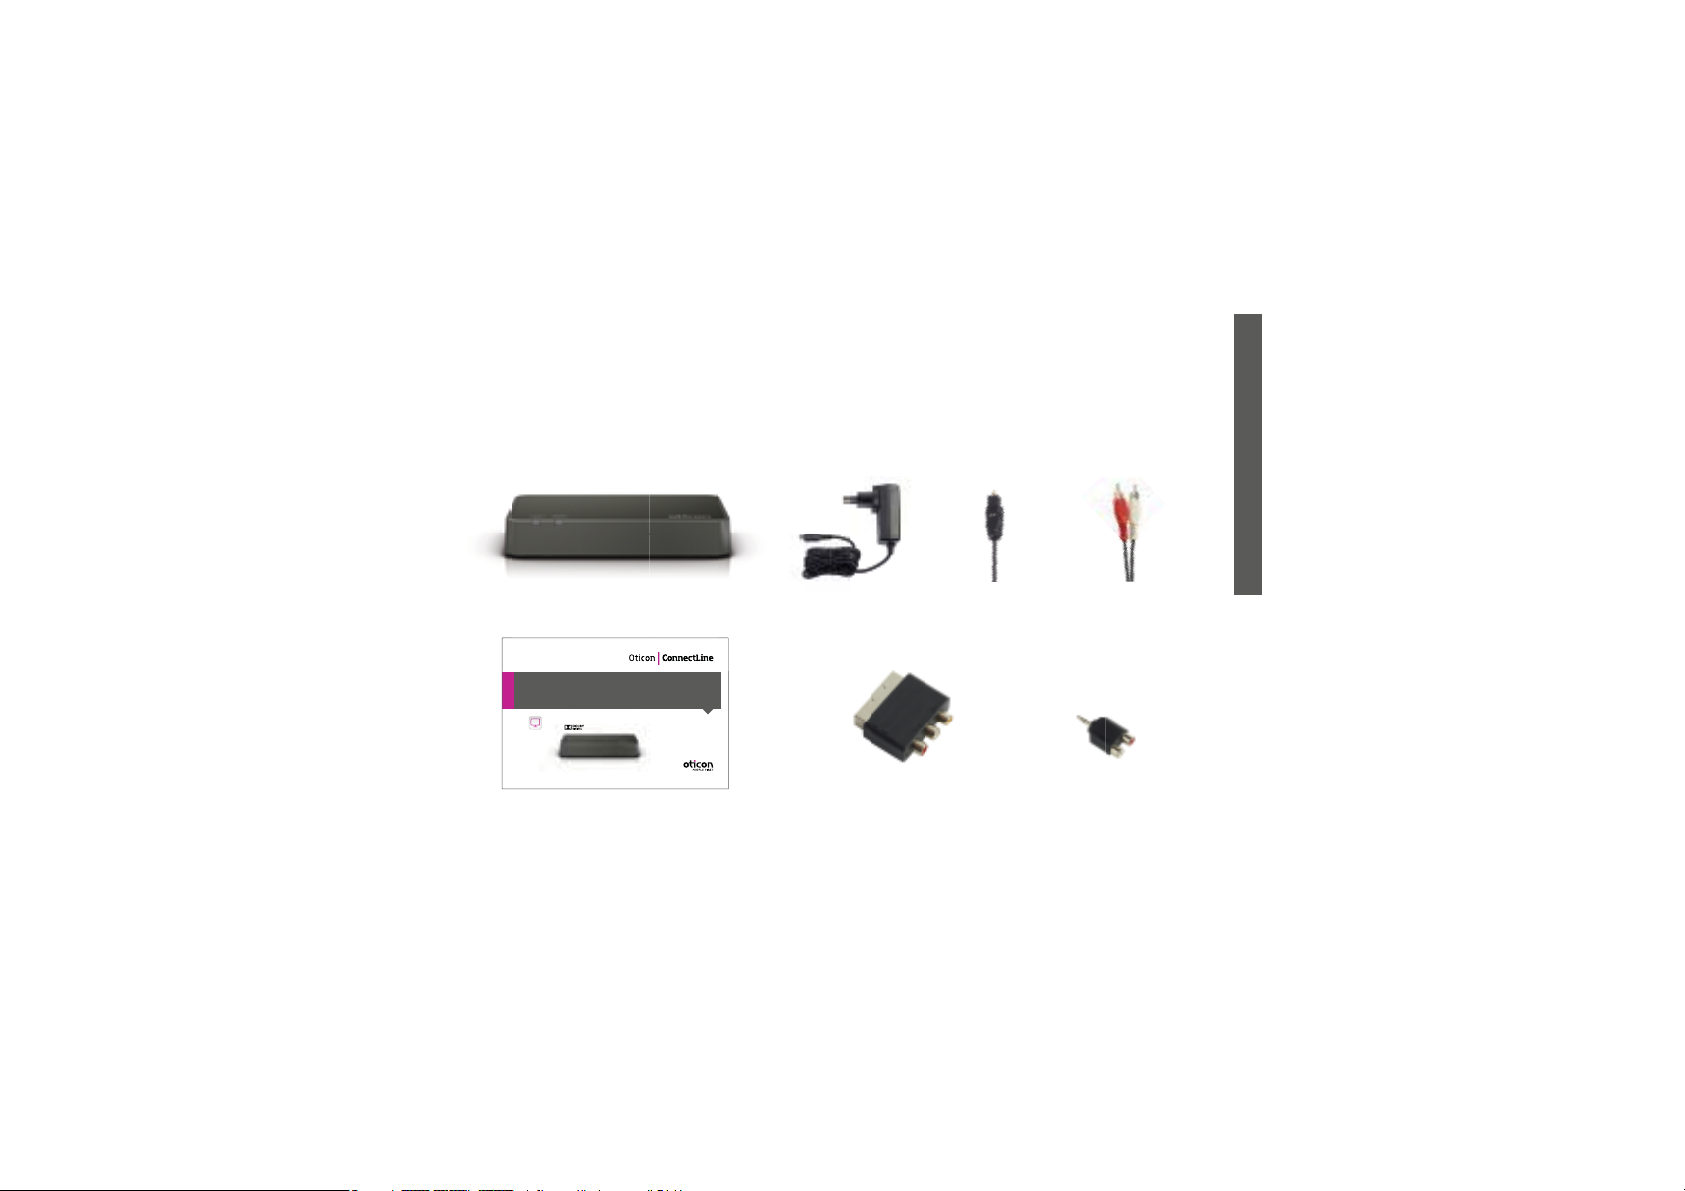
The TV adaptor box consists of the following elements:
INSTALLATION GUIDE
TV adapter Power supply
INSTRUCTIONS FOR USE TV 2.0
This guide (Installation guide and Instructions for use)
TOSLINK
SCART adapter Mini jack adapter
RCA cable
7
Page 7
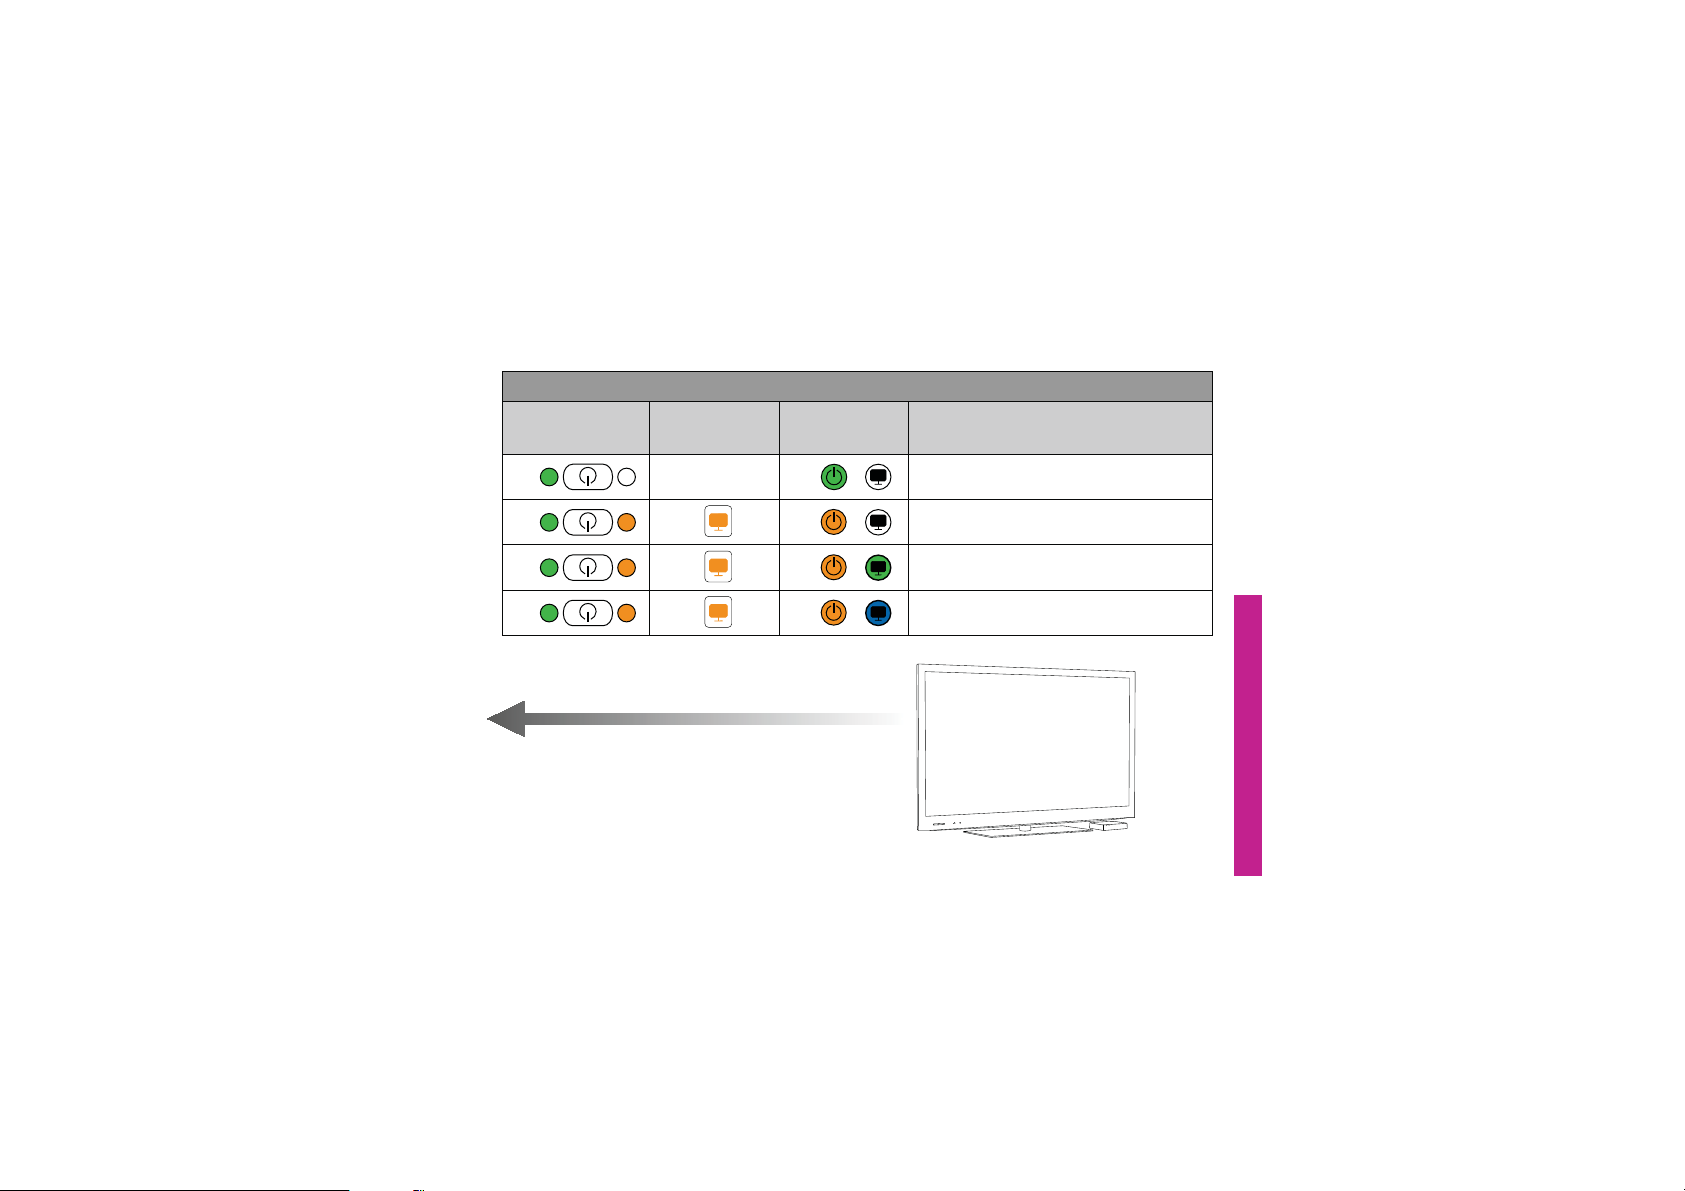
TV adapter overview
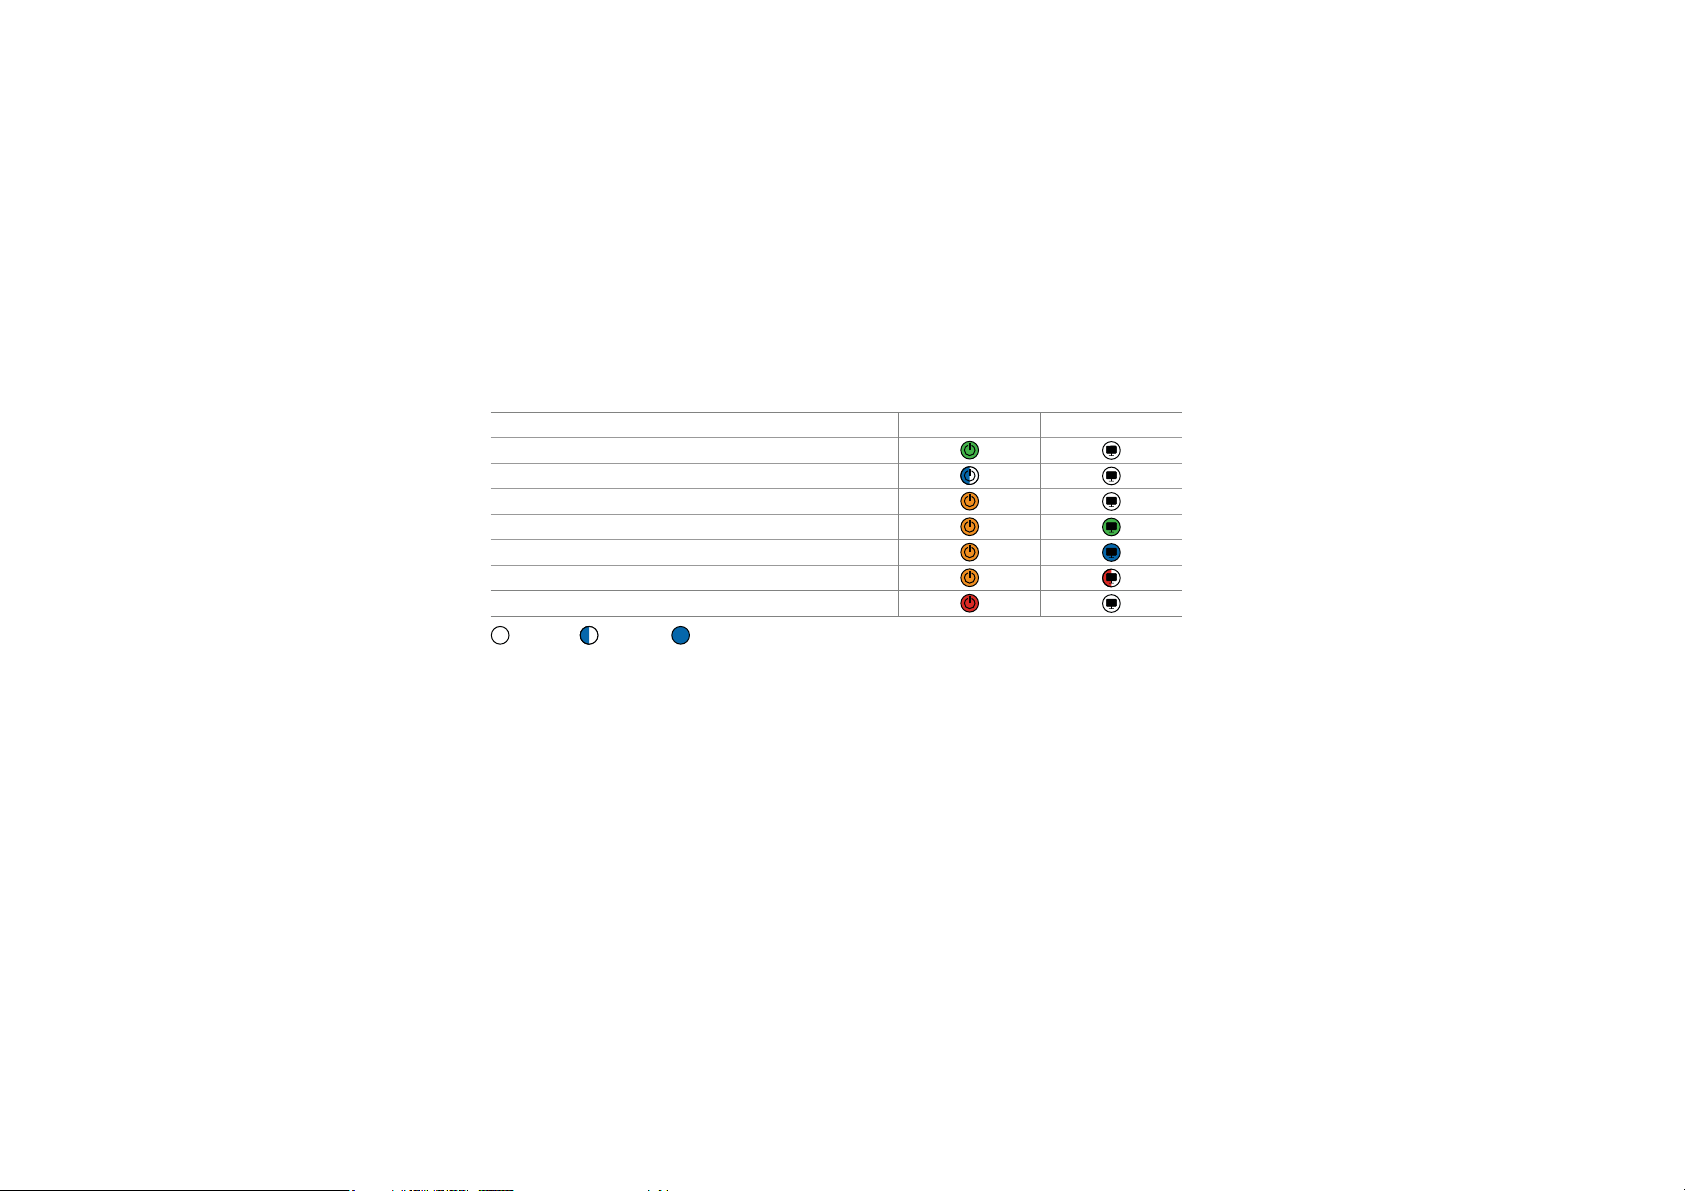
Mode Power indicator TV indicator
Power on, no connection to the Streamer
In pairing mode
Streaming - no audio input detected
RCA inserted and streaming
TOSLINK inserted and streaming (digital)
TOSLINK inserted and streaming (invalid signal)*
Fault condition **
No light Blinking Steady
* Try other input connection
* * Contact your Hearing Care Professional
8
Page 8
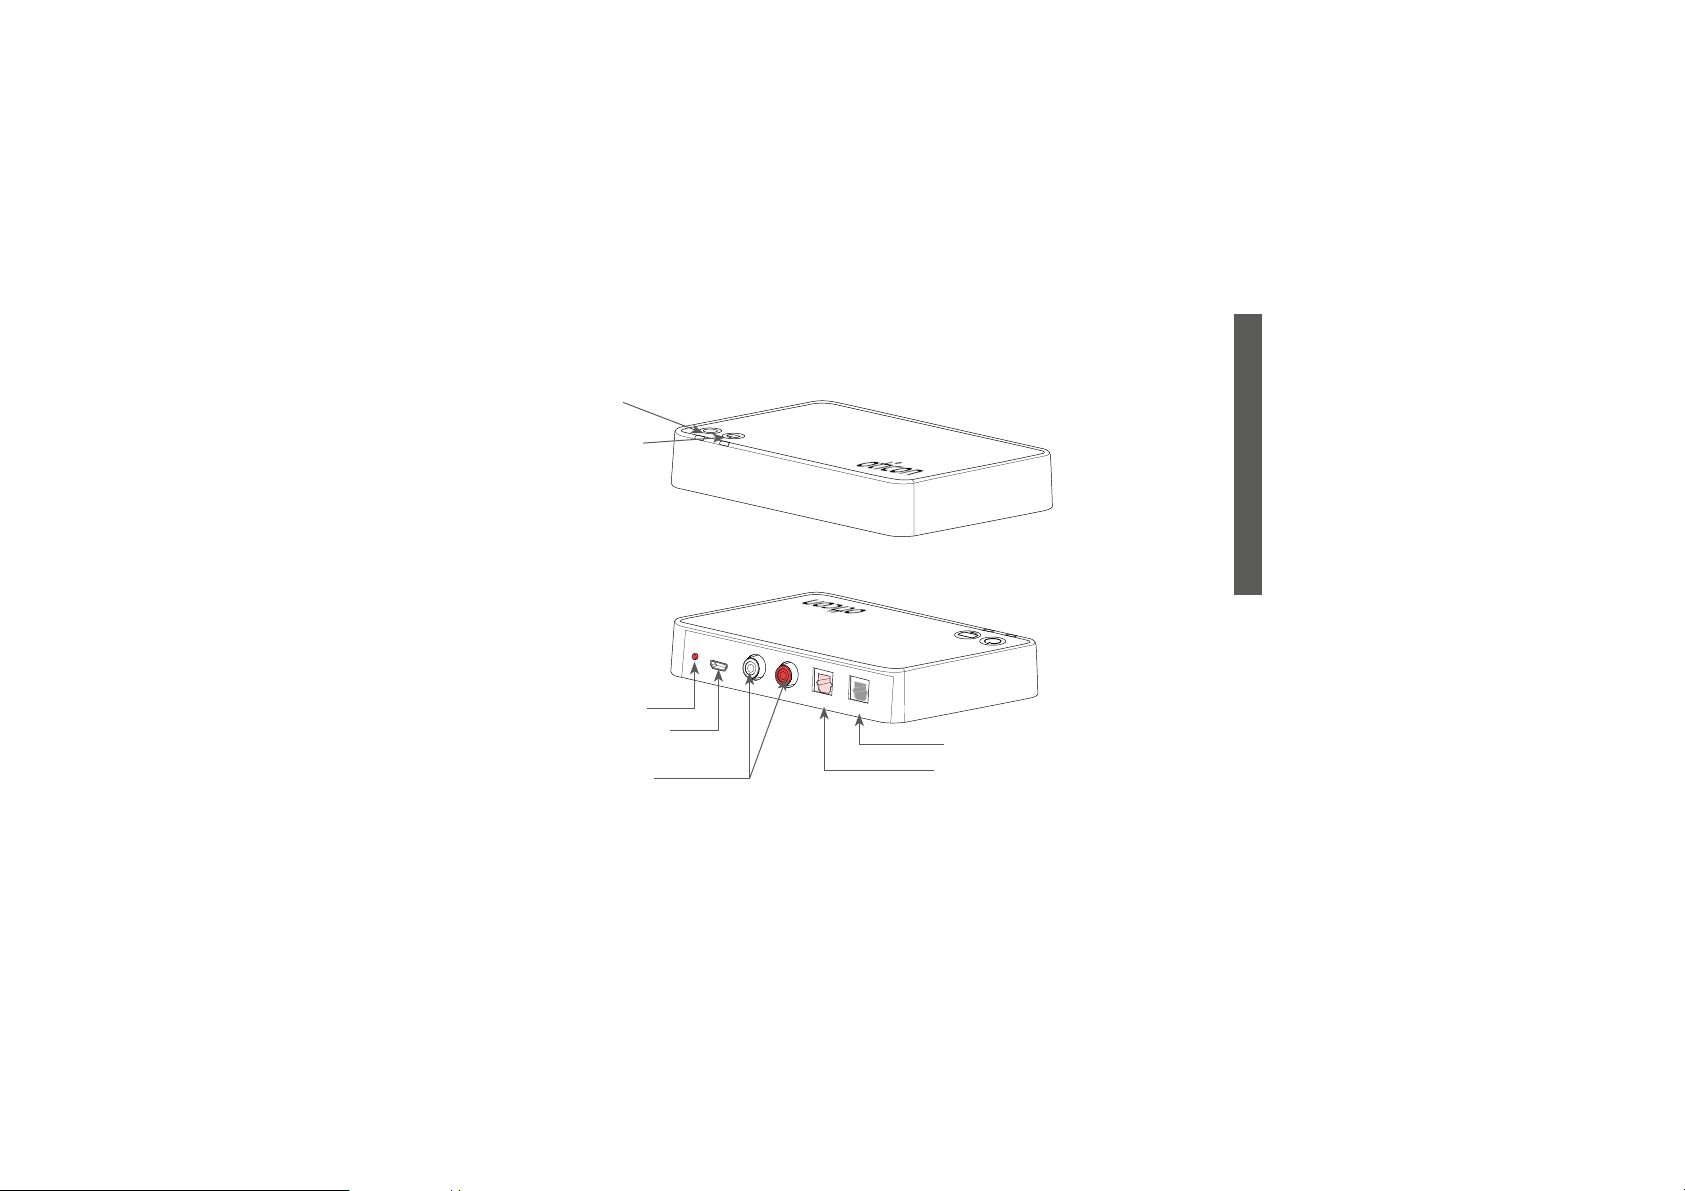
Power indicator
Front
TV indicator
Back
POWER
L
R
IN
SelectMe
Power supply
RCA left and right
* For more information please refer to: www.oticonusa.com/connectline
OUT
9
INSTALLATION GUIDE
TOSLINK out
TOSLINK in
Page 9

Warnings
You should familiarize yourself fully with the following general warnings and the entire
contents of this booklet before using your TV adapter.
Products to be connected to external equipment
t The safety of the use of the TV with RCA input cable is determined by external
signal source. When the input cable is connected to mains-operated equipment, this
equipment must comply with IEC-60065, IEC-60601 or equivalent safety standards.
t The TV adapter is designed to comply with the most stringent Standards of
International Electromagnetic Compatibility. However, the TV adapter might cause
interference with other medical devices. Please contact relevant personnel to obtain
permission before using the TV adapter in hospitals or similar venues.
10
Page 10

Warnings
t The TV adapter is not a toy and therefore should be kept out of the reach of children
and anyone else who might swallow parts or otherwise cause injury to themselves.
Special attention should be paid to the smaller components in order to prevent children
from swallowing them and choking.
If a part is swallowed, see a doctor immediately.
The TV adapter must never be washed or immersed in water or other liquids.
11
INSTALLATION GUIDE
Page 11

Installation
Activating the TV adapter for the rst time
Before you can use the Streamer and your hearing aids with your TV, the TV adapter must
be connected to a power outlet, connected to the TV and paired with your Streamer.
This is a step-by-step guide on how to install the TV adapter.
All needed parts for the installation are included in the package.
13
INSTALLATION GUIDE
Page 12
Placing the TV adapter
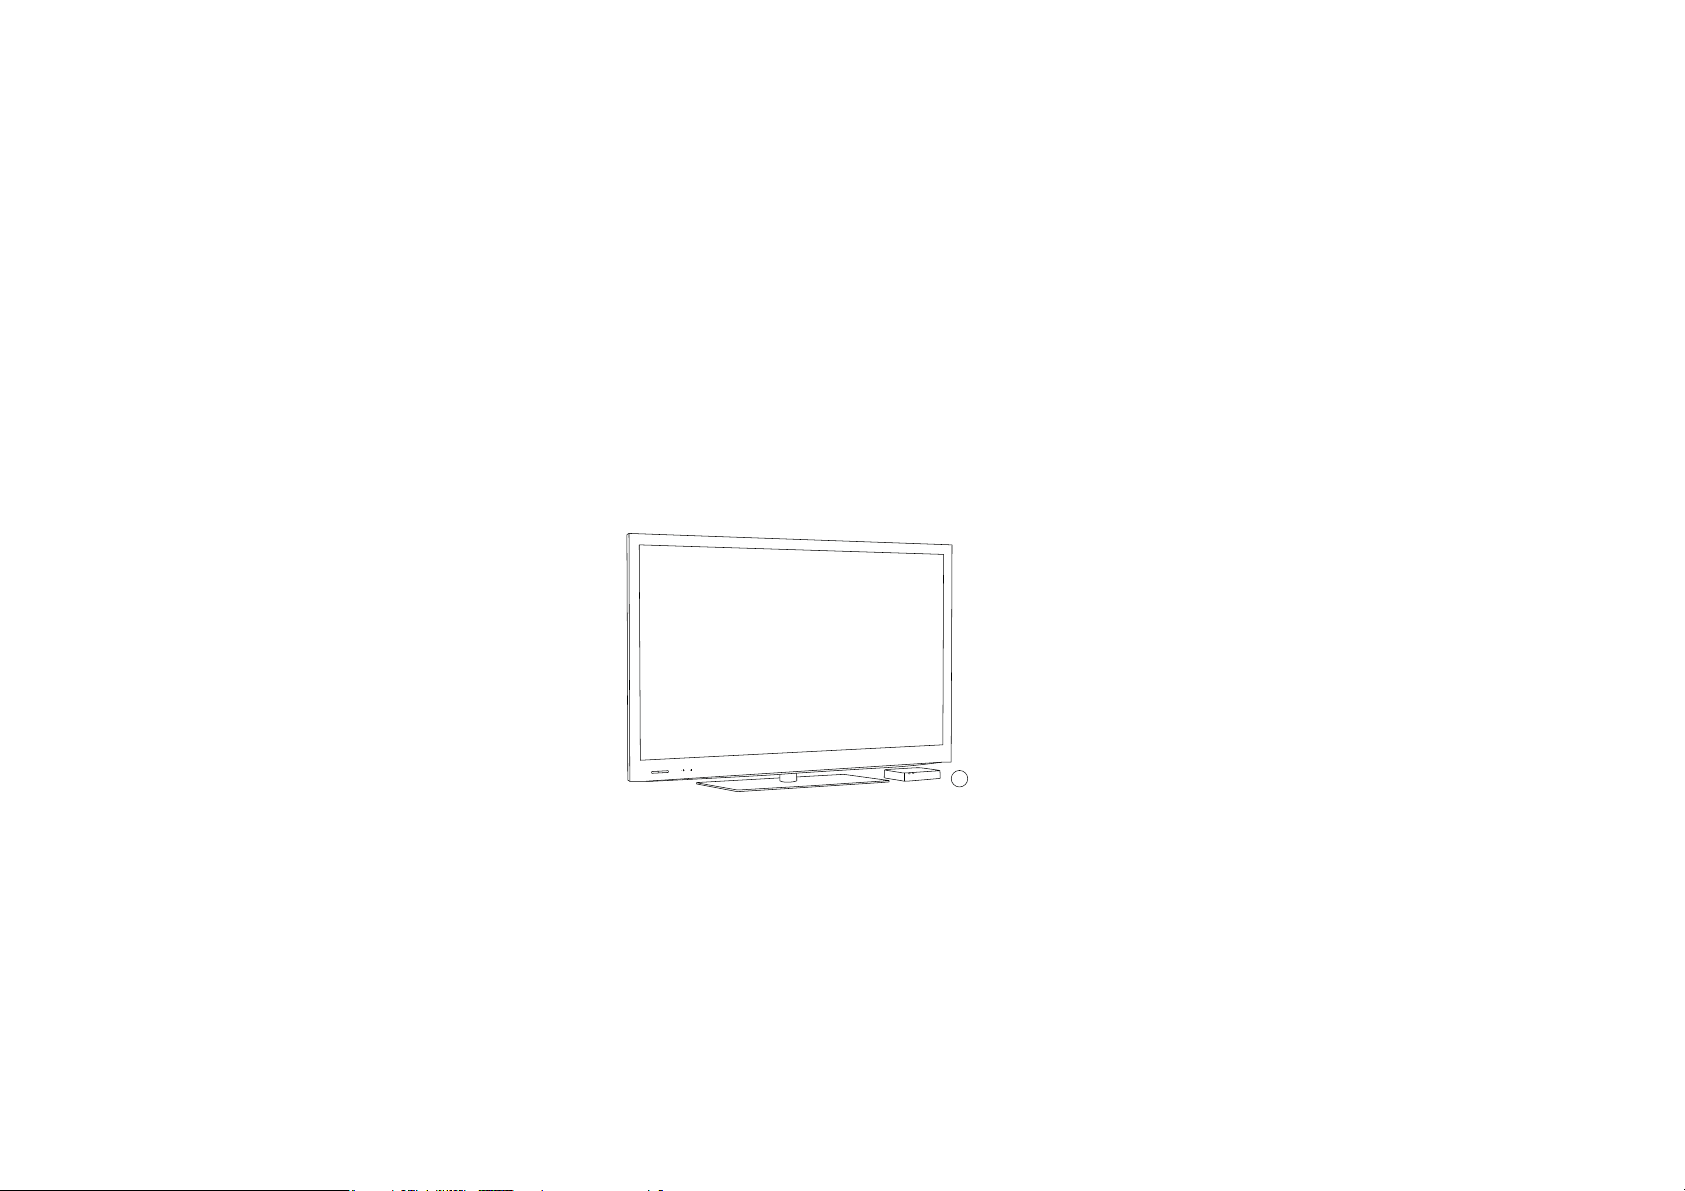
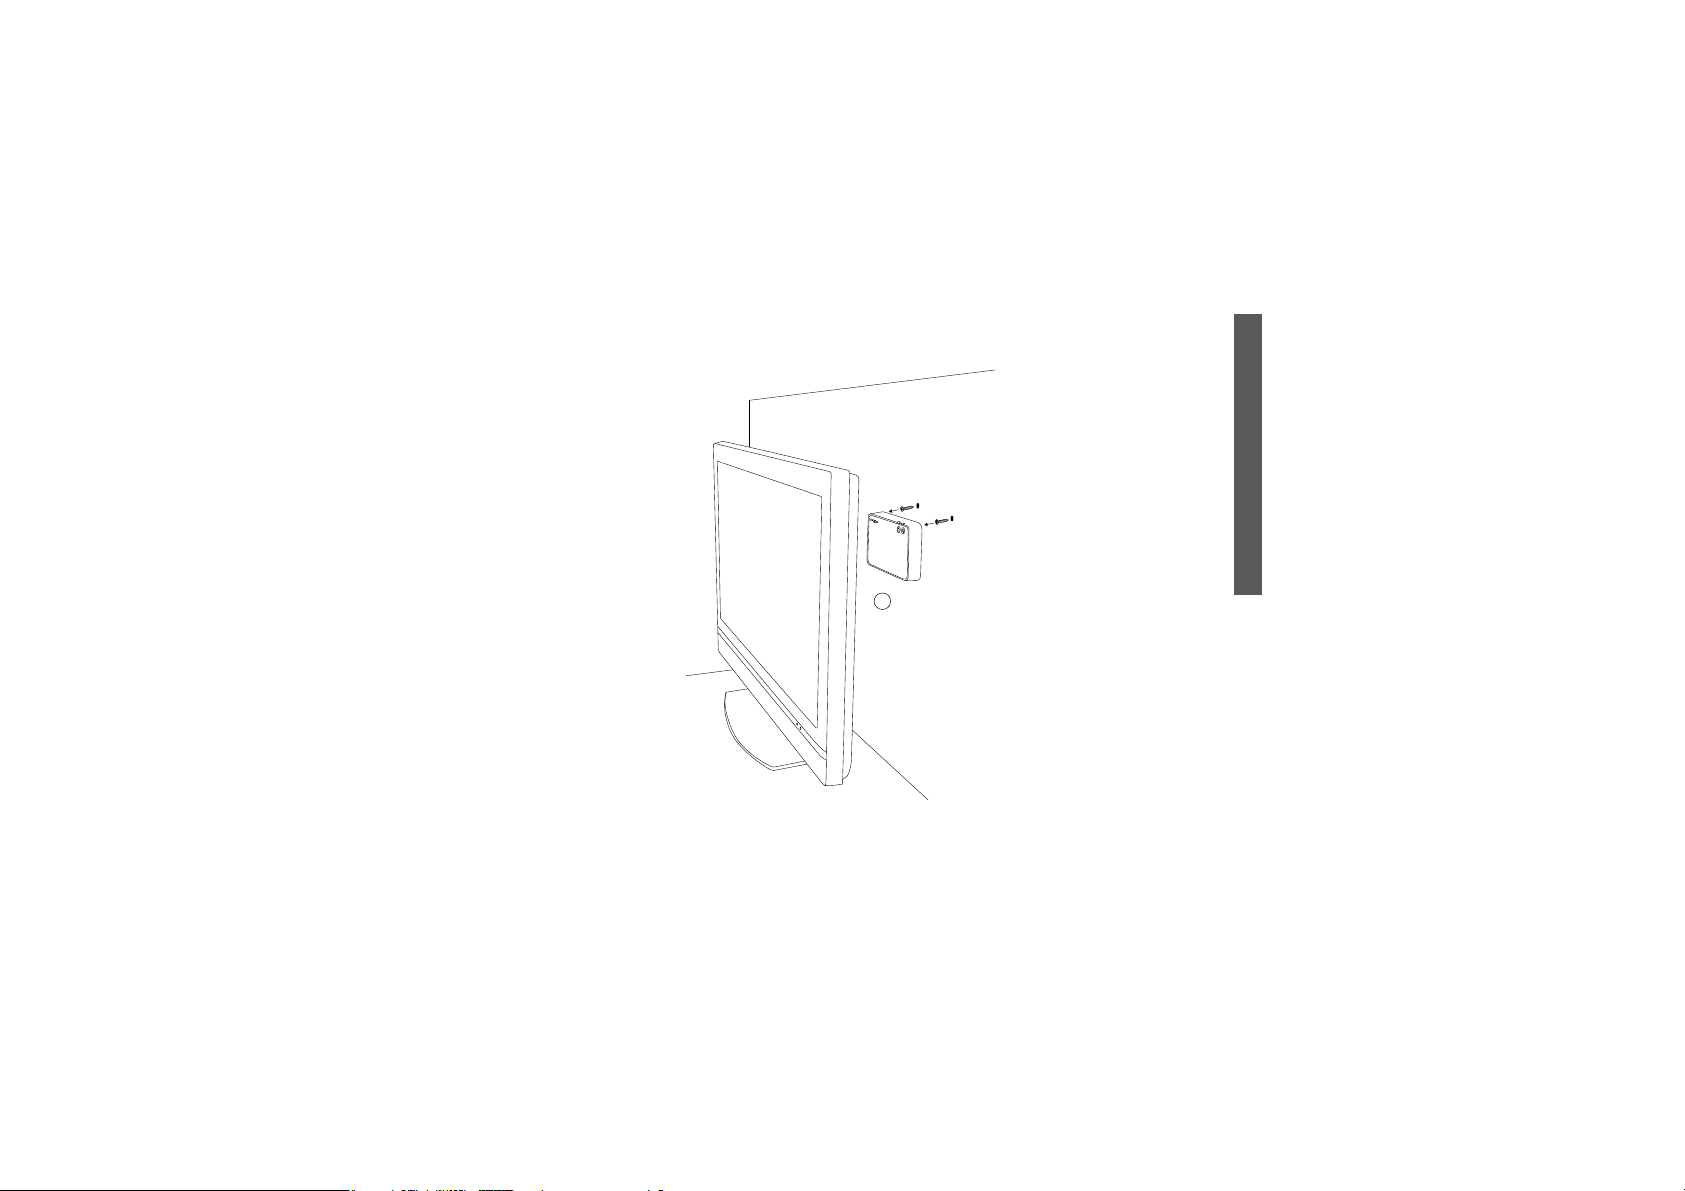
There are two options of placing the TV adapter:
1. Close to the TV - placed horizontally (A).
2. Behind or close to the TV hanging on the wall (vertically) (screws not included) (B).
A
14
Page 13
15
INSTALLATION GUIDE
B
Page 14

Connecting the TV adapter to a power outlet
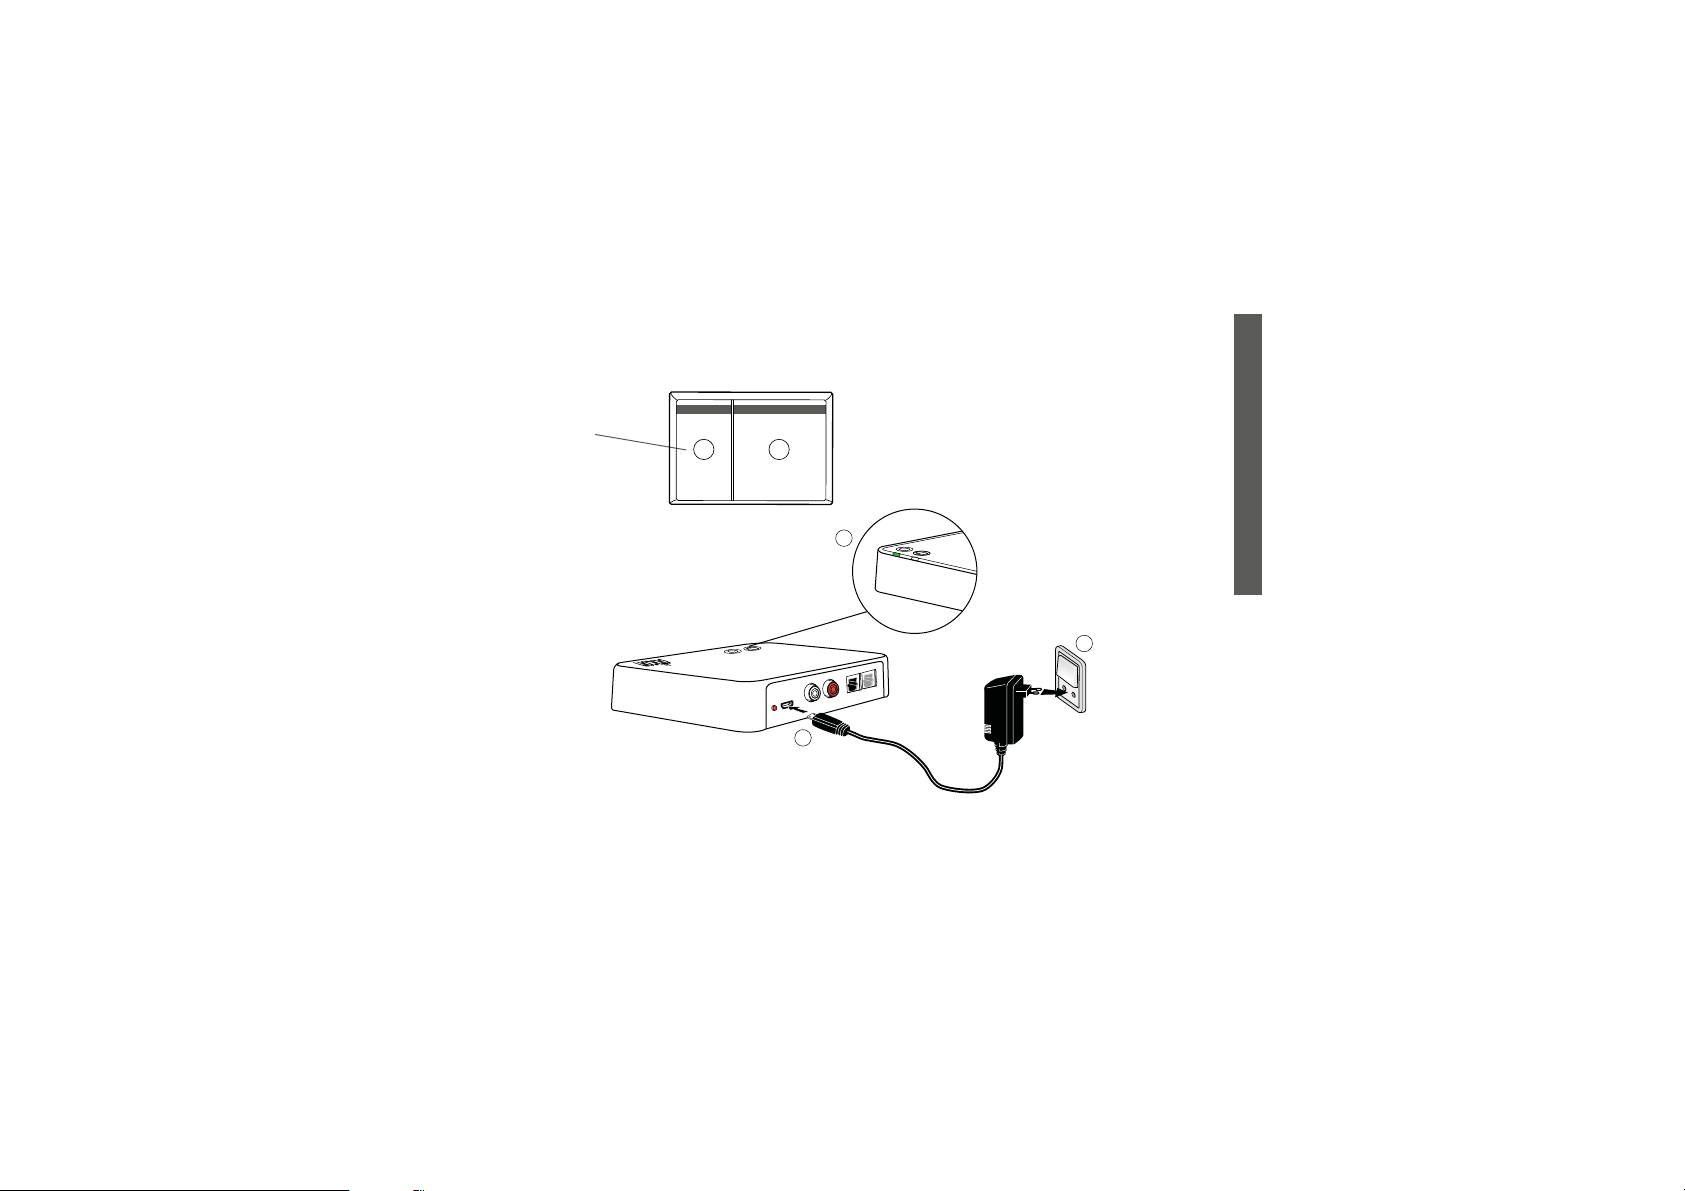
Start by connecting the TV adapter to a power outlet.
Use the power supply from box 1
1. Plug the power cord into the “power” connector on the TV adapter (A).
2. Plug the power supply into the mains wall socket (B).
3. Check that the power is turned on, after a few seconds the power indicator
green on the front of the TV adapter (C).
16
will light
Page 15
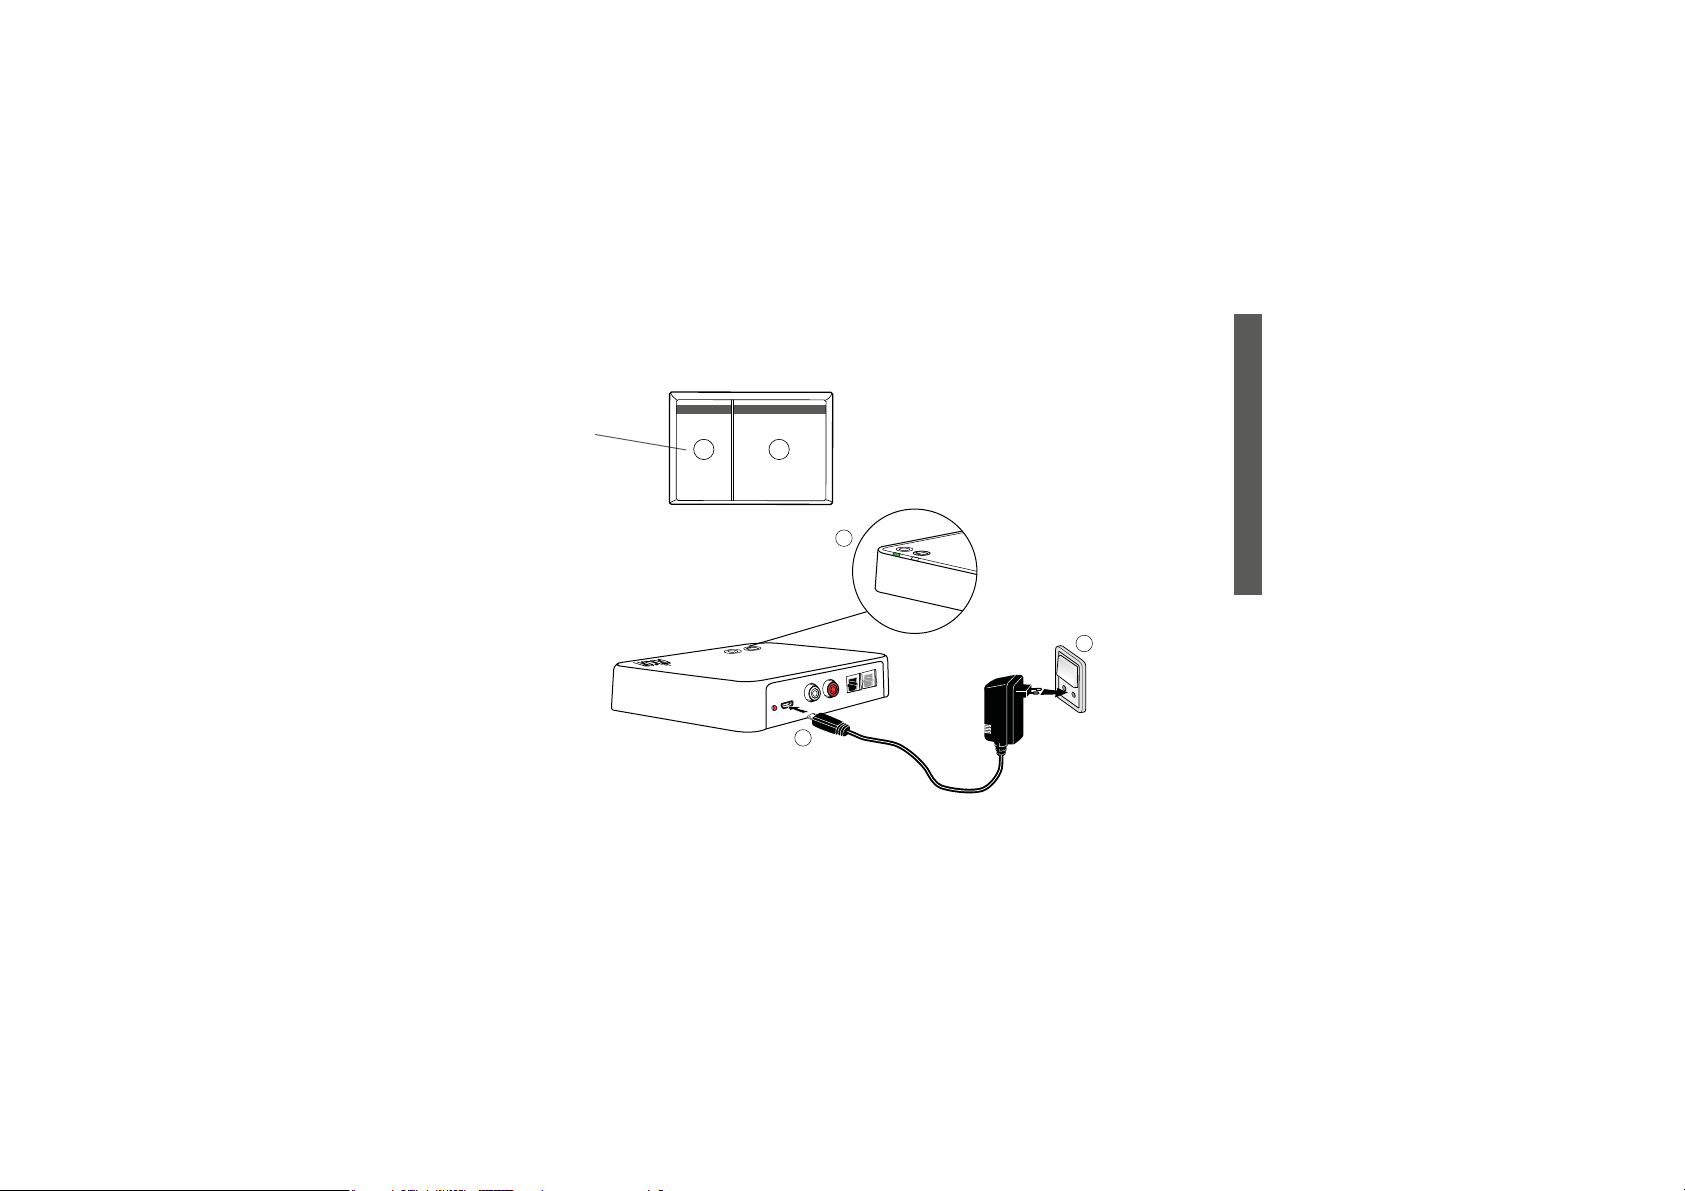
Box 1
13
C
TUO
IN
R
L
POWER
A
17
INSTALLATION GUIDE
B
Page 16

Connecting the TV adapter to the TV
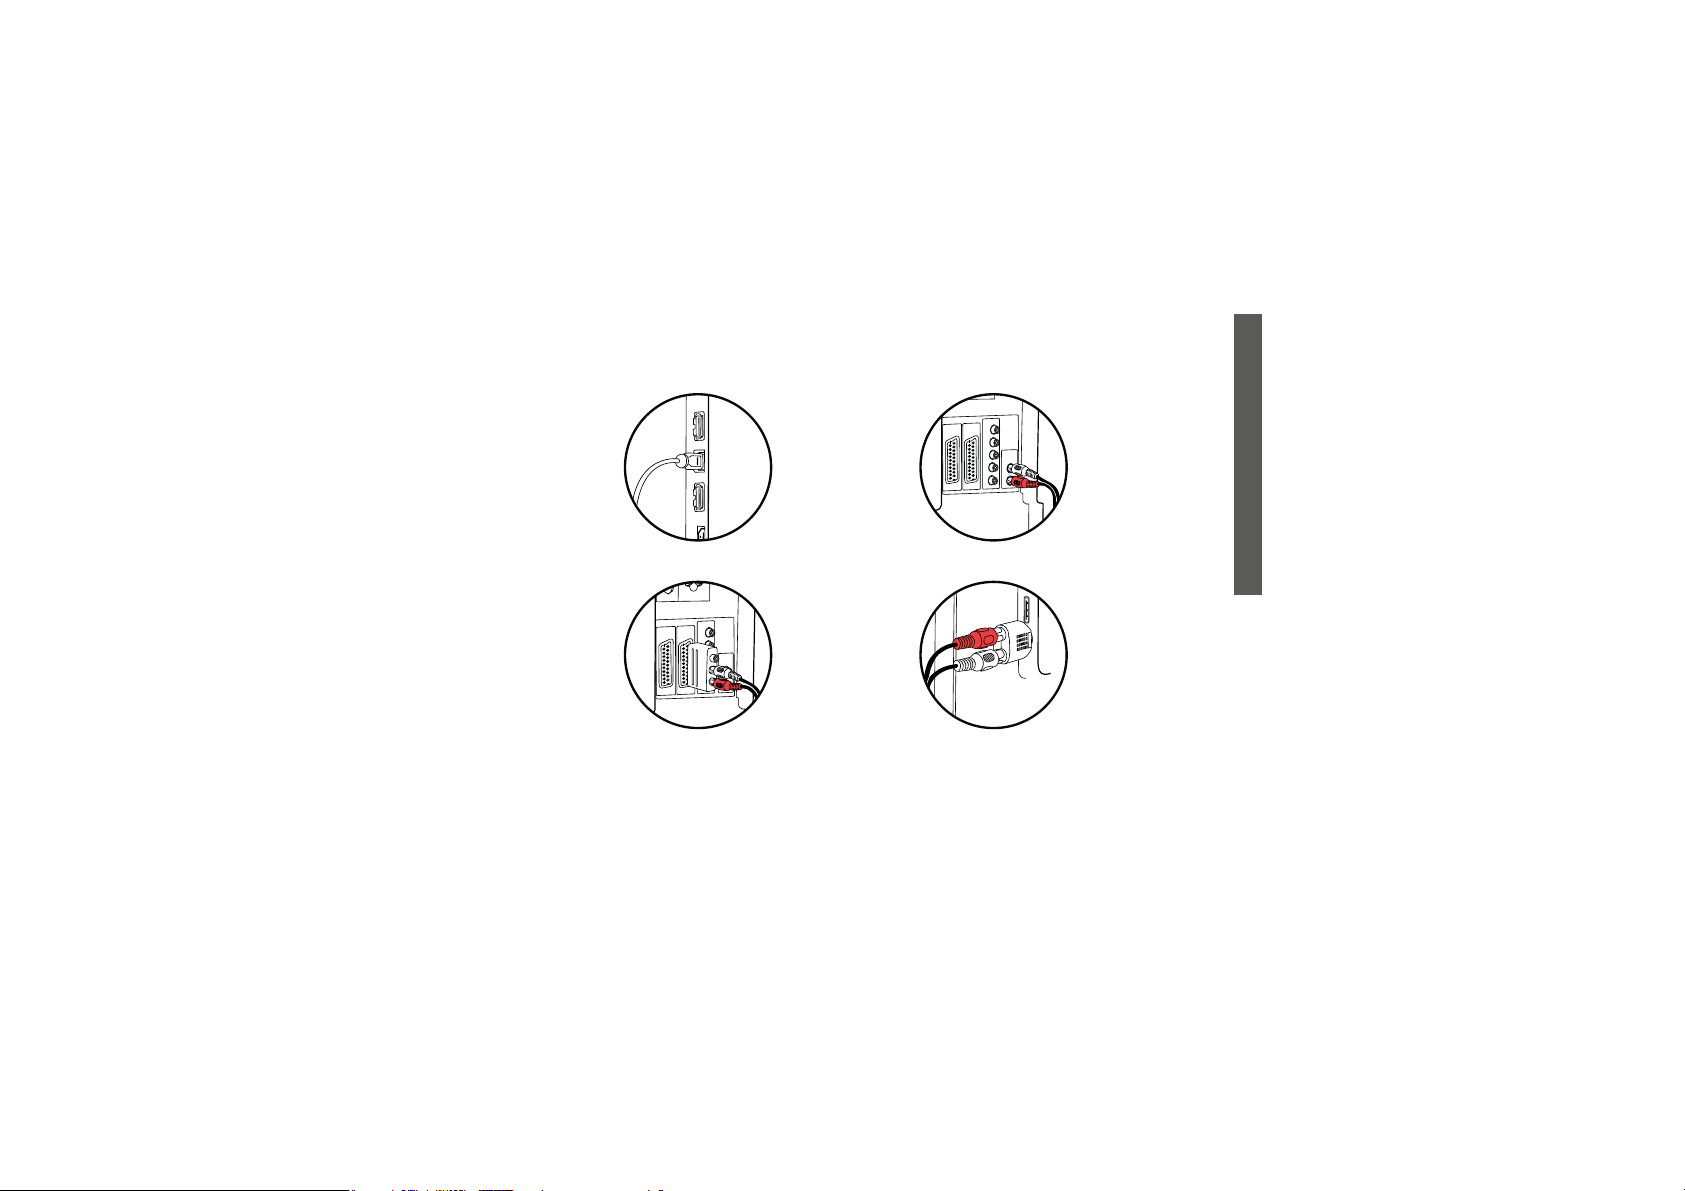
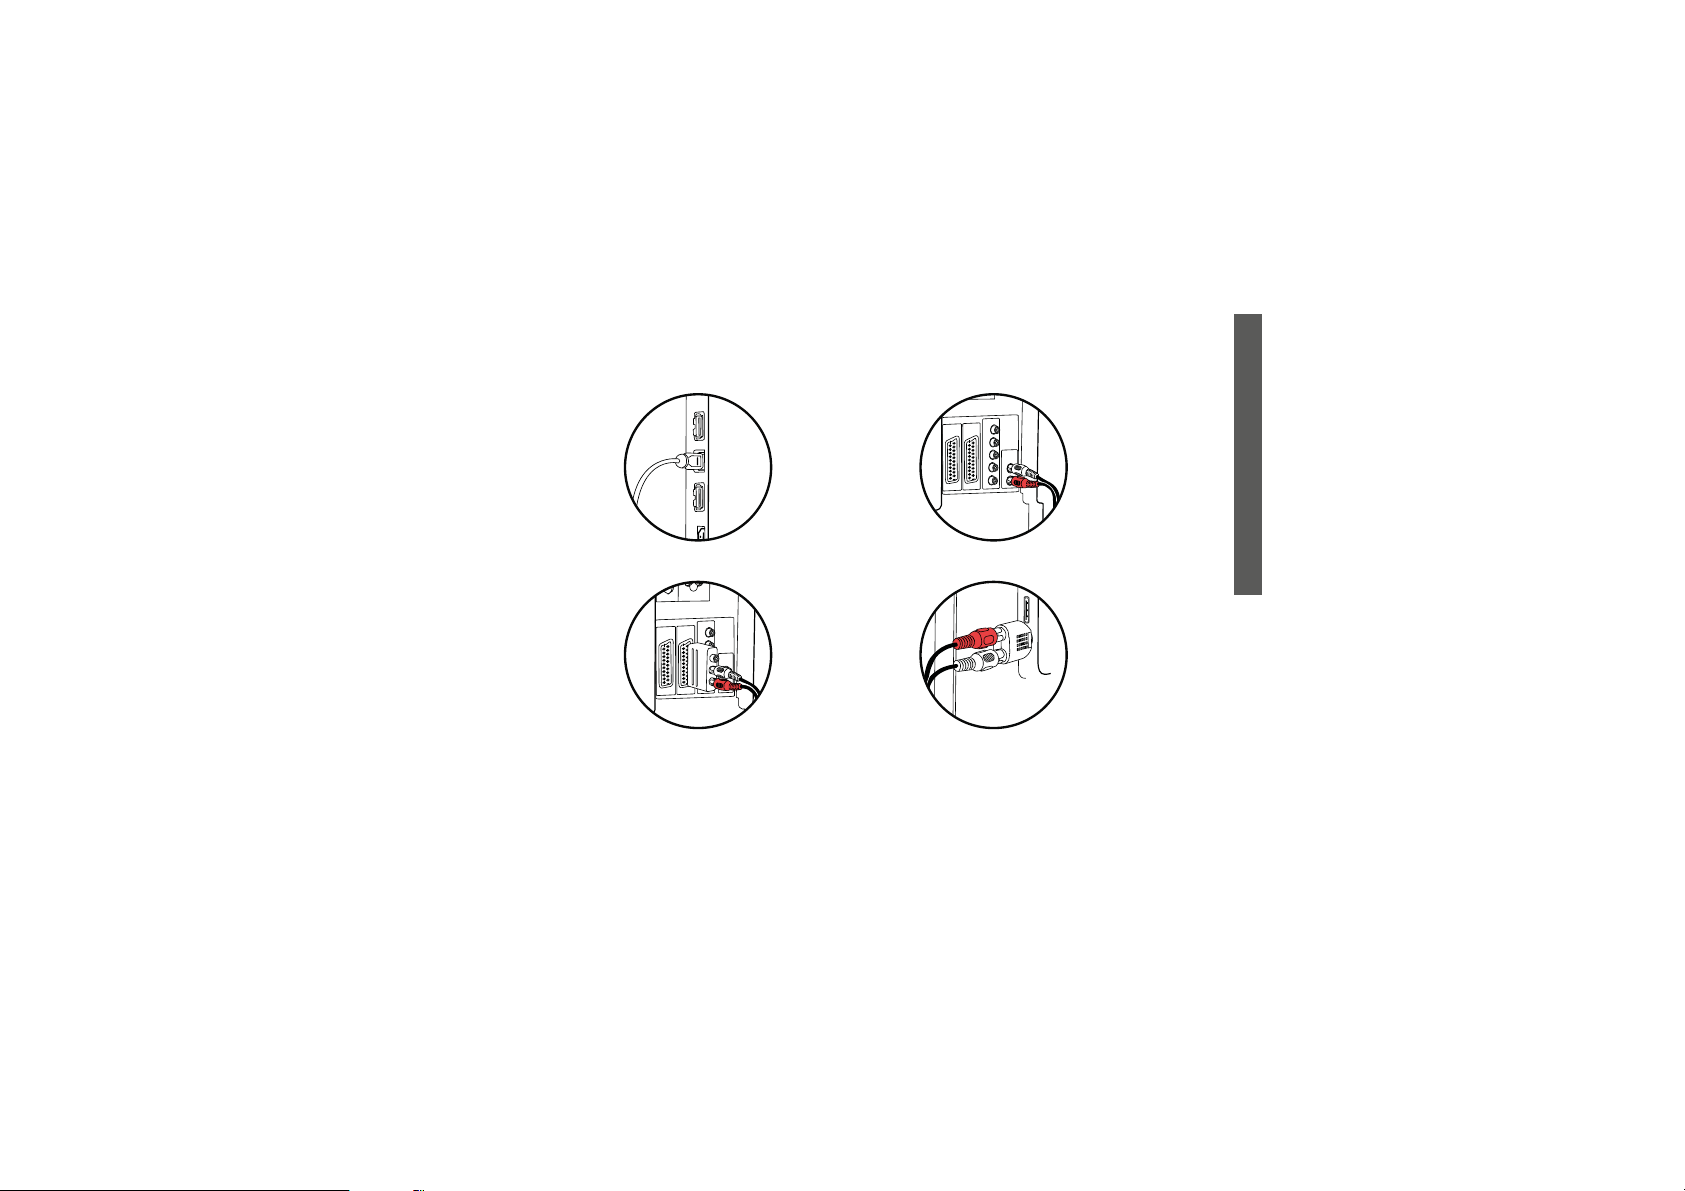
You can connect the TV adapter to the TV in four dierent ways.
Connection Page
TOSLINK. Either digital stereo (PCM) or Dolby® Digital * 20
RCA audio output L+R 22
SCART audio output (L+R) 24
Mini jack audio output (typically headphone output) 26
*Dolby Digital and the double-D symbol are registered trademarks of Dolby Laboratories.
Please refer to the detailed specication of ConnectLine TV 2.0.
www.oticonusa.com/connectline) and your TV manual/specications to ensure
(
compatibility.
Please see the following pages for a solution which ts your TV.
18
Page 17
L
R
Audio
Out
TOSLINK (p. 20)
RCA (p. 22)
INSTALLATION GUIDE
SCART (p. 24)
Mini jack (p. 26)
* For more information please refer to: www.oticonusa.com/connectline
19
Page 18

Connecting using TOSLINK
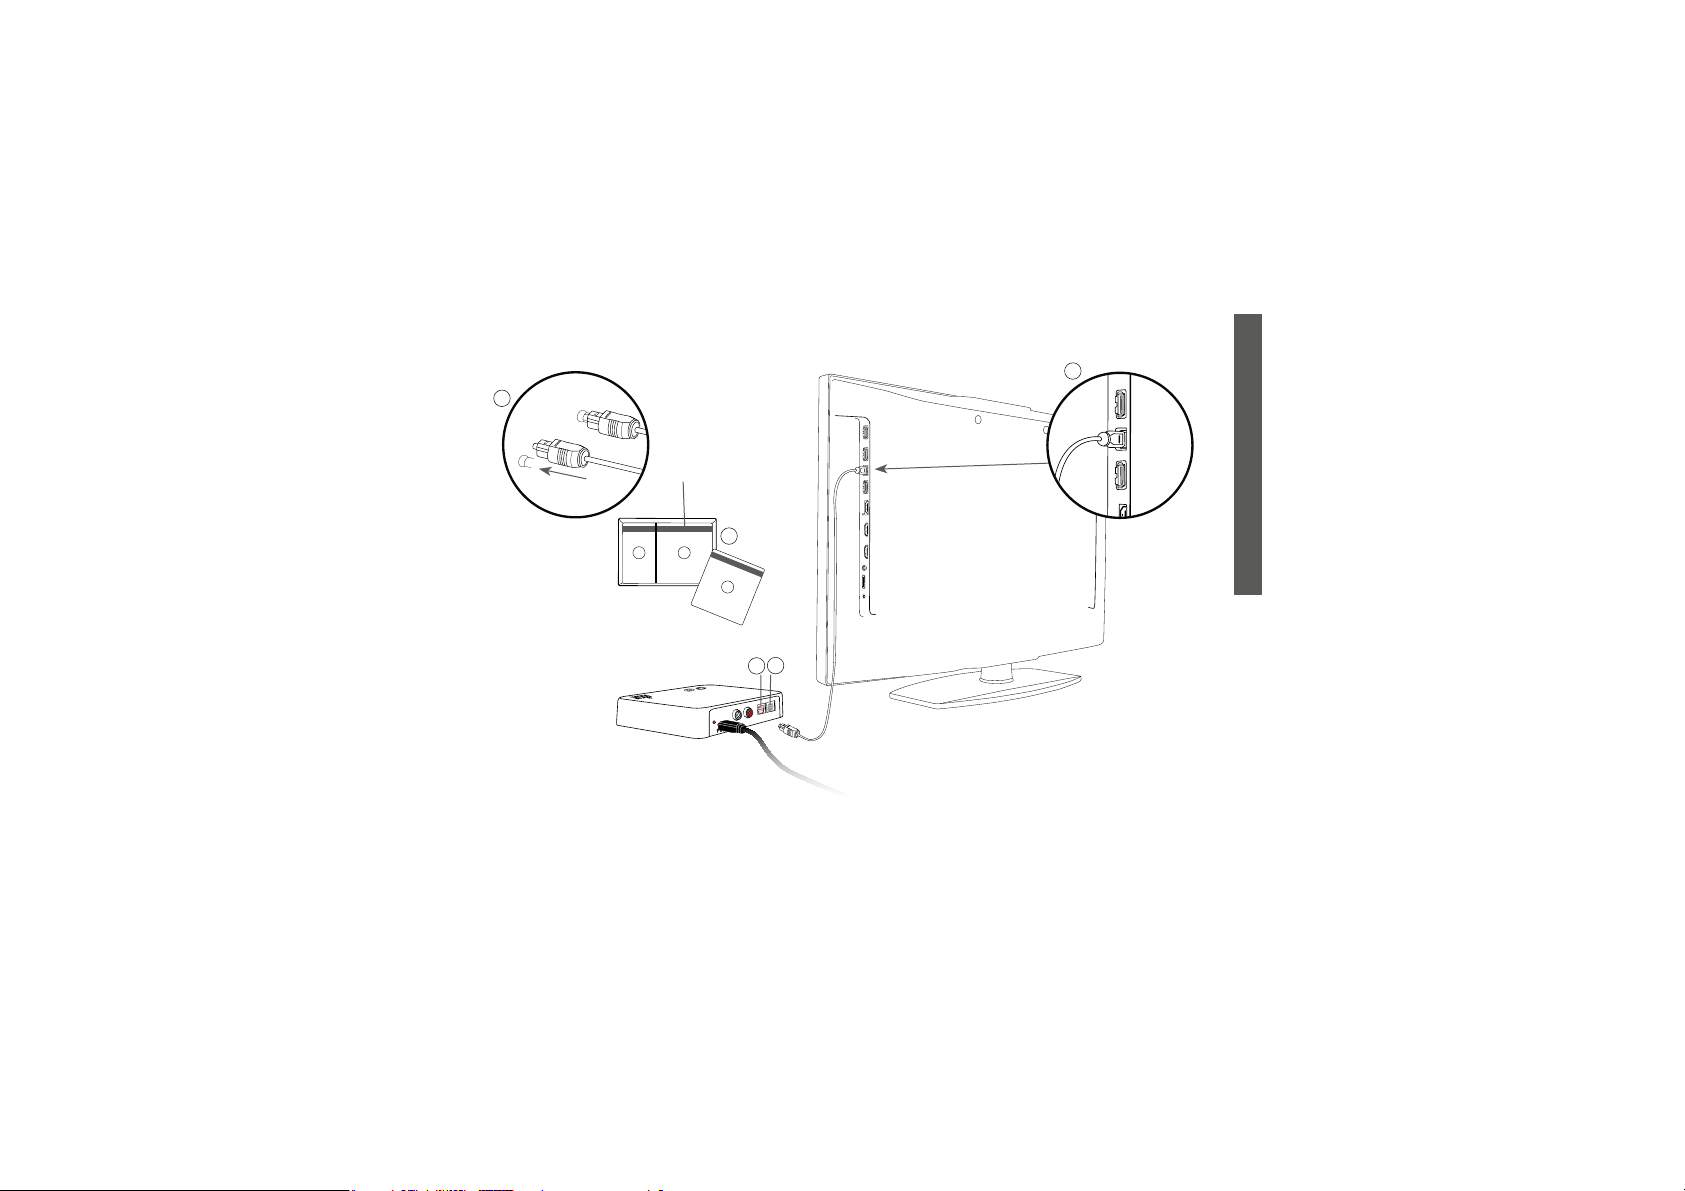
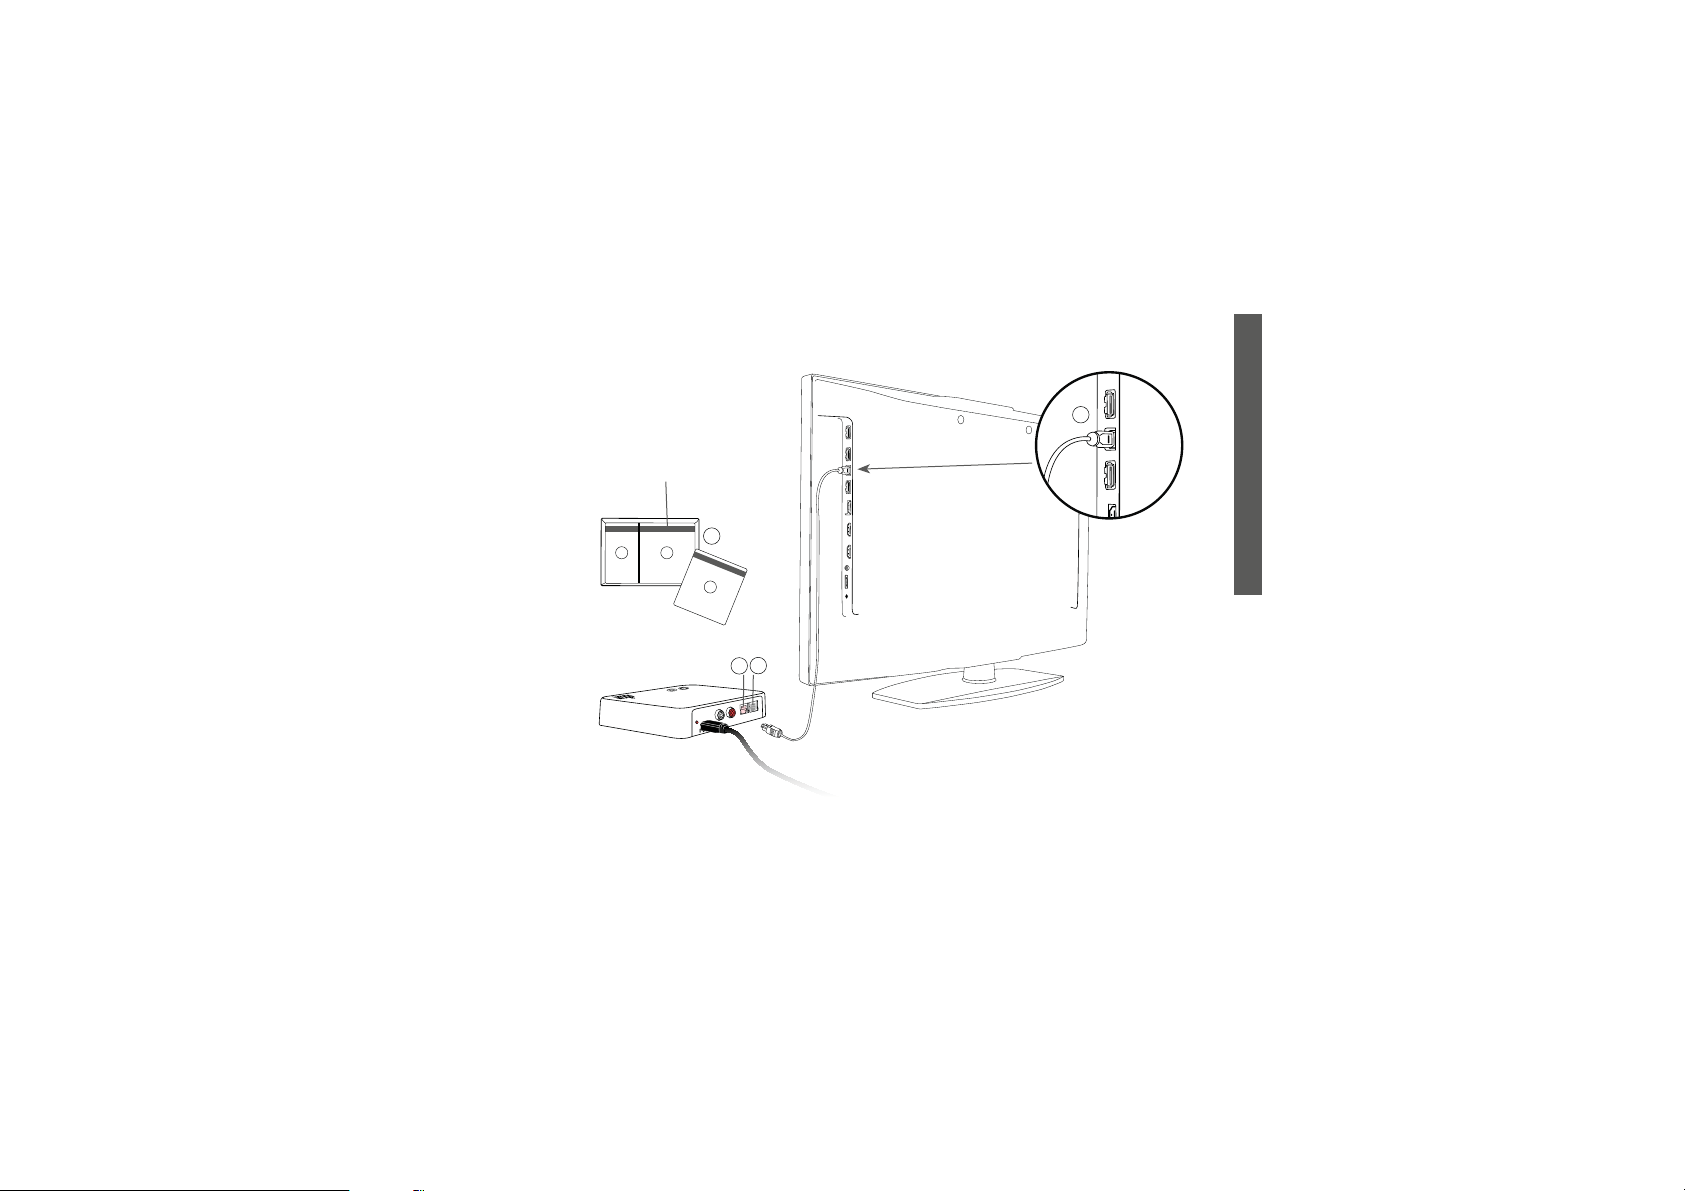
1. Use the TOSLINK cable from box no. 3 (A).
2. Remove the plastic cap from the TOSLINK cable. (B)
3. Connect the TOSLINK cable to the TOSLINK output on your TV/home theatre
system (C).
4.
Connect the TOSLINK cable to the pink TOSLINK input (D) on the TV adapter.
5.
The TOSLINK output (E) ma
external Dolby Decoders and surround sound systems etc.
6. Refer to page 28 for pairing of TV adapter with your Streamer.
Please note: It may be necessary to congure your TV, DVD player or home theatre
system so that the correct audio output is available on the TOSLINK output.
For more advanced or complex installations please refer to the support section on
www.oticonusa.com/connectline
y be used to connect other TOSLINK devices such as
20
Page 19
C
B
Box 3
13
A
R
L
2
Box 2
D
IN
C
INSTALLATION GUIDE
E
TUO
21
Page 20

Connecting using RCA
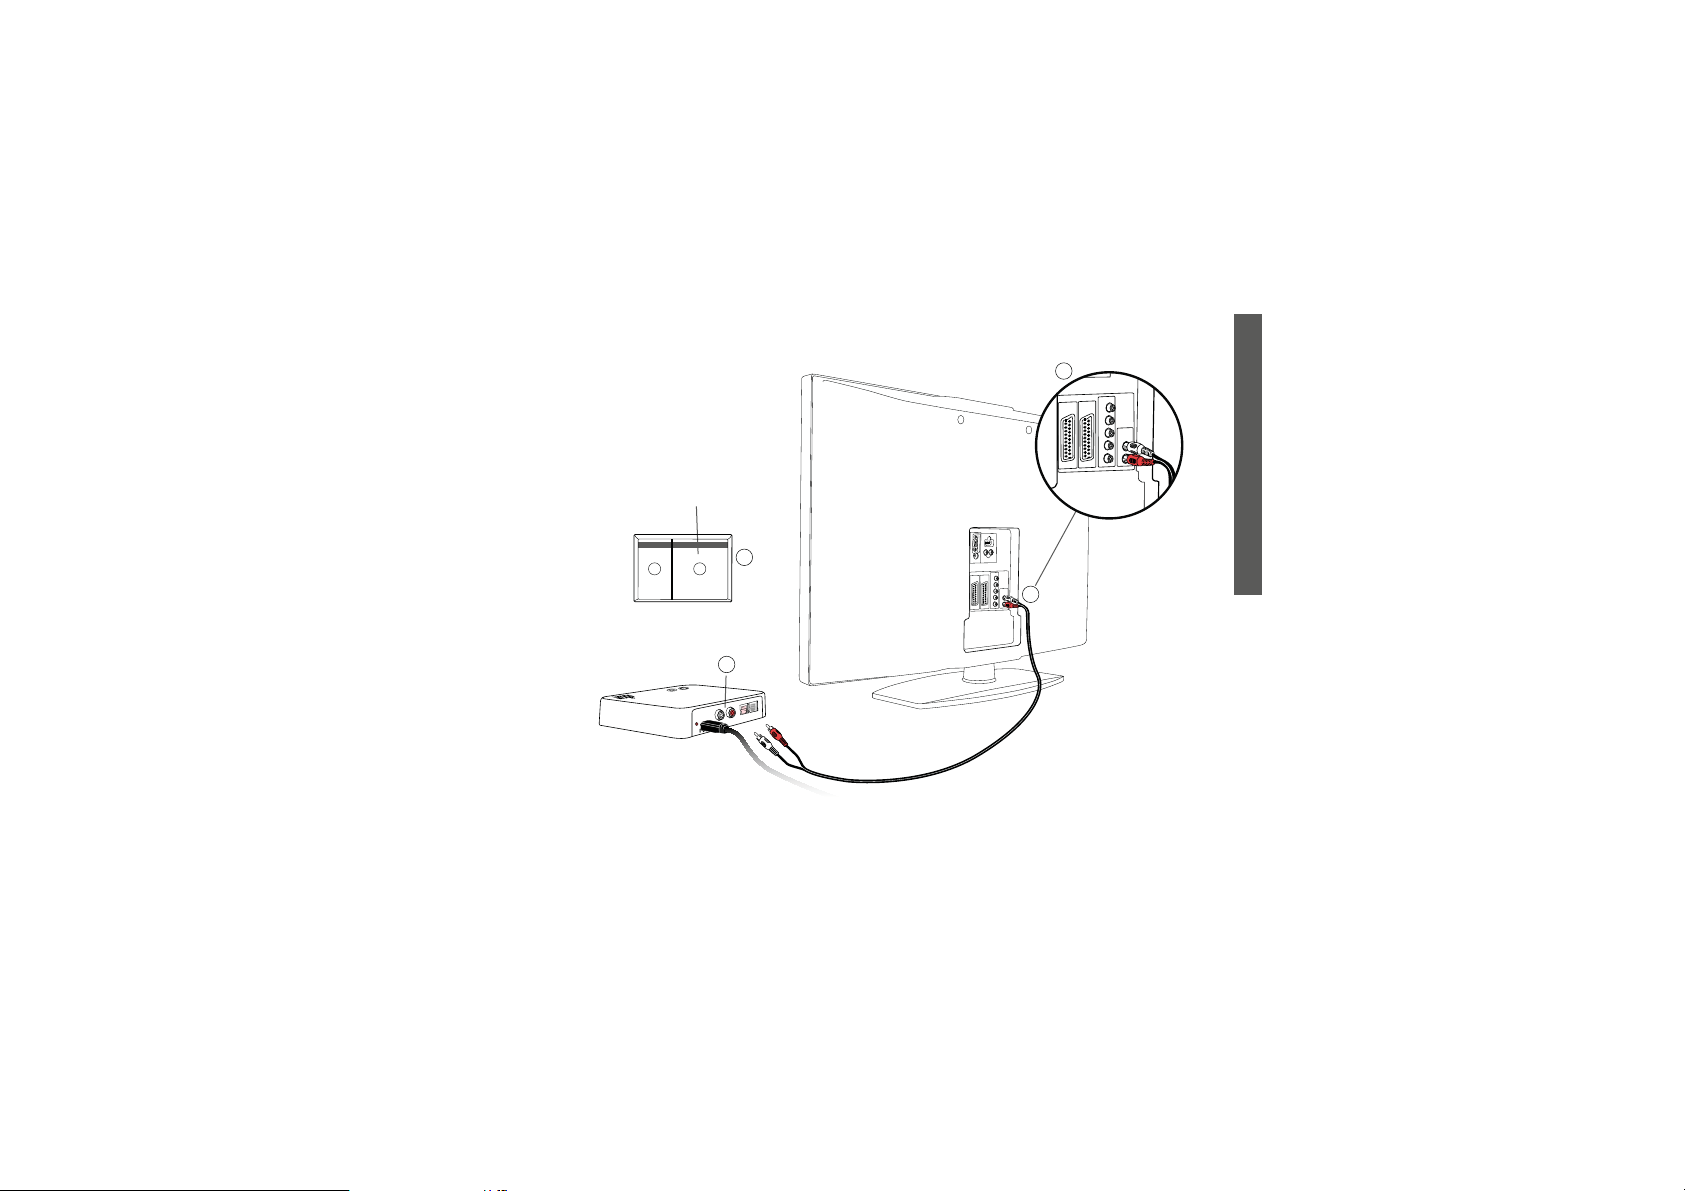
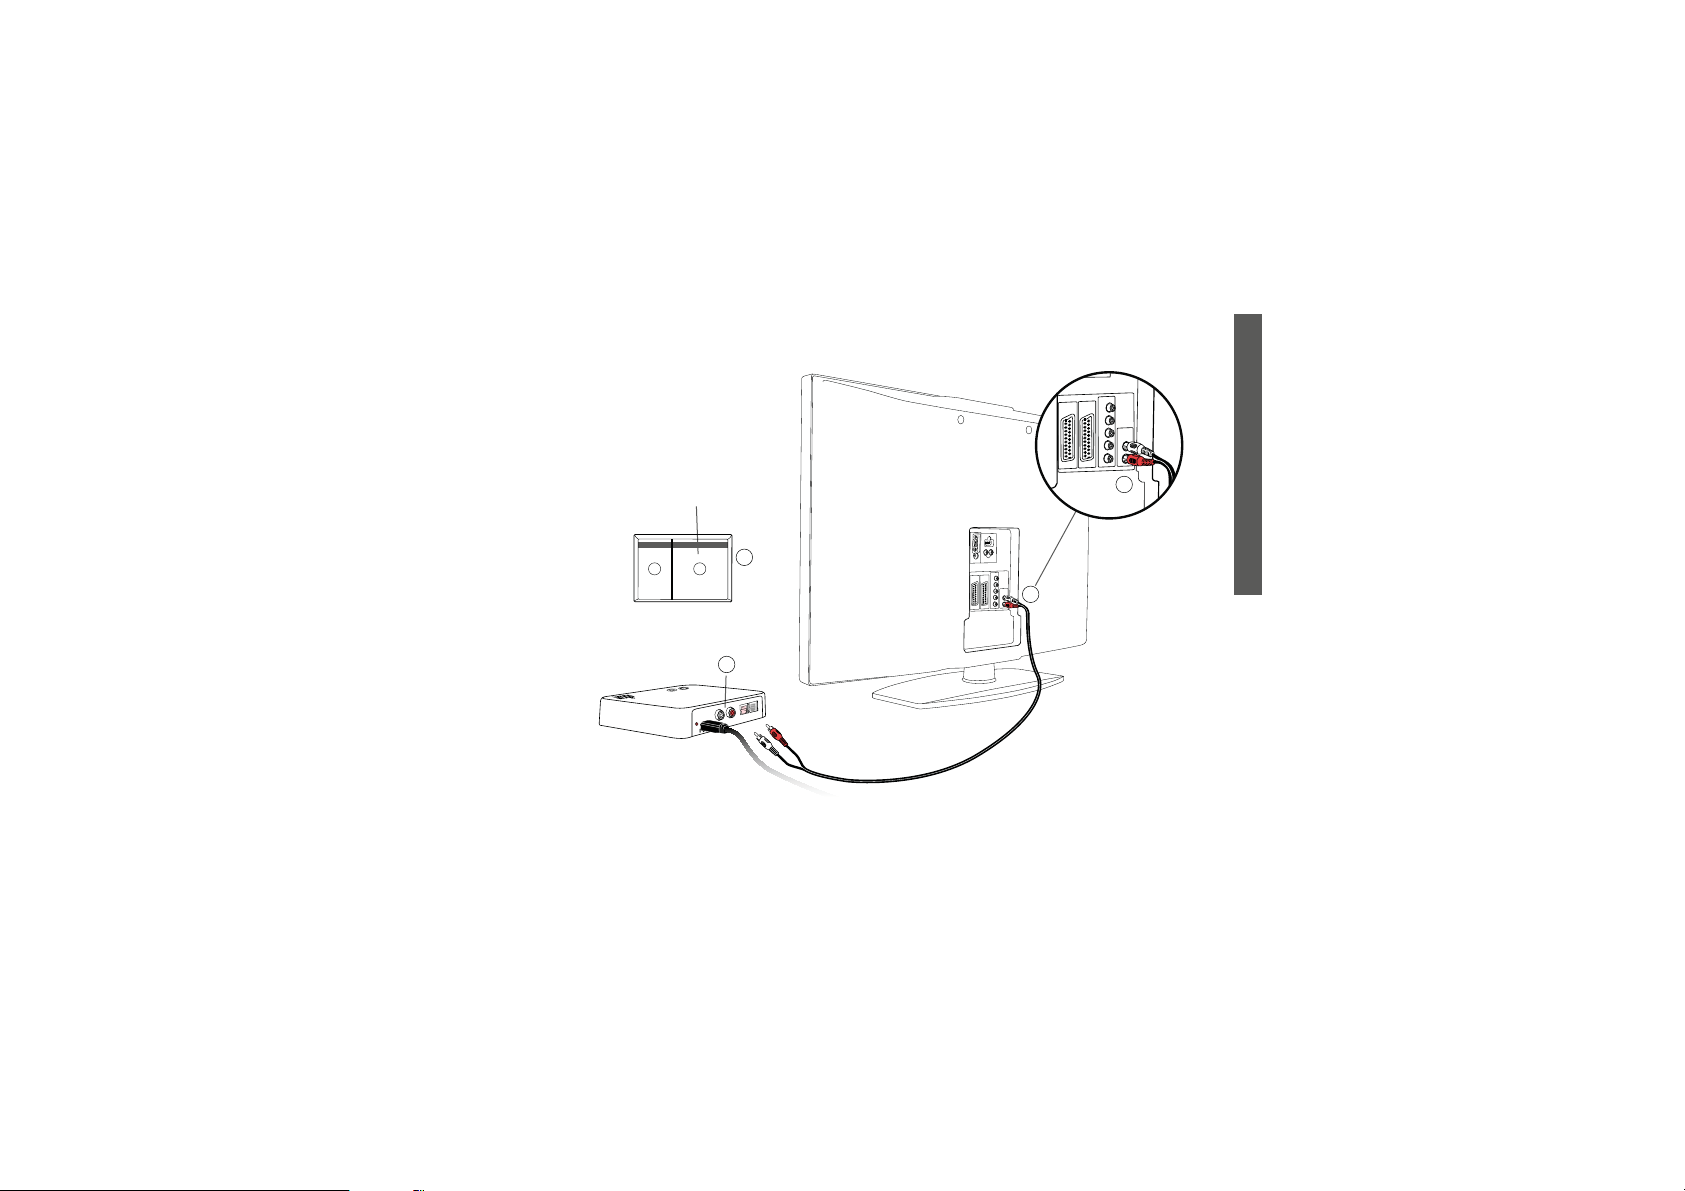
1. Use the RCA cable from box no. 2 (A).
2. Connect the RCA cable to the RCA output on your TV (B) or home theatre system.
(Typically marked “L – R AUDIO OUT” and found on the TV back or bottom panel.)
3. Connect the RCA cable to the RCA connectors (C) on the back of the TV adapter.
4.
Refer to page 28 for pairing of Streamer with the TV adapter.
Please note: It may be necessary to congure your TV so that the correct audio output is
available on the RCA output.
For more advanced or complex installations please refer to the support section on
www.oticonusa.com/connectline
22
Page 21
L
R
Audio
Out
Box 2
12
A
C
TUO
IN
R
L
23
B
INSTALLATION GUIDE
Audio
Out
L
B
R
Page 22

Connecting using mini jack adapter
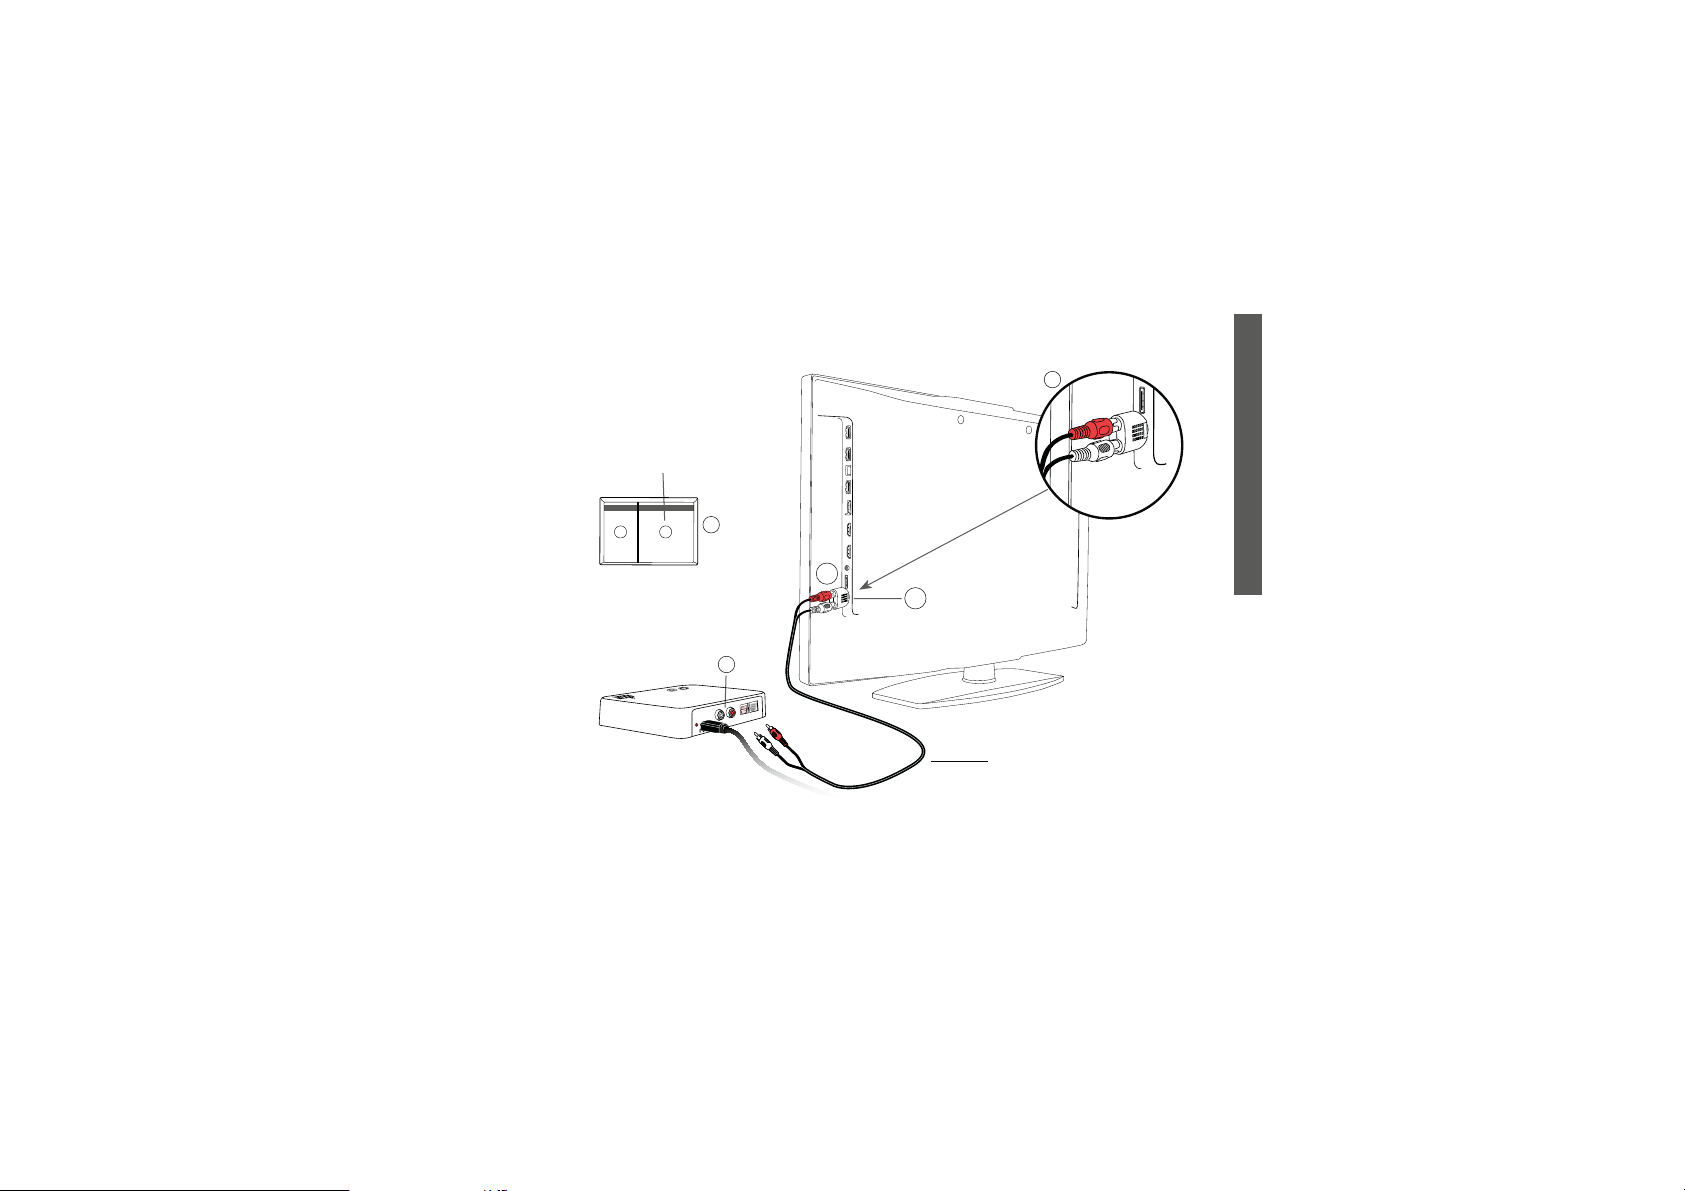
1. Use the mini jack adapter from box no. 2 (A).
2. Connect the RCA cable to the mini jack adapter (B1).
3. Connect the mini jack to the TV, this is typically the headphone output (B2).
4. Connect the RCA connectors to the TV adapter RCA input (C).
5.
Refer to page 28 for pairing of the TV adapter with Streamer.
Please note: The TV speakers may be muted when connecting to the headphone output,
and sound only heard through the Streamer/TV adapter.
For more advanced or complex installations please refer to the support section on
www.oticonusa.com/connectline
24
Page 23
Box 2
B
12
A
C
R
L
INSTALLATION GUIDE
B1
B2
TUO
IN
TV cord
25
Page 24

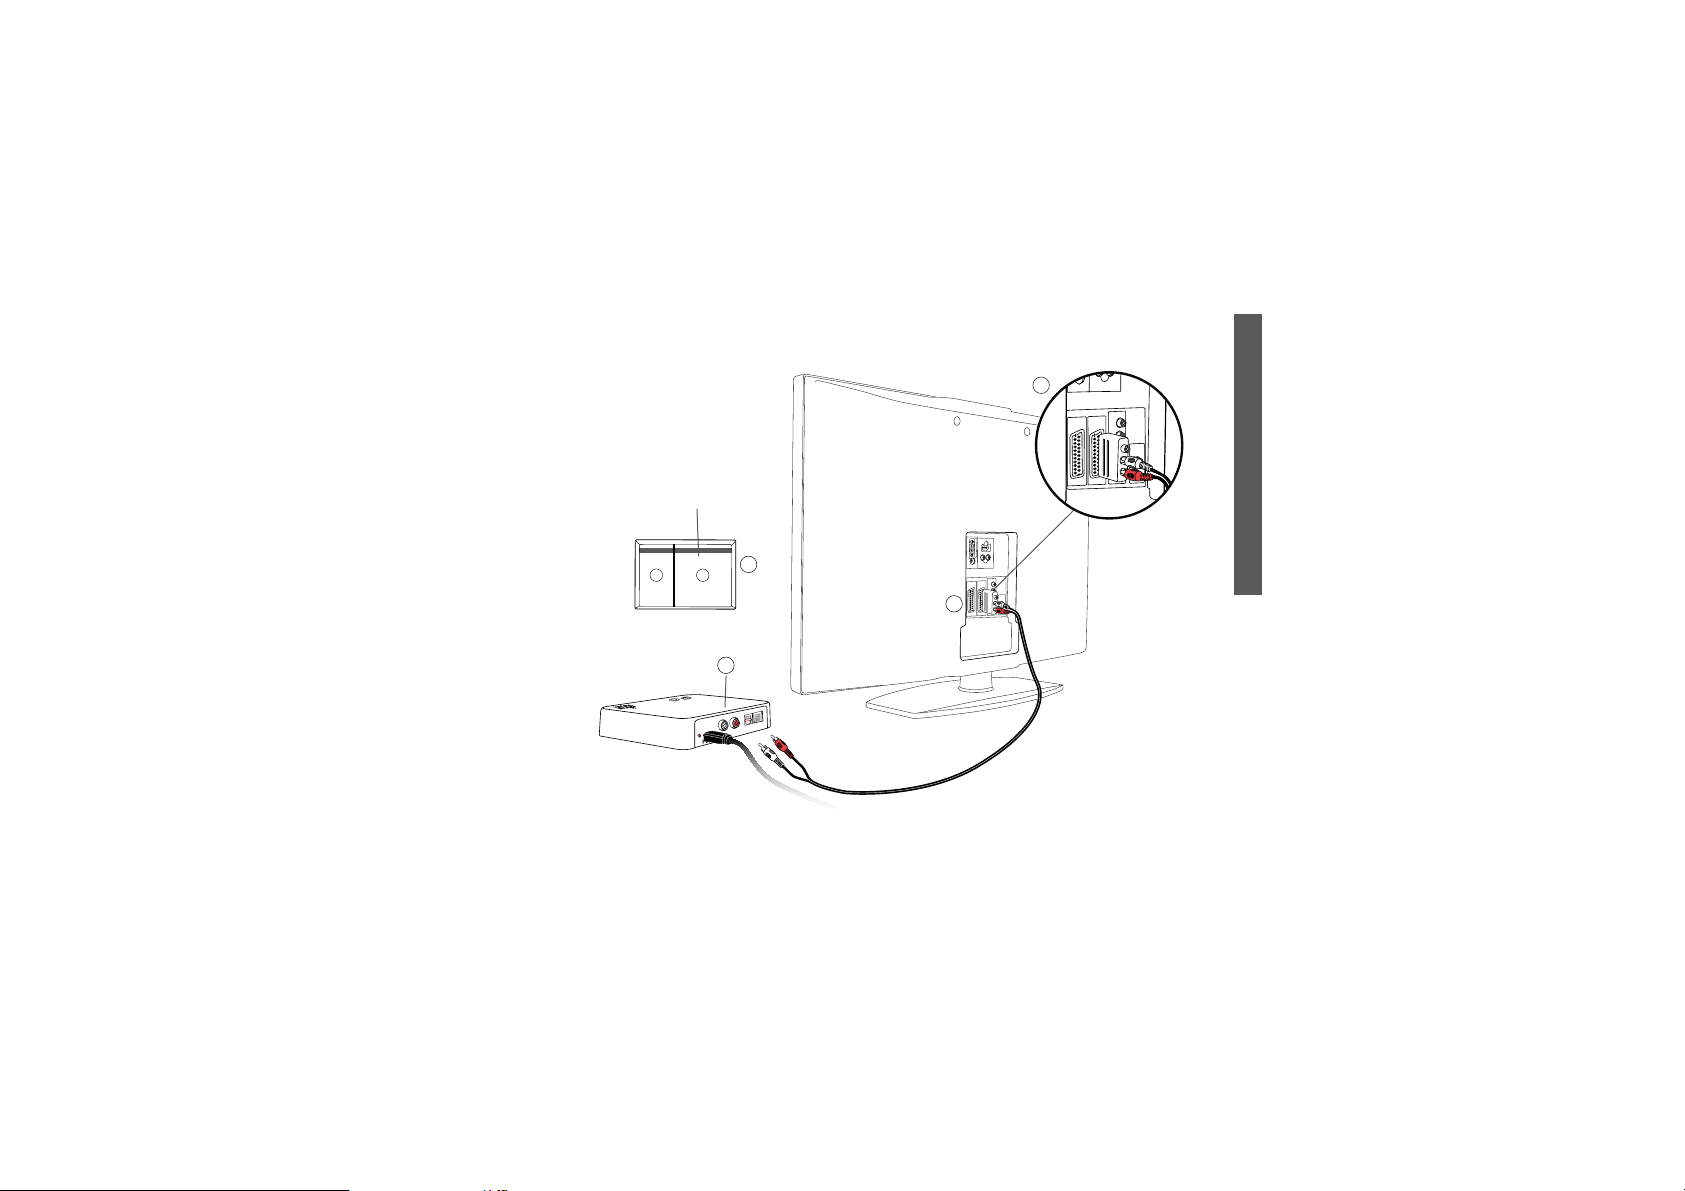
Connecting using SCART
1. Use the SCART adapter from box no. 2 (A).
2. Connect the RCA cable to the red and white terminals on the SCART adapter (B).
3. Connect the SCART adapter to the SCART output on your TV (C).
4. Connect the RCA connectors to the TV adapter RCA input (D).
5. Refer to page 28 for pairing of TV adapter with Streamer.
Please note: The audio output on the SCART connector can be dependent on the source
selected on the TV. For example some TV’s will only make TV sound available on the
SCART output (i.e. not e.g. sound from a connected DVD player).
For more advanced or complex installations please refer to the support section on
www.oticonusa.com/connectline
26
Page 25
B
Box 2
12
A
D
TUO
IN
R
L
INSTALLATION GUIDE
C
27
Page 26

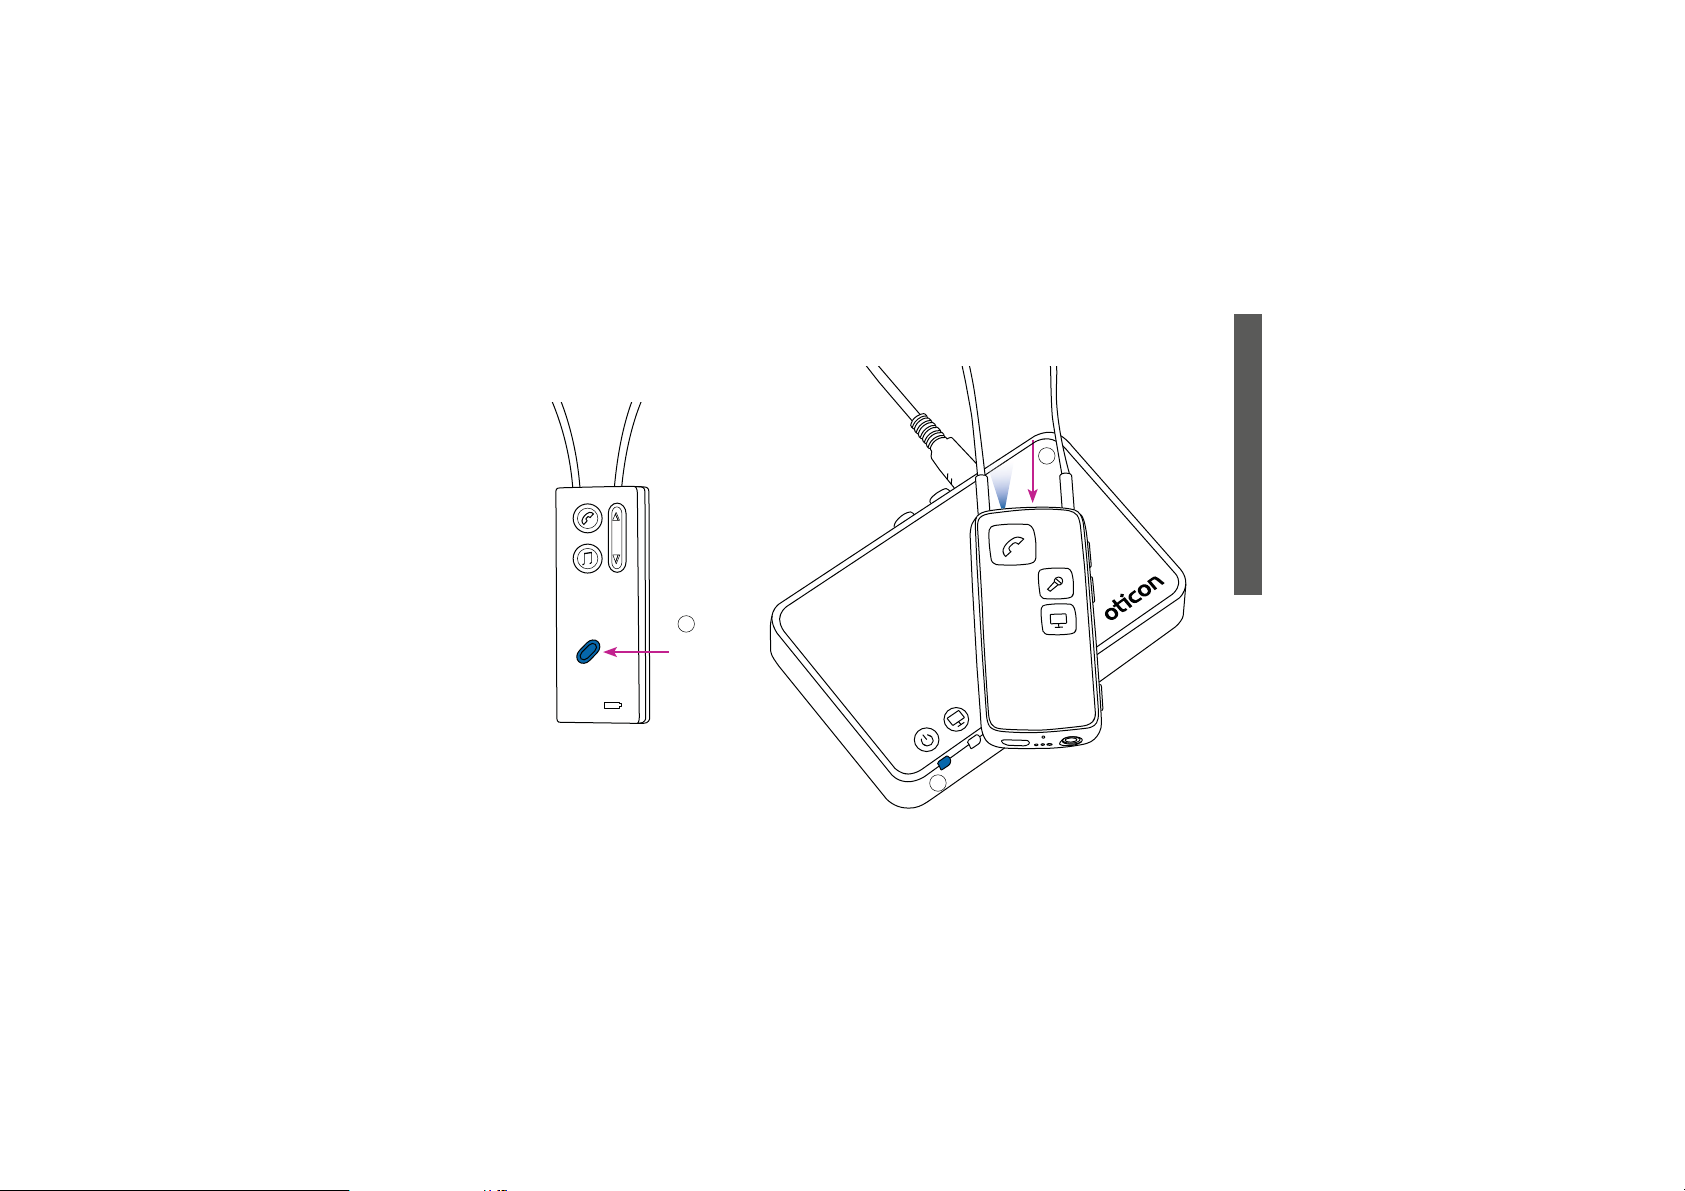
Pairing the Streamer to the TV adapter
Before using your Streamer for TV listening, it must be paired to the TV adapter.
For pairing:
1. Make sure the TV adapter is powered on, i.e. the power indicator is steady green.
2.
Press and hold the on/o
blue light starts blinking.
(If you have a rst generation Streamer 1.4, press the Bluetooth button on the front of
Streamer 1.4 for approximately seven seconds to enter pairing mode. See page 29 for
diagrams of the two versions of Streamer.)
3.
Place the S
20–60 seconds. The TV adapter will automatically begin pairing.
4. The pairing is completed when the power indicator on the TV adapter and the on/o
button on the Streamer briey turns steady blue, followed by orange status.
5. Pairing is done only once and will normally not have to be repeated.
treamer on top of, or close to, the TV adapter – the pairing takes around
button on the Streamer Pro (B) for 5-6 seconds
28
(A) until the
Page 27
Streamer 1.4
B
INSTALLATION GUIDE
B
Pairing
A
29
Page 28
Streamer Pro
Streamer Pro
top status
Steady Blinking
front
Pairing
TV
adapter
Description
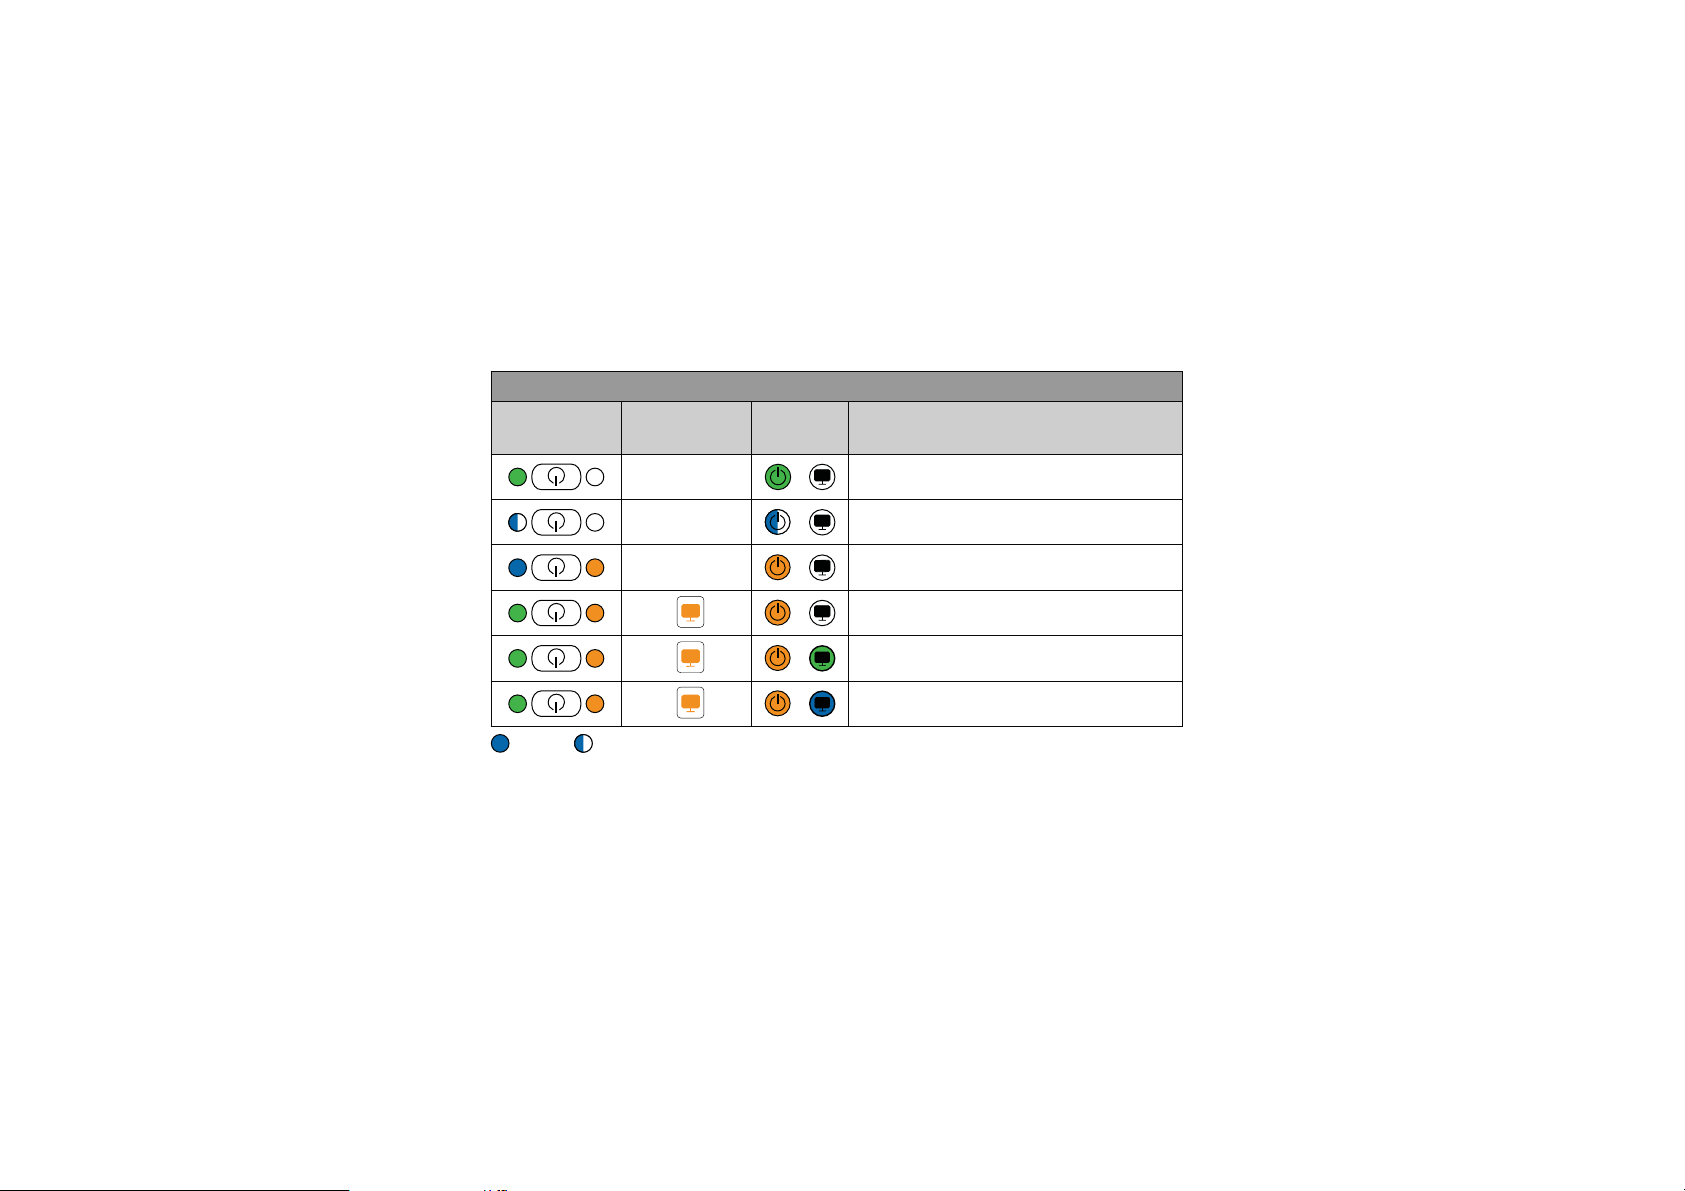
Streamer and TV adapter on
Streamer in pairing mode
Pairing complete
Streaming - no audio input detected
RCA inserted and streaming
TOSLINK inserted and streaming (digital)
30
Page 29

INSTALLATION GUIDE
Page 30

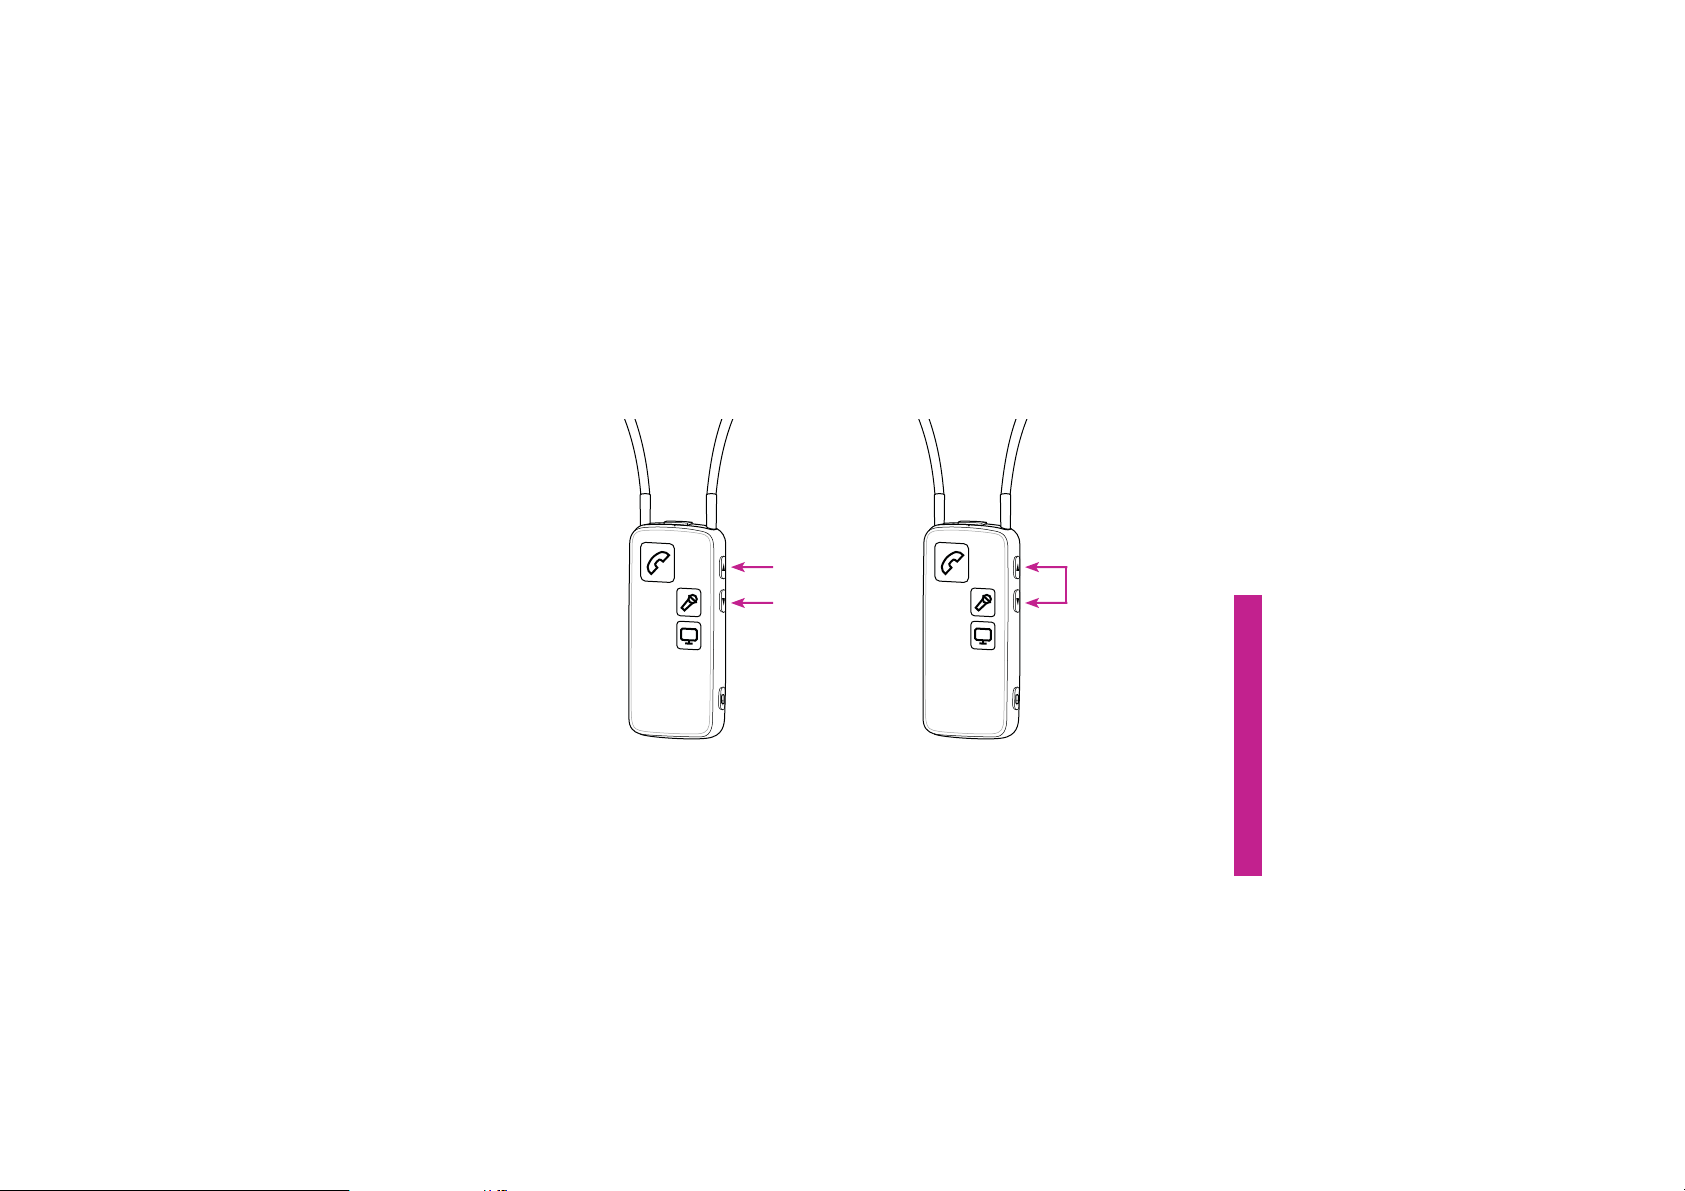
Volume control
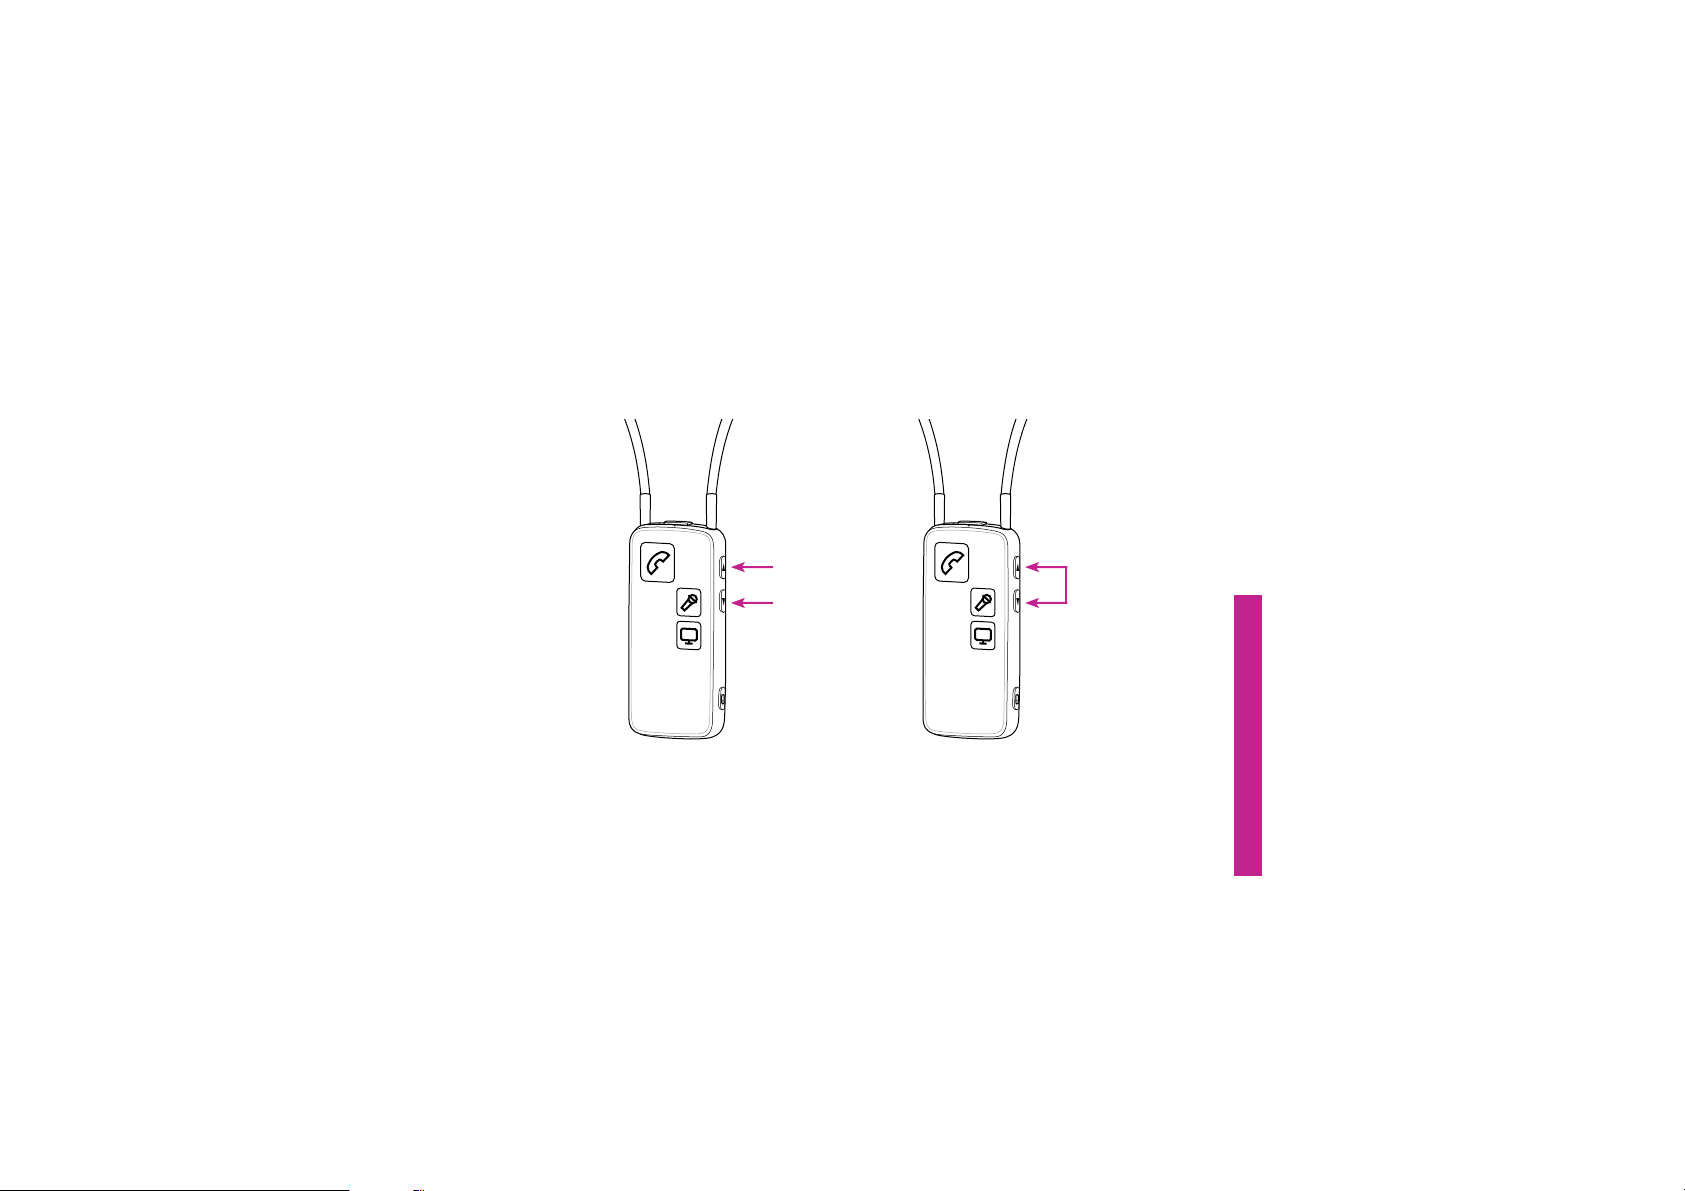
Use the volume button on the Streamer to adjust the TV volume level in the hearing
instruments. Adjust the volume by pressing up or down briey. Repeat the brief press for
further adjustments.
MUTE
While watching TV it is possible to switch o the microphones in your hearing
instruments, so that only the sound from the TV is heard.
Press both the up and down volume buttons until the surrounding sound is muted. You
will hear a conrmation beep indicating that the microphones in the hearing instruments
are now muted.
Notice: The TV volume in the hearing instruments is normally not aected by the volume
adjustments from the TV remote control.
32
Page 31
Volume up
Volume down
Mute
33
Streamer ProStreamer Pro
USER GUIDE
Page 32
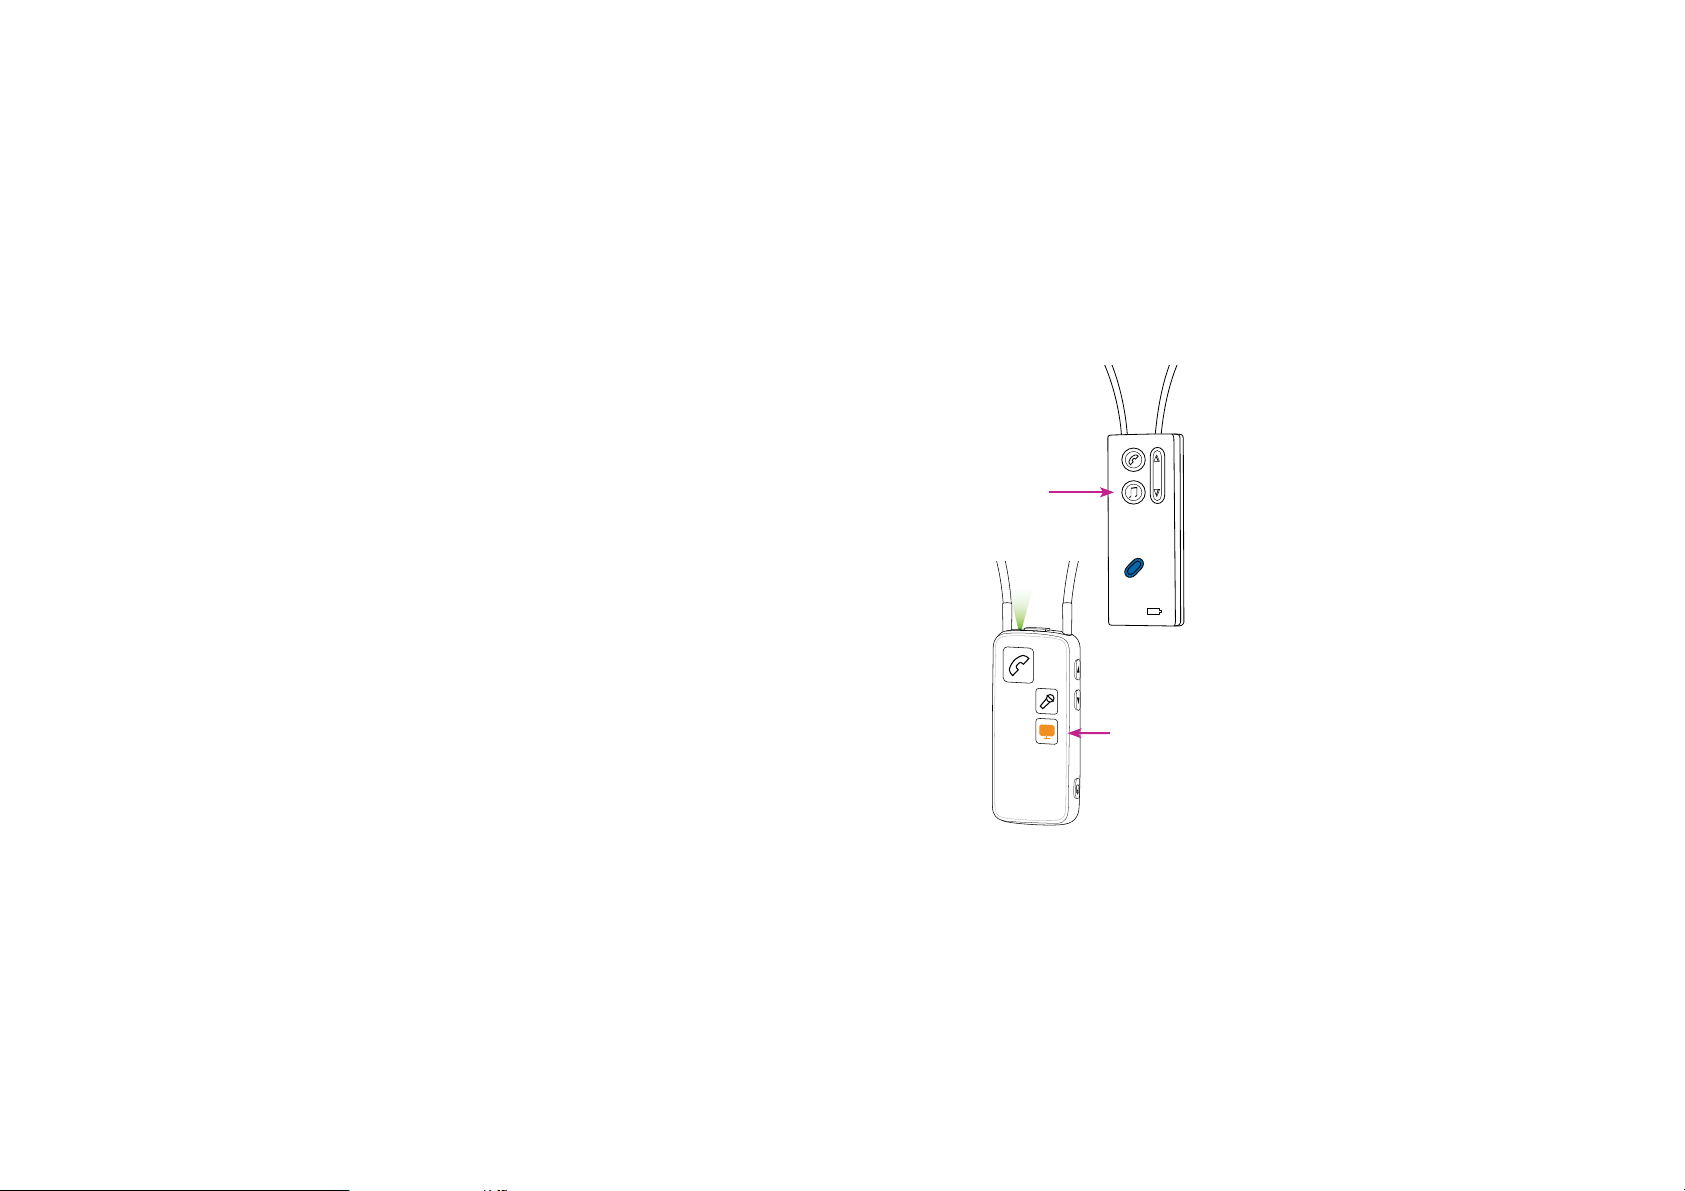
Start TV listening
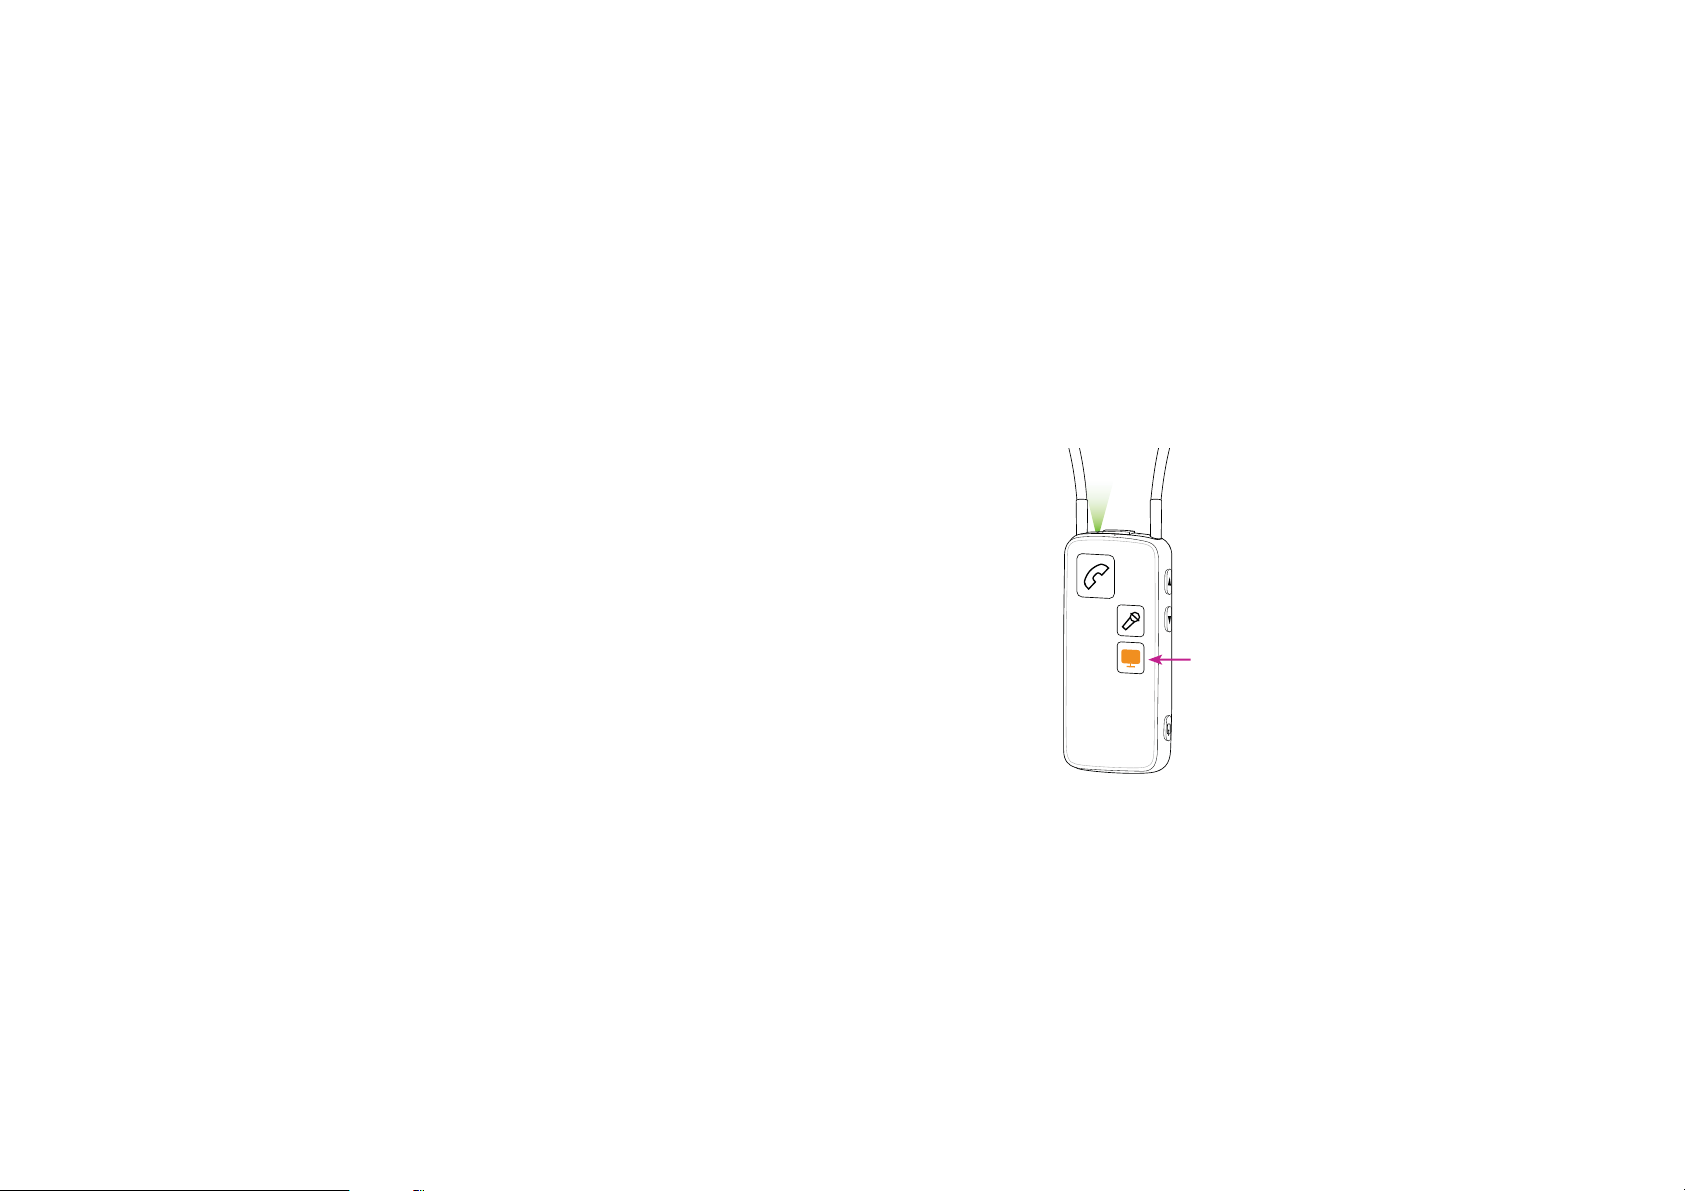
Make sure to wear the Streamer around your neck using the
neck loop, and make sure the Streamer is powered on.
Turn on the TV sound
Brie y press the TV button on the front of the Streamer. The
Streamer connects to the TV adapter. After a few seconds
a steady orange light is shown on the Streamer and the TV
adapter. You will hear a con rmation beep in your hearing
instruments followed by the sound from the connected TV.
Turn o the TV sound
Brie y press the TV button on the front of the Streamer. The
orange lights turn o on both the Streamer and the TV adapter.
You will hear a con rmation beep in your hearing instruments.
34
Streamer 1.4
Page 33
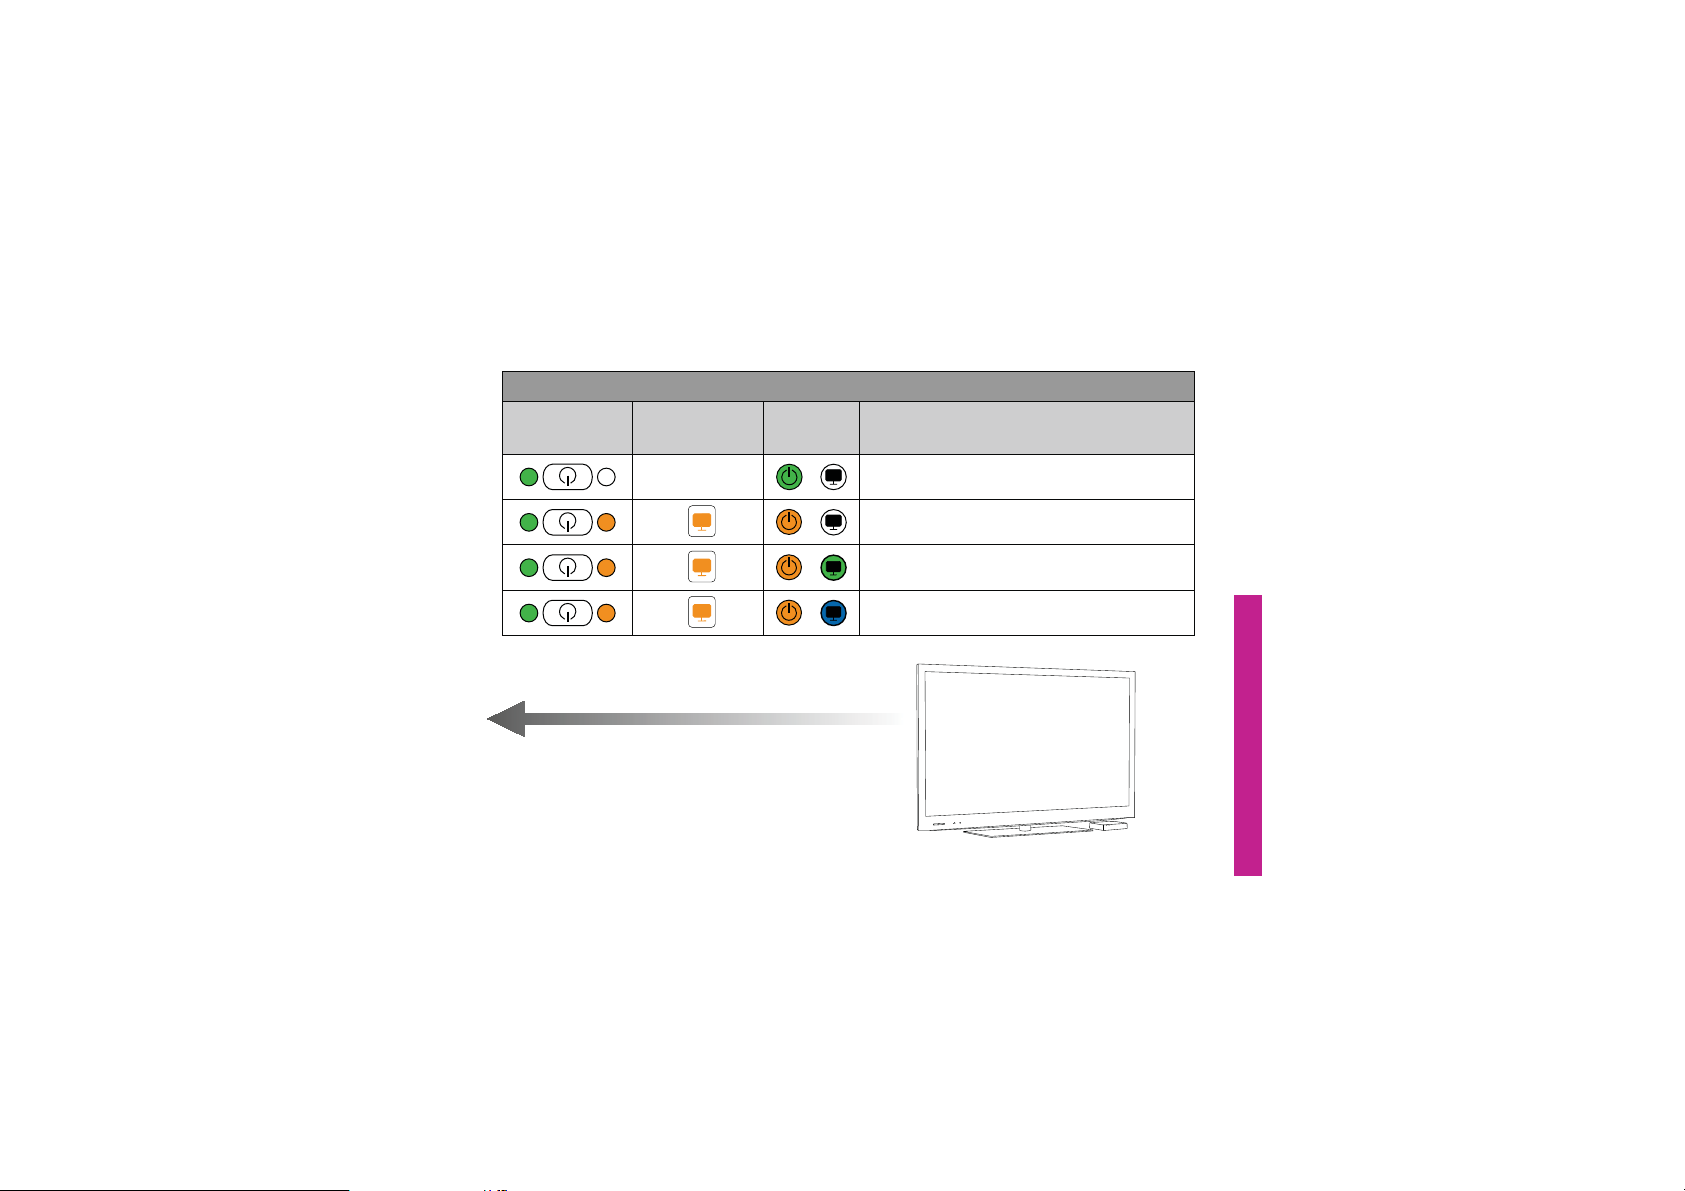
Streamer Pro
top status
Streamer Pro
front
Pairing
TV
adapter
Description
Streamer and TV adapter on
Streaming - no audio input detected
RCA inserted and streaming
TOSLINK inserted and streaming (digital)
USER GUIDE
35
Page 34

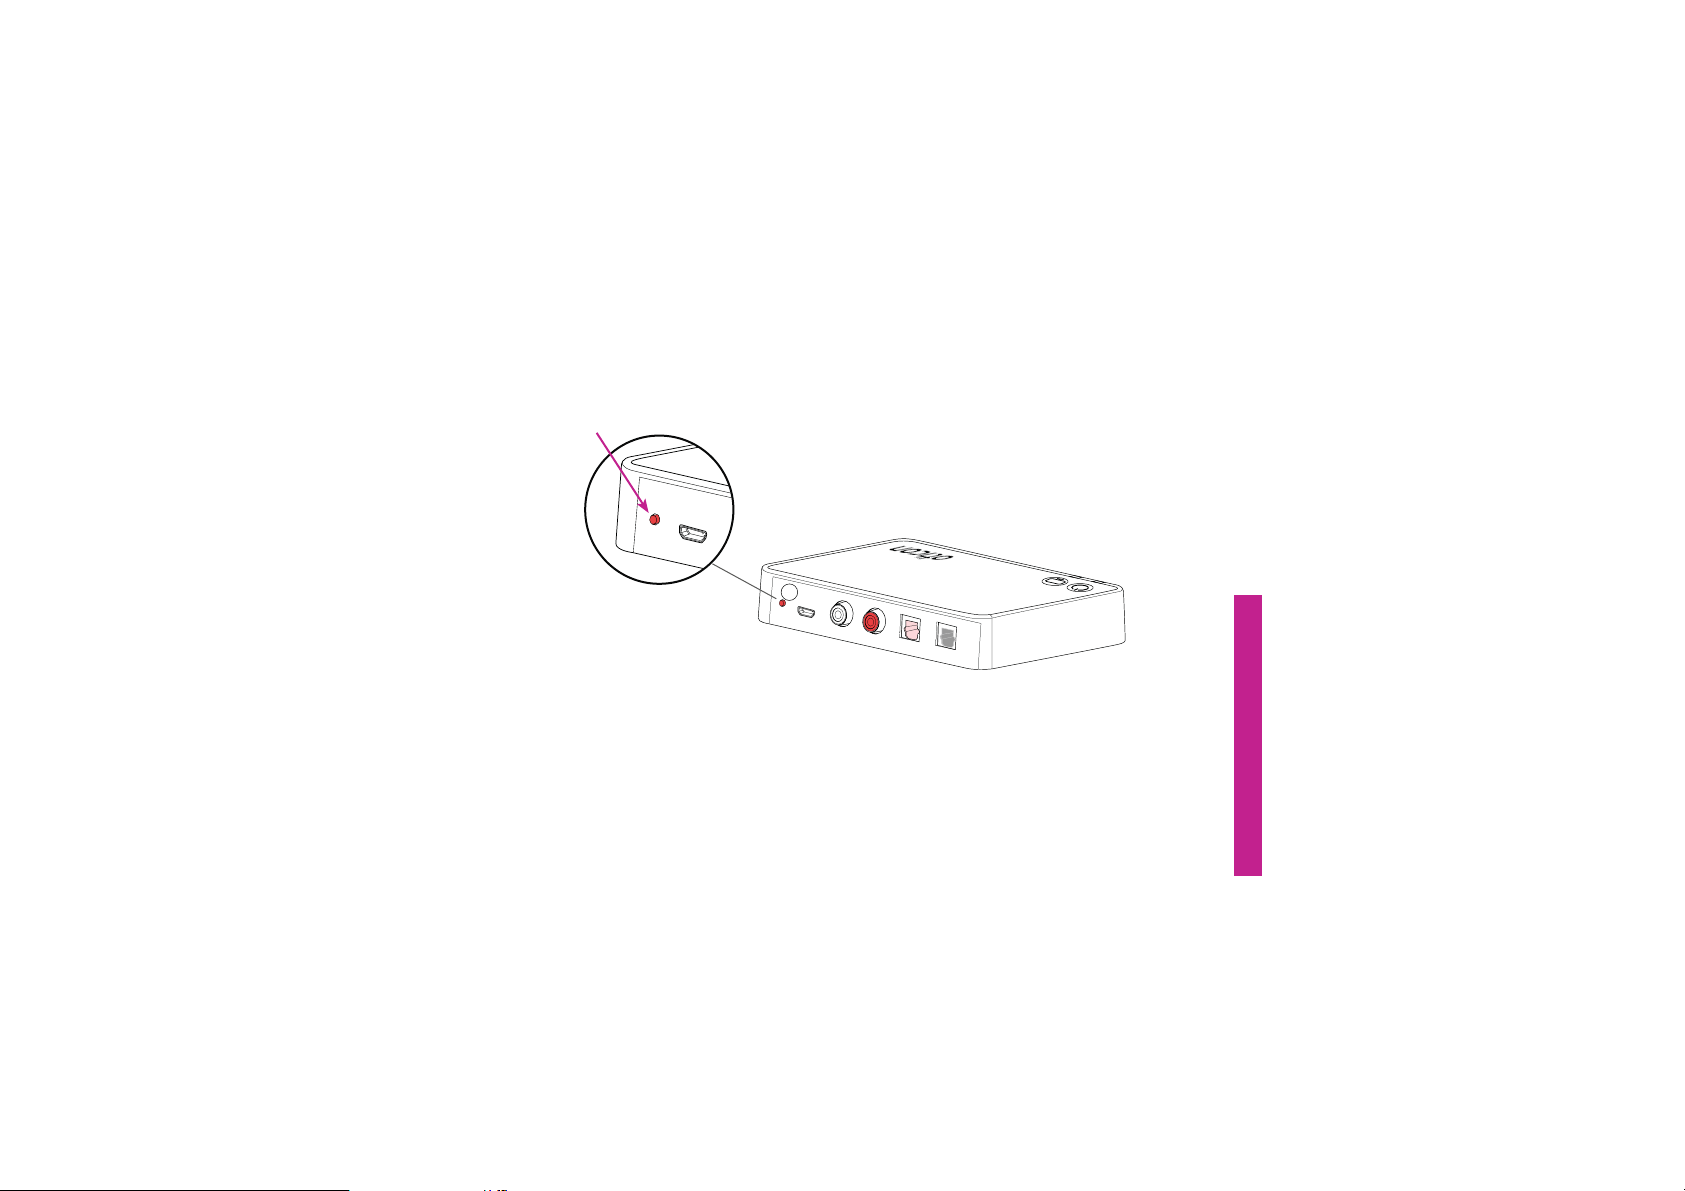
SelectMe, using more than one TV adapter
With Streamer Pro 1.1 and later you can use multiple TV adapters. E.g. one in the living room
and one in the bedroom.
To switch between TV adapters:
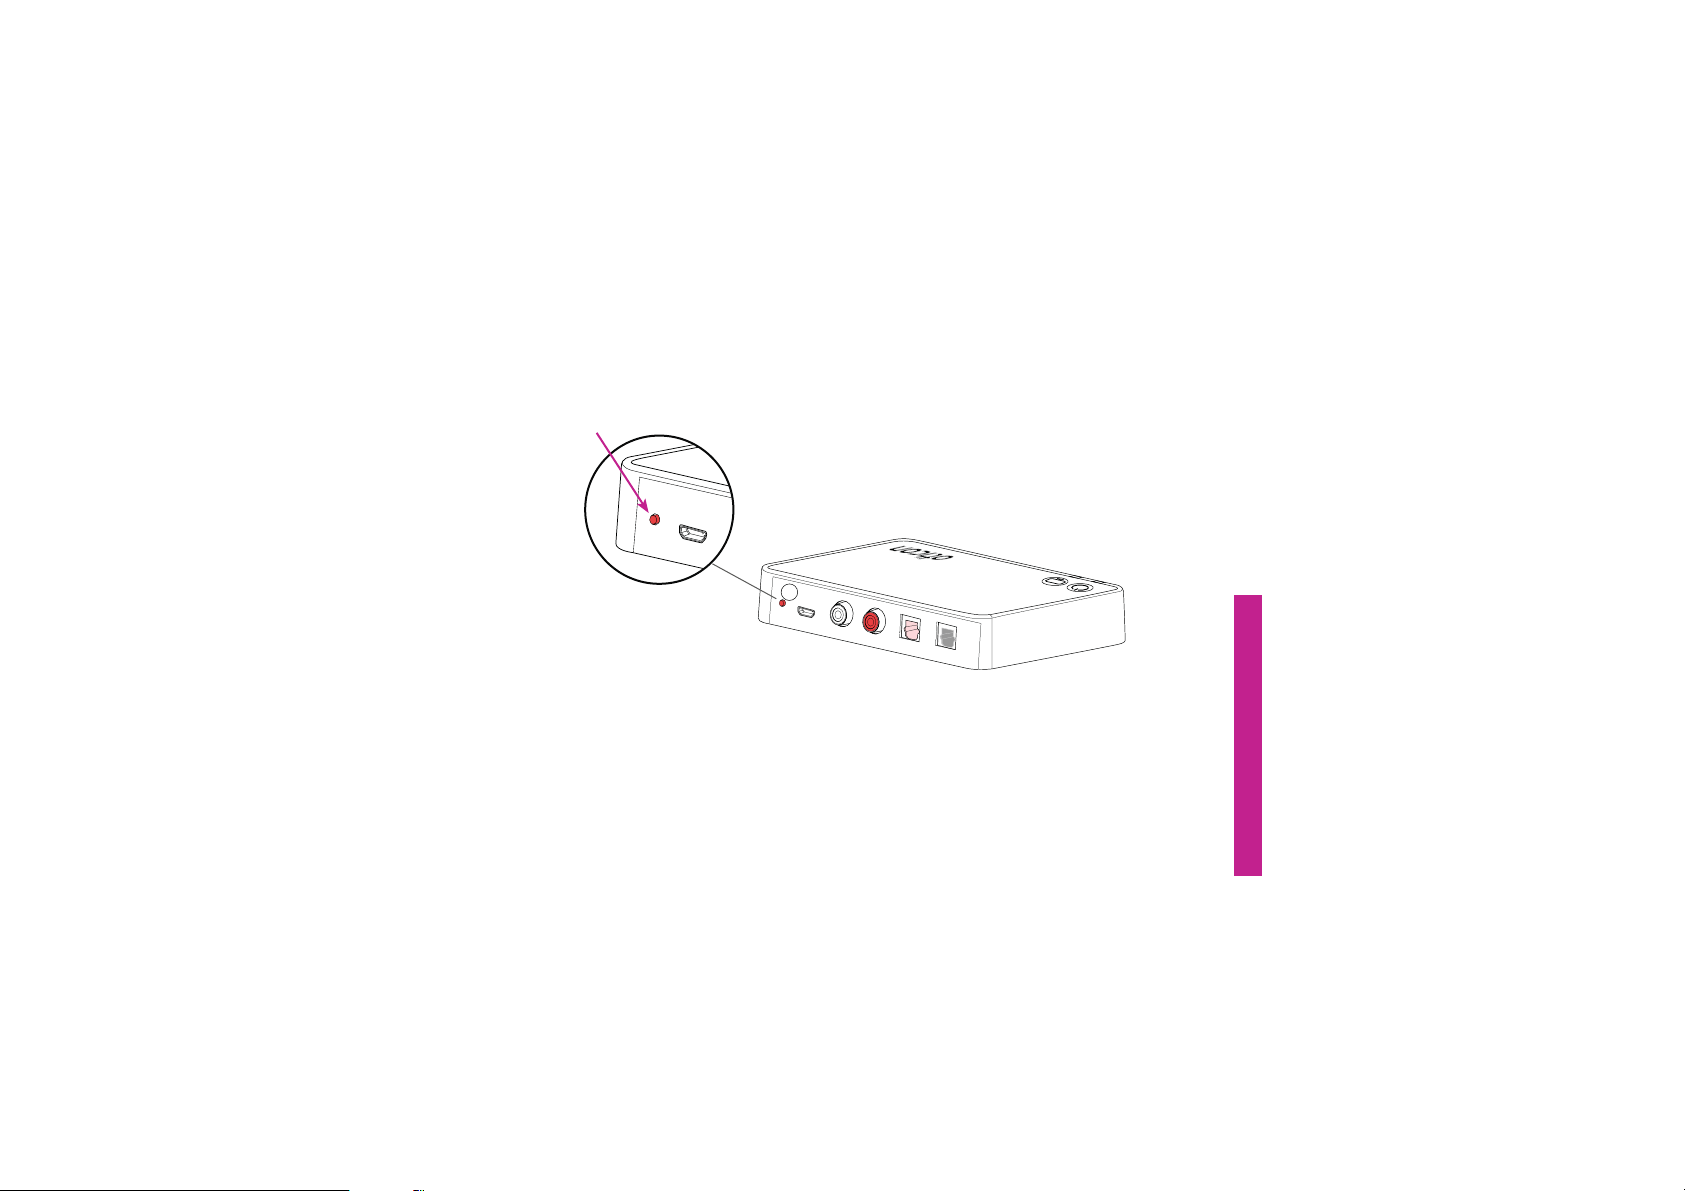
1.
Make sure you are not connected to any TV adapter i.e. the Streamer should be turned
on, but not active.
2.
Briey press the SelectMe button on the TV adapter you wish to hear the sound from (A).
3. The TV adapter is automatically connected. You will hear a conrmation beep in your
hearing instruments followed by the sound from the connected TV.
36
Page 35
POWER
A
POWER
L
R
IN
OUT
USER GUIDE
37
Page 36

Technical information
The TV Adaptor contains a 2.4 GHz Transmitter. The emission power from the TV
adapter is max. "WFSBHF dBμV/m @ meters and is well below international emission
limits for Human Exposure.
This instrument contains a module with:
FCC ID:
IC: #57#09
The device complies with Part 15 of the FCC rules and RSS-210 of Industry Canada.
Oper
1. This device may not cause harmful interference.
2. This device must accept any interference received, including interference that may
cause undesired operation.
657#09
ation is subject to the following two conditions:
38
Page 37

This transmitter must not be co-located or operating in conjunction with any other
antenna or transmitter.
Changes or modications not expressly approved by the party responsible for compliance
could void the user’s authority to operate the equipment. To comply with FCC RF exposure
requirements, the device and the antenna for this device must be installed to ensure a
minimum separation distance of 20 cm or more from a person’s body. Other operating
congurations should be avoided.
NOTE: This equipment has been tested and found to comply with the limits for a Class B
digital device, pursuant to Part 15 of the FCC rules. These limits are designed to provide
reasonable protection against harmful interference in a residential installation. This
equipment can radiate radio frequency energy and, if not installed and used in accordance
with the instructions, may cause harmful interference to radio communications. However,
there is no guarantee that interference will not occur in a particular installation.
39
USER GUIDE
Page 38

If this equipment does cause harmful interference to radio or television reception, which
can be determined by turning the equipment o and on, the user is encouraged to try to
correct the interference by one or more of the following measures:
t Relocate the receiving antenna.
t Increase the distance between the equipment and receiver.
t Connect the equipment into an outlet on a circuit dierent from that to which the
receiver is connected.
t Consult the manufacturer or an experienced radio/TV technician for help.
40
Page 39
Hereby, Oticon A/S declares that this #4'TV adapter
essential requirements and other relevant provisions of Directive 1999/5/EC.
ation of conformity is available at:
Declar
Oticon A/S
Kongebakken 9
DK-2765 Smørum
Denmark
www.oticon.com
is in compliance with the
Waste from electronic
equipment must be
handled according to
local regulations.
?
N4292
41
Page 40
People First
0000123570000001
People First is our promise
to empower people
to communicate freely,
interact naturally and
participate actively
Page 41
MODE D'EMPLOI TV 2.0
Page 42

Merci
Merci d'avoir choisi notre solution pour améliorer votre audition.
Nous avons mis le plus grand soin à vous fournir un produit nouveau, de la plus haute
qualité, et facile à utiliser.
Vous pouvez retrouver la documentation complète en ligne sur
Vous y trouverez également des présentations interactives, des vidéos d'instructions
et une section d'assistance avec des questions fréquemment posées.
Nous vous invitons à lire attentivement ce mode d'emploi avant de commencer à
utiliser votre adaptateur T V 2.0 an de bénécier pleinement de ses avantages. Pour
toute question concernant l'utilisation ou l'entretien de l'adaptateur TV 2.0, veuillez
contacter votre audioprothésiste.
Dolby Digital et le symbole double-D sont des marques déposées de Dolby Laboratories.
www.oticon.fr/tv.
Page 43

Mode d'emploi
L'adaptateur TV 2.0 est destiné à être utilisé avec le Oticon Streamer Pro et les aides
auditives sans l Oticon.
Il permet à l'utilisateur d' aides auditives d'écouter la télévision en transmet tant
directement et sans l le son du téléviseur de l'adaptateur TV 2.0 aux aides auditives
par le biais du Streamer pro.
GUIDE D'INSTALLATION
Page 44
REMARQUE IMPORTANTE :
Veuillez-vous familiariser avec l’ensemble de ce mode d'emploi avant d’utiliser votre
adaptateur TV 2.0. Il contient des instructions et des informations importantes pour
l’utilisation et la manipulation de votre adaptateur TV 2.0.
Page 45

Table des matières
Package content 7
TV adapter overview 8
Warnings 10
Installation 13
Placing the TV adapter 14
Connecting the TV adapter to a power outlet 16
Connecting the TV adapter to the TV 18
Connecting using TOSLINK 20
Connecting using RCA 22
Connecting using mini jack adapter 24
Connecting using SCART 26
Pairing the Streamer to the TV adapter 28
Turn on the TV sound 34
Turn off the TV sound 34
SelectMe, using more than one TV adapter 36
Technical information 38
INSTALLATIONGUIDE D'UTILISATION
Page 46
Contenu de la boîte
Que contient la boîte ?
GUIDE D'INSTALLATION
Adaptateur TV 2.0 Alimentation électrique
INSTRUCTIONS FOR USE TV 2.0
Ce guid e (guide d' installa tion et mod e d'emploi )
TOSLINK
Adaptateur SCART Adaptateur mini-jack
Câble RCA
7
Page 47
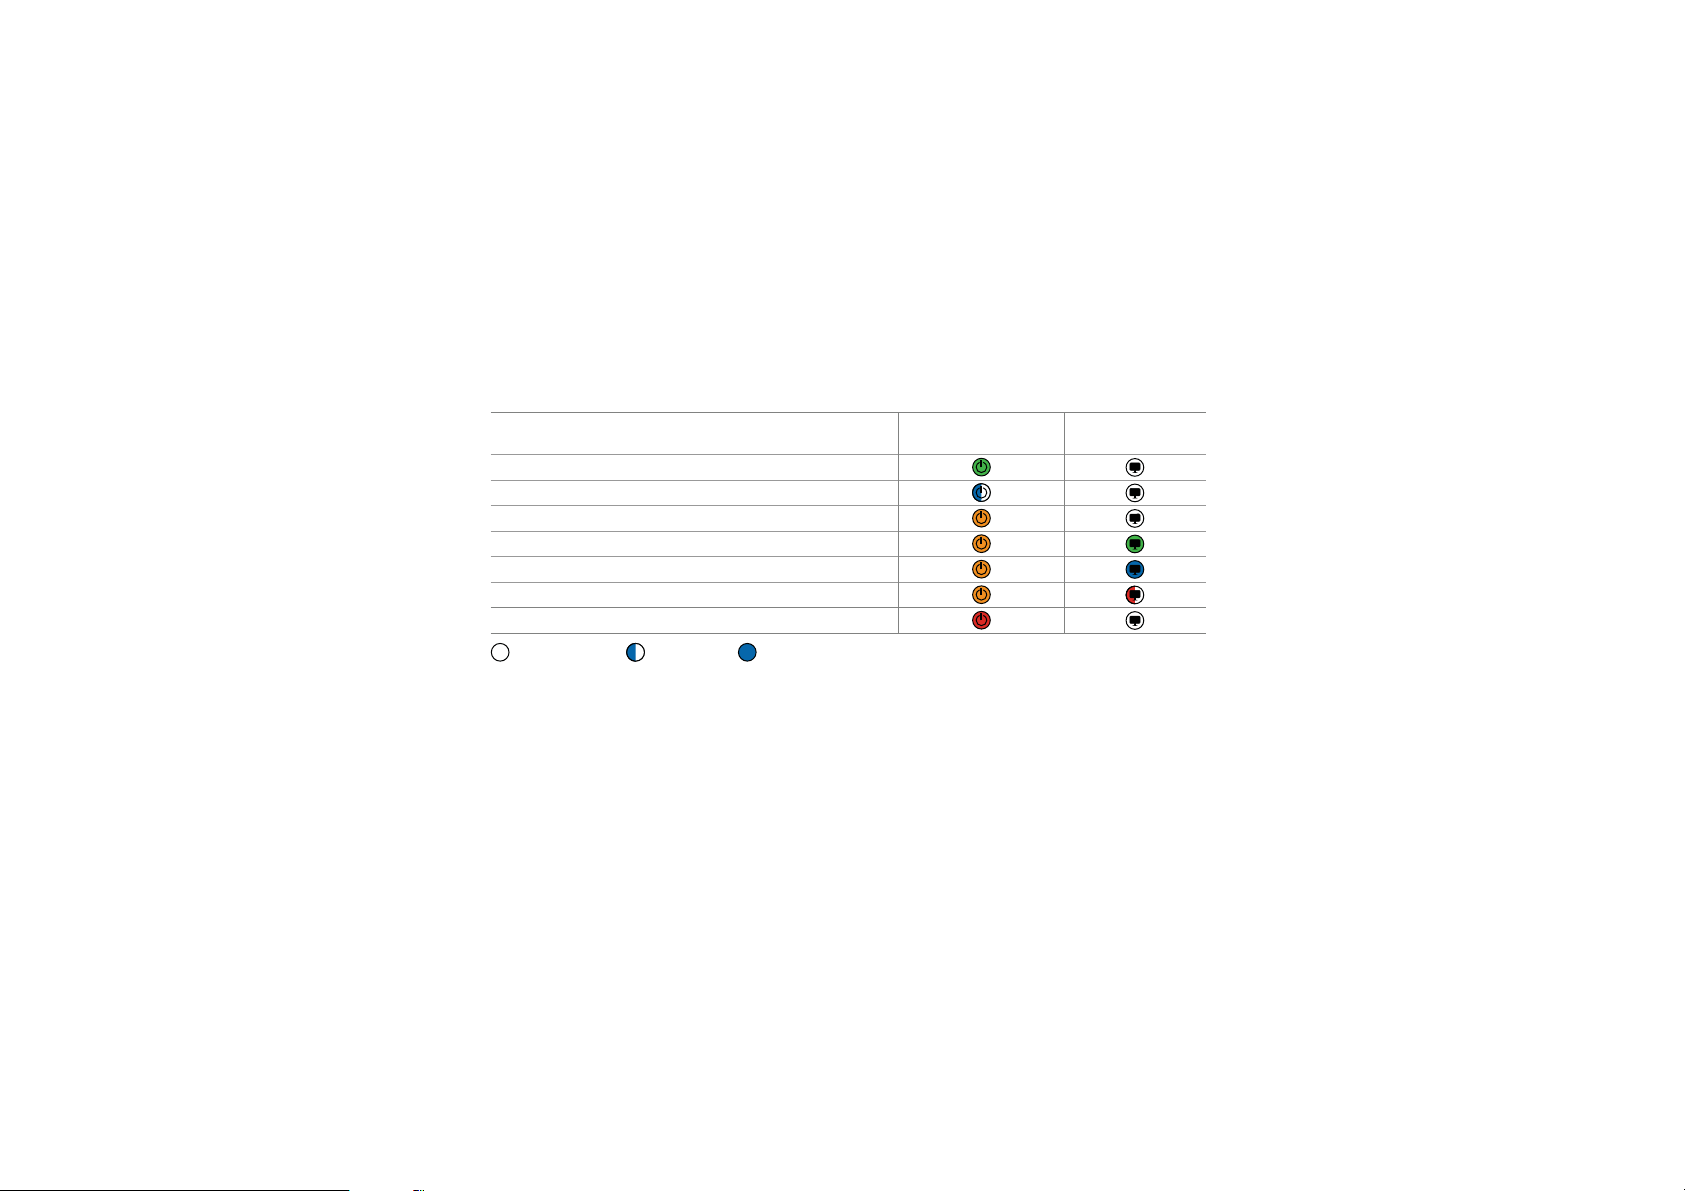
Aperçu de l'adaptateur TV 2.0
Mode
Sous te nsion, pas de con nexion avec l e Stream er Pro
En mode appairage
Streami ng - aucune ent rée audio déte ctée
RCA in séré et stre aming
TOSLINK inséré et streaming (numérique)
TOSLINK inséré et streaming (signal non valide)*
Condition de défaut**
Pas de voyant Clignotant Fixe
* Essaye z une autre co nnexion d 'entrée
* * Contactez votre audioprothésiste
Voyant de
fonctionnement
Voyant T V
8
Page 48
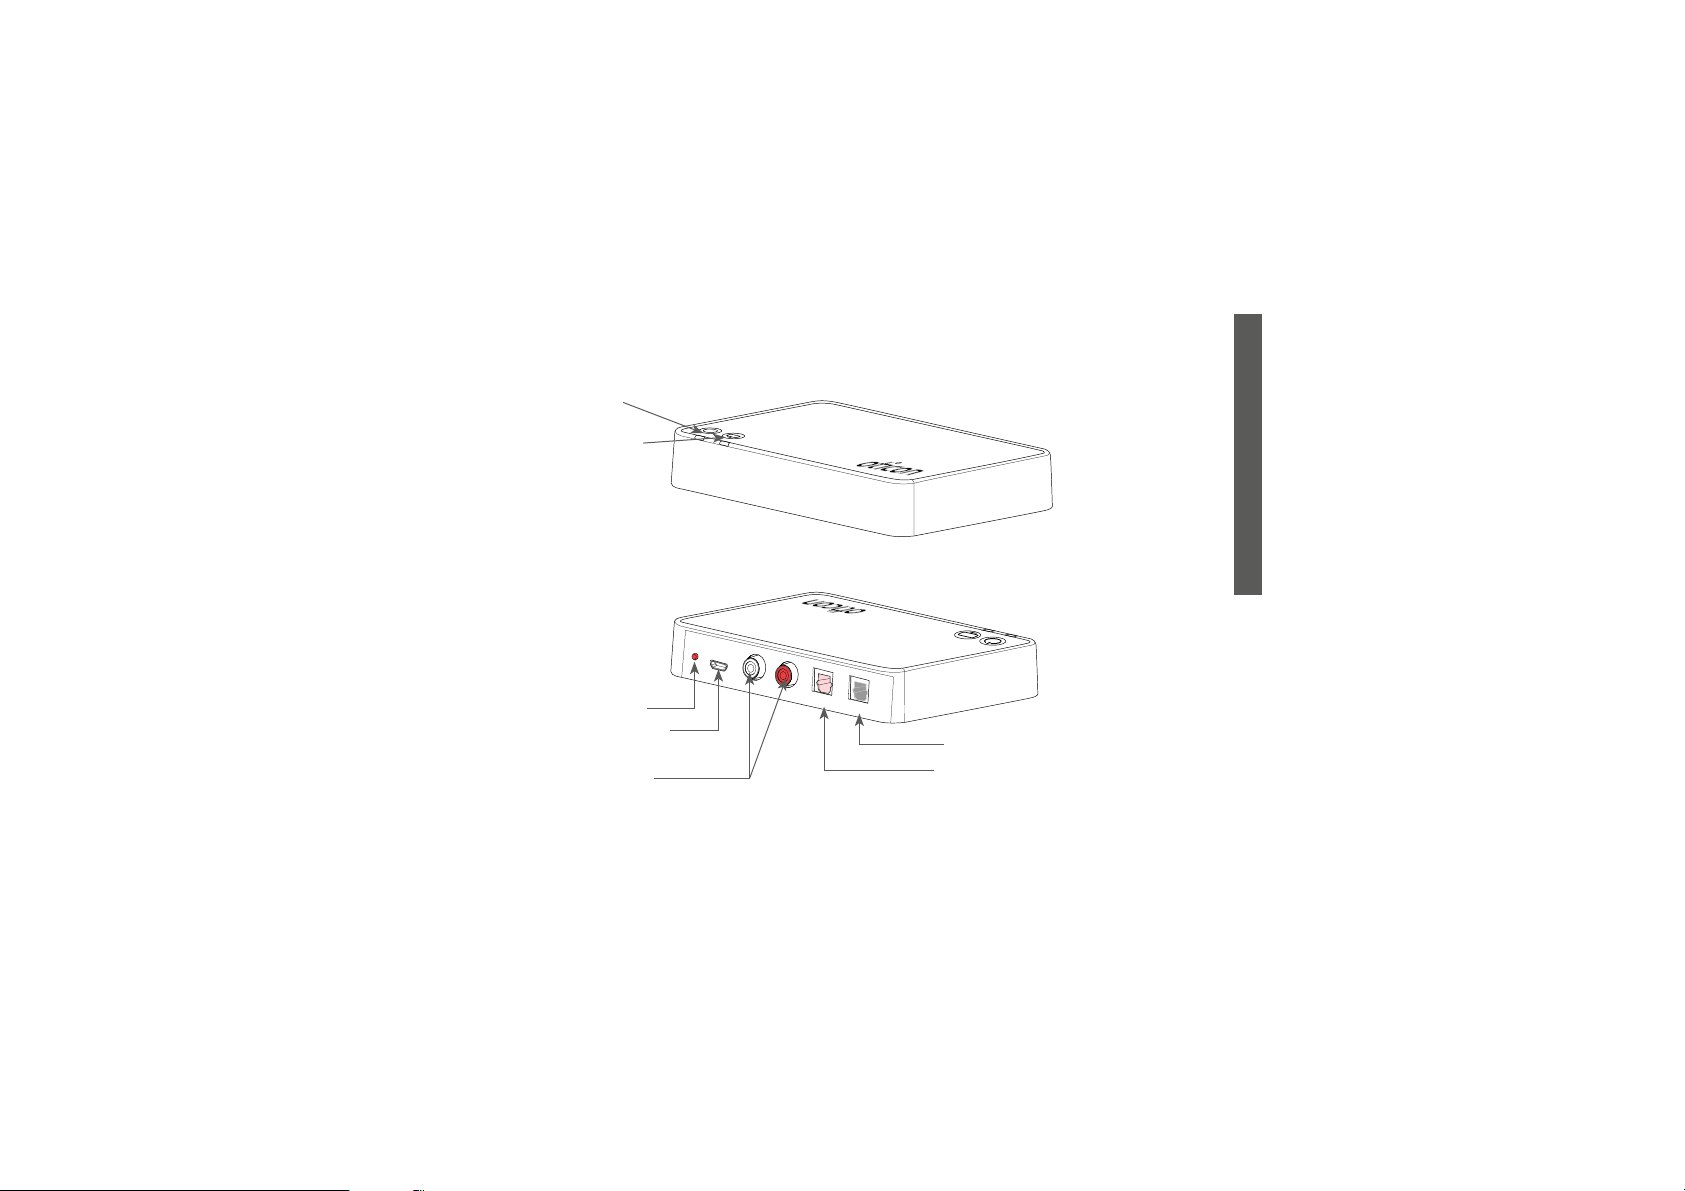
Voyant de fonctionnement
Face avant
Voya nt TV
Retour
POWER
L
R
IN
SelectMe
Alimentation électrique
RCA ga uche et droite
* Pour plus d'informations, veuillez consulter : www.oticon.fr/TV
OUT
9
GUIDE D'INSTALLATION
TOSLINK sort ie
TOSLINK entrée
Page 49

Avertissements
Vous devez vous familiariser avec les avertissements à caractère général donnés ciaprès et lire toutes les informations qui gurent dans ce mode d'emploi avant d’utiliser
votre adaptateur TV 2.0.
Produits à connecter à des équipements externes
t La sécurité de l'utilisation du téléviseur avec un câble d'entrée RCA est déterminée
par une source de signal extérieure. Lorsque le câble d'entrée est connecté à un
équipement secteur, celui-ci doit se conformer aux normes de sécurité IEC-60065,
IEC-60601 ou équivalents.
t L'adaptateur TV 2.0 a été conçu pour se conformer aux normes de compatibilité
électromagnétique internationales les plus strictes. Cependant, l'adaptateur TV
2.0 peut provoquer des interférences avec d'autres dispositifs médicaux. Veuillez
contacter le personnel concerné pour obtenir l'autorisation d'utiliser l'adaptateur TV
2.0 dans des hôpitaux ou des établissements similaires.
10
Page 50

Avertissements
t L'adaptateur TV 2.0 n'est pas un jouet et doit donc être tenu hors de la portée des
enfants et de toute autre personne susceptible d'avaler de petites pièces ou de se
blesser à leur contact. Il faut faire particulièrement attention aux petits composants
an d'empêcher que les enfants les avalent et s'étouent.
Si une pièce est avalée, consultez immédiatement un médecin.
L'adaptateur TV 2.0 ne doit jamais être lavé ni immergé dans l'eau ni aucun autre liquide.
11
GUIDE D'INSTALLATION
Page 51

Installation
Première activation de l'adaptateur TV 2.0
Avant de pouvoir utiliser le Streamer Pro et vos appareils auditifs avec votre téléviseur,
l'adaptateur TV 2.0 doit être connecté à une prise électrique, raccordé au téléviseur et
appairé avec votre Streamer Pro.
Ceci est un guide qui vous explique étape par étape comment installer l'adaptateur TV
2.0.
Toutes les pièces nécessaires à l'installation sont fournies dans la boîte.
13
GUIDE D'INSTALLATION
Page 52
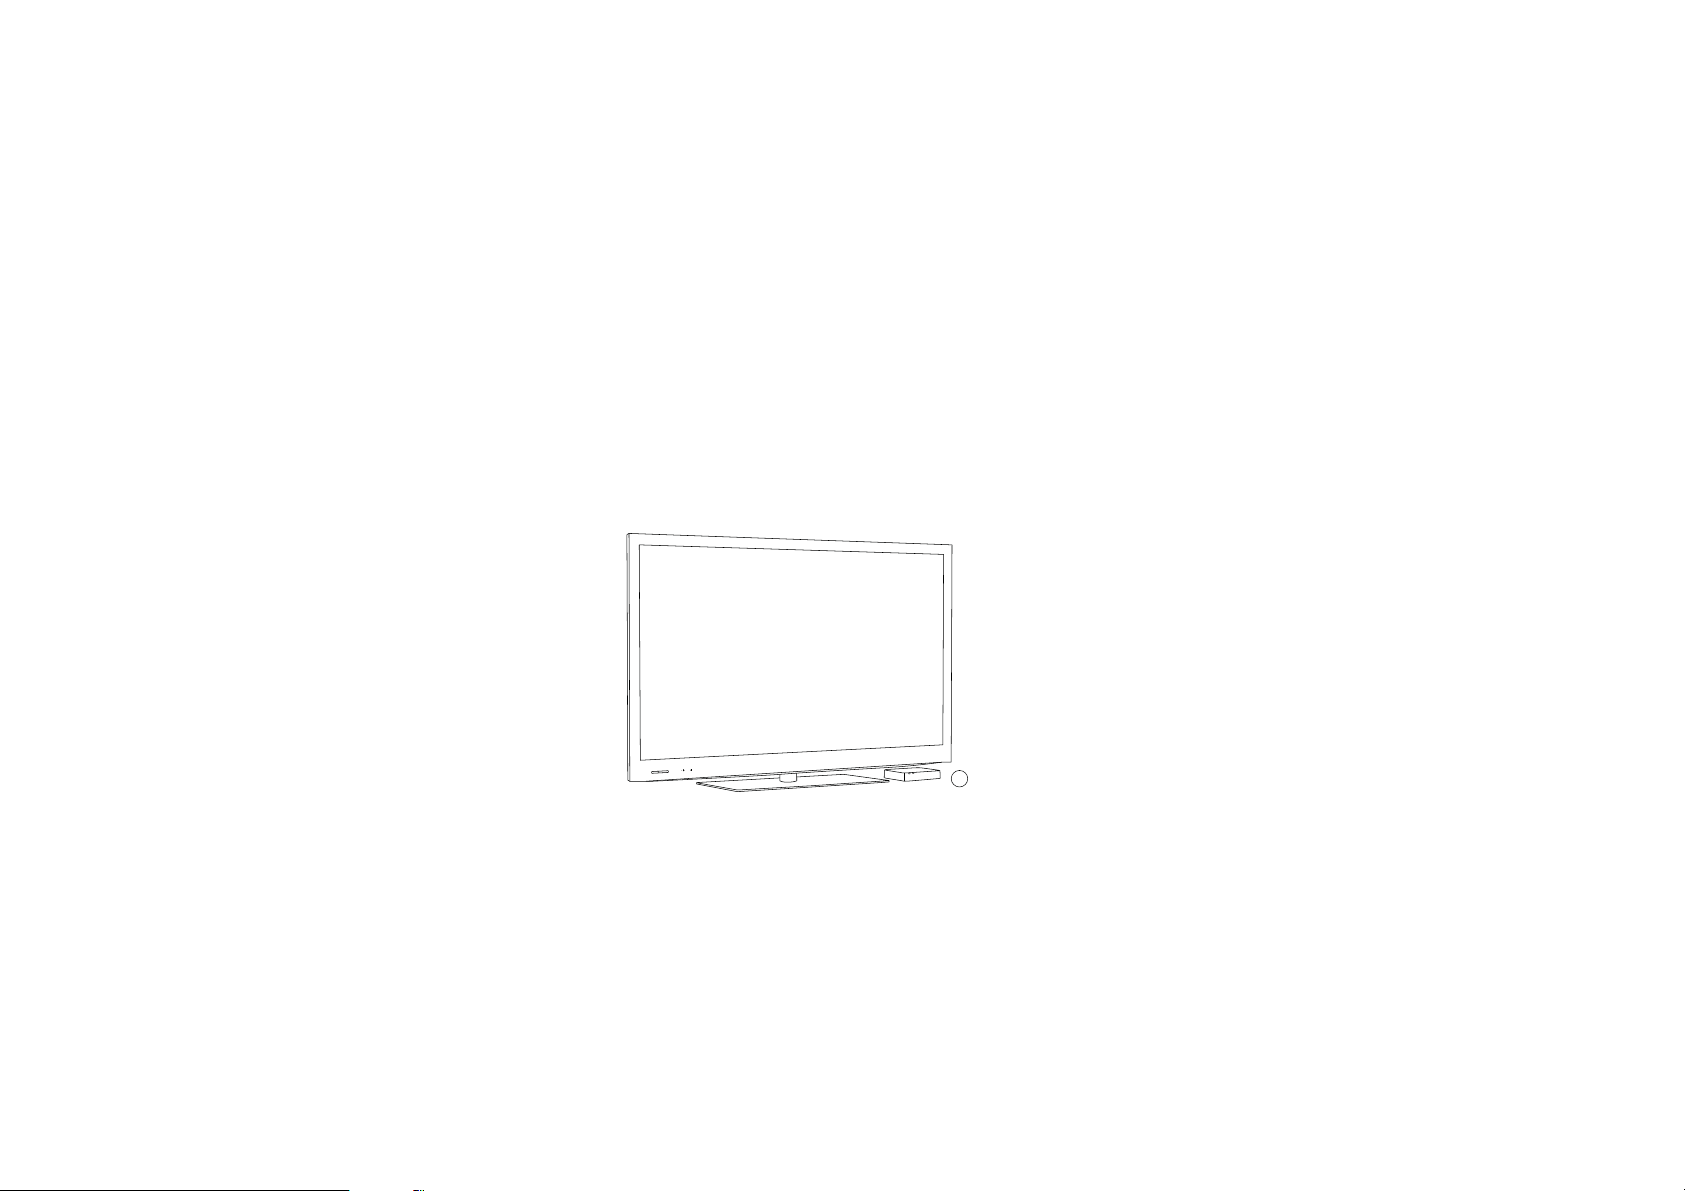
Positionnement de l'adaptateur TV 2.0
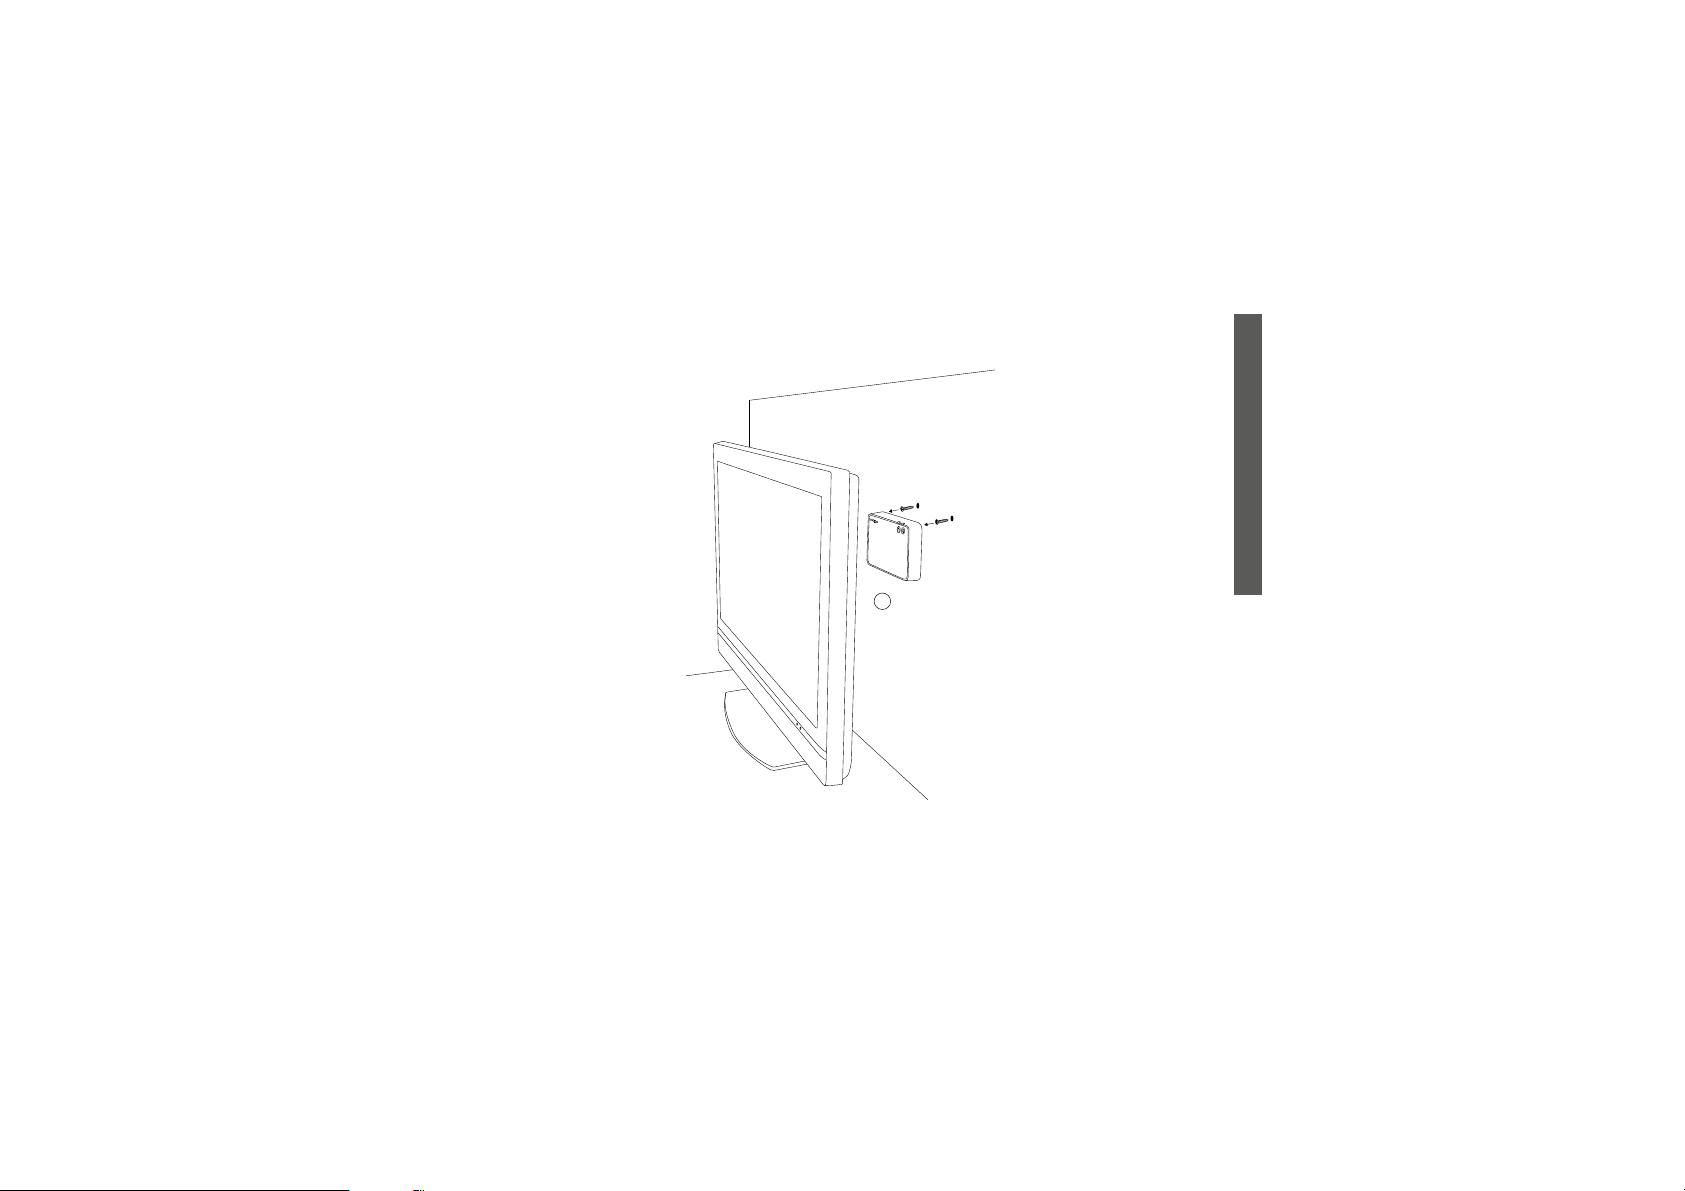
Il existe deux possibilités pour positionner l'adaptateur TV 2.0 :
1. Près du téléviseur - positionné horizontalement (A).
2. Suspendu au mur (verticalement) (vis non fournies) (B).
A
14
Page 53
15
GUIDE D'INSTALLATION
B
Page 54

Alimentation
Commencez par connecter l'adaptateur TV 2.0 à une prise électrique.
Utilisez l'alimentation électrique de la boîte 1
1. Branchez le cordon d'alimentation dans le connecteur « Power » de l'adaptateur TV
2.0 (A).
2. Branchez l'alimentation électrique dans une prise murale secteur ou une autre
source électrique (B).
3.
riez que le dispositif est sous tension. Après quelques secondes, le voyant vert
Vé
à l'avant de l'adaptateur TV 2.0 s'allumera (C).
16
Page 55
Boî te 1
13
C
GUIDE D'INSTALLATION
B
TUO
IN
R
L
POWER
A
17
Page 56

Connexion à la TV
Vous pouvez connecter l'adaptateur TV 2.0 au téléviseur de quatre façons diérentes.
Connexion Page
TOSLINK . Stéréo numéri que (PCM) ou Do lby Digital * 18
Sor tie audio RCA L+R 20
Sor tie audio SCA RT (L+R) 22
Sortie audio mini-jack (généralement sortie casque) 24
*Dolby Di gital et le sym bole double -D sont des marq ues déposé es de Dolby Lab oratories .
Veuillez vous référer aux spécications détaillées de ConnectLine TV 2.0
www.oticon.fr/tv) et aux spécications de votre téléviseur an de vérier la
(
compatibilité.
Veuillez consulter les pages suivantes pour trouver une solution qui corresponde à
votre téléviseur.
18
Page 57
L
R
Audio
Out
TOSL INK (p. 18)
RCA (p. 20)
GUIDE D'INSTALLATION
SCAR T (p. 22)
Mini-jack (p. 24)
* Pour plus d'informations, veuillez consulter : www.oticon.fr/TV
19
Page 58

Connexion par TOSLINK
1. Utilisez le câble TOSLINK de la boî te n° 3 (A).
2. Branchez le câble TOSLINK à la sor tie TOSLINK de votre téléviseur/système de home
cinéma (B).
3. Branchez le câble TOSLINK à l'entrée TOSLINK rose (C) de l'adaptateur TV 2.0.
4.
La sortie TOSLINK (D) peut être utilisée pour brancher d'autres appareils TOSLINK
tels que les décodeurs Dolby externes et les systèmes de son surround, etc.
5.
Repor tez-vous à la page 26 pour l'appairage de l'adaptateur TV 2.0 avec votre
Streamer Pro.
Remarque importante : il peut s'avérer nécessaire de congurer votre téléviseur, votre
lecteur DVD ou votre système de home cinéma pour que la sortie audio correcte soit
disponible sur la sortie TOSLINK.
Pour des installations plus complexes, veuillez-vous référer à la section d'assistance du
www.oticon.fr/tv
site
20
Page 59
B
Boî te 3
13
A
R
L
2
Boî te 2
D
C
TUO
IN
B
GUIDE D'INSTALLATION
21
Page 60

Connexion par RCA
1. Utilisez le câble RCA de la boîte n° 2 (A).
2. Branchez le câble RCA à la sor tie RCA de votre téléviseur TV (B) ou de votre système
de home cinéma. (Elle est généralement marquée « L – R AUDIO OUT » et se trouve à
l'arrière du téléviseur ou sur le panneau inférieur.)
3.
Branchez le câble RCA aux connecteurs RCA (C) situés à l'arrière de l'adaptateur TV.
4.
portez-vous à la page 26 pour l'appairage du Streamer Pro avec l'adaptateur TV
Re
2.0.
Remarque importante : il peut s'avérer nécessaire de congurer votre téléviseur pour
que la sortie audio correcte soit disponible sur la sortie RCA.
Pour des installations plus complexes, veuillez-vous référer à la section d'assistance du
site
www.oticon.fr/tv
22
Page 61
L
R
Audio
Out
Boî te 2
12
A
C
TUO
IN
R
L
23
B
GUIDE D'INSTALLATION
Audio
Out
L
B
R
Page 62

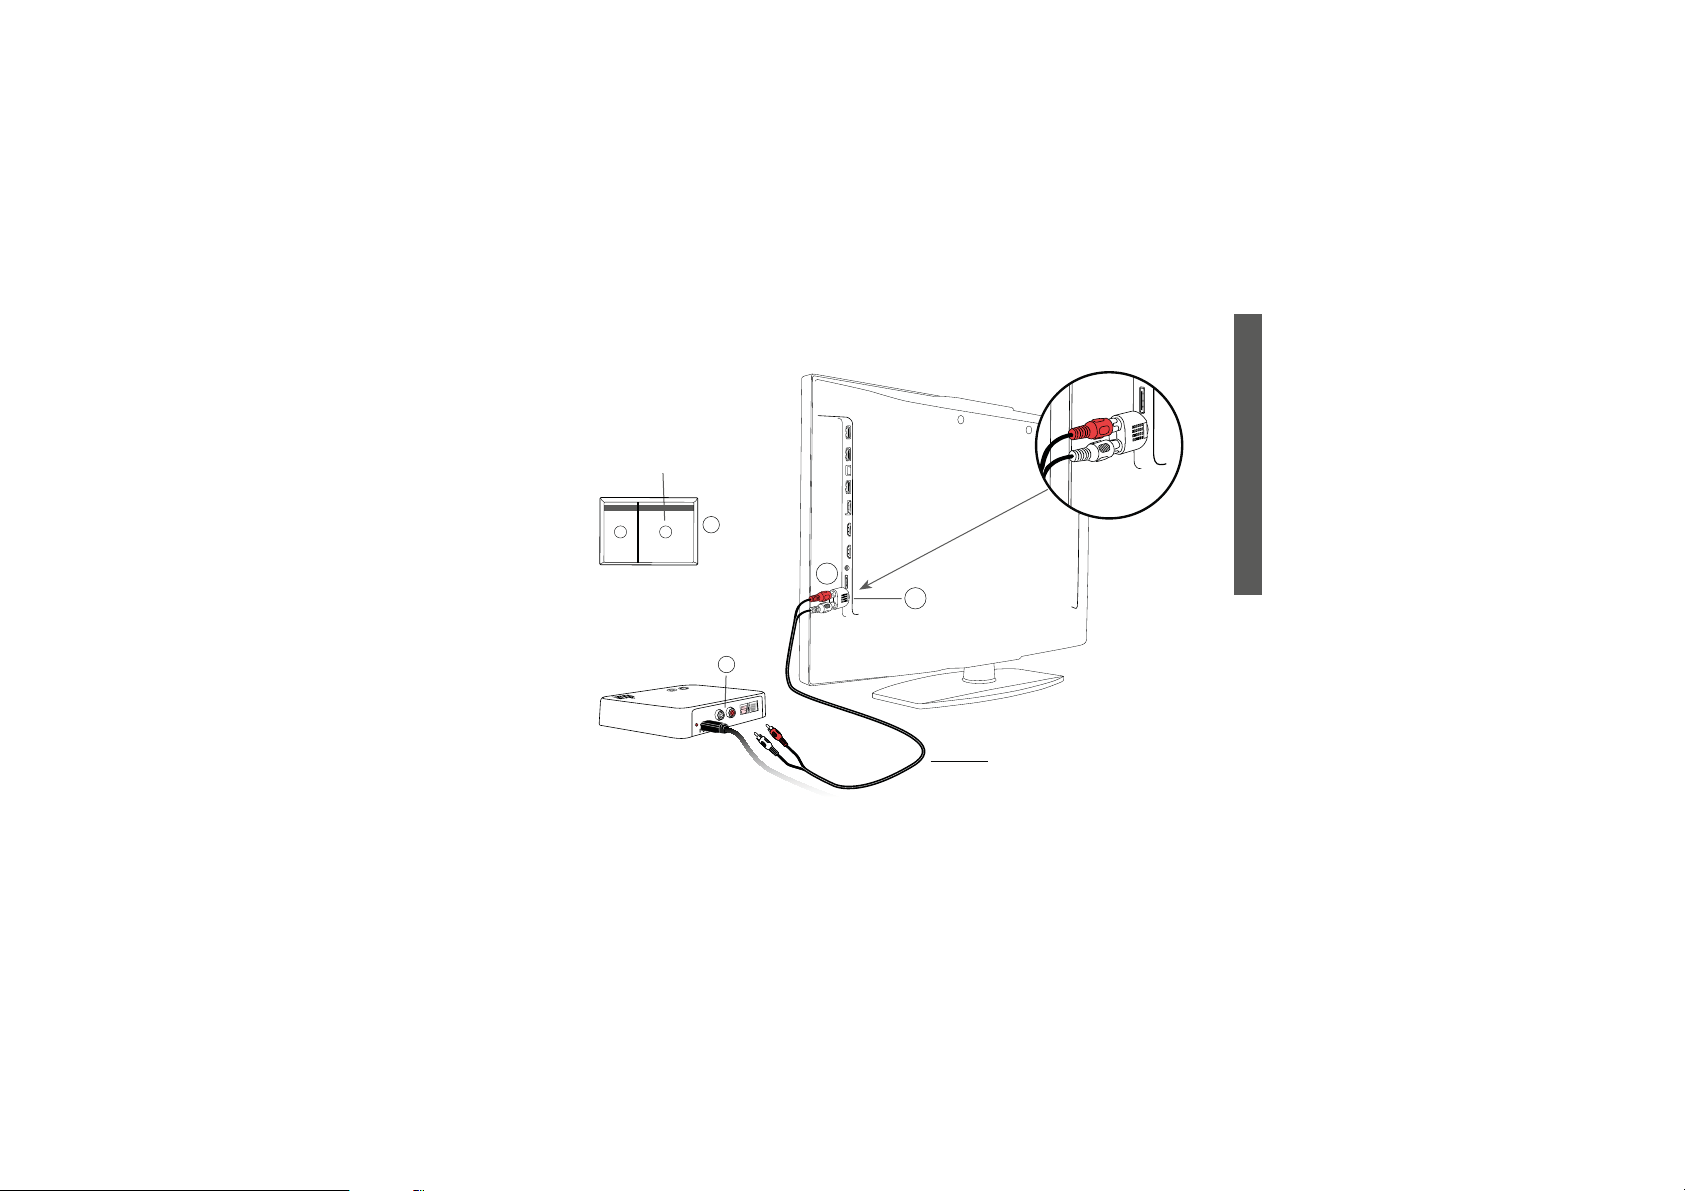
Connexion par adaptateur mini-jack
1. Utilisez l'adaptateur mini-jack de la boîte n° 2 (A).
2. Branchez le câble RCA à l'adaptateur mini-jack (B1).
3. Branchez le mini-jack au téléviseur, il s'agit généralement de la sortie casque (B2).
4. Branchez les connecteurs RCA à l'entrée RCA de l'adaptateur TV 2.0 (C).
5.
Repor tez-vous à la page 26 pour l'appairage de l'adaptateur TV 2.0 avec le Streamer
Pro.
Remarque importante : Les haut-parleurs du téléviseur peuvent être mis en mode
silencieux lors de la connexion à la sortie casque, pour que le son soit uniquement
diusé par le Streamer Pro/l'adaptateur TV 2.0.
Pour des installations plus complexes, veuillez-vous référer à la section d'assistance du
www.oticon.fr/tv
site
24
Page 63
Boî te 2
12
A
C
R
L
GUIDE D'INSTALLATION
B1
B2
TUO
IN
Cordon TV
25
Page 64

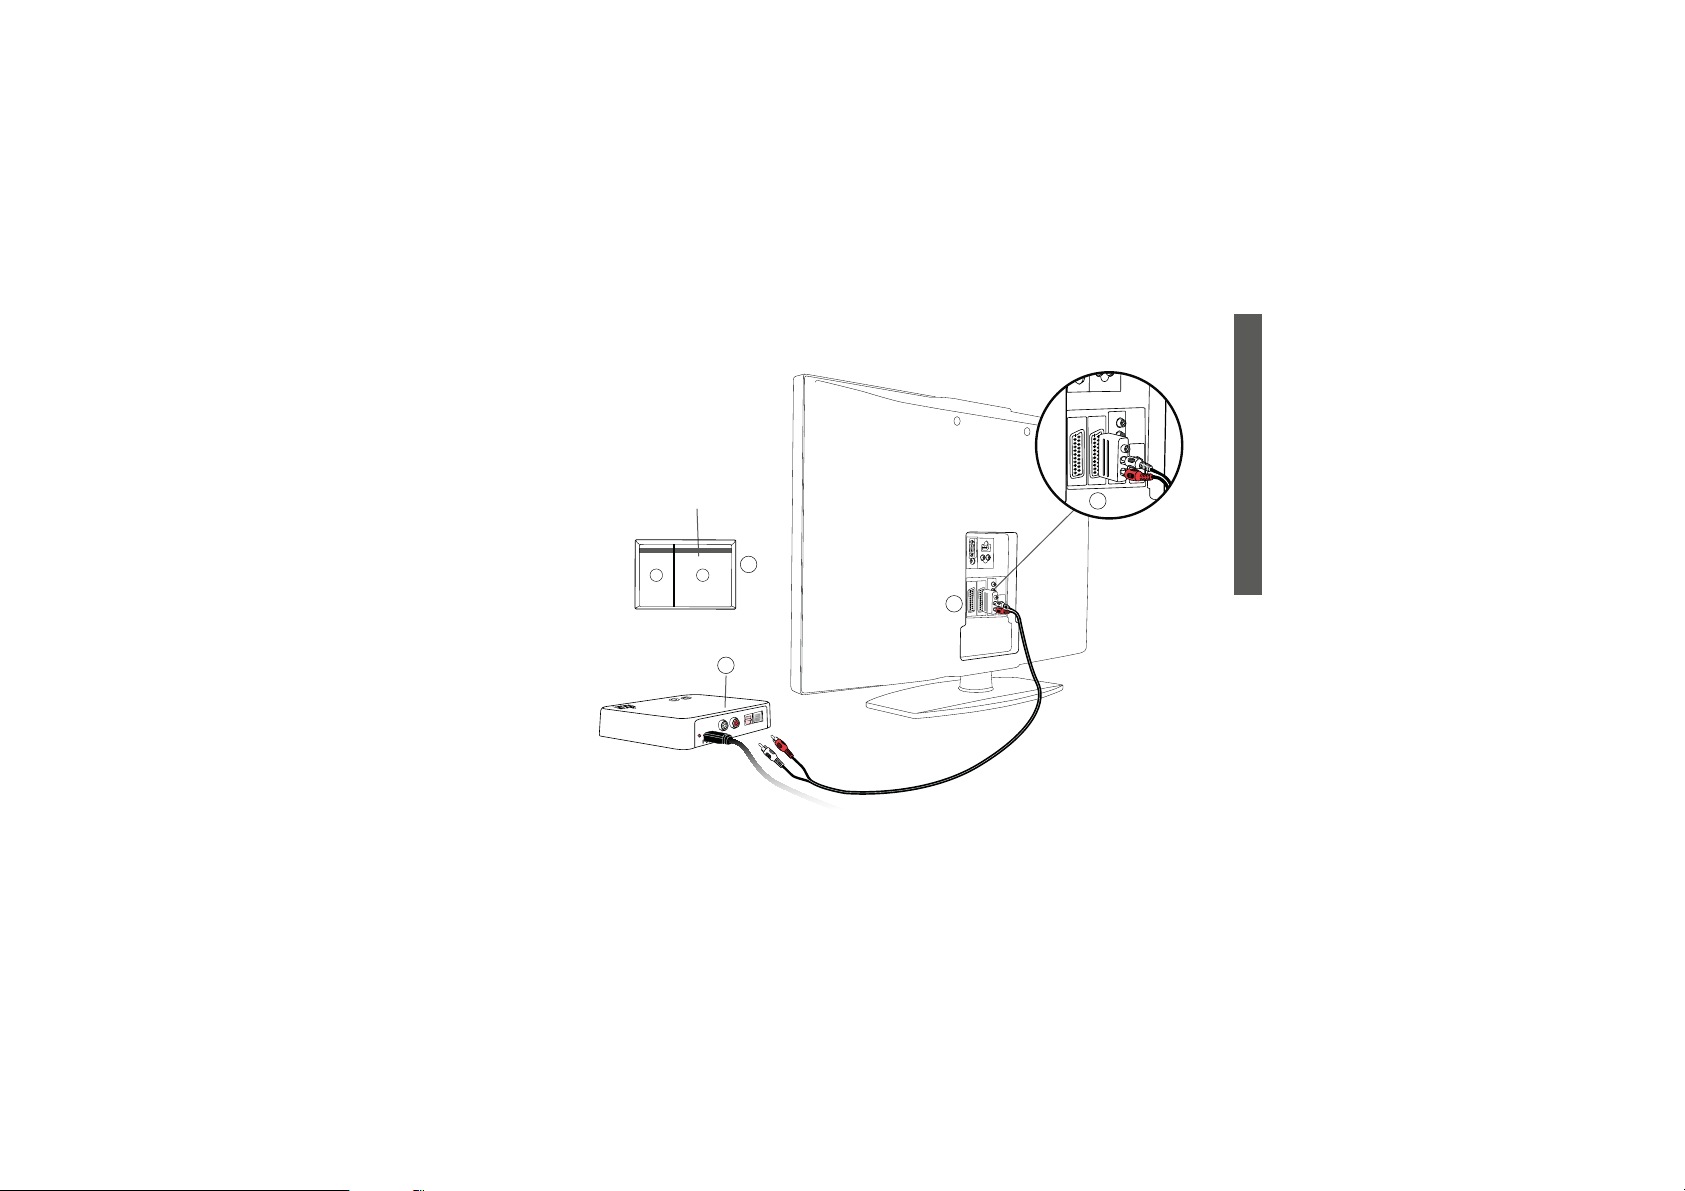
Connexion par SCART
1. Utilisez l'adaptateur SCART de la boîte n° 2 (A).
2. Branchez le câble RCA aux bornes rouge et blanche de l'adaptateur SCART (B).
3. Branchez l'adaptateur SCART à la sortie SCART de votre téléviseur (C).
4. Branchez les connecteurs RCA à l'entrée RCA de l'adaptateur TV 2.0 (D).
5. Repor tez-vous à la page 26 pour l'appairage de l'adaptateur TV 2.0 avec le Streamer
Pro.
Remarque importante : La sortie audio du connecteur SCART peut dépendre de la
source sélectionnée sur le téléviseur. Par exemple, certains téléviseurs rendent
uniquement le son du téléviseur disponible sur la sortie SCART (et pas le son d'un lecteur
DVD connecté par exemple).
Pour des installations plus complexes, veuillez-vous référer à la section d'assistance du
site
www.oticon.fr/tv
26
Page 65
Boî te 2
12
A
D
TUO
IN
R
L
B
GUIDE D'INSTALLATION
C
27
Page 66

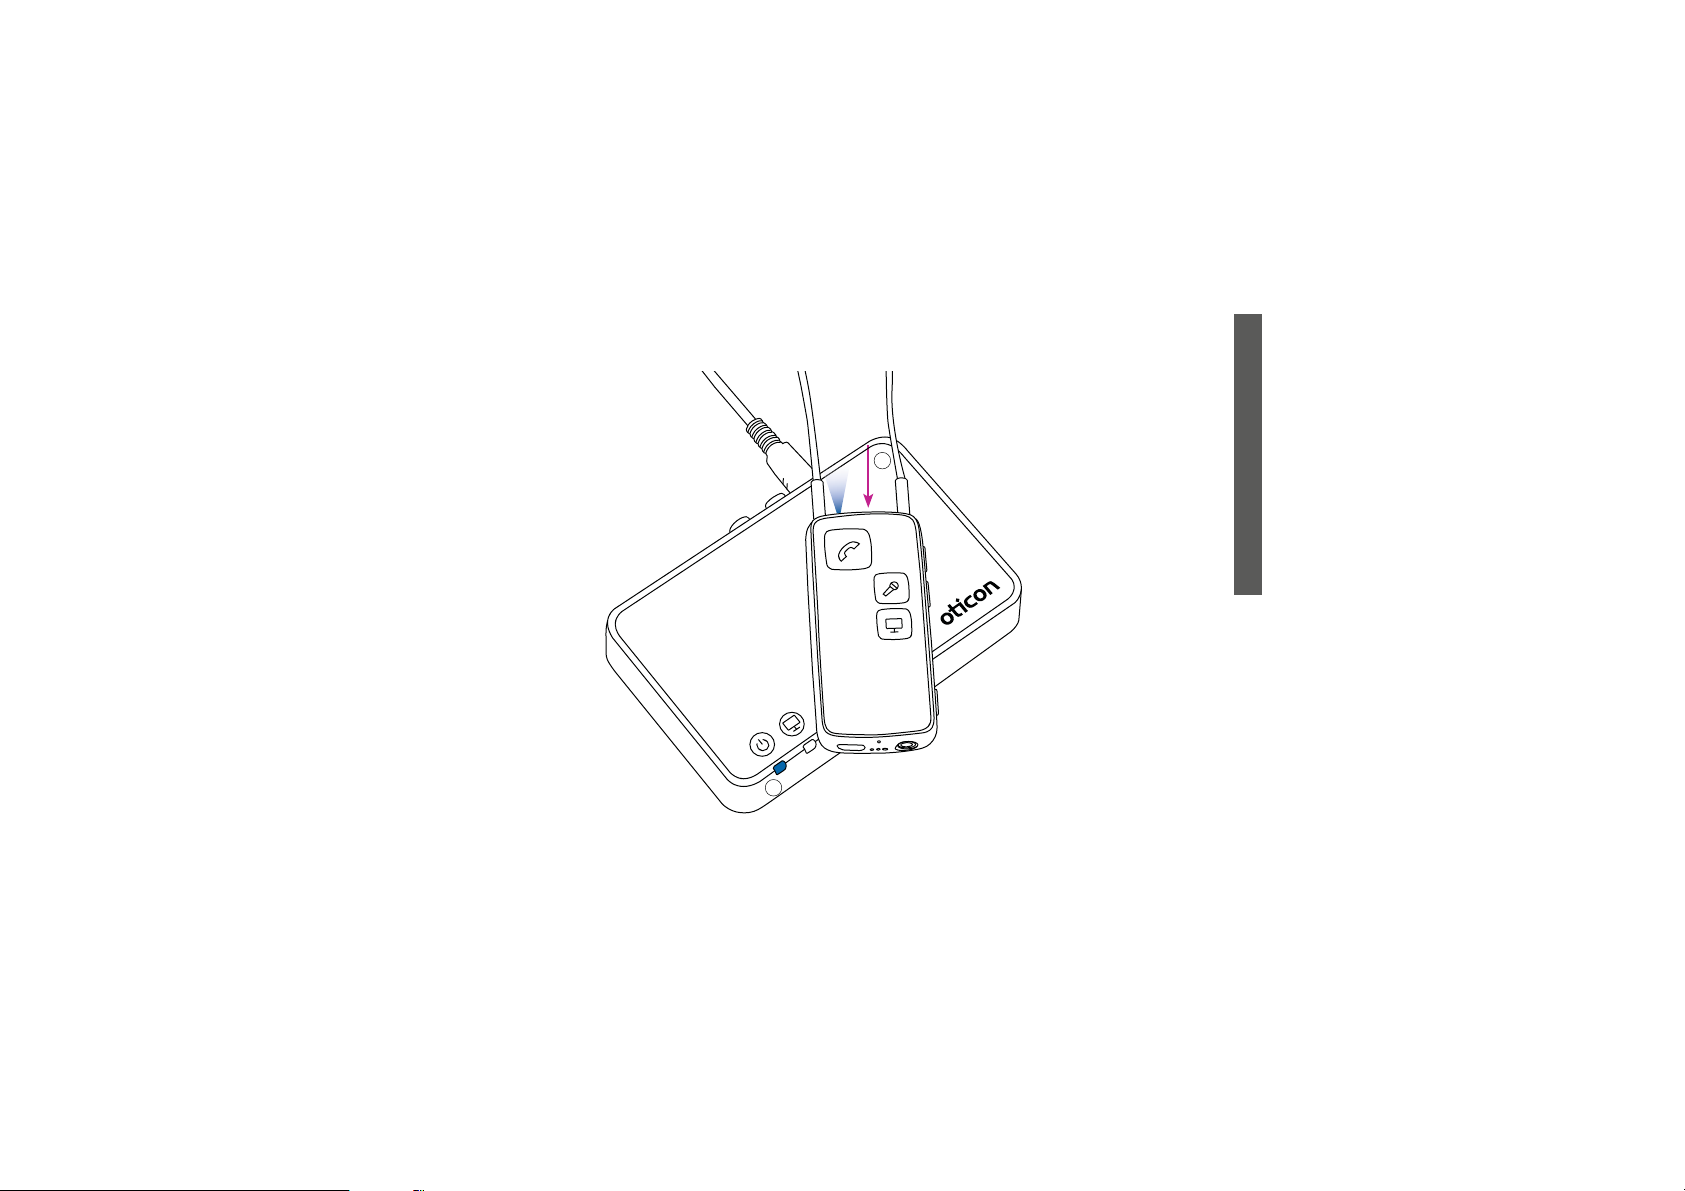
Appairage du Streamer Pro avec l'adaptateur TV 2.0
Avant d'utiliser votre Streamer Pro pour écouter la télévision, celui-ci doit être appairé
avec l'adaptateur TV 2.0.
Pour l'appairage :
1.
Veillez à ce que l'adaptateur TV 2.0 soit sous tension, c'est-à-dire que l'indicateur de
marche soit un voyant vert xe.
2.
Appuyez sur le bouton marche/arrêt du Streamer Pro (B) et maintenez-le enfoncé
pendant 5-6 secondes (A) jusqu'à ce que le voyant bleu commence à clignoter.
3.
acez le Streamer Pro au-dessus ou à proximité de l'adaptateur TV 2.0 ; l'appairage
Pl
prend environ 20 à 60 secondes. L'adaptateur TV 2.0 commencera automatiquement
l'appairage.
4. L'appairage est terminé lorsque le voyant de marche de l'adaptateur TV 2.0 et le
bouton Marche/Arrêt du Streamer Pro passent brièvement au bleu continu, puis à
l'orange.
5. L'appairage ne s'eectue qu'une seule fois et il n'est généralement pas nécessaire de
le renouveler.
28
Page 67
B
GUIDE D'INSTALLATION
A
29
Page 68
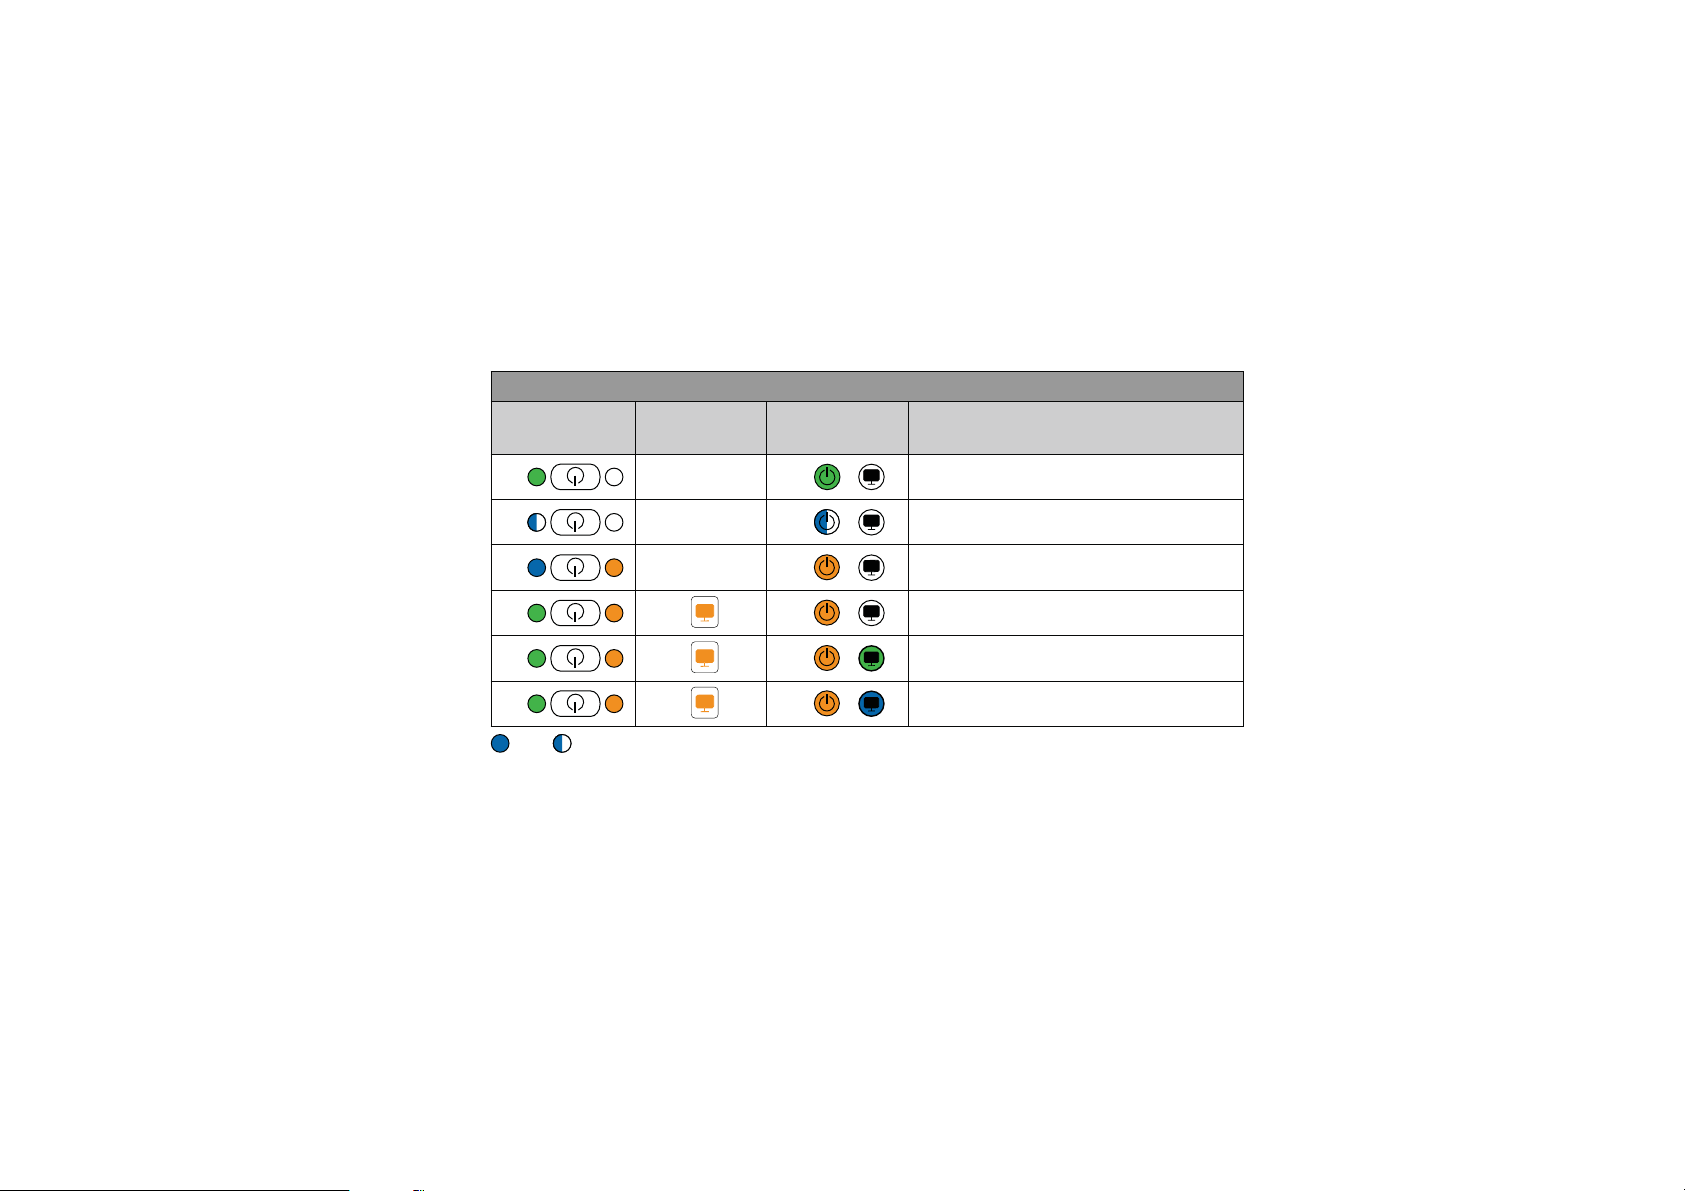
Streamer Pro
Etat
Streamer Pro
Face avant
Appairage
TV
Adaptateur
Description
Fixe Clignotant
Stream er Pro et adapt ateur TV 2.0 allu més
Stream er Pro en mode ap pairage
Appairage termin é
Streami ng - aucune ent rée audio déte ctée
RCA in séré et stre aming
TOSLINK inséré et streaming (numérique)
30
Page 69

Contrôle de volume
Utilisez le bouton de volume du Streamer Pro pour ajuster le volume du téléviseur dans
les aides auditives. Ajustez le volume en appuyant brièvement sur le bouton + ou -.
Répétez la manipulation pour des ajustements complémentaires.
MODE SILENCIEUX
En regardant la télévision, il est possible d'éteindre les microphones de vos aides
auditives pour que seul le son de la télévision soit entendu.
Appuyez sur les boutons d'augmentation et de diminution du volume jusqu'à ce que le
son environnant soit coupé. Vous entendrez un bip de conrmation indiquant que les
microphones des aides auditives sont maintenant coupés.
Remarque importante : Le volume du téléviseur dans les aides auditives n'est
généralement pas aecté par les ajustements de volume eectués sur la
télécommande du téléviseur.
32
Page 70
Augmentation du
volume
Diminution du
volume
33
Mode silencieux
Stre amer Pr oStre amer Pr o
GUIDE D'UTILISATION
Page 71
Ecouter la télévision
Veillez à porter le Streamer Pro autour de votre cou à l'aide
du tour de cou, et veillez à ce que le Streamer Pro soit sous
tension.
Allumer le son du téléviseur
Appuyez brièvement sur le bouton TV situé à l'avant du
Streamer Pro. Le Streamer Pro se connecte à l'adaptateur TV
2.0. Au bout de quelques secondes, un voyant xe orange
s'allume sur le Streamer Pro et l'adaptateur TV 2.0. Vous
entendrez un bip de con rmation dans vos aides auditives
suivi du son provenant du téléviseur connecté.
Éteindre le son du téléviseur
Appuyez brièvement sur le bouton TV situé à l'avant du
Streamer Pro. Les voyants orange s'éteignent sur le Streamer
Pro et l'adaptateur TV 2.0. Vous entendrez un bip de
con rmation dans vos aides auditives.
34
Page 72
Streamer Pro
Etat
Streamer Pro
Face avant
Appairage
TV
Adaptateur
Description
35
Stream er Pro et adapt ateur TV 2.0 allu més
Streami ng - aucune ent rée audio déte ctée
RCA in séré et stre aming
TOSLINK inséré et streaming (numérique)
GUIDE D'UTILISATION
Page 73

SelectMe, utilisation de plusieurs adaptateurs TV
Avec Streamer Pro 1.1 et ultérieur, vous pouvez utiliser plusieurs adaptateurs TV, par
exemple un dans le salon et un dans la chambre.
Pour passer d'un adaptateur TV 2.0 à l'autre :
1.
Assurez-vous que vous n'êtes connecté à aucun adaptateur TV 2.0, c'est-à-dire que
le Streamer Pro doit être allumé mais pas actif.
2.
Pour entendre le son (A), appuyez brièvement sur le bouton SelectMe de
l'adaptateur TV 2.0 concerné.
3.
L'adaptateur TV 2.0 est automatiquement connecté. Vous entendrez un bip de
conrmation dans vos aides auditives suivi du son provenant du téléviseur connecté.
36
Page 74
POWER
A
POWER
L
R
IN
OUT
GUIDE D'UTILISATION
37
Page 75

Informations techniques
L'adaptateur TV 2.0 contient un émetteur 2,4 GHz. La puissance d'émission de
l'adaptateur TV 2.0 est de
limites d'émissions internationales pour l'exposition humaine.
/
'$$*%/657#09
*$#57#09
/
Le fonctionnement de cet appareil est soumis aux deux conditions suivantes :
1. L'appareil ne risque pas de causer d'interférence dommageable.
2.
pareil doit accepter toute interférence reçue y compris celles qui peuvent
L' a p
provoquer un fonctionnement indésirable.
Déclaration d'exposition aux rayonnements IC : Cet équipement est conforme aux
limites d'exposition aux rayonnements IC indiquées pour un environnement non
contrôlé. Pour satisfaire à la conformité d'exposition RF, les utilisateurs naux doivent
dBμV/m max. @
mètres et est bien en-dessous des
38
Page 76

suivre le mode d'emploi.
Cet émetteur ne doit pas être colocalisé ou fonctionner en conjonction avec une autre
antenne ou un autre émetteur.
Tout changement apporté à l'équipement qui ne serait pas expressément approuvé par
Oticon peut annuler l'autorisation d'utilisation de l'appareil par l'utilisateur. / Tout autre
mode opératoire doit être évité.
Remarque importante : / Ces limites sont destinées à fournir une protection
raisonnable contre les inter férences nocives dans une installation résidentielle. Cet
appareil génère,utilise et peut irradier une énergie radiofréquence et, s'il n'est pas
installé et utilisé conformément aux instructions, il peut être la source d'inter férences
dommageables pour les radiocommunications. Rien ne garantit, toutefois, qu'aucune
interférence ne se produise dans une installation donnée.
39
GUIDE D'UTILISATION
Page 77

Si cet équipement cause des inter férences perturbant la réception d'émissions
radiotélévisées, ce qui peut-être déterminé en éteignant l'appareil, l'utilisateur est
invité à essayer de corriger l'interférence en prenant l'une des mesures suivantes :
t Déplacer l'antenne réceptrice.
t Augmenter la distance entre l'équipement et le récepteur.
t Brancher l'équipement sur une prise de circuit diérent de celui sur lequel le
récepteur est connecté.
t Consulter le fabricant ou un technicien radio/TV expérimenté pour obtenir de l'aide.
40
Page 78
Oticon A/S certifie par la présente que cet adaptateur #4'TV est
les exigences essentielles et autres dispositions pertinentes de la Directive 1999/5/
CE.La déclaration de conformité est disponible à :
Oticon A/S
Kongebakken 9
DK-2765 Smørum
Danemark
www.oticon.com
en accord avec
Les déc hets électroniques doivent
être tr aités sel on la
législation locale.
?
N4292
41
Page 79
People First
People First est notre promesse
pour r endre à cha cun :
la lib erté de com munique r sans
contrainte,
d’interagir naturellement et
de participer activement
 Loading...