

Page 1

TV Adapter 3.0
Instructions for use
Page 2

Introduction to this booklet
This booklet guides you on how to use and maintain your new
TV Adapter. Please read the booklet carefully, including the
Warning section. This will help you to get the
most out of your new TV Adapter.
If you have additional questions about the use of your TV Adapter,
please contact your hearing care professional.
About Installation Daily use Warnings Additional Information
For your convenience, this booklet contains a navigation bar to help
you navigate easily through the different sections.
Manufactured under licence from Dolby Laboratories. Dolby and the
double-D symbol are registered trademarks of Dolby Laboratories.
Intended use
The TV Adapter is intended as a wireless transmitter of sound from
a TV or from other electronic audio devices to hearing aids.
The TV Adapter is intended to be used by children (> 36 months)
and adults together with their hearing solution.
168382CA-US /09.06.16
168382CA-US /09.06.16
Page 3

Table of content
About
Package content 6
TV Adapter overview 8
Installation
Installation 10
Placing the TV Adapter 11
Connecting the TV Adapter to a power outlet 12
Connecting the TV Adapter to the TV 14
Connecting using TOSLINK 16
Connecting using RCA 18
Connecting using mini jack Adapter 20
Connecting using SCART 22
Pairing the TV Adapter with your hearing aids 24
Daily use
Start TV sound using your hearing aids 26
Turn off TV sound using your hearing aids 27
Volume control using your hearing aids 28
Start TV sound using the hearing aid Remote Control 30
Turn off TV sound using your Remote Control 31
Volume control using your Remote Control 32
Mute using your Remote Control 33
Start TV sound using the Oticon ON app 34
Turn off TV sound using the Oticon ON app 35
Volume control using the Oticon ON app 36
Mute using the Oticon ON app 37
More than one user 38
Removing a user/clearing pairings 39
Cleaning and maintenance 40
Warnings
Warnings 42
Additionals
Technical information 44
International warranty 47
Page 4

TV Adapter 3.0
Instructions for use
6
About Installation Daily use Warnings Additional Information
Package content
The TV Adapter box consists of the following elements:
TV Adapter Power supply
RCA cable
TOSLINK
SCART Adapter Mini jack AdapterThis guide
(Installation guide and Instructions for use)
About
Page 5

OUT
IN
R
L
POWER
8 9
About Installation Daily use Warnings Additional Information
TV Adapter overview
Mode Power indicator TV indicator
Power on, not paired to any hearing aids
Pairing complete (steady light 30 secs)
Power on, not streaming
RCA inserted and streaming
TOSLINK inserted and streaming (digital)
TOSLINK inserted and streaming (invalid signal)*
Fault condition **
No light
* Try other input connection
** Contact your hearing care professional
Blinking Fading Steady
Back
Power supply
Front
TV
TOSLINK in
Mode
TOSLINK out
RCA left and right
Power
Setup
More information: www.oticon.ca/connectivity
Page 6

10 11
About Installation Daily use Warnings Additional Information
Installation
Using the TV Adapter for the first time
Before you can use your hearing aids with your TV, the TV Adapter
must be connected to a power outlet, connected to the TV and
paired with your hearing aids.
This is a step-by-step guide on how to install the TV Adapter.
All parts needed for the installation are included in the package.
Placing the TV Adapter
Place the TV Adapter close to the TV horizontally, with free line
of sight to the hearing aids.
Installation
Page 7

TUO
IN
POWER
R
L
1 3
12 13
About Installation Daily use Warnings Additional Information
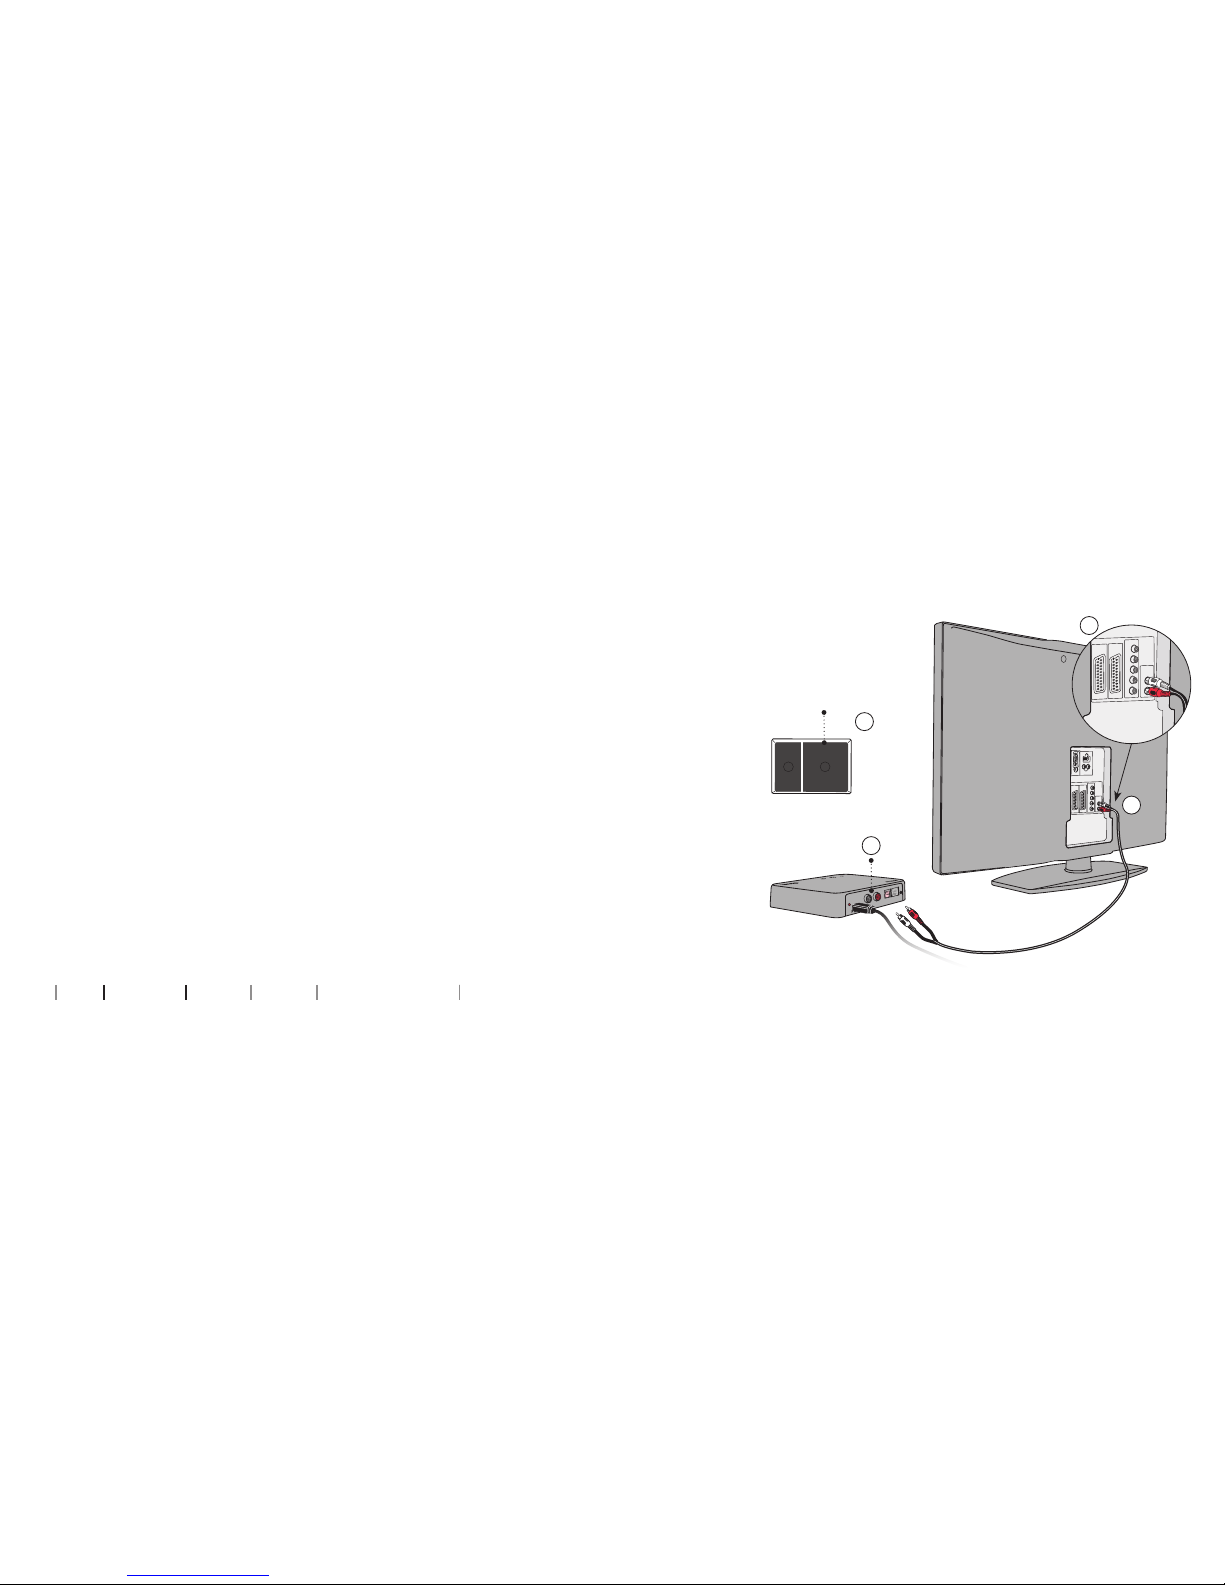
Connecting the TV Adapter to a power outlet
Start by connecting the TV Adapter to a power outlet.
Use the power supply from box 1
1. Plug the power cord into the “power” connector on the TV Adapter (A).
2. Plug the power supply into the wall socket (B).
3. Check that the power is turned on; after a few seconds both indicators
will fade blue to indicate that pairing with your hearing aids is needed.
See page 24.
Box 1
B
C
A
Page 8

L
R
Audio
Out
L
R
Audio
Out
14 15
About Installation Daily use Warnings Additional Information
Connecting the TV Adapter to the TV
You can connect the TV Adapter to the TV in four different ways.
Connection Page
TOSLINK. Either digital stereo (PCM) or Dolby® Digital * 16
RCA audio output L+R 18
Mini jack audio output (typically headphone output) 20
SCART audio output (L+R) 22
*Dolby and the double-D symbol are registered trademarks of Dolby Laboratories.
We recommend using TOSLINK.
Please see the following pages for a solution which fits your TV.
RCA (p. 18)
SCART (p. 22)
TOSLINK (p. 16)
Mini jack (p. 20)
More information: www.oticon.ca/connectivity
Page 9

L
TUO
IN
R
1 3
2
16 17
About Installation Daily use Warnings Additional Information
Connecting using TOSLINK
1. Use the TOSLINK cable from box no. 3 (A).
2. Remove the plastic cap from the TOSLINK cable (B).
3. Connect the TOSLINK cable to the TOSLINK output on your TV/home
theatre system (C).
4. Connec t the TOSLINK cable to the pink TOSLINK input (D) on the
TV Adapter.
5. The TOSLINK output (E) may be used to connect other TOSLINK dev ices
such as ex ternal Dolby Decoder s and surround sound systems.
6. Refer to page 24 for pairing of the TV Adapter with your Hearing Aid.
Please note: It may be necessary to configure your TV, DVD
player or home theatre system so that the correct audio output is
available on the TOSLINK output.
Box 3
B
C
C
A
D
E
Page 10
L
TUO
IN
R
1 2
L
R
Audio
Out
L
R
Audio
Out
18 19
About Installation Daily use Warnings Additional Information
Connecting using RCA
1. Use the RCA cable from box no. 2 (A).
2. Connect the RCA cable to the RCA output on your TV (B) or home theatre
system. (Typically marked “L – R AUDIO OUT” and found on the TV back or
bottom panel.)
3. Connect the RCA cable to the RCA connectors (C) on the back of the
TV Adapter.
4. Refer to page 24 for pairing of hearing aids with the TV Adapter.
Please note: It may be necessary to configure your TV so that the
correct audio output is available on the RCA output.
B
C
C
A
Box 2
Page 11

L
TUO
IN
R
1 2
20 21
About Installation Daily use Warnings Additional Information
Connecting using mini jack Adapter
1. Use the mini jack Adapter from box no. 2 (A).
2. Connect the RCA cable to the mini jack Adapter (B1).
3. Connect the mini jack to the TV, this is typically the headphone
output (B2).
4. Connect the RCA connectors to the TV Adapter RCA input (C).
5. Refer to page 24 for pairing of the TV Adapter with your hearing aids.
Please note: The TV speakers may be muted when connecting to
the headphone output, and sound may only be heard through the
Hearing Aids/TV Adapter.
B
B1
B2
Box 2
A
D
Page 12
1 2
L
TUO
IN
R
L
R
Audio
Out
L
R
Audio
Out
22 23
About Installation Daily use Warnings Additional information
Box 2
Connecting using SCART
1. Use the SCART Adapter from box no. 2 (A).
2. Connect the RCA cable to the red and white
terminals on the SCART Adapter (B).
3. Connect the SCART Adapter to the SCART output on your TV (C).
4. Connect the RCA connectors to the TV Adapter RCA input (D).
5. Refer to page 24 for pairing of the TV Adapter with your Hearing Aids.
Please note: The audio output on the SCART connector can be
dependent on the source selected on the TV. For example some TVs
will only make TV sound available on the SCART output (i.e. not e.g.
sound from a connected DVD player).
B
C
A
D
Page 13

24 25
About Installation Daily use Warnings Additional information
Pairing the TV Adapter with your hearing aids
Before using the TV Adapter, it must be paired with your
hearing aids.
Pairing is only required once, and takes around 20-60 seconds.
IMPORTANT NOTICE
Please refer to your hearing aid‘s instructions for use for details on the
functionality of your specific hearing aid solution.
Make sure the TV Adapter is
powered on.
Open and close the battery door on
both your hearing aids.
Place both hearing aids close to, or
on top of the TV Adapter.
Pairing is completed when the
power indicator and the TV
indicator is blue for about 30 secs.
TV Adapter Description
Pairing completed
Note: This TV Adapter can be paired to as many hearing aids as you like. All users will be able to hear the
same sound. Please see page 38 for more details.
Page 14

P2 TVP1
Change program
26 27
About Installation Daily use Warnings Additional information
Turn o TV sound using your hearing aids
To stop the sound from the TV simply change to the desired
program in your hearing aids.
Start TV sound using your hearing aids
Once a TV Adapter has been paired with your hearing aids, it will
be available as a program in your hearing aids. To listen to the TV
simply press and hold the program switch on your hearing aids to
change program.
The program cycle will depend on the programs already
available in your hearing aids.
The TV program indicator — which is different from hearing aid
program indicators — will be heard once the TV program is selected.
IMPORTANT NOTICE
Please refer to your hearing aid‘s instructions for use for details on the
functionality of your specific hearing aid solution.
Daily use
Page 15

28 29
About Installation Daily use Warnings Additional information
Volume control using your hearing aids
Use the volume button on your hearing aid to adjust the TV
volume level in both hearing aids. Adjust the volume by pressing up
or down briefly. Press briefly repeatedly for further adjustments.
Note: The TV volume in the hearing aids is normally not affected by volume adjustments from the
TV Remote Control.
IMPORTANT NOTICE
Please refer to your hearing aid‘s instructions for use for details on the
functionality of your specific hearing aid solution.
A short press on the RIGHT
hearing aid increases the volume.
A short press on the LEFT
hearing aid decreases the
volume
Page 16

P2 TVP1
30 31
About Installation Daily use Warnings Additional information
Start TV sound using the hearing aid
Remote Control
The Remote Control is an optional accessory to your wireless
hearing aids.
Once a TV Adapter has been paired to your hearing aids it will be
available as a program. To listen to TV simply press the
program selector and change program (A).
The program cycle will depend on the programs already
available in your hearing aids.
The TV program indicator which is different from program
indicators will be heard once the TV program is selected.
Turn o TV sound using your Remote Control
To stop the sound from the TV simply change to the desired
program in your hearing aids.
More information: www.oticon.ca/connectivity
Change program
A
Page 17

32 33
About Installation Daily use Warnings Additional information
Volume control using your Remote Control
Use the volume buttons on your remote to adjust the TV volume
level in both hearing aids.
Note: The TV volume in the hearing aids is normally not affected by volume adjustments from the
TV Remote Control.
Adjust the volume by pressing
up or down briefly. Repeat
the brief press for further
adjustments.
Mute using your Remote Control
While watching TV you can switch off the microphones in your
hearing aids, so that only the sound from the TV is heard.
Note: The mute and volume functions are optional and can be customized by your
hearing care professional.
Press and hold the volume down button
for approx 3 seconds until the surrounding
sound is muted. You will hear a confirmation
beep indicating that the microphones
in the hearing aids are now muted.
To unmute simply press volume
up or down briefly.
Page 18

34 35
About Installation Daily use Warnings Additional information
Start TV sound using the Oticon ON app
The Oticon ON app is an optional accessory to your wireless
hearing aids. The app works with most modern Android and
Apple smartphones.
More information: www.oticon.ca/connectivity
Turn o TV sound using the Oticon ON app
To stop the sound from the TV simply change to the wanted
program in your hearing aids.
Once a TV Adapter has been paired to
your hearing aids it will be available
as a program in your hearing aids and
visible as a source on the Oticon ON
app. To listen to TV simply select the
TV source from the app.
Page 19

P1
0 0
36 37
About Installation Daily use Warnings Additional information
Volume control using the Oticon ON app
Swipe your finger up or down to adjust the volume.
Mute using the Oticon ON app
While watching TV you can switch off the microphones in your
hearing aids, so that only the sound from the TV is heard.
Press the volume indicator to mute
the surrounding sounds. You will hear
a confirmation beep indicating that
the microphones in the hearing aids
are now muted.
To unmute simply press the volume
indicator again, or swipe your finger
up or down to adjust the volume.
Page 20

OUT
IN
R
L
POWER
38 39
About Installation Daily use Warnings Additional information
More than one user
An unlimited number of hearing aid users can listen to the sound
from one TV Adapter.
Pair the hearing aids to the TV Adapter as described on page 24.
Removing a user/clearing pairings
To remove a user from your TV Adapter perform a system reset and
re-pair the required hearing aids.
1. Reset system: Press and hold the setup button for more than 5 seconds
2. Indicators fade blue to indicate no pairings
3. Re-pair the required instruments (see page 24)
TV Adapter Description
No pairings
Fading
Setup
Page 21

40
About Installation Daily use Warnings Additional information
Cleaning and maintenance
Use a soft, dry cloth to clean the TV Adapter.
IMPORTANT NOTICE
The TV Adapter must never be washed or immersed in water or
other liquids.
Page 22

42 43
About Installation Daily use Warnings Additional information
You should familiarize yourself fully
with the following general warnings
and the entire contents of this
booklet before using your TV Adapter
to ensure personal safety and correct
use. Consult your hearing care
professional if you experience
unexpected operations or events
with your TV Adapter.
Choking hazards and risk of
swallowing small parts
• Your TV Adapter and its parts
should be kept out of reach of
children and anyone who might
swallow these items or otherwise
cause injury to themselves.
If small parts are swallowed,
see a doctor immediately.
Explosives
• The power source in your TV
Adapter has insufficient energy
to cause fire in normal usage
conditions. The TV Adapter has not
been tested for compliance with
international standards concerning
explosive environments. We
recommend not to use your TV
Adapter in areas where there is a
danger of explosions.
Interference
• Your TV Adapter has been
thoroughly tested for interference
according to the most stringent
international standards. However,
interference with your TV adapter
and other devices may occur, (e.g.
some mobile telephones, citizens
band devices and other wireless
devices). If this occurs, increase the
distance between the TV adapter
and the interfering device.
Connection to external equipment
• The safety of the use of the TV
Adapter with an auxiliary input cable is determined by the
external signal source. When
the input cable is connected to
equipment plugged into a wall
outlet, this equipment must
comply with IEC-60065, IEC-60601
or equivalent safety standards.
Warnings
Warnings
Page 23

44 45
About Installation Daily use Warnings Additional information
Technical information
Model name TVA3
Operating conditions Temperature: +5°C to +40°C
Humidity: 15% to 93%, non-condensing
Atmospheric pressure: 700 hPa to 1060 hPa
Storage and
transportation conditions
Temperature and humidity shall not exceed the below
limits for extended periods during transportation
and storage:
Temperature: -25 °C to +70 °C
Humidity: 15% to 93%, non-condensing
The TV Adapter contains a wireless transmitter using 2.4 GHz technology.
The emission power from the TV Adapter is max. 17.1 dBm EIRP.
The TV Adapter complies with international standards concerning
electromagnetic compatibility and human exposure.
Due to the limited space available on the TV Adapter relevant approval
markings can be found in this document.
USA and Canada
This device is certified under:
FCC ID: 2ACAHTVA3
IC: 11936A-TVA3
The device complies with Part 15 of the FCC Rules and with Industry Canada’s
licence-exempt RSSs.
Operation is subject to the following two conditions:
1. This device may not cause harmful interference.
2. This device must accept any interference received, including interference
that may cause undesired operation.
Changes or modifications not expressly approved by the party responsible for
compliance could void the user’s authority to operate the equipment.
Additionals
Page 24

46 47
About Installation Daily use Warnings Additional information
International warranty
Your TV Adapter is covered by an
international limited warranty issued
by the manufacturer for a period of
12 months from the date of
delivery. This limited warranty
covers manufacturing and material
defects in the device itself, but
not in accessories such as e.g.
batteries, cables, power supplies,
etc. Problems arising from improper/
incorrect handling or care, excessive
use, accidents, repairs made by an
unauthorized party, exposure to
corrosive conditions, damage due to
foreign objects entering the device
or incorrect adjustments are NOT
covered by the limited warranty and
may void it. The above warranty does
not affect any legal rights that you
might have under applicable national
legislation governing sale
of consumer goods. Your hearing
care professional may have issued
a warranty that goes beyond
the clauses of this limited
warranty. Please consult him/
her for further information.
If you need service
Take your TV Adapter to your hearing
care professional, who may be able
to sort out minor problems and
adjustments immediately.
Note: This equipment has been tested and found to comply with the limits for
a Class B digital device, pursuant to part 15 of the FCC Rules. These limits are
designed to provide reasonable protection against harmful interference in a
residential installation. This equipment generates, uses and can radiate radio
frequency energy and, if not installed and used in accordance with the
instructions, may cause harmful interference to radio communications.
However, there is no guarantee that interference will not occur in a particular
installation. If this equipment does cause harmful interference to radio or
television reception, which can be determined by turning the equipment off and
on, the user is encouraged to try to correct the interference by one or more of
the following measures:
• Reorient or relocate the receiving antenna.
• Increase the separation between the equipment and receiver.
• Connect the equipment into an outlet on a circuit different from that to which
the receiver is connected.
• Consult the manufacturer or an experienced radio/TV technician for help.
To comply with FCC RF exposure requirements, the device and the antenna for
this device must be installed to ensure a minimum separation distance of 20 cm
or more from a person’s body. Other operating configurations should be avoided.
Page 25

48 49
Local sales office
Oticon Canada
1-6950 Creditview Rd.
Mississauga, ON L5N0A6
www.oticon.ca
The manufacturer declares that this
TV adapter is in compliance with the
essential requirements and other
relevant provisions of Directive
1999/5/EC.
Declaration of Conformity is available
at the manufacturer.
SBO Hearing A/S
Kongebakken 9
DK-2765 Smørum
Denmark
www.sbohearing.com
Waste from electronic
equipment must be
handled according to
local regulations.
E2831
About Installation Daily use Warnings Additional information
Page 26

48 49
Bureau des ventes local
Oticon Canada
1-6950 Creditview Rd.
Mississauga, ON L5N0A6
www.oticon.ca
Le fabricant certifie que cet
adaptateur TV est conforme avec
les exigences essentielles et
autres dispositions pertinentes
de la Directive 1999/5/CE.
La déclaration de conformité est
disponible auprès du fabricant.
SBO Hearing A/S
Kongebakken 9
DK-2765 Smørum
Denmark
www.sbohearing.com
Les déchets
électroniques doivent
être traités selon la
législation locale.
E2831
À propos de Installation Usage quotidien Avertissements Informations techniques
Page 27

46 47
Garantie internationale
Votre adaptateur TV est couvert par
une garantie limitée internationale
assurée par le fabricant pour une
période de 12 mois à compter
de la date de livraison. Cette
garantie est limitée aux défauts
de fabrication et matériaux de
l'appareil à proprement parler. Elle
ne porte pas sur les accessoires
tels que les piles, câbles, modules
d'alimentation, etc. Les problèmes
provoqués par une manipulation ou
un entretien inapproprié(e), une
utilisation excessive, un accident,
des réparations effectuées par un
tiers non agréé, une exposition
à des conditions corrosives, des
dommages dus à la pénétration de
corps étrangers dans l'appareil ou
des ajustements incorrects ne sont
PAS couverts par la garantie limitée
et risqueraient de l'annuler. La
garantie ci-dessus n’affecte pas les
droits juridiques que pourraient vous
accorder les législations nationales
régissant la vente des biens de
consommation. Votre professionnel
de l'audition peut offrir une garantie
plus large que celle prévue par
les dispositions de la présente
garantie limitée. Pour davantage
d’informations, veuillez le consulter.
Si vous avez besoin de
services d'entretien
Amenez votre adaptateur TV chez
votre audioprothésiste, qui devrait
être en mesure de corriger les
problèmes mineurs et d'apporter
d'éventuels ajustements nécessaires.
À propos de Installation Usage quotidien Avertissements Informations techniques
Note : Cet appareil a été testé et reconnu conforme aux normes applicables aux
appareils Informatiques de Classe B, en vertu de l’article 15 des règlementations
de la FCC. Ces limites sont destinées à assurer une protection raisonnable ontre
les interférences nuisibles, dans une installation résidentielle. Cet appareil
génère, utilise et émet de l’énergie de fréquences radio et peut, en cas
d’installation ou d’utilisation non conforme aux instructions, engendrer des
interférences nuisibles au niveau des communications radio. Cependant,
aucune garantie n’est donnée que des interférences ne seront pas générées
dans une installation en particulier. En cas d’interférences avec la réception
radiophonique ou télévisuelle, qui peuvent être vérifiées en mettant
l’équipement hors, puis sous tension, l’utilisateur peut tenter de résoudre le
problème de l’une ou plusieurs des façons suivantes :
• Réorienter ou déplacer l’antenne de réception.
• Éloigner l’équipement du poste de réception.
• Branchez l’appareil sur un circuit électrique différent de celui où le récepteur
est branché.
• Consulter le fabricant ou un technicien expérimenté de radio ou de télévision.
À des fins de conformité avec les directives relatives à
l'exposition aux radiofréquences, l'appareil et l'antenne de cet
appareil doivent être installés à au moins 20 cm de distance de
quiconque. Toute autre configuration devrait être évitée.
Page 28

44 45
À propos de Installation Usage quotidien Avertissements Informations techniques
Informations techniques
Nom du modèle TVA3
Conditions de fonctionnement Température : +5°C à +40°C
Humidité : 15% à 93%, sans condensation
Pression atmosphérique : 700 hPa à 1060 hPa
Conditions de rangement
et de transport
La température et l'humidité ne doivent pas excéder
les limites ci-dessous pendant des périodes prolongées
lors du transport et du stockage:
Température : -25 °C à +70 °C
Humidité : 15% à 93%, sans condensation
L'adaptateur TV contient un émetteur sans fil avec technologie 2.4 GHz.
La puissance d'émission de l'adaptateur TV est de max. 17.1 dBm EIRP.
L'adaptateur TV est conforme aux normes internationales sur la
compatibilité électromagnétique et l'exposition humaine.
En raison de l'espace disponible limité sur l'adaptateur TV, tous les
marquages de certification sont présents dans ce document.
É-U et Canada
Cet appareil est certifié selon :
FCC ID: 2ACAHTVA3
IC: 11936A-TVA3
L’appareil est conforme à la Partie 15 des règles FCC et RSSs d’Industrie Canada.
Le fonctionnement est soumis aux deux conditions suivantes:
1. Cet appareil ne risque pas de causer d'interférences dommageables.
2. Cet appareil doit accepter les interférences reçues, y compris les
interférences pouvant entraîner un fonctionnement indésirable.
Les changements ou les modifications non expressément approuvés
par la partie responsable de la conformité pourraient annuler
l'autorité de l'utilisateur à faire fonctionner l'appareil.
Page 29

42 43
À propos de Installation Usage quotidien Avertissements Informations techniques
Vous devriez vous familiariser avec
les avertissements généraux suivants
ainsi qu'avec l'entièreté du contenu
du présent manuel avant d'utiliser
votre adaptateur TV afin d'assurer
votre sécurité et un usage conforme.
Consultez votre professionnel de
l'audition si vous êtes confronté à
des opérations ou des événements
inattendus avec votre adaptateur TV.
Risques d'étouffement et risque
d'ingestion de petites pièces
• Votre adaptateur TV et ses
composants doivent être tenus
hors de portée des enfants
et de toute autre personne
susceptible de les avaler ou
de se blesser. Si une personne
avale accidentellement une pile
ou une petite pièce, consultez
un médecin d'urgence.
Explosifs
• La source d’alimentation dans
votre adaptateur TV ne produit pas
assez d’énergie pour provoquer
un incendie dans des conditions
normales d’utilisation. L'adaptateur
TV n’a pas été testé pour en vérifier
la conformité avec les normes
internationales concernant les
environnements explosifs. Il est
recommandé de ne pas utiliser
votre adaptateur TV dans les zones
où il existe un danger d’explosion.
Interférences
• L'adaptateur TV a fait l'objet
de tests approfondis selon les
normes internationales les plus
rigoureuses pour en détecter les
interférences. Cependant, des
interférences peuvent toujours
survenir entre votre adaptateur
TV et d'autres appareils (par ex.
certains téléphones cellulaires,
appareils à bande publique,
systèmes d'alarme en magasin
et autres appareils sans fil). Si
cela se produit, augmentez la
distance entre votre adaptateur
TV et l’appareil concerné.
Branchement à de
l'équipement externe
• La sûreté de l'usage de l'adaptateur
TV avec un câble d'entrée auxiliaire
est déterminée par la source
du signal externe. Si le câble
d'entrée est branché à un appareil
branché dans une prise murale,
cet appareil doit être conforme
à IEC-60065, IEC-60601 ou une
norme de sécurité équivalente.
Avertissements
Page 30

40
Nettoyage et entretien
Utilisez un chiffon doux et sec pour nettoyer l'adaptateur TV.
REMARQUE IMPORTANTE
L'adaptateur TV ne doit jamais être lavé ni immergé dans l'eau ou un
autre liquide.
À propos de Installation Usage quotidien Avertissements Informations techniques
Page 31

OUT
IN
R
L
POWER
38 39
Plus d'un utilisateur
Un nombre illimité d'utilisateurs d'aides auditives
peuvent écouter le son d'un adaptateur TV.
Couplez les aides auditives à l'adaptateur
TV tel que décrit à la page 24.
Retirer un utilisateur / supprimer les couplages
Pour retirer un utilisateur de votre adaptateur TV,
réinitialisez le système à ses réglages d'usine et refaites
le couplage des aides auditives nécessaires.
1. Système de réinitialisation : Tenez enfoncé le bouton
de configuration pendant plus de 5 secondes
2. Les témoins devraient s'allumer en bleu pour
indiquer l'absence de couplages
3. Couplez de nouveau les instruments
nécessaires (voir page 24).
Adaptateur TV Description
Aucun couplage
Faiblissante
Configuration
À propos de Installation Usage quotidien Avertissements Informations techniques
Page 32

P1
0 0
36 37
Contrôle du volume avec l'app Oticon ON
Ajustez le volume en faisant glisser votre
doigt vers le haut ou vers le bas.
Mise en sourdine avec l'app Oticon ON
Vous pouvez éteindre le micro dans vos aides auditives
pendant que vous regardez la télévision de façon
à n'entendre que les sons du téléviseur.
Appuyez sur l'indicateur de volume
pour mettre les sons environnants
en sourdine. Vous entendrez un bip
de confirmation dans les microphones
pour indiquer que les aides auditives
ont été mises en sourdine.
Pour réactiver le son, il suffit
d'appuyer de nouveau sur l'indicateur
de volume ou de glisser votre
doigt vers le haut ou vers le bas.
À propos de Installation Usage quotidien Avertissements Informations techniques
Page 33

34 35
Activer la réception de sons TV
avec l'app Oticon ON
L'app d'Oticon ON est un accessoire facultatif pour vos aides
auditives sans fil. L'application fonctionne avec la plupart des
téléphones intelligents Android ou Apple.
Plus d'informations : www.oticon.ca/connectivity
Éteindre les sons TV avec l'app Oticon ON
Pour éteindre les sons du téléviseur, il suffit de changer de
programme dans vos aides auditives.
Une fois vos aides auditives couplées
avec votre adaptateur TV, vous
verrez ce dernier apparaître comme
programme dans vos aides auditives
et comme source dans l'app d'Oticon
ON. Pour écouter la TV, il suffit de
sélectionner la source «TV»
dans l'app.
À propos de Installation Usage quotidien Avertissements Informations techniques
Page 34

32 33
Contrôle du volume avec la télécommande
Utilisez le bouton de volume sur la télécommande pour modifier
le volume du son dans vos aides auditives.
Remarque : Le volume de la TV dans les aides auditives n'est pas normalement affecté par l'ajustement du
volume à l'aide de la télécommande du téléviseur.
Ajustez le volume en appuyant
brièvement sur le bouton du
haut ou du bas. Appuyez de
nouveau brièvement pour un
ajustement en précision.
Mise en sourdine avec la télécommande
Vous pouvez éteindre le micro dans vos aides auditives pendant
que vous regardez la télévision de façon à n'entendre que les sons
du téléviseur.
Remarque : Les fonctions de mise en sourdine et d'ajustement du volume sont optionnelles et peuvent être
configurées par votre professionnel de l'audition.
Maintenez enfoncé le bouton servant à
baisser le volume pendant 3 secondes,
jusqu'à ce que le son environnant s'éteigne.
Vous entendrez un bip de confirmation dans
les microphones pour indiquer que les aides
auditives ont été mises en sourdine.
Pour réactiver le son, il suffit d'appuyer
brièvement sur la touche du haut ou du bas.
À propos de Installation Usage quotidien Avertissements Informations techniques
Page 35

P2 TVP1
30 31
Activer la réception de sons TV avec la
télécommande des aides auditives
La télécommande est un accessoire facultatif
pour vos aides auditives sans fil.
Une fois vos aides auditives couplées avec votre adaptateur
TV, vous verrez ce dernier apparaître comme programme
dans vos aides auditives. Pour écouter la télévision, il
vous suffit d'appuyer et de maintenir enfoncé le sélecteur
de programme pour changer de programme (A).
Le cycle des programmes dépendra des programmes
déjà disponibles dans vos aides auditives.
L'indicateur de programme TV, qui est différent
des indicateurs de programme, se fera entendre
une fois le programme de TV sélectionné.
Éteindre les sons TV avec la télécommande des
aides auditives
Pour éteindre les sons du téléviseur, il suffit de changer de
programme dans vos aides auditives.
Plus d'informations : www.oticon.ca/connectivity
Changer de programme
A
À propos de Installation Usage quotidien Avertissements Informations techniques
Page 36

28 29
À propos de Installation Usage quotidien Avertissements Informations techniques
Contrôle du volume avec vos aides auditives
Pour modifier le volume du son dans vos aides auditives, utilisez le
bouton de volume sur ces dernières. Ajustez le volume en appuyant
brièvement sur le bouton du haut ou du bas. Pour une plus grande
précision, appuyez brièvement à maintes reprises.
Remarque : Le volume de la TV dans les aides auditives n'est pas normalement affecté par l'ajustement du
volume à l'aide de la télécommande du téléviseur.
REMARQUE IMPORTANTE
Veuillez consulter le mode d'emploi de vos aides auditives pour plus de
détails sur les fonctions de votre solution spécifique.
Une brève pression sur
l'aide auditive de DROITE
augmente le volume.
Une brève pression sur
l'aide auditive de GAUCHE
abaisse le volume.
Page 37

P2 TVP1
Changer de programme
26 27
À propos de Installation Usage quotidien Avertissements Informations techniques
Éteindre les sons TV avec vos aides auditives
Pour éteindre les sons du téléviseur, il suffit de changer de
programme dans vos aides auditives.
Activer la réception de sons TV
avec vos aides auditives
Une fois vos aides auditives couplées avec votre adaptateur
TV, vous verrez ce dernier apparaître comme programme dans
vos aides auditives. Pour écouter la télévision, il vous suffit
d'appuyer et de maintenir enfoncé la touche des programmes
sur vos aides auditives pour changer de programme.
Le cycle des programmes dépendra des programmes
déjà disponibles dans vos aides auditives.
L'indicateur de programme TV, qui est différent des
indicateurs de programme des aides auditives, se fera
entendre une fois le programme de TV sélectionné.
REMARQUE IMPORTANTE
Veuillez consulter le mode d'emploi de vos aides auditives pour plus de
détails sur les fonctions de votre solution spécifique.
Page 38

24 25
REMARQUE IMPORTANTE
Veuillez consulter le mode d'emploi de vos aides auditives pour plus de
détails sur les fonctions de votre solution spécifique.
Assurez-vous que l'adaptateur
TV est sous tension.
Ouvrez et fermez le compartiment
de pile sur chacune de
vos aides auditives.
Placez chaque aide auditive à
proximité ou sur l'adaptateur TV.
Le couplage est terminé lorsque
le témoin de fonctionnement et
le témoin TV sont allumés en bleu
pendant environ 30 secondes.
Adaptateur TV Description
Couplage terminé
Remarque : Cet adaptateur TV peut être couplé à un nombre illimité d'aides auditives. Tous les utilisateurs
seront en mesure d'entendre le même son. Consultez la page 38 pour plus de détails.
Coupler l'adaptateur avec vos aides auditives
Avant d'utiliser votre adaptateur TV, vous devez
le coupler avec vos aides auditives.
L'appairage ne s'effectue qu'une seule fois
et il ne dure que 20 à 60 secondes.
À propos de Installation Usage quotidien Avertissements Informations techniques
Page 39

1 2
L
TUO
IN
R
L
R
Audio
Out
1 3
L
TUO
IN
R
L
R
Audio
Out
22 23
À propos de Installation Usage quotidien Avertissements Informations techniques
Boîte 2
Branchement par SCART
1. Utilisez l'adaptateur SCART de la boîte n° 2 (A).
2. Branchez le câble RCA dans les bornes rouge et
blanche de l'adaptateur SCART (B).
3. Branchez l'adaptateur SCART à la sortie SCART de votre téléviseur (C).
4. Branchez les connecteurs RCA dans l'entrée RCA de l'adaptateur TV (D).
5. Reportez-vous à la page 24 pour coupler
l'adaptateur TV avec vos aides auditives.
Remarque importante : La sortie audio du connecteur SCART
peut dépendre de la source sélectionnée sur le téléviseur.
Par exemple, certains téléviseurs rendent uniquement
disponible le son du téléviseur sur la sortie SCART (et
pas le son d'un lecteur DVD connecté, par exemple).
B
C
A
D
Page 40

L
TUO
IN
R
1 2
L
TUO
IN
R
1 3
20 21
À propos de Installation Usage quotidien Avertissements Informations techniques
Branchement avec adaptateur mini-jack
1. Utilisez l'adaptateur mini-jack de la boîte n° 2 (A).
2. Branchez le câble RCA à l'adaptateur mini-jack (B1).
3. Branchez le mini-jack au téléviseur, il s'agit
généralement de la sortie écouteurs (B2).
4. Branchez les connecteurs RCA dans l'entrée RCA de l'adaptateur TV (C).
5. Reportez-vous à la page 24 pour coupler
l'adaptateur TV avec vos aides auditives.
Remarque importante : Les haut-parleurs du téléviseur
pourraient être mis en sourdine lors de la connexion
à la sortie écouteurs pour que le son soit uniquement
diffusé dans les aides auditives/l'adaptateur TV.
B
B1
B2
Boîte 2
A
D
Page 41

L
TUO
IN
R
1 2
L
R
Audio
Out
L
TUO
IN
R
1 3
L
R
Audio
Out
18 19
À propos de Installation Usage quotidien Avertissements Informations techniques
Branchement par RCA
1. Utilisez le câble RCA de la boîte n° 2 (A).
2. Branchez le câble RCA à la sortie RCA de votre téléviseur (B) / système
cinéma maison. (Généralement marquée « L – R AUDIO OUT » et à
l'arrière du téléviseur ou sur le panneau inférieur.)
3. Branchez le câble RCA aux ports RCA (C) situés
à l'arrière de l'adaptateur TV.
4. Reportez-vous à la page 24 pour coupler
l'adaptateur TV avec vos aides auditives.
Remarque importante : Il pourrait s'avérer nécessaire
de configurer votre téléviseur pour que la bonne
sortie audio soit disponible sur la sortie RCA.
B
C
C
A
Boîte 2
Page 42

L
TUO
IN
R
1 3
2
L
TUO
IN
R
1 3
2
16 17
À propos de Installation Usage quotidien Avertissements Informations techniques
Branchement avec TOSLINK
1. Utilisez le câble TOSLINK de la boîte n° 3 (A).
2. Retirez la protection en plastique du câble TOSLINK. (B) B
3. Branchez le câble TOSLINK à la sortie TOSLINK de
votre téléviseur / système cinéma maison (C).
4. Branchez le câble TOSLINK à l'entrée TOSLINK rose (D) de l'adaptateur TV.
5. La sortie TOSLINK (E) peut être utilisée pour brancher
d'autres appareils TOSLINK tels que les décodeurs Dolby
externes et les systèmes de son surround, etc.
6. Reportez-vous à la page 24 pour coupler
l'adaptateur TV avec vos aides auditives.
Remarque importante : il pourrait s'avérer nécessaire de configurer
votre téléviseur, lecteur DVD ou système de cinéma maison pour
que la bonne sortie audio soit disponible sur la sortie TOSLINK.
Boîte 3
B
C
C
A
D
E
Page 43

L
TUO
IN
R
1 3
2
1 3
L
TUO
IN
R
L
R
Audio
Out
L
TUO
IN
R
1 3
L
R
Audio
Out
L
TUO
IN
R
1 3
14 15
À propos de Installation Usage quotidien Avertissements Informations techniques
Brancher l'adaptateur TV au téléviseur
Il existe quatre façons de brancher l'adaptateur TV au téléviseur.
Connexion Page
TOSLINK. Soit Digital Stereo (PCM) ou Dolby® Digital * 16
Sortie audio RCA G+D 18
Sortie audio mini-jack (généralement sortie écouteurs) 20
Sortie audio SCART G+D 22
*Dolby et le symbole du double D sont des marques de commerce de Dolby Laboratories.
Nous recommandons d'utiliser le TOSLINK.
Veuillez lire les pages suivantes pour trouver la configuration qui
convient à votre téléviseur.
RCA (p. 18)
SCART (p. 22)
TOSLINK (p. 16)
Mini jack (p. 20)
Plus d'informations : www.oticon.ca/connectivity
Page 44

TUO
IN
POWER
R
L
1 3
12 13
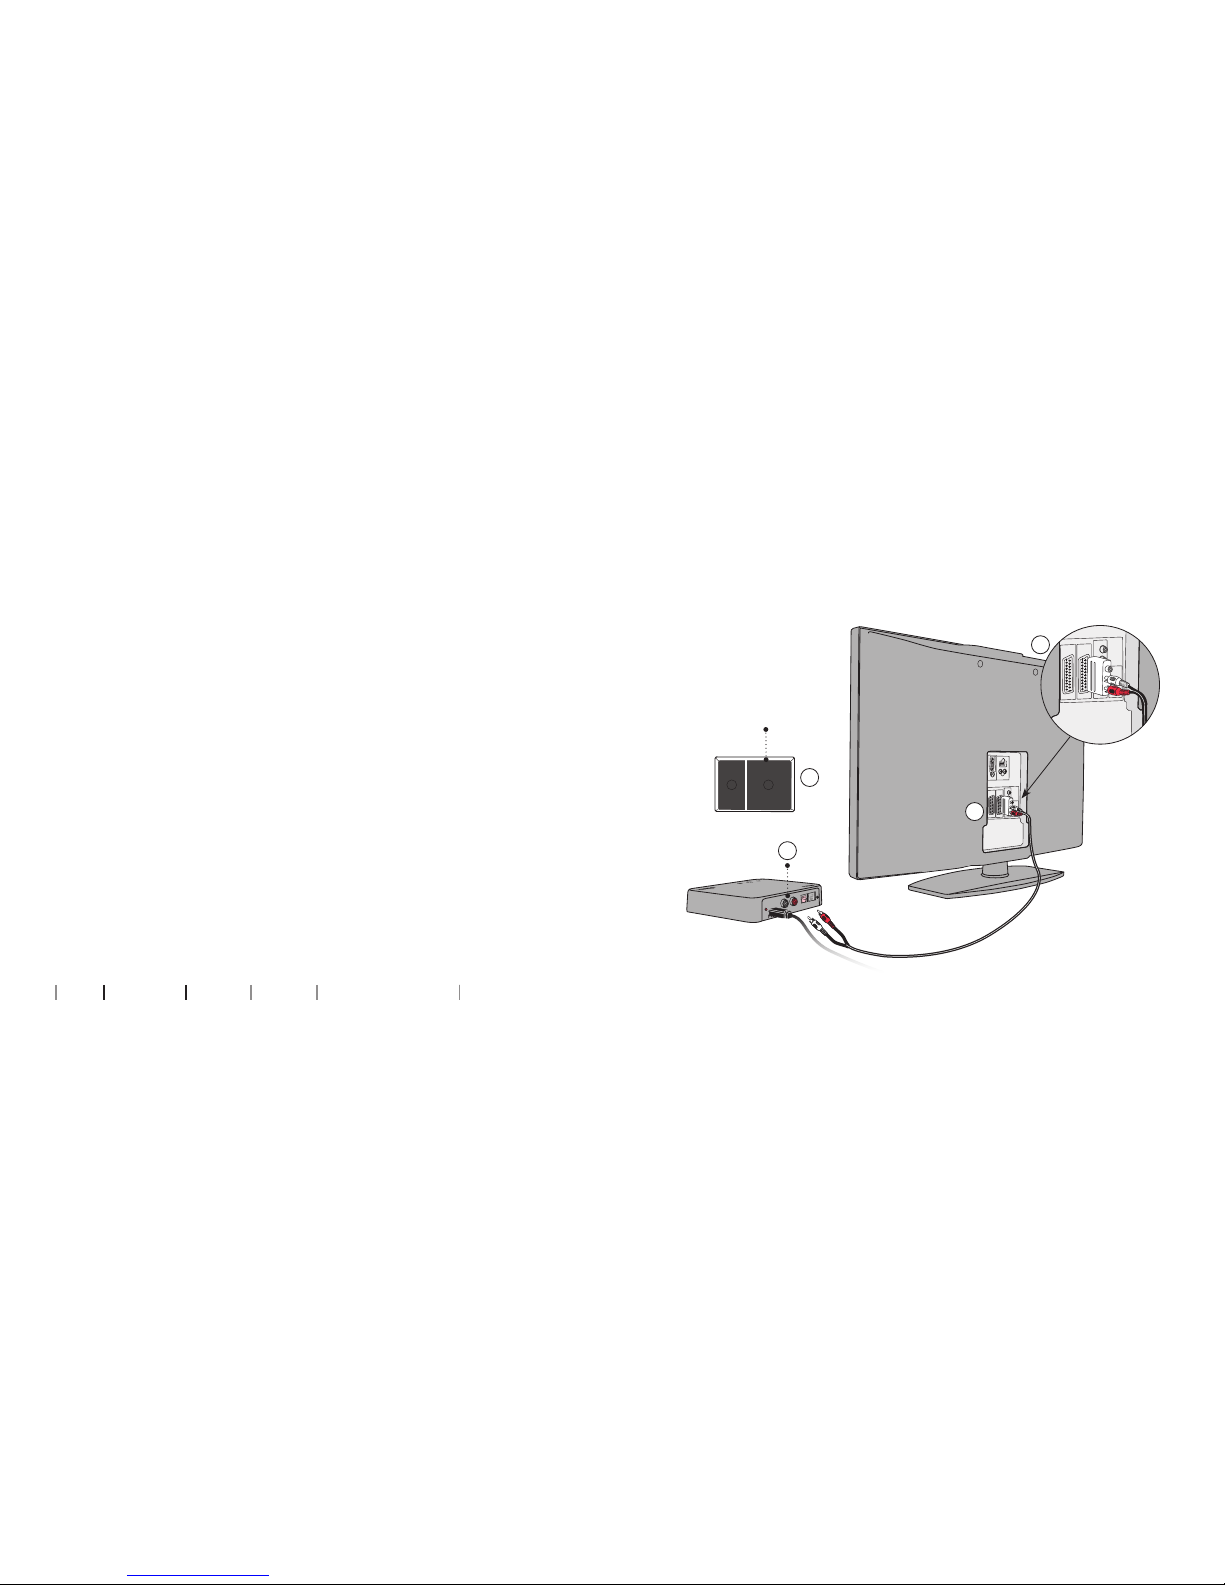
À propos de Installation Usage quotidien Avertissements Informations techniques
Brancher l'adaptateur TV à une prise électrique
Commencez par brancher l'adaptateur TV à une prise électrique.
Utilisez le bloc d'alimentation de la boîte 1
1. Branchez le câble d'alimentation dans la prise
«alimentation» de l'adaptateur TV (A).
2. Branchez le bloc d'alimentation dans la prise électrique (B).
3. Assurez-vous que l'appareil est sous tension; après quelques secondes,
les témoins devraient prendre une couleur bleue pour indiquer que
l'appareil doit être couplé avec vos aides auditives. Consultez la page 24.
Boîte 1
B
C
A
Page 45

10 11
À propos de Installation Usage quotidien Avertissements Informations techniques
Installation
Utiliser l'adaptateur TV pour la première fois
Avant d'utiliser vos aides auditives avec votre TV, l'adaptateur
TV doit être branché dans une prise électrique et dans
le téléviseur, puis couplé avec vos aides auditives.
Voici un guide étape-par-étape pour installer l'adaptateur TV.
Toutes les pièces nécessaires à l'installation
sont comprises dans la boîte.
Positionner l'adaptateur TV
Positionnez l'adaptateur près du téléviseur, à l'horizontale et
en ligne de mire directe avec les aides auditives.
Page 46

OUT
IN
R
L
POWER
8 9
À propos de Installation Usage quotidien Avertissements Informations techniques
Aucune lumière
* Essayez d'autres prises d'entrée
** Contactez votre professionnel de l'audition
Clignotante Faiblissante Stable
Derrière
Bloc d'alimentation
Devant
TV
TOSLINK entrée
Mode
TOSLINK sortie
RCA gauche et droite
Alimentation
Configuration
Plus d'informations : www.oticon.ca/connectivity
Aperçu de l'adaptateur TV
Mode
Témoin de
fonctions
Témoin
TV
En marche, aucune aide auditive couplée
Couplage terminé (la lumière s'allume
pendant 30 secondes)
En marche, aucune diffusion
RCA inséré, diffusion en cours
TOSLINK inséré, diffusion en cours (numérique)
TOSLINK inséré, diffusion en cours (signal invalide)*
État défectueux *
Page 47

TV Adapter 3.0
Instructions for use
6
À propos de Installation Usage quotidien Avertissements Informations techniques
Adaptateur TV Bloc
d'alimentation
Câble RCA
TOSLINK
Adaptateur SCART Adaptateur mini-jackLe présent guide
(Guide d'installation et mode d'emploi)
Contenu de l'emballage
L'adaptateur TV contient les éléments suivants :
Page 48

Sommaire
À propos de
Contenu de l’emballage 6
Aperçu de l’adaptateur TV 8
Installation
Installation 10
Positionner l’adaptateur TV 11
Brancher l’adaptateur TV à une prise électrique 12
Brancher l’adaptateur TV au téléviseur 14
Branchement avec TOSLINK 16
Branchement par RCA 18
Branchement avec adaptateur mini-jack 20
Branchement par SCART 22
Coupler l’adaptateur avec vos aides auditives 24
Usage quotidien
Activer la réception de sons TV avec vos aides auditives 26
Éteindre les sons TV avec vos aides auditives 27
Contrôle du volume avec vos aides auditives 28
Activer la réception de sons TV avec la télécommande
des aides auditives 30
Éteindre les sons TV avec la télécommande des aides auditives 31
Contrôle du volume avec la télécommande 32
Mise en sourdine avec la télécommande 33
Activer la réception de sons TV avec l’app Oticon ON 34
Éteindre les sons TV avec l’app Oticon ON 35
Contrôle du volume avec l’app Oticon ON 36
Mise en sourdine avec l’app Oticon ON 37
Plus d’un utilisateur 38
Retirer un utilisateur / supprimer les couplages 39
Nettoyage et entretien 40
Avertissements
Avertissements 42
Suppléments
Informations techniques 44
Garantie internationale 47
Page 49

Introduction de ce mode d'emploi
Ce mode d'emploi se veut un guide pour l'utilisation et l'entretien de
votre nouvel adaptateur TV. Nous vous invitons à lire attentivement
ce mode d'emploi, notamment la section Avertissements. Vous
devriez ainsi être en mesure de profiter au maximum de votre
nouvel adaptateur TV.
Pour toute question sur votre adaptateur TV, veuillez contacter
votre pressionnel de l'audition.
À propos de Installation Usage quotidien Avertissements Informations techniques
Pour plus de facilité, ce mode d'emploi contient une barre de
navigation qui vous aidera à vous repérer facilement dans les
différentes sections.
Fabriqué sous licence de Dolby Laboratories. Dolby et le symbole
du double D sont des marques de commerce de Dolby Laboratories.
Usage prévu
L'adaptateur TV est conçu pour transmettre à des aides auditives le
son émis par une TV ou un autre appareil électronique audio.
L'adaptateur TV est destiné aux enfants (> de 36 mois) et les
adultes qui utilisent un appareil auditif.
168382CA-FR / 27.04.16
168382CA-FR / 27.04.16
Page 50

Adaptateur TV 3.0
Mode d'emploi
0000168382000001
 Loading...