

Page 1
USER INSTRUCTIONAL BROCHURE
BTE
Page 2

Congratulations on your digital hearing instruments.
They represent some of the most advanced technology
currently available in hearing care. Carefully follow
these instructions when using and maintaining them.
They will help you fully realize their benefi ts and
ensure their continued high performance.
Important notice
Please familiarize yourself with the entire
contents of this booklet before using your hearing
instruments. It contains various statements,
instructions and important information about the
use and handling of your hearing instruments and
batteries.
Contents
Instrument view 4
Turning your hearing instrument on 5
Turning your hearing instrument off 5
Inserting your hearing instrument 6
Function switch 8
Telecoil 10
Volume Control 11
Changing batteries 12
Tamper-resistant battery door (optional) 14
Extended communication 15
Mounting of accessories 15
Ear-level FM systems 16
Dedicated receiver for Lexis FM 17
Direct Audio Input (DAI) 18
Adjustment of DAI 19
Audible and visible status indicators 20
Daily care of your hearing instruments 22
Using your hearing instruments 25
Common problems and their solutions 30
International warranty 32
Service 32
Page 3
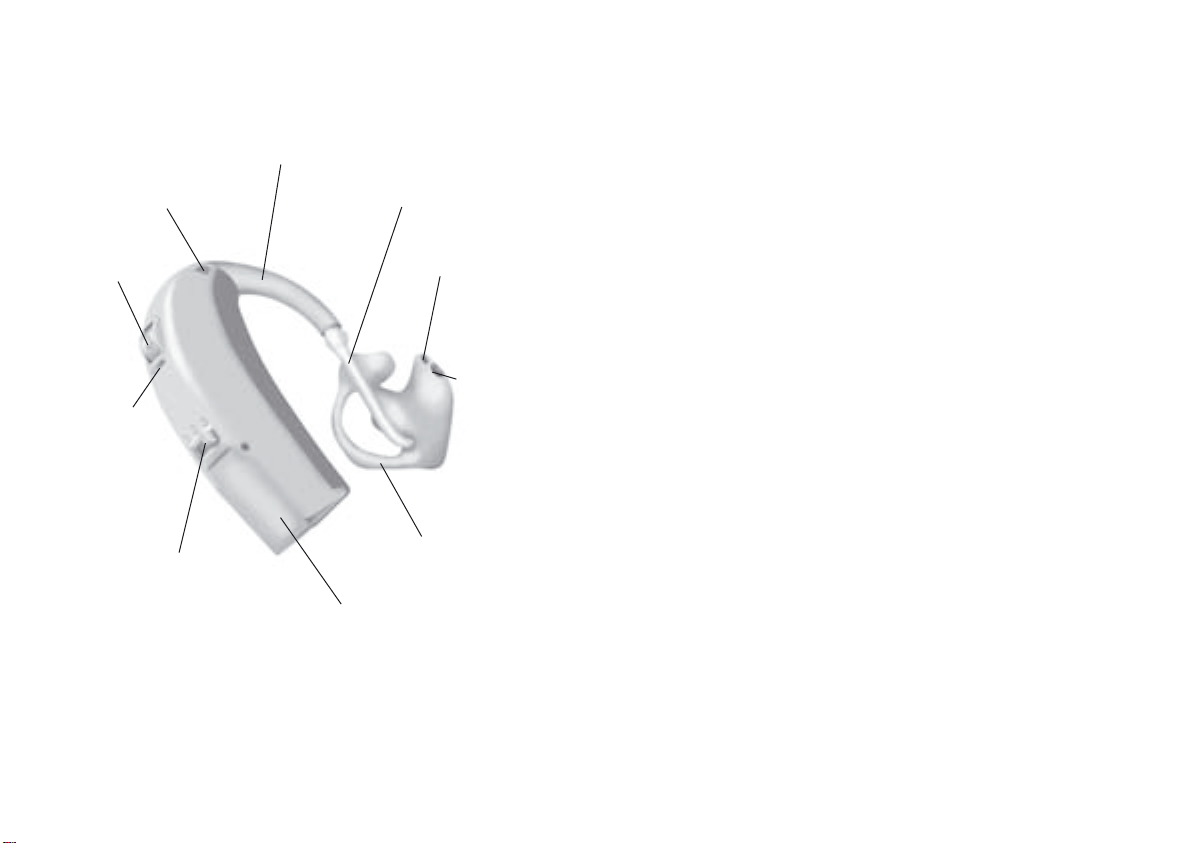
BTE – Instrument view
Turning your instruments ON
When turning your instrument ON make sure:
Microphone
opening
Volume
control
on/off
Visual
status
indicator
(LED)
Function
switch: 1 2 3
Battery size: 675
Sound hook
Battery door
on/off
Plastic tube
Sound outlet
Earmold
Ventilation
opening
1) The battery door is closed.
2) The volume control is turned up.
3) The function switch is set to a
microphone program.
When the instrument is turned on you will hear a series
of beeps indicating which program is active, and that
the battery is working.
The LED will fl ash to indicate the instrument is on, or
light up permanently depending on confi guration.
Turning your instruments OFF
When turning your instrument OFF you can use one of
the following options:
1) Turn the volume control down until it clicks.
2) Set the function switch to OFF if it has been
programmed with an OFF position.
3) Open the battery door slightly.
To preserve the battery, make sure your hearing
instrument is switched off when you are not wearing it.
4 5
Page 4
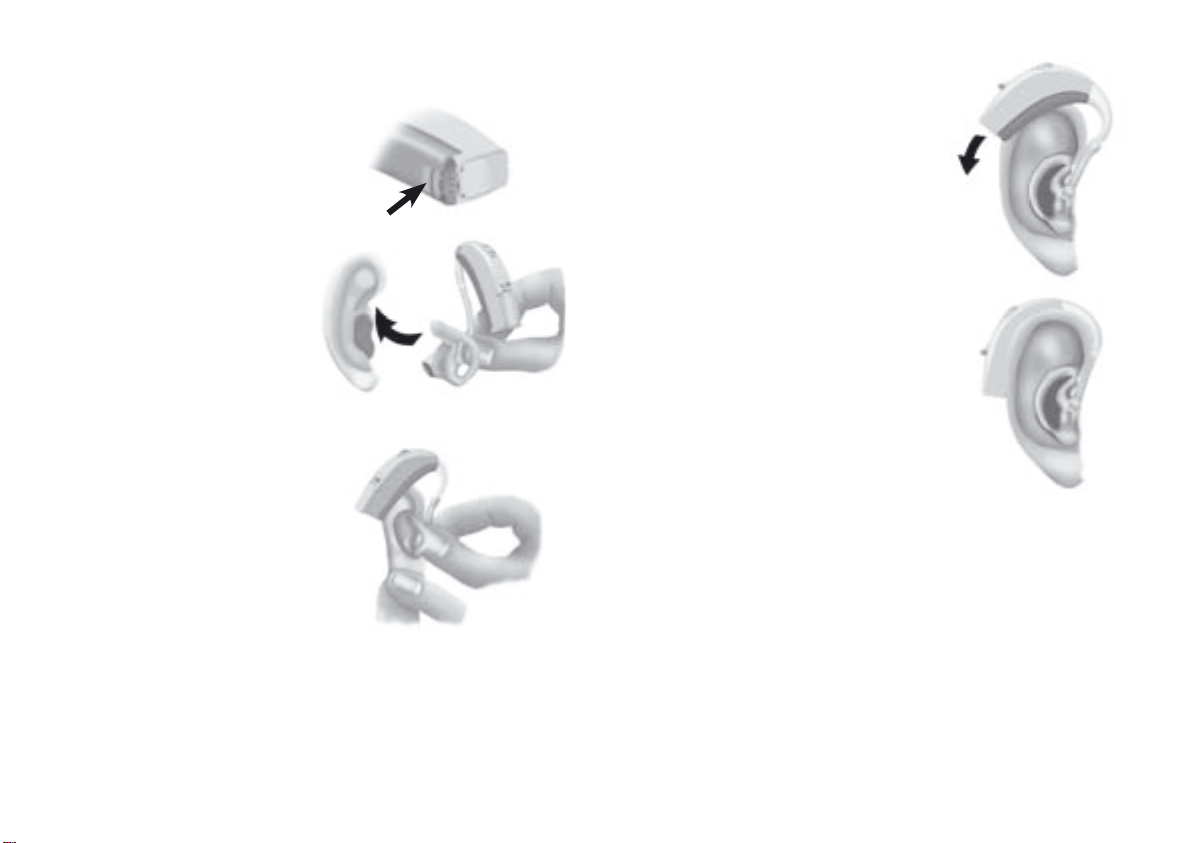
Inserting your hearing instrument
• Your hearing instruments
may have a right/leftidentifi cation. Red=Right,
Blue=Left
• Turn off the hearing
instrument.
• Hold the plastic tube as
shown.
• Place the tip of the earmold
in your ear canal, twisting
slightly, making sure that
the top part of the earmold
(A) is pushed behind and
under the fold (B) of your
ear.
• Gently pull down your
earlobe and press the
earmold in the direction
of the ear canal.
AB
• With the earmold correctly
positioned, slide the hearing
instrument over the top of your
ear to rest behind it.
• Turn on the hearing instrument
and adjust the volume control
until you hear the beeps
indicating the preferred
volume control level. This
feature is optional and may be
disengaged by your hearing
care professional.
6 7
Page 5
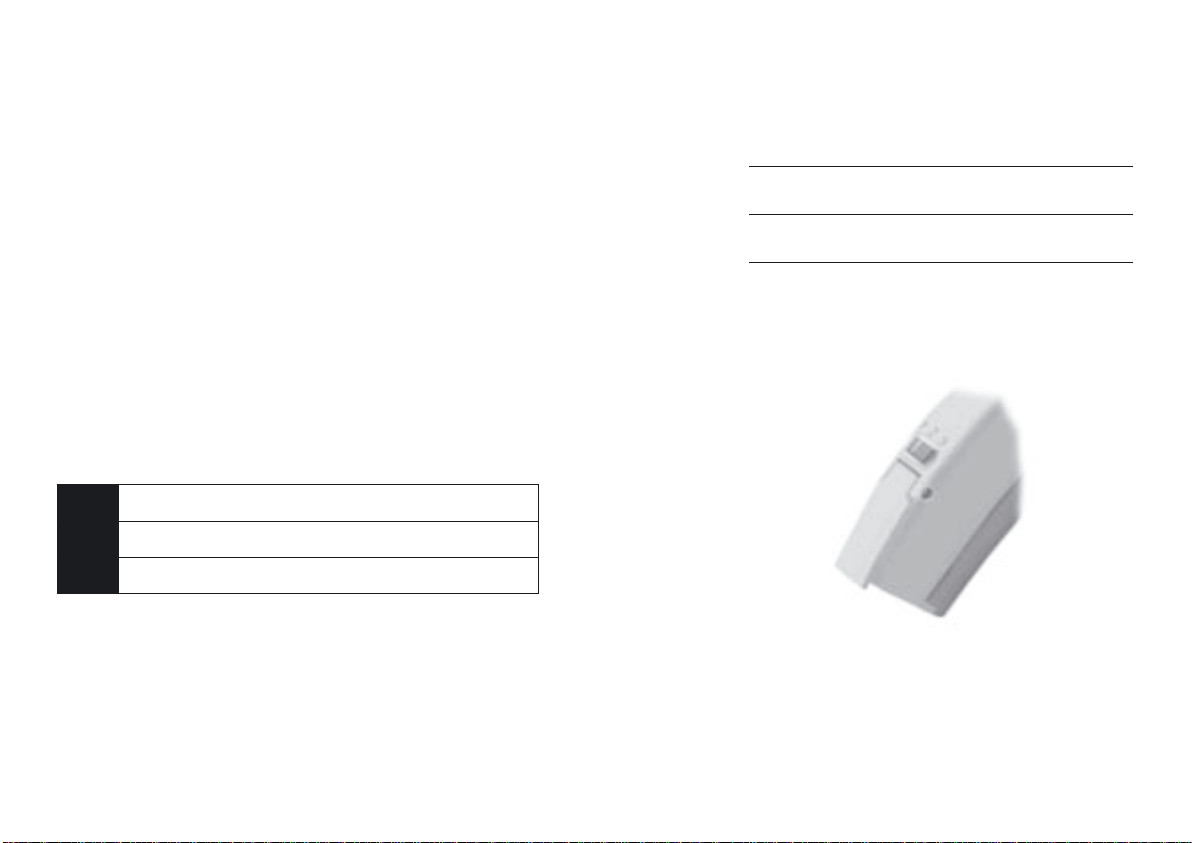
Function switch
Your hearing aid has a 3-position switch for switching
between different programs.
• When you switch between different programs, your
hearing instrument will beep.
Below you can see a description of the programs
available in your hearing instrument.
(HEARING CARE PROFESSIONAL TO COMPLETE)
Program 1
Program 2
• Operate the function switch to change programs.
The number of beeps will indicate which program
you are using if beeps are enabled.
Your hearing instrument can have up to three different
programs.
Please note that one program may be programmed as
an off position. (Optional)
One beep, when you switch to program 1
e
Two beeps, when you switch to program 2
ee
Three beeps, when you switch to program 3
eee
8 9
program 3
Page 6

Telecoil
Volume Control
The telecoil is meant for telephone conversations and
for loop systems in e.g. theatres, churches or lecture
rooms.
The telecoil is activated by operating the function
switch. When activated you will hear a certain number
of beeps.
Your telecoil can be disabled if you do not wish to use
it. This will also disable any use of direct audio input
(DAI) and FM functionality.
This wheel allows you to adjust the sound level in
different listening situations. The preferred volume
control level can be indicated by three beeps. This
level has been programmed according to your
preferences. Consult your Hearing Care Professional
if you fi nd this level too loud or too weak in most
situations.
Turning up the control increases the volume.
Maximum setting (4) gives you the loudest sound.
Turning down the control decreases the volume.
Minimum setting (1) gives you the quietest sound.
If you turn the wheel below (1) you can feel a click
and the instrument will turn off.
Your Volume Control can be disabled if you do
not wish to use it. This will also disable the off
functionality in the Volume Control.
10 11
Page 7
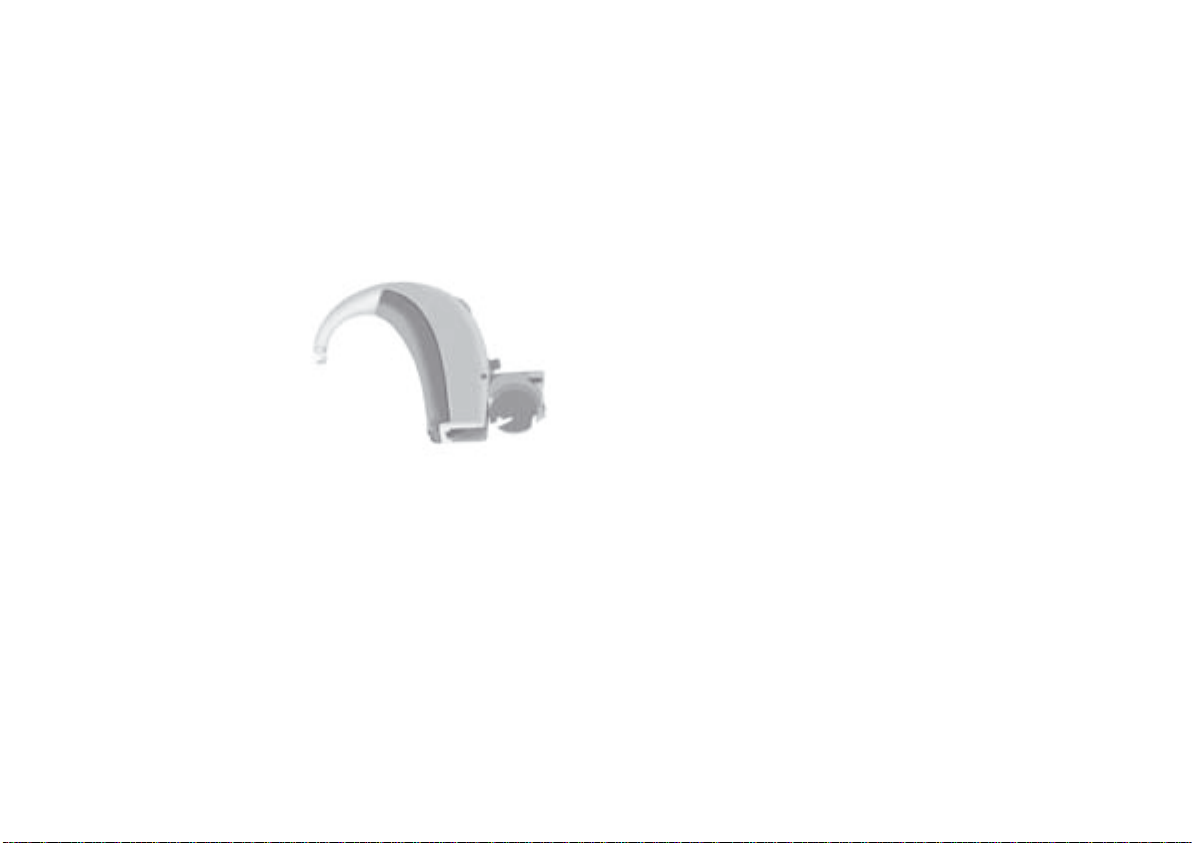
Battery Replacement
A worn-out battery should be removed immediately.
When battery power is low, you will hear a series
of two beeps. If the status light is programmed to
be steady on, it will turn off. This indicates that it
is time to change the battery. It is not an indication
of malfunction. To replace the battery, follow these
instructions:
Any moisture on the battery surface should be wiped
off before use. When you change batteries, it may take
a couple of minutes before the new battery works with
full effect.
Disposal:
• Check with your Hearing Care Professional about
arrangements for battery disposal. There may be
a system for disposing of them.
• Open the battery door
by pushing back the
raised edge and remove
the old battery.
• Remove the sticky label
from the + side of the
new battery
• Insert the new battery (size 675, preferably
dedicated super power battery) so that its + sign
faces the + sign printed on the top of the battery
door.
• The battery door should close easily. If you feel
any resistance it could be that you have placed
the battery incorrectly. Reinsert the battery and try
again.
12 13
• Never try to charge non-rechargeable batteries.
• Never dispose of batteries by burning them. There
is a risk that they will explode and cause serious
injury.
Page 8
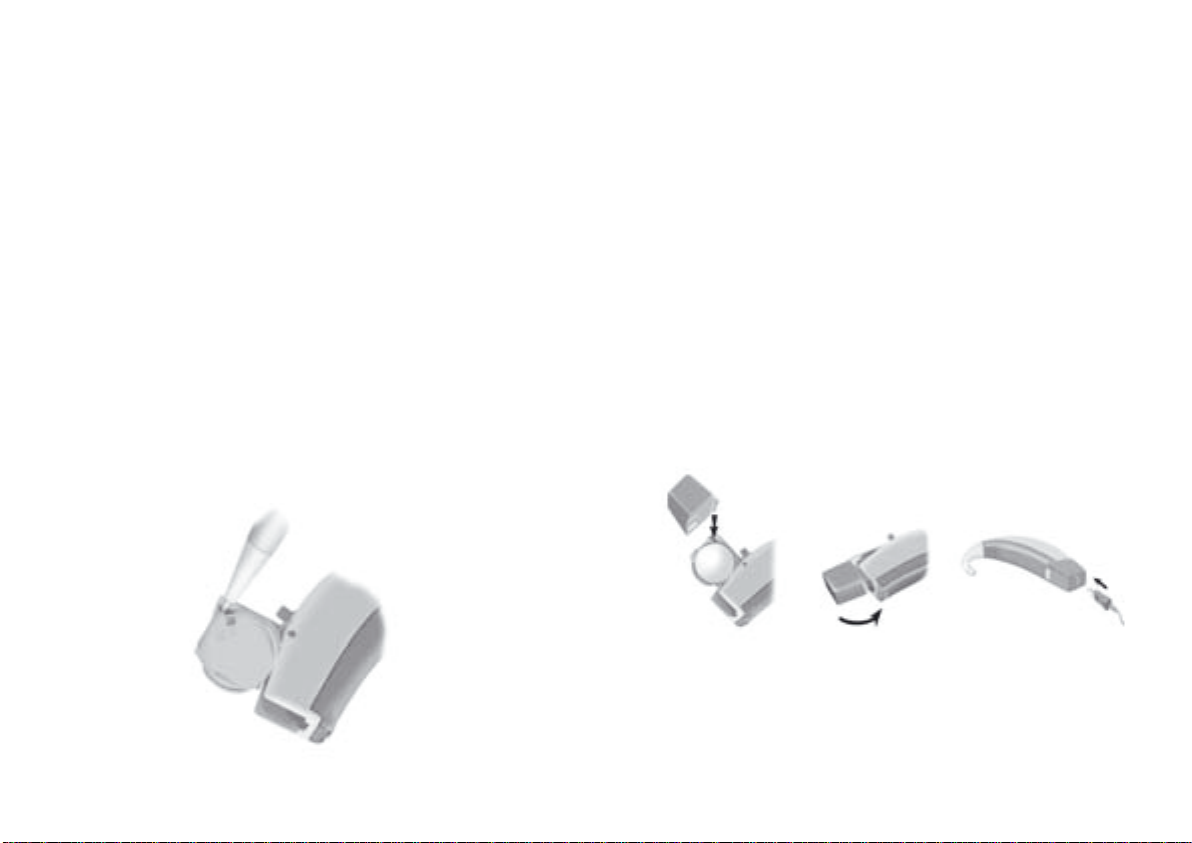
Tamper-resistant battery door
(optional)
This option is strongly recommended for infants, small
children, and people with learning diffi culties.
Instructions: To remove the battery, open the battery
door. (If a DAI shoe is mounted, the shoe has to be
removed). Insert the end of a ballpoint pen (or similar
type of object like a miniature screwdriver or paperclip
point) into the small recess in the corner. Push the
battery with the ballpoint until the battery is released.
Important: Do not force the battery door beyond
its fully open position. Insert the battery correctly.
Excessive strain can deform the battery door,
which will reduce its function and tamper resistant
effectiveness.
Extended Communication
The benefi t from your hearing instruments can be
increased in diffi cult listening situations. Your hearing
instruments are compatible with ear level FM systems,
which can allow you to hear a person talking at a
distance without interference from background noise.
You can also access interference-free audio signals via
the Direct Audio Input (DAI).
Mounting of accessories
Note: Your FM receiver or Direct Audio Input
accessories connect through the appropriate audio
input shoe, which is securely locked into position into
the battery door.
14 15
Page 9
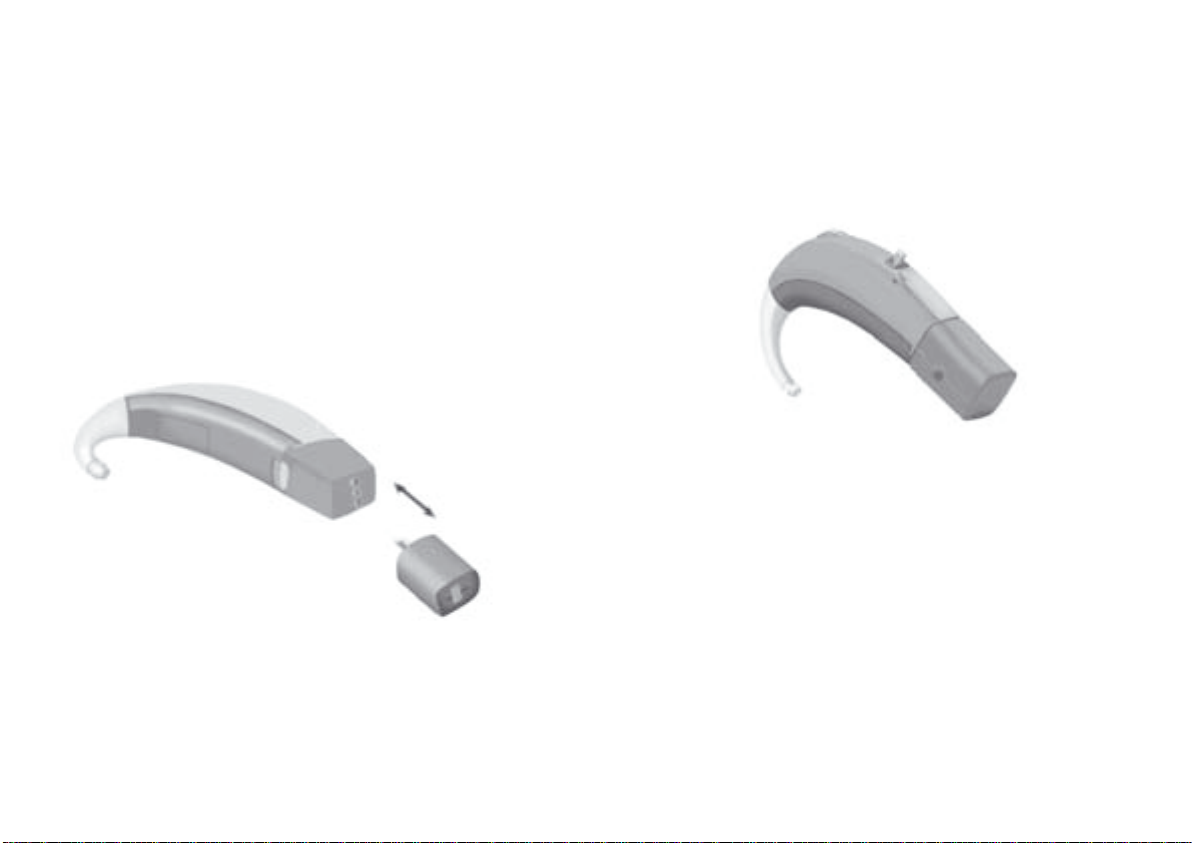
Ear-level/wireless FM systems
Dedicated receiver for Lexis FM
When using an ear-level FM system, set your program
switch to your telecoil program allowing you to hear
the external signal. Please note that your instrument
may be set up with one or more telecoil programs that
do not allow you to listen to the external signal. Your
Hearing Care Professional can change this if desired.
FM receiver + Sumo FM adaptor
FM adaptor
FM receiver
Consult your Hearing Care Professional for advice and
purchase information about ear-level/wireless FM
systems.
Users of the Lexis FM system can choose the dedicated
LE-7 receiver for Sumo DM, which conveniently
eliminates the need for an adaptor shoe and provides a
smaller profi le compared to a universal receiver.
Consult your Hearing Care Professional for advice and
purchase information about ear-level/wireless FM
systems.
16 17
Page 10
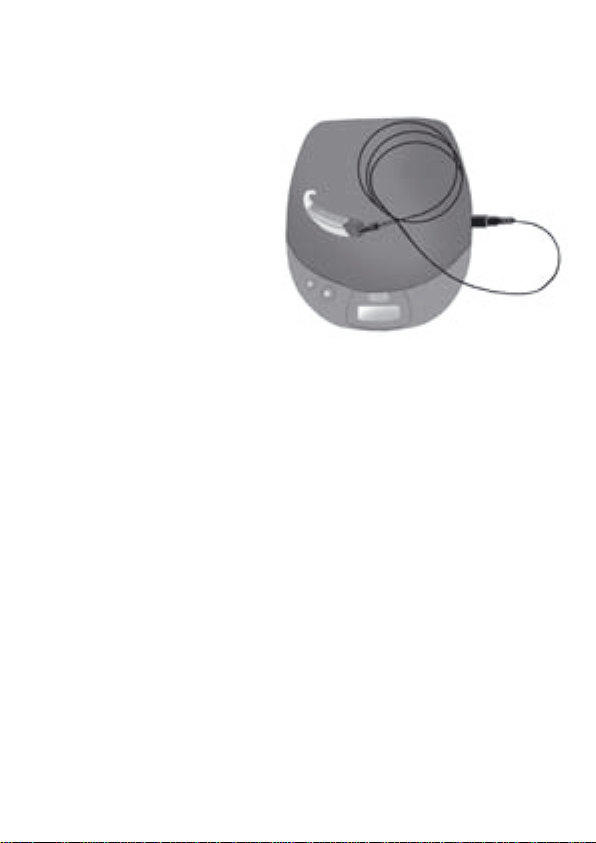
Direct Audio Input (DAI)
DAI provides access
to interference-free
audio signals from
external sources (such
as radio, TV, PC Audio
output, personal CD
players, etc). The signal
is received directly
into your hearing
instruments by using
a specifi ed cord and
coupling shoe.
When using a Direct Audio Input device, set your
program switch to your telecoil program allowing
you to hear the external signal. Please note that your
instrument may be set up with one or more telecoil
programs that do not allow you to listen to the external
signal. Your Hearing Care Professional can change this
if desired.
Consult your Hearing Care Professional for advice and
purchase information about DAI coupling shoe and
cords.
18 19
Page 11

Warnings
Hearing instruments and batteries can be dangerous if
swallowed or improperly used. Such actions can result in
severe injury, permanent hearing loss or even be fatal.
You should fully familiarize yourself with the following
general warnings and the full contents of this booklet before
using your hearing instrument.
• Hearing instruments should be used only as directed and
adjusted by your trained Hearing Specialist. Misuse can
result in sudden and permanent hearing loss.
• Hearing instruments, their parts and batteries are not toys
and should be kept out of reach of anyone who might
swallow these items or otherwise cause themselves injury.
• Never change the battery of the hearing instrument in front
of infants, small children and people with learning difficulties.
• Discard batteries carefully in a place where they cannot be
reached by infants, small children or people with learning
difficulties.
• Never put your hearing instrument or batteries in your
mouth for any reason, as they are slippery and could be
swallowed.
• Never allow others to wear your hearing instrument, as
it could be misused and permanently damage another’s
hearing.
• Hearing instruments may stop functioning, for instance if the
battery goes dead. You should be aware of this possibility,
in particular when you are in traffic or otherwise depend on
warning sounds.
If a battery or hearing instrument is swallowed, see a doctor
immediately and call the National Poison Center,
collect (202) 625-3333.
Page 12

Warning to hearing instrument dispensers
A hearing instrument dispenser should advise a prospective
hearing instrument user to consult immediately with a
licensed physician (preferably an ear specialist) before
dispensing a hearing instrument. If the hearing instrument
dispenser determines through inquiry, actual observation,
or review of any other available information concerning the
prospective user, that the prospective user has any of the
following conditions:
(i) Visible congenital or traumatic deformity of the ear.
(ii) History of active drainage from the ear within the
previous 90 days.
(iii) History of sudden or rapidly progressive hearing loss
within the previous 90 days.
(iv) Acute or chronic dizziness.
(v) Unilateral hearing loss of sudden or recent onset within
the previous 90 days.
(vi) Audiometric air-bone gap equal to or greater than 15
decibels at 500 Hertz (Hz), 1,000 Hz, and 2,000 Hz.
(vii) Visible evidence of significant cerumen accumulation or
aforeign body in the ear canal.
(viii) Pain or discomfort in the ear.
Special care should be exercised in selecting and fitting a
hearing instrument whose maximum sound pressure capability
exceeds 132 dB SPL as there may be risk of impairing the
remaining hearing of the hearing instrument user.
Important notice for prospective hearing instrument
users
Good health practice requires that a person with a hearing
loss have a medical evaluation by a licensed physician
(preferably a physician who specializes in diseases of the ear)
before purchasing a hearing instrument. Licensed physicians
who specialize in diseases of the ear are often referred to as
Otolaryngologists, Otologists or Otorhinolaryngologists. The
purpose of medical evaluation is to ensure that all medically
treatable conditions that may affect hearing are identified
and treated before the hearing instrument is purchased.
Following the medical evaluation, the physician will give
you a written statement that states that your hearing loss has
been medically evaluated and that you may be considered a
candidate for a hearing instrument.
The physician will refer you to an audiologist or a hearing
instrument dispenser, as appropriate, for a hearing
instrument evaluation.
The audiologist or hearing instrument dispenser will
conduct a hearing instrument evaluation to assess your
ability to hear with and without a hearing instrument.
The hearing instrument evaluation will enable the
audiologist or dispenser to select and fit a hearing
instrument to your individual needs. If you have reservations about your ability to adapt to amplification, you
should inquire about the availability of a trial, rental
or purchase-option program. Many hearing instrument
dispensers now offer programs that permit you to wear a
hearing instrument for a period of time for a nominal fee,
after which you may decide if you want to purchase the
hearing instrument.
Federal law limits the sale of hearing instruments to those
individuals who have obtained a medical evaluation from
a licensed physician. Federal law permits a fully informed
adult to sign a waiver statement declining the medical
evaluation for religious or personal beliefs that preclude
consultation with a physician. The exercise of such a waiver
is not in your best health interest and its use is strongly
discouraged. A hearing aid will not restore normal hearing
and will not prevent or improve a hearing impairment
resulting from organic cinditions. A hearing aid is only part
of hearing rehabilitation and may need to be supplemented
by auditory training and lip reading.
Page 13

Possible side effects
The hearing aid or earmold is a custom-made product. If
you are experiencing discomfort, see your audiologist or
hearing instrument dispenser immediately for modification
of the hearing instrument or earmold at the point of
irritation.A hearing instrument or earmold may cause an
accelerated accumulation of cerumen (earwax). Also in
rare cases, the otherwise non-allergenic material may cause
a discharge from the ear, allergic reac-tion, or any other
unusual condition. Please seek immediate consultation with
a physician if these conditions occur.
Children with hearing loss
In addition to seeing a physician for medical evaluation,
a child with a hearing loss should be directed to an
audiologist for evaluation and rehabilitation, since hearing
loss may cause problems in language development,
educational and social growth of a child. An audiologist
is qualified by training and experience to assist in the
evaluation and rehabilitation of a child with a hearing loss.
If the user is an infant, small child or person of mental
incapacity, it is recommended that the hearing instrument
be modified with a tamper-resistant battery compartment.
Page 14
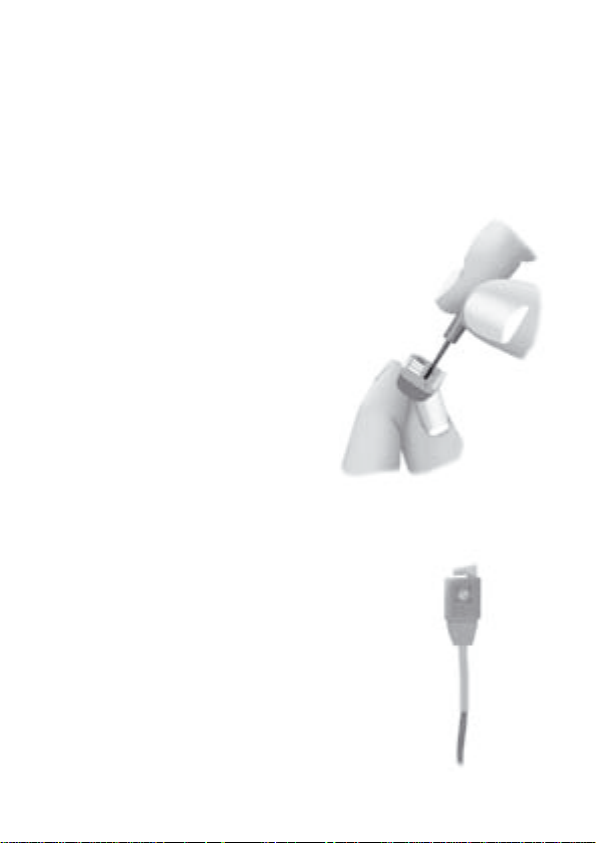
Adjustment of DAI
Note: Your hearing care professional can adjust your
DAI shoe according to the application
and level of input signal.
Step 1
Adjustment according to the
equipment the instrument is to
be connected to:
Hi setting: Plugged-in (AC)
equipment such as radio,
TV, computers, and batteryoperated devices using 4.5
volts or greater; body-worn FM
equipment.
Lo setting: Battery operated
equipment( <4.5 volts) such as
personal stereo/MP3 players.
Step 2
Adjust the input level control to
a comfortable level.
IMPORTANT: If you are using
DAI connected to equipment
that is plugged into an electrical
outlet (TV, computer) the DAI
cord should be disconnected
from the hearing aid during an
electrical (lightning) storm.
Page 15

Audible and visible status indicators
Table of functions:
Your instrument has two means of status indication, the audible
beeps and a visual status indicator (LED). The function of
these status indicators can be confi gured by your Hearing Care
Professional. In the table below you fi nd an overview of the
function and the possible confi gurations of your status indicators.
Audible beeps Visual status indicator (LED)
Instrument ready
Program switch
VC preferred level
setting
Indicate that
instrument is On
Battery low
indicator
The instrument will beep according to
the program that is active, when the
instrument is ready.
When you change program the
instrument will beep according to the
program selected.
This feature can be disabled.
Your volume control is programmed
to work under normal conditions at a
certain level. When this level is reached
by adjusting your volume control your
instrument will beep three times.
This feature can be disabled.
When the battery power is low, you will
hear a series of two beeps.
The visual status indicator will fl ash according to the program
that is active, when the instrument is ready.
When you change program the visual status indicator will fl ash
according to the program selected.
Follows audible beep setting
Your volume control is programmed to work under normal
conditions at a certain level. When this level is reached by
adjusting your volume control the visual status indicator will
fl ash three times.
This feature can be disabled.
The visual status indicator can be programmed to be steady On,
while the instrument is working.
This feature can be enabled or disabled.This is set to ON by
default for users ages 7 and younger.
If steady light is enabled, it will automatically turn OFF when
the Battery Low beeps are activated to indicate the battery should
be changed.
20 21
Page 16
Daily care of your hearing
instruments
When handling a hearing instrument, hold it over a
soft surface to avoid damage if dropped.
Before retiring for the evening:
• Make sure that there is no ear wax in any of the
earmold openings since it may reduce the hearing
instruments’ effi ciency.
• Open the battery compartments to allow air to
circulate.
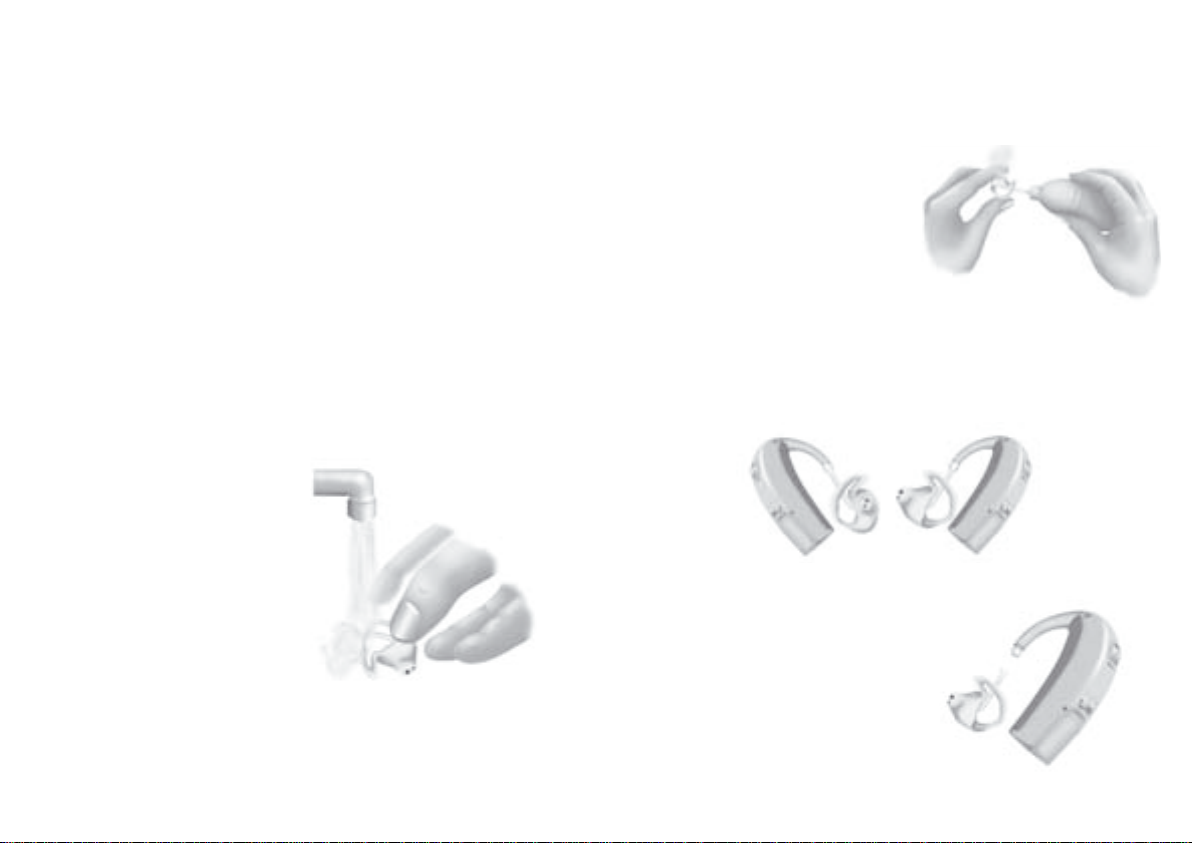
Cleaning your earmolds
The earmolds should be washed regularly:
• Disconnect the earmold
and tubing from the
hearing instrument.
• Rinse with water.
• Dry the earmold.
• Any water drops inside the
earmold or tubing should
be blown out. A special
device for this purpose (an
earmold blower) is
available from your Hearing
Care Professional.
• Make sure the earmold and tubing are completely
dry before they are reconnected to the hearing
instruments as shown in the drawing.
• Wash the earmold in
lukewarm water using
a mild soap. Do not use
strong detergents.
The hearing instruments
themselves must never be
washed!
Left Right
Replacing the tubing
The tubing in the earmold
should be replaced when it
becomes yellow or stiff. Consult
your hearing care professional in
relation to this.
22 23
Page 17

Avoiding heat, humidity and chemicals
Your hearing instruments must never be exposed to
extreme heat e.g. left inside a parked car in the sun
or dried in microwave ovens. They must never be
exposed to a lot of moisture e.g. steam baths,
showers or heavy rain.
If your hearing instruments have been exposed to
moisture or very humid conditions it may affect their
performance. Using an anti-humidity or drying kit can
help to avoid these problems and may even extend the
life of your hearing instruments. Consult your hearing
care professional for further advice. Wipe the batteries
thoroughly if moisture is present.
The chemicals in cosmetics, hairspray, hair dye,
perfume, aftershave-lotion, suntan lotion and insect
repellant can discolor and even damage your hearing
instruments. You should always remove your hearing
instruments before applying such products and allow
time for the product to dry before reinserting your
hearing instruments. If you use lotion be sure to
wipe your hands dry before inserting your hearing
instruments.
Using your hearing instruments
It takes time to adjust to a new hearing instrument.
How long this adjustment takes differs from person to
person. It will depend on a number of factors, such as
whether you have had hearing instruments before and
the degree of your hearing loss.
Seven easy steps to better hearing
1. In the quiet of your home
Try to acclimate yourself to all the new sounds you are
able to hear, including background sounds. Listen to
the many background sounds and try to identify each
sound. Keep in mind that some sounds will sound
different. You may have to learn to identify them
again. Note that in time you will become acclimated to
the sounds in your environment – if not please contact
your hearing care professional.
If using the hearing instruments cause you to feel
fatigued, remove them. Initially, you may need to wear
the hearing instruments for shorter periods of time.
You will gradually be able to increase the amount of
time you wear your hearing instruments. Eventually,
you will be able to wear your hearing instruments
comfortably all day long.
24 25
Page 18

2. Conversation with another person
Sit with someone else in a quiet room. Face each other
so you can read facial expressions easily. You might
experience new speech sounds which can seem a little
disturbing in the beginning. However, after the brain
has adapted to the new speech sounds, you may hear
speech clearer.
3. Listen to radio or TV
When listening to the TV or the radio, start out by
listening to news commentators since they usually
speak clearly, then try other programs.
If you fi nd it diffi cult to listen to TV or radio, contact
your Hearing Professional for advice about assistive
listening devices. If your hearing instrument has a
telecoil program, you may benefi t from using it with an
induction loop system.
4. In group conversations
Group situations are usually accompanied by a greater
degree of background noise. Therefore, making it a
more diffi cult listening situation. In diffi cult listening
situations, focus your attention on the person you want
to hear. If you miss a word, ask the speaker to repeat it.
5. Telecoil use in church, theatre, or cinema
An increasing number of churches, theatres and public
buildings have installed induction loop systems. These
systems send out wireless sound to be received by the
telecoil in your hearing instruments. Typically, the
facility will post a sign indicating that an induction
loop system is available for use by its patrons.
Contact your Hearing Care Professional for additional
information.
6. Using the telephone
When using the telephone place the receiver 1-1.5
inches above your upper part of the ear. It may also
help to tilt the receiver. If whistling occurs, tilt or
move the receiver away slightly and try to keep it still.
If your hearing instrument has a telecoil, try switching
the instrument to the telecoil program when listening
on the telephone. Depending on your telephone this
eliminates any whistling.
Remember that the telecoil
operates by detecting
magnetic waves. Many
electrical devices e.g.
facsimile machines and
computers emit magnetic
waves. Make sure that your
telephone is placed at least
4-6 feet away from such
equipment to avoid interference.
26 27
Page 19

7. Wireless and mobile phones
Your hearing instruments are designed to comply
with the most stringent Standards of International
Electromagnetic Compatibility. However, not all
mobile phones are hearing instrument compatible. The
varying degree of disturbance can be due to the nature
of your particular mobile phone.
Using your hearing instruments
The use of hearing instruments is only part of hearing
rehabilitation and may need to be supplemented by
assistive listening devices auditory training and/or
instruction in lip-reading.
28 29
Page 20

Common problems and their solutions
Effect
Squealing
noise
No sound
Whirring
noise or
beeping
Cause
Ear wax accumulated in ear canal
Hearing instrument inserted
improperly
Clogged sound outlet
Clogged microphone opening
Worn-down battery
Hearing aid switched to telecoil (T)
Dirty or corroded battery
contacts
Dirty or corroded battery
contacts
Dirty or corroded battery
Worn-down battery
Solution
Have ear canal examined by your doctor
Reinsert hearing instrument (pg. 6)
Clean sound outlet (pg. 22)
Clean microphone opening with a brush
Replace battery (pg. 12)
Switch to microphone signal (M) (pg. 10)
Open and close the battery door
several times or replace battery (pg. 12)
Open and close the battery door
several times or replace battery (pg. 12)
Clean battery surfaces with dry cloth
or replace battery (pg. 12)
Replace battery (pg. 12)
If none of the above solutions solve the problem,
ask your Hearing Care Professional for assistance.
30 31
Page 21

International Warranty
Oticon Warranty Certifi cate
This Oticon hearing instrument is covered by a limited
warranty issued by the manufacturer for a period of 24
months from the date of delivery. The limited warranty
covers manufacturing and material defects in the
hearing instrument itself, it does not cover accessories
such as batteries, tubing, ear molds, ear wax fi lters, etc.
Problems arising from improper handling or care,
accidents, repairs made by an unauthorized party,
exposure to corrosive conditions, physical changes in
your ear, damage due to foreign objects entering the
device, or incorrect adjustments are NOT covered by
the limited warranty and may void it.
The above warranty does not affect any legal rights that
you might have under applicable national
legis lation governing sale of consumer goods. Your
Hearing Care Professional may have issued a warranty
that goes beyond the clauses of this limited warranty.
Please consult him/her for further information.
If you need service
Take your hearing instrument to your Hearing Care
Professional, who may be able to determine and repair
minor problems in their offi ce.
Name of owner:
Dispenser:
Dispenser address:
Dispenser phone:
Purchase date:
Warranty period: Month:
Model left: Serial no.:
Model right: Serial no.:
Battery size:
Oticon, Inc.
29 Schoolhouse Rd.
Somerset, NJ 08873
www.oticonus.com
32 33
Page 22

906 64 811 00 / 03.07 Printed in Denmark
Page 23

906 64 811 00 / 03.07 Printed in Denmark
 Loading...