

Page 1

Instructions for use
BTE PP
BTE
Oticon Opn™
Oticon Opn S™
Oticon Opn Play™
Oticon Siya
Page 2

Model overview
This booklet is valid for Oticon Opn™, Oticon Opn S™,Oticon Opn Play™,
and Oticon Siya families, in the following hearing aid models:
Oticon Opn FW6
Oticon Opn 1 BTE13 PP GTIN: (01) 05707131335227
Oticon Opn 2 BTE13 PP GTIN: (01) 05707131335234
Oticon Opn 3 BTE13 PP GTIN: (01) 05707131335241
Oticon Opn S FW7
Oticon Opn S 1 BTE PP GTIN: (01) 05707131349811
Oticon Opn S 2 BTE PP GTIN: (01) 05707131349828
Oticon Opn S 3 BTE PP GTIN: (01) 05707131349835
Oticon Opn Play FW7
Oticon Opn Play 1 BTE PP GTIN: (01) 05707131349842
Oticon Opn Play 2 BTE PP GTIN: (01) 05707131349859
Oticon Siya FW1
Oticon Siya 1 BTE PP GTIN: (01) 05707131340887
Oticon Siya 2 BTE PP GTIN: (01) 05707131340894
Oticon Siya 1 BTE GTIN: (01) 05707131340887
Oticon Siya 2 BTE GTIN: (01) 05707131340894
Page 3

LED light for visual indication. Not available for Oticon Siya.
The LED light is used to help, caregivers, parents, and teachers to
operate the hearing aid and to give instructions on relevant functions
and modes (see relevant information throughout the booklet).
5
Page 4

Introduction to this booklet
This booklet gives you guidance on how to use and maintain your
new hearing aid. Please read the booklet carefully, including the
Warnings section. This will help you to get the most out of your
new hearing aid.
Intended use Oticon Opn, Oticon Opn S, and
Oticon Siya
The hearing aid is intended to amplify and transmit sound to the
ear, and thereby compensating for impaired hearing within mild
to severe-to-profound hearing loss.
Your hearing care professional has adjusted the hearing aid to meet
your needs. If you have additional questions, please contact your
hearing care professional.
About Start-up Handling Options Tinnitus Warnings More info
For your convenience, this booklet contains a navigation bar to help
you easily navigate through the different sections.
6 7
Intended use Oticon Opn Play
The hearing aid is intended to amplify and transmit sound to the
ear, and thereby compensate for impaired hearing within mild to
severe hearing loss. This hearing aid is intended for use by infants,
children and adolescents/young adults.
IMPORTANT NOTICE
The hearing aid amplification is uniquely adjusted and optimized
to your personal hearing capabilities during the hearing aid fitting
performed by your hearing care professional.
Page 5

Table of contents
About
Your hearing aid and earpiece 12
Identify left and right hearing aid 16
MultiTool for handling of batteries and cleaning 17
Start-up
Turn the hearing aid on and off 18
When to replace the battery 19
How to replace the battery (size 13) 20
Handling
Put on the hearing aid with sound hook 22
Caring for your hearing aid 23
Clean the earmold 24
Put on hearing aid with thin tube 26
Clean the thin tube 27
Replace standard earpieces 28
Clean customized earpieces 30
Continues on next page
Page 6

Table of contents
Replace ProWax filter 31
Flight mode 32
Options
Optional features and accessories 33
Change program 34
Change volume 36
Mute 38
Use hearing aid with iPhone and iPad 39
Pair with iPhone 40
Wireless accessories 42
Other options 44
Tamper-resistant battery drawer 46
Sound and LED indications 48
Tinnitus
Tinnitus SoundSupport™ (optional) 52
Guidelines for tinnitus sound generator users 53
Sound and volume adjustment 54
Limitation on use time 57
Tinnitus SoundSupport warnings 60
Warnings
General warnings 62
More info
Troubleshooting 70
Water and dust resistant (IP68) 72
Conditions of use 73
Warranty 74
Mobile phone 76
Technical information 78
Your individual hearing aid settings 84
Technical Data 86
Page 7

Your hearing aid and earpiece
The thin tube uses one of the following earpieces:
There are two different attachments and several different
Standard earpieces: Customized earpieces:
earpieces available for the hearing aid.
Open dome
With sound hook and
earmold earpiece
Sound
With thin tube
(Corda miniFit)
Bass dome, single vent
Bass dome, double vent
hook
Power dome
Tube
Mold
Thin
tube
Grip Tip
Available in small and large, left and
right, with or without vent.
Dome sizes
Ear grip (optional)
6 mm5 mm 8 mm 10 mm 12 mm
12 13
About Start-up Handling Options Tinnitus Warnings More info
Please see details for replacing the dome in
chapter “Replace dome or GripTip”
MicroMold
LiteTip
VarioTherm® MicroMold
VarioTherm® LiteTip
® VarioTherm is a registered trademark
of Dreve
Page 8

With sound hook and earmold
What it is and does
Sound hook
Microphone
openings
Sound in
With thin tube
What it is and does
Microphone
openings
Sound in
Push button
Mute, change
Brings sound
hearing aid
14 15
Tube
into the ear
Earmold
Hold the
in the ear
Battery drawer
Contains the battery.
Functions as an on/off switch
About Start-up Handling Options Tinnitus Warnings More info
Nail grip
Open the
battery drawer
volume and
programs
LED
(optional)
Program,
volume, and
battery status
Thin tube
Brings sound
into the ear
Battery drawer
Contains the battery.
Functions as an on/off switch
Push button
Mute, change
volume and
programs
LED
(optional)
Program,
volume, and
battery status
Nail grip
Open the
battery drawer
Page 9

Identify left and right hearing aid
MultiTool for handling of batteries and cleaning
It is important to distinguish between the left and the right
hearing aid as they may be programmed differently.
The MultiTool contains a magnet that makes it easier to replace
the battery in the hearing aid. It also contains a brush and wire loop
for cleaning and removing earwax. If you need a new MultiTool,
You can find left/right color indicators in the battery drawer.
please contact your hearing care professional.
Indicators can also be found on MicroMolds (optional).
Wire loopMagnet
Brush
A BLUE indicator marks
the LEFT hearing aid
16 17
About Start-up Handling Options Tinnitus Warnings More info
A RED indicator marks
the RIGHT hearing aid
IMPORTANT NOTICE
Your MultiTool has a built-in magnet. Keep the MultiTool at least 12 in.
away from credit cards and other magnetically sensitive devices.
Page 10

Turn the hearing aid on and o
When to replace the battery
The battery drawer is also used to switch the hearing aid on and
off. To save battery life, make sure your hearing aid is switched off
When it is time to replace the battery, you will hear three beeps
repeated in moderate intervals until the battery runs out.
when you are not wearing it. If you wish to return to the standard
settings of the hearing aid, simply open and close the battery
drawer (quick reset).
Optional LED
Two long green blinks indicate that the hearing aid is turned on.
Three beeps*
= The battery is running low
Battery tip
To make sure the hearing aid is always working, bring spare
Four descending tones
= The battery has run out
batteries with you, or replace the battery before you leave home.
Turn ON
Close the
battery
Turn OFF
Open the
battery drawer.
Optional LED
Red blinks, continuously repeated, to indicate battery low.
drawer with
the battery
in place.
18 19
About Start-up Handling Options Tinnitus Warnings More info
* Bluetooth® will be turned off and it will not be possible to use wireless accessories.
Note: Batteries need to be replaced more often if you are streaming to your hearing aid.
Page 11

How to replace the battery (size 13)
1. Remove
2. Uncover 3. Insert
4. Close Tip
MultiTool
Fully open the
battery drawer.
Remove the battery.
Remove the sticky
label from the
+ side
of the new battery.
Insert the new
battery into the
battery drawer.
Close the battery drawer. The
hearing aid will play a jingle
through the earpiece.
Insert it from above,
Tip:
Wait 2 minutes so that
the battery can draw
air, to ensure optimal
functioning.
20 21
About Start-up Handling Options Tinnitus Warnings More info
NOT from the side.
Make sure the
+ side
is facing up.
Hold the earpiece close to
your ear to hear the jingle.
The MultiTool can be used to
change the battery. Use the
magnetic end to remove and insert
batteries.
The MultiTool is provided by
your hearing care professional.
Page 12
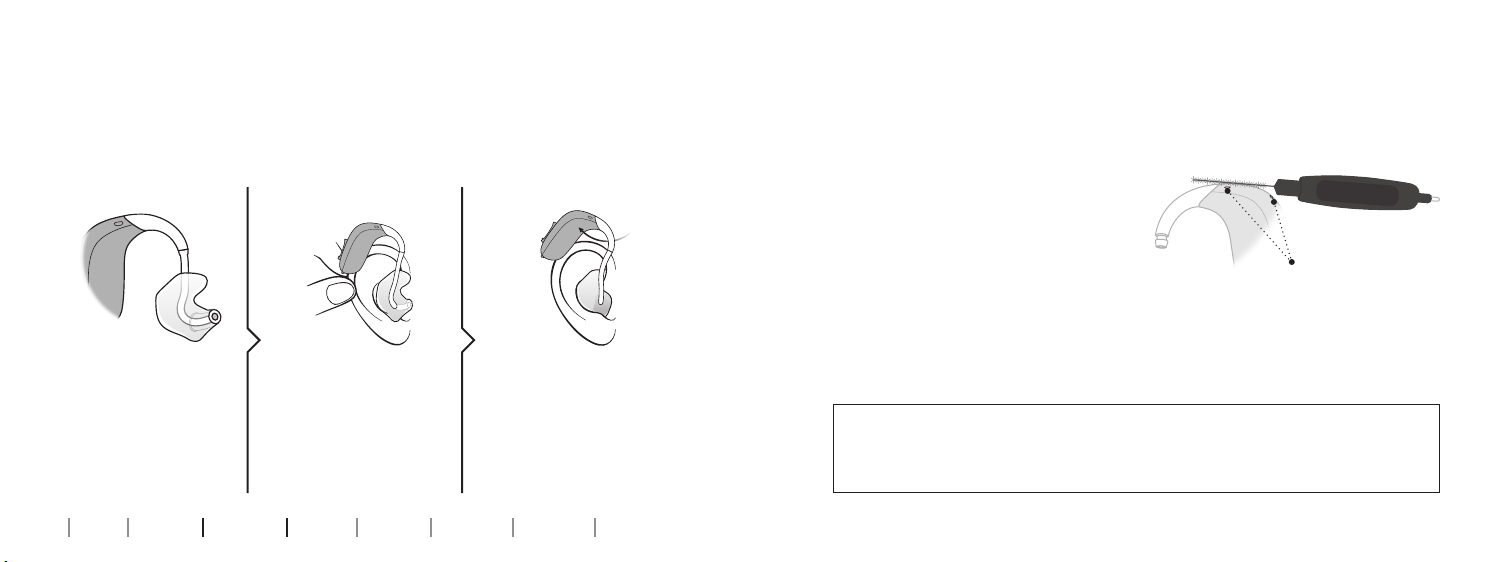
Put on the hearing aid with sound hook
Caring for your hearing aid
Read the following pages if you have a hearing aid with a sound
hook and earmold.
Step 1 Step 2
When handling your hearing aid, hold it over a soft surface to avoid
damage in case you drop it.
Clean the microphone openings
Carefully brush any debris away
from the openings. Gently brush
the surface. Make sure the brush
is not pressed into the openings.
The earmold is
customized for you
and fits your ear
shape. The earmolds
are unique for the
left or the right ear.
22 23
About Start-up Handling Options Tinnitus Warnings More info
Gently pull your ear
outwards and press
the earmold in the
direction of the
ear canal, twisting
slightly.
Place the hearing aid
behind your ear.
IMPORTANT NOTICE
Use a soft, dry cloth to clean the hearing aid. The hearing aid must
never be washed or immersed in water or other liquids.
Microphone
openings
Page 13
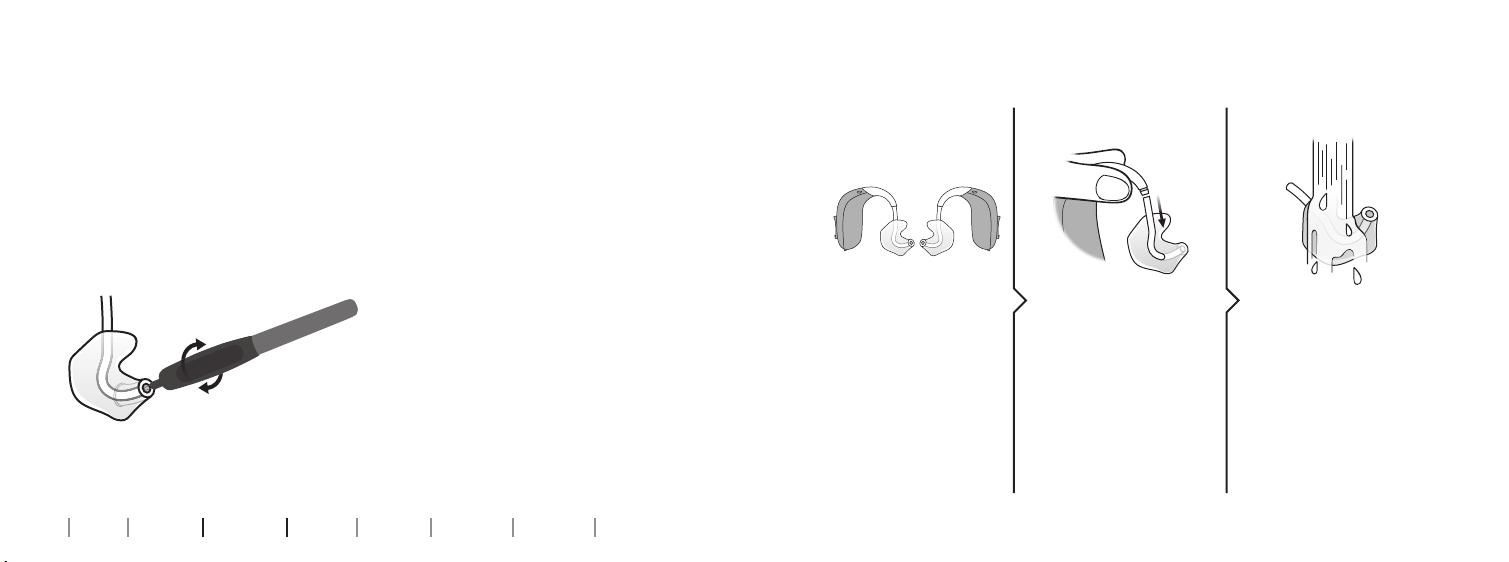
Clean the earmold
The earmold should be cleaned
regularly. Use a soft cloth
to clean the surface of the
earmold. Use the MultiTool wire
loop to clean the opening.
Replace the tube
The tubing between the
earmold and the hearing
aid should be replaced if
it becomes yellow or stiff.
Consult your hearing care
professional about this.
Wash the earmold
Step 1
Step 2 Step 3
Make sure you are
able to identify
which earmold is for
which hearing aid
before disconnect-
ing them from the
hearing aid.
24 25
About Start-up Handling Options Tinnitus Warnings More info
Disconnect the tube
and earmold from
the hook. Hold the
hook firmly when
pulling it off the
tube. Otherwise the
hearing aid may be
damaged.
Wash the earmold
and tube using mild
soap. Rinse and dry
completely before
reconnecting to the
hearing aid.
Page 14
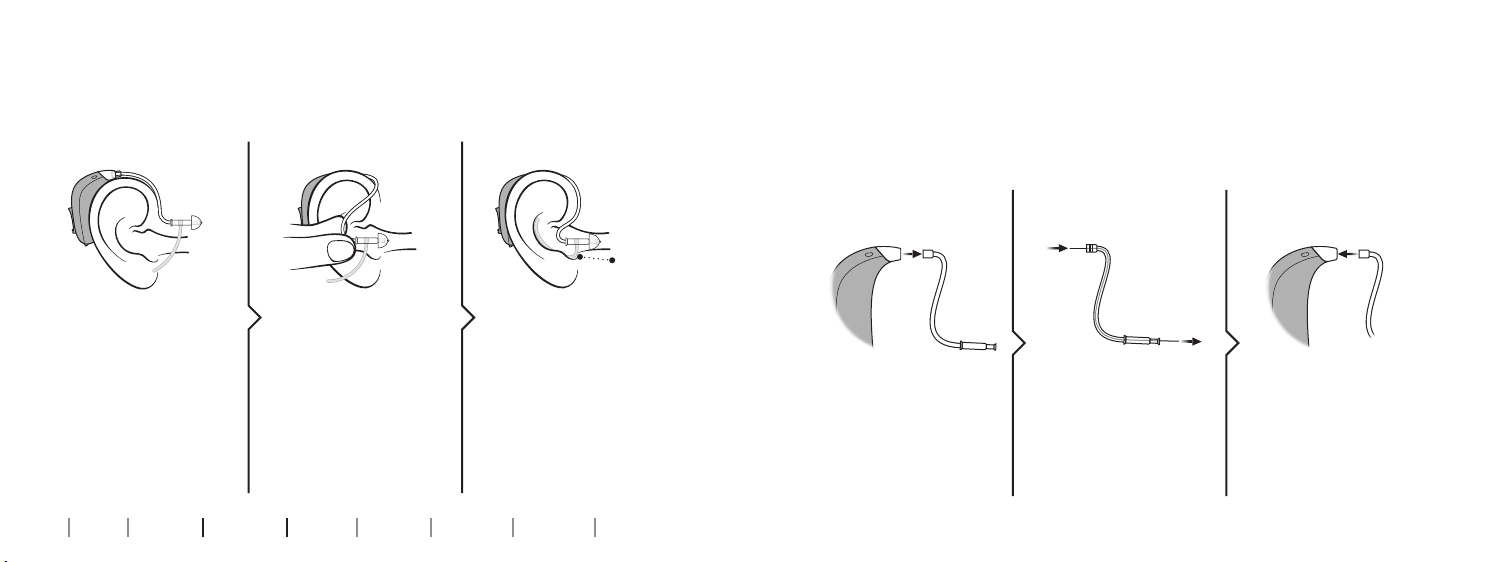
Put on hearing aid with thin tube
Clean the thin tube
Read the following pages if your hearing aid has a thin tube.
Step 1 Step 2 Step 3
Ear grip
(optional)
Place the hearing aid
behind your ear.
The thin tube should
only be used with
an attached earpiece. Use only parts
designed for your
hearing aid.
26 27
About Start-up Handling Options Tinnitus Warnings More info
Hold the bend of
the tube between
your thumb and
index finger. The
earpiece should
point towards the
ear canal opening.
Gently push the
earpiece into your
ear canal until the
thin tube sits close to
your head. If the thin
tube has an ear grip,
place it in the ear so it
follows the contour of
the ear.
The thin tube should be cleaned to keep it clear of moisture and
wax. If not cleaned, it may become blocked with wax, which stops
sound from coming into your ear.
.
Step 1 Step 2 Step 3
Pull the thin tube out
of the hearing aid.
Push the cleaning
tool all the way
through the thin
tube.
Reconnect the thin
tube to the hearing
aid.
Page 15

Replace standard earpieces
The standard earpiece (dome or Grip Tip) should not be cleaned. If
the earpiece is filled with wax, replace it with a new one. Grip Tips
should be replaced at least once a month.
Step 1 Step 2 Step 3
Hold on to the end
of the thin tube and
then pull off the
earpiece.
28 29
About Start-up Handling Options Tinnitus Warnings More info
Insert the thin tube
exactly into the
middle of the
earpiece to obtain a
secure attachment.
Push firmly to ensure
that the earpiece is
fastened securely.
IMPORTANT NOTICE
If the earpiece is not on the thin tube when removed from the ear,
the earpiece may still be in the ear canal. Consult your hearing care
professional for further instructions.
Page 16

Clean customized earpieces
The earpiece should be cleaned
regularly. The earpiece has a
white wax filter*that keeps
wax and debris from damaging
the hearing aid.
Replace the filter when
clogged, or if the sound is not
normal, or contact your hearing
care professional.
IMPORTANT NOTICE
Always use the same type of wax filter as was originally supplied with
the hearing aid. If you are in any doubt about the use or replacement of
wax filters, contact your hearing care professional.
* VarioTherm MicroMold and LiteTip do not have a wax filter
30 31
About Start-up Handling Options Tinnitus Warnings More info
Clean the vent by pressing
the brush through the
hole, twisting it slightly.
Ven t
Wax filter
Replace ProWax lter
1. Tool
New
filter
Remove the tool
from the shell. The
tool has two pins,
one empty for
removal and one
with the new wax
filter.
2. Remove 3. Insert
New
filter
Push the empty pin
into the wax filter
in the earpiece and
pull it out.
Old filter
Insert the new wax
filter using the other
pin, remove the tool,
and throw it out.
Page 17

Flight mode
Optional features and accessories
When flight mode is activated, Bluetooth® is turned off. The
hearing aid will still be working. Pressing the push button on one
hearning aid will activate flight mode on both hearing aids.
Optional LED
The LED will blink green, red, and red a few times. This confirms
that flight mode is activated.
The features and accessories described in the following pages are
optional. Please contact your hearing care professional to find out
how your hearing aid is programmed.
If you experience difficult listening situations, a special program
may be helpful. These are programmed by your hearing care
professional.
Write down any hearing situations in which you may need help.
To activate and deactivate Press the
push button for at least 7 seconds.
An audible jingle confirms your action.
Opening and closing the battery
drawer will also deactivate ight mode.
32 33
About Start-up Handling Options Tinnitus Warnings More info
Page 18

Change program
Your hearing aid can have up to 4 different programs. These are
programmed by your hearing care professional.
Optional LED
The number of green blinks indicate the selected program.
To be filled out by the hearing care professional
Program Activation sound When to use
1
2
“1 beep”
“2 beeps”
3
Press up or down
between programs.
Note that you can change continuously
between programs - both up and down
in the program order. For example, if you
want to go from program 1 to 4, you can
press the down button once instead of
pressing the up button 3 times.
34 35
About Start-up Handling Options Tinnitus Warnings More info
4
Program change:
“3 beeps”
“4 beeps”
LEFT RIGHT Short press Long press
Page 19

Change volume
The push button allows you to adjust the volume. You will hear a
click when you turn the volume up or down.
MAXIMUM
Press button
to turn volume up
Press button
to turn volume down
36 37
About Start-up Handling Options Tinnitus Warnings More info
START-UP
LEVEL
MINIMUM
You will hear
2 beeps at
start-up level.
Optional LED
The LED will blink green to confirm changes in volume, and a long
green blink at start-up level. The LED will show a red blink when
the volume reaches the minimum or maximum level.
To be filled out by the hearing care professional
Volume change
LEFT RIGHT Short press
Page 20

Mute
Use hearing aid with iPhone and iPad
Use the mute function if you need to silence the hearing aid. The
mute function only mutes the microphone(s) on the hearing aid.
Your hearing aid is Made for iPhone® and allows for direct
communication and control with iPhone, iPad® or iPod touch®.
For assistance in using these products with your hearing aid,
Optional LED
Green and red blinks, continuously repeated, to indicate mute.
Apply a long press (4 seconds) to either end
of the button to mute the hearing aid.
please contact your hearing care professional or visit:
www.oticon.com/support.
For information on compatibility,
To reactivate the hearing aid, push the
button briefly.
IMPORTANT NOTICE
Do not use the mute function as an off switch, as the hearing aid still
draws current from the battery in this mode.
38 39
About Start-up Handling Options Tinnitus Warnings More info
please visit www.oticon.com/support.
Use of the Made for Apple badge means that an accessory has been designed to connect specifically to
the Apple product(s) identified in the badge, and has been certified by the developer to meet Apple
performance standards. Apple is not responsible for the operation of this device or its compliance with
safety and regulatory standards.
Please note that use of this Accessory with iPod, iPhone, or iPad may affect wireless pelformance.
Apple, the Apple logo, iPhone, iPad, and iPod touch are trademarks of Apple Inc., registered in the U.S.
and other countries.
Page 21

Pair with iPhone
4. Prepare
6. Confirm pairing5. Select
2. General 3. Accessibility1. Settings
William’s Hearing Aids
Oticon Opn S or Oticon Opn Play
Bluetooth
General
On
Open your iPhone
and go to “Settings”.
Make sure Bluetooth
is on. Then choose
“General”.
Accessibility
On the “General”
screen, choose
“Accessibility”.
MFi Hearing Devices
On the “Accessibility”
screen, choose
“MFi Hearing Devices”.
Open and close the
battery drawer on
both hearing aids,
and place them
close to your iPhone.
The hearing aids
remain in pairing
Your iPhone will
detect the hearing
aids for pairing.
Detected devices
will appear in your
iPhone list. Choose
your hearing aids.
Bluetooth Pairing
Request
“William’s Hearing Aids” would
like to pair with your iPhone
Cancel Pair
Confirm pairing. If
you have two hearing
aids, pairing confirmation is needed for
each hearing aid.
mode for 3 minutes.
40 41
About Start-up Handling Options Tinnitus Warnings More info
When you turn o your hearing aids or Apple® device, they will no longer be connected. To connect them again, turn on your hearing
aids by opening and closing the battery door. The hearing aids will then automatically reconnect to your Apple device.
Page 22

Wireless accessories
As an enhancement to your wireless hearing aids, a range of
accessories is available. These can enable you to hear and
communicate better in many everyday situations.
ConnectClip
When paired with your mobile
phone, you can use the hearing
aid as a hands-free headset;
ConnectClip can also be used as
a remote microphone.
TV Adapter 3.0
Wireless transmitter of sound
from TV and electronic audio
FM
Your hearing aid supports
the option of attaching an
FM receiver. The FM system
allows you to receive speech or
audio signals directly to your
hearing aid from a dedicated
transmitter.
Remote Control 3.0
Offers the ability to change
program, adjust volume, or
mute your hearing aid.
Phone Adaptor 2.0
Connects your traditional home
phone to the ConnectClip via
Bluetooth allowing for hands-
free phone calls.
Oticon ON App
Offers an intuitive and discreet
way to control your hearing aid.
For iPhone, iPad, iPod touch,
and Android™ devices.
devices. TV Adapter streams
sound directly to your hearing aid.
For more information visit www.oticon.com/support or contact
your hearing care professional.
42 43
About Start-up Handling Options Tinnitus Warnings More info
Page 23

Other options
Telecoil program
Telecoil helps you hear better when using a
telephone with a built-in loop, or when you are in
buildings with teleloop systems such as theaters,
houses of worship, or lecture rooms. This symbol
or a similar sign is shown wherever a teleloop has
been installed.
Auto Phone - optional for Oticon Opn and
Oticon Siya
The Auto Phone can automatically activate a
phone program in the hearing aid, if you place a
dedicated magnet on your phone.
44 45
About Start-up Handling Options Tinnitus Warnings More info
Direct Audio Input (DAI)
DAI allows your hearing aid to receive signals directly from external
sources such as TV, radio, music players, etc. The DAI adaptor is
attached to your hearing aid and then connected via a cable to the
external sound source.
For more information, please contact your hearing care
professional.
IMPORTANT NOTICE
Only connect hearing aids with DAI to electrically powered devices that
comply with EN 60950-1, EN 60065 or equivalent safety standards. The
external signal source determines the safety of hearing aids with DAI.
Page 24

Tamper-resistant battery drawer
To keep the battery out of reach of infants, small children, and
people with cognitive impairments, a tamper-resistant battery
drawer should be used.
To lock the battery
drawer
Tool to unlock the
battery drawer
Unlock the battery
drawer
1
2
Close the battery
IMPORTANT NOTICE
Avoid excessive force when opening the battery drawer in the locked
position. Do not force the battery drawer beyond its fully opened
position. Make sure to insert the battery correctly.
Please contact your hearing care professional if you suspect the
tamper-resistant effectiveness or locking ability is damaged.
46 47
About Start-up Handling Options Tinnitus Warnings More info
door completely
and make sure it
is locked.
Use this small blue
tool provided by
your hearing care
professional.
Insert the tip of the
blue tool into the
small hole at the back
of the battery drawer.
1. Move it to the right
and push up
2. Open the battery
drawer
Page 25

Sound and LED indications
Different sound and LED light indications help to show the hearing
aid status. The different setting options are listed on the following
pages.
Your hearing care professional can set sound and LED indications to
match your preferences.
48 49
About Start-up Handling Options Tinnitus Warnings More info
Program status
Program 1 1 beep
Program 2 2 beeps
Program 3 3 beeps
Program 4 4 beeps
Wireless accessories 2 beeps
Wireless accessories
incl. microphone
Flight mode Sound
Flight mode active 4 beeps
Flight mode inactive 4 beeps
Green, short blink Green, long blink Red, short blink
Sound LED
2 beeps
LED
LED comments
Continuously
repeated
or
repeated 3 times
with small pauses
Continues on next page
Page 26

On Sound LED LED comments
On
Volume Sound LED
Preferred volume
Minimum / maximum
volume
Volume up / down
Mute
Green, short blink Green, long blink Red, short blink
50 51
About Start-up Handling Options Tinnitus Warnings More info
Start-up jingle
2 beeps
3 beeps
1 beep
Shown one time
Shown one time
Continuously
repeated or
repeated 3 times
with small pauses
Warnings Sound LED LED comments
Battery low
indication
Battery shut
down
Microphone
service check
needed
Red, short blink Red, long blink
3 beeps
4 descending
tones
8 beeps
repated
4 times
Continuously
repeated
Repeated
4 times with small
pauses
Page 27

Tinnitus SoundSupport™ (optional)
Guidelines for tinnitus sound generator users
Intended use of Tinnitus SoundSupport
Tinnitus SoundSupport is a tool intended to generate sounds to
provide temporary relief for patients suffering from tinnitus as
part of a tinnitus management program.
The target population is the adult population (over 18 years old).
Tinnitus SoundSupport is targeted to licensed hearing care
professionals (audiologists, hearing aid specialists, or
otolaryngologists) who are familiar with the evaluation and
treatment of tinnitus and hearing loss. Fitting of Tinnitus
SoundSupport must be done by a hearing care professional
participating in a tinnitus management program.
52 53
About Start-up Handling Options Tinnitus Warnings More info
These instructions contain information about Tinnitus
SoundSupport, which may have been enabled in your hearing aids
by your hearing care professional.
Tinnitus SoundSupport is a tinnitus management device intended
to generate sound of sufficient intensity and bandwidth to help
manage tinnitus.
Your hearing care professional will also be able to offer the
appropriate follow-up care. It is important to follow his/her advice
and directions regarding such care.
Prescription use only
Good health practice requires that a person reporting tinnitus have
a medical evaluation by a licensed ear physician before using a
sound generator. The purpose of such an evaluation is to ensure
that any medically treatable condition that may cause tinnitus is
identified and treated prior to using a sound generator.
Page 28

Sound and volume adjustment
Tinnitus SoundSupport is programmed by your hearing care
professional to match your hearing loss and preferences for
tinnitus relief. It offers a number of different sound options.
Together with your hearing care professional, you can select
your preferred sound(s).
Tinnitus SoundSupport programs
Together with your hearing care professional, you can decide for
which programs you may want to have Tinnitus SoundSupport
activated.The sound generator can be activated in up to four
different programs.
Mute
If you are in a program for which Tinnitus SoundSupport is
activated, the mute functionality will mute only the environmental
sounds, and not the sound from Tinnitus SoundSupport. See
chapter: “Mute the hearing aid”.
Volume adjustments with Tinnitus SoundSupport
When you select a hearing aid program for which Tinnitus
SoundSupport is activated, your hearing care professional can only
set the push button on your hearing aid to work as a volume control
for the tinnitus relief sound.
Your hearing care professional will set the volume control for the
sound generator in one of two ways:
A) Change volume in each ear separately or
B) Change volume in both ears simultaneously.
54 55
About Start-up Handling Options Tinnitus Warnings More info
Page 29

A) How to change Tinnitus SoundSupport volume in each ear
separately
To increase volume (on one hearing aid only), use a short press on
the upper part of the push button repeatedly until desired level is
reached.
To decrease volume (on one hearing aid only), use a short press on
the lower part of the push button repeatedly until desired level is
reached.
B) How to change Tinnitus SoundSupport volume in both ears
simultaneously
You can use one hearing aid to increase/decrease the sound in both
hearing aids. When changing the volume in one hearing aid, the
volume on the other hearing aid will follow.
To increase volume, use a short press on the upper part of the push
button repeatedly.
To decrease volume, use a short press on the lower part of the push
button repeatedly.
To be filled out by your hearing care professional.
56 57
About Start-up Handling Options Tinnitus Warnings More info
Limitation on use time
Daily use
The volume levels of Tinnitus SoundSupport can be set to a level
which could lead to permanent hearing damage when used for
a prolonged period of time. Your hearing care professional will
advise you of the maximum amount of time per day you should
use Tinnitus SoundSupport. It should never be used at
uncomfortable levels.
See table “Tinnitus SoundSupport: Limitation on use” in section
”Your individual hearing aid settings” at the end of this booklet to
learn how many hours per day you can safely use the relief sound
in your hearing aids.
Page 30

Important information for hearing care
professionals about Tinnitus SoundSupport
Device description
Tinnitus SoundSupport is a module function that can be enabled in
the hearing aids by a hearing care professional.
If the volume control is activated
A warning may be displayed if you activate the tinnitus volume
control in the “Buttons & Indicators” screen. This occurs if the relief
sound can be listened to at levels that may cause hearing damage.
The “Max wearing time” table in the fitting software displays the
number of hours the patient can safely use Tinnitus SoundSupport.
Maximum wearing time
The wearing time of Tinnitus SoundSupport will decrease as you
increase the level above 80 dB(A) SPL. The fitting software will
automatically display a warning when the hearing aid exceeds
80 dB(A) SPL. See “Max wearing time indicator” next to the tinnitus
fitting graph in the fitting software.
The volume control is deactivated
By default, the volume control for the sound generator is
deactivated in the hearing aid. Risk of noise exposure increases
when the volume control is activated.
58 59
About Start-up Handling Options Tinnitus Warnings More info
• Note the max wearing time for each program for which Tinnitus
SoundSupport is activated.
• Write those values in the table “Tinnitus SoundSupport:
Limitation on use”, found in the back of this booklet.
• Instruct your patient accordingly.
Page 31

Tinnitus SoundSupport warnings
If your hearing care professional has
activated the sound generator Tinnitus
SoundSupport, please pay attention to
the following warnings.
There are some potential concerns
associated with the use of any sound
generated by a tinnitus management
device. Among them are the potential
for worsening of tinnitus and/or a
possible change in hearing thresholds.
Should you experience or notice a
change in hearing or tinnitus, or any
dizziness, nausea, headaches, heart
palpitations or possible skin irritation at
the point of contact with the device, you
should immediately discontinue use of
the device and seek a consultation with
a medical, audiology, or other hearing
care professional.
60
About Start-up Handling Options Tinnitus Warnings More info
As with any device, misuse of the sound
generator feature could present some
potentially harmful effects. Care should
be taken to prevent the unauthorized
use and to keep the device out of the
reach of children and pets.
Maximum wearing time
Always follow the maximum wearing
time per day of the Tinnitus SoundSupport advised by your hearing care
professional. Prolonged use may lead
to worsening of your tinnitus or of your
hearing loss.
Page 32

General warnings
You should familiarize yourself fully with
the following general warnings before using
your hearing aid for your personal safety
and to ensure correct usage.
Please note that a hearing aid will not
restore normal hearing and will not
prevent or improve a hearing
impairment resulting from organic
conditions. Furthermore, note that in
most cases, infrequent use of a hearing
aid does not permit a user to attain its
full benefits.
Consult your hearing care professional if
you experience unexpected operations
or events with your hearing aid.
Usage of hearing aids
Hearing aids should be used only as
directed and adjusted by your hearing
care professional. Misuse can result in
sudden and permanent hearing loss.
62 63
About Start-up Handling Options Tinnitus Warnings More info
Never allow others to wear your hearing
aid as incorrect usage could cause
permanent damage to their hearing.
Choking hazards & risk of swallowing
batteries and other small parts
Hearing aids, their parts, and batteries
should be kept out of reach of children
and anyone who might swallow these
items or otherwise cause injury to
themselves.
Batteries have occasionally been mistaken
for pills. Therefore, check your medicine
carefully before swallowing any pills.
Most hearing aids can be supplied with
a tamper-resistant battery drawer upon
request. This is strongly recommended
for infants, small children, and people
with cognitive impairments.
Children younger than 36 months must
always use a tamper-resistant battery
drawer. Please talk to your hearing care
professional about the availability of
this option.
If a battery or hearing aid is swallowed,
see a doctor immediately and contact
the National Poison Center at 1-800222-1222 or National Battery Ingestion
Hotline at 202-625-3333.
Battery use
Always use batteries recommended
by your hearing care professional.
Low quality batteries may leak and
cause bodily harm.
Never attempt to recharge your
batteries, and never dispose of batteries by burning them. There is a risk that
the batteries will explode.
Dysfunction
Be aware of the possibility that your
hearing aid may stop working without
notice. Keep this in mind when you
depend on warning sounds (e.g. when
you are in traffic). The hearing aids may
stop functioning, for instance if the
batteries have expired or if the tubing is
blocked by moisture or earwax.
Active implants
The hearing aid has been thoroughly
tested and characterized for human
health according to international
standards for human exposure (Specific
Absorption Ratio - SAR), induced
electromagnetic power and voltages
into the human body.
The exposure values are well below
international accepted safety limits for
SAR, induced electromagnetic power
and voltages into the human body defined in the standards for human health
and coexistence with active medical
implants, such as pacemakers and heart
defibrillators.
Continues on next page
Page 33

General warnings
If you have an active brain implant,
please contact the manufacturer of
your implantable device for information
about the risk of disturbance.
The Auto Phone magnet and MultiTool
(which has a built-in magnet) should be kept
at least 12 in. away from the implant, e.g. do
not carry it in a breast pocket.
X-ray, CT, MR, PET scanning, and
electrotherapy
Remove your hearing aid before X-ray,
CT/MR/PET scanning, electrotherapy,
surgery, etc. as your hearing aid may
be damaged when exposed to strong
electromagnetic fields.
Heat and chemicals
The hearing aid must never be exposed
to extreme heat, e.g. left inside a parked
car in the sun.
64 65
About Start-up Handling Options Tinnitus Warnings More info
The hearing aid must not be dried in
microwave ovens or other ovens.
The chemicals in cosmetics, hairspray,
perfume, aftershave lotion, sunscreen
lotion, and insect repellent can damage
the hearing aid. Always remove your
hearing aid before applying such products and allow time to dry before use.
Power instrument
Special care should be exercised when
selecting, fitting and using a hearing
aid when the maximum sound pressure
capability exceeds 132 dB SPL (IEC 711),
as there may be risk of impairing the remaining hearing of the hearing aid user.
For information of whether your
hearing aid is a power instrument, see
the model overview in the front of this
booklet.
Possible side effects
Hearing aids and earpieces may cause
an accelerated accumulation of earwax.
The otherwise non-allergenic materials used in hearing aids may in rare
cases cause skin irritation or other side
effects.
Please consult a physician if these
conditions occur.
Interference
The hearing aid has been thoroughly
tested for interference, in accordance
with the most stringent international
standards. However, interference between the hearing aid and other devices
(e.g. some mobile telephones, citizens
band systems, shop alarm systems and
other devices) may occur. If this occurs,
increase the distance between the
hearing aid and the interfering device.
Use on aircraft
Your hearing aid has Bluetooth. On
board an aircraft, flight mode must be
activated, unless Bluetooth is permitted
by the flight personnel.
Connection to external equipment
The safety of the hearing aid when connected to external equipment with an
auxiliary input cable, is determined by
the external signal source. When connected to external equipment plugged
into a wall outlet, this equipment must
comply with IEC-62368 (or IEC-60065,
IEC-60950 until June 20, 2019) or
equivalent safety standards.
Page 34

General warnings
Warnings to hearing care
professional
A hearing care professional should
advise a prospective hearing aid user
to consult immediately with a licensed
physician (preferably an ear specialist)
before dispensing a hearing aid if the
hearing care professional determines
through inquiry, actual observation, or
review of any other available information concerning the prospective user,
that the prospective user has any of
the following conditions:
(i) Visible congenital or traumatic
deformity of the ear.
(ii) History of active drainage from the
ear within the previous 90 days.
66 67
About Start-up Handling Options Tinnitus Warnings More info
(iii) History of sudden or rapidly
progressive hearing loss within
the previous 90 days.
(iv) Acute or chronic dizziness.
(v) Unilateral hearing loss of sudden
or recent onset within the
previous 90 days.
(vi) Audiometric air-bone gap equal
to or greater than 15 decibels at
500 Hertz (Hz), 1,000 Hz, and
2,000 Hz.
(vii) Visible evidence of significant
cerumen accumulation or a
foreign body in the ear canal.
(viii) Pain or discomfort in the ear.
Special care should be exercised in
selecting and fitting a hearing aid
whose maximum sound pressure
capability exceeds 132 dB SPL as
there may be risk of impairing the
remaining hearing of the hearing
aid user.
Important notice for prospective
hearing aid users
Good health practice requires that
a person with a hearing loss have
a medical evaluation by a licensed
physician (preferably a physician
who specializes in diseases of the
ear) before purchasing a hearing aid.
Licensed physicians who specialize in
diseases of the ear are often referred
to as Otolaryngologists, Otologists or
Otorhinolaryngologists. The purpose
of medical evaluation is to ensure
that all medically treatable conditions
that may affect hearing are identified
and treated before the hearing aid
is purchased. Following the medical
evaluation, the physician will give you
a written statement that states that
your hearing loss has been medically evaluated and that you may be
considered a candidate for a hearing
aid. The physician will refer you to an
audiologist or a hearing aid dispenser, as appropriate, for a hearing aid
evaluation.
Page 35

General warnings
The audiologist or hearing care professional will conduct a hearing aid
evaluation to assess your ability to
hear with and without a hearing aid.
The hearing aid evaluation will enable
the audiologist or dispenser to select
and fit a hearing aid to your individual
needs. If you have reservations about
your ability to adapt to amplification,
you should inquire about the availability of a trial, rental or purchaseoption program. Many hearing care
professionals now offer programs that
permit you to wear a hearing aid for a
period of time for a nominal fee, after
which you may decide if you want
to purchase the hearing aid. Federal
law limits the sale of hearing aids to
those individuals who have obtained
68 69
About Start-up Handling Options Tinnitus Warnings More info
a medical evaluation from a licensed
physician.
Federal law permits a fully informed
adult to sign a waiver statement
declining the medical evaluation
for religious or personal beliefs
that preclude consultation with a physician. The exercise of such a waiver is
not in your best health interest and its
use is strongly discouraged. A hearing
aid will not restore normal hearing and
will not prevent or improve a hearing
impairment resulting from organic
conditions. A hearing aid is only part
of hearing rehabilitation and may
need to be supplemented by auditory
training and lip reading.
Children with hearing loss
In addition to seeing a physician
for medical evaluation, a child with
a hearing loss should be directed
to an audiologist for evaluation
and rehabilitation, since hearing
loss may cause problems in language
development and educational and
social growth of a child. An audiologist
is qualified by training and experience
to assist in the evaluation and rehabilitation of a child with a hearing loss.
If the user is an infant, small child, or
person with cognitive impairment, it
is recommended that the hearing aid
be modified with a tamper-resistant
battery compartment.
Page 36

Troubleshooting
Symptom Possible causes Solutions
Dead battery Replace the battery
No sound
Intermittent or
reduced sound
Squealing noise
Beeping/LED
blinking (optional)
Pairing issue with
Apple device
70 71
About Start-up Handling Options Tinnitus Warnings More info
Clogged earpieces (dome, Grip Tip, earmold or MicroMold)
Hearing aid microphone muted Unmute the hearing aid microphone
Clogged sound outlet Clean earmold or MicroMold, replace wax filter or change dome or GripTip
Moisture Wipe battery with a dry cloth
Hearing aid earpiece inserted incorrectly Re-insert the earpiece
Earwax accumulated in ear canal Have ear canal examined by your doctor
Ear has grown Contact your hearing care professional
If your hearing aid plays 8 beeps, 4 times consecutively, and/or
repeatedly blink red 4 times with small pauses, your hearing aid
needs a microphone service check
Bluetooth connection failed
Only one hearing aid paired
Clean earmold or MicroMold or replace wax filter
Consider to replace dome, or GripTip
Contact your hearing care professional
1) Unpair your hearing aid (SettingsGeneralAccessibilityHearing DevicesDevices
Forget this device). 2) Turn Bluetooth off and on again. 3) Open and close battery drawer
on hearing aid. 4) Re-pair hearing aid (see chapter: “Pair with iPhone”)
If none of the above solutions work, consult your hearing care professional.
Page 37

Water and dust resistant (IP68)
Your hearing aid is dust tight and
protected against ingress of
water, which means it is designed
to be worn in all daily life situations.
Therefore, you do not have to worry
about sweat or getting wet in the
rain. Should your hearing aid come
into contact with water and stop
working, please follow these
guidelines:
1. Gently wipe off any water.
2. Open the battery drawer, remove
the battery, and gently wipe off
any water in the battery drawer.
3. Let the hearing aid dry with the
battery drawer left open for
approximately 30 minutes.
4. Insert a new battery.
Conditions of use
Operating conditions
Storage and transport
conditions
Temperature: +34°F to +104°F
Relative humidity: 5% to 93%, non-condensing
Temperature and humidity shall not exceed
the below limits for extended periods during
transport and storage:
Temperature: -13°F to +140°F
Relative humidity: 5% to 93%, non-condensing
IMPORTANT NOTICE
Do not wear your hearing aid while showering or participating in water
activities. Do not immerse your hearing aid in water or other liquids.
72 73
About Start-up Handling Options Tinnitus Warnings More info
Page 38

Warranty
Certificate
Name of owner: __________________________________________________
Hearing care professional: __________________________________________
Hearing care professional’s address: __________________________________
Hearing care professional’s phone: ___________________________________
Purchase date: ___________________________________________________
Warranty period: _______________ Month: ___________________________
Model left: ____________________ Serial no.: _________________________
Model right: ___________________ Serial no.: _________________________
74 75
About Start-up Handling Options Tinnitus Warnings More info
International warranty
Your hearing aid is covered by an
international limited warranty issued
by the manufacturer for a period of
at least 12 months from the date of
delivery. This limited warranty covers
manufacturing and material defects
in the hearing aid itself, but not in
accessories such as batteries, tubing,
speakers, earpieces and filters, etc.
Problems resulting from improper or
incorrect handling or care, excessive
use, accidents, repairs made by an
unauthorized party, exposure to
corrosive conditions, physical changes
in your ear, damage due to foreign
objects entering the device, or incorrect adjustments are NOT covered by
the limited warranty and may void it.
The above warranty does not affect
any legal rights that you might have
under applicable national legislation
governing sale of consumer goods.
Your hearing care professional may
have issued a warranty that goes
beyond the clauses of this limited
warranty. Please consult him/her
for further information.
If you need service
Take your hearing aid to your hearing
care professional, who may be able to
sort out minor problems and adjustments immediately.
Page 39

Mobile phone
Some hearing aid users have reported
a buzzing sound in their hearing aid
when they are using mobile phones,
indicating that the mobile phone and
hearing aid may not be compatible.
The ANSI C63.19 standard determines the prediction of compatibility
between a specific hearing aid and a
mobile phone by: adding the numerical value of the rating for the hearing
aid immunity to the numerical value
of the rating for the mobile phone
emissions. A sum of 4 would indicate
that the combination of wireless
device and hearing aid is usable; a
combined rating that equals at least
5 would provide normal use; a combined rating of 6 or greater would
indicate excellent performance.
76 77
About Start-up Handling Options Tinnitus Warnings More info
Whereas all hearing aids have acoustic coupling, only the larger hearing
aids have the physical space for
telecoil (inductive) coupling. These
two types of coupling have different
rating scales (M1-M4 for acoustic
coupling and T1-T4 for telecoil coupling, respectively) and both ratings
are therefore relevant when predicting the compatibility of a particular
hearing aid.
For a hearing aid with both acoustic
coupling and telecoil coupling with a
rating of M4/T2 and with a telephone
rating of M3/T3), the combined rating
is 7 (M4 + M3) for the acoustic coupling and 5 (T2 + T3) for the telecoil
coupling. According to the guidelines
given above, both types of coupling
will thereby be acceptable, with the
acoustic coupling indicating excellent
performance and the telecoil coupling indicating normal use.
The above equipment performance
measurements, categories and
system classifications are based upon
the best information available, but it
cannot be guaranteed that all users
will be satisfied.
IMPORTANT NOTICE
The performance of individual hearing aids may vary with individual
mobile phones. Therefore, please try this hearing aid with your mobile
phone or, if you are purchasing a new phone, be sure to try it with
your hearing aid prior to purchase. For additional guidance, please
ask your mobile phone provider for the booklet entitled “Hearing Aid
Compatibility with Digital Wireless Cell Phones.”
The immunity of this hearing aid is
at least M2/T2.
The equipment performance
measurements, categories and
system classifications are based
upon the best information available
but cannot guarantee that all users
will be satisfied.
Page 40

Technical information
The hearing aid contains two radio
technologies, which are described
below:
The hearing aid contains a radio
transceiver using short-range
magnetic induction technology
working at 3.84 MHz. The magnetic
field strength of the transmitter is
very weak and is always below 15 nW
[typically below -40 dBμA/m at a
10meter/33 ft. distance].
The hearing aid also contains a radio
transceiver using Bluetooth Low
Energy (BLE) and a proprietary
short-range radio technology both
working at ISM band 2.4 GHz. The
radio transmitter is weak and always
78 79
About Start-up Handling Options Tinnitus Warnings More info
below 3 mW equal to 4.8 dBm in total
radiated power.
The hearing aid complies with
international standards concerning
electromagnetic compatibility and
human exposure.
Due to the limited space available on
the hearing aid, relevant approval
markings can be found in this
document.
Additional information can be found
in the “Technical Data sheet” on
www.oticon.com
USA and Canada
The hearing aid contains a radio
module with the following
certification ID numbers:
FCC ID: U28AUBTEP
IC: 1350B-AUBTEP
The device complies with Part 15 of
the FCC Rules and with Industry
Canada’s license-exempt RSSs.
Operation is subject to the following
two conditions:
1. This device may not cause harmful
interference.
2. This device must accept any
interference received, including
interference that may cause
undesired operation.
Changes or modifications not
expressly approved by the party
responsible for compliance could void
the user’s authority to operate the
equipment.
Page 41

This Class B digital apparatus
complies with Canadian ICES-003.
Note: This equipment has been
tested and found to comply with
the limits for a Class B digital device,
pursuant to part 15 of the FCC Rules.
These limits are designed to provide
reasonable protection against harmful interference in a residential installation. This equipment generates,
uses and can radiate radio frequency
energy and, if not installed and used
in accordance with the instructions,
may cause harmful interference to radio communications. However, there
by turning the equipment off and on,
the user is encouraged to try to
correct the interference by one or
more of the following measures:
– Reorient or relocate the receiving
antenna.
– Increase the separation between
the equipment and receiver.
– Connect the equipment into an
outlet on a circuit different from
that to which the receiver is
connected.
– Consult the manufacturer or an
experienced radio/TV technician
for help.
The manufacturer declares that this
hearing aid is in compliance with the
essential requirements and other
relevant provisions of Directive
2014/53/EU.
Declaration of Conformity is
available from the manufacturer.
Manufactured by:
Denmark
is no guarantee that interference will
not occur in a particular installation.
If this equipment does cause harmful
interference to radio or television
reception, which can be determined
80 81
About Start-up Handling Options Tinnitus Warnings More info
Waste from electronic
equipment must be
handled according to
local regulations.
Page 42

Description of symbols used in this booklet
Warnings
Text marked with a warning symbol must be read before using the device.
Manufacturer
The device is produced by the manufacturer whose name and address are stated
next to the symbol. Indicates the medical device manufacturer, as dened in EU
Directives 90/385/EEC, 93/42/EEC and 98/79/EC.
CE mark
The device complies with Medical Device Directive 93/42/EEC.
The four digit number indicates the identication of the notied body.
Electronic waste (WEEE)
Recycle hearing aids, accessories or batteries according to local regulations.
Hearing aid users can also return electronic waste to their hearing care
professional for disposal. Electronic equipment covered by Directive 2012/19/EU
on waste and electrical equipment (WEEE).
Regulatory Compliance Mark (RCM)
The device complies with electrical safety, EMC and radio spectrum requirements
for devices supplied to the Australian or New Zealand market.
IP code
Indicates the class of protections against harmful ingress of water and particulate
matter according to EN 60529:1991/A1:2002.
IP6X indicates total dust protection. IPX8 indicates the protection against the
eects of continuous immersion in water.
82 83
About Start-up Handling Options Tinnitus Warnings More info
Bluetooth logo
Registered trademark of Bluetooth SIG, Inc. where any use of such requires a
license.
Made for Apple badges
Indicates that the device is compatible with iPhone, iPad and iPod touch.
Description of symbols used on the regulatory packaging label
Keep dry
Indicates a medical device that needs to be protected from moisture.
Caution symbol
Consult instructions for use for warnings and cautions.
Catalog number
Indicates the manufacturer’s catalog number so that the medical device
can be identied.
Serial number
Indicates the manufacturer’s serial number so that a specic medical
device can be identied.
Page 43

Your individual hearing aid settings
To be filled out by your hearing care professional.
Tinnitus SoundSupport: Limitation on use
No limitation on use
Program Start-up volume (Tinnitus) Max volume (Tinnitus)
1 Max _______ hours per day Max _______ hours per day
2 Max _______ hours per day Max _______ hours per day
3 Max _______ hours per day Max _______ hours per day
4 Max _______ hours per day Max _______ hours per day
84
About Start-up Handling Options Tinnitus Warnings More info
Settings overview for your hearing aid
Left Right
Yes No
Yes No
Yes No
Yes No
On Off
On Off
On Off
On Off
Volume control
Program shift
Mute
Tinnitus SoundSupport
Volume control indicators
Beeps at min/max volume
Beeps when changing volume
Beeps at preferred volume
Battery indicators
Low battery warning
Yes No
Yes No
Yes No
Yes No
On Off
On Off
On Off
On Off
Page 44

Technical Data BTE13 PP
Opn1BTE13PP_OSPL90_2cc − 02−05−2017 − taje − 09:02:09
Opn2+3BTE13PP_FOG_2cc − 02−05−2017 − taje − 13:31:47
Opn1BTE13PP_FOG_2cc − 02−05−2017 − taje − 09:03:26
2CC Coupler measured according to American National Standard ANSI S3.222014 and ANSI S3.55-2014/Part 5. Supply voltage: Battery Zinc Air 1.4 Volt
Opn 1, Opn S 1, & Opn Play 1
Opn 2, Opn 3, Opn S 2, Opn S 3,
Opn Play 2, Siya 1, & Siya 2
Oticon
OSPL90 – Output
Sound
Pressure Level
Input: 90 dB SPL.
Technical setting: A0
Full-on Gain
Input: 50 dB SPL.
Technical setting: A0
Sound Hook
Thin tube
(size 1/1.3)
86 87
About Start-up Handling Options Tinnitus Warnings More info
dB SPL
130
120
110
100
Hz 500 1000 2000 Hz 5000 10000
100 200
dB
70
60
50
40
Hz 500 1000 2000 Hz 5000 10000
100 200
dB SPL
130
120
110
100
100 200
dB
70
60
50
40
100 200
Oticon
Hz 500 1000 2000 Hz 5000 10000
Hz 500 1000 2000 Hz 5000 10000
0 dB SPL ref. 20 mPa
Peak OSPL90 131 (1291) dB SPL 131 (129*) dB SPL 131 (129*) dB SPL
HF Average OSPL90 126 (118
Peak Full-on Gain 66 (66
HF Average Full-on Gain 61 (54
Reference Test Gain 50 d B 50 dB 50 dB
Frequency Range 120-7000 Hz 120-7000 Hz 120-7000 Hz
Total Harmonic Distortion 500 Hz 3 % 3 % 3 %
Total Harmonic Distortion 800 Hz <2% <2% <2%
Total Harmonic Distortion 1600 Hz <2 % <2 % <2 %
Battery Consumption 1.9 mA 1.9 mA 1.9 mA
Equivalent Input Noise Level (omni/dir) 14/27 dB SPL 14/27 dB SPL 14/27 dB SPL
HF Average SPLITS (left/right ear) 109/ 109 dB SPL 109/ 109 dB SPL 10 9/109 dB SPL
Attack Time <5 ms <5 ms <5 ms
Release Time <50 ms <50 ms <50 ms
* For instruments fitted with thin tube
Oticon
Opn 1, Opn S 1,
& Opn Play 1
1
) dB SPL 126 (118*) dB SP L 126 (118 *) dB SPL
1
) dB 66 (66*) dB 66 (66*) d B
1)
dB 61 (54*) dB 61 (54*) dB
Oticon
Opn 2, Opn S 2 &
Siya 1
Oticon
Opn 3, Opn S 3, Opn
Play 2, & Siya 2
Page 45

Technical Data BTE
100 200 500 1000 2000 5000 10000Hz Hz
100
110
120
130
100 200 500 1000 2000 5000 10000Hz Hz
dB
2CC Coupler measured according to American National Standard ANSI S3.222014 and ANSI S3.55-2014/Part 5. Supply voltage: Battery Zinc Air 1.4 Volt
OSPL90 – Output
Sound
Pressure Level
Input: 90 dB SPL.
Technical setting: A0
Full-on Gain
Input: 50 dB SPL.
Technical setting: A0
88 89
Sound Hook
Thin tube
(size 1/0.9)
About Start-up Handling Options Tinnitus Warnings More info
dB SPL
60
50
40
30
Siya 1 & 2
2CC Coupler
0 dB SPL ref. 20 mPa Oticon Siya 1 & Siya 2
Peak OSPL90 120 (121*) dB SPL
HF Average OSPL90 115 (105*) d B SPL
Peak Full-on Gain 57 (54*) dB
HF Average Full-on Gain 50 (41*) dB
Reference Test Gain 39 dB
Frequency Range 100-7000 Hz
Total Harmonic Distortion 500 Hz <2 %
197869US / 2019.01.10
Total Harmonic Distortion 800 Hz <2 %
Total Harmonic Distortion 1600 Hz <2 %
Battery Consumption 1.7 mA
Equivalent Input Noise Level (omni/dir) 18/28 dB SPL
HF Average SPLITS (left/right ear) 97/97 dB SPL
Attack Time <5 ms
Release Time <30 ms
* For instruments fitted with thin tube
197869US / 2019.01.10
Page 46

0000197869000001
Oticon Opn Firmware 6.0 or earlier, Oticon Siya Firmware 1.0
197869US / 2019.01.10 : Oticon Opn S & Oticon Opn Play Firmware 7.0,
 Loading...