

Page 1

miniRITE
Instructions for use
Page 2

Model overview
This booklet is valid for miniRITE in the following
hearing aid families:
Oticon Opn 1
Oticon Opn 2
Oticon Opn 3
with NFMI and 2.4 GHz radio functionality.
The following speakers are available for the above families:
Speaker 60
Speaker 85
Speaker 100
Power mould speaker 105
176477CA-US / 27.09.16 / FW 2.X
176477CA-US / 27.09.16 / FW 2.X
Page 3

Intended use
The hearing aid is intended to amplify and transmit sound to the
ear and thereby compensate for impaired hearing within mild to
severe-to-profound hearing loss. The hearing aid is not intended
to be used by infants/children <36 months.
IMPORTANT NOTICE
The hearing aid amplification is uniquely adjusted and optimized
to your personal hearing capabilities during the hearing aid fitting
performed by your hearing care professional.
Introduction to this booklet
This booklet shows you how to use and maintain your new hearing
aid. Please read the booklet carefully including the Warning section.
This will help you to get the most out of your new hearing aid.
Your hearing care professional has adjusted the hearing aid to meet
your needs. If you have further questions, please contact your
hearing care professional.
About Startup Handling Options Warnings More info
For your convenience this booklet contains a navigation bar to help
you navigate easily through the different sections.
Page 4

Table of contents 1/2
Continues on next page
About
Identify your hearing aid speaker and earpiece 10
Your hearing aid — What it is 12
What it does 13
Identify left and right hearing aid 14
Battery (size 312) 15
MultiTool for handling batteries and cleaning 16
Start up
Turn the hearing aid ON and OFF 18
When to replace a battery 19
Replace the battery 20
Handling
Put on the hearing aid 22
Caring for your hearing aid 24
Replace ProWax miniFit filter 26
Standard earpieces: dome or Grip Tip 28
Replace dome or Grip Tip 29
Customized earpieces: micromold, LiteTip or power mold 30
Clean micromold, LiteTip or power mold 31
Options
Flight mode 32
Optional features and accessories 33
Change volume (optional) 34
Mute the hearing aid (optional) 35
Change program (optional) 36
Quick reset 38
Using hearing aids with iPhone, iPad and iPod touch 39
Pairing hearing aids with iPhone 40
Re-connect your hearing aids to your iPhone, iPad or iPod touch 42
Oticon ON App 43
Wireless accessories (optional) 44
Other options (optional) 45
Page 5

Table of contents 2/2
Warnings
Usage of hearing aids 46
Battery use 47
Dysfunction 48
Active implants 48
X-ray, CT, MR, PET scanning and electrotherapy 49
Heat and chemicals 49
Power instrument 50
Possible side effects 50
Interference 51
Use on aircraft 51
More info
Troubleshooting guide 52
Water & dust resistant (IP68) 54
Conditions of use 55
Warranty certificate 56
International warranty 57
Technical information 58
Page 6

10 11
About Startup Handling Options Warnings More info
About
Identify your hearing aid speaker and earpiece
This will make it easier
for you to navigate
through this booklet.
Speakers
miniRITE hearing aids come
with three different speakers:
Earpieces
The speaker uses one of the
following earpieces:
miniRITE with Power
mold speaker
Speaker
(60 shown)
Micromold or LiteTip
* Please see details for replacing the dome or Grip Tip in section:
Replace dome or Grip Tip
Ear grip
(optional)
60 85 100
105
Grip Tip
Dome (open dome shown)*
Page 7

12 13
Wax protection
of speaker
Holds the
speaker in place
Wax filter
Ear grip
(optional)
About Startup Handling Options Warnings More info
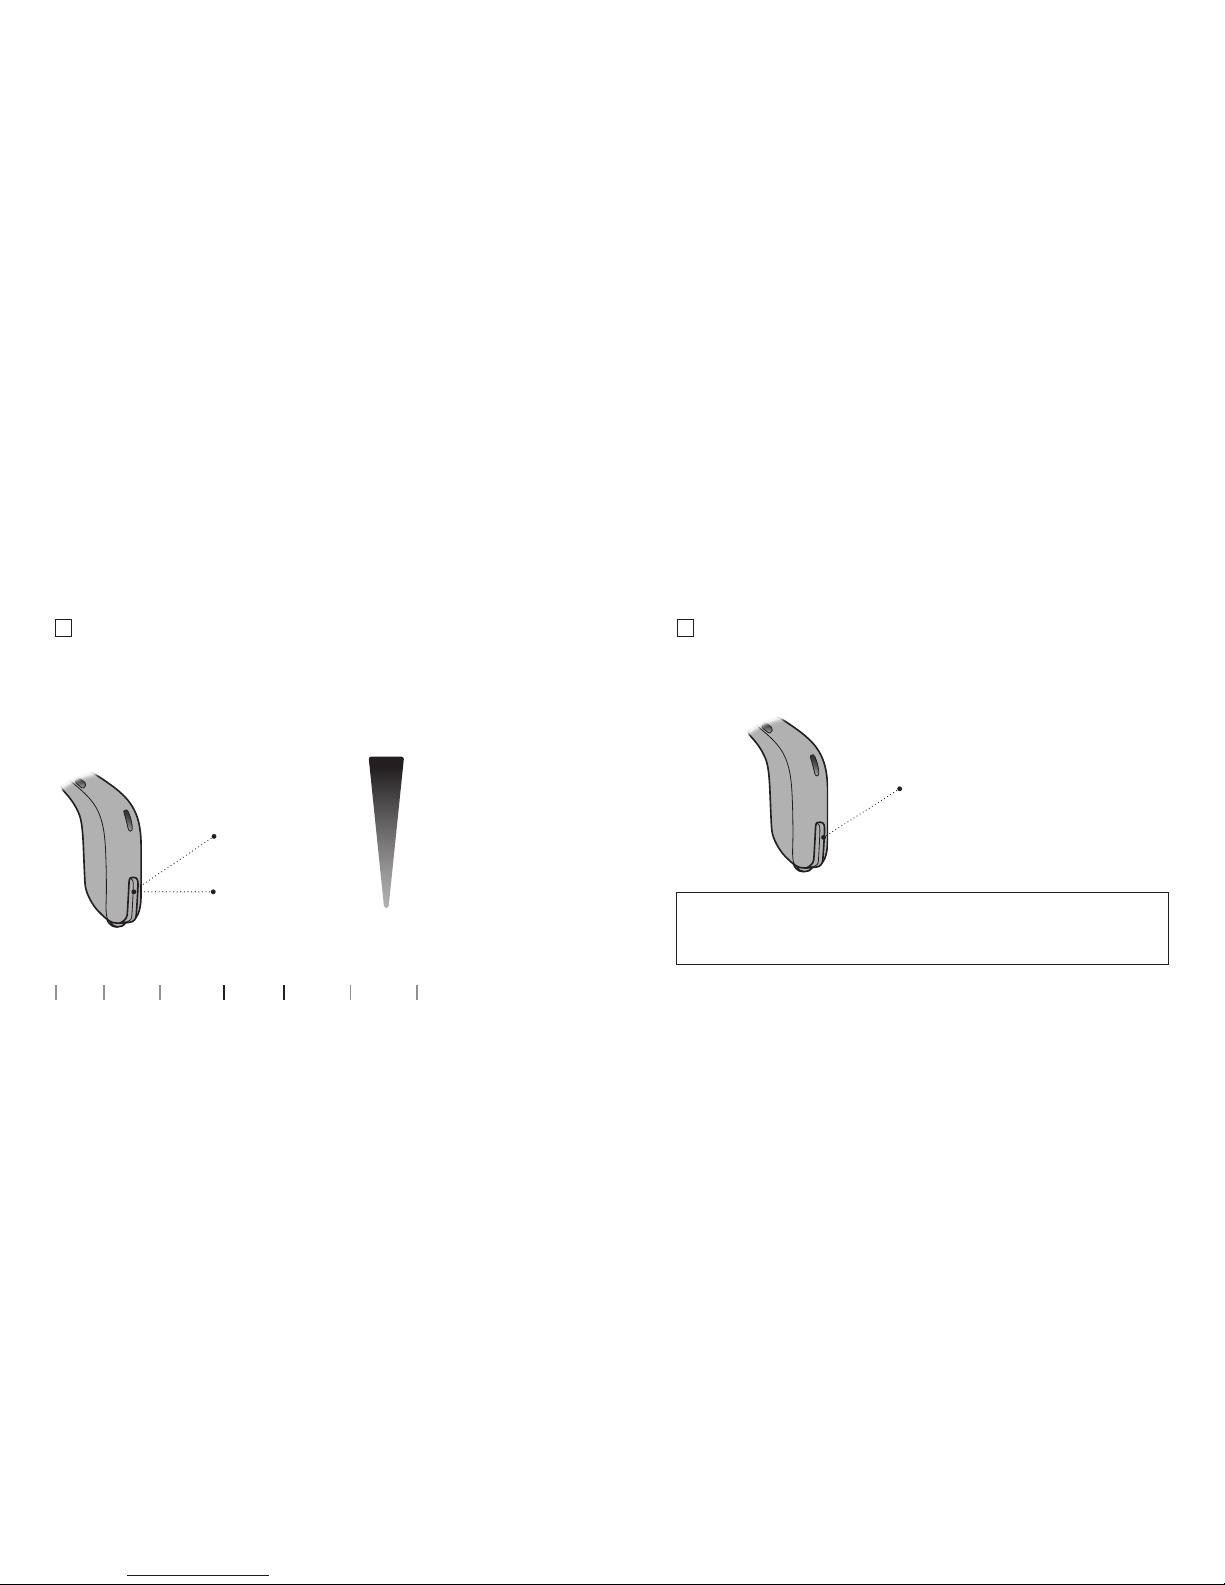
Your hearing aid — What it is
Push button Change
program and
volume and
mute the
hearing aid
Microphone
openings
Sound in
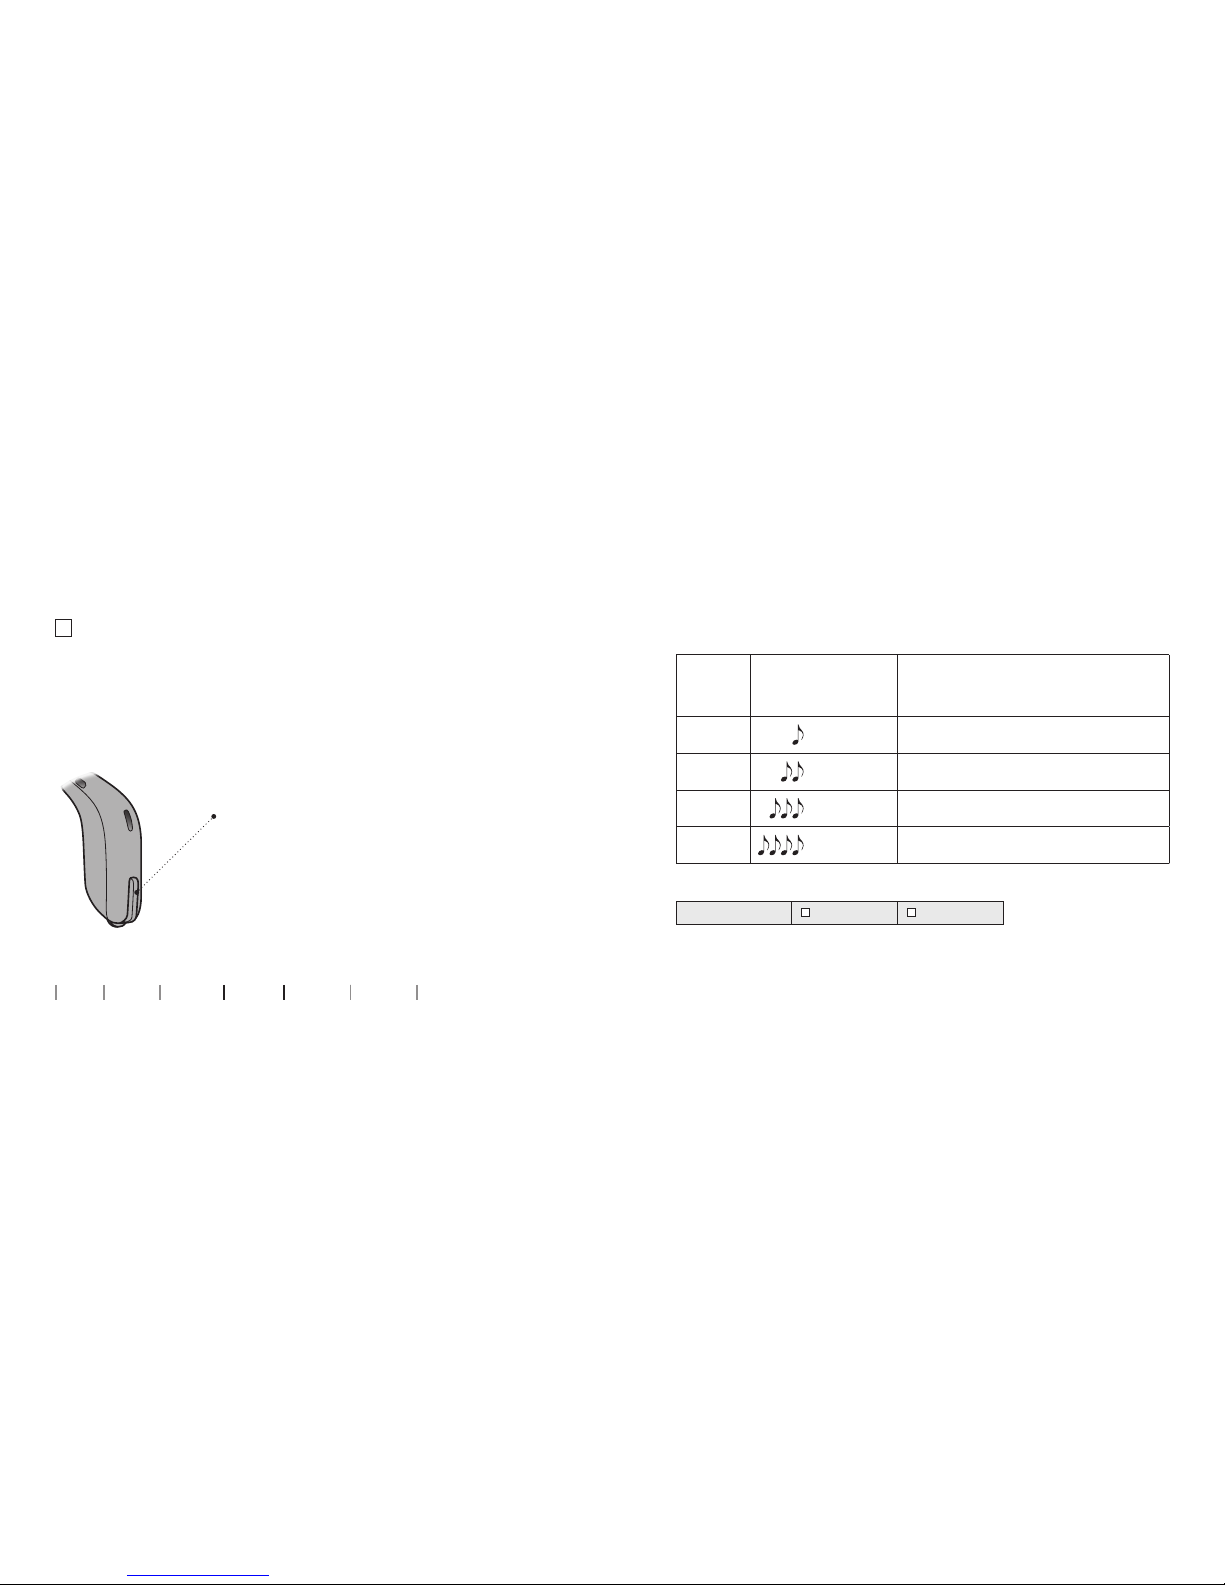
What it does
Battery drawer Contains the battery.
Battery drawer is also
the on/off switch
Sound out
Speaker
(60 shown)
Page 8

14 15
About Startup Handling Options Warnings More info
Identify left and right hearing aid
It is important to distinguish between the left and the right hearing
aid as they may be programmed differently. You can find left/right
colour indicators in the battery drawer, on 60 and 85 speakers, on
the micromolds or on the LiteTips.
Battery (size 312)
Your hearing aid is a miniature electronic device that
runs on special batteries. To activate the hearing aid,
you must insert a new battery in the battery drawer.
See how in the “Replace the battery” section.
A RED indicator marks
the RIGHT hearing aid.
A BLUE indicator marks
the LEFT hearing aid.
Battery drawer
Pull out to open
Make sure the
plus is visible
Page 9

16
About Startup Handling Options Warnings More info
MultiTool for handling batteries and cleaning
The MultiTool contains a magnet which makes it easier to replace
the battery in the hearing aid. It also contains a brush and a
wire loop for cleaning and removing ear wax. If you need a new
MultiTool please contact your hearing care professional.
Brush
Wire loopMagnet
IMPORTANT NOTICE
The MultiTool has a built-in magnet. Keep the MultiTool 30 cm away
from credit cards and other magnetically sensitive devices.
Page 10
18 19
About Startup Handling Options Warnings More info
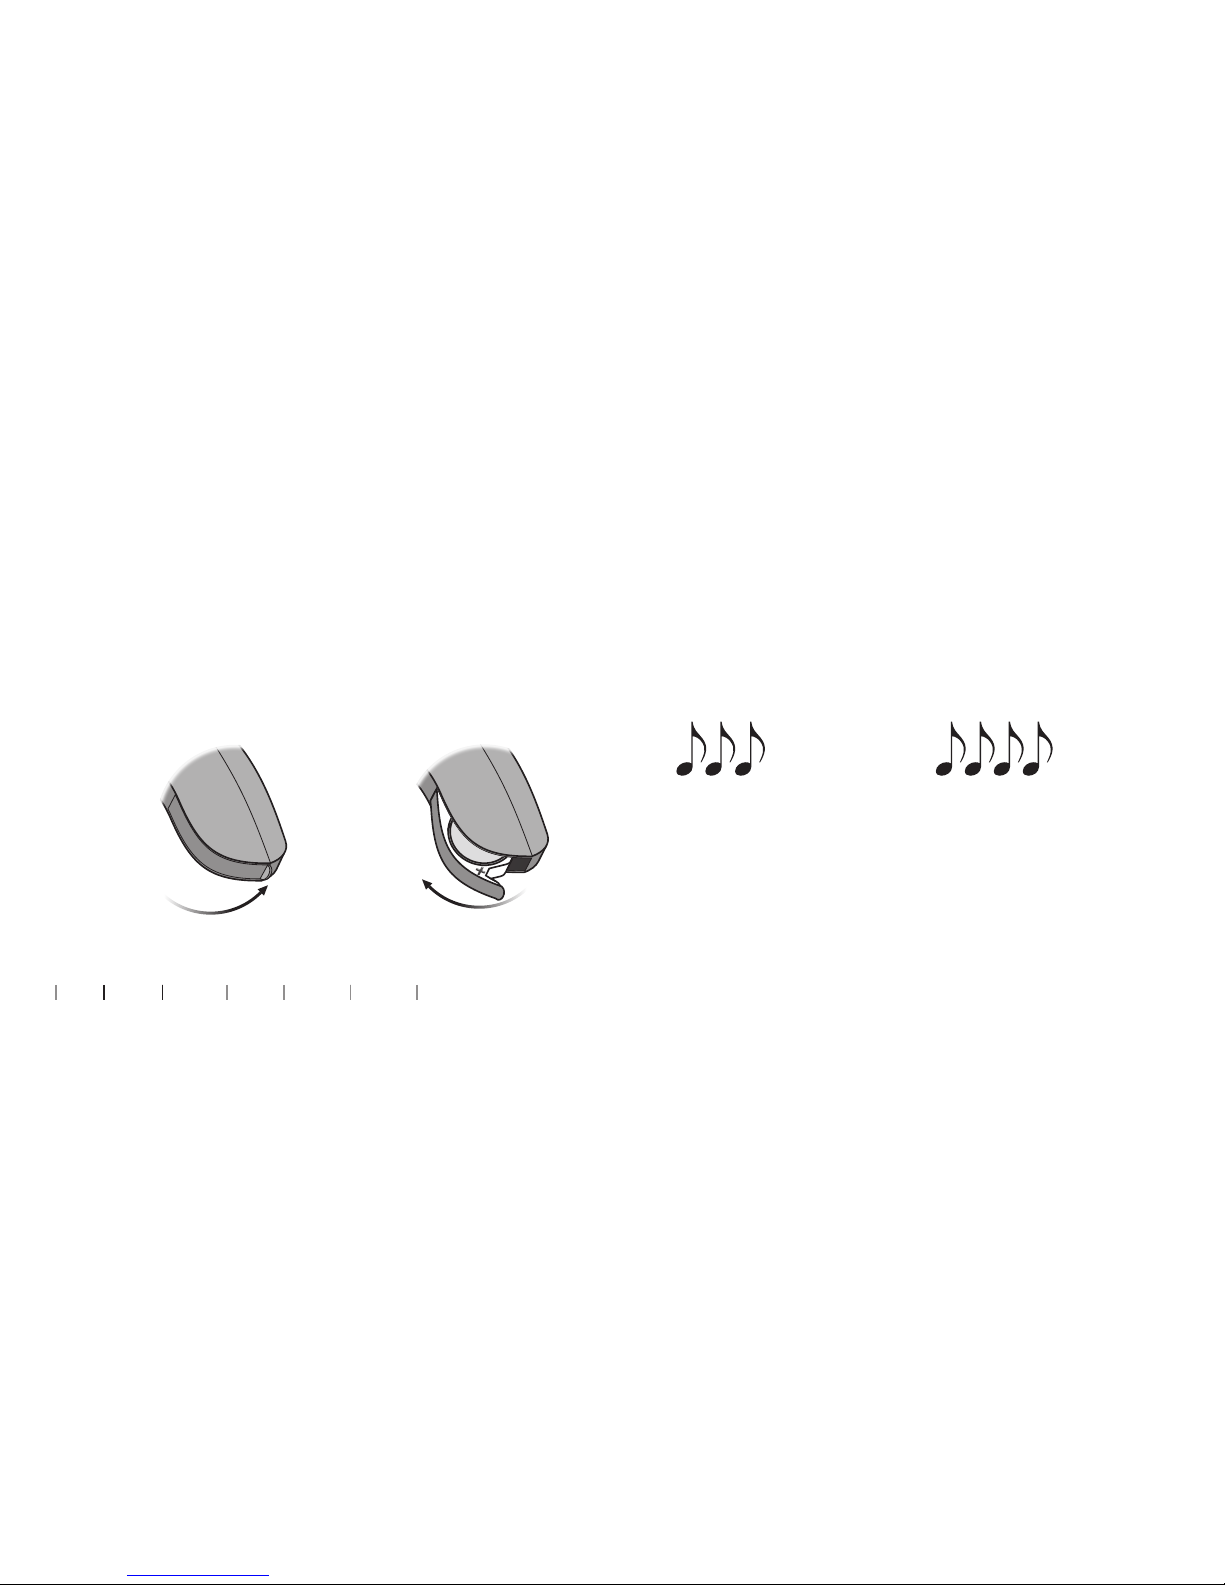
Turn the hearing aid ON and OFF
The battery drawer is used to switch the hearing aid on and off.
To save battery life, make sure your hearing aid is switched off
when you are not wearing it.
When to replace a battery
When it is time to replace the battery you will hear three beeps
repeated at moderate intervals until the battery runs out.
Three beeps
= The battery is running low
Four beeps
= The battery has run out
Battery tip
To make sure the hearing aid is always working, bring spare
batteries with you, or replace the battery before you leave home.
Turn ON
Close the
battery
drawer with
the battery
in place.
Turn OFF
Open the
battery drawer.
Start up
Page 11
20 21
About Startup Handling Options Warnings More info
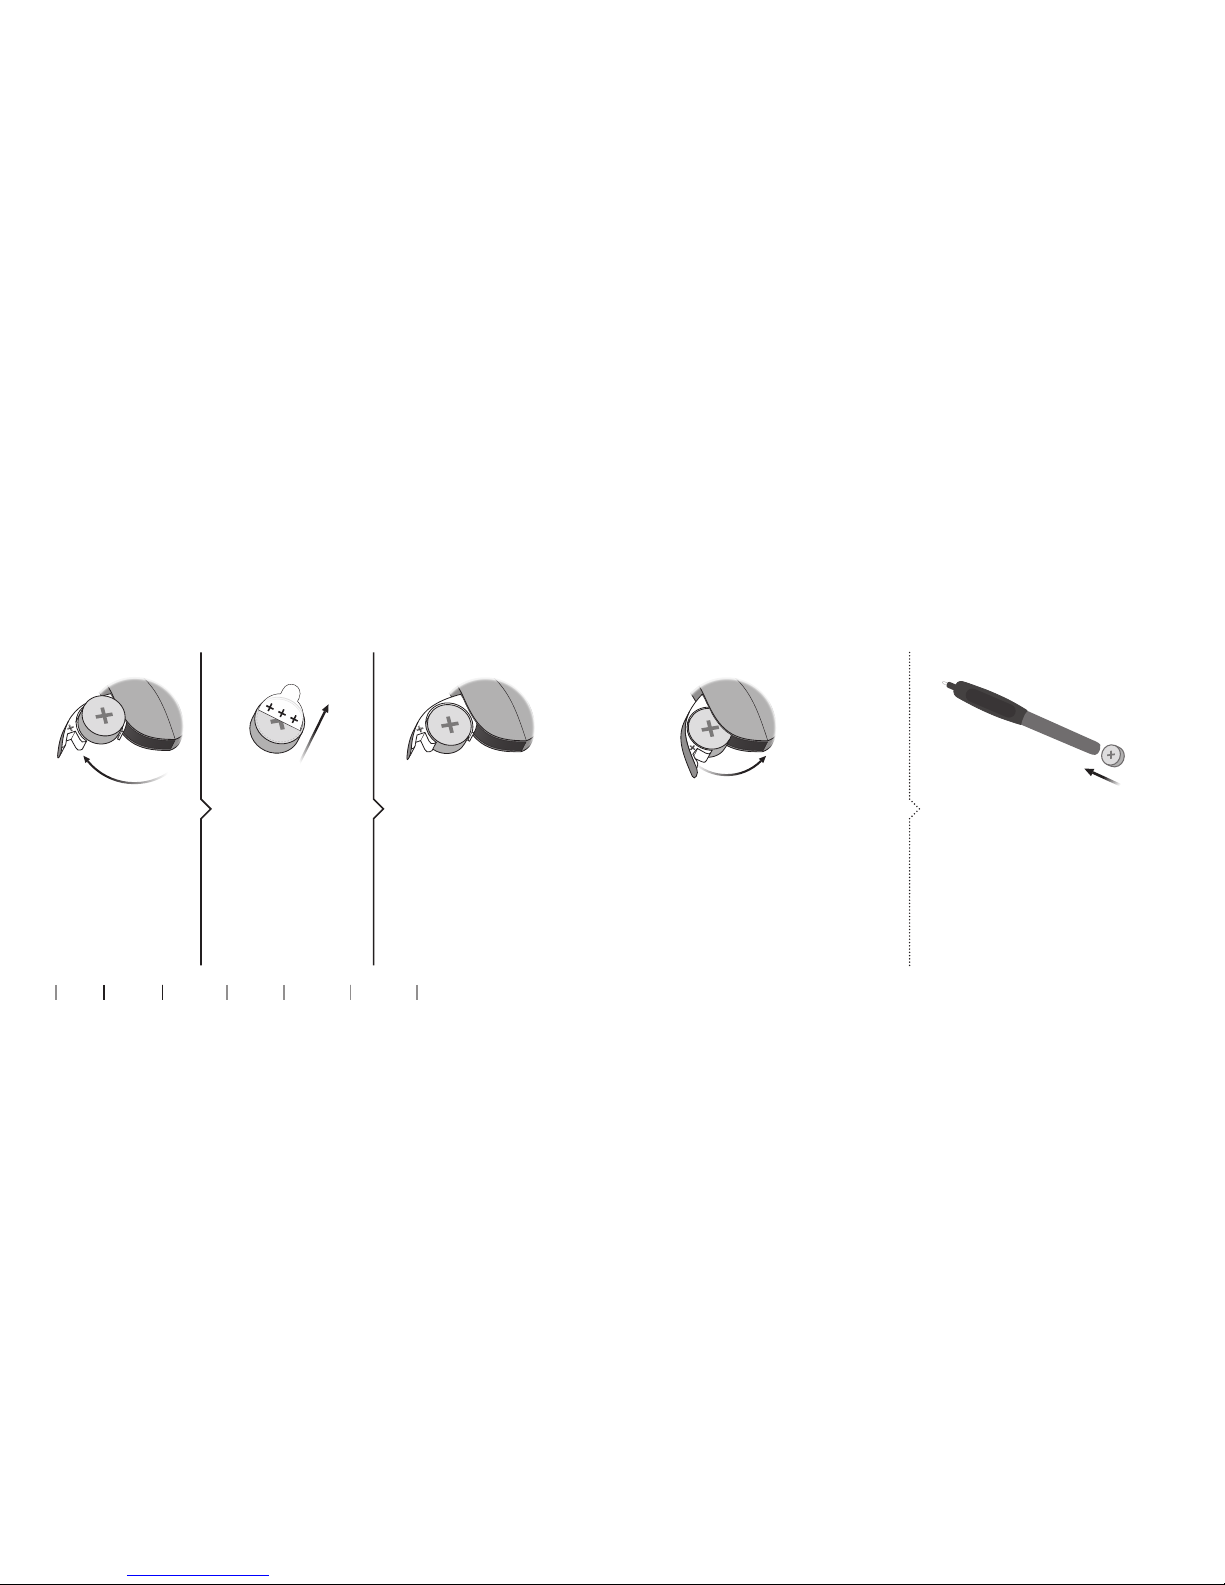
Replace the battery
2. Uncover 3. Insert
Fully open the
battery drawer.
Remove the battery.
Remove the sticky
label from the + side
of the new battery.
Insert the new
battery into the
battery drawer.
Make sure the +
side faces up.
1. Remove
MultiTool
Close the battery drawer.
The hearing aid will play a
jingle through the earpiece.
Hold the earpiece close to
your ear to hear the jingle.
The MultiTool can be used for
battery change. Use the magnetic
end to remove and insert batteries.
The MultiTool is provided by
your hearing care professional.
4. Close Tip
Page 12

22 23
About Startup Handling Options Warnings More info
The speaker brings the sound
into your ear. The speaker should
always be used with an earpiece
attached. Use only parts
designed for your hearing aid.
If the speaker has an ear grip,
place it in the ear so it follows
the contour of the ear
(see step 3).
Put on the hearing aid
Ear grip
(optional)
Ear grip
Speaker
(60 shown)
Place the hearing
aid behind your ear.
Hold the bend of
the speaker wire
between your
thumb and index
finger. The earpiece
should point
towards the ear
canal opening.
Gently push the
earpiece into your
ear canal until the
speaker wire sits
close against the side
of your head.
Step 1 Step 2 Step 3
Handling
Page 13
24 25
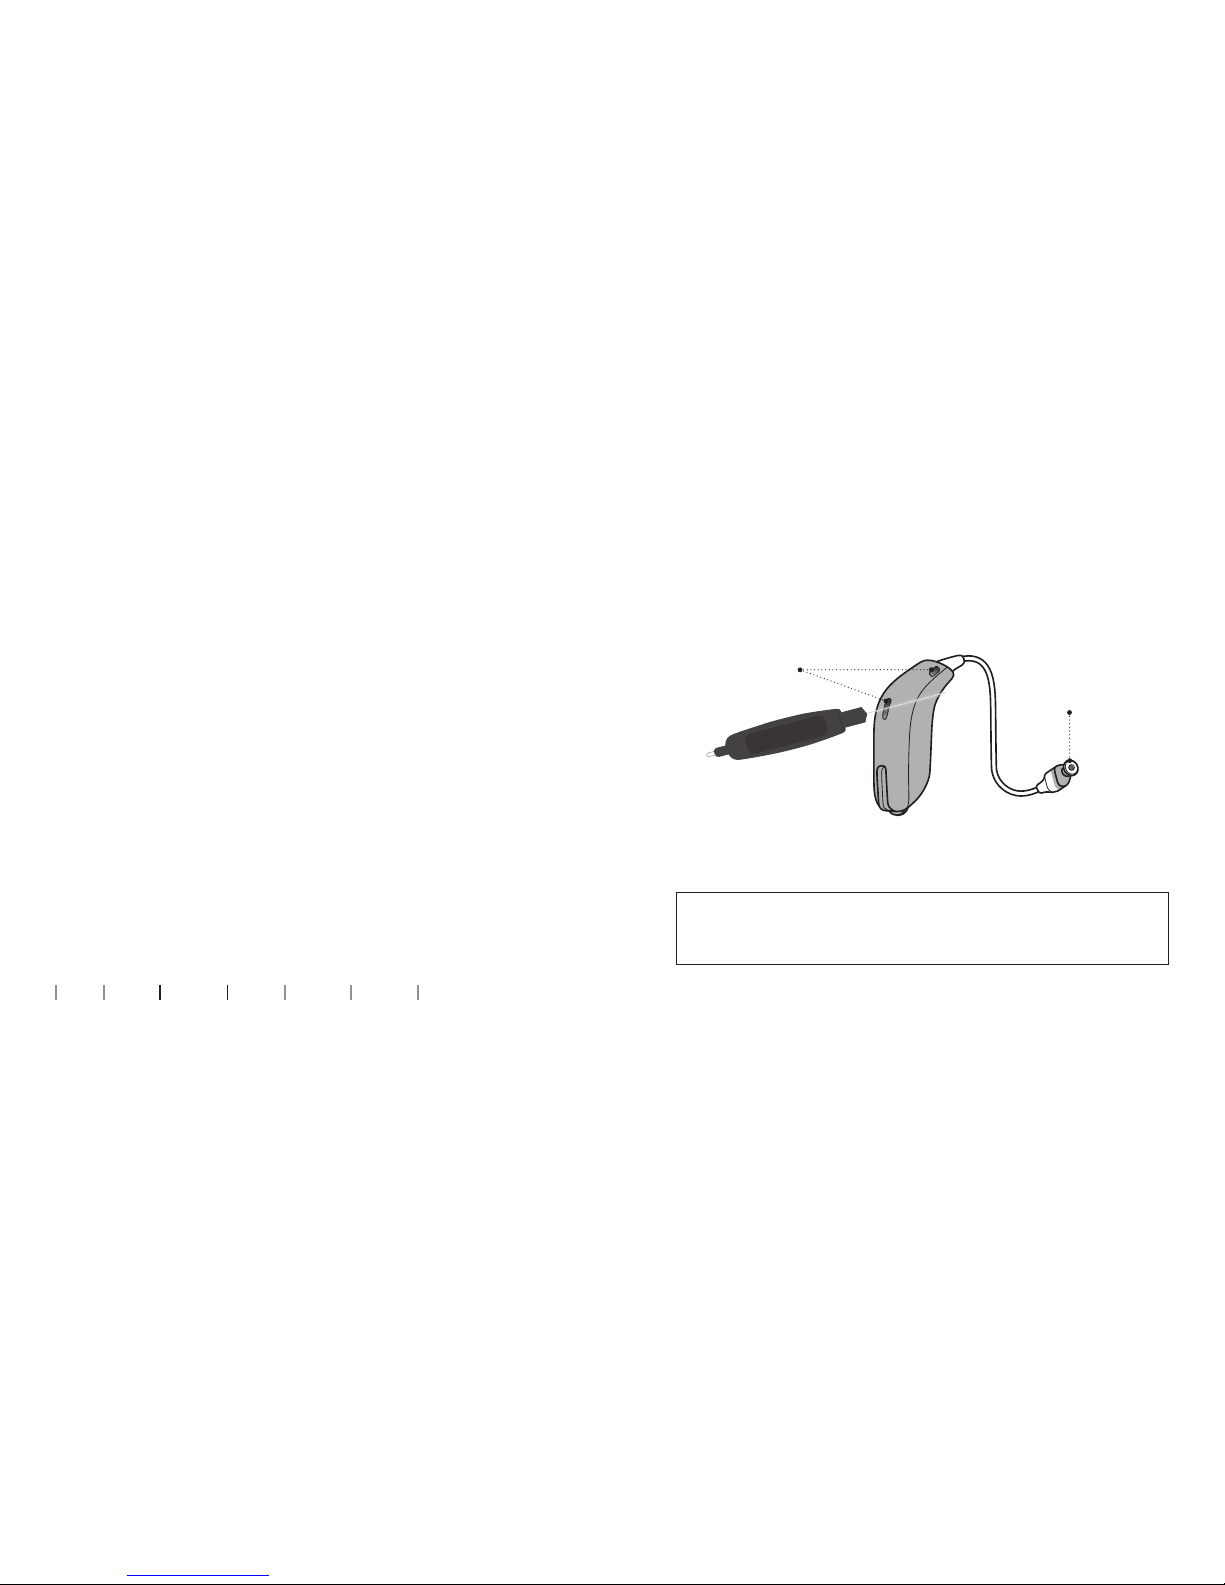
Caring for your hearing aid
When handling your hearing aid, hold it over a soft surface
to avoid damage if you drop it.
Clean the microphone openings
Carefully brush away debris from the openings. Gently brush the
surface. Make sure the brush is clean and that it is not pressed
into the openings.
Wax filter
The speaker has a white wax filter attached to the end where the
earpiece is attached. The wax filter will avoid wax and debris from
damaging the speaker. If the filter becomes clogged, please replace
the wax filter (see section Replace ProWax miniFit filter) or contact
your hearing care professional.
About Startup Handling Options Warnings More info
IMPORTANT NOTICE
Use a soft, dry cloth to clean the hearing aid. It must never be washed
or immersed in water or other liquids.
Microphone
openings
Wax filter
Page 14
26 27
About Startup Handling Options Warnings More info
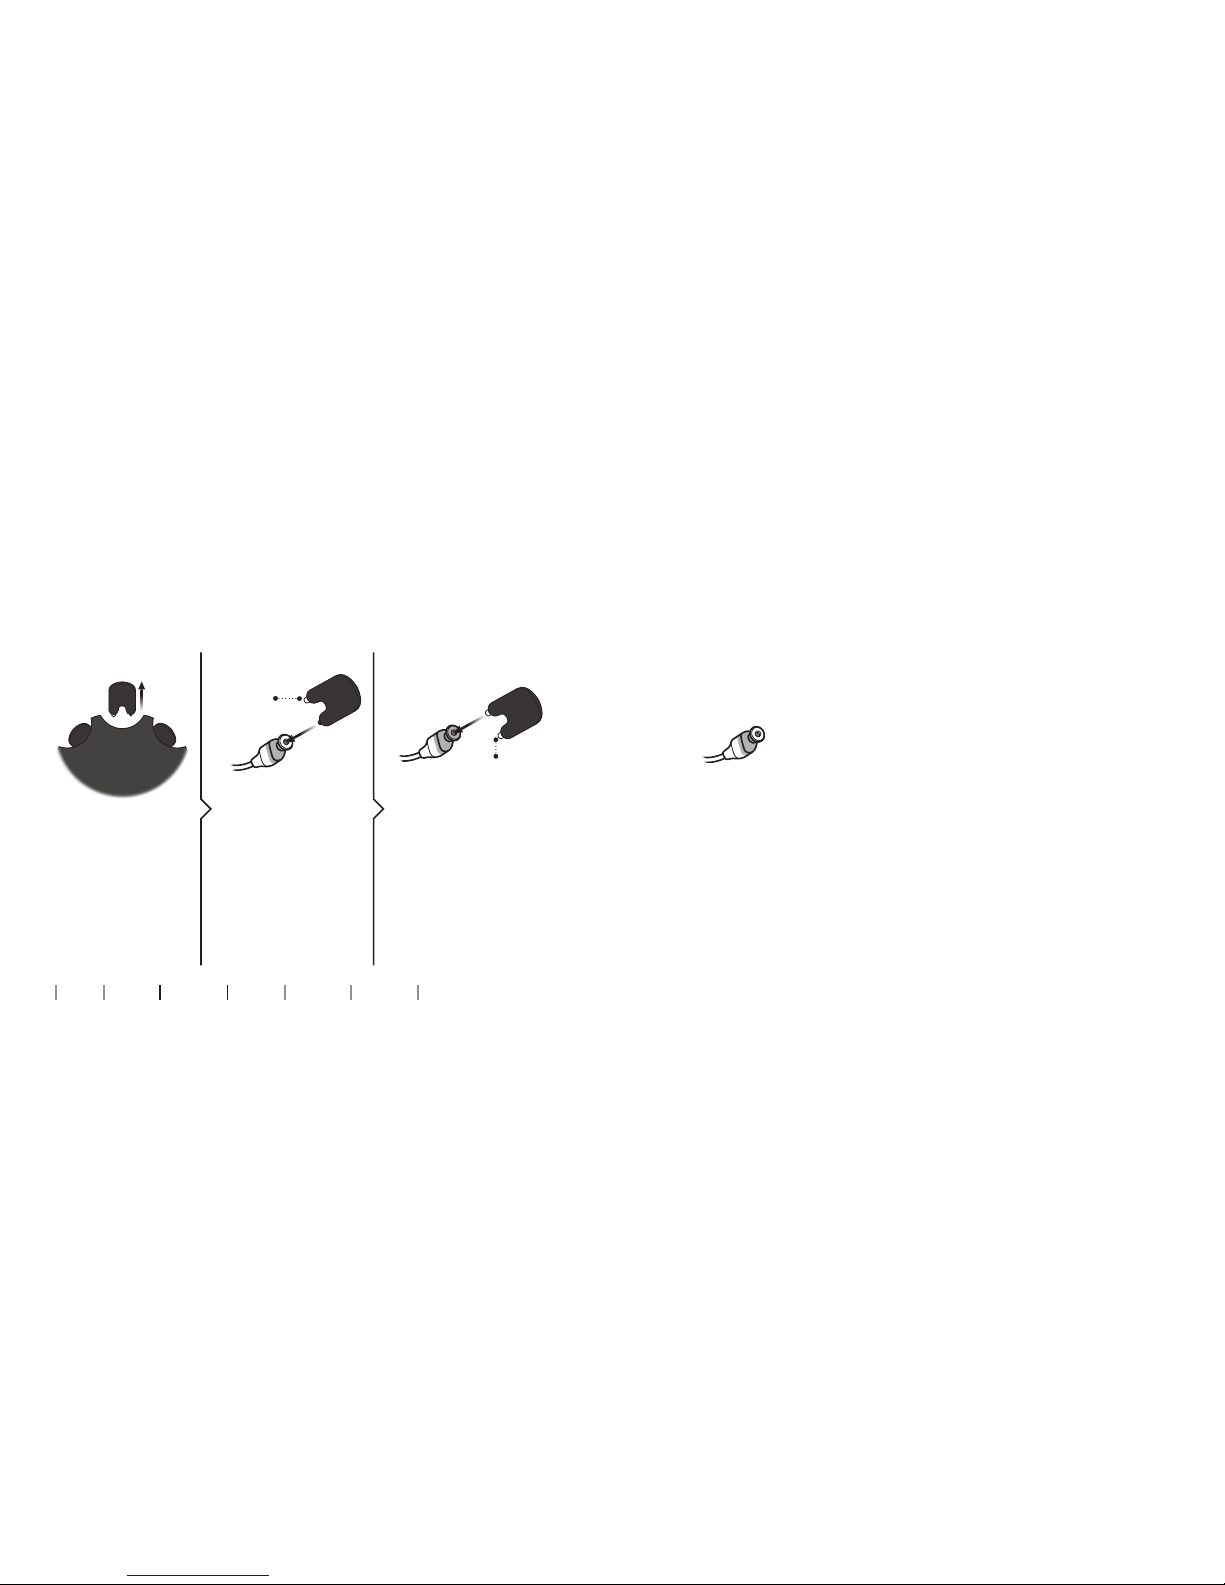
Replace ProWax miniFit lter
2. Remove 3. Insert
Remove the tool
from the shell.
The tool has two
pins, one empty
for removal and
one with the
new wax filter.
Push the empty
pin into the wax
filter in the speaker
and pull it out.
Insert the new wax
filter using the other
pin, remove the tool
and throw it out.
1. Tool
The speaker should look
like above when you have
replaced the wax filter.
4. Final
New
filter
Old
filter
Note:
If you use a mold, it requires that the hearing care professional replaces
the wax filter in the speaker.
Page 15

28 29
About Startup Handling Options Warnings More info
Open
dome
Power
dome
Grip Tip
Available in small and large,
with and without vent.
Bass dome,
single vent
Bass dome,
double vent
6 mm5 mm* 8 mm 10 mm 12 mm**
Standard earpieces: dome or Grip Tip
Both domes and Grip Tip are made of soft rubber material.
There are 4 different types of domes.
Check your dome type and size below.
IMPORTANT NOTICE
If the earpiece is not on the speaker when removed from the ear,
the earpiece might still be in the ear canal. Consult your hearing care
professional for further instructions.
Replace dome or Grip Tip
The earpiece (dome or Grip Tip) should not be cleaned. If the
earpiece is filled with wax, replace it with a new one. Grip Tip
should be replaced at least once a month.
Hold on to the
speaker and then
pull off the earpiece.
Insert the speaker
exactly into the
middle of the
earpiece to obtain a
firm attachment.
Push firmly to ensure
that the earpiece is
fastened securely.
Step 1 Step 2 Step 3
* only for speaker 60
** not for open dome
Page 16

30 31
About Startup Handling Options Warnings More info
Wax filter
Clean micromold, LiteTip or power mold
The earpiece should be
cleaned regularly.
The earpiece contains a
wax filter which should
be replaced when clogged
or when the hearing aid
does not sound normal.
Always use the wax filter
delivered by your hearing
care professional.
The vent is cleaned
by pressing the brush
through the hole,
twisting it slightly.
Ven t
LiteTip Power
mold
Micromold
Customized earpieces: micromold,
LiteTip or power mold
There are 3 different types of molds: micromold, LiteTip and a
power mold. The earpieces are customized for your ear.
Page 17

32 33
About Startup Handling Options Warnings More info
Optional features and accessories
The features and accessories described on the following pages
are optional. Please contact your hearing care professional
to find out how your hearing aid is programmed.
If you experience difficult listening situations,
a special program may be helpful. These are
programmed by your hearing care professional.
Write down hearing situations where you may need help.
Options
Flight mode
When boarding a flight or entering an area where it is
prohibited to radiate radio signals, e.g. during flight, flight
mode must be activated. The hearing aid will still be working.
It is only necessary to activate flight mode on one hearing aid.
To activate and deactivate
flight mode. Press the
push button for at least
7 seconds. A jingle
confirms your action.
Opening and closing the battery drawer will also deactivate the flight mode.
See section: Quick reset.
Page 18
34 35
About Startup Handling Options Warnings More info
You will hear
2 beeps at
the starting
level
Change volume (optional)
When you have two hearing aids, the push button allows you to
adjust the volume in both ears. You will hear a click when you turn
the volume up or down.
MAXIMUM
STARTING
LEVEL
MINIMUM
A short press on the
RIGHT hearing aid
increases volume.
A short press on the
LEFT hearing aid
decreases volume
Mute the hearing aid (optional)
Use the mute function if you need to silence the hearing aid while
wearing it.
IMPORTANT NOTICE
Do not use the mute function as an off switch, as the hearing aid still
draws current from the battery in this mode.
Apply a very long press (3-4 seconds)
to the button to mute the hearing aid.
To reactivate, push the button briefly.
Page 19
36 37
About Startup Handling Options Warnings More info
Press the button to change program
Note that if you have two hearing aids,
the RIGHT hearing aid switches forwards
from e.g. program 1 to 2 and the LEFT
hearing aid switches backwards from
e.g. program 4 to 3.
Change program (optional)
Your hearing aid can have up to 4 different programs.
These are programmed by your hearing care professional.
To be filled out by the hearing care professional
Program Sound you will
hear when
activated
When to use
1
“1 beep”
2
“2 beeps”
3
“3 beeps”
4
“4 beeps”
Program change:
Short press Long press
Page 20

Oticon Opn is compatible with iPhone SE, iPhone 6s Plus, iPhone 6s,
iPhone 6 Plus, iPhone 6, iPhone 5s, iPhone 5c, iPhone 5, 9.7-inch iPad
Pro, 12.9-inch iPad Pro, iPad Air 2, iPad Air, iPad (4th generation), iPad
mini 4, iPad mini 3, iPad mini 2, iPad mini, and iPod touch (5th and 6th
generation). Devices must be running iOS 9.3 or later.
38 39
About Startup Handling Options Warnings More info
Quick reset
If you wish to return to the standard settings of the hearing aid
programmed by your hearing care professional, simply open and
then close the battery drawer.
Open Close
Use hearing aids with iPhone, iPad and iPod touch
Your hearing aid is a Made for
iPhone® hearing aid and allows
for direct communication and
control with iPhone, iPad® or
iPod touch®.
For assistance in using these
products with your hearing
aids, please contact your
hearing care professional or
visit our support site at:
www.oticon.ca/connectivity
Page 21

40 41
About Startup Handling Options Warnings More info
Pairing hearing aids with iPhone
2. General
6. Confirm pairing
3. Accessibility1. Settings
5. Select
Open and close the
battery drawer, on
both hearing aids,
and place them
close to your iPhone.
The hearing aids
stay in pairing mode
for 3 minutes.
Your iPhone will
detect the hearing
aids for pairing.
Detected devices
will appear in your
iPhone list. Choose
your hearing aids.
Confirm pairing.
If you have two
hearing aids, pairing
confirmation is
needed for each
hearing aid.
Open your iPhone
and go to “Settings”.
Make sure Bluetooth
is on. Then choose
“General”.
On the “General”
screen, choose
“Accessibility”.
On the “Accessibility”
screen, choose
“Hearing Aids”.
Bluetooth
General
Accessibility
Hearing Aids
William’s Hearing Aids
Oticon Opn 1
On
✓
4. Prepare
Bluetooth Pairing
Request
Oticon Opn would like to pair with
your iPhone
Cancel Pair
Page 22

42 43
About Startup Handling Options Warnings More info
“Made for iPod,” “Made for iPhone,” and “Made for iPad” mean that an electronic
accessory has been designed to connect specifically to iPod, iPhone, or iPad,
respectively, and has been certified by the developer to meet Apple performance
standards. Apple is not responsible for the operation of this device or its
compliance with safety and regulatory standards. Please note that the use of this
accessory with iPod, iPhone, or iPad may affect wireless performance.
Apple, the Apple logo, iPhone, iPad, and iPod touch are trademarks of Apple Inc.,
registered in the U.S. and other countries. Apple Watch is a trademark of Apple
Inc. App Store is a service mark of Apple Inc. Android, Google Play and the Google
Play logo are trademarks of Google Inc.
Re-connect your hearing aids to your iPhone,
iPad or iPod touch
When you turn off your hearing aids or Apple device, these will no
longer be connected. To connect them again, turn on your hearing
aids by opening and closing the battery door. The hearing aids will
then automatically re-connect to your Apple device.
Oticon ON App
Oticon ON App for iPhone, iPad, iPod touch and AndroidTM devices
offers an intuitive and discreet way to control your hearing aids.
Oticon ON App enables you to connect and control an endless range
of other devices by linking to IFTTT via the internet.
Go to www.oticon.ca/connectivity for more details
and information on compatibility.
Oticon ON App is available on App Store® and on
Google Play
TM
. When downloading Oticon ON App on
iPad, search for iPhone apps on App Store.
Page 23

44 45
About Startup Handling Options Warnings More info
Wireless accessories (optional)
As an enhancement to your wireless hearing aids, a range of
wireless accessories are available. They can enable you to hear
and communicate better in everyday situations.
ConnectClip
When ConnectClip is paired
with your mobile phone, you
can use the hearing aids as a
handsfree headset.
TV Adapter 3.0
TV Adapter is a wireless
transmitter of sound from TV
and electronic audio devices.
The TV Adapter streams sound
directly to your hearing aids.
Remote Control 3.0
Remote Control offers the
ability to change program,
adjust volume or mute your
hearing aids.
For more information, please
contact your hearing care
professional or visit:
www.oticon.ca
Other options (optional)
Autophone
The autophone can automatically activate a phone
program in the hearing aid, if your telephone has a
dedicated magnet. The magnet needs to be placed
on your telephone next to the sound outlet.
For more information, please contact
your hearing care professional.
Page 24

46 47
About Startup Handling Options Warnings More info
You should familiarize yourself
fully with the following general
warnings before using your
hearing aid for your personal
safety and to ensure correct use.
Please note that a hearing aid will
not restore normal hearing and will
not prevent or improve a hearing
impairment resulting from organic
conditions. Furthermore, note that
in most cases, infrequent use of
a hearing aid does not permit a
user to attain full benefit from it.
Consult your hearing care
professional if you experience
unexpected operations or
events with your hearing aid.
Usage of hearing aids
• Hearing aids should be used
only as directed and adjusted by
your hearing care professional.
Misuse can result in sudden
and permanent hearing loss.
• Never allow others to wear
your hearing aid as incorrect
usage could cause permanent
damage to their hearing.
Choking hazards & risk of
swallowing batteries
• Hearing aids, their parts,
and batteries should be kept
out of reach of children and
anyone who might swallow
these items, or otherwise
cause injury to themselves.
• Batteries have occasionally been
mistaken for pills. Therefore, check
your medicine carefully before
swallowing any pills.
• Most hearing aids can be supplied
with a tamper-resistant battery
drawer upon request. This is
strongly recommended for infants,
small children and people with
learning difficulties.
• Children below 36 months must
always use a tamper-resistant
battery drawer. This option is
available in BTE, miniBTE, RITE
and miniRITE hearing aids.
If a battery or hearing aid is
swallowed, see a doctor immediately.
Battery use
• Always use batteries recommended
by your hearing care professional.
Batteries of low quality may leak
and cause bodily harm.
• Never attempt to recharge
your batteries and never
dispose of batteries by burning
them. There is a risk that the
batteries will explode.
Warnings
Warnings
Page 25

48 49
About Startup Handling Options Warnings More info
Dysfunction
• Be aware of the possibility
that your hearing aid may stop
working without notice. Keep
this in mind when you depend
on warning sounds (e.g. when
you are in traffic). The hearing
aids may stop functioning, for
instance if the batteries have
expired or if the tubing is blocked
by moisture or ear wax.
Active implants
• Caution must be taken with active
implants. In general, follow the
guidelines recommended by
manufacturers of implantable
defibrillators and pacemakers
regarding use with mobile
phones and magnets.
• The Autophone magnet and
MultiTool (which has a built-in
magnet) should be kept more than
30 cm away from the implant, e.g.
do not carry it in a breast pocket.
• If you have an active brain implant,
please contact the manufacturer
of your implantable device for
information about the risk of
disturbance.
X-ray, CT, MR, PET scanning
and electrotherapy
• Remove your hearing aid before
X-ray, CT/MR/PET scanning
electrotherapy, surgery etc. as
your hearing aid may be damaged
when exposed to strong fields.
Heat and chemicals
• The hearing aid must never be
exposed to extreme heat e.g.
left inside a parked car in the sun.
• The hearing aid must not be dried
in microwave ovens or other ovens.
• The chemicals in cosmetics,
hairspray, perfume, aftershave
lotion, suntan lotion and insect
repellent can damage the hearing
aid. Always remove your hearing
aid before applying such products
and allow time to dry before use.
Warnings
Page 26

50 51
About Startup Handling Options Warnings More info
Power instrument
• Special care should be excercised
in selecting, fitting and using
a hearing instrument where
maximum sound pressure
capability exceeds 132 dB SPL
(IEC 711), as there may be risk of
impairing the remaining hearing
of the hearing instrument user.
For information on whether
your instrument is a power
instrument, speak with your
hearing care professional or
consult the settings overview
page at the end of this manual.
Possible side effects
• Hearing aids, molds or domes
may cause an accelerated
accumulation of ear wax.
• The otherwise non-allergenic
materials used in hearing aids
may in rare cases cause a skin
irritation or other side effects.
Please seek consultation with a
physician if these conditions occur.
Interference
• The hearing aid has been
thoroughly tested for interference,
according to the most stringent
international standards. However,
interference between the hearing
aid and other devices (e.g. some
mobile telephones, citizens
band systems and shop alarm
systems and other devices) may
occur. If this occurs, increase the
distance between the hearing
aid and the interfering device.
Use on Aircraft
• Your hearing aid contains
Bluetooth. On board an aircraft,
flight mode must be activated,
unless Bluetooth is permitted
by the flight personnel.
Warnings
Page 27

52 53
About Startup Handling Options Warnings More info
Symptom Possible causes Solutions
No sound
Dead battery Replace the battery
Clogged earpieces (dome, Grip Tip, micromold or LiteTip)
Clean mold
Consider replacing wax filter or dome
Intermittent or
reduced sound
Clogged sound outlet Clean mold or replace wax filter in speaker, mold or dome
Moisture Wipe battery with a dry cloth
Dead battery Replace the battery
Squealing noise
Hearing aid earpiece inserted incorrectly Re-insert the earpiece
Ear wax accumulated in ear canal Have ear canal examined by your doctor
Beeping
If your hearing aid plays 8 beeps, 4 times consecutively,
your hearing aid needs a microphone service check
Contact your hearing care professional
Pairing issue with
Apple device
Bluetooth connection failed
1) Unpair your hearing aids (Settings➝General➝Accessibility➝Hearing Aids➝Devices➝
Forget this device). 2) Turn Bluetooth off and on again. 3) Open and close battery drawer on
hearing aids. 4) Re-pair hearing aids (see section Pair Hearing Aids with iPhone)
Only one hearing aid paired
If none of the above solutions work, consult your hearing care professional for assistance.
Troubleshooting guide
More info
Page 28

54 55
About Startup Handling Options Warnings More info
Water & dust resistant (IP68)
Your hearing aid is dust-tight and
protected against ingress of water
which means it is designed to be
worn in all daily life situations.
Therefore you do not have to worry
about sweat or getting wet in the
rain. Should your hearing aid come in
contact with water and stop working,
please follow these guidelines:
1. Gently wipe off any water
2. Open the battery drawer,
remove the battery and and
gently wipe off any water
in the battery drawer
3. Let the hearing aid dry with the
battery drawer left open for
approximately 30 minutes
4. Insert a new battery
IMPORTANT NOTICE
Do not wear your hearing aid while showering or participating in water
activities. Do not immerse your hearing aid in water or other liquids.
Conditions of use
Operating conditions
Temperature: +1°C to +40°C
Relative humidity: 5% to 93%, non-condensing
Storage and
transportation
conditions
Temperature and humidity should not exceed
the following limits for extended periods during
transportation and storage:
Temperature: -25°C to +60°C
Relative humidity: 5% to 93%, non-condensing
Page 29

56 57
About Startup Handling Options Warnings More info
International warranty
Your hearing aid is covered by an
international limited warranty
issued by the manufacturer for a
period of 12 months from the date of
delivery. This limited warranty covers
manufacturing and material defects
in the hearing aid itself, but not in
accessories such as e.g. batteries,
tubing, speakers, earpieces and
filters, etc. Problems arising from
improper/incorrect handling or care,
excessive use, accidents, repairs
made by an unauthorized party,
exposure to corrosive conditions,
physical changes in your ear, damage
due to foreign objects entering the
device or incorrect adjustments
are NOT covered by the limited
warranty and may void it. The above
warranty does not affect any legal
rights that you might have under
applicable national legislation
governing sale of consumer goods.
Your hearing care professional
may have issued a warranty that
goes beyond the clauses of this
limited warranty. Please consult
him/her for further information.
If you need service
Take your hearing aid to your hearing
care professional, who may be able
to sort out minor problems and
adjustments immediately.
Warranty certicate
Name of owner: __________________________________________________
Hearing care professional: __________________________________________
Hearing care professional address: ___________________________________
Hearing care professional phone: ____________________________________
Purchase date: ___________________________________________________
Warranty period: _______________ Month: ___________________________
Model left: ____________________ Serial no.: _________________________
Model right: ___________________ Serial no.: _________________________
Page 30

58 59
About Startup Handling Options Warnings More info
Technical information
The hearing aid contains two
radio technologies, which
are described below:
The hearing aid contains a radio
transceiver using short range
magnetic induction technology
working at 3.84 MHz. The magnetic
field strength of the transmitter is
very weak and is always below
-40 dBμA/m at 10 meter distance.
The hearing aid also contains a
radio transceiver using Bluetooth
Low Energy (BLE) and a proprietary
short range radio technology
both working at 2.4 GHz. The
2.4 GHz radio transmitter is
weak and is always below 4 dBm
e.i.r.p. in total radiated power.
The hearing aid complies with
international standards concerning
electromagnetic compatibility
and human exposure.
Due to the limited space
available on the hearing aid
relevant approval markings can
be found in this document.
USA and Canada
The hearing aid contains a radio
module with the following
certification ID numbers:
FCC ID: U28AUMRIT
IC: 1350B-AUMRIT
The device complies with Part 15 of
the FCC Rules and with Industry
Canada’s licence-exempt RSSs.
Operation is subject to the
following two conditions:
1. This device may not cause
harmful interference.
2. This device must accept any
interference received, including
interference that may cause
undesired operation.
Changes or modifications not
expressly approved by the party
responsible for compliance
could void the user’s authority
to operate the equipment.
More information: www.oticon.ca
Page 31

60 61
About Startup Handling Options Warnings More info
The manufacturer declares
that this hearing aid is
in compliance with the
essential requirements and
other relevant provisions
of Directive 1999/5/EC.
Declaration of Conformity is available
from the manufacturer.
Manufactured by:
Oticon A/S
Kongebakken 9
DK-2765 Smørum
Denmark
www.oticon.global
Waste from electronic
equipment must be
handled according to
local regulations.
E2831
Distributor:
Oticon Canada
1-6950 Creditview Rd.
Mississauga, ON L5N 0A6
www.oticon.ca
Page 32

Power instrument Yes No
Settings overview for your hearing aid
Left Right
Yes No
Volume control
Yes No
Yes No
Program shift
Yes No
Yes No
Mute
Yes No
Volume control indicators
On Off
Beeps at min/max volume
On Off
On Off
Clicks when changing volume
On Off
On Off
Beeps at preferred volume
On Off
Battery indicators
On Off
Low battery warning
On Off
Page 33

Appareil Power Oui Non
Aperçu des réglages de votre aide auditive
Gauche Droit
Oui Non
Commande de volume
Oui Non
Oui Non
Changement de programme
Oui Non
Oui Non
Mode silencieux
Oui Non
Indicateurs de contrôle de volume
Activé Désactivé
Émet un bip au volume
minimal / maximal
Activé Désactivé
Activé Désactivé
Clics lors des changements
de volume
Activé Désactivé
Activé Désactivé
Bips au volume préféré
Activé Désactivé
Indicateurs de pile
Activé Désactivé
Indicateur de pile faible
Activé Désactivé
Page 34

E2831
60
À propos de Démarrage Manipulation Options Avertissements
Plus d'informations
Les déchets
électroniques doivent
être traités selon la
législation locale.
Le fabricant certifie que
cette aide auditive est
conforme aux exigences
essentielles et autres
dispositions pertinentes de
la directive 1999 / 5 / CE.
La déclaration de conformité est
disponible auprès du fabricant :
Manufacturier :
Oticon A/S
Kongebakken 9
DK-2765 Smørum
Denmark
www.oticon.global
Distributeur :
Oticon Canada
1-6950 Creditview Rd.
Mississauga, ON L5N 0A6
www.oticon.ca
Page 35

58 59
À propos de Démarrage Manipulation Options Avertissements
Plus d'informations
Informations techniques
L’aide auditive contient deux
technologies radio, qui sont
décrites ci-dessous :
L’aide auditive contient un
émetteur-récepteur radio qui
utilise une technologie d’induction
magnétique à courte portée
fonctionnant à 3,84 MHz. L’intensité
du champ magnétique de l’émetteur
est très faible et est toujours
inférieure à -40 dB uA / m,
à 10 mètres de distance.
L’aide auditive contient également
un émetteur-récepteur radio
utilisant le Bluetooth Low Energy
(BLE) et une technologie radio à
courte portée exclusive, les deux
fonctionnant à 2,4 GHz. L’émetteur
radio 2,4 GHz est faible et est
toujours inférieur à 4 dBm e.i.r.p.
en puissance totale irradiée.
L'aide auditive est conforme aux
normes internationales sur la
compatibilité électromagnétique
et l'exposition humaine.
En raison de l'espace disponible limité
sur l'aide auditive, tous les marquages
d'approbation pertinents peuvent
être trouvés sur ce document.
É-U et Canada
L’aide auditive contient un module
radio avec les certifications des
numéros d’identification suivantes :
FCC ID: U28AUMRIT
IC: 1350B-AUMRIT
L’appareil est conforme à la
Partie 15 des règles FCC et
RSSs d’Industrie Canada.
Le fonctionnement est soumis
aux deux conditions suivantes:
1. Cet appareil ne risque pas
de causer d'interférences
dommageables.
2. Cet appareil doit accepter les
interférences reçues, y compris les
interférences pouvant entraîner
un fonctionnement indésirable.
Les changements ou les
modifications non expressément
approuvés par la partie responsable
de la conformité pourraient
annuler l'autorité de l'utilisateur
à faire fonctionner l'appareil.
Plus d'informations sur www.oticon.ca
Page 36

56 57
À propos de Démarrage Manipulation Options
Avertissements
Plus d'informations
Garantie internationale
Votre aide auditive bénéficie d’une
garantie limitée internationale assurée
par le fabricant. Cette garantie est
de 12 mois à compter de la date de
livraison. Cette garantie est limitée
aux défauts de fabrication et des
matériaux de l’aide auditive en soi.
Elle ne porte pas sur les accessoires
tels que les piles, les tubes, le
pare cérumen, etc. Les problèmes
provoqués par une manipulation
ou un entretien inapproprié(e), une
utilisation excessive, des accidents,
des réparations effectuées par un
tiers non agréé, une exposition à
des conditions corrosives, des
changements physiques dans
votre oreille, des dommages dus à
la pénétration de corps étrangers
dans l'appareil ou des ajustements
incorrects ne sont PAS couverts par la
garantie limitée et peuvent l'annuler.
La garantie ci-dessus n’affecte pas
les droits juridiques que pourraient
vous accorder les législations
nationales régissant la vente des
biens de consommation. Votre
audioprothésiste peut offrir une
garantie plus large que celle prévue
par les dispositions de la présente
garantie limitée. Pour davantage
d’informations, veuillez le consulter.
Si vous avez besoin de
services d'entretien
Prenez régulièrement rendez-vous
avec votre audioprothésiste qui pourra
rapidement en faire l'entretien, la
conguration ou la réparation.
Certicat de garantie
Nom de l’utilisateur: ______________________________________________
Audioprothésiste : ________________________________________________
Adresse de l’audioprothésiste : ______________________________________
N° de téléphone de l’audioprothésiste : _______________________________
Date d’achat: ____________________________________________________
Période de garantie: ____________ Mois : ____________________________
Appareil gauche: _______________ N° de série: _______________________
Appareil droit: _________________ N° de série: _______________________
Page 37

54 55
À propos de Démarrage Manipulation Options
Avertissements
Plus d'informations
Résistance à l’eau et à la poussière (IP68)
Votre aide auditive est étanche à
la poussière et est protégée contre
l’infiltration d’eau, ce qui signifie
qu’elle est conçue pour toutes les
situations de la vie quotidienne.
Vous n'avez donc pas à vous
préoccuper de la transpiration ou
de la pluie. Si votre aide auditive
entre en contact avec de l'eau et
cesse de fonctionner, veuillez
suivre les consignes suivantes:
1. Essuyez l'eau délicatement
2. Ouvrez le logement de
pile, enlevez la pile et
essuyez délicatement l'eau
présente à l'intérieur
3. Laissez sécher l'aide auditive en
laissant le logement de pile ouvert
pendant environ 30 minutes
4. Insérez une pile neuve
REMARQUE IMPORTANTE
Ne portez pas votre aide auditive pendant que vous vous douchez ou
que vous participez à des activités nautiques. N'immergez pas votre
aide auditive dans l'eau ou d'autres liquides.
Conditions d'utilisation
Conditions de
fonctionnement
Température : +1°C à +40°C
Humidité relative : 5% à 93%,
sans condensation
Conditions de
rangement et
de transport
La température et l'humidité ne doivent
pas excéder les limites ci-dessous
pendant des périodes prolongées lors
du transport et du rangement :
Température : -25°C à +60°C
Humidité relative : 5% à 93%,
sans condensation
Page 38

52 53
À propos de Démarrage Manipulation Options
Avertissements
Plus d'informations
Symptôme Causes possibles Solutions
Pas de son
Pile usée Remplacez la pile
Embouts obstrués (dôme, GripTip, micro-embout ou LiteTip)
Nettoyez l'embout
Pensez à remplacer le pare-cérumen ou le dôme
Son intermittent
ou réduit
Sortie du son bouchée Nettoyez l’embout ou remplacez le pare-cérumen de l’écouteur, de l’embout ou du dôme.
Humidité Essuyez la pile avec un chiffon sec
Pile usée Remplacez la pile
Bruit aigu
Embout de l'aide auditive mal inséré Réinsérez l’embout correctement
Cérumen accumulé dans le conduit auditif Faites examiner votre conduit auditif par un médecin
Bips
Si votre aide auditive émet 8 bips, 4 fois consécutives, le
microphone de votre aide auditive a besoin d’être vérifié.
Contactez votre audioprothésiste
Problème d’appairage
avec un appareil Apple
Connexion Bluetooth ayant échouée
1) Mettez n à l’appairage de vos aides auditives ( Réglages ➝ Général ➝ Accessibilité ➝ Aides
auditives ➝ Appareils ➝ Oublier cet appareil). 2) Éteignez puis rallumez Bluetooth à nouveau.
3) Ouvrez et fermez le logement de la pile des aides auditives. 4) Appairez à nouveau les aides
auditives (voir la section Appairer des aides auditives avec un iPhone)
Une seule aide auditive a été appairée
Si aucune de ces solutions ne résout le problème, consultez votre audioprothésiste.
Guide de dépannage
Page 39

50 51
À propos de Démarrage Manipulation Options
Avertissements
Plus d'informations
Aides auditives Power
• Une attention particulière doit
être apportée dans la sélection,
l’adaptation et l’utilisation d’un
appareil auditif dont le niveau de
sortie maximum peut dépasser
132 dB SPL (IEC 711) car il peut y
avoir un risque de porter atteinte à
l’audition résiduelle de l’utilisateur.
Pour savoir si votre appareil est un
appareil Power, reportez-vous à la fin
de cette brochure.
Eets secondaires potentiels
• Les appareils auditifs, les
embouts ou les dômes peuvent
provoquer une accumulation
plus rapide de cérumen.
• Bien que les matériaux utilisés
pour fabriquer les aides auditives
soient hypoallergéniques, ils
peuvent provoquer une irritation
de la peau ou d'autres eets
secondaires dans de très rares cas.
Veuillez consulter un médecin
si ces eets se produisent.
Interférences
• L'aide auditive a fait l'objet de
tests approfondis pour en vérier
la résistance aux interférences.
Ces tests ont été réalisés selon
les normes internationales les
plus rigoureuses. Cependant, des
interférences peuvent toujours
survenir entre votre aide auditive et
d'autres appareils (par ex. certains
téléphones cellulaires, appareils
à bande publique, systèmes
d'alarme en magasin et autres
appareils sans l). Si cela se produit,
augmentez la distance entre l'aide
auditive et l’appareil concerné.
Usage dans l'avion
• Votre aide auditive contient le
Bluetooth. Le mode avion doit
être activé à bord d'un avion, à
moins que le personnel de bord
ne vous accorde expressément
l'autorisation d'utiliser Bluetooth.
Avertissements
Page 40

48 49
À propos de Démarrage Manipulation Options
Avertissements
Plus d'informations
Dysfonctionnement
• Sachez qu'il est possible que votre
aide auditive cesse de fonctionner
sans préavis. Tenez-en compte
lorsque vous dépendez de sons
d'alerte (par exemple, lorsque vous
êtes au volant). Une aide auditive
peut cesser de fonctionner si, par
exemple, sa pile est déchargée
ou si le tube est obstrué par de
l’humidité ou du cérumen.
Implants actifs
• Faire preuve de prudence avec les
implants actifs. En général, suivez
les directives recommandées par
les fabricants de débrillateurs
implantables et de stimulateurs
cardiaques concernant
l’utilisation avec des téléphones
portables et des aimants.
• Votre aimant AutoPhone et l’outil
multiusage (doté d'un aimant
intégré) doivent être conservés
à plus de 30 cm de l'implant : ne
le transportez donc pas dans une
poche de poitrine, par exemple.
• Si vous avez un implant intracrânien,
veuillez contacter le fabricant
de votre appareil implantable
pour des informations sur les
risques de perturbation.
Radiographie, scanneur, IRM,
scanneur TEP et électrothérapie
• Retirez votre aide auditive pour
les séances de radiographie, de
tomodensitométrie, d’IRM, de
scanneur TEP, d’électrothérapie,
d’interventions chirurgicales,
etc., an d'éviter qu'elles
ne soient endommagées
par d'éventuels champs
électromagnétiques importants.
Chaleur et produits chimiques
• Votre aide auditive ne doit jamais
être exposée à une température
extrême, par exemple dans une
voiture stationnée en plein soleil.
• L'aide auditive ne doit pas être
séchée au four à micro-ondes
ou dans un autre four.
• Les produits chimiques contenus
dans les produits de beauté, les
laques, les parfums, les lotions
après-rasage, les crèmes solaires
ou les produits insecticides peuvent
abîmer votre aide auditive. Enlevez
toujours votre aide auditive avant
d’utiliser ce genre de produits
et attendez que ce dernier
sèche avant de la remettre.
Avertissements
Page 41

46 47
À propos de Démarrage Manipulation
Options
Avertissements Plus d'informations
Pour votre sécurité personnelle
et pour garantir une utilisation
correcte de votre aide auditive,
veuillez bien vous familiariser avec
les avertissements d'ordre général
suivants avant de l'utiliser.
Veuillez noter qu'une aide auditive ne
restaure pas une audition normale
et ne prévient pas ou n'améliore pas
une décience auditive résultant
de conditions biologiques. Il est
également important de noter que,
bien souvent, l'utilisation peu fréquente
d'une aide auditive empêche un
utilisateur d'en proter pleinement.
Consultez votre audioprothésiste
si vous êtes confronté à un
fonctionnement ou à des événements
inattendus avec votre aide auditive.
Utilisation des aides auditives
• Les aides auditives doivent
uniquement être utilisées
selon les instructions et les
paramètres congurés par votre
audioprothésiste. L’utilisation
incorrecte d’une aide auditive
peut provoquer une perte auditive
soudaine et permanente.
• Ne laissez jamais quiconque
autre que vous utiliser vos aides
auditives; tout abus risquerait
d'endommager de façon permanente
l'audition de cette personne.
Risques d'étouement et risque
d'avaler les piles
• Les aides auditives, leurs composants
et les piles doivent être tenus hors
de portée des enfants et de toute
autre personne susceptible de les
avaler ou de se blesser à leur contact.
• Il est déjà arrivé que des piles
soient confondues avec des pilules.
Il faut donc toujours vérier les
médicaments que vous devez avaler.
• La plupart des aides auditives
peuvent être munies d’un
logement de pile de sécurité.
Cela est fortement recommandé
pour les enfants et les personnes
ayant un handicap intellectuel.
• Les enfants âgés de moins de 36 mois
doivent toujours utiliser un logement
de pile de sécurité. Cette option est
disponible avec les aides auditives
BTE, miniBTE, RITE et miniRITE.
Si une personne avale accidentellement
une aide auditive ou une pile,
consultez un médecin d'urgence.
Utilisation de la pile
• Utilisez toujours les piles
recommandées par votre
audioprothésiste. Les piles de
mauvaise qualité peuvent fuir et
être à l’origine de blessures.
• Ne jamais tenter de recharger vos
piles et ne jamais tenter de les
brûler. La pile risquerait d’exploser.
Avertissements
Page 42

44 45
À propos de Démarrage Manipulation
Options
Avertissements Plus d'informations
Accessoires sans l (en option)
Une vaste gamme d’accessoires est disponible afin d'améliorer
le rendement de votre aide auditive sans fil. Ils peuvent vous
aider à mieux entendre et communiquer pendant vos activités
quotidiennes.
ConnectClip
Si le ConnectClip est appairé
à votre téléphone cellulaire,
vous pourrez utiliser les aides
auditives comme un casque
d'écoute mains libres.
Adaptateur TV 3.0
L'adaptateur TV est un émetteur
sans l qui diuse le son du
téléviseur ou d'un autre appareil
électrique audio. L'adaptateur
TV diuse du son directement
dans vos aides auditives.
Télécommande 3.0
La télécommande vous permet
de changer de programme, de
régler le volume ou de mettre
votre aide auditive en sourdine.
Pour de plus amples
informations, veuillez contacter
votre audioprothésiste ou
visitez le www.oticon.ca
Autres options
Auto Phone
La fonction Auto Phone peut activer
automatiquement un programme téléphonique
dans l'aide auditive si votre téléphone est doté
d'un aimant dédié. L'aimant doit être placé sur
votre téléphone, près de la sortie du son.
Veuillez contacter votre audioprothésiste pour plus d’informations.
Page 43

42 43
À propos de Démarrage Manipulation
Options
Avertissements Plus d'informations
Appli ON d'Oticon
L’appli ON d’Oticon, pour iPhone, iPad, iPod Touch et appareils
Android™, offre une façon intuitive et discrète de contrôler vos
aides auditives. L’appli ON d’Oticon vous permet de vous connecter
à une infinité d’autres appareils et de les contrôler,
simplement en se reliant à IFTTT via Internet. Aller au
www.oticon.ca/connectivity pour plus de détails et
d’information sur la compatibilité.
L’Appli ON d’Oticon est disponible dans l’App Store
et sur Google Play™. Pour télécharger l’Appli ON
d’Oticon sur un iPad, chercher l’appli pour
iPhone dans l’App Store.
«Conçu pour l'iPod», «Conçu pour l'iPhone» et «Conçu pour l'iPad» signifient
qu'un accessoire électronique a été conçu pour se brancher spécifiquement
au iPod, iPhone ou iPad, respectivement, et que son fabricant certifie que le
produit répond aux normes de rendement Apple. Apple ne saurait être tenue
responsable du fonctionnement de cet appareil ou de sa conformité avec les
normes de sécurité réglementaires. Veuillez noter que l'usage de cet accessoire
avec iPod, iPhone ou iPad pourrait affecter la performance sans fil.
Apple, le logo Apple, iPhone, iPad et iPod touch sont des marques déposées d’Apple
Inc., enregistrées aux États-Unis et dans d’autres pays. Apple Watch est une marque de
commerce d’Apple Inc. App Store est une marque de service d’Apple Inc. Android, Google
Play et le logo Google Play sont des marques de Google Inc.
Reconnecter vos aides auditives à
votre iPhone, iPad ou iPod touch
Lorsque vous éteignez vos aides auditives ou votre appareil
Apple, ces derniers ne seront plus connectés. Afin de
les reconnecter, allumez vos aides auditives en ouvrant
et en fermant le logement à pile. Les aides auditives se
reconnecteront automatiquement à votre appareil Apple.
Page 44

40 41
À propos de Démarrage Manipulation
Options
Avertissements Plus d'informations
Appairer des aides auditives avec un iPhone
2. Général
6. Confirmer l’appairage
3. Accessibilité1. Réglages
5. Sélectionner
Ouvrez et fermez le
logement de la pile des
deux aides auditives
et approchez ces
dernières de votre
iPhone. Les aides
auditives demeureront
en mode d’appairage
pendant 3 minutes.
Votre iPhone
détectera les aides
auditives à appairer.
Les aides détectées
apparaîtront dans la
liste de votre iPhone.
Sélectionnez vos
aides auditives.
Confirmez l’appairage.
Si vous avez deux
aides auditives,
la confirmation
d’appairage doit se
faire pour chacune
des aides auditives.
Ouvrez votre iPhone et
ouvrez les paramètres.
Assurez-vous que la
fonction Bluetooth
est activée. Choisissez
ensuite «Général».
Sur l'écran
«Général»,
choisissez ensuite
«Accessibilité».
Sur l'écran
«Accessibilité»,
choisissez
«Aides auditives».
Bluetooth
Général
Accessibilité
Aides auditives
Aides auditives de Guillaume
Marche
✓
4. Préparer
Demande d’appairage
Bluetooth
Oticon Opn aimerait s’appairer
avec votre iPhone
Annuler Appairer
Page 45

Oticon Opn est compatible avec iPhone SE, iPhone 6s Plus, iPhone
6s, iPhone 6 Plus, iPhone 6, iPhone 5s, iPhone 5c, iPhone 5, iPad Pro
9,7 pouces, iPad Pro 12,9 pouces, iPad Air 2, iPad Air, iPad (4ème
génération), iPad mini 4, iPad mini 3, iPad mini 2, iPad mini, et iPod
touch (5ème et 6ème génération). Les appareils doivent être équipés
d’iOS 9.3 ou supérieur.
38 39
À propos de Démarrage Manipulation
Options
Avertissements Plus d'informations
Réinitialisation rapide
Si vous souhaitez réinitialiser les paramètres de votre aide auditive
configurés par votre audioprothésiste, il suffit d'ouvrir et de fermer
votre compartiment de pile.
Fermer
Utiliser les aides auditives avec un iPhone,
un iPad ou un iPod touch
Votre aide auditive est
conçue pour fonctionner avec
un iPhone® et permet une
communication et un contrôle
directs avec un iPhone, un
iPad® ou un iPod touch®.
Si vous avez besoin d’aide
pour utiliser ces produits avec
vos aides auditives, veuillez
contacter votre audioprothésiste
ou visiter notre site au
www.oticon.ca/connectivity.
Ouvrir
Page 46

36 37
À propos de Démarrage Manipulation
Options
Avertissements Plus d'informations
Appuyez sur le bouton pour changer
de programme.
Veuillez noter que si vous avez deux
aides auditives, celle de droite basculera,
par exemple, entre le programme 1 et 2,
tandis que celle de gauche basculera, par
exemple, entre les programmes 4 et 3.
Changer de programme (en option)
L'aide auditive peut contenir jusqu'à 4 programmes différents.
Faites-les programmer par votre audioprothésiste.
À faire remplir par l’audioprothésiste
Programme Son que vous
entendez lorsqu'il
est activé
Quand l'utiliser
1
1 bip
2
2 bips
3
3 bips
4
4 bips
Changement de programme :
Pression brève Pression longue
Page 47

34 35
À propos de Démarrage
Manipulation
Options Avertissements Plus d’informations
Vous
entendrez 2
bips au niveau
de volume de
démarrage.
Changer le volume (en option)
Si vous avez deux aides auditives, le bouton-poussoir vous aidera
à ajuster le volume du son qu'elles émettent. Vous entendrez un
clic lorsque vous augmenterez ou diminuerez le volume.
MAXIMUM
NIVEAU DE
DÉMARRAGE
MINIMUM
Appuyez brièvement
sur l'aide auditive
de DROITE
pour augmenter
le volume.
Appuyez brièvement
sur l'aide auditive de
GAUCHE pour baisser
le volume.
Mise en sourdine de l'aide auditive (optionnel)
Utilisez la fonction de mise en sourdine si vous devez réduire une
de vos aides auditives au silence pendant que vous la portez.
REMARQUE IMPORTANTE
N'utilisez pas la fonction de mise en sourdine pour éteindre votre aide
auditive, car elle continuerait alors à consommer l’énergie de la pile.
Maintenez le bouton enfoncé
pendant 3 à 4 secondes pour
mettre l'aide auditive en sourdine.
Pour réactiver le son, appuyez
brièvement sur le bouton.
Page 48

32 33
À propos de Démarrage
Manipulation
Options Avertissements Plus d'informations
Fonctions et accessoires en option
Les fonctions et accessoires décrits dans les pages suivantes sont
proposés en option. Veuillez contacter votre audioprothésiste
pour savoir comment est programmée votre aide auditive.
Si vous êtes confronté à des situations d'écoute difficiles, un
programme spécial peut vous être utile. Faites-le programmer
par votre audioprothésiste.
Écrivez les situations d'écoute pour lesquelles
vous pourriez avoir besoin d'aide.
Mode avion
Si vous montez à bord d'un avion ou accédez à un endroit où les
signaux radio sont interdits (par ex. en vol), il vous faut activer
le mode avion. L’appareil auditif fonctionnera toujours. Le mode
avion doit être activé sur une seule des aides auditives.
Pour activer et désactiver
le mode avion, presser
le bouton-poussoir
pendant au moins 7
secondes. Un tintement
confirmera votre action.
Ouvrir et fermer le logement à pile désactivera également le mode avion.
Voir la section : Réinitialisation rapide.
Page 49

30 31
À propos de Démarrage
Manipulation
Options Avertissements Plus d'informations
Embouts sur mesure: micro embout
LiteTip ou embout power
Il y a 3 types d’embouts: le micro embout, le LiteTip et un embout
Power. Ils sont faits sur mesure, pour votre oreille.
Pare-cérumen
Entretenir un micro embout,
un LiteTip ou un embout power
L'embout doit être
nettoyé régulièrement.
L'embout contient un
pare-cérumen qui doit être
remplacé lorsqu’obstrué ou
lorsque les sons émis par
l'aide auditive sont anormaux.
Utilisez toujours le
pare-cérumen fourni par
votre audioprothésiste.
Nettoyez l'évent en
introduisant la brosse
dans l'ouverture,
tout en la tournant
légèrement.
Évent
Embout
Power
Micro-Embout LiteTip
Page 50

28 29
À propos de Démarrage
Manipulation
Options Avertissements Plus d'informations
Dôme
ouvert
GripTip
Disponibles en formats petit et large, avec ou
sans évent.
Dôme Bass,
à évent simple
Dôme Bass,
à double évent
6 mm5 mm* 8 mm 10 mm 12 mm**
Embouts standards : dôme ou Grip Tip
Les dômes et Grip Tip sont tous deux faits de caoutchouc mou.
Il existe 4 types de dômes différents. Cherchez le type et la
taille de votre dôme ci-dessous.
REMARQUE IMPORTANTE
Si l'embout n'est pas sur l’écouteur lorsqu'il est retiré de l'oreille, il
pourrait être demeuré dans votre conduit auditif. Consultez votre
audioprothésiste pour la marche à suivre.
Remplacer un dôme ou un Grip Tip
L'embout (en dôme ou à adhérence) n'a pas besoin d'être nettoyé.
Si l'embout est rempli de cérumen, remplacez-le par un neuf.
Le GripTip devrait être remplacé au moins une fois par mois.
Tenez l’écouteur, puis
tirez sur l'embout.
Insérez l’écouteur
précisément au
milieu de l'embout
pour l'attacher
fermement.
Appuyez fermement
afin de vous assurer
qu'il est bien
fixé en place.
Étape 1 Étape 2 Étape 3
Dôme
Power
* seulement pour récepteur 60
** Pas disponible pour dôme ouvert
Page 51

26 27
À propos de Démarrage Manipulation Options
Avertissements
Plus d’informations
Remplacer le ltre ProWax miniFit
2. Retirer 3. Insérer
Retirez l'outil
de la coque. Cet
outil a deux bras:
un vide pour le
retrait et l'autre
pour l'insertion du
nouveau filtre.
Insérez le bras
vide dans le
pare-cérumen,
dans l’écouteur,
puis retirez-le.
Insérez le nouveau
pare-cérumen avec
l'autre bras, retirez
l'outil et jetez-le.
1. Outils
L’écouteur devrait avoir l'air de
l'image ci-dessous une fois le
pare-cérumen remplacé.
4. Final
Nouveau
filtre
Filtre usé
Remarque :
Si vous utilisez un embout, le pare-cérumen dans le récepteur
doit être remplacé par un audioprothésiste.
Page 52

24 25
Prendre soin de votre aide auditive
Lorsque vous manipulez votre aide auditive, tenez-la au-dessus
d’une surface lisse, pour éviter de l’abîmer si elle tombe.
Nettoyer les entrées du microphone
Brossez délicatement les impuretés qui se trouvent dans les
ouvertures. Brossez délicatement la surface. Assurez-vous que
la brosse est propre et ne l'enfoncez pas dans les ouvertures.
Pare-cérumen
L'extrémité de l’écouteur avec embout est équipée d'un
filtre pare-cérumen blanc. Le pare-cérumen est conçu
pour empêcher le cérumen et les débris d'endommager
l’écouteur. Si le filtre est obstrué, veuillez remplacer le
pare-cérumen (voir la section « Remplacer le filtre ProWax
miniFit ») ou contactez votre audioprothésiste.
À propos de Démarrage Manipulation Options
Avertissements
Plus d'informations
REMARQUE IMPORTANTE
Utilisez un chiffon doux et sec pour nettoyer l'aide auditive. Elle ne doit
jamais être lavée ni immergée dans l'eau ou un autre liquide.
Microphone
Pare-
cérumen
Page 53

22 23
À propos de Démarrage
Manipulation
Options Avertissements Plus d'informations
L’écouteur transmet le son à
votre oreille. Il doit toujours être
utilisé avec un embout attaché.
Utilisez uniquement des pièces
conçues pour votre aide auditive.
Si l’écouteur est muni d'une
pièce de maintien, placez-le
dans l'oreille de façon à ce
que la pièce de maintien fasse
le tour de l'oreille (voir l'étape 3).
Mettre l’aide auditive en place
Pièce de
maintien
(option)
Pièce de
maintien
Écouteur
(60, ci-contre)
Placez l’aide
auditive derrière
votre oreille.
Tenez la courbe de
l’écouteur entre
votre pouce et votre
index. L'embout
doit être dirigé
vers l'ouverture du
conduit auditif.
Insérez doucement
l'embout dans votre
conduit auditif
jusqu’à ce que le fil
de l’écouteur se loge
dans votre oreille.
Étape 1 Étape 2 Étape 3
Page 54

20 21
À propos de
Démarrage Manipulation Options Avertissements Plus d'informations
Remplacer la pile
2. Déballer 3. Insérer
Ouvrez complètement
le logement de la
pile. Retirez la pile.
Retirez l'étiquette
sur le côté
positif (+) de la
nouvelle pile.
Insérez la nouvelle
pile dans le logement
de pile. Veillez à ce
que le côté positif
(+) soit tourné
vers le haut.
1. Retirer
Outil
multiusage
Refermez le logement de pile.
L'aide auditive diffusera une
petite musique par l'embout.
Tenez la sortie de son près de
votre oreille pour entendre la
petite musique.
L’outil multiusage peut être
utilisé pour changer la pile.
Utilisez l'extrémité magnétique
pour retirer et insérer les piles.
L’outil multiusage vous est fourni
par votre audioprothésiste.
4. Fermer Embout
Page 55

18 19
À propos de
Démarrage Manipulation Options Avertissements Plus d'informations
Allumer / éteindre les aides auditives
Le logement de pile est également utilisé pour allumer
et éteindre l'aide auditive. Pour éviter de décharger la
pile prématurément, assurez-vous de bien éteindre
votre appareil lorsque vous ne vous en servez pas.
Allumer
Fermer le
logement de
pile avec la
pile en place.
Éteindre
Ouvrir le
compartiment
de pile.
Quand remplacer une pile
Lorsque la pile doit être remplacée, trois bips se font entendre,
à intervalles modérés, jusqu'à épuisement total de la pile.
Trois bips
= La pile devient faible
Quatre bips
= La pile est vide
Conseil pour la pile
Pour vous assurer que l'aide auditive fonctionne en
permanence, prenez des piles de rechange sur vous
ou remplacez la pile avant vos déplacements.
Page 56

16
À propos de
Démarrage Manipulation Options Avertissements Plus d’informations
Outil multiusage pour la manipulation
des piles et le nettoyage
L’outil multiusage comporte un aimant qui aide au remplacement
des piles de l'aide auditive. Il comporte également une brosse et
une boucle de l servant à éliminer la cire d'oreille. Si vous avez besoin
d'un nouvel outil multiusage, veuillez contacter votre audioprothésiste.
Brosse
Boucle de fil
Aimant
REMARQUE IMPORTANTE
L’outil multiusage dispose d'un aimant intégré. Placez l’outil multiusage
à au moins 30cm des cartes de crédit et autres objets magnétiques.
Page 57

14 15
À propos de
Démarrage Manipulation Options Avertissements Plus d'informations
Identier les aides auditives gauche et droite
Il est important de distinguer l’aide auditive de gauche
de celle de droite car elles peuvent être programmées
différemment. Vous trouverez une légende des couleurs
dans le compartiment de pile, sur les écouteurs 60 et
85, sur les micro-embouts ou sur les LiteTips.
Pile (taille 312)
Votre aide auditive est un dispositif électronique miniature qui
fonctionne avec des piles spéciales. Pour activer l’aide auditive,
vous devez insérer une pile neuve dans le compartiment de pile.
Découvrez comment procéder dans la section « Remplacer la pile ».
Un repère ROUGE
à l'intérieur du
compartiment de
pile marque l'aide
auditive de DROITE.
Un repère BLEU
à l'intérieur du
compartiment de
pile marque l'aide
auditive de GAUCHE.
Logement de pile
Tirez pour ouvrir
Assurez-vous que
le signe «+»
est bien visible.
Page 58

12 13
Pare-cérumen
de l’écouteur
Maintien
l’écouteur
en place
Pare-
cérumen
Ear grip
(optionnel)
À propos de
Démarrage Manipulation Options Avertissements Plus d'informations
Votre aide auditive — Descriptif
Bouton
poussoir
Modifier le
programme
et le volume
et mettre
l’aide auditive
en sourdine
Entrées
microphone
Entrée
du son
Utilisation
Logement de pile Contient la pile et
sert d’interrupteur
Marche / Arrêt
Sortie
du son
Écouteur
(60, ci-contre)
Page 59

10 11
À propos de Démarrage Manipulation
Options
Avertissements Plus d'informations
Identiez l’écouteur et l'embout
de votre aide auditive
Vous pourrez ainsi naviguer
plus facilement dans
ce mode d'emploi.
Écouteurs
Les aides auditives miniRITE
sont pourvues de trois
écouteurs différents :
Embouts
L’écouteur utilise l'un des deux
embouts suivants :
miniRITE avec écouteur
embout Power
Écouteur
(60, ci-contre)
Grip Tip
Dôme (montré ouvert ci-contre)*
* Veuillez consulter les instructions de remplacement du dôme ou du Grip Tip à la section :
Remplacer un dôme ou un Grip Tip
Pièce de
maintien
(optionnel)
60 85 100
105
Micro-embout ou LiteTip
Page 60

Table des matières 2 / 2
Appli ON d’Oticon 43
Accessoires sans fil (en option) 44
Autres options 45
Avertissements
Utilisation des aides auditives 46
Risques d’étouffement et risque d’avaler les piles 47
Utilisation de la pile 47
Dysfonctionnement 48
Implants actifs 48
Radiographie, scanneur, IRM, PET-scan et électrothérapie 49
Chaleur et produits chimiques 49
Aides auditives Power 50
Effets secondaires potentiels 50
Interférences 51
Utilisation dans l’avion 51
Suppléments
Guide de dépannage 52
Résistance à l’eau et à la poussière (IP68) 54
Conditions d’utilisation 55
Certificat de garantie 56
Garantie internationale 57
Informations techniques 58
Page 61

Table des matières 1 / 2
Suite à la page suivante
À propos de
Identifiez l’écouteur et l’embout de votre aide auditive 10
Votre aide auditive — Descriptif 12
Utilisation 13
Identifier les aides auditives gauche et droite 14
Pile (taille 312) 15
Outil multifonctionnel pour la manipulation
des piles et le nettoyage 16
Démarrage
Allumer / éteindre les aides auditives 18
Quand remplacer une pile 19
Remplacer la pile 20
Manipulation
Mettre l’aide auditive en place 22
Prendre soin de votre aide auditive 24
Remplacer le filtre ProWax miniFit 26
Embouts standards : dôme ou Grip Tip 28
Remplacer un dôme ou un Grip Tip 29
Écouteurs sur mesure: micro embout LiteTip ou embout power 30
Entretenir un micro embout, un LiteTip ou un embout power 31
Options
Mode avion 32
Fonctions et accessoires en option 33
Changer le volume (en option) 34
Mise en sourdine de l’aide auditive (en option) 35
Changer de programme (en option) 36
Réinitialisation rapide 38
Utiliser les aides auditives avec un iPhone,
un iPad ou un iPod touch 39
Appairer des aides auditives avec un iPhone 40
Reconnecter vos aides auditives à votre iPhone,
iPad ou iPod touch 42
Page 62

Usage prévu
L’aide auditive est conçue pour amplifier et transmettre les sons à
l’oreille et, ainsi, compenser une perte auditive de légère à sévère-
profonde. L'aide auditive n'est pas destinée à une utilisation par
des nourrissons / enfants de moins de 36mois.
REMARQUE IMPORTANTE
L'amplification de l'aide auditive est ajustée de façon unique et
optimisée selon vos capacités auditives personnelles au cours
de l'ajustement de l'appareil effectué par votre audioprothésiste.
Introduction de ce mode d'emploi
Ce mode d'emploi vous guide dans l'utilisation et l'entretien
de votre nouvelle aide auditive. Nous vous invitons à lire
attentivement ce mode d'emploi, y compris la section
Avertissements. Vous devriez ainsi être en mesure de
profiter au maximum de votre nouvelle aide auditive.
Votre audioprothésiste a ajusté l'aide auditive à vos besoins. Si vous
avez d'autres questions, veuillez contacter votre audioprothésiste.
À propos de Démarrage Manipulation
Options
Avertissements Plus d'informations
Pour votre commodité, ce mode d'emploi contient une barre de
navigation qui vous aidera à vous repérer facilement dans les
différentes sections.
Page 63

176477CA-FR / 27.09.16 / FW 2.X
176477CA-FR / 27.09.16 / FW 2.X
Aperçu du modèle
Ce livret porte sur les miniRITE des familles
d’aides auditives suivantes :
Oticon Opn 1
Oticon Opn 2
Oticon Opn 3
avec NMFI et fonction radio 2,4GHz.
Les écouteurs suivants sont disponibles pour les familles ci-dessus :
Speaker 60
Speaker 85
Speaker 100
Écouteur embout Power 105
Page 64

miniRITE
Mode d’emploi
0000176477000001
 Loading...