

Page 1
INSTRUCTIONS FOR US E T30/T31
Page 2

Introduction
Congratulations on your decision to take the next step in improving classroom FM.
With the Amigo T30 and T31 FM transmitters, you will experience all the benefits that
comes with a product family that is designed to meet the needs that arises through
everyday use.
The Amigo product is extremely versatile, making life much easier for users in school
settings. The transmitters and receivers can be used with virtually all Behind-the-Ear
hearing instruments, as well as cochlear implants and bone anchored hearing solutions.
Page 3

Contents
Typical package content 7
Overview of the T30/T31 8
Preparing your Amigo system 9
Charging the battery 10
Selecting language and country (first time only) 12
The Amigo Receivers 13
Changing the pin orientation 14
Using Amigo R12 15
Choosing and changing channels 16
Synchronising Amigo receivers 17
Synchronising other manufacturers’ receivers 19
About channels 20
Using the TT-function (T31 only) 21
Connecting external audio sources (TV, MP3 etc.) 23
T30 and T31 special functions 24
LED / Display legend 27
Microphone options 28
Cleaning of the T30/T31 29
Appendix A: Troubleshooting 30
Appendix B: Manufacturer’s warranty 32
Warnings 37
Page 4
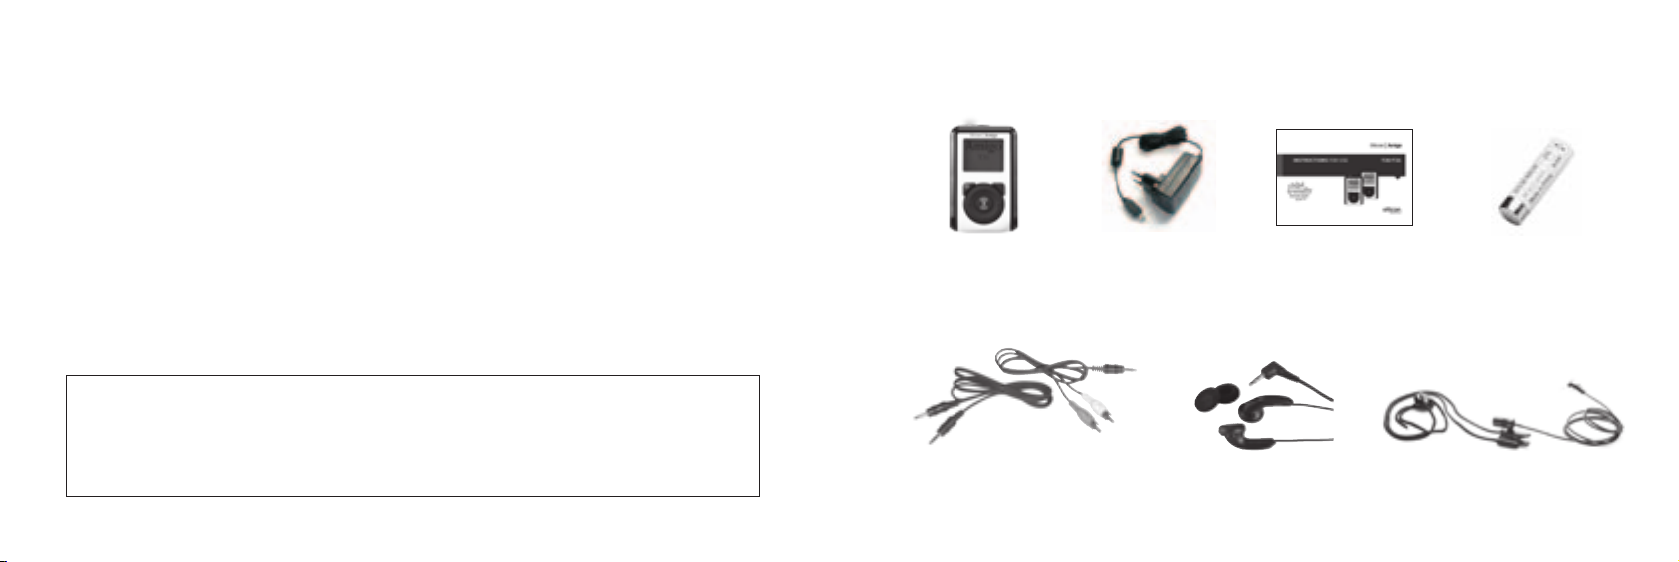
Typical package content
IMPORTANT NOTICE
Please familiarise yourself with the entire contents of this booklet before using your
Amigo T30/T31. The booklet contains various statements, safety instructions and
important information about the use and handling of the Amigo T30/T31
T30/T31 Charger
Aux cables
Instructions For Use
Monitoring earphones
7
Rechargeable NiMH
AA battery
Omni microphone
Page 5
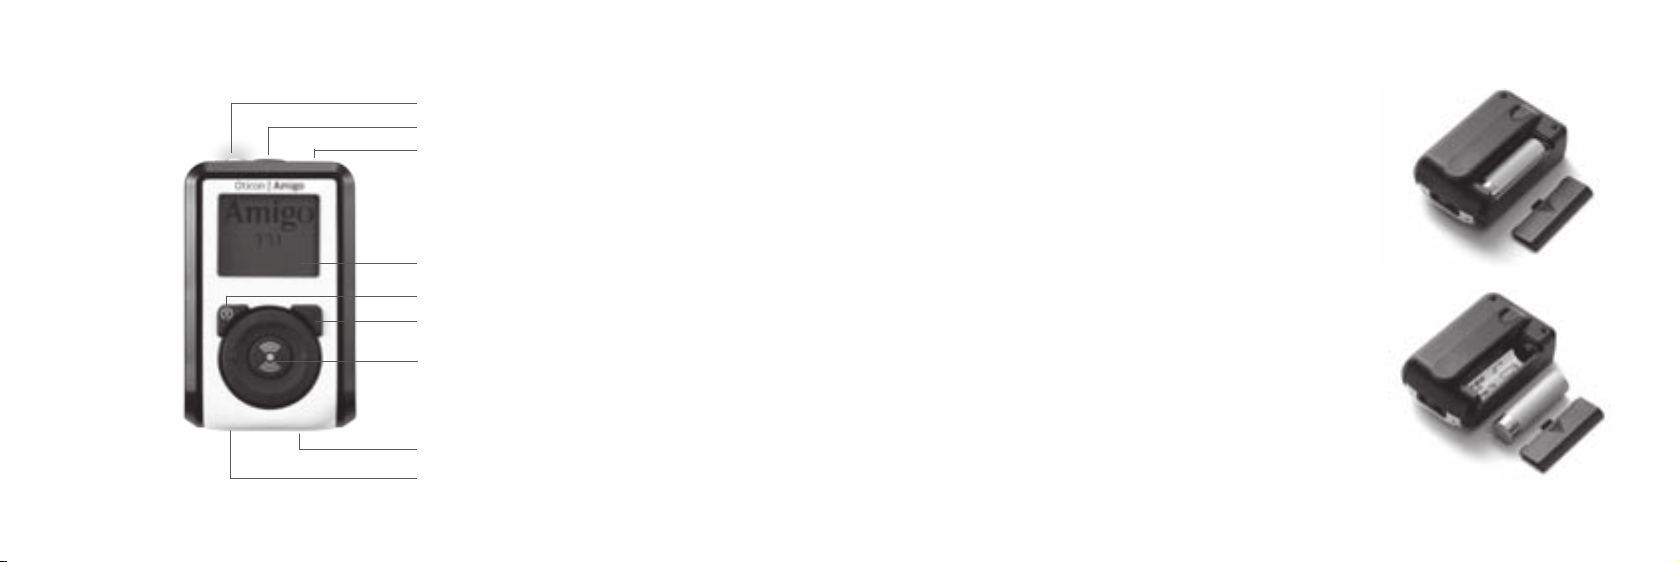
Overview of the T30/T31
LED status indicator
ON/OFF/Mute
2.5 mm microphone jack
High resolution LCD display
Team Teaching (T31 only)
Clear entered values
Synchronize receiver/enter
“MiniB” USB charge jack
3.5 auxiliary audio input jack
Preparing your Amigo system
Inserting battery
Remove the battery lid on the back of the transmitter and
insert the rechargeable battery – remember to position
the battery according to the markings (+/ -) on the label.
Then replace the battery lid. The T30/T31 can then be
used to charge the battery that came in the package.
Note: The positive and negative ends of the battery may
appear similar, so do double-check that the battery is
positioned correctly.
SYNC acts as the “ENTER” button. “C” acts as the “CLEAR/EXIT” button.
9
Page 6

Charging the battery
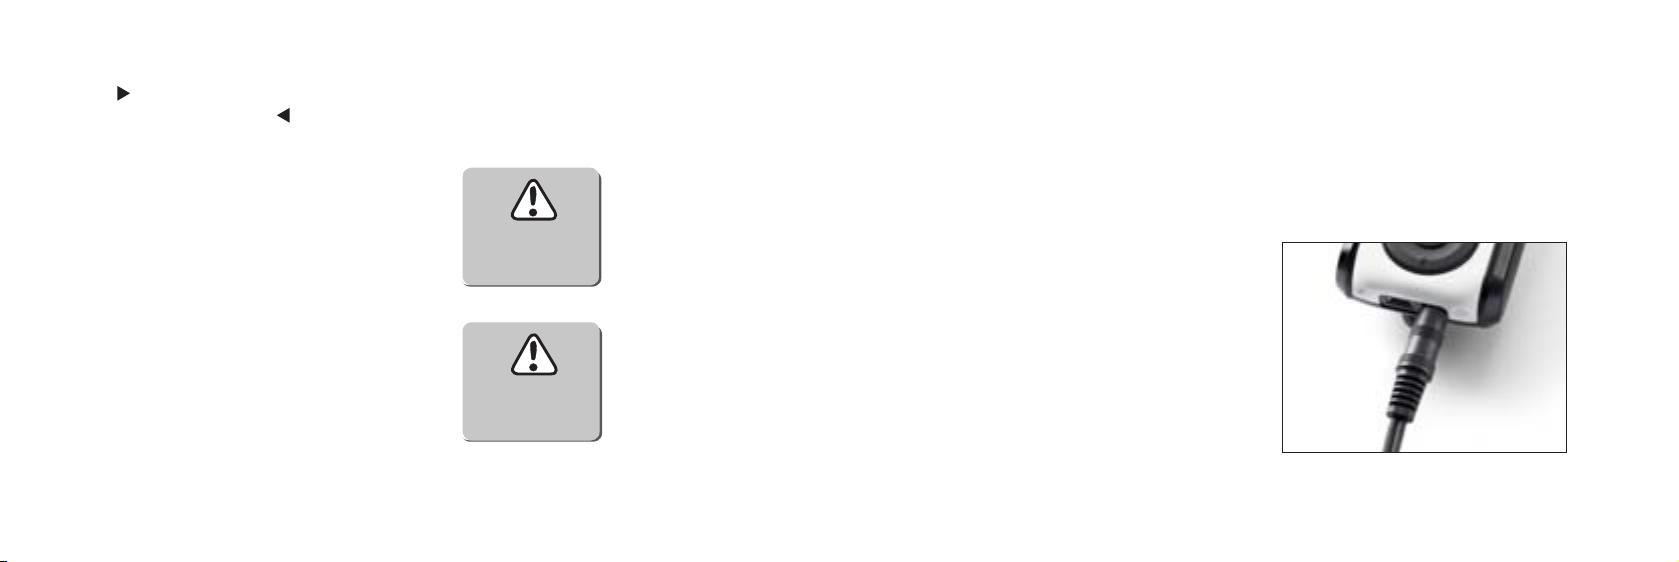
To charge the battery, plug in the charger as shown
in the picture.
The Amigo T30/T31 uses one AA rechargeable NiMH
battery, which must be charged for 14 hours before
being used for the first time.
The T30/T31 offers failsafe charging, which prevents
alkaline batteries being charged.
The display on the T30/T31 will indicate when the
unit is charging. Also, the LED will turn on and shine
green.
Note: With a typical user pattern it is recommended
to replace rechargeable batteries once every year,
because the battery capacity decreases each time
it is charged.
10 11
T30
Battery charging
Charging Error
Check
Battery!
If you do not have time to charge the battery that came with the T30/T31, you can
replace the battery with any of the following:
• Special “silver-banded” rechargeable batteries
(Only available through your hearing care professional, these are the only batteries
that can be recharged inside the transmitter.)
• Standard, rechargeable NiMH batteries
These cannot be recharged inside the transmitter, but must be charged in a separate
charger.
• Standard, non-rechargeable alkaline batteries
Can be used when rechargeable batteries are not available, i.e. if you don’t have time
to charge your rechargeable batteries. Alkaline batteries cannot be recharged and
cannot be purchased from Oticon.
Note: Always dispose of old batteries in approved battery disposal bins. For more
information please consult your Hearing Care Professional.
Page 7
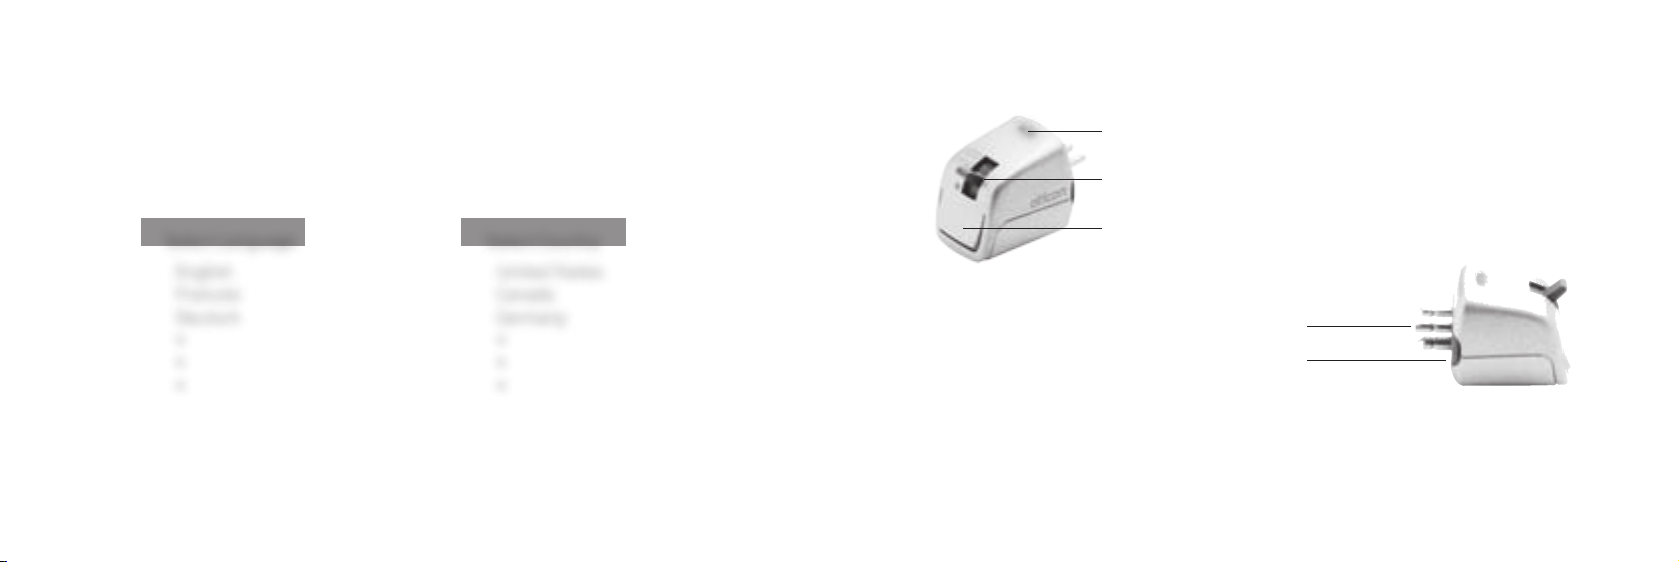
Selecting language and country (first time only)
The Amigo Receivers
Turn the transmitter on by pressing and holding the On/Off button for two seconds.
Press ▲ or ▼ to select language, and confirm by pressing the SYNC button.
To select your country, use the ▲ or ▼ buttons, and confirm by pressing the SYNC button.
Select Language
English
Francais
Deutsch
•
•
•
Note: Selecting a country will also select a predefined channel list, which contains all
of the channels approved for use in that country.
Warning: Only use channels legal in your country
12 13
Select Country
United States
Canada
Germany
•
•
•
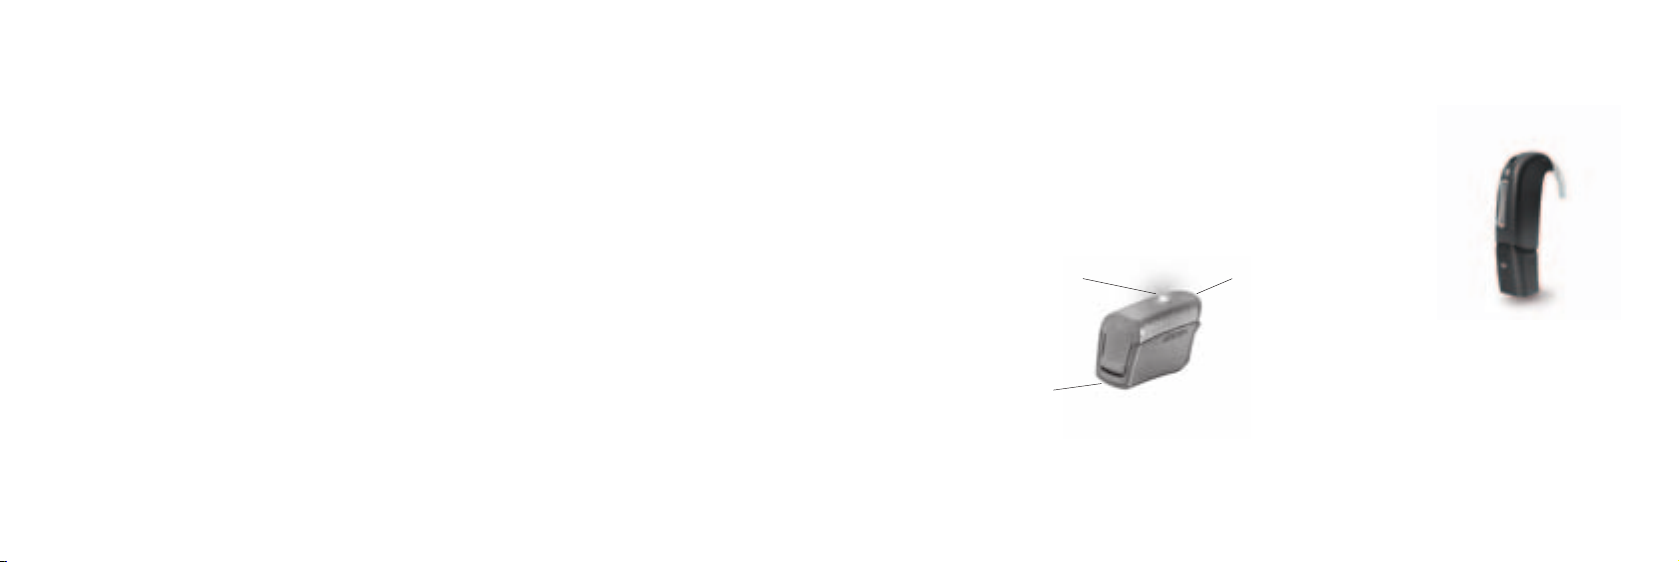
LED status indicator
3-position mode switch
Channel seek/toggle (R2 and R7 only)
Europin connector
Europin rotation lock
Note: Since Amigo receivers draw their power from the hearing instrument battery,
there is no reason to try to open the receiver casing. Never attempt to do this.
Page 8
Changing the pin orientation
Using Amigo R12
If the pins on the Amigo receiver do not match the holes on the audio shoe, they can
be rotated in steps of 90°.
Simply pull the tab on both sides of the receiver back simultaneously, move the pins
and push the tab back in.
Amigo receivers can be positioned with the LED facing to the front or the back.
Note: To ensure optimal antenna performance, the Amigo R1/R2 must be positioned
with the LED facing either to the front or to the back.
14 15
• The hearing instrument detects the Amigo R12 and automatically adds two programs
and will default go to the FM+M program.
• If the switch on the hearing instrument is enabled, it is
possible to change program on the hearing instrument.
LED status indicator
Channel seek/Off
Note: Visit www.Amigofm.com for a comprehensive list of the hearing instruments that
can be used with Amigo R12.
Hearing instrument
connector
Oticon Safari with
the dedicated,
Amigo R12 receiver.
Page 9
Choosing and changing channels
Synchronising Amigo receivers
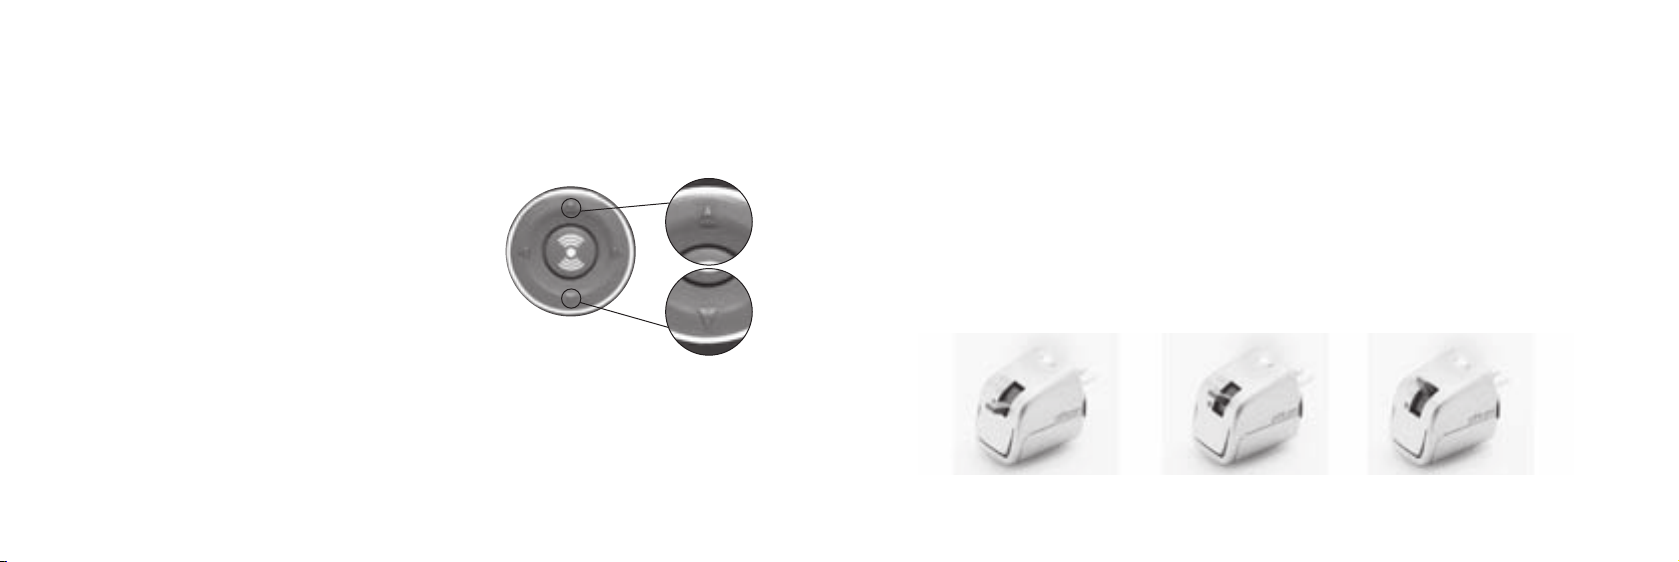
To change the transmitting channel on the Amigo transmitter, press and hold either
the ▲ button or the ▼ button for two seconds to select one of the predefined lists of
channels.
When the channel number begins to blink, press ▲
or ▼ to change channel. Press the SYNC button to
confirm the choice of channel. The transmitter will
then be locked on to the new channel.
When the channel number is blinking you can return
to the original channel by pressing the C-button.
This will also take you back to the main menu.
Whenever you need to change channel, simply repeat
the procedure.
16 17
Connect the receiver to a hearing instrument, and turn it on. Check that the receiver
switch is set to one of the two ON modes.
Within a distance of approximately 50 cm, press the SYNC button on the transmitter
briefly. The LED on the transmitter will then blink three times, and the SYNC logo will
appear on the screen. If the synchronisation is successful, the receiver will also blink
three times.
Note: The switch on the receivers can be disabled, so use the T30/T31 or the WRP to
check the status. In its default setting, the receiver switch is enabled.
Off
FM-only
FM+HA
Page 10
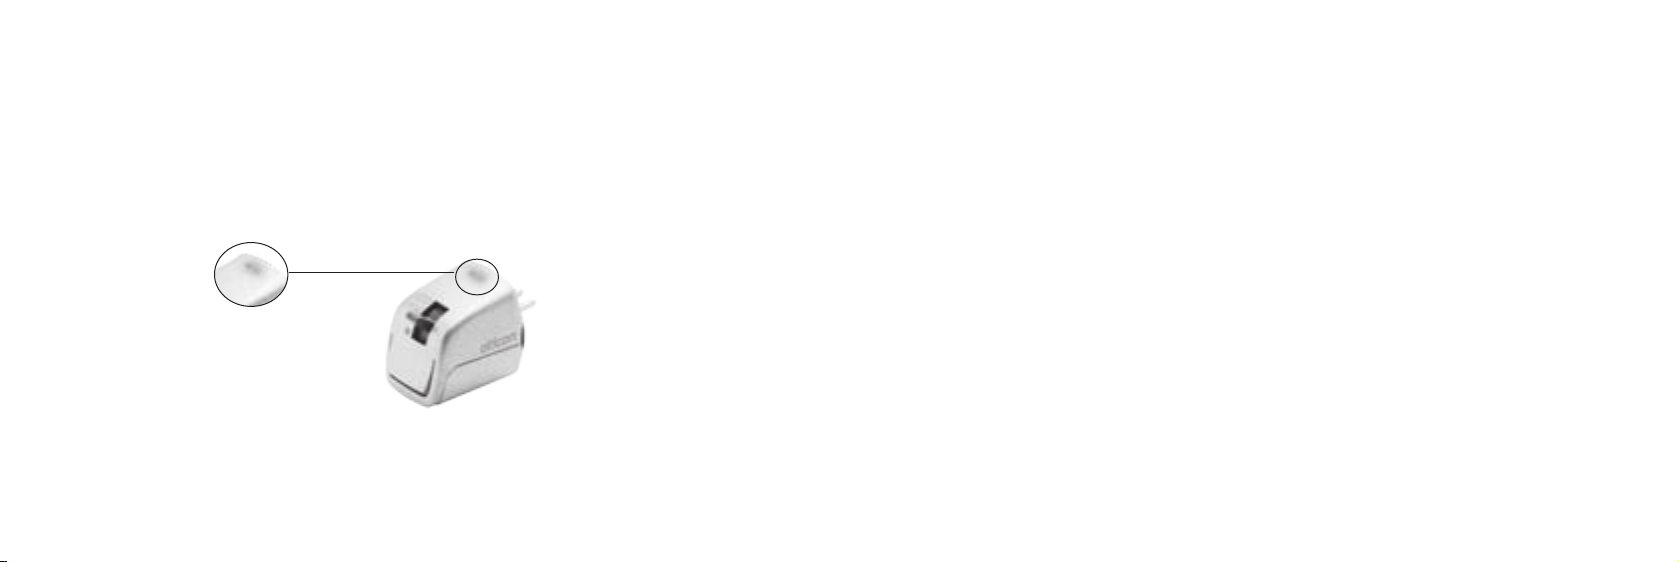
When the receiver’s LED is on, it confirms that:
Synchronising other manufacturers’ receivers
• The hearing instrument battery is ok
• The receiver is on
• The transmitter and receiver are working together perfectly
• The child is on the right channel
Note: To obtain information about connecting your Amigo receivers to Cochlear Implants
and bone anchored hearing solutions, please consult your Hearing Care Professional.
18 19
The T30/T31 are compatible with most other manufacturers’ receivers. However, Amigo
receivers can only be synchronised wirelessly by Amigo transmitters.
To ascertain whether an FM signal is present you must ensure that both the transmitter
and the receiver are on the same channel.
Find out which channel the receiver is operating on, and change the channel on the
T30/T31 by pressing either the ▲ or the ▼ button. The system should then be working.
Page 11
About channels
Using the TT-function (T31 only)
Your Amigo system is a radio device, and like any other radio, it communicates on specific
channels. Your transmitter and receiver must be on the same channel to work together.
Within a close proximity, never operate two transmitters on the same channel – you will
experience interference.
If you are travelling internationally, be aware that your channel may not be approved
for use in all countries. If you wish to use your T30/T31 in a different country, you must
contact your Hearing Care Professional who can help you change the country set-up.
Some electronic devices (microwave ovens, computers, and flourescent lights, for example)
can interfere with your Amigo signal.
20 21
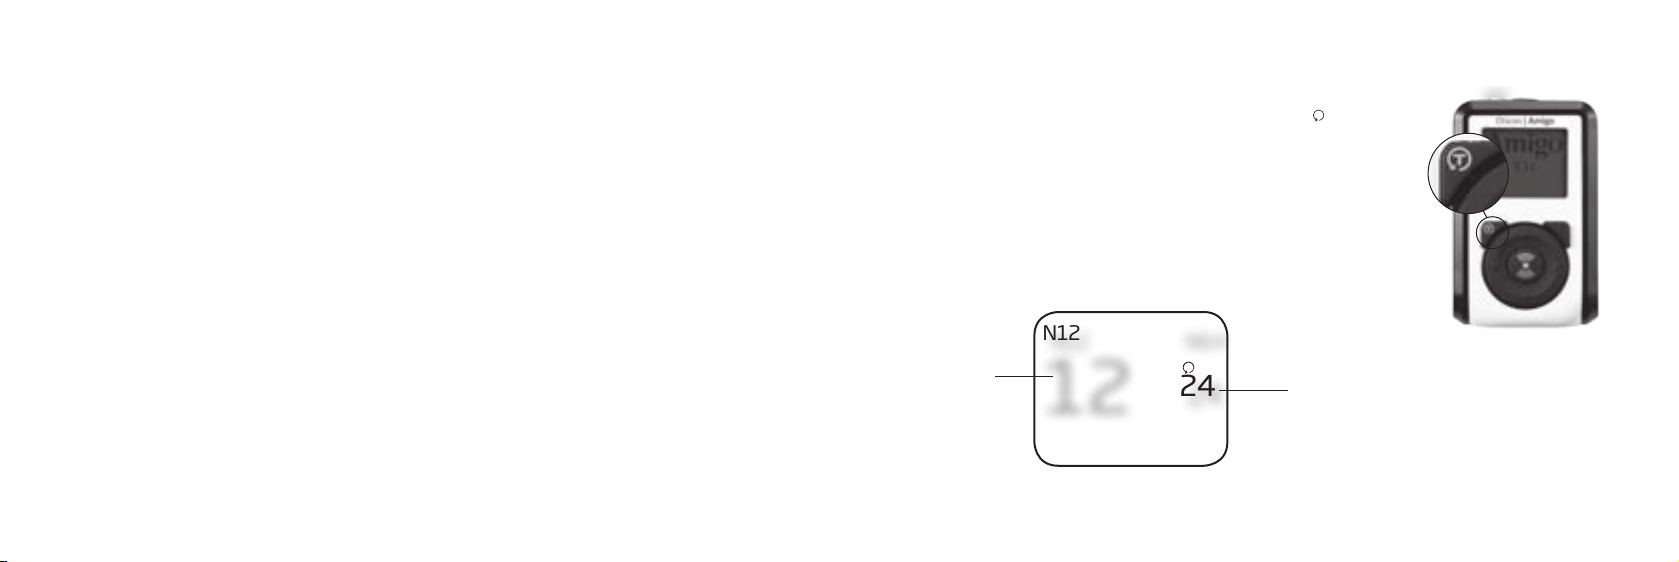
Enable the TT-function on the T31 by pressing the T button.
The screen will then show the primary channel being used
for FM transmission, as well as the TT channel.
To change channels, press and hold the ▲ or ▼ button.
The primary channel will then blink.
N64
T
24
TT channel
Primary
channel
N12
12
Page 12
To change the primary channel press ▲ or ▼. To change the team teaching channel
press
the primary channel press
followed by either ▲ or ▼ to move up or down the channel list. To go back to
. Save the channel settings by pressing the SYNC button.
Connecting external audio sources (TV, MP3 etc.)
Connect the audio cable to the T30/T31 (see picture). Then connect it to the external
audio source, e.g.:
The T31 will not allow you to select the same
channel as the primary and TT-channels:
The T31 will also issue an interference
warning if the two channels are incompatible.
• Computer/Television
• CD/DVD/MP3 player
Primary and TT
Channels
Cannot Match!
The T30/T31 can be used for narrating aux
sessions (TV, Video etc.) Connect the T30 to
the external audio source and turn it on. On
the T31 press the TT button and set the
primary and TT channel. The TT channel
must be the same as on the T30. Now the
Primary and TT
Channels
will Interfere!
22 23
teacher can narrate the session on the T31.
Page 13
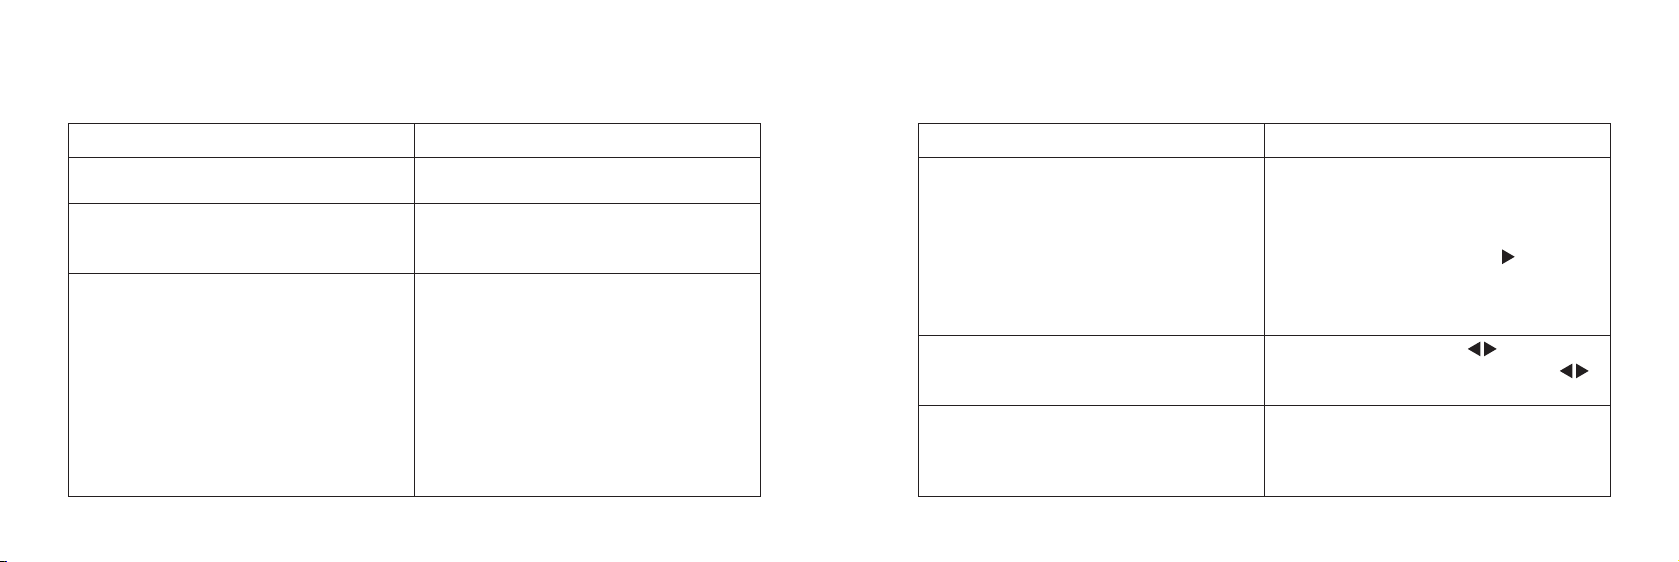
T30 and T31 special functions
Feature How to
Mute the transmitter One quick press on the On/Off button
mutes the transmitter.
Change channel
Synchronise Amigo receivers Within a distance of approx. 50 cm, Amigo
Press and hold ▲ or ▼. The channel will
then blink. You can change it by pressing ▲
or ▼. Press the SYNC button to save.
receivers can be synchronised by pressing
the SYNC button.
24 25
Feature How to
One-touch Team Teaching (T31 only) Press the TT button. This will provide
access to the primary and team teaching
channels. The primary channel can be
changed by pressing ▲ or ▼. To change the
team teaching channel, press
either ▲ or ▼ to go up or down the
channel list. Save the channel settings by
pressing the SYNC button.
Lock the keypad
Monitor a single channel You can use earphones to hear what the
To lock the keypad, press
seconds. To unlock the keypad, press
again for three seconds.
child is hearing. First unplug the
microphone and then insert the earphone’s
jack into the aux input.
and then
for three
Page 14
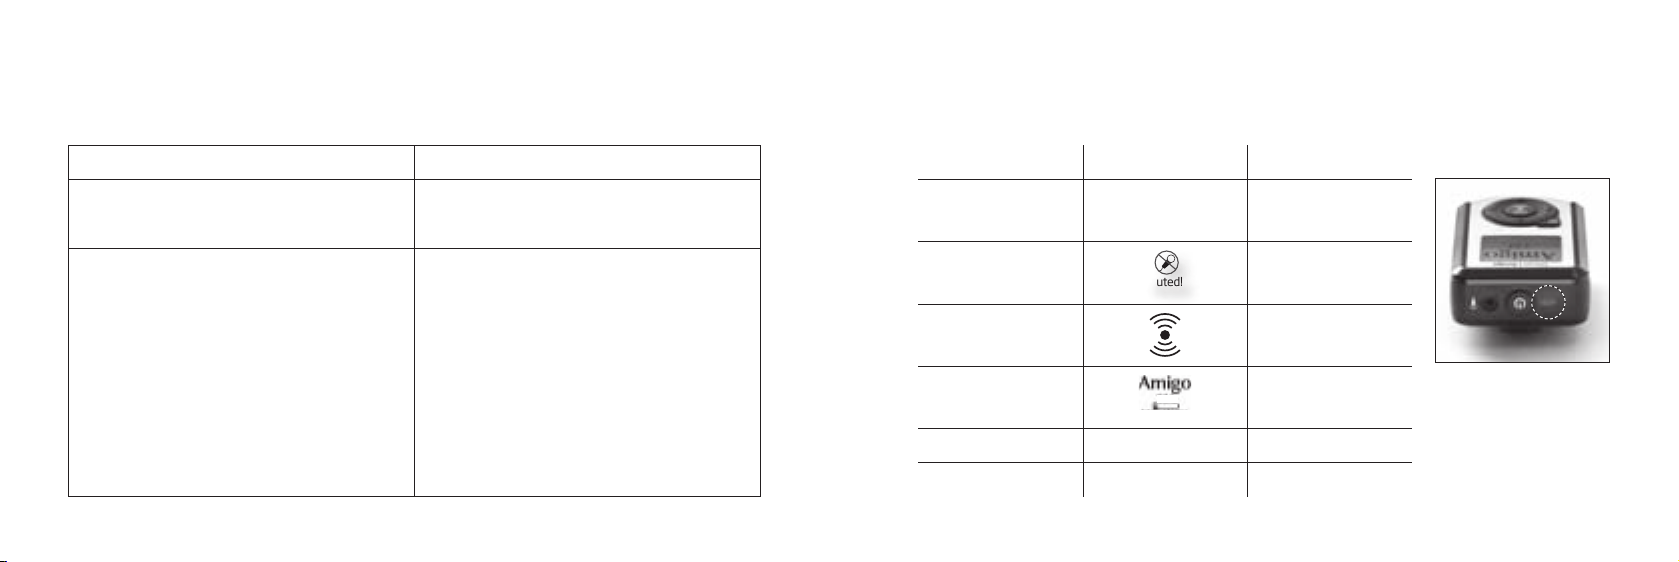
LED / Display legend
The LED on the T30/T31 indicates the following:
Feature How to
Flip display 180°
Press the “C” button and the ▲ button.
You can reverse the rotation by pressing
both buttons again.
Automatic mute The T30/T31 constantly scans for the
presence of speech. If the teacher is silent,
it automatically mutes the microphone
signal, to protect the child from irrelevant,
incidental noise.
26 27
LED Display Meaning
Steady red On and
transmitting
Blinking red
Flashing red burst
Steady green
Muted!
T30
Battery charging
Muted
Synchronising
Charging
Blinking green Low battery
Off Off or error
Page 15

Microphone options
Cleaning of the T30/T31
Plug-in the microphone in the top of the T30/T31
and attach the microphone either to your clothes
or to the lavaliere cord. The lavalier cord allows you
to wear the microphone around your neck.
Three microphones are available:
• Clip-on directional microphone.
• Boom microphone. The earhook can easily be
attached around one ear, and the microphone
placed close to the mouth.
Note: Since the microphone also acts as the
antenna, users must keep it attached and in
an upright position.
28 29
The T30/T31 is moisture repellent, making it very easy to clean with a damp cloth.
Oticon recommends cleaning on a regular basis.
Page 16

Appendix A: Troubleshooting
Problem Solution
The battery will not charge Check that it is positioned correctly.
Make sure that it is the “silver-sleeved”
rechargeable type of battery, as this is
the only type the T30/T31 will charge
(for safety reasons).
No sound / no FM reception Check that the hearing instrument battery
is working, and that it is on. Check that
the receiver is on and correctly connected.
Check that the transmitter is on.
Press the SYNC button again.
30 31
The receivers cannot be synchronised Synchronisation takes place wirelessly,
so if the receiver fails to confirm (with
three blinks of the LED), try to move
the transmitter closer, further away or
a little bit to one side. Then press the
SYNC button again.
Interference If interference is encountered on a
channel, change to another channel.
Press ▲ or ▼ to change channel.
For assistance with troubleshooting or answers to other questions please consult your
Hearing Care Professional.
Page 17

Appendix B: Manufacturer’s warranty
The manufacturer, Oticon, issues a one-year limited warranty to the original consumer
of this product.
This warranty comes into effect upon the date of original purchase of this equipment,
and will remain in effect for one calendar year from that date.
Please notice that extended warranties may apply in your country. Please contact your
local Hearing Care Professional for more information.
What is covered by this warranty?
Any electronic component which, because of workmanship, manufacturing or design
defects, fails to function properly under normal use during the life of this warranty will be
replaced or repaired at no charge for parts or labour when returned to the point of purchase. Transportation is paid by the customer. If it is determined that repair is not feasible,
the entire unit may be replaced with an equivalent unit upon mutual agreement of the
Hearing Care Professional and customer.
32 33
What is not covered by this warranty?
This one-year limited warranty does not cover:
• Malfunctions resulting from abuse, neglect or accident.
• Peripheral accessories as itemised within the product brochure, when such items are
later than 90 days from the original purchase.
• Batteries.
• Instruments connected, installed, used or adjusted in a manner contrary to the
instructions provided.
• Consequential damages and damages resulting from delay or loss of this instrument.
The exclusive remedy under this warranty is strictly limited to repair or replacement as
herein provided.
• Products damaged in transit unless investigated by the shipper and returned to the
warrantor with the investigation report.
The manufacturer reserves the right to make changes in the design or construction of
any of its instruments at any time without incurring any obligation to make any changes
whatsoever on units previously purchased. This warranty is in lieu of all other expressed
warranties by the manufacturer. No representative or person is authorized to represent
or assume for the manufacturer any liability in connection with the sale or use of this
product other than as set forth above.
Page 18

If your Amigo system requires service under the terms of this warranty, carefully package
the instrument to prevent damage in transit and return it to the point of purchase.
Include a detailed description of the problem, your full name, billing and shipping address
and telephone number.
The above warranty does not affect any legal rights that you might have under applicable
national legislation governing sale of consumer goods. Your point of purchase may have
issued a warranty that goes beyond the clauses of this limited warranty. Please consult
your point of purchase for further information.
34 35
Date of purchase:
Amigo serial numbers:
Microphone:
Receiver left:
Receiver right:
Oticon A/S
Kongebakken 9
DK-2765 Smørum
Denmark
Page 19

This instrument is certified under: FCC ID: U28AT31
IC: 1350B-AT31
This device complies with Part 15 of the FCC Rules, and with RSS-210 of Industry Canada.
Operation is subject to the following three conditions:
(1) this device may not cause harmful interference, and
(2) this device must accept any interference received, including interference that may
cause undesired operation.
(3) this device may not interfere with TV reception or Federal Government radar.
Changes or modifications not expressly approved by the party responsible for compliance
could void the user’s authority to operate the equipment.
Hereby Oticon declares that this Amigo is in compliance with the essential requirements
and other relevant provisions of Directive 1999/5/EC. Declaration of conformity is available at
Oticon A/S
Kongebakken 9
DK-2765 Smørum
Denmark
36
Warnings
Amigo parts can be dangerous if swallowed:
The Amigo system is not a toy and therefore should be kept out of the reach of children and anyone else
who might swallow parts or otherwise cause injury to themselves. Special attention should be paid to
the smaller components in order to prevent children from swallowing them and choking. Never change the
battery and never connect the receiver to the hearing instrument in front of infants, small children or
persons with learning difficulties.
If a part is swallowed, see a doctor immediately.
Risk of harm caused by unintentional noise that may
muffle important signalsSystem dysfunctions:
The Amigo system will cease to function if the batteries have run out. The system may also produce a high
whistling noise (feedback) if the battery is low, or if it is subjected to loud sound while the microphone is off
but the receiver is still on. Users should be aware that these sounds should not be confused with warning
sounds – e.g. car horns in traffic.
Use on aircrafts:
Amigo should not be used on aircrafts without the permission of the flight crew. Please note that Amigo can
cause interference with other medical devices. Such interference can also be caused by radio signals, power
line disturbances, airport metal detectors, electromagnetic fields from other medical devices and electrostatic discharges. Please, contact the manufacturer of other medical devices for information about the risk
of disturbance.
Page 20

Battery use:
• Always use NiMH rechargeable batteries or alkaline batteries.
• Always use batteries recommended by your Hearing Care Professional.
• Never attempt to recharge non-rechargeable batteries.
• Never expose the batteries to great heat by putting it in the oven, micro wave oven
or burning it. There is a risk that it will explode and cause serious injury.
Safety requirements regarding Direct Audio Input (DAI):
The safety of the use of Amigo with DAI (Direct Audio Input) is determined by the external signal source.
When the DAI is connected to mains-operated equipment, this equipment must comply with IEC-60065,
IEC-60601 or equivalent safety standards.
USB connector:
The safety of recharging batteries with the USB connector only is determined by the external equipment.
When the USB connector is connected to mains-operated equipment, this equipment should be UL approved
or comply with equivalent safety requirements.
108560UK / 10.10
The Amigo T30/T31 contains an FM radio transmitter operating on a country specific tuning range in
the frequency band 169 MHz - 217 MHz, with emission power below 10mW. Furthermore a short range
induction technology working at 3.7 MHz with a magnetic field strength below - 15 dBµA/m @ 10m.
The radio system’s emission power is below international emission limits for Human Exposure.
The Amigo T30/T31 complies with international standards concerning Electromagnetic Compatibility.
Due to the limited space available on the instruments all relevant approval markings are found in this
document.
0543
Waste from electronic
equipment must be
handled according to
local regulations.
N1175
108560UK / 10.10
Page 21

It ta kes a tru ly ded icate d a ppro ach to hel p c hil dre n w ith
hea ri ng prob lems ac hie ve t hei r f ul l p otent ial . T hat ’s why
we del iver t he s olut ion s a nd ser vice s that pro fes sion als an d
ca reg iver s ne ed to prov ide ch ild ren th e op por tun iti es they
de ser ve. Th is is what ch ild -fr iend ly hea rin g c are is al l abou t.
 Loading...