

Page 1

Alta2 Nera2 Ria2
INSTRUCTIONS FOR USE IIC-CIC
Page 2

Introduction to this booklet
This booklet guides you in how to use and maintain your new
hearing instrument. Please read the booklet carefully including
the Warnings section. This will help you to achieve the full benet
of your new hearing instrument.
Your Hearing Care Professional has adjusted the hearing instrument to
meet your needs. If you have additional questions, please contact your
Hearing Care Professional.
About Start up Handling Options Warnings More info
For your convenience, this booklet contains a navigation bar to help
you navigate easily through the dierent sections.
On some pages, you will nd a link to the Oticon web page. Type
the link into your internet browser for additional information and
instructional videos.
Page 3

Intended use
The hearing instrument is intended to amplify and transmit sound to
the ear and thereby compensate for impaired hearing. The hearing
instruments are not intended to be used by infants/children < 36
months.
The hearing instrument compensate for mild to moderate hearing loss.
IMPORTANT NOTICE
The hearing instrument amplication is uniquely adjusted and optimised
to your personal hearing capabilities during the instrument tting
performed by your Hearing Care Professional.
Page 4

Table of contents
About
Start up
Handling
Instrument overview (CIC shown) 6
Identify left and right instrument 8
Battery (size 10) 9
Turn the hearing instrument on and o 10
When to replace a battery 11
Replace the battery 12
Caring for your hearing instrument 14
Filter replacement 18
Replace ProWax lter 19
Replace T-Cap lter 20
Insert the hearing instrument 21
Remove the hearing instrument 22
Page 5

Options
Warnings
More info
Optional features and accessories 24
Wireless accessories (optional) 25
Change program or volume (optional) 26
Warnings 30
Avoiding moisture 36
Conditions 37
Troubleshooting guide 38
Warranty certicate 40
International warranty 41
Mobile phone 42
Technical information 44
Page 6
6
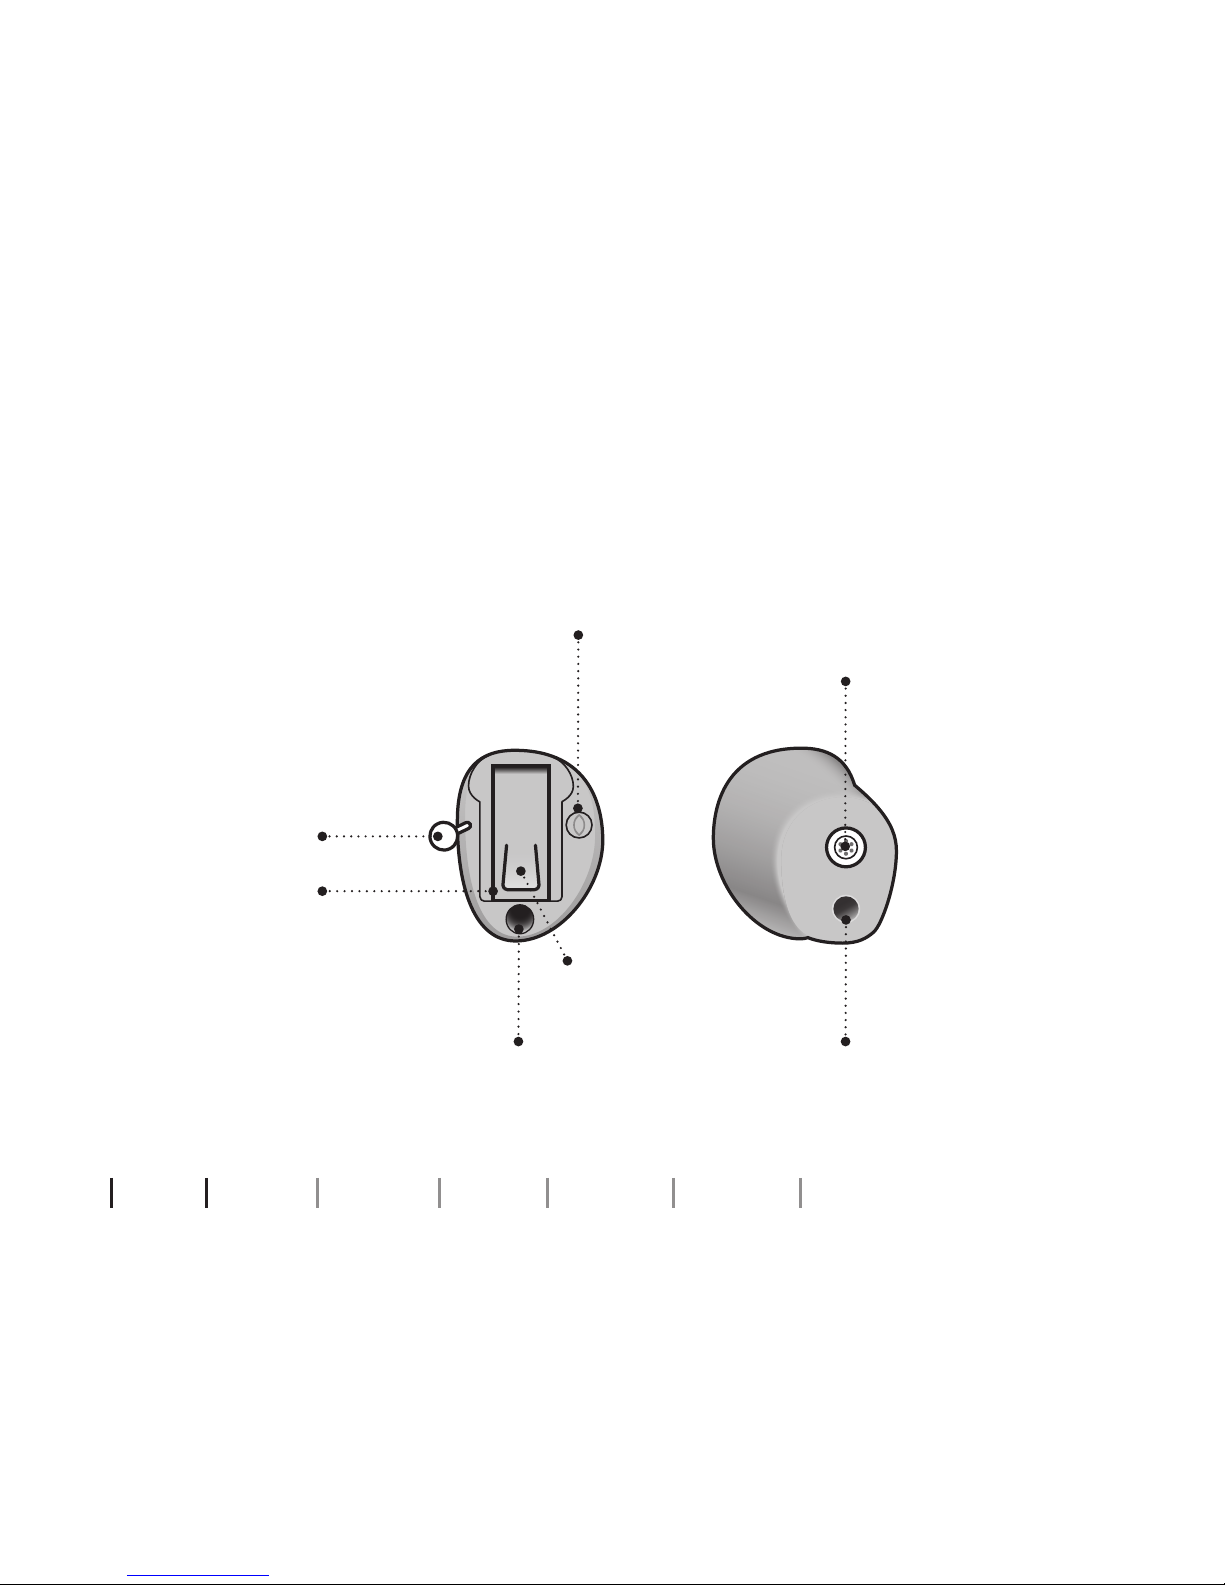
Instrument overview (CIC shown)
What it is
Battery drawer
Pull-out string
Speaker with
ProWax lter
Vent
Nail grip
Vent
Microphone
with T-Cap lter
About Start up Handling Options Warnings More info
Page 7
7
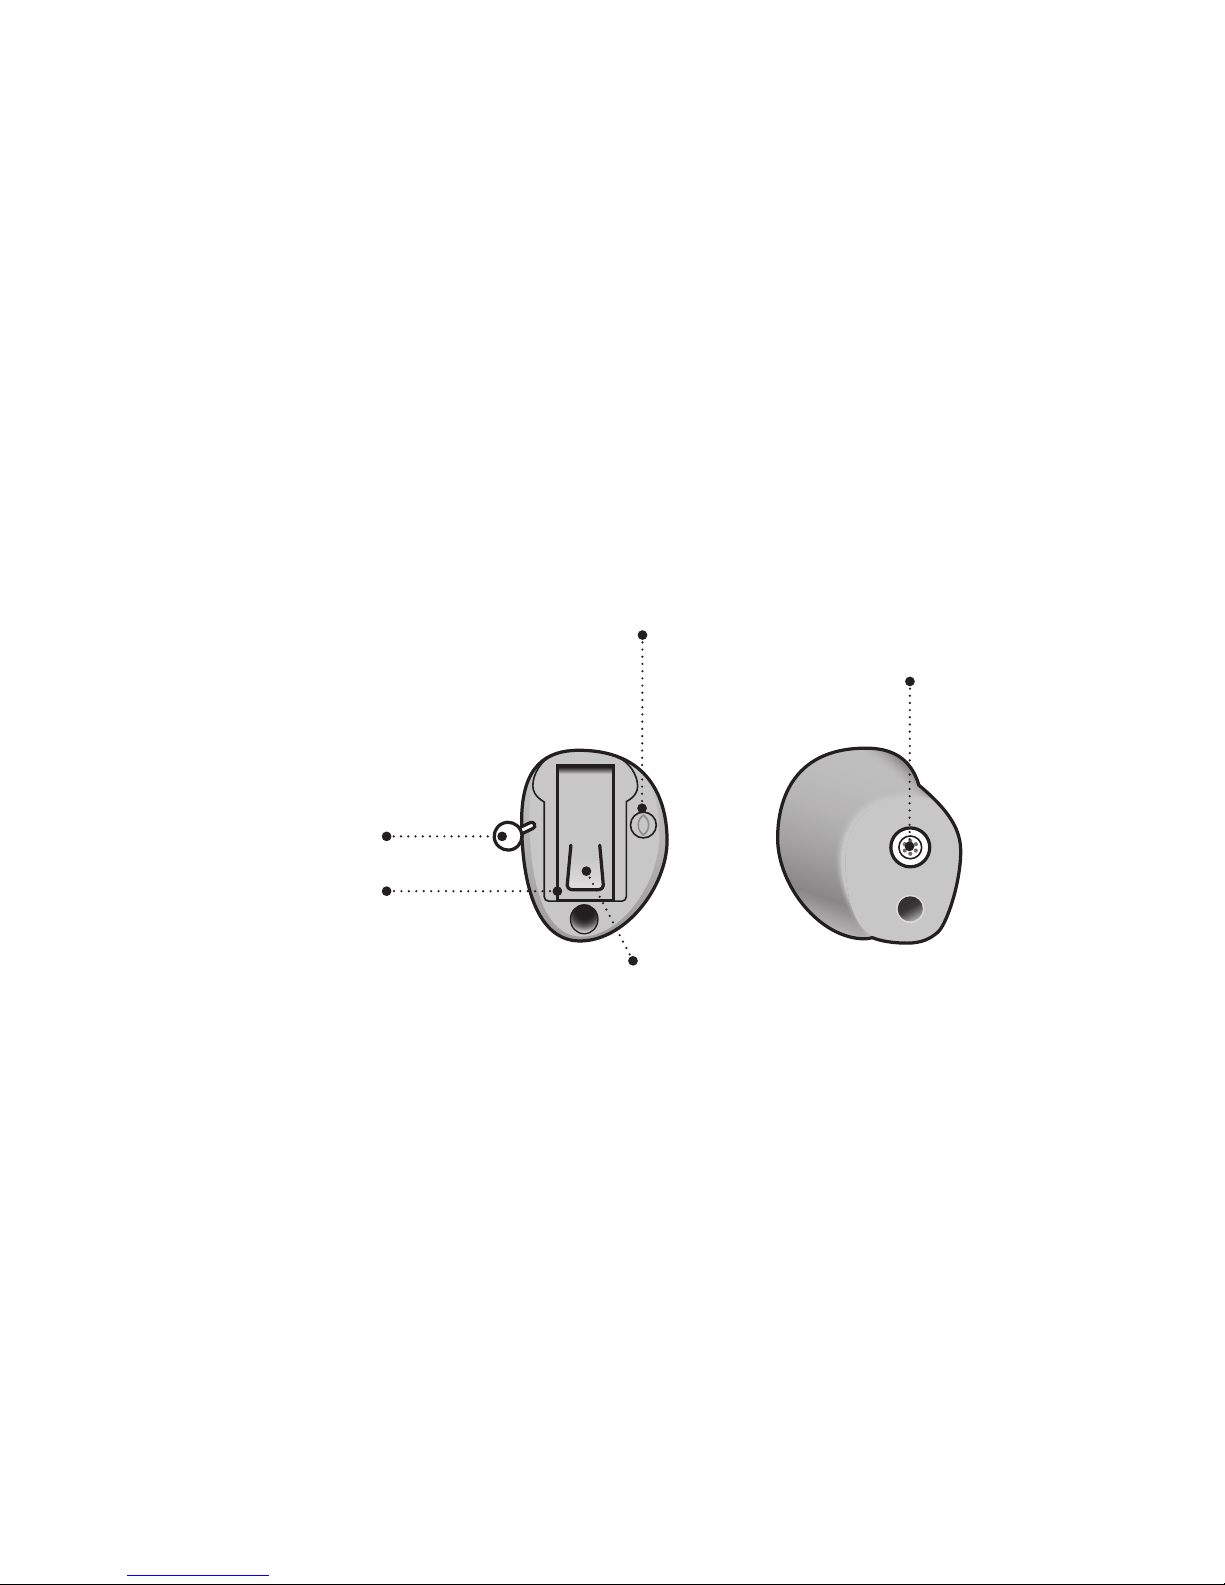
What it does
Contains the
battery. Battery
drawer is the on/
o switch
To help pull out
the instrument
from the ear canal
Sound into
the ear canal
Open the
battery drawer
Components may be positioned dierently on your instruments.
Sound in
Page 8

8
Identify left and right instrument
It is important to distinguish between the left and the right
instrument as they might be shaped and programmed dierently.
A BLUE shell, text or dot
identies the LEFT
instrument.
A RED shell, text or dot
identies the RIGHT
instrument
About Start up Handling Options Warnings More info
Page 9

9
Battery (size 10)
Your hearing instrument is a miniature electronic device that runs on
special batteries. To activate the hearing instrument, you must insert
a new battery in the battery drawer. See how in the “Replace the
battery” section.
Battery drawer
Pull out to open
www.oticon.com/battery
Page 10

10
Turn the hearing instrument on and o
The battery drawer is also used to switch the hearing instrument
on and o. To preserve the battery, make sure your instrument is
switched o when you are not wearing it.
Turn ON
Close the battery drawer with
the battery in place.
Turn OFF
Open the battery drawer
About Start up Handling Options Warnings More info
Page 11

11
When to replace a battery
When it is time to replace the battery you will hear two beeps
repeated in moderate intervals until the battery runs out.
Two beeps
= The battery is running low
Four beeps
= The battery has run out
Battery maintenance tip
To make sure the hearing instrument is always working, bring spare
batteries with you or replace the battery before you leave home.
www.oticon.com/battery
Page 12
12
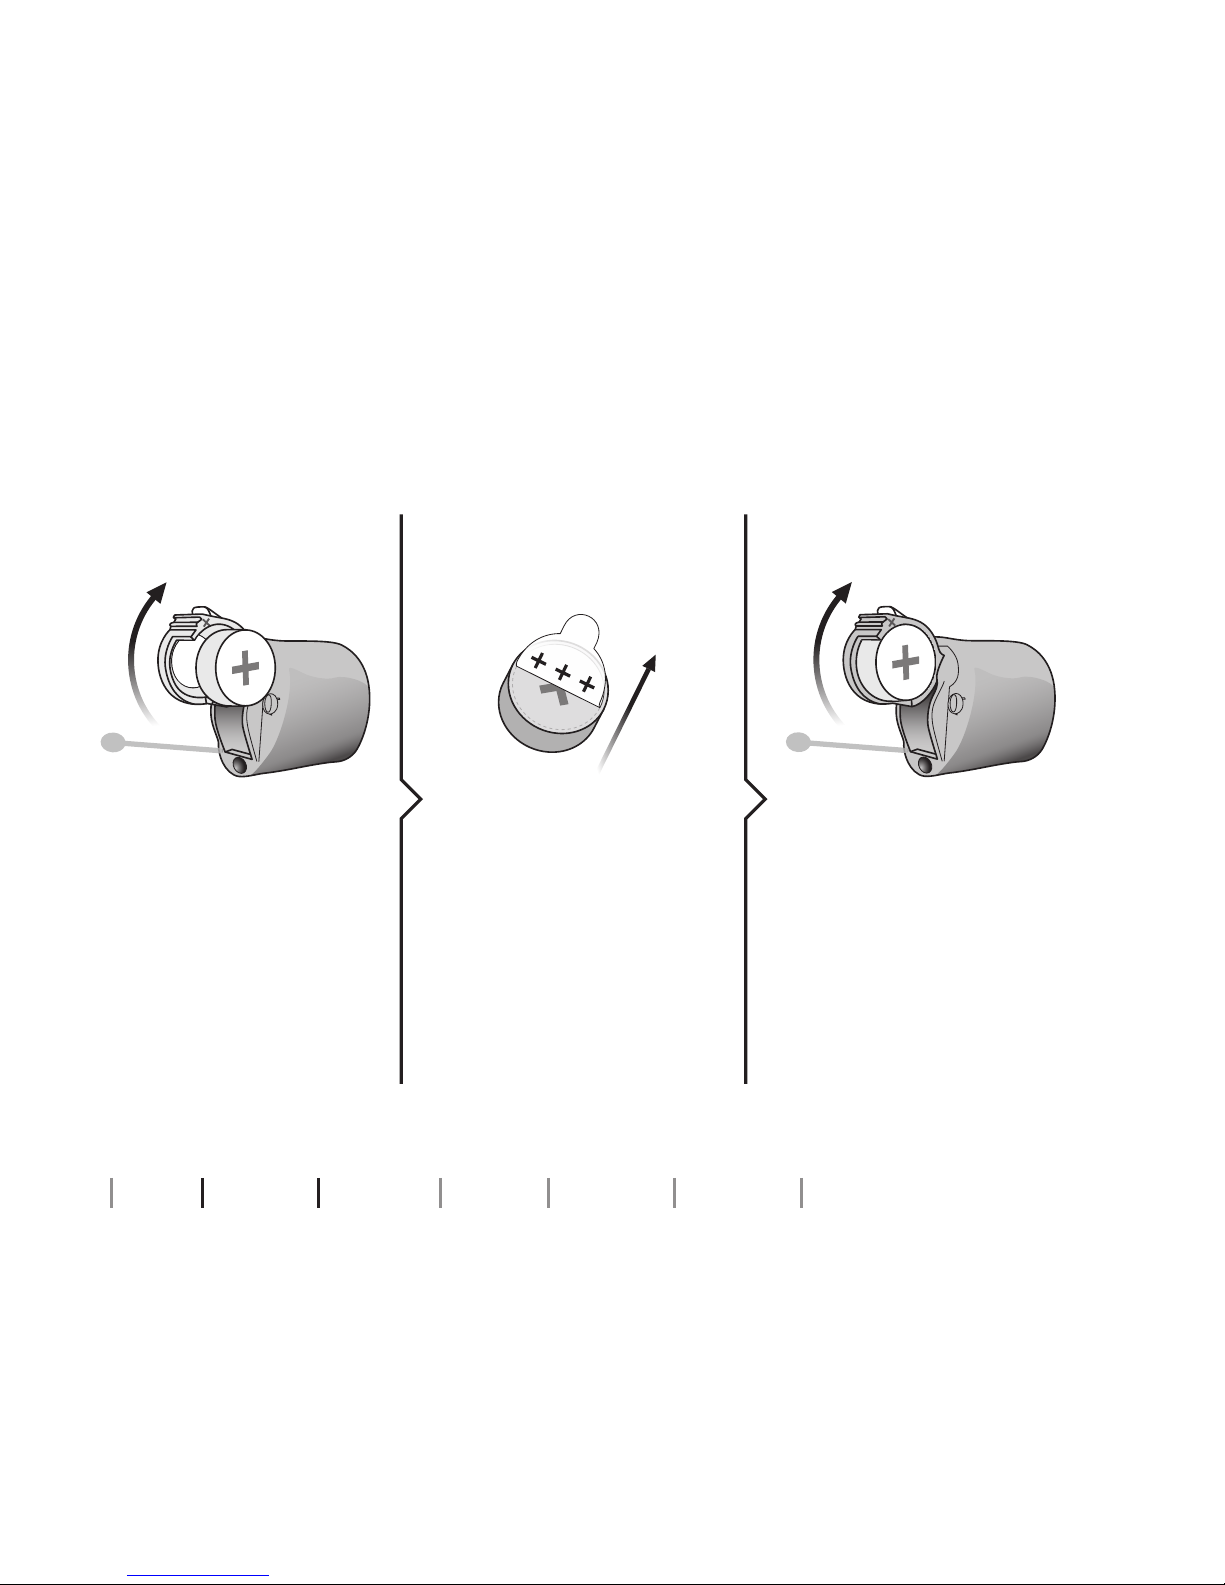
Replace the battery
2. Uncover 3. Insert
Fully open the
battery drawer by
pulling the nailgrip
up. Remove the
battery.
Remove the
sticky label from
the + side of the
new battery. Leave
the battery uncovered for 2-5 minutes
before inserting.
Insert the new
battery into the
battery drawer.
Match the + of the
battery with the + on
the battery drawer.
1. Remove
About Start up Handling Options Warnings More info
Page 13

13
MultiTool
Close the battery drawer. The
instrument will play a jingle when
it starts up. Hold the instrument
close to your ear to hear the jingle.
The MultiTool can be used for
battery change. Use the magnetic
end to remove and insert batteries.
The MultiTool is provided by
your Hearing Care Professional.
4. Close Tip
www.oticon.com/battery-ite
Page 14

14
About Start up Handling Options Warnings More info
Caring for your hearing instrument
When handling your hearing instrument, hold it over a soft surface
to avoid damage if you drop it.
The MultiTool
Inside the MultiTool there is a brush and a wire loop for cleaning ear
wax from the instrument. The brush can be replaced.
Brush MagnetWire loop
IMPORTANT NOTICE
Your MultiTool has a built-in magnet. Keep the MultiTool 30 cm away from
credit cards and other magnetically sensitive devices.
Page 15

15
IMPORTANT NOTICE
Use a soft, dry cloth to clean the hearing instrument. It must never be
washed or immersed in water or other liquids.
Cleaning the instrument
Carefully brush away debris from the microphone openings.
Gently brush the surface.
Microphone
openings
www.oticon.com/clean
Page 16

16
Vent
About Start up Handling Options Warnings More info
Cleaning the vent
Clean the vent by pressing the brush through the vent while twisting
it slightly.
Page 17

17
Small vent cleaner
If the vent is very small, a special tool may be required.
Please consult your Hearing Care Professional.
www.oticon.com/clean-vent
Page 18

18
About Start up Handling Options Warnings More info
Filter replacement
If you experience reduced sound quality, it is time to change the
lters.
Please refer to the following pages for instructions on how to replace
the lters.
IMPORTANT NOTICE
Always use the same type of wax lter as was originally supplied with the
instrument. This is provide by your Hearing Care Professional.
If you are in any doubt about the use or replacement of wax lters, contact
your Hearing Care Professional.
Page 19

19
Replace ProWax lter
2. Remove 3. Insert
Remove the tool from
the shell. The tool
has two pins, one
empty for removal
and one with the
new ProWax lter.
Push the empty pin
into the ProWax lter
in the instruments
speaker and pull it
out.
Insert the new ProWax
lter using the other
pin. Remove the tool
and throw it out.
1. Tool
New
lter
www.oticon.com/lter-ite
Page 20

20
About Start up Handling Options Warnings More info
Replace T-Cap lter
2. Remove 3. Insert
Remove the tool from
the packaging. The
tool has two ends,
one for removal and
one with the new
T-Cap lter.
Push the tool fork
under the top edge
of the used T-Cap
lter and lift it out.
Insert the new T-Cap
lter and remove the
tool by twisting it
slightly. Throw the tool
out after use.
1. Tool
new lter
Page 21

21
Insert the hearing instrument
Hold the instrument with the
coloured dot facing upwards. Place
the tip of the instrument in your
ear canal.
Gently pull the top of your ear
outwards and push the hearing
instrument into the ear canal, twisting slightly if necessary. Follow the
natural contour of the ear canal.
Step 1 Step 2
www.oticon.com/insert
Page 22

22
Remove the hearing instrument
Hold the hearing instrument by the pull-out string (if available).
Gently pull the instrument from the ear canal.
If your instrument doesn’t have a pull-out string, you can remove it
by pulling on the edge of the instrument.
IMPORTANT NOTICE
DO NOT use the battery door as a handle to insert or remove your
instruments. It is not designed for this purpose.
About Start up Handling Options Warnings More info
Page 23

Page 24

24
About Start up Handling Options Warnings More info
Optional features and accessories
The features and accessories described on the following pages are
optional. Please contact your Hearing Care Professional to nd out
how your hearing instrument is programmed.
If you experience dicult listening situations, a special program may
be helpful. These are programmed by your Hearing Care Professional.
Write down hearing situations where you may need help.
Page 25

25
Wireless accessories (optional)
As an enhancement to your wireless hearing instrument a broad range
of wireless accessories are available.
ConnectLine
ConnectLine is a family of
products that allows you to
receive audio signals from
TVs, phones, music players,
PCs or an external microphone
wirelessly through your hearing
instrument.
Remote Control
The Remote Control oers an
opportunity to change program,
adjust or mute the volume in
your hearing instruments.
For detailed information on
wireless accessories contact
your Hearing Care Professional
or visit www.oticon.com.
Page 26

26
About Start up Handling Options Warnings More info
Change program or volume (optional)
If you have ConnectLine Streamer or Remote Control, you can change
programs and adjust the volume of your instruments.
Please contact your Hearing Care Professional for more information.
Page 27

27
To be lled out by the Hearing Care Professional
Program Sound you will hear
when activated
When to use
1
“1 beep”
2
“2 beeps”
3
“3 beeps”
4
“4 beeps”
Page 28

28
About Start up Handling Options Warnings More info
Quick reset
If you wish to return to the standard settings of the instrument
programmed by your Hearing Care Professional, simply open and
then close the battery drawer.
Open Close
Page 29

Page 30

30
For your personal safety and to ensure
correct use, you should familiarise
yourself fully with the following general warnings before using your hearing
instrument.
Please note that a hearing aid will not
restore normal hearing and will not
prevent or improve a hearing impairment resulting from organic conditions.
Furthermore, note that in most cases,
infrequent use of a hearing instrument
does not permit a user to attain full
benet from it.
Consult your Hearing Care Professional if you experience unexpected
operations or events with your hearing
instrument.
Usage of hearing instruments
• Hearing instruments should be used
only as directed and adjusted by your
Hearing Care Professional. Misuse
can result in sudden and permanent
hearing loss.
• Never allow others to wear your
hearing instrument, as incorrect use
could cause permanent damage to
their hearing.
Warnings
About Start up Handling Options Warnings More info
Page 31

31
Choking hazards & risk of swallowing
batteries or other small parts
• Hearing instruments, their parts,
and batteries should be kept out of
reach of children and anyone who
might swallow these items or otherwise cause injury to themselves.
• Batteries have occasionally been
mistaken for pills. Therefore, check
your medicine carefully before
swallowing any pills.
• Most hearing instruments can be
supplied with a tamper-resistant
battery drawer upon request. This is
strongly recommended for infants,
small children and people with learning diculties.
• Children below 36 months must
always use a tamper-resistant
battery drawer. This option is
available in BTE, miniBTE, RITE and
miniRITE instruments.
If a battery or hearing instrument is
swallowed, see a doctor immediately.
Page 32

32
Battery use
• Always use batteries recommended
by your Hearing Care Professional.
Batteries of low quality may leak and
cause bodily harm.
• Never attempt to recharge your batteries and never dispose of batteries
by burning them. There is a risk that
the batteries will explode.
Dysfunction
• Be aware of the possibility that
your hearing instrument may stop
working without notice. Keep this in
mind when you depend on warning
sounds (e.g. when you are in trac).
The hearing instruments may stop
functioning, for instance if the batteries have expired or if the tubing is
blocked by moisture or ear wax.
Warnings
About Start up Handling Options Warnings More info
Page 33

33
Active implants
• Caution must be taken with active
implants. In general, follow the
guidelines recommended by manufacturers of implantable debrillators and pacemakers regarding use
with mobile phones and magnets.
• Your hearing instrument has a wireless transmission. Please keep the
hearing instrument at least 15 cm
away from the implant, e.g. do not
carry it in a breast pocket.
• When the hearing instruments
are mounted on or in the ears, the
distance between the hearing
instruments and the implant is larger
than 15 cm.
• The MultiTool (which has a built-in
magnet) should be kept more than
30 cm away from the implant, e.g. do
not carry it in a breast pocket.
• If you have an active brain implant,
please contact the manufacturer of
your implantable device for information about the risk of disturbance.
Page 34

34
Explosives
• The power source in your hearing
instrument has insucient energy
to cause re in normal usage conditions. The hearing instrument has
not been tested for compliance with
international standards concerning
explosive environments.
It is recommended not to use your
hearing instrument in areas where
there is a danger of explosions.
X-ray, CT, MR, PET scanning and
electrotherapy
• Remove your hearing instrument
during, for example, X-ray, CT/MR/
PET scanning, electrotherapy or
surgery as your instrument may be
damaged when exposed to strong
elds.
Avoiding heat and chemicals
• Your hearing instrument must never
be exposed to extreme heat, e.g.,
left inside a parked car in the sun.
• Your hearing instrument must not
be dried in microwave ovens or other
ovens.
• The chemicals in cosmetics, hairspray, perfume, aftershave lotion,
suntan lotion and insect repellent
can damage your hearing instrument. Always remove your hearing
instrument before applying such
products and allow time to dry
before reinserting it.
Warnings
About Start up Handling Options Warnings More info
Page 35

35
Possible side eects
• Hearing instruments, moulds or
domes may cause an accelerated
accumulation of ear wax.
• The otherwise non-allergenic materials used in hearing instruments
may in rare cases cause a skin irritation or any other unusual condition.
Please seek consultation with a physician if these conditions occur.
Interference
• Your hearing instrument has been
thoroughly tested for interference,
according to the most stringent
international standards. However,
interference with your hearing
instrument and other devices may
occur, (e.g., some mobile telephones, citizens band systems, and
shop alarm systems). If this occurs,
increase the distance between the
hearing instrument and the device.
Page 36

36
About Start up Handling Options Warnings More info
Avoiding moisture
Your hearing instrument must never be
exposed to steam baths, showers or
heavy rain, etc.
Should your hearing instrument come
in contact with water and stop working, please follow these guidelines:
1. Gently wipe o any water.
2. Open the battery drawer, remove
the battery and gently wipe o any
water in the battery drawer.
3. Let the hearing instrument dry with
the battery drawer left open for
approximately 30 minutes.
4. Insert a new battery.
IMPORTANT NOTICE
Do not wear your hearing instrument while showering or participating in
water activities. Do not immerse your hearing instrument in water or other
liquids.
Page 37

37
Conditions
Operating conditions
Temperature: +1°C to +40°C
Relative humidity: 5% to 93%, non-condensing
Storage and
transportation conditions
Temperature and humidity shall not exceed
the below limits for extended periods during
transportation and storage:
Temperature: -25°C to +60°C
Relative humidity: 5% to 93%, non-condensing
Page 38

38
Symptom Possible causes
No sound
Worn-out battery
Clogged speaker
Clogged microphone
Intermittent or
reduced sound
Clogged speaker
Moisture
Worn-out battery
Squealing noise
Hearing instrument not inserted properly
Ear wax accumulated in ear canal
If none of the above solutions work, consult your Hearing Care Professional for assistance.
Troubleshooting guide
About Start up Handling Options Warnings More info
Page 39

39
Solutions
Replace the battery
Clean speaker or replace ProWax
Clean microphone or replace lter (T-Cap)
Clean speaker or replace ProWax
Wipe battery and instrument with a dry cloth
Replace the battery
Re-insert the hearing instrument
Have ear canal examined by your doctor
Page 40

40
Warranty certicate
Name of owner: _____________________________________________________
Dispenser: _________________________________________________________
Dispenser address: __________________________________________________
Dispenser phone: ___________________________________________________
Purchase date: _____________________________________________________
Warranty period: ________________ Month: _____________________________
Model left: _____________________ Serial no.: ___________________________
Model right: ____________________ Serial no.: ___________________________
Battery size: _______________________________________________________
About Start up Handling Options Warnings More info
Page 41

41
International warranty
Your hearing instrument is covered
by an international limited warranty
issued by the manufacturer for a
period of 12 months from the date of
delivery. This limited warranty covers
manufacturing and material defects
in the hearing instrument itself, but
not accessories such as batteries,
tubing, ear wax lters etc. Problems
arising from improper handling or care,
excessive use, accidents, repairs made
by an unauthorised party, exposure to
corrosive conditions, physical changes
in your ear, damage due to foreign objects entering the device, or incorrect
adjustments are NOT covered by the
limited warranty and may void it. The
above warranty does not aect any
legal rights that you might have under
applicable national legislation governing the sale of consumer goods. Your
Hearing Care Professional may have
issued a warranty that goes beyond
the clauses of this limited warranty.
Please consult him/her for further
information.
If you need service
Take your hearing instrument to your
Hearing Care Professional, who may
be able to sort out minor problems and
adjustments immediately.
Page 42

42
Mobile phone
Some hearing instrument users have
reported a buzzing sound in their
hearing instrument when they are
using mobile phones, indicating that
the mobile phone and hearing
instrument may not be compatible.
The ANSI C63.19 standard determines the prediction of compatibility
between a specic hearing instrument
and a mobile phone by: adding the
numerical value of the rating for the
hearing instrument immunity to the
numerical value of the rating for the
mobile phone emissions. A sum of 4
would indicate that the combination of
wireless device and hearing instrument
is usable; a combined rating that equals
at least 5 would provide normal use;
a combined rating of 6 or greater would
indicate excellent performance.
Whereas all hearing instruments have
acoustic coupling, only the larger
instruments have the physical space
for telecoil (inductive) coupling. These
two types of coupling have dierent
rating scales (M1-M4 for acoustic coupling and T1-T4 for telecoil coupling,
respectively) and both ratings are
therefore relevant when predicting the
compatibility of a particular hearing
instrument.
For a hearing instrument with both
acoustic coupling and telecoil coupling
with a rating of M4/T2 and with a telephone rating of M3/T3, the combined
About Start up Handling Options Warnings More info
Page 43

43
rating is 7 (M4 + M3) for the acoustic
coupling and 5 (T2 + T3) for the telecoil
coupling. According to the guidelines
given above, both types of coupling
will therefore be acceptable, with the
acoustic coupling indicating excellent
performance and the telecoil coupling
indicating normal use.
The above equipment performance
measurements, categories and system
classications are based upon the best
information available, but it cannot
be guaranteed that all users will be
satised.
The immunity of this hearing
instrument is M4.
IMPORTANT NOTICE
The performance of individual hearing instruments may vary with
individual mobile phones. Therefore, please try this hearing instrument
with your mobile phone or, if you are purchasing a new phone, be sure to
try it with your hearing instrument prior to purchase.
For additional guidance, please ask your mobile phone provider for the
booklet entitled “Hearing Aid Compatibility with Digital Wireless Cell
Phones.”
Page 44

44
Technical information
The hearing instrument contains a
radio transmitter using short-range
magnetic induction technology working at 3.84 MHz. The magnetic eld
strength of the transmitter is
< -42 dBμA/m @ 10m.
The emission power from the radio
system is well below international
emission limits for human exposure.
For comparison, the radiation of the
hearing instrument is lower than
unintended electromagnetic radiation
from, for example, halogen lamps,
computer monitors, dishwashers, etc.
The hearing instrument complies with
international standards concerning
Electromagnetic Compatibility.
Due to the limited space available on
the instrument, all relevant approval
markings are found in this document.
Additional information can be found
in the Product Information sheet on
Oticon.com.
About Start up Handling Options Warnings More info
Page 45

45
IIC & CIC wireless instruments contain
a module with:
FCC ID: U28FU2CICWL
IC: 1350B-FU2CICWL
The device complies with Part 15 of
the FCC rules and RSS-210 of Industry
Canada.
Operation is subject to the following
two conditions:
1. This device may not cause harmful
interference.
2. This device must accept any
interference received, including
interference that may cause
undesired operation.
Changes or modications not expressly
approved by the party responsible
for compliance could void the user’s
authority to operate the equipment.
More information: www.oticon.com
Page 46

46
161048UK / 06.15
About Start up Handling Options Warnings More info
Oticon declares that this hearing
instrument is in compliance with the
essential requirements and other relevant provisions of Directive 1999/5/EC.
Declaration of Conformity is available
from the manufacturer.
Manufactured by:
Oticon A/S
Kongebakken 9
DK-2765 Smørum
Denmark
www.oticon.com
Waste from electronic
equipment must be
handled according to
local regulations.
E2831
Page 47

Settings overview for your hearing instrument
Left Right
Yes No
Volume control
Yes No
Yes No
Program shift
Yes No
Yes No
Mute
Yes No
Volume control indicators
On O
Beeps at min /max volume
On O
On O
Clicks when changing volume
On O
On O
Beeps at preferred volume
On O
Battery indicators
On O
Low battery warning
On O
161048UK / 06.15
Page 48

People First is our promise
to empower people
to communicate freely,
interact naturally and
participate actively
0000161048000001
 Loading...