

Page 1
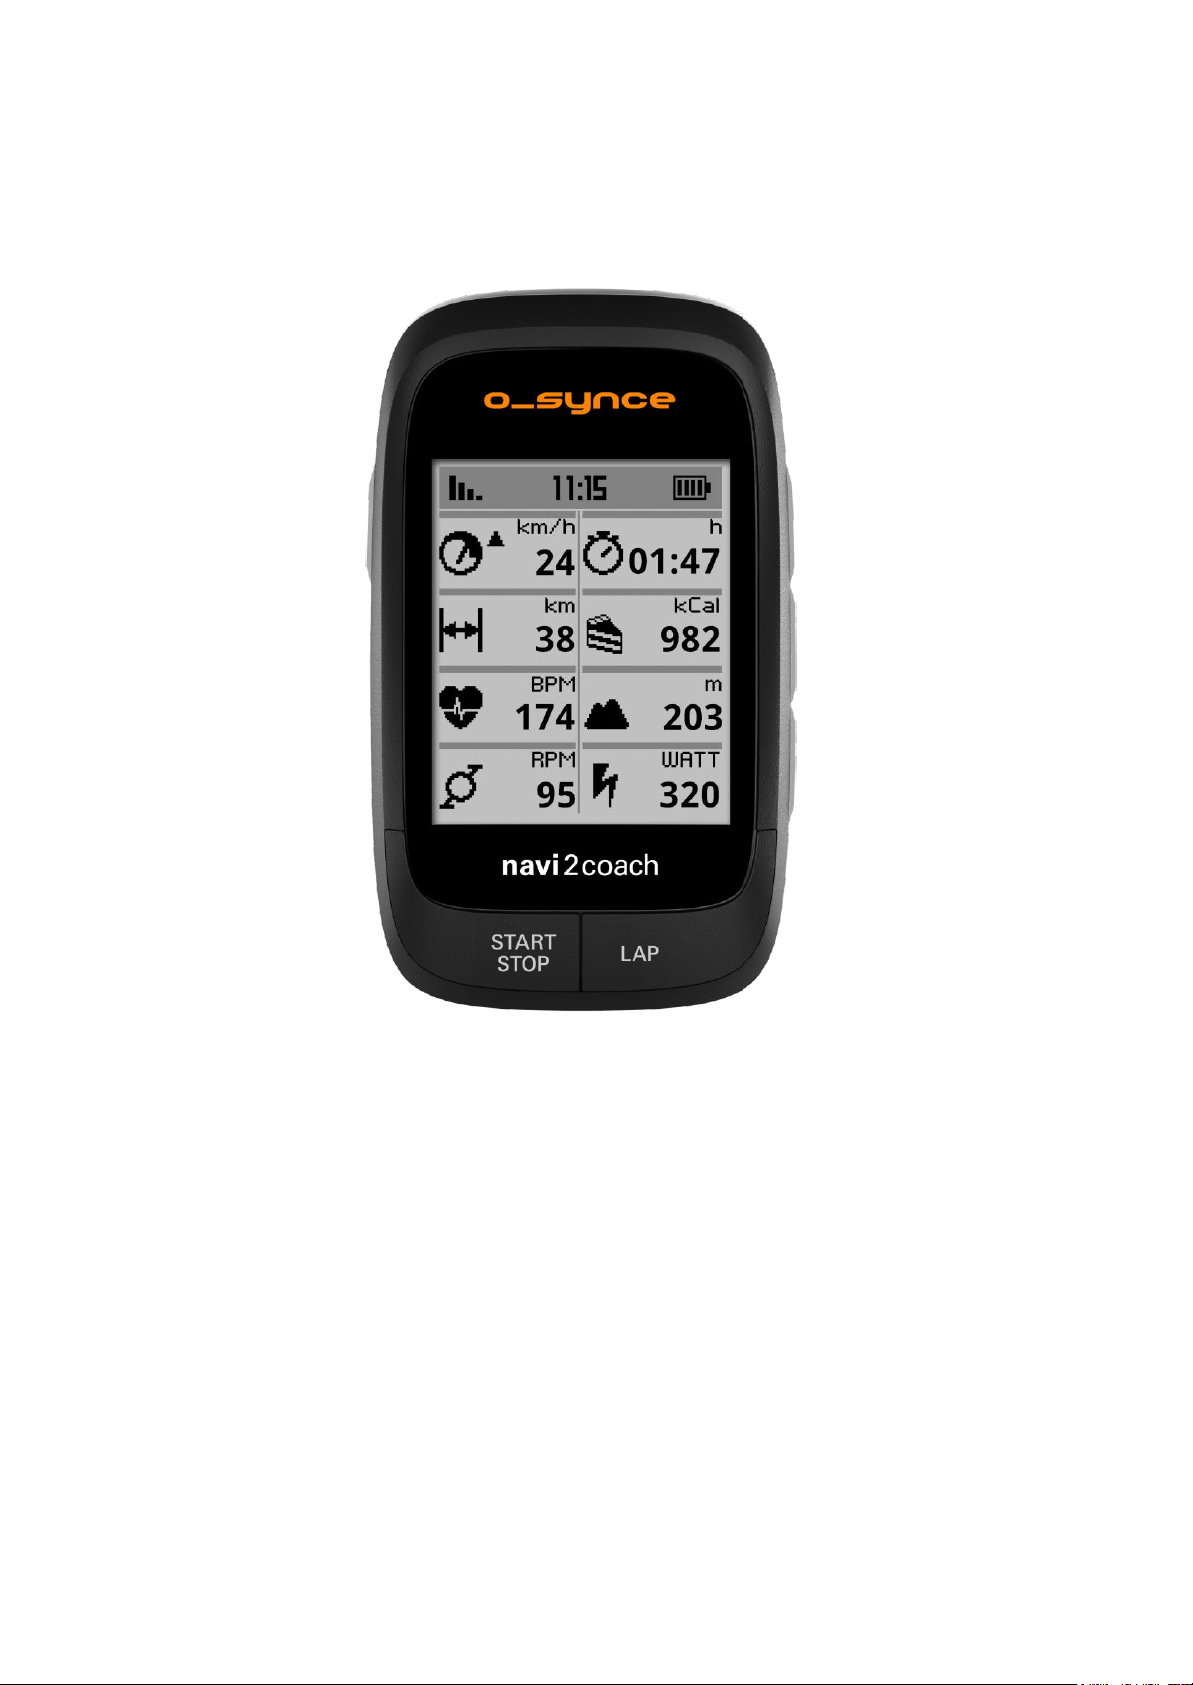
User‘s guide - ENGLISH
navi2coach
Page 2

2 Scope of delivery
1 / 38
navi2coach
Index
1 GENERAL
1.1 General information ........................................................................................................................................ 5
2 Scope of delivery ............................................................................................................................................... 6
2.1 Compatible o-synce accessories (optional) ................................................................................................ 6
2.2 How to use compatible accessories of o-synce (optional) ........................................................................ 7
2.2.1 Use of ANT+ remote ............................................................................................................................... 7
2.3 Compatible ANT+ accessories of other producers .................................................................................... 9
3 First steps .......................................................................................................................................................... 10
3.1 Welcome menu .............................................................................................................................................. 10
3.2 Start and stop recording ............................................................................................................................... 10
3.3 Change settings or load additional functions during recording – Intermediary menu ........................ 10
Backtrack .................................................................................................................................................. 10
........................................................................................................................................................... 4
Navigation ................................................................................................................................................. 10
Geocaching ............................................................................................................................................... 10
Sport Profiles ............................................................................................................................................ 10
4 Summary of functions .......................................................................................................................................... 11
4.1 Training ........................................................................................................................................................... 11
4.1.1 Training schedule .................................................................................................................................. 11
4.1.2 Planning a workout session ................................................................................................................. 12
4.1.3 Menu item: Workouts ............................................................................................................................ 12
4.1.4 Menu item: Zone Training .................................................................................................................... 12
4.2 Navigation ...................................................................................................................................................... 14
4.2.1 Where do I get GPX routes? ............................................................................................................... 14
4.2.2 How can I transfer routes onto my device? ...................................................................................... 14
4.2.3 Start Navigation ..................................................................................................................................... 14
4.2.4 Follow routes again (Loading a track) ................................................................................................ 14
4.2.5 Delete route or track. ............................................................................................................................ 14
4.3 Geocaching .................................................................................................................................................... 14
4.4 Weighing – ANT+ weight function .............................................................................................................. 15
4.5 Deleting workout sessions and data .......................................................................................................... 15
4.5.1 In the device ........................................................................................................................................... 15
4.5.2 Via trainingLab ....................................................................................................................................... 15
5 Setup .................................................................................................................................................................. 15
5.1 User data ........................................................................................................................................................ 15
Page 3

2 Scope of delivery
1.1 General information
navi2coach
2 / 38
5.1.1 Menu item: Weight .......................................................................................................................... 15
5.1.2 Menu item: Gender .......................................................................................................................... 15
5.1.3 Menu item: Birthday ........................................................................................................................ 16
5.1.4 Menu item: Height ........................................................................................................................... 16
5.1.5 Menu item: HRT max ...................................................................................................................... 16
5.1.6 Menu item: Resting heart rate ....................................................................................................... 16
5.1.7 Menu item: Scale ............................................................................................................................. 16
5.2 Sport Profiles ................................................................................................................................................. 16
5.2.1 Activate sport profile .............................................................................................................................. 17
5.2.2 Configurate sport profiles ..................................................................................................................... 17
5.3 Altitude ............................................................................................................................................................ 23
5.4 Change display pages (Menu item: Display Pages) ................................................................................ 24
5.4.1 Edit Data Pages (Menu item: Edit) ................................................................................................ 25
5.4.1.1 Overview of possible data fields (Firmware v1.04) ....................................................................... 26
5.5 Compass calibration ..................................................................................................................................... 27
5.6 System ............................................................................................................................................................ 27
5.6.1 Language .......................................................................................................................................... 27
5.6.2 Time and date................................................................................................................................... 27
5.6.3 Data .................................................................................................................................................... 27
5.6.4 Sounds .............................................................................................................................................. 28
5.6.5 Units ................................................................................................................................................... 28
5.6.6 Display ............................................................................................................................................... 28
5.6.7 Totals ................................................................................................................................................. 30
5.6.8 USB only charges ............................................................................................................................ 30
5.6.9 Factory Reset ................................................................................................................................... 30
5.6.10 Navigation ......................................................................................................................................... 30
5.6.11 About .................................................................................................................................................. 30
6 Workout analysis and data summary .............................................................................................................. 31
6.1 In your navi2coach ........................................................................................................................................ 31
6.1.1 Menu item: Activities ....................................................................................................................... 31
6.1.2 Menu item: Totals ............................................................................................................................ 31
6.2 In your PC ....................................................................................................................................................... 31
7 Analysis of data with trainingLab software ................................................................................................... 32
7.1 Download & Installation .............................................................................................................................. 32
7.2 Upload & download data ............................................................................................................................ 32
Page 4

2 Scope of delivery
3 / 38
navi2coach
7.2.1 Setup device ..................................................................................................................................... 33
7.2.2 Import device .................................................................................................................................... 33
7.2.3 Workout Editor .................................................................................................................................. 34
8 Trouble-shooting .............................................................................................................................................. 35
9 Table of wheel sizes ........................................................................................................................................ 36
10 Specifications ............................................................................................................................................... 37
11
12
Terms of guarantee
Regulatory Information
...................................................................................................................................... 37
................................................................................................................................ 37
navi2coach manual ENGLISH
Last update: 06.03.2013
Based on navi2coach firmware 1.06
Page 5

2 Scope of delivery
1.1 General information
navi2coach
4 / 38
1 GENERAL
Congratulations on your purchase of a navi2coach. The ultimate bike
training computer allows you a workout on professional level. Through
its multiple training functions navi2coach leaves no wishes desired
when it comes to recording and displaying of data.
navi2coach offers the following core functions:
Data transfer via ANT+ permits connection through following
sensor types of all ANT+ producers:
Heart rate sensor (heart2feel x)
Bike speed sensor (macro2sx speed)
Cadence sensor (macro2sx cad)
Combo sensor for bike speed and cadence (macro2sx com)
Power meters (power distribution right-left, TSS and IF
supported)
ANT+ remote control (ANT+ remote)
ANT+ scale
Altimeter via barometric sensor
Temperature display
GPS-recording and track navigation
Recording exact to the second
Freely configurable data fields
Workout function which displays current and proximate training step
Extensive training functions (zone training, coaching)
Extensive powermeter functions (right-left comparison, TSS, IF,
FTP and many more)
Exchangeable battery (for long distances or in case your battery
starts suffering from loss of power)
Optional remote control for the ultimate ease of use.
Multiple workout timers which create individual messages (such as
„please eat & drink now“)
„Recharge while riding“-function: Device does not switch to
computer mode if supplied with power.
Up to 4 sport profiles with individual sensor combinations and
display settings (such as road bike, time trial bike, mountain bike,
city bike).
Simple configuration and workout scheduling via PC software
trainingLab
Use of FIT file format for maximum compatibility with training
software or online training platforms of third party providers.
Page 6

2 Scope of delivery
5 / 38
navi2coach
1.1 General information
You regularly perform one or more sports and want to achieve
progress in your workout? Then navi2coach is the perfect tool for
you. Its concept of operation relies on numerous functions that allow
a broad operational range which can be additionally enlarged by
various ANT+ sensors.
This user guide helps you to understand the basic functions of
your navi2coach.
For further product information or questions about optional
accessory and the free software trainingLab please have a look at
our website www.o-synce.com.
ATTENTION! Please consult a medical doctor before you start
training, especially if you wear a cardiac pacemaker or other
electronic implants.
Strong electromagnetic fields or other wireless 2.4 GHz transmitters
can affect the connection to your heart rate belt or to further
accessory. Sources of interference can be power lines, electric
motors, microwaves, 2.4 GHz mobile phones, wifi connections or
radio-controlled traffic lights. By gaining distance from sources of
interference, all data should be displayed normally again.
Page 7
navi2coach
6 / 38
2 Scope of delivery
2 Scope of delivery
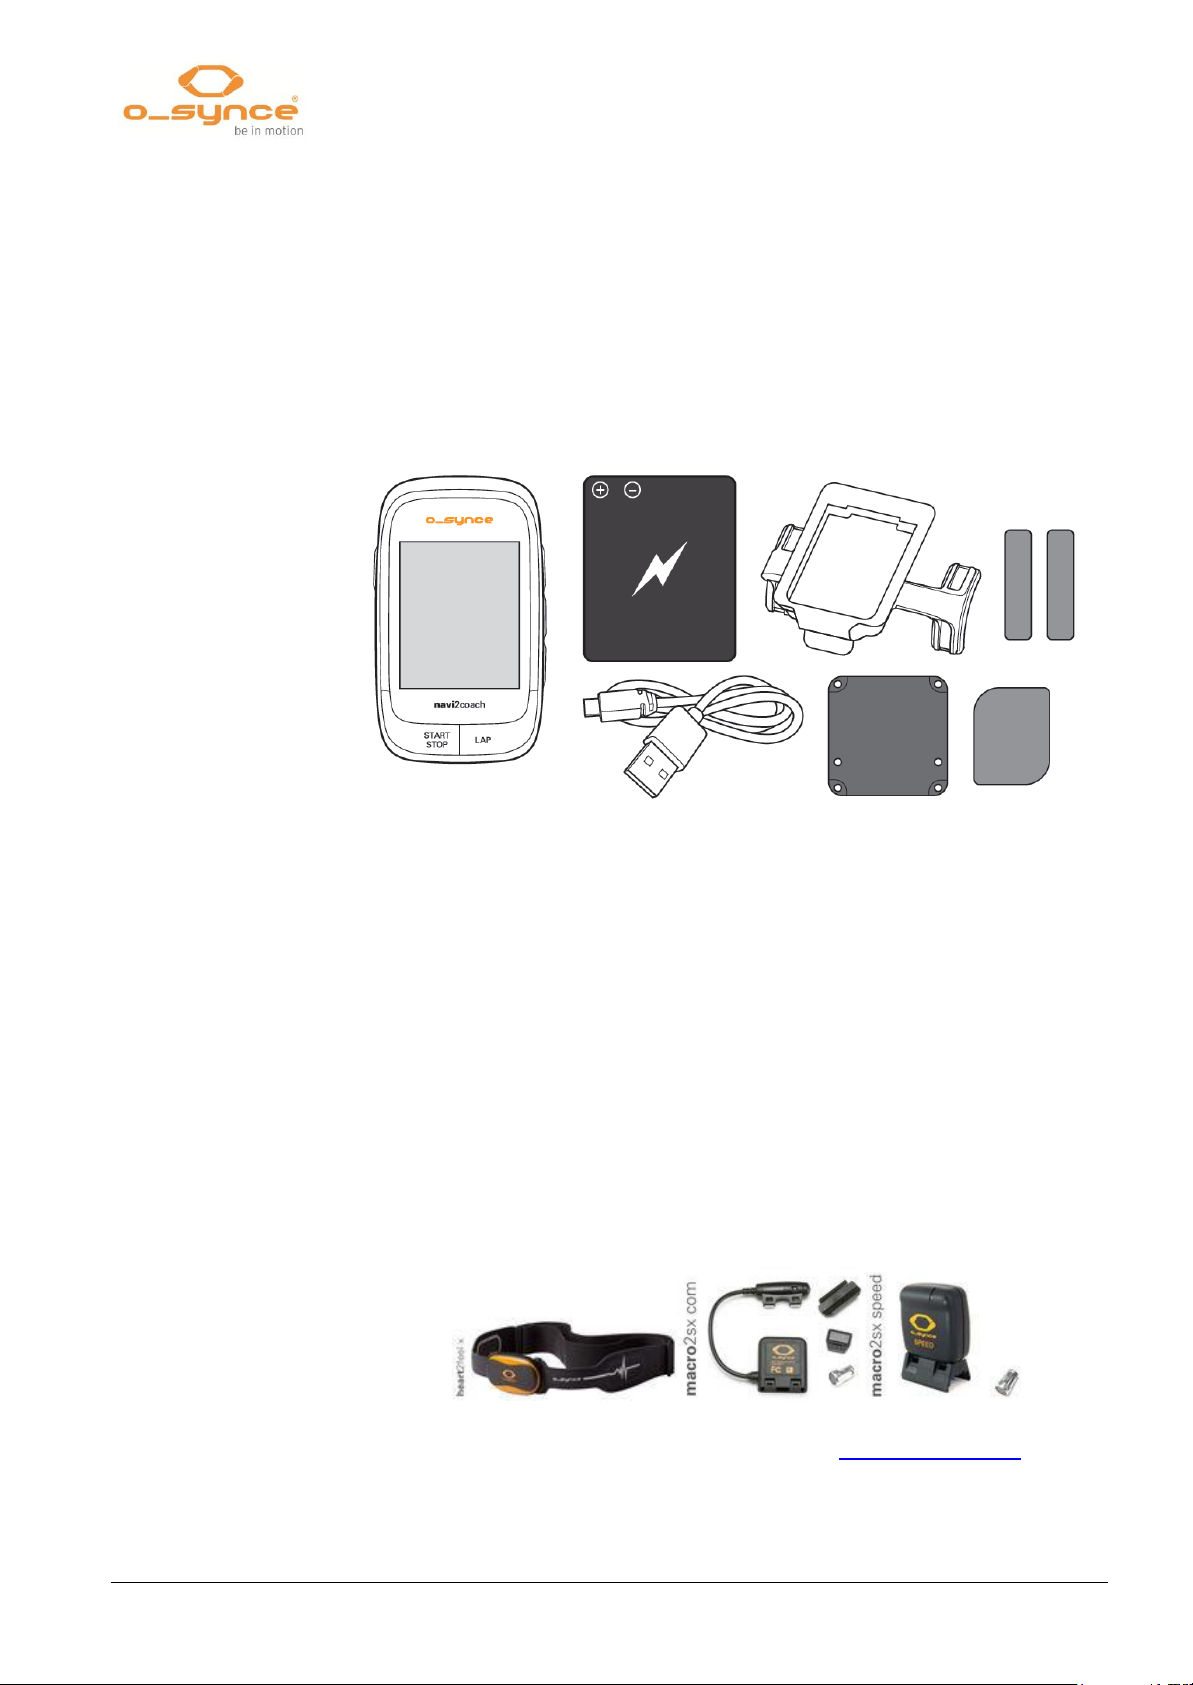
Your navi2coach package contains the following parts:
1x navi2coach
1x 750mAh battery pack
1x Micro USB cable
1x bike holder with fastening parts
1x Quickstart guide
2.1 Compatible o-synce accessories (optional)
o-synce offers the following accessories for the use with
navi2coach. For further information about compatible
accessories please visit www.o-synce.com.
Some of the functions which are described in this manual can only be
used with additional accessories (marked as “optional”).
Heart rate sensor (heart2feel x)
Bike speed sensor (macro2sx speed)
Cadence sensor (macro2sx cad)
Combo sensor for bike speed and cadence (macro2sx com)
ANT+ remote control (ANT+ remote)
For details on accessories have a look under ANT+ Accessories on our
website (http://www.o-synce.com/en/products/accessories/antaccessories.html).
Page 8

2 Scope of delivery
7 / 38
navi2coach
2.2 How to use compatible accessories of o-synce (optional)
2.2.1 Use of ANT+ remote
2.2.1.1 Pairing ANT+remote with navi2coach
1. Remove yourself at least 40m for the "pairing" process from
other similar ANT+ devices.
2. Bring the ANT+remote in the near (1m) of the o-synce head unit
(e.g. navi2coach).
3. Please press and hold the upper and lower button (▲ and ▼) for
about 2 seconds until the Status LED lights flashes green and
red together for 2 seconds.
4. Now the ANT+remote is looking for a head unit (status LED
flashes green and red together)
5. If required, follow the specific instructions for "pairing" in the
User's Guide of your o-synce head unit or smartphone.
6. Once the status LED is flashing green, the ANT+remote is
connected to the head unit successfully.
After replacing the battery, the ANT+remote must be paired to the head
unit (e.g. navi2coach) again.
2.2.1.2 Adjusting the assembly side of ANT+remote
Depending on mounting position, of the remote you may need to adjust
the key settings.
Assembly on the left side of the handlebar
After you have installed the ANT+remote on the left side, please press
and hold the upper and middle buttons (▲ and ●) for about 2 seconds.
Once the Status LED turns green for 2 seconds, the remote control is
set to the left side of the handlebar.
Assembly on the right side of the handlebar
After you have installed the ANT+remote on the right side, please press
and hold the upper and middle buttons (▲ and ●) for about 2 seconds.
Once the Status LED turns red for 2 seconds, the remote control is set to
the right side of the handlebar.
Page 9
navi2coach
8 / 38
2 Scope of delivery
2.2.1.3 Key function during workout
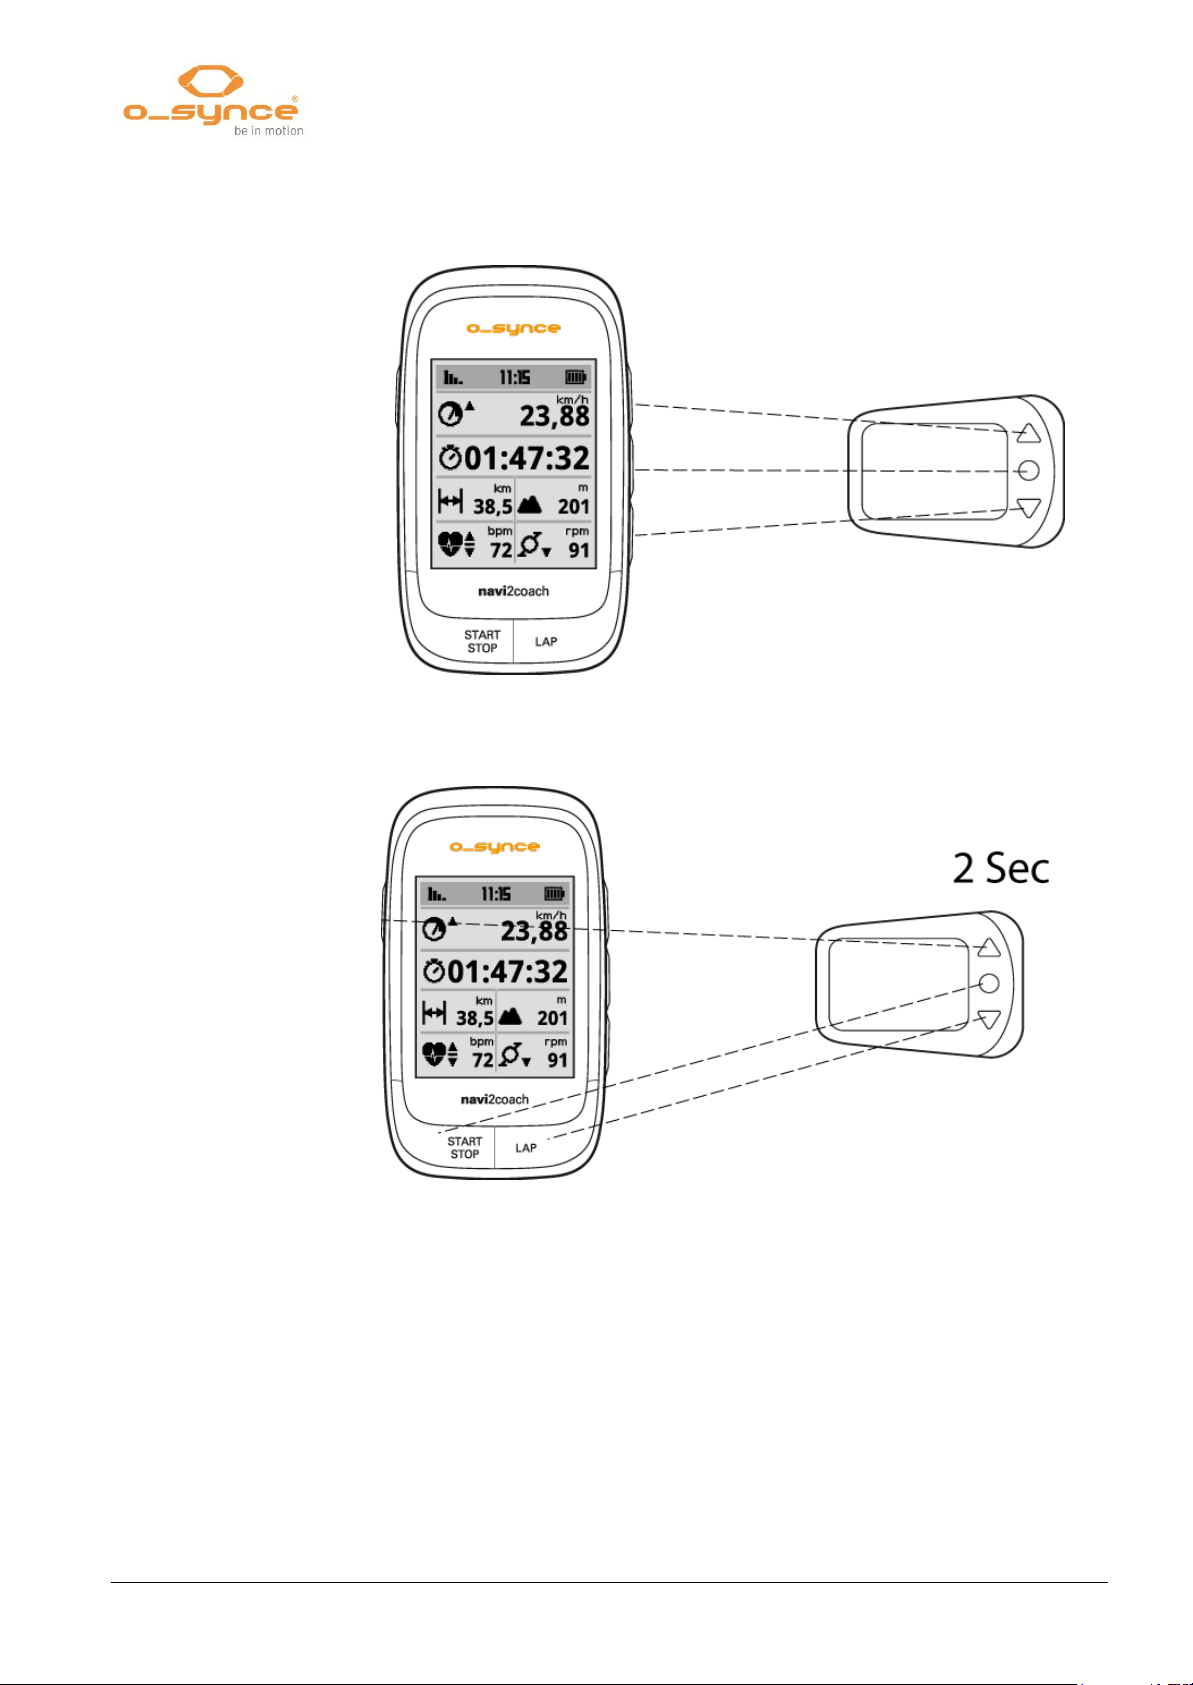
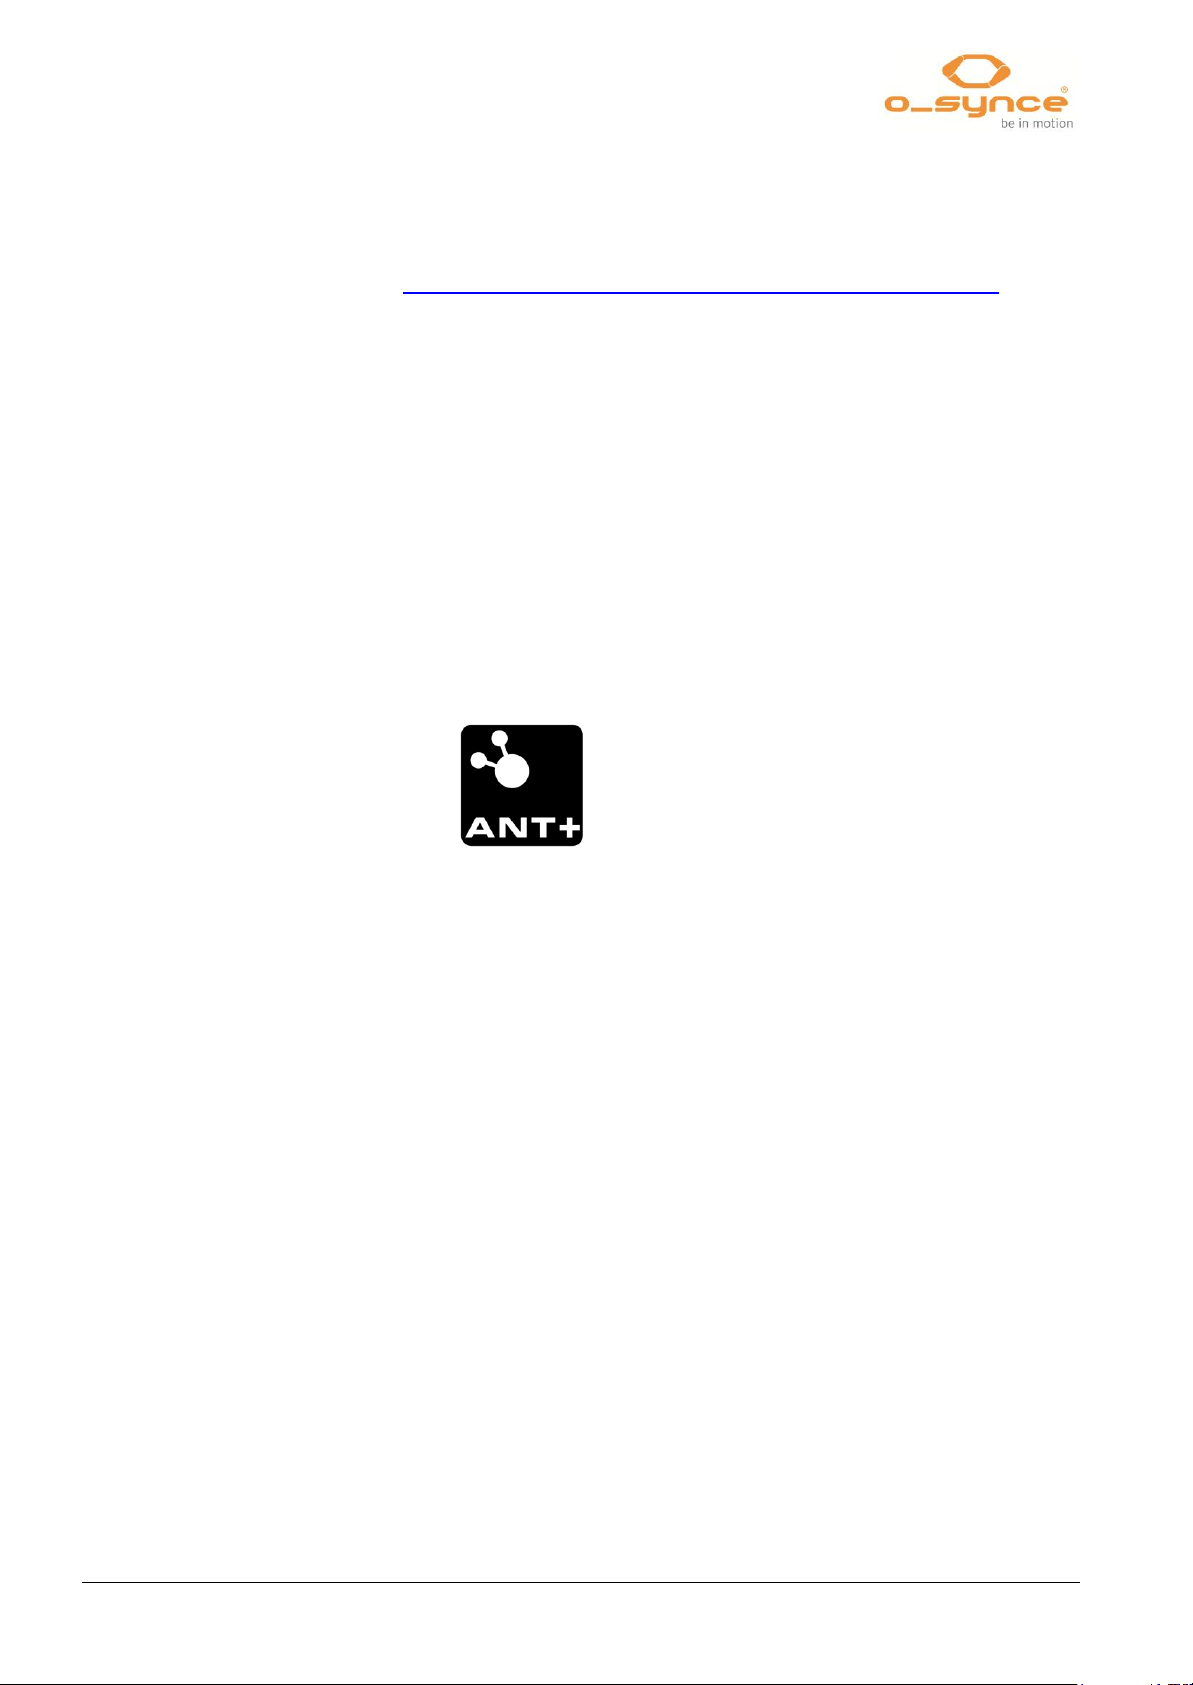
When you push the remote keys (▲, ● & ▼) they will have the same
functionalities as the keys on the right hand side of navi2coach.
When you hold the keys for 2 seconds they will have following
functions: Power (▲), Lap (▼)and Start/Stop (●).
Page 10
2 Scope of delivery
9 / 38
navi2coach
2.3 Compatible ANT+ accessories of other producers
To find out which accessories of other producers is compatible with
your navi2coach visit the following website
(http://www.thisisant.com/modules/mod_product-directory.php)
Following sensor types are supported by navi2coach:
Heart rate sensors
Bike speed sensors
Cadence sensors
Combo sensors for bike speed and cadence
Power meter sensors (Power2max, SRM, Rotor, Quarq,
Cycleops, e.g.)
ANT+ remote control (currently only from o-synce)
ANT+ scale (such as Beurer, Tanita)
Producers of ANT+ sensors are for example Garmin, Bontrager,
Adidas, VDO or Cycleops. If you buy sensors please pay attention to
the ANT+ symbol.
Page 11

navi2coach
10 / 38
3 First steps
3 First steps
Additional to the quick start guide this manual supplies you with
further information concerning functions and settings.
As the quick start guide explains important basics and the
installation of your navi2coach please read it before you
continue.
If you have lost your quick start guide, just download it here.
3.1 Welcome menu
The first time you switch on your device, you will be guided through the
most important settings. Once you reach the menu item READY, you will
be redirected to the main menu by confirming the selection.
3.2 Start and stop recording
You can start recording by pushing the START/STOP button at any time,
no matter if you are in the main menu or currently using the workout,
navigation or geocaching mode. To stop recording just press the
START/STOP button again. To leave the recording mode press the
power key once.
To save your recording and to return to the main menu chose Stop
Training.
3.3 Change settings or load additional functions during recording – Intermediary
menu
Once you stop recording and chose the intermediary menu by pushing
the POWER button you’ll find standard functions like Resume and Stop
Training. You also find Sport Profiles and the Advanced menu whose
following functions you may change or add during recording.
Backtrack
Shows your previous track reversed for riding it back to your starting
point.
Navigation
Spontaneously load a track which you wish to follow during your training.
Geocaching
Load a POI (place of interest) which will be displayed in the navigation
mode.
Sport Profiles
Change profiles if you want to switch bikes or sport activities during a
workout session.
Page 12
4 Summary of functions
11 / 38
navi2coach
4 Summary of functions
4.1 Training
4.1.1 Training schedule
For an effective workout varied training sessions with specific pausing
times are absolutely essential. To plan an adequate workout you
should consult a coach or a training platform such as
Trainingsplan.com. Before starting a specific workout program
please consult a medical doctor to check your fitness/health.
Most workout sessions are divided into different parts like warm-up,
main workout and cool down. navi2coach allows you to plan detailed
workout parts ahead and continuingly displays the current and
following workout step. Therefore you always know how long your
training will last which allows you to mentally prepare for following
workout steps.
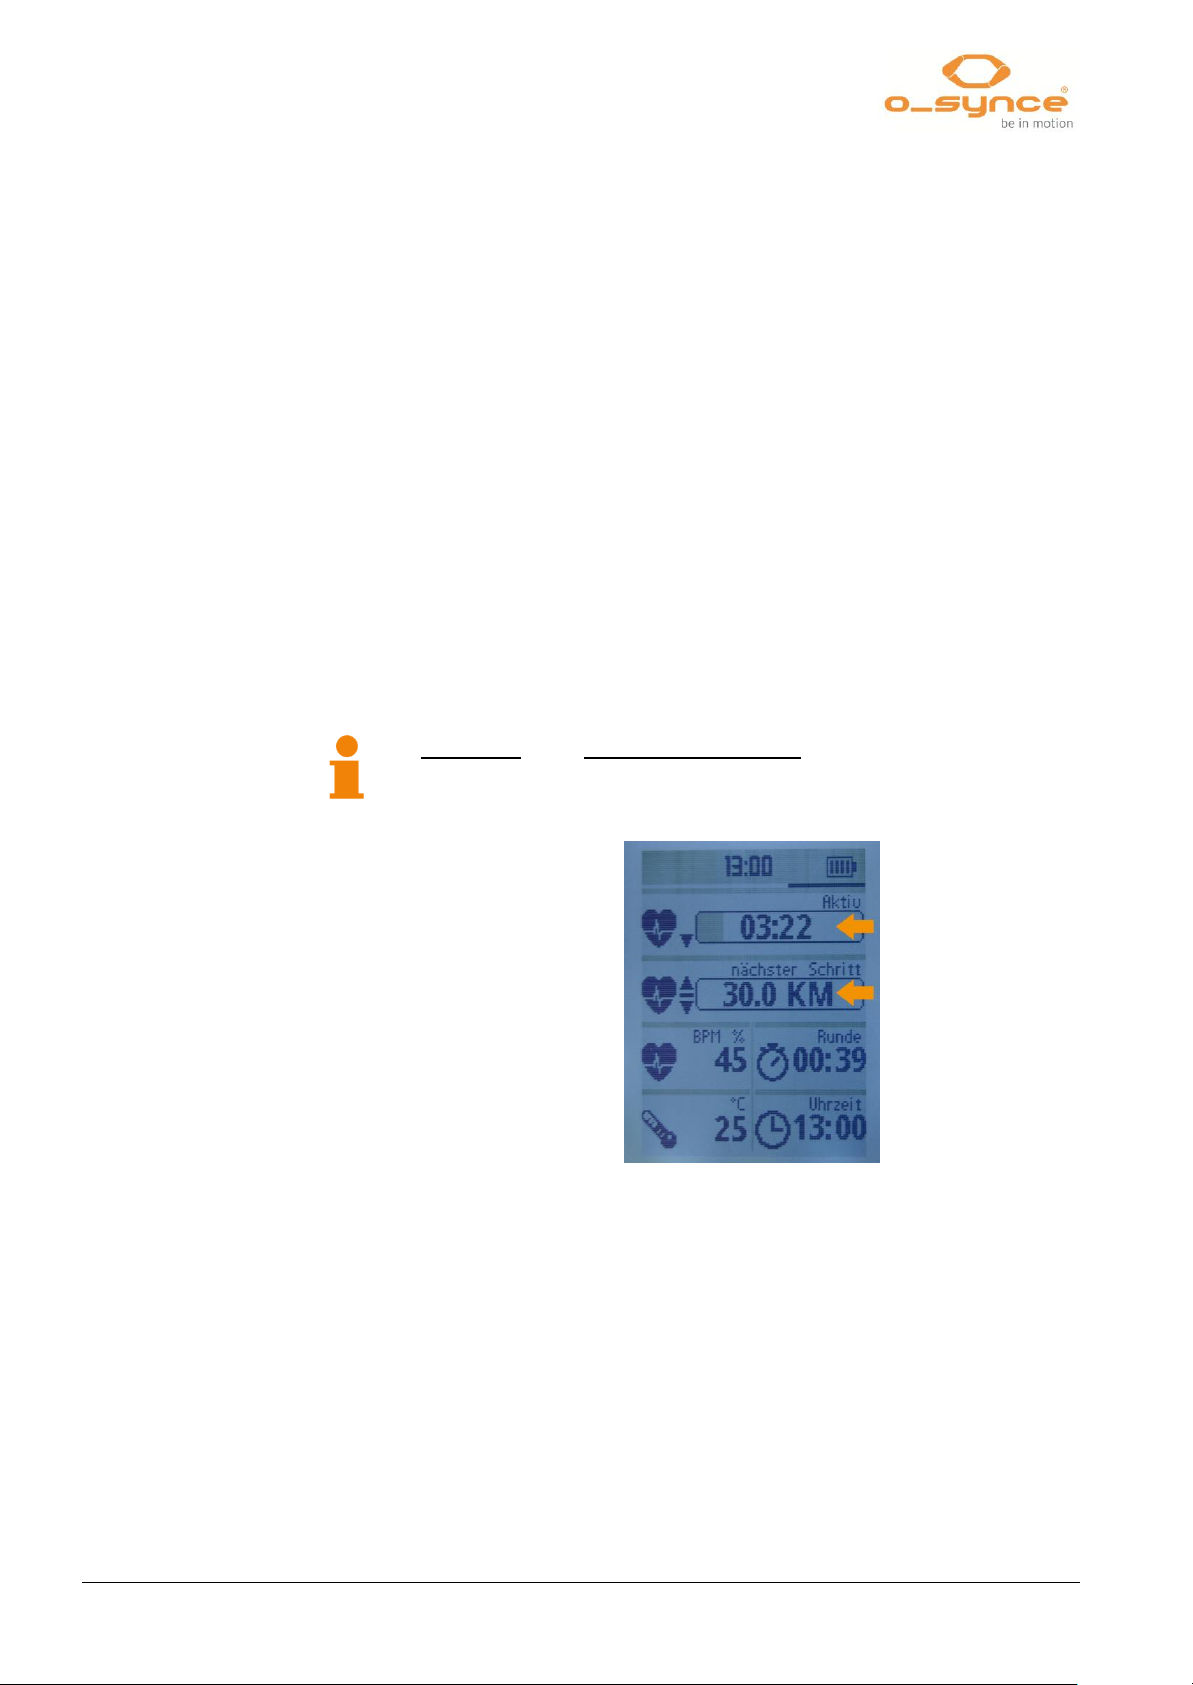
NOTE: To use the workout feature you need to add the function
“Workout” and “Workout (next step)” to one of your data pages
to see your workout steps. Ex works the data page 4 has them
already preset.
In addition to preset workout sessions navi2coach also offers you the
well-known zone training. (4.1.5 Menu: Zone training – page 10).
You would like to use the miscellaneous navi2coach training
functions? Just read through the following workout functions.
Page 13
navi2coach
12 / 38
4 Summary of functions
4.1.2 Planning a workout session
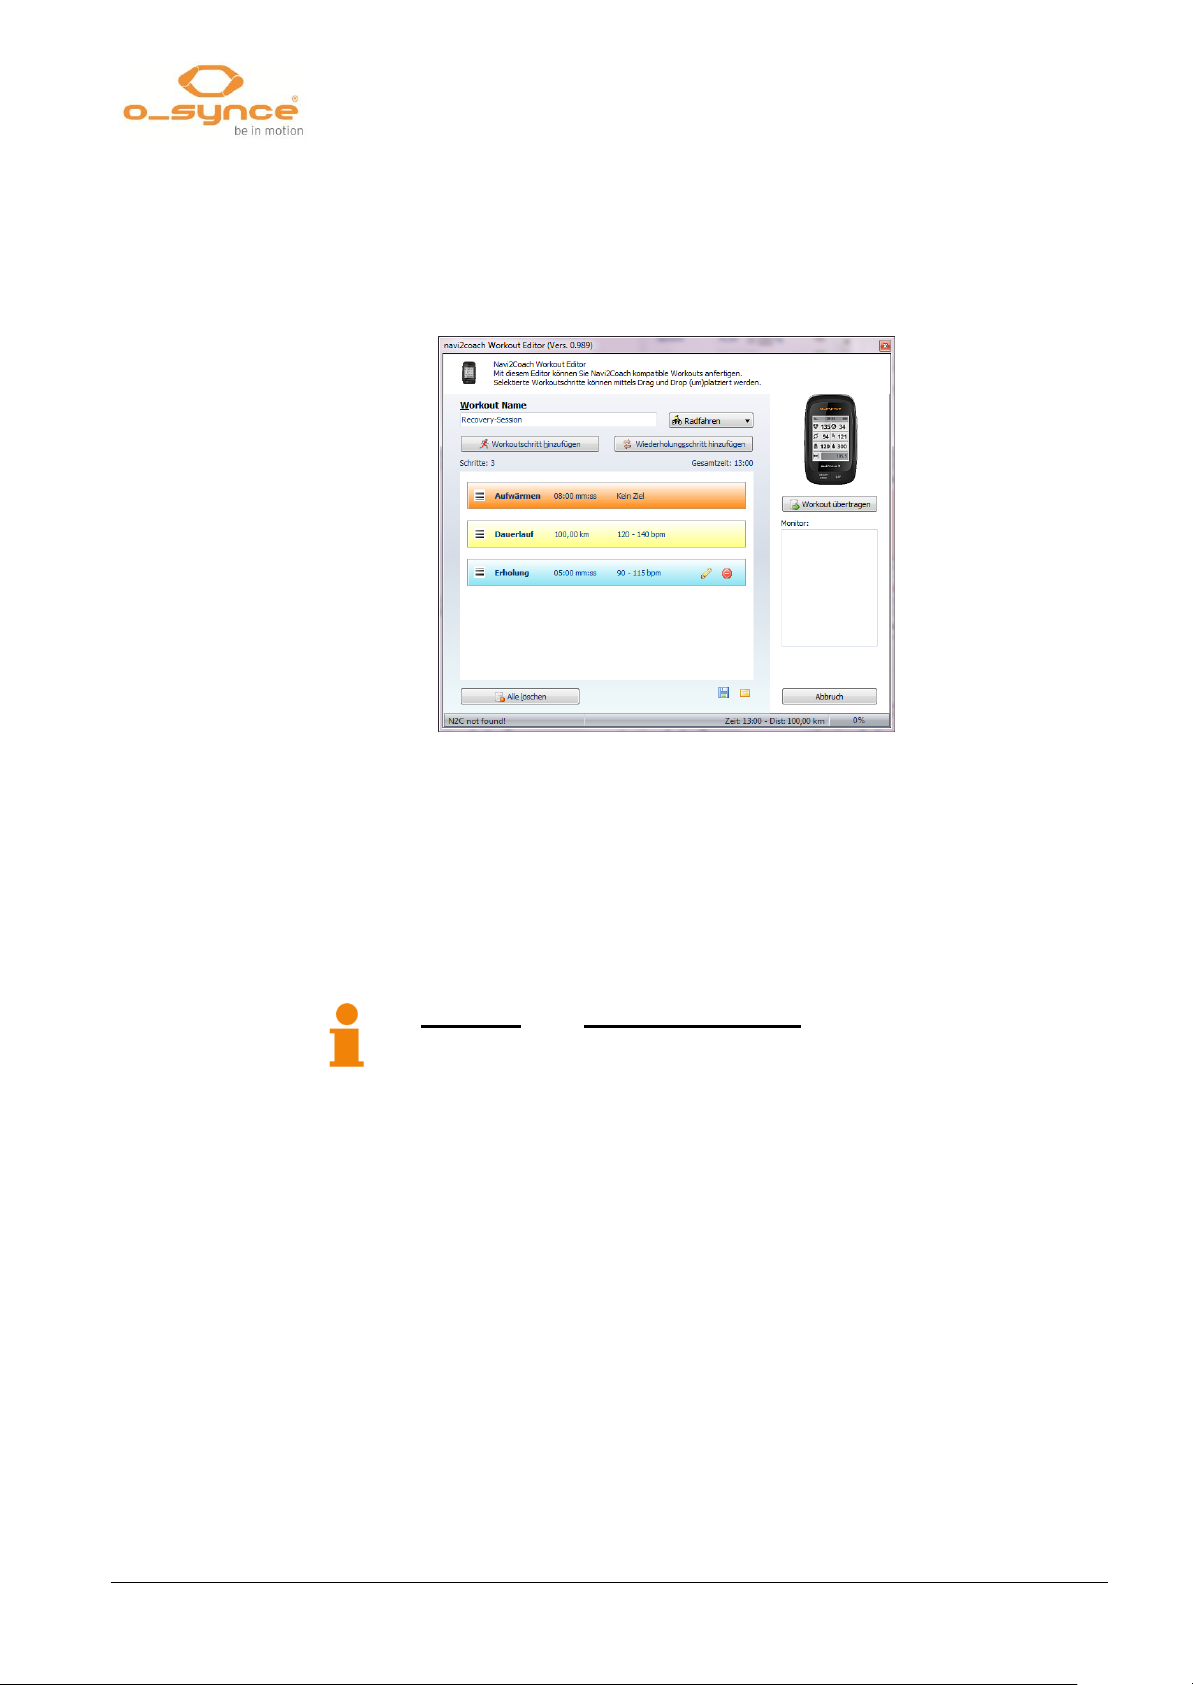
trainingLab software helps you to plan your workout in a few simple
steps with your PC. Therefore you select the Workout Editor, then
plan a workout by creating training steps and afterwards transfer the
created workout session onto your navi2coach.
Training portals like Trainingsplan.com and Trainigpeaks also allow you
to download preset workout sessions directly onto your device. Just
transfer the FIT file into the Import-folder of your device.
4.1.3 Menu item: Workouts
This function registers all workouts created by you. You can start them
by choosing the desired one.
NOTE: To use the workout feature you need to add the function
“Workout” and “Workout (next step)” to one of your data pages
to see your workout steps. Ex works the data page 4 has them
already preset. The navigation screen will always display your
current workout step.
4.1.4 Menu item: Zone Training
Define a training zone in which you want to perform your workout. You
can either train by heart rate zone or, in case you are using an ANT+
powermeter, by power zone. Choose the appropriate zone for your
workout session. To change your zone setting, enter the setup menu.
You’ll find detailed information under Setup > Sport Profiles. During the
workout navi2coach will indicate if you are still in your designated
training zone.
Page 14
4 Summary of functions
13 / 38
navi2coach
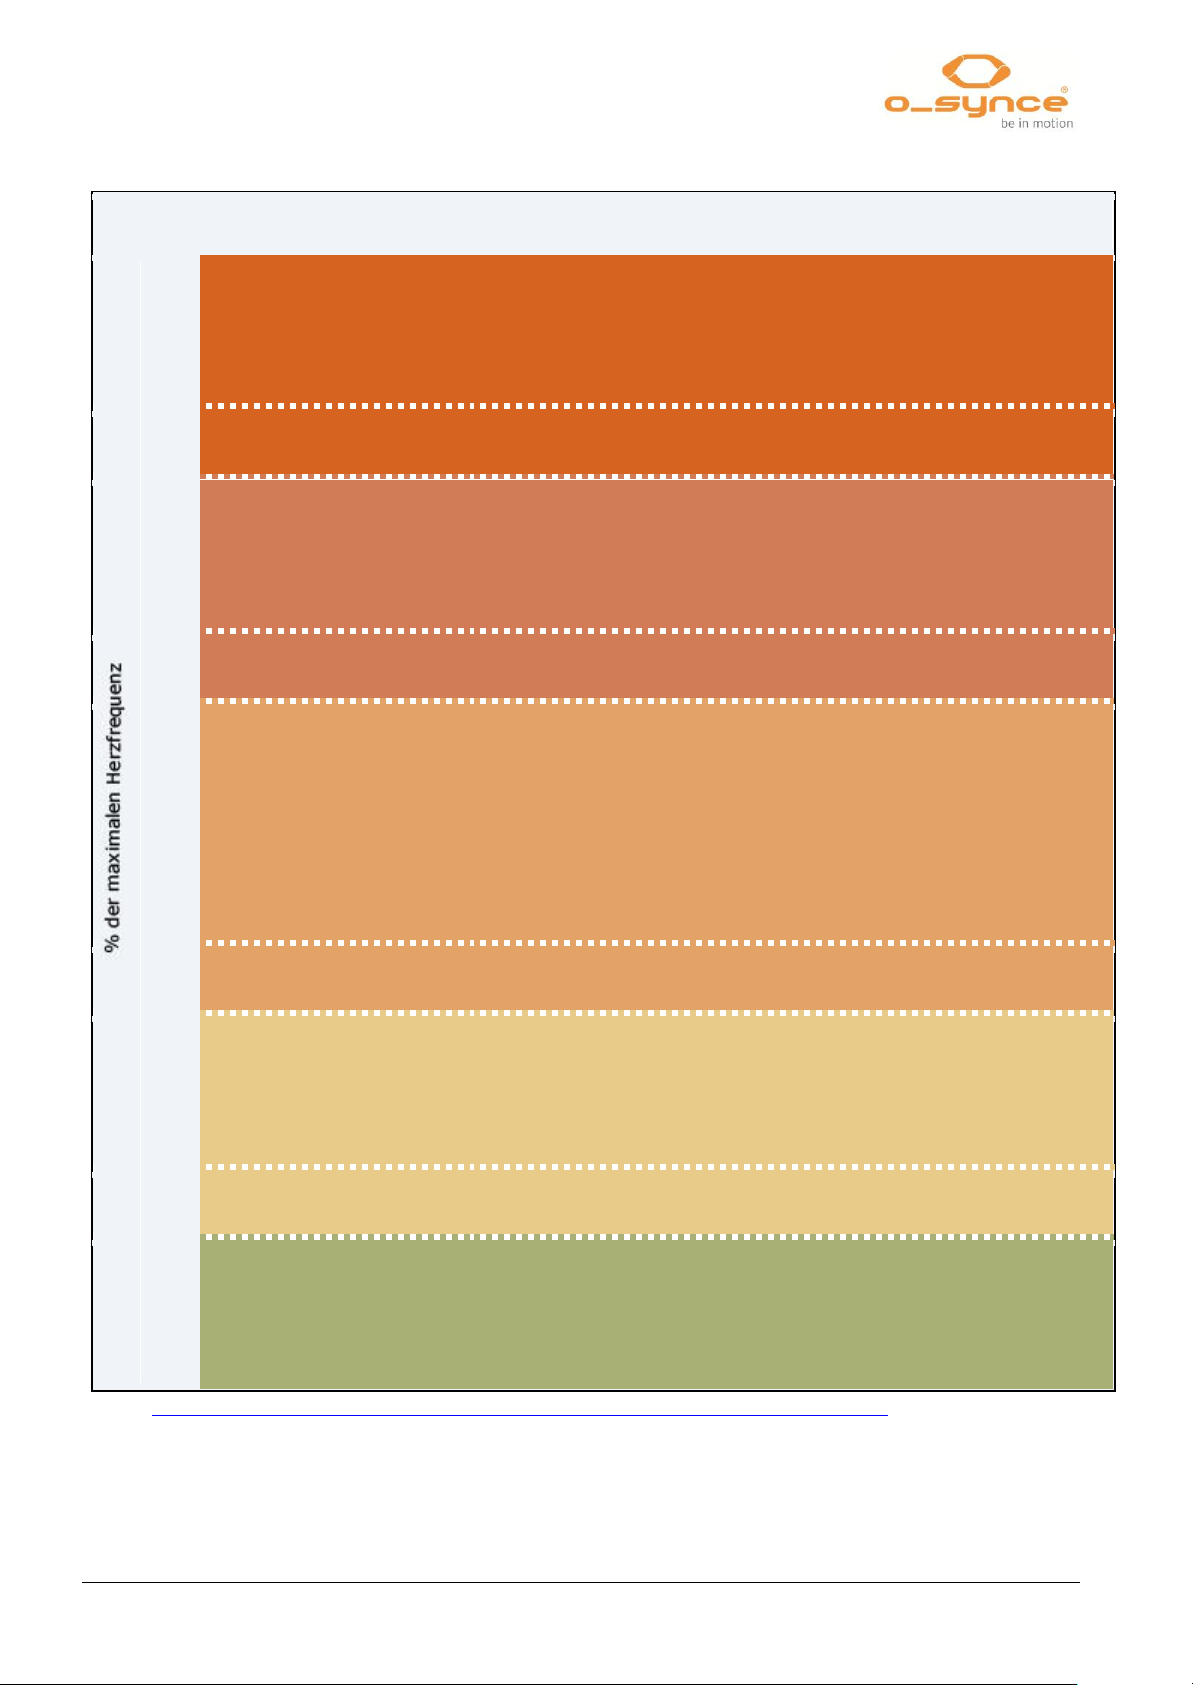
5 health zones
100
Red zone
90-100% MHF
» Warning zone!
» Maximum of physical stress and absolute training limit
» Only suitable for professional athletes
» Subjective pressure: extremely stressful
90
Transition szone
Anaerobic zone
80-90% MHF
» Also called professional development training
» Upward displacement of anaerobic treshold
» Improvement in the reduction of lactic acid
» Subjective pressure: stressful to very stressful
80
Transition zone
Aerobic zone
70-80% MHF
» Increasing endurance
» Strengthening of the heart
» Further improvement of cardiovascular and respiratory system
and respiration
» Improvement of aerobe capacity
» Enhanced fat burning rate
» Subjective pressure: medium to stressful
70
Transition zone
Fat burning zone
60-70% MHF
» Optimal fat burning for trained athletes
» Further strengthening of cardiovascular
» Relaxed pace
» Subjective pressure: easy to medium
60
Transition zone
50
Health zone
50-60% MHF
» Entry /rehabilitation zone
» Stabilization of cardiovascular system
» Regeneration training
» subjective pressure: very easy to easy
Depending on your training goal we recommend the following heart rate zones:
Source: http://www.lauftechnik.de/lt_pulsmessung_Die_5_Herzfrequenzzonen.shtml
Page 15

navi2coach
14 / 38
4 Summary of functions
4.2 Navigation
4.2.1 Where do I get GPX routes?
navi2coach allows you to follow a route via track view and through the
indication of turning points. In order to perform navigation, transfer a
GPX or FIT file onto your device and open it.
You can download preset routes from the following websites or create
your own ones.
http://www.gpsies.com
http://www.bikeroutetoaster.com
http://openrouteservice.org
http://maps.cloudmade.com
Fee-based software:
www.Magicmaps.de
Currently the indication of turning points is only supported by the online
application Cloudmade.
4.2.2 How can I transfer routes onto my device?
Transfer the planned route as GPX or FIT file onto your PC.
Connect your navi2coach to your computer. Your windows PC will show
you a new removable drive. On a MAC a new device “navi2coach” will
be recognized. Copy the file into the folder „Import“. Now the route is
saved on your navi2coach and ready to get selected.
4.2.3 Start Navigation
Select Navigation >> Routes in the main menu and choose your
desired route from the displayed list.
4.2.4 Follow routes again (Loading a track)
You have recorded a route and wish to follow it again? Recall the saved
route through Training >> Activities. Choose the desired track and
select Load as Track. The track can be followed now.
4.2.5 Delete route or track.
Connect the device to your PC or MAC. Navigate to the device directory
Courses and delete any track you want to remove from your navi2coach.
4.3 Geocaching
The geocaching function allows you to enter GPS coordinates into your
device and to display them. Alternatively you may use the trainingLab
software to load POI (places of interest) into your device and recall them.
The POI and your current position will be displayed.
Page 16

5 Setup
15 / 38
navi2coach
4.4 Weighing – ANT+ weight function
You find this function under Setup >> User Data >> Weight. (Menu
item: Weight, page 16).
4.5 Deleting workout sessions and data
4.5.1 In the device
Delete a recording
Training >> Ativities >> Select the session you want to delete >>
Delete
Delete a POI
Geocaching >> Select the POI you want to delete >> Delete
Delete a workout session
Training >> Workouts >> Select a workout session >> Delete
Reset a profile
Training >> Totals >> Select a profile >> Totals reset
4.5.2 Via trainingLab
5 Setup
5.1 User data
In the device setup menu of your trainingLab software you can delete
all training data at once.
You can adjust all navi2coach functions under the menu item Setup in
the main menu of your device.
TIP: You may easily adjust all settings on your PC by installing the
trainingLab software, then selecting device >> setup device >>.
navi2coach and following the setup dialogue.
Create your personal profile under menu item Setup >> User Data.
The entered data will be used to calculate accurate measurement
results concerning burnt calories, burnt fat, definition of your training
zones and will additionally affect other training functions.
5.1.1 Menu item: Weight
Enter your current body weight.
5.1.2 Menu item: Gender
Page 17

navi2coach
16 / 38
5 Setup
Select you gender: male or female.
5.1.3 Menu item: Birthday
Enter your date of birth and allow navi2coach to calculate your age.
5.1.4 Menu item: Height
Please enter your body size.
5.1.5 Menu item: HRT max
Please enter your maximum heart rate.
TIP: to find out your maximum heart rate you should perform a
VO2max test (endurance test) under medical supervision.
Alternatively you may calculate your maximum heart rate by using
the following, approximate value:
220 – age = maximum heart rate
This value is just an approximate reference which may vary
considerably in each individual.
5.1.6 Menu item: Resting heart rate
5.1.7 Menu item: Scale
5.2 Sport Profiles
Please enter your resting heart rate.
You can measure your resting heart rate before getting up
and leaving the bed in the morning. The night before put your
navi2coach and your heart rate belt beside your bed. On the
following morning you put on your heart rate belt without leaving the
bed and start a recording. Just relax and observe how low your
heart rate falls in the next 5 minutes. Use the lowest value as your
resting heart rate.
The scale recalls the weighing function. Activate this function by
selecting “Weigh” and step on an ANT+ compatible scale. Your
data will be saved after the weighing process.
Under menu item Sport Profiles you can either activate a certain
sport profile or you can adjust the sport profile settings. Sport
profiles allow you to use your navi2coach for multiple sport
activities or for different bikes. You may relate multiple sensors,
individual data views, profile-specific training zones or variable
wheel sizes to each sport profile. Furthermore you can preset
Page 18

5 Setup
17 / 38
navi2coach
individual workout alerts which remind you to perform something
(eat, drink, pause, e.g.) after a defined time, distance or calorie
consumption. You find more details further down.
5.2.1 Activate sport profile
To switch between sport profiles choose the desired sport profile in
the list of sport profiles. By selecting a sport profile it becomes
automatically activated and you will end up in the underlying sport
profile setup menu. If you do not wish to change the settings of a
sport profile just leave the menu.
5.2.2 Configurate sport profiles
Select the sport profile you want to set up from the list of sport
profiles. Now you can adjust the sport profile settings by choosing
different menu items which are individually adjustable.
5.2.2.1 Menu item: Sensors
In this menu you can set up and pair all sensors. By choosing a
sensor you may set up and pair it individually or you may
alternatively pair all sensors at the same time by selecting the
menu item “Pair all”.
In the latter case the device will search for all active ANT+ sensors
in a radius of 10 meters. Pay attention to only be surrounded by
sensors you really want to use for your chosen profile and which
are definitely active within the 10 meter radius of your navi2coach.
Page 19

navi2coach
18 / 38
5 Setup
5.2.2.2 Pair and set up sensors individually
Select the sensor you want to pair or set up in the desired sport
profile. The following information and functions are available:
Connected (yes/no) indicates an already existing connection
to an active sensor.
Sensor ID shows you the identification number oft the paired
sensor.
Enabled (yes/no) allows you to decide if the paired sensor will
be used or not. If you change an active state to “no”, the device
will no longer search the enabled sensor but ignore it.
Pair again starts a new search for the chosen sensor type
(within a radius of 10 meters) and pairs it if the device is active.
Calibration is only possible in the power sensor setup and is
used to calibrate it. You’ll find further information under
Page 20

5 Setup
19 / 38
navi2coach
5.2.2.3 Power sensor (Power meter) , page 20.
Sensor Info Some sensors send additional information to your
navi2coach (battery level, e.g.). You can recall this information
under Sensor Info.
ATTENTION: With the exception of the heart rate sensor
you may choose different ANT+ sensors for speed,
cadence, power and remote control within each sport
profile. Only if you change the heart rate sensor it will be
changed in every other sport profile, too.
The use of different heart rate sensors with differing profiles
is not intended.
Page 21
navi2coach
20 / 38
5 Setup
5.2.2.3 Power sensor (Power meter) calibration
Where: Setup >> Sport Profiles >> Name of profile >> Sensors
>> Power >> Calibration
In the setup of Sensors select Power. In the next menu choose
Calibration and you will find the following setup options:
Auto Zero
Manual Zero
For further specific information about the calibration of your power
meter have a look into the manual of its manufacturer.
5.2.2.4 Set up your wheel size (Menu item: Wheelsize)
Where: Setup >> Sport Profiles >> Name of profile >>
Wheelsize
If you use an additional ANT+ sensor for speed measuring it is
necessary to adjust your wheel size.
Choose the sport profile for your bike, select Wheelsize and adjust
the size of your wheel.
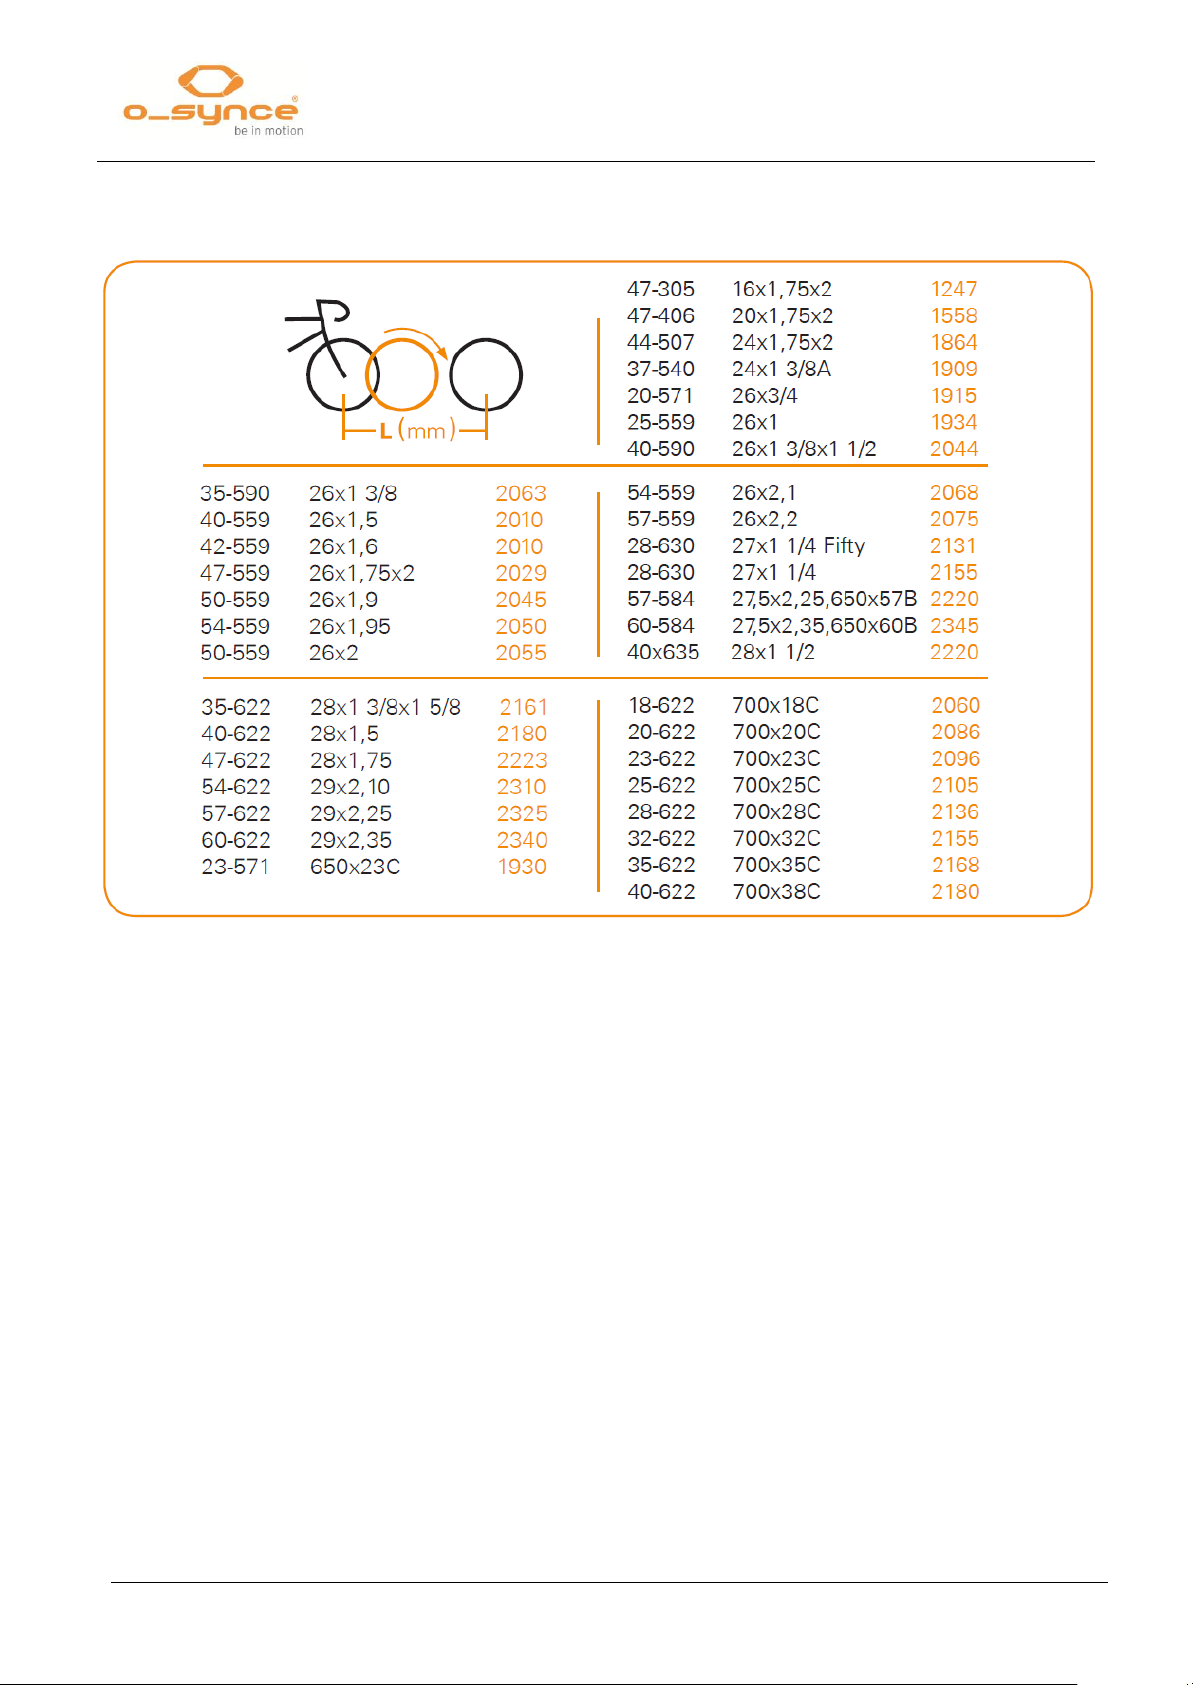
You’ll find an overview of common wheel sizes on page 32.
NOTE: Due to the fact that air pressure, abrasion of the rim and
weight of the cyclist have a great impact on the wheel
circumference the precise wheel size can only be determined by
your own measurement.
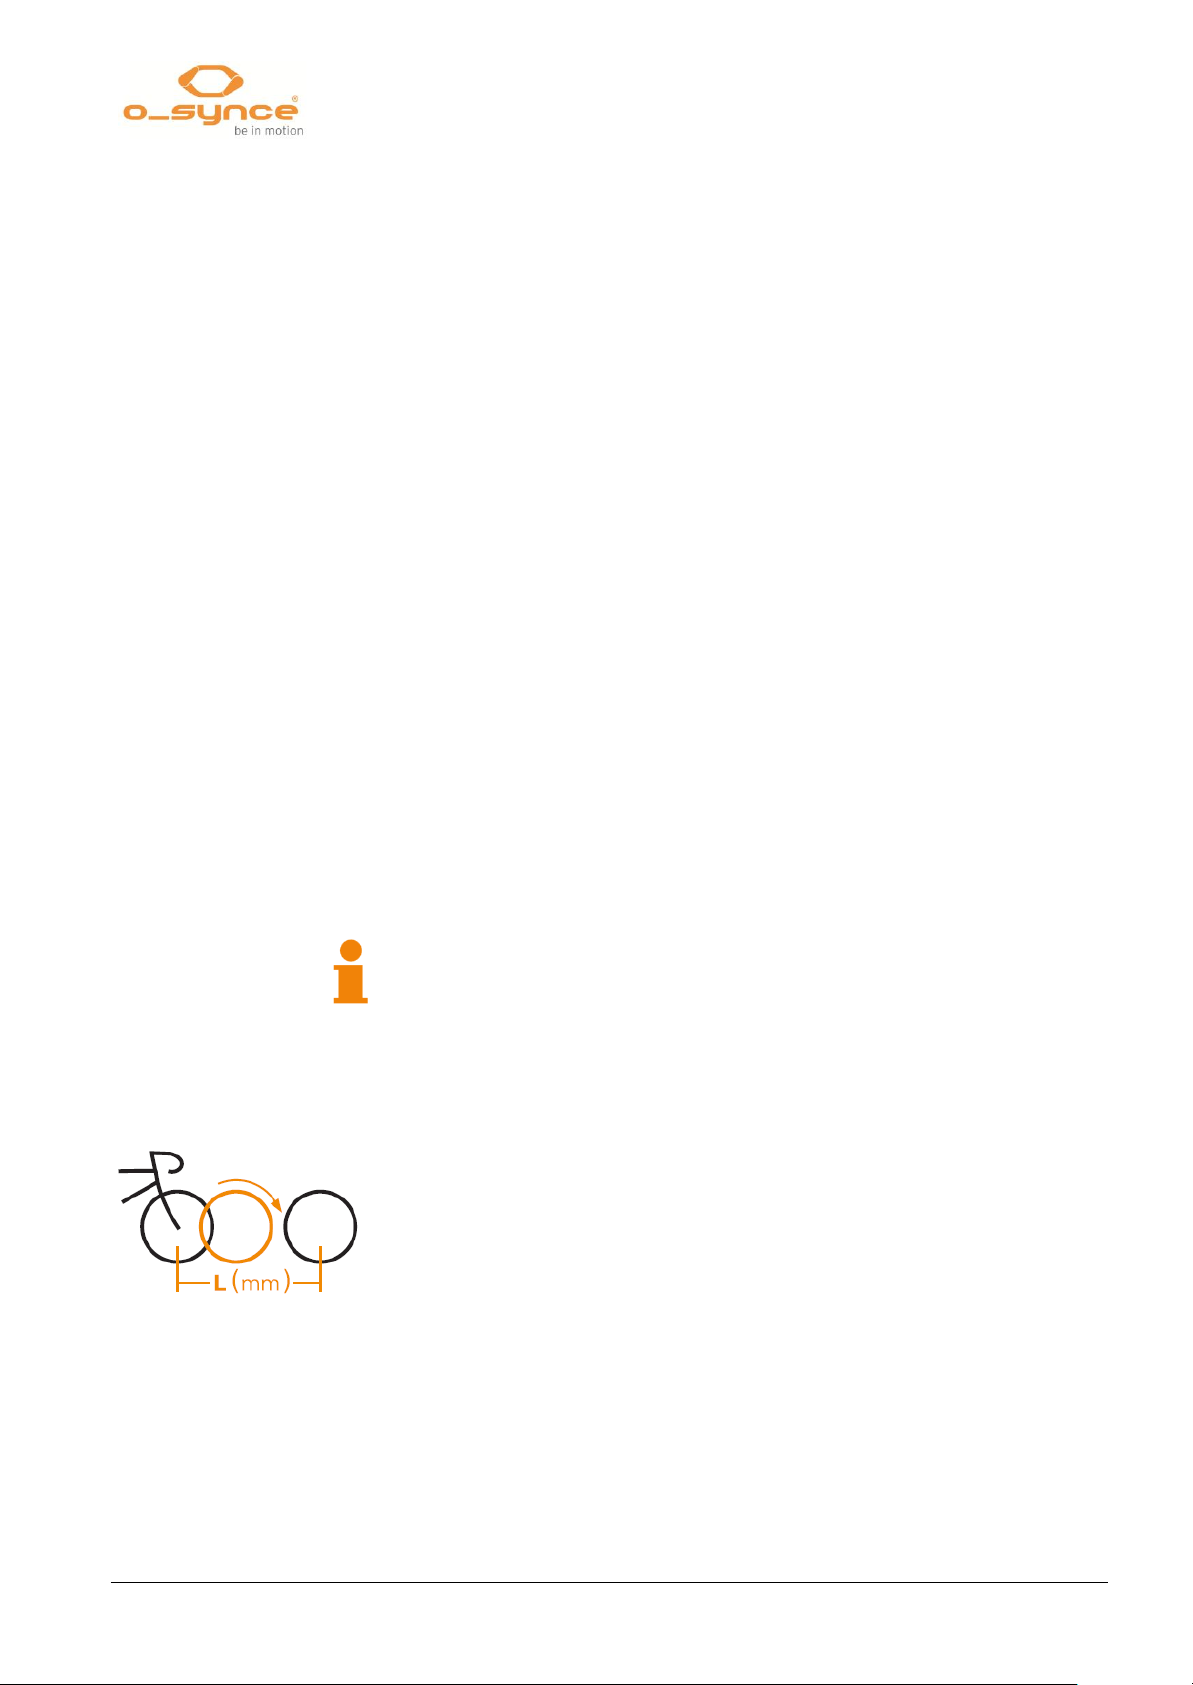
1. Mark a starting point on the floor (using tape, chalk, e.g.).
2. Position the front wheel of your bike with the valve exactly
onto your floor mark.
3. Rotate the front wheel with some pressure on the handle
bar (simulation of your weight) one time until the valve is in
the floor position again. Here you mark a second point on
the floor.
4. Now measure the distance between the marked points. The
distance in millimeter corresponds with the wheel size you
can now enter into your navi2coach.
Page 22

5 Setup
21 / 38
navi2coach
5.2.2.5 Define your heart rate and power zones (Menu item: HRT Zones /
PWR Zones)
Where: Setup >> Sport Profiles >> Name of Sport profile >>
HRT Zones or PWR Zones
You can individually set up different values for each sport profile.
Your setup options are:
Maximum values for pulse and FTP-performance. The FTP-
performance value is required to display the percentage of
your training zones.
Display the percentage of your maximum heart rate / the
percentage of your FTP-performance or display the heart
beats per minute (BPM) / your watt performance.
Upper limits of up to 5 training zones. Training Zone 6
results from the upper limit of Training Zone 5.
If you wish to define your training zones in % (percentage), it is
obligatory to know your maximum heart rate / FTP value.
To set up your training zone you have to define the upper limit of
each zone. The lower limit always results from the upper value of
the previous zone.
Example of a zonal structure in %
Zone 1 – Upper limit 45% / Zone 0-45%
Zone 2 – Upper limit 55% / Zone 46% - 55%
Zone 3 – Upper limit 65% / Zone 56% - 65%
Zone 4 – Upper limit 75% / Zone 66% - 75%
Zone 5 – Upper limit 85% / Zone 76% - 85%
Zone 6 is automatically Zone 86% - 100%
You’ll find further information concerning the Zone Training on
page 12 (4.1.4 Menu item: Zone Training)
Page 23

navi2coach
22 / 38
5 Setup
5.2.2.6 Menu item: SmartBreak
This function allows you to pause a recording you have already
started because your pace has fallen under the 2.5 km/h mark. If
you continue with your movement, the recording restarts
automatically at its previous point.
5.2.2.7 Automatic lap times (Menu item: AutoLap)
The AutoLap function allows an automatic setting of split times.
The following settings are possible:
Lap time after distance – By covering a certain distance (for
example every 2 km) a lap time will be set.
Lap time after time – A lap time will be set after a certain
amount of time (for example every 10 minutes.
5.2.2.8 Set up training alerts (Menu item: Timer)
Where: Setup >> Sport Profiles >> Name of Profile >>
Timer/Nutrition
Alerts provide the possibility to remember certain issues while
you’re training. You can set up to two alerts with the following
parameters:
Create individual alert messages (for example: Drink!)
Define the time at which the alert will remind you. The
entered value is a fixed moment at which the alert will be
displayed repeatedly.
An alert based on the covered distance, time or calories.
Example
To receive the alert „Drink!“ every 30 minutes, you set the timer in
the following way:
Based on: Time >> Value: 30:00 >> Message: Drink!
Page 24

5 Setup
23 / 38
navi2coach
5.2.2.9 Setup Display pages (Menu item: Display Pages)
Where: Setup >> Sport Profiles >> Name of Sport Profile >>
Display Pages
navi2coach allows you to create up to 6 data pages (5.4 Change
display pages (Menu item: Display Pages), page 24).
Any number of these 6 pages can be related to each sport profile.
Under menu item Display Pages
you can define which data page will be used for the chosen sport
profile.
Choose the designated data page in the list of display pages and
change your settings in the following way:
The setup options are Yes and No (if you choose yes the chosen
data page will be displayed, if you chose no it won’t).
You can set up different data pages under Setup >> Display
5.3 Altitude
Pages (5.4 Change display pages (Menu item: Display
Pages), page 24).
TIP: To easily configure display pages, just use the trainingLab
setup software.
Where: Setup >> Altitude
navi2coach uses a barometric altimeter. To supply you with
accurate altitude values it should be calibrated before your training.
You have the following calibration options:
via GPS: In case the GPS signal is sufficient, altitude will be
calibrated automatically if you start a recording.
at a POI: If you are in direct proximity of a chosen POI your
altitude will be calibrated after the POIs altitude.
This function is only possible if you do not move or record.
manually: Enter an home-altitude which you may use for
calibration at any time.
Page 25

navi2coach
24 / 38
5 Setup
5.4 Change display pages (Menu item: Display Pages)
navi2coach allows you to arrange your data pages individually so
you can decide by yourself which data you want to display. You
may adjust the settings in the device itself or, more easily, by using
the trainingLab PC software.
Choose the data page you want to set up or change.
Now you have the following options:
Edit allows you to edit the chosen page.
Delete Page deletes the chosen page irrevocably. You may
create a new page.
Page 26

5 Setup
25 / 38
navi2coach
5.4.1 Edit Data Pages (Menu item: Edit)
After selecting a data page for editing, the current configuration will
be displayed. You can switch between each data field by using the
arrow keys and choose the one you want to change. The active
field is indicated by a black frame. Start editing by pressing the
middle button.
Here are your options:
Change function:
The menu always indicates the current function. By
selecting a function with the middle button, a list of possible
functions will be displayed. You may scroll through the
functions by using the arrow keys. Select the function you
want to edit.
Change field size.
navi2coach allows you to display one or two data fields per
row.
Perform the following steps to change the amount of data
fields:
o Divide a data field (create two fields out of one)
Choose a large data field which has the size of a
whole row. Select Split Field in the following menu.
Now you can adjust the functions of the two, newly
created fields as described above.
o Connect two data fields (reduce two data fields to
one) If you have chosen a data field within a row
which consists of two data fields you may delete the
chosen field by using the function Deleted Field.
TIP: Some functions show more information if you allow them to be
displayed over a whole row (for example: Power balance right/left).
The following functions are currently selected (Firmware status
15.10.2012):
Page 27
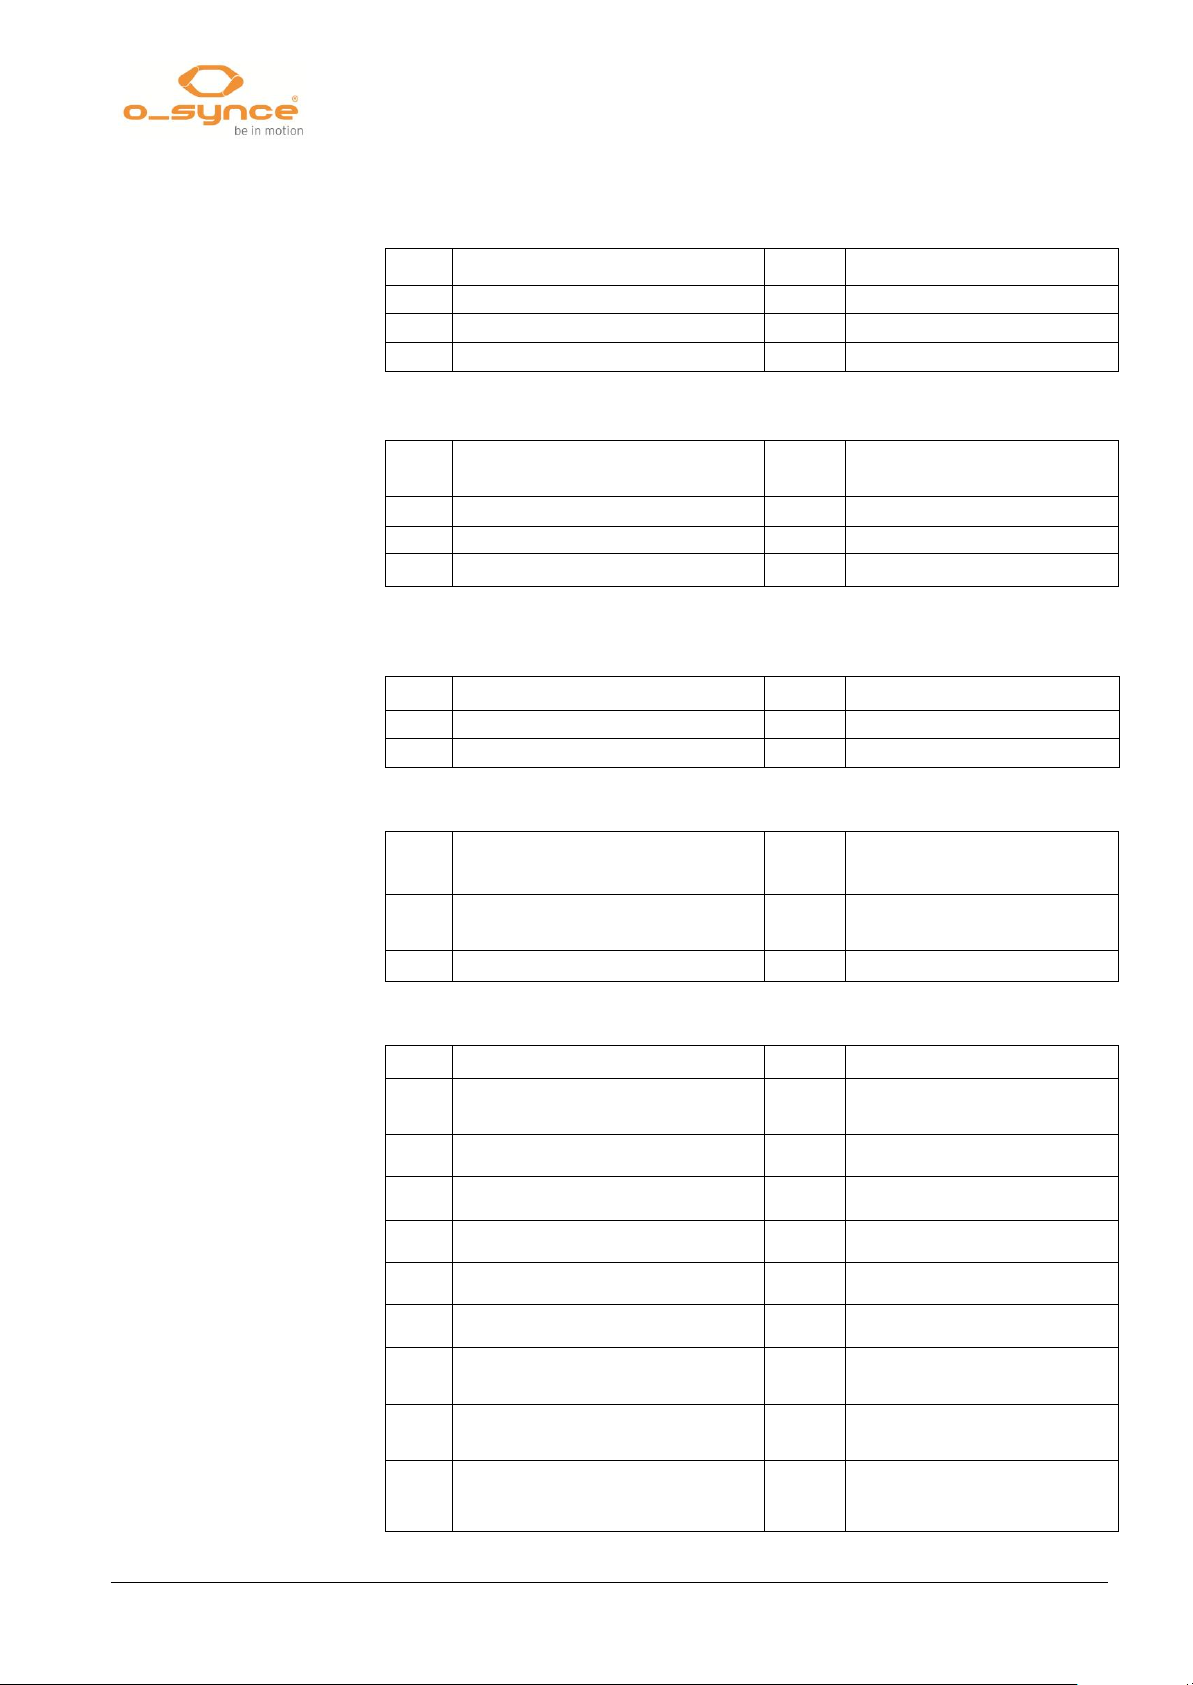
navi2coach
26 / 38
5 Setup
Distance
Distance last lap
Distance current lap
Stopwatch
Lap time current lap
Lap time last lap
Distance to POI
Time
Heart rate (Beats per minute or %,
depending on your profile setup)
Average heart rate of current
lap
Average heart rate
Average heart rate of last lap
Maximum heart rate
Calories
Burnt fat
Speed
Average speed of current lap
Average speed
Average speed of last lap
Maximum speed
Cadence
Average cadence of current
lap
Average cadence
Average cadence of last
lap
Maximum cadence
Power (Watt)
Average power (Watt)
Average power 30 sec. (Watt)
Average power 3 sec
(Watt)
IF (Intensity factor)
Maximum power
Average power current lap
Average power last lap
NP (Normalized power)
Peak power 60min
Peak power 20min
Peak power 5min
Peak power 30 sek.
Peak power 1min
Peak power 3 sek.
TSS (Training Stess Score)
Power distribution (right & left leg in
%)
Average power distribution
(left & right leg in %)
Average Power distribution of
current lap (right & left leg in %)
Average Power distribution of
last lap (right & left leg in %)
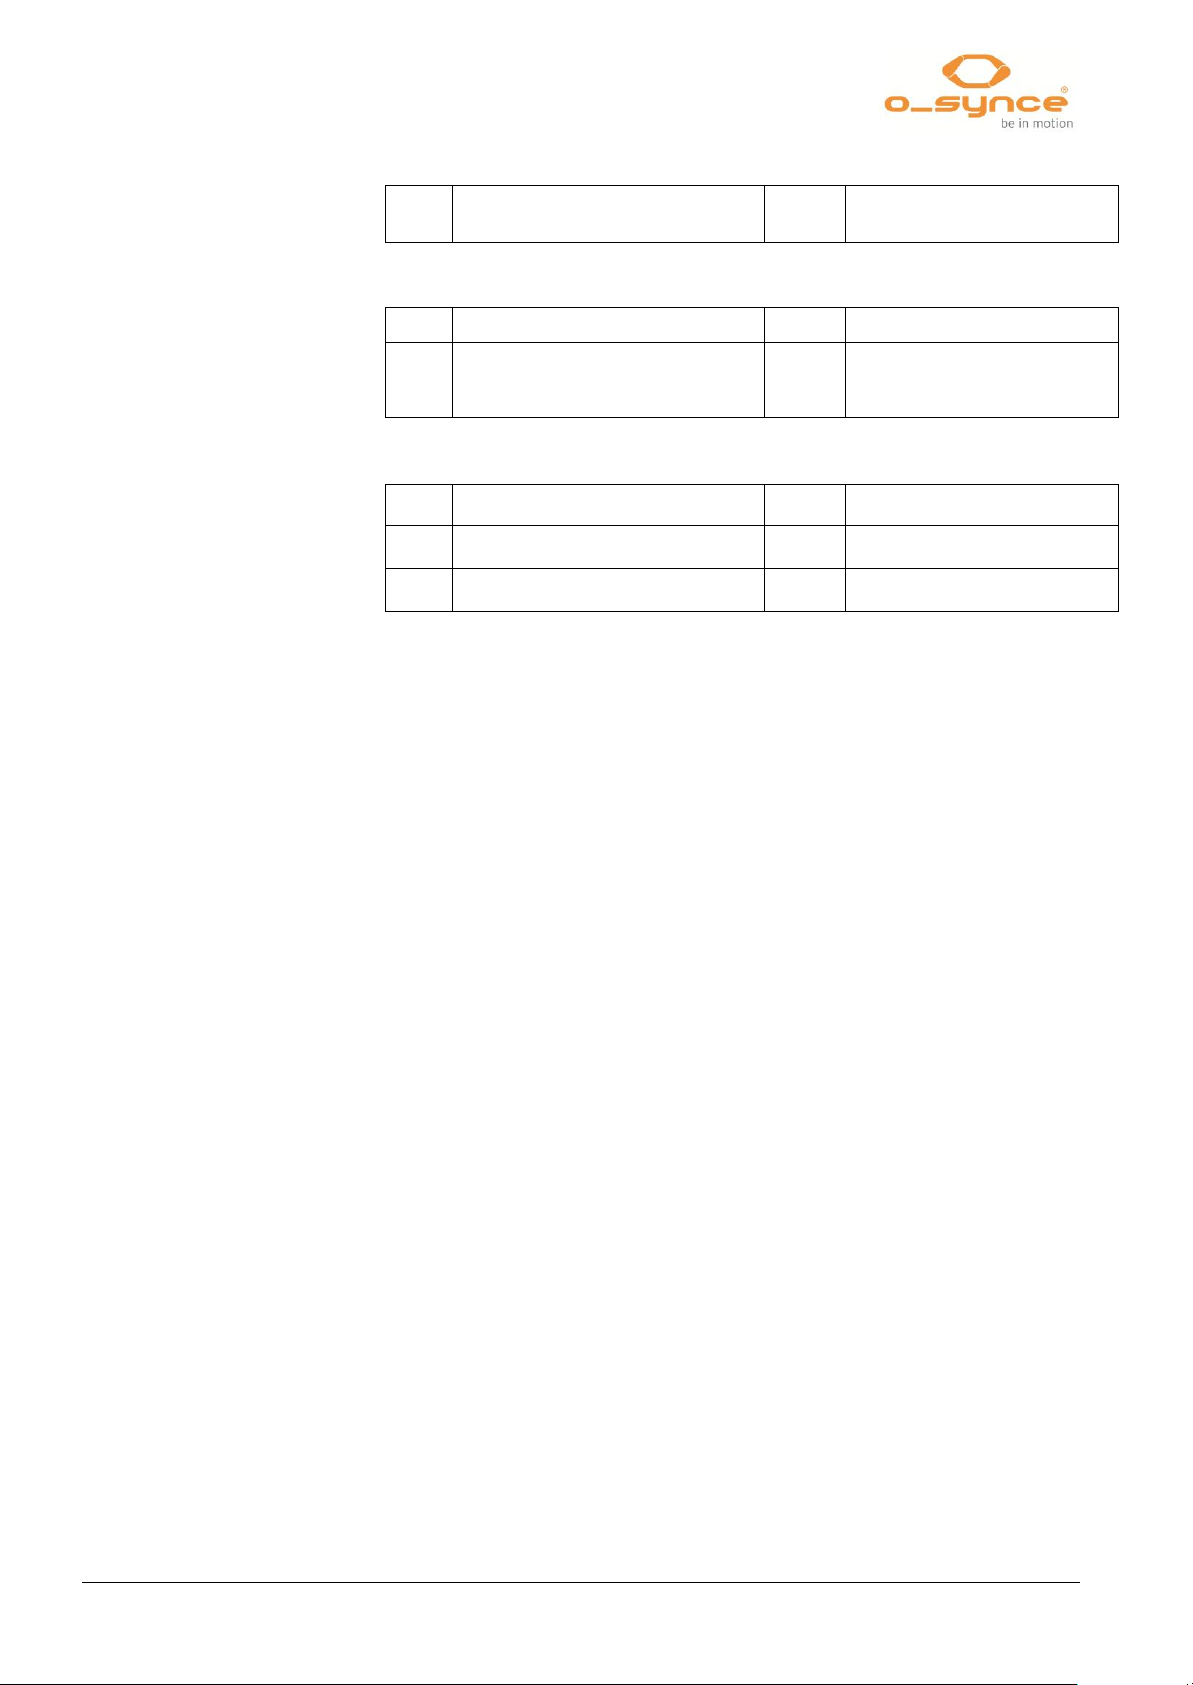
5.4.1.1 Overview of possible data fields (Firmware v1.04)
Distance & Time functions
Heart rate related functions
Speed related functions
Cadance related possibilities
Powermeter related possibilities
Page 28
5 Setup
27 / 38
navi2coach
Target zone of current training
step
Missing distance/time of
current training step
Current altitude
Altitude difference, ascending
Altitude difference, descending
Ascent/Descend (%)
Temperature
Sunrise time
Sunset time
GPS-course
PS-Accuracy
Workout posibilties
Altitude functions
Miscellaneous
5.5 Compass calibration
5.6 System
Place the navi2coach onto flat ground and rotate it slowly clockwise
until you get a confirmation from the device that it has been
calibrated (sound & message). Avoid any magnetic sources close to
the device like computers during calibration. To abort the calibration
push the power button.
The menu item System contains all configuration options which refer
to the standard settings of your navi2coach.
5.6.1 Language
Choose a language for the system.
5.6.2 Time and date
Select the hour format (12/24h), your time zone and decide if your
device should switch automatically to daylight saving time (DST).
You may also activate or deactivate daylight saving time manually.
5.6.3 Data
Set up the time interval (recording rate) of your data recordings.
Possible settings are:
1s
5s
Page 29

navi2coach
28 / 38
5 Setup
10
20s
30s
60s
5.6.4 Sounds
Set up the acoustic volume for sound signals.
5.6.5 Units
Here you can define which measuring units will be used by your
navi2coach. Possible options are metric or english/imperial.
Metric: km, meters, cm, km/h, kg.
English/Imperial: miles, feet, inch, mph, pounds.
5.6.5.1 Temperature
Select if temperature will be displayed in Celsius (°C) or Fahrenheit
(°F).
5.6.5.2 Altitude
Select the units of altitude indication. Options are meter and feet.
5.6.6 Display
This menu allows you to setup your display by adjusting the following
functions:
Contrast
Backlight
5.6.6.1 Display contrast
navi2coach offers 10 contrast nuances. Please select the nuance
which is the easiest to read for you.
5.6.6.2 Backlight
navi2coach offers out he following setups:
Page 30

5 Setup
29 / 38
navi2coach
Enabled (yes/no) If it is enabled the backlight will be
activated by pushing any button
Intensity You have the choice of levels 1-10. Level 10
represents the brightest backlight level.
Duration Define how long the backlight stays powered.
Only at night The above settings only apply if the sun has
already settled down. As a reference sunrise time (30 min.
later) and sunset time (30 min. earlier) are used.
Page 31

navi2coach
30 / 38
5 Setup
5.6.7 Totals
Here you can review and reset the statistics of each sport profile.
Select Totals Reset if you want to reset your profile data to zero.
5.6.8 USB only charges
If you have chosen Yes the device can be connected to a power
source without switching into PC mode. This is very useful if you
want to recharge your device during a bike ride by using a battery
pack.
If you select No your navi2coach switches directly into PC mode and
can be read-out.
If navi2coach does not switch into PC-Mode upon connection to
your PC or MAC, then it means that “USB only charging” has been
activated. In this case switch your device off before connecting it to
your PC or disable USB only charging feature in the device settings.
5.6.9 Factory Reset
If you want to reset your device back to delivery condition you can
perform a factory reset. Before performing a factory reset make sure
the device is connected to a power source or to your PC. Select the
menu item Factory Reset and confirm with Yes.
5.6.10 Navigation
Under menu item Navigation you can switch off the GPS reception
and also set the track orientation:
GPS: On/off
Track orientation: Course/North
5.6.11 About
If you think about downloading a new version, here is the place to
check the version of your firmware.
Page 32

6 Workout analysis and data summary
31 / 38
navi2coach
6 Workout analysis and data summary
6.1 In your navi2coach
You’ll find a summary of your data under menu item Training. Select
the training menu and choose one of the following options:
6.1.1 Menu item: Activities
Registers all saved training sessions and shows a summary of each
workout. Under this menu item you can not only review or delete an
activity but also recall a ridden track and then ride it again.
6.1.2 Menu item: Totals
Shows a statistic summary of your training profiles:
Stopwatch
Distance
Calories
Elapsed time (net time)
Sessions
6.2 In your PC
navi2coach uses the FIT file format to record your workout sessions.
This file format is used by various training portals and software
providers. Because of that you may also use other software than the osynce trainingLab software to analyze your workout sessions. As osynce currently doesn’t support MAC-compatible software the following
options may be of interest for MAC users:
Trainingsplan.com
Golden Cheetah
Trainingspeaks.com
2Peak.de
Rubitrack
Strava
Sporttracks und many more
To prepare for analyzing just download your training data into your
software. If your software does not support the automatic download
from your device, you may want to copy your data from the file
“Activities” and import it into your software.
Details about our trainingLab software follow in the next chapter.
Page 33
navi2coach
32 / 38
7 Analysis of data with trainingLab software
7.1 Download & Installation
Visit the website www.o-synce.com, select „Software” and download
the trainingLab installation package. Follow the instructions and install
the software on your PC.
7.2 Upload & download data
Connect your navi2coach via the provided micro USB cable with your
PC. Now a PC symbol will appear in the display of your navi2coach.
Open trainingLab software on your PC and select “Device”.
If your navi2coach does not switch into PC mode you have to
deactivate the function „USB only charges“, which you find under
Setup >> System (see page 30, 5.6.8 ).
Page 34
7 Analysis of data with trainingLab software
33 / 38
navi2coach
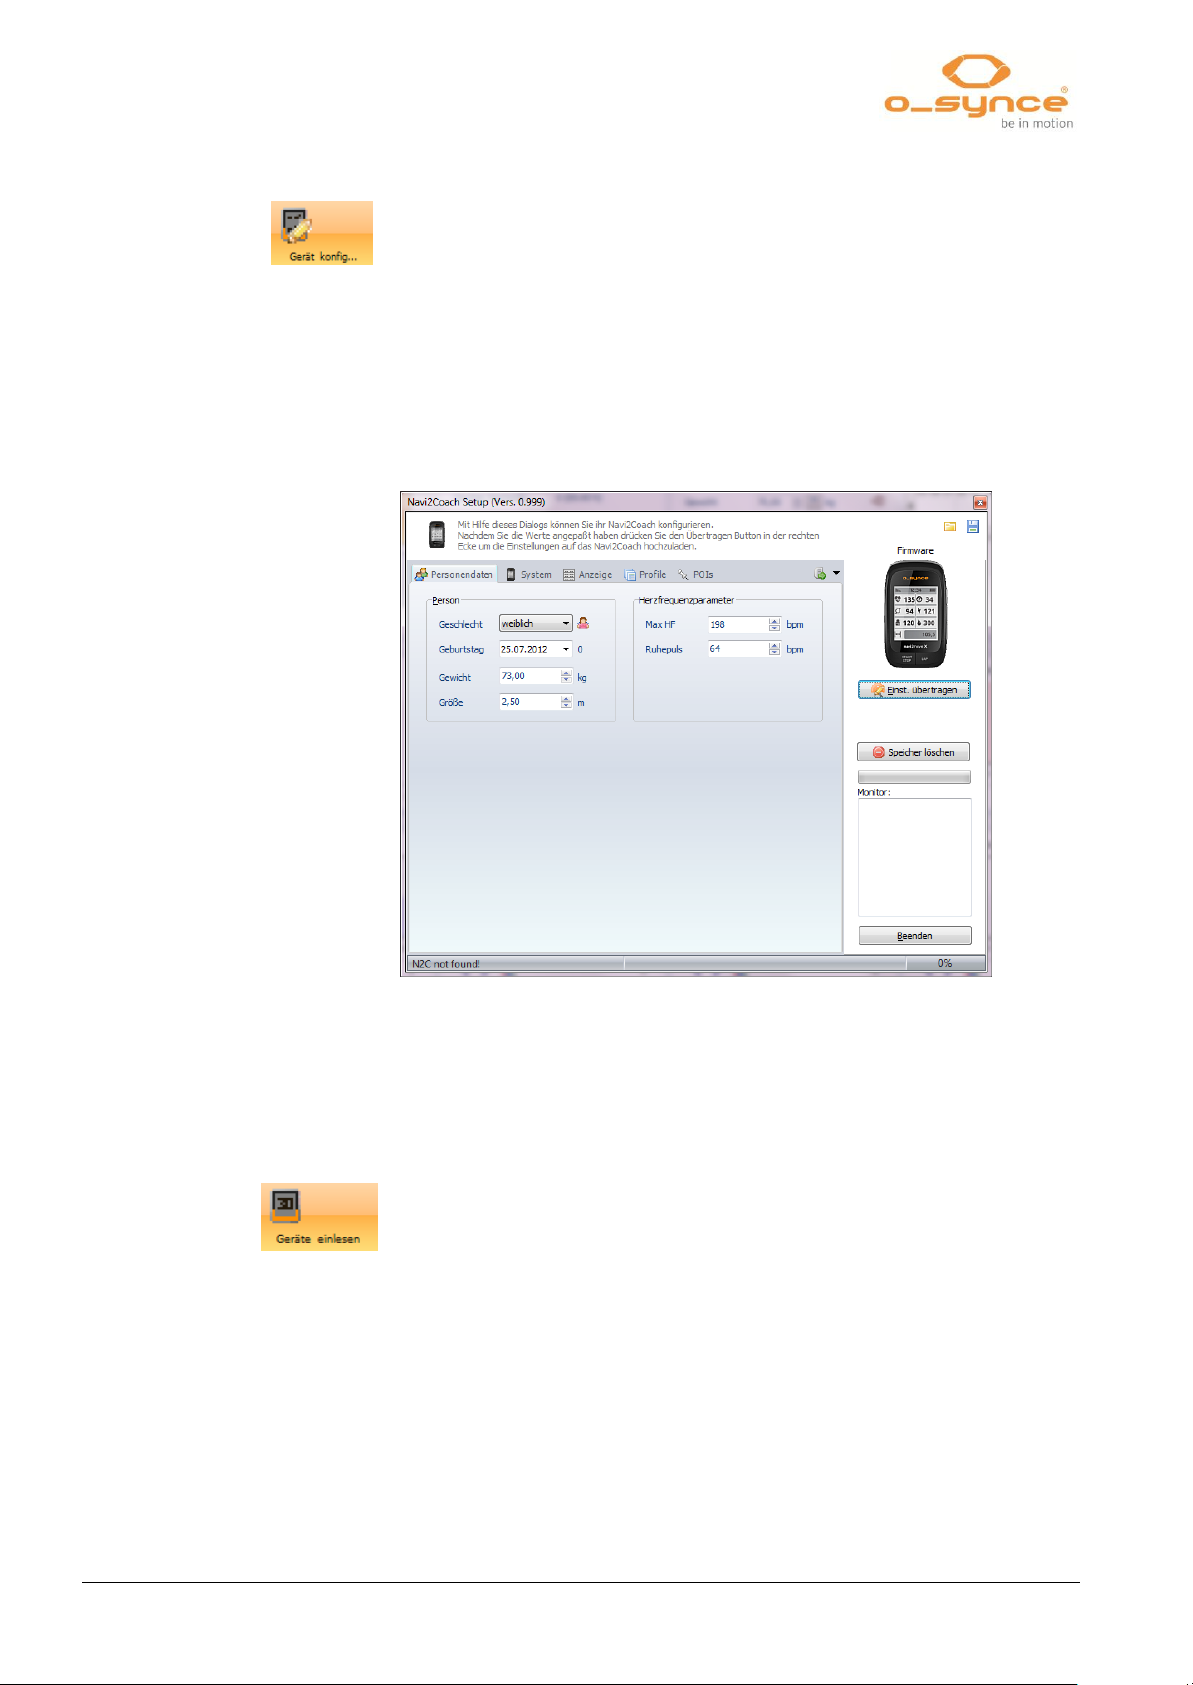
7.2.1 Setup device
Press the „Setup device“ button und select navi2coach. You now
may proceed with the following settings:
•
System (language, time, date, units, etc.)
•
User data (gender, birthday, weight, size, max. HF)
•
Display (configuration of data pages and its functions)
•
Profiles (Adjust sensors, display, heart rate & power zones, timer
functions and autostart/autolap)
•
POI (Create and manage POIs)
Transfer your settings to your navi2coach by pressing the „Transfer
Settings“-button.
7.2.2 Import device
Press the „Import Device“-button and select navi2coach. The
download of your recorded data starts automatically.
Page 35

navi2coach
34 / 38
7 Analysis of data with trainingLab
software
7.2.3 Workout Editor
To create a workout, press the Button “Workout Editor” and select
navi2coach. Now create individual workout steps and change their
position via drag & drop. Transfer your finished workout session by
pressing „Transfer workout“.
Page 36
8 Trouble-shooting
35 / 38
navi2coach
8 Trouble-shooting
The sensors can’t be
paired
You can’t quit he current
menu
Your device doesn’t switch
into PC mode
The workout steps are not
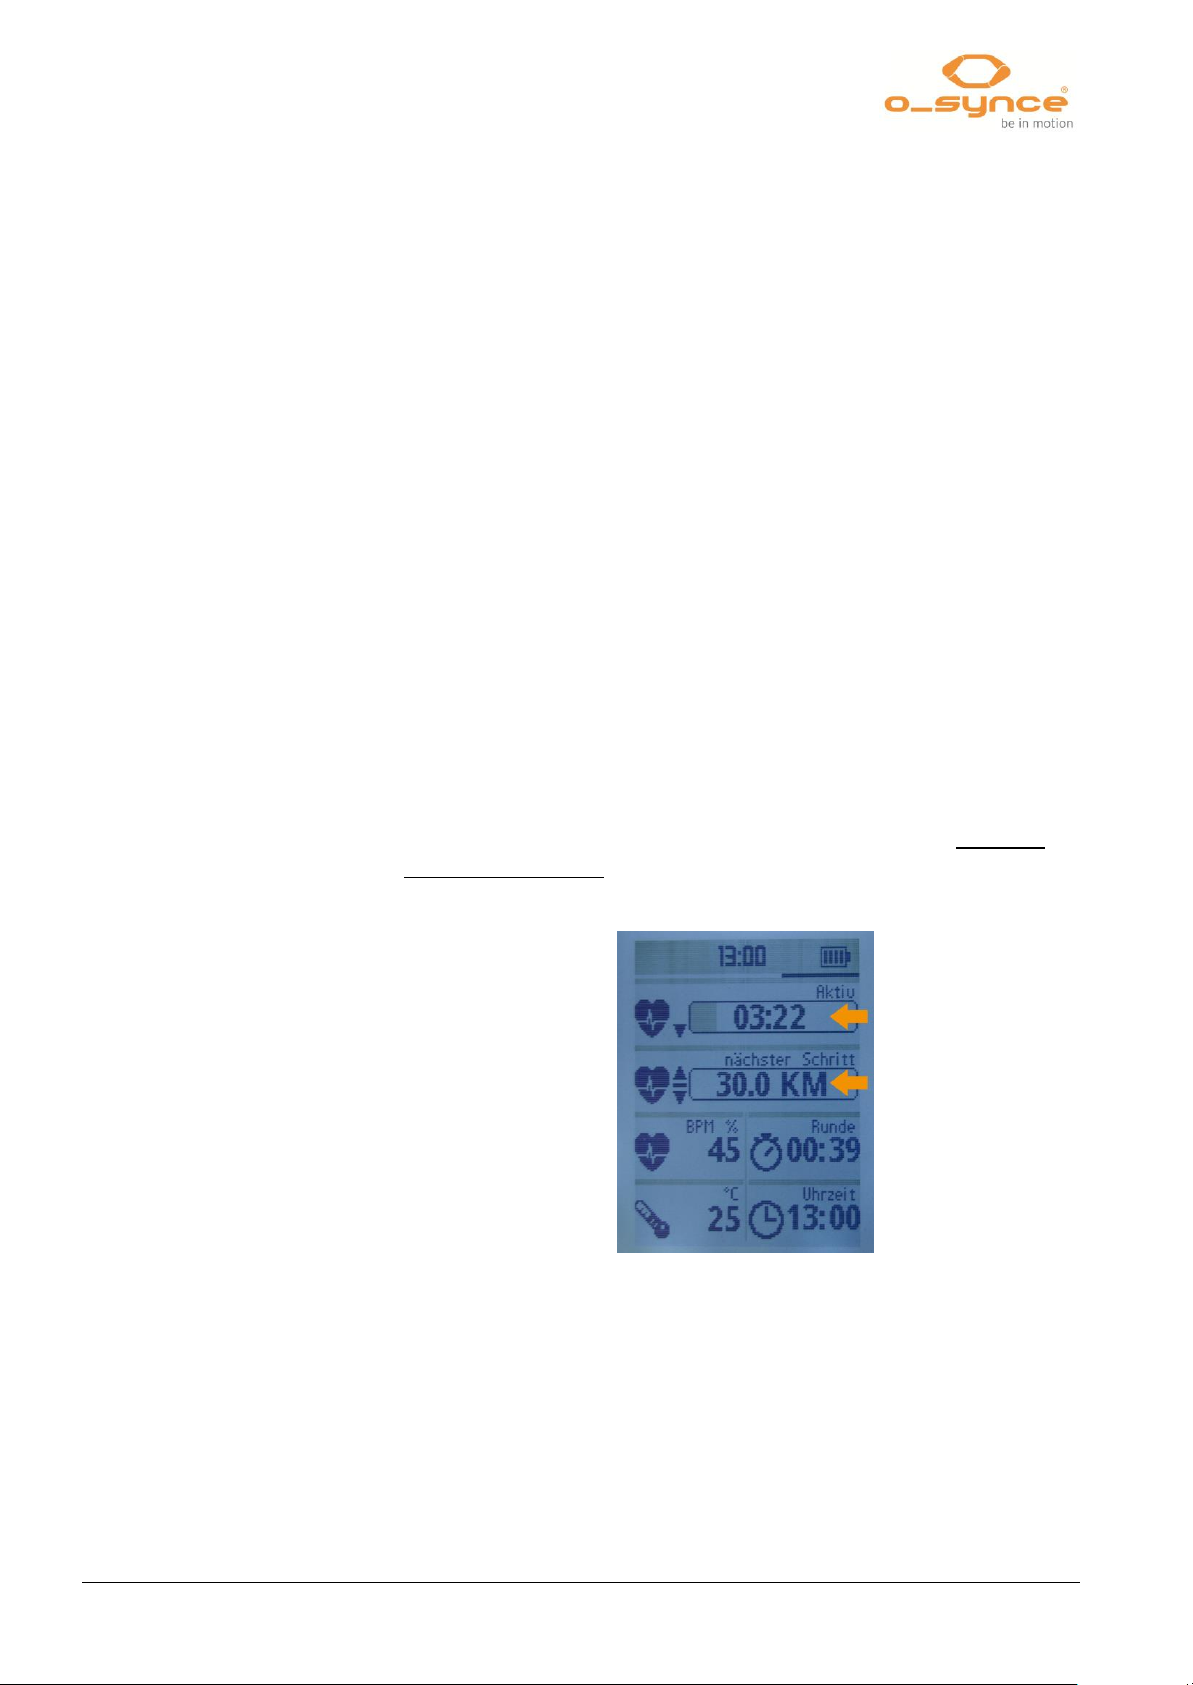
displayed anywhere.
Where do I find them?
If you struggle with questions or problems please visit our
website and consult the FAQ section: http://www.osynce.com/faq/index.php?lang=en
Make sure the sensors are active.
To provide a proper contact between your chest and the transmitter,
please moisturize the sensors of your heart2feel x heart rate belt
(rubber pads). Activate the bike sensors (speed sensor and cadence
sensor) by moving a magnet along the sensor mark (in a maximum
distance of 3 mm).
Press the power button on the left side of your device to leave the
current menu.
navi2coach doesn’t switch into PC mode you have to
If your
deactivate the function „USB only charges“, which you find under
Setup >> System (see page 30, 5.6.8 ).
To use the workout feature you need to add the function “Workout” and
“Workout (next step)” to one of your data pages to see your workout
steps. Ex works the data page 4 has them already preset.
Page 37
navi2coach
36 / 38
9 Table of wheel sizes
9 Table of wheel sizes
Page 38

37 / 38
navi2coach
10 Specifications
Weight and dimensions
65 g – 8,0 cm x 4,9 cm x 2,0cm
Water resistance
Weatherproof protection IPX7
Battery
750mAh, lithium battery
PC interface
MicroUSB cable
Battery life
Up to 14-16 hours, depending on outdoor
temperature and used functions
Data memory
27 MB or up to 200 hours of workout recording
Temperature range
-10 °C up to +50°C. Avoid recharging the battery
under a temperature of 0°
10 Specifications
11 Terms of guarantee
We are only liable for damages in accordance to the statutory regulations in respect to our contractual
partners. Batteries are excluded from warranties but can be returned after use. In case of a warranty
please contact the retailer where you purchased your device.
12 Regulatory Information
This product is compliant with the Directive 1999/5/EC. The relevant Declaration of Conformity is
available at http://www.o-synce.com/customer-support/.
o-synce Europe GmbH has not approved any changes or modifications to this device by the user.
Any changes or modifications could void the user’s authority to operate the equipment.
FCC regulatory information
This equipment has been tested and found to comply with limits for a Class B digital device, pursuant to
Part 15 of the FCC rules. These limits are designed
to provide reasonable protection against harmful interference in residential installations. This equipment
generates, uses, and can radiate radio frequency energy, and if not installed and used in accordance
with the instructions, may cause harmful interference to radio communications. However, there is no
guarantee that interference will not occur in a particular installation.
If this equipment does cause interference to radio or television equipment reception, which can be
determined by turning the equipment off and on, the user is encouraged to try to correct the interference
by one or more of the following measures:
Reorient or relocate the receiving antenna
Increase the separation between the equipment and receiver
Connect the equipment into an outlet on a circuit different from that to which the receiver is
connected.
Consult the dealer or an experienced radio/TV technician for help
Page 39

navi2coach
38 / 38
12 Regulatory Information
To assure continued compliance, any changes or responsible for compliance could void the users
authority to operate this equipment. (Example- use only shielded interface cables when connecting to a
computer or peripheral devices).
Radiation Exposure Statement
This device complies with Part 15 of the FCC Rules. Operation is subjected to the following two
conditions 1) this device may not cause harmful interference and 2) this device must accept any
interference received, including interference that may cause undesired operation.
Caution! The manufacturer is not responsible for any radio or TV interference caused by unauthorized
could void the users authority to operate the equipment.
 Loading...