

Page 1
Operating instructions
EU 80
TREND MARKING SYSTEMS
PO BOX 1311 CASTLE HILL NSW 2154
TEL: (02) 9629-9535 FAX: (02) 9629-7535
EMAIL: [email protected]
INTERNET: www.trendmarking.com.au
Page 2

Operating instructions EU 80
!
Safety instructions
• The unit should be opened only by qualified personnel. Pull the
main plug before opening the unit.
• The used electrolytes are an inorganic and organic, oxidizing
appearing substance in mineral watery matrix.
• The substances are poisonous when swallowed (R25) and
dangerous when in bad health(Xn).
Please read and follow electrolyte safety data sheets in accordance with
91/155/EWG.
General Information
The described machine is designed to mark products made of steel and other
electrically conductive surfaces, with electric current and electrolyte. Proper
functioning and lifetime use of this product depends on the correct treatment and
maintainence of the system. The operation manual and maintainence instructions
must be carefully studied by all operating personnel before the system is used.
Copyrights
All parts of this technical document including any patents described or trademarks
contained therein are sole property of Ostling Markiersysteme GmbH Solingen,
Germany. Without our prior approval no part of this document may be duplicated or
made available to a third party. Any misuse of this manual is strictly prohibited. No
form of misrepresentation of the content of this technical document will be permitted.
Liability
For any error in shipment or damage caused during shipping our liability is limited to
those conditions outlined in the Terms of Delivery. The duration of warranties are
described in the Terms and Conditions specified. We are not responsible for any
damage caused by improper handling of equipment nor for damage coused by
disregarding operating instructions as outlined in this owner’s manual.
ÖSTLING Markiersysteme
1
Page 3

Operating instructions EU 80
Contents
1.0 Function explanation 3
2.0 Technical data 3
2.1 controls 3
3.0 Programming procedure 4
3.1 Preparing the marking head 4
3.2 Moistening the felt with electrolyte 4
3.3 stencils 5
4.0 Marking process 5
5.0 Maintainence 5
6.0 Accessories 5
7.0 Troubleshooting 6
7.1 Problem: No mark 6
7.2 Problem: Mark is unclear 6
7.3 Problem: Black spots around the mark 6
8.0 Electrolytes 7
2
ÖSTLING Markiersysteme
Page 4
Operating instructions EU 80
1.0 Functions
The EU 80 is for marking small production series of steel and other electrically
conductive surfaces. It does not matter whether the product is made of hardened
steel, steam homo black finished, nickel plated, chromed, large or small, flat or
round.
The input voltage is 230 V (AC), the output voltage can be set to 8 V, 16 V or 24 V
(AC), or installed with 100 VA power.
2.0 Technical Data
Input voltage 230 V, AC
Output voltage 8 V, 16 V oder 24 V (AC)
Power 100 VA
Circuit breaker T 2 A
Dimentions (L x W x H) 155 x 200 x 150 mm
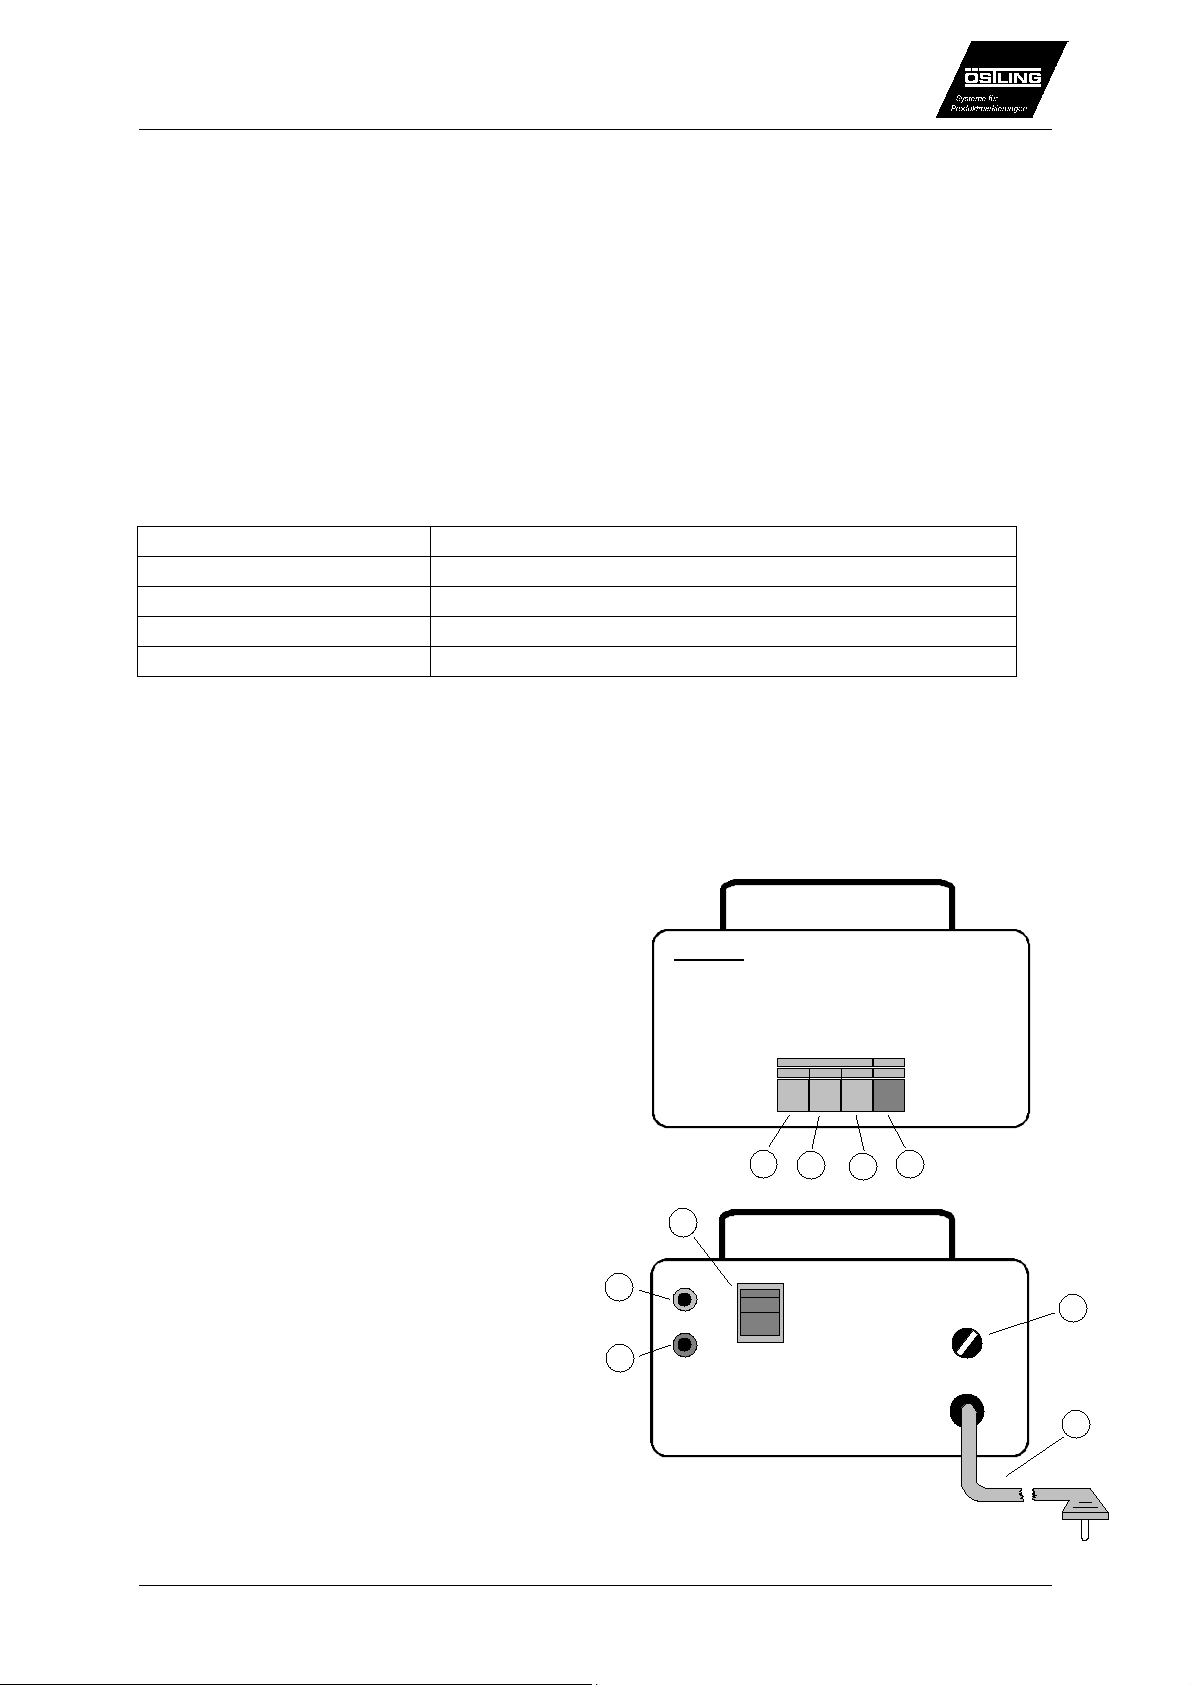
2.1 Controls
Pos. 1 Voltage 8 V (AC)
Pos. 2 Voltage 16 V (AC)
Pos. 3 Voltage 24 V (AC)
Pos. 4 Unit off
Pos. 5a Connection - Positive cable
Pos. 5b Connection - Negative cable
Pos. 6 ON - OFF Switch
Pos. 7 Circuit breaker T 2 A
Pos. 8 Power cord
5a
5b
ÖSTLING
6
8V AC
ON OFF
16V AC
24V AC
2
MINIETCH 80
41
3
7
ÖSTLING Markiersysteme
8
3
Page 5
Operating instructions EU 80
3.0 Programming procedure
• Plug the banana plug with the red cable in the red plug insert (Pos. 5a).
• Attach the other end of the red positive cable with the connector on the marking
head (Pos. A).
• Plug the banana plug with the blue cable in the black plug (Pos. 5b).
• Put the other end of the blue negative cable on an electrically conductive base, or
directly on the product.
• Plug in the power cord (Pos. 8) with 230 V AC- alternating current.
3.1 Preparing the marking head
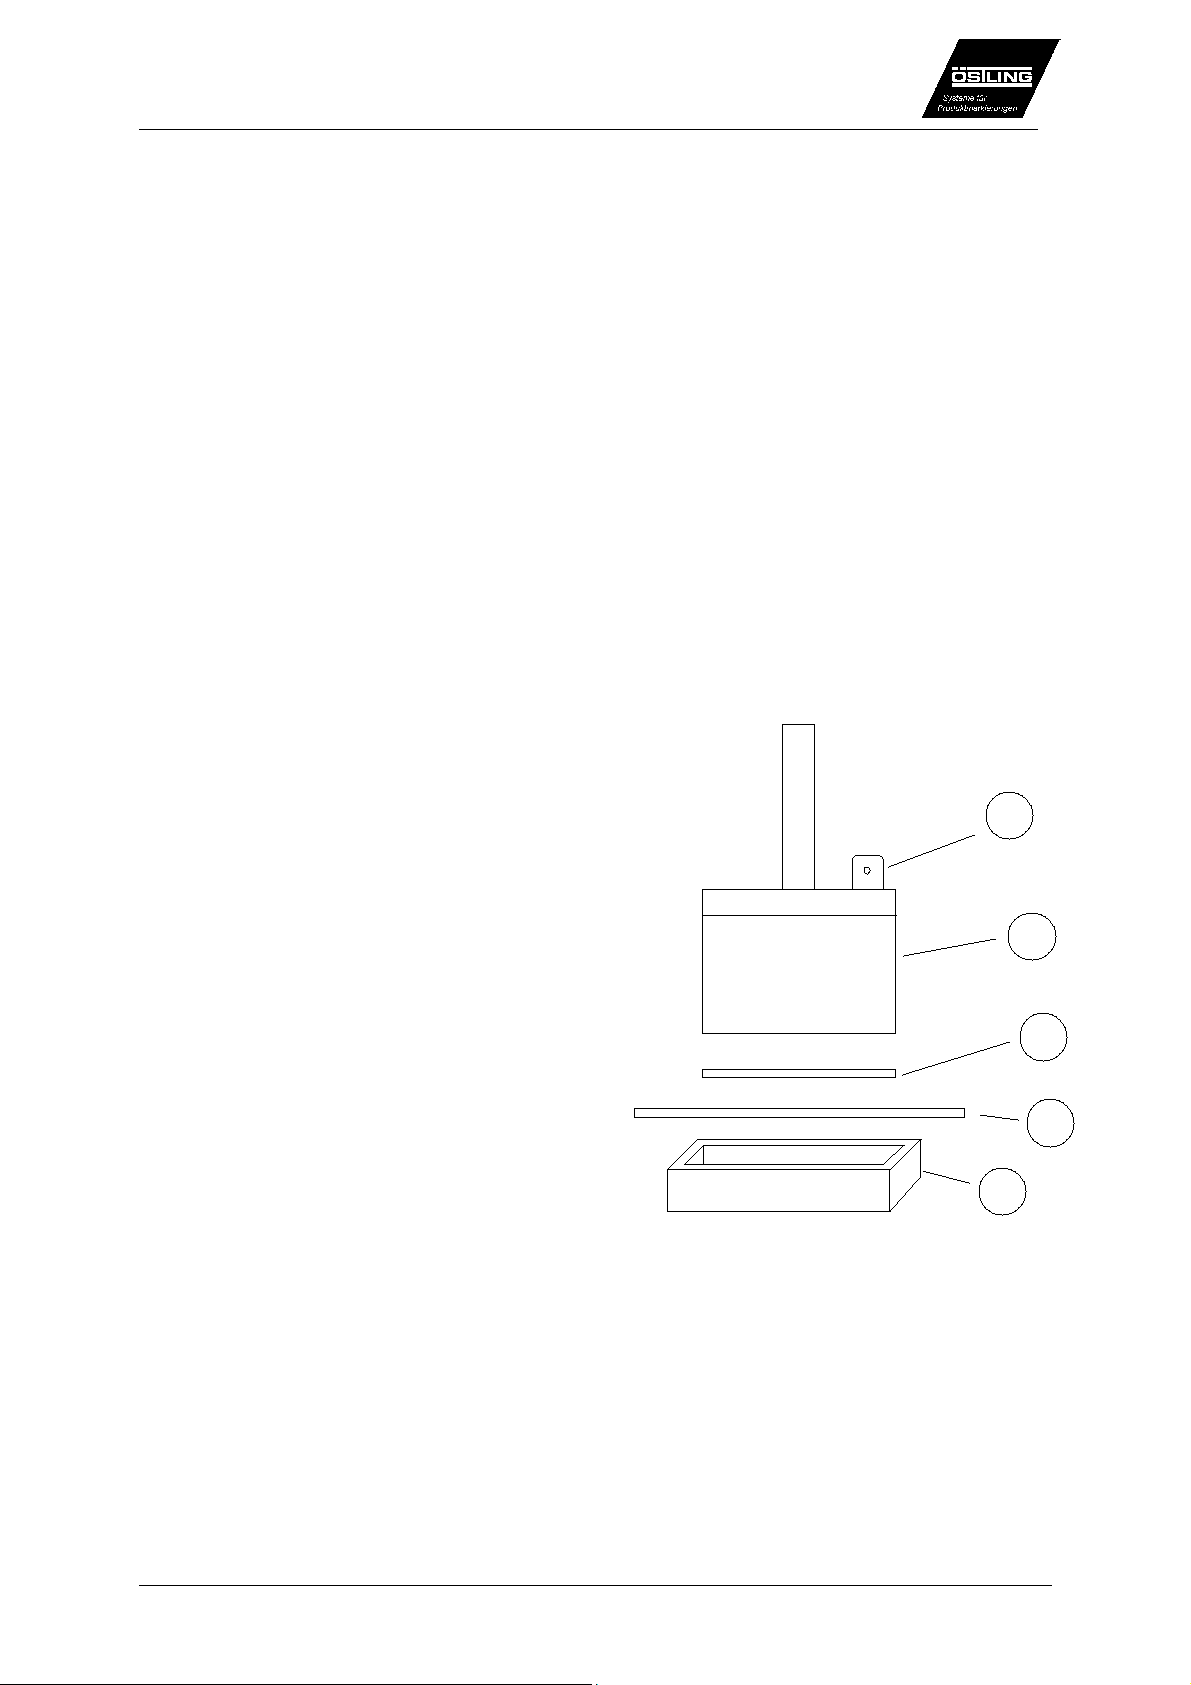
Prepare a piece of black felt in the same size as the surface of the marking head.
Fit a piece of conductive net (Pos. D) so that the net covers the edge of the marking
head (Pos. B) approyimately 15 mm. Now place the felt (Pos C) on the marking
head, and place the conductive net over the felt in order that you may fasten the
cassette felt (Pos. E) with the net. Slip an o-ring over the net and around the
marking head so that everything is secure.
A
Pos. A Connection to positive cable
Pos. B Marking head
Pos. C Felt
Pos. D Conductive net
Pos. E Cassette
B
E
3.2 Moistening the felt with electrolyte
Before you use the marking head we reccomend that you rinse it with clean water so
that the felt is soaked. After you have wrung out the felt to get rid of excess water,
you may operate with the electrolyte.
C
D
4
ÖSTLING Markiersysteme
Page 6

Operating instructions EU 80
3.3 Stencils
In order to make your own stencils quickly and professionally, ask about our
customized stencil printing systems. This includes the Östling PT 220, 550, and a
24 pin printer as well as all software.
4.0 Marking process
• Turn on the machine (Pos. 6).
• Set your desired voltage (Pos. 1 - Pos. 3) the voltage you choose will be lit.
• Place the product to be marked on a base plate or other device. Place the Stencil
on the product. After that push the prepared marking head lightly on the product.
The marking time normally takes 1 - 1,5 seconds for black marking.
Hint: After marking it is a good idea to rinse the marking head and stencil with clean
water.
Attention: If you notice the etching quality begin to slip, re-check the felt and the
conductive net. Under normal use the felt will begin to collect carbon. For this
reason replace the felt as needed.
5.0 Maintainence
Regular maintainence of th marking machine is not necessary. If you do experience
difficulty, however, please turn to our service department. Unauthorized opening of
the machine will void the warranty.
6.0 Accessories
In order to make a more efficient operation we offer a marking station for the hand
operated unit. This consists of a base plate with T - nuts, two jiggings for attaching
your product, and an X-Y-Z stencil holder.
With this hand marking station, the product is laid on the affixed jiggings and the
stencil is affixed properly with the X-Y-Z stencil holder.
For further technical help you may turn to our technicians in order that they may
answer your specific questions about different marking heads and other accessories
such as customized construction or integrating the unit into your assembly line.
ÖSTLING Markiersysteme
5
Page 7

Operating instructions EU 80
7.0 Troubleshooting
7.1 Problem: No mark
Try the following:
• Is the power cord plugged in ?
• Are all the cables properly installed ?
• Has a voltage been set ?
• Is the circuit breaker (Pos. 7) on the back side in order ?
• Is the marking head soaked with electrolyte ?
Please observe:
• Electrolytic marking works for electrically conductive surfaces only.
• Laquered, anodized, or other protected surfaces cannot be marked
electrolytically
7.2 Problem: Mark is unclear
• Make sure that the stencil is clean.
• Rinse the stencil with water to get rid of oxides.
• Make sure that the surface to the product is clean. Clean off excess dirt or
oil with a dry cloth before you begin marking.
7.3 Problem: Black marks around the mark
The stencil has not been handled properly. It has been nicked and has a hole or is
torn in some other way. In order to correct the problem the best solution is to
replace the stencil. In an emergency, you may cover the holes with adhesive tape
until another stencil arrives.
Please call us when:
• you experience technical difficulties.
• you would like sample materials marked.
• you would like more information regarding accessories such as
different marking heads, felt, electrolyte, conductive net, or you need
any other assistance.
• you would like information about additional Östling products such as
pin marking, pad printing, lazer marking, or injet printing.
6
ÖSTLING Markiersysteme
Page 8
White marking AC 8 V Black with
ÖSTLING Markiersysteme
Black marking AC 8 V Black with
8.0 Electrolytes
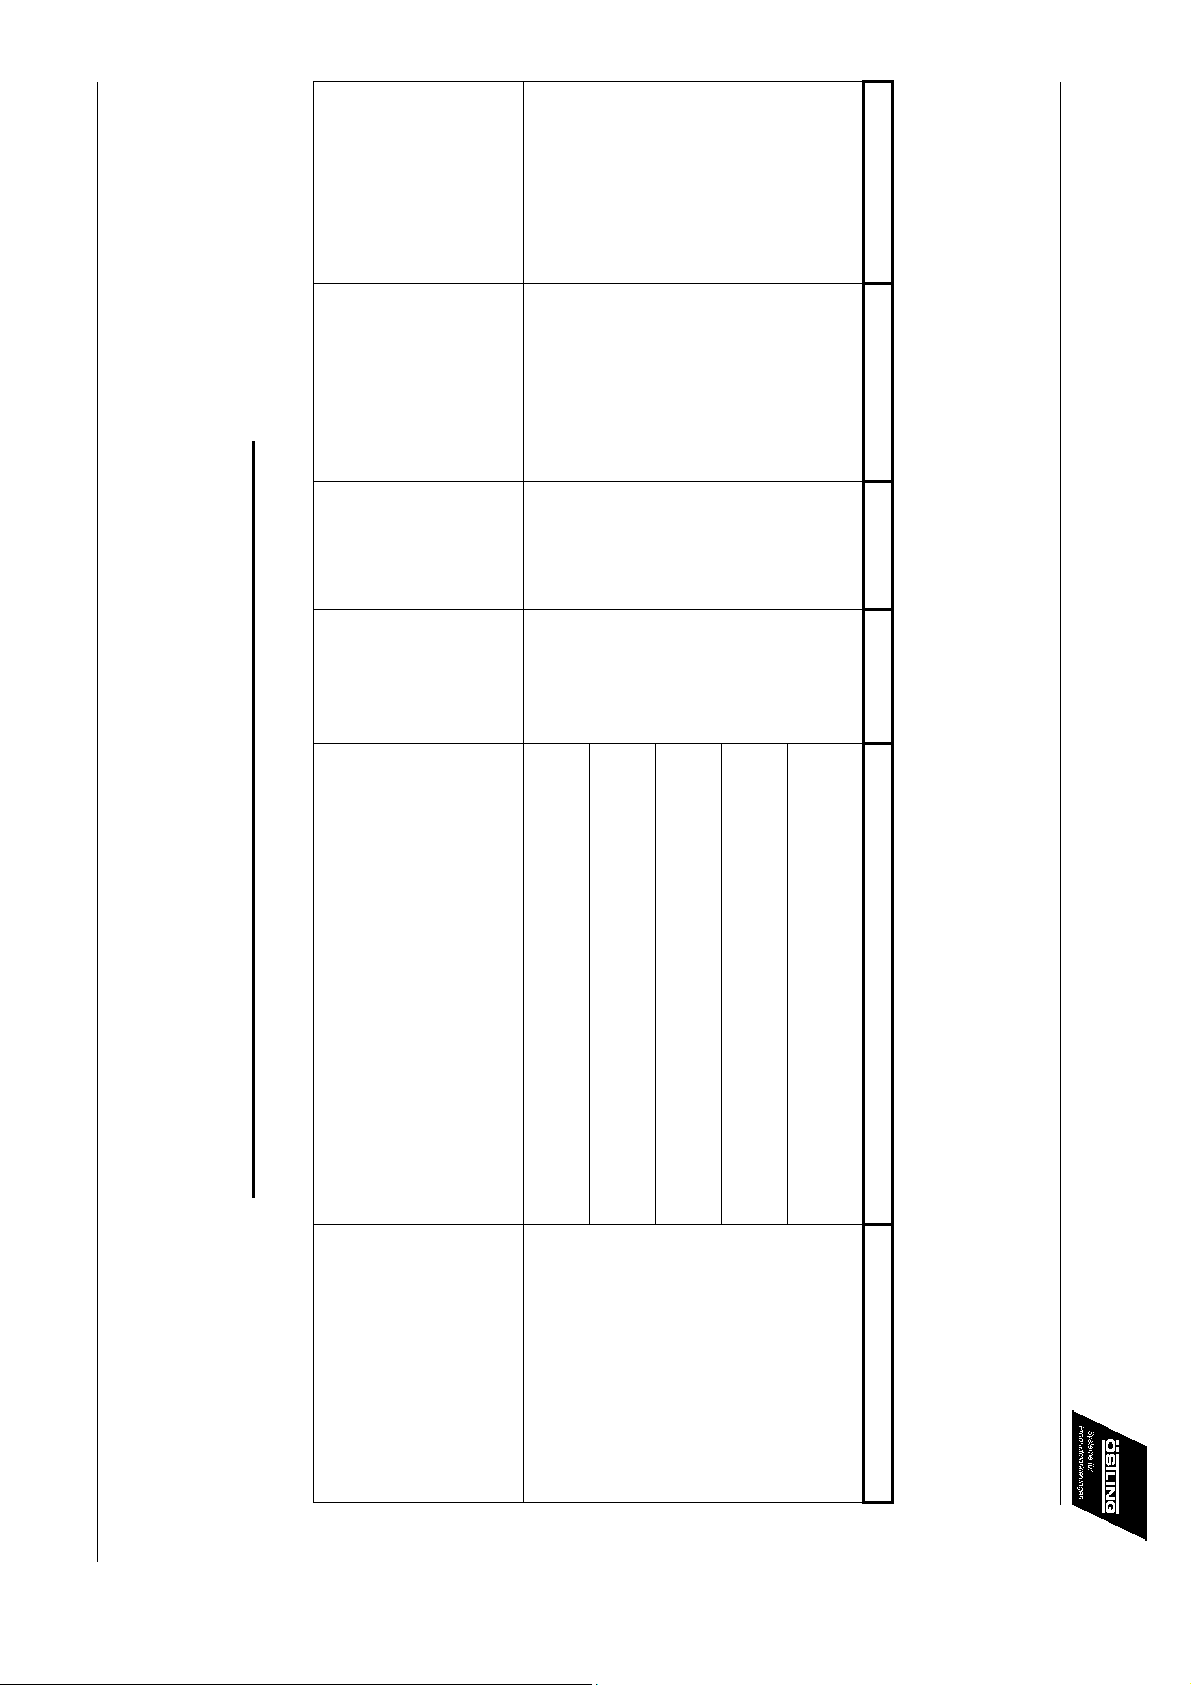
Type of marking Current Voltage Felt Material Electrolyte Remarks
Bedienungsanleitung EU 80
Electrolyte must be discarded after the marking process is comple
Steel 676, 74 ,67/10/3, 676R74
conductive net
Stainless steel 6744, 70 ,72 ,SP1
concuctive net
Tungsten Carbide 332/2
Black oxidized
(Homp steamed)
117 Strong
119 Medium
114 Soft Neutralize with N8
Zink coated 639
Chrome , Nickel 75
7
Page 9

ÖSTLING Markiersysteme
 Loading...