

Page 1
User’s Manual
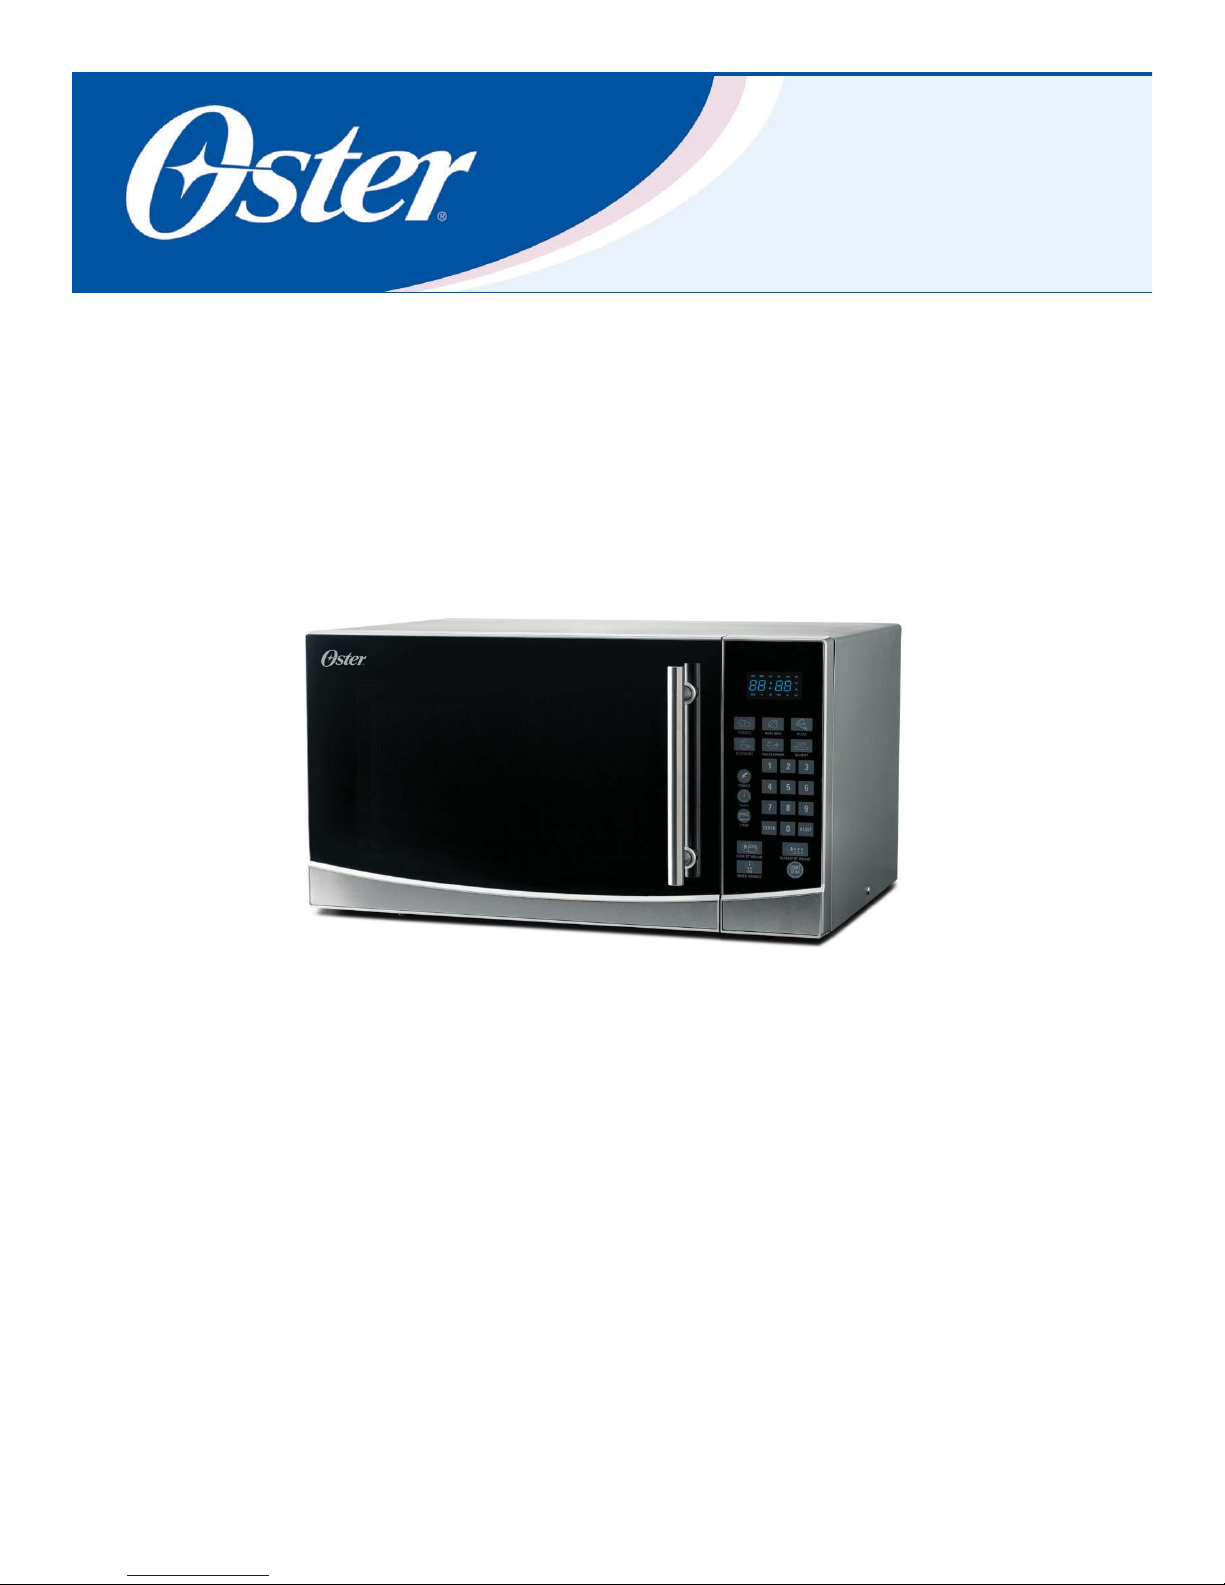
1.1 Cu. Ft. Countertop Microwave
MLO040908
Model: OM1101N0E
Page 2

TABLE OF CONTENTS
IMPORTANT SAFETY INSTRUCTIONS 3
INSTALLATION GUIDE 4
GROUNDING INSTRUCTIONS 5
PRODUCT DIAGRAM 5
CONTROL PANEL 6
OPERATION INSTRUCTIONS 7
COOKING UTENSILS GUIDE 11
COOKING TECHNIQUES 12
CLEANING AND CARE 14
BEFORE CALLING FOR SERVICE 15
SPECIFICATIONS 15
Page 3

IMPORTANT SAFETY INSTRUCTIONS
READ ALL SAFETY INSTRUCTIONS BEFORE USING THIS MICROWAVE
WARNING - to reduce the risk of burns, electric shock, fi re, injury to persons, or exposure to excessive
microwave energy, basic safety precautions should be followed, including the following:
Read all instructions before using the microwave.
1.
This microwave must be grounded. Connect only to properly grounded outlets. See page 5 for grounding
2.
instructions.
Install or place this microwave only in accordance with installation instructions.
3.
Some products, such as sealed glass jars, may explode and should not be heated in this microwave.
4.
This microwave is intended for use only as described in this manual. Do not use corrosive chemicals or
5.
vapors in this microwave. This type of microwave is specifi cally designed to heat, cook, or dry foods. It is
not designed for laboratory use.
As with any appliance, close supervision is necessary when used by children.
6.
Do not overcook food. Carefully attend to the microwave when paper, plastic, or other combustible
7.
materials are placed inside the microwave to facilitate cooking.
Remove wire twist-ties from paper or plastic bags before placing in microwave.
8.
If materials inside the microwave should ignite, keep microwave door closed, turn it off, and disconnect the
9.
power cord or turn off the power fuse at the circuit breaker panel.
Do not use the microwave cavity for storage purposes. Do not leave paper products, cooking utensils, or
10.
food in the cavity when not in use.
Liquids, such as water, coffee, or tea may overheat beyond the boiling point without appearing to be boiling
11.
due to surface tension of the liquid. Visible bubbling or boiling when the container is removed form the
microwave is not always present. THIS COULD RESULT IN VERY HOT LIQUIDS SUDDENLY BOILING
OVER WHEN A SPOON OR OTHER UTENSIL IS INSERTED INTO THE LIQUID. To reduce the risk
of injury: do not overheat the liquid; stir the liquid both before and halfway through heating; do not use
straight-sided containers with narrow necks; after heating, allow the container to stand in the microwave a
short time before removing; use extreme care when inserting a spoon or other utensil into the container.
Do not heat oil or fat for deep-frying in this microwave. It is diffi cult to control the temperature of oil in the
12.
microwave.
Pierce foods with heavy skins, such as potatoes, before cooking.
13.
The contents of feeding bottles and baby jars should be stirred or shaken and the temperature should be
14.
checked before serving to avoid burns.
Cooking utensils may become hot from heat transferred from the heated food. Pot holders may be needed to
15.
handle these utensils.
Do not cover or block any openings on the microwave.
16.
Do not store or use this microwave outdoors. Do not use this microwave near water.
17.
Do not operate this microwave if it has a damaged cord or plug, if it is not working properly, or if it has been
18.
damaged or dropped.
Do not immerse the cord or plug in water. Keep cord away from heated surfaces. Do not let the cord hang
19.
over the edge of the table or counter.
Use only thermometers specifi cally designed for microwaves.
20.
Do not operate any heating or cooking under this microwave.
21.
Be certain the glass tray and roller rings are in place when using the microwave.
22.
Read and follow the specifi c “Precautions to Avoid Possible Exposure to Excessive Microwave Energy”
23.
section found on page 4
SAVE THESE INSTRUCTIONS
3
Page 4
IMPORTANT SAFETY INSTRUCTIONS (continued)
When cleaning microwave surface and door, use only mild, nonabrasive soaps or detergents applied with a sponge or
24.
soft cloth.
This microwave should be serviced only by qualifi ed service personnel. For service and repair, please contact our
25.
Customer Support Center at 866-866-6283.
PRECAUTIONS TO AVOID POSSIBLE EXPOSURE TO EXCESSIVE
MICROWAVE ENERGY
1.
Do not attempt to operate this microwave with the door open. Door open operation can result in
harmful exposure to microwave energy. It is important not to defeat of tamper with the safety locks.
2.
Do not place any objects between the microwave front face and the door, or allow soil or cleaner
residue to accumulate on sealing surfaces.
3.
Do not operate the microwave if damaged. It is particularly important that the microwave door be
properly closed and there is no damage to the door, hinges and latches, or door seals and sealing
surfaces.
4.
The microwave should not be adjusted or repaired by anyone except properly qualifi ed service
personnel.
SAVE THESE INSTRUCTIONS
INSTALLATION GUIDE
Make sure all packing materials are removed from inside the microwave door.
1.
Check the microwave for damage, such as misaligned or bent door, damaged door seals and sealing
2.
surface, broken or loose door hinges and latches, and dents inside the cavity or on the door. If there
are any damages, do not operate the microwave and contact Customer Service at 1-866-866-6283.
This microwave must be placed on a fl at, stable surface to hold its weight and the heaviest food
3.
likely to be cooked inside.
Do not place the oven where heat, moisture, or high humidity is generated. Do not place microwave
4.
near combustible materials.
For correct operation, the oven must have suffi cient air fl ow. Allow 8” of space above the
5.
microwave, 4” at the back, and 2” on each side of the unit. Do not cover or block any openings on
the microwave. Do not remove microwave feet.
Do not operate the oven without the glass tray, roller support, and shaft in their proper positions.
6.
Make sure the power supply cord is undamaged and does not run under the microwave or over any
7.
hot or sharp surface.
The socket must be readily accessible so the microwave can be easily unplugged in an emergency.
8.
4
Page 5
GROUNDING INSTRUCTIONS
This microwave must be grounded. In the event of an electrical short circuit, grounding reduces risk
of electric shock by providing an escape wire for the electric current. Consult a qualified electrician or
serviceman if the grounding instructions are not completely understood, or if doubt exists as to whether
the appliance is properly grounded. For questions regarding the grounding instructions, please contact our
Customer Support Center at 866-866-6283.
WARNING: Improper use of the grounding plug can result in risk of electric shock.
ELECTRICAL REQUIREMENTS
The electrical requirements for this microwave are a 120V, 60Hz, AC only, 20 amp.
•
It is recommended that a separate circuit serving only the microwave be provided.
•
The microwave is equipped with a 3-prong grounding plug. It must be plugged into a wall outlet
•
properly installed and grounded.
POWER CORD
• A short power supply cord is provided to reduce the risks resulting from becoming entangled in or
tripping over a long cord.
• Longer cord sets or extension cords are available and may be used if care is taken in using them.
• If using a longer cord, the marked electrical rating of the cord set or extension cord should be
at least as great as the electrical marking of the microwave itself and the extension cord must be
a grounded-type 3-wire cord. The longer cord should be arranged so it will not drape over the
counter or tabletop.
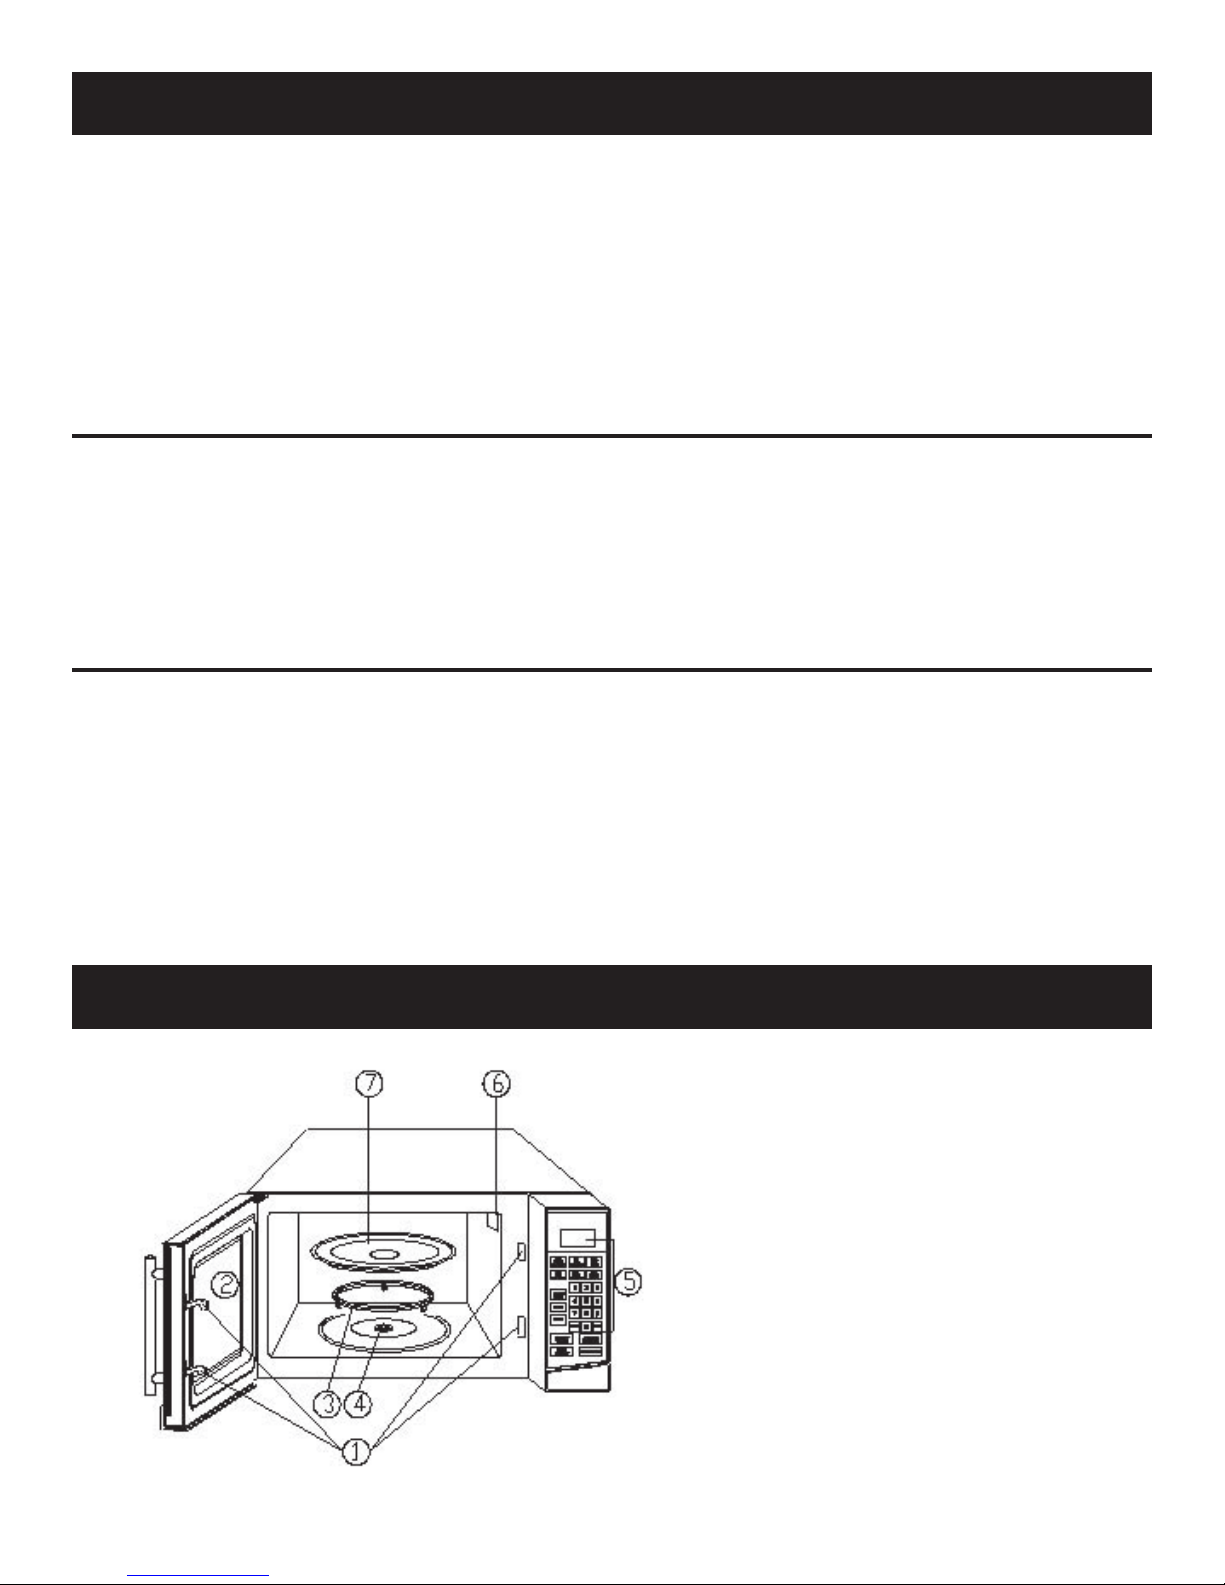
PRODUCT DIAGRAM
Safety interlock system
1.
Observation window
2.
Turntable ring assembly
3.
Turntable shaft
4.
Control panel
5.
Air vent
6.
Glass tray
7.
5
Page 6
CONTROL PANEL
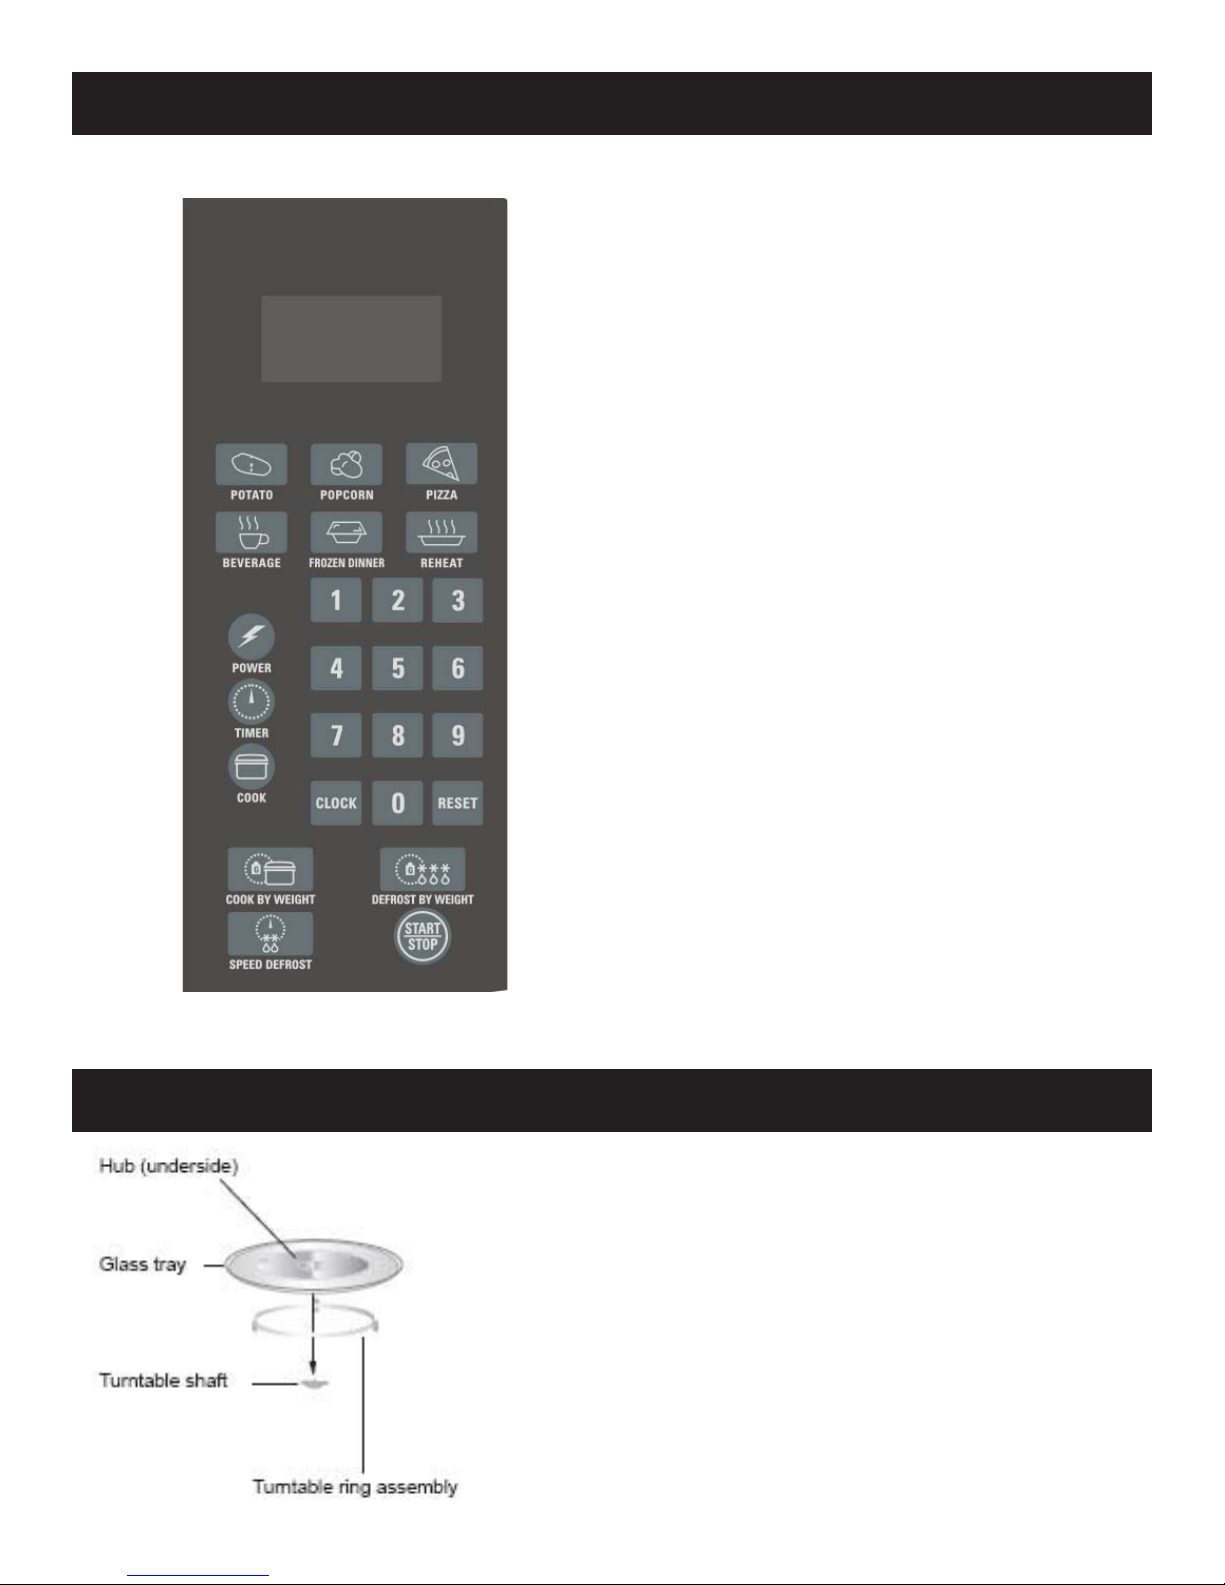
MENU ACTION SCREEN: Cooking time, power,
indicators, and present time are displayed.
QUICK COOK BUTTONS: Instant settings to cook
particular foods.
POWER: Used to set power levels to cook foods
properly.
TIMER: Timer functions independently, even while a
cooking program is in progress.
COOK: Used for multi-staged cooking. Enables
cooking at multiple power levels and time settings.
COOK BY WEIGHT: Programmed cooking based
on weight of foods cooked.
DEFROST BY WEIGHT: Programmed defrosting
based on weight of foods cooked.
SPEED DEFROST: Quick defrost function that
alternates defrost and stand times to quickly and
effectively defrost foods.
NUMBER PAD (0-9): Touch to set time or amount.
CLOCK: Sets current time.
RESET: Clears all previous settings.
START/STOP: Touch to start or stop cooking.
INSTALLING THE TURNTABLE
Never place the glass tray upside down.
•
The glass try should never be restricted.
•
Both the glass tray and turntable ring assembly must
•
always be used during cooking.
All food and containers of food should always be placed on
•
the glass tray for cooking.
If the glass tray or turntable ring assembly cracks or
•
breaks, contact your nearest authorized service center.
6
Page 7
OPERATION INSTRUCTIONS
SETTING THE CLOCK
Press the CLOCK button.
1.
Use the number pads to enter in the correct time.
2.
Press the CLOCK button again to confi rm.
3.
MICROWAVE COOKING
Using the number pads, enter the desired cook time.
1.
Press the START/STOP button to start.
2.
The power level defaults to 100%.
POWER LEVEL
The power level defaults to 100%. To change the cooking power level:
Using the number pads, enter the desired cook time.
1.
Press the POWER LEVEL button to select the desired power level.
2.
Press the START/STOP button to start.
3.
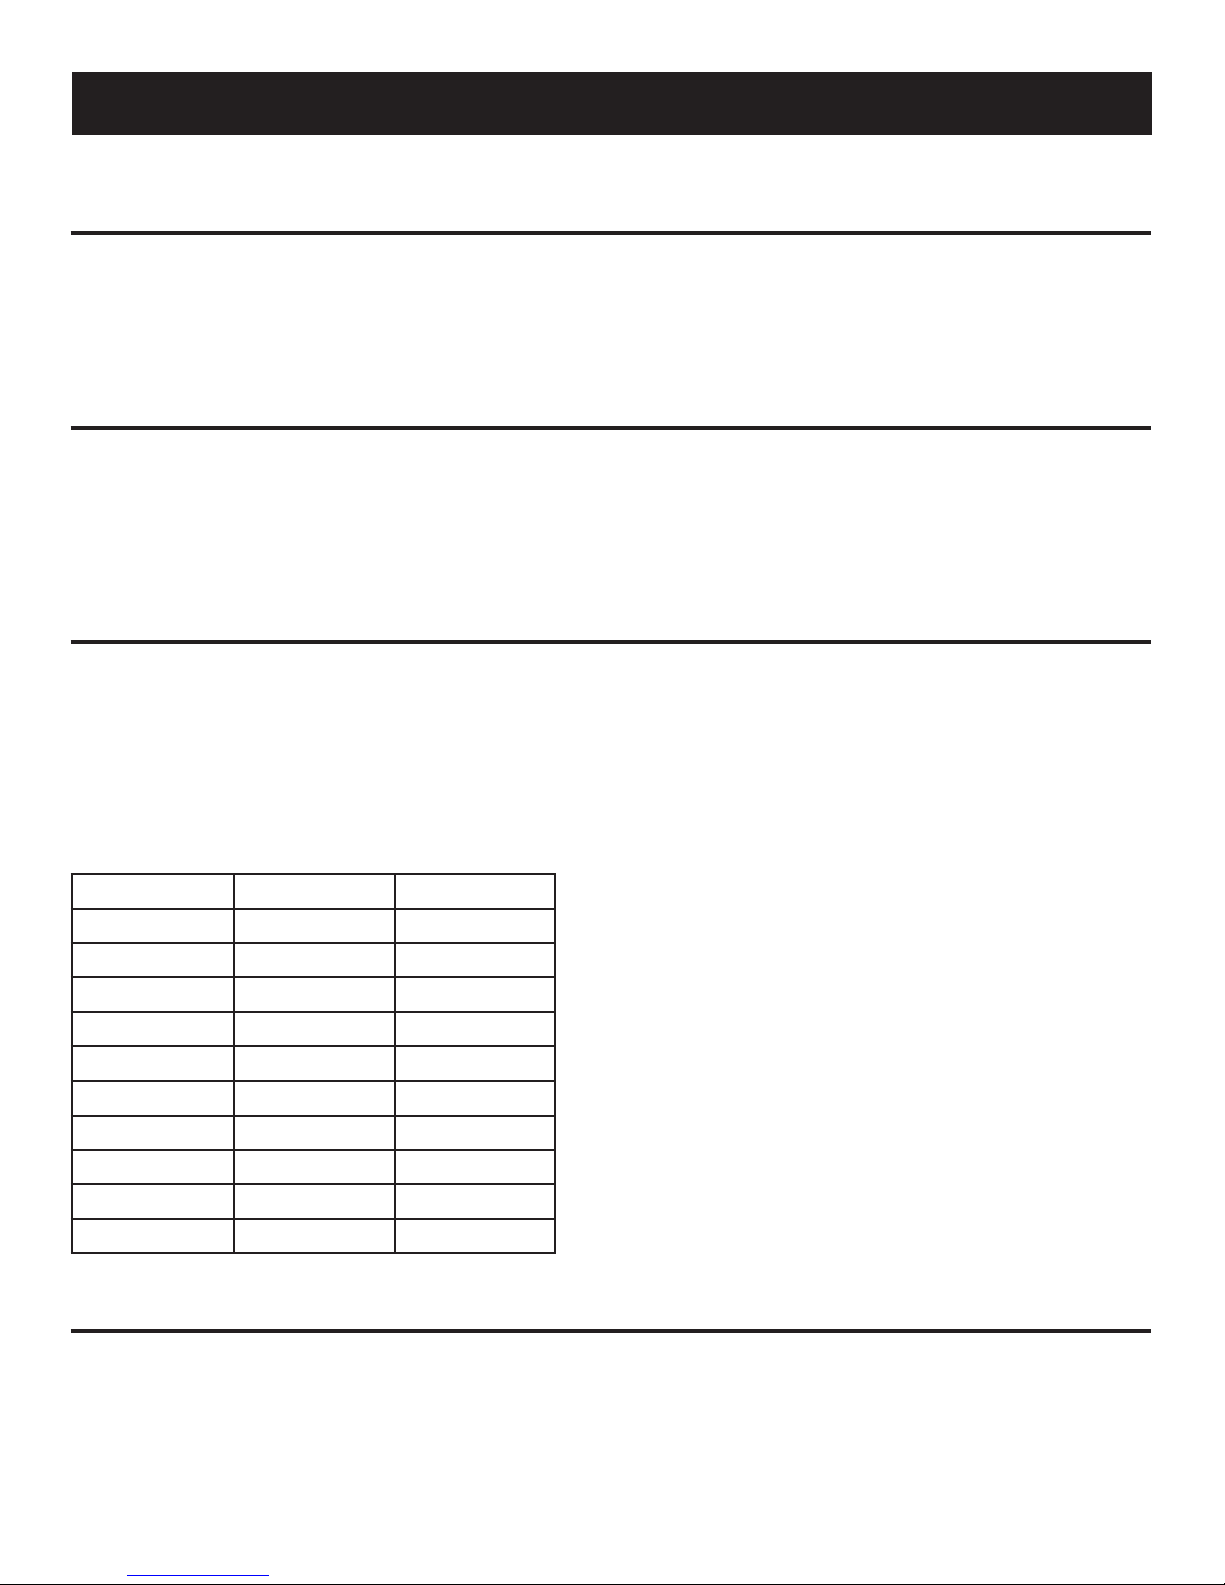
There are 10 power levels available:
LEVEL POWER DISPLAY
10 100% PL 10
9 90% PL 9
8 80% PL 8
7 70% PL 7
6 60% PL 6
5 50% PL 5
4 40% PL 4
3 30% PL 3
2 20% PL 2
1 10% PL 1
KITCHEN TIMER
Press the KITCHEN TIMER button.
1.
Using the number pads, enter the desired timer time.
2.
Press the START/STOP button to start.
3.
7
Page 8
OPERATION INSTRUCTIONS (continued)
FAST START
Press the START/STOP button to cook one minute. Each time you press this button, the cook time
1.
will increase by one minute.
AUTO DEFROST
Press the AUTO DEFROST button.
1.
Using the number pads, enter in the weight (ounces) of the item you want to defrost. Note the
2.
minimum number you can enter is 4 (oz).
Press the START/STOP button to start.
3.
EXPRESS TIME DEFROST
Press the EXPRESS DEFROST button.
1.
Using the number pads, enter the desired defrost time.
2.
The default power level for auto defrost is 3. If you wish to change the power level, press the
3.
POWER LEVEL button and the desired power level.
Press the START/STOP button to start.
4.
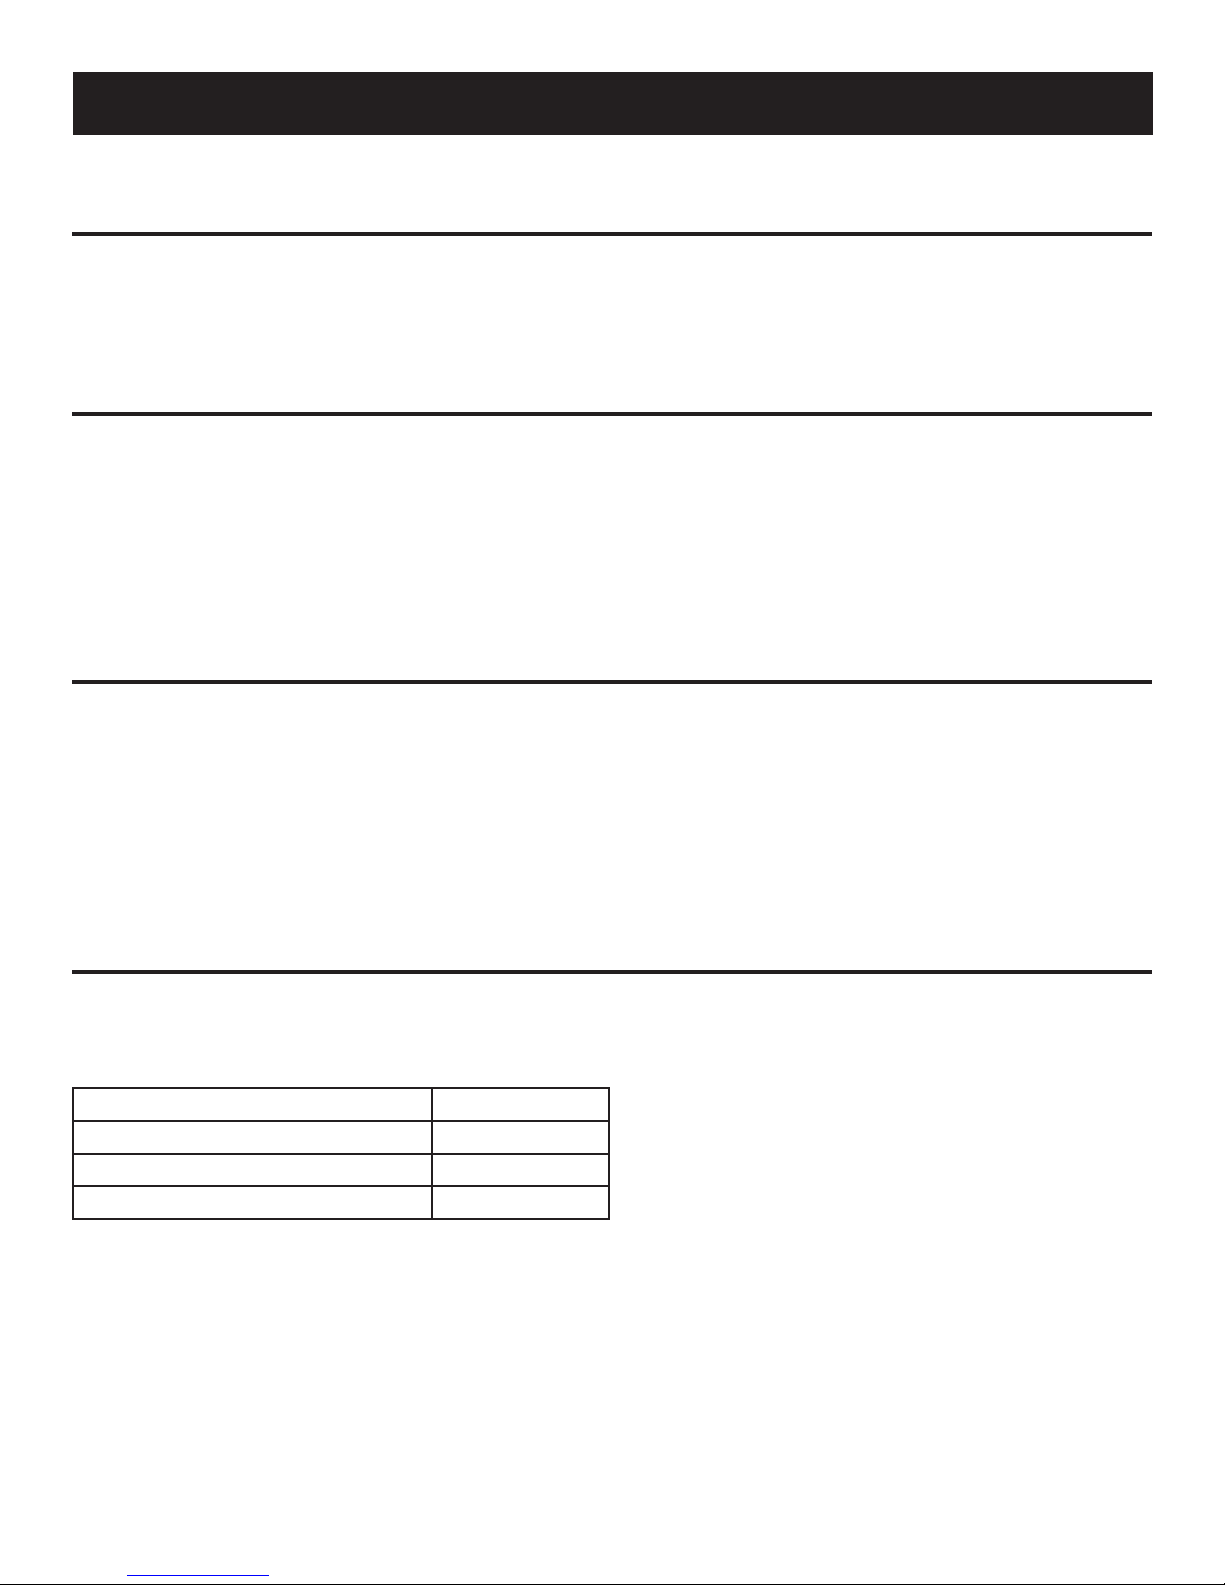
POPCORN
Press the POPCORN button to set the weight as to the chart below.
1.
Press START/STOP to start
2.
PRESS POPCORN BUTTON WEIGHT
1 time 1.75 oz
2 times 3.0 oz
3 times 3.5 oz
8
Page 9
OPERATION INSTRUCTIONS (continued)
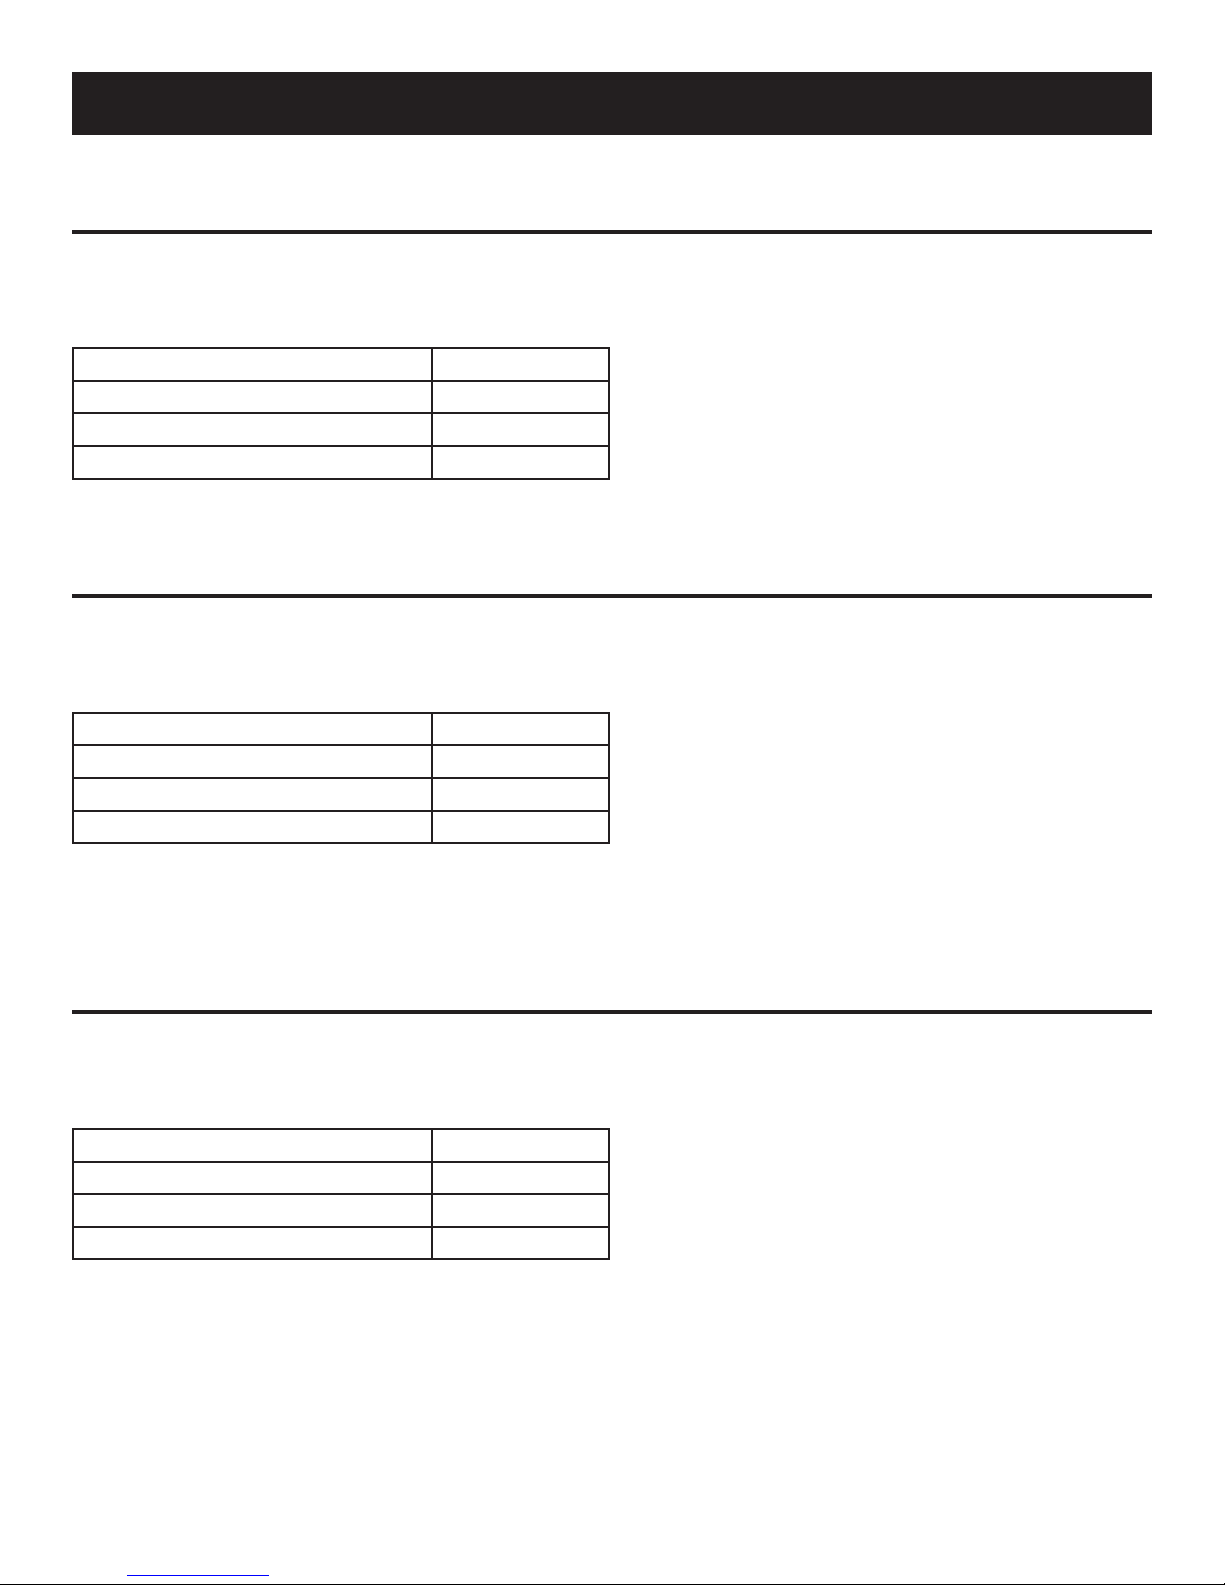
BEVERAGE
Press the BEVERAGE button to set the weight as to the chart below.
1.
Press START/STOP to start
2.
PRESS BEVERAGE BUTTON WEIGHT
1 time 1 mug
2 times 2 mugs
3 times 3 mugs
REHEAT
Press the REHEAT button to set the weight as to the chart below.
1.
Press START/STOP to start
2.
PRESS REHEAT BUTTON WEIGHT
1 time 9.0 oz
2 times 12.0 oz
3 times 18.0 oz
PIZZA
Press the PIZZA button to set the weight as to the chart below.
1.
Press START/STOP to start
2.
PRESS PIZZA BUTTON WEIGHT
1 time 3.0 oz
2 times 6.0 oz
3 times 9.0 oz
9
Page 10
OPERATION INSTRUCTIONS (continued)
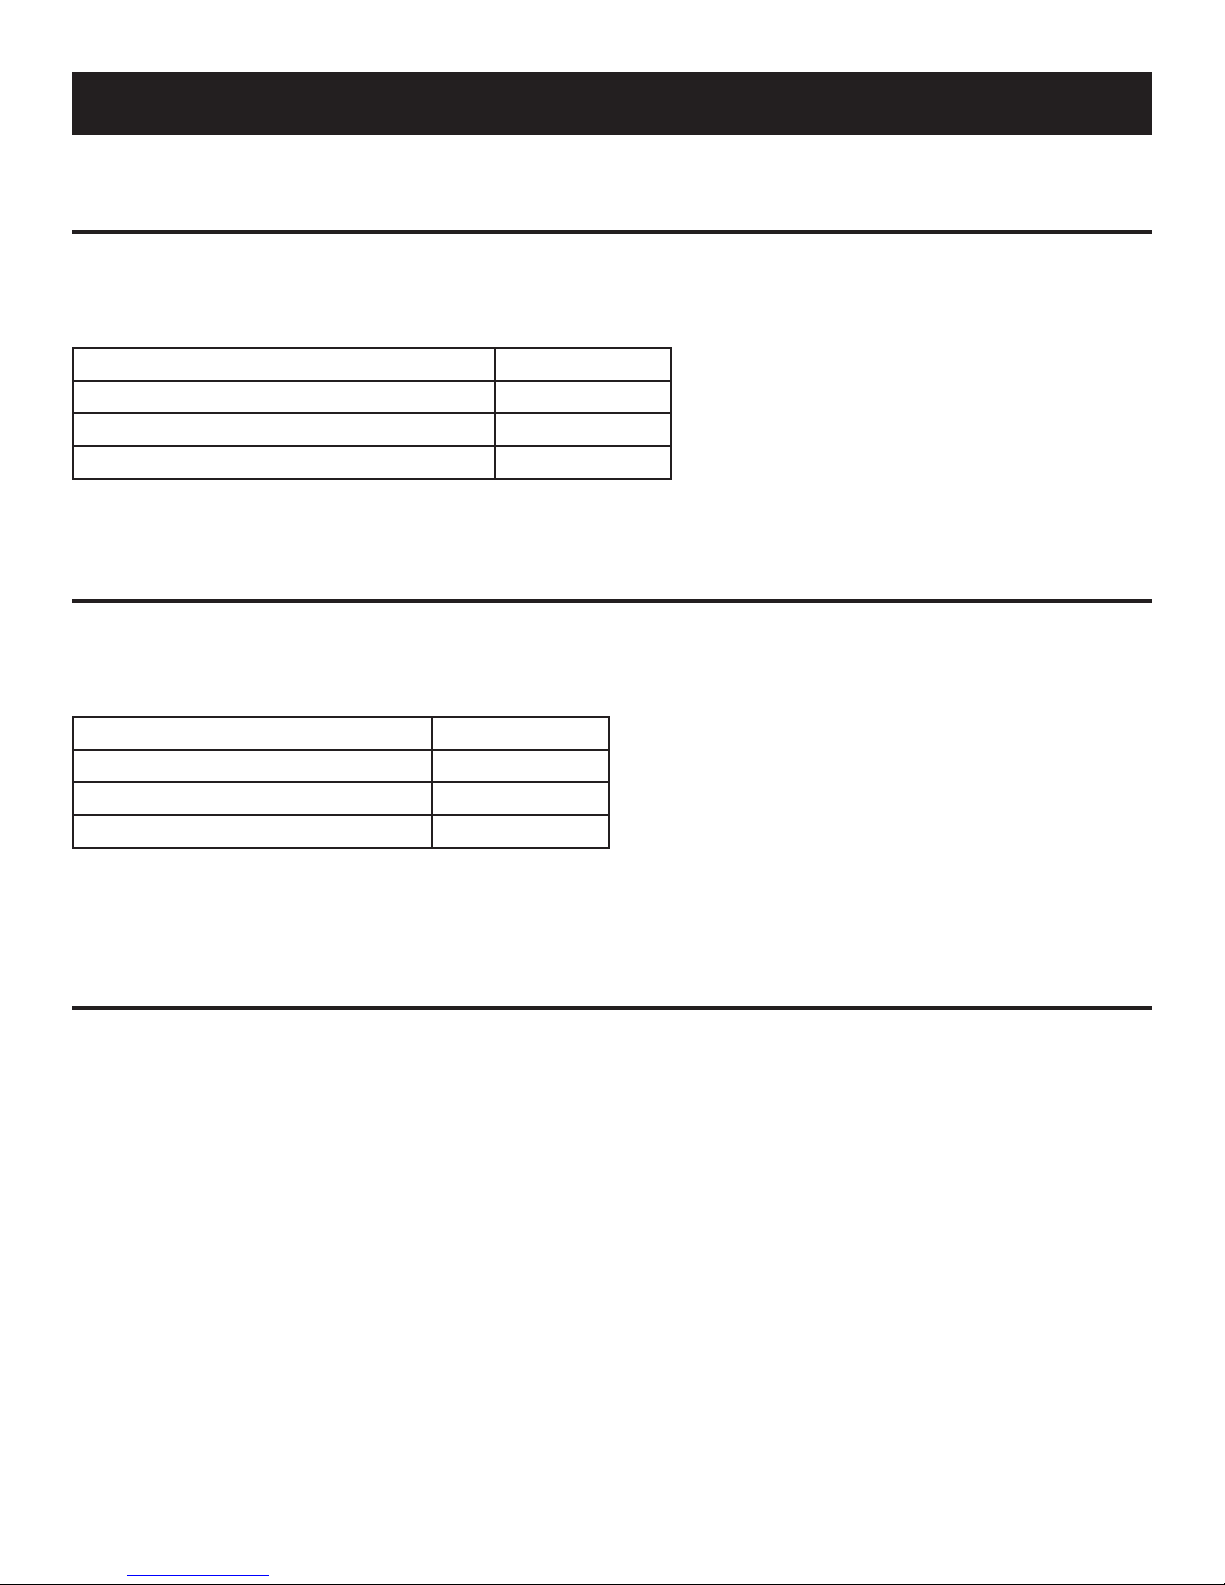
FROZEN ENTREE
Press the FROZEN ENTREE button to set the weight as to the chart below.
1.
Press START/STOP to start
2.
PRESS FROZEN ENTREE BUTTON WEIGHT
1 time 9.0 oz
2 times 12.0 oz
3 times 18.0 oz
POTATO
Press the POTATO button to set the weight as to the chart below.
1.
Press START/STOP to start
2.
PRESS POTATO BUTTON WEIGHT
1 time 1 potato
2 times 2 potatoes
3 times 3 potatoes
SETTING CHILD LOCK
The safety lock prevents unsupervised operation by children.
To set, press and hold STOP/CLEAR for three seconds. A long beep will sound to set the child lock.
•
•
To cancel, press and hold STOP/CLEAR for three seconds. A long beep will sound to cancel the
child lock.
10
Page 11
COOKING UTENSILS GUIDE
This section lists which utensils can be used in this microwave, which have limited use for short periods,
and which should not be used in this microwave.
RECOMMENDED
Microwave browning dish -- Use to brown the exterior of small items such as steaks, chops, or
pancakes. Follow the directions provided with your browning dish.
Microwaveable plastic wrap -- Use to retain steam. Leave a small opening for some steam to escape
and avoid placing it directly on the food.
Paper towels and napkins -- Use for short-term heating and covering; these absorb excess moisture and
prevent splattering. Do not use recycled paper towels which may contain metal and could ignite.
Glass and glass-ceramic bowls and dishes -- Use for heating and cooking.
Paper plates and cups -- Use for short-term heating at low temperatures. Do not use recycled paper
which may contain metal and could ignite.
Wax paper -- Use as a cover to prevent splattering.
Thermometers -- Use only those labeled “Microwave Safe” and follow all directions. Check the food
in several places. Conventional thermometers may be used on microwaved food once the food has been
removed from the microwave.
LIMITED USE
Aluminum foil -- Use narrow strips of foil to prevent overcooking exposed areas. Using too much foil
can damage your microwave, so be careful. Keep 1” between foil and microwave cavity.
Ceramic, porcelain, and stoneware -- Use these if they are labeled “Microwave Safe”. If they are not
labeled, test them to make sure they can be used safely.
Plastic -- Only use if labeled “Microwave Safe”. Other plastics may melt.
11
Page 12
COOKING UTENSILS GUIDE (continued)
NOT RECOMMENDED
Glass jars and bottles -- Regular glass is too thin to be used in a microwave. It can shatter and cause
damage and injury.
Paper bags -- These are a fi re hazard, except for popcorn bags that are designed for microwave use.
Styrofoam plates and cups -- These can melt and leave unhealthy residue on food.
Plastic storage and food containers -- Containers such as margarine tubs can melt in the microwave.
Metal utensils -- These can damage your microwave. Remove all metal before cooking.
Note:
Should you wish to check if a dish is safe for microwaving, place the empty dish in the microwave
•
and microwave on high for 30 seconds. A dish that becomes very hot should not be used.
COOKING TECHNIQUES
Your microwave makes cooking easier than conventional cooking, provided you keep these
considerations in mind:
STIRRING
Stir foods such as casseroles and vegetables while cooking to distribute heat evenly.
•
Food at the outside of the dish absorbs more energy and heats quicker, so stir from the outside to the
•
center.
The microwave will turn off when you open the door to stir your food.
•
ARRANGEMENT
Arrange evenly shaped foods, such as chicken pieces or chops, with the thicker, meatier parts
•
towards the outside of the turntable where they receive more microwave energy.
To prevent overcooking, place delicate areas, such as asparagus tips, towards the center of the
•
turntable.
12
Page 13
COOKING TECHNIQUES (continued)
SHIELDING
Shield food with narrow strips of aluminum foil to prevent overcooking.
•
Areas that need shielding include poultry wing tips, the ends of poultry legs, and corners of square
•
baking dishes.
Use only small amounts of aluminum foil, as larger amounts may damage your microwave.
•
TURNING
Turn foods over midway through cooking to expose all parts to microwave energy.
•
This is especially important when cooking large foods such as roasts.
•
STANDING
Foods cooked in a microwave build up internal heat and continue to cook for a few minutes after
•
heating stops.
Let foods stand to complete cooking, especially for foods such as cakes and whole vegetables.
•
Roasts need this time to complete cooking in the center without overcooking the outer areas.
•
All liquids, such as soup or hot chocolate, should be shaken or stirred when cooking is complete.
•
When heating baby food, stir well after removing from microwave and test temperature before
•
serving.
ADDING MOISTURE
Microwave energy is attracted to water molecules.
•
Food that is uneven in moisture content should be covered or allowed to stand so that the heat
•
disperses evenly.
Add a small amount of water to dry food to help it cook.
•
13
Page 14

CLEANING AND CARE
Turn off the microwave and unplug the power cord from the wall when cleaning.
1.
Keep the inside of the microwave clean. When food splatters or spilled liquids adhere to microwave
2.
walls, wipe with a damp cloth. Mild detergents may be used if the microwave gets very dirty. Avoid
using spray or other harsh cleaners may stain, streak, or dull the door surface.
The outside of the microwave should be cleaned with a damp cloth. To prevent damage to the
3.
operating parts inside the microwave, water should not be allowed to seep into the ventilation
openings.
Wipe the window on both sides with a damp cloth to remove any spills or splatters.
4.
Do not allow the control panel to become wet. Clean with a soft, damp cloth. When cleaning the
5.
panel, leave the microwave door open to prevent it from accidentally turning on.
If steam accumulates inside or around the outside of the door, wipe with a soft cloth. This may
6.
occur when the microwave is operated under high humidity. This is normal.
It may be necessary to remove the glass tray for cleaning. Wash the tray in warm, soapy water or in
7.
a dishwasher.
The roller ring and microwave fl oor should be cleaned regularly to avoid excessive noise. Wipe the
8.
bottom surface of the microwave with a mild detergent. The roller ring may be washed in mild,
soapy water or in a dishwasher. When removing the roller ring, be sure to replace it in the proper
position.
Remove odors from your microwave by combining a cup of water with the juice and skin of one
9.
lemon in a microwaveable bowl. Microwave for 5 minutes. Wipe thoroughly and dry with a soft
cloth.
If the light bulb burns out, please contact customer service (1-866-866-6283) to have it replaced.
10.
The microwave should be cleaned regularly and any food deposits should be removed. Failure
11.
to maintain the microwave in a clean condition could lead to deterioration of surfaces that could
adversely affect the life of the unit and could possibly result in a hazardous situation.
Please do not dispose of this appliance into a regular garbage receptacle. Please check to see where
12.
you can dispose such appliances.
14
Page 15
BEFORE CALLING FOR SERVICE
Before asking for service, please check each item below:
Check to ensure the microwave is plugged in securely. If not, remove the plug from the outlet, wait
•
10 seconds, and plug it in again securely.
Check for a blown circuit fuse or a tripped main circuit breaker. If these seem to be operating
•
properly, test the outlet with another appliance.
Check to ensure the control panel is programmed correctly and the timer is set.
•
Check to ensure the door is securely closed, engaging the door safety lock system. If the door is not
•
properly closed, the microwave energy will not fl ow inside.
SPECIFICATIONS
Power Consumption 120 V, 60 Hz, 1450 W
Output 1000W
Microwave Capacity 1.1 Cu. Ft.
Net Weight (pounds) Approx. 36.2
15
Page 16
© 2008 Sunbeam Products, Inc. doing business as Jarden Consumer Solutions. All rights reserved.
®
is a registered trademark of Sunbeam Products, Inc. used under license.
Oster
Distributed by MLO Appliance Company, LLC. 4400 Baker Road, Minnetonka, MN 55343.
For service, support and warranty information, visit www.osterliving.com or call 1-866-866-6283.
 Loading...