

Page 1
\
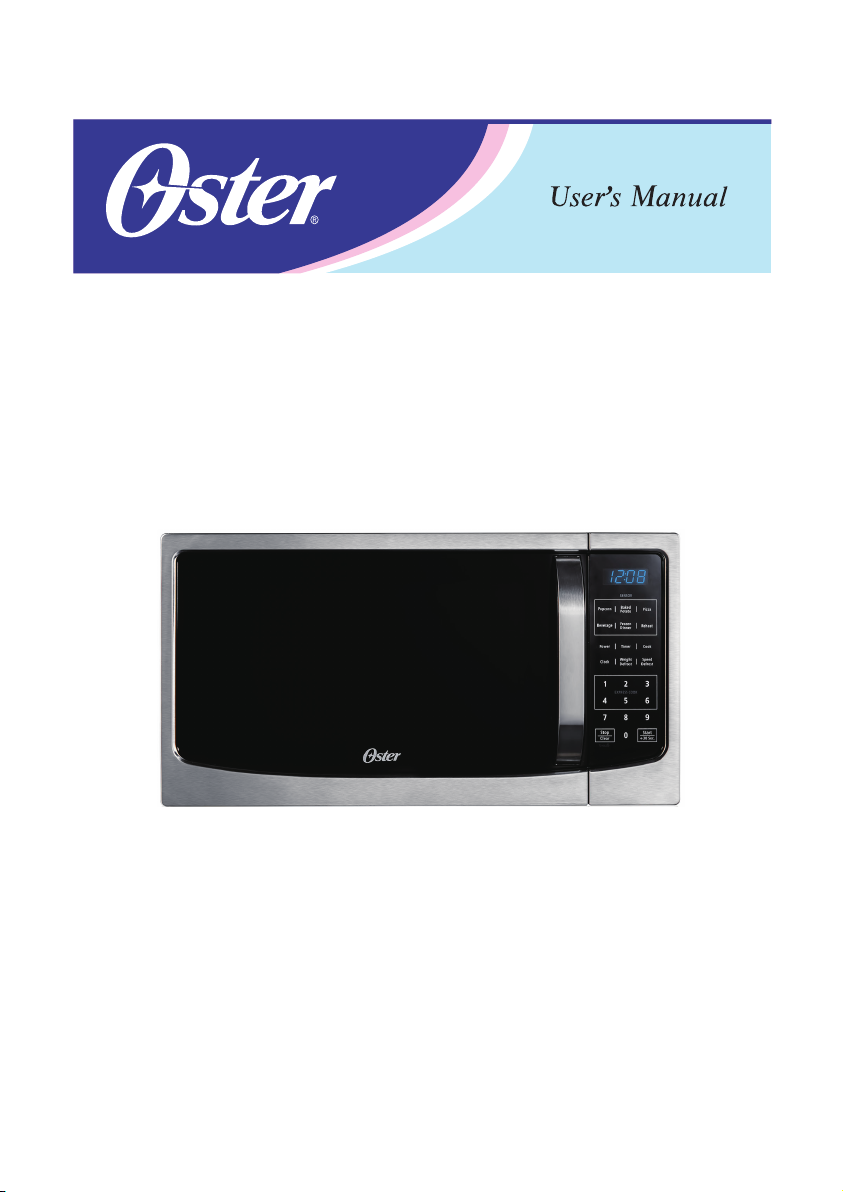
cu. ft. Countertop Microwave
1.6
GL N 032718
Model:
OGWT1603SE
Page 2

TABLE OF CONTENTS
IMPORTANT SAFETY INSTRUCTIONS...................................................
PRECAUTIONS TO AVOID POSSIBLE EXPOSURE TO EXCESSIVE
MICROWAVE ENERGY............................................................................
INSTALLATION GUIDE.............................................................................
GROUNDING INSTRUCTIONS................................................................
INSTALLING THE TURNTABLE...............................................................
PRODUCT DIAGRAM...............................................................................
CONTROL PANEL....................................................................................
OPERATION INSTRUCTIONS.................................................................
ABOUT THE SENSOR FEATURES..........................................................
SENSOR COOK SETTINGS....................................................................
COOKING UTENSILS GUIDE..................................................................
CLEANING AND CARE............................................................................
SPECIFICATIONS....................................................................................
WARRANTY ..............................................................................................
2
5
6
6
8
9
10
11
15
16
17
19
20
21
1
Page 3

IMPORTANT SAFETY INSTRUCTIONS
READ ALL SAFETY INSTRUCTIONS BEFORE USING THIS MICROWAVE
WARNING - to reduce the risk of burns, electric shock, fire, injury to persons,
or exposure to excessive microwave energy, basic safety precautions should
be followed, including the following:
1. Read all instructions before using the microwave.
2. Read and follow the specific “PRECAUTIONS TO AVOID POSSIBLE
EXPOSURE OR EXCESSIVE MICROWAVE ENERGY” on page 5.
3. This microwave must be grounded. Connect only to properly grounded
outlets. See page 5 for grounding instructions.
4. Install or place this microwave only in accordance with installation
instructions.
5. Some produce such as whole eggs and sealed containers - for example,
closed glass jars - are able to explode and should not be heated in this
oven.
6. This microwave is intended for use only as described in this manual. Do
not use corrosive chemicals or vapors in this microwave. This type of
microwave is specifically designed to heat, cook, or dry foods. It is not
designed for laboratory use.
7. As with any appliance, close supervision is necessary when used by
children.
8. To reduce the risk of fire in the oven cavity:
(1) Do not overcook food. Carefully attend to the microwave when paper,
plastic, or other combustible materials are placed inside the microwave
to facilitate cooking.
(2) Remove wire twist-ties from paper or plastic bags before placing in
microwave.
2
Page 4

IMPORTANT SAFETY INSTRUCTIONS
(cont’d.)
(3) If materials inside the microwave should ignite, keep microwave door
closed, turn it off, and disconnect the power cord or turn off the power
fuse at the circuit breaker panel.
(4) Do not use the microwave cavity for storage purposes. Do not leave
paper products, cooking utensils, or food in the cavity when not in use.
9. Liquids, such as water, coffee, or tea, may overheat beyond the boiling
point without appearing to be boiling due to surface tension of the liquid.
Visible bubbling or boiling when the container is removed from the
microwave is not always present. THIS COULD RESULT IN VERY HOT
LIQUIDS SUDDENLY BOILING OVER WHEN A SPOON OR OTHER
UTENSIL IS INSERTED INTO THE LIQUID. To reduce the risk of injury:
(1) Do not overheat the liquid;
(2) Stir the liquid both before and halfway through heating;
(3) Do not use straight-sided containers with narrow necks;
(4) After heating, allow the container to stand in the microwave a short
time before removing;
(5) Use extreme care when inserting a spoon or other utensil into the
container.
10. Do not heat oil or fat for deep frying in this microwave. It is difficult to
control the temperature of oil in the microwave.
11. Pierce foods with heavy skins, such as potatoes, before cooking.
12. The contents of feeding bottles and baby jars should be stirred or shaken
and the temperature should be checked before serving to avoid burns.
13. Cooking utensils may become hot from heat transferred from the heated
food. Pot holders may be needed to handle these utensils.
3
Page 5

IMPORTANT SAFETY INSTRUCTIONS
(cont’d.)
Do not cover or block any openings on the microwave.
14.
Do not store or use this microwave outdoors. Do not use this microwave
15.
near water, for example, near a kitchen sink, in a wet basement, near a
swimming pool, or similar location.
16. Do not operate this microwave if it has a damaged cord or plug, if it is
not working properly, or if it has been damaged or dropped.
17. Do not immerse the cord or plug in water. Keep cord away from heated
surfaces. Do not let the cord hang over the edge of the table or counter.
18. Use only thermometers specifically designed for microwaves.
19. Do not operate any heating or cooking under this microwave.
20. Be certain the glass tray and roller rings are in place when using the
microwave.
21. When cleaning microwave surface and door, use only mild, nonabrasive
soaps or detergents applied with a sponge or soft cloth.
22. This equipment generates, uses and can radiate radio frequency energy
and, if not installed and used in accordance with the instructions, may
cause harmful interference to radio communications. However, there is no
guarantee that interference will not occur in a particular installation. If this
equipment does cause harmful interference to radio or television reception,
which can be determined by turning the equipment off and on, the user is
encouraged to try to correct the interference by one or more of the
following measures:
(1) Reorient or relocate the receiving antenna.
(2) Increase the separation between the equipment and receiver.
4
Page 6

IMPORTANT SAFETY INSTRUCTIONS
IMPORTANT SAFETY INSTRUCTIONS
(cont’d.)
(3) Connect the equipment into an outlet on a circuit different from that
to which the receiver is connected.
(4) Consult the dealer or an experienced radio/TV technician for help.
23. This microwave should be serviced only by qualified service personnel.
For service and repair, please contact our Customer Support Center at
1-800-324-0340.
PRECAUTIONS TO AVOID POSSIBLE
IMPORTANT SAFETY INSTRUCTIONS
EXPOSURE TO EXCESSIVE MICROWAVE ENERGY
1. Do not attempt to operate this microwave with the door open. Door open
operation can result in harmful exposure to microwave energy. It is important
not to defeat or tamper with the door interlocks.
2. Do not place any objects between the microwave front face and the door,
or allow soil or cleaner residue to accumulate on sealing surfaces.
3. Do not operate the microwave if damaged. It is particularly important that
the microwave door be properly closed and there is no damage to the
door (bent), hinges and latches (broken or loosened), or door seals and
sealing surfaces.
4. The microwave should not be adjusted or repaired by anyone except properly
qualified service personnel.
SAVE THESE INSTRUCTIONS
5
Page 7

INSTALLATION GUIDE
1. Make sure all packing materials are removed from inside the mcirowave
door.
2. Check the microwave for damage, such as misaligned or bent door,
damaged door seals and sealing surface, broken or loose door hinges and
latches, and dents inside the cavity or on the door. If there are any damages,
do not operate.
3. This microwave must be placed on a flat, stable surface to hold its weight
and the heaviest food likely to be cooked inside.
4. Do not place the oven where heat, moisture, or high humidity is generated.
Do not place microwave near combustible materials.
5. For correct operation, the oven must have sufficient air flow. Allow 8” of
space above the microwave, 4” at the back and 2” on each side of the unit.
6. Do not cover or block any openings on the microwave. Do not remove
microwave feet. Do not operate the oven without the glass tray, roller
support, and shaft in their proper positions. Make sure the power supply
cord is undamaged and does not run under the microwave or over any hot
or sharp surface.
7. The socket must be readily accessible so the microwave can be easily
unplugged in an emergency.
GROUNDING INSTRUCTIONS
This microwave must be grounded. In the event of an electrical short circuit,
grounding reduces risk of electric shock by providing an escape wire for the
electric current. Consult a qualified electrician or serviceman if the grounding
6
Page 8
GROUNDING INS
instructions are not completely understood, or if doubt exists as to whether
the appliance is properly grounded, and either: 1) If it is necessary to use an
extension cord, use only a 3-wire extension cord that has a 3-blade grounded
plug, and 3-slot receptacle that will accept the plug on the appliance. The
marked rating of the extension cord shall be equal to or greater than the
electrical rating of the appliance, or 2) Do not use an extension cord. If the
power supply cord it too short, have a qualified electrician or service man
install an outlet near the appliance. For questions regarding the grounding
instructions, please contact our Customer Support Center at 1-800-324-0340.
WARNING: Improper use of the grounding plug can result in risk of electric
TR
UCTIONS (cont’d.)
shock.
ELECTRICAL REQUIREMENTS
The electrical requirements for this microwave are a 120V, 60Hz, AC only,
20 amp. It it recommended that a separate circuit serving only the microwave
be provided.
The microwave is equipped witih a 3-prong grounding plug. It must be plugged
into a wall outlet properly installed and grounded.
POWER CORD
1. A short power supply cord is provided to reduce the risks resulting from
becoming entangled in or tripping over a long cord.
2. Longer cord sets or extension cords are available and may be used if care
is taken in using them.
3. If using a longer cord, the marked electrical rating of the cord set or
extension cord should be at least as great as the electrical marking of the
microwave itself and the extension cord must be a grounded-type 3-wire
cord. The longer cord should be arranged so it will not drape over the
counter or tabletop.
7
Page 9

GROUNDING INSTRUCTIONS
(cont’d.)
RADIO OR TV INTERFERENCE
Should there be any interference caused by the microwave oven to your
radio or TV, check that the microwave oven is on a different circuit, relocate
the radio or TV as far away from the oven as feasible, and check position
and signal of receiving antenna.
INSTALLING THE TURNTABLE
1. Never place the glass tray upside down.
2. The glass tray should never be restricted.
3. Both the glass tray and turntable ring assembly must always be used
during cooking.
4. All food and containers of food should always be placed on the glass tray
for cooking.
5. If the glass tray or turntable ring assembly cracks or breaks, contact
1-800-324-0340.
8
Page 10
PRODUCT DIAGRAM
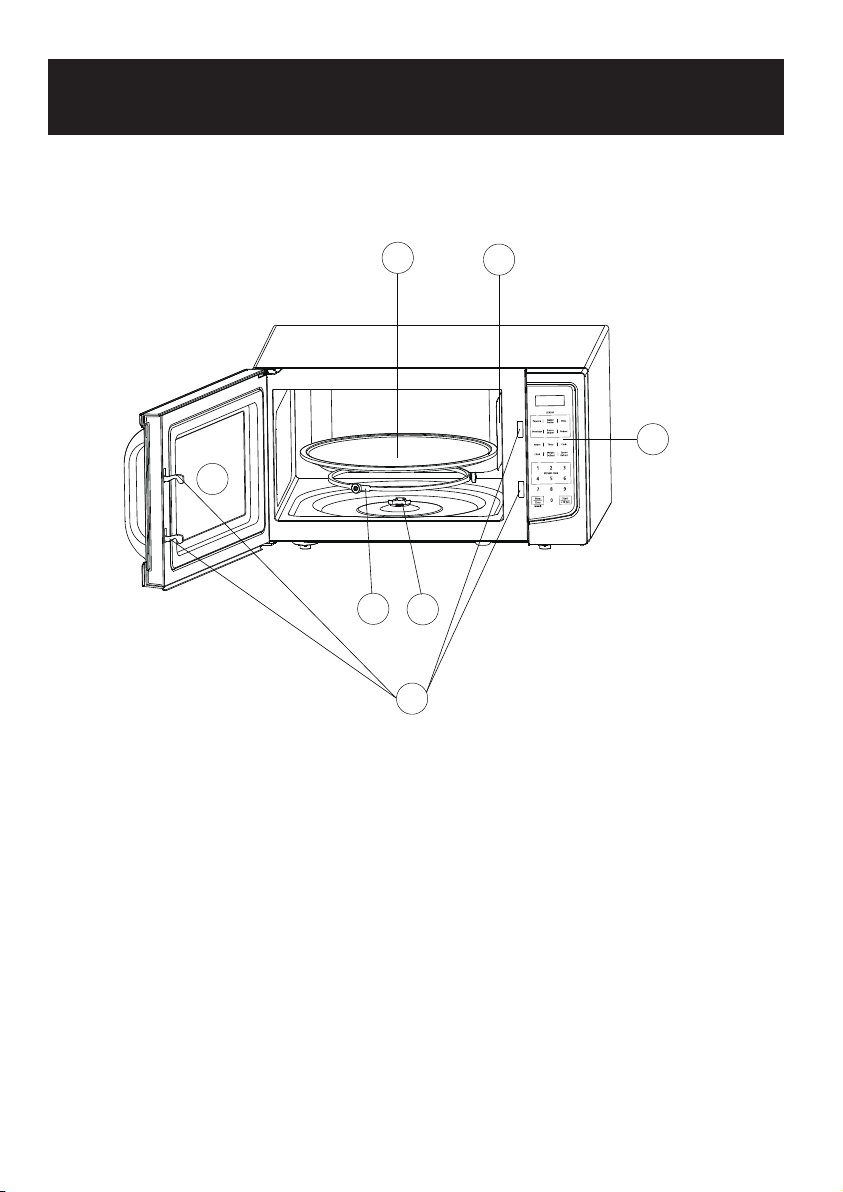
2
1. Door Lock System
2. Oven Window
7
3
4
1
6
5
3. Roller Ring
4. Shaft
5. Control Panel
6. Wave Guide (Do not remove)
7. Glass Tray
9
Page 11
CONTROL PANEL
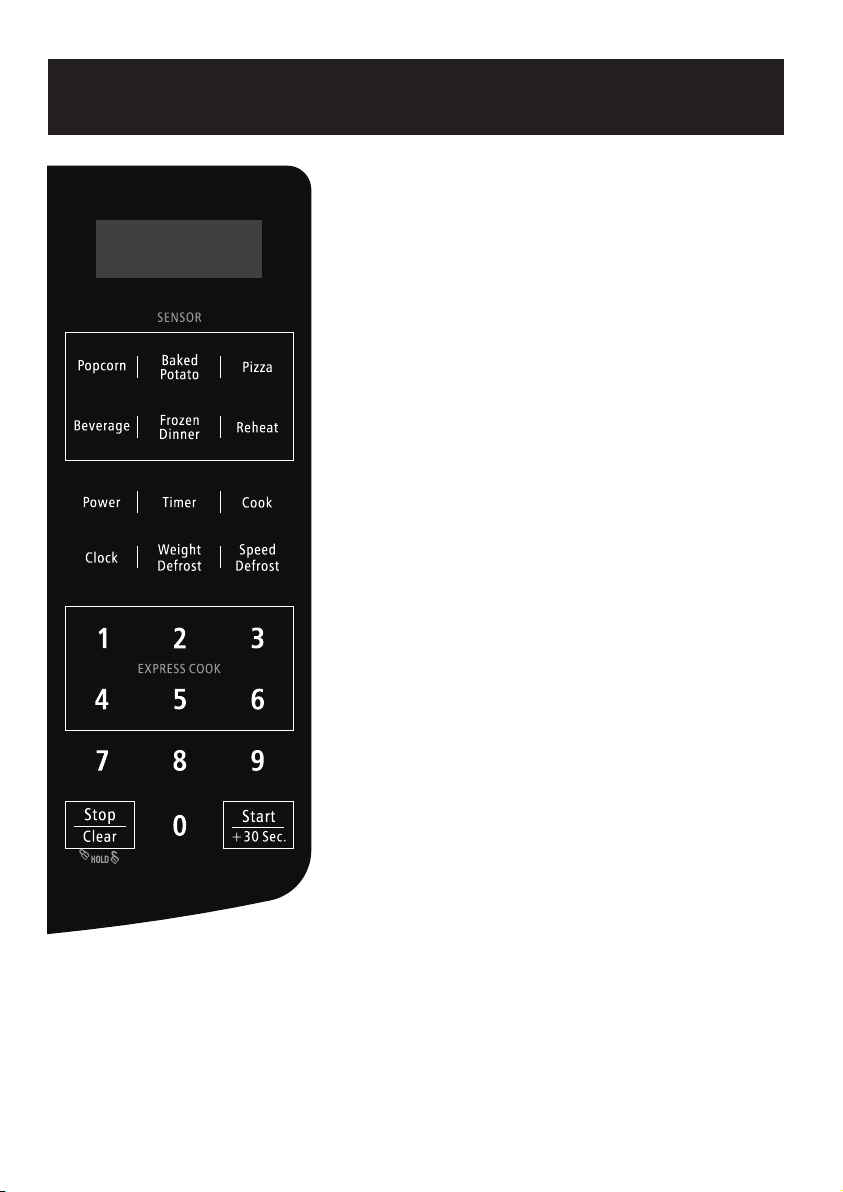
DISPLAY
Cooking time, power, indicators and present
time are displayed.
SENSOR COOKING MENU
Automatically adjusts the time, based on the
type of food you are cooking.
POWER
Use to set microwave power levels.
TIMER
The timer function can be used even in the
process of cooking to set the oven clock.
COOK
Use for multi-stage cooking. It enables
cooking at multiple power and time settings
automatically.
L KCO
C
Clock is used to set current time.
WEIGHT DEFROST
Programmed defrosting based on the weight
of the foods to be defrosted.
SPEED DEFROST
Quick defrost function that alternates defrost
and stand times.
NUMBER
Touch to set time, weight or the amount.
EXPRESS COOK
Number pads (1-6)
S
TOP/CLEAR
Touch to stop or clear all previous settings
before cooking.
S
ART/+30 SEC.T
Touch to start a cooking program or use
+30 Sec. to program the oven to microwave
food at 100% power, or touch it to add 30
seconds during cooking program.
PADS (0-9)
10
Page 12
OPERATION INSTRUCTIONS
SETTING THE CLOCK
1. Touch CLOCK once to select the 12 hour clock.
2. Enter the correct time by touching the number pads.
3. Touch CLOCK again.
Note that this is a 12 hour clock.
SETTING THE TIMER
1. Touch TIMER once.
2. Enter the correct time by touching the number pads. The maximum time
is 99 minutes and 99 seconds.
3. Touch START/+30 Sec.
NOTES:
(1) You can check the timer during the timing process for 5 seconds by
touching TIMER.
(2) Touch STOP/CLEAR in the 5 seconds to cancel TIMER during timing
process.
(3) This function is just for time countdown but will not start the microwave
heating program.
SETTING A COOKING PROGRAM
A. One-stage Cooking
1. The default setting is 100% microwave power output. If you want to set a
power level other than 100%, press COOK pad once, “00:00” will display.
2. Use the number pads to set a cooking time. You can set a cooking time
from one second to 99 minutes and 99 seconds.
3. Press POWER once.
4. Touch number pad to enter desired power level.
5. Press START/+30 Sec. to start cooking.
11
Page 13
OPERATION INSTRUCTIONS (cont’d.)
NOTE:
During cooking, you can check the power by touching POWER.
Touch
number
pad
1、 9 8 7 6 5 4 3 2 10
Cooking
power
Display
PL- 9PL10
PL- 2PL- 3PL- 4PL- 5PL- 6PL- 7PL- 8
10%20%30%40%50%60%70%80%90%100%
PL- 1
B. Multi-stage Cooking
Some recipes require different stages of cooking at different temperatures.
1. SET STAGE 1:
Follow steps 1 and 2 in “One-stage Cooking”. DO NOT TOUCH
START/+30 Sec.
2. SET STAGE 2:
Touch COOK then enter correct cooking time and (lower) power level.
3. Touch START/+30 Sec.
NOTES:
(1) After stage 1 time has elapsed, one signal sounds, signaling the beginning
of stage 2.
(2) After total time elapsed, the system will sound beeps with END in display.
The beeps will continue to sound every two minutes automatically until the
door is opened or touch “STOP/CLEAR” pad.
+30 SECONDS
Use this feature to program the oven to microwave food at 100% power
conveniently.
12
Page 14
OPERATION INSTRUCTIONS (cont’d.)
1. Touch START/+30 Sec. in quick succession to set the cooking time (each
touch for 30 seconds, up to 99 minutes and 99 seconds). The oven
will start automatically with full power level.
2. +30 Sec. allows you to add an extra 30 seconds to the current cooking cycle
emit gnikooc dnetxe ot ti esu osla nac uoY m.argorp gnikooc tnerruc eht ta
in multiples of 30 seconds, up to 99 minutes and 99 seconds.
NOTE:
This function is only used in express cook and microwave cooking program.
.gnihcuot yb sdnoces 03 fo selpitlum ni emit gnikooc dnetxe nac uoY
START/+30 Sec. repeatedly during microwave cooking.
WEIGHT DEFROST
1. Touch STOP/CLEAR to reset the oven.
2. Touch WEIGHT DEFROST repeatedly to choose the food types.
3. Touch the number pad to enter food weight.
4. Touch START/+30 Sec.
Weight defrost code description:
Food Type
Meat Once 1 oz.
Poultry Twice 1 oz.
Touch WEIGHT
DEFROST pad
Three times 1 oz. Fish
Min. Weight
Max. Weight
96 oz.
64 oz.
32 oz.
NOTES:
(1) Weight must be in ounces. Ounce weights less than 1 must be preceded
by a 0. If label gives weight in pounds only, change the fraction of a
pound to ounces using the chart given next page.
13
Page 15
OPERATION INSTRUCTIONS (cont’d.)
Converting Fractions of Pound to Ounces:
Fractions of a Ounces
Less than .03 0
.03 to .09 1
.10 to .15 2
.16 to .21 3
.22 to .27 4
.28 to .34 5
.35 to .40 6
.41 to .46 7
.47 to .53 8
Pound Pound
Fractions of a Ounces
.54 to .59 9
.60 to .65 10
.66 to .71 11
.72 to .78 12
.79 to .84 13
.85 to .90 14
.91 to .97 15
above .97 go to next even
(2) During defrosting, the system will pause automatically and sound to
remind user to turn food over, after that, touch START/+30 Sec. to resume.
(3) After total time elapsed, the system will sound beeps with END in display.
The beeps will continue to sound every two minutes automatically until the
door is opened or touch STOP/CLEAR pad.
SPEED DEFROST
Touch SPEED DEFROST one time, and input estimated defrost time (up to
99 minutes and 99 seconds), then touch START/+30 Sec. to start process.
Power default value is PL-6.
EXPRESS COOK
Program can be started immediately at full power level after touching the
number pad from 1-6.
Suppose you want to set quick cook
for 6 minutes.
1. Touch number pad 6.
2. 6:00 can be seen on display.
Touch number pad Time
1 1 Minute
2 2 Minutes
3 3 Minutes
4 4 Minutes
5 5 Minutes
6 6 Minutes
14
Page 16

OPERATION INSTRU
OPERATION INSTRUCTIONS (cont’d.)
SETTING CHILD LOCK
The door lock prevents unsupervised operation by children.
To set, touch and hold STOP/CLEAR for 3 seconds. “Loc” is indicated on
the display for 3 seconds.
To cancel, touch and hold STOP/CLEAR for 3 seconds. “Loc” indication
disappears.
COOKING END REMINDER FUNCTION
The oven will beep 4 times to alert the user that cooking time has ended.
“End” will display. The time of day will display by opening the door or pressing
STOP/CLEAR pad.
ABOUT THE SENSOR FEATURES
HUMIDITY SENSOR
The sensor features detect the increasing humidity released during cooking.
The oven automatically adjusts the cooking time to various types and
amounts of food. To ensure the best results with sensor cook, follow
recommendations:
1. Ensure the glass tray, the outside of the cooking containers and the inside
of the microwave oven are dry before placing food in the oven. Residual
beads of moisture turning into steam can mislead the sensor.
15
Page 17

OPERATION INST
ABOUT THE SENSOR FEATURES
(cont’d.)
2. Cover food with lid, or with vented plastic wrap. Never use tightly sealed
plastic containers.
3. During cooking process, do not open the oven door. Doing so will cause
inaccurate cooking since the steam from food is no longer contained
within the oven cavity.
4. All foods should have a rest time.
5. Do not use the sensor feature twice in succession on the same food
portion, this could result in severely overcooked food. If food is undercooked
after the countdown, use time cooking for additional cooking time.
6. If you open the oven door or touch STOP/CLEAR during cooking, the
system returns to standby mode immediately.
SENSOR COOK SETTINGS
RU
POPCORN
Touch POPCORN once. POPCORN automatically sets the cooking time for a
3.5 ounce bag of microwave popcorn. When the released steam is detected
by the oven, the remaining cooking time will appear in the display.
BAKED POTATO
Touch BAKED POTATO once, the oven will start automatically. When the
released steam is detected by the oven, the remaining cooking time will
appear in the display.
PIZZA
Touch PIZZA once, the oven will start automatically. When the released
steam is detected by the oven, the remaining cooking time will appear in
the display.
16
Page 18
OPERATION INST
SENSOR COOK SETTINGS (cont’d.)
RU
BEVERAGE
Touch BEVERAGE repeatedly to choose the number of cups for beverage,
then the oven will start automatically, the remaining cooking time will
appear in the display.
FROZEN DINNER
Touch FROZEN DINNER once, the oven will start automatically. When the
released steam is detected by the oven, the remaining cooking time will
appear in the display.
REHEAT
Touch REHEAT once, the oven will start automatically. When the released
steam is detected by the oven, the remaining cooking time will appear in
the display.
COOKING UTENSILS GUIDE
This section lists which utensils can be used in the microwave, which ones
have limited use for short periods, and which ones should not be used in
the microwave.
RECOMMENDED
Microwave browning dish
such as steaks, chops, or pancakes. Follow the directions provided with
your browning dish.
— Use to brown the exterior of small items
17
Page 19

OPERATION INST
COOKING UTENSILS GUIDE (cont’d.)
RU
Microwaveable plastic wrap — Use to retain steam. Leave a small
opening for some steam to escape and avoid placing it directly on the food.
Paper towels and napkins — Use for short-term heating and covering;
these absorb excess moisture and prevent spattering. Do not use recycled
paper towels, which may contain metal and could ignite.
Glass and glass-ceramic bowls and dishes — Use for heating or cooking.
Paper plates and cups
— Use for short-term heating at low temperatures.
Do not use recycled paper, which may contain metal and could ignite.
Wax paper
— Use as a cover to prevent spattering.
Thermometers — Use only those labeled “Microwave Safe” and follow all
directions. Check the food in several places. Conventional thermometers
may be used on microwave food once the food has been removed from the
oven.
o
LIMITED USE
Aluminum foil — Use narrow strips of foil to prevent overcooking of
exposed areas. Using too much foil can damage your oven, so be careful.
You should keep distance of 1 inch (2.54 cm) between aluminum foil and
cavity.
Ceramic, porcelain, and stoneware — Use these if they are labeled
“Microwave Safe”. If they are not label ed, test them to make sure they can
can be used safely.
Plastic — Use only if labeled “Microwave Safe”. Other plastics can melt.
NOT RECOMMENDED
Glass jars and bottles — Regular glass is too thin to be used in a microwave.
It can shatter and cause damage and injury.
Paper bags — These are a fire hazard, except for popcorn bags that are
designed for microwave use.
Styrofoam plates and cups — These can melt and leave an unhealthy
residue on food.
18
Page 20

OPERATION INST
COOKING UTENSILS GUIDE (cont’d.)
RU
Plastic storage and food containers — Containers such as margarine
tubs can melt in the microwave.
Metal utensils — These can damage your oven. Remove all metal before
cooking.
NOTE: Should you wish to check if a dish is safe for microwaving, place the
empty dish in the oven and microwave on HIGH for 30 seconds. A dish
which becomes very hot should not be used.
CLEANING AND CARE
1. Turn off the microwave and unplug the power cord from the wall when
cleaning.
2. Keep the inside of the microwave clean. When food splatters or spilled
liquids adhere to microwave walls, wipe with a damp cloth. Mild detergents
may be used if the microwave gets very dirty. Avoid using spray or other
harsh cleaners. They may stain, streak, or dull the door surface.
3. The outside of the microwave should be cleaned with a damp cloth. To
prevent damage to the operating parts inside the microwave, water should
not be allowed to seep into the ventilation openings.
4. Wipe the window on both sides with a damp cloth to remove any spills or
splatters.
5. Do not allow the control panel to become wet. Clean with a soft, damp
cloth. When cleaning the panel, leave the microwave door open to
prevent it from accidentally turning on.
6. If steam accumulates inside or around the outside of the door, wipe with
a soft cloth. This may occur when the microwave is operated under high
humidity. This is normal.
7. It may be necessary to remove the glass tray for cleaning. Wash the tray
in warm, soapy water or in a dishwasher. The roller ring and microwave
floor should be cleaned regularly to avoid excessive noise. Wipe the
bottom surface of the microwave with a mild detergent.
19
Page 21
CLEANING AND CARE (cont’d.)
8.
The roller ring may be washed in mild, soapy water or in a dishwasher.
RU
When removing the roller ring, be sure to replace it in the proper position.
9.
Remove doors from your microwave by combining a cup of water with
the juice and skin of one lemon in a microwaveable bowl. Microwave for 5
minutes. Wipe thoroughly and dry with a soft cloth.
10.
If the light bulb burns out, please contact customer service to have it
replaced.
The microwave should be cleaned regularly and any food deposits should
11.
be removed. Failure to maintain the microwave in a clean condition could
lead to deterioration of surfaces that could adversely affect the life of the
unit and could possibly result in a hazardous situation.
12. Please do not dispose of this appliance into a regular garbage receptacle.
Please check to see where you can dispose such appliances.
SPECIFICATIONS
Power Consumption 120V, 60Hz, 1600W
Output
Operation Frequency 2450MHz
Outside Dimensions
(HxWxD)
Oven Cavity Dimension
(HxWxD)
Oven Capacity 1.6 cu. ft.
Cooking Uniformity Turntable System
Net Weight Approx. 38.4 lbs.
12 3/16 x 21 3/4 x 19 3/4 inches
9 13/16 x 15 3/4 x 17 inches
1100W
20
Page 22

WARRANTY FOR OSTER® COUNTERTOP MICROWAVE
OGWT1603SE
TWO-YEAR LIMITED WARRANTY
For two years from the date of purchase, when this appliance is operated and maintained according to instructions attached to
or furnished with the product, Guangdong Galanz Microwave Electrical Appliances Manufacturing Co., Ltd. (“GALANZ”)
will pay for replacement parts and repair labor costs to correct defects in materials or workmanship, replace the appliance
with an equivalent unit or a new unit, or refund the purchase price, solely at our option. Service mus
GALANZ designated service company.
To Obtain Warranty Service and Troubleshooting Information:
If you need service, first see the Bef
To obtain service, call our Consumer Care Center at: 1-800-324-0340 in the U.S.
GALANZ will not pay for:
1. Service calls to correct the installation of your appliance, to instruct you how to use your appliance, to replace house
fuses or correct house wiring, or to replace light bulbs.
2. Repairs when your appliance is used in other than normal, single-family household use.
3. Pickup and delivery.
4. Damage resulting from accident, alteration, misuse, abuse, fire, flood, improper installation, acts of God, or use of
products not approved by GALANZ.
5. Repairs to parts or systems resulting from unauthorized modif
6. Service or warranty support for units located and/or operated outside the United States.
NO WARRANTIES, WHETHER EXPRESS OR IMPLIED, INCLUDING, BUT NOT LIMITED TO, ANY IMPLIED
WARRANTIES OF MERCHANTABILITY OR FITNESS FOR A PARTICULAR PURPOSE, OTHER THAN
THOSE EXPRESSLY DESCRIBED ABOVE SHALL APPLY. M
WARRANTIES AFTER THE EXPRESS WARRANTY PERIOD STATED ABOVE. NO OTHER EXPRESS
WARRANTY OR GUARANTY GIVEN BY ANY PERSON, FIRM OR ENTITY WITH RESPECT TO THE
PRODUCT SHALL BE BINDING ON GALANZ. REPAIR OR REPLACEMENT IS THE EXCLUSIVE REMEDY
OF THE CONSUMER. GALANZ AND SUNBEAM PRODUCTS, INC. SHALL NOT BE LIABLE FOR ANY
INCIDENTAL OR C
THE PRODUCT. NOTWITHSTANDING THE FOREGOING, CONSUMER’S RECOVERY AGAINST GALANZ
SHALL NOT EXCEED THE PURCHASE PRICE OF THE PRODUCT SOLD BY GALANZ. THIS WARRANTY
SHALL NOT EXTEND TO ANYONE OTHER THAN THE ORIGINAL CONSUMER WHO PURCHASED THE
PRODUCT AND IS NOT TRANSFERABLE.
Some states or provinces do not allow the exclusion or limitation of incidental or consequential damages or allow limita
on warranties, so limitation or exclusions may not apply to you. This warranty gives you specific legal rights, and you may
have other rights that vary from state to state or provi
apply. Contact your authorized GALANZ dealer to determine if another warranty applies.
ONSEQUENTIAL DAMAGES CAUSED BY THE USE, MISUSE OR INABILITY TO USE
ore Calling for Service section of your User Manual.
ns made to the appliance.
icatio
ANUFACTURER FURTHER DISCLAIMS ALL
nce to province. Outside the 50 United States, this warranty does not
t be provided by a
tions
Keep this Warranty and your sales slip together for future reference. You must provide proof of purchase for
in-warranty service.
Write down the following information about your appliance to better help you obtain assistance or service if you ever need it.
You will need know your comple
label / plate.
Date of Purchase: Store / Dealer:
Model No.: Serial No.:
te model number and serial number. You can find this information on the model and number
CUSTOMER’S RECORD
21
Page 23

© 2019 Sunbeam Products, Inc. All rights reserved.
Oster logo is a registered trademark of Sunbeam Products, Inc.
®
used under license. Distributed by Guangdong Galanz Microwave
Electrical Appliances Manufacturing Co., Ltd., Huangpu, Zhongshan,
Guangdong, 528429, China.
For service, support and warranty information, call 1-800-324-0340.
 Loading...