

Page 1
Instruction Manual
COFFEEMAKER
PLEASE READ ALL INSTRUCTIONS BEFORE USING
Manual de Instrucciones
CAFETERA
LEA TODAS LAS INSTRUCCIONES ANTES DE USAR
Manual de Instruções
CAFETEIRA
LEIA TODAS AS INSTRUÇÕES ANTES DE USAR ESTE APARELHO
BVSTDCSK12
& BVSTDCSK13
MODELS/MODELOS
Page 2

English-1
IMPORTANT SAFEGUARDS
When using electrical appliances, basic safety precautions should always be followed to reduce
the risk of re, electric shock and/or injury to persons, including the following:
READ ALL INSTRUCTIONS BEFORE USING THE COFFEEMAKER.
1. DO NOT touch hot surfaces . Use handles or knobs.
2. To protect against re or electrical shock, do not put cord, plug or appliance in water or any
other liquid.
3. Turn the coffeemaker off and unplug the power cord from the power source when the
coffeemaker or clock are not in use and before cleaning. Allow the coffeemaker parts to cool
before putting on or taking off parts and before cleaning the appliance.
4. DO NOT operate any appliance with a damaged cord or plug or operate it after the appliance
malfunctions, or has been damaged in any manner. Return this appliance only to the nearest Oster®
Authorized Service Center for examination, repair or adjustment.
5. The use of accessory attachments not recommended or sold by the manufacturer
may cause re, electrical shock or injury.
6. DO NOT use outdoors.
7. DO NOT let the power cord hang over the edge of a table or counter or allow it to
come in contact with hot surfaces.
8. DO NOT place this appliance on or near a hot gas or electric burner, or in a heated oven.
9. To disconnect, turn the coffeemaker OFF, then remove the power plug from wall outlet.
10. Place the coffeemaker on a hard, at level surface to avoid interruption of air ow
underneath the appliance.
11. DO NOT use appliance for other than intended use.
12. This appliance is not intended for use by persons (including children) with reduced physical,
sensory or mental capabilities, or lack of experience and knowledge, unless they have been
given supervision or instruction concerning use of the appliance by a person responsible for
their safety. Children should be supervised to ensure that they do not play with the appliance.
13. Close supervision is necessary when any appliance is used by or near children, or
incapacitated individuals.
14. This appliance is not intended to be operated by means of an external timer or separate
remote-control system.
15. This appliance is intended to be used in household and similar applications such as: staff
kitchen areas in shops, ofces and other working environments farm houses by clients in
hotels, motels and other residential type environments bed and breakfast type environments.
THIS UNIT IS FOR HOUSEHOLD USE ONLY.
SAVE THESE INSTRUCTIONS
Page 3

English-2
DECANTER USE AND CARE
Follow the instruction below to reduce or eliminate the chance of breaking the decanter:
a.This decanter is designed for use with your Oster® coffeemaker and therefore must
never be used on a range top or in any oven, INCLUDING A MICROWAVE OVEN.
b. DO NOT set a hot decanter on a wet or cold surface.
c. DO NOT use a cracked decanter or a decanter having a loose or weakened handle.
d. DO NOT clean the decanter with abrasive cleansers, steel wool pads or other
abrasive materials.
e. Discard the decanter immediately if it is ever boiled dry.
f. Protect the decanter from sharp blows, scratches or rough handling.
WARNING:
To reduce the risk of re or electric shock, do not remove any service covers. There
are no user serviceable parts inside the coffeemaker. Only authorized personnel should
repair the coffeemaker.
SPECIAL CORD SET INSTRUCTIONS
1. A short power-supply cord is provided to reduce the risk resulting from becoming
entangled in or tripping over a long cord.
2. Extension cords are available and may be used if care is exercised in their use.
3. If an extension cord is used, the marked electrical rating of the extension cord must
be the same as the product. The resulting extended cord must be arranged so that it
will not drape over the counter top or table top where it can be pulled on by children
or tripped over accidentally.
Page 4
English-3
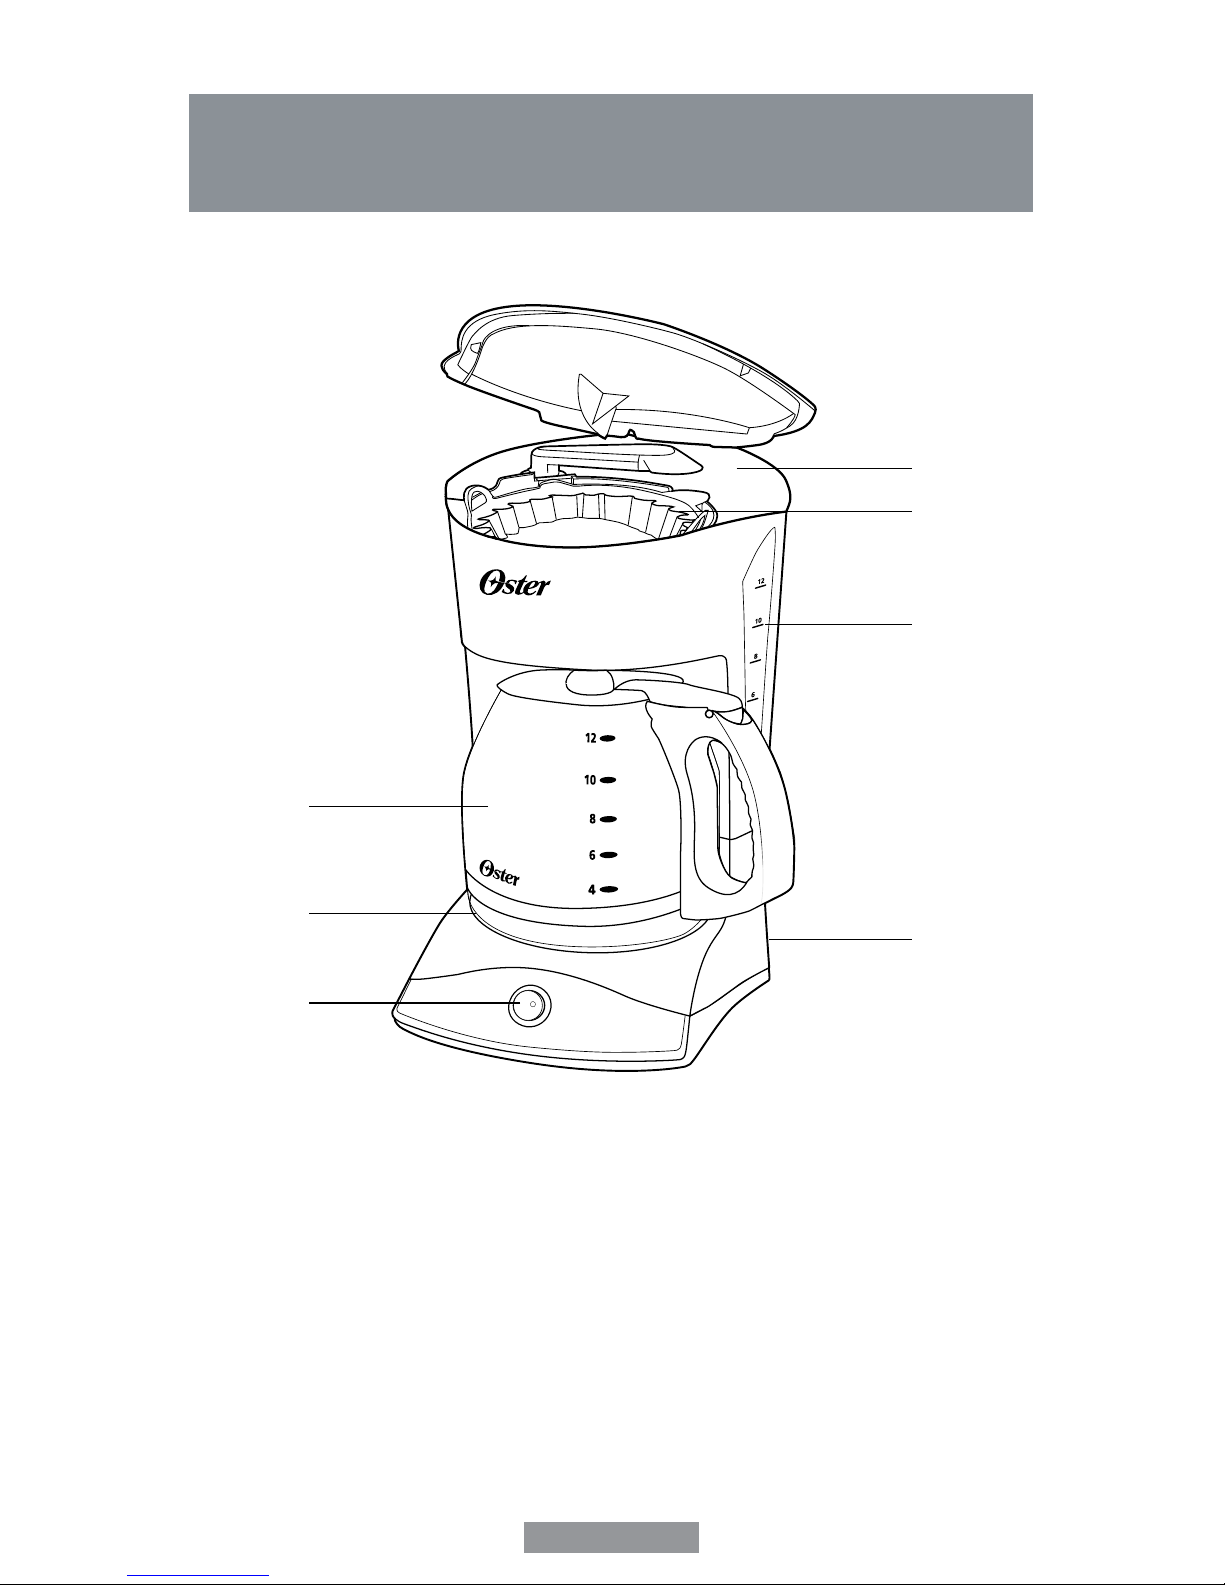
DESCRIPTION OF THE APPLIANCE
1. Decanter
2. Warming Plate
3. ON/OFF Switch
4. Water Reservoir
5. Brew Basket
6. Water Level Indicator
7. Power Cord
1
2
3
5
4
6
7
Page 5
English-4
COFFEEMAKER FEATURES
Your new Oster
®
coffeemaker has the following features:
• 12-Cup brewing capacity.
• Cord storage – Allows you to store extra cord length for a tidy countertop.
• Drip free decanter – Designed to help prevent drips after pouring
• Ergonomically Designed Handle – Provides comfort, control and condence when
pouring.
• Removable lter basket – The lter basket will lift out of socket to allow you to
remove a lter and ground coffee before returning back to its socket.
• ON/OFF indicator light – This safety feature reminds you that your coffeemaker is on.
• Non-stick warming plate – This feature prevents the decanter from sticking to the
surface of the warming plate.
• Pause’n Serve – Can’t wait for the coffee to nish brewing? The Pause’n Serve
feature allows you up to 30 seconds to pour a cup of coffee while the coffee is still
brewing.
SETTING UP YOUR COFFEEMAKER
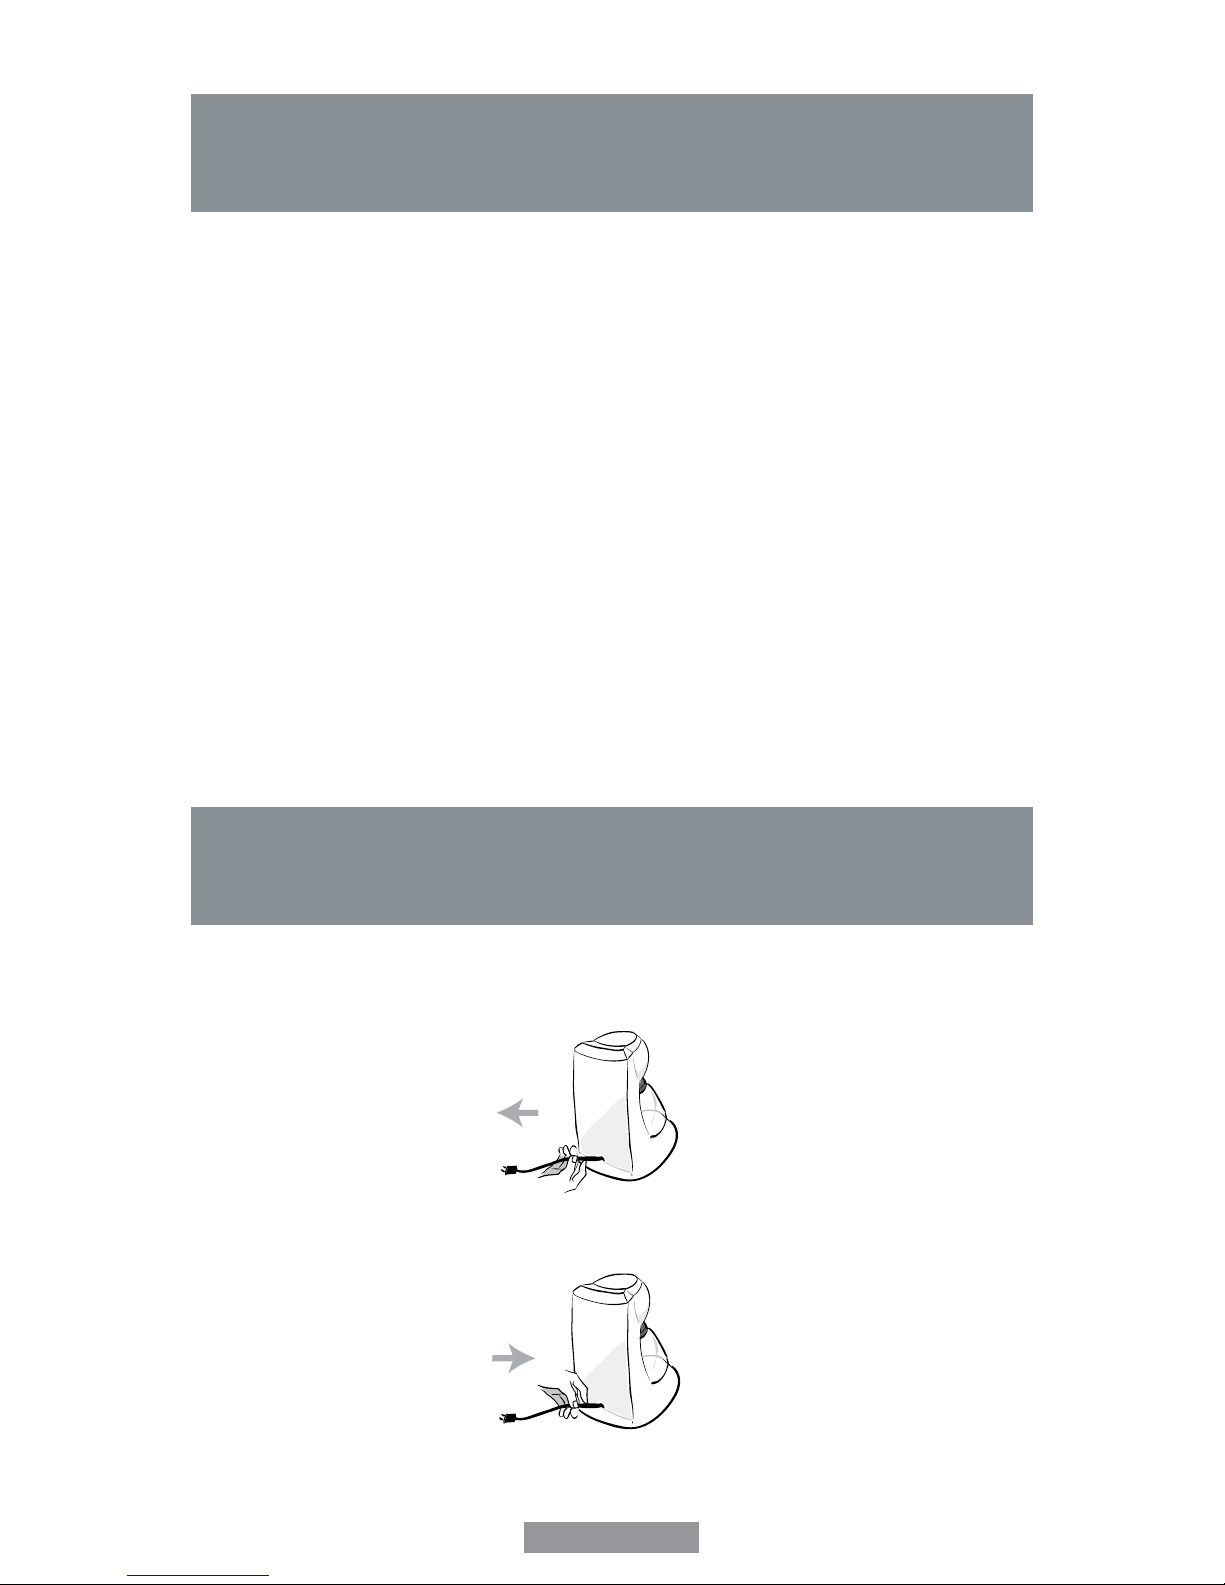
Adjusting the Power Cord Length
You can customize the length of the power cord so that it is the exact length you desire.
To increase the length of the power cord: Grasp the power cord (not the power plug)
and gently lift it out of the slot, then feed it into the coffeemaker. Lock the cord in the slot
when nished.
To decrease the length of the power cord: Grasp the power cord, lift it out of the slot,
then feed it into the coffeemaker. Lock the cord in the slot when nished.
Page 6

English-5
Adding Water and Ground Coffee
1) Open brew basket lid, turn showerhead to the back and lift out the removable lter
insert.
2) Place paper lters, it is important that the sides of the lter t ush against
the sides of the lter insert. If lter collapse occurs, for best results, dampen the lter
before placing it in the brew basket and adding ground coffee.
3) Add the desired amount of ground coffee to the lter. Gently shake the lter insert to
level the ground coffee.
4) Be certain that the lter is centered in the middle of the removable lter basket insert.
Close the brew basket.
5) Fill the water reservoir with the desired amount of tap water.
6) Close the brew basket lid.
7) Place the decanter on the warming plate.
If the brew basket overows or fails to empty into the decanter, do not open the
brew basket lid. An overow may cause personal injury or damage to property.
To reduce the risk of damaging the decanter and/or the risk of personal injury,
do not add cold water to the decanter if the decanter is already hot. Allow the
decanter to cool before using.
Do not brew coffee while the brew basket lid is open.
using your coffee maker
Cleaning the coffeemaker before rst use
Follow the steps below under “Adding Water and Ground Coffee” and “Brewing Coffee
Now”, but do not add coffee grounds.
Selecting and Measuring Ground Coffee
For best results, use coffee ground for use with automatic drip coffeemakers. The
amounts shown below are suggested amounts.
Number of Cups Tablespoons
12 9
10 71/2
8 6
6 41/2
4 3
2 11/2
One cup = Five ounces of brewed coffee
Page 7

English-6
BREWING COFFEE
Push the switch so the light illuminates.
This light indicates that the coffeemaker is on and the brew cycle will begin. When the
coffee stops owing, the brew cycle is complete.
While the coffee is brewing, the Pause ‘n Serve feature allow you to sneak a cup of
coffee from the decanter. REPLACE THE DECANTER ON THE WARMING PLATE
WITHIN 30 SECONDS TO PREVENT OVERFLOW AND POSSIBLE INJURY.
To turn Off the coffeemaker, push the switch so the light is no longer illuminated.
If the brew basket overows or fails to empty into the decanter, do not open the
brew basket. Turn off the coffeemaker. Unplug the coffeemaker and wait for the
contents to cool before handling.
Your Coffeemaker must be cleaned when you begin to notice excessive steaming or the
brewing time increases considerably. This condition is caused by a build-up of lime and
mineral deposits from your water. If the pumping action stops before all the water has
been pumped out of the machine, the appliance requires cleaning.
The frequency of cleaning depends on the hardness of water used. The following table
gives a suggested cleaning schedule.
Suggested Cleaning Interval
Type of Water Cleaning Frequency
Soft Water Every 80 Brew Cycles
Hard Water Every 40 Brew Cycles
Your Coffeemaker may be cleaned using vinegar.
Cleaning the Decanter
Hard water can leave a whitish stain on the decanter. Coffee may then turn this stain
brown.
To remove decanter stains:
1) Fill the decanter with a solution of equal parts tap water and vinegar and let the
solution stand in the decanter for approximately 20 minutes.
2) Discard the solution and wash and rinse the decanter.
Do not use harsh abrasive cleansers that may scratch the decanter; scratches may
cause the decanter to break.
CLEANING INSTRUCTIONS
Page 8

English-7
POTENTIAL PROBLEMS PROBABLE CAUSE
“On” light does not illuminate • Unplugged
• Power outage
Coffee is not brewing • Unplugged
• Power outage
• The water reservoir is empty; check
water window
• The lter basket is not properly
inserted
• Carafe is not placed all the way on
the warming plate
Coffeemaker only brews water • No grounds in lter basket
Coffeemaker brews slowly • Coffeemaker needs cleaning
Filter basket overows • The lter basket is not properly
inserted
• Carafe is not placed all the way on
the warming plate
• Carafe lid not on carafe
• Too many grounds placed in lter
• Carafe was removed from warming
plate for longer than 30 seconds
Burning coffee smell • Empty carafe was left on hot
warming plate
• Coffee was spilled on a warming
plate
Coffee is not hot • Power outage
Coffee tastes bad • Coffee ground other than for
automatic-drip Coffeemaker was
used
• Ground coffee-to-water ratio was
unbalanced
Grounds are in coffee • Paper lter not properly seated in
basket
• Filter overowed
TROUBLESHOOTING
Page 9

Español-1
PRECAUCIONES IMPORTANTES
Cuando se utiliza cualquier artefacto eléctrico siempre se deben seguir precauciones
básicas de seguridad para evitar el riesgo de incendio, descarga eléctrica y/o lesiones,
incluyendo las siguientes:
LEA TODAS LAS INSTRUCCIONES ANTES DE UTILIZAR SU CAFETERA.
1. NO toque las supercies calientes de la cafetera . Utilice las asas o perillas.
2. Para protegerse contra una descarga eléctrica, no sumerja el cable, el enchufe o la
cafetera en agua u otros líquidos.
3. Apague la cafetera, desenchúfela del tomacorriente cuando ésta o el reloj no estén en uso y
espere que se enfríe antes de colocarle o retirarle piezas y antes de su limpieza.
4. NO opere ningún artefacto con un cable o enchufe dañados, después de que el
artefacto haya fallado o si se cae al suelo o se daña de cualquier otra manera. Regrese el
artefacto al Centro de Servicio Oster® Autorizado más cercano para examinarlo, repararlo o
para ajustarlo mecánica o eléctricamente.
5. El uso de accesorios no recomendados o no vendidos por el fabricante del artefacto
puede causar incendios, descargas eléctricas o lesiones corporales.
6. NO la utilice al aire libre.
7. NO permita que el cable cuelgue del borde de la mesa o mostrador o que entre en
contacto con supercies calientes.
8. NO coloque este artefacto sobre o cerca de quemadores de estufas de gas o
eléctricas, ni dentro de un horno caliente.
9. Para desconectar, coloque el control en la posición de APAGADO, después remueva el
enchufe del tomacorriente.
10. Coloque la cafetera sobre una supercie dura y nivelada para evitar la interrupción del ujo de
aire debajo del artefacto.
11. NO utilice este artefacto para otro propósito que no sea para el que ha sido diseñado.
12. Este artefacto eléctrico no está destinado para ser usado por personas (lo que incluye
niños) cuyas capacidades físicas, sensoriales o mentales estén disminuidas, o carezcan de
experiencia y conocimiento, a menos que una persona responsable de su seguridad los haya
supervisado o instruido en el uso de este electrodoméstico. Los niños deberán estar bajo
supervisión para cerciorarse de que NO jueguen con el artefacto eléctrico.
13. Se requiere estricta supervisión cuando las personas discapacitadas o los niños utilicen
cualquier electrodoméstico o estén cerca de él.
14. Este artefacto no ha sido diseñado para funcionar mediante un temporizador externo ni un
sistema de control remoto
15. Este artefacto ha sido diseñado para uso doméstico o en aplicaciones similares tales como:
áreas de cocina del personal de tiendas, ocinas y otros ambientes de trabajo, granjas,
clientes de hoteles, moteles y otros ambientes de tipo residencial, así como en ambientes de
hospederías.
ESTA UNIDAD ESTÁ DISEÑADA SOLO PARA USO DOMÉSTICO.
CONSERVE ESTAS INSTRUCCIONES
Page 10

Español-2
CUIDADO Y USO DE LA JARRA
Siga las siguientes instrucciones para reducir o eliminar el riesgo de romper la jarra:
a. Esta jarra está diseñada para ser utilizada con su cafetera Oster®, por lo tanto nunca
debe ser usada sobre las hornillas de una estufa, horno ni TAMPOCO EN UN
HORNO MICROONDAS.
b. NO coloque la jarra de vidrio caliente sobre una supercie fría o mojada.
c. NO utilice una jarra quebrada o con un asa debilitada.
d. NO limpie la jarra con polvos limpiadores, bras metálicas o de lana o cualquier otro
material abrasivo.
e.Deseche la jarra inmediatamente si sus contenidos se evaporan al hervir.
f. Proteja la jarra de los, raspaduras o un manejo brusco.
ADVERTENCIA:
Para reducir el riesgo de incendio o descarga eléctrica, no quite ninguna cubierta para
dar servicio al artefacto. En el interior de la cafetera no se encuentra ninguna parte que
pueda ser remplazada. Solamente el personal autorizado debe reparar la cafetera.
INSTRUCCIONES ESPECIALES DEL CABLE ELÉCTRICO
1. El artefacto cuenta con un cable eléctrico corto como medida de seguridad para
prevenir el riesgo de tropezar, tirar o enredarse con un cable más largo.
2. Puede utilizar cables de extensión si se observan las precauciones adecuadas.
3. Si se usan los cables de extensión la capacidad nominal eléctrica del cable de
extensión debe ser el mismo del producto. Coloque el cable de extensión de manera
que no cuelgue del borde del mostrador o mesa donde pueda tirarlo un niño o pueda
tropezar con él accidentalmente.
Page 11

Español-3
DESCRIPCIÓN DEL ARTEFACTO
1. Jarra
2. Plato Calefactor
3. Interruptor de Encendido/Apagado
4. Tanque de Agua
5. Canasta de Preparación
6. Indicador de Nivel del Agua
7. Cable Eléctrico
1
2
3
5
4
6
7
Page 12

Español-4
CARACTERISTICAS DE SU CAFETERA
Su nueva cafetera Oster® tiene las siguientes características:
• Capacidad de preparación de 12 tazas
• Almacenamiento del cables – Le permite almacenar la longitud extra del cable que
no utilice para mantener limpio su mostrador o mesa
• Jarra resistente a goteos – Diseñada para ayudar a prevenir goteos después de servir
• Mango de la jarra diseñado ergonómicamente – Proporciona comodidad, control y
seguridad al servir el café
• Canasta de ltro removible – La canasta del ltro removible le permite levantar la
canasta de la cavidad y sacar el ltro y el café molido antes de colocarla nuevamente
en su lugar
• Luz indicadora de Encendido/Apagado – Esta función de seguridad le recuerda que
su cafetera está encendida
• Plato calefactor antiadherente – Esta característica previene que la jarra se adhiera
a la supercie del plato calefactor
• Sistema de Pausa de Colado - ¿Quiere disfrutar de una taza de café mientras su
cafetera está colando? Esta función le brinda hasta 30 segundos para servirse su taza
de café mientras que el café continúa preparándose
Ajustando la Longitud del Cable Eléctrico
Usted puede ajustar la longitud del cable eléctrico de manera que tenga la longitud
exacta que usted desea.
Para aumentar la longitud del cable eléctrico:Tome el cable eléctrico (no el enchufe) y
hálelo suavemente sacándolo de la ranura, después hálelo alejándolo de la cafetera.
Para reducir la longitud del cable eléctrico: Tome el cable eléctrico, sáquelo de la ranura
y después lleve el cable hacia el interior de la cafetera, asegure el cable en la ranura
cuando haya terminado.
PREPARANDO SU CAFETERA
Page 13

Español-5
Añadiendo Agua y Café Molido:
1) Abra la tapa de la canasta de preparación, gire la regadera a la parte de atrás y retire
el inserto del ltro.
2) Coloque un ltro de papel para preparar 8-12 tazas dentro de la canasta del ltro.
Cuando se usa ltro de papel es importante que los lados del ltro queden ajustados
contra las paredes del inserto del ltro. Si el ltro se dobla, para mejores resultados,
humedezca el ltro antes de colocarlo dentro de la canasta de preparación y añada
los granos molidos de café.
3) Agregue la cantidad deseada de café molido al ltro. Suavemente agite el ltro para
nivelar el café molido.
4) Asegúrese de que el ltro esté en el centro del inserto del ltro removible de la
canasta y después cierre la canasta de preparación.
5) Llene el tanque de agua con la cantidad deseada de agua de grifo.
6) Cierre la tapa de la canasta del ltro.
7) Coloque la jarra sobre el plato calefactor.
Si la canasta de preparación se desborda o falla en desocuparse, no abra la tapa
de la canasta de preparación. Un desbordamiento puede causar lesión personal o
daños.
Para reducir el riesgo de dañar la jarra y/o el riesgo de lesión personal, no agregue
agua fría a la jarra si ésta está caliente. Permita que la jarra se enfríe antes de
utilizarla de nuevo.
No prepare café con la canasta de preparación abierta.
USANDO SU CAFETERA
Limpieza de la cafetera antes de utilizarla por primera vez:
Siga los pasos indicados en la sección “Añadiendo Agua y Café Molido” y en
“Prepa-rando Café Ahora”, pero sin agregar café.
Seleccionando y Midiendo el Café Molido:
Para mejores resultados, utilice el tipo de café para cafeteras de goteo automático. Las
cantidades que se muestran a continuación son cantidades sugeridas.
Número de tazas Cucharadas Soperas
12 9
10 71/2
8 6
6 41/2
4 3
2 11/2
Una taza = 5 onzas de café preparado
Page 14

Español-6
PREPARANDO CAFÉ
Presione el interruptor de manera que la luz se encienda.
Esta luz indica que la cafetera está encendida y que el ciclo de preparación está por
iniciarse. Cuando el café deje de uir en la cafetera, el ciclo de preparación se ha
completado.
Mientras que el café está siendo preparado, el Sistema de Pausa de Colado le permite
retirar la jarra y servirse su café. COLOQUE LA JARRA SOBRE EL PLATO
CALEFACTOR EN UN PERÍODO MENOR A 30 SEGUNDOS PARA PREVENIR QUE
EL CAFÉ SE DERRAME Y OCASIONE UNA POSIBLE LESIÓN.
Apague la cafetera presionando el interruptor hasta que la luz ya no esté iluminada.
Usted debe limpiar su cafetera cuando note cualquiera de las siguientes condiciones:
Salida excesiva de vapor o los tiempos de preparación aumentan considerablemente.
Esto es causado por la acumulación de residuos minerales que se encuentran en el
agua. Si la acción de bombeo se detiene antes de que toda el agua haya sido bombeada fuera del artefacto, la cafetera requiere limpieza.
La frecuencia de limpieza de la cafetera depende de la dureza del agua que se utiliza
para preparar el café. La siguiente tabla le indica un programa sugerido de limpieza.
Intervalos de Limpieza Sugeridos
Tipos de Agua Frecuencia de Limpieza
Agua suave Cada 80 ciclos de preparación
Agua dura Cada 40 ciclos de preparación
Puede limpiar su cafetera utilizando vinagre.
Limpieza de la Jarra:
El agua dura puede dejar manchas blancas en la jarra. El café puede tornar estas
manchas color café.
Para remover las manchas de la jarra:
1) Llene la jarra con una solución de partes iguales de agua y vinagre blanco y deje que
la solución repose en la jarra durante aproximadamente 20 minutos.
2) Deseche la solución, lave y enjuague la jarra.
No use limpiadores abrasivos que puedan dejar rallar la jarra; las rallas pueden propiciar
que la jarra se rompa.
LIMPIANDO SU CAFETERA
Page 15

Español-7
PROBLEMAS POTENCIALES CAUSAS PROBABLES
La luz de encendido ON no se ilumina • Está desconectada
• Interrupción de la energía eléctrica
No prepara café • Esta desconectada
• Interrupción de la energía eléctrica
• No hay agua en el tanque, revise la
ventana de visibilidad
• La canasta del ltro no está
correctamente insertada
• La jarra no está totalmente colocada
sobre el plato calefactor
La cafetera prepara agua solamente • No hay café colocado en la canasta
del ltro
La cafetera prepara café muy lentamente • Requiere limpieza
La canasta del ltro se desborda • La canasta del ltro no está
correctamente insertada
• La jarra no está totalmente
colocada sobre el plato calefactor
• La tapa de la jarra no está
correctamente colocada
• Hay demasiado café en el ltro
• La jarra fue removida del plato
calefactor por más de 30 segundos
Olor a café quemado • Se dejó la jarra vacía sobre el plato
calefactor caliente
• Se derramó café sobre el plato
calefactor
El café no está caliente • Interrupción de la energía eléctrica
El café no tiene buen sabor • Se utilizó un tipo de café molido no
recomendado para cafeteras de
goteo
• La proporción de agua/café no fue
balanceada
Hay borra de café en la bebida • El ltro de papel no fue correctamente
colocado en la canasta
PROBLEMAS Y SOLUCIONES
Page 16

Português-1
PRECAUÇÕES IMPORTANTES
Ao utilizar qualquer utensílio elétrico deve-se seguir as precauções básicas de
segurança para evitar riscos de incêndio, descarga elétrica e/ou lesões:
LEIA TODAS AS INSTRUÇÕES ANTES DE UTILIZAR SUA CAFETEIRA
1. NÃO toque na superfície quente da cafeteira . Utilize o puxador.
2. Para se proteger de descargas elétricas, não mergulhe o o elétrico de alimentação da
cafeteira em água ou outros líquidos.
3. Desligue a cafeteira, tire-a da tomada quando esta, ou o relógio, não estiverem em
uso e espere que a cafeteira esfrie antes de colocar ou retirar peças e antes da
limpá-la.
4. NÃO opere nenhum aparelho com os danicados, quando o aparelho esteja falhando,
quando tiver danos de qualquer natureza, ou se cair no chão. Procure a assistência técnica
Oster® mais próxima para consertá-lo ou ajustar a parte mecânica, ou elétrica.
5. O uso de acessórios não recomendados, ou não vendidos pelo fabricante da
cafeteira pode causar incêndios, descargas elétricas ou lesões corporais.
6. NÃO utilize a cafeteira ao ar livre.
7. NÃO permita que o o que pendurado na borda de uma mesa ou balcão, nem que
entre em contato com superfícies quentes.
8. Para desconectar, coloque o controle na posição de DESLIGADO e depois tire o plugue da
tomada.
9. NÃO utilize essa cafeteira para outro propósito que não seja aquele para o qual ela foi
designada.
10. Coloque a cafeteira sobre uma superfície sólida e nivelada para evitar a interrupção do uxo
de ar de baixo dela.
11. NÃO use este produto para ns que não sejam os recomendados
12. Este aparelho elétrico não está destinado a ser usado por pessoas (incluindo crianças) cujas
capacidades físicas, sensoriais ou mentais estejam reduzidas ou careçam de experiência
e conhecimento necessários para utilizá-lo, a menos que uma pessoa responsável por
sua segurança tenha supervisionado ou instruído quanto ao uso deste eletrodoméstico. As
crianças deverão estar sob supervisão para garantir que NÃO brinquem com o aparelho
elétrico.
13. É necessária a estrita supervisão quando se utilize o eletrodoméstico próximo a crianças ou
pessoas incapacitadas.
14. Este aparelho não foi desenvolvido para funcionar através de um timer externo nem um
sistema de controle remoto.
15. Este aparelho foi desenvolvido para o uso doméstico ou em aplicações semelhantes tais
como: áreas de cozinha de funcionários de lojas, escritórios e outros ambientes de trabalho,
clientes de hotéis, motéis e outros ambientes do tipo residencial assim como em ambientes
de pousadas.
ESTE ELETRODOMÉSTICO FOI FEITO SOMENTE PARA USO DOMÉSTICO.
Page 17

Português-2
CUIDADO E USO DA JARRA
Siga as seguintes instruções para reduzir ou eliminar o risco de quebrar a jarra:
a. Esta jarra foi designada para ser utilizada com a sua cafeteira Oster®, portanto
nunca deve ser usada sobre as grelhas de um forno TAMPOUCO EM UM FORNO
DE MICROONDAS.
b. NÃO coloque a jarra de vidro quando estiver quente sobre uma superfície fria ou
molhada.
c. NÃO utilize uma jarra rachada, ou com a alça quebrada.
d. NÃO lave a jarra com pós de limpeza, bras metálicas ( ou de lã de aço) nem
qualquer outro material abrasivo.
e. Jogue fora a jarra, imediatamente, se o conteúdo se evapora ao ferver.
f. Mantenha a jarra longe de objetos cortantes, raspaduras ou manuseio brusco.
ADVERTÊNCIA:
Para reduzir o risco de incêndios, ou descargas elétricas não retire nenhuma das tampas
que vedam a cafeteira, para colocá-la em funcionamento. No interior da cafeteira não há
nenhuma parte que possa ser trocada. Somente a assistência técnica autorizada pode
consertar sua cafeteira.
INSTRUÇÕES ESPECIAIS SOBRE O FIO ELÉTRICO
1. A cafeteira tem um o curto como medida de segurança para evitar que pessoas
tropecem , puxem, ou se enrosquem nele.
2. Pode-se utilizar extensões desde que se observe as precauções adequadas.
3. Ao usar o de extensão, a capacidade nominal e elétrica desse o deve ser a
mesma da cafeteira. Coloque a extensão de maneira que não que pendurada na
borda de uma mesa, ou balcão onde uma criança possa puxar ou tropeçar nela,
acidentalmente.
GUARDE ESTAS INSTRUÇÕES
Page 18

Português-3
DESCRIÇÃO DA CAFETEIRA
1. Jarra
2. Chapa de aquecimento
3. Interruptor Liga/Desliga
4. Compartimento para água
5. Base para o ltro
6. Indicador do nível de água
7. Fio elétrico
1
2
3
5
4
6
7
Page 19

Português-4
CARACTERÍSTICAS DA SUA CAFETEIRA
Sua nova cafeteira Oster® tem as seguintes características:
• Capacidade para preparar 36 xícaras.
• Para guardar o o. - Permite que você guarde o excedente de o que não estiver
utilizando, para não estorvar na mesa, ou balcão.
• Jarra antigotejamento - Idealizada para prevenir gotejamento na hora de servir.
• A alça da jarra de desenho ergonômico - Proporciona comodidade, controle e
segurança para servir o café.
• Base para o ltro removível - A base para o ltro removível permite a você retirá-la
da cavidade para tirar o ltro com o pó de café, antes de colocá-la novamente no seu
lugar.
• Luz indicadora de Ligado/Desligado - Esta função de segurança permite-lhe lem-
brar que a sua cafeteira está ligada.
• Placa de aquecimento antiaderente - Esta característica previne que a jarra grude
na superfície da placa de aquecimento.
• Sistema de pausa de preparo para coar - Você quer desfrutar de uma xícara de café
enquanto a cafeteira estiver coando? Está função lhe proporciona até 30 segundos
para que você possa servir-se de uma xícara de café, enquanto o café estiver coando.
PREPARANDO SUA CAFETEIRA
Ajustando o comprimento do o elétrico
Você pode ajustar o comprimento do o, de modo que ele tenha o comprimento exato
que você deseja.
Para aumentar o comprimento do o: Pegue o o (não o plugue, puxe-o do sulco, delica-
damente, para afastá-lo (tirá-lo para fora)da cafeteira.
Para reduzir o comprimento do o: Pegue o o, desencaixe-o do sulco e depois o guie
até o interior da cafeteira. Prenda o o no sulco quando terminar esta operação.
Page 20

Português-5
Limpeza da cafeteira antes do primeiro uso:
Siga os passos indicados na seção “Colocando água e pó de café” e em “Preparando o
café instantaneamente”, porém, sem adicionar o pó de café e faça a cafeteira funcionar
como se já estivesse preparando um ‘café com água e pó’.
Selecionando e medindo o pó de café:
Para melhores resultados, utilize o pó de café com granulação adequada às cafeteiras
de gotejamento automático. Sugerimos as quantidades a seguir:
Colocando água e pó de café
1) Abra a tampa do recipiente apropriado para colocar o porta-ltro, gire o ‘regador’ (bico
para gotejamento) para trás e retire o porta-ltro.
2) Coloque um ltro para o preparo de 24-36 xícaras de café dentro do porta ltro. Quando
usar ltro de papel, é importante que as bordas superiores do ltro quem bem
ajustadas na borda do porta-ltro , bem como, bem ajustado à sua parede interna.
Se o ltro dobrar, para melhores resultados, umedeça-o antes de colocá-lo dentro do
porta-ltro e, a seguir, ponha o pó de café
3) Acrescente a quantidade desejada de pó de café no ltro. Agite, suavemente, para
nivelar o pó de café.
4) Assegure-se que o ltro esteja bem no centro do porta-ltro. Em seguida, feche a
tampa do recipiente designado para a colocação do porta-ltro.
5) Coloque água potável no compartimento para água da sua cafeteira, na quantidade
desejada.
6) Feche a tampa do recipiente designado para a colocação do porta ltro
7) Coloque a jarra sobre a placa de aquecimento da cafeteira.
Observação: Se o recipiente para colocação do porta-ltro transbordar, não abra
sua tampa. Um transbordamento pode causar lesão pessoal, ou danos.
Para reduzir o risco de possíveis danos à jarra e/ou risco de lesão pessoal, não
coloque mais água fria na jarra, se esta estiver quente. Deixe a jarra esfriar antes
de utilizá-la novamente.
Não prepare café com a tampa do recipiente para colocação do porta-ltro aberta.
USANDO SUA CAFETEIRA
Número de xícaras de café Colheres de sopa
36 9
30 71/2
24 6
18 41/2
12 3
6 11/2
1 xícara = 275 ml de café preparado
Page 21

Português-6
PREPARANDO CAFÉ
Pressione o interruptor para acender a luz.
Esta luz indica que a cafeteira está ligada e que o ciclo de preparo vai começar.
Quando o café pára de uir é porque o ciclo está terminado.
Enquanto o café estiver coando, o ‘Sistema de Pausa de Coar’, permite-lhe retirar
a jarra e servir-se do café que já estiver coado. COLOQUE A JARRA NOVAMENTE
SOBRE A PLACA DE AQUECIMENTO, EM 30 SEGUNDOS, PARA PREVENIR QUE O
CAFÉ DERRAME E POSSA CAUSAR ALGUMA LESÃO.
Desligue a cafeteira pressionando o interruptor, até que a luz se apague.
A cafeteira deve ser limpa, se você notar os seguintes detalhes:
Saída excessiva de vapor, ou os tempos aumentaram, consideravelmente. Este
problema ocorre quando se acumulam resíduos minerais provenientes da água. Se o
procedimento de bombear água, parar antes de esvaziar toda a água que fora colocada
para coar o café, sua cafeteira precisa de limpeza.
A freqüência de limpeza da cafeteira vai depender da quantidade de resíduos minerais
que a água contenha. A seguinte tabela sugere programas de limpeza da cafeteira.
Intervalos de Limpeza Sugeridos
Tipos de Água Freqüência de Limpeza
Água com poucos resíduos minerais Cada 80 ciclos de preparo
Água com muitos resíduos minerais Cada 40 ciclos de preparo
Pode limpar sua cafeteira utilizando vinagre branco.
Para limpá-la proceda como se você estivesse coando café. No entanto, não adicione
pó de café. Coloque somente a água com vinagre, numa proporção de mistura em
partes iguais (50% de cada).
Limpeza da jarra
A água, com muitos resíduos minerais, pode deixar manchas esbranquiçadas na jarra,
ou transformá-las, posteriormente, em cor de café. Manchas de café, de tonalidade
marrom, também podem aparecer, devido ao uso contínuo da jarra.
Para remover as manchas da jarra:
1) Encha a jarra com uma solução de partes iguais de água e vinagre branco e deixe
que essa solução repouse na jarra por, aproximadamente, 20 minutos.
2) Isso feito, jogue fora a solução utilizada, lave e enxágüe a jarra.
Não use limpadores abrasivos que possam arranhar a jarra. As arranhaduras podem
facilitar a quebra da mesma.
LIMPANDO SUA CAFETEIRA
Page 22

Português-7
POSSÍVEIS PROBLEMAS PROVÁVEIS CAUSAS
A luz de “Ligada” – ON - não acende • E s t á de s l i gad a d a to m a da d e f o rça
• Falta de energia elétrica
O café não ltra • Está desligada da tomada de força
• Falta de energia elétrica
• Não há água no compartimento de
água. Observe o visor
• O porta-ltro não está corretamente
colocado
• A jarra não está totalmente colocada
sobre a placa de aquecimento
A cafeteira prepara somente água • Não há pó de café no ltro
A cafeteira funciona lentamente • A cafeteira precisa de limpeza
O porta-ltro deixa o café transbordar • O porta-ltro não está corretamente
colocado
• A jarra não está corretamente
colocada na placa de aquecimento
• A tampa da jarra não está colocada
corretamente
• Há muito pó de café no ltro
• A jarra foi removida da placa de
aquecimento por mais de 30 segundos
Odor de café queimado • A jarra cou vazia sobre a placa
aquecedora
• O café derramou sobre a placa
aquecedora
O café não está quente • Houve interrupção de energia elétrica
O café não tem bom sabor • O pó de café usado não é
recomendado para cafeteiras de
gotejamento
• A proporção de água/café não foi bem
proporcional
Há borras no café • O ltro de papel não foi colocado
corretamente no porta-ltro
PROBLEMAS E SOLUÇÕES
Page 23

Printed in China Impreso en China Impresso na China
P.N. 157870
CBA -030712
The following information is intended for Mexico only
CAFETERA OSTER
®
MODELOS: BVSTDCSK12, BVSTDCSK12-013, BVSTDCSK13,
BVSTDCSK13-013
LEA EL INSTRUCTIVO ANTES DE USAR EL APARATO
LA SIGUIENTE INFORMACIÓN ES PARA MÉXICO:
IMPORTADOR: SUNBEAM MEXICANA, S.A. DE C.V.
AV. JUÁREZ No. 40-201, EX–HACIENDA DE SANTA MÓNICA,
TLALNEPANTLA, ESTADO DE MÉXICO,
C.P. 54050, R.F.C. SME570928G90, TEL. 53660800
PAÍS DE ORIGEN: CHINA
PAÍS DE PROCEDENCIA: CHINA, E.U.A.
CONTENIDO: 1 PIEZA
CARACTERÍSTICAS ELÉCTRICAS
60 Hz 120 V
900 W
Electric Characteristics Series Models:/ Características eléctricas de los modelos de la serie:
BVSTDCSK12-XXX & BVSTDCSK13-XXX
Voltage/Voltaje Frequency/Frecuencia Power/Potencia
120 V 60 Hz 900 W
127 V 60 Hz 900 W
220 V 50/60 Hz 900 W
220 V 50 Hz 900 W
220 V 60 Hz 900 W
© 2012 Sunbeam Products, Inc. All rights reserved. Distributed by Sunbeam Latin America, LLC,
5200 Blue Lagoon Drive, Suite 470, Miami, FL 33126.
One year limited warranty – please see insert for details.
© 2012 Sunbeam Products, Inc. Todos los derechos reservados. Distribuido por Sunbeam Latin
America, LLC, 5200 Blue Lagoon Drive, Suite 470, Miami, FL 33126.
Garantía limitada de un año – por favor consulte los detalles en el inserto.
© 2012 Sunbeam Products, Inc. Todos os direitos reservados. Distribuído pela Sunbeam Latin
America, LLC, 5200 Blue Lagoon Drive, Suite 470, Miami, FL 33126.
Garantia limitada de um ano – para maiores detalhes, consulte o certificado.
www.oster.com
XXX where X is any number between 0 and 9 or any letter between A and Z.
XXX en donde X es cualquier numero entre 0 y 9 o cualquier letra entre A y Z.
 Loading...