

Page 1
User Manual
Multi-use Rice Cooker
with steam tray
For product questions contact:
Jarden Consumer Service
USA: 1.800.334.0759
www.oster.com
©2008 Sunbeam Products, Inc. doing business as Jarden Consumer Solutions.
All rights reserved. Distributed by Sunbeam Products, Inc. doing business as
Jarden Consumer Solutions, Boca Raton, Florida 33431.
Para preguntas sobre los productos llame:
Jarden Consumer Service
EE.UU.: 1.800.334.0759
www.oster.com
©2008 Sunbeam Products, Inc. operando bajo el nombre de
Jarden Consumer Solutions. Todos los derechos reservados.
Distribuido por Sunbeam Products, Inc. operando bajo el nombre de
Jarden Consumer Solutions, Boca Raton, Florida 33431.
Manual de Instrucciones
Arrocer á Riz Multi-usage
con bandeja para cocinar al vapor
MODEL/
MODELO
4751
Printed in China SPR-052908 Impreso en China
Visit us at www.oster.com
P.N. 128342
Page 2

IMPORTANT SAFEGUARDS
THIS UNIT IS FOR
When using electrical appliances, basic safety precautions
should always be followed, including the following:
READ AND SAVE THESE INSTRUCTIONS
• Make sure the voltage in your outlet is the same as the voltage indicated on
the appliance’s rating label.
• Do not touch hot surfaces. Use potholders when removing cover or handling
hot containers to avoid steam burns.
• To protect against risk of electric shock, do not immerse the cord, plug or
cooking unit in water or any other liquid.
• Extreme caution must be exercised when any appliance is used near children.
• Unplug from wall outlet when not in use and before cleaning. Allow to cool
before cleaning or storing this appliance.
• Never yank the cord to disconnect the cooking unit from the outlet. Instead,
grasp the plug and pull to disconnect.
• Do not operate any appliance if the cord is damaged. Do not use this appliance
if the unit malfunctions, if it is dropped or has been damaged in any manner.
In order to avoid the risk of an electric shock, never try to repair the appliance
yourself. Take it to an authorized service station for examination and repair.
• The use of accessories or attachments not recommended by the manufacturer
may cause fire, electrical shock or injury.
• Do not use outdoors or for commercial purposes.
• Do not use this appliance for purposes other than the one for which it
was designed.
• Do not let the electrical cord hang over the edge of the table or countertop,
or touch hot surfaces.
• Do not operate appliance while empty.
• Do not place on or near a hot gas or electric burner or heated oven.
• Use extreme caution when moving any appliance containing hot food, water,
oil or other liquids.
• Do not operate this appliance without the Lid in place on the unit.
Steam is generated during use.
• Lift and open cover carefully to avoid scalding and allow water to drip
into the Inner Pot.
• To disconnect, remove plug from outlet. Always unplug after use.
• CAUTION: This appliance generates steam during use. Proper precautions
must be taken to prevent the risk of burns, fire or other damage to persons
or property.
DO NOT IMMERSE THE HEATING BODY OF THE RICE COOKER IN
WATER OR ANY OTHER LIQUID
HOUSEHOLD USE ONLY
This appliance has a polarized alternating current plug (one blade is wider than
the other). To reduce the risk of electric shock, as a safety feature, this plug will
fit in a polarized outlet only one way. If the plug does not insert fully in the
outlet, reverse the plug. If it still fails to fit, contact a qualified electrician.
DO NOT ATTEMPT TO DEFEAT THIS SAFETY FEATURE.
EXTENSION CORD USE
A short power-supply cord is provided to reduce the risk resulting from becoming
entangled in or tripping over a longer cord. An extension cord may be used if care
is exercised in its use. If an extension cord is used, the electrical rating of the cord
must be at least as great as the electrical rating of the appliance. The extension
cord should be arranged so that it will not drape over the countertop or tabletop
where it can be pulled on by children or tripped over unintentionally.
SAVE THESE INSTRUCTIONS
WELCOME
Congratulations on your purchase of an OSTER®Multi-Use Rice Cooker!
To learn more about OSTER®products, please visit us at www.oster.com.
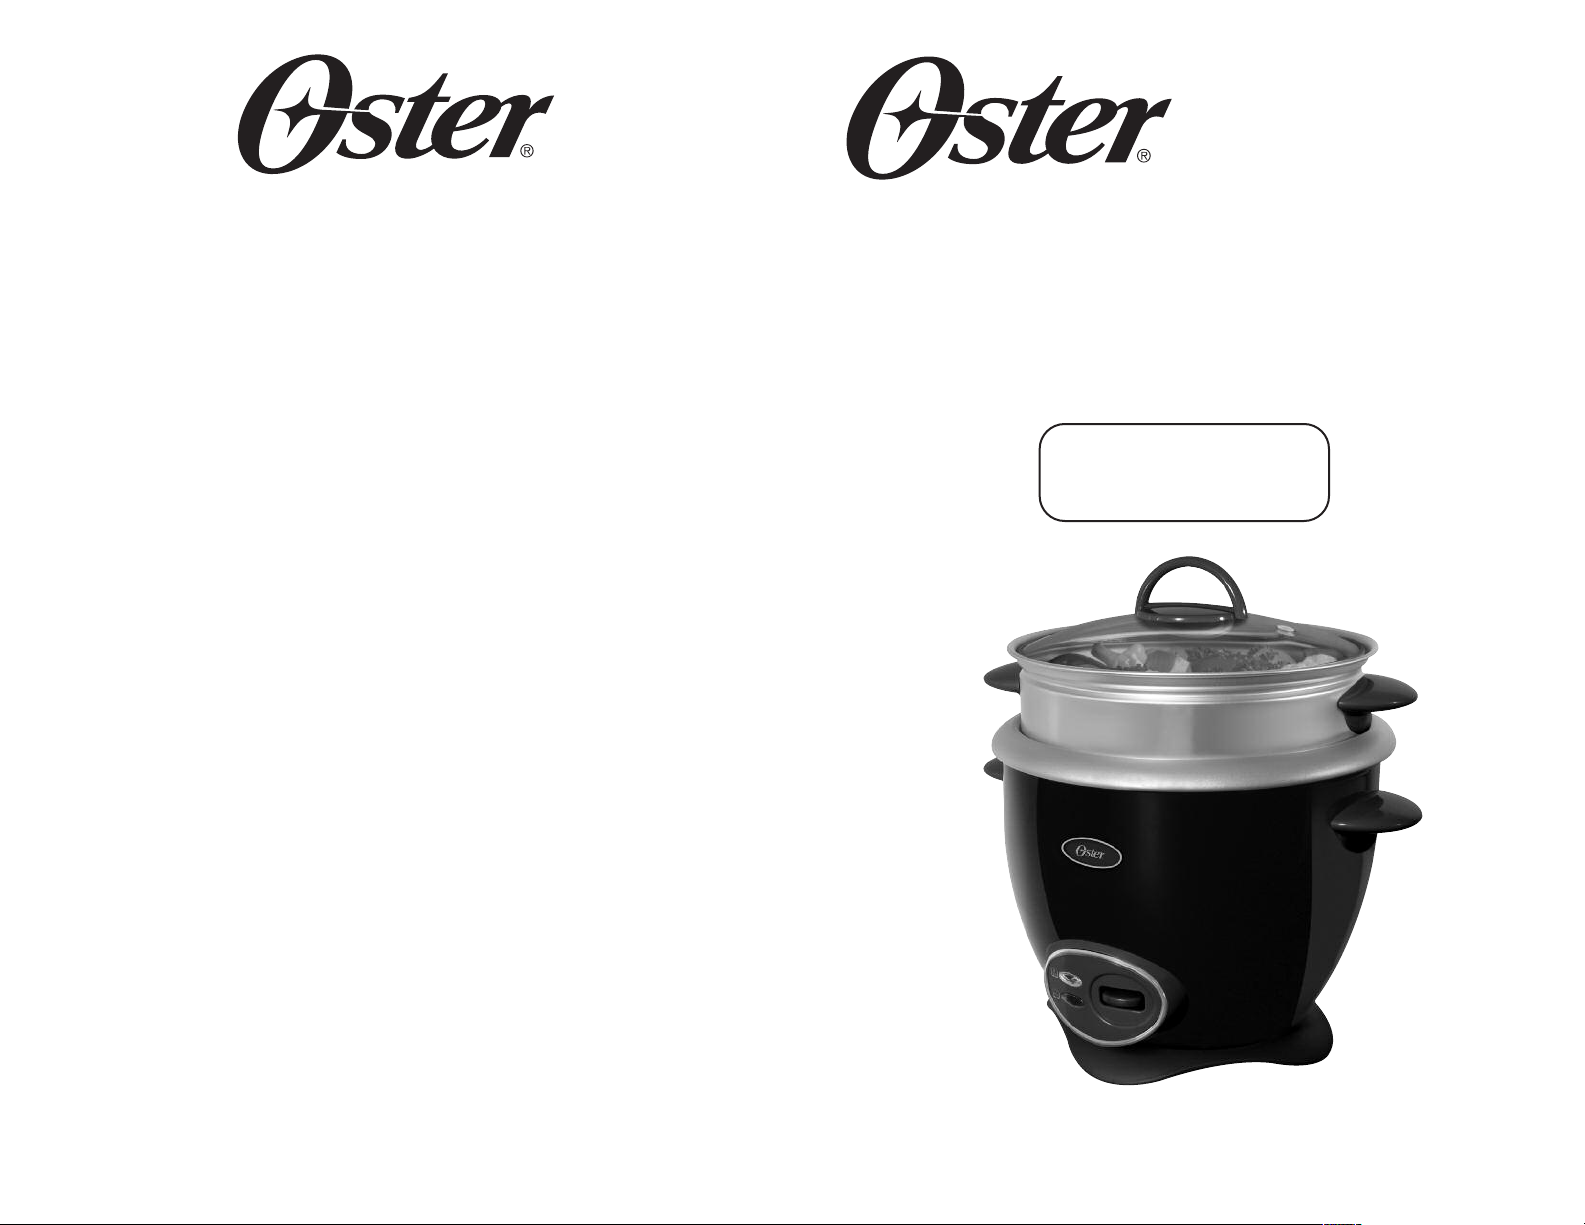
PARTS IDENTIFICATION
Before using your Rice Cooker for the first time, you should become familiar with
all of the parts. Read all Instructions and Safeguards carefully.
1. Glass Lid
2. Handle
3. Heating Body
4. On-Switch Button
5. Cook Light (red)
6. Keep Warm Light (yellow)
7. Power Cord
8. Measuring Cup
9. Paddle
10. Inner Pot
11. Steaming Tray
11
10
8
9
7
6
5
1
2
3
4
English-2English-1
Page 3

USING YOUR OSTER®MULTI-USE RICE COOKER
PREPARING YOUR RICE COOKER
• Remove any labels or stickers from appliance.
• Thoroughly wash Glass Lid, Inner Pot, Paddle, Steaming Tray and Measuring Cup
in warm, soapy water before first use, then rinse and dry carefully.
USING YOUR MULTI-USE RICE COOKER
1. Make sure appliance is unplugged.
2. Measure raw rice for desired amount with the Measuring Cup (160 ml) provided.
3. Add rice to inner pot. One cup of the uncooked rice will make about two cups of
cooked rice. Unit allows for a maximum of 7 cups (1.2 L) uncooked rice.
4. By using the Measuring Cup, add proper amount of water to the rice inside the
Inner Pot (for every cup (160ml) of raw rice, add 1-1/2 cups of water). For stickier
rice, add slightly more water. For fluffier rice, use slightly less water.
5. Set the Inner Pot into the Rice Cooker. Make sure that the Inner Pot sits directly in
contact with the heating plate by turning it slightly from right to left until it is
seated properly. Cover with Lid. DO NOT OPERATE THIS APPLIANCE
UNCOVERED. STEAM IS GENERATED DURING USE.
6. Plug the Power Cord into an electrical outlet. Activate the Rice Cooker by pushing
down on the On-Switch Button. Make sure the Cook Light (red) is on.
7. After 15 minutes, stir rice. Lift and remove the Lid carefully to avoid scalding and
allow water to drip into the Inner Pot. Use the Paddle or another long handheld
utensil to scoop and stir rice. After stirring, cover the Inner Pot with the Lid.
8. When your rice is cooked, the Rice Cooker will automatically switch to the warm
function and the Keep Warm Light (yellow) will turn on. The Rice Cooker will
keep the rice warm until the unit is disconnected from the wall outlet.
9. The Rice Cooker will automatically keep rice warm at 140°F – 175°F (60°C – 80°C).
10. When the rice temperature dips below this range, the yellow Keep Warm Light will
turn off and the red Cook Light will turn on indicating that the heat preservation
process has begun. When the rice temperature reaches 140°F, the Keep Warm Light
(yellow) will once again turn on and the Cook Light (red) will turn off.
11. Allow the appliance to cool completely before cleaning. Disconnect the plug from
the wall outlet when not in use.
RICE AND GRAIN
There are numerous varieties of rice depending upon region of origin and use. Please
refer to the chart on the next page for preparing different varieties of rice:
TYPE OF RICE AMOUNT OF RICE AMOUNT OF WATER
UPS
BASMATI / INDIAN FIRM
BROWN VARIATIONS
SUSHI / SHORT GRAIN
JASMINE / LONG GRAIN
RISOTTO
NOTES:
Wash the rice in a separate bowl, prior to cooking, if desired. For softer rice,
we suggest preparing rice and water in the Inner Pot and letting soak for
10 – 20 minutes before cooking.
1 CUP
1 CUP
1 CUP 1 CUP
2 CUPS 1 CUP
3 CUPS 1 CUP
1-1/2 C
2 CUPS & 2 TBSP.
INSTRUCTIONS TO REHEAT RICE
- To reheat cold rice, add 1/4 cup (4 Tbsp.) of cold water per cup of cooked rice,
stir to mix, then press down on the On-Switch Button to start cooking.
- When rice is warm, the Rice Cooker will automatically switch to the keep
warm function.
USING THE STEAMING TRAY
Steam cooking vegetables retains more nutrients than boiling or baking, while
preserving the bright, natural color.
1. Prepare vegetables by washing, peeling and then cutting into smaller sized pieces.
2. Make sure the unit is unplugged.
3. Fill the Inner Pot with the appropriate amount of water. (See Chart)
4. Set the Inner Pot into the heating body. Make sure that the Inner Pot sits directly in
contact with the heating plate.
5. Place vegetables in the Steaming Tray and position the Tray on top of the Inner
Pot. Cover with Lid. DO NOT OPERATE THIS UNIT UNCOVERED. STEAM IS
GENERATED DURING USE.
6. Plug the Power Cord into a wall outlet. Activate the Rice Cooker by pushing down
the On-Switch Button. Make sure the red Cook Light is on.
7. Time the cooking manually according to the chart on next page. The unit will
automatically switch to the keep warm cycle once all the water evaporates. If all
the water evaporates and you wish to extend the cooking cycle, add more water.
8. Once the vegetables have been steamed according to your personal preference,
remove the Steamer Tray from the Rice Cooker.
9. Disconnect from the wall outlet and allow the unit to cool completely
before cleaning.
English-4English-3
Page 4

AMOUNT OF AMOUNT OF APPROX . TIME
TYPE OF VEGETABLE VEGETABLE WATER (MINUTES)
RECIPES
EENBEANS
GR
10 O
UNCES
/ 300G
BROCCOLI 10 OUNCES/ 300G
CARROTS (SLICED) 8 OUNCES/ 200G
CAULIFLOWER 8 OUNCES/ 200G
CORN (KERNEL) 10 OUNCES/ 300G
PEAS 10 OUNCES/ 300G
SPINACH 5 OUNCES/ 150G
MIXED VEGETABLES 10 OUNCES/ 300G
NOTE:
These times are approximate. It is recommended that you monitor the steaming process
and adjust the cooking time according to your preference. Stir vegetables occasionally
during the cooking process. When cooking rice, steaming times may vary.
1
⁄3 CUP/ 50 M
1
⁄3 CUP / 50 ML 30 – 35
1
⁄3 CUP / 50 ML 30 – 35
1
⁄3 CUP / 50 ML 30 – 35
1
⁄3 CUP / 50 ML 40 – 45
1
⁄3 CUP / 50 ML 30 – 35
1
⁄3 CUP / 50 ML 20 – 30
1
⁄3 CUP / 50 ML 30 – 35
L
30 – 35
CARE AND CLEANING
This appliance should be cleaned after every use
• Unplug the Rice Cooker from the wall outlet when not in use or before cleaning.
Never immerse the Heating Body in water or any other liquid! Allow the Rice
Cooker to cool completely before cleaning.
• Do not use abrasive cleaners, scouring pads or steel wool to clean the Rice Cooker.
• Heating Body: lightly wipe the exterior with a damp cloth or sponge. DO NOT
IMMERSE HEATING BODY INTO WATER OR ANY OTHER LIQUID. Dry
thoroughly with a soft cloth.
• Inner Pot: fill with hot water and let sit for a while and then wash with hot, soapy
water using a sponge and dry thoroughly with a cloth or use dishwasher.
• Lid, Measuring Cup, Paddle and Steaming Tray: wash in warm, soapy water. Rinse
thoroughly and dry or use dishwasher. CAUTION: handle the Lid with extreme care,
as it may become slippery when wet.
• Heating plate: grains of rice or other foreign matter may stick to the heating plate.
These must be removed to prevent inadequate cooking. To remove cooked rice,
smooth sandpaper can be used. Smooth out and polish the spot for good contact
between the heating plate and the bottom of the Inner Pot.
• There are no user serviceable parts inside this appliance. Do not attempt to repair this
appliance yourself as you could render it dangerous to use.
SPANISH RICE
1
⁄2 lb. (250g) of sausage (chorizo) 1 medium onion
1 tbsp. yellow pepper, ground 1 tsp. paprika
2 cups tomatoes, diced,
without skin or seeds 1 cup green peas
1 red pepper, diced 2 celery stalks, sliced
1 green pepper, diced 2 cups long-grain rice
3 cups chicken broth Salt and pepper
Chop the onion. In the Oster
add onion, yellow pepper, paprika and tomatoes. Mix together. Add the remaining
vegetables, the rice and the broth. Check seasoning, cover and cook until done.
Garnish with curly parsley. Serve hot.
®
Multi-Use Rice Cooker, sauté the sausage cut in slices,
FETTUCINI WITH APPLE, SHRIMP AND CURRY SAUCE
1
⁄2 lb. (1⁄4 kg) fettucini 4 tbsps. butter
3 tbsps. flour 1 tsp. curry
½ cup cream 1 cup chicken broth
2 cups apples, peeled and diced 1 lb. (
Parmesan cheese to taste Juice of one lemon (for the apples)
In the Oster
2 minutes. Add cream, chicken broth, apples and shrimp. Stir until thickened.
Remove from Rice Cooker and keep hot. Then in the Oster
pour sufficient water and salt to cook fettucini al dente. Serve the fettucini with the
sauce and sprinkle with Parmesan cheese.
®
Multi-Use Rice Cooker, melt butter, add flour and curry. Cook for
1
⁄2kg) shrimp
®
Multi-Use Rice Cooker,
RICE WITH SHELLFISH
1 package (16 oz or 400 g) saffron rice 12 small clams
1
⁄2 lb (250 g) shrimp, shelled
and deveined, with or without tails
1 cup sweet peas ¼ red pepper, diced
Wash clams, shucking thoroughly, and rinse well. Cook rice in the Oster
Rice Cooker, following the instructions on the package. Add clams, shrimp, oysters,
sweet peas and red pepper five minutes before the rice is fully cooked. Mix well,
without stirring. Serve with French bread croutons and a fresh salad. Option:
The saffron rice may be substituted with brown rice.
1
⁄2 lb (250 grams) oysters
®
Multi-Use
English-6English-5
Page 5

RECIPES
RECIPES
MILANESE MINESTRONE
1 lb. (1⁄2 kg) chicken breast 2 cloves garlic, chopped
1 tbsp. basil ½ cup celery
½ cup fresh beans ½ tsp. thyme
½ tsp. oregano ½ cup onions, sliced
½ cup green pepper, chopped ½ cup mushrooms, sliced
½ cup squash, diced 2 cups tomatoes, diced, without skins or seeds
3 medium potatoes, 1 lb. (
peeled and diced
2 tsps. of Worcestershire sauce 1 cup Parmesan cheese
3 tbsps. margarine 2 quarts water
Salt
In the Oster
chicken is cooked, remove and dice. Reserve the broth. In the Oster
Cooker, melt butter, add garlic, onion, celery, green pepper, mushrooms, beans and
squash. Sauté until soft. Add the tomatoes, then the potatoes and sauté for 5 more
minutes. Add this mixture to the chicken broth, add Worcestershire sauce, the herbs
bouquet (basil, thyme, oregano), salt, chicken and noodles. Cook 10 minutes until the
potatoes are cooked, but firm. Add Parmesan cheese while stirring. Cook 2 minutes
longer. Serve and sprinkle with more cheese.
®
Multi-Use Rice Cooker, pour water and boil chicken with the salt. When
1
⁄2 kg) fine noodles
®
Multi-Use Rice
RICE WITH CHICKEN
2 lb rice 1 onion
3 green peppers 2 carrots
4 cloves garlic celery to taste
4 chicken breasts 3 tbsps. salt
black pepper to taste oregano to taste
chicken broth, 1 envelope tomato paste
Cook the chicken in water, salt, black pepper, oregano, chicken broth in the Oster
Multi-Use Rice Cooker. When done, shred the chicken in the water in which it was cooked
and add green peppers, onion, garlic, celery and carrots, everything well chopped. Cook 10
minutes, and add tomato paste and shredded chicken. After the sauce is cooked, add the
uncooked, washed rice and cover the rice somewhat more than normal.
®
RICE AND TUNA SALAD
2 cups cooked rice 2 peppers in vinegar*
1 can tuna 3
3 hard-boiled eggs Mayonnaise
Salt and pepper Lettuce leaves
Olive oil Vinegar
Cook the rice in the Oster
and place on a platter until it is completely cool. Dice the cooked peppers and slice the
eggs. Shred the tuna and add along with the remaining ingredients to the rice, reserving
some of the egg slices and olives to garnish the salad. Season with olive oil, salt, pepper
and vinegar. Serve the salad on a platter with lettuce leaves and garnish with
hard-boiled egg and olives.
* Peppers in vinegar: wash and cut the peppers in two lengthwise. Remove the seeds
and cook the peppers in a saucepan with two cups water and one-half cup vinegar
with a pinch of salt. After 15 minutes, remove from heat.
®
Multi-Use Rice Cooker in the traditional manner, remove
1
⁄2 oz. (100g) green olives
RICE PUDDING
1 cup rice 3 cups water
1 cinnamon stick 2 whole cloves
1¾ cup evaporated milk 1¼ cup condensed milk
1 tsp. grated lemon ½ cup dark raisins
and orange peel
1 tsp. vanilla ¼ cup grape brandy
1 egg yolk Powdered cinnamon
In the Oster
cinnamon stick and cloves. Once the rice is cooked, add evaporated and condensed milk,
grated lemon and orange peel, and raisins. Continue stirring until set. Add vanilla, grape
brandy and the egg yolk well beaten. Sprinkle with cinnamon and serve.
®
Multi-Use Rice Cooker, cook the pre-washed rice with 3 cups of water,
English-8English-7
Page 6

One-Year Limited Lifetime Warranty
Sunbeam Products, Inc. doing business as Jarden Consumer Solutions or if in Canada, Sunbeam
Corporation (Canada) Limited doing business as Jarden Consumer Solutions (collectively “JCS”)
warrants that for a period of one year from the date of purchase, this product will be free from
defects in material and workmanship. JCS, at its option, will repair or replace this product or any
component of the product found to be defective during the warranty period. Replacement will be
made with a new or remanufactured product or component. If the product is no longer available,
replacement may be made with a similar product of equal or greater value. This is your exclusive
warranty. Do NOT attempt to repair or adjust any electrical or mechanical functions on this
product. Doing so will void this warranty.
This warranty is valid for the original retail purchaser from the date of initial retail purchase and is
not transferable. Keep the original sales receipt. Proof of purchase is required to obtain warranty
performance. JCS dealers, service centers, or retail stores selling JCS products do not have the right
to alter, modify or any way change the terms and conditions of this warranty.
This warranty does not cover normal wear of parts or damage resulting from any of the following:
negligent use or misuse of the product, use on improper voltage or current, use contrary to the
operating instructions, disassembly, repair or alteration by anyone other than JCS or an authorized
JCS service center. Further, the warranty does not cover: Acts of God, such as fire, flood, hurricanes
and tornadoes.
What are the limits on JCS’s Liability?
JCS shall not be liable for any incidental or consequential damages caused by the breach of any
express, implied or statutory warranty or condition.
Except to the extent prohibited by applicable law, any implied warranty or condition of
merchantability or fitness for a particular purpose is limited in duration to the duration of the
above warranty.
JCS disclaims all other warranties, conditions or representations, express, implied, statutory or
otherwise.
JCS shall not be liable for any damages of any kind resulting from the purchase, use or misuse of,
or inability to use the product including incidental, special, consequential or similar damages or
loss of profits, or for any breach of contract, fundamental or otherwise, or for any claim brought
against purchaser by any other party.
Some provinces, states or jurisdictions do not allow the exclusion or limitation of incidental or
consequential damages or limitations on how long an implied warranty lasts, so the above
limitations or exclusion may not apply to you.
This warranty gives you specific legal rights, and you may also have other rights that vary from
province to province, state to state or jurisdiction to jurisdiction.
How To Obtain Warranty Service
In the U.S.A.
If you have any question regarding this warranty or would like to obtain warranty service, please
call 1-800-334-0759 and a convenient service center address will be provided to you.
In Canada
If you have any question regarding this warranty or would like to obtain warranty service, please
call 1-800-667-8623 and a convenient service center address will be provided to you.
In the U.S.A., this warranty is offered by Sunbeam Products, Inc. doing business as Jarden
Consumer Solutions located in Boca Raton, Florida 33431. In Canada, this warranty is offered by
Sunbeam Corporation (Canada) Limited doing business as Jarden Consumer Solutions, located at
20 B Hereford Street, Brampton, Ontario L6Y 0M1. If you have any other problem or claim in
connection with this product, please write our Consumer Service Department.
PRECAUCIONES IMPORTANTES
Cuando use algún artefacto eléctrico, siempre deben seguirse
precauciones básicas de seguridad, incluyendo las siguientes:
LEA TODAS LAS INSTRUCCIONES
• Asegúrese que el voltaje en su tomacorriente sea la misma que el voltaje
indicado en la placa del artefacto.
• No toque las superficies calientes. Cuando quite la tapa o manipule
contenedores calientes, use agarraderas resistentes al calor para evitar
quemaduras del vapor.
• Para protegerse contra descargas eléctricas, no sumerja el cable, el enchufe o
la unidad de cocción en agua o cualquier otro líquido.
• Extrema precaución debe ser ejercida cuando cualquier artefacto es utilizado
cerca de niños.
• Desconecte del tomacorriente cuando no está en uso o antes de limpiarlo.
Permita que se enfríe antes de limpiar o guardar el artefacto.
• Nunca tire del cable para desconectar la unidad de cocción del
tomacorriente. Más bien, agarre el enchufe y hale para desconectar.
• No opere ningún artefacto si el cable está dañado. No use el artefacto si no
funciona bien, si se ha caído o haya sido dañado de alguna forma. Para evitar el
riesgo de descarga eléctrica, nunca trate de repararlo usted mismo.
• El uso de accesorios o aditamentos que no sean los recomendados por el
fabricante pudiera causar incendio, descarga eléctrica o lesiones personales.
• No lo use a la intemperie o para propósitos comerciales.
• No use este artefacto con propósitos diferentes a los cuales fue diseñado.
• No permita que el cable eléctrico cuelgue del borde de la mesa o del
mostrador, o toque superficies calientes.
• No opere el artefacto cuando esté vacío.
• No coloque el artefacto sobre o cerca de una hornilla caliente de gas o
eléctrica, ni dentro de un horno caliente.
• Use solamente sobre superficies planas y resistentes al calor.
• Tenga extremada precaución cuando mueva un artefacto que contenga
alimentos calientes, agua, aceite u otros líquidos calientes.
• No opere este artefacto sin la Tapa en su lugar sobre la unidad.
El vapor se genera durante su uso.
• Levante y abra la tapa cuidadosamente para evitar quemarse y permita que
el agua escurra dentro de la olla interior.
• Para desconectar, remueva el enchufe del tomacorriente. Siempre desenchufe
después de utilizarlo.
• PRECAUCION: Este artefacto genera vapor durante su uso. Precauciones
apropiadas deben tomarse para prevenir riesgos de quemaduras, incendio u
otros daños tanto personales como materiales.
¡NO SUMERJA LA PARTE QUE CALIENTE DE SU ARROCERA EN
AGUA NI UN NINGUN OTRO LIQUIDO!
PLEASE DO NOT RETURN THIS PRODUCT TO ANY OF THESE
ADDRESSES OR TO THE PLACE OF PURCHASE.
Español-10English-9
Page 7

ESTE UNIDAD ES SÓLO PARA
USO DOMÉSTICO
Este artefacto tiene un enchufe polarizado (una clavija es más ancha que la otra).
Para reducir el riesgo de descarga eléctrica, como elemento de seguridad, este
enchufe encaja en un tomacorriente polarizado en una sola dirección. Si el enchufe
no cabe completamente en el tomacorriente, invierta el enchufe. Si todavía no
entra, contacte un electricista calificado. NO INTENTE MODIFICAR ESTE
ELEMENTO DE SEGURIDAD.
USO DE CABLE DE EXTENSIÓN
A short power-supply cord is provided to reduce the risk resulting from
becoming entangled in or tripping over a longer cord. An extension cord
may be used if care is exercised in its use. If an extension cord is used, the
electrical rating of the cord must be at least as great as the electrical rating
of the appliance. The extension cord should be arranged so that it will not
drape over the countertop or tabletop where it can be pulled on by children
or tripped over unintentionally.
GUARDE ESTAS INSTRUCCIONES
BIENVENIDOS
Felicitaciones por su compra de la Cuiseur á Riz á multi-usage OSTER®!
Para conocer más acerca de los productos OSTER®por favor visítenos en
www.oster.com.
IDENTIFICACIÓN DE LAS PARTES
Antes de usar su Vaporera de Alimentos por primera vez, usted debe familiarizarse
con todas las partes. Lea todas las instrucciones y precauciones detenidamente.
1. Tapa de Vidrio
2. Asas
3. Cuerpo Calefactor
4. Interruptor de Encendido
5. Luz de Cocción (roja)
6. Luz de Calentar (amarilla)
7. Cordón Eléctrico
8. Taza Medidora
9. Cucharón
10. Olla Interior
11. Bandeja para Cocinar
al Vapor
11
10
8
9
7
6
5
1
2
3
4
UTILIZANDO SU
CUISEUR Á RIZ Á MULTI-USAGE
OSTER
®
PREPARANDO SU VAPORERA DE ALIMENTOS
• Quite cualquier etiqueta del aparato.
• Antes del primer uso, lave muy bien con agua tibia y jabonosa laTapa de Vidrio, la Olla
Interior, el Cucharón, la Bandeja para Cocinar al Vapor y la Taza Medidora de acuerdo.
Después enjuague y seque cuidadosamente.
USANDO SU CUISEUR Á RIZ Á MULTI-USAGE
1. Asegúrese de que la Arrocera esté desconectada del tomacorriente.
2. Mida la cantidad deseada de arroz crudo con la taza graduada que se incluye de
160ml. que viene can la Arrocera.
3. Agregue arroz a la olla interior. Una taza de arroz crudo producirá alrededor de
dos tazas de arroz cocido. La Unidad permite hasta un máximo de 7 tazas ( 1.2 L )
de arroz crudo.
4. Con la ayuda de la Taza Medidora, agregue la cantidad correcta de agua al arroz
dentro de la Olla Interior (por cada taza (160ml.) de arroz crudo, agregue 1,25
tazas de agua). Para un arroz más mojadito (pegajoso), agregue un poco más de
agua. Para un arroz más suelto (esponjoso), use menos agua.
5. Coloque la Olla Interior del artefacto. Asegúrese de que ésta hace contacto con el
Plato Calefactor, girándola ligeramente de derecha a izquierda hasta que esté
colocada correctamente. Cubra con la tapa. NO OPERE ESTE ARTEFACTO SIN
QUE ESTÉ CUBIERTO CON LA TAPA. EL VAPOR SE GENERA DURANTE EL
USO.
6. Conecte el Cable eléctrico. Encienda la Arrocera presionando el Interruptor
deEncendido hacia abajo. Verifique que la Luz de Cocción (roja) esté iluminada.
7. Después de 15 minutos mezcle el arroz. Levante y abra la Tapa cuidadosamente
para evitar quemarse y deje que el agua gotee hacia la Olla Interior. Use el
Cucharón o cualquier otro utensilio con un mango largo para mezclar el arroz.
Después de mezclar, cubra la Olla Interior con la Tapa.
8. Cuando el arroz ya esté cocido, la Arrocera automáticamente cambiará a la función
de calentar y la Luz de Calentar (amarilla) se iluminará. La Arrocera permanecerá
calentando hasta que la unidad sea desconectada del tomacorriente.
9. La Arrocera mantendrá el arroz caliente a una temperatura de 140°F – 175°F
(60°C – 80°C) automáticamente.
10. Cuando la temperatura del arroz baje de este rango, la Luz de Calentar (amarilla)
se apagará y la Luz de Cocción (roja) se encenderá indicando que ha iniciado el
proceso de conservación de calor. Cuando la temperatura del arroz alcanza 140°F,
la luz amarilla se iluminará nuevamente y la Luz de Cocción (roja) se apagará.
11. Permita que el aparato se enfríe completamente antes de limpiar. Desconecte la
Arrocera del tomacorriente cuando no la esté utilizando.
Español-12Español-11
Page 8

ARROZ Y GRANOS
Existe una numerosa variedad de arroz dependiendo de la región de origen y su uso.
Por favor referirse al cuadro de abajo para preparar diferentes variedades de arroz:
TIPO DE ARROZ CANTIDAD DE ARROZ CANTIDAD DE AGUA
BASMATI / INDIAN FIRM 1 TAZA 1-1/2 TAZAS
(ARROZ DE GRANO LARGO)
VARIEDADES DE ARROZ MARRÓN 1 TAZA 2 TAZAS & 2 CDAS.
SUSHI /GRANO CORTO 1 TAZA 1 TAZA
JASMINE / GRANO LARGO 2 TAZAS 1 TAZA
RISOTTO 3 TAZAS 1 TAZA
NOTA:
Lave el arroz en un tazón por separado si así lo desea. Para un arroz más suave,
sugerimos que prepare el arroz y el agua en la Olla Interior y déjelo remojando de 10 a
20 minutos antes de cocinar.
CANTIDAD CANTIDAD TIEMPO APROX.
IPO DE VEGETAL DE VEGETALES DE AGUA (MINUTOS)
T
IJOLESVERDES
FR
10 O
NZAS
/ 300G
BRÓCULI 10 ONZAS/ 300G
ZANAHORIA (EN RUEDITAS) 8 ONZAS/ 200G
COLIFLOR 8 ONZAS/ 200G
MAÍZ ( E GRANO ENTERO) 10 ONZAS/ 300G
ARVEJAS 10 ONZAS/ 300G
ESPINACAS 5 ONZAS/ 150G
VEGETALES MIXTOS 10 ONZAS/ 300G
NOTA:
Estos tiempos son aproximados. Es recomendable que usted supervise el proceso de
cocción al vapor y ajuste los tiempos de acuerdo a su preferencia. De vez en cuando,
revuelva los vegetales durante el proceso de cocción. Al cocinar el arroz, el tiempo para
cocer al vapor puede variar.
1
⁄3 TAZA/ 50 M
1
⁄3 TAZA / 50 ML 30 – 35
1
⁄3 TAZA / 50 ML 30 – 35
1
⁄3 TAZA / 50 ML 30 – 35
1
⁄3 TAZA / 50 ML 40 – 45
1
⁄3 TAZA / 50 ML 30 – 35
1
⁄3 TAZA / 50 ML 20 – 30
1
⁄3 TAZA / 50 ML 30 – 35
L
30 – 35
INSTRUCCIONES PARA RECALENTAR EL ARROZ
- Para recalentar arroz frío, agregue 1/4 de taza (4 cucharadas) de agua fría por
cada taza de arroz, revuelva y mezcle, después presione el Interruptor de
Encendido para cocinar.
- Cuando el arroz esté caliente, la Arrocera automáticamente cambiará a la función
de calentar.
CÓMO USAR LA BANDEJA PARA COCINAR A VAPOR
Los vegetales cocinados al vapor retienen mucho más los nutrientes que los vegetales
hervidos o cocidos y además conservan su color natural.
1. Prepare los vegetales, lávelos bien, pélelos y córtelos en trozos pequeños.
2. Asegúrese de que la Arrocera esté desconectada del tomacorriente.
3. Llene la Olla Interior con la cantidad de agua recomendada (Ver la Tabla).
4. Coloque la Olla Interior dentro del Cuerpo Calefactor. Asegúrese de que la Olla
Interior haga contacto con el plato calefactor.
5. Coloque los vegetales en la Bandeja para Cocinar a Vapor y coloque la Bandeja
encima de la Olla Interior. Cubra con la Tapa. NO OPERE ESTE ARTEFACTO
SIN QUE ESTÉ CUBIERTO CON LA TAPA. EL VAPOR SE GENERA
DURANTE EL USO.
6. Conecte la unidad al tomacorriente. Encienda la Arrocera presionando el
Interruptor hacia abajo. Verifique que la Luz de Cocción (roja) esté iluminada.
7. Controle manualmente el tiempo de cocción de acuerdo al siguiente cuadro. La
unidad pasará automáticamente al ciclo de mantener caliente al evaporarse toda el
agua. Si toda el agua llega a evaporarse y usted desea los alimentos más cocidos,
agregue más agua.
8. Una vez que los vegetales estén cocidos remueva la Bandeja para Cocinar al Vapor
(modelo 4731 solamente) de la Olla Interior.
9. Desconecte la Arrocera del tomacorriente y permita que se enfríe completamente
antes de limpiar.
CUIDADO Y LIMPIEZA
Limpie la Arrocera después de cada uso.
• No use limpiadores abrasivos, esponjas de metal o lana para limpiar la Arrocera.
• Cuerpo Calefactor: limpie ligeramente el exterior con un paño o esponja húmedos.
¡No sumerja el Cuerpo Calefactor en agua o en ningún otro líquido! Seque bien con
un paño suave.
• Olla Interior: llene con agua caliente y permita que esté así un tiempo, después lave
con agua caliente jabonosa y una esponja; seque bien con un paño. También puede
lavarse en lavaplatos.
• Lave la Tapa, Taza de Medir, Cucharón y Bandeja de Vapor con agua jabonosa tibia.
Enjuague bien y seque o use lavaplatos eléctrico. PRECAUCIÓN: manipule la Tapa
con extremo cuidado, ya que se puede resbalar cuando está mojada.
• Plato Calefactor: granos de arroz y otros objetos extraños pueden pegarse al plato
calefactor. Estos deben ser removidos para prevenir un funcionamiento inadecuado
al cocinar. Para remover arroz cocido, un papel con lija suave puede usarse. Suavice
y elimine los residuos para que la Olla Interior y el plato calefactor estén en contacto
al cocinar.
• No hay partes que usted pueda reparar dentro de la Arrocera. No intente reparar este
electrodoméstico ya que puede ser peligroso.
Español-14Español-13
Page 9

RECETAS
RECETAS
ARROZ A LA ESPAÑOLA
1
⁄2 lb. (250g) de chorizo 1 cebolla mediana
1 cucharada de ají amarillo molido 1 cucharadita de pimentón
2 tazas de tomates picados, 1 taza de arvejas
sin piel ni semillas
1 pimiento rojo cortado en cuadritos
Corte la cebolla. Sofría en la Arrocera Multi-Uso Oster el chorizo en rueditas, agregue
la cebolla, el ají amarillo, paprika y los tomates. Mezclar homogéneamente. Incorporar
el resto de los vegetales, el arroz y el caldo, verificar la sazón, tapar y dejar cocinar
hasta que esté listo. Decorar con perejil fresco. Servir caliente.
FETTUCINI EN SALSA DE MANZANAS, CAMARONES Y CURRY
1
⁄2 lb. (1⁄4 kg) fettucini 4 cdas. de mantequilla
3 cdas. de harina 1 cdita. de curry
½ taza de crema 1 taza de caldo de pollo
2 tazas de manzanas, peladas
y en cuadritos 1 lb. ( ½ kg.) camarones
Queso Parmesano al gusto Jugo de un limón ( para las manzanas )
En la Arrocera Multi-Usos Oster
Cocer por 2 minutos. Agregar la crema de leche, el caldo de pollo, las manzanas y los
camarones. Mover hasta que espese. Retire de la Arrocera y manténgalo caliente.Vierta
suficiente agua y sal en la Arrocera Multi-Uso Oster para cocinar los fettuccini al
dente. Servir el fettucini con salsa y espolvorear con abundante queso parmesano.
®
, derretir la mantequilla, agregar la harina y el curry.
ARROZ CON MARISCOS
1 paquete (16 onzas o 400 gramos) 12 almejas pequeñas de arroz con azafrán
1
⁄2 libra (250 gramos) de ostiones
1 taza de chícharos dulces ¼ pimiento rojo cortado en cuadros
Lave las almejas tallando minuciosamente y enjuague muy bien. Prepare el arroz en la
Arrocera Multi-Usos Oster
almejas, los camarones, ostiones, chícharos y pimiento cinco minutos antes que el arroz
se haya cocido. Mezcle bien con movimientos envolventes y sirva con trocitos de pan
francés y una ensalada fresca. Opción: Puede sustituirse el arroz con azafrán por una
mezcla de arroz integral.
®
, siguiendo las instrucciones del empaque. Añada las
1
⁄2 libra (240 gramos) de camaroneslimpios,
con o sin cola
MINESTRÓN MILANÉS
1 lb. (1⁄2 kg) de pechuga de pollo 2 dientes de ajo picados
1 cucharada de albahaca ½ taza de apio
½ taza de frijolito fresco ½ cucharadita de tomillo
½ cucharadita de orégano ½ taza de cebollas en rodajas
½ taza de pimientos verdes, picados ½ taza de champiñones,
½ taza de calabacines picados 2 tazas de tomates, en cuadritos sin
3 papas medianas, 2 cucharaditas de salsa inglesa
peladas y en cuadritos
1
1 lb. (
⁄2 kg) de fideos canutos 1 taza de queso parmesano
3 cucharadas de margarina 2 litros de agua
Sal al gusto
En la Arrocera Multi-Usos Oster
pollo esté cocido, retirar y cortar en cuadritos. Reservar el caldo. En la Arrocera
Multi-Uso Oster
pimiento, los champiñones, el frijolito y los calabacines. Freír hasta que se ablanden.
Agregar los tomates, luego las papas y freír por 5 minutos más. Agregar esta
preparación al caldo de pollo, incorporar la salsa inglesa, el bouquet de hierbas
(albahaca, tomillo, orégano), sal, pollo y fideos. Dejar cocinar por 10 minutos hasta
que las papas estén cocidas pero firmes. Incorporar el queso parmesano revolviendo.
Dejar por 2 minutos más. Al servir espolvorear con más queso.
®
, derretir la margarina, agregar los ajos, la cebolla, el apio, el
®
, verter el agua y hervir el pollo con la sal. Cuando el
en rebanadas
semilla y sin concha.
ARROZ CON POLLO
2 lbs. arroz 1 cebolla
3 aji dulce 2 zanahorias
4 dientes de ajo apio al gusto
4 pechugas de pollo 3 cucharadas de sal
pimienta al gusto orégano al gusto
caldo de pollo, 1 sobre pasta de tomate
Se cocina el pollo en agua, sal, pimienta, orégano, caldo de pollo en su Arrocera
Multi-Usos Oster
el ají, la cebolla, ajo, apio, zanahoria todo bien picadito, 10 minutos de cocimiento, se le
agrega pasta de tomate y el pollo deshilachado. Luego de tener la salsa se le agrega al arroz
crudo y limpio tapando el arroz un poco más de lo normal.
®
. Al estar listo se deshilacha el pollo en el agua que se cocinó, se hierven
Español-16Español-15
Page 10

RECETAS
ENSALADA DE ARROZ CON ATÚN
2 tazas de arroz cocido 2 pimientos en vinagre*
1 lata de atún 3
3 huevos duros Mayonesa
Sal y pimienta Hojas de lechuga
Aceite de oliva Vinagre
Cocinar el arroz en la Arrocera Multi-Usos Oster
colocarlo en una fuente hasta que se enfríe totalmente. Cortar los pimientos cocidos en
trocitos y los huevos duros en rodajas. Desmenuzar el atún e incorporarlo junto con el
resto de los ingredientes al arroz, dejando algunas rodajas de huevo y aceitunas para
decorar. Condimentar con aceite de oliva, sal, pimienta y vinagre. Vaciar la ensalada
sobre una fuente decorada con hojas de lechuga y adornar con huevos duros y
aceitunas.
* Pimientos en vinagre: lavar y cortar los pimientos por la mitad a lo largo. Quitarle las
semillas y ponerlos a cocinar en una cacerola con dos tazas de agua y media taza de
vinagre de vino con un poco de sal. Después de 15 minutos, retirar del fuego.
ARROZ CON LECHE
1 taza de arroz 3 tazas de agua
1 palito de canela 2 clavos de olor
1¾ taza de leche evaporada 1¼ lata de leche condensada
1 cucharadita de ralladura de ½ cup dark raisins
limón y naranja
1 cucharadita de vainilla ¼ taza de pisco
1 yema de huevo Canela en polvo
En la Arrocera Multi-Usos Oster
3 tazas de agua, el palito de canela y los clavos de olor. Una vez cocido el arroz, agregar
los dos tipos de leche, la ralladura y las pasas. Seguir moviendo hasta que tome cuerpo.
Incorporar la vainilla, el pisco y la yema de huevo bien batida. Espolvorear con canela
y servir.
®
, poner a hervir el arroz, previamente lavado, con las
1
⁄2 oz. (100g) de aceitunas verdes
®
en la forma tradicional, retirarlo y
Garantía Limitada de 1 Año
Sunbeam Products, Inc. operando bajo el nombre de Jarden Consumer Solutions, o en Canadá,
Sunbeam Corporation (Canada) Limited operando bajo el nombre de Jarden Consumer Solutions,
(en forma conjunta, “JCS”), garantiza que por un período de un año a partir de la fecha de compra,
este producto estará libre de defectos de materiales y mano de obra. JCS, a su elección, reparará o
reemplazará este producto o cualquier componente del mismo que presente defectos durante el
período de garantía. El reemplazo se realizará por un producto o componente nuevo o reparado. Si
el producto ya no estuviera disponible, se lo reemplazará por un producto similar de valor igual o
superior. Ésta es su garantía exclusiva. No intente reparar o ajustar ninguna función eléctrica o
mecánica de este producto. Al hacerlo elimínará ésta garantía.
La garantía es válida para el comprador minorista original a partir de la fecha de compra inicial y la
misma no es transferible. Conserve el recibo de compra original. Para solicitar servicio en garantía
se requiere presentar un recibo de compra. Los agentes y centros de servicio de JCS o las tiendas
minoristas que venden productos de JCS no tienen derecho a alterar, modificar ni cambiar de
ningún otro modo los términos y las condiciones de esta garantía.
Esta garantía no cubre el desgaste normal de las piezas ni los daños que se produzcan como
resultado de uso negligente o mal uso del producto, uso de voltaje incorrecto o corriente
inapropiada, uso contrario a las instrucciones operativas, y desarme, reparación o alteración por
parte de un tercero ajeno a JCS o a un Centro de Servicio autorizado por JCS. Asimismo, la garantía
no cubre actos fortuitos tales como incendios, inundaciones, huracanes y tornados.
¿Cuál es el límite de responsabilidad de JCS?
JCS no será responsable de daños incidentales o emergentes causados por el incumplimiento de
alguna garantía o condición expresa, implícita o legal.
Excepto en la medida en que lo prohíba la ley aplicable, cualquier garantía o condición implícita de
comerciabilidad o aptitud para un fin determinado se limita, en cuanto a su duración, al plazo de la
garantía antes mencionada.
JCS queda exenta de toda otra garantías, condiciones o manifestaciones, expresa, implícita, legal o
de cualquier otra naturaleza.
JCS no será responsable de ningún tipo de daño que resulte de la compra, uso o mal uso del producto,
o por la imposibilidad de usar el producto, incluidos los daños incidentales, especiales, emergentes o
similares, o la pérdida de ganancias, ni de ningún incumplimiento contractual, sea de una obligación
esencial o de otra naturaleza, ni de ningún reclamo iniciado contra el comprador por un tercero.
Algunas provincias, estados o jurisdicciones no permiten la exclusión o limitación de los daños
incidentales o emergentes ni las limitaciones a la duración de las garantías implícitas, de modo que
es posible que la exclusión o las limitaciones antes mencionadas no se apliquen en su caso.
Esta garantía le otorga derechos legales específicos y es posible que usted tenga otros derechos que
varían de un estado, provincia o jurisdicción a otro.
Cómo solicitar el servicio en garantía
En los Estados Unidos.
Si tiene alguna pregunta sobre esta garantía o desea recibir servicio de garantía, llame al 1-800-334-0759
y podrá obtener la dirección del centro de servicio que le resulte más conveniente
En Canadá
Si tiene alguna pregunta sobre esta garantía o desea recibir servicio de garantía, llame al 1-800-334-0759
y podrá obtener la dirección del centro de servicio que le resulte más conveniente
En los Estados Unidos, esta garantía es ofrecida por Sunbeam Products, Inc. operando bajo el nombre
de Jarden Consumer Solutions, Boca Ratón, Florida 33431. En Canadá, esta garantía es ofrecida por
Sunbeam Corporation (Canada) Limited operando bajo el nombre de Jarden Consumer Solutions, 20 B
Hereford Street, Brampton, Ontario L6Y 0M1. Si usted tiene otro problema o reclamo en conexión con
este producto, por favor escriba al Departamento de Servicio al Consumidor.
POR FAVOR NO DEVUELVA ESTE PRODUCTO A NINGUNA DE
ESTAS DIRECCIONES NI AL LUGAR DE COMPRA
Español-18Español-17
 Loading...