

Page 1
Li-Ion, Cordless Pet Nail Grinder
Lima de uñas inalámbrica con batería Li-ion
Instrucon Manual
Manual de instrucciones
Mode d’emploi
Ponceuse d’ongles sans l pour animaux
de compagnie, à baerie Li-ion
For Commercial Use Only
Exclusivamente para uso comercial
Pour ulisaon commerciale uniquement
Model 078129-900
Modelo 078129-900
Modèle 078129-900
Model 078129-900-051
Modelo 078129-900-051
Modèle 078129-900-051
Page 2

IMPORTANT SAFEGUARDS
WARNING – When using electric appliances, basic precautions should
always be followed, including the following:
1. Read all the instructions before using the appliance.
2. To reduce the risk of injury, close supervision is necessary when an
appliance is used near children.
3. Do not contact moving parts.
4. Only use attachments recommended or sold by the manufacturer.
5. Do not use outdoors.
6. To reduce the risk of electrical shock, do not put cord or charging
base in water or other liquid. Do not place or store appliance where
it can fall or be pulled into a tub or sink.
7. Use only the charger supplied by the manufacturer to recharge.
8. Do not unplug the charging base by pulling on cord. To unplug,
grasp the plug, not the cord.
9. Unplug the charging base from outlet when not in use and before
cleaning.
10. Do not operate the charging base with a damaged cord or plug, or
after the charging base malfunctions or is dropped or damaged in
any manner. Return appliance to the nearest authorized service facility for examination, repair, or electrical or mechanical adjustment.
11. This appliance can be used by children aged from 8 years and
above and persons with reduced physical, sensory or mental
capabilities or lack of experience and knowledge if they have been
given supervision or instruction concerning use of the appliance in
a safe way and understand the hazards involved.
12. Children shall not play with the appliance.
13. Cleaning and user maintenance shall not be made by children.
14. With the exception of grinding drum, sanding bands and sanding
stone, this Nail Grinder does not have user-serviceable parts. Any
maintenance not explained in this manual should be performed by
an Authorized Service Center.
English-1
SAVE THESE INSTRUCTIONS
Electrical Ratings
Input: 100-240V ~ 50/60 Hz 0.5A
Output: 5.0V DC - 1.0 A
For Commercial Use only
Note: Use charging base only with wall adapter Dongguan Yinli Electronics
Co., Ltd. Model # YLS0121A-T050100
Page 3
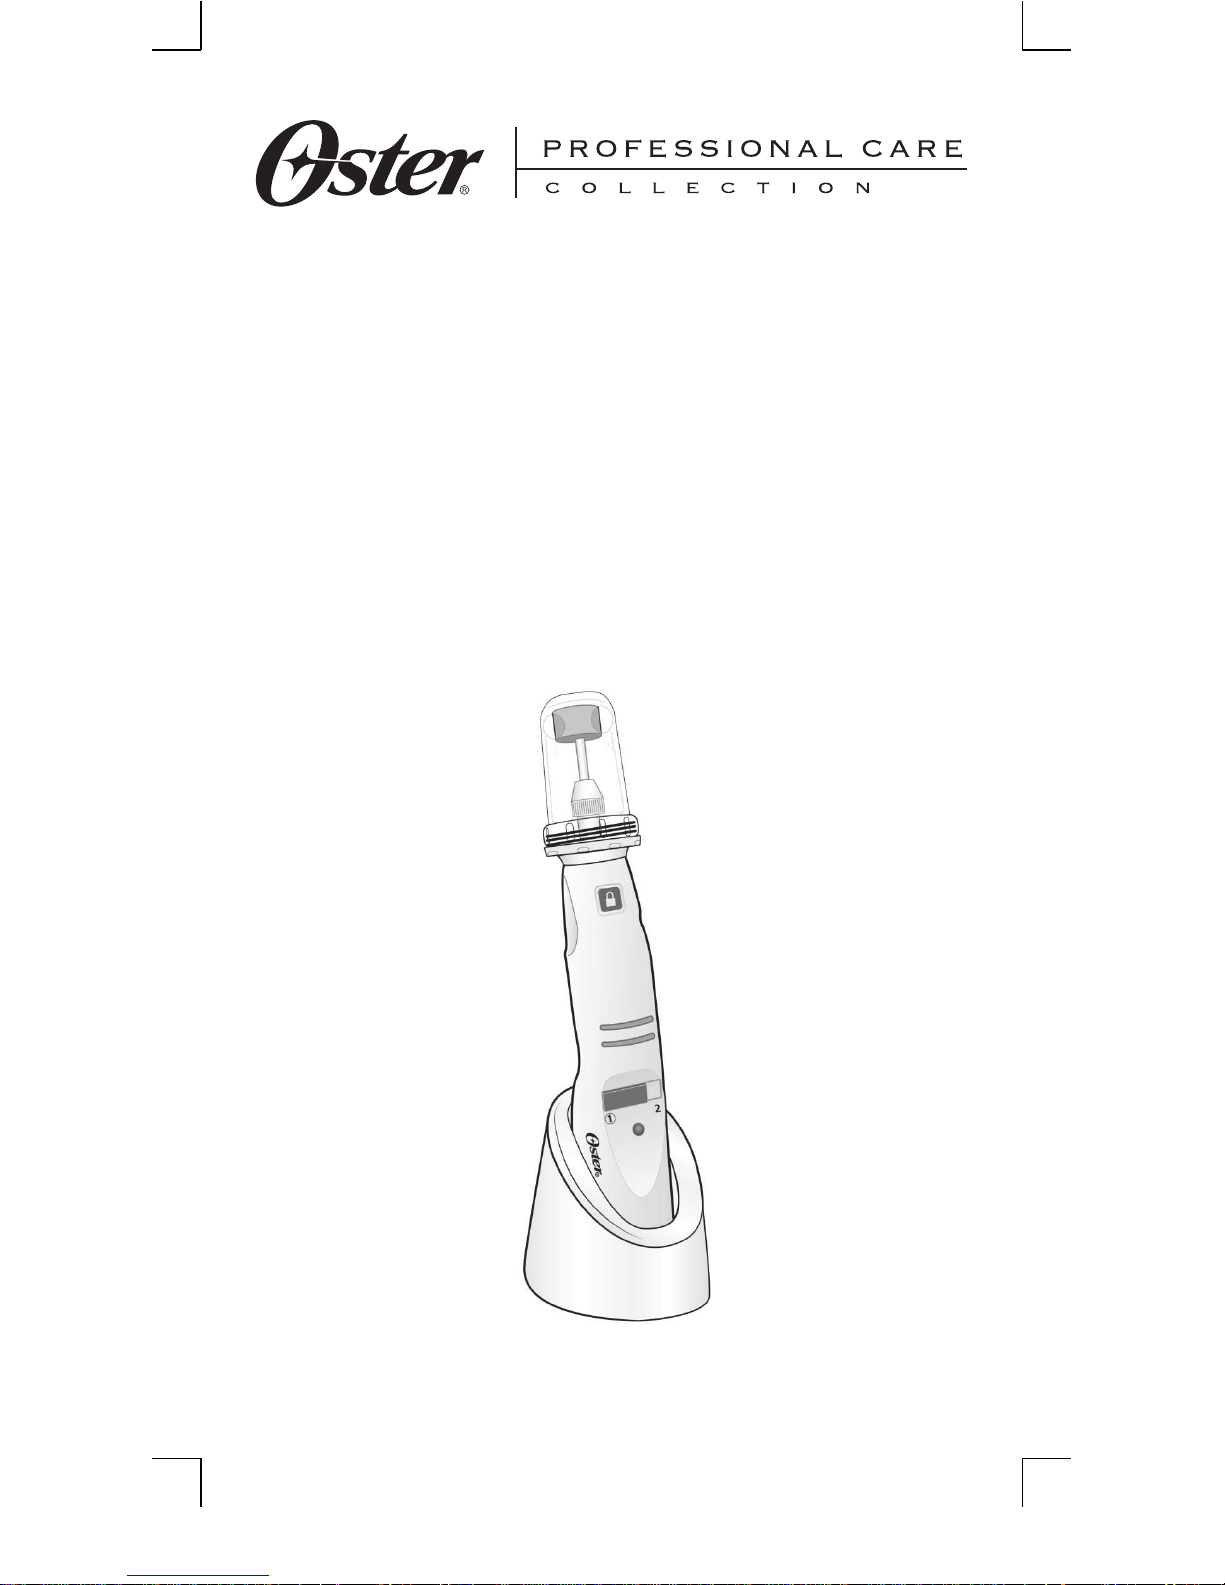
INTRODUCTION
Thank you for purchasing The Oster® Lithium-Ion, Cordless Nail Grinder.
It is a professional tool designed to meet the highest standards of
performance allowing you to safely and efficiently clean, groom and trim
pet nails. Although your Nail Grinder has been thoroughly tested and
inspected at every stage of its manufacturing and assembly, it is
recommended that you clean and maintain it as instructed in this manual.
This will ensure optimum performance and maximum life of the Nail
Grinder.
This product has been designed with 2 speeds – low and high, and
performs equally well on both. However, using the lower speed setting will
minimize sanding band heat and wear.
Included in this box you will find the following:
Nail Grinder with Removable Safety Guard
Charging Stand
Power Cord Adaptor
Sanding Drum
#80 Grit Sanding Stone
#60 and #100 Sanding Bands
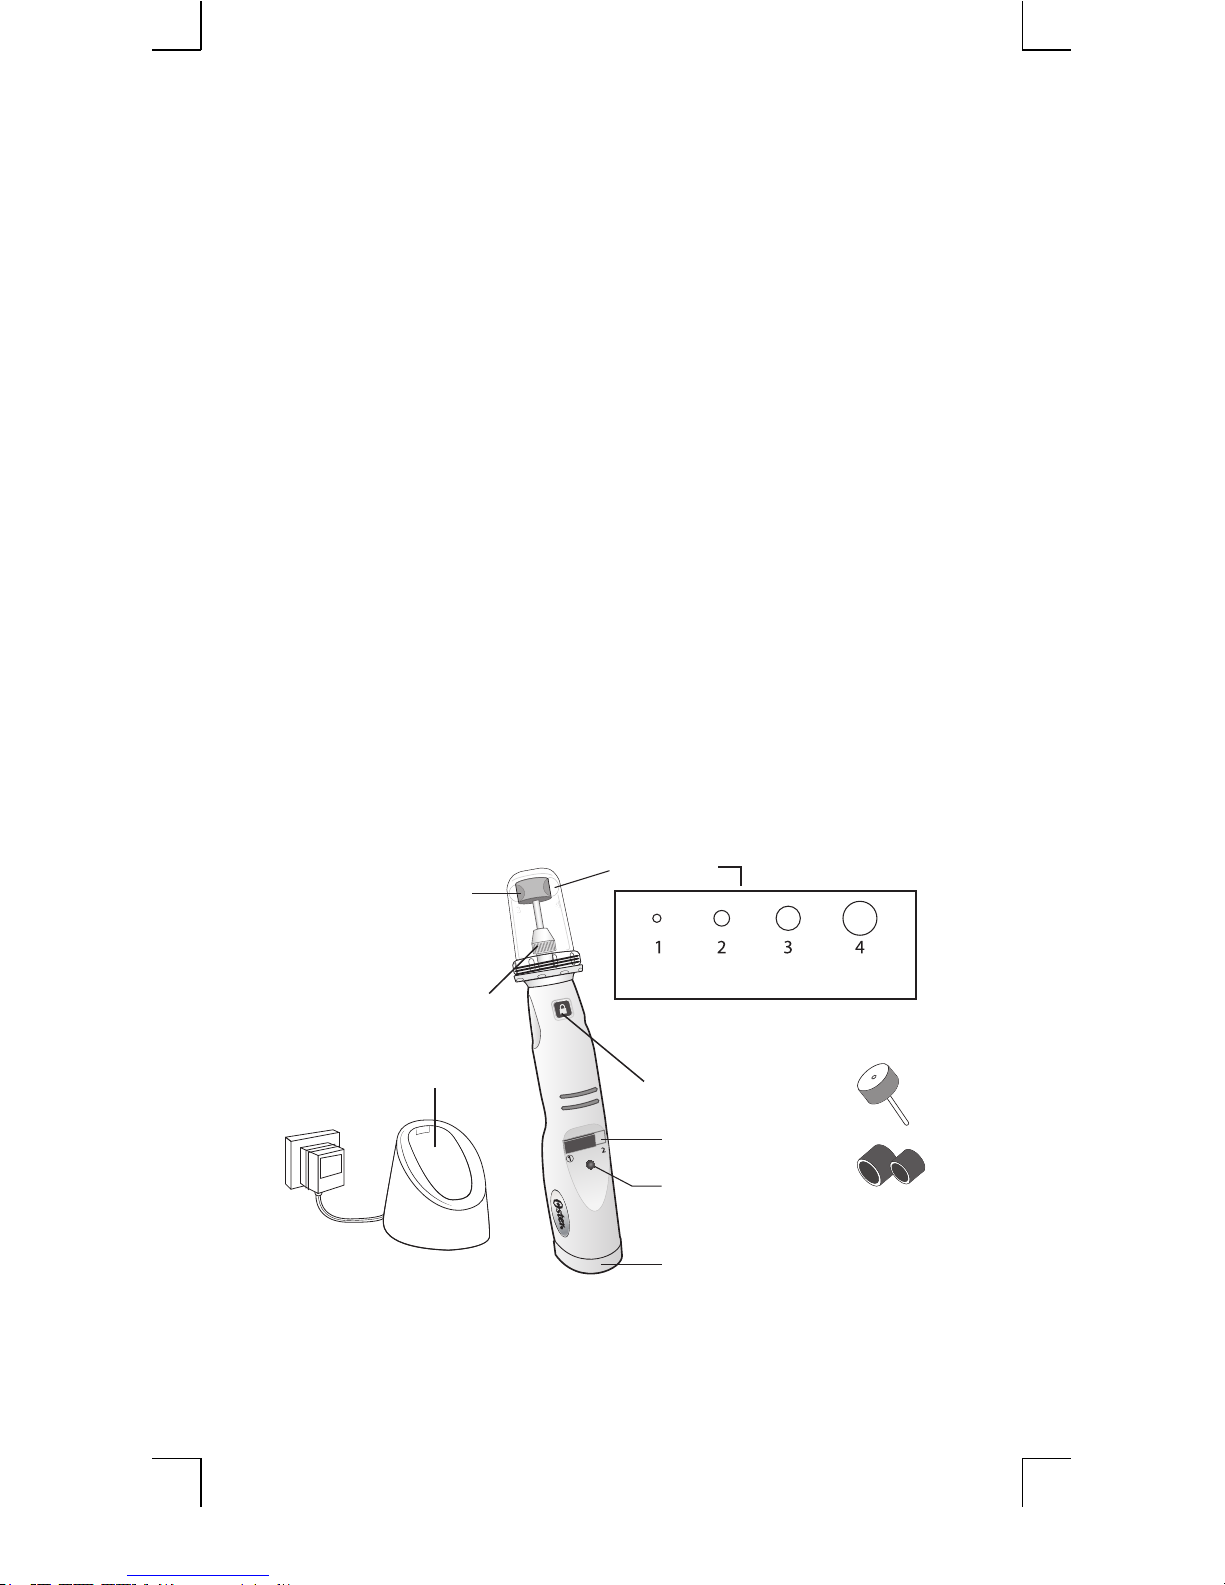
GETTING FAMILIAR WITH YOUR NAIL GRINDER AND ACCESSORIES
English-2
Charging
Stand
Sanding Drum
Collet
Removable
Safety Guard
Collet Lock Button
On/Off Switch
(2 speeds)
LED
Indicator Light
#80 grit sanding stone
#60 sanding band
#100 sanding band
Battery
Compartment
toy
breeds
small
breeds
medium
breeds
large
breeds
Adaptor
Page 4

BEFORE YOU BEGIN
Tips for using this nail grinder
• Due to less speed, noise and vibration, younger pets may be more
comfortable with the low-speed setting. The low speed setting will
also minimize sanding band heat and wear.
• Make sure animal is comfortable with nail grinder sound by turning
unit on prior to starting the grinding process.
• Trimming a pet’s nail using this Nail Grinder requires both hands.
Therefore it may be helpful to have assistance in those instances
where pet requires restraint.
• Always keep hair away from spinning parts. If hair is accidentally
caught in spinning drum, immediately turn power OFF and untangle
hair.
• When grinding around a furry pad, brush coat up and hold it out
of the way of the grinding wheel. You can also isolate the nail
by pushing it through a piece of gauze. This isolates the nail by
keeping longer hair out of the way.
• For excessively long nails, first cut off tip with manual nail trimmer,
then grind.
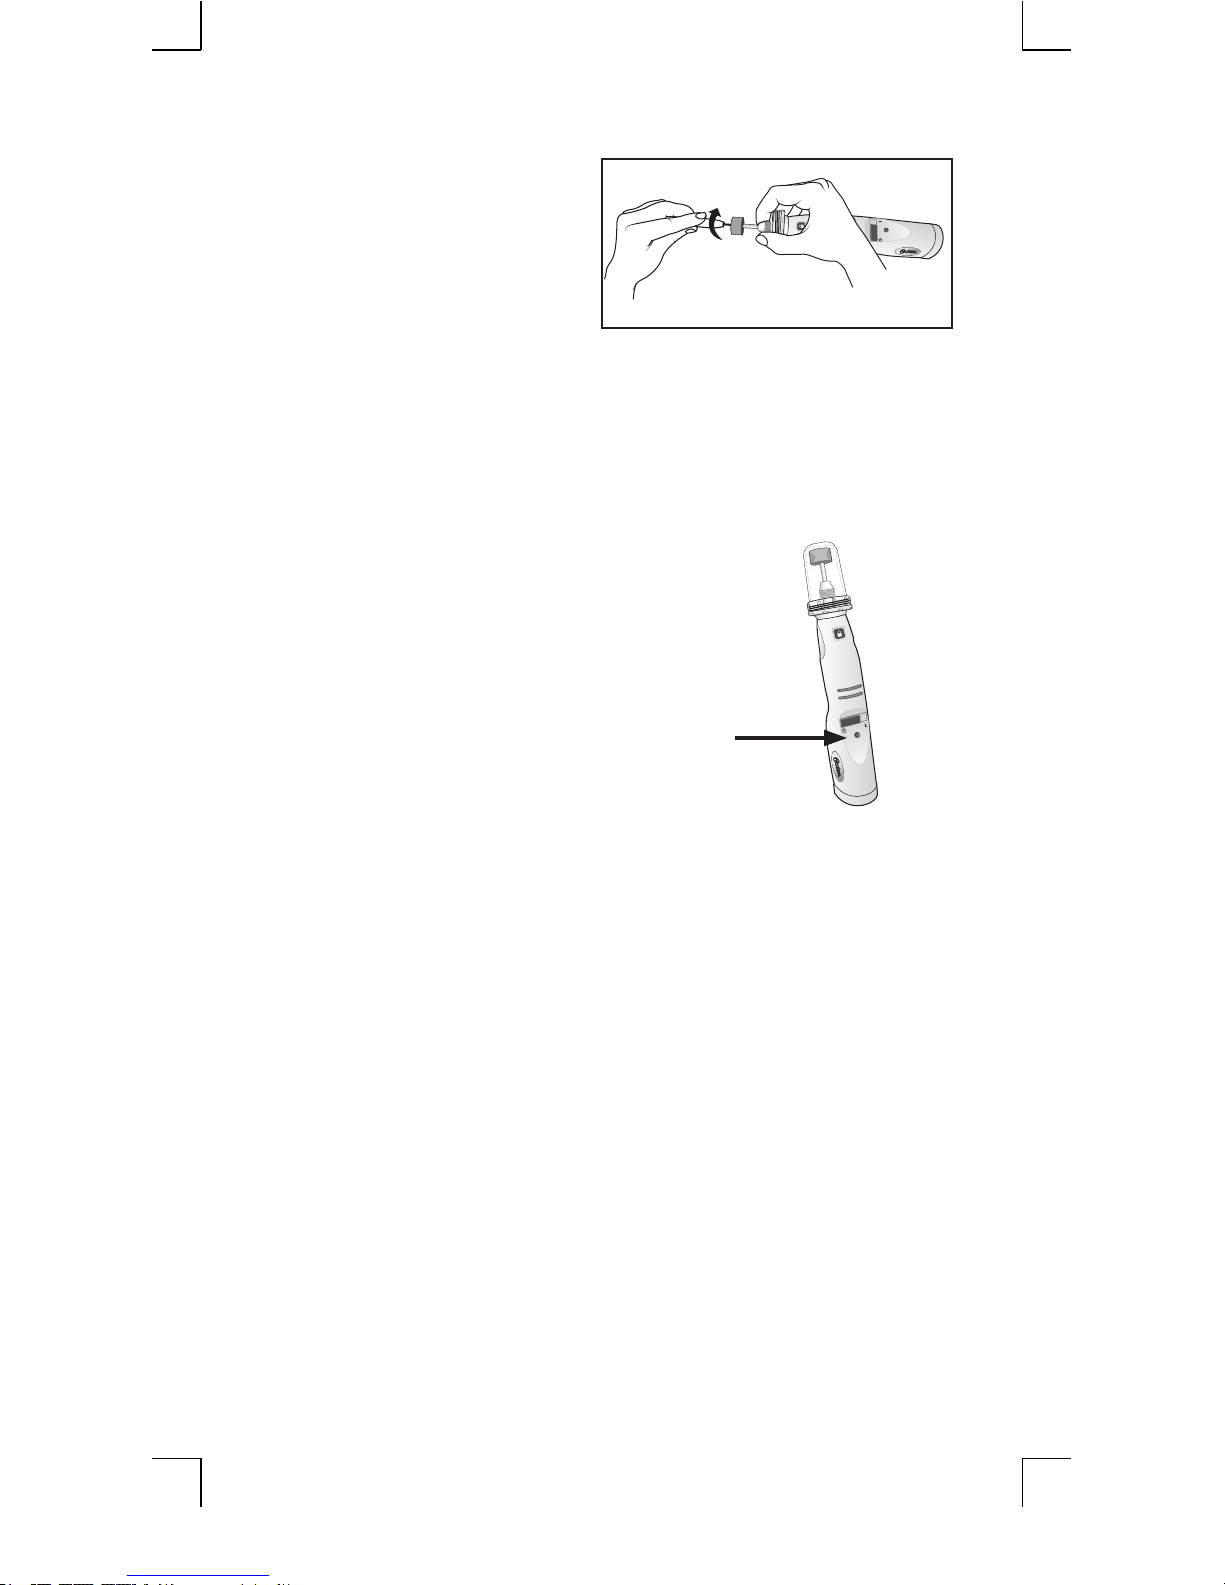
Installing Sanding Drum/Changing Stone
Make sure Nail Grinder is OFF (center position).
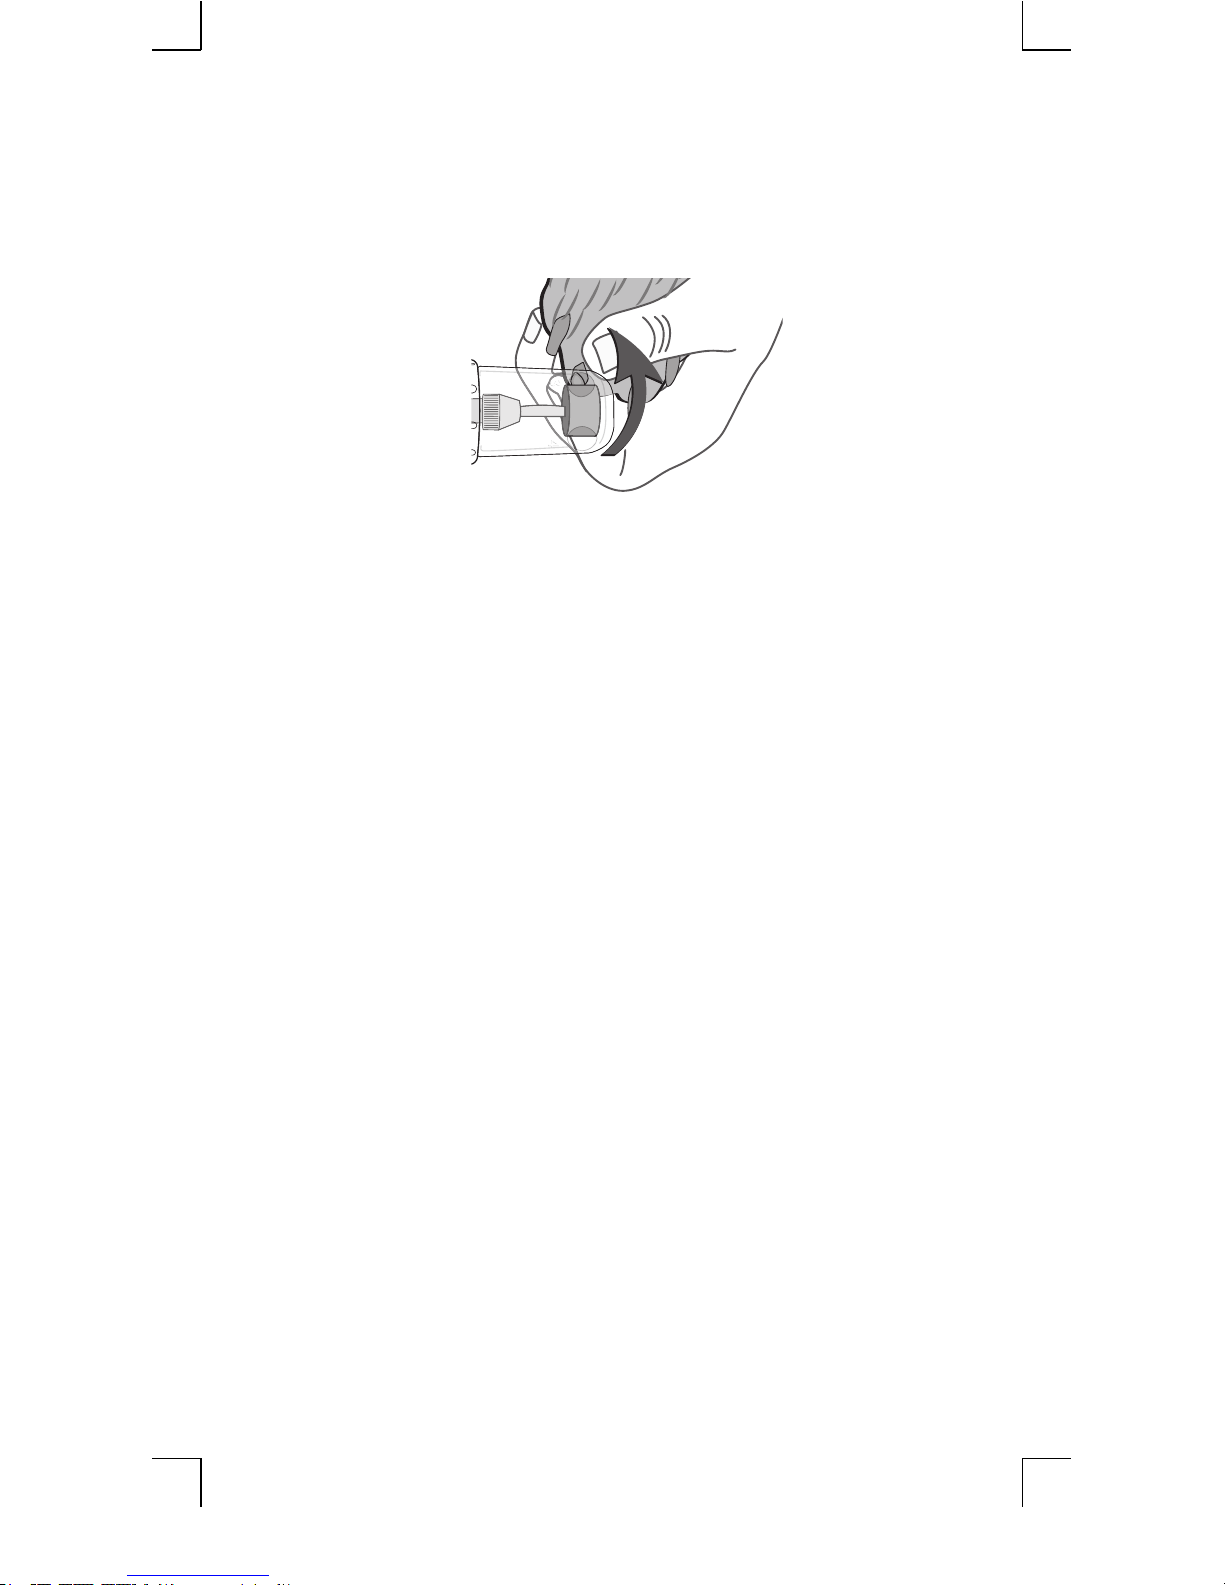
1. Press and hold collet lock button.
2. Turn collet (nut) in either
direction until you feel the
button unlock and hear a
click. (Diagram 1)
3. Continue to unscrew collet
counter clockwise to open
hole in top of assembly.
If there is already a drum
or sanding stone in the collet, opening the hole will allow it to be
easily removed by gently pulling upwards on the stem.
4. Insert stem of sanding drum or sanding stone into collet and tighten
by turning clockwise until finger tight.
5. Release collet lock button. The collet (nut) can spin freely for
normal operation when the collet lock button is not engaged.
Diagram 1
English-3
Page 5
Installing Sanding Band onto Sanding Drum
1. Hold collet nut with thumb
and forefinger to prevent
spinning.
2. With other hand, using a
small Philips screwdriver
turn top screw counter
clockwise 2-3 rotations to
contract the drum. (Diagram 2)
3. Slide the old band off (if replacing).
4. Slide the new sanding band on.
5. Expand the drum by turning the top screw clockwise.
This will secure the band onto the drum and prevent it from sliding off.
LED Indicator Light
• Solid Red – Charging in process
• Solid Green – Charging complete
• Flashing Red – Low battery
Charging Nail Grinder
Before using your Nail Grinder for the first time, allow the
battery to fully charge – up to 110 minutes. Charging is
complete when LED Indicator on Nail Grinder shows a
solid green light.
1. Plug the power cord of the charging base into an outlet with the
rated voltage for your unit. The adaptor should only be connected to
an AC 120V, 60Hz power supply or 220V, 50-60 Hz power supply,
depending on model and plug configuration.
2. Ensure that power switch on Nail Grinder is in OFF (center) position
3. Insert the Nail Grinder into charging base so that front faces
outward and the contacts are aligned with the contacts on the
charging base. The front of the Nail Grinder is the side containing
the locking button, power switch and indicator light. The indicator
light on front of nail grinder will be solid RED indicating charging
is in process. The indicator light will be solid GREEN when fully
charged.
Diagram 2
English-4
Page 6
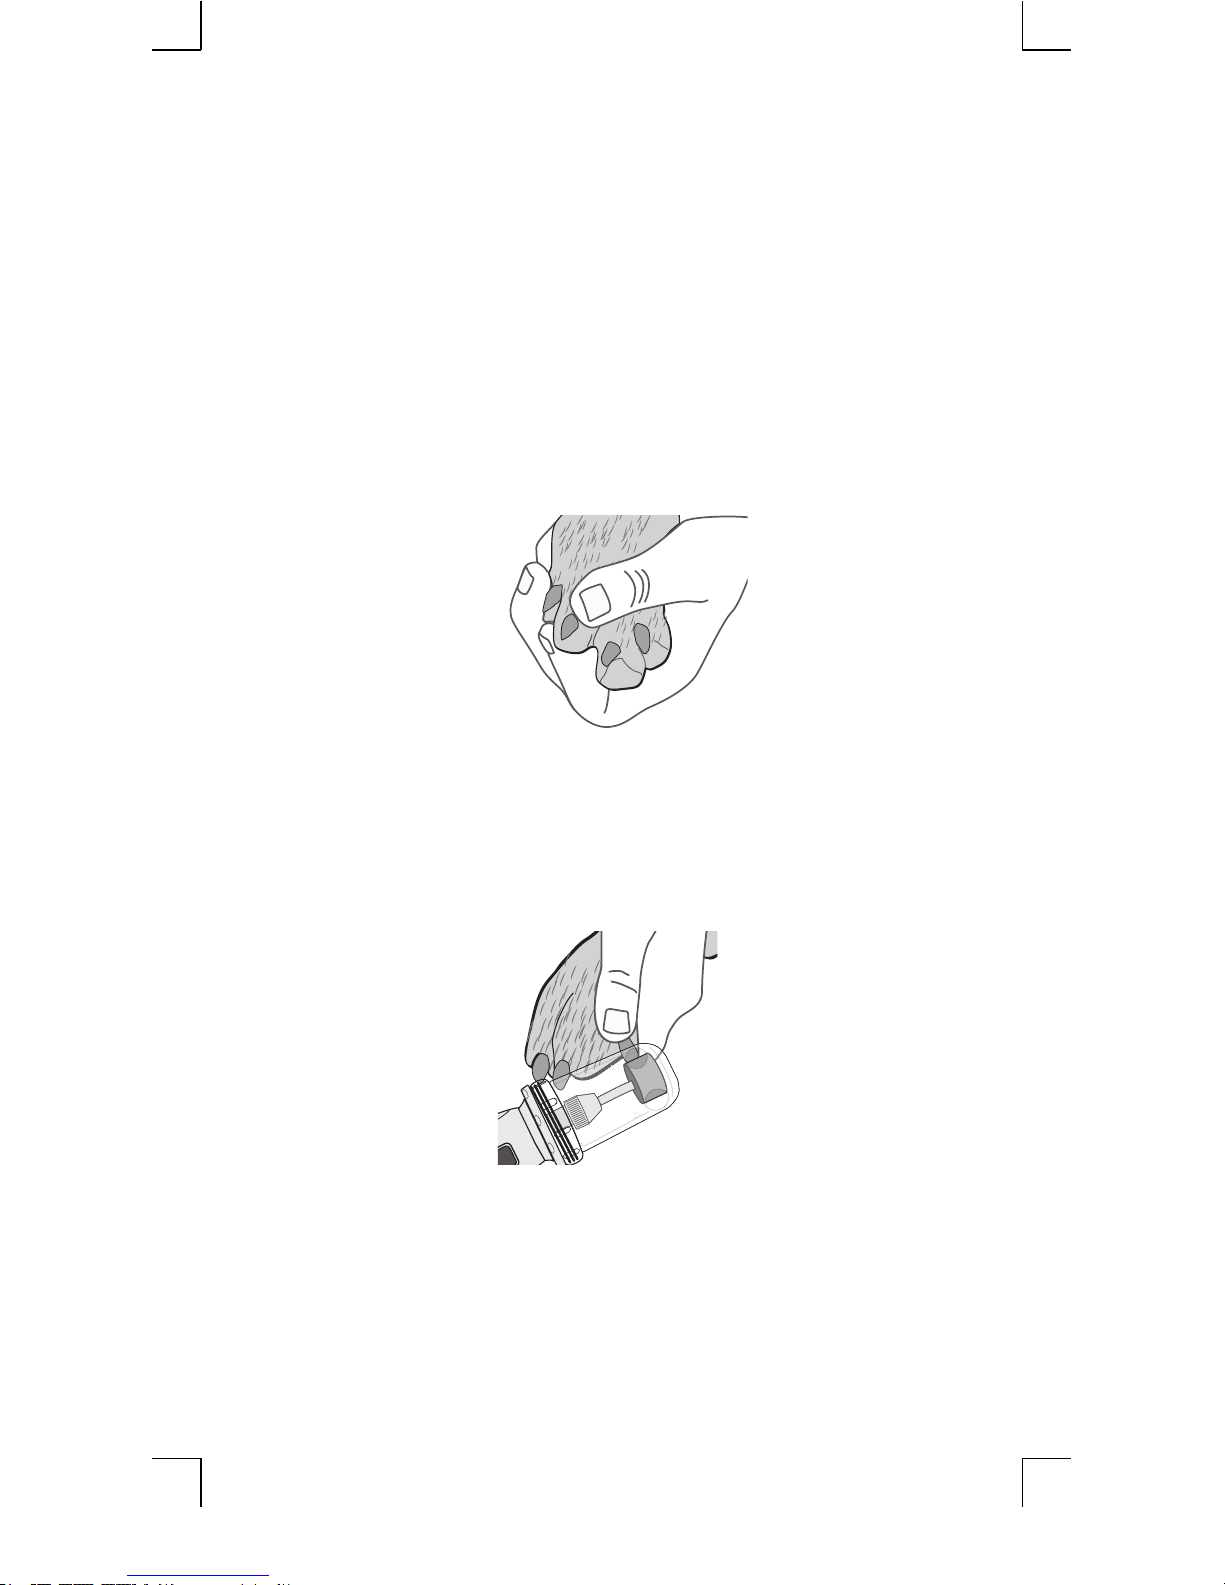
OPERATING INSTRUCTIONS
1. Remove the Nail Grinder from its charging stand. Turn it ON by
moving switch to low (1) setting. The speed of the nail grinder can
be adjusted between low (1) and high (2) with this switch. It is
recommended to always start on the low setting. High speed can be
used on dogs already conditioned and excepting of the nail grinder
noise and feel. Large dogs may require high speed because of their
thicker, larger nail.
2. Gently squeeze the nail between the thumb and pointer finger to
extract and further expose the nail. See above for tips regarding
longer hair.
3. Insert a nail into the matching size hole in the Removable Safety Guard.
CAUTION: Always operate nail grinder with Removable Safety
Guard in place. Using the Nail Grinder without the Removable
Safety Guard can cause injury or damage to unprotected areas.
4. Hold the Nail Grinder firmly without applying excessive force.
Gently start grinding from the bottom. Continue up and over nails in
a steady upward motion to ensure smooth edge, no more than 2-4
seconds at a time, alternating between nails. We do not recommend
English-5
Page 7
trimming a single nail all at one time. Continue to grind over edges
of nails to remove any roughness. Stop grinding when you get
close to the “Quick” (bloodline in nail). You will see the Quick begin
to appear when you look at the nail head on.
5. Turn Nail Grinder off by sliding switch to the center (OFF) position.
MAINTENANCE
With the exception of grinding drum, sanding bands and sanding stone,
this Nail Grinder does not have user-serviceable parts. Any maintenance
not explained in this manual should be performed by an Authorized Service
Center.
Never clean Nail Grinder or replace bands/stone with motor ON.
To clean, remove Safety Guard and use compressed dry air to clean debris
from drum/stone/band area. Plastic housing and Safety Guard can be
easily wiped clean with a clean, damp (water) cloth.
NOTE: Certain cleaning agents and solvents can damage plastic parts. Use
only a water-moistened cloth when wiping plastic housing.
CAUTION: Cleaning and user maintenance shall not be made by children.
REPLACING SANDING BAND OR SANDING DRUM/SANDING STONE
For more information, refer to Before you Begin section of this
manual – Installing Drum / Changing Stone and Installing Sanding Band
on to Sanding Drum.
REPLACEMENT ACCESSORIES
The following Nail Grinder replacement accessories are available through
your Oster® authorized dealer:
078129-110: Replacement Grinding Stone
078129-120: Replacement Grooming Bands (3 each of #60 grit and #100 grit)
078129-130: Replacement Grooming Drum
English-6
Page 8
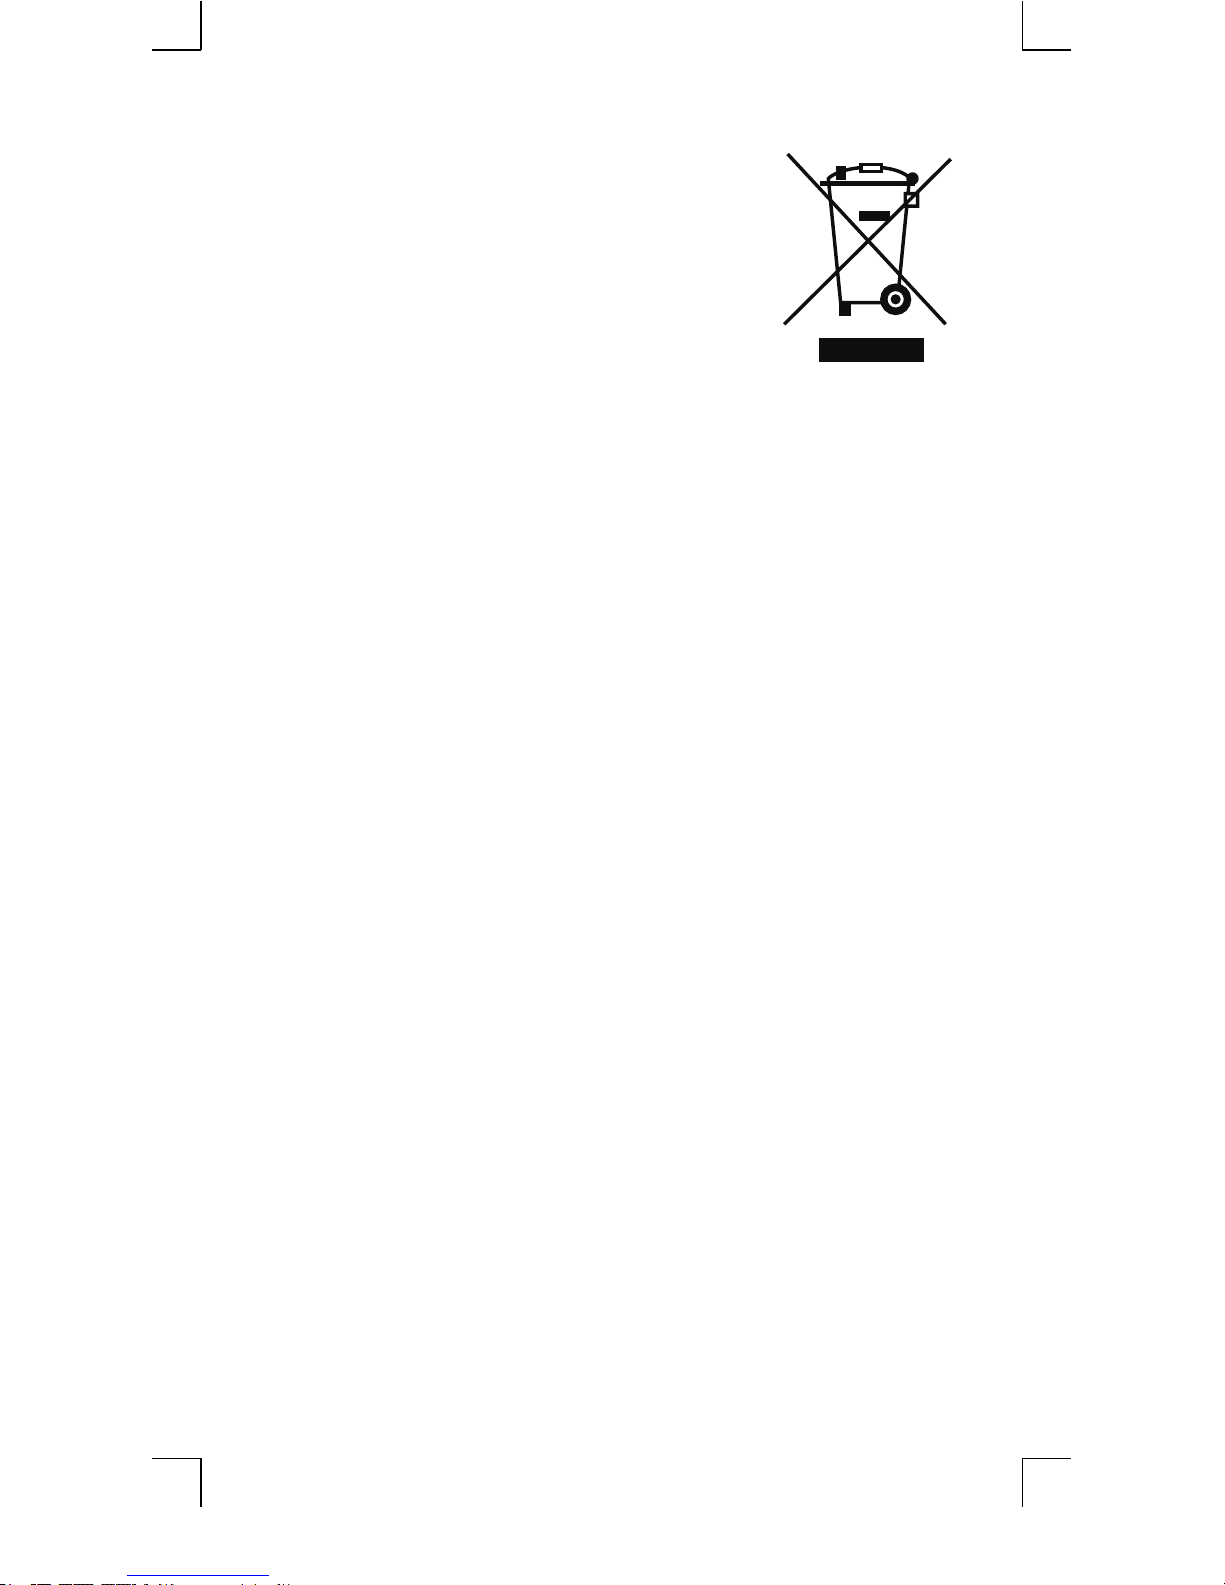
BATTERY MUST BE RECYCLED OR DISPOSED OF PROPERLY.
1. The battery must be removed from the appliance
before it is scrapped.
2. The battery is to be disposed of safely.
WARNING
1. This product contains a lithium-ion battery.
2. Battery must be recycled or disposed of properly.
Disposal in E.U. countries
Do not dispose of the appliance with domestic refuse.
As part of the E.U. Directive governing the disposal of electric and
electronic appliances, please discard unwanted batteries and/or battery
operated products at your local recycling center. Correct disposal will
ensure environment protection and prevent a potential harmful impact on
people and the environment.
For battery removal or maintenance and/or repair of this appliance please
contact an Authorized Service Center.
Disposal in non-E.U. countries
Please dispose of the appliance at the end of service life in an environmentally friendly manner, in accordance with national, state,and local laws and
regulations.
2 YEAR LIMITED WARRANTY
This product is warranted for two (2) years from date of purchase to be
free of mechanical and electrical defects in material and workmanship. The
manufacturer’s obligation hereunder is limited to repairing such products
during the warranty period, provided the product is sent prepaid to an
Authorized Service Station. This warranty does not cover normal wear
of parts or damage resulting from any of the following: Negligent use or
misuse of the product, normal wear and tear, damage, Acts of God, use
on improper voltage or current, use contrary to operating instructions, or
disassembly, repair or alteration by any person other than an Authorized
Service Station. Return of the Owner Registration Card is not required
for warranty coverage. This warranty gives you specific legal rights and
you may also have other rights which vary from state to state, province
to province or jurisdiction to jurisdiction. No other warranty is provided
and to the extent prohibited by applicable law, any implied warranty of
merchantability or fitness for a particular purpose is limited to the duration
of this warranty and the company shall not be responsible for incidental or
consequential damages.
English-7
Page 9

In accordance with one or more of the following European Directives, as
applicable: Low Voltage (2006/95/EC), Electromagnetic Compatibility
(2004/108/EC), RoHS (2011/65/EU) and Ecodesign (2009/125/EU), the
CE-marking has been affixed on the equipment. The following importer
and distributor keeps the conformity declaration on file: Oster GmbH, Am
Eisernen Steg 20, D-65795, Hattersheim, Germany.
HOW TO GET SERVICE WHEN YOU NEED IT
To locate your closest Service Center, please go to www.osterpro.com
1. Once you have located a Service Center, take your product there.
To make packaging the product easier, use the original packaging
materials and carton if you have them.
2. If it is necessary to ship the unit to the Service Center:
a. Pack it carefully in a good carton with plenty of crumpled
paper or other padding around it. Tape or tie the carton
securely.
b. The warranty does not cover damage in transit. Carefully
address the package to the nearest Service Station. Don’t
forget your name and return address, including postal zip
code.
c. Your Post Office will tell you the proper amount of postage
and can insure the package against loss.
3. If returning the grinder, include Sanding Drum in package.
4. When ordering Parts or Accessories specify the Service number (or
Model No. and the Series Letter) indicated on your product.
English-8
Page 10

Or for service, please contact:
North America:
Oster Direct® Services
904 Red Road, McMinnville, TN 37110
(800) 830-3678
www.osterpro.com
Or an Authorized Service Center
Europe, Africa and Middle East:
Oster GmbH
info@oster-europe.com
+49 (0) 69 410 120
For all other countries,
Please contact your local authorized distributor
© 2015 Sunbeam Products, Inc. doing business as Jarden Consumer Solutions. All rights
reserved. Distributed by Sunbeam Products, Inc. doing business as Jarden Consumer Solutions,
Boca Raton, Florida 33431. In Europe, imported and distributed by Oster GmbH, D-65795,
Hattersheim, Germany.info@oster-europe.com.
For inquiries regarding recycling and proper disposal of this product, please contact your local
waste management facility.
Printed in China P.N. 177060 RevA
078129-900_15EFSM1 GCDS-OST41375-SL
English-9
Page 11

ADVERTENCIAS IMPORTANTES
ADVERTENCIA – Al utilizar aparatos electrónicos, han de seguirse las
precauciones básicas, incluidas las siguientes:
1. Lea todas las instrucciones antes de utilizar el aparato.
2. Para reducir el riesgo de daños, es necesario supervisar
atentamente el aparato cuando se utiliza cerca de niños.
3. No toque las piezas en movimiento.
4. Utilice solo los complementos recomendados o comercializados
por el fabricante.
5. No utilice el aparato en el exterior.
6. Para reducir el riesgo de descargas eléctricas, no introduzca la base
de carga o el cable en agua ni en ningún otro líquido. No coloque
ni guarde el aparato en un lugar desde el que se pueda caer o tirar
por accidente a la bañera o el lavabo.
7. Para cargar el aparato, utilice únicamente el cargador que provea el
fabricante.
8. No desconecte el soporte de carga tirando del cable de alimentación. Para desconectarlo, tire del enchufe, no del cable.
9. Desconecte el soporte de carga de la toma de corriente cuando no
lo esté utilizando y antes de limpiarlo.
10. No utilice el soporte de carga con un cable de alimentación o
enchufe que esté dañado, tras un error de funcionamiento o si este
sufre una caída o daño de cualquier tipo. Envíe el aparato al centro
de asistencia autorizado más cercano para proceder a su examen,
reparación o ajuste eléctrico o mecánico.
11. Los niños a partir de 8 años de edad y las personas con facultades
físicas, sensoriales o mentales reducidas o falta de experiencia y
conocimientos, podrán utilizar este aparato siempre que se les haya
enseñado su modo de empleo seguro y hayan comprendido los
posibles riesgos.
12. Debe evitarse que los niños jueguen con el aparato.
13. Debe evitarse que los niños realicen las tareas de limpieza y
mantenimiento.
14. Con la excepción del tambor, las bandas y la piedra de limado,
esta Lima de uñas no tiene piezas que pueda reparar el usuario.
Cualquier otro mantenimiento no descrito en este manual deberá
ser realizado en un Centro de Asistencia Autorizado.
Español-1
CONSERVE ESTAS INSTRUCCIONES
Especicaciones eléctricas
Entrada: 100-240 V ~ 50/60 Hz 0,5 A
Salida: 5,0 V DC - 1,0 A
Para uso exclusivamente comercial
Nota: Utilice el soporte de carga con el adaptador Dongguan Yinli
Electronics Co., Ltd. Modelo nº YLS0121A-T050100
Page 12

INSTRUCCIONES
Gracias por comprar la Lima de Uñas Inalámbrica Oster® con Batería de
iones de litio. Este aparato es un dispositivo profesional diseñado para
cumplir con los requisitos de funcionamiento más exigentes, lo cual le
permitirá limpiar, recortar y cuidar las uñas de sus mascotas. Aunque la
Lima de Uñas se ha sometido a numerosas pruebas e inspecciones en
todas las fases de producción y montaje, le recomendamos que mantenga
este dispositivo limpio y lo guarde tal y como se indica en este manual.
De este modo, le garantizamos que la Lima de Uñas tendrá un rendimiento máximo y una vida útil más larga.
Este producto dispone de dos velocidades, la velocidad baja y la
velocidad alta, y funciona igual de bien en ambas velocidades. No
obstante, la configuración en velocidad baja le permitirá reducir al
mínimo el recalentamiento y el desgaste de la banda de limado.
Esta caja incluye los siguientes elementos:
Lima de uñas con tapa de seguridad desmontable
Soporte de carga
Adaptador del cable de alimentación
Tambor de limado
Piedra de limado de grano #80
Bandas de limado de grano #60 y #100
ACOSTUMBRÁNDOSE A LA LIMA DE UÑAS Y SUS ACCESORIOS
Español-2
Soporte de
carga
Tambor de limado
Cabezal
Tapa de seguridad
desmontable
Botón de bloqueo del
cabezal
Botón de Encendido/
Apagado (2 velocidades)
Luz indicadora
LED
Compartimiento
para la batería
Razas
enanas
Razas
pequeñas
Razas
medianas
Razas
grandes
Adaptador
Piedra de limado de grano #80
Banda de limado de grano #60
Banda de limado de grano #100
Page 13

ANTES DE EMPEZAR
Consejos de utilización de esta lima de uñas
• Es posible que las mascotas más pequeñas estén más tranquilas si
se utiliza el dispositivo con la configuración de velocidad más baja,
debido a que el aparato funciona más despacio y genera menos
ruido y vibración. Asimismo, la velocidad baja también reducirá al
mínimo el recalentamiento y el desgaste de la banda de limado.
• Encienda el aparato un poco antes de empezar con el limado para
asegurarse de que el animal se acostumbra al sonido.
• Es necesario utilizar ambas manos para limarle las uñas a un animal con este aparato. Por tanto, resulta útil contar con la ayuda de
otra persona cuando las mascotas requieren que las sujeten durante
el proceso.
• Mantenga el pelo alejado de las partes giratorias del aparato en
todo momento. Si el pelo se engancha al tambor de limado por
accidente, APÁGUELO inmediatamente y desenganche el pelo.
• Cuando esté limando las uñas de una pata con mucho pelo, cepíllelo hacia atrás y manténgalo apartado de la lima. También puede
aislar la uña envolviendo la pata en una gasa y dejando traspasar
la uña únicamente. De este modo, se aísla la uña y se mantiene
apartado el pelo más largo.
• Para limar las uñas excesivamente largas, corte la punta con un
cortaúñas manual y después límela.
Colocar/Cambiar la piedra del tambor de limado
Asegúrese de que la limadora está APAGADA (el botón en la posición del
centro).
1. Apriete y mantenga apretado
el botón de bloqueo del
cabezal.
2. Gire el cabezal (con su
tuerca) en cualquier
dirección hasta que oiga
que el botón se libera y se
escucha un clic. (Imagen 1)
3. Siga desenroscando el
cabezal en dirección contraria a las agujas del reloj para destapar
el hueco en la parte superior de dispositivo. En el caso de que ya
hubiese una piedra de limado en el cabezal, abra el agujero para
poder quitarlo fácilmente tirando suavemente del eje hacia arriba.
4. Inserte el eje del tambor de limado o de la piedra de limado en el
cabezal y apriete girando en la dirección de las agujas del reloj
hasta que quede bien ajustada.
5. Suelte el botón de bloqueo. El cabezal (tuerca) puede girar
libremente para un uso normal cuando el botón de bloqueo no está
presionado.
Imagen 1
Español-3
Page 14

Instalación de la banda de limado en el tambor de limado
1. Sujete el cabezal con el pulgar y el índice para impedir
que gire.
2. Con la otra mano y con
un destornillador pequeño
Philips, gire el tornillo de la
parte superior en la dirección
contraria a las agujas del reloj.
Dos o tres giros bastarán para apretar el tambor. (Diagrama 2)
3. Retire la banda que ya no vaya a utilizar (en caso de querer
cambiarla).
4. Inserte la nueva banda.
5. Para extender el tambor, gire el tornillo de la
parte superior en la dirección de las agujas del
reloj. Esta etapa permitirá que la banda esté bien
adherida al tambor y que no se deslice.
Luz indicadora LED
• Rojo – Carga en curso
• Verde – Carga completa
• Luz intermitente roja – Batería baja
Carga de la lima de uñas
Antes de utilizar la lima de uñas por primera vez, deje que la batería se cargue por completo – hasta 110 minutos. La carga habrá finalizado cuando
la luz indicadora LED esté verde.
1. Enchufe el cable de alimentación del soporte de carga en una toma
de corriente que tenga la tensión eléctrica que corresponda a su
aparato. El adaptador sólo debería conectarse a un suministro
eléctrico AC 120V, 60Hz o 220V, 50-60 Hz, según la configuración
del modelo y del enchufe.
2. Asegúrese de que el botón de encendido de la lima de uñas esté en
la posición OFF (centro).
3. Inserte la lima de uñas en el soporte de carga de forma que la
parte delantera quede hacia el exterior y que los contactos estén
alineados con el soporte. La parte delantera de la lima es el lado en
el que se encuentran el botón de bloqueo, el botón de encendido y
la luz indicadora. Dicha luz en la parte delantera de la lima de uñas
estará ROJA e indicará por tanto que la carga está en curso. La luz
se volverá VERDE cuando se haya completado la carga.
Diagrama 2
Español-4
Page 15

INSTRUCCIONES DE FUNCIONAMIENTO
1. Retire la lima de uñas del soporte de carga. Póngalo en marcha
deslizando el botón de encendido (ON) a la posición de velocidad
baja (1). Con este botón, la velocidad de la lima de uñas se puede
ajustar entre (1) baja y (2) alta. Se recomienda siempre empezar
en la velocidad baja. La velocidad alta puede utilizarse en perros
que ya estén acostumbrados al sonido y a la sensación de la lima
de uñas. Los perros grandes, al tener una uñas más grandes y más
gruesas, podrían necesitar la velocidad alta.
2. Presione suavemente la uña entre el pulgar y el índice para extraerla. Si necesita consejo sobre este proceso con animales de pelo
largo, consulte los párrafos anteriores.
3. Inserte la uña en el agujero correspondiente de la tapa de seguridad.
CUIDADO: trabaje siempre con la tapa de seguridad desmontable
puesta. El uso de la lima de uñas sin la tapa puede provocar
lesiones y daños en las zonas desprotegidas.
4. Sujete la lima de uñas con firmeza pero sin apretar demasiado
Empiece a limar suavemente desde la parte inferior. Siga hacia
arriba y sobre las uñas con movimientos constantes con el fin de
garantizar un borde liso. No se debe sobrepasar un limado entre
2 y 4 segundos por cada pasada, pasando de una uña a otra. Le
recomendamos de no corte la misma uña de una sola vez. Siga
Español-5
Page 16

limando los bordes de las uñas para eliminar cualquier rugosidad.
Deje de limar cuando se acerque del «hiponiquio» (tejido vivo
dentro de la uña). Podrá ver donde empieza el «hiponiquio» si mira
la uña de su mascota de frente.
5. Apague la lima de uñas poniendo el botón en el centro (posición OFF).
MANTENIMIENTO
A excepción del tambor, de las bandas y de la piedra de limado, esta lima
uñas no tiene piezas que pueda reparar el usuario. Cualquier tarea de
mantenimiento que no esté explicada en este manual de instrucciones
deberá realizarla un centro de atención autorizado.
No limpie ni cambie las bandas o la piedra de la lima de uñas con el motor
encendido.
Para limpiarla, retire la tapa de seguridad y utilice aire comprimido seco
para eliminar los residuos de la zona del tambor/piedra/banda. La carcasa
de plástico y la tapa de seguridad pueden limpiarse fácilmente con un
trapo limpio y húmedo (con agua).
Atención: algunos productos de limpieza y disolventes pueden dañar las
partes de plástico. Utilice sólo un trapo humedecido con agua para limpiar
las carcasas de plástico.
PRECAUCIÓN: Debe evitarse que los niños realicen las tareas de limpieza
y mantenimiento.
CAMBIO DE UNA BANDA / TAMBOR O PIEDRA DE LIMADO
Para más información, véase el párrafo «Antes de empezar» de este
manual - «Colocar/Cambiar la piedra del tambor de limado».
ACCESORIOS DE REPUESTO
Los siguientes accesorios de recambio están disponibles a través de su
distribuidor Oster® autorizado:
078129-110: Piedra de limado de repuesto
078129-120: Bandas de acabado de repuesto (3 de grano #60 y 3 de grano
#100)
078129-130: Tambor de aseo de repuesto.
Español-6
Page 17

LA BATERÍA DEBE RECICLARSE O DESECHARSE ADECUADAMENTE
1. Retire la batería del aparato antes de desecharlo.
2. Se debe desechar la batería de forma segura.
ADVERTENCIA
1. Este producto cuenta con una batería de iones de
litio.
2. La batería debe reciclarse o desecharse
adecuadamente.
Eliminación de aparatos en los países de la
Unión Europea
No deseche el aparato junto con los residuos domésticos.
En virtud de la Directiva de la Unión Europea sobre la eliminación de
los aparatos eléctricos y electrónicos, le rogamos que se deshaga de las
baterías usadas y/o de los productos que funcionan con pilas llevándolos
al centro de reciclaje de su localidad. Desechar las baterías de forma
adecuada garantizará la protección del medioambiente y evitará los
peligros que puedan afectar a las personas y el medioambiente.
Para retirar la batería o para efectuar el mantenimiento y/o la reparación de
este aparato, por favor, contacte con un centro de atención autorizado.
Eliminación en países que no forman parte de la Unión Europea
Por favor, deseche el aparato al final de su vida útil de forma ecológica,
de acuerdo con las leyes y con los reglamentos locales, nacionales y
estatales.
2 AÑOS DE GARANTÍA LIMITADA
Por el presente se garantiza, por un periodo de dos (2) años a partir de
la fecha de adquisición, que el material y la fabricación de este producto
no tienen ningún desperfecto eléctrico ni mecánico. La obligación del
fabricante se limita a la reparación de dichos productos durante el periodo de garantía, siempre que el producto sea enviado a portes pagados a
un centro de asistencia autorizado. La presente garantía no cubre el uso
normal de las partes del aparato o los daños que resulten de los siguientes: uso negligente o incorrecto del producto, el uso y desgaste normal,
daños, casos fortuitos, uso de una tensión de corriente inadecuada, uso
contrario a las instrucciones de funcionamiento o el desmonte, reparación
o modificación de cualquier persona que no sea del centro de asistencia
autorizado. No se requiere el reenvío del contrato de garantía por parte
del propietario para poder beneficiarse de ésta. La presente garantía le
otorga derechos legales y es posible que disponga de otros derechos
Español-7
Page 18

que pueden ser distintos de un Estado a otro, de una provincia a otra o
de una jurisdicción a otra. No se proporciona ninguna otra garantía y, sin
perjuicio de lo establecido por la legislación aplicable, cualquier garantía
implícita o condición de comercialización o adecuación a un uso concreto
tendrá una duración limitada a la duración de la garantía mencionada
anteriormente. Asimismo, la empresa no será responsable de ningún
daño fortuito o indirecto.
De conformidad con una o varias de las Directivas de la Unión Europea
que figuran a continuación, según corresponda: Baja Tensión (2006/95/
CE), Compatibilidad Electromagnética (2004/108/CE), RoHS (2011/65/
UE) y Diseño Ecológico (2009/125/UE), se ha colocado el marcado CE
en el instrumental. El importador y proveedor que figura a continuación
dispone de la declaración de conformidad en sus archivos: Oster GmbH,
Am Eisernen Steg 20, D-65795 Hattersheim, Alemania.
CÓMO OBTENER ASISTENCIA CUANDO LA NECESITE
Para localizar su centro de atención más cercano, diríjase a www.osterpro.com
1. Una vez tenga localizado dicho centro de atención, lleve el producto
a ese sitio. Para empaquetar el producto de la manera más fácil,
utilice el empaquetado y cartón original si los tiene guardados.
2. Si necesita enviar el aparato al centro de atención:
a. Empaquételo cuidadosamente en una caja de cartón recia
llena de papel arrugado o cualquier otro tipo de envoltorio.
Cierre el paquete con cinta adhesiva o átelo bien para que no
se abra.
b. La garantía no cubre los daños de transporte. Indique
claramente la dirección a la que quiere dirigir el paquete
para enviarlo al centro de asistencia más cercano. No olvide
indicar su nombre y la dirección del remitente, incluido el
código postal.
c. Su oficina de correos le indicará el importe del franqueo y
podrá asegurar el paquete en caso de pérdida.
3. Si devuelve la lima, por favor, incluya el tambor de limado en el
paquete.
4. Cuando pida piezas o accesorios, especifique el número de
Asistencia (o número de modelo y la letra de serie) que figuran
indicados en su producto.
Español-8
Page 19

Para solicitar asistencia, póngase en contacto con:
América del Norte:
Oster Direct® Services
904 Red Road McMinnville, TN 37110
(800) 830-3678
www.osterpro.com
O un centro de atención autorizado
Europa, África y Oriente Medio:
Oster GmbH
info@oster-europe.com
+49 (0) 69 410 120
Para todos los demás países,
por favor, contacte con su distribuidor local autorizado.
©2015 Sunbeam Products, Inc. bajo la denominación social Jarden Consumer Solutions. Todos
los derechos reservados. Distribuido por Sunbeam Products, Inc. que opera bajo la denominación
social Jarden Consumer Solutions, Boca Raton, Florida 33431. En Europa, importado y distribuido
por Oster GmbH, D-65795, Hattersheim, Alemania. Info@oster-europe.com.
Para preguntas relacionadas con el reciclaje y la correcta eliminación de este producto, por favor
póngase en contacto con su centro local de gestión de residuos.
Impreso en China
Español-9
Page 20

MISES EN GARDE IMPORTANTES
ATTENTION – Lorsque vous utilisez des appareils électriques, les
précautions de base devraient toujours être prises, y compris les suivantes :
1. Lisez toutes les instructions avant d’utiliser l’appareil.
2. Afin de réduire les risques de blessures, une surveillance étroite
doit être menée lorsqu’un appareil est utilisé près d’enfants.
3. Ne touchez pas les pièces en mouvement.
4. N’utilisez que les pièces détachables recommandées ou vendues
par le fabriquant.
5. Ne l’utilisez pas en extérieur.
6. Afin de réduire les risques d’électrocution, n’introduisez pas le
cordon ou le socle du chargeur dans l’eau ou tout autre liquide. Ne
placez ou ne rangez pas l’appareil à un endroit où il pourrait tomber
ou être plongé dans un évier ou un lavabo.
7. Pour recharger votre appareil, n’utilisez que le chargeur fourni par
le fabriquant.
8. Ne débranchez pas le socle chargeur en tirant sur le cordon. Pour
débrancher, saisissez la fiche et non pas le cordon.
9. Débranchez le socle chargeur de la prise électrique lorsqu’il n’est
pas utilisé et avant de le nettoyer.
10. N’utilisez pas le socle chargeur si le cordon ou la fiche sont
endommagés, suite à un dysfonctionnement du socle, s’il est tombé
ou s’il a été endommagé de quelque façon que ce soit. Retournez
l’appareil au centre d’entretien le plus près afin qu’il soit examiné,
réparé ou que les réglages électriques ou mécaniques nécessaires
soient effectués.
11. Les enfants âgés de 8 ans ou plus, les personnes ayant un handicap
physique, sensitif ou mental ou qui manquent d’expérience et de
connaissances peuvent utiliser cet appareil s’ils le font sous surveillance ou s’ils ont reçu les instructions nécessaires pour l’utiliser
d’une façon sure et s’ils comprennent bien les risques qui y sont
impliqués.
12. Les enfants ne doivent pas jouer avec l’appareil.
13. Les enfants ne doivent ni nettoyer, ni effectuer l’entretien de l’appareil.
14. À l’exception du tambour, des bandes de ponçage et de la pierre à
poncer, cette ponceuse d’ongles n’a pas de pièces qui puissent être
réparées par l’utilisateur. Tout entretien non expliqué dans de mode
d’emploi doit être réalisé dans un centre d’entretien agréé.
Français-1
CONSERVEZ CES INSTRUCTIONS
Caractéristiques électriques
Entrée: 100-240V ~ 50/60 Hz 0.5A
Sortie: 5.0V DC - 1.0 A
Pour utilisation commerciale uniquement
Remarque: N’utilisez le socle chargeur qu’avec l’adaptateur mural
Dongguan Yinli Electronics Co., Ltd. Modèle # YLS0121A-T050100
Page 21

INTRODUCTION
Nous vous remercions d’avoir acheté la ponceuse d’ongles sans fil, à
batterie Lithium-Ion Oster®.
Il s’agit d’un outil professionnel conçu pour atteindre les critères de
performance les plus élevés, en vous permettant de nettoyer, toiletter et
couper les ongles des animaux de compagnie. Bien que votre ponceuse
d’ongles ait été testée et examinée minutieusement à toutes les étapes
de fabrication et d’assemblage, nous vous conseillons de la nettoyer et
de réaliser l’entretien conformément aux instructions du présent mode
d’emploi. Ceci assurera le plus haut rendement et la plus longue durée de
vie de la ponceuse d’ongles.
Ce produit a été conçu à deux vitesses – rapide et lente – et fonctionne
bien aux deux vitesses. Nonobstant, lorsque vous utilisez la vitesse lente,
la chaleur et l’usure de la bande de ponçage seront minimisées.
Dans cette boîte, vous trouverez les éléments suivants :
Ponceuse d’ongles à capuchon de sécurité amovible
Socle de charge
Adaptateur de cordon d’alimentation
Tambour de ponçage
Pierre à poncer à grain #80
Bandes de ponçage à grain #60 et #100
CONNAISSEZ UN PEU MIEUX LES ACCESSOIRES DE VOTRE
PONCEUSE D’ONGLES
Français-2
Socle de
charge
Tambour de ponçage
Pince de serrage
Capuchon de
sécurité amovible
Bouton de verrouillage
de la pince de serrage
Bouton On/off
(2 vitesses)
Voyant lumineux
LED
Compartiment
de la batterie
Mini
races
Petites
races
Races
moyennes
Grandes
races
Adaptateur
pierre à poncer à grain #80
bande de ponçage à grain #60
bande de ponçage à grain #100
Page 22

AVANT DE COMMENCER
Conseils d’utilisation de la ponceuse d’ongles
• En raison de moins de vitesse, bruits et vibrations, les animaux de
compagnie les plus jeunes se sentiront plus à l’aise avec la vitesse
lente. De plus, cette dernière réduira la chaleur et l’usure de la
bande de ponçage.
• Assurez-vous que l’animal se sent à l’aise avec le son de la ponceuse d’ongles en mettant l’appareil en marche avant de commencer
à poncer.
• Pour couper les ongles d’un animal de compagnie avec la ponceuse
d’ongles, il est nécessaire d’utiliser les deux mains. C’est pour
cette raison qu’il conviendrait que quelqu’un vous aide dans les
circonstances où l’animal ait besoin d’être retenu.
• Maintenez toujours les poils éloignés des pièces tournantes. Si
des poils s’attrapent accidentellement dans le tambour tournant,
éteignez immédiatement l’appareil et démêlez les poils.
• Lorsque vous poncez près de pulpes de doigts poilus, brossez le
pelage vers le haut et maintenez-le éloigné de la roue à poncer.
Vous pouvez aussi isoler la griffe en la faisant passer à travers un
morceau de gaze. Cela permet d’isoler la griffe en maintenant les
poils les plus longs hors de la portée.
• Pour les ongles trop longs, coupez d’abord le bout avec un
coupe-ongles manuel, puis poncez.
Installation du tambour de ponçage / remplacement de la pierre
Assurez-vous que la ponceuse d’ongles est éteinte (OFF, bouton en
position centre).
1. Maintenez appuyé le bouton
de verrouillage de la pince
de serrage.
2. Faites tourner la pince de
serrage (écrou) dans les
deux sens jusqu’à ce que
vous sentiez le bouton
déverrouillé et entendiez un
clic. (Schéma 1)
3. Continuez de dévisser la pince de serrage dans le sens inverse
des aiguilles d’une montre pour ouvrir le trou sur le haut de
l’assemblage. S’il y a déjà une pierre à poncer dans la pince de
serrage, ouvrez le trou afin de pouvoir la retirer facilement en tirant
soigneusement la tige vers le haut.
4. Insérez la tige du tambour de ponçage ou de la pierre abrasive dans
la pince de serrage et pressez en la faisant tourner dans les sens
des aiguilles d’une montre jusqu’à qu’elle soit bien fixe.
5. Relâchez le bouton de verrouillage de la pince de serrage. La pince
de serrage (écrou) peut tourner librement pour un fonctionnement
normal lorsque le bouton de verrouillage n’est pas enfoncé.
Schéma 1
Français-3
Page 23

Installation de la bande de ponçage sur le tambour de ponçage
1. Tenez la pince de serrage avec
le pouce et l’index pour éviter
qu’elle ne tourne.
2. Avec l’autre main et à l’aide
d’un tournevis Philips,
tournez la vis supérieur dans
le sens inverse des aiguilles
d’une montre. Deux ou trois
rotations suffiront pour serrer le
tambour. (Schéma 2)
3. Retirez l’ancienne bande (en cas de remplacement).
4. Insérez la nouvelle bande.
5. Étendez le tambour en faisant tourner la vis supérieure dans le sens des
aiguilles d’une montre. Cette étape assurera l’attache de la bande au
tambour et évitera qu’elle ne glisse.
Le voyant lumineux LED
• Rouge – Charge en cours
• Vert – Charge terminée
• Rouge clignotant – Batterie faible
Recharger la ponceuse d’ongles
Avant d’utiliser la ponceuse d’ongles pour la première
fois, laissez que la batterie se recharge complètement. –
jusqu’à 110 minutes. La charge est terminée lorsque le
voyant lumineux LED est vert.
1. Branchez le cordon d’alimentation du socle du chargeur dans une
prise ayant la tension nominale correspondant à votre appareil.
L’adaptateur ne devrait être branché qu’à une alimentation électrique
AC 120V, 60Hz ou 220V, 50-60 Hz, selon le modèle et la forme de
la prise.
2. Assurez-vous que le bouton de la ponceuse d’ongles est sur la
position OFF (centre).
3. Insérez la ponceuse d’ongles dans le socle de charge de façon
à ce que le devant soit tourné vers l’extérieur et que les contacts
soient alignés sur ceux du socle de charge. La face de la ponceuse
d’ongles est celle où sont situés le bouton de verrouillage, le
bouton d’alimentation et le voyant lumineux. Ledit voyant sur la face
de la ponceuse s’allumera en ROUGE ; ce qui indique que la charge
est en cours. Lorsque la batterie sera complètement rechargée, le
voyant lumineux sera VERT.
Schéma 2
Français-4
Page 24

INSTRUCTIONS D’UTILISATION
1. Retirez la ponceuse d’ongles du socle de charge. Mettez-le en
marche en positionnant le bouton sur la vitesse lente (1). Avec ce
bouton, la vitesse de la ponceuse d’ongles peut être réglée entre
lent (1) et rapide (2). Nous vous conseillons de toujours commencer sur la position lente. La vitesse rapide peut être utilisée sur les
chiens qui sont habitués au bruit et à la sensation de la ponceuse
d’ongles. Il est probable qu’il soit nécessaire d’utiliser la vitesse
rapide sur les chiens de grande taille du fait que leurs griffes sont
plus grandes et plus épaisses.
2. Pressez soigneusement la griffe entre le pouce et l’index pour
dégager et mieux exposer la griffe. Si vous souhaitez obtenir des
conseils sur les poils longs, veuillez vous reporter aux paragraphes
précédents.
3. Insérez une griffe dans le trou correspondant dans le capuchon de
sécurité amovible.
ATTENTION: Le capuchon de sécurité doit toujours être mis en
place pendant le fonctionnement de l’appareil. Si vous utilisez la
ponceuse d’ongles sans le capuchon de sécurité, des blessures ou
des dommages peuvent être causés sur les zones non protégées.
4. Tenez fermement la ponceuse d’ongles sans y appliquer une force
excessive. Commencer à poncer soigneusement depuis le bas.
Continuez vers le haut et sur les griffes en utilisant un mouvement
ascendant et régulier afin d’obtenir un bord lisse. Ne poncez
qu’entre 2 et 4 secondes une griffe à la fois en passant d’une griffe
Français-5
Page 25

à une autre. Nous vous déconseillons de couper une seule griffe
en une fois. Continuez à poncer le bord des griffes pour enlever
toute rugosité. Arrêtez de poncer lorsque vous vous approchez du
« hyponychium » (partie vive). Vous pouvez voir le commencement
de l’hyponychium en regardant la griffe de face.
5. Éteignez la ponceuse d’ongles en positionnant le bouton au centre
(OFF).
ENTRETIEN
À l’exception du tambour, des bandes de ponçage et de la pierre à poncer,
cette ponceuse d’ongles n’a pas de pièces qui puissent être réparées par
l’utilisateur. Tout entretien non expliqué dans le présent mode d’emploi
devrait être réalisé par un centre d’entretien agréé.
Ne nettoyez jamais la ponceuse d’ongles ou ne remplacez jamais les
bandes / pierre lorsque le moteur est en marche (sur ON). Pour nettoyer,
veuillez retirer le capuchon de sécurité et utiliser de l’air comprimé sec
pour enlever les débris de la zone du tambour / pierre / bande. Vous
pouvez facilement nettoyer le boîtier plastique et le capuchon de sécurité
en les essuyant avec un chiffon propre et humide (avec de l’eau).
ATTENTION: certains produits de nettoyage ou solvants peuvent
endommager les pièces en plastique. N’utilisez qu’un chiffon humecté
d’eau lorsque vous essuyez le boîtier plastique.
ATTENTION: Les enfants ne doivent ni nettoyer, ni effectuer l’entretien de
l’appareil.
REMPLACEMENT DE LA BANDE DE PONÇAGE, OU DU TAMBOUR /
PIERRE À PONCER
Pour plus d’informations, veuillez vous reporter au paragraphe « Avant
de commencer » du présent mode d’emploi – « Installation du tambour
de ponçage / remplacement de la pierre » et « Installation de la bande de
ponçage sur le tambour de ponçage ».
ACCESSOIRES DE RECHANGE
Les suivants accessoires de rechange pour la ponceuse d’ongles sont
disponibles chez votre concessionnaire Oster® agréé :
078129-110: Pierre à poncer de rechange
078129-120: Bandes de toilettage de rechange (3 à grain #60 et 3 à grain #100)
078129-130: Tambour de toilettage de rechange
Français-6
Page 26

LA BATTERIE DOIT ÊTRE RECYCLÉE OU JETÉE CONVENABLEMENT.
1. La batterie doit être retirée de l’appareil avant
d’être mise au rebut.
2. La batterie doit être jetée en toute sécurité.
ATTENTION
1. Ce produit est pourvu d’une batterie lithium-ion.
2. La batterie doit être recyclée ou jetée convenablement.
Élimination dans les pays de l’Union Européenne
Ne jetez pas l’appareil avec les déchets domestiques.
En vertu de la Directive de l’Union Européenne régissant l’élimination
d’appareils électriques et électroniques, veuillez vous débarrasser des
batteries usagées et / ou des produits à piles en les emmenant au centre de
recyclage de votre localité. Une élimination correcte assurera la protection
de l’environnement et évitera un impact potentiellement dangereux sur les
personnes et l’environnement.
Pour enlever la batterie de cet appareil ou pour en effectuer l’entretien et /
ou la réparation veuillez contacter un centre de service agréé.
Élimination dans les pays non-membres de l’Union Européenne
Veuillez jeter l’appareil à la fin de la durée de vie de manière écologique,
conformément aux lois et réglementations nationales, locales et d’État.
GARANTIE LIMITÉE DE DEUX ANS
Il est garanti que le produit, pour une durée de deux ans à compter de
la date d’acquisition, est exempt de tout défaut électrique ou mécanique
du matériel et de main-d’œuvre. L’obligation du fabriquant se limite à la
réparation desdits produits pendant la période de garantie, sous réserve
que le produit soit envoyé prépayé à un centre de service agréé. La
présente garantie ne couvre pas l’usure normale des pièces de l’appareil ou
les dommages causés par : utilisation imprudente ou impropre du produit,
l’usure et la détérioration normale, dommages, cas de force majeure,
utilisation d’un voltage ou d’un courant inapproprié, utilisation contraire
aux instructions d’utilisation, démontage, réparation ou modification par
toute entité autre qu’un centre de service agréé. Il n’est pas nécessaire que
le propriétaire renvoie le contrat de garantie pour bénéficier de celle-ci.
La présente garantie vous donne des droits juridiques concrets et vous
disposez sûrement d’autres droits différents en fonction de l’État, province
ou de la juridiction. Nulle autre garantie n’est fournie et, dans la mesure
interdite par la loi applicable, toute garantie implicite de qualité marchande
ou d’adéquation à une fin particulière est limitée à la durée de la présente
Français-7
Page 27

garantie et, la société n’est pas tenue responsable d’un quelconque
dommage indirect ou direct.
En conformité avec une ou plusieurs des directives européennes suivantes,
si applicable : celles relatives à la basse tension (2006/95/CE), à la
compatibilité électromagnétique (2004/108/CE), RoHS (2011/65/UE)
et à l’écoconception (2009/125/UE), le marquage CE a été apposé sur
l’équipement. L’importateur et distributeur suivant conserve la déclaration
de conformité dans ses archives : Oster GmbH, Am Eisernen Steg 20,
D-65795 Hatterheim, Allemagne.
COMMENT BÉNÉFICIER DU SERVICE LORSQUE VOUS EN AVEZ BESOIN
Pour localiser votre centre de service le plus proche, veuillez visiter la
page www.osterpro.com
1. Une fois que vous avez localisé le centre de service, emmenez-y
le produit. Pour emballer le produit plus facilement, utilisez les
matériels d’emballage originaux et le carton si vous les avez
conservés.
2. Si l’appareil doit être expédié au centre de service :
a. Emballez-le soigneusement dans un carton rempli de papier
froissé ou de tout autre rembourrage l’entourant. Scotchez ou
attachez le carton solidement.
b. La garantie ne couvre pas les dommages survenus au cours
du transport. Envoyez soigneusement le paquet au centre
d’entretien le plus proche. N’oubliez pas d’indiquer votre nom
et l’adresse de réexpédition, y compris le code postal.
c. Le bureau de poste vous indiquera le prix de l’affranchisse-
ment et peut assurer le paquet contre toute perte.
3. Si vous rendez la ponceuse, veuillez inclure le tambour de ponçage
dans le paquet.
4. Lorsque vous commandez des pièces ou des accessoires, veuillez
préciser le numéro du service (ou numéro du modèle et la lettre de
série) figurant sur votre produit.
Français-8
Page 28

Pour vous prévaloir de ce service, veuillez contacter :
Amérique du nord :
Oster Direct® Services
904 Red Road, McMinnville, TN 37110
(800) 830-3678
www.osterpro.com
Ou un centre de service agréé
Europe, Afrique et Moyen-Orient :
Oster GmbH
info@oster-europe.com
+49 (0) 69 410 120
Pour tous les autres pays
Veuillez vous adresser à votre distributeur local agréé
© 2015 Sunbeam Products, Inc. faisant affaire sous le nom de Jarden Consumer Solutions.
Tous droits réservés. Distribué par Sunbeam Products, Inc. faisant affaire sous le nom de Jarden
Consumer Solutions, Boca Raton, Floride 33431. En Europe, importé et distribué par Oster GbmH,
D-65795, Hattersheim, Allemagne. info@oster-europe.com.
Pour toute information concernant le recyclage et l’élimination appropriée de ce produit, veuillez
contacter votre entreprise locale de gestion des déchets.
Imprimé en Chine
Français-9
 Loading...