

Page 1

Instructions for use
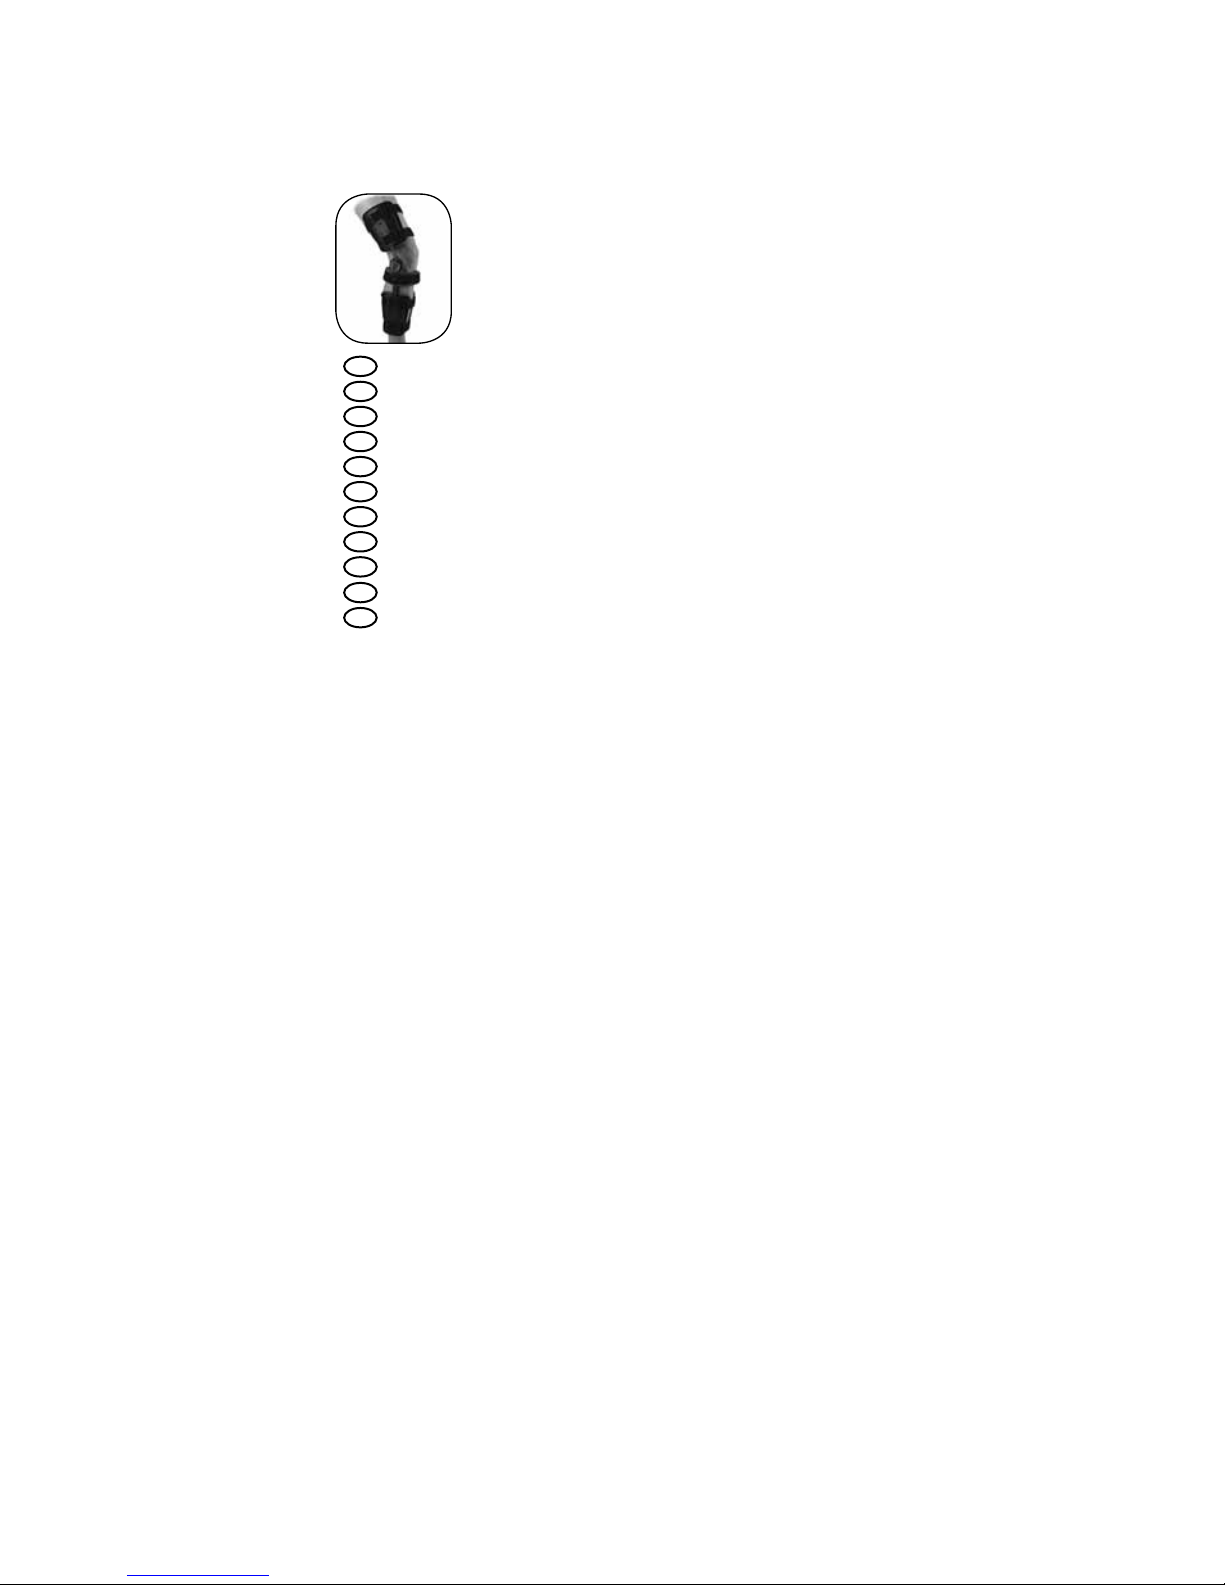
Rehab
Page 2
Instructions for use................................................5
Gebrauchsanweisung.............................................6
Guide de fabrication...............................................7
Instrucciones para el uso.......................................8
Istruzioni per l’uso.................................................9
Bruksanvisning.......................................................10
Brugsanvisning.......................................................11
Bruksanvisning.......................................................12
Käyttöohjeet............................................................13
Gebruiksaanwijzing................................................14
Instruções de Utilização.........................................15
EN
DE
FR
ES
IT
DA
SV
NL
PT
FI
NO
....................................................................3
Page 3

4
EN - Caution: This product has been designed and tested based on
single patient usage and is not recommended for multiple patient use.
If any problems occur with the use of this product, immediately contact
your medical professional.
DE- Zur Beachtung: Dieses Produkt ist für die Anwendung bei ein und
demselben Patienten vorgesehen und geprüft. Der Einsatz für mehrere
Patienten wird nicht empfohlen. Wenn beim Tragen dieses Produkts
Probleme auftreten, sofort den Arzt verständigen.
FR- Attention: Ce produit a été conçu et testé pour être utilisé par un
patient unique et n’est pas préconisé pour être utilisé par plusieurs patients. En cas de problème lors de l’utilisation de ce produit, contactez
immédiatement un professionnel de santé.
ES- Atención: Este producto se ha diseñado y probado para su uso en
un paciente único y no se recomienda para el uso de varios pacientes.
En caso de que surja algún problema con el uso este producto, póngase
inmediatamente en contacto con su profesional médico.
IT- Avvertenza: Questo prodotto è stato progettato e collaudato per
essere utilizzato per un singolo paziente e se ne sconsiglia l’impiego per
più pazienti. In caso di prob¬lemi durante l’utilizzo del prodotto, contattare immediatamente il medico di fiducia.
DA- Forsigtig: Dette produkt er beregnet og afprøvet til at blive brugt af
én patient. Det frarådes at bruge produktet til flere patienter. Kontakt
din fysioterapeut eller læge, hvis der opstår problemer i forbindelse med
anvendelsen af dette produkt.
SV- Var försiktig: Produkten har utformats och testats baserat på användning av en en-skild patient och rekommenderas inte för användning
av flera patienter. Om det skulle uppstå problem vid användning av
produkten ska du omedelbart kontakta din läkare.
NL- Opgelet: Dit product is ontworpen en getest voor eenmalig gebruik.
Hergebruik van dit product wordt afgeraden. Neem bij problemen met
dit product contact op met uw medische zorgverlener.
PT- Atenção: Este produto foi concebido e testado com base na utilização num único doente e não está recomendado para utilização em
múltiplos doentes. Caso ocorra algum problema com a utilização deste
produto, entre imediatamente em contacto com o seu profissional de
saúde.
Page 4
3
5
4
7
8
1
6
2
3
Mid
Strap
4
3
2
1
Page 5

5
ENGLISH
CAUTION
This product is to be used only under the supervision of a licensed health care
professional. Care must be taken to follow the advice of the healt care professional
when using this or any medical device.
ADJUST THE BRACE LENGTH
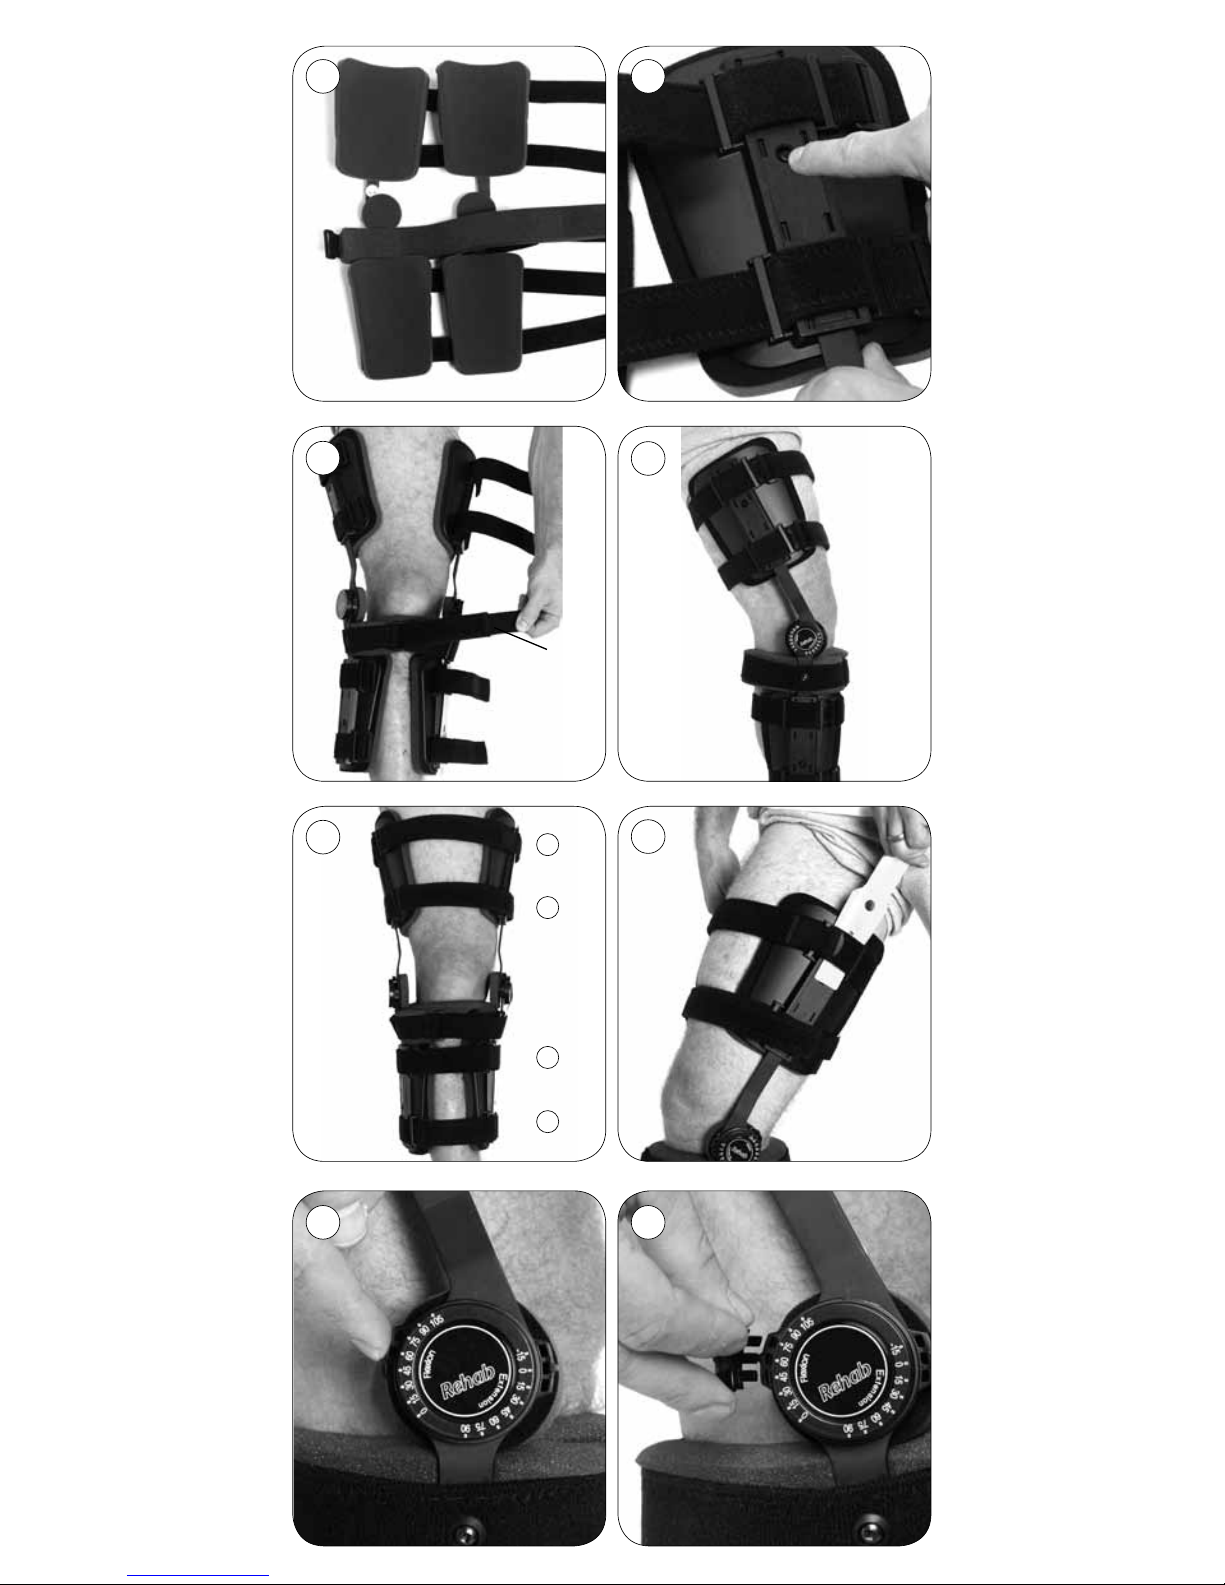
1 Each pair of shells, (2 upper and 2 lower), must be set to the same position
(Figure 1). Failure to do so could cause hinge malalingment and brace
slippage.
2 Depress button on each shell and slide shell to required length (Figure 2).
APPLY THE BRACE
3 Undo mid-strap and place brace under patient´s leg (Figure 3). Attain correct
hinge position by adjusting the mid-strap and pad.
4 Hinges are centered halfway between the front and back of the knee
(Figure 4).
5 Hinges and shells are parallel (Figure 5).
6 Pass strap throug the d-ring and fasten the hook tap end back onto the strap
to secure (Figure 3).
7 The mid-strap should be tightened as firmly as possible without restricting
circulation. Adjust stap length through hinge arm d-rings
Correct Brace Position.
ADJUST THE SHELL STRAP LENGTH
8 Align calf shells so hinges are parallel to tibia. Secure strap 1 (Figure 5). Pull
strap tight, pass strap through d-ring and fasten the hook tab end back onto
the strap.
9 Align thigh shells so hinges are parallel with the femur.
10 Secure straps 2,3, and 4 (Figure 5) using same procedure.
11 When desired strap length is achieved remove hook cover on shell and mid-
strap (Figure 6). Press strap against hook to secure.
12 After straps are secured, check brace position again and adjust if necessary.
Leave straps fastened at hook contact along shells. The brace is now properly
sized for the patient. Future application and correct positioning can be done
easily by fastening straps along the front of the brace position.
RANGE OF MOTION
13 Push and set to desired extension position (Figure 7).
14 Push and set to desired flexion position (Figure 7).
15 After Range of Motion is set push Range Of Motion Spring Locks into place
(Figure 8).
16 Make adjustments to both hinges.
NOTE: Range of Motion Lock is not to be used in the 105 degree
CARE AND MAINTENANCE
Liners may be hand washed with cold water. Hang to dry.
WARRANTY
Ossur post operative bracing product are disposable, limited use devices not
intended for long term use. We warrant our products against defects in material
and workmanship in the following manner; 30 days for skin contact parts (foam
and straps) and 90 days for shells and hinges. Since we cannot control the manner
in which such devices are fit, applied, adjusted or used, this warrany does nota
apply to products which have been neglected, abused, incorrectly applied or
incorrectly fit. There are no warranties, either expressed or implied, other than
those listed above.
Page 6

6
DEUTSCH
WARNHINWEIS
Dieses Produkt darf nur unter Aufsicht eines zugelassenen Arztes verwendet werden.
Der Rat des Arztes muss sorgfältig befolgt werden, wenn Sie dieses oder ein anderes
medizinisches Gerät benutzen.
ORTHESENLÄNGE ANPASSEN
1. Jedes Paar Schalen (2 obere und 2 untere) muss in der gleichen Position
eingestellt sein (Abbildung 1). Sind die Schalen nicht gleich eingestellt, kann dies
zu einer Gelenkfehlausrichtung und zu einem Verrutschen der Orthese führen.
2. Drücken Sie den Knopf auf jeder Schale und schieben Sie die Schale auf die
gewünschte Länge (Abbildung 2).
ORTHESE ANLEGEN
3. Lösen Sie den Mittelriemen und platzieren Sie die Orthese unter dem Bein des
Patienten (Abbildung 3). Die richtige Gelenkausrichtung erhalten Sie, indem Sie
den Mittelriemen und das Polster anpassen.
4. Die Gelenke sind auf der Hälfte zwischen Vorder- und Rückseite des Knies
zentriert (Abbildung 4).
5. Gelenke und Schalen sind parallel zueinander (Abbildung 5).
6. Führen Sie den Riemen durch den D-Ring und befestigen Sie das hintere Ende
der Hakenschlaufe auf dem Riemen, um ihn festzuziehen (Abbildung 3).
7. Der Mittelriemen sollte so fest wie möglich angezogen werden, ohne die
Durchblutung abzuklemmen. Passen Sie die Riemenlänge durch die D-Ringe des
Gelenkarms an. Korrigieren Sie, wenn nötig die, Position der Orthese.
SCHALENRIEMENLÄNGE ANPASSEN
8. Richten Sie die Wadenschalen so aus, dass sich die Gelenke parallel zur Wade
befinden. Ziehen Sie den Riemen 1 fest (Abbildung 5), Führen Sie ihn durch den
D-Ring und befestigen Sie das Hakenschlaufenende wieder auf dem Riemen.
9. Richten Sie die Oberschenkelschalen so aus, dass die Gelenke parallel zum
Oberschenkelknochen sind.
10. Befestigen Sie die Riemen 2,3 und 4 (Abbildung 5) auf die gleiche Art und Weise.
11. Wenn die gewünschte Riemenlänge erreicht ist, entfernen Sie die
Hakenabdeckung auf der Schale und den Mittelriemen (Abbildung 6). Drücken
Sie den Riemen gegen den Haken, um ihn zu sichern.
12. Wenn Sie die Riemen befestigt haben, überprüfen Sie erneut die Position der
Orthese und korrigieren Sie sie ggf. Die Riemen sollten an den Hakenkontakten
entlang der Schalen befestigt bleiben. Die Orthese ist jetzt richtig für den
Patienten eingestellt. Zukünftige Anwendung und die korrekte Positionierung
können ganz einfach vorgenommen werden, indem die Riemen entlang der
Vorderseite der Orthese angezogen werden.
BEWEGUNGSSPIELRAUM
13. Schieben Sie und stellen Sie die gewünschte Extensionsposition ein
(Abbildung 7).
14. Schieben Sie und stellen Sie die gewünschte Beugungsposition ein
(Abbildung 7).
15. Wenn der Bewegungsspielraum eingestellt wurde, drücken Sie die
Federschlösser des Bewegungsspielraums zurück (Abbildung 8).
16. Passen Sie beide Gelenke an.
HINWEIS: Das Schloss des Bewegungsspielraums darf nicht im Winkel von 105
Grad verwendet werden.
REINIGUNG UND PFLEGE
Die Polster können mit kaltem Wasser von Hand gewaschen werden. Zum Trocknen
aufhängen.
GARANTIE
Die postoperativen Orthesenprodukte von Össur sind Hilfsmittel mit
eingeschränkter Nutzungsdauer, die nicht für den langfristigen Gebrauch gedacht
sind. Unsere Produkte besitzen die folgende Garantie gegen Material- und
Verarbeitungsfehler; 30 Tage für Teile, die Kontakt mit der Haut haben (Schaumstoff
und Riemen) und 90 Tage für Schalen und Gelenke. Da wir nicht die Art und Weise
kontrollieren können, wie die Hilfsmittel angepasst, angelegt, eingestellt oder
verwendet werden, gilt diese Garantie nicht für Produkte, die vernachlässigt,
zweckentfremdet, falsch angelegt oder nicht richtig angepasst wurden. Andere
Garantien, ausdrückliche oder implizierte, als die oben angegebenen werden nicht
gewährt.
Page 7

7
FRANÇAIS
PRÉCAUTIONS
Ce produit ne doit être utilisé que sous la supervision d'un professionnel de santé
agréé. Il convient de respecter les conseils du professionnel de santé lors de
l’utilisation de ce dispositif médical ou de tout autre dispositif.
AJUSTEZ LA LONGUEUR DE L’ORTHÈSE
1 Chaque paire de coques (2 supérieures et 2 inférieures) doit être réglée à
la même position (Figure 1). Un non-respect de cette indication risque de
provoquer un mésalignement non alignement de la charnière et de faire glisser
l’orthèse.
2 Appuyez sur le bouton situé sur chaque coque et faites glisser la coque jusqu’à
obtenir la longueur souhaitée (Figure 2).
POSEZ L’ORTHÈSE
3 Défaites la sangle centrale et placez l’orthèse sous la jambe du patient
(Figure 3). Pour obtenir une position correcte de la charnière, ajustez la sangle
centrale et le rembourrage.
4 Les charnières sont centrées à mi-hauteur entre l’avant et l’arrière du genou
(Figure 4).
5 Les charnières et les coques sont parallèles (Figure 5).
6 Faites passer la sangle dans l'anneau en D et repassez l’extrémité contenant le
crochet de fixation sur la sangle pour la fixer (Figure 3).
7 La sangle centrale doit être serrée autant que possible sans entraver la
circulation. Ajustez la longueur de la sangle grâce aux anneaux en D du bras
d’articulation. Corrigez la position de l’orthèse.
AJUSTEZ LA LONGUEUR DE LA SANGLE DE LA COQUE
8 Alignez la coque de mollet de façon à ce que les charnières soient parallèles au
tibia. Fixez la sangle 1 (Figure 5). Tirez fermement sur la sangle, faites-la passer
dans l'anneau en D et redoublez le filet d’implantation du crochet sur la sangle
pour le fixer.
9 Alignez les coques de cuisse de façon à ce que les charnières soient parallèles
au fémur.
10 Fixez les sangles 2, 3, et 4 (Figure 5) en suivant la même procédure.
11 Lorsque vous avez obtenu la longueur de sangle souhaitée, retirez la couverture
de crochet de la coque et le milieu de la sangle (Figure 6). Appuyez la sangle
contre le crochet pour fixer.
12 Une fois que les sangles sont en place, vérifiez à nouveau la position de l’orthèse
et ajustez si nécessaire. Laissez les sangles fixées au point de contact entre
les crochets et les coques. L’orthèse est maintenant correctement réglée à la
taille du patient. Lors d’applications futures et pour obtenir un positionnement
correct en toute simplicité, fixez les sangles le long de l’avant de l’orthèse.
AMPLITUDE ARTICULAIRE
13 Appuyez et réglez pour obtenir la position d’extension voulue (Figure 7).
14 Appuyez et réglez pour obtenir la position de flexion voulue (Figure 7).
15. Une fois l’amplitude articulaire réglée, appuyez sur les verrous à ressort de
l'amplitude articulaire pour les bloquer (Figure 8).
16 Ajustez les deux charnières.
REMARQUE: Le verrou de l’amplitude articulaire ne doit pas être utilisé à 105
degrés.
MAINTENANCE ET ENTRETIEN
Les manchons peuvent être lavés à la main à l’eau froide. Suspendez-les pour les
faire sécher.
GARANTIE
Les produits orthétiques postopératoires Ossur sont des appareils jetables d’usage
limité. Ils ne sont pas destinés à une utilisation à long terme. Nous garantissons
nos produits contre les défauts matériels et les vices de fabrication de la façon
suivante : pendant 30 jours pour pièces en contact avec la peau (mousse et sangles)
et 90 jours pour les coques et les charnières. Dans la mesure où ne nous ne
pouvons contrôler la façon dont ces appareils sont posés, appliqués, ajustés ou
utilisés, cette garantie ne s’applique pas aux produits endommagés à l’issue de
négligence, d’emploi abusif, d’application ou de pose incorrectes. Il n’existe aucune
autre garantie, qu’elle soit exprimée ou implicite, à part les garanties énumérées
ci-dessus.
Page 8

8
ESPAÑOL
PRECAUCIONES
Este producto debe utilizarse únicamente bajo la supervisión de un profesional
sanitario autorizado. Se debe tener la precaución de seguir la recomendación del
profesional sanitario al utilizar éste o cualquier dispositivo médico.
AJUSTE LA LONGITUD DE LA ABRAZADERA
1 Cada par de piezas del armazón, (2 superiores y 2 inferiores), se debe colocar
en la misma posición (Figura 1). El no hacerlo puede ocasionar un mal
alineamiento del gozne y deslizamiento de la abrazadera.
2 Presione el botón en cada pieza del armazón y deslice la pieza hasta la
longitud requerida (Figura 2).
COLOQUE LA ABRAZADERA
3 Desabroche la correa media y sitúe la abrazadera bajo la pierna del paciente
(Figura 3). Llegue hasta la posición correcta del gozne ajustando la correa
media y la almohadilla.
4 Los goznes se centran a mitad del recorrido entre la parte frontal y trasera de
la rodilla (Figure 4).
5 Los goznes y las piezas del armazón son paralelos (Figura 5).
6 Pase la correa a través del anillo en d y apriete el extremo de la llave de gancho
de nuevo sobre la correa para asegurarla (Figura 3).
7 La correa media debe estar apretada tan firmemente como sea posible sin
impedir la circulación. Ajuste la longitud de la correa a través de los anillos en
d del brazo de la bisagra Corrija la posición de la abrazadera.
AJUSTE LA LONGITUD DE LA CORREA DEL ARMAZÓN
8 Alinee las piezas del armazón de la pantorrilla de modo que los goznes estén
paralelos a la tibia. Asegure la correa 1 (Figura 5). Tense la correa, pase la
correa a través del anillo en d y apriete el extremo de la llave de gancho de
nuevo sobre la correa.
9 Alinee las piezas del armazón del muslo de modo que los goznes estén
paralelos al fémur.
10 Asegure las correas 2, 3, y 4 (Figura 5) utilizando el mismo procedimiento.
11 Cuando logre la longitud deseada de la correa retire la cubierta del gancho
sobre la pieza del armazón y la correa media (Figura 6). Presione la correa
sobre el gancho para asegurarla.
12 Después de haber asegurado las correas, compruebe la posición de la
abrazadera de nuevo y ajústela si es necesario. Deje las correas apretadas
en contacto con el gancho a lo largo de las piezas del armazón. El tamaño
de la abrazadera esta ahora ajustado adecuadamente para el paciente. Se
pueden realizar fácilmente futuras aplicaciones y posicionamientos correctos
apretando las correas a lo largo de la parte frontal de la posición de la
abrazadera.
RANGO DE MOVIMIENTO
13 Pulse y establezca la posición de extensión deseada (Figura 7).
14 Pulse y establezca la posición de flexión deseada (Figura 7).
15 Después de haber establecido el rango de movimiento coloque en su lugar los
cierres de resorte de rango del movimiento (Figura 8).
16 Realice ajustes en ambos goznes.
NOTA: El cierre de rango de movimiento no se utiliza en el ángulo de 105
grados
CUIDADOS Y MANTENIMIENTO
Los encajes se pueden lavar a mano con agua fría. Cuélguelo para secar.
GARANTÍA
Los productos postoperatorios de abrazadera de Ossur son dispositivos
desechables, de uso limitado no previstos para un uso a largo plazo.
Garantizamos nuestros productos frente a defectos materiales y de mano de
obra del siguiente modo; 30 días para las piezas en contacto con la piel (espuma
y correas) y 90 días para las piezas del armazón y goznes. Puesto que no
podemos controlar el modo en el que dichos dispositivos se colocan, aplican,
ajustan o utilizan, esta garantía no afecta a productos que han sido descuidados,
maltratados, aplicados incorrectamente o ajustados incorrectamente. No existen
otras garantías, explícitas o implícitas, distintas a las citadas más arriba.
Page 9

9
ITALIANO
PRECAUZIONI D’IMPIEGO
Questo prodotto è destinato a essere usato esclusivamente dietro controllo di
un medico professionista. Quando si usa questo o un altro dispositivo medico,
occorre prestare attenzione e seguire i consigli del medico.
REGOLARE LA LUNGHEZZA DEL SOSTEGNO
1 Ciascun paio di conchiglie (2 superiori e 2 inferiori), deve essere impostato
alla stessa posizione (Figura 1). La mancata osservanza di tale precauzione
potrebbe provocare il disallineamento della cerniera e lo scivolamento del
sostegno.
2 Premere il pulsante posto su ciascuna delle conchiglie e far scivolare la
conchiglia alla lunghezza richiesta (Figura 2).
APPLICARE IL SOSTEGNO
3 Slacciare la cinghia mediana e collocare il sostegno sotto la gamba del
paziente (Figura 3). Regolare la cinghia mediana e il cuscinetto in modo da
ottenere la posizione corretta della cerniera.
4 Le cerniere si centrano sulla mezzeria tra la parte anteriore e quella posteriore
del ginocchio (Figura 4).
5 Cerniere e conchiglie sono paralleli (Figura 5).
6 Far passare la cinghia attraverso l’anello a D e fissare il retro dell’estremità del
foro del gancio sulla cinghia per fissarla (Figura 3).
7 Occorre fissare la cinghia mediana il più saldamente possibile senza tuttavia
limitare la circolazione. Regolare la lunghezza della cinghia attraverso gli anelli
a D della cerniera Correggere la posizione del sostegno.
REGOLARE LA LUNGHEZZA DELLA CINGHIA DELLA CONCHIGLIA
8 Allineare le conchiglie del polpaccio in modo che le cerniere siano parallele
alla tibia. Fissare la cinghia 1 (Figura 5). Tirare la cinghia, farla passare
attraverso l’anello a D e fissare il retro dell’estremità del foro del gancio sulla
cinghia.
9 Allineare le conchiglie della coscia in modo che le cerniere siano parallele al
femore.
10 Fissare le cinghie 2, 3 e 4 (Figura 5) usando la stessa procedura.
11 Dopo aver ottenuto la lunghezza della cinghia desiderata, togliere la copertura
del gancio sulla conchiglia e sulla cinghia mediana (Figura 6). Premere la
cinghia contro il gancio per fissarla.
12 Dopo aver fissato le cinghie, controllare nuovamente la posizione del
sostegno e, se occorre, regolarla. Lasciare le cinghie fissate al contatto del
gancio lungo le conchiglie. A questo punto, il sostegno è correttamente
dimensionato per il paziente. È possibile realizzare facilmente l’applicazione
e il corretto posizionamento futuri fissando le cinghie lungo la parte anteriore
della posizione del sostegno.
INTERVALLO DI MOVIMENTO
13 Spingere e impostare alla posizione di estensione desiderata (Figura 7).
14 Spingere e impostare alla posizione di flessione desiderata (Figura 7).
15 Dopo aver impostato l'Intervallo di movimento, spingere in sede i dispositivi
di bloccaggio della molla dell’intervallo di movimento (Figura 8).
16 Apportare le regolazioni del caso a entrambe le cerniere.
NOTA: Non bisogna usare il dispositivo di bloccaggio impostandolo sul grado
105
CONSERVAZIONE E MANUTENZIONE
I rivestimenti devono essere lavati a mano con acqua fredda. Lasciare asciugare
all’aria.
GARANZIA
I dispositivi di sostegno postintervento Ossur sono monouso, destinati a un
uso limitato e non a lungo termine. Garantiamo i nostri prodotti da difetti nei
materiali e nella lavorazione come segue: 30 giorni per le parti a contatto con la
pelle (spugna e cinghie) e 90 giorni per le conchiglie e le cerniere. Dato che non
abbiamo il controllo sul modo in cui tali dispositivi sono indossati, applicati,
regolati o usati, questa garanzia non vale per i prodotti che siano stati trascurati,
usati, applicati o indossati in modo improprio. Oltre alle garanzie descritte in
precedenza, non vi sono altre garanzie esplicite o implicite.
Page 10

10
NORSK
FORSIKTIG
Dette produktet skal kun brukes under tilsyn av lege. Det er viktig å følge legens
råd når man bruker dette eller andre medisinske apparater.
JUSTER SKINNELENGDEN
1. Hvert skallpar (2 øvre og 2 nedre) må settes i samme posisjon (Figur 1). Gjør
man ikke dette, kan hengselet forskyve seg og skinnen kan skli.
2. Trykk ned knappen på hvert skall og skyv skallet til ønsket lengde (Figur 2).
SETT PÅ SKINNEN
3. Ta vekk midtremmen og sett skinnen under pasientens ben (Figur 3). Oppnå
riktig hengselposisjon ved å justere midtremmen og puten.
4. Hengslene er sentrert halvveis mellom forsiden og baksiden av kneet (Figur
4).
5. Hengsler og skall er paralelle (Figur 5).
6. Dra remmen gjennom d-ringen og fest enden av kroken tilbake på remmen for
å sikre den (Figur 3).
7. Midtremmen burde festes så stramt som mulig uten å begrense
sirkulasjonen. Juster remlengden gjennom hengselarmede d-ringer Riktig
skinneposisjon.
JUSTER SKALLREMLENGDEN
8. Rett tykkleggskallene så hengslene står parallelt med tibia. Sikre rem 1 (Figur
5). Stram remmen, dra remmen gjennom d-ringen og fest kroken på remmen
igjen.
9. Rett lårskallene så hengslene står paralellt med lårbenet.
10. Sikre rem 2, 3 og 4 (Figur 5) ved å bruke sammen prosedyre.
11. Når du har riktig remlengde kan du fjerne krokfestet på skillet og midtremmen
(Figur 6). Trykk remmen mot kroken for å sikre.
12. Sjekk skinneposisjonen igjen og juster hvis nødvendig etter at remmene er
sikret. Hold remmene festet til krokkontakten langs skallene. Skinnen har nå
riktig størrelse for pasienten. Senere påføring og riktig plassering kan gjøres
lett ved å feste remmene langs forsiden av skinneposisjonen.
BEVEGELSESUTSLAG
13. Trykk og sett i ønsket ekstensjonsposisjon (Figur 7).
14. Trykk og sett i ønsket fleksjonsposisjon (Figur 7).
15. Etter bevegelsesutslaget er stilt inn, trykk bevegelsesutslag springlåsene på
plass (Figur 8).
16. Utfør justeringer på begge hengslene.
MERK: Bevegelsesutslagslåsen skal ikke brukes I 105 grader
STELL OG VEDLIKEHOLD
Linjer kan håndvaskes med kaldt vann. Henges opp til tørk.
GARANTI
Ossur postoperative skinneprodukter er kastbare, begrenset bruk apparater er ikke
ment for langsiktig bruk. Vi garanterer våre produkter mot defekter materiale og
utførelse på følgende måte; 30 dager for hudkontakt deler (skum og remmer) og
90 dager for skall og hengsler. Da vi ikke kan kontrollere hvordan apparater passer,
påføres, justeres eller brukes, gjelder ikke denne garantien produkter som har
blitt neglisjert, misbrukt, feilaktig anvendt eller feil passform. Det er ingen andre
garantier, verken uttrykt eller underforstått, enn de som er listet ovenfor.
Page 11

11
DANSK
OBS!
Dette produkt må kun anvendes af en kvalificeret læge. Man bør omhyggeligt følge
lægens råd, når man anvender dette eller ethvert andet medicinsk udstyr.
JUSTER SKINNENS LÆNGDE
1. Hvert par skaller, (2 øvre og 2 nedre), skal være i den samme position (Figur
1). At undlade dette kan det forårsage forskydning af hængsel og skred af
skinnen.
2. Tryk knappen ned på hver af skallerne og før skallen hen til den nødvendige
længde (Figur 2).
PÅSÆT SKINNEN
3. Åbn den midterste strop og placer skinnen under patientens ben (Figur 3).
Sørg for at hængslerne er i korrekt position ved at justere den midterste strop
og pude.
4. Hængslerne er centreret halvvejs mellem for- og bagsiden af knæet (Figur 4).
5. Hængsler og skaller er parallelle (Figur 5).
6. Før remmen gennem D-ringen og fastgør igen ”han” enden på remmen for at
sikre den (Figur 3).
7. Den midterste rem skal spændes så fast som muligt, uden at hindre
blodomløbet. Juster remmenes længde gennem hængselarmens d-ringe.
Juster skinnens position.
JUSTER REMLÆNGDEN FOR SKALLERNE
8. Juster lægskallerne, så hængslerne er parallelle med skinnebenet. Fastgør rem
1 (Figur 5). Træk remmen til, før remmen gennem D-ringen og fastgør igen
”han” enden på remmen.
9. Juster lårskallerne, så hængslerne er parallelt med lårbenet.
10. Fastgør rem 2, 3, og 4 (Figur 5) ved at anvende samme procedure.
11. Når den ønskede remlængde er opnået, fjernes beskyttelsen fra velcroen på
skallen og den mellemste rem (Figur 6). Pres remmen mod velcroen for at
fæstne den.
12. Efter stropperne er fæstnede, check skinnernes stilling igen og juster om
nødvendigt. Efterlad remmene fastgjorte på velcroen langs skallerne. Skinnen
er nu korrekt justeret for patienten. Fremtidige påføring og korrekt placering
kan nemt foretages ved at fastgøre remme langs den forreste del af skinnens
stilling.
BEVÆGELSESOMRÅDE
13. Tryk og indstil den til den ønskede ekstensionsindstilling (Figur 7).
14. Tryk og indstil den til den ønskede fleksionsindstilling (Figur 7).
15. Efter at bevægelsesområdet er fastsat, sæt bevægelsesområdets fjederlås på
plads (Figur 8).
16. Juster begge hængsler.
BEMÆRK: Bevægelsesområdets lås skal ikke anvendes for 105 grader
PLEJE OG VEDLIGEHOLDELSE
Foringer kan håndvaskes med koldt vand. De skal hængetørre.
GARANTI
Ossurs post operative skinneprodukter er til bortkastning efter brug og til
begrænset anvendelse. De ikke er beregnet til langvarig brug. Vi garanterer vores
produkter mod defekter i materialer og udførelse på følgende måde; 30 dage for
dele der har kontakt med huden (skum og stropper) og 90 dage for skaller og
hængsler. Da vi ikke kan kontrollere den måde, hvorpå disse anordninger tilpasses,
påføres, justeres eller anvendes, er denne garanti ikke gældende for produkter,
som er blevet forsømt, mishandlet, fejlagtigt anvendt eller forkert tilpasset. Der er
ingen garantier, udtrykt eller underforstået, andre end de ovenfor anførte.
Page 12

12
SVENSKA
FÖRSIKTIGHET
Denna produkt får endast användas under överinseende av legitimerad
sjukvårdspersonal. Du måste vara noga med att följa vårdpersonalens råd när du
använder denna eller annan medicinsk utrustning.
JUSTERA ortosens LÄNGD
1 Varje par med skal (2 övre och 2 nedre) måste vara inställda i samma position
(figur 1). Underlåtelse att göra detta kan orsaka felställning och att stödet
glider.
2 Tryck ned knappen på varje skal och dra skalet till önskad längd (figur 2).
PLACERA ORTOSEN
3 Lossa bandet i mitten och placera ortosen under patientens ben (figur 3).
Placera leden i korrekt position genom att justera bandet i mitten och kudden.
4 Lederna ska placeras mitt emellan knäets fram- och baksida (figur 4).
5 Lederna och skalen är parallella (figur 5).
6 Dra bandet genom D-ringen och fäst kardborredelen på bandets baksida för
att säkra denna (figur 3).
7 Bandet i mitten ska dras åt så hårt som möjligt utan att förhindra
cirkulationen. Justera band längden genom ledarmens D-ringar Korrekt
position på ortosen .
JUSTERA BANDLÄNGDEN PÅ SKALET
8 Justera vadskalet så att lederna är parallella med skenbenet. Fäst band 1
(figur 5). Dra åt bandet ordentligt, dra den igenom D-ringen och fäst
kardborredelen på bandets baksida.
9 Justera lårskalen så att lederna är parallella med femur
10 Fäst banden 2, 3 och 4 (figur 5) på samma sätt.
11 När önskad bandlängd har uppnåtts lossar du kardborredelen från skalet och
bandet i mitten (figur 6). Tryck bandet mot kardborredelen för att säkra den.
12 När banden har fästs kontrollerar du ortosens position på nytt och justera den
om det behövs. Låt banden vara fästa vid kardborrebanden längs hela skalet.
Ortosen har nu lämplig storlek för patienten. Användning och placering kan i
framtiden enkelt göras genom att fästa banden längs stödets framsida.
RÖRELSEOMFÅNG
13 Tryck och ställ in önskad extensionsposition (figur 7).
14 Tryck och ställ in önskad flexionsposition (figur 7).
15 När rörelseomfånget har ställts in trycker du fjädrarna för rörelseomfång på
plats (figur 8).
16 Justera båda lederna.
OBS! Rörelseomfångslåset får inte användas vid 105 grader
SKÖTSEL OCH UNDERHÅLL
Polstringen kan tvättas för hand i kallt vatten. Hängtorkas.
GARANTI
Össurs postoperativa ortos produkter är avsedda för engångsbruk, produkter
som är avsedda för begränsad användningstid inte att användas vid långvarigt
bruk. Vi garanterar att våra produkter är fria från brister i material och tillverkning
enligt följande: 30 dagar för delar som kommer i kontakt med huden (kuddar och
band), och 90 dagar för skal och leder. Eftersom vi inte kan kontrollera hur sådana
produkter passas in, placeras, justeras eller används, gäller inte denna garanti för
produkter som utsatts för försummelse, missbruk, applicerats på ett felaktigt sätt
eller inte passats in ordentligt. Det finns inga andra garantier, vare sig uttryckliga
eller underförstådda, utöver de ovan angivna.
Page 13

13
SUOMI
HUOMIO
Tuotetta tulee käyttää ainoastaan hoitoalan ammattilaisen ohjauksessa. Tämän tai
muiden lääketieteellisten laitteiden käytössä on noudatettava tarkkaan hoitoalan
ammattilaisen ohjeita.
ORTOOSIN PITUUDEN SÄÄTÄMINEN
1. Molemmat mansettiparit (2 ylä- ja 2 alamansettia) on asetettava samaan
asentoon (Kuva 1). Muussa tapauksessa ortoosinivelet eivät ehkä pysy
paikallaan, ja ortoosi saattaa lipsua.
2. Paina kunkin mansetin painiketta ja liu'uta mansetti vaaditun pituiseksi (Kuva
2).
ORTOOSIN PUKEMINEN
3. Avaa keskihihna ja aseta ortoosi potilaan jalan alapuolelle (Kuva 3). Saat
aikaan oikean ortoosinivelen asennon säätämällä keskihihnaa ja pehmustetta.
4. Ortoosinivelet keskitetään jalan sivulle polven puoliväliin (Kuva 4).
5. Ortoosinivelet ja mansetit ovat samansuuntaiset (Kuva 5).
6. Vie hihna D-renkaan läpi ja kiinnitä tarranauhaliuskan pää taakse hihnaan sen
kiinnittämiseksi (Kuva 3).
7. Keskihihna pitäisi kiristää mahdollisimman tiukalle verenkiertoa häiritsemättä.
Säädä hihnan pituutta ortoosinivelen varren d-renkaiden avulla. Korjaa
ortoosin asentoa.
MANSETIN HIHNAN PITUUDEN SÄÄTÄMINEN
8. Kohdista pohjemansetit, niin että ortoosinivelet ja sääriluu ovat
yhdensuuntaisia. Kiinnitä hihna 1 (Kuva 5). Vedä hihna kireälle, vie se
D-renkaan läpi ja kiinnitä tarranauhan pää hihnaan.
9. Kohdista reisimansetit niin, että ortoosinivelet ja reisiluu ovat
yhdensuuntaisia.
10. Kiinnitä hihnat 2, 3 ja 4 (Kuva 5) saman toimenpiteen avulla.
11. Kun haluttu pituus on saatu aikaan, poista tarran suojus mansetista ja
keskihihnasta (Kuva 6). Kiinnitä hihna painamalla se tarraa vasten.
12. Kun hihnat on kiinnitetty, tarkista ortoosin asento uudelleen ja säädä sitä
tarvittaessa. Jätä hihnat kiinni mansettien tarranauhoihin. Ortoosi on nyt
säädetty potilaan kokoon sopivaksi. Jatkossa ortoosin voi pukea ja asettaa
vaivatta oikein kiinnittämällä hihnat ortoosin etuosaan.
LIIKELAAJUUS
13. Työnnä ja aseta haluttuun ojennusasentoon (Kuva 7).
14. Työnnä ja aseta haluttuun koukistusasentoon (Kuva 7).
15. Kun liikelaajuus on asetettu, aseta liikelaajuuden jousilukitus paikalleen (Kuva
8).
16. Säädä molempia ortoosiniveliä.
HUOMAUTUS: Liikelaajuuden lukitusta ei saa käyttää 105 asteen kohdalla
HOITO JA HUOLTO
Pehmusteet voidaan pestä käsin kylmällä vedellä. Ripusta kuivumaan.
TAKUU
Ossurin leikkauksen jälkeiset ortoosituotteet ovat kertakäyttöisiä laitteita, joiden
käyttö on rajallista. Niitä ei ole tarkoitettu pitkäaikaiskäyttöön. Tuotteillemme
myönnettävä takuu kattaa materiaali- ja valmistusvirheet. Ihokontaktissa
olevien osien (vaahtomuovi ja hihnat) takuu on 30 vuorokautta ja mansettien
ja ortoosinivelten takuu 90 vuorokautta. Koska emme voi valvoa laitteiden
sovittamista, pukemista, säätöä tai käyttöä, tämä takuu ei koske tuotteita, joihin on
kohdistunut laiminlyöntejä tai joita on käytetty, puettu tai sovitettu virheellisesti.
Yllä mainitun takuun lisäksi ei myönnetä muita nimenomaisia tai oletettuja takuita.
Page 14

14
NEDERLANDS
LET OP
Dit product mag enkel gebruikt worden onder toezicht van een erkende
gezondheidswerker. Het is belangrijk dat u rekening houdt met de aanbevelingen
van de gezondheidswerker als u dit of andere medische apparaten aanwendt.
DE LENGTE VAN DE BRACE AANPASSEN
1. Elk paar schalen, (2 bovenste en 2 onderste), dient op dezelfde positie worden
ingesteld (Afbeelding 1). Als deze niet op dezelfde positie staan, kan dit leiden
tot verkeerde uitlijning van het scharnier en de brace laten slippen.
2. Op beide schalen de knoppen indrukken en vervolgens verschuiven tot de
vereiste lengte (Afbeelding 2).
DE BRACE AANBRENGEN
3. Maak de middelste band los en plaats de brace onder het been van de patiënt
(Afbeelding 3). Stel het scharnier op de correcte positie in door de middelste
band en het vulstuk aan te passen.
4. De scharnieren worden in het midden geplaatst, halverwege de voor- en
achterzijde van de knie (Afbeelding 4).
5. Scharnieren en schalen lopen evenwijdig (Afbeelding 5).
6. Steek de band door de d-ring en bevestig de klittenbandsluiting op de band
(Afbeelding 3).
7. De middelste band dient zo stevige mogelijk aangespannen te worden zonder
hierbij de bloedcirculatie te hinderen. Pas de lengte van de band aan door de
scharnierarm en de d-ringen. Correcte bracepositie.
DE LENGTE AANPASSEN VAN DE SCHAALBAND
8. Lijn de kuitschalen uit zodat de scharnieren evenwijdig lopen met de tibia.
Bevestig band 1 (Afbeelding 5). Span de band aan, steek hem door de d-ring
en bevestig de klittenbandsluiting op de band.
9. Lijn de dijbeenschalen uit zodat deze evenwijdig lopen met het femur.
10. Maak nu banden 2, 3, en 4 (Afbeelding 5) vast op dezelfde manier.
11. Als de gewenste bandlengte is bereikt, kunt u de klittenbandbescherming
tussen de schaal en middelste band verwijderen (Afbeelding 6). Druk de band
vervolgens stevig tegen de klittenband om deze te bevestigen.
12. Als alle banden zijn vastgemaakt, kunt u de positie van de brace nogmaals
controleren en deze, indien nodig, aanpassen. Laat de banden op de
klittenband bevestigd aan de zijde van de schalen. De brace heeft nu de
correcte maat voor de patiënt. Het aantrekken en correct positioneren van de
brace kan vanaf nu eenvoudig gebeuren door de banden aan te spannen langs
de voorzijde.
BEWEGINGSBEREIK
13. Indrukken en op de gewenste extensiepositie instellen (Afbeelding 7).
14. Indrukken en op de gewenste flexiepositie instellen (Afbeelding 7).
15. Plaats de veervergrendelingen voor bewegingsbereik nadat u het
bewegingsbereik heeft ingesteld (Afbeelding 8).
16. Pas, indien nodig, de scharnieren aan.
OPMERKING: De vergrendeling voor bewegingsbereik mag niet gebruikt
worden op stand 105 graden.
REINIGING EN ONDERHOUD
Liners mogen in een handwasje met koud water worden gereinigd. Ophangen en
laten drogen.
GARANTIE
De post-operatieve braces van Össur zijn persoonlijke producten voor eenmalig
gebruik en zijn niet bedoeld voor langdurig gebruik. Onze producten vallen onder
de volgende garantiebepalingen m.b.t. fabricage en materiaalfouten; 30 dagen
op onderdelen die in aanraking komen met de huid (schuimrubber en banden)
en 90 dagen op de schalen en scharnieren. Aangezien we geen controle kunnen
uitoefenen op de wijze waarop zulke apparaten worden aangemeten, toegepast,
aangepast of gebruikt; is deze garantie niet van toepassing op producten die
verwaarloosd, misbruikt, verkeerd toegepast of niet correct aangemeten zijn.
Naast de bovenvermelde garantiebepalingen zijn geen andere garanties van kracht.
Page 15

15
PORTUGUÉS
ATENÇÃO
Este produto apenas deve ser utilizado sob supervisão de um profissional
de cuidados de saúde licenciado. Deve ter em atenção os conselhos do seu
profissional de cuidados de saúde quando utilizar este ou qualquer outro
dispositivo médico.
AJUSTAR O COMPRIMENTO DA JOELHEIRA
1. Todos os pares de estruturas (2 superiores e 2 inferiores) devem estar
ajustadas para a mesma altura (Figura 1). Se não for o caso, poderá causar
um desalinhamento da articulação e o deslizamento da joalheira.
2. Pressione os botões em todas as estruturas e deslize-as até obter o
comprimento necessário (Figura 2).
APLICAR A JOALHEIRA
3. Desaperte a correia intermédia e coloque a joalheira por debaixo da perna do
paciente (Figura 3). Obtenha a posição correcta da articulação ajustando a
correia intermédia e a almofada.
4. As articulações encontram-se centradas a meio entre a parte frontal e a parte
traseira do joelho (Figura 4).
5. As articulações e estruturas estão paralelas (Figura 5).
6. Passe a correia pelo anel em D e fixe a extremidade da fita de ganchos de volta
na correia de forma segura (Figura 3).
7. A correia intermédia deverá ser apertada o mais firmemente possível, sem
restringir a circulação. Ajuste o comprimento da correia através dos anéis em
D do braço da articulação Posição correcta da joalheira.
AJUSTE O COMPRIMENTO DA CORREIA DA ESTRUTURA
8. Alinhe as estruturas da barriga da perna de forma que as articulações fiquem
paralelas à tíbia. Segure a correia 1 (Figura 5). Puxe firmemente a correia,
passe-a através do anel em D e fixe a extremidade dos ganchos novamente à
correia.
9. Alinhe as estruturas da coxa de forma que fiquem paralelas com o fémur.
10. Fixe as correias 2, 3 e 4 (Figura 5) utilizando o mesmo procedimento.
11. Quando é alcançado o comprimento desejado da correia, remova a cobertura
dos ganchos na estrutura e na correia intermédia (Figura 6). Pressione a
correia contra o lado dos ganchos da fita e fixe.
12. Depois de as correias estarem seguras, verifique novamente a posição da
joalheira e ajuste-a, caso necessário. Deixe as correias fixas do lado dos
ganchos da fita, ao longo das estruturas. A joalheira tem agora o tamanho
indicado para o paciente. Assim, será muito fácil aplicar e ajustar o
posicionamento correcto em futuras utilizações, apertando as correias ao
longo da frente da posição da joalheira.
INTERVALO DE MOVIMENTO
13. Empurre e ajuste para a posição de extensão desejada (Figura 7).
14. Empurre e ajuste para a posição de flexão desejada (Figura 7).
15. Depois do Intervalo de Movimento estar ajustado, empurre os Fechos Molas
do Intervalo de Movimento para os devidos lugares (Figura 8).
16. Ajuste as articulações de ambos os lados.
NOTA: O Fecho do Intervalo de Movimento não deve ser utilizado a 105º
CUIDADOS E MANUTENÇÃO
Os revestimentos podem ser lavados à mão com água fria. Pendure para secar.
GARANTIA
Os produtos de apoio pós-operatório da Ossur são dispositivos descartáveis, de
utilização limitada e não tencionados para utilização a longo prazo. Garantimos
a qualidade dos nossos produtos contra defeitos de material e de fabrico nas
seguintes condições: 30 dias para as peças que têm contacto com a pele (espuma
e correias) e 90 dias para as estruturas e articulações. Visto não podermos
controlar a forma como estes dispositivos são adaptados, aplicados, ajustados ou
utilizados, esta garantia não se aplica aos dispositivos que foram negligenciados,
abusados, incorrectamente aplicados ou adaptados. Não há garantias, expressas
ou implícitas, que se estendam para além das garantias acima referidas.
Page 16

Össur Head Office
Grjothals 5
110 Reykjavik, Iceland
Tel: +354 515 1300
Fax: +354 515 1366
mail@ossur.com
www.ossur.com
Össur Americas
27051 Towne Centre Drive
Foothill Ranch, CA 92610
USA
Tel: +1 (949) 382 3883
Tel: +1 800 233 6263
Fax: +1 800 831 3160
ossurusa@ossur.com
Össur Canada
120-11231 Dyke Road
Richmond, BC
V7A OA1, Canada
Tel: +1 604 241 8152
Fax: +1 604 241 8153
Össur Europe
Ekkersrijt 4106-4114
P.O. Box 120
5690 AC Son en Breugel
The Netherlands
Tel: +800 3539 3668
Tel: +31 499 462840
Fax: +31 499 462841
info-europe@ossur.com
Össur Europe BV
Kundenservice Deutschland
Augustinusstrasse 11A
50226 Frechen
Deutschland
Tel: +49 (0) 2234 6039 102
Fax. +49 (0) 2234 6039 101
info-deutschland@ossur.com
Össur Nordic
P.O. Box 67
751 03 Uppsala, Sweden
Tel: +46 1818 2200
Fax: +46 1818 2218
info@ossur.com
Össur UK
Building 3000
Manchester Business Park
Aviator Way
Manchester M22 5TG, UK
Tel: +44 161 490 8500
Fax: +44 161 490 8501
ossuruk@ossur.com
Össur Iberia S.A.
Parque Europolis
Calle Edimburgo n°14
28232 Las Rozas(Madrid) Spain
Tel: +34 91 636 06 93
Fax: +34 91 637 21 43
ortesica@ossur.com
Össur Asia
上海虹梅路1801号W16B 棟2楼
邮政编号:200233
电话:+86 21 6127 1700
传真:+86 21 6127 1799
asia@ossur.com
Össur Asia-Pacific
2 Redbank Road
Northmead NSW 2152
Australia
Tel: +61 2 9630 9206
Fax: +61 2 9630 9268
info-asiapacific@ossur.com
www.ossur.com ©Copyright Össur 2010 IFU 0417 Rev.2
 Loading...