

Page 1
Instructions for use
Form Fit® Thumb Spica
Page 2

................................................................3
Instructions for use............................................5
EN
Gebrauchsanweisung.........................................7
DE
Guide de fabrication...........................................9
FR
Instrucciones para el uso...................................11
ES
IT
Istruzioni per l’uso.............................................13
NO
Bruksanvisning...................................................15
DA
Brugsanvisning...................................................17
SV
Bruksanvisning...................................................19
FI
Käyttöohjeet........................................................21
NL
Gebruiksaanwijzing............................................23
PT
Instruções de Utilização.....................................25
Page 3

EN- This product has been designed and tested based on single patient usage. It is a
single-use device and should never be used by multiple patients. If any problems occur
with the use of this product, immediately contact your medical professional.
DE- Zur Beachtung: Dieses Produkt ist für die Anwendung bei ein und demselben
Patienten vorgesehen und geprüft. Der Einsatz für mehrere Patienten wird nicht
empfohlen. Wenn beim Tragen dieses Produkts Probleme auftreten, sofort den Arzt
verständigen.
FR- Attention: Ce produit a été conçu et testé pour être utilisé par un patient unique et
n'est pas préconisé pour être utilisé par plusieurs patients. En cas de problème lors de
l'utilisation de ce produit, contactez immédiatement un professionnel de santé.
ES- Atención: Este producto se ha diseñado y probado para su uso en un paciente único
y no se recomienda para el uso de varios pacientes. En caso de que surja algún problema
con el uso este producto, póngase inmediatamente en contacto con su profesional
médico.
IT- Avvertenza: Questo prodotto è stato progettato e collaudato per essere utilizzato per
un singolo paziente e se ne sconsiglia l'impiego per più pazienti. In caso di problemi
durante l'utilizzo del prodotto, contattare immediatamente il medico di fiducia.
DA- Forsigtig: Dette produkt er beregnet og afprøvet til at blive brugt af én patient.
Det frarådes at bruge produktet til flere patienter. Kontakt din fysioterapeut eller læge, hvis
der opstår problemer i forbindelse med anvendelsen af dette produkt.
SV- Var försiktig: Produkten har utformats och testats baserat på användning av en enskild
patient och rekommenderas inte för användning av flera patienter. Om det skulle uppstå
problem vid användning av produkten ska du omedelbart kontakta din läkare.
NL- Opgelet: Dit product is ontworpen en getest voor eenmalig gebruik. Hergebruik van
dit product wordt afgeraden. Neem bij problemen met dit product contact op met uw
medische zorgverlener.
PT- Atenção: Este produto foi concebido e testado com base na utilização num único
doente e não está recomendado para utilização em múltiplos doentes. Caso ocorra algum
problema com a utilização deste produto, entre imediatamente em contacto com o seu
profissional de saúde.
Page 4
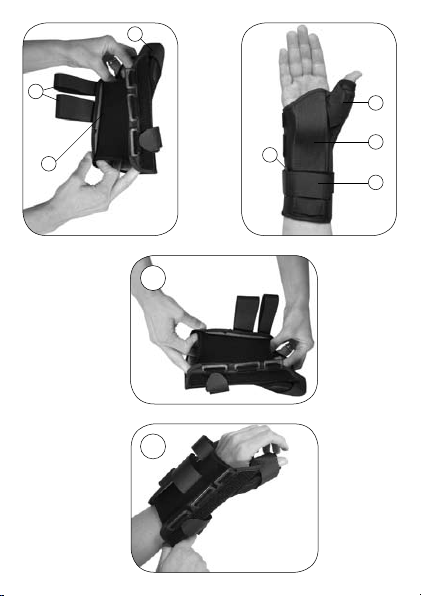
A
C
D
E
C
B
F
G
1
2
3
Page 5
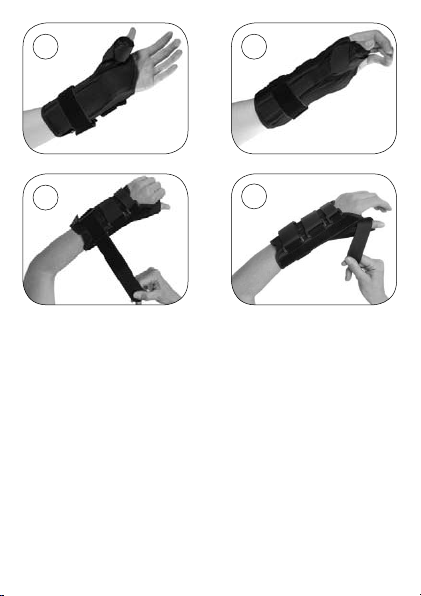
3
4
5
4
6
Page 6

ENGLISH
USES
Gameskeeper’s Thumb, selected scaphoid injuries, soft tissue
injuries, DeQuevain’s Tendinitis, and post cast healing.
CAUTION
Patients should be instructed to inspect their hand, wrist,
thumb, and product before and after each use.
PHOTO CAPTIONS
A. Thumb support
B. Circumferential strap d-ring
C. Stockinet
D. Contact closure straps
E. Thumb stay
F. Palmar stay
G. Circumferential strap
FITTING INSTRUCTIONS
1. Undo contact closure straps and circumferential strap.
2. Place hand into the spica and thumb into thumb support.
Ensure stockinet positions on top of the hand.
3. Align the palmar stay to the palm of the hand. Adjustments
on the aluminum palmer stay can be performed by a certified
medical professional.
4. Ensure the thumb stay is on the radial border of the forearm.
Adjustments on the aluminum thumb stay can be performed
by a certified medical professional.
5. Ensure that the adjustable circumferential strap
loops through both d-rings for added support. Fasten
circumferential strap.
6. Fasten all contact closure straps and secure to a snug fit.
Adjustments may be necessary as hand, wrist, and thumb
swelling patterns change. Straps may be cut as desired.
5
Page 7

HOT/COLD THERAPY
1. For cold therapy, remove gel pad from brace and place into
a freezer for approximately 20 minutes to 1 hour. To reduce
swelling, apply directly to the skin with hand elevated for 20
minutes.
2. For hot therapy, remove gel pad from brace and place in
microwave oven for 20 second intervals at low setting until
hot. Do not use oven or flame to heat the gel pad. Do not
apply heated gel pad directly to skin. If too hot, allow to cool
before applying.
3. Once gel pad is hot/cold, use contact closure tabs to adhere
it into the brace to continue therapy. Diabetics and patients
with vascular insuciencies must always consult a physician
before using hot/cold therapy.
WASHING INSTRUCTIONS
1. This product may be cleaned using a mild detergent and cold
water. Remove aluminum stays and gel pad before washing.
Do not use bleach or strong detergents. Do not wash in
washing machine.
2. Lay brace out flat on a towel and air dry. Do not squeeze or
wring out the brace. Do not place in dryer or near heater.
6
Page 8

DEUTSCH
INDIKATIONEN
Kollateralbandruptur, bestimmte Kahnbeinverletzungen,
Weichteilverletzungen, Sehnenscheidenentzündung, Heilung
nach Ablegen des Gipsverbands
VORSICHTSHINWEISE
Der Patient sollte angewiesen werden, die Hand, das
Handgelenk, den Daumen und das Produkt vor und nach dem
Tragen der Orthese zu kontrollieren.
BILDUNTERSCHRIFTEN
A. Daumenstütze
B. D-Ring des Umfangsriemens
C. Trikot
D. Klettbandverschlüsse
E. Daumenschiene
F. Handflächenschiene
G. Umfangsriemen
ANLEITUNG ZUM ANLEGEN
1. Klettbandverschlüsse und Umfangsriemen lösen.
2. Hand in Spica und Daumen in Daumenschiene stecken. Die
Trikots müssen sich über der Hand befinden.
3. Handflächenschiene mit der Handfläche ausrichten. Die
Ausrichtung der Aluminiumhandflächenschiene kann von
einem Mediziner vorgenommen werden.
4. Die Daumenschiene muss an der Außenseite des Unterarms
anliegen. Die Ausrichtung der Aluminium-Daumenschiene
kann von einem Mediziner vorgenommen werden.
5. Der einstellbare Umfassungsriemen muss durch beide
D-Ringe führen, um zusätzlichen Halt zu bieten. Den
Umfassungsriemen festziehen.
6. Alle Klettbandverschlüsse festziehen, so dass die Orthese
7
Page 9

fest anliegt. Wenn sich der Schwellungszustand von Hand,
Gelenk oder Daumen verändert, ist eventuell eine erneute
Korrektur erforderlich. Die Riemen können bei Bedarf
abgeschnitten werden.
WÄRME-/KÄLTETHERAPIE
1. Bei Anwendung zur Kältetherapie das Gelkissen aus der
Orthese herausnehmen und 20 Minuten bis 1 Stunde
lang in einen Gefrierschrank legen. Zum Reduzieren einer
Schwellung 20 Minuten lang direkt auf die Haut legen und
die Hand dabei anheben.
2. Bei Anwendung zur Wärmetherapie das Gelkissen aus der
Orthese herausnehmen und für jeweils 20 Sekunden in die
auf niedrige Leistung eingestellte Mikrowelle legen, bis es
ausreichend warm ist.
Das Gelkissen nicht im Backofen oder auf dem Herd
erwärmen. Das erwärmte Gelkissen nicht direkt auf die Haut
legen. Wenn es zu heiß ist, vorher abkühlen lassen.
3. Das erwärmte bzw. kalte Gelkissen mit dem Klettband
in der Orthese fixieren. Diabetiker und Patienten mit
Gefäßerkrankungen sollten immer Rücksprache mit
einem Arzt halten, bevor sie eine Wärme-/Kältetherapie
durchführen.
PFLEGEANLEITUNG
1. Dieses Produkt kann mit einem milden Reinigungsmittel und
30�C warmem Wasser gesäubert werden. Vor dem Waschen
die Aluminiumschienen und das Gelkissen entfernen. Keine
Bleichmittel oder starken Reinigungsmittel verwenden. Nicht
in der Waschmaschine waschen.
2. Die Orthese flach auf ein Handtuch legen und an der Luft
trocknen lassen. Nicht zusammenpressen oder auswringen.
Nicht in einen Wäschetrockner oder neben einen Heizkörper
legen.
8
Page 10

FRANÇAIS
USAGES
Entorse du skieur, certaines blessures du scaphoïde, blessures
des tissus mous, tendinite de DeQuevain et période de guérison
après retrait d’un plâtre.
PRÉCAUTIONS
Les patients doivent veiller à inspecter leur main, leur poignet,
leur pouce et le produit avant et après chaque utilisation.
LÉGENDES PHOTOS
A. Support de pouce
B. Anneau en D de sangle circonférentielle
C. Jersey tubulaire
D. Sangles de fermeture à contact
E. Renfort de pouce
F. Renfort palmaire
G. Sangle circonférentielle
INSTRUCTIONS DE POSE
1. Défaites les sangles de fermeture à contact et la sangle
circonférentielle.
2. Placez votre main dans le spica et votre pouce dans le
support prévu à cet eet. Assurez-vous que le jersey tubulaire
recouvre votre main jusqu’en haut.
3. Alignez le renfort palmaire en aluminium avec la paume de
votre main. Le réglage du renfort palmaire en aluminium doit
être eectué par un professionnel de santé agréé.
4. Assurez-vous que le renfort de pouce est aligné sur l’arête
radiale de votre avant-bras. Le réglage du renfort de pouce en
aluminium doit être eectué par un professionnel de santé
agréé.
5. Faites passer la sangle circonférentielle réglable dans
les anneaux en D de sorte qu’elle forme une boucle
9
Page 11

pour bénéficier d’un meilleur support. Serrez la sangle
circonférentielle.
6. Fixez toutes les sangles de fermeture à contact et serrez-les
confortablement. Des réglages peuvent être nécessaires au
fur et à mesure de l’évolution des œdèmes de la main, du
poignet et du pouce. Vous pouvez couper les sangles à la
longueur de votre choix.
THÉRAPIE À CHAUD/FROID
1. Pour la thérapie à froid, enlevez le Gel Pad de l’orthèse et
placez-le au congélateur de 20 minutes à une heure. Pour
réduire la tuméfaction, appliquez directement sur la peau
avec la main en l’air pendant 20 minutes.
2. Pour la thérapie à chaud, enlevez le Gel Pad de l’orthèse et
placez-le au micro-ondes à des intervalles de 20 secondes,
réglage faible, jusqu’à ce qu’il devienne chaud.
N’utilisez pas un four ou une flamme pour réchauer le Gel
Pad. N’appliquez pas le Gel Pad chaué directement sur
la peau. S’il est trop chaud, laissez-le refroidir avant toute
application.
3. Une fois le Gel Pad chaud/froid, utilisez les languettes de
fermeture à contact pour le faire adhérer à l’orthèse afin de
poursuivre la thérapie. Les diabétiques et patients sourant
d’insusances vasculaires doivent toujours consulter un
médecin avant d’utiliser la thérapie à chaud/froid.
INSTRUCTIONS DE LAVAGE
1. Ce produit peut être nettoyé avec un détergent doux et de
l’eau froide. Retirez les renforts en aluminium et le Gel Pad
avant le lavage. N’utilisez pas d’eau de Javel ni de détergents
forts. Ne lavez pas le produit en machine.
2. Faire sécher l’orthèse à plat sur une serviette, sans l’essorer.
N’écrasez pas et n’essorez pas l’orthèse. Ne placez pas le
produit dans un sèche-linge ou près d’un radiateur.
10
Page 12

ESPAÑOL
USOS
“Pulgar del guardabosques” (lesión del ligamento colateral ulnar),
determinadas lesiones del escafoides, lesiones de tejidos blandos,
tendinitis de DeQuevain y curación tras la retirada de la escayola.
PRECAUCIONES
Será necesario enseñar al paciente cómo examinarse la mano,
la muñeca y el pulgar, así como a revisar el producto antes y
después de cada uso.
LEYENDA DE FOTOGRAFÍAS
A. Soporte para el pulgar
B. Anilla en D de la cincha circular
C. Media elástica
D. Cinchas de cierre por contacto
E. Fijación del pulgar
F. Fijación palmar
G. Cincha circular
COLOCACIÓN
1. Desabroche las cinchas de cierre por contacto y la cincha
circular.
2. Coloque la mano en el soporte y el pulgar en el soporte
correspondiente. Asegúrese de que la media elástica se
encuentre en la antemano.
3. Alinee la fijación palmar con la palma de la mano. Los
ajustes de la fijación palmar de aluminio puede realizarlos un
profesional de la salud certificado para ello.
4. Asegúrese de que la fijación para el pulgar se encuentra en
el extremo radial del antebrazo. Los ajustes de la fijación de
aluminio para el pulgar puede realizarlos un profesional de la
salud certificado para ello.
5. Asegúrese de que la cincha circular ajustable pase por las dos
11
Page 13

anillas en D para un mayor soporte. Abroche la cincha circular.
6. Fije las cinchas de cierre por contacto ajustables y cerciórese
de que el ajuste le proporcione comodidad. Puede ser
necesario realizar ajustes debido a las modificaciones de los
patrones de hinchazón de la mano, la muñeca y el pulgar. Las
cinchas se pueden cortar a la longitud deseada.
TERAPIA FRÍO/CALOR
1. Para la terapia por frío, retire la almohadilla de gel del
soporte y colóquela en el congelador de 20 minutos a 1
hora aproximadamente. Para reducir la hinchazón, aplíquela
directamente sobre la piel durante 20 minutos con la mano
elevada.
2. Para la terapia por calor, retire la almohadilla de gel del soporte
y caliéntela en un horno microondas en intervalos de 20
segundos a baja potencia hasta que esté caliente. No use un
horno convencional ni una llama para calentar la almohadilla
de gel. No coloque la almohadilla de gel caliente directamente
sobre la piel. Si está demasiado caliente, déjala enfriar antes de
colocarla.
3. Cuando la almohadilla de gel esté fría/caliente, use las cintas
de cierre por contacto para adaptarla al soporte y siga con
la terapia. Los pacientes con diabetes y con insuficiencias
vasculares deben consultar siempre a un médico antes de usar
la terapia por frío/calor.
MANTENIMIENTO
1. Este producto puede limpiarse con un detergente suave y agua
fría. Retire las fijaciones de aluminio y la almohadilla de gel
antes de llevar a cabo la limpieza. No use lejía ni detergentes
fuertes. No lo lave en la lavadora.
2. Deje secar el soporte horizontalmente sobre una toalla y al
aire seco. No estruje ni escurra el soporte. No lo seque en la
secadora ni cerca de un calefactor.
12
Page 14

ITALIANO
INDICAZIONI
Pollice dello sciatore, lesioni allo scafoide, lesioni ai tessuti
molli, Tendinite di DeQuevain e fase riabilitativa post-gesso.
PRECAUZIONI D’IMPIEGO
I pazienti debbono essere istruiti su come esaminare mano,
polso, pollice e prodotto prima e dopo l’uso.
DIDASCALIE IMMAGINI
A. Supporto per il pollice
B. Anello a D per cinghia circonferenziale
C. Tessuto elasticizzato
D. Cinghie con chiusura a strappo
E. Supporto per il pollice
F. Supporto palmare
G. Cinghia circonferenziale
POSIZIONAMENTO
1. Slacciare le cinghie con chiusura a strappo e la cinghia
circonferenziale.
2. Poggiare la mano nella fasciatura a spica e il pollice
nell’apposito supporto. Assicurarsi che il tessuto
elasticizzato si trovi sulla parte superiore della mano.
3. Allineare il supporto palmare con il palmo della mano. La
regolazione del supporto palmare in alluminio può essere
svolta da un medico specialista.
4. Assicurarsi che il supporto per il pollice si trovi sul lato
radiale dell’avambraccio. La regolazione del supporto
per il pollice in alluminio può essere svolta da un medico
specialista.
5. Assicurarsi che la cinghia circonferenziale regolabile passi
attraverso entrambi gli anelli a D, in modo da garantire un
maggiore supporto. Fissare la cinghia circonferenziale.
13
Page 15

6. Fissare tutte le chiusure a strappo in modo che il tutore,
una volta indossato, risulti confortevole. Può rendersi
necessaria una successiva regolazione nel caso di variazione
del gonfiore della mano, del polso e del pollice. È possibile
tagliare le cinghie alla lunghezza desiderata.
TERAPIA CALDO/FREDDO
1. Per la terapia del freddo, rimuovere il cuscinetto in gel e
collocarlo nel congelatore per 20 minuti - 1 ora. Per ridurre
l’edema, applicarlo direttamente sulla pelle tenendo la mano
sollevata per 20 minuti.
2. Per la terapia del caldo, rimuovere il cuscinetto in gel, e
collocarlo nel forno a microonde, regolato su una bassa
potenza, ad intervalli di 20 secondi, finché raggiunge la
temperatura desiderata.
Non usare forni convenzionali o fiamme per riscaldare il
cuscinetto in gel. Non applicare il cuscinetto riscaldato
direttamente sulla pelle. Se è troppo caldo, attendere che si
rareddi prima di applicarlo.
3. Una volta che il cuscinetto è alla temperatura desiderata
(caldo/freddo), fissarlo sul tutore usando gli inserti con
chiusura a strappo, e proseguire la terapia. I pazienti
diabetici e/o con insucienze vascolari debbono sempre
consultare il medico di fiducia prima di utilizzare la terapia
del caldo/freddo
ISTRUZIONI PER IL LAVAGGIO
1. Pulire questo prodotto usando un detergente delicato
e acqua fredda. Rimuovere gli elementi in alluminio e il
cuscinetto gel prima del lavaggio. Non usare candeggina o
detergenti aggressivi. Non lavare in lavatrice.
2. Lasciare asciugare il tutore all’aria, orizzontalmente su
un asciugamano. Non strizzare né torcere il tutore. Non
collocare il prodotto in un’asciugatrice o vicino a stufe o
caloriferi.
14
Page 16

NORSK
ANVENDELSE
Skitommel, spesielle skafoidskader, mykvevsskader, de
Quervains-tendinitt og tilheling etter bruk av gips.
FORSIKTIG
Pasientene må instrueres i å undersøke hånden, håndleddet,
tommelen og produktet hver gang før og etter bruk.
BILLEDTEKSTER
A. Tommelstøtte
B. D-ring til omkretsrem
C. Trikot
D. Borrelåsremmer
E. Tommelavstiver
F. Håndflateavstiver
G. Omkretsrem
TILPASNINGSINSTRUKSJONER
1. Løsne borrelåsremmene og omkretsremmen.
2. Sett hånden i spicaen og tommelen i tommelstøtten. Pass på
at trikoten kommer oppå hånden.
3. Rett inn avstiverne etter håndflaten. Justering av avstiverne i
aluminium kan gjøres av autorisert, medisinsk personell.
4. Pass på at tommelstøtten kommer på den radiale kanten av
underarmen. Justering av tommelavstiverne i aluminium kan
gjøres av autorisert, medisinsk personell.
5. Pass på at den justerbare omkretsremmen går gjennom
begge d-ringene, for ekstra støtte. Fest omkretsremmen.
6. Fest alle borrelåsremmer slik at støtten sitter tett. Justeringer
kan være nødvendig etter som hevelser i hånd, håndledd og
tommel endrer seg. Remmene kan klippes til som ønsket.
VARME-/KULDETERAPI
15
Page 17

1. Ved kuldeterapi fjernes gelputen fra støtten og legges i
fryseren i omtrent 20 minutter til 1 time. Legg direkte på
huden med hånden hevet i 20 minutter for å redusere
hovenhet.
2. Ved varmeterapi fjernes gelputen fra støtten og varmes
i mikrobølgeovn med 20 sekunders intervaller ved lav
innstilling til den er varm. Ikke bruk komfyr eller åpen flamme
til å varme opp gelputen. Ikke legg den oppvarmede gelputen
rett på huden. Er den for varm, må den avkjøles før bruk.
3. Så snart gelputen har riktig temperatur, brukes
borrelåsklaene til å feste den i støtten for fortsatt terapi.
Diabetikere og pasienter med vaskulær insusiens må alltid
kontakte lege før bruk av varme-/kuldebehandling.
VASKEANVISNINGER
1. Dette produktet kan vaskes med et mildt rengjøringsmiddel
og kaldt vann. Ta ut aluminiumsavstiverne og gelputen
før vasking. Ikke bruk blekemiddel eller kraftig
rengjøringsmiddel. Må ikke vaskes i vaskemaskin.
2. Legg støtten flatt på et håndkle, og la den lufttørke. Ikke klem
eller vri vannet ut av bandasjen. Ikke bruk tørketrommel. Må
ikke legges nær varmeovn.
16
Page 18

DANSK
ANVENDELSE
Skier’s thumb, visse skader på bådbenet, skader på blødt
væv, de Quervains tendonitis og opheling efter fjernelse af
gipsbandager.
OBS!
Instruer patienterne til at undersøge hånden, håndleddet,
tommelfingeren og produktet før og efter hver anvendelse.
BILLEDTEKSTER
A. Tommelfingerstøtte
B. D-ring til yderbånd
C. Net
D. Lukkeremme
E. Tommelfingerstav
F. Håndfladestav
G. Yderbånd
JUSTERINGSVEJLEDNING
1. Løsn lukkerne og yderbåndet.
2. Placer hånden i Spica-støtten og tommelfingeren i
tommelfingerstøtten. Kontroller nettets positioner oven på
hånden.
3. Bring håndfladestaven på linje med håndfladen. Justeringer
af aluminiumsstaven til håndfladen kan udføres af en
fysioterapeut eller læge.
4. Kontroller, at tommelfingerstaven ligger på underarmens
radiale grænse. Justering af aluminiumsstaven til håndfladen
kan udføres af en fysioterapeut eller læge.
5. Kontroller, at det justerbare yderbånd føres gennem begge
D-ringe for at sikre ekstra støtte. Fastgør yderbåndet.
6. Fastspænd alle lukkeremme, og fastgør dem, så de slutter
tæt om hånden og håndleddet. Det kan blive nødvendigt
17
Page 19

at foretage justeringer, da hævelser af hånd, håndled og
tommelfinger kan ændre sig. Remmene kan afkortes efter
behov.
VARME-/KULDEBEHANDLING
1. For kuldebehandling: Fjern gelpuden fra rygstøtten, og læg
gelpuden i et fryseskab i ca. 20 minutter til 1 time. Gelpuden
anbringes dernæst direkte på huden i 20 minutter, mens
hånden holdes højt, for at reducere hævelsen.
2. For varmebehandling: Fjern gelpuden fra rygstøtten, og
læg gelpuden i mikrobølgeovnen. Opvarm gelpuden med
intervaller på 20 sekunder ved en lav indstilling, til den er
varm. Brug ikke ovnen eller åben ild til at opvarme gelpuden.
Anbring ikke den varme gelpude direkte på huden. Lad
gelpuden køle af, hvis den er for varm.
3. Fastgør gelpuden i skinnen ved hjælp af lukkeflapperne,
når gelpuden er varm/kold, for at fortsætte behandlingen.
Diabetikere og patienter med karsygdomme skal altid rådføre
sig med en læge, før de bruger varme-/kuldebehandling.
VASKEANVISNINGER
1. Dette produkt kan rengøres med et mildt rengøringsmiddel
og koldt vand. Fjern aluminiumsstavene og gelpuden inden
vask. Brug ikke blegemidler eller skrappe rengøringsmidler.
Vask ikke produktet i vaskemaskinen.
2. Læg produktet fladt på et håndklæde og lad det lufttørre.
Udøv ikke tryk på og vrid ikke produktet. Skinnen må ikke
tørres i tørretumbler eller i nærheden af et varmeapparat.
18
Page 20

SVENSKA
ANVÄNDNING
Skidåkartumme, vissa båtbensskador, mjukvävnadsskador, de
Quervains tendinit och läkning efter gips.
FÖRSIKTIGHET
Patienten ska uppmanas att undersöka sin hand, handled,
tumme och produkt före och efter varje användningstillfälle.
BILDER
A. Tumortos
B. Omslutande rem d-ring
C. Trikå
D. Fäste kardborremmar
E. Tumstöd
F. Handflatsstöd
G. Omslutande rem
TILLPROVNING
1. Lossa remmarna med kardborrfästen och den runtgående
remmen.
2. Placera handen i ortosen och placera tummen i tumhålet.
Kontrollera trikåns placering uppe på handen.
3. Justera handflatstödet efter handflatan. Justeringar på
handflatstödet i aluminium kan göras av en läkare.
4. Kontrollera att tumstödet är i den radiala kanten av
underarmen. Justeringar på tumstödet i aluminium kan göras
av en läkare.
5. Se till att den justerbara omkretsremmen löper genom båda
d-ringarna för ökat stöd. Fäst den runtgående remmen.
6. Fäst alla kardborremmar och säkra tills den sluter tätt
runt handen och handleden. Justeringar kan behövas när
svullnaden i handen, handleden och tummen varierar.
Remmarna kan kortas av efter behov.
19
Page 21

VÄRME-/KYLTERAPI
1. För kylterapi tas geldynan ur ortosen och placeras i frysen i
20 till 60 min. För att minska svullnaden placeras den direkt
på huden under 20 minuter, med handen placerad högt.
2. För värmeterapi tas geldynan ur ortosen och placeras i
mikrovågsugnen under 20-sekundersintervaller på låg eekt
tills den är varm. Använd inte ugnen eller öppen eld för att
värma geldynan. Placera inte den varma geldynan direkt på
huden. Om den är för varm måste den svalna innan den
placeras.
3. När geldynan är varm/kall används flikarna med
kardborrfäste för att fästa den i ortosen för att fortsätta
terapin. Diabetiker och patienter med otillräcklig cirkulation
(vaskulär insuciens) måste alltid kontakta en läkare innan
värme-/kylterapi används.
TVÄTTINSTRUKTIONER
1. Produkten kan rengöras med milt rengöringsmedel och kallt
vatten. Ta bort aluminiumstöden och geldynan innan den
tvättas. Använd inte blekmedel eller starka rengöringsmedel.
Tvätta inte i tvättmaskin.
2. Lägg ut skenan plant på en handduk och lufttorka. Krama
eller vrid inte ur ortosen. Placera inte i torktumlare eller i
närheten av element.
20
Page 22

SUOMI
KÄYTTÖAIHEET
Hiihtäjän peukalo, ranteen veneluun tietyt vammat,
pehmytkudosvammat, de Quervainin jännetuppitulehdus ja
kipsin poistamisen jälkeinen hoito.
HUOMAUTUS
Potilasta tulee neuvoa tarkastamaan käden, ranteen ja peukalon
sekä ortoosin kunto aina ennen ortoosin käyttöä ja käytön
jälkeen.
KUVATEKSTIT
A. Peukalolenkki
B. Rannehihnan d-rengas
C. Suojaneulos
D. Tarrakiinnityshihna
E. Peukalotuki
F. Kämmentuki
G. Rannehihna
ORTOOSIN PUKEMINEN
1. Avaa tarrakiinnityshihnat ja rannehihna.
2. Aseta käsi ortoosiin ja työnnä peukalo peukalolenkin läpi.
Varmista, että suojaneulos on kämmenselän puolella.
3. Kohdista kämmentuki kämmeneen. Vain valtuutetut
hoitoalan ammattilaiset saavat säätää alumiinista
kämmentukea.
4. Varmista, että peukalotuki on kyynärvarren radiaalisella
sivulla. Vain valtuutetut hoitoalan ammattilaiset saavat
säätää alumiinista peukalotukea.
5. Varmista, että säädettävä rannehihna kulkee lisätuen
takaamiseksi molempien d-renkaiden läpi. Kiinnitä
rannehihna.
6. Kiinnitä tarrakiinnityshihnat ja kiristä ne tiukkaan. Ortoosin
21
Page 23

säätäminen saattaa olla tarpeen, koska käden, ranteen ja
peukalon turvotus voi vaihdella. Hihnoja voi tarvittaessa
lyhentää leikkaamalla.
KUUMA-/KYLMÄHOITO
1. Jos käytät kylmähoitoa, irrota geelityyny ortoosista ja pidä
sitä ennen käyttöä pakastimessa 20 minuutista 1 tuntiin.
Voit vähentää turvotusta pitämällä geelityynyä 20 minuuttia
suoraan iholla käden ollessa nostettuna ylös.
2. Jos käytät kuumahoitoa, irrota geelityyny ortoosista ja
lämmitä sitä ennen käyttöä mikroaaltouunissa alhaisella
teholla 20 sekunnin jaksoissa, kunnes se on kuuma. Älä
lämmitä geelityynyä uunissa tai avotulella. Älä aseta kuumaa
geelityynyä suoraan iholle. Jos tyyny on liian kuuma, anna sen
jäähtyä hieman ennen käyttöä.
3. Kun geelityyny on kuuma/kylmä, kiinnitä se painonapeilla
ortoosiin ja pue ortoosi päälle. Potilaiden, joilla on diabetes
tai verisuonioireita, tulee aina neuvotella lääkärin kanssa
ennen kuuma-/kylmähoidon aloittamista.
PUHDISTUSOHJEET
1. Tuotteen voi puhdistaa kylmällä vedellä ja miedolla
pesuaineella. Irrota alumiinituet ja geelityyny ennen
puhdistamista. Älä käytä puhdistamiseen valkaisuaineita tai
vahvoja pesuaineita. Tuote ei kestä konepesua.
2. Levitä ortoosi auki pyyheliinan päälle ja anna sen
ilmakuivua. Älä purista tai väännä ortoosia kuivaksi. Älä laita
kuivausrumpuun tai lämmönlähteen lähelle.
22
Page 24

NEDERLANDS
INDICATIES
Ruptuur van het ulnair collateraal ligament van de duim,
bepaalde scaphoïde letsels, letsels aan zachte weefsels, De
Quervain tendinitis, na gipsbehandeling.
LET OP
Instrueer de patiënt zijn/haar hand, pols, duim en het product
te inspecteren voor en na elk gebruik.
FOTOBIJSCHRIFTEN
A. Duimsteun
B. D-ring voor polsband
C. Stockinette
D. Sluiting
E. Duimbalein
F. Palmaire balein
G. Polsband
AANLEGINSTRUCTIES
1. Maak de sluitingen en de polsband los.
2. Leg uw hand in de spica en steek uw duim door de opening.
Zorg ervoor dat de stockinette zich op de bovenzijde van de
hand bevindt.
3. Lijn de palmaire balein uit met de handpalm. De palmaire
balein van aluminium kan worden versteld door een erkende
medische zorgverlener.
4. Zorg ervoor dat de duimbalein zich aan de radiale kant
(spaakbeen) van de onderarm bevindt. De duimbalein van
aluminium kan worden versteld door een erkende medische
zorgverlener.
5. De verstelbare polsband moet door beide D-ringen gehaald
worden voor een betere ondersteuning. Bevestig de
23
Page 25

polsband.
6. Maak alle sluitbanden stevig vast. Mogelijk moeten er
aanpassingen worden gedaan als het zwelpatroon van de
hand, pols en duim verandert. De banden kunnen naar
believen afgeknipt worden.
WARMTE- OF KOUDEBEHANDELING
1. Voor koudebehandeling: verwijder de gelpad uit de brace
en plaats deze ongeveer 20 minuten tot 1 uur in de vriezer.
Plaats de gelpad vervolgens 20 minuten direct op de huid
om de zwelling te verminderen. Leg daarbij uw hand hoog.
2. Voor warmtebehandeling: verwijder de gelpad uit de brace
en plaats deze in de magnetron. Verwarm de gelpad steeds
20 seconden bij een laag vermogen tot deze de gewenste
temperatuur bereikt heeft.Gebruik geen oven of vuur om de
gelpad te verwarmen. Breng de warme gelpad niet direct op
de huid aan. Laat de gelpad afkoelen als deze nog te heet is
om aan te brengen.
3. Zodra de gelpad warm/koud is, gebruikt u de sluitlipjes
om de gelpad in de brace te bevestigen en de behandeling
voort te zetten. Diabetici en patiënten met vaatproblemen
moeten altijd een arts raadplegen voordat zij warmte- of
koudetherapie toepassen.
WASINSTRUCTIES
1. Dit product mag worden gereinigd met een mild
reinigingsmiddel en koud water. Verwijder de aluminium
baleinen en de gelpad voor het wassen. Gebruik geen
bleekmiddel of agressieve reinigingsmiddelen. Niet in de
wasmachine wassen.
2. Leg de brace plat op een handdoek en laat deze aan de lucht
drogen.Niet in de brace knijpen of deze uitwringen. Niet in
de droger of vlakbij een verwarming plaatsen.
24
Page 26

PORTUGUÊS
INDICAÇÕES
Polegar de Gameskeeper, lesões seleccionadas do escafóide,
lesões de tecido moles, Tendinite de De Quervain e
consolidação pós-aplicação de gesso.
ATENÇÃO
Os doentes devem ser instruídos no sentido de observarem
a mão, punho, polegar e produto antes e depois de cada
utilização.
LEGENDA DAS FOTOGRAFIAS
A. Apoio para o polegar
B. Anilha D da correia circunferencial
C. Stockinette
D. Correias com fecho por contacto
E. Descanso para o polegar
F. Apoio para a palma da mão
G. Correia circunferencial
INSTRUÇÕES PARA AJUSTE
1. Desaperte as correias com fecho por contacto e a correia
circunferencial.
2. Coloque a mão na espiga e coloque o polegar no apoio para
o polegar. Assegure-se de que a stockinette está posicionada
no cimo da mão.
3. Alinhe o apoio para a palma da mão com a palma da mão.
Os ajustes do apoio para a palma da mão em alumínio
podem ser feitos por um profissional médico qualificado.
4. Assegure-se de que o descanso para o polegar se encontra
na margem radial do antebraço. Os ajustes ao apoio para o
polegar em alumínio podem ser feitos por um profissional
médico qualificado.
5. Assegure-se de que a correia circunferencial ajustável passa
25
Page 27

pelas duas anilhas D, para maior apoio. Aperte a correia
circunferencial.
6. Aperte todas as correias com fecho por contacto e aperte
bem. Podem ser necessários ajustes à medida que os
padrões de tumefacção da mão, punho e polegar se alterem.
As correias podem ser cortadas conforme desejado.
TERAPIA PELO CALOR/FRIO
1. Para a terapia pelo frio, retire a almofada de gel do suporte
e coloque num congelador durante aproximadamente
20 minutos a 1 hora. Para reduzir a tumefacção, aplique
directamente na pele com a mão elevada durante 20
minutos.
2. Para a terapia pelo calor, retire a almofada de gel do suporte
e coloque num forno microondas durante intervalos de 20
segundos, numa potência baixa, até ficar quente. Não use
um forno nem chama para aquecer a almofada de gel. Não
aplique a almofada de gel aquecida directamente na pele. Se
estiver demasiado quente, deixe arrefecer antes de aplicar.
3. Depois da almofada de gel estar quente/fria, use as abas de
fecho por contacto para prendê-la no suporte para continuar
a terapia. Os doentes diabéticos ou que apresentem
insuficiências vasculares devem sempre consultar um
médico antes de usar a terapia pelo calor/frio.
INSTRUÇÕES DE LAVAGEM
1. Este produto pode ser limpo utilizando um detergente suave
e água fria. Retire os suportes de alumínio e a almofada
de gel antes de lavar. Não utilize lixívia nem detergentes
agressivos. Não lave à máquina.
2. Estenda horizontalmente o suporte numa toalha e seque-o
ao ar. Não esprema nem torça. Não seque à máquina nem
coloque próximo de um aquecedor.
26
Page 28

Form Fit® Thumb Spica is covered by one or more of the following patents. Other U.S. and foreign
patents pending. ® indicates trademark registration in
U.S.A. and selected countries only.
EP: 690703
USA: 5,695,452
Page 29

Ossur Americas
27412 Aliso Viejo Pkwy
Aliso Viejo, CA 92656, USA
Tel: +800 233 6263
Fax +1 949 362 3888
ossurusa@ossur.com
Sports Medicine & Extremity
Tel: +800 222 4284
Fax: +800 453 4567
Trauma & Spine
Tel: +800 257 8440
Fax: +856 848 0531
Podiatry & Retail
Tel: +800 521 0601
Fax: +800 284 4356
Ossur Canada
120-11231 Dyke Road
Richmond, BC
V7A OA1, Canada
Tel: +1 604 241 8152
Fax: +1 604 241 8153
Ossur Europe
Ekkersrijt 4106-4114
P.O. Box 120
5690 AC Son en Breugel
The Netherlands
Tel: +800 3539 3668
Tel: +31 499 462840
Fax: +31 499 462841
saleseurope@ossur.com
Ossur Head Office
Grjothals 5
110 Reykjavik, Iceland
Tel: +354 515 1300
Fax: +354 515 1366
mail@ossur.com
Ossur Germany
Kundenservice Deutschland
Römerfeldstraße 2
50259 Pulheim, Germany
Tel: +49 2238 30 58 50
Fax. +49 2238 30 58 01
info-deutschland@ossur.com
Ossur Nordic
P.O. Box 67
751 03 Uppsala, Sweden
Tel: +46 1818 2200
Fax: +46 1818 2218
info@ossur.com
Ossur UK
Building 3000
Manchester Business Park
Aviator Way
Manchester M22 5TG, UK
Tel: +44 161 490 8500
Fax: +44 161 490 8501
ossuruk@ossur.com
Ossur Asia
上海虹梅路1801号W16B 棟2楼
邮政编号:200233
电话:+86 21 6127 1700
传真:+89 21 6127 1799
asia@ossur.com
Ossur Asia-Pacific
2 Redbank Road
Northmead NSW 2152
Australia
Tel: +61 2 9630 9206
Fax: +61 2 9630 9268
info-asiapacific@ossur.com
www.ossur.com ©Copyright, Ossur, 2009 IFU 0283 Rev. 4
 Loading...