

Page 1
LED340
www.sylvania.com/SIGNAGE
BoxLED® Plus DS (Double Side)
BX12BA-W4F
Signage Lighting System
INSTALLATION GUIDE
WARNING: ONLY QUALIFIED PERSONNEL SHOULD PERFORM INSTALLATION
TO AVOID ELECTRICAL SHOCK OR COMPONENT DAMAGE, DISCONNECT POWER BEFORE
PERFORMING INSTALLATION OF THE POWER SUPPLIES, MODULES, AND/OR RGB CONTROLLERS.
Failure to install the power supplies and/or LED modules in accordance with the National Electric Code (NEC), all
applicable Federal, State, and local electric codes as well as the specific Underwriters Laboratories (UL) safety
standards for the installation, location and application may cause serious personal injury, death, property damage
and/or product malfunction.
These instructions are guidelines for installation of LED modules and power supplies. Installation requirements may
vary depending on the application. Licensed electricians should provide all installation services for connection for
both primary and secondary (input/output) of the power supplies.
1.0 PREPARE FOR INSTALLATION
1.1 Tools Required:
- Wire stripper/cutter
- Screwdriver
- Measuring tape
1.2 Supplies Required:
- PLTC cable
- Wire nuts/connectors
- #8 screws or rivets
- Accessory Mounting Track and Brackets
1.3 Carefully remove existing neon or fluorescent tubes, HID or incandescent light sources and power
supplies and/or ballasts if necessary.
1.3.1 Make sure power is turned off.
a. Where applicable, determine if a disconnect switch needs to be installed (may be
integral with existing power supply/transformer).
1.3.2 Remove all existing screws, sockets and wiring.
1.3.3 Dispose of all old sign components in the proper manner.
1.3.4 Repair and seal any unused openings in the sign enclosure. Openings greater than ½”
diameter require a metal patch secured by screws or rivets and caulked with nonhardening caulk. Smaller openings may be sealed with non-hardening caulk.
1.3.5 Clean the inside of the sign to make sure it is free of dirt.
Page 2
3
2.0 MECHANICAL INSTRUCTIONS
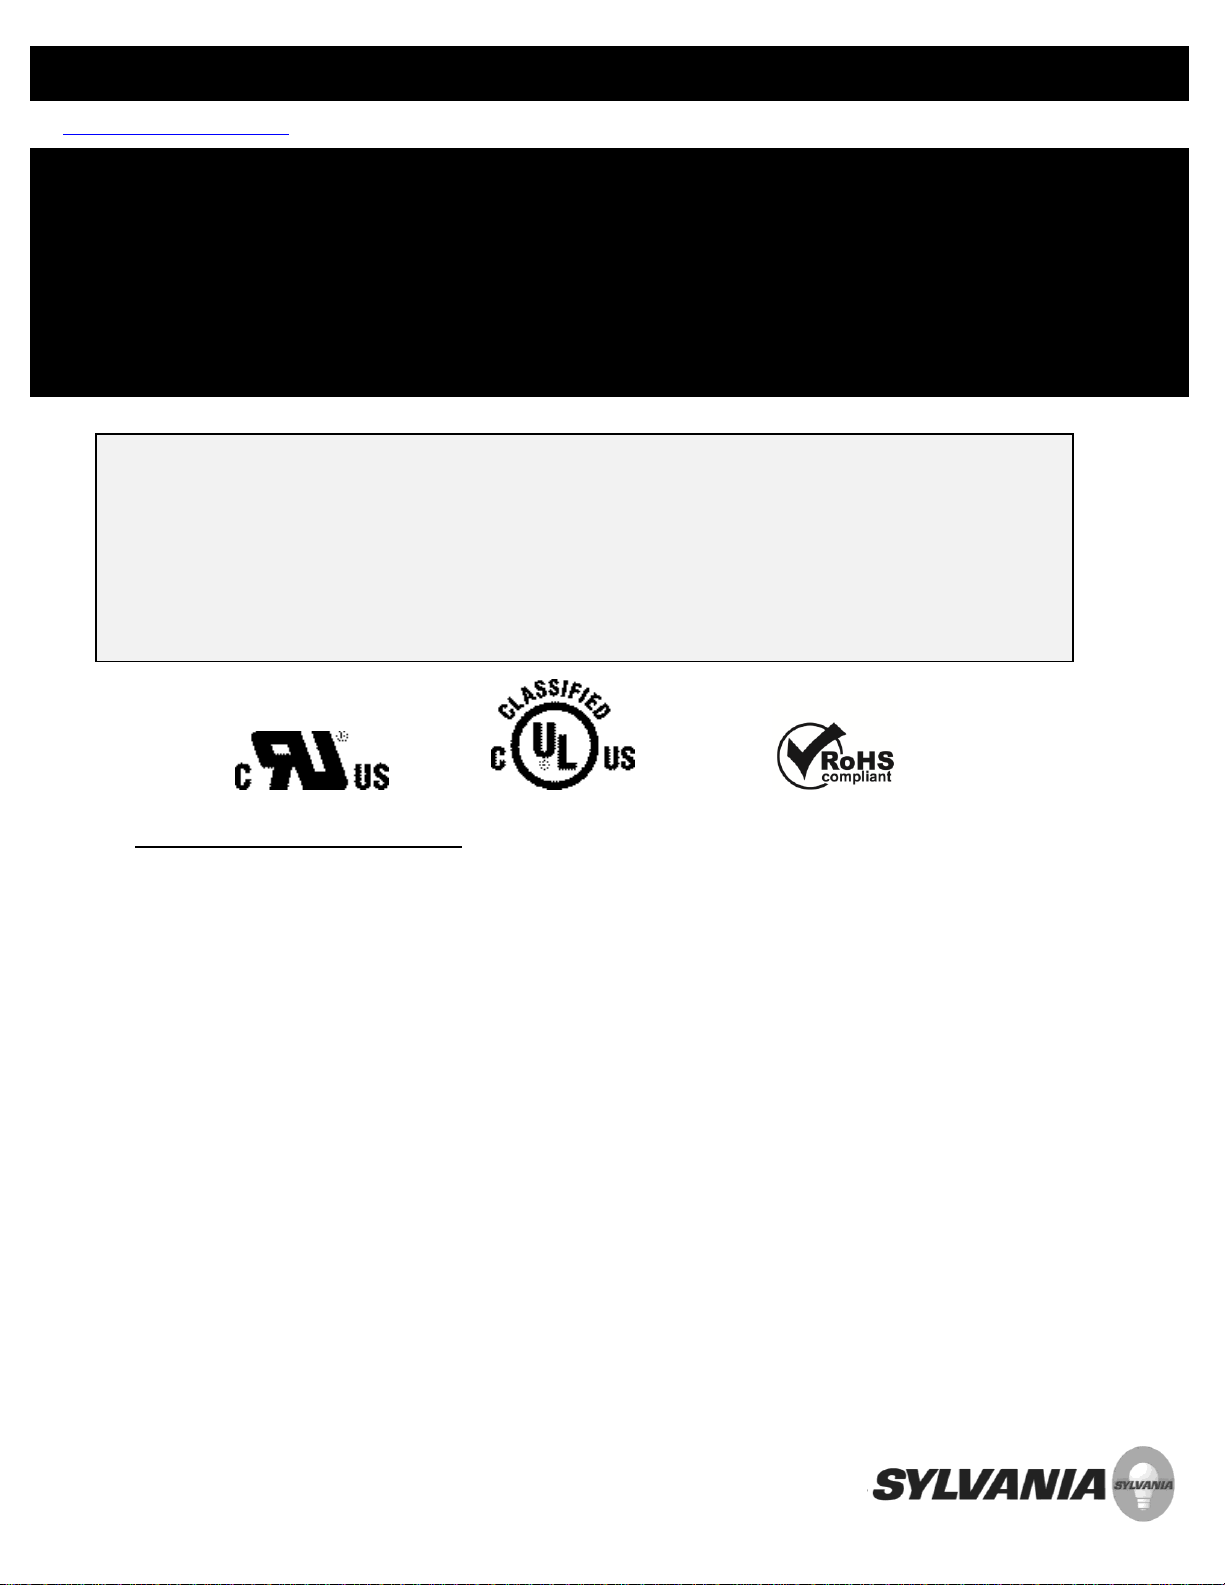
2.2 Measure inside cabinet dimensions
2.1 Refer to desired module layout
2.3 Required track lengths
Page 3
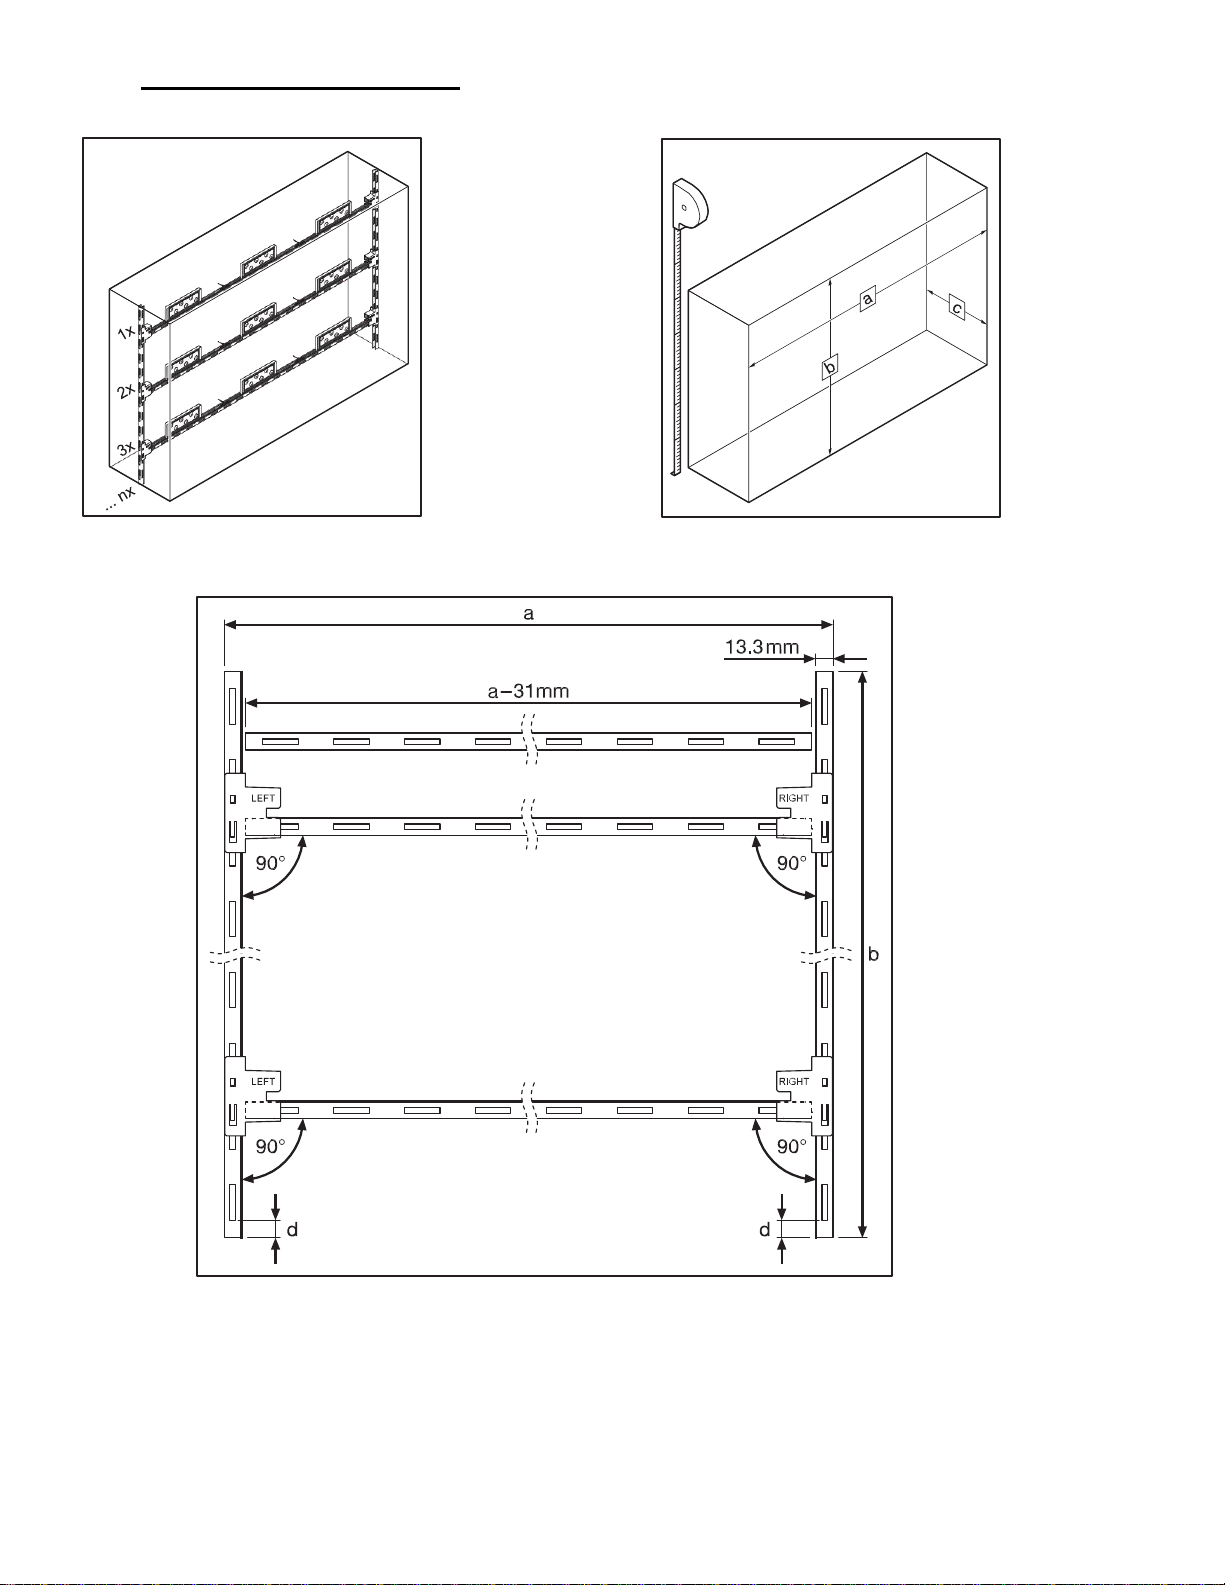
2.4 Cut the two “b” track segments to
length – be certain the dimension “d” on
both track pieces is the same to ensure
the tracks are parallel in the case
2.5 Attach the two “b” track segments to
the sides of the case
Page 4

2.6 Examples of module spacing
Page 5

2.7a Insert BoxLED Plus DS modules into
the required number of “a” track pieces –
referring to step 2.6 for layout options
2.7b Insert one end of the module into
the track and push down on the opposite
end until it clicks into place
2.8 Loop any excess wire around the
track in-between the modules and tie
wrap it into place
Page 6

2.9 Slide the Left and Right mounting
brackets onto the corresponding ends of
each of the “a” track segments
2.10 Slide the assembly into the desired
mounting holes in the “b” track segments
and push down on the left and right
brackets so they click into place
Page 7

VAC into Disconnect Switch
Optional
Disconnect
Switch
VAC out from
Disconnect Switch
3.0 ELECTRICAL INSTRUCTIONS
3.0 Use wire nuts or connectors to connect the white and red (+) input wire of the
modules to the red (+) output wires of the 24V power supply. Connect the black and
white (-) input wire of the modules to the blue (-) output wire of the 24V power supply
(see Figure 11).
3.1 Cap off any unused connection wires when finished.
3.2 Make sure AC line is OFF before beginning power supply installation. Secure power
supply to clean metal surface using screws (see Figure 12).
Figure 11 Figure 12
3.3 OPTIONAL AC DISCONNECT SWITCH INSTALLATION: Connect disconnect switch in
line with VAC line (black wire) (see Figure 13).
3.4 Finish power supply AC connection by connecting black VAC line to black input cord of power
supply, and white neutral to white input cord of power supply. Connect green ground wire from line to
the same metal surface the power supply is mounted on (see Figure 14).
Figure 13 Figure 14
Page 8

3.5 Power Supply Information:
Item
Number
Ordering Description
Power
Supply
Wattage
Input
Voltage
(VAC)
Input
Current
(A)
Output
Voltage (V)
51514
OT75W/24V/UNV
75W
120/277
0.76/0.33
24
51522
OT96W/12V/UNV
96W
120/277
0.97/0.39
24
Item Number
Ordering Abbreviation
Max. Modules per
Power Supply
51514
OT75W/24V/UNV
7
51522
OT96W/12V/UNV
9
Problem
Possible Cause
Corrective Action
Entire sign does
not light
No input power
Check AC connection to power supply.
Entire sign/one or
more LED runs do
not light
No power to LED
modules
Check power supply connection to modules.
Check DC polarity- power supply red output wires must be connected to
red striped module wires, power supply blue output wires must be
connected to black striped module wires.
Verify power supply output voltage is 24V.
Part of an LED run
does not light
No power to that
run
Check module to module connection for correct polarity.
One module does
not light
Module has been
damaged
Replace the module. Observe correct polarity.
Specifications subject to change without notice
OSRAM, BoxLED, and OPTOTRONIC are registered trademarks of OSRAM GmbH
SYLVANIA is a registered trademark of OSRAM SYLVANIA Inc.
© 2013 OSRAM SYLVANIA Inc. 01/14
Table 1 – Power Supply Information
Table 2 – Max. Number of Modules per Power Supply
4.0 Troubleshooting Guide
 Loading...