

Page 1
www.osram.com
OSRAM GmbH
Berliner Allee 65
86153 Augsburg
Germany
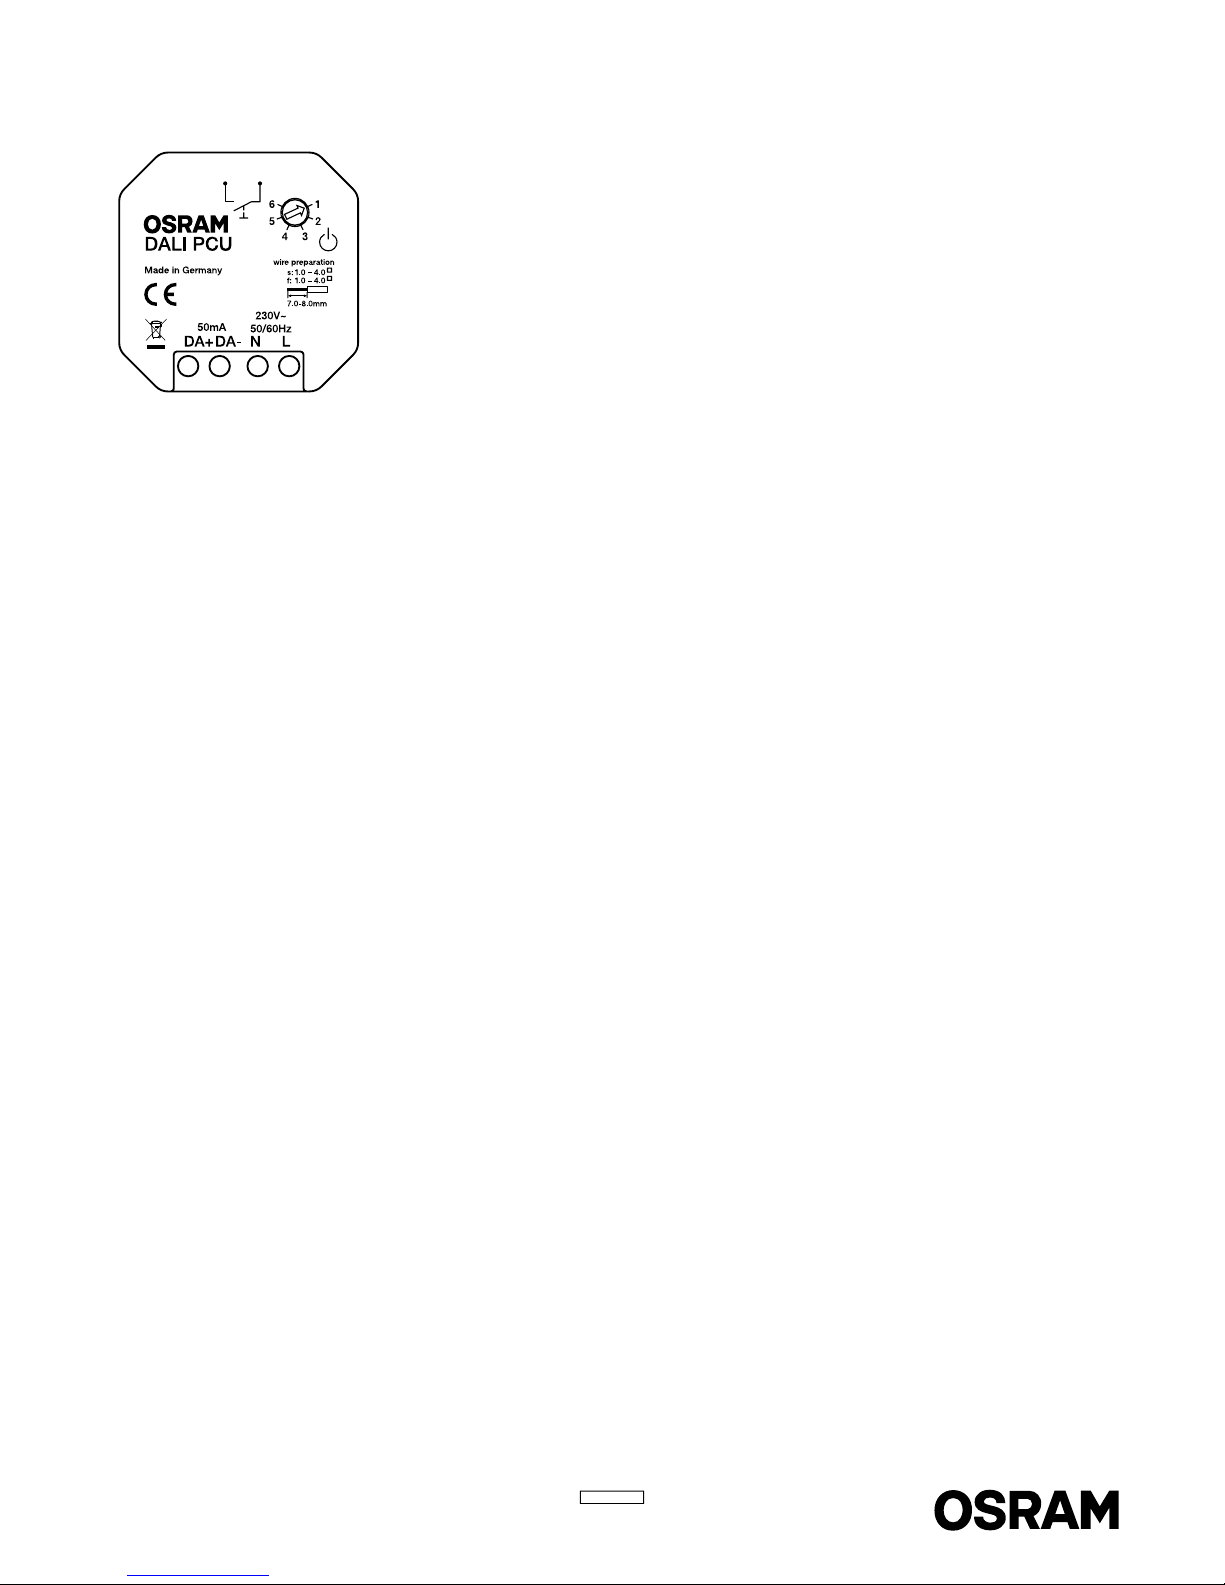
DALI PCU
G1504424 0
C1049 2720
05 .06 .18
Operating instructions . . . . . . 02
Bedienungsanleitung . . . . . . . 03
Mode d’emploi . . . . . . . . 04
Istruzioni per l‘uso . . . . . . . 05
Instrucciones de uso . . . . . . . 06
Gebruiksaanwijzing . . . . . . . 07
Driftsinstruktioner . . . . . . . . 08
Käyttöohjeet . . . . . . . . . 09
Veiledning ang. betjening . . . . . . 10
Brugsanvisning . . . . . . . . 11
Návod pro obsluhu . . . . . . . 12
Instrukcja obsługi . . . . . . . . 13
Návod na použitie . . . . . . . 14
Navodila za uporabo . . . . . . . 15
Page 2

www.osram.com
OSRAM GmbH
Berliner Allee 65
86153 Augsburg
Germany
2
Operating instructions DALI PCU
Application and function
The DALI PCU converts manual operations of a common external push to make button into corresponding DALI commands and allows
manual control of DALI fixtures. The DALI PCU can be directly supplied out of the DALI control wire (=passive operation) or source the
necessary supply current by itself, if it is connected to mains voltage (=active operation). By a parallel connection of several DALI PCU
the number of points of operation respectively the number of controllable DALI ECG can be increased easily. If several DALI PCU are
connected in parallel, the commands of the last operated DALI PCU are valid, all other PCU also listen to this commands. Therefore a
change of the point of operation is possible at any time without disturbing side effects like a jump in brightness.
Buildup of several points of operation
Up to 4 DALI PCU can be interconnected, in doing so the correct polarity of the DALI control wires has to be respected. Each mains
powered DALI PCU (= active DALI PCU) is able to supply up to 25 DALI ECG and an additional DALI PCU that is not connected to mains
(=passive DALI PCU). At least one active DALI PCU is required.
By that following systems sizes are possible:
• One active DALI PCU: up to 25 DALI ECG and one passive DALI PCU connectible.
• Two active DALI PCU: up to 50 DALI ECG and two passive DALI PCU connectible.
• Three active DALI PCU: up to 75 DALI ECG and one passive DALI PCU connectible.
• Four active DALI PCU: up to 100 DALI ECG connectible.
Commissioning
Adjusting minimal brightness level (optional)
Hint: In rotary position 6, the adjustment of minimal brightness is locked.
If necessary the dimming range of the DALI PCU can be restricted at the lower end respectively adjusted to the dimming range of the
connected ECG as described below.
1. Switch off the lighting via a short push to the external push button of the DALI PCU.
2. Press the push button and keep it pressed until the lighting starts to blink after approx. 20s, after that, release the button.
3. Set the desired minimal brightness by long presses to the push button (Dimming direction changes with every button press)
4. Store the minimal brightness level by two subsequent short presses to the push button (= double click).
If no brightness level is stored, the procedure is terminated automatically after 60s and the old setting is maintained.
Reset of minimal brightness level and resetting of connected DALI ECG
Hint: In rotary position 6, the adjustment of minimal brightness is locked.
1. Switch off the lighting via a short push to the external push button of the DALI PCU.
2. Press the push button and keep it pressed until the lighting starts to blink after approx. 20s (all connected ECG are set to ex-factory
settings by a DALI RESET command), after that release the button.
3. After the light stops blinking, store the brightness level by two subsequent short presses to the push button (= double click).
Configure behavior after mains interruption (optional)
Via the integrated rotary switch the behavior after mains interruption can set. For a proper function apply the same setting to all interconnected DALI PCU. Changed settings require a mains interruption before getting valid.
Setting 1 (not recommended in combination with motion detectors): Light will go the state before mains interruption
Setting 2: Light remains off
Setting 3: Light will switch on with the memory value stored by double click.
Setting 4: Light will switch on at 50% brightness
Setting 5: Light will switch on at 100% brightness
Setting 6: Light level according the DALI POWER ON LEVEL stored in the ECG, this level can be set individually for each ECG by a cor-
responding programming tool, e.g. DALI MAGIC from OSRAM (ex. Factory setting 100%).
Operation
Switch the lighting ON and OFF: Make a short press to the push button
Increase / decrease light level: Make a long press to the push button, dimming direction changes with every button press.
Storing a fixed switch on level (= Memory-value):
• Switch on the lighting and dim to the desired level
• Push the button briefly two times (=double click). Storage of the switch on level is confirmed by a two times blinking.
Delete fixed switched on level:
• Switch off the lighting.
• Push the button briefly two times (=double click). Deletion of the switch on level is confirmed by a switch on to 100%.
Page 3

www.osram.com
OSRAM GmbH
Berliner Allee 65
86153 Augsburg
Germany
3
Bedienungsanleitung DALI PCU
Anwendung und Funktion
Das DALI PCU setzt Betätigungen eines externen Tasters mit Schließerkontakt handelsüblicher Schalterprogramme in DALI Kommandos um und ermöglicht so die manuelle Bedienung von Leuchten mit DALI Schnittstelle. Das DALI PCU kann direkt aus der DALI
Steuerleitung versorgt werden (= passiver Betrieb) oder selbst den notwendigen Steuerstrom liefern, wenn es an Netzspannung angeschlossen wird (= aktiver Betrieb). Durch Parallelschaltung mehrerer DALI PCU lässt sich die Anzahl der Bedienstellen bzw. die Anzahl
der ansteuerbaren Leuchten auf einfache Weise erhöhen. Werden mehrere DALI PCU parallel geschaltet, gelten die Kommandos des
zuletzt betätigten PCU, alle anderen DALI PCU empfangen diese Kommandos ebenfalls. Ein Wechsel der Bedienstelle ist daher jederzeit
ohne störende Nebeneffekte wie z.B. Lichtwertsprünge möglich.
Aufbau mehrerer Bedienstellen
Bis zu 4 DALI PCU können miteinander verbunden werden, dabei ist auf die richtige Polung der DALI Steuerleitung zu achten. Jedes
netzversorgte DALI PCU (=aktives DALI PCU) kann 25 DALI EVG und ein weiteres nicht an Netzspannung angeschlossenes DALI PCU
(=Passives DALI PCU) versorgen. Es ist mindestens ein aktives DALI PCU erforderlich.
Damit ergeben sich folgende Systemgrößen:
• Ein aktives DALI PCU: bis zu 25 DALI EVG und ein passives DALI PCU anschließbar.
• Zwei aktive DALI PCU: bis zu 50 DALI EVG und zwei passive DALI PCU anschließbar.
• Drei aktive DALI PCU: bis zu 75 DALI EVG und ein passives DALI PCU anschließbar.
• Vier aktive DALI PCU: bis zu 100 DALI EVG anschließbar.
Inbetriebnahme
Einstellen der minimalen Grundhelligkeit (optional)
Der Dimmbereich des DALI PCU kann wie nachfolgend beschrieben bei Bedarf nach unten begrenzt bzw. an den Dimmbereich der
angeschlossen EVG angepasst werden.
Hinweis: bei Drehschaltereinstellung 6 ist die Einstellung der Grundhelligkeit gesperrt.
1. Beleuchtung per Kurzdruck auf den externen Taster des DALI PCU ausschalten.
2. Taster betätigen und gedrückt halten bis die Beleuchtung nach ca. 20s zu Blinken beginnt, danach Taster loslassen.
3. Über Langdruck die gewünschte Minimalhelligkeit einstellen (Dimmrichtung wechselt mit jedem Langdruck)
4. Eingestellte Minimalhelligkeit durch zwei aufeinanderfolgende Kurzdrucke auf den Taster (= Doppelklick) speichern.
Wird kein Wert gespeichert, endet die Einstellprozedur automatisch nach 60s und die alte Einstellung bleibt erhalten.
Zurücksetzen der minimalen Grundhelligkeit und Reset der angeschlossenen DALI Vorschaltgeräte
Hinweis: bei Drehschaltereinstellung 6 ist die Einstellung der Grundhelligkeit gesperrt
1. Beleuchtung per Kurzdruck auf den externen Taster des DALI PCU ausschalten.
2. Taster betätigen und gedrückt halten bis die Beleuchtung nach ca. 20s zu Blinken beginnt, danach Taster loslassen.
3. Nachdem die Beleuchtung aufgehört hat zu Blinken, Minimalhelligkeit durch zwei aufeinanderfolgende Kurzdrucke auf den Taster
(Doppelklick) auf Werkseinstellung zurücksetzen.
Verhalten nach Netzunterbrechung einstellen (optional)
Über den im Gerät integrierten Drehschalter kann das Verhalten nach Netzunterbrechung eingestellt werden. Für eine Korrekte Funktion
müssen alle miteinanderverbundenen DALI PCU gleich eingestellt sein. Eine geänderte Einstellung wird erst nach einer Netzunterbrechung wirksam.
Einstellung 1 (nicht empfohlen in Kombination mit Bewegungsmeldern): Beleuchtung geht auf den letzten Wert vor Netzunterbrechung.
Einstellung 2: Beleuchtung bleibt aus.
Einstellung 3: Beleuchtung geht auf den gespeicherten Memory-Wert.
Einstellung 4: Beleuchtung geht auf 50%.
Einstellung 5: Beleuchtung geht auf 100%
Einstellung 6: Beleuchtung geht auf den im DALI EVG gespeicherten POWER ON LEVEL Wert, dieser Wert ist über ein entsprechendes
Programmierwerkzeug, wie z.B. das OSRAM DALI MAGIC, geräteindividuell einstellbar (Werkseinstellung 100%).
Bedienung
Beleuchtung Ein-/Ausschalten: Taster kurz drücken.
Beleuchtung heller/dunkler dimmen: Taster lange drücken, Dimmrichtung wechselt bei jedem Langdruck.
Feste Einschalthelligkeit speichern (= Memory-Wert):
• Beleuchtung einschalten und gewünschte Helligkeit einstellen.
• Taster zweimal kurz hintereinander drücken (Doppelklick). Die Speicherung der Einschalthelligkeit wird durch zweimaliges Blinken der
Beleuchtung bestätigt.
Feste Einschalthelligkeit löschen (=Auto-Memory aktivieren):
• Beleuchtung ausschalten.
• Taster zweimal kurz hintereinander drücken (Doppelklick). Das Löschen der festen Einschalthelligkeit wird durch Einschalten der Beleuchtung
mit max. Helligkeit bestätigt. Als Einschalthelligkeit wird dann der jeweils letzte Wert vor manuellem Ausschalten über Kurzdruck verwendet.
Page 4

www.osram.com
OSRAM GmbH
Berliner Allee 65
86153 Augsburg
Germany
4
Mode d’emploi DALI PCU
Applications et fonctions
Le PCU DALI convertit les actions manuelles d‘un bouton-poussoir conventionnel externe pour en faire des commandes DALI, permettant ainsi le contrôle manuel des appareils DALI. Le PCU DALI peut être alimenté directement par le fil de commande DALI (= fonctionnement passif), ou s‘autoalimenter s‘il est connecté au secteur (= fonctionnement actif). En raccordant parallèlement plusieurs PCU
DALI, le nombre de points de commande, et respectivement celui de BE DALI, peuvent être facilement augmentés. Si plusieurs PCU
DALI sont raccordés parallèlement, les commandes du dernier PCU DALI ayant fonctionné sont valides, tous les autres PCU répondant
aussi à ces commandes. Il est donc possible de modifier le point d‘utilisation à tout moment sans effets secondaires gênants, comme
un changement brutal de luminosité.
Accumulation de plusieurs points d‘utilisation
Jusqu‘à 4 PCU DALI peuvent être interconnectés ; en opérant de la sorte, la polarité correcte des fils de commande DALI doit être respectée. Chaque PCU DALI alimenté sur secteur (= PCU DALI actif) peut alimenter jusqu‘à 25 BE DALI, plus un PCU DALI non connecté
au secteur (= PCU DALI passif). Au moins un PCU DALI actif est nécessaire.
Ainsi, les tailles de système suivantes sont possibles :
• Un PCU DALI actif : jusqu‘à 25 BE DALI, plus un PCU DALI passif, connectables.
• Deux PCU DALI actifs : jusqu‘à 50 BE DALI, plus deux PCU DALI passifs, connectables.
• Trois PCU DALI actifs : jusqu‘à 75 BE DALI, plus un PCU DALI passif, connectables.
• Quatre PCU DALI actifs : jusqu‘à 100 BE DALI connectables.
Mise en service
Réglage du niveau de luminosité minimal (facultatif)
Remarque : Commutateur rotatif en position 6, le réglage de luminosité minimale est verrouillé.
Si nécessaire, la plage de gradation du PCU DALI peut être restreinte à la limite inférieure et réglée en fonction de la plage de gradation
du BE connecté, comme indiqué ci-dessous.
1. Éteignez la lumière en appuyant brièvement sur le bouton-poussoir externe du PCU DALI.
2. Appuyez sur le bouton-poussoir et maintenez la pression jusqu‘à ce que l‘éclairage commence à clignoter au bout d’une vingtaine
de secondes ; relâchez ensuite le bouton.
3. Définissez la luminosité minimale souhaitée en appuyant longuement plusieurs fois sur le bouton (le sens de la gradation change à
chaque nouvel appui sur le bouton)
4. Enregistrez le niveau minimal de luminosité en appuyant brièvement deux fois en suivant sur le bouton-poussoir (= double-clic).
Si aucun niveau de luminosité n‘est enregistré, la procédure se termine automatiquement au bout de 60 secondes, et le réglage précédent est conservé.
Réinitialisation du niveau minimal de luminosité et remise à zéro des BE DALI raccordés
Remarque : Commutateur rotatif en position 6, le réglage de luminosité minimale est verrouillé.
1. Éteignez la lumière en appuyant brièvement sur le bouton-poussoir externe du PCU DALI.
2. Appuyez sur le bouton-poussoir et maintenez la pression jusqu‘à ce que l‘éclairage commence à clignoter au bout d’une vingtaine de secondes (tous les BE raccordés sont réglés suivant les paramètres d‘usine par une commande DALI RESET) ; relâchez ensuite le bouton.
3. Lorsque la lumière arrête de clignoter, enregistrez le niveau de luminosité en appuyant brièvement deux fois en suivant sur le boutonpoussoir (= double-clic).
Configuration du comportement après coupure de l‘alimentation secteur (facultatif)
Le comportement après une coupure de l‘alimentation secteur peut être paramétré via le commutateur rotatif intégré. Pour un fonctionnement correct, appliquez le même réglage à tous les PCU DALI interconnectés. Les nouveaux réglages ne seront pris en compte
qu’après avoir coupé l’alimentation.
Réglage 1 (déconseillé en association avec des détecteurs de mouvement) : La lumière reviendra à l‘état dans lequel elle était avant la
coupure de l‘alimentation secteur
Réglage 2 : La lumière reste éteinte
Réglage 3 : La lumière s‘allumera avec la valeur mémorisée par le double-clic.
Réglage 4 : La lumière s‘allumera à 50 % de luminosité
Réglage 5 : La lumière s‘allumera à 100 % de luminosité
Réglage 6 : Niveau de lumière suivant le NIVEAU À L‘ALLUMAGE DALI mémorisé dans le BE ; ce niveau peut être défini individuellement
pour chaque BE avec un outil de programmation approprié, par ex. le DALI MAGIC OSRAM (réglage en sortie d‘usine 100 %).
Fonctionnement
Allumer et éteindre la lumière : Appuyez brièvement sur le bouton-poussoir
Augmenter / diminuer le niveau de lumière : Appuyez longuement sur le bouton-poussoir ; le sens de la gradation change à chaque
nouvel appui sur le bouton.
Mémorisation d‘un niveau défini à l‘allumage (= valeur mémorisée) :
• Allumez la lumière et réglez la luminosité au niveau souhaité
• Appuyez brièvement sur le bouton deux fois en suivant (= double-clic). La mémorisation du niveau à l‘allumage est confirmée par
deux clignotements.
Supprimer la valeur de niveau de luminosité à l‘allumage mémorisée :
• Éteignez l‘éclairage.
• Appuyez brièvement sur le bouton deux fois en suivant (= double-clic). La suppression du niveau à l‘allumage est confirmée par un
allumage à 100 %.
Page 5

www.osram.com
OSRAM GmbH
Berliner Allee 65
86153 Augsburg
Germany
5
Istruzioni per l‘uso DALI PCU
Applicazione e funzionamento
L’unità di controllo di potenza DALI converte l’azionamento manuale di un comune interruttore a pulsante esterno nei comandi DALI
corrispondenti e consente il controllo manuale degli impianti DALI. La PCU DALI può essere alimentata direttamente dal filo di controllo
DALI (funzionamento passivo) oppure ricavare autonomamente la corrente di alimentazione necessaria qualora sia collegata a una presa
di alimentazione (funzionamento attivo). Collegando in parallelo più PCU DALI con il rispettivo numero di punti di manovra, è possibile
aumentare facilmente il numero di alimentatori elettronici DALI controllabili. Qualora più PCU DALI siano collegate in parallelo, sono validi i comandi dell’ultima PCU DALI attivata; tutte le altre PCU rispondono comunque a tali comandi. Risulta pertanto possibile modificare
i punti di manovra in qualsiasi momento, senza effetti collaterali preoccupanti quali sbalzi di luminosità.
Accumulo di più punti di manovra
Possono essere interconnesse tra loro fino a 4 PCU DALI: nel compiere tale operazione, deve essere rispettata la corretta polarità dei
fili di controllo DALI. Ciascuna PCU DALI alimentata a corrente (PCU DALI attiva) è in grado di alimentare un massimo di 25 ECG DALI e
una PCU DALI aggiuntiva non collegata alla presa di alimentazione (PCU DALI passiva). Si richiede l’uso di almeno una PCU DALI attiva.
In queste condizioni, è possibile creare sistemi delle seguenti dimensioni:
• Una PCU DALI attiva: fino a 25 ECG DALI e una PCU DALI passiva collegabili.
• Due PCU DALI attive: fino a 50 ECG DALI e due PCU DALI passive collegabili.
• Tre PCU DALI attive: fino a 75 ECG DALI e una PCU DALI passiva collegabili.
• Quattro PCU DALI attive: fino a 100 ECG DALI collegabili.
Messa in esercizio
Regolazione del livello minimo di luminosità (facoltativa)
Suggerimento: Con la manopola in posizione 6, la regolazione della luminosità minima viene bloccata.
Se necessario, è possibile limitare l’intervallo di regolazione luminosità della PCU DALI al rispettivo valore inferiore regolato sulla base
dell’intervallo di regolazione luminosità dell’ECG collegato, come descritto di seguito.
1. Spegnere l’impianto di illuminazione tramite una breve pressione dell’interruttore a pulsante esterno della PCU DALI.
2. Premere l’interruttore a pulsante e tenerlo premuto fino a quando la luce inizia a lampeggiare, dopo circa 20 secondi; quindi rilasciare il pulsante.
3. Impostare il valore di luminosità minima desiderato tramite pressioni prolungate dell’interruttore a pulsante (la direzione del fascio
luminoso varia ad ogni pressione del pulsante).
4. Memorizzare il livello di luminosità minima tramite due brevi pressioni ravvicinate dell’interruttore a pulsante (doppio clic).
Se non viene memorizzato alcun livello di luminosità, la procedura si arresta automaticamente dopo 60 secondi e viene mantenuta
l’impostazione precedente.
Reimpostazione del livello di luminosità minima e degli ECG DALI collegati
Suggerimento: Con la manopola in posizione 6, la regolazione della luminosità minima viene bloccata.
1. Spegnere l’impianto di illuminazione tramite una breve pressione dell’interruttore a pulsante esterno della PCU DALI.
2. Premere l’interruttore a pulsante e tenerlo premuto fino a quando la luce inizia a lampeggiare, dopo circa 20 secondi (tutti gli ECG
collegati sono impostati sui parametri di fabbrica tramite il comando DALI RESET); quindi rilasciare il pulsante.
3. Una volta che la luce avrà smesso di lampeggiare, memorizzare il livello di luminosità tramite due brevi pressioni ravvicinate dell’interruttore a pulsante (doppio clic).
Configurazione del comportamento in caso di interruzione dell‘alimentazione (facoltativa)
È possibile impostare il comportamento in caso di interruzione dell’alimentazione tramite l’interruttore a manopola integrato. Per un
funzionamento ottimale, impostare il medesimo parametro su tutte le PCU DALI interconnesse tra loro. Le impostazioni modificate
richiedono un’interruzione dell’alimentazione prima di essere valide.
Impostazione 1 (non raccomandata in combinazione con rilevatori di movimento): L’illuminazione tornerà allo stato precedente all’interruzione dell’alimentazione.
Impostazione 2: L’illuminazione rimarrà spenta.
Impostazione 3: L’illuminazione si attiverà con il valore memorizzato tramite doppio clic.
Impostazione 4: L’illuminazione si attiverà con luminosità al 50%.
Impostazione 5: L’illuminazione si attiverà con luminosità al 100%.
Impostazione 6: Il livello di luminosità sarà regolato sulla base del livello di attivazione (DALI POWER ON LEVEL) memorizzato nell’ECG.
Questo livello può essere impostato singolarmente per ciascun ECG tramite uno strumento di programmazione corrispondente: es. DALI MAGIC di OSRAM (parametro di fabbrica: 100%).
Funzionamento
Accendere e spegnere l‘impianto di illuminazione: Esercitare una breve pressione sull’interruttore a pulsante.
Aumentare o diminuire il livello di illuminazione: Esercitare una pressione prolungata sull’interruttore a pulsante (la direzione del fascio
luminoso varia ad ogni pressione del pulsante).
Memorizzare un livello di accensione fisso (valore in memoria):
• Accendere l’impianto di illuminazione e regolare la luminosità al livello desiderato.
• Premere brevemente il pulsante per due volte (doppio clic). La memorizzazione del livello di accensione è confermata da un doppio lampeggio.
Cancellare un livello di accensione fisso:
• Spegnere l’impianto di illuminazione.
• Premere brevemente il pulsante per due volte (doppio clic). La cancellazione del livello di accensione è confermata dall’accensione
delle luci a piena potenza (100%).
Page 6

www.osram.com
OSRAM GmbH
Berliner Allee 65
86153 Augsburg
Germany
6
Instrucciones de uso DALI PCU
Aplicación y funciones
La unidad PCU DALI convierte las órdenes manuales realizadas a través de botones externos activados mediante pulsación en los comandos DALI correspondientes y permite el control manual de dispositivos DALI. La unidad PCU DALI puede alimentarse directamente
a través del cable de control DALI (funcionamiento pasivo) o suministrar la corriente necesaria por sí sola al conectarla a la corriente
eléctrica (funcionamiento activo). Mediante la conexión en paralelo de varias unidades PCU DALI, es posible incrementar fácilmente
el número de puntos de manejo correspondiente al número de equipos de control electrónico (ECG) DALI controlables. Si hay varias
unidades PCU DALI conectadas en paralelo, serán válidos los comandos de la última unidad PCU DALI manipulada; el resto de unidades PCU también harán caso a estos comandos. De este modo, es posible cambiar el punto de manejo en cualquier momento sin
incómodas consecuencias, como un aumento del brillo.
Acumular varios puntos de manejo
Pueden interconectarse hasta 4 unidades PCU DALI respetando siempre la polaridad correcta de los cables de control DALI. Cada
unidad PCU DALI conectada a la corriente eléctrica (unidad PCU DALI activa) puede alimentar a un máximo de 25 ECG DALI y a otra
unidad PCU DALI que no esté conectada a la corriente eléctrica (unidad PCU DALI pasiva). Es necesario que al menos una unidad PCU
DALI esté activa.
Esto significa que son posibles los siguientes tamaños de sistemas:
• Una unidad PCU DALI activa: pueden conectarse hasta 25 ECG DALI y una PCU DALI pasiva.
• Dos unidades PCU DALI activas: pueden conectarse hasta 50 ECG DALI y dos PCU DALI pasivas.
• Tres unidades PCU DALI activas: pueden conectarse hasta 75 ECG DALI y una PCU DALI pasiva.
• Cuatro unidades PCU DALI activas: pueden conectarse hasta 100 ECG DALI.
Puesta en marcha
Ajustar el nivel de brillo mínimo (opcional)
Consejo: en la posición giratoria 6, se bloquea el ajuste de brillo mínimo.
Si es necesario, el rango de intensidad de la unidad PCU DALI puede restringirse al mínimo correspondiente ajustado en el rango de
intensidad del ECG conectado, tal y como se indica a continuación.
1. Apagar la iluminación pulsando brevemente el botón externo de la unidad PCU DALI.
2. Mantener pulsado el botón durante 20 s aproximadamente hasta que la luz comience a parpadear; tras ese tiempo, soltar el botón.
3. Ajustar el brillo mínimo deseado con pulsaciones largas del botón (la intensidad irá cambiando cada vez que se pulse el botón).
4. Guardar el nivel de brillo mínimo con dos pulsaciones cortas seguidas del botón (doble clic).
Si no se guarda ningún nivel de brillo, el proceso finaliza automáticamente tras 60 s y se mantienen los ajustes anteriores.
Restablecer el nivel de brillo mínimo y los ECG DALI conectados
Consejo: en la posición giratoria 6, se bloquea el ajuste de brillo mínimo.
1. Apagar la iluminación pulsando brevemente el botón externo de la unidad PCU DALI.
2. Mantener pulsado el botón durante 20 s aproximadamente hasta que la luz comience a parpadear (todos los ECG conectados se
restablecen a la configuración de fábrica mediante un comando DALI); tras ese tiempo, soltar el botón.
3. Una vez que la luz deje de parpadear, guardar el nivel de brillo con dos pulsaciones cortas seguidas del botón (doble clic).
Configurar el comportamiento tras un corte eléctrico (opcional)
Es posible ajustar el comportamiento de la unidad tras un corte eléctrico a través del interruptor giratorio integrado. Para un funcionamiento correcto, aplicar la misma configuración a todas las unidades PCU DALI conectadas. Para que los cambios en la configuración
se hagan efectivos, es necesario cortar la corriente eléctrica.
Ajuste 1 (no recomendado en combinación con detectores de movimiento): La iluminación volverá al estado en el que estaba antes del
corte eléctrico
Ajuste 2: La luz permanecerá apagada
Ajuste 3: La luz se encenderá con el valor guardado en la memoria al hacer doble clic.
Ajuste 4: La luz se encenderá al 50 % de brillo
Ajuste 5: La luz se encenderá al 100 % de brillo
Ajuste 6: Nivel de luz según el nivel de encendido de la unidad DALI almacenado en el ECG; puede ajustarse un nivel individual para
cada ECG con la herramienta de programación correspondiente, como DALI MAGIC de OSRAM (p. ej., configuración de fábrica al 100 %)
Manejo
Encender y apagar la luz: Pulse brevemente el botón.
Subir/bajar el nivel de luz: Pulse el botón de manera prolongada; la intensidad cambiará cada vez que pulse el botón.
Guardar un nivel de encendido predeterminado (valor en la memoria):
• Encender la iluminación y regular el nivel deseado.
• Pulsar el botón brevemente dos veces (doble clic). Un doble parpadeo de la luz confirmará que se ha guardado el nivel de encendido.
Eliminar el nivel de encendido predeterminado:
• Apagar la luz.
• Pulsar el botón brevemente dos veces (doble clic). El 100 % de brillo al encender la iluminación confirmará que se ha eliminado el
nivel de encendido.
Page 7

www.osram.com
OSRAM GmbH
Berliner Allee 65
86153 Augsburg
Germany
7
Gebruiksaanwijzing DALI PCU
Toepassing en Functie
De DALI PCU zet manuele opdrachten van een externe druktoets met maakcontact om in DALI commando’s en laat zo manuele bediening
van DALI verlichtingstoestellen toe. De DALI PCU kan rechtstreeks gevoed worden vanuit de DALI leiding (=passieve toepassing) of zelf de
benodigde voedingsstroom genereren, indien de PCU verbonden is met de netspanning (=actieve toepassing). Door parallelle schakeling van
meerdere DALI PCU kan het aantal bedieningspunten of aantal aanstuurbare DALI E-VSA eenvoudig verhoogd worden. Als verscheidene DALI
PCU parallel verbonden zijn, zijn de commando’s van de laatst bediende DALI PCU geldig, alle andere PCU volgen de commando’s hiervan.
Dit betekent ook dat afwisselend gebruik van de bedieningspunten altijd mogelijk is zonder storende effecten zoals helderheidsverschillen.
Opbouw meerdere bedieningspunten
Tot 4 DALI PCU kunnen met elkaar verbonden worden, daarbij moet wel op de correcte polariteit van de DALI stuurleiding gelet worden.
Elke DALI PCU die met de netspanning verbonden is (=actieve DALI PCU) kan 25 DALI E-VSA en een niet aan de netspanning aangesloten
DALI PCU (=passieve DALI PCU) voeden. Tenminste 1 actieve DALI PCU is noodzakelijk.
Door voorgaande zijn volgende configuraties mogelijk:
• Eén actieve DALI PCU: tot 25 DALI E-VSA en één passieve DALI PCU aansluitbaar
• Twee actieve DALI PCU: tot 50 DALI E-VSA en twee passieve DALI PCU aansluitbaar
• Drie actieve DALI PCU: tot 75 DALI E-VSA en één passieve DALI PCU aansluitbaar
• Vier actieve DALI PCU: tot 100 DALI E-VSA aansluitbaar
Inbedrijfstelling
Instellen van het minimale lichtniveau (optioneel)
Indien nodig kan het dimbereik van de DALI PCU naar onderen begrensd worden, respectievelijk aan het dimniveau van de aangesloten
E-VSA aangepast worden.
1. Schakel de verlichting uit door korte druk op de externe druktoets van de DALI PCU
2. Druk op de druktoets en hou deze ingedrukt tot de verlichting begint te knipperen na ongeveer 20 seconden, laat dan de druktoets los
3. Stel het gewenste minimale lichtniveau in door lange periodes te drukken op de druktoets (met elke opeenvolgende keer dat gedrukt
wordt wijzigt dimrichting)
4. Sla het minimale lichtniveau op door twee keer na elkaar kort te drukken (dubbelklik).
Indien er geen lichtniveau is ingesteld wordt de procedure automatisch beëindigd na 60 seconden en blijft de vorige instelling behouden.
Terugzetten van het minimale lichtniveau en reset van de aangesloten DALI voorschakelapparaten
Nota: bij draaischakelaar instelling 6 is de instelling van het basislichtniveau geblokkeerd.
1. Verlichting uitschakelen door kort op de externe druktoets van de DALI PCU te drukken
2. Druktoets ingedrukt houden tot de verlichting begint te knipperen na ongeveer 20 seconden (alle aangesloten E-VSA worden teruggezet
naar de fabrieksinstellingen door een DALI reset commando, laat dan de druktoets los
3. Nadat de verlichting stopt met knipperen, sla het minimale lichtniveau op door de druktoets twee opeenvolgende keren kort in te
drukken (=dubbelklik)
Instellen van werking na onderbreking van de netspanning (optioneel)
Door de geïntegreerde draaischakelaar kan het gedrag na onderbreking van de netspanning worden ingesteld. Voor een goede werking
moeten alle met elkaar verbonden DALI PCU gelijk ingesteld zijn. Gewijzigde instellingen vereisen een stroomtoevoeronderbreking,
voordat ze van kracht worden.
Instelling 1: (niet aanbevolen in combinatie met bewegingsmelders): lichtniveau gaat terug naar situatie voor de onderbreking
Instelling 2: licht blijft uit
Instelling 3: lichtniveau gaat naar niveau dat door dubbelklik is ingesteld
Instelling 4: licht gaat aan op 50% helderheid
Instelling 5: licht gaat aan op 100% helderheid
Instelling 6: lichtniveau wordt overeenkomstig het DALI POWER ON LEVEL ingeschakeld zoals opgeslagen in het E-VSA, dit lichtniveau
kan voor elk E-VSA individueel ingesteld worden door een overeenkomstig programmeertool, bijv. DALI MAGIC van OSRAM
(fabrieksinstelling = 100%)
Bediening
Verlichting aan/-uitschakelen: Druk de druktoets kort in
Verhoog/verlaag het lichtniveau: Druk de druktoets lang in, de dimrichting verandert bij elke druk op de toets
Een vast inschakellichtniveau instellen (=Memory-waarde):
• Schakel de verlichting in en dim naar het gewenste lichtniveau
• Druk twee maal kort na elkaar op de druktoets (=dubbelklik). Bevestiging van het inschakellichtniveau zichtbaar door twee maal knipperen
van de verlichting
Verwijderen van vast inschakellichtniveau (=auto-Memory activeren):
• Schakel de verlichting uit
• Druk twee maal kort na elkaar op de druktoets (=dubbelklik). Verwijdering van inschakellichtniveau wordt bevestigd door inschakelen
van licht op 100% lichtsterkte
Page 8

www.osram.com
OSRAM GmbH
Berliner Allee 65
86153 Augsburg
Germany
8
Driftsinstruktioner DALI PCU
Användning och funktion
DALI PCU konverterar manuell hantering av en gemensam yttre slutande tryckströmbrytare till motsvarande kommandon för DALI och
möjliggör manuell kontroll av DALI-system. DALI PCU kan drivas direkt genom DALI:s kontrollkabel (=passiv drift) eller förses med ström
direkt om den är nätansluten (=aktiv drift). Genom en parallel anslutning av flera DALI PCU kan antalet driftpunkter samt antalet DALI
ECG som kontrolleras lätt ökas. Om flera DALI PCU ansluts parallellt gäller kommandona på den sist anslutna DALI PCU, samtliga andra
PCU följer också dessa kommandon. Därmed är en ändring av driftpunkt möjlig vid vilken tidpunkt som helst utan att detta ger störande
sidoeffekter som ett hopp i ljusnivån.
Uppbyggnad av flera driftpunkter
Upp till 4 DALI PCU kan kopplas ihop men det är nödvändigt att den korrekta polariteten på DALI:s kontrollkablar respekteras. Varje
nätansluten DALI PCU (= aktiv DALI PCU) kan användas för upp till 25 DALI ECG och en ytterligare DALI PCU som inte är nätansluten
(=passiv DALI PCU). Det krävs minst en aktiv DALI PCU.
Därmed är följande systemstorlekar möjliga:
• En aktiv DALI PCU: upp till 25 DALI ECG och en ansluten passiv DALI PCU.
• Två aktiva DALI PCU: upp till 50 DALI ECG och två anslutna passiva DALI PCU.
• Tre aktiva DALI PCU: upp till 75 DALI ECG och en ansluten passiv DALI PCU.
• Fyra aktiva DALI PCU: upp till 100 anslutna DALI ECG.
Inställningar
Justering av lägsta ljusnivå (valfritt)
Tänk på: I position 6 vid rotation låses justeringen av lägsta ljusnivå fast.
Vid behov kan räckvidden för dimning på DALI PCU begränsas till den lägre delen alternativt justeras till räckvidden för dimning på
ansluten ECG som det beskrivs nedan.
1. Släck ljuset genom ett kort tryck på den yttre tryckknappen på DALI PCU.
2. Tryck på tryckknappen och håll den intryckt ända tills ljuset börjar blinka efter cirka 20 sekunder, därefter släpper du knappen.
3. Ställ in önskad lägsta ljusstyrka genom långa tryck på tryckknappen (Riktningen på dimningen ändas med varje tryck på tryckknappen)
4. Spara den lägsta ljusnivån genom två korta och på varandra följande tryck på tryckknappen (= dubbelklickning).
Om inte någon ljusnivå sparas avslutas proceduren automatiskt efter 60 sekunder och då sparas den gamla inställningen.
Återställning av lägsta ljusnivå och återställning av ansluten DALI ECG
Tänk på: I position 6 vid rotation låses justeringen av lägsta ljusstyrka fast.
1. Släck ljuset med ett snabbt tryck på den yttre tryckknappen på DALI PCU.
2. Tryck på tryckknappen och håll den intryckt ända tills ljuset börjar blinka efter cirka 20 sekunder (alla anslutna ECG ställs in på tidigare
fabriksinställningar genom ett DALI RESET-kommando), därefter släpper du knappen.
3. När ljuset har slutat blinka sparar du ljusnivån med två korta, på varandra följande tryck på tryckknappen (= dubbelklickning).
Konfigurera inställningar efter strömavbrott (valfritt)
Via det inbyggda vredet kan inställningarna ställas in efter ett strömavbrott. För korrekt funktion bör samma inställning användas på alla
sammanslutna DALI PCU. Ändrade inställningar börjar gälla först efter en frånkoppling av strömmen.
Inställning 1 (rekommenderas ej i combination med rörelsedetektorer): Ljuset kommer att återgå till samma inställning som före strömavbrottet
Inställning 2: Ljuset förblir släckt
Inställning 3: Ljuset kommer att tändas med det minnesvärde som sparats genom dubbelklickning.
Inställning 4: Ljuset kommer att tändas med 50 % ljusstyrka
Inställning 5: Ljuset kommer att tända med 100 % ljusstyrka
Inställning 6: Ljusnivå enligt DALI POWER ON LEVEL som sparas i ECG, denna nivå kan ställas individuellt för varje ECG genom ett
korresponderande programmeringsverktyg, t.ex. DALI MAGIC från OSRAM (t.ex. Fabriksinställning 100%).
Drift
Tända och släcka ljuset: Med ett snabbt tryck på tryckknappen
Höja / sänka ljusnivån: Håll tryckknappen intryckt en längre stund, dimningriktningen ändras med varje tryck på knappen.
Spara en fast tändningsnivå (= Minnesvärde):
• Tänd ljuset och dimma det till önskad nivå.
• Tryck på knappen snabbt två gånger (= dubbelklickning). Att tändningsnivån har sparats bekräftas av två blinkningar.
Radera fast tändningsnivå:
• Släck ljuset.
• Tryck på knappen snabbt två gånger (= dubbelklickning). Raderingen av tändningsnivån bekräftas med en tändning med 100 % ljusnivå.
Page 9

www.osram.com
OSRAM GmbH
Berliner Allee 65
86153 Augsburg
Germany
9
Käyttöohjeet DALI PCU
Käyttö ja toiminta
DALI PCU muuntaa tavallisen ulkoisen painokytkimen manuaaliset toiminnot vastaaviksi DALI-käskyiksi ja mahdollistaa DALI-laitteiden
manuaalisen ohjauksen. DALI PCU voi saada virtansa suoraan DALI-ohjausjohdosta (=passiivinen toiminta) tai se voi muodostaa sen
itse, jos se on kytketty verkkovirtaan (=aktiivinen toiminta). Jos useita DAPI PCU -laitteita kytketään rinnakkain, toimintapisteiden ja
vastaavasti ohjattavien DALI ECG -laitteiden määrää voidaan helposti kasvattaa. Jos useita DALI PCU -laitteita kytketään rinnakkain,
viimeksi käytetyn DALI PCU -laitteen käskyt ovat voimassa ja kaikki muut PCU:t myös kuuntelevat näitä käskyjä. Tästä syystä toimintapisteen vaihto on mahdollista milloin tahansa ilman häiritseviä sivuvaikutuksia kuten kirkkauden äkillistä muutosta.
Usean toimintapisteen muodostaminen
Jopa 4 DALI PCU -laitetta voidaan yhdistää keskenään. Tällöin on otettava huomioon DALI-ohjausjohtojen oikea napaisuus. Jokainen
verkkovirtaan kytketty DALI PCU (= aktiivinen DALI PCU) pystyy syöttämään virtaa 25 DALI ECG -laitteelle ja DALI PCU -lisälaitteelle,
joita ei ole kytketty verkkovirtaan (=passiivinen DALI PCU). Järjestelmässä on oltava ainakin yksi aktiivinen DALI PCU.
Tällöin seuraavan kokoiset järjestelmät ovat mahdollisia:
• Yksi aktiivinen DALI PCU: kytkettävissä jopa 25 DALI ACG -laitetta ja yksi passiivinen DALI PCU.
• Kaksi aktiivista DALI PCU -laitetta: kytkettävissä jopa 50 DALI ACG -laitetta ja kaksi passiivista DALI PCU -laitetta.
• Kolme aktiivista DALI PCU -laitetta: kytkettävissä jopa 75 DALI ACG -laitetta ja yksi passiivinen DALI PCU.
• Neljä aktiivista DALI PCU -laitetta: kytkettävissä jopa 100 DALI ECG -laitetta.
Käynnistys
Alimman kirkkaustason säätö (valinnainen)
Vihje: Alimman kirkkaustason säätö on lukittuna kun kiertokytkin on asennossa 6.
DALI PCU -laitteen himmennysaluetta voidaan tarvittaessa rajoittaa alapäästä vastaamaan säädetyn kytketyn ECG-laitteen himmennysaluetta alla kuvatulla tavalla.
1. Sammuta valot painamalla lyhyesti DALI PCU -laitteen ulkoista painiketta.
2. Paina painiketta ja pidä sitä alhaalla kunnes valot alkavat vilkkumaan noin 20 sekunnin kuluttua, tämän jälkeen vapauta painike.
3. Aseta haluamasi alin kirkkaustaso painamalla painiketta pitkään (himmennyssuunta vaihtuu painikkeen jokaisellapainalluksella)
4. Tallenna alin kirkkaustaso kahdella painikkeen peräkkäisellä lyhyellä painalluksella (= kaksoisnapsautus).
Ellei kirkkaustasoa tallenneta, toimenpide keskeytetään automaattisesti 60 sekunnin kuluttua ja vanha asetus pysyy voimassa.
Alimman kirkkaustason nollaus ja kytketyn DALI ECG -laitteen nollaus
Vihje: Alimman kirkkaustason säätö on lukittuna kun kiertokytkin on asennossa 6.
1. Sammuta valot painamalla lyhyesti DALI PCU -laitteen ulkoista painiketta.
2. Paina painiketta ja pidä sitä alhaalla kunnes valot alkavat vilkkumaan noin 20 sekunnin kuluttua (kaikki kytketyt ECG-laitteet palautetaan tehdasasetuksiin DALI RESET -käskyllä) painikkeen vapautuksen jälkeen.
3. Sen jälkeen kun valot lakkaavat vilkkumasta, tallenna kirkkaustaso kahdella painikkeen peräkkäisellä lyhyellä painalluksella (= kaksoisnapsautus).
Määrittele toiminta verkkovirtakatkoksen jälkeen (valinnainen)
Verkkovirtakatkoksen jälkeinen toiminta voidaan asettaa käyttämällä integroitua kiertokytkintä. Jotta järjestelmä toimisi haluamallasi tavalla, käytä samoja asetuksia kaikissa yhteenkytketyissä DALI PCU -laitteissa. Muutetut asetukset otetaan käyttöön, kun virta kytketään
uudelleen päälle.
Asetus 1 (ei suositella käytettäväksi yhdessä liiketunnistimien kanssa): Valot palaavat tilaan, jossa ne olivat ennen verkkovirtakatkosta
Asetus 2: Valot pysyvät sammutettuina
Asetus 3: Valot sytytetään arvoon, joka on tallennettu muistiin kaksoisnapsautuksella.
Asetus 4: Valot sytytetään 50 % kirkkauteen
Asetus 5: Valot sytytetään 100% kirkkauteen
Asetus 6: ECG-laitteen DALI POWER ON LEVEL (DALI TASO KÄYNNISTETTÄESSÄ) -muuttujaan tallennettuun valotasoon, tämä taso
voidaan asettaa erikseen jokaiselle ECG-laitteelle vastaavalla ohjelmointityökalulla, esim. OSRAMin DALI MAGIC (esim. tehdasasetus 100 %).
Toiminta
Valojen sytyttäminen ja sammuttaminen: Paina painiketta lyhyesti
Kasvata tai vähennä valaistuksen tasoa: Paina painiketta pitkään, himmennyssuunta vaihtuu painikkeen jokaisella painalluksella.
Kiinteän käynnistystason tallennus (= arvo muistissa):
• Sytytä valot ja himmennä ne haluamallesi tasolle
• Paina painiketta nopeasti kaksi kertaa (=kaksoisnapsautus). Käynnistystason tallennus vahvistetaan vilkuttamalla valoja kaksi kertaa.
Kiinteän käynnistystason poisto:
• Sammuta valot.
• Paina painiketta nopeasti kaksi kertaa (=kaksoisnapsautus). Käynnistystason poisto vahvistetaan sytyttämällä valot tasoon 100 %.
Page 10

www.osram.com
OSRAM GmbH
Berliner Allee 65
86153 Augsburg
Germany
10
Veiledning ang. betjening DALI PCU
Bruk og funksjon
DALI PCU gjør manuell betjening av en vanlig utvendig trykknapp om til korresponderende DALI-kommandoer og gjør det dermed mulig
med manuell styring av lys med DALI-grensesnitt. DALI PCU kan få strøm rett fra DALI-styringskabelen (= passiv betjening) eller selv
levere den nødvendige styringsstrømmen, så framt den er koblet til nettspenningen (= aktiv betjening). Gjennom parallellkobling av flere
DALI PCU, kan en enkelt øke antallet betjeningssteder, hhv. antallet DALI ECG som styres. Dersom flere DALI PCU er koblet parallelt,
gjelder kommandoene fra den DALI PCU som sist er betjent, alle andre PCU mottar også disse kommandoene. Dermed er endring i
betjeningssted mulig når som helst uten forstyrrende bivirkninger, slik som f.eks. svingninger i lysstyrke.
Oppbygging av en rekke driftssteder
Opptil 4 DALI PCU kan kobles sammen med hverandre, idet det tas hensyn til riktig polaritet for DALI -styringskablene. Hver enkelt DALI
PCU som får strøm fra nettet (= aktiv DALI PCU) kan forsyne opptil 25 DALI ECG og én ekstra DALI PCU som ikke er tilkoblet strømnettet
(=passiv DALI PCU). Det trengs minst én aktiv DALI PCU.
Dermed er de følgende systemstørrelsene mulige:
• En aktiv DALI PCU: Opptil 25 DALI ECG og en passiv DALI PCU kan kobles til.
• To aktive DALI PCU: Opptil 50 DALI ECG og to passive DALI PCU kan kobles til.
• Tre aktive DALI PCU: Opptil 75 DALI ECG og en passiv DALI PCU kan kobles til.
• Fire aktive DALI PCU: Opptil 100 DALI ECG kan kobles til.
Idriftssetting
Regulering av minimalt lysstyrkenivå (valgfritt)
NB! I vridningsposisjon 6 er reguleringen av minimalt lysstyrkenivå låst.
Om nødvendig kan lysdempingsgraden på DALI PCU begrenses nedover, hhv. reguleres til lysdempingsgraden for den tilkoblede ECG,
slik som beskrevet nedenfor.
1. Slå av lyset ved å kort trykke på den utvendige trykknappen på DALI PCU.
2. Trykk på trykknappen og hold den inntrykket til lyset begynner å blinke etter omtrent 20 sek., og slipp deretter knappen.
3. Still inn ønsket minimal lysstyrke ved å trykke lenge på trykknappen (lysdempingens retning endres for hvert trykk på knappen)
4. Lagre minimalt lysstyrkenivå ved å trykke kort på trykknappen to ganger etter hverandre (= dobbeltklikk).
Dersom ikke noe lysstyrkenivå lagres, avsluttes prosedyren automatisk etter 60 sek. og den gamle innstillingen opprettholdes.
Nullstilling av minimalt lysstyrkenivå og nullstilling av tilkoblede DALI ECG
NB! I vridningsposisjon 6 er reguleringen av minimalt lysstyrkenivå låst.
1. Slå av lyset ved å kort trykke på den utvendige trykknappen på DALI PCU.
2. Trykk på trykknappen og hold den inntrykket til lyset begynner å blinke etter omtrent 20 sek. (alle tilkoblede ECG-er stilt inn på tidligere fabrikkinnstillinger ved hjelp av en DALI RESET-kommando), og slipp deretter knappen.
3. Etter at lyset har sluttet å blinke, lagrer du lysstyrkenivået ved å raskt to ganger etter hverandre trykke på trykknappen (= dobbelklikk).
Konfigurer adferd etter strømbrudd (valgfritt)
Ved hjelp av den integrerte vridningsbryteren kan adferden etter et strømbrudd stilles inn. For at de skal virke som de skal, bør du bruke
samme innstilling for alle DALI PCU som er koblet sammen med hverandre. Endrede innstillinger krever frakobling fra strømnettet før
de trer i kraft.
Innstilling 1 (ikke anbefalt i kombinasjon med bevegelsesdetektorer): Lyset vil gå tilbake til den tilstanden det var i før strømbruddet
Innstilling 2: Lyset forblir avslått
Innstilling 3: Lyset vil bli slått på med den minneverdien som er lagret ved dobbelklikk.
Innstilling 4: Lyset vil bli slått på med 50 % lysstyrke
Innstilling 5: Lyset vil bli slått på med 100 % lysstyrke
Innstilling 6: Lysnivå i hht.DALI PÅSLÅTT-NIVÅET som er lagret i ECG, dette nivået kan stilles inn separat for hver ECG ved hjelp av et til-
hørende programmeringsverktøy, slik som f.eks. DALI MAGIC fra OSRAM (eksempelvis med en fabrikkinnstilling på 100 %).
Betjening
Slå lyset PÅ og AV: Trykk kort på trykknappen.
Øk/reduser lysstyrken: Trykk lenge på trykknappen, lysdempingens retning endres for hvert knappetrykk.
Å stille en bryter permanent inn på samme styrke (= minneverdi):
• Slå på lyset og demp det til ønsket styrke (nivå).
• Trykk kort to ganger på bryteren (= dobbeltklikk). At bryteren er permanent stilt inn på samme styrke, bekreftes med blinking to ganger.
Koble ut permanent instilling av bryter på samme styrke:
• Slå av lyset.
• Trykk kort to ganger på bryteren (= dobbeltklikk). At bryterens permanente instilling er koblet ut, bekreftes av en bryter på 100 %.
Page 11

www.osram.com
OSRAM GmbH
Berliner Allee 65
86153 Augsburg
Germany
11
Brugsanvisning DALI PCU
Anvendelse og funktion
DALI PCU omsætter gængse kontaktprogrammer ved aktivering af en ekstern trykknap med sluttekontakt til DALI kommandoer og
muliggør dermed manuel betjening af lamper med DALI grænseflade. DALI PCUen kan forsynes direkte fra DALI styreledningen (= passiv drift) eller kan selv levere den nødvendige styrestrøm, når den tilsluttes til netspænding (= aktivdrift). Ved parallelforbindelse af flere
DALI PCUer kan antallet af betjeningssteder eller antallet af styrbare lamper nemt øges. Hvis flere DALI PCUer parallelforbindes, gælder
kommandoerne den sidst aktiverede PCU, alle andre DALI PCUer modtager ligeledes disse kommandoer. Det er derfor altid mulighed
at skifte betjeningssted uden forstyrrende bivirkninger som fx spring i lysværdi.
Opbygning af flere betjeningssteder
Op til 4 DALI PCUer kan forbindes med hinanden, i den forbindelse skal man være opmærksom på den rigtige poling af DALI styreledning. Alle net-forsynede DALI PCUer (= aktiv DALI PCU) kan forsyne 25 DALI EVG og en DALI PCU mere, der ikke er tilsluttet netspænding (= passiv DALI PCU). Mindst en aktiv DALI PCU er nødvendig.
Dermed fås følgende systemstørrelser:
• En aktiv DALI PCU: op til 25 DALI EVG og en passiv DALI PCU kan tilsluttes.
• To aktive DALI PCUer: op til 50 DALI EVG og to passive DALI PCU kan tilsluttes.
• Tre aktive DALI PCUer: op til 75 DALI EVG og en passiv DALI PCU kan tilsluttes.
• Fire aktive DALI PCUer: op til 100 DALI EVG kan tilsluttes.
Idriftsætning
Indstilling af minimum lysniveau (valgfrit)
Dæmpningsområdet for DALI PCU efter behov begrænses nedad som beskrevet nedenfor eller tilpasses dæmpningsområdet for den
tilsluttede EVG.
OBS: ved drejekoblingsindstilling 6 er indstilling af lysstyrken spærret
1. Belysningen slukkes med kort tryk på den eksterne trykknap på DALI PCUen.
2. Trykknappen aktiveres og holdes nede, indtil belysningen begynder at blinke efter ca. 20 sek., derefter slippes trykknappen.
3. Den ønskede minimum lysstyrke indstilles med langt tryk (dæmpningsretning skifter med hvert langt tryk).
4. Den indstillede minimums lysstyrke gemmes ved at trykkes to gange kort efter hinanden på trykknappen (= dobbeltklik).
Hvis er ikke gemmes nogen værdi, slutter indstillingsproceduren automatisk efter 60 sek., og den gamle indstilling bibeholdes.
Reset af minimum lysniveau og tilsluttede DALI forkoblinger
OBS: ved drejekoblingsindstilling 6 er indstilling af lysstyrken spærret
1. Sluk belysning med kort tryk på den eksterne trykknap på DALI PCUen.
2. Aktiver trykknappen og hold den neden indtil belysningen efter ca. 20 sek. begynder at blinke, derefter slippes trykknappen.
3. Når belysningen er holdt op med at blinke, resettes minimum lysniveauet til fabriksstillingen med to efter hinanden følgende korte tryk
på trykknappen (dobbeltklik).
Indstilling af funktion efter strømafbrydelse (valgfrit)
Funktionen efter strømafbrydelse kan indstilles via den drejekontakt, der er integreret i apparatet. Alle DALI PCUer, der er forbundet
med hinanden, skal indstilles ens for at få en korrekt funktion. Ændrede indstillinger kræver afbrydelse af strømforsyningen, før de bliver
gældende.
Indstilling 1 (anbefales ikke i kombination med bevægelsessensorer): Belysning går til den sidste værdi før strømafbrydelse.
Indstilling 2: Belysning forbliver slukket.
Indstilling 3: Belysning skifter til den gemte memory-værdi.
Indstilling 4: Belysning skifter til 50%.
Indstilling 5: Belysning skifter til 100%
Indstilling 6: Belysning skifter til den POWER ON LEVEL-værdi (niveau ved tænding), der er gemt i DALI EVG, denne værdi kan indstilles
individuelt for apparatet via et passende programmeringsværktøj, som fx OSRAM DALI MAGIC, (fabriksindstilling 100%).
Betjening
Tænd/sluk belysning: Tryk kort på trykknappen.
Dæmp belysning lysere/mørkere: Tryk lang tid på trykknappen, dæmpningsretning ændres ved hvert langt tryk.
Gem fast lysstyrke ved tænding (= memory-værdi):
• Tænd belysning og indstil ønsket lysstyrke.
• Tryk to gange kort efter hinanden på trykknappen (dobbeltklik). Lysstyrken ved tænding bekræftes ved at belysningen blinker to gange.
Slet fast tilkoblings ved tænding (= aktiver auto-memory):
• Sluk belysning.
• Tryk to gange kort efter hinanden på trykknappen (dobbeltklik). Sletning af den faste lysstyrke ved tænding bekræftes ved at belysningen tændes med max. lysstyrke. Som lysstyrke ved tænding anvendes derefter den sidste værdi, der var aktuel før manuel slukning
via kort tryk.
Page 12

www.osram.com
OSRAM GmbH
Berliner Allee 65
86153 Augsburg
Germany
12
Návod pro obsluhu DALI PCU
Aplikace a funkce
Jednotka DALI PCU převádí manuální akci společného externího tlačítka na příslušné příkazy DALI a umožňuje manuální ovládání
zařízení DALI. Jednotka DALI PCU může být napájena přímo ovládacím vodičem DALI (= pasivní provoz) nebo (pokud je připojena k
elektrické síti) může získávat potřebný napájecí proud sama (= aktivní provoz). Paralelním zapojením několika jednotek DALI PCU může
být snadným způsobem zvýšen počet provozních bodů, respektive počet předřadníků DALI ECG, které lze řídit. Pokud je paralelně zapojeno několik jednotek DALI PCU, jsou platné příkazy naposledy použité jednotky DALI PCU, všechny ostatní PCU se tedy řídí těmito
příkazy. Tímto způsobem může být kdykoliv zvýšen počet provozních bodů bez rušivých vedlejších efektů, jako je náhlá změna intenzity
osvětlení.
Vytvoření několika provozních bodů
Lze propojit až 4 jednotky DALI PCU, přičemž je třeba dbát na zachování správné polarity ovládacích vodičů DALI. Každá jednotka DALI
PCU napájená z elektrické sítě (= aktivní DALI PCU) je schopna napájet až 25 DALI ECG a další jednotku DALI PCU, která není napájena
z elektrické sítě (= pasivní DALI PCU). Je vyžadována alespoň jedna aktivní jednotka DALI PCU.
Díky tomu je umožněno vytvoření následujících systémů:
• Jedna aktivní jednotka DALI PCU: až 25 předřadníků DALI ECG a jedna připojitelná pasivní jednotka DALI PCU.
• Dvě aktivní jednotky DALI PCU: až 50 předřadníků DALI ECG a dvě připojitelné pasivní jednotky DALI PCU.
• Tři aktivní jednotky DALI PCU: až 75 předřadníků DALI ECG a jedna připojitelná pasivní jednotka DALI PCU.
• Čtyři aktivní jednotky DALI PCU: až 100 připojitelných předřadníků DALI ECG.
Uvedení do provozu
Nastavení minimální intenzity osvětlení (volitelné)
Tip: V poloze 6 otočného přepínače je nastavení minimální intenzity osvětlení zablokováno.
V případě potřeby může být spodní limit rozsahu stmívání zařízení DALI PCU omezen, respektive přizpůsoben rozsahu stmívání připojeného předřadníku ECG podle níže uvedeného popisu.
1. Vypněte osvětlení krátkým stisknutím externího tlačítka jednotky DALI PCU.
2. Stiskněte tlačítko a přidržte jej stisknuté až do chvíle, kdy začne osvětlení blikat (přibližně po 20 sekundách), poté tlačítko uvolněte.
3. Dlouhým stisknutím tlačítka nastavte požadovanou minimální intenzitu osvětlení (při každém stisknutí se změní směr změny intenzity osvětlení).
4. Uložte minimální intenzitu osvětlení dvěma po sobě následujícími stisky tlačítek (= dvojklik).
Pokud není intenzita osvětlení uložena, dojde po uplynutí 60 sekund k automatickému ukončení procedury a je zachováno původní
nastavení.
Resetování minimální intenzity osvětlení a resetování připojených předřadníků DALI ECG
Tip: V poloze 6 otočného přepínače je nastavení minimální intenzity osvětlení zablokováno.
1. Vypněte osvětlení krátkým stisknutím externího tlačítka jednotky DALI PCU.
2. Stiskněte tlačítko a přidržte ho stisknuté až do chvíle, kdy začne, přibližně po 20 sekundách, osvětlení blikat (u všech připojených
předřadníků ECG je pomocí příkazu DALI RESET obnoveno tovární nastavení), poté tlačítko uvolněte.
3. Poté, co osvětlení přestane blikat, uložte intenzitu osvětlení dvěma po sobě následujícími stisky tlačítek (= dvojklik).
Konfigurace chování po přerušení napájení (volitelné)
Chování po přerušení napájení může být nastaveno pomocí otočného přepínače. Pro zajištění správné funkce nastavte všechny jednotky DALI PCU stejným způsobem. Aby mohly být změny nastavení zaregistrovány, je třeba vypnout napájení.
Nastavení 1 (není doporučováno v kombinaci s detektory pohybu): Je obnoven stav, který byl aktivní před přerušením napájení.
Nastavení 2: Osvětlení zůstane vypnuté
Nastavení 3: Osvětlení se rozsvítí intenzitou, která byla do paměti uložena dvojklikem.
Nastavení 4: Osvětlení se rozsvítí s 50% intenzitou.
Nastavení 5: Osvětlení se rozsvítí se 100% intenzitou.
Nastavení 6: Intenzita osvětlení odpovídá výchozí intenzitě (DALI POWER ON LEVEL) uložené v předřadníku ECG, tato intenzita může
být nastavena pro jednotlivé předřadníky zvlášť pomocí programovacího nástroje, jako je například DALI MAGIC od společnosti OSRAM (např. tovární nastavení 100 %).
Ovládání
Zapnutí a vypnutí osvětlení: Krátce stiskněte tlačítko.
Zvýšení/snížení intenzity osvětlení: Přidržte tlačítko stisknuté, při každém stisknutí se změní směr změny intenzity osvětlení (zvyšování/snižování).
Ukládání pevně stanovené intenzity při zapnutí (= uložená hodnota):
• Zapněte osvětlení a nastavte požadovanou intenzitu.
• Stiskněte krátce tlačítko dvakrát za sebou (= dvojklik). Uložení intenzity při zapnutí je potvrzeno dvojitým bliknutím.
Odstranění pevně stanovené intenzity při zapnutí:
• Vypněte osvětlení.
• Stiskněte krátce tlačítko dvakrát za sebou (= dvojklik). Odstranění intenzity při zapnutí je potvrzeno zapnutím osvětlení se 100% intenzitou.
Page 13

www.osram.com
OSRAM GmbH
Berliner Allee 65
86153 Augsburg
Germany
13
Instrukcja obsługi DALI PCU
Zastosowanie i funkcja
Urządzenie DALI PCU przekształca sygnały z ręcznej obsługi wspólnego, zewnętrznego przycisku standardowego NO na odpowiednie
polecenia DALI i umożliwia ręczne sterowanie oprawami DALI. Urządzenie DALI PCU można zasilać bezpośrednio poprzez przewód
sterujący DALI (= działanie pasywne) lub też może ono pobierać niezbędny prąd zasilania samoczynnie, jeśli jest podłączone do zasilania sieciowego (= działanie aktywne). Dzięki równoległemu połączeniu kilku urządzeń DALI PCU liczbę punktów obsługi, czy też liczbę
sterowanych elektronicznych układów zasilających DALI ECG, można z łatwością rozszerzyć. Jeśli kilka urządzeń DALI PCU zostanie
podłączonych równolegle, wiążące są polecenia z ostatniego urządzenia DALI PCU, które było obsługiwane — wszystkie pozostałe
urządzenia PCU również otrzymują te polecenia. Dlatego też zmiana punktu obsługi jest możliwa w dowolnym momencie, bez niepożądanych efektów ubocznych, takich jak nagły skok poziomu jasności.
Montaż kilku punktów obsługi
Istnieje możliwość wzajemnego połączenia do 4 urządzeń DALI PCU; w takim przypadku należy przestrzegać odpowiedniej biegunowości przewodów sterujących DALI. Każde urządzenie DALI PCU zasilane z sieci (= aktywne urządzenie DALI PCU) może zasilać do 25
elektronicznych układów zasilających DALI ECG oraz dodatkowe urządzenie DALI PCU, które nie jest podłączone do sieci (= pasywne
urządzenie DALI PCU). Wymagane jest przynajmniej jedno aktywne urządzenie DALI PCU.
Stąd wynikają następujące możliwe rozmiary systemu:
• Jedno aktywne urządzenie DALI PCU: możliwość podłączenia do 25 układów DALI ECG i jednego pasywnego urządzenia DALI PCU.
• Dwa aktywne urządzenia DALI PCU: możliwość podłączenia do 50 układów DALI ECG i dwóch pasywnych urządzeń DALI PCU.
• Trzy aktywne urządzenia DALI PCU: możliwość podłączenia do 75 układów DALI ECG i jednego pasywnego urządzenia DALI PCU.
• Cztery aktywne urządzenia DALI PCU: możliwość podłączenia do 100 układów DALI ECG.
Uruchomienie
Regulacja minimalnego poziomu jasności (opcjonalne)
Wskazówka: regulacja podstawowego poziomu jasności jest zablokowana w przypadku ustawienia przełącznika obrotowego 6.
W razie potrzeby zakres ściemniania urządzenia DALI PCU może zostać ograniczony w dolnej granicy lub też wyregulowany zgodnie z
zakresem ściemniania podłączonych układów ECG, jak opisano poniżej.
1. Wyłączyć oświetlenie, krótko naciskając zewnętrzny przycisk urządzenia DALI PCU.
2. Nacisnąć przycisk i przytrzymać go, aż światło zacznie migać po ok. 20 s, a następnie zwolnić przycisk.
3. Ustawić żądany minimalny poziom jasności, długo naciskając przycisk (kierunek regulacji jasności zmienia się z każdym naciśnięciem
przycisku).
4. Zapisać minimalny poziom jasności, krótko naciskając przycisk dwa razy (= podwójne kliknięcie).
Jeśli żaden poziom jasności nie zostanie zapisany, proces ten jest automatycznie przerywany po upływie 60 s i zachowywane jest poprzednie ustawienie.
Przywracanie ustawień minimalnego poziomu jasności i resetowanie podłączonych układów DALI ECG
Wskazówka: regulacja podstawowego poziomu jasności jest zablokowana w przypadku ustawienia przełącznika obrotowego 6.
1. Wyłączyć oświetlenie, krótko naciskając zewnętrzny przycisk urządzenia DALI PCU.
2. Nacisnąć przycisk i przytrzymać go, aż światło zacznie migać po ok. 20 s (wszystkie podłączone układy ECG są przywracane do
ustawień fabrycznych przez polecenie RESET systemu DALI), a następnie zwolnić przycisk.
3. Gdy światło przestanie migać, zapisać poziom jasności, krótko naciskając przycisk dwa razy (= podwójne kliknięcie).
Konfiguracja zachowania po wystąpieniu przerwy w zasilaniu sieciowym (opcjonalne)
Zachowanie po wystąpieniu przerwy w zasilaniu sieciowym można ustawić za pomocą zintegrowanego przełącznika obrotowego. Aby
zapewnić prawidłowe działanie, należy zastosować to samo ustawienie do wszystkich wzajemnie połączonych urządzeń DALI PCU.
Zmiana ustawień wymaga przerwy w zasilaniu sieciowym, nim zostanie wprowadzona.
Ustawienie 1 (niezalecane w połączeniu z czujnikami ruchu): Oświetlenie powróci do stanu sprzed wystąpienia przerwy w zasilaniu
Ustawienie 2: Oświetlenie pozostanie wyłączone
Ustawienie 3: Oświetlenie zostanie włączone zgodnie z zapamiętaną wartością zapisaną przez podwójne kliknięcie.
Ustawienie 4: Oświetlenie zostanie włączone przy 50% poziomie jasności
Ustawienie 5: Oświetlenie zostanie włączone przy 100% poziomie jasności
Ustawienie 6: Poziom oświetlenia zgodny z ustawieniem poziomu przy włączaniu urządzenia DALI (POWER ON LEVEL) zapisanym w
układzie ECG; poziom ten można ustawić indywidualnie dla każdego układu ECG za pomocą odpowiedniego narzędzia
do programowania, np. DALI MAGIC firmy OSRAM (ustawienie fabryczne 100%).
Obsługa
WŁĄCZANIE i WYŁĄCZANIE oświetlenia: Krótko nacisnąć przycisk.
Zwiększanie/zmniejszanie poziomu oświetlenia: Długo nacisnąć przycisk, kierunek regulacji jasności zmienia się z każdym naciśnięciem
przycisku.
Zapisywanie stałego poziomu włączania (= zapamiętana wartość):
• Włączyć oświetlenie i ściemnić je do wymaganego poziomu.
• Krótko nacisnąć przycisk dwa razy (= podwójne kliknięcie). Światło zamiga dwa razy, potwierdzając zapisanie poziomu włączania.
Usuwanie stałego poziomu włączania:
• Wyłączyć oświetlenie.
• Krótko nacisnąć przycisk dwa razy (= podwójne kliknięcie). Poziom oświetlenia zostanie ustawiony na 100%, potwierdzając usunięcie
poziomu włączania.
Page 14

www.osram.com
OSRAM GmbH
Berliner Allee 65
86153 Augsburg
Germany
14
Návod na použitie DALI PCU
Použitie a funkcia
DALI PCU konvertuje ručné ovládanie štandardného externého tlačidla tak, že integruje tlačidlo do príslušných DALI príkazov a umožňuje ručné ovládanie DALI osvetľovacích prístrojov. DALI PCU je možné napájať priamo z riadiaceho vodiča DALI (= pasívne ovládanie)
alebo zo samostatného zdroja prúdu, ak je pripojené priamo na sieťové napätie (= aktívne ovládanie). Paralelným zapojením viacerých
DALI PCU je možné ľahko zvýšiť počet prevádzkových bodov, resp. počet ovládaných DALI ECG. Ak sa viacero DALI PCU zapojí paralelne, platia príkazy z posledného ovládaného DALI PCU, všetky ostatné PCU sa tiež riadia týmito príkazmi. Preto je možná zmena
miesta obsluhy – kedykoľvek a bez vedľajších účinkov –, napríklad prudký skok intenzity.
Spojenie viacerých bodov ovládania
Je možné spojiť až 4 DALI PCU, pritom je potrebné dodržiavať správnu polaritu ovládacích vodičov DALI. Každé DALI PCU napájané
zo siete (= aktívne DALI PCU) dokáže napájať až 25 DALI ECG a ďalšie DALI PCU, ktoré nie je napájané zo siete (= pasívne DALI PCU).
Potrebné je aspoň jedno aktívne DALI PCU.
Takto sú možné rôzne veľkosti systému:
• Jedno aktívne DALI PCU: možnosť pripojiť až 25 DALI ECG a 1 pasívne DALI PCU.
• Dve aktívne DALI PCU: možnosť pripojiť až 50 DALI ECG a 2 pasívne DALI PCU.
• Tri aktívne DALI PCU: možnosť pripojiť až 75 DALI ECG a 1 pasívne DALI PCU
• Štyri aktívne DALI PCU: možnosť pripojiť až 100 DALI ECG.
Uvedenie do prevádzky
Nastavenie minimálnej intenzity(voliteľné)
Tip: Na pozícii 6 je nastavenie minimálnej intenzity zablokované.
Podľa potreby je možné stmievací rozsah DALI PCU obmedziť na dolnej hranici a nastaviť stmievací rozsah pripojeného ECG takto:
1. Vypnúť osvetlenie krátkym stlačením externého tlačidla DALI PCU.
2. Stlačiť tlačidlo a držať stlačené, kým nezačne osvetlenie blikať, cca 20 s, následne tlačidlo uvoľniť.
3. Nastaviť požadovanú intenzitu dlhým stlačením tlačidla (pri každom stlačení tlačidla sa mení smer stmievania).
4. Uložiť minimálnu úroveň intenzity dvoma za sebou nasledujúcimi krátkymi stlačeniami tlačidla (= dvojklik).
Ak sa neuloží úroveň intenzity, postup sa automaticky ukončí po 60 s a uchová sa pôvodné nastavenie.
Resetovanie minimálnej úrovne intenzity a resetovanie pripojeného DALI ECG
Tip: Na pozícii 6 je nastavenie minimálnej intenzity zablokované.
1. Vypnúť osvetlenie krátkym stlačením externého tlačidla DALI PCU.
2. Stlačiť tlačidlo a držať stlačené, kým nezačne osvetlenie blikať, cca 20 s, následne tlačidlo uvoľniť (všetky pripojené ECG sú nastavené na výrobné nastavenie pomocou príkazu DALI RESET), potom uvoľniť tlačidlo.
3. Keď osvetlenie prestane blikať, uložiť minimálnu intenzitu dvoma za sebou nasledujúcimi krátkymi stlačeniami tlačidla (= dvojklik).
Konfigurácia správania po prerušení hlavného napájania (voliteľné)
Pomocou integrovaného otočného ovládača môžete nastaviť správanie po prerušení napájania. Pre správnu funkciu nastavte rovnaké
nastavenie na všetkých spojených DALI PCU. Zmenené nastavenia vyžadujú pred ich potvrdením prerušenie hlavného napájania.
Nastavenie 1 (neodporúča sa v kombinácii s pohybovými detektormi): Svetlo sa prepne do stavu pre výpadkom napätia.
Nastavenie 2: Svetlo zostane vypnuté.
Nastavenie 3: Svetlo sa zapne s hodnotou uloženou dvojkliknutím.
Nastavenie 4: Svetlo sa zapne s 50 % intenzitou.
Nastavenie 5: Svetlo sa zapne so 100 % intenzitou.
Nastavenie 6: Intenzita podľa DALI POWER ON LEVEL (intenzita pri zapnutí DALI) uloženej v ECG, túto hodnotu je možné nastaviť samostatne
pre každé ECG pomocou príslušného programovacieho nástroja, napr. DALI MAGIC od OSRAM (nastavenie z výroby – 100 %).
Obsluha
Zapnutie/vypnutie osvetlenia: Krátke stlačenie tlačidla .
Zvýšenie/zníženie intenzity osvetlenia: Dlhé stlačenie tlačidla, smer stmievania sa mení pri každom stlačení tlačidla.
Uloženie fixnej intenzity pri zapnutí (= pamäťová hodnota):
• Zapnite osvetlenie a nastavte požadovanú intenzitu.
• Krátko dvakrát stlačte tlačidlo (= dvojklik). Uloženie intenzity pri zapnutí sa potvrdí dvojitým bliknutím.
Vymazanie uloženej intenzity pri zapnutí:
• Vypnite osvetlenie.
• Krátko dvakrát stlačte tlačidlo (= dvojklik). Vymazanie intenzity pri zapnutí sa potvrdí zapnutím na 100 %.
Page 15

www.osram.com
OSRAM GmbH
Berliner Allee 65
86153 Augsburg
Germany
15
Navodila za uporabo DALI PCU
Uporaba in delovanje
Z ročnim upravljanjem zunanje potisne tipke vam enota DALI PCU omogoča ustrezen prenos stikalnih programov DALI in ročno upravljanje svetilk z vmesnikom DALI. DALI PCU se lahko neposredno napaja iz krmilnega voda DALI (= pasivno delovanje) ali sama tvori
potrebni krmilni tok, če je priključena na omrežno napetost (= aktivno delovanje). Če je vzporedno priključenih več enot DALI PCU, je
mogoče število upravljalnih mest oziroma število krmiljenih enot DALI ECG preprosto povečati. Če je vzporedno povezanih več enot
DALI PCU, veljajo ukazi enote DALI PCU; ki je obratovala nazadnje, ostale enote PCU pa delujejo v skladu s temi ukazi. Zato je krmilno
mesto mogoče kadar koli spremeniti, kar pa ne povzroči stranskih učinkov, npr. nihanj v svetlosti.
Izgradnja različnih krmilnih mest
Povezati je mogoče do 4 enote DALI PCU, pri tem pa je treba upoštevati pravilno polarnost krmilnega voda DALI. Vsaka enota DALI
PCU, ki se napaja iz omrežja (= aktivna DALI PCU), lahko napaja do 25 DALI ECG in dodatno enoto DALI PCU; ki ni priključena na
omrežje (= pasivna enota DALI PCU). Za to je potrebna vsaj ena aktivna enota DALI PCU.
Tako so možne naslednje dimenzije sistemov:
• Ena aktivna enota DALI PCU: povezati je mogoče do 25 DALI ECG in eno pasivno enoto DALI PCU.
• Dve aktivni enoti DALI PCU: povezati je mogoče do 50 DALI ECG in dve pasivni enoti DALI PCU.
• Tri aktivne enote DALI PCU: povezati je mogoče do 75 DALI ECG in eno pasivno enoto DALI PCU.
• Štiri aktivne enote DALI PCU: povezati je mogoče do 100 DALI ECG.
Obratovanje
Prilagajanje minimalne osnovne svetlosti (izbirno)
Namig: Pri vrtljivi nastavitvi 6 se prilagajanje minimalne svetlosti zaklene.
Če je potrebno, se razpon zatemnilnosti enote DALI PCU lahko omeji navzdol oziroma se tako prilagodi tudi razpon zatemnilnosti priključene ECG, kar je opisano v nadaljevanju.
1. Izključite osvetlitev s kratkim pritiskom na zunanjo potisno tipko na enoti DALI PCU.
2. Pritisnite in držite potisno tipko, dokler svetilo po pribl. 20 sekundah ne začne utripati. Potem tipko spustite.
3. Želeno minimalno svetlost nastavite z dolgimi pritiski na potisno tipko (smer temnjenja spremenite z vsakim pritiskom na tipko)
4. Minimalno stopnjo svetlosti shranite z dvema zaporednima kratkima pritiskoma na potisno tipko (= dvojni klik).
Če se stopnja svetlosti ne shrani, se ta postopek samodejno prekine po 60 sekundah, ohrani pa se stara nastavitev.
Ponastavitev minimalne stopnje svetlosti in ponastavljanje priključenih DALI ECG
Namig: Pri vrtljivi nastavitvi 6 se prilagajanje minimalne svetlosti zaklene.
1. Izključite osvetlitev s kratkim pritiskom na zunanjo potisno tipko na enoti DALI PCU.
2. Pritisnite potisno tipko in jo držite pritisnjeno, dokler svetilo po pribl. 20 sekundah ne začne utripati (vse priključene ECG se ponastavijo na tovarniške nastavitve z ukazom DALI RESET). Nato spustite tipko.
3. Ko svetilo preneha utripati, stopnjo svetlosti shranite z dvema zaporednima kratkima pritiskoma na potisno tipko (= dvojni klik).
Nastavljanje konfiguracije po motnjah napajanja (izbirno)
Z integriranim vrtljivim stikalom lahko ponastavite konfiguracijo po motnjah napajanja. Za ustrezno delovanje morajo biti vse povezane
enote DALI PCU enako nastavljene. Preden postanejo spremenjene nastavitve veljavne, je potrebna prekinitev napajanja.
Nastavitev 1 (ni priporočljivo v kombinaciji z detektorji gibanja): Svetilo preide v stanje, nastavljeno pred motnjo napajanja.
Nastavitev 2: Svetilo ostane izključeno.
Nastavitev 3: Svetilo je vključeno z vrednostjo, ki ste jo v pomnilnik shranili z dvojnim klikom.
Nastavitev 4: Svetilo se vključi s 50-odstotno svetlostjo.
Nastavitev 5: Svetilo se vključi s 100-odstotno svetlostjo.
Nastavitev 6: Svetilo sveti glede na shranjeno vrednost DALI POWER ON LEVEL v ECG; to stopnjo je mogoče individualno nastaviti za
vsako ECG z ustreznim orodjem za programiranje, npr. DALI MAGIC družbe OSRAM (100-odstotna tovarniška nastavitev).
Delovanje
VKLOP in IZKLOP svetila: Na kratko pritisnite potisno tipko.
Večanje/manjšanje stopnje svetlosti: Daljši pritisk na potisno tipko, smer temnjenja se spremeni z vsakim pritiskom na tipko.
Shranjevanje določene svetlosti ob vklopu (= shranjena vrednost):
• Vklopite svetilo in ga zatemnite na želeno stopnjo.
• Dvakrat na kratko pritisnite tipko (= dvojni klik). Svetlost ob vklopu je shranjena, ko svetilo dvakrat utripne.
Brisanje določene svetlosti ob vklopu:
• Izklopite svetilo.
• Dvakrat na kratko pritisnite tipko (= dvojni klik). Shranjena svetlost ob vklopu je izbrisana z vklopom svetila na 100-odstotno svetlost.
 Loading...