


Osprey TALON User Guide

Osprey Talon SAH E-23 User Guide
Some information in this user guide is specific to firmware build
© 2018 Osprey Video. All rights reserved.
Osprey® is the registered trademark of Osprey Video. Microsoft®, Windows® is a registered trademark of Microsoft Corporation. Any other product names, trademarks, trade names, service
marks, or service names owned or registered by any other company and mentioned herein are the property of their res pective companies.
No part of this specification may be reproduced, transcribed, transmitted or stored in a retrieval system in any part or by any means with out the express written consent of Osprey Video.
Osprey Video reserves the right to change any products herein at any time and without notice. Osprey Video makes no representations or war ranties regarding the content of this document,
and assumes no responsibility for any errors contained herein.
Overview
Thank you for purchasing the Osprey® Talon video encoder from Osprey Video. This user guide provides step-by-step
instructions for installing and using your new video encoder. For the latest Osprey product information and news, visit our
website at www.ospreyvideo.com.
FEEDBACK:
We greatly value your input. Please direct any questions, comments or support issues to
support@ospreyvideo.com
+1 972 488 7156
Product Description
The Osprey Talon is a hardware based, small form-factor H.264 video encoder designed to be easy to use, portable, and easily
stream both standard definition and high definition content to broadband and mobile networks via H.264 RTMP servers such as
Adobe® and Wowza®.
1.10.0.257. If your Talon is using an earlier firmware, please consider
upgrading to the latest version by checking the Osprey website.
i
<20180425>

Osprey Talon User Guide
2
<20180425>

Osprey Talon User Guide
Overview .................................................................................................................................... 1
FEEDBACK: ....................................................................................................................................... 1
Product Description ......................................................................................................................... 1
Getting Started ................................................................................................................................. 6
Prerequisites .................................................................................................................................... 6
Using Talon for the First Time ................................................................................................. 7
Osprey BOSS and DHCP.................................................................................................................... 7
Osprey BOSS Without DHCP ............................................................................................................ 7
Osprey BOSS With an Invalid Static IP ............................................................................................. 8
Unknown IP Address Without Osprey BOSS .................................................................................... 8
Osprey Talon Product Identification ........................................................................................ 8
Osprey Talon Back ............................................................................................................................ 9
Panel Diagram .................................................................................................................................. 9
Osprey Talon G2 Encoder Front Panel Diagram ............................................................................ 10
LCD Touch Control ................................................................................................................... 10
Osprey Talon G1H Front Panel Diagram ........................................................................................ 12
Osprey Talon Status Lights ............................................................................................................. 13
Talon Web GUI ........................................................................................................................ 14
1.0 Tab ID ....................................................................................................................................... 14
2.0 System Control ......................................................................................................................... 15
Talon IP Setup .......................................................................................................................... 15
Firewall Configuration ............................................................................................................. 16
Session Timeout ...................................................................................................................... 16
Set Name ................................................................................................................................. 17
Set Password ........................................................................................................................... 17
Reboot ..................................................................................................................................... 17
Update Firmware ..................................................................................................................... 17
4.0 Operating Mode ....................................................................................................................... 20
1x3 MBR Mode ........................................................................................................................ 20
2X2 LC Mode ............................................................................................................................ 20
1X1 3G Mode ........................................................................................................................... 20
Changing Operating Modes ..................................................................................................... 20
5.0 Status ....................................................................................................................................... 21
6.0 Encoder Configuration ............................................................................................................. 22
Stream Capacity ....................................................................................................................... 22
3
<20180425>

Osprey Talon User Guide
Stream Control Buttons ........................................................................................................... 23
Stop/Start ........................................................................................................................................ 23
Save .................................................................................................... Error! Bookmark not defined.
Clone ............................................................................................................................................... 23
Delete .............................................................................................................................................. 23
Status .............................................................................................................................................. 23
Encoder Setup ......................................................................................................................... 24
AutoStart ......................................................................................................................................... 24
Video Source ................................................................................................................................... 24
16:9 ................................................................................................................................................. 24
Encode Profiles (RTMP/RTP only) ................................................................................................... 25
Video Bitrate ................................................................................................................................... 25
Video Rate Control .......................................................................................................................... 25
Maximum Delay .............................................................................................................................. 25
Advanced Settings ........................................................................................................................... 26
Video Resolution ............................................................................................................................. 27
Frame Rate ...................................................................................................................................... 27
Video Profile .................................................................................................................................... 27
GOP Size .......................................................................................................................................... 27
Number of B Frames ....................................................................................................................... 27
DeInterlacing ................................................................................................................................... 27
Audio Enable ................................................................................................................................... 28
Audio Info ........................................................................................................................................ 28
Output Setup ........................................................................................................................... 29
Output Format ................................................................................................................................ 29
RTMP/RTMPS .................................................................................................................................. 29
UDP ................................................................................................................................................. 30
RTP .................................................................................................................................................. 31
Save to File ...................................................................................................................................... 33
File Naming ..................................................................................................................................... 33
Wowza Cloud .................................................................................................................................. 35
Facebook Live .................................................................................................................................. 38
IBM Cloud Video ............................................................................................................................. 44
4
<20180425>

Osprey Talon User Guide
StreamSpot ..................................................................................................................................... 46
Zixi ................................................................................................................................................... 47
Osprey BOSS .................................................................................................................................... 48
Installing Osprey BOSS .................................................................................................................... 48
Locating Talon with Osprey BOSS ................................................................................................... 49
Additional Operations from BOSS ................................................................................................... 50
Reboot ............................................................................................................................................. 50
Clear Configuration ......................................................................................................................... 51
Clear System .................................................................................................................................... 51
Appendix A: Encoding Profiles ............................................................................................. 53
Appendix B: Osprey Hardware Specifications ...................................................................... 54
Osprey Talon G1 model SAH-E23 ................................................................................................... 54
Osprey Talon G2 model SAHD-E23 ................................................................................................ 54
Osprey Talon G1H model AH-E23 .................................................................................................. 55
Appendix C: Troubleshooting tips ......................................................................................... 56
5
<20180425>

Osprey Talon User Guide
Getting Started
Before you can use your Osprey Talon encoder, you first need to set up and configure it. This chapter provides you with the
details and step-by-step instructions you need to make your installation as quick and easy as possible.
Here are three starting requirements:
AC power source (100 - 240 V)
IP connection and/or Internet connection on a dynamic host configuration protocol/domain name server (DHCP/DNS) network
A ‘configuration host’ system
A configuration host is a networked PC computer running a compatible HTML browser. The browser on the host will be
used to access the configuration web page on the Talon encoder. There is also a small application called ‘Osprey
BOSS’ that is used to locate and identify Talon on the local network. BOSS works with PC and Linux. Once Talon has
The Osprey Talon encoder, an easy-to-use streaming device, allows you to:
been identified on the network any HTML browser can be used to configure your encoder.
Connect to a compatible browser on a dynamic host configuration protocol/domain name server (DHCP/DNS) network.
Configure and connect your audio and video source to the Osprey Talon.
Select your output formats and streaming settings.
Enter your streaming server information.
Start streaming your media.
You can configure and use the Osprey Talon straight from the box for any streaming activities. Use the web interface for setting
options and controlling your Osprey Talon from another networked computer.
This section addresses the high-level actions you must perform to physically connect and set up your Osprey Talon video
encoder.
Prerequisites
Before connecting the Osprey Talon encoder, ensure you comply with the following prerequisites:
All packaged items are undamaged and in working order.
Your environment meets all starting requirements.
Safety instructions, notices, and warnings in section 8.0 at the end of this document, including:
FCC Notice
Environmental Notices
Warnings
6
<20180425>
Osprey Talon User Guide
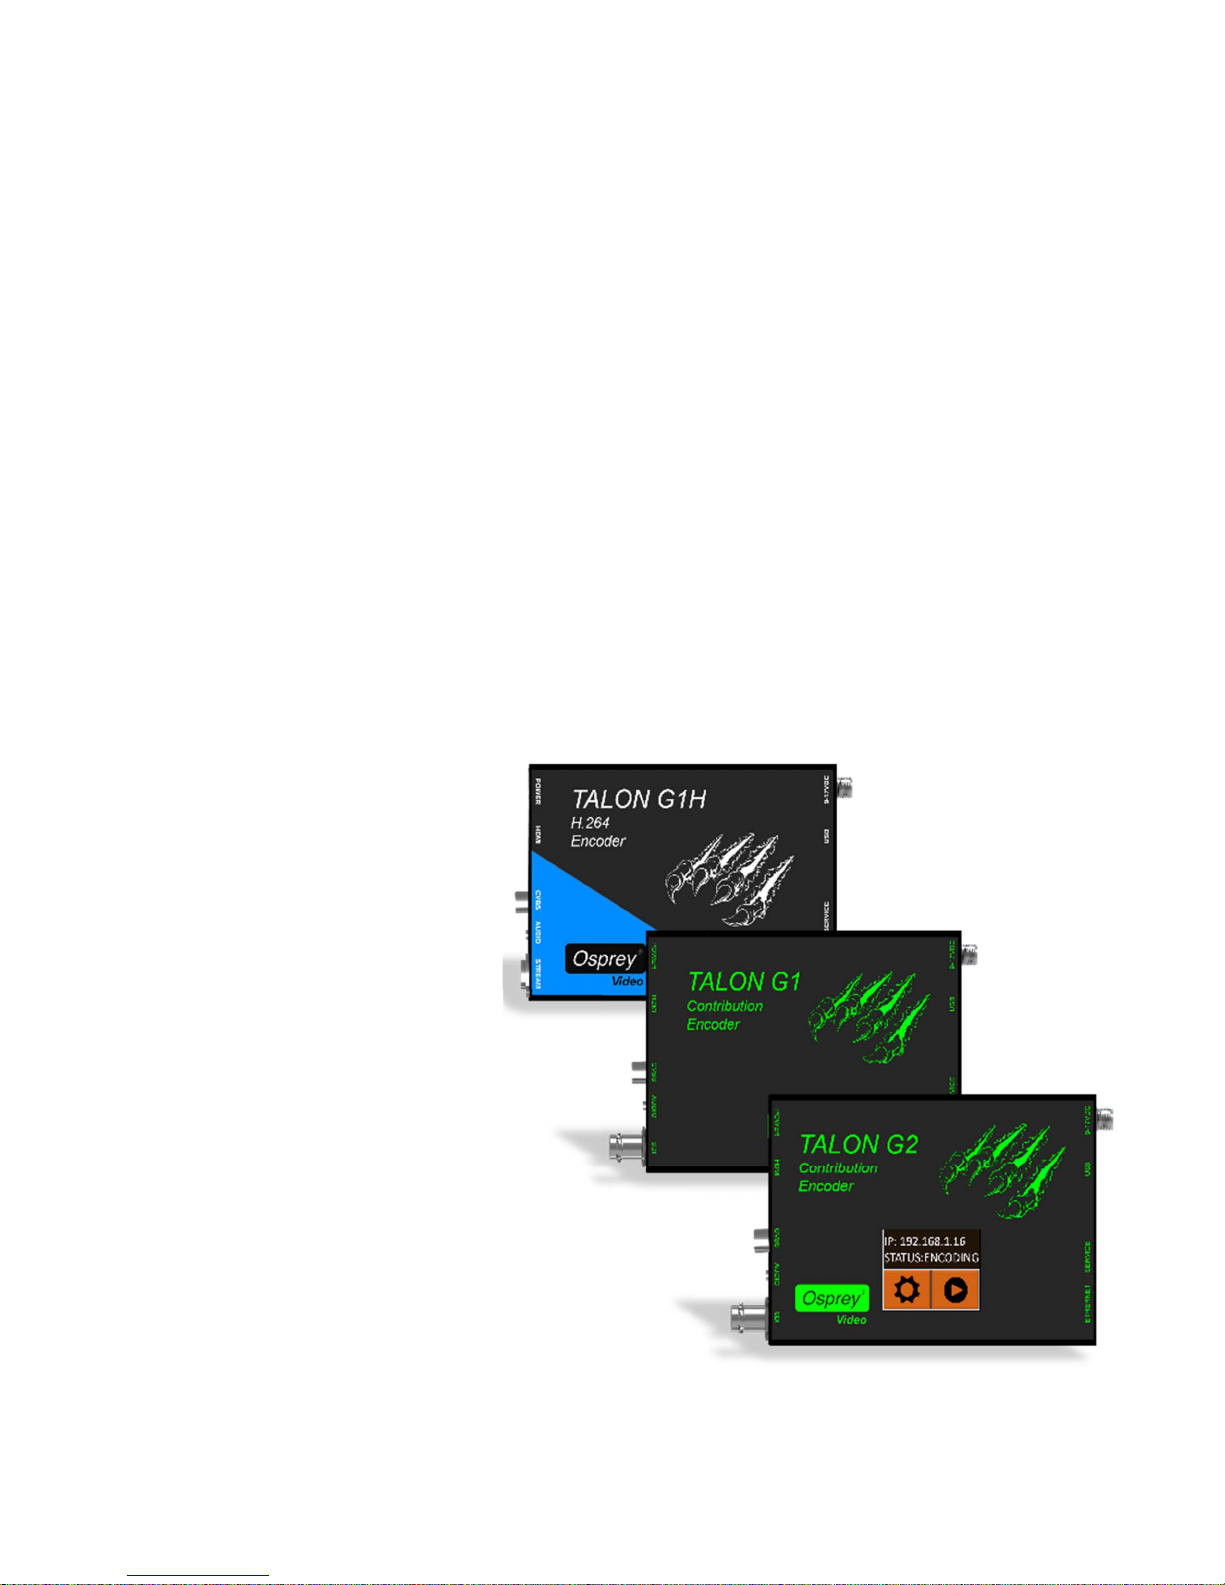
Introducing Osprey Talon
Osprey Talon G2, G1 and G1H hardware-based streaming contribution encoders are designed for A/V and broadcast customers
tasked with delivering quality video via RTMP, RTP, and UDP over the unmanaged internet.
Talon G1 and G2 can ingest video via 3G-SDI, HDMI, or Analog Composite (CVBS)
Talon G1H supports HDMI and CVBS.
Each Talon encoder uses the same web interface and Osprey BOSS utility to access and configure their features. Functions that
are not part of that model are not visible in the web page.
Using Talon for the First Time
All configuration of Talon is done via the internal web server. If you already know the IP address of your Talon, simply type that
address into a web browser on a computer that has access to your network. You should proceed to the “Login” portion of this
guide.
If you do not know the IP address of Talon, the Osprey BOSS utility is the best way to determine the network location of Talon
and connect with it. As an alternative to installing Osprey BOSS, you can insert a thumb drive into the USB port on Talon. After a
minute, remove the thumb drive and insert it in an available PC. On the drive, you will find a file named “TalonIP.txt” that
contains the IP address.
Osprey BOSS and DHCP
The easiest way to configure the address of Talon is to attach it to a network that automatically assigns IP addresses via DHCP.
Simply connect the network cable and power up the Talon. DHCP will assign the IP address, Netmask, and Gateway. Then you
can use Osprey BOSS from a computer on the same local network to locate Talon and connect to the web GUI. For best results,
be certain your network is connected before switching on your Talon.
Osprey BOSS Without DHCP
If your network does not support DHCP, it is still possible to use Osprey BOSS to discover your Talon and assign a static IP
address. As in the example above, connect Talon to the network and power it on. Because there is no DHCP on the network,
Talon will assign the static IP address of ‘10.10.10.10’. From a PC on the same network, open Osprey BOSS. BOSS will locate the
Talon and display the IP address. It is most likely that this address will not be compatible with your network. Use BOSS to assign
a temporary address to your Talon. Be certain that address is compatible with your network. Then you can use BOSS to access
the web GUI of your Talon. As soon as you log in on Talon, navigate to the “System Control” tab and assign the correct static IP
address in the “Talon IP Setup” dialog. Be certain that you include a Default Gateway in the setup. Talon will not be recognized
unless it has a default gateway assigned. If your network is small and does not require a default gateway, simply repeat the IP
address in the “Default Gateway” location. Do not leave it blank.
IMPORTANT NOTE: When Talon powers up for the first time it waits for a DHCP address. If it doesn’t receive one immediately it
will assign the 10.10.10.10 address. If Talon is set to wait for DHCP and the power and network go down, it is possible that
Talon will power up and assign an address before the DHCP server can respond. If Talon powers up fully and the encoder is set
to auto-start the encoder could fail. If this happens, wait until the network recovers and then power cycle your Talon to receive
the DHCP address.
7
<20180425>
Osprey Talon User Guide
Talon G2 H.264 Encoder
Osprey BOSS With an Invalid Static IP
You might find that you have configured Talon for a static IP on one network and then moved it to a network where that
address is invalid. Simply connect Talon to the current network. Then start Osprey BOSS on a PC on that network. BOSS will
identify the address of the Talon even though it will not be able to connect with the web GUI. Similar to the scenario above, use
BOSS to change the invalid static IP to one that is valid on the current network. Then access the web GUI and complete the
updating of the address on Talon.
Unknown IP Address Without Osprey BOSS
In this scenario, Talon is installed on a network and already has an IP address. You find yourself without access to Osprey BOSS.
With Talon powered up and attached to the network, insert a thumb drive in the USB port of Talon. The thumb drive needs to
be formatted with either FAT or FAT32. After about minute remove the thumb drive and insert it in another computer. On the
drive, there will be a file called “TalonIP.txt” that will contain the IP address and MAC address of your Talon. You can then use
the IP address to connect via a modern browser. Any time you insert a thumb drive into Talon a “TalonIP.txt” file will be
created.
IMPORTANT NOTE: Talon is only compatible with IPv4 addresses. Never connect an Osprey Talon system to the Internet through a direct
connection. We recommend taking precautions against unwanted access such as installing systems behind a router or firewall. The speed of the
router or switch should match or exceed the speed of the system’s network card. See your network administrator for recommendations.
Osprey Talon Product Identification
Talon G1H H.264 Encoder
G1H supports HDMI and CVBS inputs
and has a single front panel button for
one-touch encoder control. It has the
same encoding capacity as the G1 and
G2.
Talon G1 H.264 Encoder
SDI, HDMI, CVBS, Analog Audio Inputs
3 Configuration Modes
Closed Caption Support
Simultaneous Streaming and Archiving
All the features of the G1, plus an external touch display
providing IP Information, Stop/Start control and Encoder
Status.
8
<20180425>
Osprey Talon User Guide
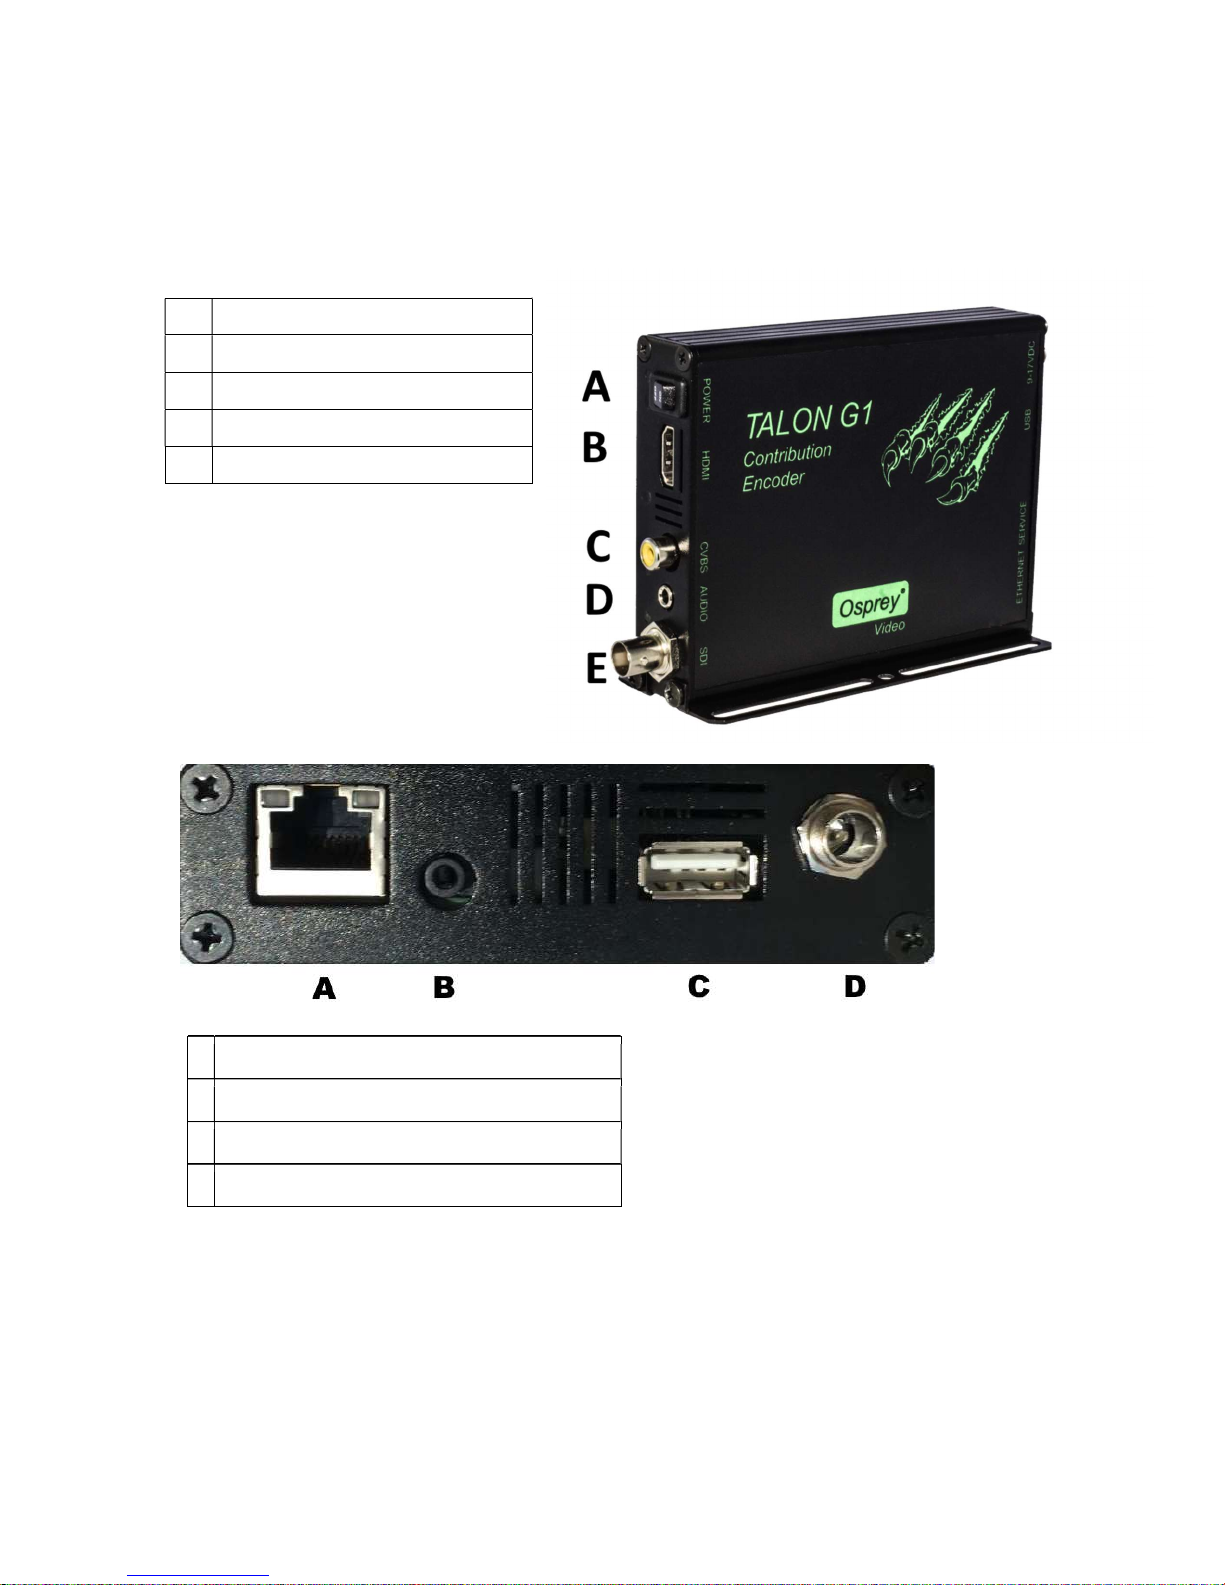
Osprey Talon G1 Front Panel Diagram
You should familiarize yourself with the front panel controls for the Osprey Talon. Besides the basic buttons for power,
start/stop, up/down and menu access, there are indicator lights that are hidden until illuminated.
A Power On/Off
B HDMI in
C Composite in (CVBS)
D Unbalanced Audio in
E HD/SDI in
Osprey Talon Back
Panel Diagram
A 1G Ethernet
B Service
C USB
D 9 – 17 VDC
9
<20180425>
Osprey Talon User Guide
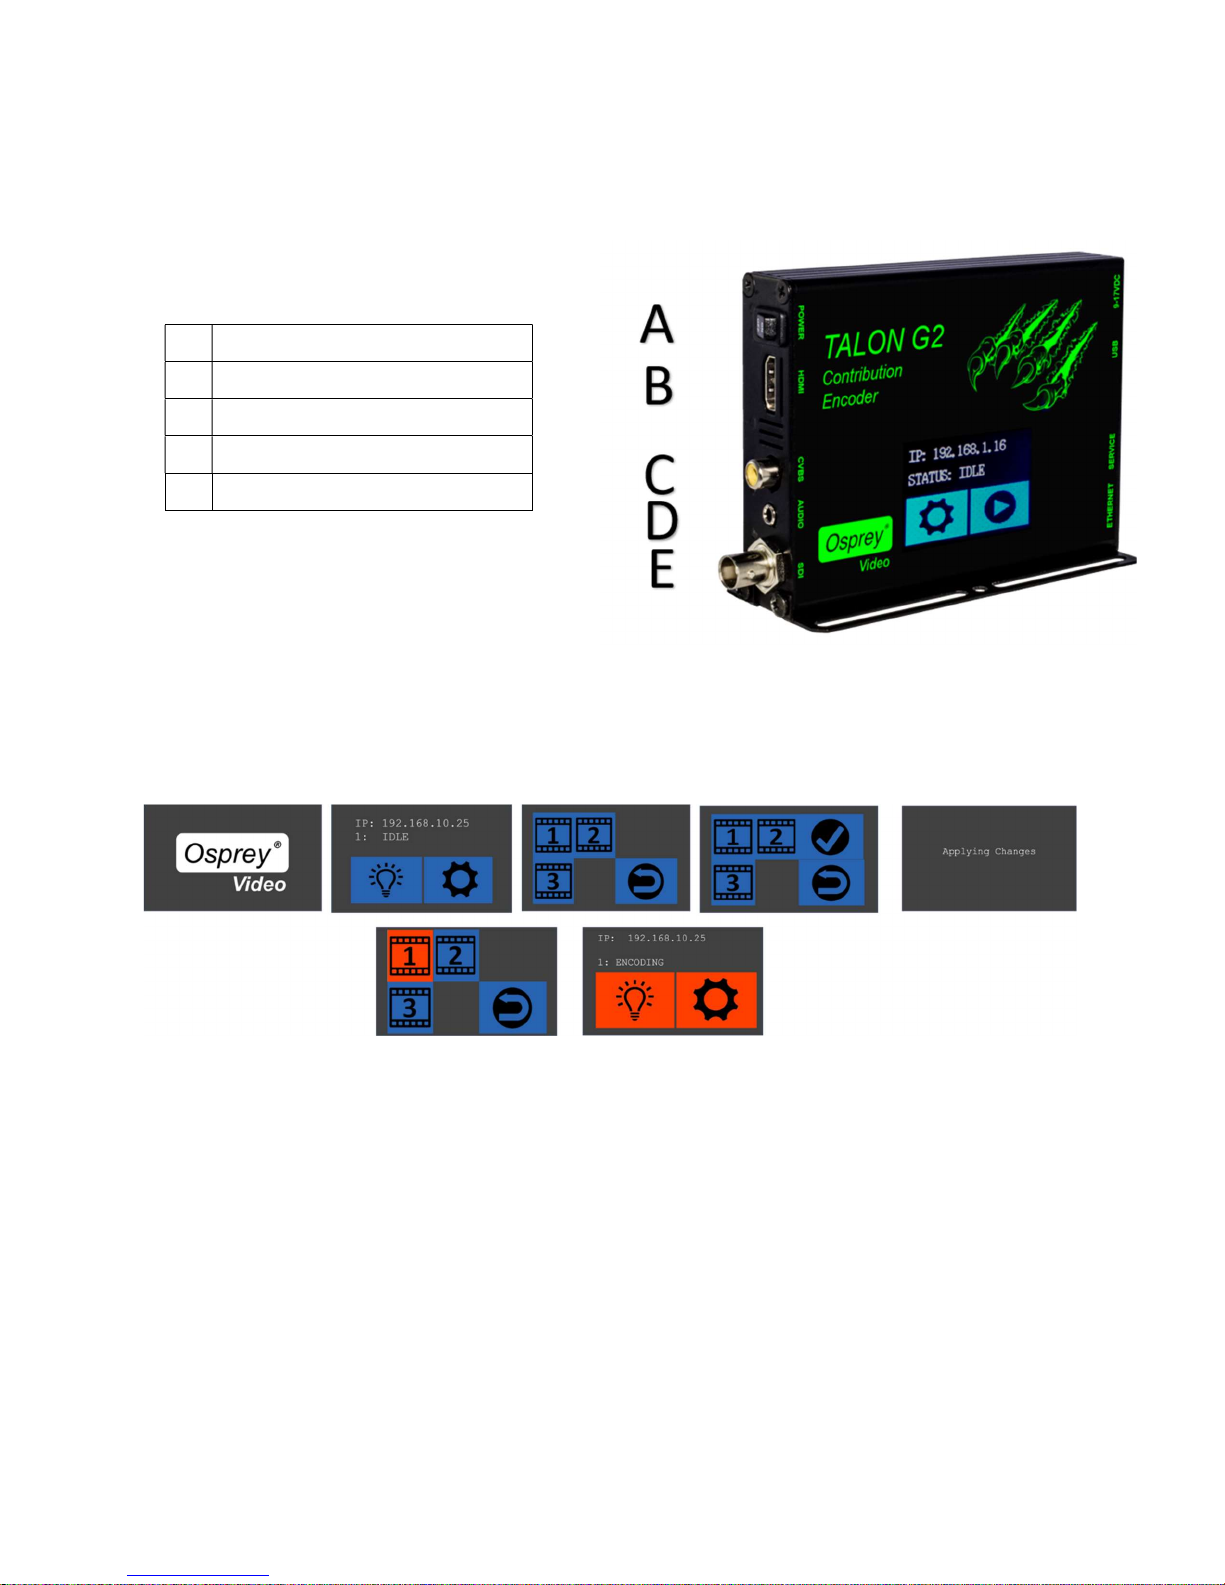
Osprey Talon G2 Encoder Front Panel Diagram
The front panel of the G2 is the same as the G1. However, on the top surface is a touch sensitive LCD panel that can be used to
control the encoder without accessing the Web interface.
Osprey Talon front panel
A Power On/Off
B HDMI in
C Composite in (CVBS)
D Unbalanced Audio in
E HD/SDI in
LCD Touch Control
Configuration of the Talon G2 is done using the Web interface. Once stream outputs have been configured, they may be started
and stopped with the LCD Touch Control on the front of the encoder. To configure the streams, use the IP address listed on the
Touch Control to point your browser to the configuration page.
10
<20180425>
Osprey Talon User Guide
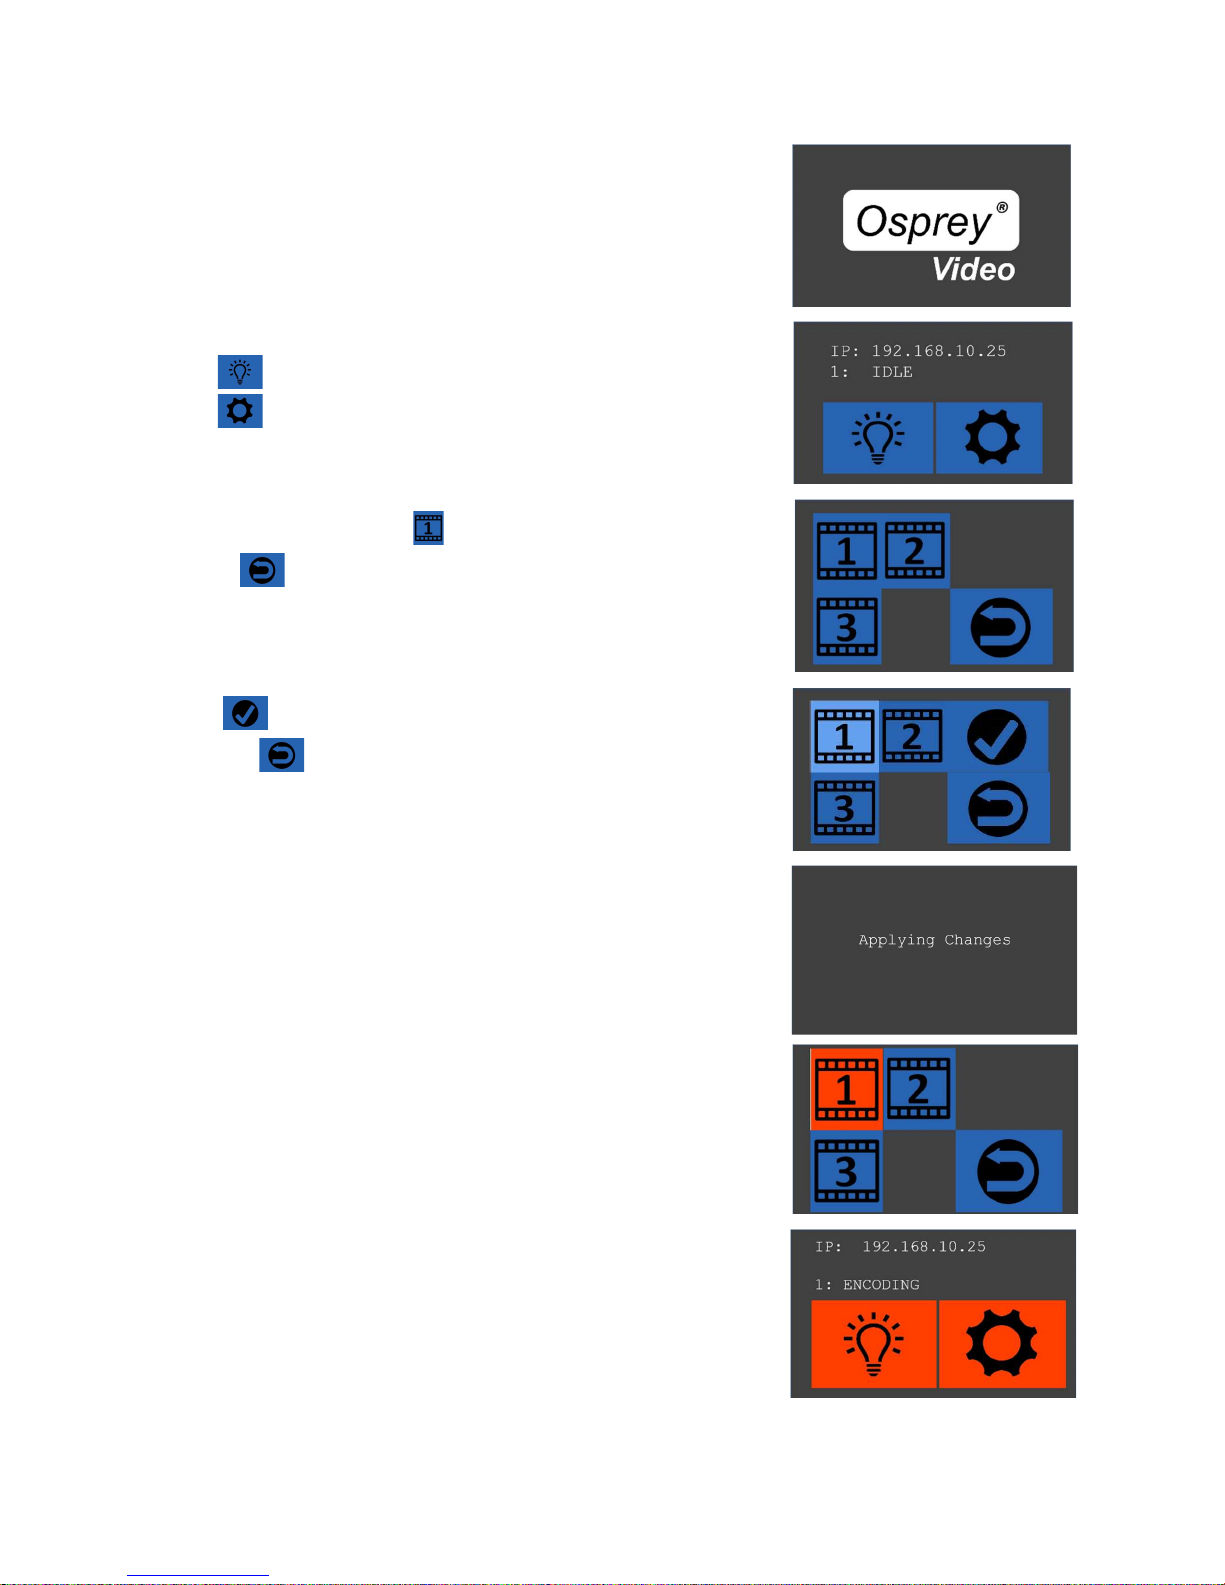
Boot Screen
Shows IP address and encoder status.
Encoder
Screen
Change
Main Screen
The Touch Control
screen updates continuously to
provide the status of Talon encoding operations.
Select to turn off the screen
Select to go to streams screen
Select Stream by Number to change
state or to return to Main Screen
Select to confirm changes to the
stream or to return to the Main
Screen without changing
The stream icon will change to Orange
indicating a running state. Select arrow to
return to main screen.
Main Screen icons will be red indicating
Talon is encoding. Status will update for
each stream. If “Error” is shown for any
encoder, use the Web Interface to view
details on the error.
11
<20180425>

Osprey Talon User Guide
Osprey Talon G1H Front Panel Diagram
Talon G1H has two distinct differences from the G1.
1. It does not have an SDI input.
2. On the front panel is a single button to allow users to stop and start the G1H without having to use the web interface.
A Power On/Off
B HDMI in
C Composite in (CVBS)
D Unbalanced Audio in
E One Touch Start/Stop
To use the One Touch feature:
Create and test encoder settings using the web interface.
Press and release the One Touch button one time to start an encoding session
Repeat one time, to stop an encoding session.
All configured sessions will start/stop with the button is pressed. Once started, pressing will stop all running sessions. A simple,
one second press is all it takes. It takes a few seconds for the panel lights to indicate that the stream is started.
NOTE: Do not press and hold for more than 10 seconds. Holding the button for more than 10 seconds will erase all current
configurations and reboot Talon. Reboot starts on the release of the button.
12
<20180425>

Osprey Talon User Guide
Osprey Talon Status Lights
There are five lights on the front panel of Talon that indicate the status of several functions.
A and B: Indicate power and boot status of Talon.
Single Red indicates that Talon’s power is on but is not ready
Red and Orange indicates Talon is booting. A and B will flash half way through the boot cycle
Single Blue indicates that Talon is ready
Blue an Orange indicates that Talon is encoding
C, D and E: Green lights after Talon is ready indicate that video sync is locked.
C = HDMI
D = Composite (CVBS)
E = HD-SD/SDI
13
<20180425>

Osprey Talon User Guide
Talon Web GUI
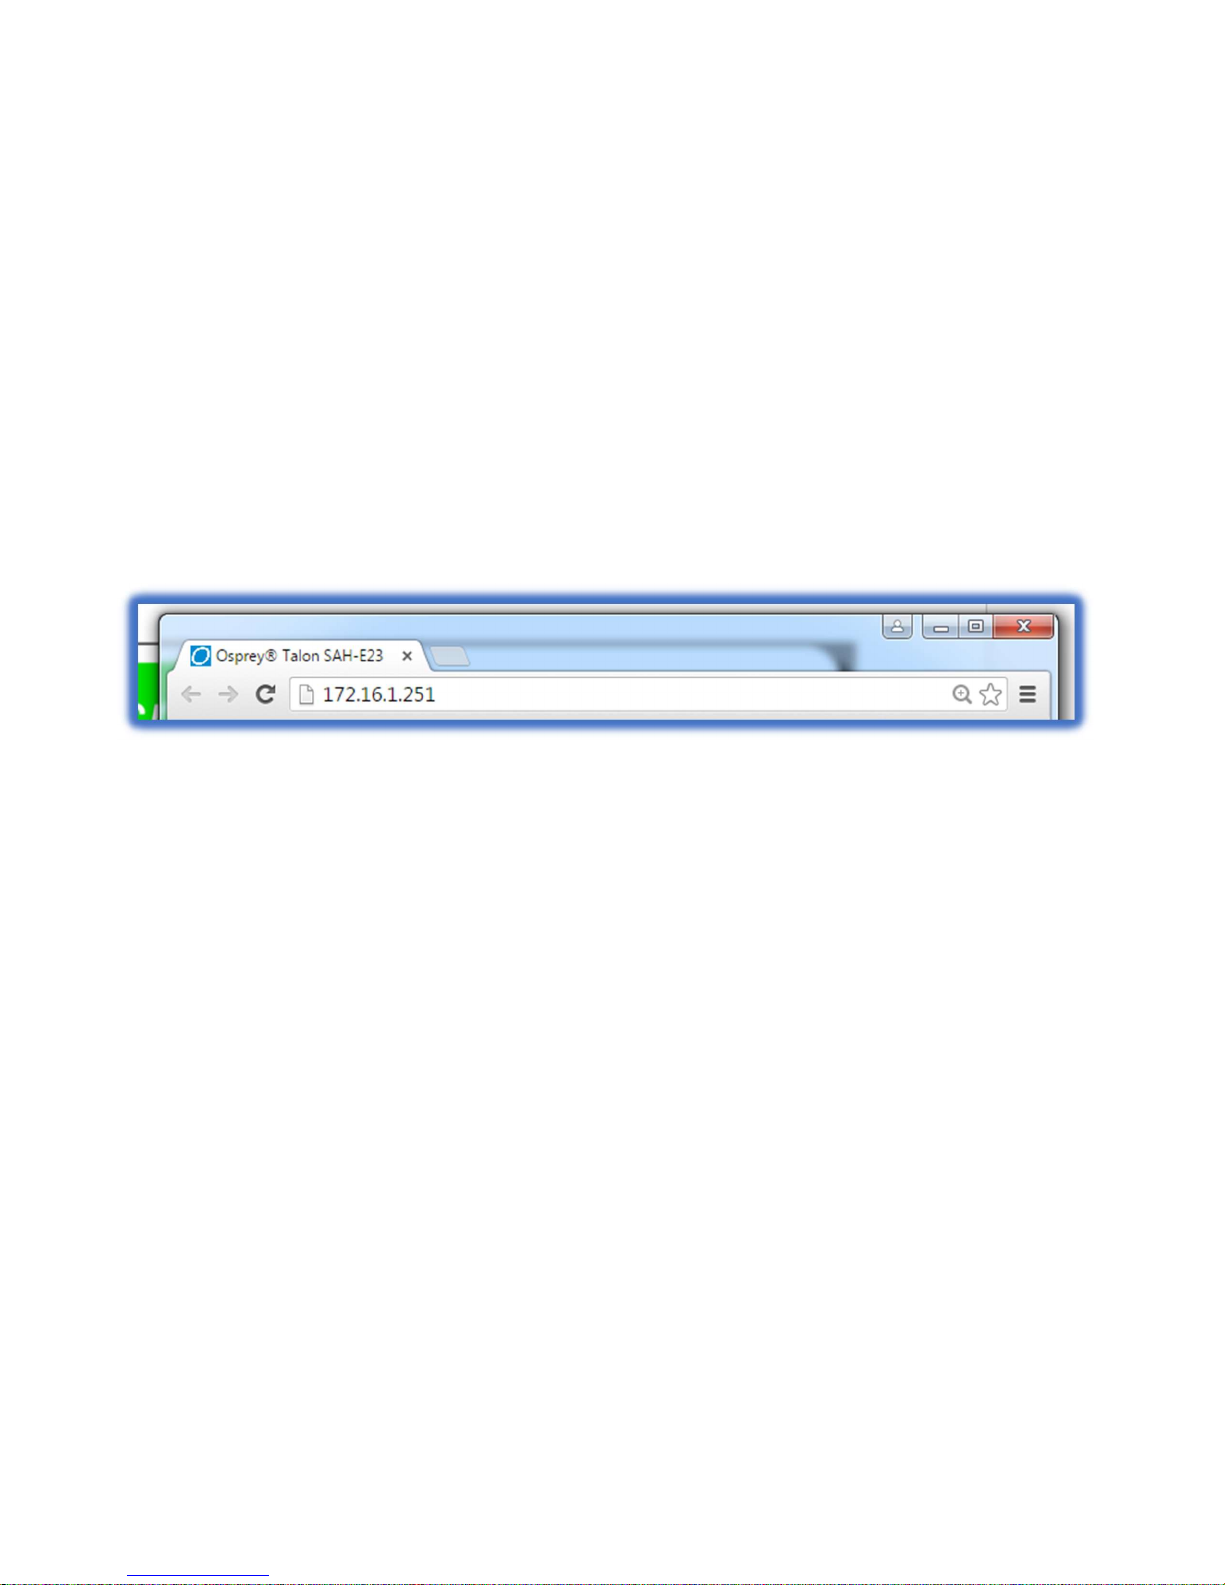
To login to the Talon page, first enter the IP address of Talon in a web browser (show below) and
press enter.
Your browser will be directed to the Talon Web Interface.
Upon login, you will reach the home page of the web configuration site. The default password is
‘osprey’. For increased security always change the default password.
1.0 Tab ID
The tabs on the front page provide access to the available configuration features of the Talon.
System Control IP Setup, Set Device Name, Set Password, Update Firmware, Select Mode
Status Displays real time information regarding streams and inputs
Stream 1 Contains all streaming settings for one output stream including source and output setup.
+ Selecting this item allows you to add additional encoders (streams)
Up to a total of 3 (depending on the mode selected).
14
<20180425>
Osprey Talon User Guide
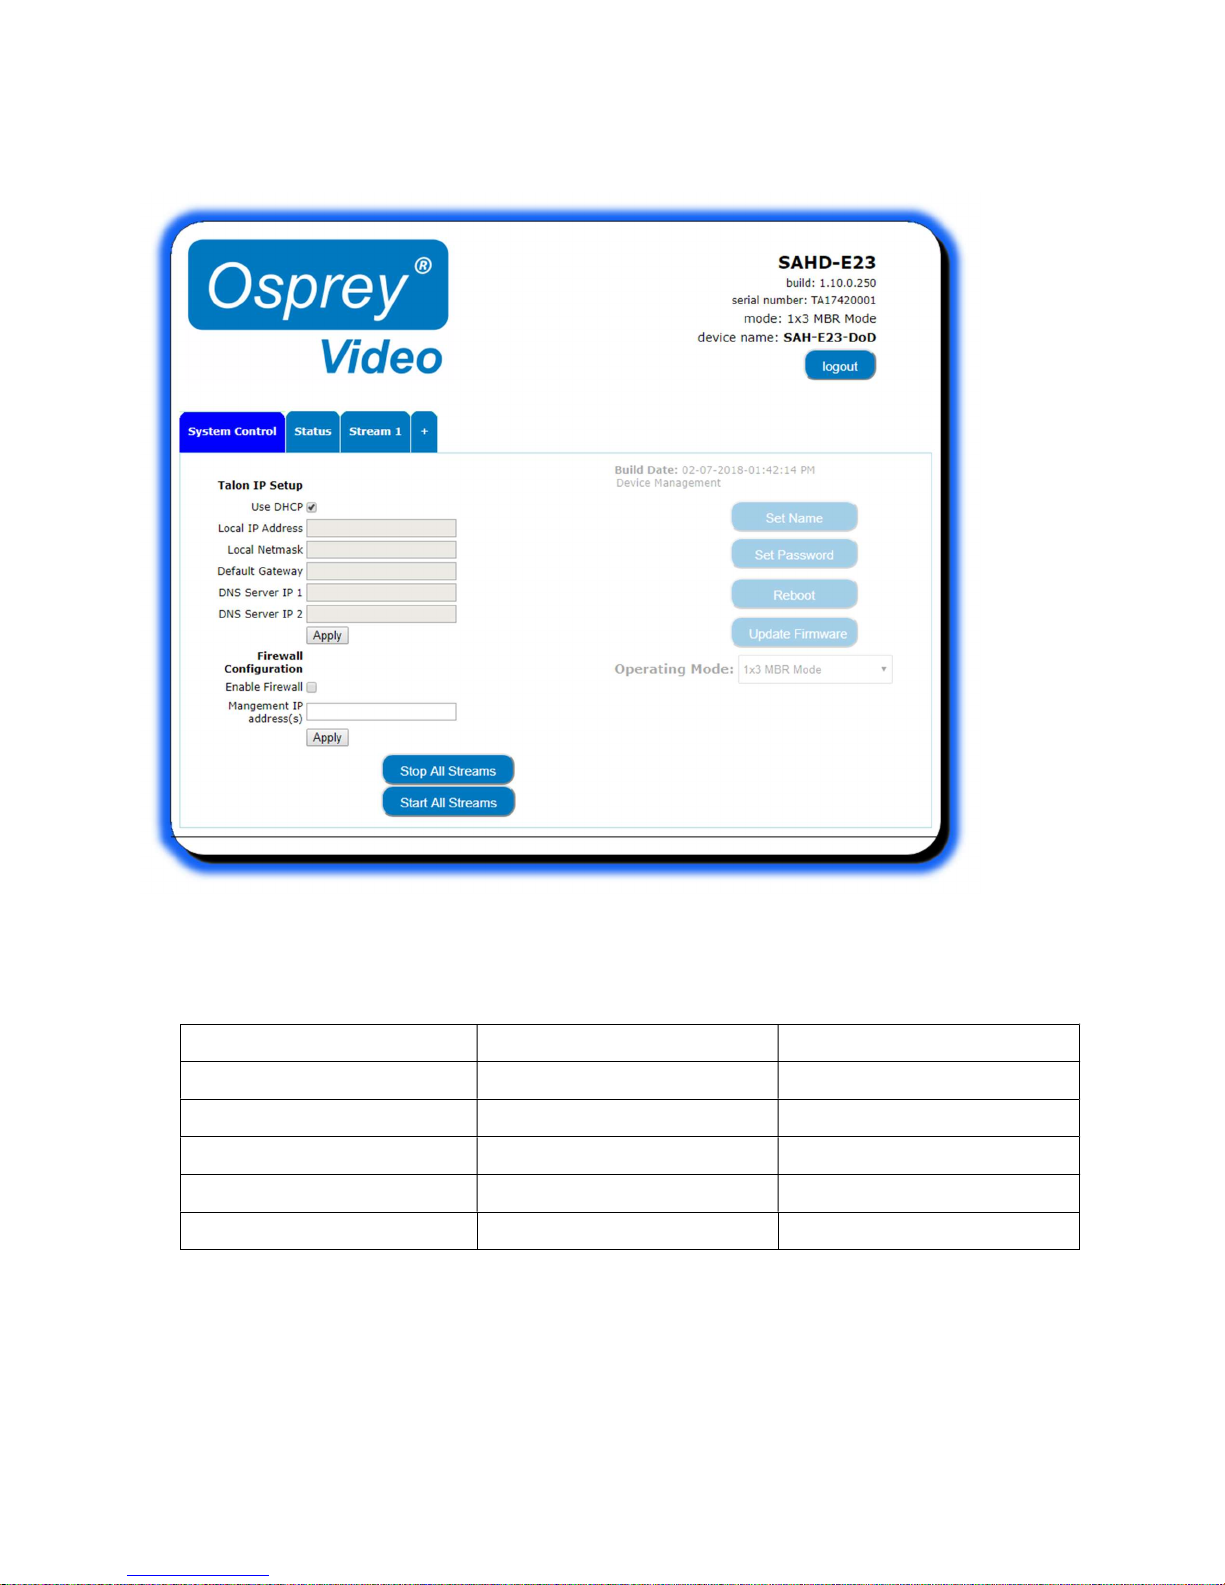
2.0 System Control
This tab accesses most of the administrative functions of the Talon.
Talon IP Setup
By default, Talon receives its IP address via DHCP. If you need to use a static address it can be set in the IP setup dialog box on
the System Control page. If you are not familiar with the settings found here check with your system administrator before
changing any settings.
Feature (default) Description
IP Address Automatically Assigned Sets the IP address
Netmask Automatically Assigned Sets the netmask
Gateway Automatically Assigned Sets the gateway
Use DHCP Checked Enables/Disables DHCP
DNS Server IP (1 and 2) Automatically Assigned Specifies Domain Name Server
NOTE: When configuring static IP addresses, Talon requires all variables to be filled in. Static addresses without Netmask,
Gateway and two DNS servers may fail. Osprey Boss may not be able to find a Talon with a failed address.
15
<20180425>
Osprey Talon User Guide
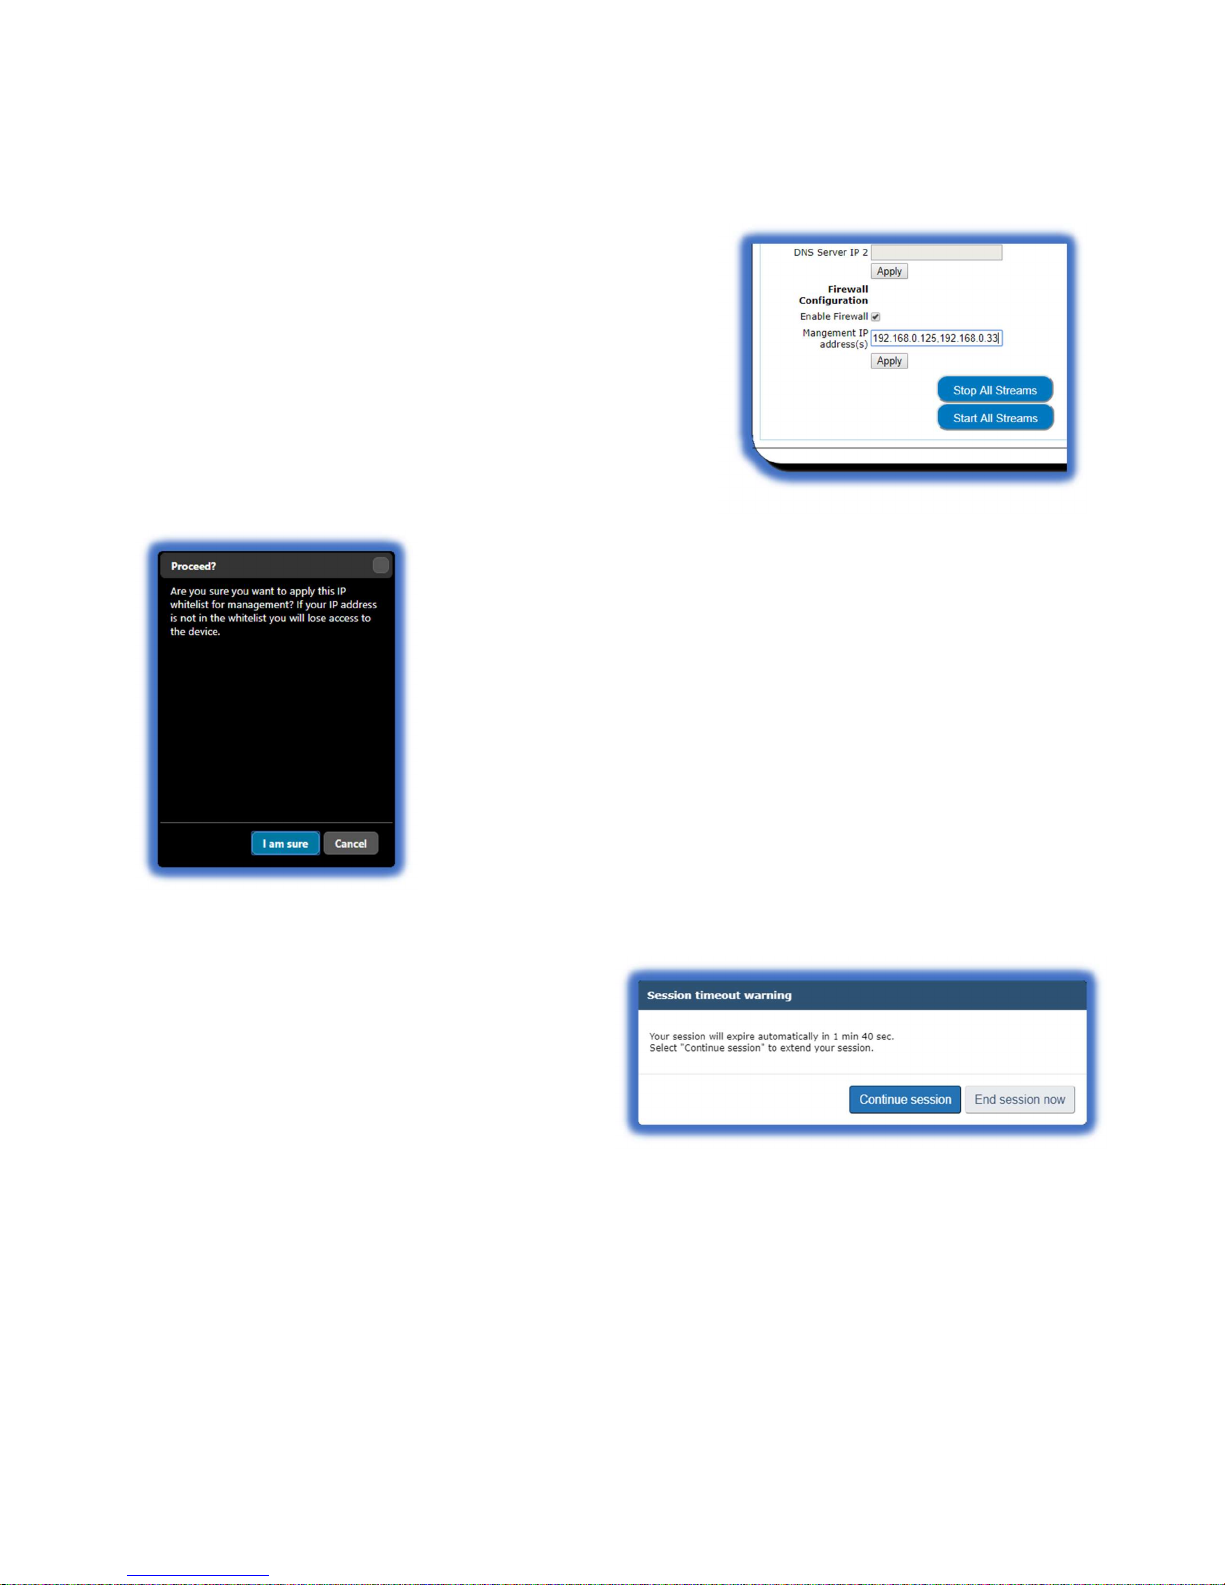
Firewall Configuration
By default, Talon’s configuration and control webpages can be accessed by
any web browser that can reach it on the network. To add another level of
security, users can enable the Talon firewall. Enabling the firewall effectively
prevents any browser from connecting to Talon unless it is included on the
“Management IP Address” whitelist. Simply add the IP address of the
computer you wish to configure or control Talon. [Example:192.168.1.124]
Additional addresses can be added, separated by a comma.
CAUTION: Before enabling the firewall, be certain that the Management IP Address box
contains at least one address, and that address is the one you want to use for access.
Activating the firewall with an empty address box will result in losing access to Talon.
Session Timeout
To prevent accidental unauthorized access, the Talon
webpage will timeout after five minutes of inactivity. To
rejoin the session you will need to login.
16
<20180425>

Osprey Talon User Guide
3.0 Device Management
Device management tasks allow the configuration of operating system features. These features aren’t accessed on a regular
basis because they are not involved in the configuration of the encoder itself.
Set Name
The model designation for Talon is loaded as the default device name. To easily distinguish multiple Talons, you can create a
new name here.
Set Password
The default password is “osprey”. To maintain device security, it is recommended you change the default password.
Reboot
Reboot performs a complete power reset of the device. Make sure you save all your settings before rebooting.
Update Firmware
Osprey provides periodic firmware updates for Talon. There are two methods to perform the update.
17
<20180425>
 Loading...